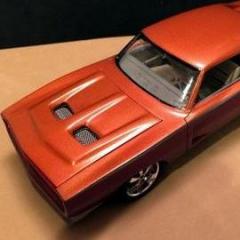
RestoModGuy Posted October 3, 2016 Share Posted October 3, 2016 My first Tri-Five build. This is the old Revell kit with the crummy molded chassis. I did a lot of mods to this version of a Pro-Touring restomod. Left the body stock - Paint is Duplicolor Graphite top and tail and spear. Front is Duplicolor Gun Metal Gray with Tamiya Clear Red over that. 6-coats of Wet Clear all polished and buffed. Lot's of BMF where chrome needed to be. Hand made custom side mirrors from tear-drop aluminum stock. PE door handles. Completely custom made interior. I used the stock tub, molded in a 1991 C4 Vette dash, center console and door panels. Molded in rear buckets with molded console and C4 front buckets. Made my own suede color mix paint for the interior. Chassis, I built a custom pan and installed the IRS from a C4 rear and front suspension, along with C4 exhaust and custom aluminum tips from tear-drop aluminum stock. Wheels are stock C4 ZR1 wheel I inserted into Pegasus chrome sleeves, I think it gives it a "stock-custom appearance. Engine is C4 ZR1 with custom made dual-horn aluminum cold air intake. hand made radiator. I think I gave this old kit a fresh updated restomod appearance. Before After Build pic chassis Custom pan, exhaust, fuel tank and C4 IRS Quote Link to comment Share on other sites More sharing options...
Harry P. Posted October 3, 2016 Share Posted October 3, 2016 Very cool! Wow, you did a lot of work on this one... nicely done. Two small suggestions... the front bumper is sagging. Can you remove it and re-glue it in place correctly? Other suggestion is strictly my opinion, but I would have gone with the graphite colored rear bumper to tie it into the graphite color rear end for a cleaner look... the way you tied in the front bumper color to the color of the front of the car. Quote Link to comment Share on other sites More sharing options...
bbowser Posted October 3, 2016 Share Posted October 3, 2016 Very nice! I'm not usually a fan of the big wheels but they look good in this application. Great work on the interior as well. Quote Link to comment Share on other sites More sharing options...
carman1 Posted October 3, 2016 Share Posted October 3, 2016 very nice ! Quote Link to comment Share on other sites More sharing options...
cobraman Posted October 3, 2016 Share Posted October 3, 2016 Sweet looking Chevy. Quote Link to comment Share on other sites More sharing options...
RestoModGuy Posted October 3, 2016 Author Share Posted October 3, 2016 Very cool! Wow, you did a lot of work on this one... nicely done. Two small suggestions... the front bumper is sagging. Can you remove it and re-glue it in place correctly? Other suggestion is strictly my opinion, but I would have gone with the graphite colored rear bumper to tie it into the graphite color rear end for a cleaner look... the way you tied in the front bumper color to the color of the front of the car.Thanks for the comments. Yes, after the picture was taken I noticed and did remove the front bumper and correctly aligned. I will be taking new pics this weekend. The rear bumper I painted the lower color to align with the lower cut down of the red along the sides below the chrome trim. The Graphite rear bumper I tried and didn't particularly like the all graphite rear. The red rear bumper added a upper-lower contrast, I prefer.Harry, I did make custom side mirrors though! Quote Link to comment Share on other sites More sharing options...
Harry P. Posted October 3, 2016 Share Posted October 3, 2016 Thanks for the comments. Yes, after the picture was taken I noticed and did remove the front bumper and correctly aligned. I will be taking new pics this weekend. The rear bumper I painted the lower color to align with the lower cut down of the red along the sides below the chrome trim. The Graphite rear bumper I tried and didn't particularly like the all graphite rear. The red rear bumper added a upper-lower contrast, I prefer. Harry, I did make custom side mirrors though! Yes, I noticed! Quote Link to comment Share on other sites More sharing options...
Leonidas Posted October 3, 2016 Share Posted October 3, 2016 Absolutely stunning build! Flawless in my eyes! Quote Link to comment Share on other sites More sharing options...
geetee66 Posted October 3, 2016 Share Posted October 3, 2016 Superb!some of those shots make it look 1:1Beautiful paint, too Quote Link to comment Share on other sites More sharing options...
Jmaracing Posted October 3, 2016 Share Posted October 3, 2016 Very sharp looking build. Great job!! Quote Link to comment Share on other sites More sharing options...
Immortal Chips Posted October 3, 2016 Share Posted October 3, 2016 Looks great Jim Quote Link to comment Share on other sites More sharing options...
MeatMan Posted October 4, 2016 Share Posted October 4, 2016 Nice work! Some innovative additions.Where did the wheels & tires come from? I shelved by '56 because the wheels I have don't give it "that look" like yours. I'd like some in a similar size. Quote Link to comment Share on other sites More sharing options...
slusher Posted October 4, 2016 Share Posted October 4, 2016 What a knockout. I love everything about it. Quote Link to comment Share on other sites More sharing options...
Perspective Customs Posted October 4, 2016 Share Posted October 4, 2016 That's really cool Jim! Quote Link to comment Share on other sites More sharing options...
kymdlr Posted October 4, 2016 Share Posted October 4, 2016 Great build. I am doing a similar custom theme but with a 50's ford & modern ford parts The Vette Mods on this are awesome. I will need to acquire that model vette kit now for some ideas of my own, care to share which kit(s) you used for the Wheels, Motor, suspension? Quote Link to comment Share on other sites More sharing options...
Zoom Posted October 4, 2016 Share Posted October 4, 2016 Yes, really a cool car! Quote Link to comment Share on other sites More sharing options...
Intmd8r Posted October 4, 2016 Share Posted October 4, 2016 Nice scratch building skills, and very nice build over all. The two tone body has two of my favorite colors on it!I don't normally criticize builds, but I find the use of the Work Wheels logo (aftermarket Japanese wheel company) on the engine intake a little confusing on an otherwise well thought out build. Especially since you used modified OEM C4 wheels on the chassis. Quote Link to comment Share on other sites More sharing options...
espo Posted October 4, 2016 Share Posted October 4, 2016 Tremendous amount of work on this build. Hard to think this is the same kit that it is based on. Looks like a car I saw in Street Rodder Magazine a couple of months ago. Quote Link to comment Share on other sites More sharing options...
Recommended Posts
Join the conversation
You can post now and register later. If you have an account, sign in now to post with your account.
Note: Your post will require moderator approval before it will be visible.