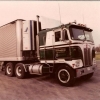
KJ790 Posted October 9, 2021 Posted October 9, 2021 This is a project that I have always wanted to embark on, but never had the guts to try. I decided to finally take the plunge and attempt to build a Peterbilt 372. This seems to be a model of truck that people either love or hate (with more leaning towards the hate side of things). Personally, I have always thought it was a really cool design. My family owned this one back in the day, and I always liked the look of it. This project started in an unlikely manner. About a year ago, I was attempting to draw pinstripes in Microsoft Word, but with an inkjet printer I can only print things that will show up on light colors. Since this 372 was white, I gave it a shot. I was pretty happy with how they came out, and knowing that this file existed in my computer has been bugging me until I can put it to use. So I started by cutting out the basic sides of the cab. I use .020" thick styrene and layer it to get the features I want. I can make the bottom layer relatively solid, and make separate features such as doors that all glue onto the base layer. 1
Pete68 Posted October 9, 2021 Posted October 9, 2021 (edited) KJ. Nice start. I’m sorry but I never could like these trucks we called the “Football Helmets” I remember in the early 90s Werner Enterprise ran some of these and a place call Holmbolt Express bought one and put it in their fleet it was so odd see it. I think you got this I’ll be following along. Edited October 9, 2021 by Pete68
KJ790 Posted October 9, 2021 Author Posted October 9, 2021 4 minutes ago, Pete68 said: KJ. Nice start. I’m sorry but I never could like these trucks we called the “Football Helmets” I remember in the early 90s Werner Enterprise ran some of these and a place call Holmbolt Express bought one and put it in their fleet it was so odd see it. I think you got this I’ll be following along. Thanks! That seems to be the common opinion of these. We always called this one "The Egg". The cab gets pieced together with a back wall, a roof, and then a front firewall. I made some sketches based on pictures that I found on the internet to try to scale the shape of the cab out. 1
KJ790 Posted October 9, 2021 Author Posted October 9, 2021 I roughed out a front nose for the cab. My initial attempt has the wheel arches too far forward in my opinion, so I shifted them backwards .060" after this photo was taken. Next was to finish off the grille, headlight buckets, and bumper. Finally, some rear cab fairings and roof top spoiler were roughed out. Lots of sanding ahead to get all of the seams smooth. Everything is just set in place for the photo mock-up. 2
Pete68 Posted October 9, 2021 Posted October 9, 2021 (edited) KJ. Your knocking this one out fast. Very nice Scratch. Will this one be called “The Egg II” lol Edited October 9, 2021 by Pete68
gotnitro? Posted October 9, 2021 Posted October 9, 2021 Now thats scratchbuilding !!! Really interesting how the whole idea for the cab starts w pinstripes ! Awesome fabrication, 1
KJ790 Posted November 1, 2021 Author Posted November 1, 2021 The cab is now in primer and the chassis has been started. I am using an RoG Peterbilt 359 frame and rear suspension that I have modified to work with the cabover. 1
Rob Hall Posted November 1, 2021 Posted November 1, 2021 Looking good..neat looking cab...googling turned up this article on Bruce Canepa's car hauler based on a 372.. https://www.thedrive.com/news/33508/you-wont-find-a-greater-car-hauler-than-this-aero-bodied-canepa-peterbilt
trick my mixer Posted November 2, 2021 Posted November 2, 2021 Scratch building at its best. Very nice work.
gotnitro? Posted November 2, 2021 Posted November 2, 2021 Very nicely done , proportions look spot on! The cut outs around windshield must've been fun to make
vincen47 Posted November 3, 2021 Posted November 3, 2021 Looks fantastic. I’m glad to see you jump into this one. It’ll be one of a kind. I haven’t heard of anyone building a 372.
peteski Posted November 3, 2021 Posted November 3, 2021 Threads like this WIP (featuring scratchbuilds like this) are the best feature of this forum. It is amazing to a decal artwork, and few flat pieces of styrene rapidly turning into a unique model, not ever offered as a kit. Awesome!
bobthehobbyguy Posted November 4, 2021 Posted November 4, 2021 Impressive work. Amazing scratchbuilding.
KJ790 Posted November 6, 2021 Author Posted November 6, 2021 Thanks everyone! I was able to get some paint on the cab. And a little pin striping.
Bowtienutz Posted November 18, 2021 Posted November 18, 2021 Very ambitious project I sure wish you would have cast it. It's a love it or hate it cabover. I love it.
Rockford Posted November 18, 2021 Posted November 18, 2021 Without the pictures to prove it you would never believe that was scratchbuilt. Just brilliant work.
KJ790 Posted February 12, 2022 Author Posted February 12, 2022 It has been a while since I gave an update, so time for a photo dump. I used a Cat 3406 engine from a Revell snap kit, but made some modifications to make it an air-to-air charge cooled engine. Next up was the chassis. I used frame rails and rear suspension from an RoG Peterbilt. The frame had to be shortened and the front portion of the frame was scratch built. Basic plumbing was created using various sized styrene round stock. I modified the radiator from a Revell snap kit to be narrower, then scratch built a charge cooler to mount in front of the radiator. The air filter canister, battery box, fuel filter, and exhaust mount were scratch built. Fuel tank brackets (and eventually fuel tanks) were from Kootenay 3D model parts.
KJ790 Posted February 12, 2022 Author Posted February 12, 2022 I had to cheat a little for the dash. Rather than scratch building one, I decided to draw this one in CAD and 3D print it. Since these trucks had a "break-away" intake system, the air cleaner is open when the cab is raised. I decided to make an air filter using some photo-etched mesh that I had left over from a previous build. The chassis is getting closer to finished. I used resin 2-hole wheels that I had cast for the drive wheels, and some Keystone aluminum rims for the steer wheels. The tires are rubber pieces that I cast. Fuel tanks are now mounted and the exhaust is almost finished.
Recommended Posts
Create an account or sign in to comment
You need to be a member in order to leave a comment
Create an account
Sign up for a new account in our community. It's easy!
Register a new accountSign in
Already have an account? Sign in here.
Sign In Now