

935k3
-
Posts
1,863 -
Joined
-
Last visited
Content Type
Profiles
Forums
Events
Gallery
Everything posted by 935k3
-
 Picked this up at AC Moore with a 40% off coupon. I like this airbrush because it uses one needle and tip set up to from a 2mm line to 3" wide due th the double grind angles on the needle tip. It feels good in hand. It's the Badger 155 Anthem.
 -
Higher grit sanding and also a finer grade polish used after the compound. Such as Tamiya Fine polish or Novus #2 to name a few will help
-
I have use this glue for years and here is what i found to clear out the tube You can get the brass wire at well stocked shops that carry model rail road stuff or try Walther's. The glue lasts for a long, I had a bottle that was over 10 years old that was still good.
-
First I cut them with a new #11 blade or a new single edge razor blade after the stay put. Then using a 10/0 paint brush I apply solven t in the panel line. A good tool to press the decal down in the crack is a toothpick sharpened to a flat blade shape. The use the "blade' to push the decal down in the crack.
-
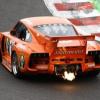
Great job one of the coolest "production" based race cars of all time. Porsche's Norbert Singer was a master at interpreting the "meaning" of the rulebook.
-
Well, excuse me Don. I used a google image search which lets you see the pic and copy it's location without even seeing the website .
-
I have to second the good doctor. Since I bought my Iawata Eclipse HP-CS(gravity feed) I pretty much stopped using all my other airbrushes. They are absolute quality. I got mine at Hobby Lobby with the 40% off coupon for around $107. It came with a nice inline water trap. You can use a Iawata hose or get an adapter for a Paasche hose like I use. You can also buy preset handles to use them like a single action airbrush.
-
Some people like their Azteks but when you see what they cost and look at this pic they look like a toy compared to quality airbrushes. I would not expect this to last a life time like an Iawata, Badger or Paasche.
-
Excellent transformation. Rally cars are some of my favorite kits to build.
-
The Paasche "H" model airbrush is a great choice for somebody starting out and it will last a lifetime.
-
Try using Future under decals it's thinner and easier to clean up. Cleanup with ammonia when dry. If it's a smaller decal just hold the decal with tweezers and use Q-Tip wet with future across the back before application. This works especially well when decals have to applied to windows(like drivers names on rally cars) as decals do not stick well to bare bare plastic.
-
Just finished this one. Added details: cutout naca duct screens and replaced with brass screen, seat belts,recognition light on top of scoop made from turned red sprue, headlights replaced, scratch built turbo boost knob and the turn signals on top of front fenders were made from orange tinted epoxy on foil.
-
For those looking foil like the kind found in cigarette packs try the cake section at the big craft stores(AC MOORE). They have rolls of it in gold or silver. I guess used to sit cakes on. I used for the heat shielding on the exhaust pipe and tunnel of this Peugeot rally car. I usually use a spray adhesive on the back to mount it.
-
-
Try filling with as much plastic using liquid cement first then use a good two part putty to fill in the rest.
-
What is the best clear for Tamiya Acrylics?
935k3 replied to seeker589's topic in Tips, Tricks, and Tutorials
I had many problems with cracking paint when using Future over Tamiya Acrylics, that's one of many reasons I stopped using them on bodies. Two stage Urethane clears are probably the only option. -
Nice paintjob, what blue did you use?
-
No, he is just not the fastest service and some stuff he lists he does not have an orders from another vendor to get what you ordered. You will get what you ordered. Checkout MShobbies.com for the best and fastest service. They answer all e-mails and get your order out quickly. I always check them first when I need something.
-
Nice start. I started that one too but i was not happy with the blue I mixed so I quit for now. Anybody a know a good blue to use on this one. It has a purplish tint to it. I mixed Tamiya TS-44 Brilliant Blue and TS-57 Blue Violet. I mixed it in the wrong order. I think I shoulld have started with the Ts-57 then add the blue, I went the other way.
-
FUTURE, it's the safest non reactive clear their is. On small parts it can be applied with a Q-Tip. It is about the only clear that lays over without chemically reacting with what is under it. It can be easily stripped with ammonia or Windex.
-
Try pressing the decal down with a very hot damp cloth. If the decal is not sticking put some Future white glue underneath.
-
Future will seal putty and body work and you can just about any paint over it but I would avoid waterbased acrylics like Tamiya in the bottle as it can crack.
-
I liked NASCAR back then and that is on of my all time favorite cars from that series. Beautiful job. I want to build on myself sometime.
-
I am thinking about getting a color laser printer for decals and wanted to know if they print OK on the Ink Jet Decal paper like Testor's. I have some paper for lasers only that is white but every type of paint or clear including water based acrylics makes the decal wrinkle up. Any recommendations on a decent one for under $300. I know they print better on plain paper but I have never tried making decals with one.
-
With some practice it can be wiped on instead of spraying. I use the round disposable cosmetic pads from the dollar store. I dip them in Future and damp some execes off on a paper towel then carefully wipe it on to good result. I use a Q-Tip for smaller areas.