
THarrison351
-
Posts
1,503 -
Joined
-
Last visited
Content Type
Profiles
Forums
Events
Gallery
Everything posted by THarrison351
-
Looks great! I still have a drawer full of those House of Kolor paints, including the Hot Magenta!
-
Yeah, it's unfortunate that they've never corrected the mold. I have the first release 2000 Baldwin Motion Camaro that the Z-28 was cloned from, and it's RH headlamp bezel is just the same.
-
Thanks Alan! I have to agree. AMT, MPC and Johan for the most part had the body proportions nailed down on their kits in sixties and seventies, especially the promo based ones. The details of the engine and chassis is where it sometimes had compromises. Then there's the kits that where modified into some other subject and then returned poorly to the original or decontented to save a few pennies. Thank you Zippi! Thanks Chris! Thank you Ismael! Yeah, it was hard to find other completed stock versions for reference, I found two Cabriolets, and one Coupe. Anything else was a gasser or street rod. Thanks Jim! Look forward to seeing it completed. Thank you Dave! I liked the idea of the two colors over the standard solid tone. Looking through the Dupont 1937 paint chips showed swan grey and regatta red were two I could color match pretty easy Thanks Slusher! Thank you Ulf! AMT did capture the look! Yeah, sometimes I wish I had all the kits I ruined when I was a kid, but then again I have too many kits as it is. I find medium CA glue with accelerator fills a lot of problems, and I have used Evergreen sheets like I did on the hood hinge.
-
Looks grreat evenn with the deccal dissaster. The right headlight defect has been there since day one.
-
I just finished this up. It's an old ProShop release from a couple of decades ago. Comes pre-painted for easy assembly. Yeah, right. Well, I had built a bunch of the other ProShop cars in the past and thought I'd try this one. Bought it off eBay around 10 years ago. Started to build it and it wasn't great, but sometimes AMT kits made in the sixties were more difficult than others. It wasn't until I started on the body when I knew there were issues. The parting lines were terrible and they'd painted over them. I was going to look past the dark brownish-red color not matching, but when I tried to assemble the hood and it would not fit without a splice of plastic, I just gave in. So it went back in the box. A couple of weeks ago I resurrected it and realized it really needed a color change. It's not factory, they never offered two-tone, but the colors are close. I find very few example of this kit completed on the internet. It's not an easy kit to finish stock. The best part of the whole kit is the Stove Bolt six! H Here is what I found in the box after hibernating for about ten years. You can see the fenders and wheels do not match. I added a strip of styrene to help make the hood fit. Also, those terrible parting lines. There's a large one on the rear roll pan too. It's not really visible in this photo, but the track width has the tires sticking out past the fenders. I narrowed all four wheel backs to tuck the wheels inside the fenders. The engine is nice though! Color change and my first tire painted with a whitewall Not many stock Cabriolets to get information on the Net. The one I picked was right hand drive, so I mistakenly put the fender steps on the wrong side. No holes drilled for taillights or the rear license plate. Some things have location divots on the inside for drilling, but not these. The hood needed opening latches. Not even a lump, I made some out of bent wire. I pinned the headlights to locate them and make them stable. I pinned the spare tire too Comes with an up top too There's no upper radiator hose, but it has a pin in the water neck and radiator, I slipped some wire insulation in between Very simple interior That's about it. I built the coupe version a couple times when I was a kid back in seventies. I recall purple and metallic blue. I built them as gassers and don't remember having issues, but Testors tube glue fixed many problems
-
Petty engine paint color?
THarrison351 replied to dawgvet's topic in WIP: Stock Cars (NASCAR, Super Stock, Late Model, etc.)
I think his engine blocks at this point were the same dark blue as his chassis components. I have seen them in Petty blue to though. Here's a link I posted from another source with lots of photos from the time period -
Thank you Carl! Thanks David! Truthfully, I've had this piece of fine stainless screen floating in my scrap parts since the early nineties. I think it came from an old hobby shop in Greenville, South Carolina, long gone at least twenty years. I've used it on several NASCAR builds. It was getting kind of bent up and wrinkled, but fortunately there was enough straight area to do this. I have know idea where I'll find more. Thank you Ray! Thanks Gary! Your welcome, I enjoy this! Thank you Jim! Thanks Trevor! I do too! I grew up watching racing at an old oval now gone in Las Vegas, Nevada in the seventies, and the historic Langley Field Speedway in the later seventies and eighties. The newly appointed NASCAR Senior Vice President of Competition Elton Sawyer, was one of my favorite local drivers to watch. The color I used was Tamiya TS-23 light blue over their grey primer. Thank you Jimmy! Thanks Scott!
-
Another kit from my son. Not a bad kit to build and from what I can find, mostly accurate. I made a few mods to please my eyes. Paint and decal scheme I was shooting for. I have a window net ordered First mock up. I narrowed the front suspension a bit All painted, ready for detailing and assembly I like it once it's getting close to being finished A couple more steps. There's a coil in the cowl plenum intake area. I added a wiring even though you can't see it once it's built. Added windshield bars too Added a grill screen and made a new spoiler. Also sanded off all hood pins and added these photo-etch ones. Yes, the windshield bars were added offset to the right, just like his car was Made a new fuel fill quick disconnect. It's just an aluminum rivet drilled and trimmed to fit The spoiler I made is held on with double sided tape. l need to adjust it a bit It's funny, the engine has no distributor, but in the area for the air plenum intake below the cowl. they molded in a coil. I added a pre-wired distributor and drilled all the holes for the plug wires. Ypu can't see much, but it was fun. Added my first hinges too. I have tiny magnets to keep the trunk lid on and I think the oil tank has a cooling air intake extending out below the floor The exhaust fit is terrible and I added an oil filter. The rear end should be a quick-change, I don't know what this one represents. The other AMT kit cars have a quick-change rear end. Overall, I'm very happy with the way it turned out and on to the next kit
-
If your building the recent Petty Dodge Chargers or Plymouth Satellite/Road Runner/GTX from Salvinos JR, here's a good source for photos. check under the album tab to narrow down the time period Flickr
-
Nice dog!
-
I've been wanting the Coronet ever since it was first hinted years ago. Gives me hope for the Demon. I built that Datsun turd when I was a kid and immediately blew it up with a firecracker. Won't be trying it again fifty years later
-
By far the most plastic kits I've produced in years
-
Let's see replicas of cars you owned or drove.
THarrison351 replied to GLMFAA1's topic in Model Cars
I only have one vehicle I owned that I've replicated in my possession. A 1993 Ford Ranger Super Cab -
Thanks Slusher! Thank you Bill! I'm thinking about getting the second rerelease and doing the movie version. I figure I can get the PPP Firestone NASCAR tires for the movie version. Thanks Tom! Yeah, I had know idea of this kits existence prior to its issue in 2002. I've never been to a model or trade show. My research to build it led me to the information of it's origins and the first issues values. I too wonder if the guy ever got what he wanted for his "valuable" kits Thank you Larry!
-
For the 1966 movie "Fireball 500" a custom car was created by Barris Kustom for the main character. It started life as a stock 1966 Barracuda with a 273 4 barrel. The body modifications are a love it or hate it kind of thing. The kit was based on the 1965/1966 annual barracuda kit modified to look like the show car, not the movie car. It comes with a sad excuse for a tandem axle trailer too. From everything I've read, at one time this kit because it was only issued once in 1966, was very highly coveted and valuable. That changed in the early 2000s when the molds were discovered and it was reissued. That's the kit I have. It looks like they changed the decals a bit and swapped out the the tires for lower profile versions. Around five years ago, Round2 issued it again with a new expanded set of decals. These have the original movie, and two new corrected fireball sets for the sides. However, they didn't correct the RH side USA shield for some inexplicable reason. As far as I can see everything else in the kit is the same as the 2002 issue. It's not a bad kit to build considering the age and it based on an annual 3n1 promo style kit. The annual kit was only offered with a slant six or a 426 hemi for the engine, so they opted to use the hemi as the SSXR's power. Someone could use a later AMT Duster kit and update the chassis and engine to make it correct, but I'm not up for that this go around. On to the pictures! (Barris Kustom) Movie car, looks like it has Firestone NASCAR gold stripe tires on it. Headrests are different too. You might be able to tell from the picture the steering wheel was "wood" rimmed in the movie. (Custom Rodder) How it looks after the movie and when it was kitted originally. Paint changed, headrests changed, hood pins added, side windows added and all tinted orange. Currently running lower profile white letter radials The model is issued with only one racing mirror. I scrounged two like ones from the parts box and pinned them on I didn't realize until after the USA shield was on, the fuel filler was going to be a problem. There's a raised circle for it's placement. That USA shield is so wrong...It's supposed to be like the left side with the USA forward, and for some odd reason the Plymouth stickers were not placed equally on the front fenders on the show car There's hidden Cibie euro lights behind the tube grill The taillights in the back of the headrests and tail fins appear metallic on the show car. I left the red plastic showing cause I like it. License plate should be recessed You really can't see inside the interior. More pics at the end. I didn't know Tamiya clear orange would craze windows. I'm glad I taped up the outside. I added a simple pre-wired distributor You have to love those early annual promo chassis... Air brushed with decanted Tamiya and Testors Lacquer. Testors white, Tamiya gold, clear orange, and clear red. I painted the back 3/4s gold, the middle orange, then added red Ready for final assembly Only five pieces
-
Thanks! You're correct about the the decals blue color, but that's what's available. I believe it's close to the same dark blue they used on the chassis parts and wheels and somewhere I read it was called equipment blue, but I've also read Kyle Petty called it Ford dark blue. I used the same thing I've always used for tampo prints and that's cotton balls and acetone. You have to be careful because it does remove some base paint. Edges will become bare if worked hard. I've tried non-acetone nail polish remover too. It works, it's slow, expensive comparatively, and in the end will remove some base paint.
-
Thanks Bob! I appreciate the compliments! Thank you Chris! Thanks Larry! I agree Dave! I'm thinking Racing Champions took the Franklin Mint Superbird and made some simplifications for cost and manufacturing cuts. It's clear they come from the same design. Thank you Mr. Slusher! Thanks Don! I'm pretty happy the way it turned out too! It took several cardboard templates to get the template correct. Dave as far as I know about the Franklin Mint tooling, Icon has that and they used it for the University of Racing Legends 1969 Charger 500s and Charger Daytonas. They created new tooling for the bodies and modified the chassis to fit. The chassis on the Charger 500s is almost exactly duplicated including the incorrect exhaust. On the Daytonas they have the correct dual side pipes. I wish they had corrected the wheels too. Not sure if Round 2 has the tooling from the RC2 Superbirds. Does your RC2 Superbird have diecast chassis or a plastic chassis? Also, on the Racing Champions cars I've seen the front nose intakes appear to be cast with chassis
-
Good job Randy! I picked up my last one(#2) a few weeks ago. I was looking for the postal Jeep, which I found and saw the #2 to complete the GT 40 set.
-
Didn't they have this in a promo and a SnapFast plus years ago? Seems like I built a maroon one for my son that looked just like this.
-
This is a project I’ve thought about for several years. Wanting to acquire a derelict Franklin Mint Petty Superbird and convert it into a Pete Hamilton version. I’ve been watching eBay for the best candidate, and most were overpriced or too damaged for my needs. This popped up a few weeks ago with a decent BIN and reasonable shipping with only a broken wheel and dirtiness. The wheel was an easy enough fix, the spindle where the screw mounts the screw was a clean break. Disassembled the wheel and glued the broken stub back on the spindle. My memory is terrible and there used to be a lot of great information on Randy Ayer’s NASCAR model sight until his server crashed and most was lost. Things I researched to change from the Petty to Hamilton car. First off, I knew from an interview of Richard Petty that I'd read years ago about the Petty Museum Superbird which the Franklin Mint car was based on was inaccurate. It was a short track car that they attached a Superbird front clip, rear window plug, and wing. The car never ran a race as a Superbird. They also massaged some parts like the fender vents to make them more aerodynamic as he was updating the car with every new trick they could come up with. First, the most obvious(and since changed, but wrong color) thing is the slotted wheels. Those wheels didn’t come into use until the 1972 season with the conversion to disc brakes although you’ll see slot wheels on drum brake cars because these were the first race wheels specifically for NASCAR. They might even be lighter, due to not having two centers welded together on the solid wheels. I know they kept the brakes cooler. I used PPP wheels in place of the slot halves of the Mint assembly and it worked out ok. Superglue can be your friend. Second was the tires themselves. In the 1970 season, NASCAR Goodyear tires went from treaded to slicks. Richard Petty said something like he was afraid of the slicks because if someone so much as spit on the pavement you could spin out or something to that effect. You can see visibly on the outside of tire when they changed by the Goodyear lettering. The small letters are the treaded tires and the larger were the slicks. The Mint car comes with Goodyear Eagles print which started use in 1981 but the tires are treaded? Fortunately, a little acetone and some course sandpaper on the treads made them look a little more acceptable. Third, the exhaust exiting out the left side! Only the short track cars ran both pipes out the left side because the cars squatted to the right in the turns, and they’d scrape if they were on the right. I cut up the pipe from the right header and drilled a couple of new holes for it to fit in. It’s not perfect when viewed from the bottom, but it works. Fourth, no front spoiler! I built a chin spoiler out of thin aluminum to match as close as possible his Talladega wins. The Daytona win spoiler is interesting and complicated, but there’s no side windows in this replica so that version was out. Fifth, the hood pin. So many, including my own personal Petty Superbird are often missing these sad looking lumps of plastic imitating hood pins. This derelict diecast had all of them! I removed them, saving one for my Petty car. And replaced the missing pins with lovely photo-etched ones from Pro-Tech. Last and requiring the most work, was the removal of all the Petty Tampo printing. Fortunately, I’ve dealt with this in previous diecast conversions, so I knew lacquer thinner, and acetone would be no match. I did leave the hood cubic inch print, but all the rest came off. I had several collections of Hamilton decals to choose from, but they were so old that even with a coat of clear, they crumbled in the water. Power Slide and Mikes Decal’s bailed me out and what great decals they are. The red nose trapezoid to help the pit crews distinguish the cars was the only dilemma. I compared my Franklin Mint car to my other 1/24 Superbirds, and it’s nearly 3/16 wider at the nose. Not sure if this is a Mint anomaly or the Museum Superbird dimension. Anyways, I had to split that decal and paint the center. Tried and true Testers 1103 red bottle paint over flat white primer matched good enough. Some of the other decals were a compromise to scale, but close enough for my needs. I also discovered the passenger door handle cover decal or Tampo was never on the car. I looked at the seller’s pictures and it’s missing and there’s no evidence it ever was on it. Last items: the seller didn’t disclose the car came from a smoker’s house. It reeked of cigarettes, and I didn’t notice in the pictures how yellowed the windows were. Even after polishing, they’re still yellow. I also added the missing upper radiator hose that all these cars came without. It’s not routed correctly, but it’s there. I would have added spark plug wires, but the engine was glued in so well I feared it would damage before I could remove it. The upper frame crash bars are in the way to drill the valve covers for wires. Icon diecast which produced the University of Racing Legends diecast used the Franklin Mint Petty diecast to clone the 1969 Charger 500s and Charger Daytonas. They created new body’s, but the chassis is almost untouched. I last read Icons were not planning to produce anymore cars until all their inventory was sold. I’m hoping because they produced the Chargers from the Petty molds, they can someday produce Superbirds! Painted the black line like the Pettys did to make it look like the nose cone was separate Painted the aero trim between the bumper and body. It's part of the chrome bumper on the standard diecast I need to add the jack point guide marks Don't know the reason, but Pete's number 40 was never centered on his cars Corrected exhaust All cleaned up and ready for modifications As recieved from seller, dirt and all Nice clean break Incorrect exhaust Car I tried to copy I used this picture to figure out the spoiler Teammates. You can see how yellow the windows are
-
Two lovely cars!
-
Beautiful Model! I have the first brown and gold release. Yours still has the wings on the flying B hood ornament, very rare. Mine has the B but the wings are gone. I had another one used for parts and its was missing entirely. The brown and gold versions also suffered from zinc pest. My parts car had it bad in the top
-
Thanks! I built about fifty or so various aircraft when I joined the Air Force between 1983 and 1987 before I got married. Once I was married, all my aircraft went into storage and I just built and collect model cars. Eventually I gave all the aircraft away to a neighbor. They never would have survived the moves anyways. Thank you! Thanks! Thank you Thanks! It was and would you believe it's DNA is in the F-18 Hornet?
-
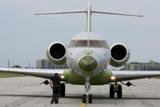
First plastic aircraft model in 35+ years. My son recently commented the lack of affordable F-5 models either diecast or pre-built. Usually around $100 minimum shipped. I decided I'd buy a kit and build one for him. This kit offered decent details, multiple decal options, fair reviews, and looked easy enough to build. It took a month to ship from China, and another month of weekends to complete. Finding paint to match was the toughest part. Even those that were the correct paint codes needed tweaking and still ended a little off to my old eyes. Not much more than paint and decals. So finished just in time for his birthday last weekend and he put it proudly on a bookshelf. Today he became a proud father, and I'm a grandfather! On my son's shelf Pretty simple cockpit, the decals take care of most of it. The belts were photoetch, and tiny Comes with decals to do eight different versions. Very tiny decals and tightly grouped Ready for final assembly
-
Round2/ AMT '55 Chevy Nomad Wagon Kit Coming in 2023
THarrison351 replied to stavanzer's topic in Car Kit News & Reviews
Great Kit, easy to build! First one was in the mid-seventies with the red custom El Camino on the side, long gone to the plastic graveyard. Last one I built was the pre-painted ProShop blue and white release. Still have all the leftover parts. There's a lot of them!

