
bogger44
-
Posts
1,620 -
Joined
-
Last visited
Content Type
Profiles
Forums
Events
Gallery
Everything posted by bogger44
-
Very nice group! Where did you get the decals for the '64?
-
Great work, JC. The motor and traction bars look fabulous. I have the same kit that was my Dad's that he built way back when that I'd like to rebuild someday, seeing what you're doing here I may go the same route as I find it very inspiring.
-
Thanks guys!
-
Earlier in the week I finally managed to put the wraps on this one. These Polar Lights kits aren't the easiest to build, but not the worst either. That being said it was still a fun build and look forward to the days when I build the other ones I have lurking in the stash. The decals gave me some headaches as, even with a coat of Microscale decal film applied, they cracked in several areas. I just patched them up the best I could and did some small paint touch-up work to them. The rubber supercharger drive belt broke on me, so I made one out of Tamiya masking tape. I drilled out the ends of the headers as well, and the rest of the build is box stock. Paint is Model Master GTS Blue Pearl lacquer. Thanks for checking it out and any comments/questions.
-
Again, great work on your holy grail, Kevin! The hood mishap was a bummer but it looks like you were able to rectify it pretty well. I really like your take on this one, congrats on a job well done! P.S. I am still really humbled that you think so highly of the one I built. Glad it could be of some inspiration.
-
That is a good question. I'm not really sure on another way of installing them as it is such a tight fit. I just looked at mine and it would be a fair bit of work and maybe not worth it or doable but maybe remove the lower control arms from the framerails first? That might possibly allow the headers to be installed to the motor before dropping it in. But then I'm not sure about what would have to be done with the motor mounts. I wish I could help more with a surefire way but that's about all I can come up with.
-
Truly insirational work JC! She's looking phenomenal and you're providing a great tutorial on all the steps your taking. I might have to buck up and try my hand at this with one of my Falcon kits, using your's as a guide. Best of luck with the headers!
-
Thanks for the comments guys. Oh yes LOL, that was probably the most cumbersome assembly of the entire build. I installed them according to the instructions and placed them in along the framerails first then installed the motor. I do believe I glued the motor in place before attaching the headers to the heads. It was a bit of a battle and time consuming but eventually got them to cooperate. I can't really say I had any tricks to the process though. Are you having trouble with your's too? Of note, the tie rod install was a small battle too.
-
Thanks again guys. You are correct, Barry. Other than the small things already mentioned, the only other relatively notable addition is the windshield wiper posts I made from filed down ends of a toothpick. Also, I should note that the rear window needed to be carefully filed down a small amount to fit correctly.
-
AMT 1962 Ford Thunderbird Sports Roadster 390 Tri-Power
bogger44 replied to RandyB.'s topic in Model Cars
I sure wish I could crank out high quality builds as fast as you do, Randy! I second the outstanding color choice, really suits it well. Very well done. -
Thanks guys. I should note that I also spliced the decal with Cincinnati on it to the correct spelling. It was a pretty easy and straight forward build with little in terms of fitment issues. Count me in as well in waiting for the Dyno Don car. I'm so glad these cars are being kitted.
-
My first completion of the new year. I finished it up early last week but due to that crazy polar vortex (woke up to -41 on Thursday morning) I wasn't able to take some outdoor pictures until today. Built it pretty much straight out of the box. The only real mod I did was space the front tires out a little as they were sunk in quite a ways when built oob. I also left the wing windows off as I just like the look that the restored one has without them. Model Master Classic White laquer was the paint of choice. Thanks for looking and any comments/questions.
-
I can't really add anything that hasn't already been said, you really knocked this one out of the park Randy! I gotta get me one of these....or two or three lol.
-
I guess I'll throw my hat in the ring with a year in review post. Life got a little busy and hectic at times so I didn't get as much built this year as I would have liked, but maybe '19 will turn out to be a more productive year.
-
Thanks again for all the comments guys, I really am humbled. Lol yeah I'm glad my mirrors didn't grow legs! I remember your build and still love it. Calypso Coral and Candy Apple Red have been my favorite colors on these for years.
-
X2 Very, Very nice!
-
Looks pretty sharp to me, nice work. I've always liked this gen of 300's, and yellow is my favorite color on them to boot. Did that clear hood come with the kit?
-
No problem, I've used them on numerous builds and have yet to have an issue with them. He has top notch products. Thanks guys.
-
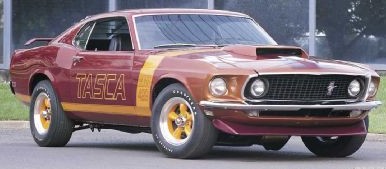
Real sharp pony, Roy. I like the exhaust dumping ahead of the axle. This reminds me of a 1:1 very similar to what you've built here that I "almost" bought a few years back. It was a black on black '84 GT with a built 5.0 and numerous other upgrades throughout the car that just needed some minor finishing. I spotted it on Craigslist like 5hrs after it was posted, called the guy and it had just sold. I was bummed....
-
Those are decals from Fireball Modelworks, excellent quality stuff. The tires themselves are just plain with no lettering. Thanks again for the comments everyone, you're too kind.
-
Thanks guys.
-
Finally managed to get another build wrapped up this week. Fairly box stock with some engine wiring, more accurate parts box air cleaner (from the 70 Torino GT I think) as well as valve covers from an unknown source. Pretty sure their big block FE ones but they look close enough for me. Also formed the exhaust cutouts on the rear valance per Mach 1 specs. The rear tires weren't lined up with the wheel wells so I slid the axle forward, and in the process trimmed a bit too much off the driveshaft but oh well. Paint is Duplicolor Bright Red. Thanks for looking and any comments/questions.
-
Looks like you hit a bullseye with your Dart, Mike. I love the colors, and it's nice seeing the recall wheels on it. Sorry about the air cleaner decal, those pie pans give me grief, too.
-
That Porsche is BEAUTIFUL! Very nice work on all that black trim.
-
Very, very nicely done and those wheels look really sharp on it. Love those Cyclones.