
Belugawrx
-
Posts
6,165 -
Joined
-
Last visited
Content Type
Profiles
Forums
Events
Gallery
Everything posted by Belugawrx
-
 My friend Jimmy asked me to build his 1941 Ford out of a '40 kit that he has had for quite some time. Although started, I was able to carefully take it apart... This is his truck From the looks of it the only thing I will need to add are the extra chrome strips up the front of the hood, and take the bumperettes from the front bumper, and get rid of those louvers on the hood,... but if anyone sees anything else feel free to comment. He tells me it's a Jaguar colour, but I keep bugging him saying 'why a Chevy colour on a Ford.'?..lol More to follow as it happens Cheers
 -
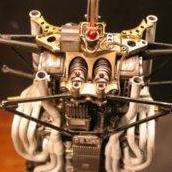
I started this more than 4 years ago, and didn't start a WIP because the sites were inundated with 312 T4 builds at the time and I didn't want to have to keep up..lol..anyways...I bare metal foiled the cockpit and fuel tank, added extra wires and plumbing to the engine and transmission, battery cables and hold downs, electrical to the gauges and controls, kill switch, brake lines to the front and rear, buttons to the windscreen, ...and on and on...I chose Duplicolor Acrylic lacquer spray #CBVW2037 Tornado red for the body paint, and some coats of Duplicolor Acrylic lacquer spray #CDAL1695 clear gloss to shine it up. Then lots of 1000g sanding followed by Novus polish #3 and Meguiar's Ultimate Polish to finish.The side skirts were sprayed with Alclad #116 semi gloss aluminum and the skid strips picked out with a Krylon silver leaf pen..the front and rear wings were stripped of the chrome and shot with Alclad #107 chrome over gloss black, and then coated with Alclad #600 Aqua Gloss Clear. All engine parts, skirts, and some body panel areas were washed with a variety of solutions..Tamiya panel washes and custom mixed grime washes...I don't like a clean engine..lolThe decals came from Michael at Indycals, although I did mask and spray the white with Duplicolor #CBHY Nordic White before decals went down to avoid any opacity problems.This is a close representation of Jody Scheckter's winning ride at Monza, but by no means perfect...On to the pictures...Any and all hairs you may see on the model were lovingly supplied by this girlThanks ZigThis build was in the box more than on the bench over the course of 4+ years and I'm happy with the results.Thanks for looking in...happy building !All questions, comments and critiques are welcome.Cheers
-
60 Apache mock up
Belugawrx replied to Fantom's topic in WIP: Model Trucks: Pickups, Vans, SUVs, Light Commercial
I like the tire and wheel combo.. I have this kit staring at me from the stash, I was thinking something like this...Root Beer roof and Ivory lower body I'll be following your progress..Good luck Cheers
-
Love it Howard.. need to see it as a tripod for your camera lol
-
Ferrari 312T4
Belugawrx replied to Belugawrx's topic in WIP: Other Racing: Road Racing, Land Speed Racers
And she's done... Setting up some glamour shots outside and going 'Under Glass' Thanks for following along and commenting on another 4+ year build...lol Cheers -
Tamiya Porsche Turbo RSR Type 934
Belugawrx replied to cobraman's topic in WIP: Other Racing: Road Racing, Land Speed Racers
Looks good Ray? -
Ferrari 312T4
Belugawrx replied to Belugawrx's topic in WIP: Other Racing: Road Racing, Land Speed Racers
The Clear gloss acrylic lacquer I use is an automotive product, so quite durable... This is how it looks after....no more orange peel..YAY!! This is going into final assembly -
Chaparral 2D
Belugawrx replied to Pierre Rivard's topic in WIP: Other Racing: Road Racing, Land Speed Racers
Nice detailing there Pierre ! -
Ferrari 312T4
Belugawrx replied to Belugawrx's topic in WIP: Other Racing: Road Racing, Land Speed Racers
Hi Edgar..I have had Future react with both Set and Sol..it left a cloudy area which never disappeared... would be best to run a test with the same paint, decal solution, spare decal, and Future, just to be sure. I know it seems like a lot of work, but better to know in the beginning than have the heart break at the end....Good luck? Thanks for checking in Randy (Birdcage is looking awesome !!) After another couple coats of Clear I felt comfortable wet sanding with 1000g again, and starting with Novus 1 and 2, then Meguiar's Ultimate Polish,I've got the right side rear buffed out ...Cheers -
Nice job laying down that black paint Dave !
-
Came out great Pierre ! Still can't believe the base and clear are brush painted ...!!! Excellent Cheers
-
Coming along nicely, the reservoirs look great. I always add alot of details to these big scale kits, and sometimes it gets hidden behind or under more parts, but I know they are there. Filling voids and empty spaces just adds to the realism of the build...keep it up? Cheers
-
Tameo Williams FW07
Belugawrx replied to gbtr6's topic in WIP: Other Racing: Road Racing, Land Speed Racers
Is this 1:43rd scale...? It could fit on my pointer finger? I admire your work sir !. -
Ferrari 312T4
Belugawrx replied to Belugawrx's topic in WIP: Other Racing: Road Racing, Land Speed Racers
-
This is looking great Bruce,... ,...............wait what..? Snow in Reno?, are you in the mountains?
-
Ferrari 312T4
Belugawrx replied to Belugawrx's topic in WIP: Other Racing: Road Racing, Land Speed Racers
Ok..thanks guys..I did go to Crappy Tire and picked up a couple cans of Acrylic Lacquer Duplicolor cans They changed the label, but it says Acrylic lacquer. .warmed it up in HOT water 3Coats..looks like a pinecone with 3 coats of clear on it, I know so far so good, masked the red clear after 40 minutes,and shot Dulcote on the rad housing and intake tunnels And of coarse another mockup Another wet sand and clear 2-3,4 coats Thanks for looking in ...Cheers -
Ferrari 312T4
Belugawrx replied to Belugawrx's topic in WIP: Other Racing: Road Racing, Land Speed Racers
All the decals on...now to decide on clear coat. I've had to use some Micro-Set to settle the decals into the side pod crevices, so Future is OUT, I've been staring at my Alclad #310 Gloss Klear Kote (Laquer over Acrylic Laquer?), Or my stand by Alclad #600 Aqua Gloss Clear ...Or go to the store and buy some more Duplicolor Acrylic Laquer clear gloss (I only have their Acrylic enamel in stock) More to follow, as it happens Cheers -
Jaguar E-Type 1962 Le Mans
Belugawrx replied to Pierre Rivard's topic in WIP: Other Racing: Road Racing, Land Speed Racers
That's not too bad I was worried as well re; the body fitment, a little 1000g dry sand on the dash and brush another coat on I guess. Engine compartment looking good ! Cheers -
Looks Great !!
-
Ferrari 333SP
Belugawrx replied to Chris Smith's topic in WIP: Other Racing: Road Racing, Land Speed Racers
Man, how do you even start those carbon decals?...Do you use alot of Sol - Set or what? Looking good brother..keep it going Cheers -
Ferrari 312T4
Belugawrx replied to Belugawrx's topic in WIP: Other Racing: Road Racing, Land Speed Racers
-
Chaparral 2D
Belugawrx replied to Pierre Rivard's topic in WIP: Other Racing: Road Racing, Land Speed Racers
If you build it, they will come.....put as much,..or as little detail as YOU want Pierre Great build so far Cheers -
Amazing vid Bill..I noticed the sheet steel discs (thought they were on the rear..?),maybe determined alot of the reversing down the street parts..lol The body work and full interior they accomplished was just incredible..! Thanks for posting it up?
-
my third model kit ever, what do you think?
Belugawrx replied to drugsarebad420's topic in Model Cars
Nice job !!? -
Ferrari 312T4
Belugawrx replied to Belugawrx's topic in WIP: Other Racing: Road Racing, Land Speed Racers
A little 1000g sanding on those tape lines and she should be ready for decals and clear...wheww

