Russell C
-
Posts
1,931 -
Joined
-
Last visited
Content Type
Profiles
Forums
Events
Gallery
Everything posted by Russell C
-
Yup, when you type into the "Reply to this topic" box at the bottom of any thread, your reply then appears for all to see and isn't restricted to just one person. Somehow, ads that appear at people's websites generate pennies of revenue for the websites, but I don't know how. While I would like to support this MCM site that way, the growing number of ads I saw several years back just became too intolerably obnoxious to see (like what you seem to be describing about the "offer to download the PDF Manual"), so I went to the AdBlock website ( https://getadblock.com/en/ ) and clicked on their button to install that application on my computer. It's free, and it absolutely kills every ad there is that appears in this forum. ALL of them. I know there are ads because every once in a while when I am out of town, I use the borrowed smartphone I have to log into the forum, and there's no AdBlock on that thing, so that's when I see what other members here have been complaining about.
-
Don't know if this will be much of a help but instead more of a reassurance that you might be reading too much into what the requirements are for participation here. Myself, I have 1500-ish posts since 2013, I occasionally see notes sometimes saying my Profile is only "50% complete", but since I have no idea what that means, I've just ignored it. It's as complete as I need it to be. Regarding "Adding tags to a post", I think that means when you post your own startup topic (as opposed to simply replying in an existing thread) there's an option under the title box to add tags to the topic you want to post. I've made use of that feature a few times, but since I've never seen any benefit from seeing tags, I don't actually know what good it is. Finally, after all these years of posting here, I can't think of any time I've seen the "invitation to 'View Manual' in PDF form" you mention. Where did you see that? What manual?
-
 Hit the radiator area with black, will tidy up the outer edges since the paint doesn't stick too firmly to the chrome. Hit the engine (masked off the rectangle area for the exhaust & intake manifolds), tranny & rear axle with primer so I can see what divots need to be filled in. Hit the front spring and inside wheel backs' disc brake areas with my old-but-still-spraying Model Master buffing magnesium, will buff those out a bit more later. I'll have to brush paint the discs on the other sides of these wheel backs, which I salvaged off my Red Baron glue bomb. That crumbly thing is giving up more than just its oil pan & fuel tank. If only the long ago builder could see how bits of it continue to live on as an entry into the GSL contest ... Bothered me that when I temporarily pinned the scoop to the carbs (which I - oops - had sideways in my Wednesday post) and pinned the scoop & carbs to the primered intake manifold, the carbs looked so visually uninteresting just sitting on the intake. And it also bothered me that after seeing 89AKurt's fuel lines out of his carbs that I would have no stable way to put in my own fuel lines & linkages without first gluing both carbs to the intake, which would need to have its final coat of paint on it. So, I created a more interesting looking bottom adapter plate that I could glue the carbs to separately (heat-stretched sprue will make create the "bolts"), where I could drill all the holes in the carbs and make the fuel lines connect, including making sure that when I temporarily pin the whole unit to the intake and temporarily pin that to the engine, I'll be able to locate to the incoming fuel line and accelerator pedal linkage in a repeatable way before I paint all the various pieces. Objective being to minimize the handling after final coats of paint.
-
Thanks! Having my fun messing with people's minds, too. There was an angle of truth to the "weapons carrier" bit a few posts back. ?
-
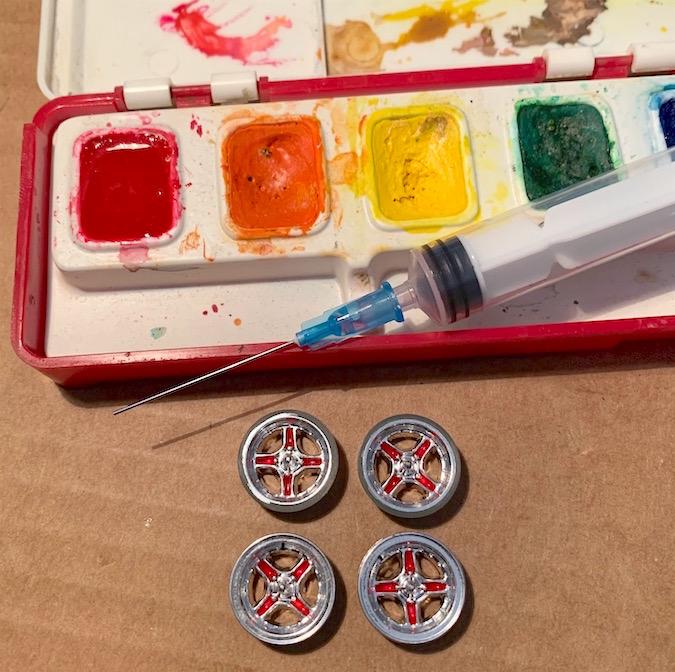
Thought this was an experiment worth trying. Watercolor paint dating from my grade school days, and one of those thin diameter syringes that comes with a color ink refill bottle for my inkjet printer. Seems to be working out well so far, and the nice thing about water soluble paint is that if you overfill one of the spokes where it bleeds into the center hub, just run it under the faucet and start over. Might need one more layer added, I'll see when these dry out.
-
Sprue Stretching Tutorial.
Russell C replied to StevenGuthmiller's topic in Tips, Tricks, and Tutorials
Endless uses for the stuff, I've saved my various efforts over the years and use it for engine compartment wires, for pins connecting one part to another, for tire valve stems, for filling in drilled holes, on and on. One handy thing I found out was that if you file a length of sprue to a half-round shape and then heat-stretch it, it will maintain that half-round shape. Pretty much retains the shape when you heat stretch a rectangular rod. Heat-stretch Plastruc tubing and you get a much thinner diameter tube.
-
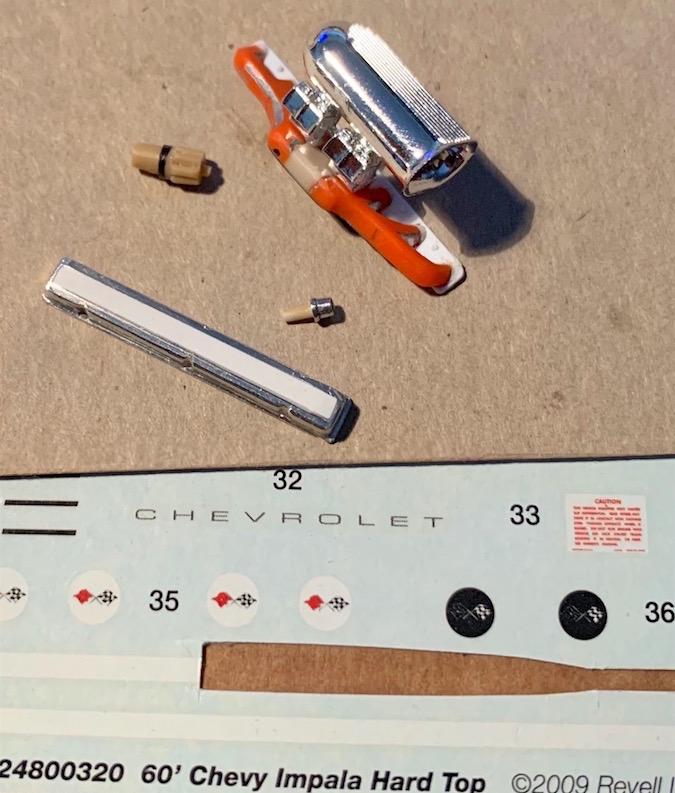
Engine progress. Bare Metal Foiled the valve cover except for the raised center area, which I covered with the white stripe decal section from the Revell '60 Chevy sheet. The "Chevrolet" script will go on there next. No room for an oil filler neck on the kind of GM prototype slant engine I'm doing, so the oil fill cap will go on the cover where the "O" is. One less unused scrap part out of my parts pile, I 'lathe-turned' that cap into a more perfect circle on my motor tool and scribed in an "O" on the top while it was spinning which I filled in with a Sharpie marker and polished off the excess. Believe it or not, I got some Bare Metal Foil to stay put around the main body of that cap, and the trick to getting a thin strip to stick to the bottom ridge was dabbing a teensy amount of Tenax (a.k.a. methyl ethyl keytone) with a super fine tip brush just ahead of the foil strip I was laying down. Burnished it while it was spinning on the motor tool with the edge of a piece of thin cardboard, then hit it with the Simichrome polish I mentioned in the prior post. BMF is finicky stuff, but it could be that the heat action of the burnishing makes the adhesive work better. Also worked out the wire pins for holding the Revell '29 roadster carbs / scoop together, and to the intake. Added heat-stretched sprue "bolts" to the intake flange. Scratch built a distributor cap differently than what I did for my flat 5 engine in the last Common Kit entry I build, since the parts box distributor I had was just too big in diameter. This time I 'lathe-turned' the tan plastic sprue on my motor tool into a perfect circle cylinder, then hand drilled the number of plug holes I need as close to the edge as possible, then 'lathe-turned' the upper third so that half of the hole sections were opened out - it looks like a gear when viewed from the top. Then I heat-stretched the same color sprue to the diameter I needed for the plug-in nubs (or whatever the term for those is) and individually glued them them in the open hole areas around the perimeter of the cap. After the glue dried, I lathe-turned the outer ones down to the same height. I'll drill the holes for the incoming wires later. Somewhere between 6 and 9, including the center one, if I counted right.
-
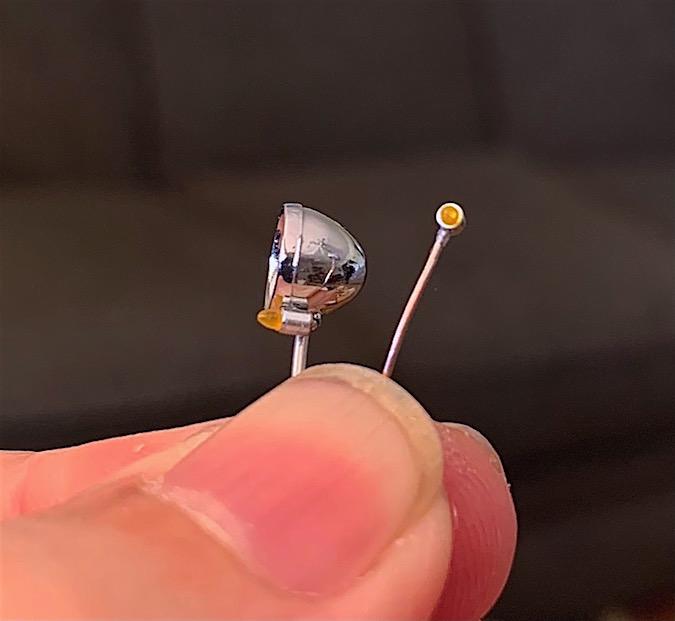
Front turn signals. Wasn't sure if this would work, but worth a shot if it did, and I do have fun 'lathe-turning' tiny things on my motor tool. The ingredients here is some old clear amber sprue from one of my mid 1970s AMT truck builds, then some K&S really small diameter aluminum tubing (polished with Simichrome Polish to chrome-like shine), and two sizes of aluminum wire scrap. First, 'lathe-turn' the amber sprue into smaller diameter rod, then jamb that into the tubing where it stays stuck, and then chuck both into the motor tool and 'lathe-turn' the amber bit into it its final bullet shape. Reverse direction on this, jamb a bit of aluminum wire into the open back end, clip with a wire cutters, then use the motor tool as a sort of circular vice to grip the piece such that you can use a #76 drillbit to drill the hole for the wire that mounts the turn signal unit to the headlight bucket. Then finally saw off the back to the proper length, file the back to a dome shape, polish the back end to a nice shine, and it's done.
-
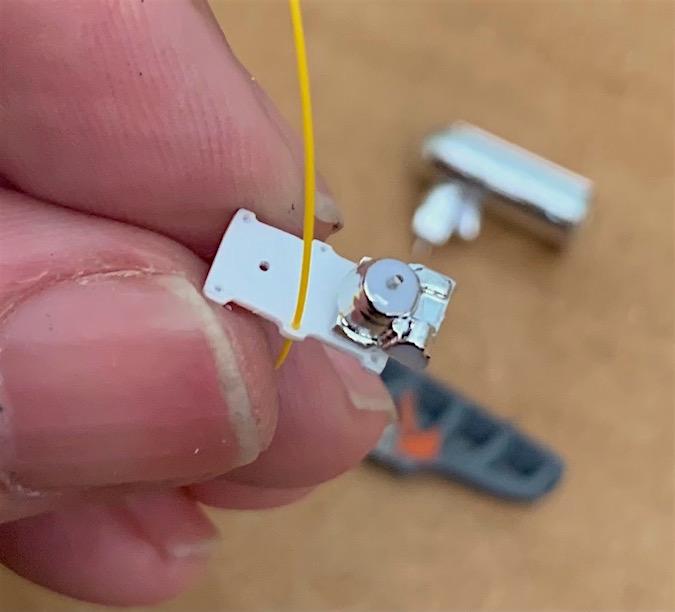
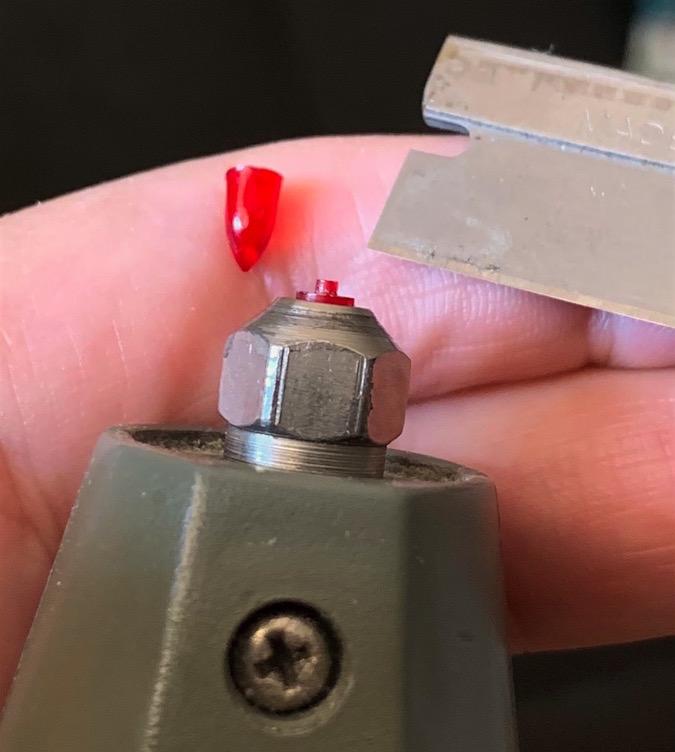
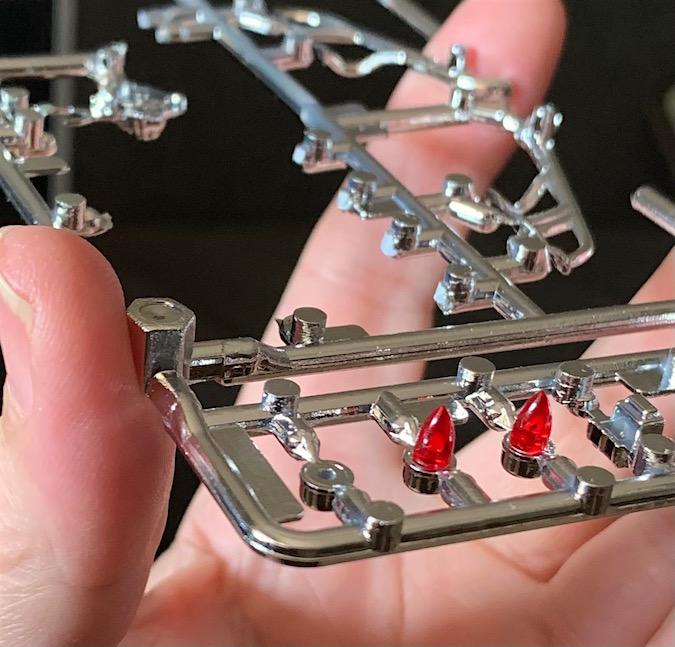
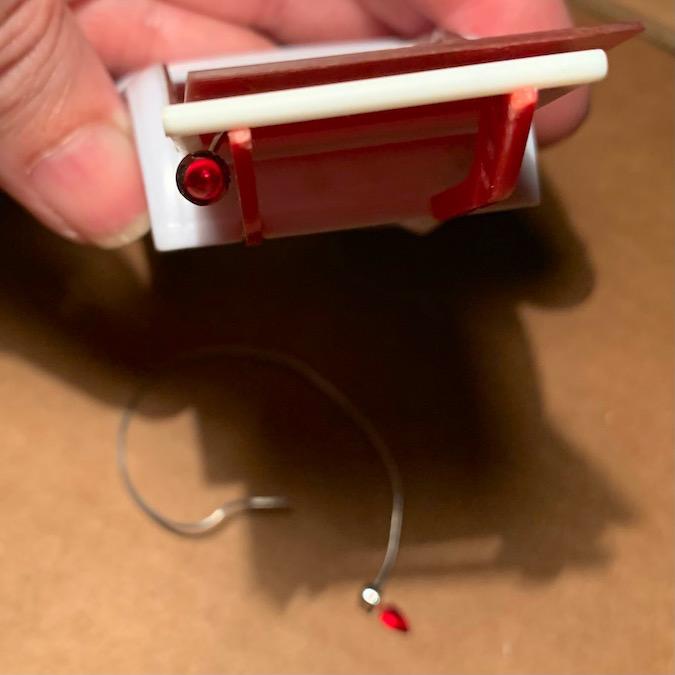
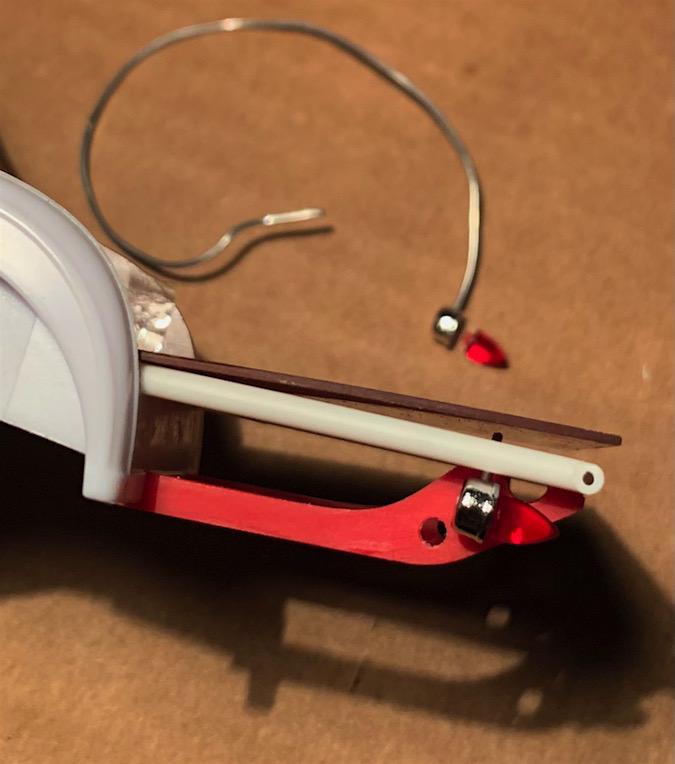
Can't really use the either of kit's Revell '29 roadster taillights options since they'd be too far under the flatbed platform. My original idea was to put a pair of bullet taillight lenses from my junk pile into some polished aluminum tubing, but since the tri-carb's air cleaner caps look like the appearance I wanted and were nearly the same in diameter with the nuts on top being an ideal spot to run an electric power wire in, why not use those instead? The lenses were a bit long, so I chucked them backwards into my motortool and used one of those dangerous weapons of massive self-destruction to lathe turn them down to a size to match the hole in the underside of the air cleaner caps. Polish up some aluminum wire, drill some holes in the frame and the caps, and that's mostly it. I'll probably put two wire rings like I showed in this tip at the bases of the lenses to give them more of a complete look, and later on, each light will get an electric power wire stuffed into the back that goes up into the frame.
-
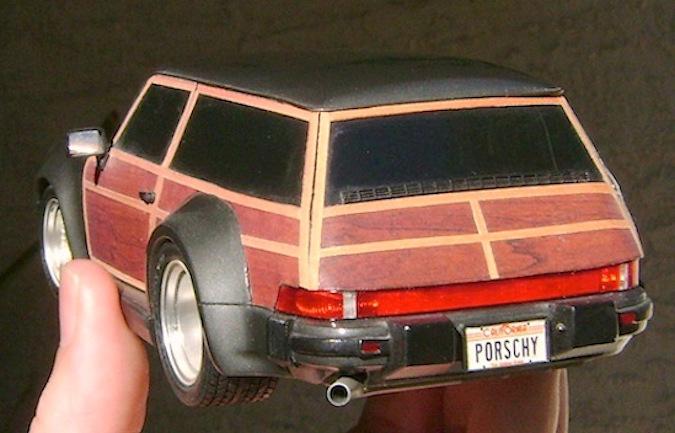
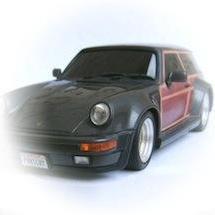
The Porsche Turbo wagon in my avatar image, I built it way back in the early 1990s. The "wood" itself was nothing more than paper that was photographs of wood decor in one of those really ritzy fancy house magazine, which I doubleside taped to the body. If I remember right, the darker areas was some guy's cherrywood bar, and the lighter strips were likely from photos of pine cabinets.
-
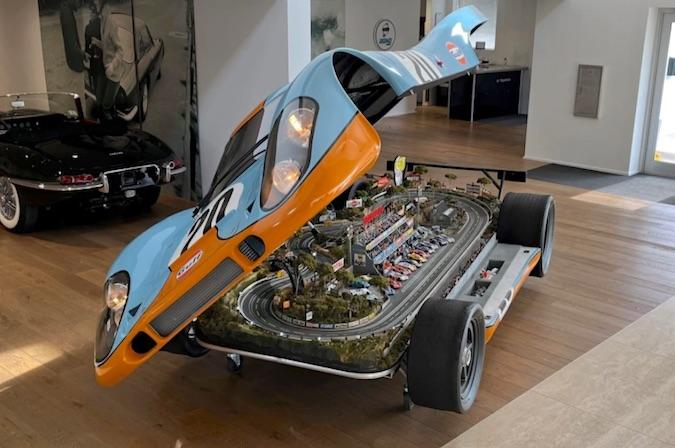
Ends 6 days from today: https://bringatrailer.com/listing/porsche-917-style-slot-car-track/
-
Initially thought I'd have to use a different underside exhaust setup with the header pipes collector idea I had, but it turns out I can use the Revell '29 roadster muffler & rear pipe section, while using a longer thick solder wire for the front section (handy material from my late father's electrics soldering hobby). Might use a leftover length of nickel plated tubing from my last GSL Common Kit entry's flat five velocity stacks collection, but cut shorter …. unless it looks like it's too large in diameter.
-
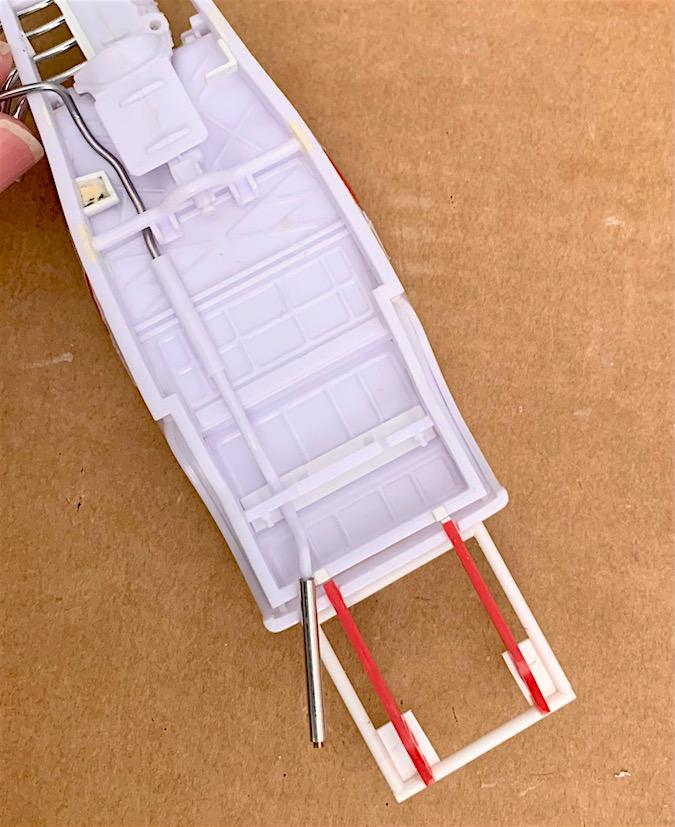
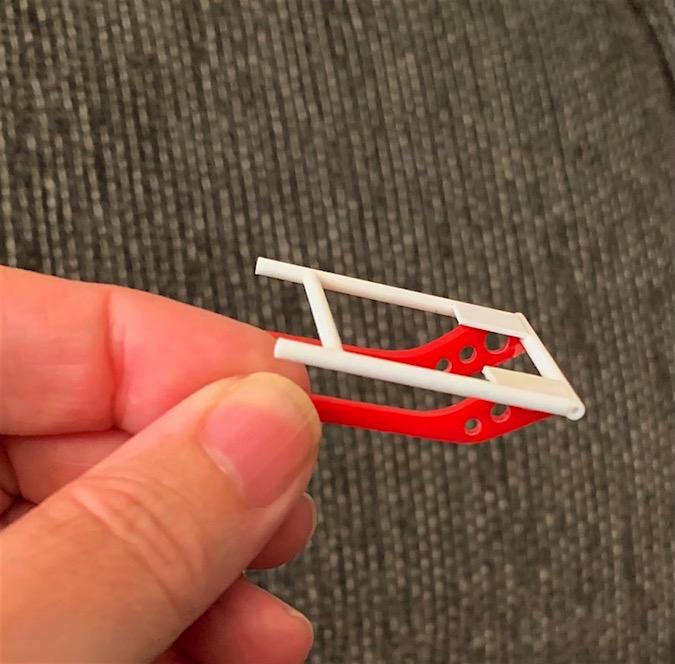
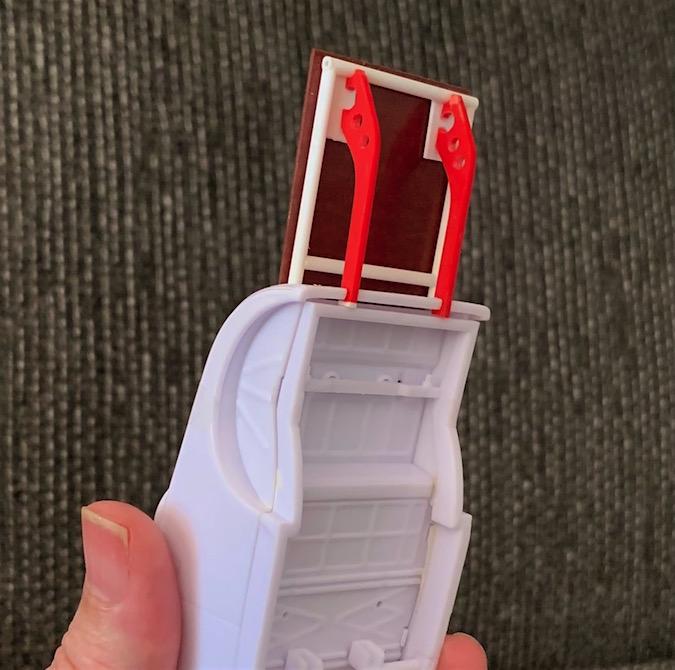
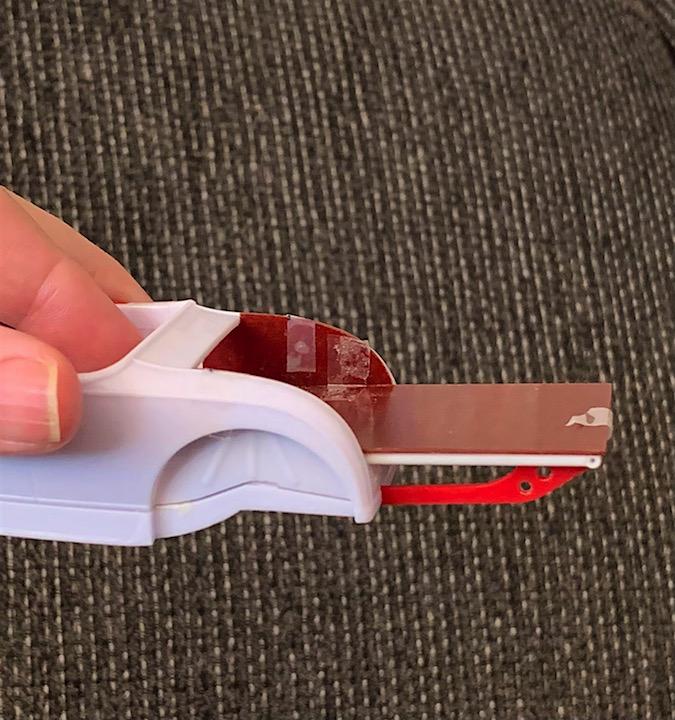
It's nice that this kit has the separate fuel tank and battery items, but with the seat in the way from the front, and the deck lid molded closed, what good is that if you can't see these items? So, back in March last year, I showed in the "What did I Accomplish Today" thread how I sliced out the deck lid. However, my project needs to haul, in the literal sense of the word. I've seen old 1:1 pickup bed conversions of Model As, but I'm thinking just a flatbed extension will work. Combo of Plastruc tubing and the bits sliced off the Red Baron glue bomb I have the held up its fuel tank, since that looks more stylish than just angle iron. Panels that look like wood will do, and because I am ever more lazy on painting in my old age, I thought I'd use a scrap of really thin 1940s or '50s-era blank circuit board material I gleaned out of my late father's electronics boards scrap pile. Looks sorta like Masonite to me. Smells terrible when you cut it, though, hold your breath. Since the flatbed displaces the fuel tank and since the Red Baron tank was one of the few bits in good condition in that gluebomb, why not just locate it in the forward area with a filler neck extension? Filler neck is thick soldering wire, I'll slice it down to the right height when I get to the point of permanently the tank in place. An aircraft carrier? Sounds like a boatload of fun. A weapons carrier is a great idea, though …..
-
AMT GMC ASTRO and it’s changes through the years.
Russell C replied to Pete68's topic in Truck Kit News & Reviews
Never had to cover a surface that big before using my adhesive back mylar trick, but if the pin can can be filed flat, either the same trick would work, or perhaps the mylar on a thin rectangle of plastic would work to provide a dead flat area, if filing the pin away leaves too much of an uneven surface.
-
Welcome, you've come to the right place for that range of vehicles.
-
2023 BRGB Movin' On Kenworth
Russell C replied to leafsprings's topic in WIP: Model Trucks: Big Rigs and Heavy Equipment
That is great to know! -
2023 BRGB Movin' On Kenworth
Russell C replied to leafsprings's topic in WIP: Model Trucks: Big Rigs and Heavy Equipment
Forgot to include what I think is also the program creator's Philip D'Antoni's official Facebook page for his show, where you don't have to log in to FB to view the photos (although FB sometimes arbitrarily throws in a "not logged in" tag and blanks the screen). Looks like D'Antoni hasn't put in new content since last October, but I remember guys asking tech questions and/or finding answers there about details for the assortment of trucks seen on the show. https://www.facebook.com/movinontvshow/photos -
2023 BRGB Movin' On Kenworth
Russell C replied to leafsprings's topic in WIP: Model Trucks: Big Rigs and Heavy Equipment
The show is what prompted me to build nothing but trucks from '75-ish through to 1987. My favorite episode was where Will thought about getting his own Diamond Reo Raider. You probably already know of the official website for the show? http://www.movinontvshow.com/ Some good reference photos there. My one gripe with the current owner of the 1:1 original (?) TV show truck is - last I saw - he still has the newer Budd wheels on it rather than the proper Alcoas. -
Off black paint for scale effect.
Russell C replied to D.Pack's topic in Model Building Questions and Answers
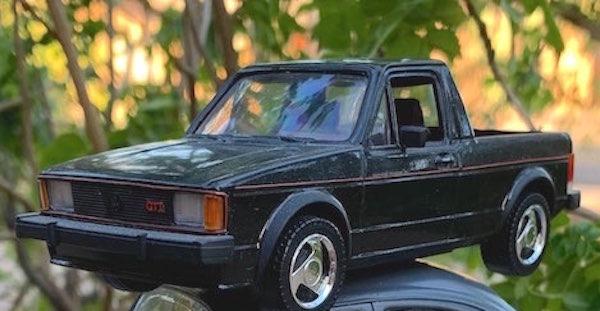
Valid question on how much to back off from pure black before it becomes just a noticeably really dark gray. I never cared too much for Tom Daniel's "California Street Vette" in orange with all those giant hood / roof black louvers and rear glass cover louvers, but lately an I idea I have is how interesting it would be in black-on-black -- matte or semi-gloss on the louvers. But the key to pulling that off well would be to different shades of really dark gray that can be mistaken at first glance for black. I've only done one model in black, a 32nd scale Revell VW Pickup shortened to GTI length, but whenever I try to photograph it in direct sunlight, it just disappears into a basic shape where the details are lost in the contrast with the bright background.
-
Made a bracket for the alternator out of a black-anodized dead soft aluminum tag that I fetched out of the scraps barrel from my long-ago job at an aerospace nameplate manufacture (same material I used for my GSL Group 15 entry's Y-block engine generator brackets). Bends but doesn't break easily, quite carvable. Touch up the bare silver metal areas with a black Sharpie marker and it's all good. Thought I could just lathe-turn grooves using my motor tool into the three Revell roadster pulleys and then create a new fan belt out of heat-stretched black plastic sprue. That worked well for the bottom pulley, but the longer I looked at the upper ones that would be silver-painted, the more certain I was that I'd end up smudging the paint man-handling those into place. No way to smudge aluminum. So, I used my mini-lathe to create the two top pulleys from aluminum rod.
-
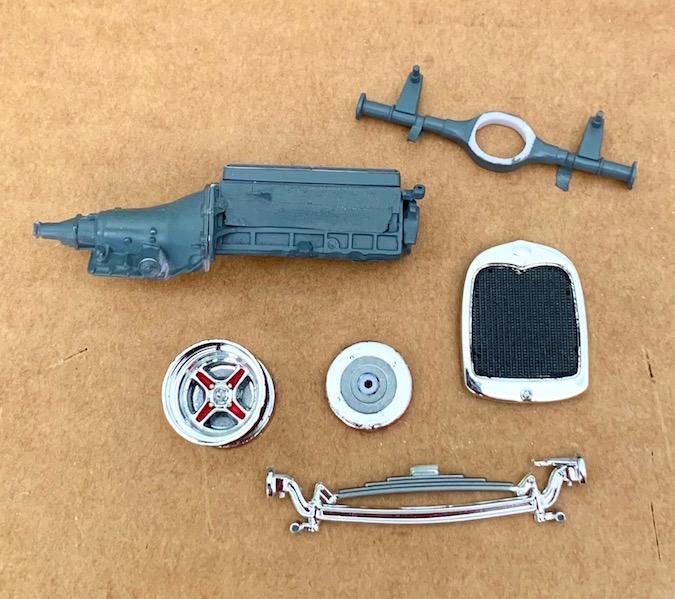
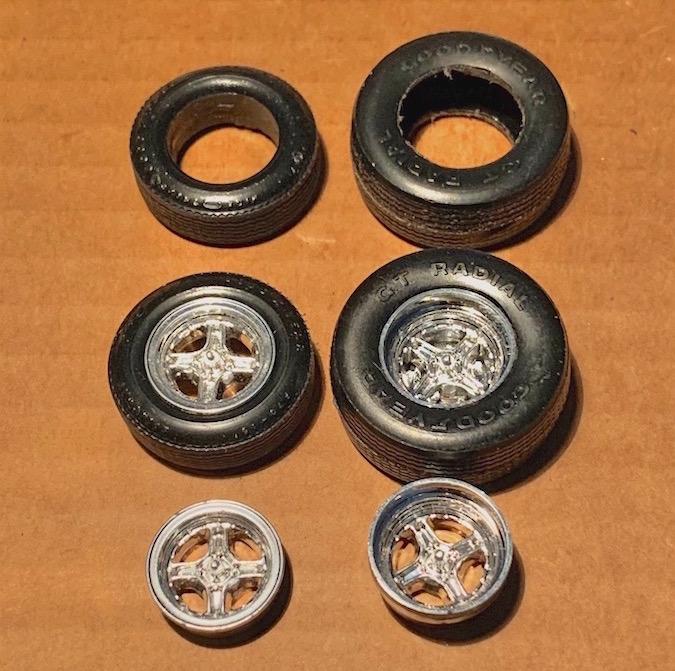
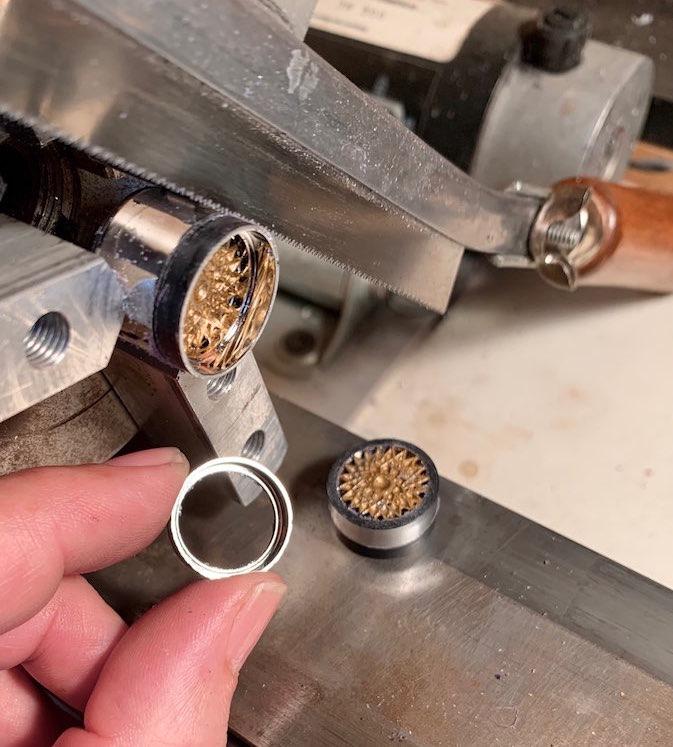
Try as I might to like the wheels / narrow tires & drum brakes in the Revell '29 roadster kit that's the basis of this Common Kit class, the road racer in me prefers disc brakes and tires with a bit more contact patch, even though this build will be a rod that motors around to shows not all that fast. Since not so many street rods are seen with 4-spoke wheels, and I spotted a nice set of 'em on eBay last year that were the custom wheels in the MPC 1984 Dodge Daytona, that's what I'll use. However, they are all the same offset and I want big meats in the back. To cure that problem, just slice the outer rim areas off something like the front wheels off the Revell IMSA Mustang (thanks to MCM forum modeler Dan Doane for lending his parts box set!). The experienced mini-lathe owners will spot the one I have in the 2nd pic below and ask why I didn't just turn a new pair of rims out of aluminum. Answer: I'm not that good at machining. What I did there was chuck the wheels into the lathe to get a good true circle cut into the wheel at the depth I needed (fer gawd's sake, be careful with that saw not to impale yourself!!) and then I rotated the chuck by hand to carefully saw the rest of the way through. Don't know where the front tires I have came from, the backs are the 2-piece plastic ones from the Revell Chevy Luv pickup .... because they just happen to be the size / width I need, and the tread pattern on 'em isn't terrible. Not too difficult to cut a bigger wheel opening in 'em.
-
Bicycle pump at the 1:18 point count as an instrumental music device?
-
Oh, man, that brings back fond memories of the college station in Albuquerque. No top 20 megahits ever, but instead the full range of connoisseur music all day long drifting pretty much seamlessly from one style gradually over into another, classical to ragtime to WW2 big band to Miles Davis to country swing to fabulous blue grass. Bach to Earl Scruggs. Weekends were specialty programs like the "Thistle & Shamrock" (a national show done somewhere else in the country) and the local pure 1920s jazz records collection I listened to every Sunday night in the half hour drive from my parents' house back to the college dorm. The only commercials they had were the gag ones the DJs created along with their short filler bits. "You're listening to N.P.R. - National Paranoid Radio ... on KUNM, 90.1 FM."
-
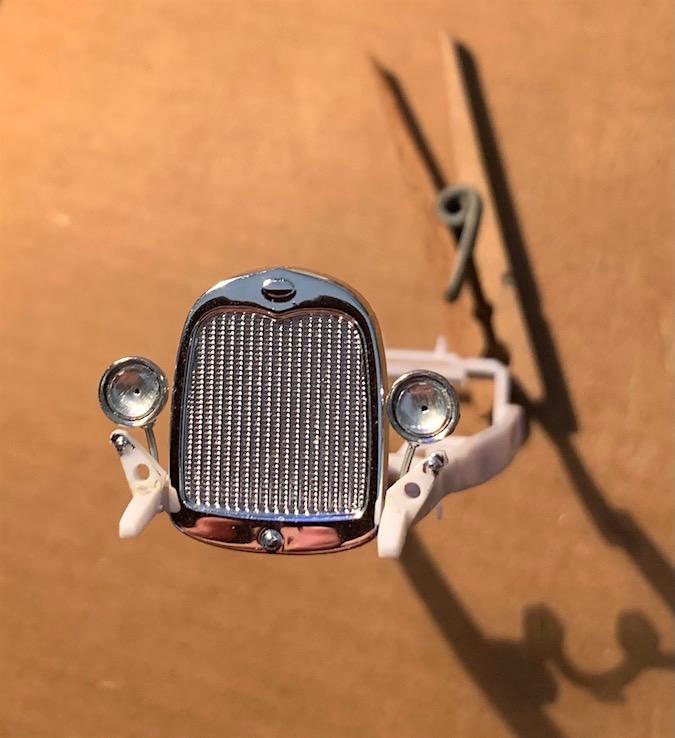
Chose the smallest headlights option, got those & their aluminum wire rod brackets more or less figured out. Didn't like the look of the really deep recesses behind lenses, so I used "89AKurt's" tip on how to make headlight reflectors out of standard aluminum foil. The reflectors are just temporarily dropped in here as are the headlights on the wires, they'll all be lined up and fitted better in the final assembly. Heat-stretched clear plastic sprue will work as headlight bulbs, where the ends will be hit with one more round of heat to make 'em look like round bulbs.
-
Update: '33 Ford Coupe 4-wheel independent suspension
Russell C replied to Kruzn's topic in WIP: Model Cars
Transaxle sure does resemble the one in the MPC Ford Mark IV Le Mans race car kit ....