Russell C
-
Posts
1,930 -
Joined
-
Last visited
Content Type
Profiles
Forums
Events
Gallery
Everything posted by Russell C
-

Cabs under construction
Russell C replied to Repstock's topic in WIP: Model Trucks: Big Rigs and Heavy Equipment
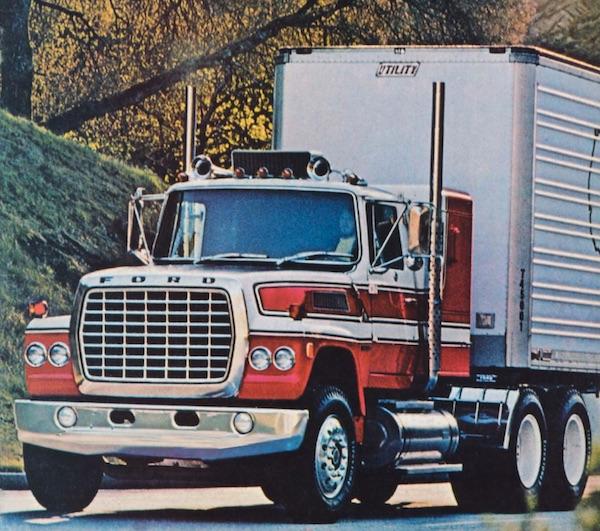
Missed this thread from years back, great starts! I have a weakness for the long hood L Fords, and halfway recently wondered what a phantom late-70s round quadlight version might look like, so I did a quick photo alteration of one of the Ford brochures. Alas, no available time to take on such a model project ...
-
Help me ID this truck, 60’s Ford semi
Russell C replied to Oldmopars's topic in General Automotive Talk (Trucks and Cars)
Wow, I've surfed across his various posts, but missed this one on his assortment of cabs: -
Shout Out to:Bolide Plastic Model Werks!
Russell C replied to stavanzer's topic in Car Aftermarket / Resin / 3D Printed
Have not heard of this company before - one to bookmark! https://www.bolidemodels.com/shop -
Help me ID this truck, 60’s Ford semi
Russell C replied to Oldmopars's topic in General Automotive Talk (Trucks and Cars)
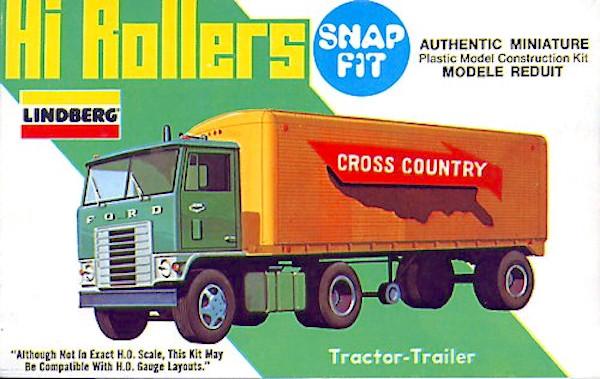
Day cab already available in kit form ....... if ya don't mind that it is 1/87 scale and a bit more primitive that what the box illustration shows. (dump body might also be available in the same scale for model railroad builders)
-
Somehow I missed this whole thread until today. Way back in 2014 I encouraged Dan to join MCM and post some of his 3D artwork, his one thread is this one - I'd encourage you guys to have him dive back in here to tell us all a little more about his work as it applies to the ever-growing 3D printing.
-
Nice job! I forget where I read it several years back, but the reason the 1:1 had a Pontiac is because it was built after the model kit came out, and the airplane engine that Tom Daniel put in his kit design would have been way bigger in scale than it is depicted in the model. Or something to that effect.
-
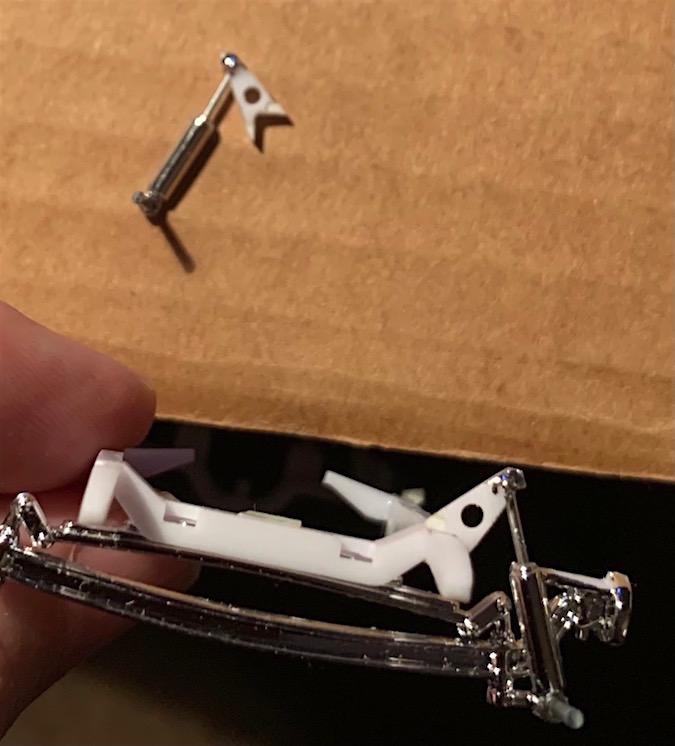
Beefed up the front shock towers then glued them in place using the temporally pinned-together shocks to hold them in proper alignment overnight. Lucked out in my first attempt to put the two up and over s-bends in the steering link, might need just one more slight tweak. Using the channeled body option steering column because I think it looks better. Will be filling in the gaps around the shock towers next so that it looks like a pro-welder 1:1 installation. Making good headway on turning the V8 into an inline. Reinforcing ribs will be added to the black part of the passenger side of the engine next. The distributor will end on this driver's side similar to the way those are but mirror-opposite on Dodge slant engines. Added side drain plugs to the transmission pan, 'late-turned' on my motor tool from little bits of old white metal sprue I saved from a 1/87 scale semi-truck kit.
-
Johan ‘70 Cadillac ElDorado pro touring (low and aggressive)
Russell C replied to Steve H's topic in WIP: Model Cars
The guy who creates those images does indeed have killer talent! -
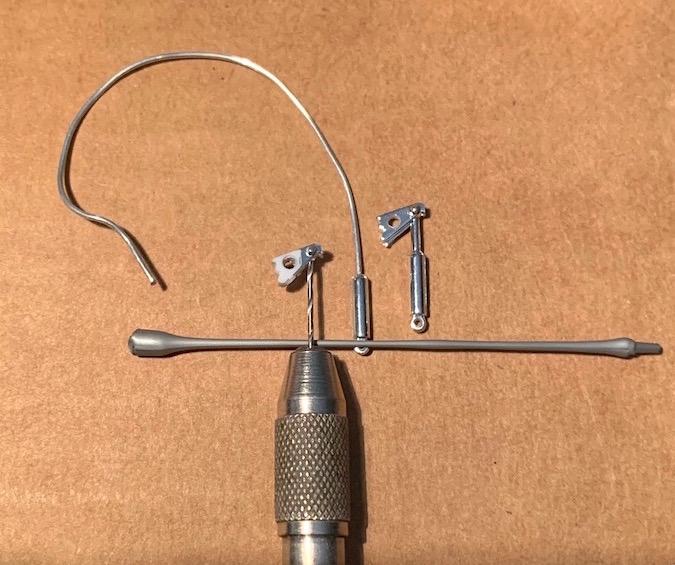
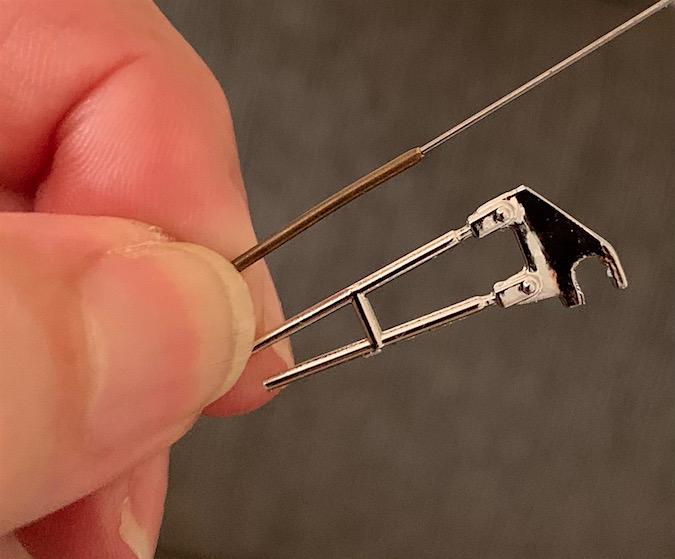
I have no practical machining experience either, so I can't help there. My late father was an expert machinist, however, who did the rear wheels for my Lambo 300 and the outer rims for my Lambo Flambé. I have less than zero math comprehension skills, what I do is pure eyeball engineering which probably sends machinist experts crawling up the walls. Best advice I have is practice, practice, practice on various scraps (always wear eye protection!), and these days, observe whatever lessons there might be out at "Youtube University" on hobbyist mini-lathe machining. Plus if anyone in a local club can show you the procedures in person along with all the safety measures, that's even better. Plastic does melt at higher spinning speeds, that's true. The 'lathe-turning' - in quote marks - I also do on my motor tool for really small parts is at its lowest setting, which is something less than 1000rpm. For example, in the above photo of the sliced-apart steering link, the little cylinder end that connects to the spindle was chucked into my motor tool and turned using a razor blade to get it to a more cylindrical shape before I drilled the hole in it for the new wire rod. Basic idea illustrated below, but I use two hands, of course.
-
Johan ‘70 Cadillac ElDorado pro touring (low and aggressive)
Russell C replied to Steve H's topic in WIP: Model Cars
Will be keeping an eye on this. Saved a bookmark in my widebodies collection years back from Yasid Design on a more extreme pro touring since it looked like a neat idea.
- 220 replies
-
- 1
-

-
- johan
- pro touring
- (and 1 more)
-
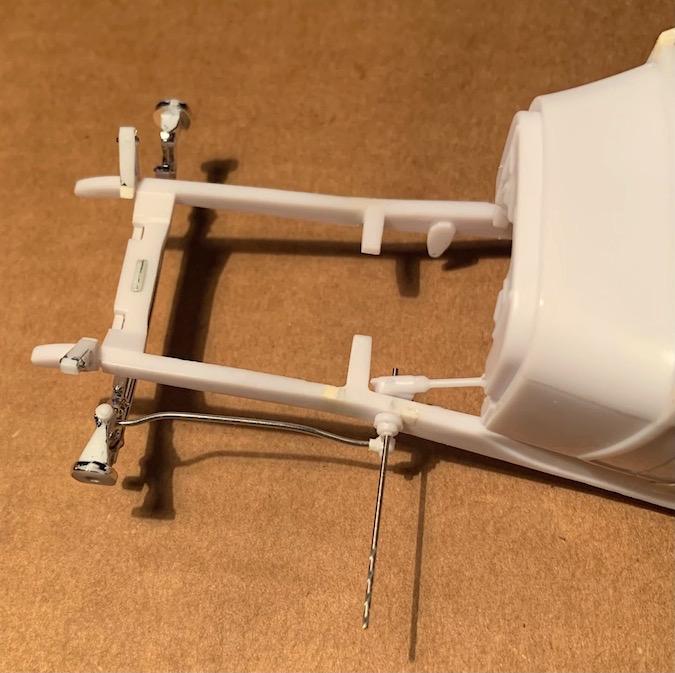
Thought that might be the case - instructions not helpful there since the last 2 pages show both versions in the front view using the lower of the two notches (not that I know how to follow instructions anyway). I scouted through a bunch of completed model photos, including some in this guy's Fotki collection, and it looked like some modelers were using the upper one, and others filed it into one big notch. A little hard to tell in some builds. Will be sculpting on mine a bit more. The other reason I wanted mine separated from the shocks was so that I could glue them to the frame and paint everything the same color. Will be using curved wire rod brackets to hold up the headlights that's less of a wide-eyed appearance. Below is the new polished aluminum rod steering link, before bending / shorting to the proper length, since I extended the frame for the longer inline engine. Also, seeing where I need to scribe the inside of the frame for locating the radius rod brackets when I glue them in after painting the frame. Beefed up the tab on the transverse spring for a more solid fit to the crossmember. No more parting lines on the tops of the spindle arms, but also no more chrome. Some bits of chrome mylar adhesive-back material should do the trick to fix that. The steering box will have to be located a bit farther forward, but I'll drive off that bridge when I get to it.
-
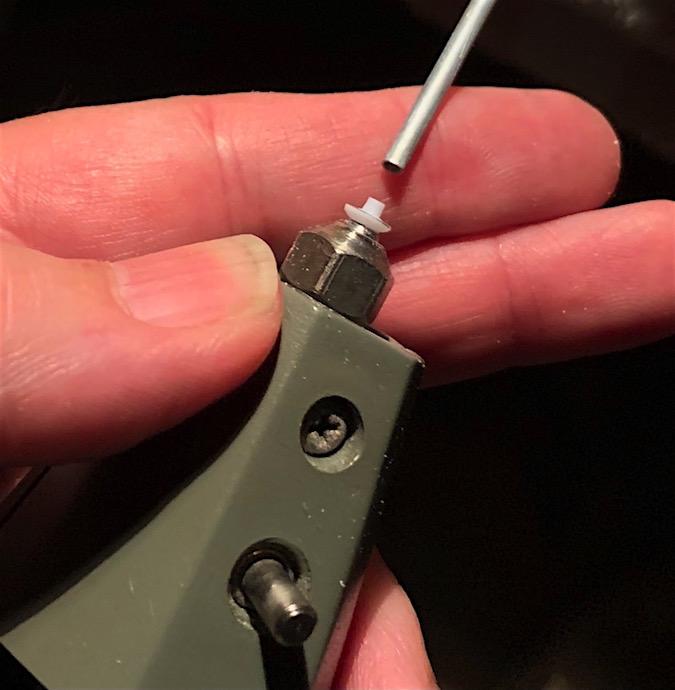
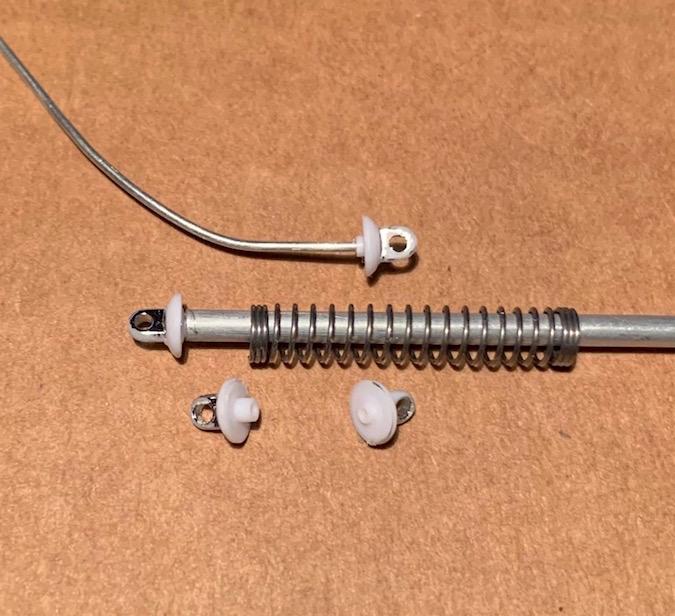
Couldn't leave the front shocks alone. The shock bodies are good enough for me, the parting lines on the sides aren't too noticeable, but the lines were a bit more noticeable on the shock rods, and I'd prefer to have a different color tone to those rods, via polished aluminum wire. Drilled out the bottom shock mounts, stretched silver gray plastic sprue will serve as the bolts to the axle, a little more sturdy than the tiny pins on shock mounts. Don't know why this kit has two notches in the brackets that get glued to the frame, so I'll fill in the top notches. Will also drill out those big holes a little more neatly, they didn't form well in the kit I got.
-
Missed seeing this thread until tonight. Quality work! The Miura could just as well be a photo of a 1:1. How did you build the campfire, though? ?
-
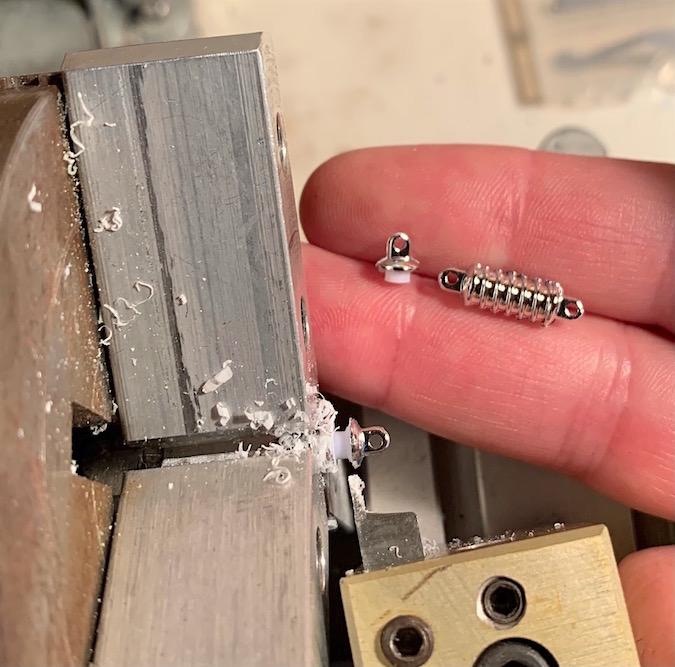
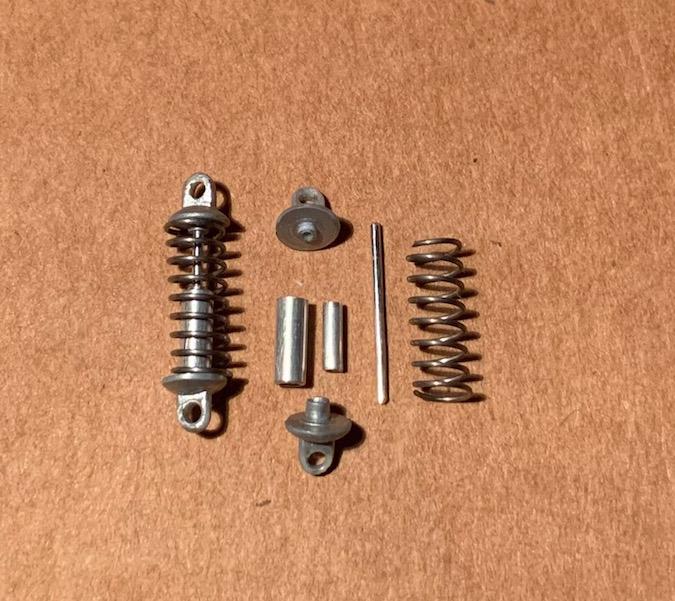
Couldn't resist taking the 1-piece rear coilovers up several notches in detail, made easier for me since my late father gave me a mini-lathe a couple of decades ago. First order of business was to lathe-turn the centers down to a size that I could later chuck into my 1980s era motor tool, to 'lathe-turn' the parting lines off the dome areas. Then, since the tab areas (or whatever those are called) were sturdy enough, I was able to flip the units upside down and 'lathe-turn' in a boss in the lower unit that a bit of aluminum tubing (the shock body) would fit over, and then a smaller boss in the top unit that a length of polished aluminum wire (the shock rod) would fit into. Save those springs out of clicker ballpoint pens, they're the right size for coil springs! I still had some old Testers Metalizer stainless steel spray paint, but the plastic bits might need one more shot, from excessive handling wearing down the one later I sprayed. Needed a smaller diameter bit of aluminum tubing as a sleeve inside the shock body. So, a 1-piece of plastic gets turned into a 6-piece assembly. Fun!
-
GSL Common Kit: [revision] just another Model A Roadster
Russell C replied to 89AKurt's topic in WIP: Model Cars
Fun thing is, your work on the rear suspension / coilover shocks in January last year is what motivated me to begin on my own GSL "Common Kit Class" entry, even though didn't get around to my coilovers work until this past couple of weeks. -
Tiny hand-made wire rings to put around knob bases is my not-much-of-a-secret.
-
A classic! How could I forget about that one!
-
Seems this Revell kit's chrome trees weren't too happy leaving the factory, the rear radius rods were both snapped in two. My kit also had the thoroughly warped windshield frame and one incomplete wheel trim ring, but I'm using different wheels and only need the windshield frame uprights to go with the removable hardtop I plan. The rear radius can be fixed with some ancient brass tubing I have with wire inserts in the ends. Added a little beef to the axle mounting area since the arm ends looked a bit too thin, and cut a section of Plastruc tubing to match the widened arms, then sliced that in half with a razor blade, so that each half could be the "other side of the axle" bits for these arm ends. My next trick - inspired by "89AKurt's" fun with the rear shocks/springs - will be to separate them into upper/lower caps, to accept 2-piece shocks and real metal spring coils.
-
That seems to open up the possibilities of using other kit's bodies of the '29 Ford, but off the top of my head from not knowing all that much about what the other kit manufacturers put out, the only other '29s I can think of are the Revellogram '29 Goodguys / Rat Rod pickup versions and the really old Monogram '29 ragtop pickup and the current (?) AMT Woody / Pickup, and their often re-released '29 roadster. I was thinking of the old Monogram red & black phaeton kit, but when I looked that up, the kit is labeled as a '30, plus I was two years off for the sedan / sedan deliveries Revell did and re-did that were '31 bodies. All of those flat-grille versions from '28 to '31 look the same to me, but other guys are way better on knowing what kits had what bodies, plus what the subtleties were from one year to the next.
-
Paint Strippers - What to Use?
Russell C replied to pbj59's topic in Model Building Questions and Answers
Huh. Wonder what the active ingredient is. Unless I miss it, it doesn't say at their site. Degreaser, and paint is a form if grease, sorta. https://leatherchemicals.co.uk/product/norsol-solvent-leather-cleaner/ -
I'll confess to cheating, sorta, a tip I learned from the late Bob Paeth maybe 2 decades back at one of the GSL contests where he showed us how a stiff paper disc screwed into a motor tool shank will work as a good circular saw, for lack of a better description. Details on that tip at my comment reply with two more photos at this Panel Cutting thread.
-
I showed how I lengthened the frame back in March in the "What did You Accomplish Today" thread, but here it is again, where I grafted the front part of the "sectioned frame option" onto the highboy frame. Another thing I did a while back came from reasoning that if the front part of the differential is chrome in the '29 Revell kit, the back part should be, too. I did an online search for custom Ford 9 inch axles and there are places offering a chrome or polished stainless steel separate cover, so I sliced off the back of the pumpkin so that I could spray it later with a really shiny chrome silver paint.
-
Yep, gotta bring at least something to GSL. If only I had more time, and/or less other obligations that would then free up more hobby time .... Yep, actually bought the Revell kit at Hobby Lobby back in Sept 2021, then figured out more or less what I was going to do this past February and showed a couple of photos in the "What Did You Accomplish Today" thread after that, and only just this week got enough photos collected to start a WIP thread. Time gets away from me too often, so I'd better get cracking in this!
-
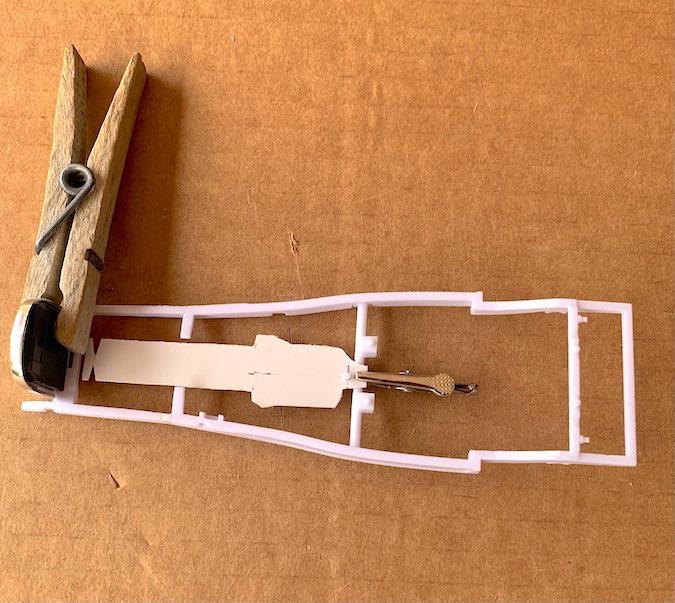
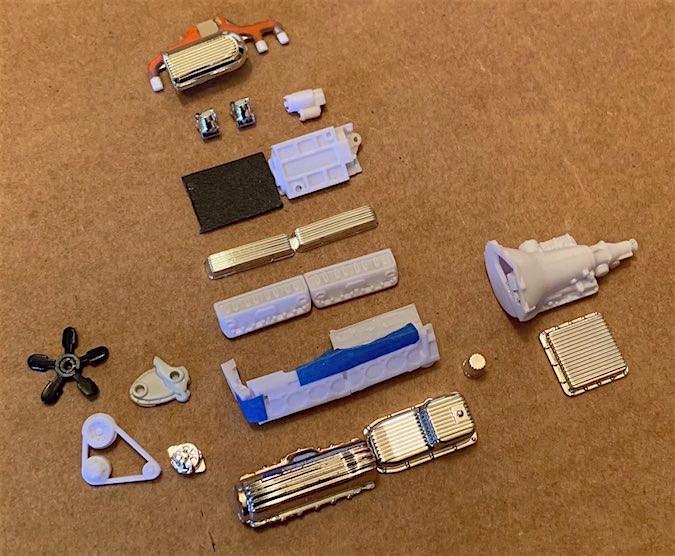
You never heard about the GM slant engine equivalent to Dodge's slant 6 because it doesn't exist. That's the fun of model building, even when it flies in the face of reality or physics because — as legendary model builder Cody Grayland said many years back about an implausible item in one of his models — "It's just a model." I didn't originally plan to do a GSL "Common Kit" entry (the Revell '29 Ford roadster, 4th paragraph down in the Class descriptions at GSL's site) but I did plan to put my GM prototype slant engine idea into a much newer Chevy with an opening hood. After thinking about it a while, it dawned on me to put it out in the open in a street rod where the story might be that the 1:1 rod builder aims to use a really obscure engine to set the car apart from other more traditional or mildly radical Ford rods. Here's the basic ingredients: the kit engine right side block sliced off to switch around and extend the left side (a slant opposite from the Dodge engines), a potential chrome / ribbed oil pan extension sourced from an eBay Red Baron glue bomb I got over a year ago, and a modded one-outlet water pump/front cover piece from my engine parts scrap pile, since I don't think I want the kit's chrome one with the alternator bracket over where the passenger side exhaust / intake pipes will be (the Dodges put it over on the exhaust/intake side, but I'll make that decision later). Two of the kit's carb trio should be fine under the kit scoop. The kit's intake manifold plate under the supercharger can serve as the new right side of the block, along with a textured scrap piece that'll have heat-stretched sprue as reinforcing rib extensions. The new Dodge-style intake manifold is a spliced-together / filed flatter pair of exhaust manifolds from an eBay Revell '69 Vette glue bomb I got back in 2016 (it's become quite a redistributed scrapyard among my several projects - more on that in a future different WIP thread and in my Quicksilver WIP). I'm not a fan of electric fans in street rods, so a fan from the scrap pile will do fine. I'm pretty sure I can hide the splice of the valve covers by putting an inset plate area in that'll have the long "Chevrolet" logo letters decal on it out of the Revell '60 Impala hardtop. I built an Isuzu 4-cylinder to be an exact replica of my Chevy Luv 1:1 engine, except for the headers. I had the right engine in my top fuel dragster. I built the Y-block the right way for the right '56 Ford Crown Victoria those go in. Trust me, this will be facing the right direction. I put the engine in my '66 Beetle for the last GSL "Common Kit" category facing the right direction, didn't I? Trust me, this will be a sensible build. That is to say, model builders will see the collective sense in it all. Hey. I resemble that remark.
-
Tamiya - Honda Ballade Sports Mugen CR-X Pro
Russell C replied to 89AKurt's topic in WIP: Model Cars
I'm so hopelessly right-handed that back in the day when I built my CRX, I could not force myself to leave it LHD. If I ever end up in a British / Australian driving area in a stickshift car, I'll probably end up plowing into a tree or a building or another car while trying to figure out how to shift gears.