Pete J.
-
Posts
3,982 -
Joined
-
Last visited
Content Type
Profiles
Forums
Events
Gallery
Everything posted by Pete J.
-

Why the variety in scales?
Pete J. replied to aurfalien's topic in Model Building Questions and Answers
Interesting how this keeps popping up. To understand scale you have to go back to when engineers and draftsmen made drawings with pencil, paper, triangles and all the scales were done manually. You can still buy the old style scales(rulers). These are triangular rulers that have a dozen scales on each one. http://www.staples.com/Staedtler-Mars-12-Architect-s-Triangular-Scale/product_274746 They come in two types. Engineers and Architects. Engineers scales are divided in 10ths and architects are in 12ths. This is because engineering drawings are done in tenthousands of an inch and architectural drawings are in feet and inches. Both are in portions of demarcations per inch. For instance 1:12 is 12 scale inches per inch or one foot to the inch. 1:24th is the same 24 inches per inch or two feet per inch. Technically it is a proportion and should be written 1:24 and not 1/24 but that is how it is written on the scales so it carries over. I firmly believe it is to confuse the uninitiated. My thoughts on how the common modeling scales came to be is that it was easier for some people to think in inches and they used an architects scale. Others would make the drawings for the machinists making the molds and would make the drawings in 10,000ths of an inch. In either case they would work in one of the common scales on the ruler/scale that they had and not work in some odd scale that they would have to create to use. With the advent of computers and CAD scale became something that could be easily adjusted with the touch of a button so that is not as important in creating molds and such anymore, but that is some of the history of scale. -
Yea, but you would need two feet of reinforced concrete to hold it up. No second story stuff!
-
waxing a finished model ???
Pete J. replied to bubbaman's topic in General Automotive Talk (Trucks and Cars)
In spite of appearances to the contrary there are actually two different conversations going on here and that is because of the use of the word "wax". Wax should mean a coating that when applied lays down a highly reflective surface. Unfortunately, if you go to the wax aisle in an auto parts store, what you get most often is a mix of polishing compound and wax, because most cars need a bit of polishing in addition to waxing to look their best. To have this discussion make sense, you need to differentiate between polishing and waxing. Polishing paint is a process that levels the surface by cutting away paint until it is level with a series of different polishes and/or abrasive pads/papers. The idea is akin to a mirror. To get the best reflection the surface that is silvered must be as smooth and level as possible so that light is reflected in as uniform a manner as possible. Any irregularities in the surface will cause the light to scatter and the reflection will not be as bright. On a model this means that you start with flat sanding sticks to level the surface and get rid of all the orange peel, drips and unevenness. Then you have to switch over to getting rid of the sanding marks. You do that by resanding with progressively finer grits until you get down to a fine polishing paste. If done right you will have a high gloss finish, but regardless of how fine a grit you use, if you look under a microscope, you will always see some very fine scratches. This is where wax comes into play. A pure wax, without any polishing compounds will fill those minute scratches and raise the gloss to a higher level. Any wax will do this but it is best to select one for the type of paint that you have, otherwise if may interact with the paint and soften it and ruin the finish over time. There are hundreds of products out there that work so pick one that works for you and stick with it. Personally, I use a lot of different types. I like Mothers pure carnauba, Pledge furniture polish and Tamiya model wax. All work well for me and it is just a matter of what I have handy at the time. Mothers has a harder finish. Pledge is great for the "Just before the show" final touch up and Tamiya wax is a good in-between wax. -
I couldn't resist commenting on your post. Although I understand your comment, I would say again that the magic is in the magician, not the wand. Every airbrush is designed for a given use and can produce a good finish if you stay within those parameters or are willing to work to get a better finish. Anything that atomizes the paint and gets it to the model will work. From there it becomes a matter of working with the result to get a perfect paint job. You can sand and polish almost any paint job to perfection. It just takes time and effort. The quality of airbrush and the type of paint is was designed to lay down, determine how much time and effort you have to expend to get the job done. Having said that, a cheap airbrush can be treated as a kit that with care can be modified to work very well, but it will involve micro polishing parts such as the needle and nozzle to make the paint flow through smoothly. Keep in mind that paint is not a single consistent product. Viscosity, particle size, carrier and solvent all effect how it goes through a brush and these will vary by type of paint(lacquers, enamels and acrylics), manufacture and look(metallic, metal flake, solid color, candies, etc.). So you can't just say I use model paint and leave it at that. Then you also have to consider how you paint. Do you want something with a wide pattern for doing bodies in fewer passes or are you laying down fades that require a tight pattern. Perhaps you want to have a scale accurate overspray like you see on 70's Chrysler products. These are all considerations. If you don't know, it might be a good choice to get a brush with interchangeable needles and nozzles of different sizes to start. My old Badger Crescendos did just that, and I learned a lot about using an airbrush and what paints that I used required. I then bought a second brush to do what I did most. That is how I wound up with four brushes that I use for different reasons.
-
My three "go to" stripers(no not the kind at the local bar) are Super clean engine degreaser, 91% isopropyl alcohol or break fluid. One of these will always work. An overnight soak is generally all that is needed.
-
Airbrush or spray can?
Pete J. replied to Eloveless's topic in General Automotive Talk (Trucks and Cars)
Bill, great example of what can be done with a little resourcefulness and time. This was exactly my point. The magic is in the magician not the wand. It is just easier with the right tools and experience. When I was younger and starting to accumulate tools, my wife would often question me about the need for a given new tool. That all ended one day when I responded to her, "Dear, I could build a complete house with a Swiss army knife but why would I want to?" Owning tools does not guarantee a good job, it just encourages you to do better. -
Adventures in soldering:The GT40 project New pics 2/13/17
Pete J. replied to Randy D's topic in WIP: Model Cars
BLAH_BLAH_BLAH_BLAH Randy! I'm hanging up my soldering iron. No way am I going to get there! Absolutely stunning! Somebody alert the Smithsonian. They need this so bad and don't know it! -
Airbrush or spray can?
Pete J. replied to Eloveless's topic in General Automotive Talk (Trucks and Cars)
Steve, I have to agree and disagree with you on the selection issue. It may be local, but I can still get custom mixed paints in rattle cans at the local auto paint shop so selection is not the only reason to get an air brush. There are a whole lot of things you can do with airbrushes that rattle cans just don't work for as well. You can do a fade with an rattle can, but it isn't nearly as precise as an airbrush. Very fine detail work is also much harder to do with rattle cans. Kind of like watering house plants with a fire hose. You can also control the flow and density of paint with a airbrush. The rattle can is a one size fits all. Some times you want to get a little bit of paint out at a time to control bleed under masking. Not something a rattle can will do. There are many more that I don't know. Having said that, the airbrush is not for everyone. It just depends on what type of painting you want to do. A single color stock body? Sure, a rattle can will probably work just fine, and this is what most builders are looking for. Other than that an airbrush just makes the job easier. -
Airbrush or spray can?
Pete J. replied to Eloveless's topic in General Automotive Talk (Trucks and Cars)
I am a bit surprised at how this conversation has gone. It seems that people tend to view this as and "either/or" question as though there a right or wrong here. There isn't. Rattle cans, airbrushes, brushes, clippers, side cutters all are just tools. They suit everyone differently. A piece of this is about budget and part is about allocation of personal assets and time and a portion is about personal skills. I have drawers full of tools and have spent a fair chunk of change on it all. It suits me. I don't encourage anyone else to do the same but I like tools and each of my tools has a function that it does particularly well for me. I use what makes me build to the best of my ability. Trading information is a good thing and I hope that is what is happening here. As with any creative endeavor, I would remind all that "The magic is in the magician not in the wand." -
Airbrush or spray can?
Pete J. replied to Eloveless's topic in General Automotive Talk (Trucks and Cars)
Yes, all the above. Airbrush, rattle can, hand brush, a toothpick, Q-tips, what ever works. There ain't no way to do it right. Only what works best for you! -
printable decal paper
Pete J. replied to CelticModeler's topic in Model Building Questions and Answers
Paper is only half of the equation. The other half is the ink and printer. If the images are fuzzy on an inkjet printer, you should check the quality settings on your printer. Set the DPI to the maximum your printer will handle. This reduces the amount of ink deposited at any given site and thus reduces the "running". Gives you a sharper image. Some papers work better than others with given inks. I use the Papilio with HP printer and ink with excellent results. Different inks and printers may not do that. I would suggest one of their sample packs to check it out. Also, I use clear automotive lacquer as a top coat. This works for me because it has a flex agent added. I spray as thin a coat as I can. A thicker coat will prevent the decal from conforming to the surface. Also all the solvents must be put down under the decal as the paint on top will prevent it from penetrating. To save paper, I cut the sheets into 4X5 and run it through the photo tray on my printer. That way you don't waist a lot of paper. -
What did you see on the road today?
Pete J. replied to Harry P.'s topic in General Automotive Talk (Trucks and Cars)
Wow, what is the probability that there are two of these painted the same way! Slight difference in the rims though, but that is weird! Thanks for the post -
Caution! This stuff has proven to be addicting! You will find yourself with bucket of metal, a drawer full of solders and fluxes and more soldering tools than you ever knew existed! Eventually you will find yourself on the Sherline web site and your credit card in hand. When that day comes, don't blame me. I warned you!
-
Adventures in soldering:The GT40 project New pics 2/13/17
Pete J. replied to Randy D's topic in WIP: Model Cars
Very nice shock joint. I've done them in 1:12 and they drove me nuts. Doing them in 1:24 is over the top. Stunning piece. -
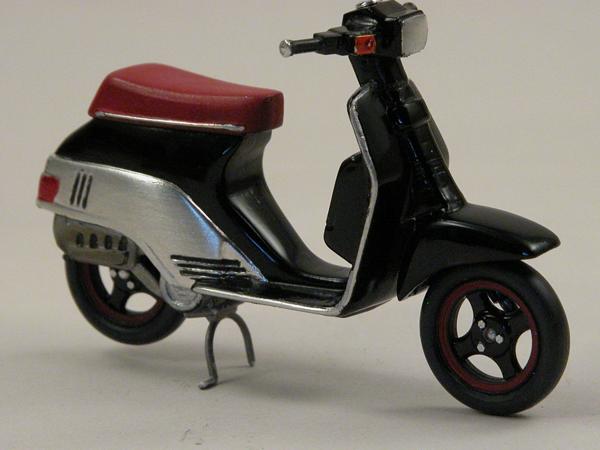
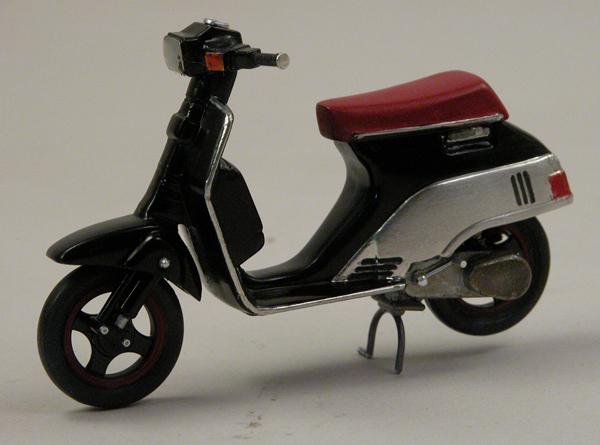
Quick build scooter
Pete J. replied to Pete J.'s topic in WIP: All The Rest: Motorcycles, Aviation, Military, Sci-Fi, Figures
Yes. When it was originally designed it was in the campus friends accessory kit. Way back when, Tamiya had a lot of different "accessory" packages that included tools, people and fun other bits. I think the last package they did was the Subaru Rally mechanics set . -
Quick build scooter
Pete J. replied to Pete J.'s topic in WIP: All The Rest: Motorcycles, Aviation, Military, Sci-Fi, Figures
I should have! -
There is a bit of a story to this little build. I built it because my local club(San Diego Model Car Club) had a quarterly theme of "any Tamiya Kit". Well, I am probably the biggest proponent of all things Tamiya in the club so I couldn't very well let that go by without building something. The question was what could I build in the time I had. Being the great procrastinator that I am I had two weeks. On top of that I like to take my time with my builds. I was digging through my stash and I came up with this scooter. Now there are a few people on this forum who will recognize the "kit". This is not a retail kit per se, in that you can't buy it in a box by itself. They did produce a kit with four different scooters and it also comes in the Campus Friends box but never by itself. This kit came from Tamiya Headquarters in Japan. If you visit them, there is an injection molding machine in the lobby spitting these things out and as a visitor, you are welcome to grab a few and that is were this one came from. I visited their HQ as a Tamiya/con winner in 1998. Fast forward to three weeks ago. In addition to the "any Tamiya kit" theme we held our first workshop in recent memory. The work shop was on applying Bare Metal Foil. I took one look at this little kit and decided that it might be a chance for me to brush up on my BMF skills so I was off to the races! All the metal work that you see here with three exceptions is BMF. The exceptions are the bolts(machined aluminum on a Sherline mill), the kick starter(also machined but on a Sherline lathe) and the speedometer bezel which the kit is lacking, also machined. Every thing else is BMF'ed. The trim was laid down before painting and then once painted the edge was cleaned off with a swab dipped in lacquer thinner. The side cover was BMF'ed after painting and then made to look like brushed aluminum with a little steel wool. All the lights are just BMF painted over with Tamiya acrylic clear orange and red and then covered with canopy glue(formula 560) to give the impression of a lens. It was a fun little kit.

-
Actually, I am a bit stunned. I got is first search! Never done that before!
-
One seroius stash...Humor
Pete J. replied to 69NovaYenko's topic in General Automotive Talk (Trucks and Cars)
Hmmm, I've got to believe that there is something going on here we can't see. You all know how strong model boxes are and I find it unlikely that you could stack models that high and not have some of the bottom ones collapse. All in all though, it is a nice stack! -
Non-California Lacquer Thinner
Pete J. replied to Dave Ambrose's topic in General Automotive Talk (Trucks and Cars)
Ok, so alcohol and acetone with a little MEK thrown in is lacquer thinner. Why is that ban? I don't get it. -
Model building season is coming to a end
Pete J. replied to junkyardjeff's topic in General Automotive Talk (Trucks and Cars)
Oh I remember Going the IPMS nats in Phoenix some time back and was walking from the restaurant(or was it the bar, I can't remember) at 11 at night and it was 113 out. That is what keeps me in SoCal. -
Non-California Lacquer Thinner
Pete J. replied to Dave Ambrose's topic in General Automotive Talk (Trucks and Cars)
Get the car ready boy's. Were headed to Chicago! We be runnin' thinner!
-
Non-California Lacquer Thinner
Pete J. replied to Dave Ambrose's topic in General Automotive Talk (Trucks and Cars)
Dave, I still have two cans of pre-VOC lacquer thinner. One is down to less than a quart and is the old DuPont stuff. I guard it and use it sparingly just because. The other is a can of HOK that is unopened. These have to last me the rest of my life. I still cringe at the thought of the five gallon can of the good DuPont stuff I blew through the airbrush as cleaner. Here is the label from the DuPont can if it helps at all. I am a little surprised that the first ingredient is alcohol. -
Non-California Lacquer Thinner
Pete J. replied to Dave Ambrose's topic in General Automotive Talk (Trucks and Cars)
For those who live here, no explanation is necessary. For those who don't, no explanation is sufficient. -
Model building season is coming to a end
Pete J. replied to junkyardjeff's topic in General Automotive Talk (Trucks and Cars)
That is the truth, although it has on occasion been too hot in August to work in the garage. I guess the "off season" is a couple of days long here. Of course that also applies to the gardening season here too. Do I build a model or mow the lawn? I so confused !