StevenGuthmiller
-
Posts
15,089 -
Joined
-
Last visited
Content Type
Profiles
Forums
Events
Gallery
Everything posted by StevenGuthmiller
-

Any tips for metallics?
StevenGuthmiller replied to Don Wheeler's topic in Model Building Questions and Answers
It comes in one ounce jars. Enough to do at least one 1/25th scale model. But, if you think that you need more, order 2. It is pre-thinned and ready to use straight from the jar, but it can be thinned with regular lacquer thinner if necessary. use a good automotive primer. It is an automotive lacquer and is a hot paint, no different than Duplicolor. Steve -
Sorry Steve. You are correct. My messages were full. I emptied them out, (hope there was nothing there that I needed) so now you can PM me and get me your address. Steve
-
Any tips for metallics?
StevenGuthmiller replied to Don Wheeler's topic in Model Building Questions and Answers
I think Bill covered it pretty well. I prefer to use one of those after market paint suppliers, namely MCW for the reason that Bill stated. The metallics are much more in scale than most rattle can paints. If you want a match that is as close as possible to the correct color, I would suggest going to the MCW (Model Car World) website and ordering from there. I did check and they do carry correct 1952-1954 "Saddle Brown Metallic". Steve -
Well Steve, it's like some kind of divine intervention, but I just happen to have one driver's side 1967 Bonneville tail light! It's funny how things work out sometimes. When I bought my '67 Bonneville builder, it was missing one bucket seat and had a broken passenger side tail light lens. I got in under the wire with Modelhaus and ordered a set of seats and a set of tail lights, so now I have one lonely driver's side tail light lens and a bucket seat left after my build. If you like, you can PM me and we can arrange for the lens to be shipped to you. Never shipped to Canada before, so you'll have to give me the low down. Steve
-
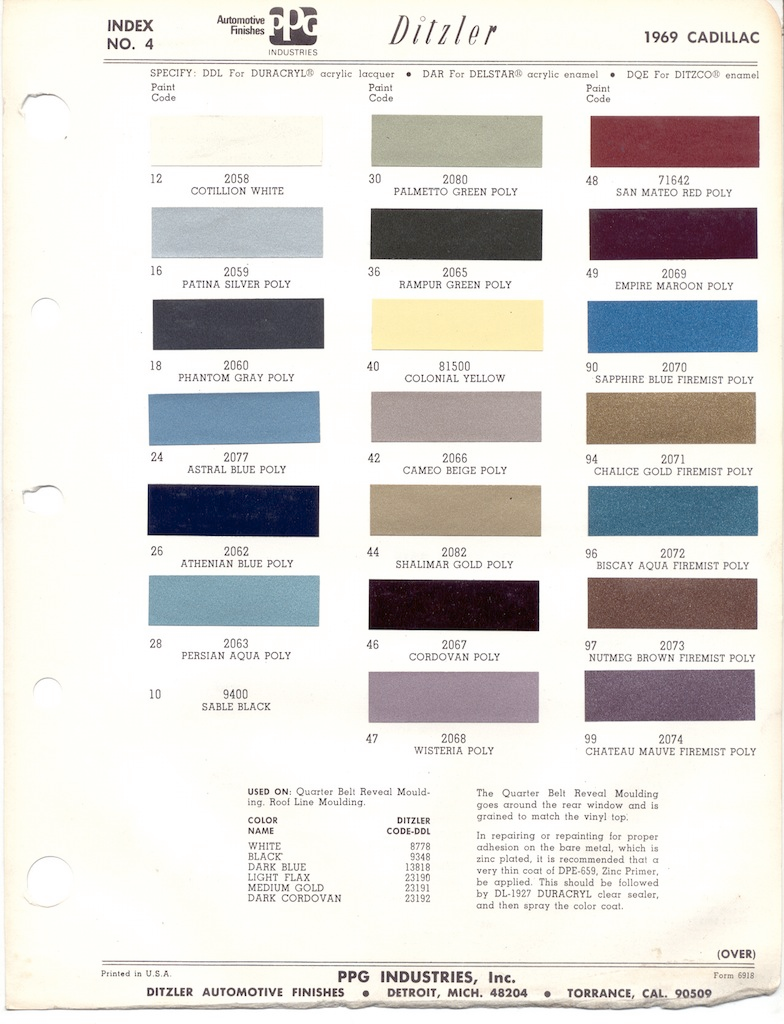
There were 2 colors similar to this offered on the '69 Cadillac. Not certain which one this is, but there was "Wisteria" and "Chateau Mauve Firemist". There's a mouth full! My guess is the latter. Steve

-
Thanks Paul. That is a giant compliment coming from the master! Steve
-
If it wasn't for the fact that it's so nicely done Paul, I would call it heresy to cut up a rare model like this. But being as it started as a promo, I'll give it a pass. Nice work man! Steve
-
I just use Elmer's white glue. I thin it down slightly with water to make it easier to brush on. The embossing powder that I have been using came in a set of 16 metallic colors. As a general rule, I can find a color to use straight from that set without painting it. If not, embossing powders can be mixed to a degree. This one required a mixture of blue and green to get the shade that I was looking for. I paint the surface to be covered with a color relatively close to the color of powder I will be using. Then brush on the glue and sprinkle on the powder.........done! Steve
-
decals for '62 Bel Air dashboard?
StevenGuthmiller replied to fiatboy's topic in Car Aftermarket / Resin / 3D Printed
I use his stuff all of the time as well. Especially the period license plates. He makes some gauge face decals for vintage kits also. "www.bestmodelcarparts.com" is the website, although he has currently closed down operations for a move, but you can still get some of his stuff on ebay. Steve -
Thanks Rick! Luckily AMT did a really nice job of molding the upholstery detail on this kit. I was quite surprised with the attention to detail with the upholstery texture and details like the stitching. Steve
-
The interior is finished, and I have to say, I'm quite proud of it. It turned out pretty nice. Here is a recap of the modifications that I did to it. Door panels: First, the door panels were removed from the bucket to make the modifications easier. The door panels were extensively reworked by grinding out the old arm rests, window cranks and a portion of the trim. The vertical trim panel and the pleats were the only thing left as original. The pleats were all re-scribed and refined. New trim, arm rests, window cranks, and door lock buttons were added. The door courtesy lights were also added and the top portion of the panel was scribed to represent the chrome window channel trim. Front seats: The one piece seat and console assembly was first cut apart. The seats were then modified by removing the lower "skirt" of the seat and adding re-worked seat bases from a Monogram '59 Cadillac. Some detail was added to the seat back and chrome trim was added to separate the back from the seat upholstery. Some bases were also added to raise the seats up slightly and to facilitate gluing into the bucket. Steering wheel: First the horn ring and center cap were removed from the steering wheel. Then the steering wheel and horn ring were thinned considerably and "grip indentations" were filed into the wheel. A "flower pot" center cap was scratch built and a blinker switch and flasher button were added to the column. Dash board: Little was done to the dash except the addition of a steering column collar, a speaker grille and defroster vents. A gauge panel decal was also added. Console: Trim was added around the perimeter if the console, panel lines were scribed & a shifter was fashioned from the original kit boot and knob and a shaft made from a stick pin. The rear seat and bucket are unchanged except for the addition of embossing powder carpets and a clutch and brake pedal. Everything was then painted, detailed and chromed with both foil and Molotow ink. Now I can concentrate on finishing the polishing of the body and then foiling can resume. Then on to the engine and chassis. So far I am pleased with how quickly this project is progressing. Steve
-
1961 Cadillac Series 62 Coupe, by Modelhaus
StevenGuthmiller replied to Jeffcad's topic in Model Cars
Steve -
1961 Cadillac Series 62 Coupe, by Modelhaus
StevenGuthmiller replied to Jeffcad's topic in Model Cars
So nice! Like an idiot, I didn't buy one of these when Modelhaus was in operation! Are you listening Ron? Steve -
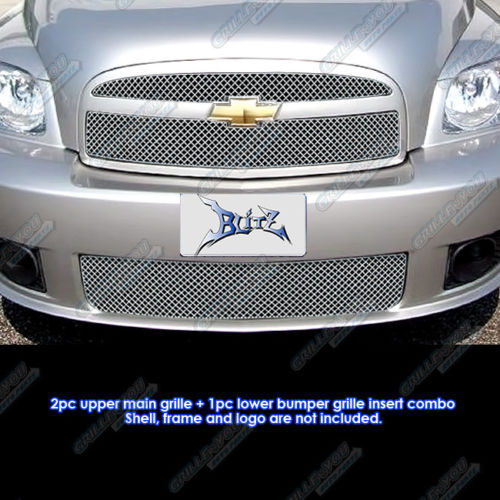
You can order one of these for $78.00. The upper and lower set for $142.00. I think you would be better off by a long shot than trying to use Molotow ink on it. I can't see that lasting through a good rain storm. Steve
-
That's nice! Man I wish I would have bought one of Modelhaus's 1960 Polara hard top kits! You're not helping Paul! Steve
-
What Did You Have for Dinner?
StevenGuthmiller replied to StevenGuthmiller's topic in The Off-Topic Lounge
I'm not much for IPA, but the lamb sounds delicious! Steve -
Small AB compressor suggestions?
StevenGuthmiller replied to aurfalien's topic in Model Building Questions and Answers
I've started using a 6 gallon pancake compressor. The nice thing about it as that I can fill the tank in the garage and then bring the compressor inside for air brushing. No noise to disturb the wife that way. A tank full will last me quite some time before I need to refill. And I can use the compressor for other jobs other than just modeling. Steve -
AMT '60 Chevy pick up
StevenGuthmiller replied to Paul Hettick's topic in Model Trucks: Pickups, Vans, SUVs, Light Commercial
Personal taste I guess. For me, unless it's a step side or a 50s Chevy Cameo, I'll take a long box every time. Steve -
I believe that I have the door panels installed satisfactorily. Steve
-
AMT '60 Chevy pick up
StevenGuthmiller replied to Paul Hettick's topic in Model Trucks: Pickups, Vans, SUVs, Light Commercial
Excellent! I would be more interested in one of these kits if it were a long box. I've never understood the attraction to the short box look. To my eye, it makes a truck look stubby and a little dumpy. An 8 foot box helps to make the truck look a little more sleek and low. Steve -
It might help eliminate some of the riff raff! Steve
-
Airbrush soak?
StevenGuthmiller replied to Kit Basher's topic in Model Building Questions and Answers
Be certain to check and clean all of the little air passages around the tip as well as the one from the body into the tip. Plugged air passages will greatly diminish the performance of the brush. Steve -
A little more accomplished on the interior. The arm rests and window cranks have been installed on the door panels as well as the horn ring and "flower pot" center cap to the steering wheel. The floor is carpeted and the rear seat and clutch and brake pedals have been added. The door panels will be added to the bucket next and then the underside of the bucket needs to be painted black. Then the remainder of the parts can be added. Steve
-
You did a wonderful job! The color is nice and the foil job looks top notch! Very clean overall. Steve
-
Airbrush soak?
StevenGuthmiller replied to Kit Basher's topic in Model Building Questions and Answers
You could probably soak it in thinner if you remove the seals prior, but the Badger 200 is extremely easy to disassemble and clean without needing to soak it. The old Badger 200 that I have is my "go to" brush and it has been very easy to clean. If you unscrew the tip and pull out the needle, the trigger will fall out. Then the body can be unscrewed from the blue tail section if needed. I don't even take the tip out of the 2 piece tip section when I clean it. You can clean the tip and the surrounding air passages without disassembling it. There is nothing inside of the body that is inaccessible to cleaning tools if you have some small brushes of some sort. You're only objective is to be certain that the air and paint passages are all clear. And of course be certain that your tip and needle are undamaged and in good condition. Steve