StevenGuthmiller
-
Posts
14,971 -
Joined
-
Last visited
Content Type
Profiles
Forums
Events
Gallery
Everything posted by StevenGuthmiller
-

amt car models how to paint
StevenGuthmiller replied to Milo's topic in Model Building Questions and Answers
I agree. If you're new to the hobby, you have a considerable road ahead of you. This hobby is not for the "instant gratification" crowd. It takes more than a casual desire to throw together a couple of models. It takes commitment and drive to get really good at it. First order of business in my opinion, is to think hard about whether or not this is something that you will really love doing, or if it's just more of a passing fancy. I can't tell you how often I've seen guys accumulating hundreds, or even thousands of dollars worth of kits, supplies and materials over the course of a year or so, only to be trying to sell it all off the next year. Some of them without ever doing any work on a model at all. They see pictures of some beautifully built models on line, and think, "i can do that" without having a clue of what is involved with getting to that point. I don't want to discourage anyone, but unless this hobby is something that really trips your trigger, and something that you're committed to for the long haul, it's likely not going to materialize into a whole lot. Steve -
What did you see on the road today?
StevenGuthmiller replied to Harry P.'s topic in General Automotive Talk (Trucks and Cars)
I work in the valet/guest services department at a local medical facility, and a patient entrusted me to park this little gem for him today. Steve -
Bare metal foil small writing
StevenGuthmiller replied to Ctmodeler's topic in Model Building Questions and Answers
For me, there are various reasons for each operation. Priming, color and clear. I've been using automotive acrylic lacquers for many years, and the amount of primer that I use was born out of the fact that inadequate primer depth can open you up to issues such as plastic crazing, which can destroy a model body in short order. That, coupled with the fact that I've been building a lot of irreplaceable vintage models, prompted me to be extra careful to be certain that there will be no possibility of body damage, and once you have found a system that works virtually every time without fail, there's little reason to change it, whether it be a rare kit or not. I often see people on various boards that spray one coat of primer on their model, expecting it to protect, only to be sorely disappointed. I can't tell you how often I've seen crazed paint on models on Facebook for instance, and the builder asking what happened? And just to compound the situation, you'll usually see endless posts from people who apparently don't even know what their looking at, trying to explain what has happened when they don't even know themselves. It's pretty easy for a seasoned builder to identify crazing, and it almost always comes down to the same cause. Inadequate priming. The primers that I use are relatively thin, and go on in pretty thin coats, so I have just resigned myself to the fact that in order for me to be comfortable with the protection, 5 coats is about what I'll need. The amount of color that I put on a body is a little more subjective. I use an airbrush as a rule, and my objective with the color coats is just to get a good, even color with enough depth to give it the richness and the color saturation that I desire. Usually, this translates to anywhere from 3 to 5 coats. In other words, I keep spraying color until it looks right to me. With the clear, it's pretty simple. I ALWAYS polish my projects, regardless of how "shiny" the finished paint out of the airbrush or spray can. I just feel that it gives a more realistic finish for various reasons that I won't go into now. It's for this reason why I use as much clear as I can to give enough depth to ensure that I'm not going to be sitting and looking at a spot where I polished through the clear into the paint and wishing that I had added one more clear coat. I discovered some time ago that with the clear that I use, 5 coats is about perfect for adding enough protection from burn through from polishing, while at the same time, not obscuring any detail. As an added bonus, more clear adds depth of color to the finished paint job as well, which never hurts. So, in short, I use a lot of primer to be darn certain that the plastic is protected from a hot paint, and I use a lot of clear to protect against that one little spot of polishing "burn through" that can really ruin your day. Since I started using this regimen, my paint job failure rate has dropped to almost nothing, so the way I see it, "if it ain't broke, don't fix it". Steve -
Bare metal foil small writing
StevenGuthmiller replied to Ctmodeler's topic in Model Building Questions and Answers
Thank you for this post Greg. This depicts exactly what I was referring to when I was talking about a fine line of primer being visible around the perimeter of the script in some cases when applying the foil prior to primer. It might not always be evident, but you are running that risk if you apply it that early. I didn't bring this issue up because I heard it somewhere. I've experienced it and just wanted people to know that it could be a possibility. This is exactly the reason why I began applying the foil later in the painting process. Not only does it eliminate the possibility of this happening, but the less paint that you have to remove from the foil, the easier this technique is. Steve -
Rattle can lacquer finish questions
StevenGuthmiller replied to atomicholiday's topic in Model Building Questions and Answers
I agree. Take your time and you'll do well. You don't have to have years of body shop experience, or spend decades trying to perfect a perfectly shot paint job, (that's often not perfect anyway) to get fantastic results. The willingness to put forth a little sweat equity is all that's required. Steve -
amt car models how to paint
StevenGuthmiller replied to Milo's topic in Model Building Questions and Answers
I brush paint almost nothing. Everything is sprayed, either with an airbrush, or spray can. There was virtually no masking on the body depicted, except for the black area on the radiator shroud. The rest is foil, most of which is applied after the paint process is finished. But be aware, I'm not getting these results straight from the airbrush or can. I always cut and polish my projects to get the finest finish possible. Steve -
Rattle can lacquer finish questions
StevenGuthmiller replied to atomicholiday's topic in Model Building Questions and Answers
Maybe at this point some examples of people's work might be helpful to back up their techniques. This is not directed at anyone in particular, but with as much time as I spend on various social media sites, I can attest to how often I see people making statements about how nice their favorite technique works, whether it be paint related, or something else, only to find once photographic proof is provided, that it's not all it's cracked up to be. Very often, we get a lot of lip service on these issues, but not a lot of evidence to back it up. The Molotow chrome issue in particular comes to mind. I can't tell you how often I've heard statements about how Molotow will give you results just as good as foil, but upon inspection you find otherwise the vast majority of the time. I've tried this experiment a few times, and it's usually quite telling. When you ask someone to "show me" how their claimed results are just as good as, or better than another, more often than not, you get nothing but crickets. That's not to say that there are not those out there that can produce an exemplary finished product with whatever their product or technique of choice is, but there are a lot more who's standards are not very high who for some reason or another feel that they should be advising others on their techniques, only to find that it's not always that impressive once you see it. (Mostly I'm thinking of Facebook in this regard) Nobody has everything figured out, (myself included) but I have no compunctions about offering up some evidence to illustrate my successes, (or failures for that matter) That said, I'll throw in a few examples of my work, and they can be taken or left, but they are at least a true picture of what you can expect if you use the techniques and materials that I do. Some of these were painted with and airbrush and aftermarket, hobby related paints, and some with Duplicolor. All polished in the end. Steve -
amt car models how to paint
StevenGuthmiller replied to Milo's topic in Model Building Questions and Answers
If you're using good primer, (I use mainly Duplicolor) there won't be any excess thickness to speak of. Likewise, lacquer paints will go on much thinner than enamel, which is a small part of why I use lacquers. They dry so much faster and thinner, and the color availability is endless. Primer sealer is just what it says. It seals whatever is underneath it in place to prevent bleed through and it also helps with the gloss of the paint coats. There are many viable glues to adhere parts, whether they're clear or not. Personally, I use clear 2-part, 5 minute epoxy for nearly everything. The hobby has made great strides and advances since the days of tube glue and rattle can enamels, but I'm sorry to say that it can take years, or even decades, to find the right procedures that work for you. Just as an illustration about paint thickness, take as an example my current '64 Bonneville project. This model has 5 coats of lacquer primer/sealer, 5 or 6 coats of color, (lacquer) and another 5 coats of clear lacquer. There is no heavy paint build up or detail hide whatsoever. The materials you use are the true measure of whether or not you will have success. Just as much so as the techniques or processes that you use. Steve -
Very cool! I've had both of these at one point or another, and if they're not acetate, they're probably X-EL re-pops from the 80s. I traded away my '57, and my dad threw away my '58 in a basement cleaning fit many years ago! Steve
- 38,774 replies
-
- 1
-

-
- johan
- glue bombs
- (and 1 more)
-
amt car models how to paint
StevenGuthmiller replied to Milo's topic in Model Building Questions and Answers
Definitely need to prime! And prime well. I would start with a good gray primer and probably a primer sealer before considering a white primer. I haven't had a lot of experience with models molded in orange or red, although I've had success with blues and yellows, but my understanding is red and orange are the worst for bleed through. I would use a couple of coats of good gray lacquer primer, and then a few more light coats of primer sealer. I use mostly automotive lacquers, so I wouldn't be afraid to tackle this, but a good base of primer would absolutely be a must. Steve -
Rattle can lacquer finish questions
StevenGuthmiller replied to atomicholiday's topic in Model Building Questions and Answers
I never do. But it's a consideration. I'm just careful and vigilant in those areas. Doing your polishing under magnification is helpful, and I usually have little problem with it. Steve -
Rattle can lacquer finish questions
StevenGuthmiller replied to atomicholiday's topic in Model Building Questions and Answers
My process is pretty simple. I start with the finest grit possible to remove any orange peel or blemishes present. I use Micro-Mesh pads, so 3600 is usually a good starting point for me. I sand until the surface is smooth, or at least as smooth as possible, and then move on to the next finer grit. You can use the pads wet, or dry, but I prefer to use them just very lightly dampened. Just to relieve the monotony, I will usually concentrate on one section of the body at a time. Maybe just the trunk lid area, or one side of the body to start, and go through the entire process on that area before moving on to the next section, but that's not necessary. Just my preference. Once smooth, I move on the next finest grit, which is just to remove the scratches from the previous pad, and begin to shine up the paint. 4.000, 6,000, 8,000, and finally 12,000. Once you have progressed through all of the pads, you should end up with a very smooth, and relatively shiny surface. Then I proceed with the liquid polishes. I use Novus polishes, but generally prefer to skip the #3 "heavy scratch remover" unless it's absolutely necessary. I will usually start with the #2 "fine scratch remover". Polish everything, usually doing a couple of applications of the #2, on every panel. This should net a very nice, smooth, shiny, and even finish. But at this point, I give it at least one, maybe 2 more applications of Turtle Wax "scratch and swirl remover". I've found that this product will really bring up the shine to a high luster. Bear in mind that the thicker the coating of clear coat that you have to work with, the less chance that you'll have of polishing through the clear down to the color on the high points and body lines, but I still will be careful and use light pressure in these areas. In most cases, these high points will generally be smoother to start than the rest of the surface any way, due to the fact that paint tends to draw away from them as the paint dries. But this also means that the paint is thinner in those areas, so extra caution is required. I might skip sanding those body creases entirely with the heavier grits and rely on a few light passes with the last 3 or so finest grits to ensure no burn through. Use care in those areas with the liquid polishes as well, as they will also remove a small amount of paint. Finally, when polishing is complete, give the body a cleaning in warm water and dish soap to help clean away any polishing material residue from the panel lines, etc. I will often use a round tooth pick, sharpened to a fine chisel point to scrape away any polish stuck down in the deep panel recesses. Finally, once the model is all but completely assembled and ready for the shelf, I give it a once over with Novus #1, "clean and shine". This will help remove finger prints and smudges left during the assembly process, and also helps with static dust. Oh, and by the way, a soft cotton cloth of some sort works very well for the liquid polishing processes. A piece of old cotton t-shirt, or soft cotton flannel works great! This process by no means takes years to perfect. It's actually a pretty basic procedure. Anyone, no matter your experience level, can master polishing pretty quickly. And then sit back and enjoy the fact that you can achieve beautiful, nearly perfect paint jobs with a little elbow grease when other guys are still wasting their lives trying to achieve that "perfect" paint job right out of the can or airbrush through years of laborious trials and techniques, in the hopes that someday they'll get it right....... because they don't want to sweat a little today. Steve -
What Did You Have for Dinner?
StevenGuthmiller replied to StevenGuthmiller's topic in The Off-Topic Lounge
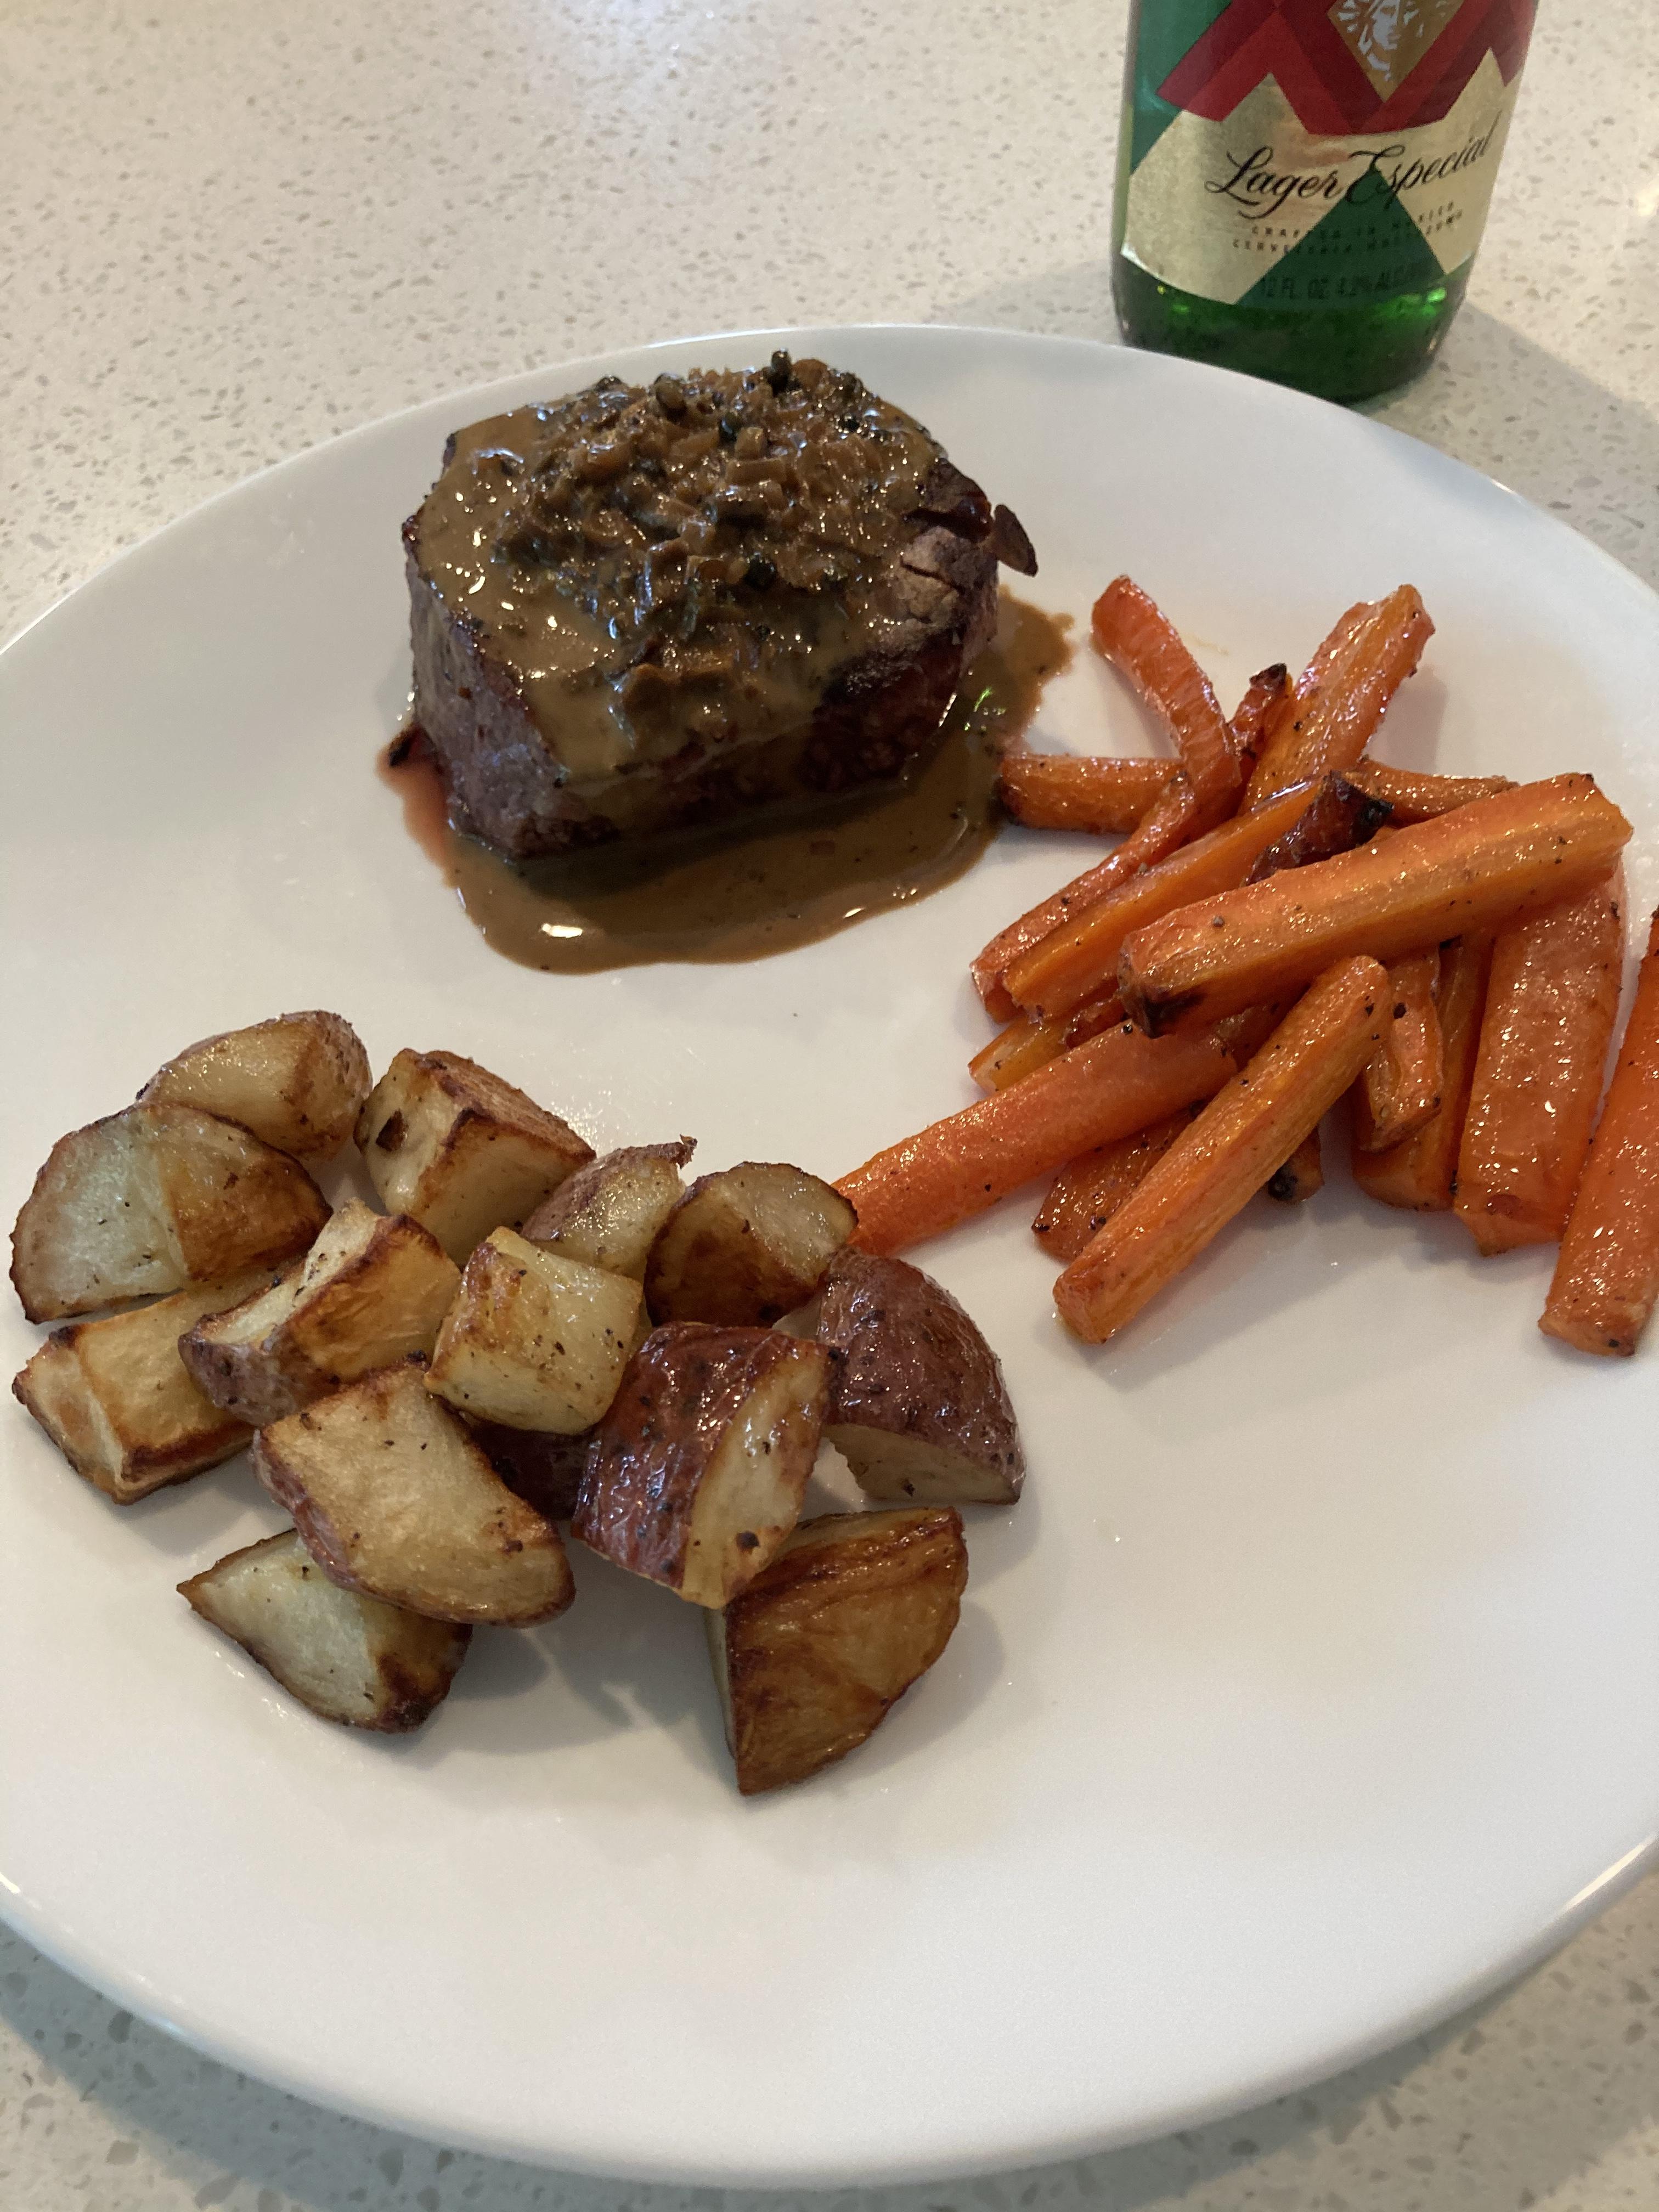
Beef filet with mushroom green peppercorn sauce with roasted red potatoes and maple glazed carrots. Steve
-
Clear Over Polished Gold Metallic
StevenGuthmiller replied to dmbgamer's topic in Model Building Questions and Answers
Mmmm, I don't know. Sounds like quite a mish-mash of different material brands, but if you're not experiencing any difficulties thus far, maybe you'll be okay. You're only problem is likely to be one of two things. First, as you have already polished the paint, there's probably going to be some vestige of silicates left on the surface. You never want to paint over anything that has wax or a polish containing silicates in it. The clear will fish eye on you like crazy. You can try giving it a good cleaning in hot water and dish washing detergent to remove them, or maybe someone else has another suggestion for that. I would recommend cleaning with alcohol, but I have no idea what it will do to the particular paint you're using. Second issue is of course would be the type of clear you're using. Be darn sure that it's compatible, not only with the decals, but with the paint underneath it. In these "experimental" circumstances, especially with paint, give yourself about a 50% chance of success. But I have faith in you. Steve -
What Did You Have for Dinner?
StevenGuthmiller replied to StevenGuthmiller's topic in The Off-Topic Lounge
Spent a little of my time this holiday weekend using up some of the copious amount of beef in my freezer! First, it was smoked brisket on Saturday. Today, 3 lbs of jerky going into the smoker. (Probably a little over a pound will come out!) Tonight it's going to be fillets on the grille. Steve -
What Did You Have for Dinner?
StevenGuthmiller replied to StevenGuthmiller's topic in The Off-Topic Lounge
Looks like a wonderful meal!! Steve -
olds Toronado
StevenGuthmiller replied to El Roberto's topic in Model Building Questions and Answers
No matter the manufacturer, they’re all going to be expensive. Steve -
Right. I just wish that the space between panels was a little larger so that chassis viewing was a little easier. Steve
- 38,774 replies
-
- 1
-

-
- johan
- glue bombs
- (and 1 more)
-
Finally picked one of these up from Scale Motorsport for the next time I go to a show. Steve
- 38,774 replies
-
- 4
-
-
- johan
- glue bombs
- (and 1 more)
-
Can Rustoleum Be Thinned?
StevenGuthmiller replied to oldcarfan's topic in Model Building Questions and Answers
A little insight on the paints that I pictured in my post. The flat black and satin black seem to spray and hold up well once thinned with lacquer thinner. The gloss black sprays well, but longevity after the fact is not great. The paint turns to jelly within a few days. So if you decide to use the paints pictured, mix only what you will be able to use up in a short period if you're using the gloss black. I have no evidence of this, but I assume that other gloss colors in the same line will probably act in the same fashion. Fortunately, there's so much paint in one of these little cans, that I don't mind losing a little to drying up. Steve -
That’s absolutely the case in my family. ? Steve
-
Can Rustoleum Be Thinned?
StevenGuthmiller replied to oldcarfan's topic in Model Building Questions and Answers
Rustoleum enamel spray cans appear to be the same type of paint as the little square bottles of Testors enamel. I've been buying these cans of Rustoleum enamel and successfully thinning them with lacquer thinner. It still takes a while to dry, but it speeds things up a little. Steve -
Glass Tinting Experiment.
StevenGuthmiller replied to StevenGuthmiller's topic in Tips, Tricks, and Tutorials
Well, I'm pretty excited about the results on this windshield!! I decided to try a little trick that I heard from a fellow on a Facebook group........That's right, I said Facebook! You never know where you might find a little tidbit. He suggested that when spraying the tint band, to lift the edge of the tape on the leading edge, and spray from the direction of the mask, (lower edge of windshield) to help eliminate any visible line, and give the slight "fogging" effect on the edge of the tint. Worked like a dream. It also helps to eliminate any fogging of the rest of the windshield that is likely to occur when just spraying it freehand, to keep it nice and clear. I have a little transparent blue/green Testors acrylic that I had mixed for glass some time ago, but seemed to have limited success with, so I masked in the prescribed fashion and gave it a few light passes on the inside of the glass. I'm pretty pumped that I've finally found a viable solution for tinting glass. A little more labor intensive than just shooting a coat of transparent blue on, but I don't mind taking a little extra time to get a result that I'm pleased with! Steve -
Glass Tinting Experiment.
StevenGuthmiller replied to StevenGuthmiller's topic in Tips, Tricks, and Tutorials
I think I've got pretty much what I'm looking for! I let the enamel tint dry for a couple of days, got out the finest couple of Micro-Mesh pads, and some Novus #2 and gave it a quick polish to remove a few blemishes. The enamel is tough enough to withstand some fairly aggressive polishing. The result is a nice subtle tint, (which is what I wanted) with a very nice reflective gloss, and perfect clarity. Now I just need to decide on the best way to add a tint band, (probably with materials I have on hand) and I'll be very happy. This very light tint will probably be almost imperceptible along side the turquoise body and interior of my '64 Bonneville, but I really wanted to try this avenue for this, as well as future builds, to see if it would work as I had hoped. I'm satisfied, and I don't have to spend any more money on materials, other than what's already in my arsenal. Thanks for all of your suggestions. Steve -
I'm just amazed at how many really ugly guys can produce such beautiful children!! Steve