Snake45
-
Posts
22,539 -
Joined
-
Last visited
Content Type
Profiles
Forums
Events
Gallery
Everything posted by Snake45
-

Revell 1968 Chevy Chevelle SS 396...........My take
Snake45 replied to MrObsessive's topic in Car Kit News & Reviews
Wasn't me working on a Beaumont. -
Thanks old friend! Thanks for the kind words. That's a common problem on these old builds. I had the problem often myself back in the day, before I figgered out how to beat it. Oh, I forgot to mention that this is my 40th glue bomb/survivor rescue/restoration (not including full rebuilds). Ten were survivors of my own teenage builds of the '60s, the other 30 are others' builds bought off eBay or at the local monthly toy show.
-
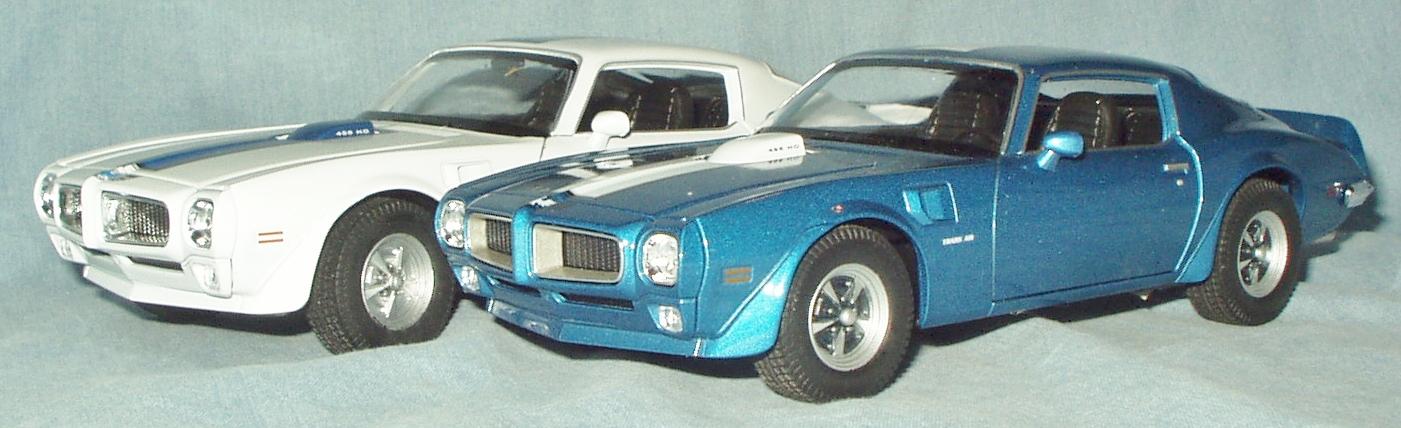
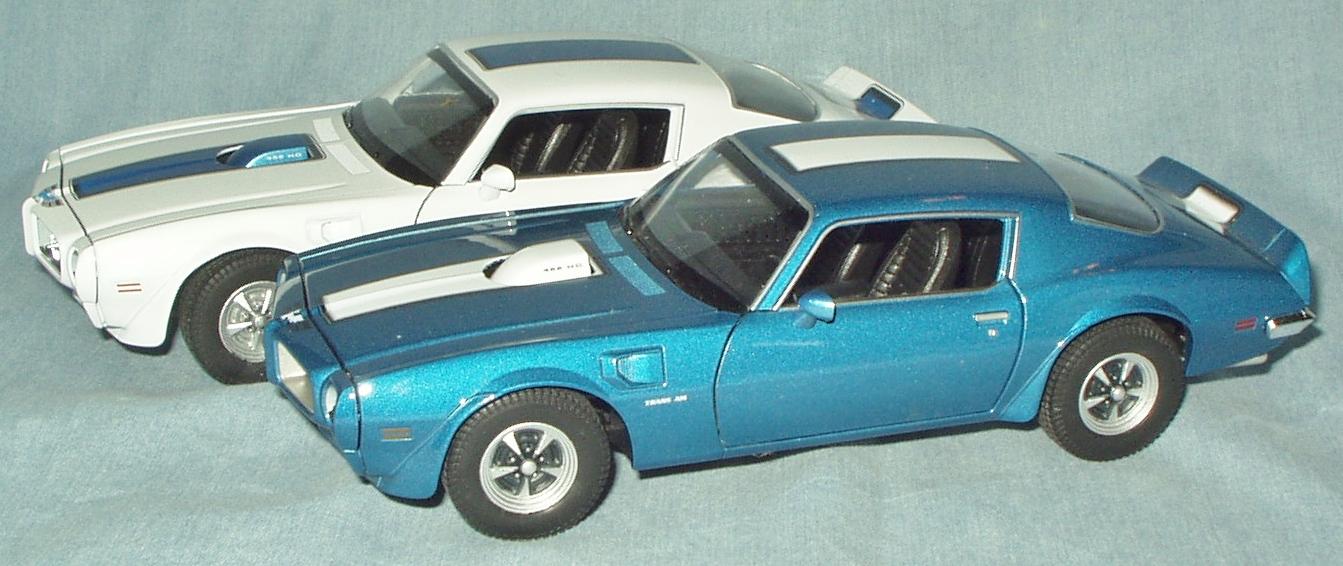
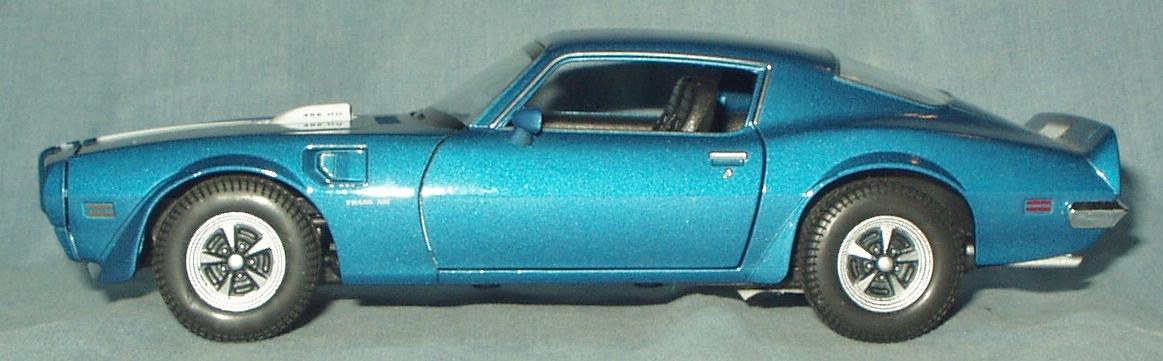
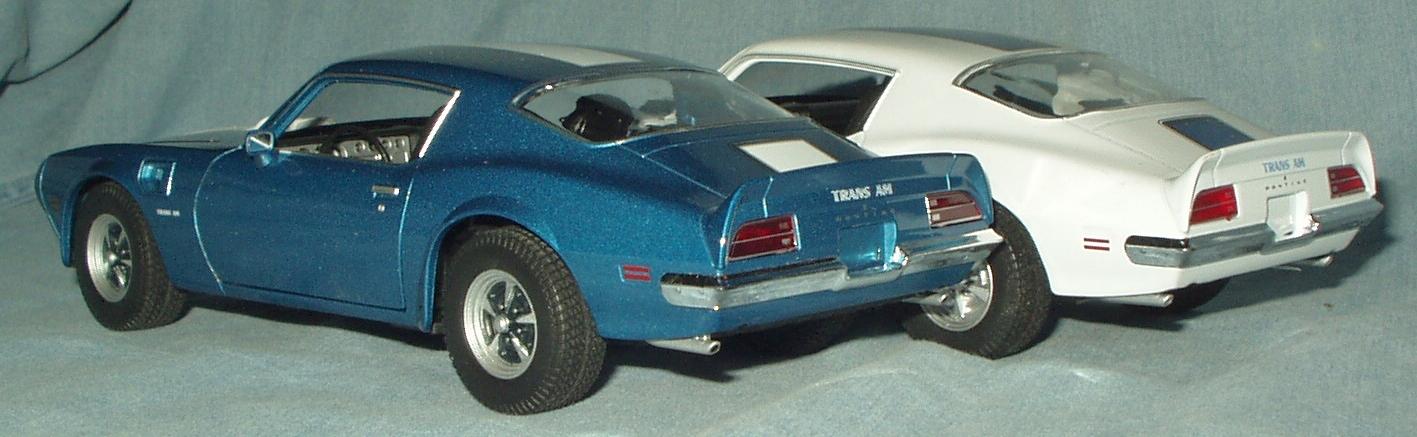
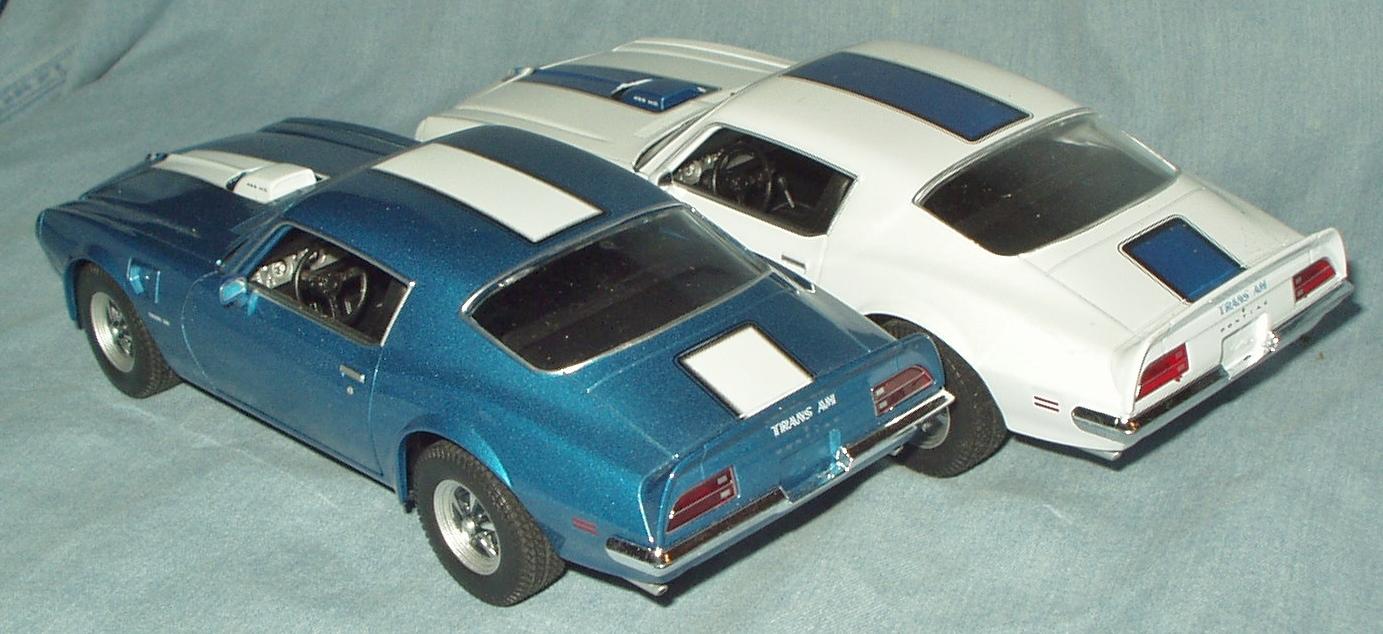
I built both side by side when they first came out. The AMT isn't horrible but the Revell is DEFINITELY more accurate in shape. I'll never do another "serious" build of the AMT; any such I build will be on Revells. The Revell kit isn't hard to find at all. I think it was last reissued as California Wheels but there might have been another reissue since then, even.
-
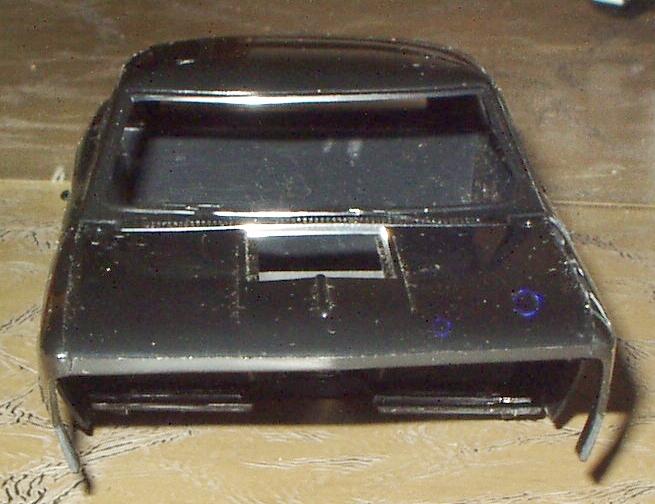
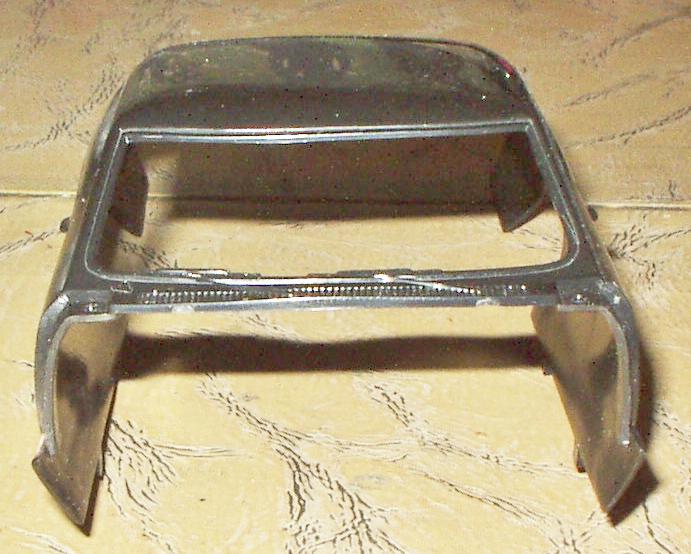
Mine was probably as bad as yours to start, or near so. Below are before and after pics of my fix. This took about 15 minutes of CAREFUL work involving hot water. I could have even brought it up a little more, but I discovered, as you did, that the glass almost seems made to fit the bowed-in top. This was the best compromise I found between correct shape and windshield fit. (I didn't want to make a new windshield.)

-
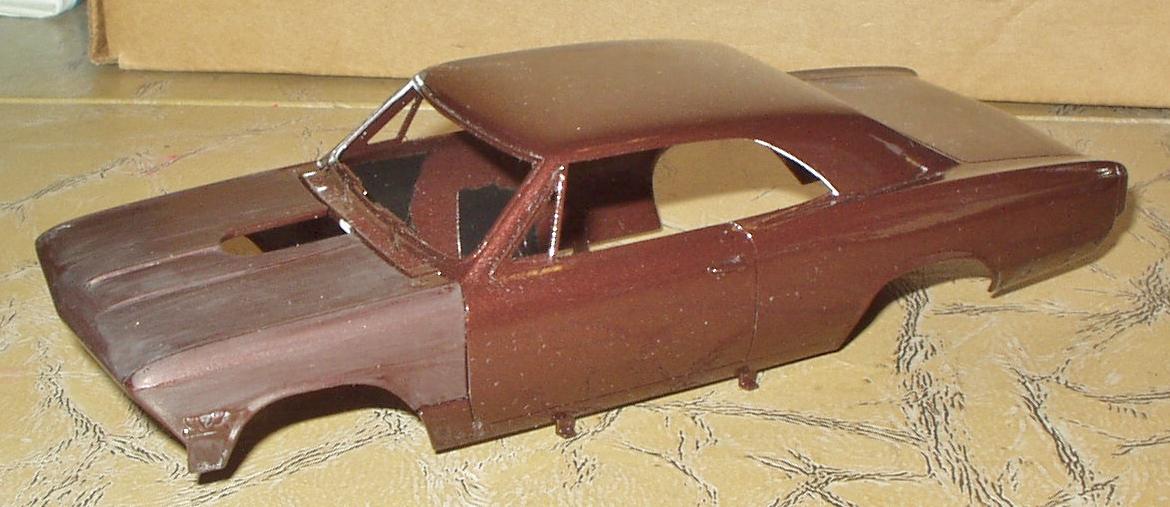
I'm currently trying to finish up (by the end of the year) a Monogram Chevelle I started in the '70s and have thrown back in the box in disgust many, many times over the years. I'm now determined to GITTER DONE. But the more I look at it, the less I like the shape of the mid-body. Looks like about 1/8" should come out of the c-pillars. I spent a LOT of time fitting the front end to the body, and a certain amount of time straightening out the front of the roof. I'm currently polishing the body. Here's what it look like a couple weeks ago: You have one more option: There's an inexpensive 1/24 diecast (Maisto, I think?); I've seen it in Marina Blue and black and other colors might be available. Shape is right and it looks good on the shelf.
-
Yah, you said the same thing over a year ago.
-
Thanks for the kind words!
-
Yeah. Here's three favorites I can think of offhand.
-
It's beginning to grow on me. It's not right, but it's not unattractive. Thanks for your kind words. Thanks for your kind words, and the Welly TA Challenger scales out at 1/25, which is a major reason I like it so much. I did a full writeup on it here a while back. I think it's my alltime favorite diecast.
-
Interesting idea. Haven't tried lighter fluid for that. I think it would probably damage paint, and I know it does strange stuff to plastic, but there might be some application where it would work well. Thanks!
-
Thanks for the kind words!
-
It might have something to do with thickness. Not long ago I tried to mail some parts to someone here in a regular envelope. It made weight, but it wouldn't quite fit through a slot in a template, so I had to pay the package rate for it. Had never heard of that before that.
-
I get that. I've never cared for any of his stuff that played on the radio. But his Darkness on the Edge of Town album is absolutely brilliant. And he's done a few other good songs over the years, but almost none of them ever got any air time.
-
Yeah, but the age could explain some of the things I've heard him say....
-
Who?
-
Very pretty! What's the price point on the Icons? I've never seen one.
-
"Bring Out Your Dead" Completion Build--ROUND 2 Is On!
Snake45 replied to Snake45's topic in WIP: Model Cars
Very cool! I've updated the update to add your new (?) project. GITTER DONE! -
We had a near-zero cold snap this morning. My car blew up on the way to work. (It never stopped running, but the temp gauge spiked. Same thing happened last year in a severe cold snap and it cost several hundred dollars to get fixed.) Luckily I was going by a gas station just as I noticed the gauge. (Wasn't just the gauge--the heater was blowing only cold air, which also happened last year when this happened.) Even more lucky, there just happened to be a tow truck there dropping off another car. I asked the guy how much to tow me to my mechanic/dealer, and he quoted me a reasonable (I thought) $60, so I said let's go. He dropped the car off and then took me home. I paid the guy cash and told the guy to put the money in his pocket if he wanted. He sure saved me a buttload of time and aggravation, and Merry Christmas to him! Waiting to hear from my shop when they can get it done.
-
"Bring Out Your Dead" Completion Build--ROUND 2 Is On!
Snake45 replied to Snake45's topic in WIP: Model Cars
Still making progress polishing out my Chevelle body, and trying to adapt the Chevelle engine to the '64 GTO chassis, and then fit the whole mess into the Chevelle body, which is turning out to be MUCH more involved than I imagined. GRRRRRRR! Update time: ROUND 5: FINISH DATE DECEMBER 31, 2019 Straightliner59: SS/GT Firebird #1 Model Citizen: '49 Ford Tudor Dave Branson: RMR Resin Van FIRST COMPLETION! GOTTER DONE! Moving on to Honda F-1 Misha: ‘49 Ford MAKING GREAT PROGRESS! Tom Geiger: Trabant 600 Panel Wagon MAKING PROGRESS! Prostreeter69: Pro Street Bronco Bobthehobbyguy: Ghost Rider Corvette Modlbldr: '64 Tbolt Snake45: '66 Chevelle MAKING GREAT PROGRESS! TarheelRick: '69 SC/Rambler Bernard Kron: '29 Ford roadster THIRD COMPLETION! GOTTER DONE! Moving on to old-school dragster. LL3 Model Worx: Joker Goon Car SECOND COMPLETION! GOTTER DONE! -
No. Try again. SnakeACP45 at AOL dot com.
-
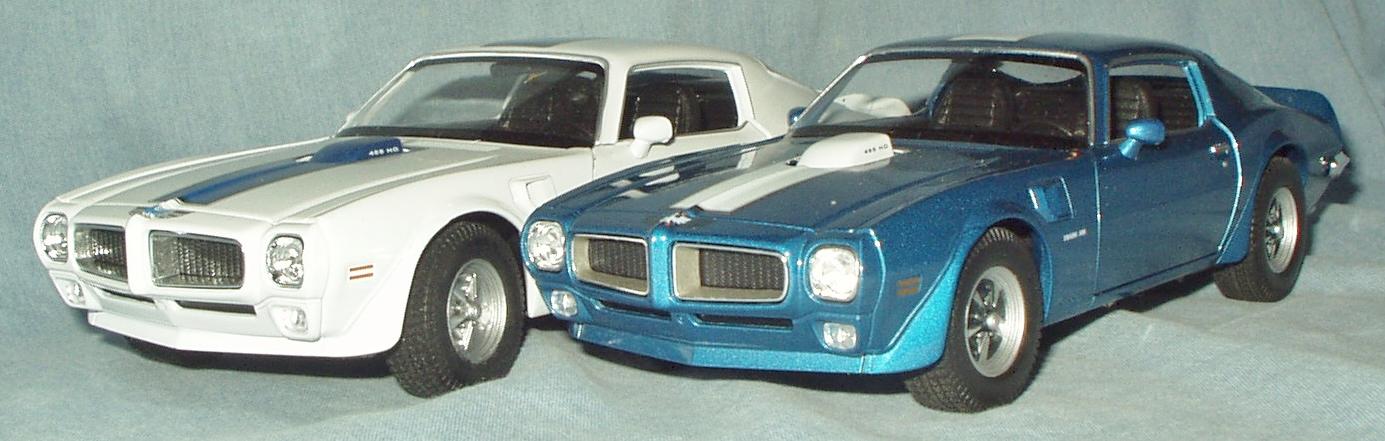
Scored this one at Rite Aid for $10 recently. I’d seen others’ on here, but if I’d realized how nice this thing is in person, I’d have made the effort to net-order one months ago. First off, it’s 1/25 scale, not 1/24, always a plus in my book. (The Motor Max ’73 is 1/24). The front end is slightly better shaped than the Motor Max. Rally II wheels are quite nice, and the tires are of a good size. The metallic blue paint on mine is outstanding, and the white TA stripe looks quite acceptable. Even the hood fit is exceptional for a diecast. About the only thing not to like about this model is that the “hip” crease on the upper quarter panels is much more pronounced than on the real car—more like a ’67-’69 than a 2nd Gen F-body. It’s not unattractive, it’s just not right. But everything else here is so nice I don’t mind living with it. This one required less Snake-Fu than most. All I did was sand the tire treads, hit the light lens stems with white paint, paint the inner perimeter of the grill openings with Testor Steel, and detail the wheels with Model Master Gunmetal (a metallic gray/black that looks good for the dark areas of Rally IIs). Total Snake-Fu time was only 2-3 hours, most of which was painting the wheels. After doing the blue one, I liked it so much I later bought a white one (another $10 Rite Aid score). Haven't yet Snake-Fued the white one, but it provides a nice contrast so you can see what a big difference the grille and wheel detailing makes. I really like this one—it’s right under the ’70 T/A Challenger on my list of Favorite Wellys. And, like the Challenger, it looks good enough to be displayed on my 1/25 models shelf (not relegated to Diecast Ghetto). The really good Wellys are probably the best values in all of Model Car World, especially if you can get them for $10 at Rite Aid. Thanks for looking, and as always, comments welcome.
-
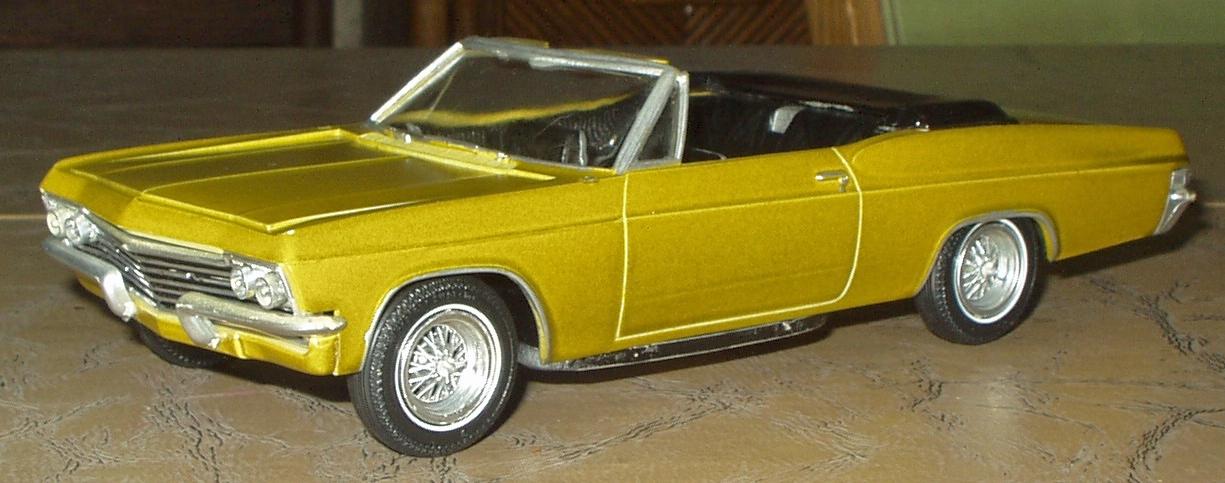
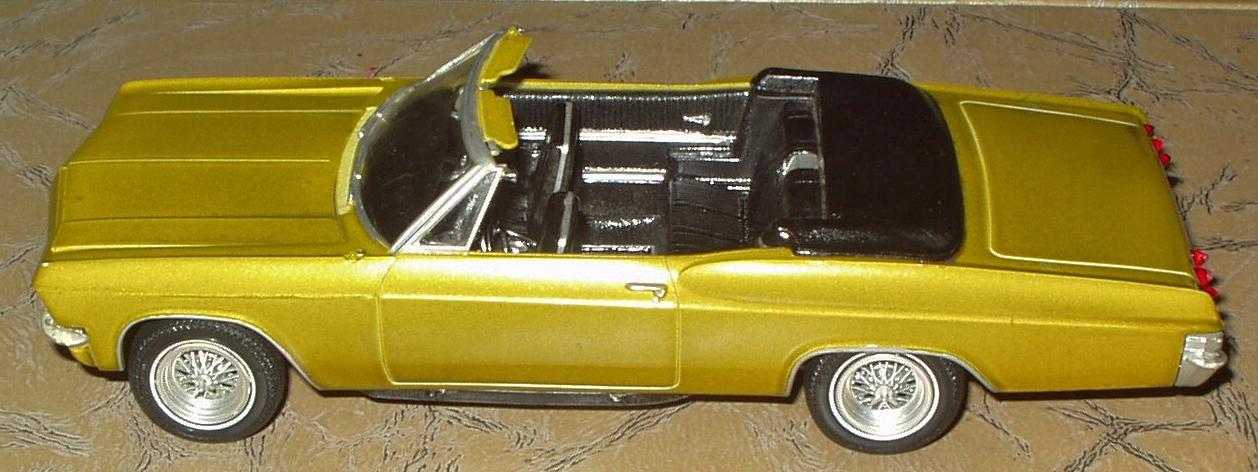
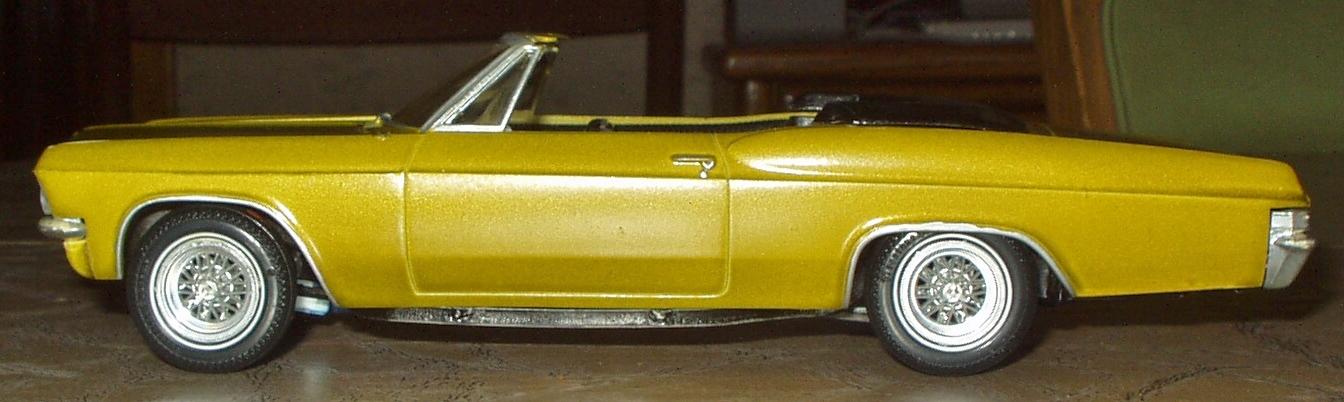
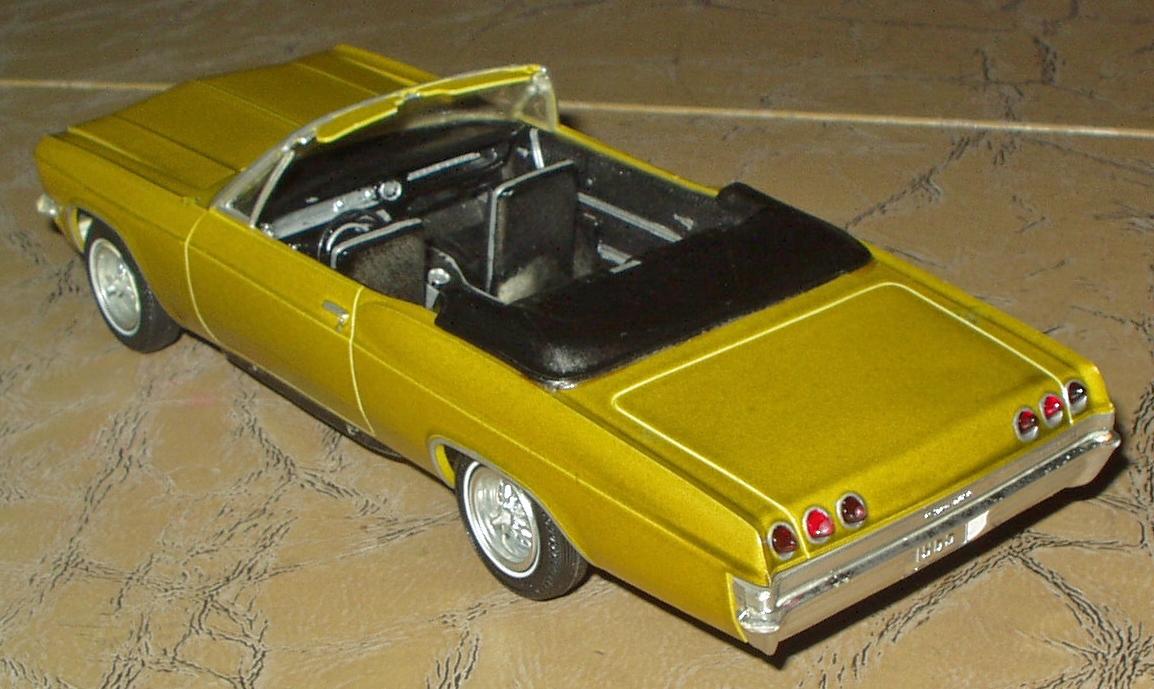
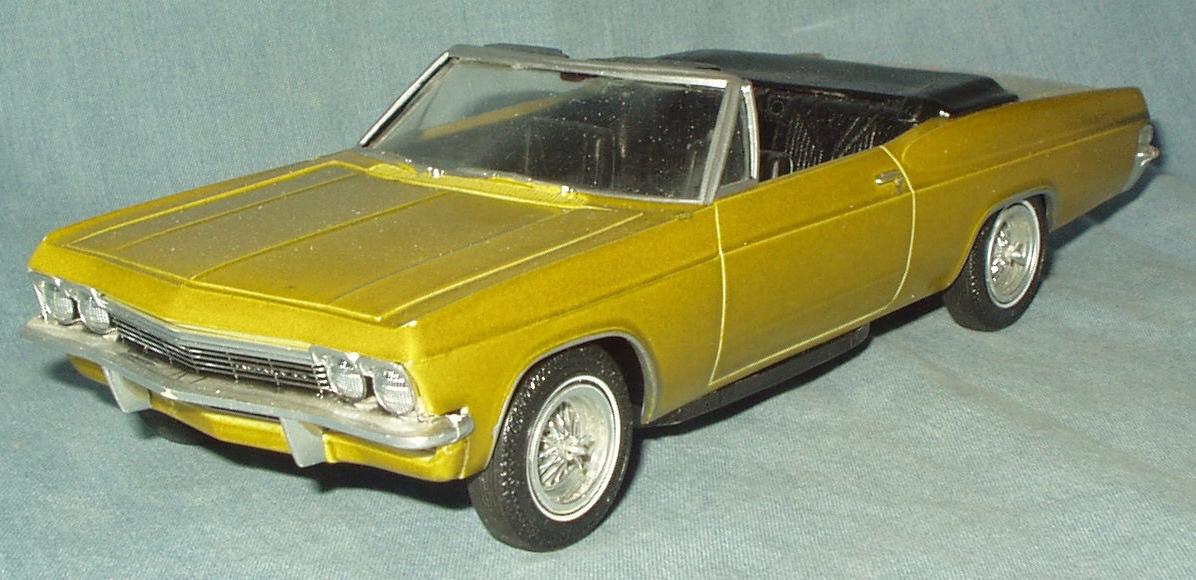
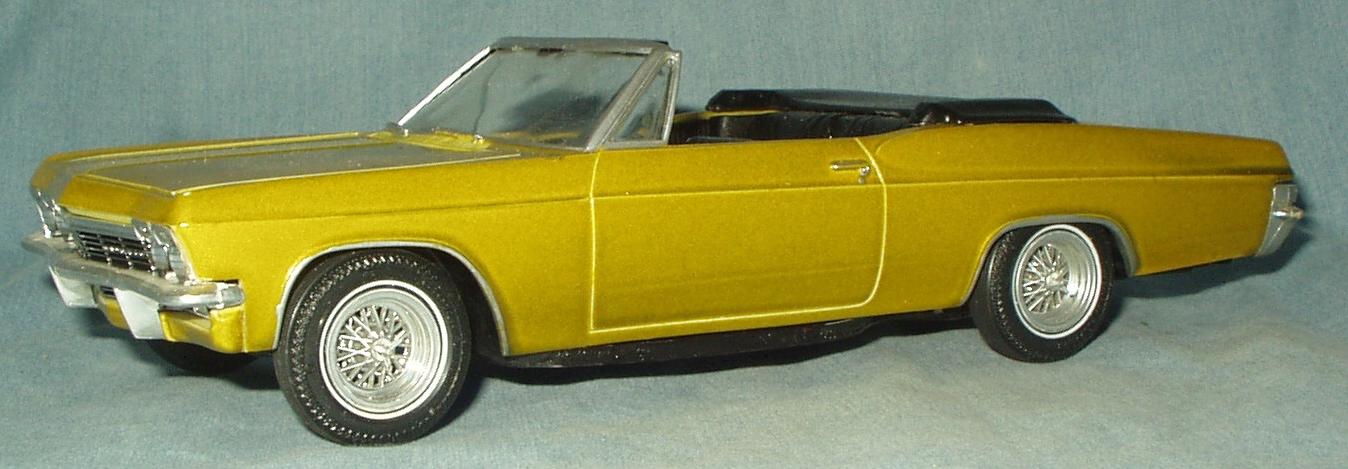
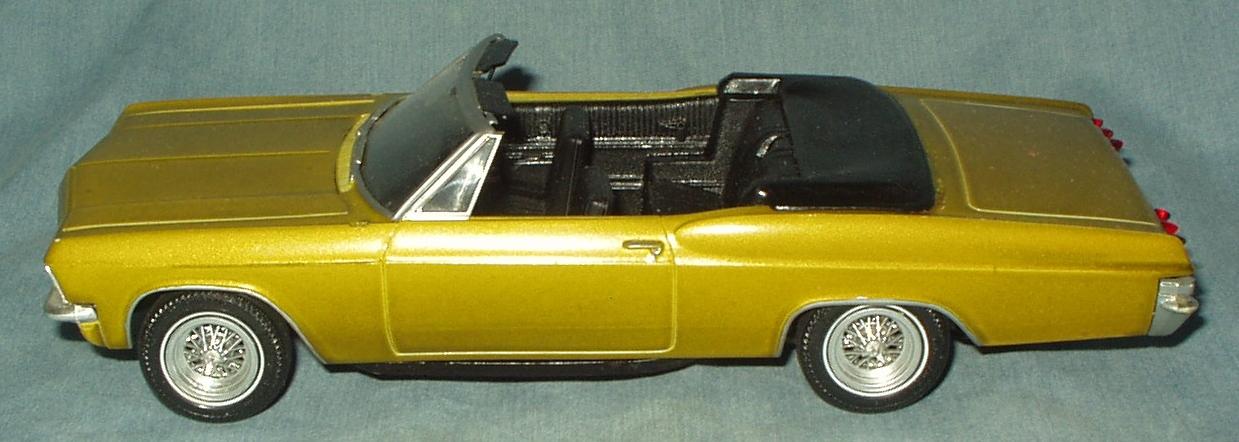
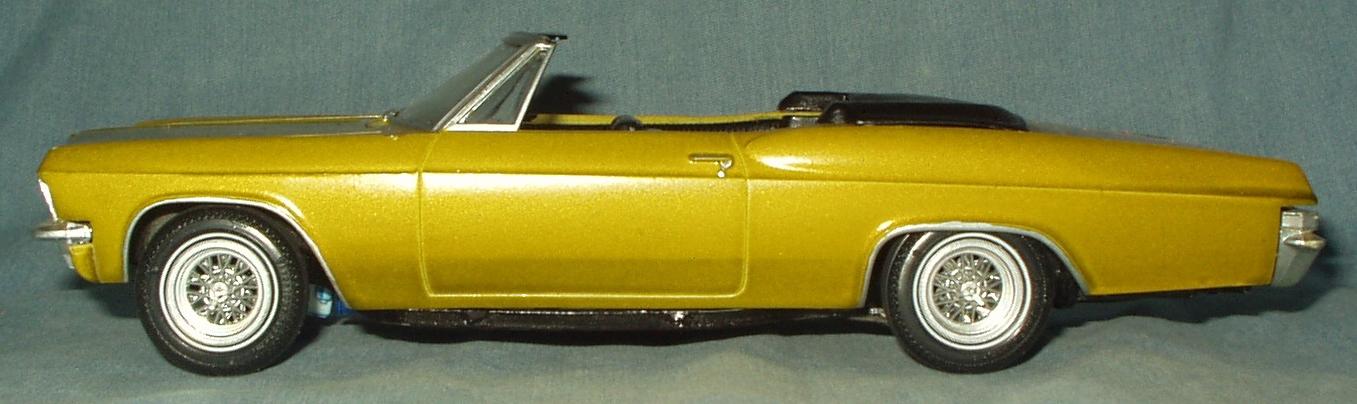
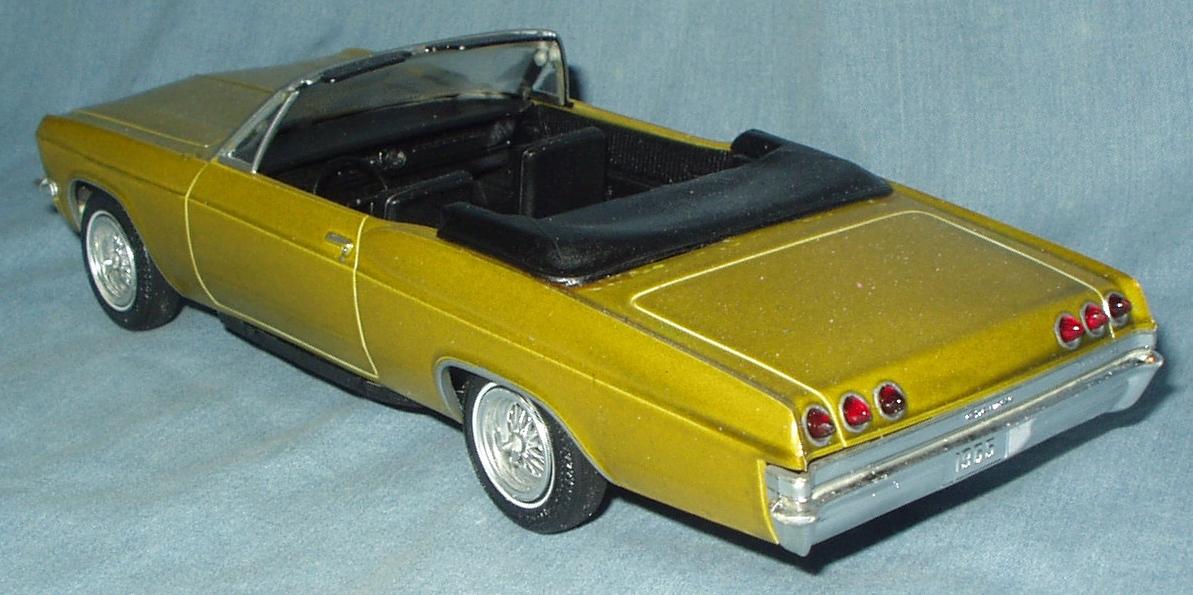
Bought this one fairly cheap off eBay a few months ago. It came with the kit custom grille and front end installed, and the custom bullet taillights, but oddly, the stock rear bumper and chrome trim panel. Was gonna just restore it as-is, but then had a chance at an original AMT ’65 Impala grille/bumper at a reasonable price. Paint appears to be one coat of AMT Lime Gold Metallic lacquer. It’s not great but I’ve seen worse. I’ve DONE worse. If the Original Builder had laid on two or three coats instead of just one, it might have polished out nicely, but thin as is was, I didn’t want to risk it. Judging from the tube glue spots on the tops of the front fenders, apparently it originally had a pair of spotlights. Interior was spray (glossy) black with brushed Chrome Silver detailing that was, uhhh, not-perfect. At first I was just gonna touch this all up with brushed black and brushed silver, or Silver Sharpie, and then bomb it all with matte clear, but ended up shooting the whole interior in satin black. I hit some of the chrome trim on the console with Silver Sharpie but otherwise didn’t waste any time on the gut. Maybe another time. Wheels were obviously from the AMT ’65 Riviera on AMT Firestone Supreme tires. I sanded the treads. The windshield was a mess and had to be CAREFULLY cut out with a razor saw. I polished out/off as much glue as I could, then put it back. Again, not perfect, but by this point I’d decided to just button this one back up and put it on the shelf as a relic/survivor. At some point in the future I might strip it back to bare plastic and do a full rebuild on it. Or maybe its next custodian will want to do that. At any rate, it goes on my 2019 DONE list. Thanks for looking, and as always, comments welcome.
-
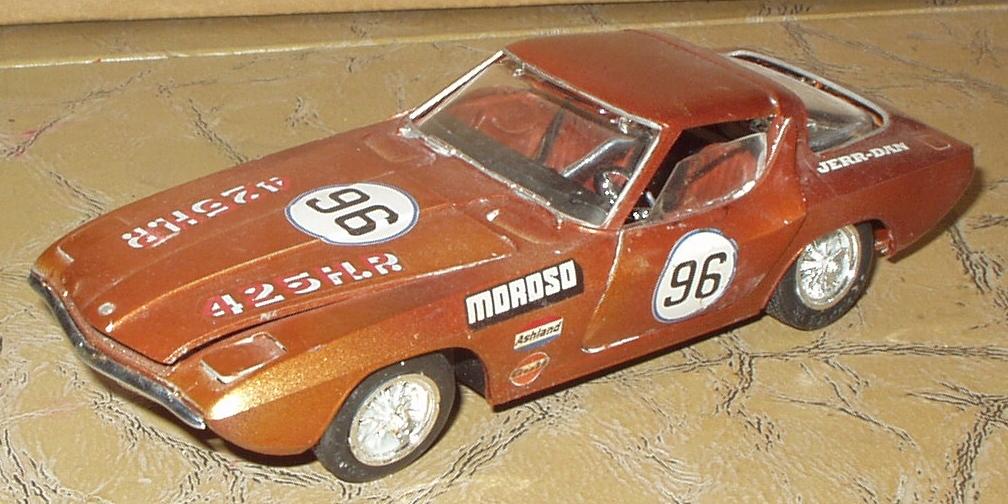
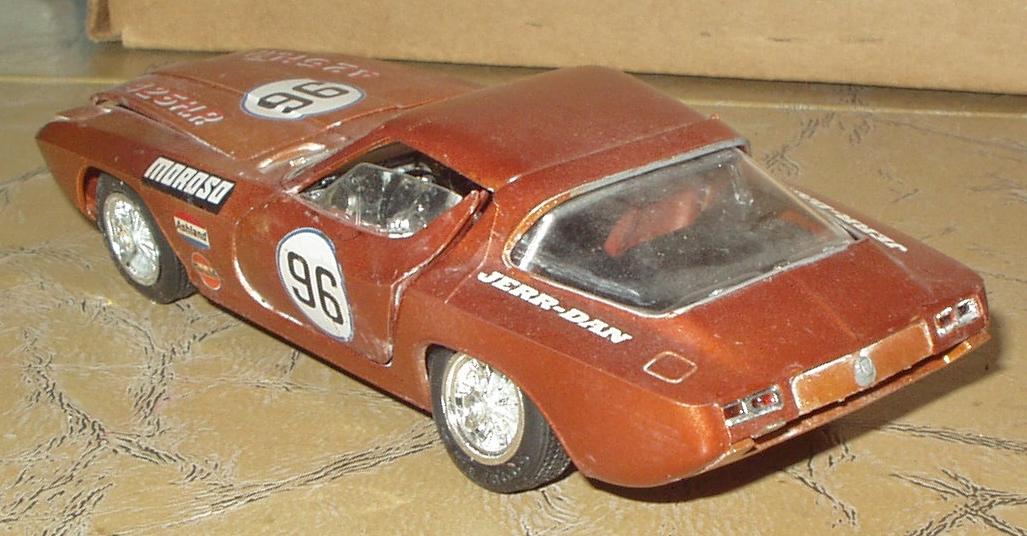
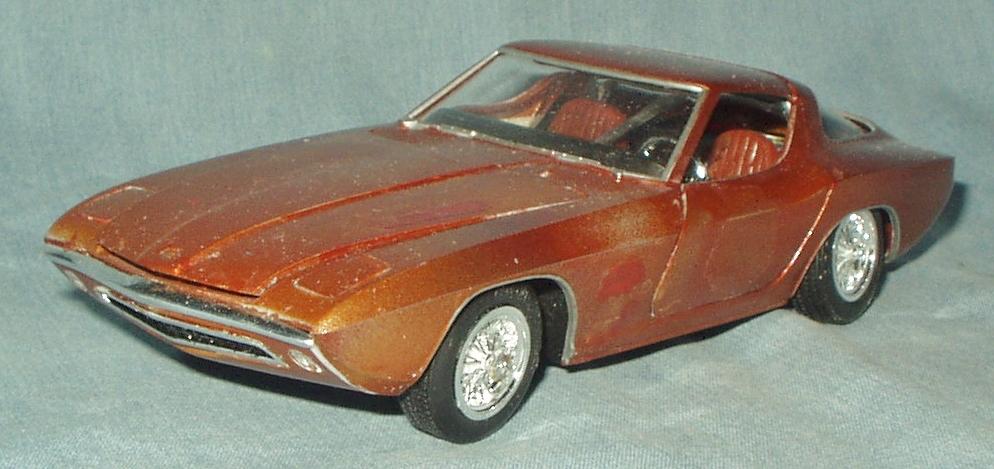
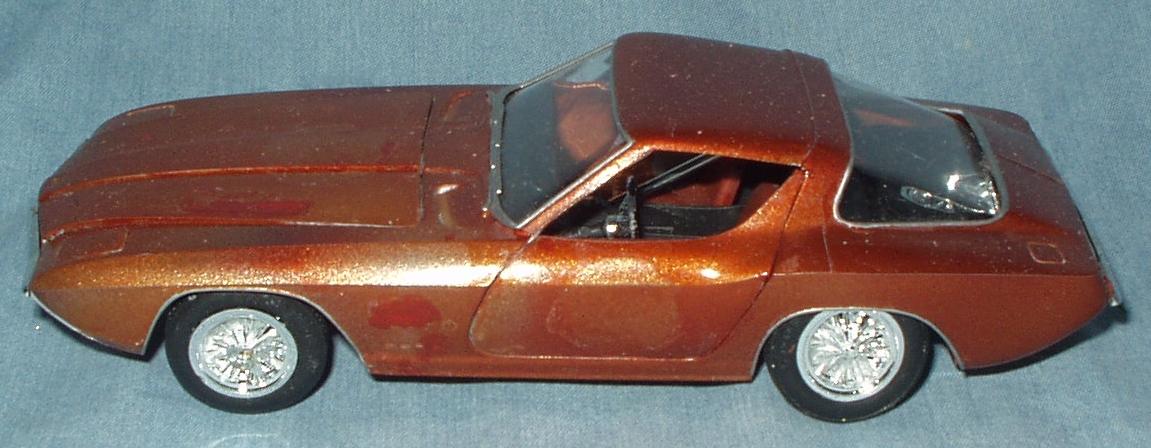
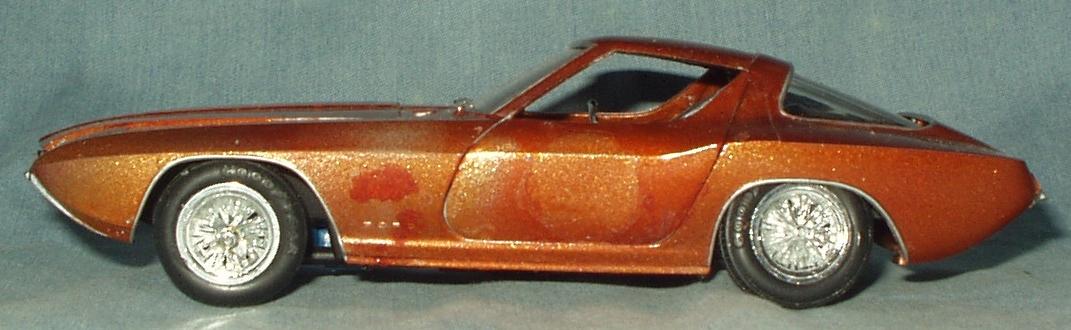
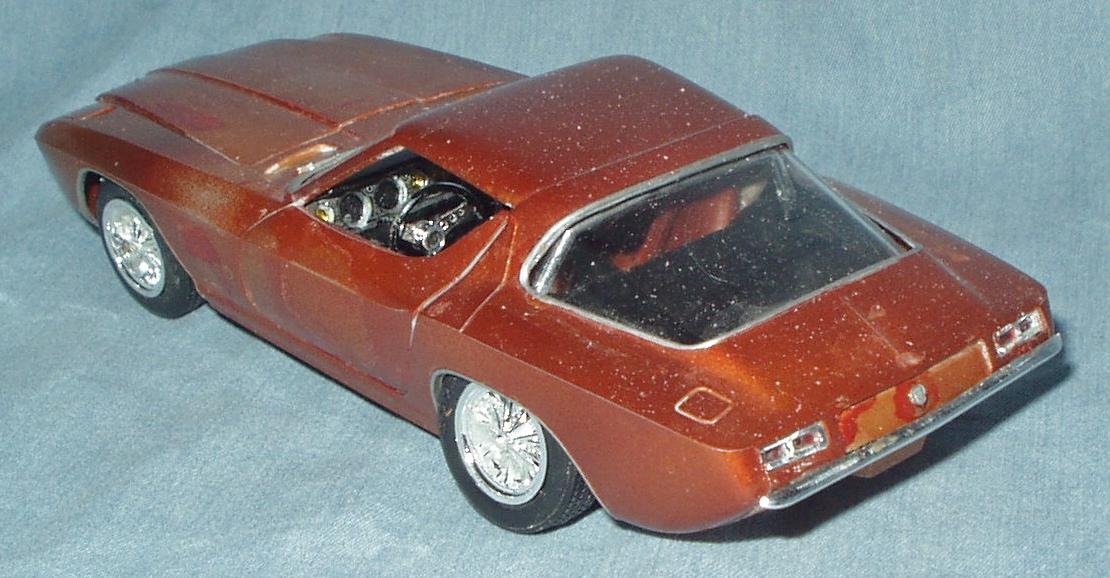
Bought this one at the local toy show last month. It seemed to be complete—some parts were separated , but it looked like everything was in the plastic baggie. The paint looked fairly good—at least workable—and I liked the color, which I thought might have been old AMT Burnt Orange Metallic, which would have made this an original IMC issue, which of course would have been cool. (I found out later that, because of the tires, it’s a common Lindberg reissue. Oh well.) It came apart pretty easily; even the windows came out cleanly and undamaged. Next order of business was removing all the bogus decals. My favorite go-to method (scraping with a fingernail under hot running water) wasn’t particularly effective, so I let the body soak in hot water for an hour and tried again. Again, some of the decals came off, but not all, so I let it soak some more. I repeated this five or six more times and still didn’t get everything off. At this point I escalated from my thumbnail to a plastic spoon. This got the last of the decals but also unfortunately took off some of the paint as well. Almost as bad, many of the decals had done something to the paint underneath them, leaving the finish with a slightly different color and “sparkle.” At this point I was a bit disappointed and disgusted. The body really needed a complete stripping and repainting, and if I did that, I’d feel obligated to go through and update and improve the entire chassis and interior, and the whole job (which had started as a quickie “rescue,” remember) would end up taking two or three times as much time and effort as it would take to build a new kit out of the box. The effort would be justified if this were a rare kit, but since it was reissued by Lindberg, it’s not rare at all. So I decided to just Snake-slap it back together and treat it as if it were one of my earliest builds I was trying to preserve as original as possible. I did take the time to fit both doors, which had never been trimmed properly to fit well into their openings. They do now. I also broke out and refitted the headlight doors. Reassembled (with, I admit it, a certain amount of Tacky Glue and masking tape involved), I discovered that Testor One Coat Flaming Orange was a good match for touchup, and was probably in fact the original paint type. Touching up this much bare plastic with a brush would never look “good,” I knew going in, but I did the best I could and it only looks semi-vomitatious. Heck, in a couple spots, the touchup was so clean you can hardly see it. But mostly, not so much. So it’s on the shelf in all its hideous glory. I didn’t even try to do anything with the wire wheels, every one of which had glue damage. I couldn’t think of anything I could have done to them to make them look any better—or worse, for that matter. Oh well, it is what it is. I did learn that this was a pretty cool little kit, and that the car looks great in this color. When I get around to building the new one I have in the stash, I’ll probably do it in the same color. Thanks for looking, and as always, comments welcome.
-
I've shot the Testor primers over normal flat enamels as primers, provided they were good and dry. You might want to see if your hobby dealer has a dark flat green of some sort in the Model Master line. That would make a great primer for you, too.
-
That looks like a '65, not the wretched reissued '67 under discussion. Although the reissues of the '65 are pretty wretched too in their own way.