swede70
-
Posts
727 -
Joined
-
Last visited
Content Type
Profiles
Forums
Events
Gallery
Everything posted by swede70
-
Greetings... Here the '70 Laguna Seca iteration receives a pair of rear flares laboriously patched and shaped from substandard castings recently poured. The otherwise clumsy mounting points on each door for the exterior rear view mirrors as well as the door handles have been discreetly filled, hopefully to vanish from sight forthwith. More noticeable, the grille surrounds have been painted Testor's Model Master Magnesium, while Tamiya Panel Black was employed to touch in the grille mesh to suggest perforations. Continuing and barely made out would be the abbreviated side pipes seen every now and again across the '70 SCCA Trans-Am series on these cars, cobbled together from solid rod stock and ancient ERTL Cobra 427 SC parts. Also made out would be the painted Minilite wheels, sprayed with obsolete Model Master Nassau Blue Metallic Lacquer No. 28128. Two and half cans of the latter were picked up at a hobby show this past weekend, hence my favorite Pontiac hue for the '69 and dual '70 T/G Firebird projects isn't at immediate risk of being exhausted. Lastly, the engine-tuned applique instrument panel vanishes, to be replaced with a simple fill panel in lieu of aluminum gauge rings and instrument decals being added to the same - in time. Not much to see in total perhaps, but evolving just the same. Thanks... Mike K./Swede70

-
Very neat these. I too have modified the Yat Ming/Road Legends '70 Rebel Machine and really love that this unconventional topic was done in 'our' scale. Can I ask what tires you swapped on or in? Below I've employed now super scarce Hwy. 61 E60-15's only used on the front of their AAR 'Cuda and Challenger T/A releases. Thanks... Mike K./Swede70
-
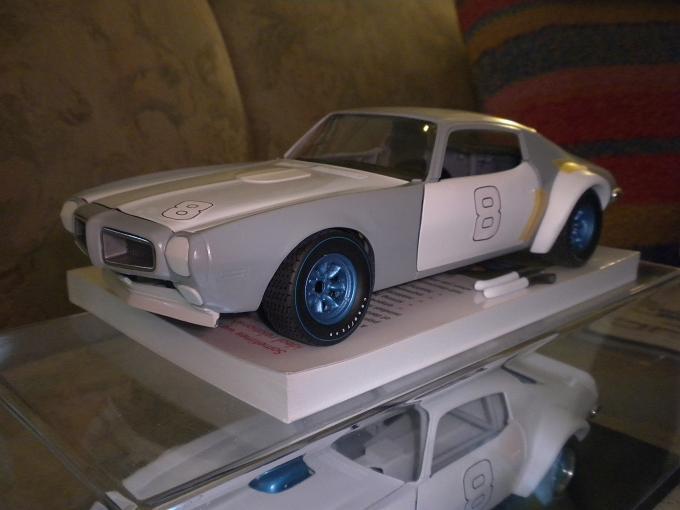
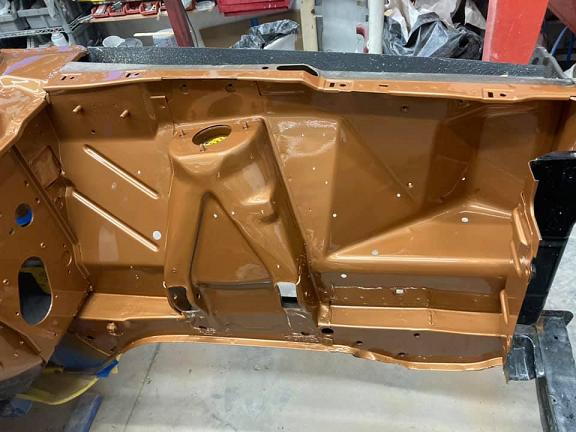
Thanks for the kind words, the continuing interest displayed... Here a dive into my spares inventory reveals the outlines of a '70 T/G Racing Firebird, but rather in Laguna Seca spec. where homologation hiccups precluded the use of all the Trans Am model-specific aero aids, fender vents, the shaker hood scoop, etc. The scale model represents what was first intended for the project, and what many casual vintage SCCA Trans-Am Series enthusiasts mistake for the season-long configuration of the topic given the heavy press coverage and volume of reportage and photographs taken at the California-situated track consistent with cementing such an impression. If anything, embracing the bespoilered iteration evaded all the troubled suggested further up this thread given the amount of work that is required across the shell introduce at this stage. In point of fact, seen below is my second attempt to achieve a certain result even at it initially took form as a '72 Formula 455 H.O. project now on hold. Oh well - all the labor poured into the shell was in point of fact collecting dust given period racers intrigue more than replica stock projects for this enthusiast. Appalling as it sounds, the cast-in rear wing was filed and sanded off entire across an extended period consistent with leaving no trace of its otherwise undeniable presence. As before, the aerodynamic wheel arch spats were bent in just forward of the rear wheel arch opening - but so too the same situated up front. The Trans Am-model specific fender vents were filed off and filled as required, while a previous effort to fashion a hood plug w/character line to match the same contour present on the hood 'stamping' serves nicely to replicate the quickly fabricated sheet metal patch panel required in the wake of the unsettling Chief Steward tech. inspection judgement handed down to the team at the first race of the '70 season. Repeating past choices backed if you will by research, four GMP '67-'69 Penske Camaro 'rear' tires are employed on all corners, power steering and brakes fitted, an early iteration of the Bendix Hydroboost system employed to actuate such. Resin Minilite wheel faces of my own (more or less) creation mesh to essentially stock ERTL second generation Firebird Trans Am mounts. The expected abbreviated side pipe installation exists, albeit these are off this particular iteration right at present. Across days the front wheel arch opening profiles were enlarged along the bottom both forward and back, while efforts to better vent the rear flare molds created from what was glued to my '70 Mid-Ohio project shell ought to appear identical. The rear track will grow should the flare molds produce that which I want. The dreary cast-in side window weather seals will further be filed out, the raised trim filed flat. Lastly (well - at least thus far as my focus shifts yet again! Sigh...), the door top trim/contour has been filed and sanded off, the holes seen politely asking to be plugged consistent with facilitating their disappearance. Thanks for your review of this dual-project update... Mike K./Swede70
-
Greetings, Modest stuff, but here the cast-in rear license plate otherwise attached to the rear bumper was carefully filed out, what unplated plastic showing through touched in with a Molotow chrome paint pen. The ERTL rear bumper mounting pegs are fairly small and break easily, whereas the holes to accommodate the bumper installation on the back of the body shell are typically a bit large. Taken together, the pegs break off, the rear bumper itself often positioned or hanging off at an angle affording the unit a rather low-rent look. ...given the right tail light cluster wasn't pressed home with full force on this mock up view, the installation of the same seems a bit saggy. ...nice to witness the rear bumper riding level though. For a few hours spent, the rear bumper mounts were rebuilt with plastic rod stock, the holes on the shell carefully cleaned and drilled out to more or less match the size of the new mounting pegs worked up. Some further putty application and final shaping was performed on the rear flares, while a better application of Tamiya Fine White Surface Primer helps along the back of the shell too. Moving along, another attempt at seeking out custom decal services consistent with bettering what was tried before with another vendor long ago likely comes next. Oh - ACE Hardware Premium Paint/Primer Light Gray Gloss Enamel/1196401 seems a very good choice for the interior hue and will likely be used on my Penske Camaro and Javelin projects besides. Kind thanks for your review of this project update... Mike K./Swede70
-
Greetings, Small stuff in total, but here the molds for the transmission project applicable to the pair of Pontiac-powered SCCA Trans-Am projects maintained have been completed consistent with providing duplicates of what is judged necessary for each. A GMP Penske Trans-Am Camaro Muncie M22 four-speed transmission was trimmed, ground and plugged where necessary to clean it up, while the side cover rendered on the same was ground flat. The side cover in turn was sourced from a Lane '65 SS396 Chevelle engine assembly - itself a rereleased ACME item purchased apart from a complete model or tool. The pair of Lakewood explosion-proof bellhousings, one intended to replicate a Pontiac/Oldsmobile spec., the other, a Chevrolet spec., were likewise prepared to produce a mold of each. Given all the resulting resin parts were rendered separately, it's anticipated that painting such shouldn't prove all that hard. A better clutch linkage is possible, as is a better shift linkage given I'm not modifying rare 1:18th spares at this point. Slow progress - but progress all the same. Thanks for your review of this post. Mike K./Swede70
-
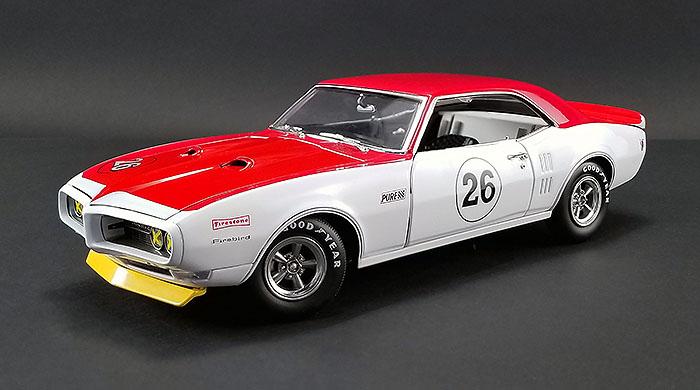
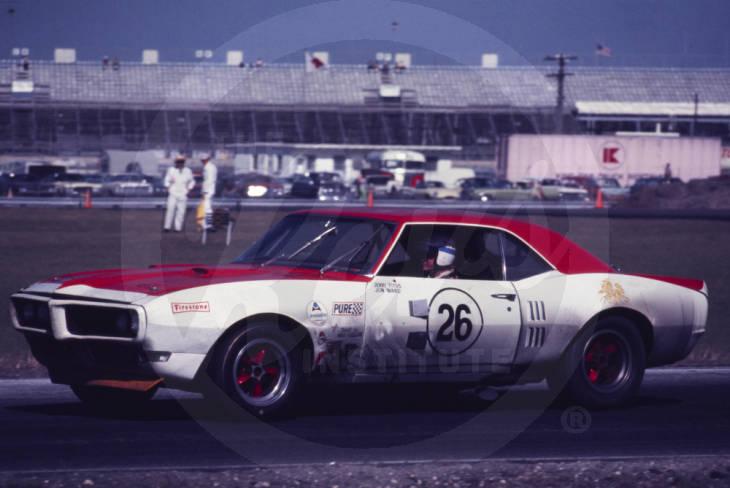
Picking up from a sprawling 1:25th/1:18th '64 Tempest 'Gray Ghost' thread, this would be a continuation of the ACME/Exact Detail Titus/Ward Firebird project subthread otherwise touched upon there. Mostly this is a limited refurbishment of what in the diecast world is known or marketed as a 'Tribute Release'; i.e. some of the visuals are provided to suggest investment consistent with imagining that one has purchased a full-on racer, but soon one notices that paintwork and perhaps wheels and tire have been provided to echo something not strictly provided for making a close inspection of matters. Here the topic has appropriate paintwork of good quality, although then one expectation after another is dashed; i.e. no roll cage, uninspired wheels and tires, and a Pontiac engine beneath the hood where an Al Bartz-built small block Chevrolet 302 cross ram engine would otherwise be expected. Finish choices are wrong here and there, the livery isn't complete as-delivered, while more than one original purchaser exclaimed 'No thanks' and sent this release back! ...as released then. Notice the argent grille 'tunnels', livery cues drawn from was is purported to be the restored racer, etc. ...the topic motoring through the infield at the '69 Daytona 24HR race then. Much discreet work is called for if things are going to appear close to this specification. - Hoping I could do something with it for application, here I've scratch built a roll cage, added resin wheels with CNC machined outer rim lips (done by Dancing Bear Scaled Components), applied a mix of fill-in decals (some commissioned to 3 Amigos Decals), and inserted a GMP Penske Camaro engine with appropriate mods. Laboring now to ensure all the new assemblies live in harmony with each other, taking my lumps and making adjustments as necessary. The front valence panel w/spoiler is off the model, lending things an odd look. The numeral illuminating lamps on the doors haven't been fabricated and stand to come. Still - rather neat. The otherwise expected wheel arch chrome trim painted white on this ACME release were each cut off, affording needed space inside the wheel housings. The rocker panels were retained and cleanly reshaped on the ends prior to being refitted. A terrific effort from 3 Amigos Decals, the odd Sleipnir (Nordic mythological reference relating to an eight-legged horse ridden by the god Odin) was cleanly reproduced and added atop each rear wheel arch opening. Some smaller decals were likewise commissioned, although others were just found within my Rubbermaid Tub 'o Decals. While just in brief, here would be an effort to replace the stock GMP Penske Chevrolet stock bell housing with a scratch built Lakewood Chevrolet explosion-proof 'hydroformed' model. The latter can be shared across many of my projects and had proved a stumbling block for a long time, happily soon to be cleared. Thanks for your interest. Mike K./Swede70
-
Greetings, Trying if you will to work up a good transmission assembly for my '70 Titus Firebird, here would be isolated some likely spares to cast. Derived from plastic sheet stock can be made out a scratch built Pontiac/Oldsmobile Lakewood explosion proof bellhousing, while the transmission case is a modified GMP item, the side cover a Lane/Exact Detail item. U joints from the GMP Penske Camaro as well as a Lane/Exact detail differential will likely round out things. Thanks... Mike K./Swede70
-
1968 RKE/JRT SCCA Trans Am Javelin
swede70 replied to swede70's topic in WIP: Other Racing: Road Racing, Land Speed Racers
Greetings, Having secured three auction items relating to period Jo-Han box art some time ago, I finally had the negatives scanned and one image printed in 12 x 18. This would be the '72 Roy Woods Racing Trans-Am Javelin, sans box lettering as again it's just the artist's illustration. The end panel/box top art in question is shown here as kit GC-2700. I worried that the negatives might not be usable for any number of reasons and hesitated to do anything at all with them, hence pleased that a nice result was obtained. Distracted/invested in other scale projects at present, always SCCA Trans-Am themed (but of course). Thanks... Mike K./Swede70
-
Updating in discreet measure, seen would be the result of efforts to remove the dreary cast-in front license plate mounts off of this period road racer... ...before, with cast resin plugs seen employed to literally flush fill the headlamp installation in addition to the turn indicator recesses. Another set have been cast, shaped and painted in anticipation of installing such in the final project shell situated to the right. Notice too the extent of the front fender flares which otherwise are difficult to appreciate. ...while after in the wake of considerable efforts to fill out and off the raised metal platforms and for filling the remains of the plate installation points with plastic rod stock and Microballoon filler. Filing out the center mounting hole of the metal front valence/center spoiler element helps to better tuck in the same in relation to the surrounding panel work. Thanks... Mike K./Swede70
-
Greetings, A brief update this as I try to work up a reasoned accessory drive for the engine. Seen would be a combination of GMP parts and other found items to turn the alternator, the water pump as well as a combined Bendix power steering pump that also generated either vacuum or hydraulic boost to the brakes (the operation of which is something of a mystery to me). The Lane/Exact Detail crank pulley was copied in resin and used to add a third groove to it, while a very thin harmonic balancer was further added and can be discreetly made out. The stock alternator was removed from the Lane/Exact Detail Pontiac 400 V8, although enough of the mount was retained to situate the power steering pump as before. Notice the water pump pulley as well as the power steering/power brake assist pulley is oversized consistent with underturning each in anticipation of sustained high RPM operation. Also made out would be some refinements in relation to the air cleaner housing hitherto absent beneath the shaker scoop base and seal, while the carburetor and intake adapter plate situated beneath it is effectively out of sight. Better exhaust headers are being plotted, while the wiring and plumbing required is being charted consistent with seeing matters through. The last image uploaded relates somewhat futile efforts to shrink the panel gap between the back of the door(s) and each respective quarter panel for concerted tugging, pulling and twisting of the large dogleg hinge each door hangs upon. Huge success wasn't registered for the effort, although things (maybe) look a bit better. Thanks for your review of this post. Mike K./Swede70
-
In relation to Mark's comments and questions: Concerning the work outsourced to 3 Amigos, the decals made up wouldn't constitute a full set, but rather just a handful of images that ACME didn't provide as tampo prints that might otherwise have been retained on their prefinished 1:18th diecast release. I also worried about the cost of everything, feeling it best to rely on my personal container of waterslide decal sheets collected across time to fill in the contingency/accessory decal markings with cleanly registered images on hand versus commissioning markings that I thought and feared would either be of equal quality or lesser quality at best. As things turned out, I think the product delivered by 3 Amigos is considerably better than what the late Kenny Terry was able to produce as well as anything I've received from Patto's Place in Australia. I don't think S. Lopez at 3 Amigos Decals has added what was in essence 'my' custom work order to his range of offerings, but if he's receptive to shrinking down what he has on file to 1:25th to suit your needs, I'd say approach him and go for it. He outsources his printing to another firm in the United States (3 Amigos Decals does design work in Mexico), while the print firm is very likely using technology that the home rooted or cottage industry hobbyist couldn't hope to afford or employ. I was very agreeably surprised as to how good the 3 Amigos product was and how fast the turnover proved concerning the work performed for me. I'm glad to read that you've been able to obtain the Patto's Place waterslide decal art for your 1:25th project in turn, while for mulling the qualities of a similar project in the same scale obtained from PP in the form of his '71 Penske Javelin sheet, it certainly looks clean enough for me and undoubtedly usable. Some of the 1:18th sheets I've ordered for possible use on a '70 Autodynamics Challenger project as well as a '70 AAR 'Cuda project have been less impressive, good perhaps for large solid color characters, but decidedly disappointing with regards to the smaller contingency/accessory decal markings which were clumsily rendered and of poor quality. Usually the way to go is to combine the best rendered markings/decals from a multitude of sources consistent with coming up with the strongest collection of materials that reflect the right design, color choice, size, vibrancy vs. opaqueness or transparency, reliable adhesion - and not so rare that you'd not have the option of stacking duplicate images to brighten up everything. My Dan Gurney '70 'Cuda race retirement ride has PP door numerals set slightly further apart versus what was seen early season, and even if nothing else on the PP product offering sheet was subsequently used, the solid white numeral decals worked very well and I have no complaints to register about such. In short and in sum, what works - works! - In relation to Harry's comments and advice: I just submitted a request to move a slightly lost '70 Titus Firebird thread to this subpage on the forum, hence I'll try to keep things better segregated. Until late 'we' didn't have a separate road racing section (or something close) to post within and upon in relation to the Model Car Magazine Forum, although happily for recent developments the situation has altered. For the light volume of my posts and on-again, off-again commitment to various projects, it didn't seem out of bounds to bundle my period Pontiac SCCA Trans-Am projects onto one thread given people often find individual project threads slip away and vanish should such not be routinely updated. Further up this thread people have gently asked to be directed to what was posted before, while I've tried to comply with such wishes for pasting in this and that link. A lot of my resin casting efforts also feed like-themed projects, hence when something is duplicated and themed just-so, all the Pontiac (in this instance) projects are nurtured a bit and pushed further along versus plastic kit work that reflects a person restricting their focus to a single project at a time and no other. Small batches of things cast and fabricated to support small batches of projects like-themed then, while soon I'll have the decal art for the Gray Ghost (both the 1:25th and 1:18th efforts) alternately revised or commissioned to push those projects ahead, and will likely bond the flare work to the 1:18th shell given I've developed a bit of confidence concerning how that can be done for work on the '70 Titus Firebird. I'm still learning how to do this, suffering if you will from the usual pressures of having my ambitions outpace my knowledge and/or skill set. Thanks... Mike K./Swede70
-
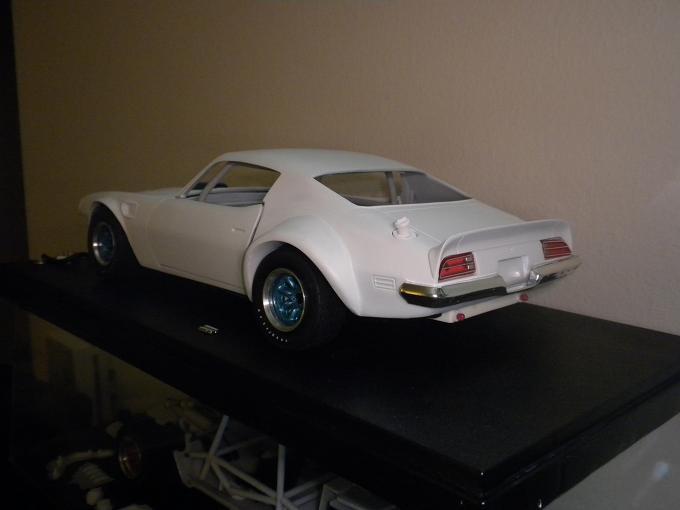
Just an update in brief concerning my '69 Daytona 24HR class-winning Jerry Titus/Jon Ward Firebird project based on the ACME tribute release. Fill in markings were negotiated out as custom work undertaken by 3 Amigos Decals. ...the Prestolite contingency/accessory decal has since been replaced, although most everything else is good. Done by 3 Amigos, the driver's i.d., the Sylvania Electric logo, the 'Paint by Mike Shields' lettering, as well as the odd motif seen atop the rear wheel arch opening represent new additions. Other decals are a touch tiny given they are repurposed 1:25th scale waterslides pressed into service here. Lamps to illuminate the door roundels stand to be fabricated and added soon. . ...while this would be a good view of the artwork added atop the rear wheel arch opening on either side of the model. Easily missed for reviewing period photos, I was very impressed for the effort made and the results achieved here by 3 Amigos. The chromed wheel arch trim worked up by Lane/Exact Detail has been cut out of this example, while notice too that I've tried to disguise the thickness of the panel work around the arch openings to suggest thin panel work stampings versus a clumsy and too heavy to be believed body casting. Mike K./Swede70
-
Greetings, Finally working up the courage to bond the rear flares in place after having created urethane molds of the flares should anything go seriously wrong, here will be seen the body in primer. Some small quirks and problems still need to be seen to, but mostly it's good. Negotiating out better custom decal art will form the next step, whereas it's an odd experience for me to just apply a bit of paint and noticing dramatic changes when my usual practice is to adjust, adjust and adjust which isn't nearly so transformative if the reader understands what I'm saying. Soon the interior and chassis and roll cage will receive paint consistent with actually seeing one of my projects to a solid conclusion, and more in the way of good updates can be shared. Thanks... Mike K./Swede70
-
1:20th scale Shocking Line 1970 Ferrari (1971 spec.) 512 M diecast
swede70 replied to swede70's topic in Diecast Corner
Thanks for your input and guidance as to the differences manifest between the variants of the 512 M and the one-off 512 F. I'd read Donohue's The Unfair Advantage and carry with me some remembrances of differences between the Kirk White/Roger Penske Racing 512 bodywork and aero configuration as contrasted to the factory cars, but really hadn't much appreciation or strict knowledge to discern the smaller frontal area of the solitary 512 F. Darn - but one refinish choice then! Again - I appreciate the interest displayed and the guidance afforded for the images posted. Mike K./Swede70 -
1:20th scale Shocking Line 1970 Ferrari (1971 spec.) 512 M diecast
swede70 replied to swede70's topic in Diecast Corner
Thanks for your input. I'm not well versed in the intricacies of the 512 and it's maturation (i.e. I tried to make some edits so-prompted), although happy all the same to have an example in scale. It doesn't seem that Edison/Shocking Line lasted for so very long as a going concern, while happy to note that another passing through has been able to secure examples of interest (i.e. your Alfa Romeo 33) for not so much. Kind regards... Mike K./Swede70 -
Greetings, For years I was half-tempted to purchase a slightly damaged example from a friend who sets up at a local toy show, although with the passage of time I've been able to secure three of these toy/diecast metal sports prototype racers. The Ferrari 512 S and 512 M typically competed against period rival Porsche 917's, while both fill the screen when viewing Steve McQueen's Solar production of Le Mans (the film then) from '71. The image above represents Swede Savage and Peter Revson NART entry at the 12 Hours of Sebring where they posted a DNF. Concerning the models, the finish on these isn't amazing, the decal work iffy at best, although they are fun shelf pieces even as 1:20th isn't a common scale. Asking prices are all over the map for these, being either $150+ (typically with complete original packaging, plus the two keys enclosed) or fetching almost nothing, with the models seen being picked up for $15-$20 tops. The third example I possess is out of sight, having been purchased for parts and the all important key. A small length of square plastic stock can be used as a surrogate key which allows one to remove the wheels, lock or unlock the doors, and access the battery tray beneath. Sort of like the Schuco metal models where one could remove the wheels of such with a special tool provided, the tiny range of Edison/Shocking Line (odd name then) Ferrari 512 models had functional headlamps and tail lamps, functional steering, opening doors/engine cover/front clip, and delicate functional suspension. One example I purchased still had it's FAO Swartz branded AA batteries inside, likely being a pricey purchase for some kiddo visiting NYC back in the day. Thanks... Mike K./Swede70
-
Very nice indeed - thanks for sharing. Mike K./Swede70
-
Italeri Ferrari 275 gtb
swede70 replied to TC's topic in WIP: Other Racing: Road Racing, Land Speed Racers
Looks very nice indeed. Thanks for sharing... Mike K./Swede70 -
1968 RKE/JRT SCCA Trans Am Javelin
swede70 replied to swede70's topic in WIP: Other Racing: Road Racing, Land Speed Racers
...while this would be a pair of reference images for a '68-'69 trunnion front suspension with taller, solid suspension turrets, and further, with the fenders in place. Use of a a separate lip beneath a standard Jo-Han body shell wide enough to mount panels or panel work beneath solves the problem of creating an undercut profile (where dictated or required) that nevertheless fits tightly above along the whole length of whatever assembly is worked up. Thanks... Mike K./Swede70
-
1968 RKE/JRT SCCA Trans Am Javelin
swede70 replied to swede70's topic in WIP: Other Racing: Road Racing, Land Speed Racers
Greetings, Long unenthralled with the inner fender/inner wing detail afforded by Jo-Han even within the space of their SC/Rambler tool (modified iterations included and seen further up this thread), hope exists to scratch build something that could be fit to my range of Javelin Trans-Am projects. Differences rooted in the use of and for later abandonment of the trunnion front suspension design for ball joints would be factored in, as well as subtle alteration of dimensions and quirks characteristic of the Jo-Han '68-'70 chassis versus the '71 and later chassis. Seen below is some very basic and preliminary work consistent with setting the stage, as well as a few reference images courtesy of the 1:1 restoration crowd (a '70 with the new ball joint front suspension turret design being featured here then): Back to my little scale world, a dead '69 AMX body gave it's life to afford material from atop each fender as well as the cowl area to ensure whatever might be added below will mate seamlessly to the underside of any Jo-Han Javelin shell, while the next step would be to fabricate carefully shaped fill panels to flesh out the front subframe top surfaces situated further down. If all this comes off, then the rest might be sensitively fleshed out. Early days then, and while the engineering hack is pretty ugly, at least the dimensions for such seem stable and true enough to allow for shameless experimentation. Thanks.. Mike K./Swede70
-
Looking very nice indeed, anticipating further progress for the topic is a favorite one. Thanks for sharing... Mike K./Swede70
-
86 monte carlo dirt st.stock
swede70 replied to cheyenne93's topic in WIP: Other Racing: Road Racing, Land Speed Racers
Looks very good. The wheel color choice seems entirely appropriate, while the Hoosier sidewall markings also look the business. Thanks for sharing... Mike K./Swede70 -
1968 RKE/JRT SCCA Trans Am Javelin
swede70 replied to swede70's topic in WIP: Other Racing: Road Racing, Land Speed Racers
...while this would some group shots of my later Trans-Am Javelins receiving roll cage work one at a time consistent with ensuring reasoned symmetry if nothing more. It's a bit easier if similar work is undertaken across the three seen here lest I forget lessons learned for going back and attempting to generate like results on what often came out of the same shop in-period. Some bars still need to be added, while each is a compromise given what Jo-Han afforded in terms of space within each interior. Thanks. Not a great angle, but at least efforts to ensure that the cages fill out the space afforded, that they rest tightly without strain and appear reasonably symmetrical can be appreciated at a glance. The wet sump oil pans are resin copies of the early issue part which included hardware along the mounting flange. Given I'll need to create either Aviaid extended wet sumps or Weaver Bros. dry sump pans, it's nice to have an easily replicated starting point as it's certain I'll waste a few examples learning to do what I must. Mike K./Swede70
-
1968 RKE/JRT SCCA Trans Am Javelin
swede70 replied to swede70's topic in WIP: Other Racing: Road Racing, Land Speed Racers
Thanks again for the kind notice... Not hugely exciting this, but seen is a scratch built shifter platform intended to be shared across Javelin projects mated to the irregular contours of the the Jo-Han Trans-Am Javelin floor. It still needs a bit of help, although it's mostly there. Also made out is one my resin battery boxes resting quietly in the passenger's side front footwell, although some further material will be added to it. Of passing note, the interior is a very rough casting sold by a certain unsteady and less than reliable source on eBay. One can make out evidence of core shift along the driver's side door trim top facing the camera, while even more flash was witnessed when this hulk was pulled out the box it came in. No effort was made to integrate the locating tabs into the casting that otherwise cleanly site the part to structure provided by Jo-Han and hidden within the tail panel area (i.e. nothing hangs off the back of the rear parcel shelf as one would expect), while in this instance the eBay seller made a very crude effort of things consistent with roughly casting the locating tabs individually and just tossing them in the box. In 1985 this would have been state of the art, whereas in 2021, it's substandard and not worth the money. Thanks... Mike K./Swede70
-
RED MCG 1/18 ALFA ROMEO Giulia Nuova super mod
swede70 replied to modifier's topic in Diecast Corner
Nice work - a good compromise given it can be hard to find suitable tires for a vintage topic even if it reflects updates consistent with what might be seen at a modern day vintage event. It's always nice too if one can introduce some turned aluminum parts or subtle photo-etched items onto a model which can help greatly to telegraph quality - something often lacking on sealed resin renditions of this or that even as costs soar. Just in short, it would be nice to have a hobby lathe, and braver still it is to do such work by hand. Your work (always) appears very clean, hence however you achieve your ends, the techniques in play clearly do what is necessary. Shuffling wheels and tires consistent with establish what's good and separating out what isn't is a constant battle with my own 1:18th scale period road racing models, while coming up with sidewall markings that represent what was appropriate in-period vs. what corporate will license now to subtly promote the brand irrespective of accuracy can be irksome if a topic calls for such. Not here though - hence just mulling things aloud. Thanks again for sharing... Mike K./Swede70