Chariots of Fire
-
Posts
2,788 -
Joined
-
Last visited
Content Type
Profiles
Forums
Events
Gallery
Everything posted by Chariots of Fire
-

KFS Michigan Loader
Chariots of Fire replied to Warren D's topic in WIP: Model Trucks: Big Rigs and Heavy Equipment
What did you use for the color coat? -
Making Tracks
Chariots of Fire replied to Chariots of Fire's topic in WIP: Model Trucks: Big Rigs and Heavy Equipment
Not so much I think. The M-20 was designed to haul tanks so I don't know that the D-7 (not the D-8) will be any heavier. The D-7 kit has arrived in the US. Just waiting for it to clear NYC. -
Making Tracks
Chariots of Fire replied to Chariots of Fire's topic in WIP: Model Trucks: Big Rigs and Heavy Equipment
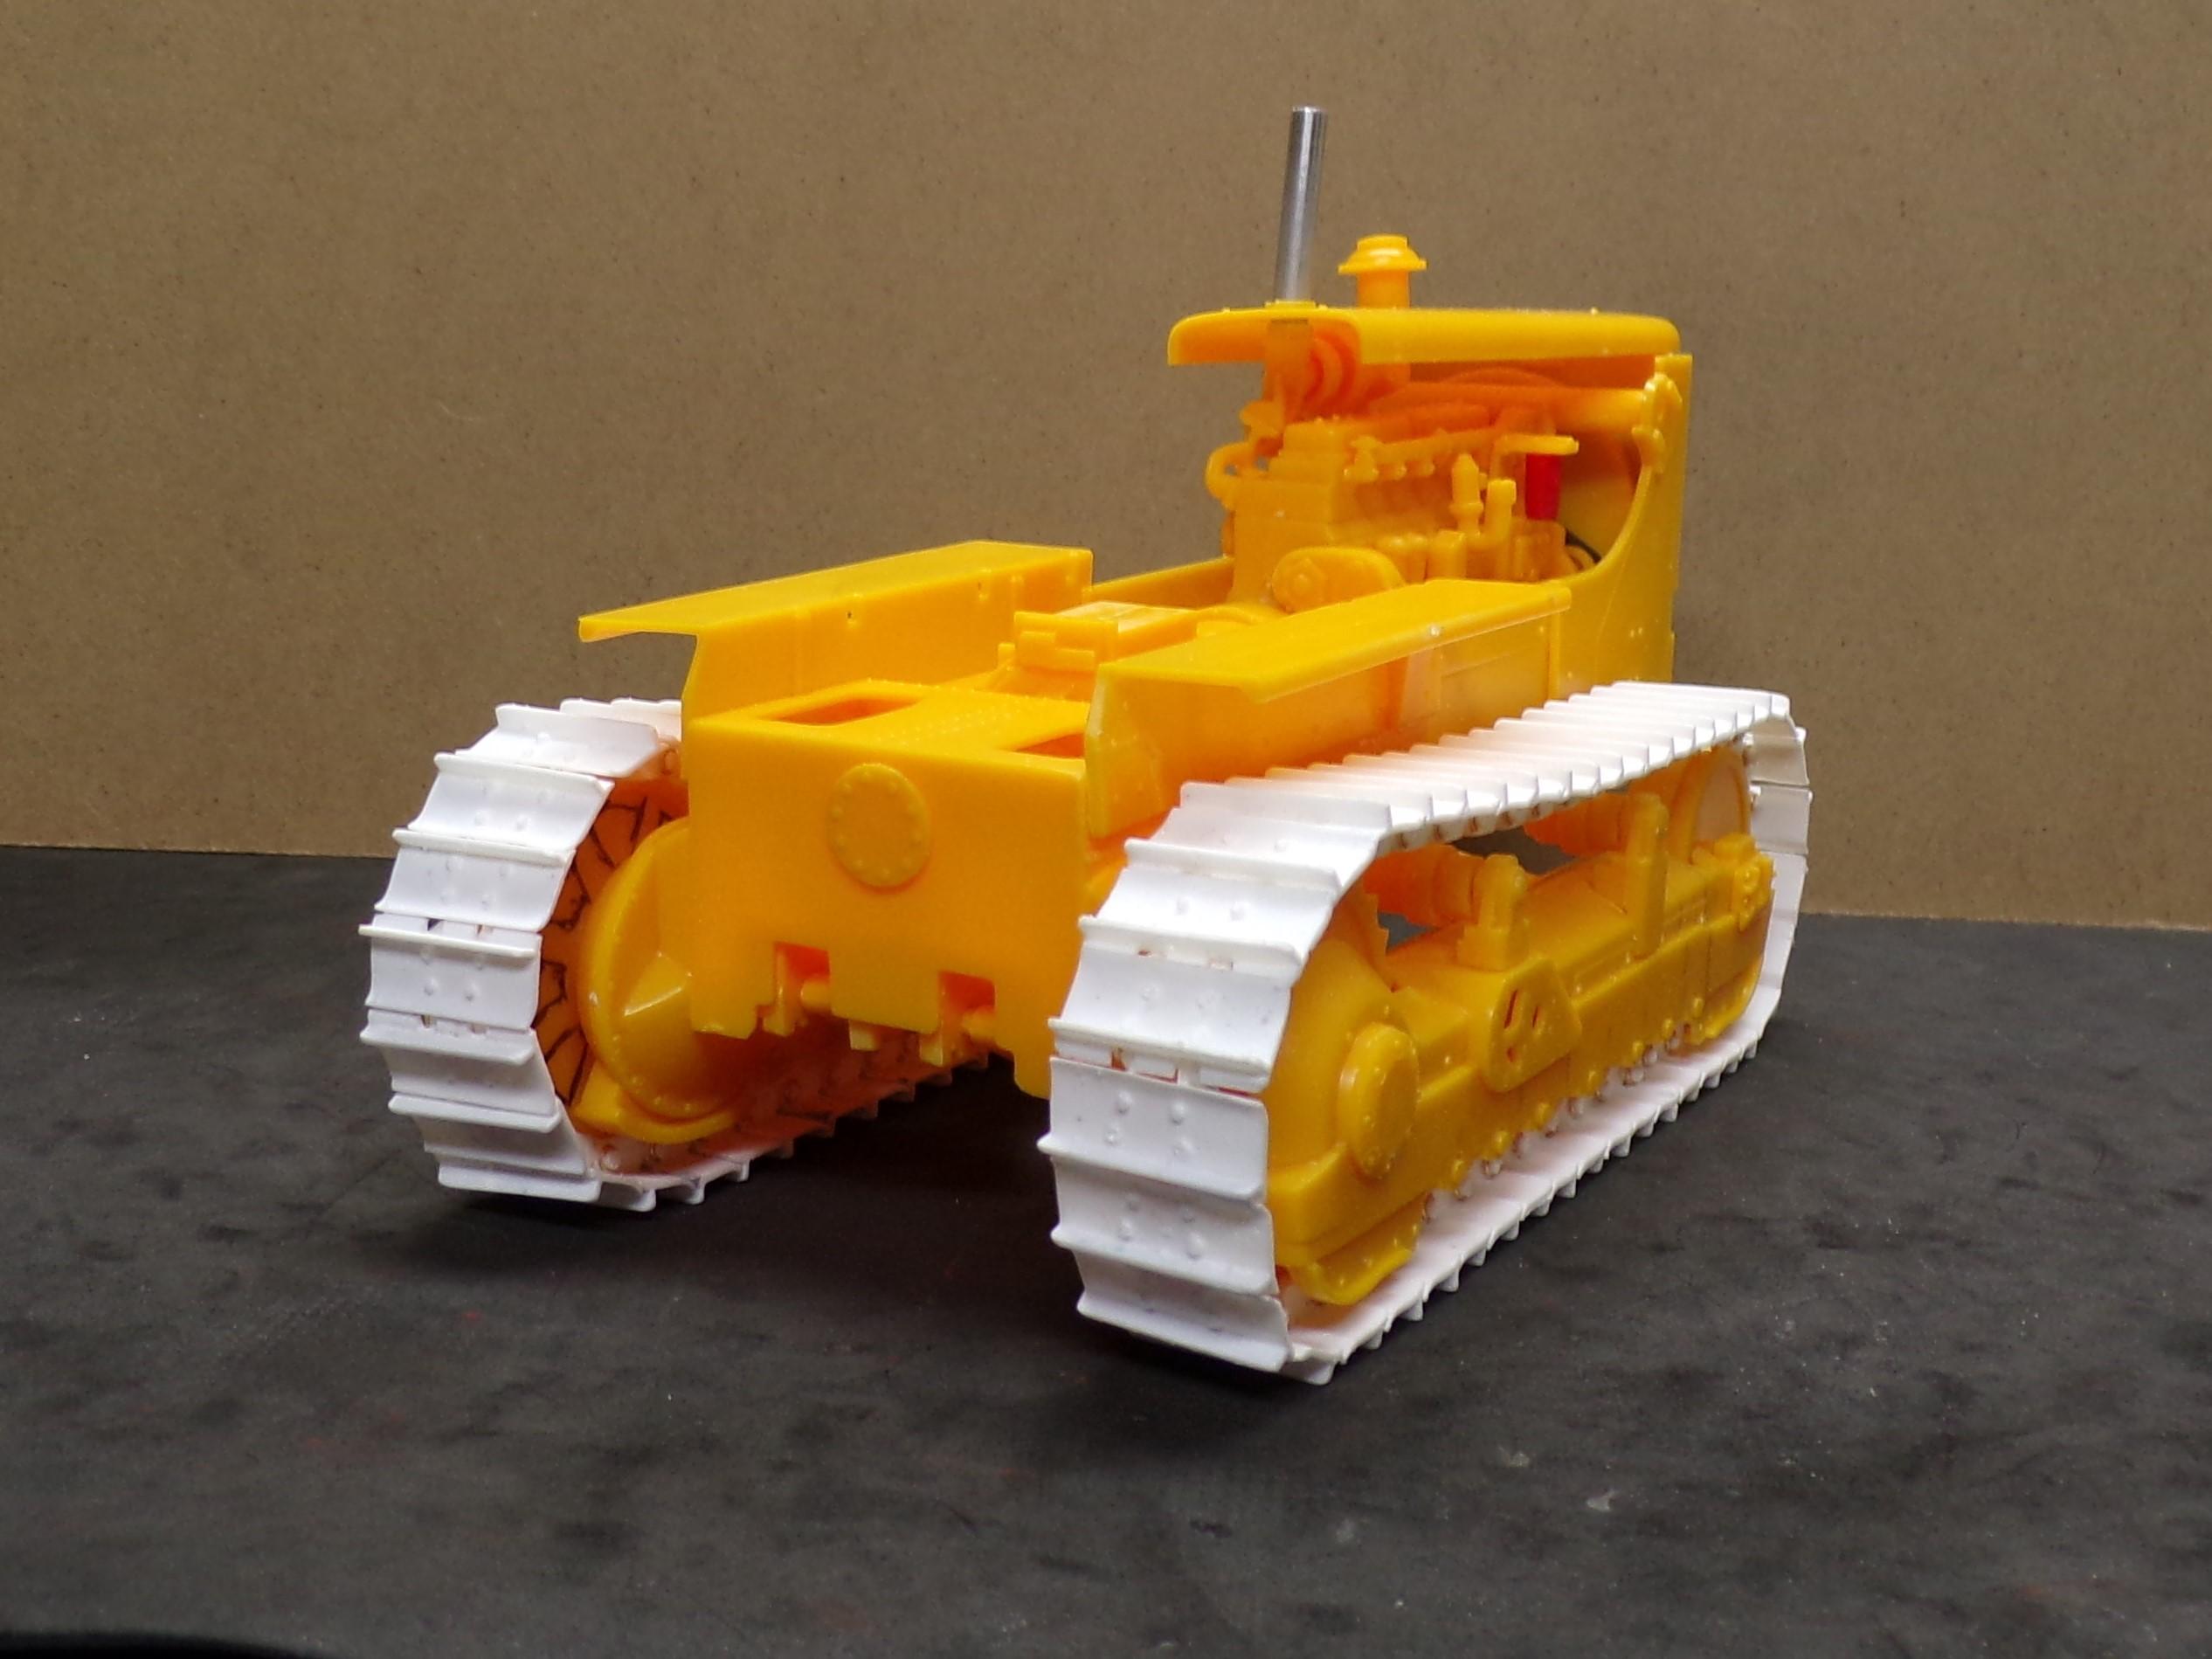
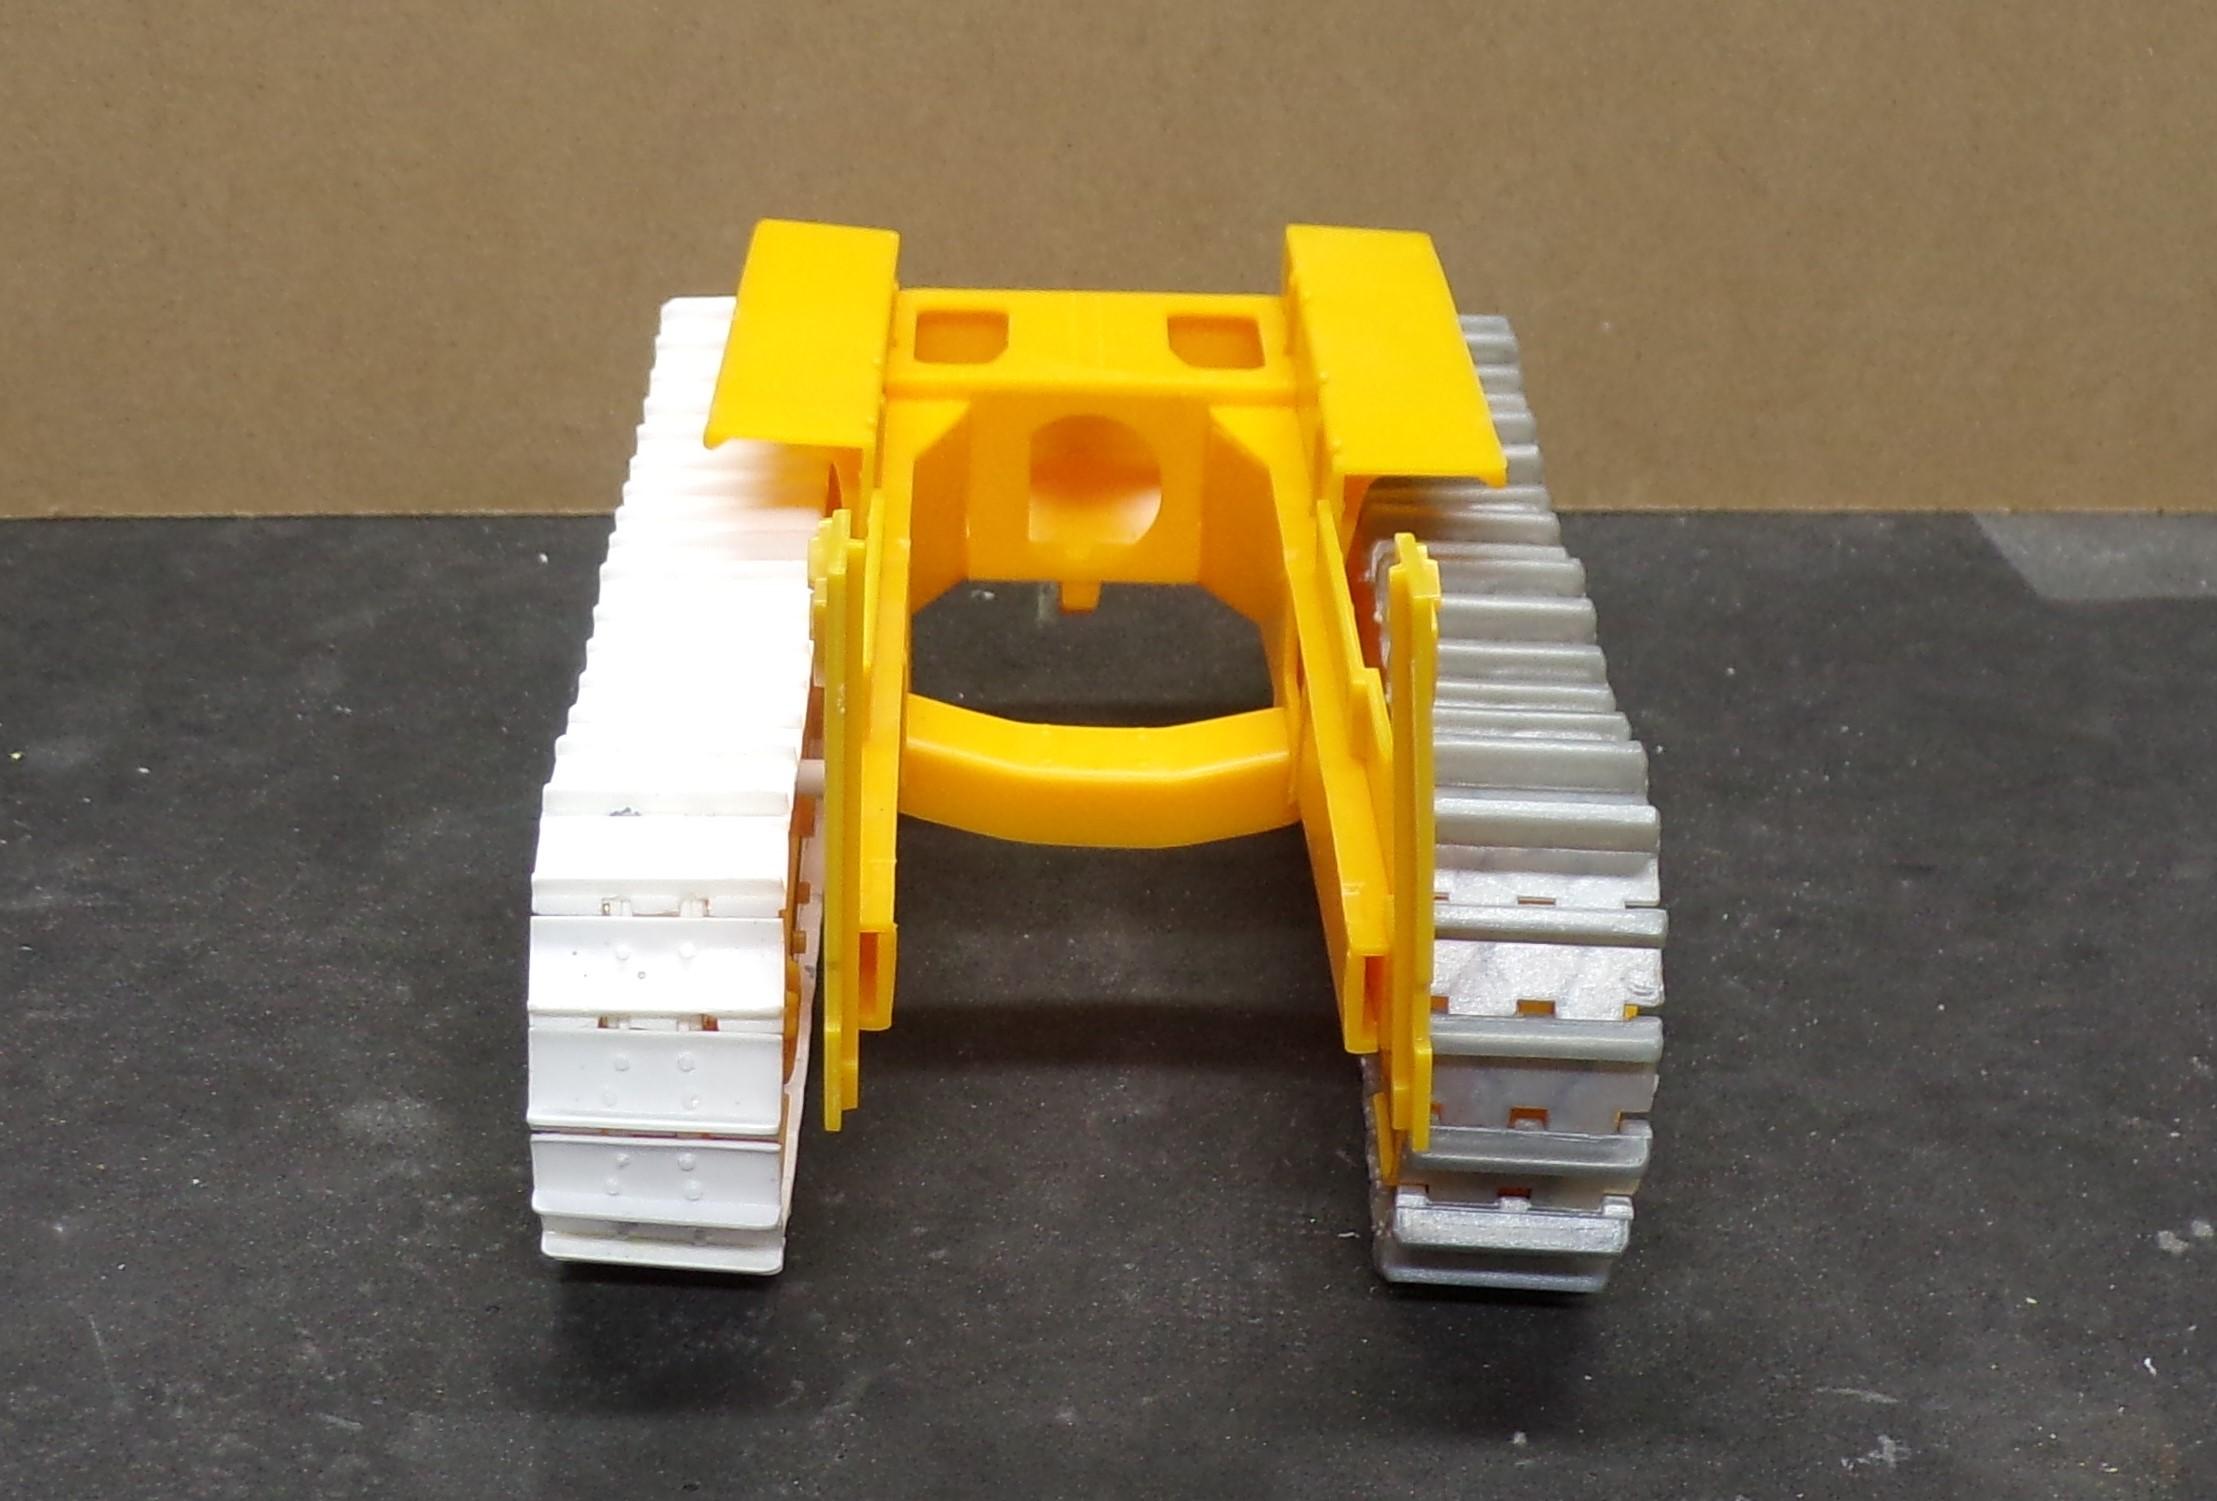
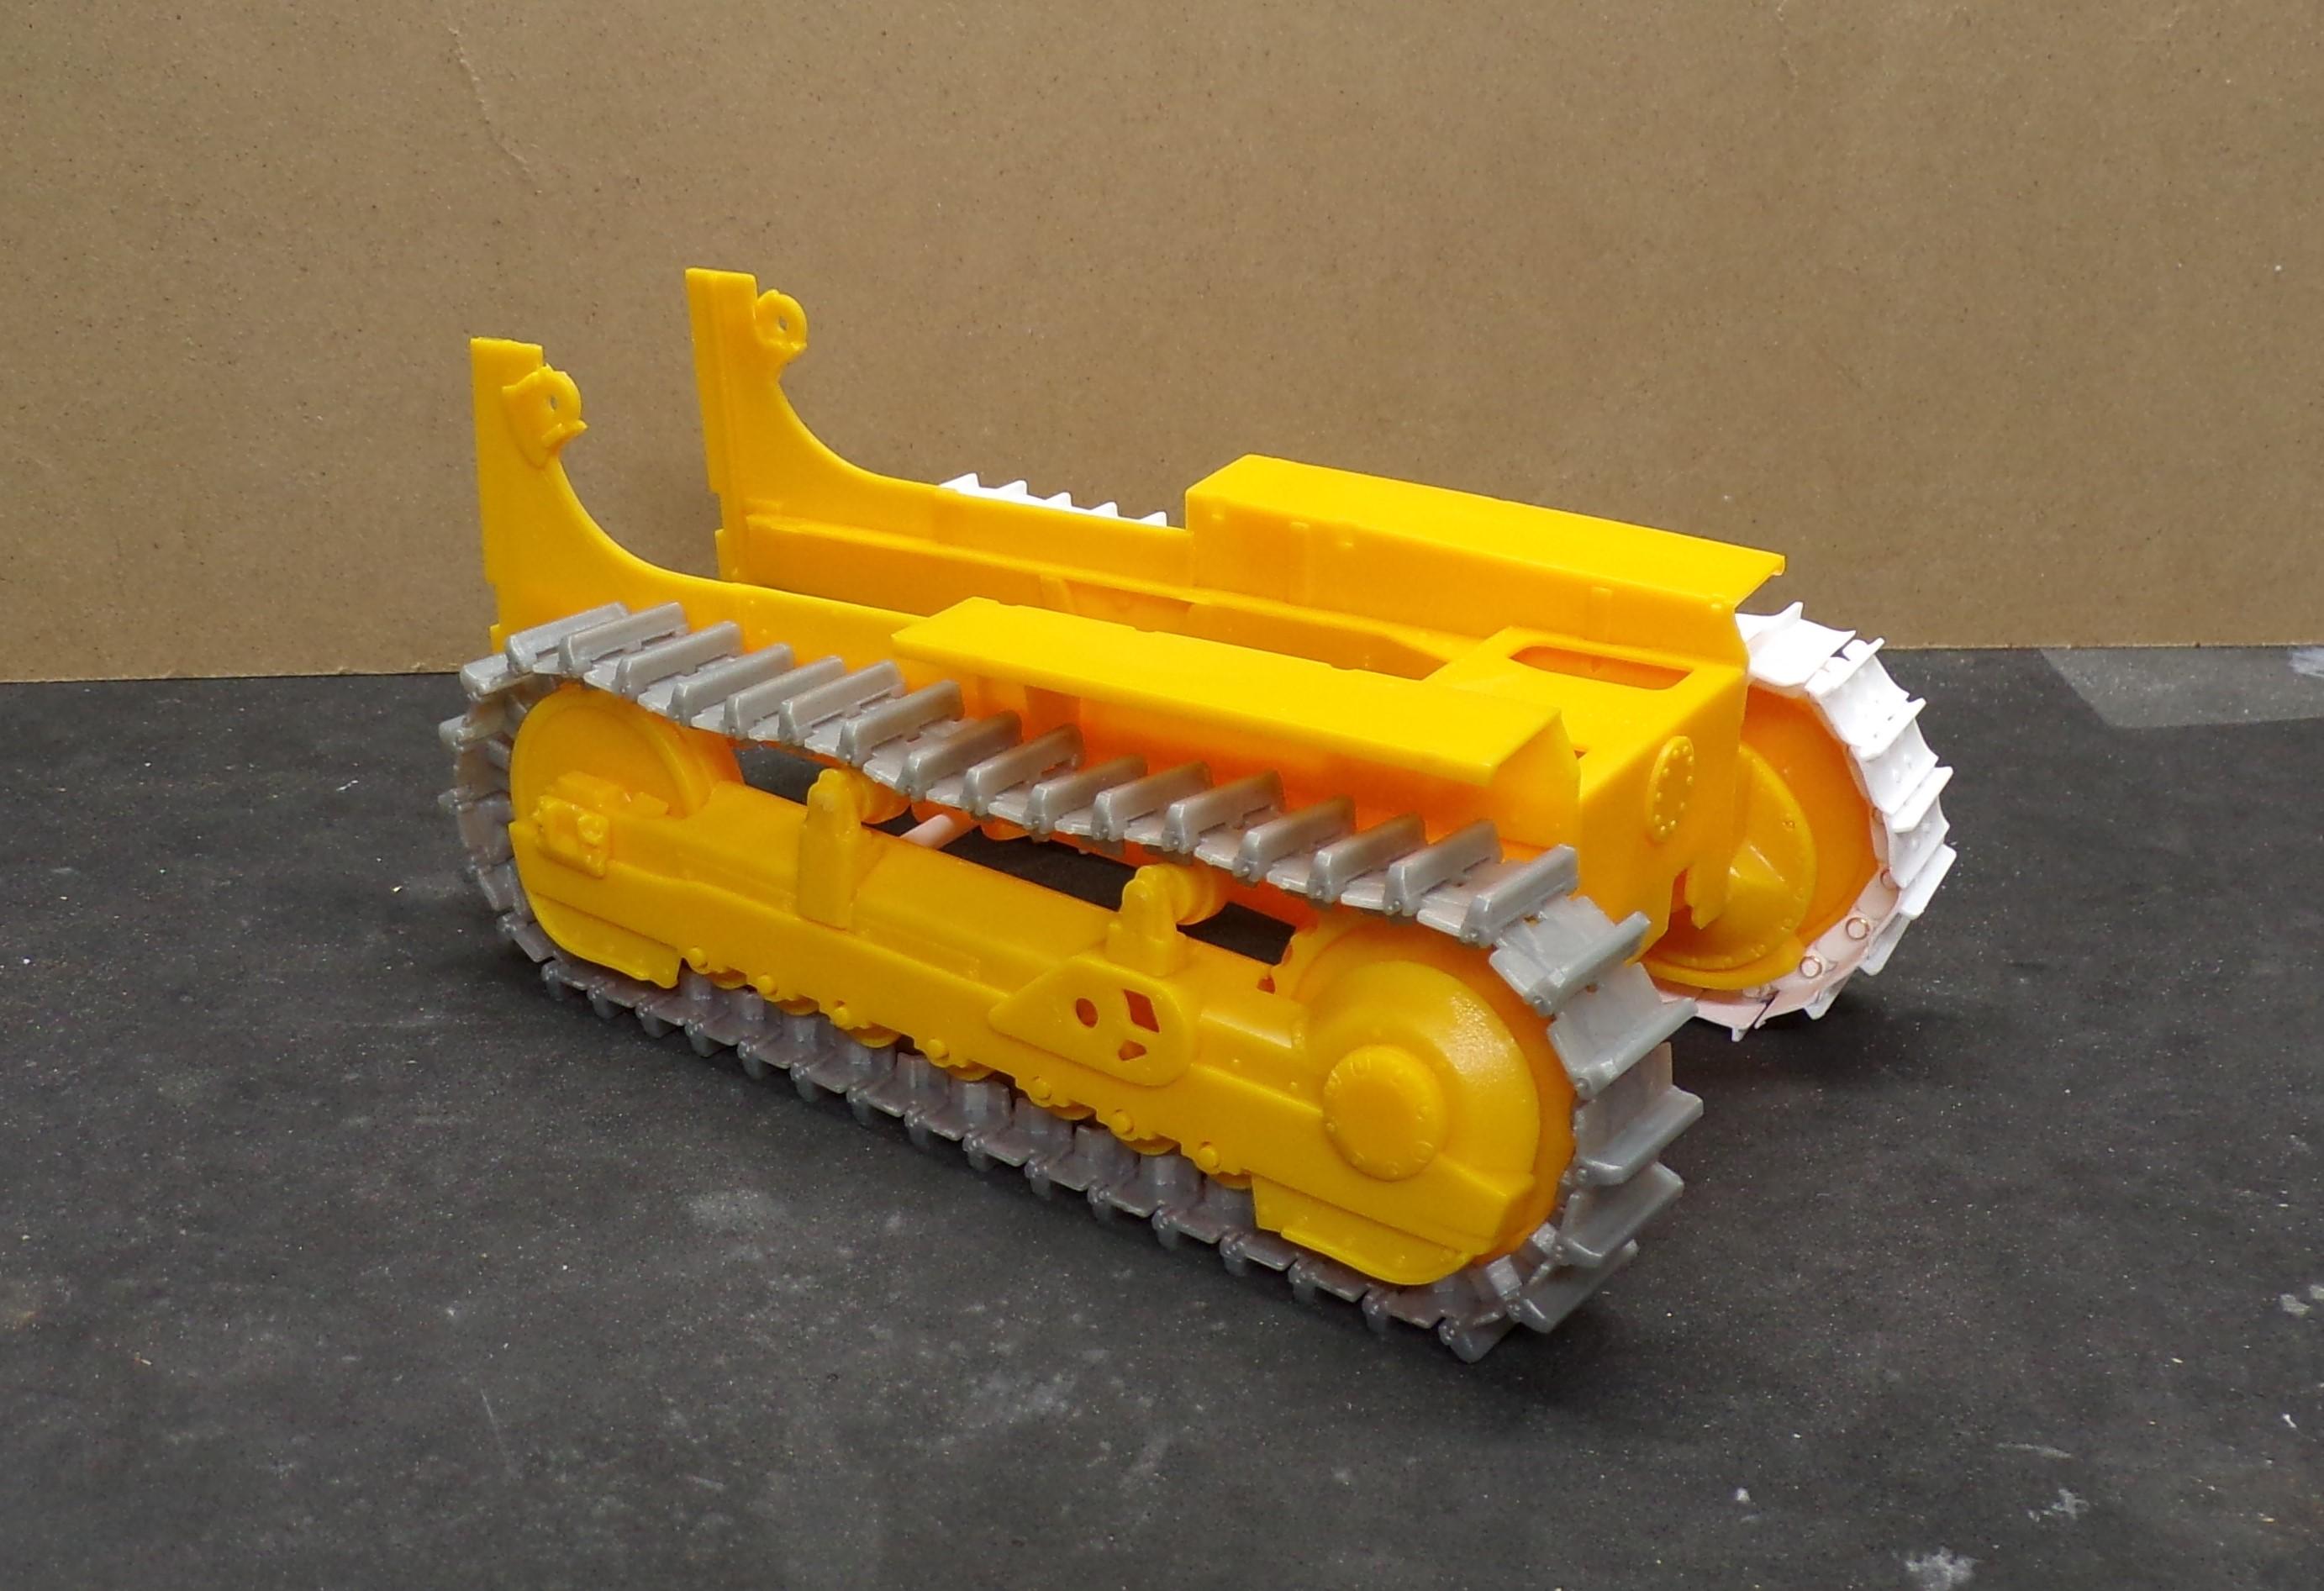
FINALLY! The other side is done. I don't know what happened during the casting process, whether one side of the AMT kit is shorter than the other or not but the second set of tracks has one less plate in it than the original side. If I put the additional plate in, the tracks are way too loose. So if nobody counts, they won't know the difference (except that I have now told you all). ? So here's what they look like on a partially built up AMT D-8. The kit was one I bought at a show and some of the parts were already together so rather than pull out another kit I decided to do up this one with some additional scratch building along the way.
-
AMT Fruehauf Tank Trailer
Chariots of Fire replied to OldTrucker's topic in Model Trucks: Big Rigs and Heavy Equipment
Those tanks are so much bigger than the one I built. In a way I'm glad I didn't have to deal with parting lines and joints where the two halves come together. However, I'll bet the same technique could be used to scratch build one of the larger ones as well.
-
Making Tracks
Chariots of Fire replied to Chariots of Fire's topic in WIP: Model Trucks: Big Rigs and Heavy Equipment
You got that right, Steve! A very slooowww process indeed! I will put them away for a rainy day project!? -
Making Tracks
Chariots of Fire replied to Chariots of Fire's topic in WIP: Model Trucks: Big Rigs and Heavy Equipment
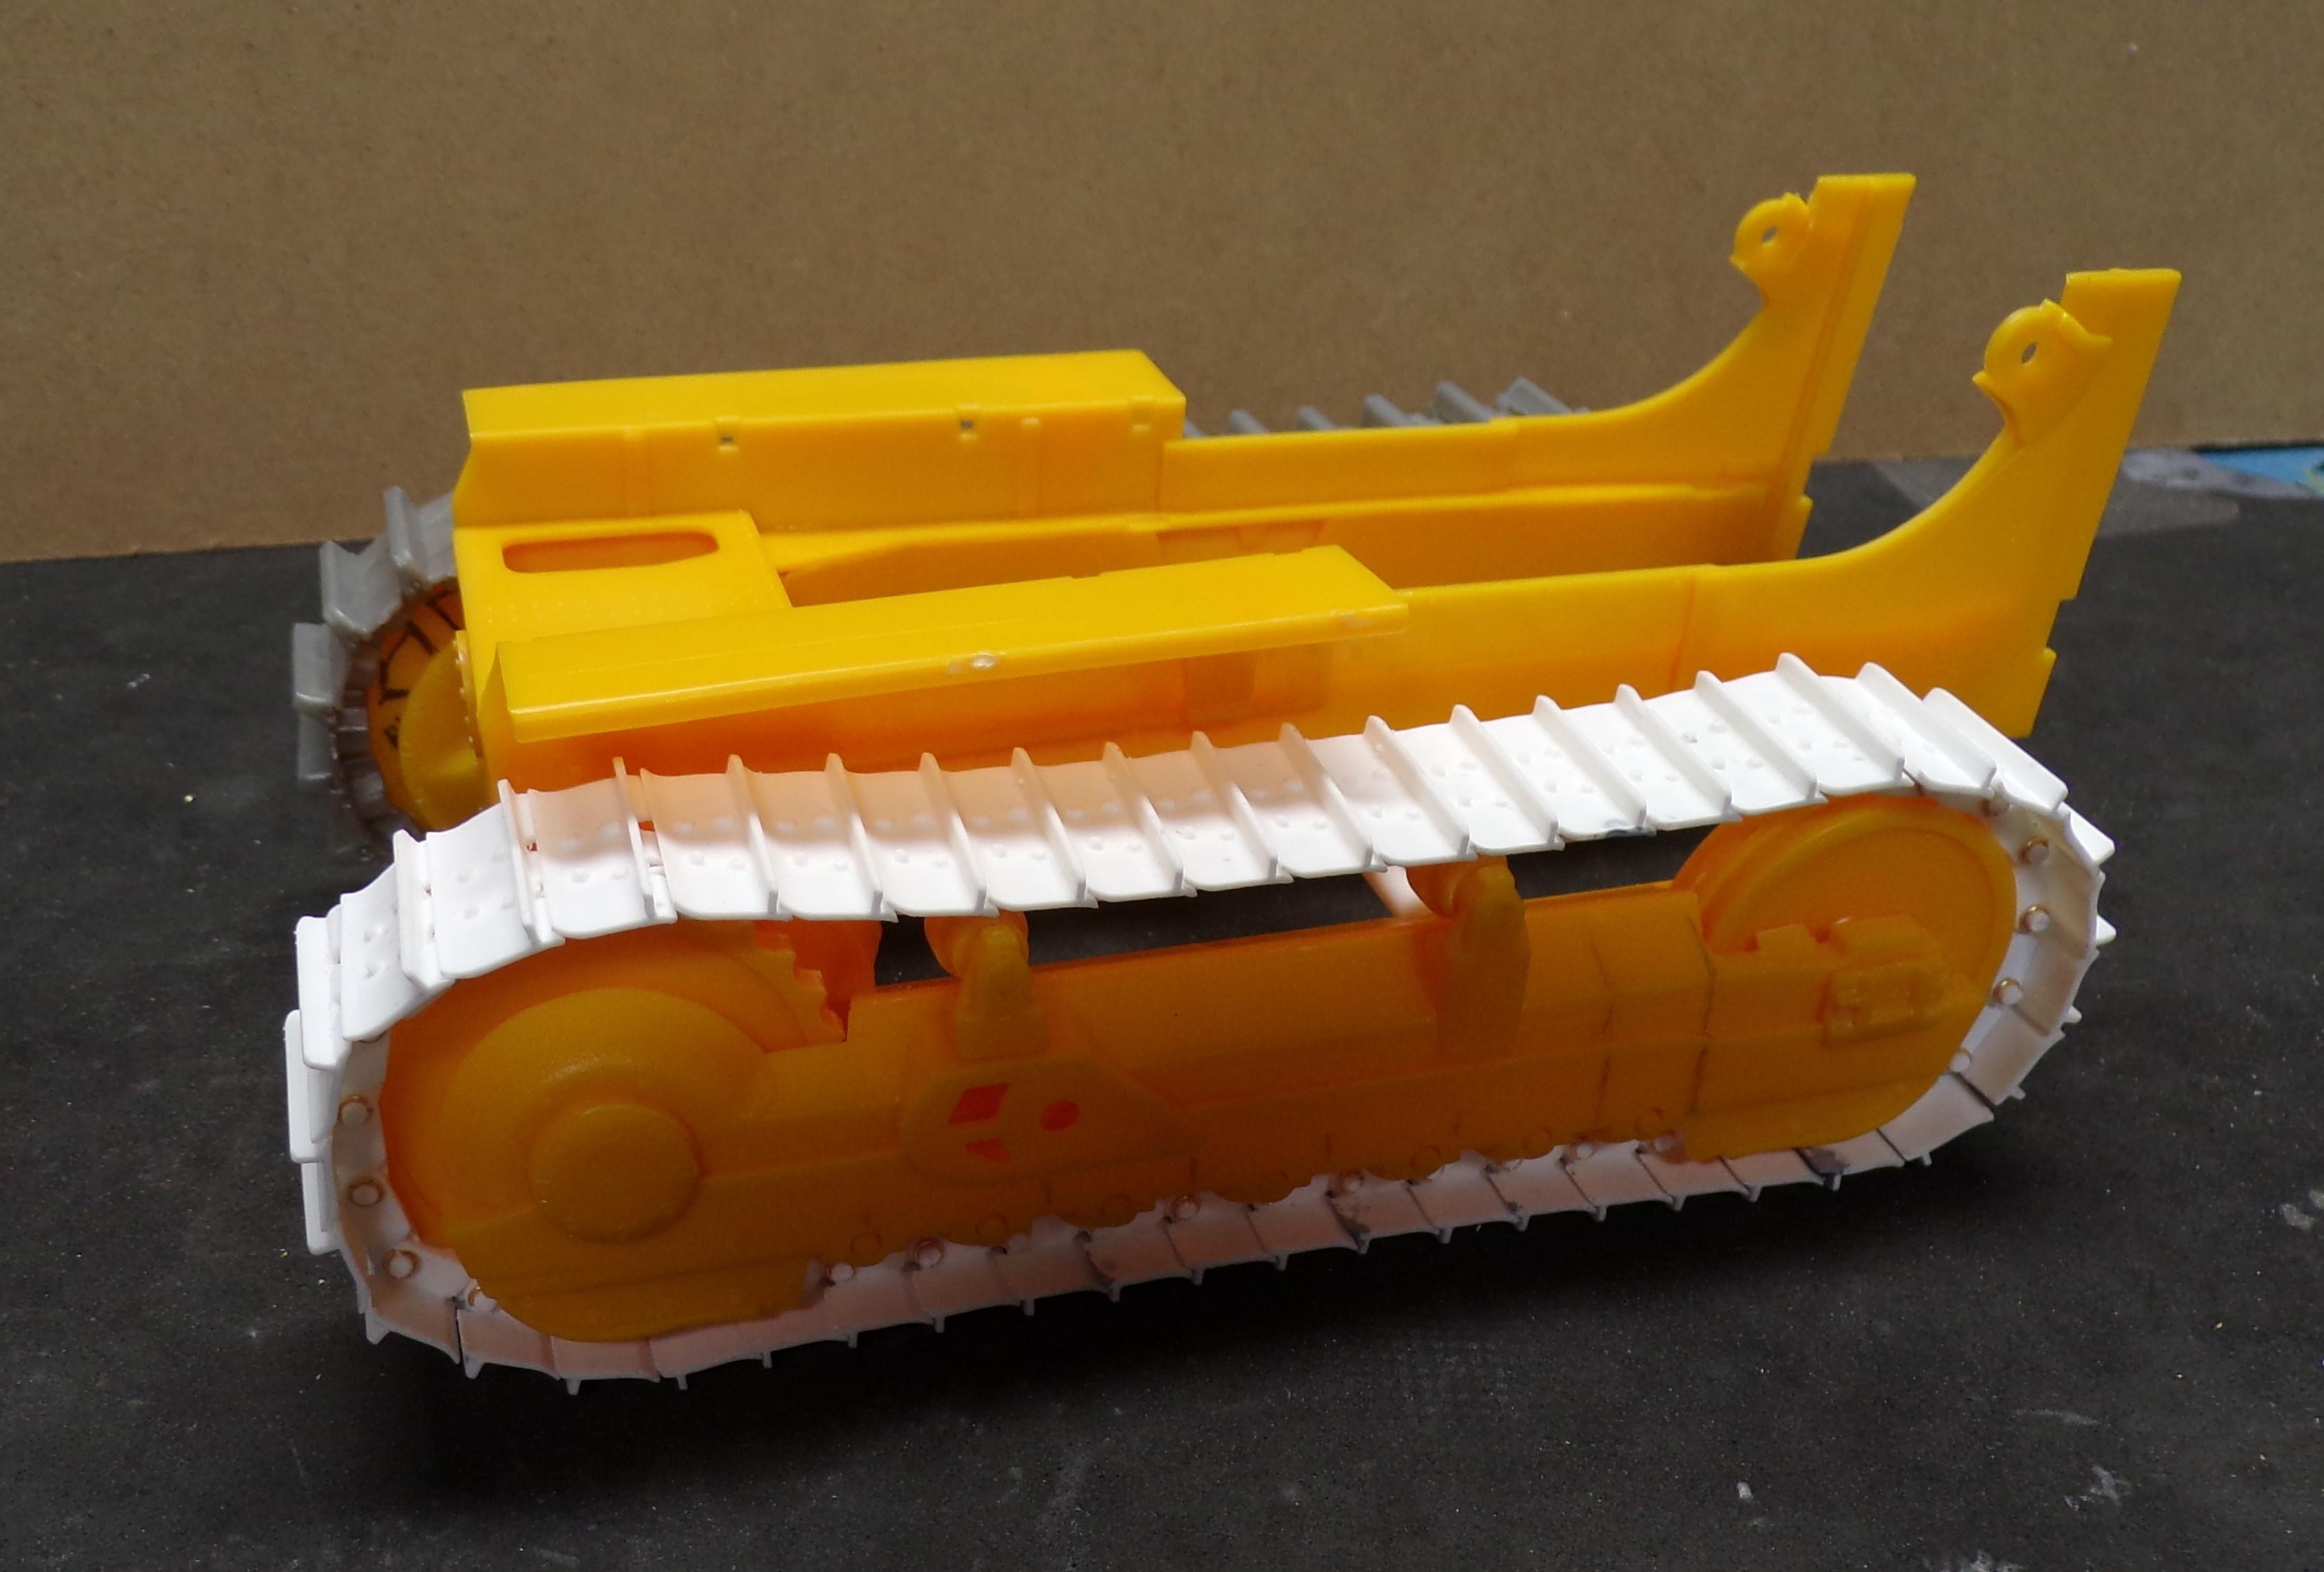
Got one side completed! There are 44 separate pads and links on just the one side with 45 connecting pins. They fit the D-8 sprockets quite well. I ground down the drive sprocket just a bit so that the pins fit into the notches better. Not to get the other side done!!? Silver tracks are from the AMT kit. White ones are mine. I'm happy with the results.
-
AMT Fruehauf Tank Trailer
Chariots of Fire replied to OldTrucker's topic in WIP: Model Trucks: Big Rigs and Heavy Equipment
I like it! Nice color combo! -
KFS Michigan Loader
Chariots of Fire replied to Warren D's topic in WIP: Model Trucks: Big Rigs and Heavy Equipment
That is BIG!! Nice work going on there, Warren! -
Making Tracks
Chariots of Fire replied to Chariots of Fire's topic in WIP: Model Trucks: Big Rigs and Heavy Equipment
Thanks for the info, Paul. I will keep it for reference. Just made a new piece of the sprocket for the final drive. Will cast it up in several pieces to get the right thickness. I'm finding more and more about the D-8 that is nowhere near like the D-7! -
Hey, Brian. I have been accused in times past of having a shrink ray machine. However the truth is I have gnomes who work for me under the table!?
-
M-20 Prime Mover
Chariots of Fire replied to Chariots of Fire's topic in WIP: Model Trucks: Big Rigs and Heavy Equipment
Renshape comes in various grades. I use 440 grade (7000 now I believe). It is the least expensive yet retains sufficient strength and durability for working. You can find references to it on line. Not cheap BTW. But they do make samples that are reasonable enough. -
Making Tracks
Chariots of Fire replied to Chariots of Fire's topic in WIP: Model Trucks: Big Rigs and Heavy Equipment
With 3D just about anything can be printed nowdays! I haven't reached the 3D plateau yet except to order some 3D parts from someone who does that sort of thing. -
Making Tracks
Chariots of Fire replied to Chariots of Fire's topic in WIP: Model Trucks: Big Rigs and Heavy Equipment
You are right Russell. Just a bit off on the location of the connection holes and the result is a curve. I noticed that in what I am doing since each link is cast from the same mold. Fortunately this can be corrected by a bit of cleanup of the holes where the connecting pin goes. (Hope I don't get fired!) -
Making Tracks
Chariots of Fire replied to Chariots of Fire's topic in WIP: Model Trucks: Big Rigs and Heavy Equipment
Thanks, Bob! I'm just a glutton for punishment, I guess! So far I have 22 tracks done of the 36 or so that I need for one side. Also ran out of casting resin so more is on the way. -
Making Tracks
Chariots of Fire replied to Chariots of Fire's topic in WIP: Model Trucks: Big Rigs and Heavy Equipment
Looks like I'm pretty close on the workup of the tracks. I may have to tweak the sprocket drive a bit but other than that they will fit just fine. $60 is not bad. -
Don't forget the old Floquil paints for railroad modeling. Some of the best paint ever!
-
M-20 Prime Mover
Chariots of Fire replied to Chariots of Fire's topic in WIP: Model Trucks: Big Rigs and Heavy Equipment
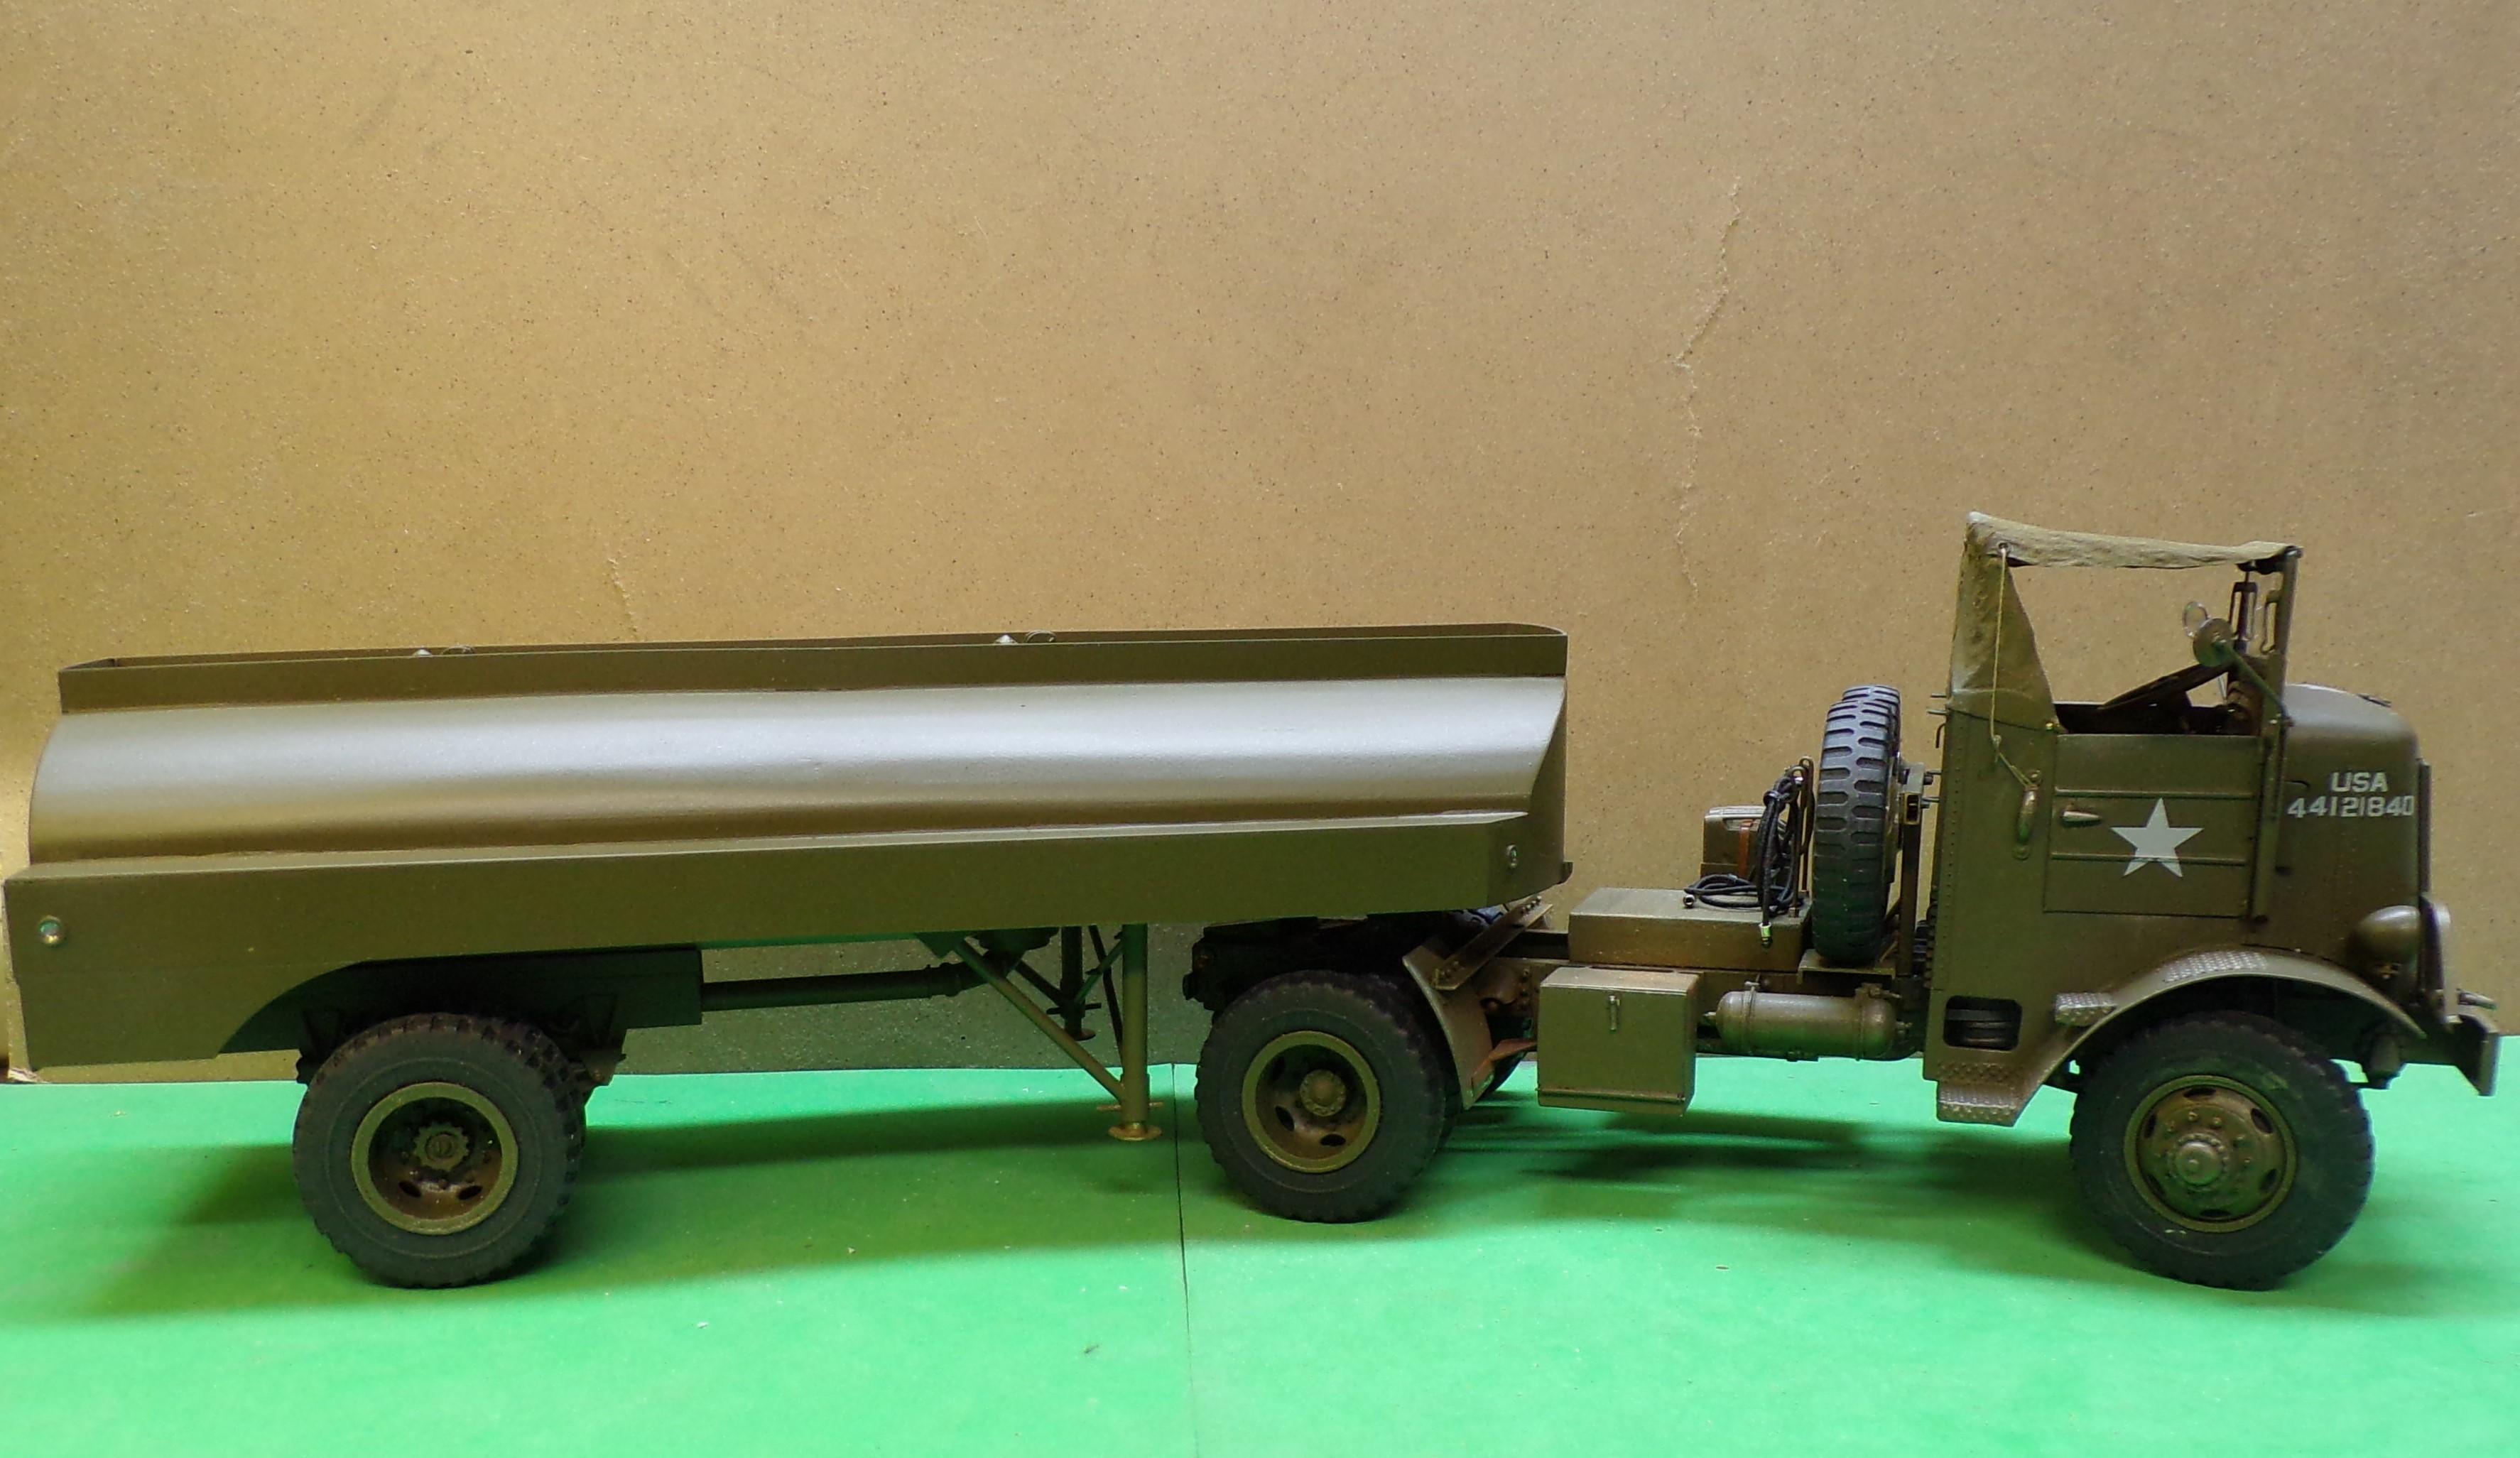
Hey, Bob. Two versions in the photo. The larger one is 1/35 scale and there is a second one at 1/72 scale beside it with British markings. I made the small one and still have the 1/35 scale one to do if I can convince myself to betray 1/25 scale building for a while!!? It was done by Merit International. The kit is exceptional in quality with MANY parts! -
M-20 Prime Mover
Chariots of Fire replied to Chariots of Fire's topic in WIP: Model Trucks: Big Rigs and Heavy Equipment
Thanks, Greg. I have a load already in progress. They carried D-7 bulldozers during the Red Ball times. Will be using the AMT Cat D-8 to start with but the tracks are being done over "as we speak". -
Making Tracks
Chariots of Fire replied to Chariots of Fire's topic in WIP: Model Trucks: Big Rigs and Heavy Equipment
This will probably be the one and only. I know there are some 3D printed ones out there but they are big $$$! -
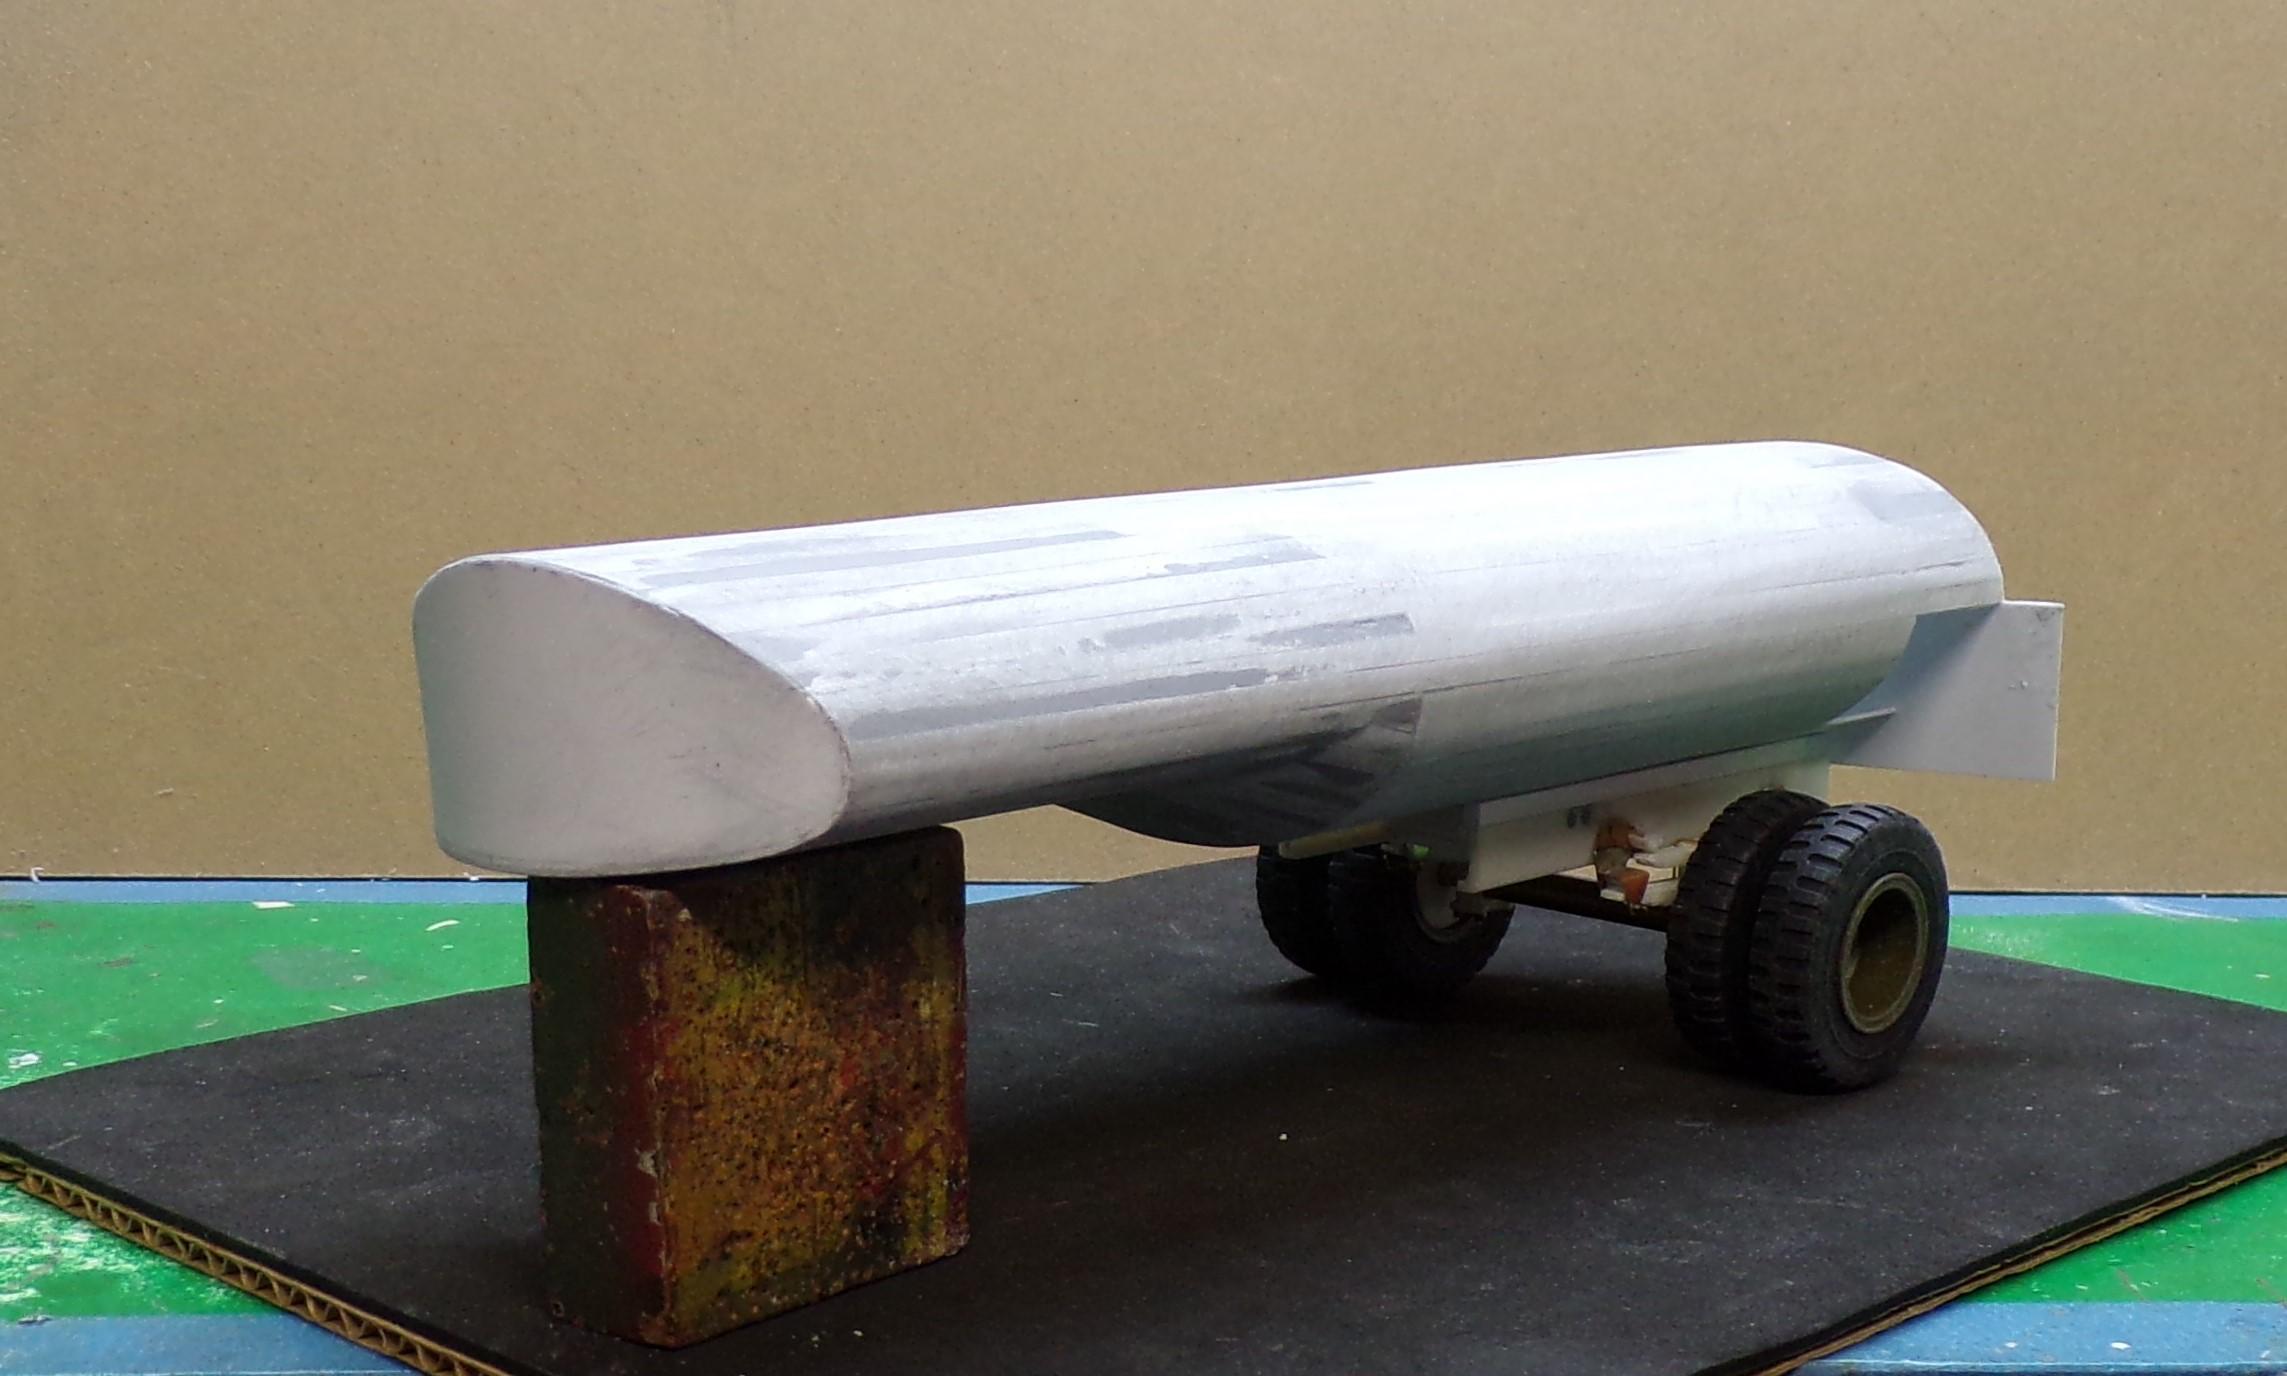
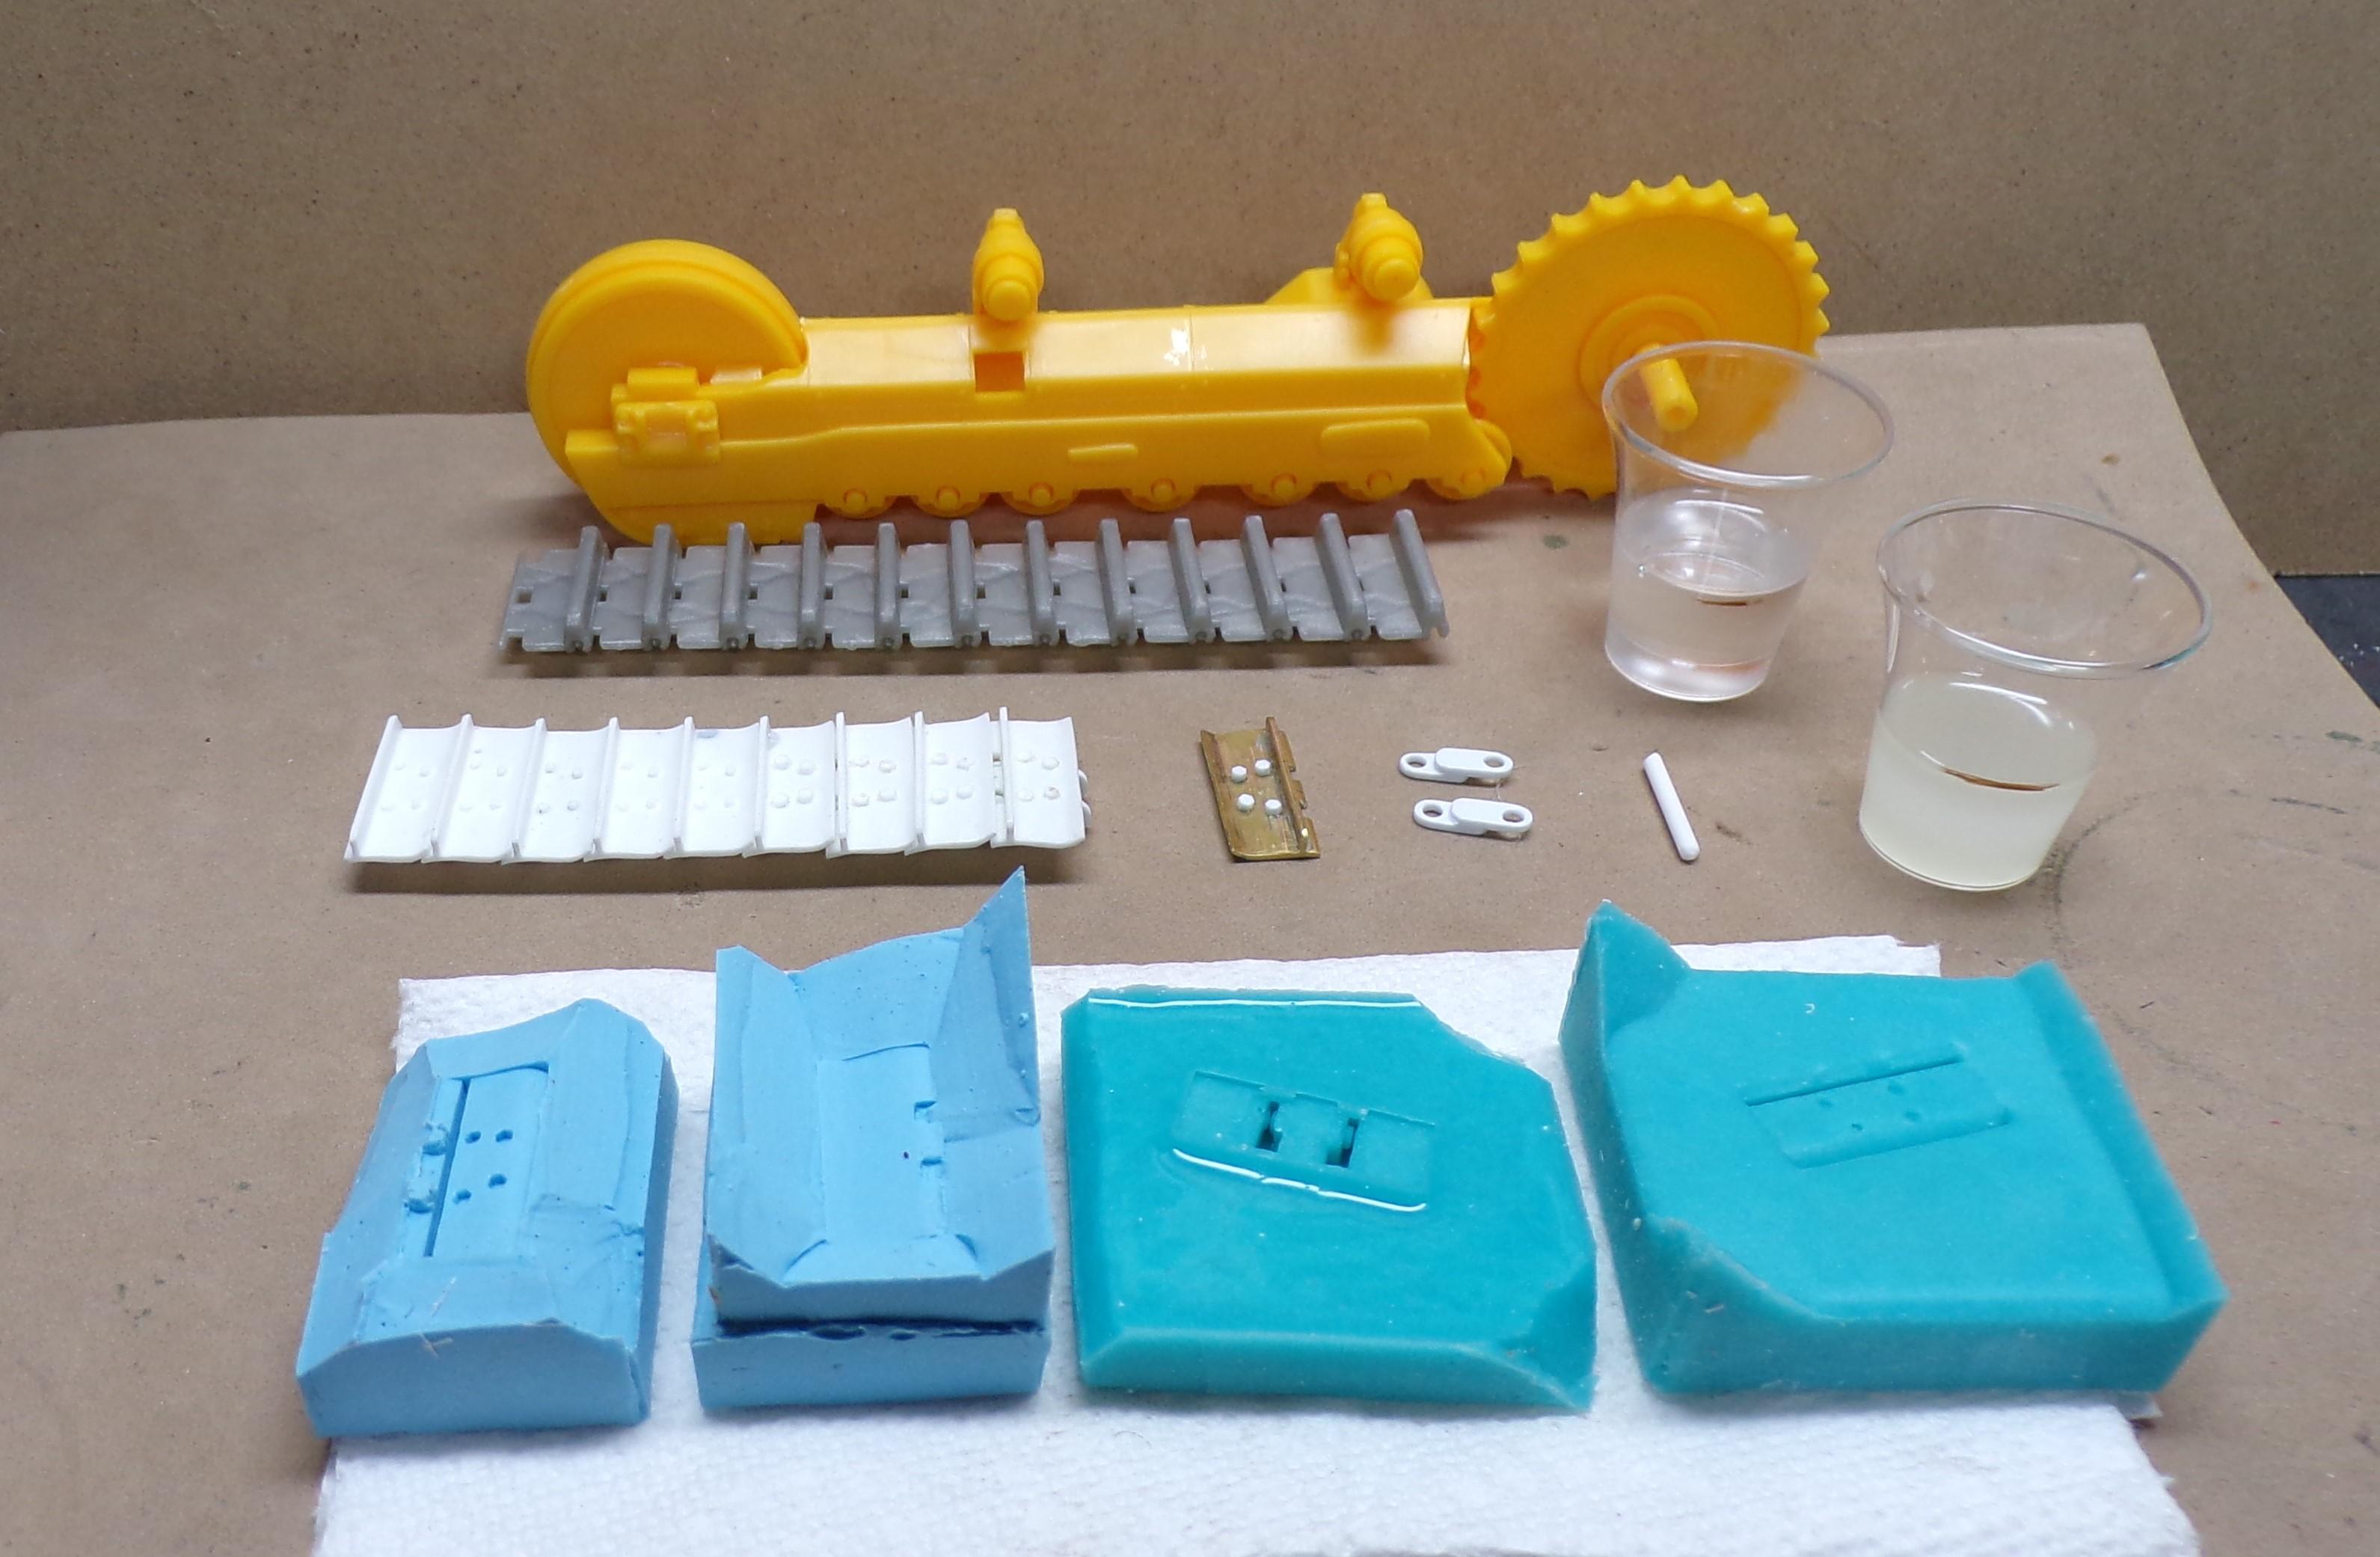
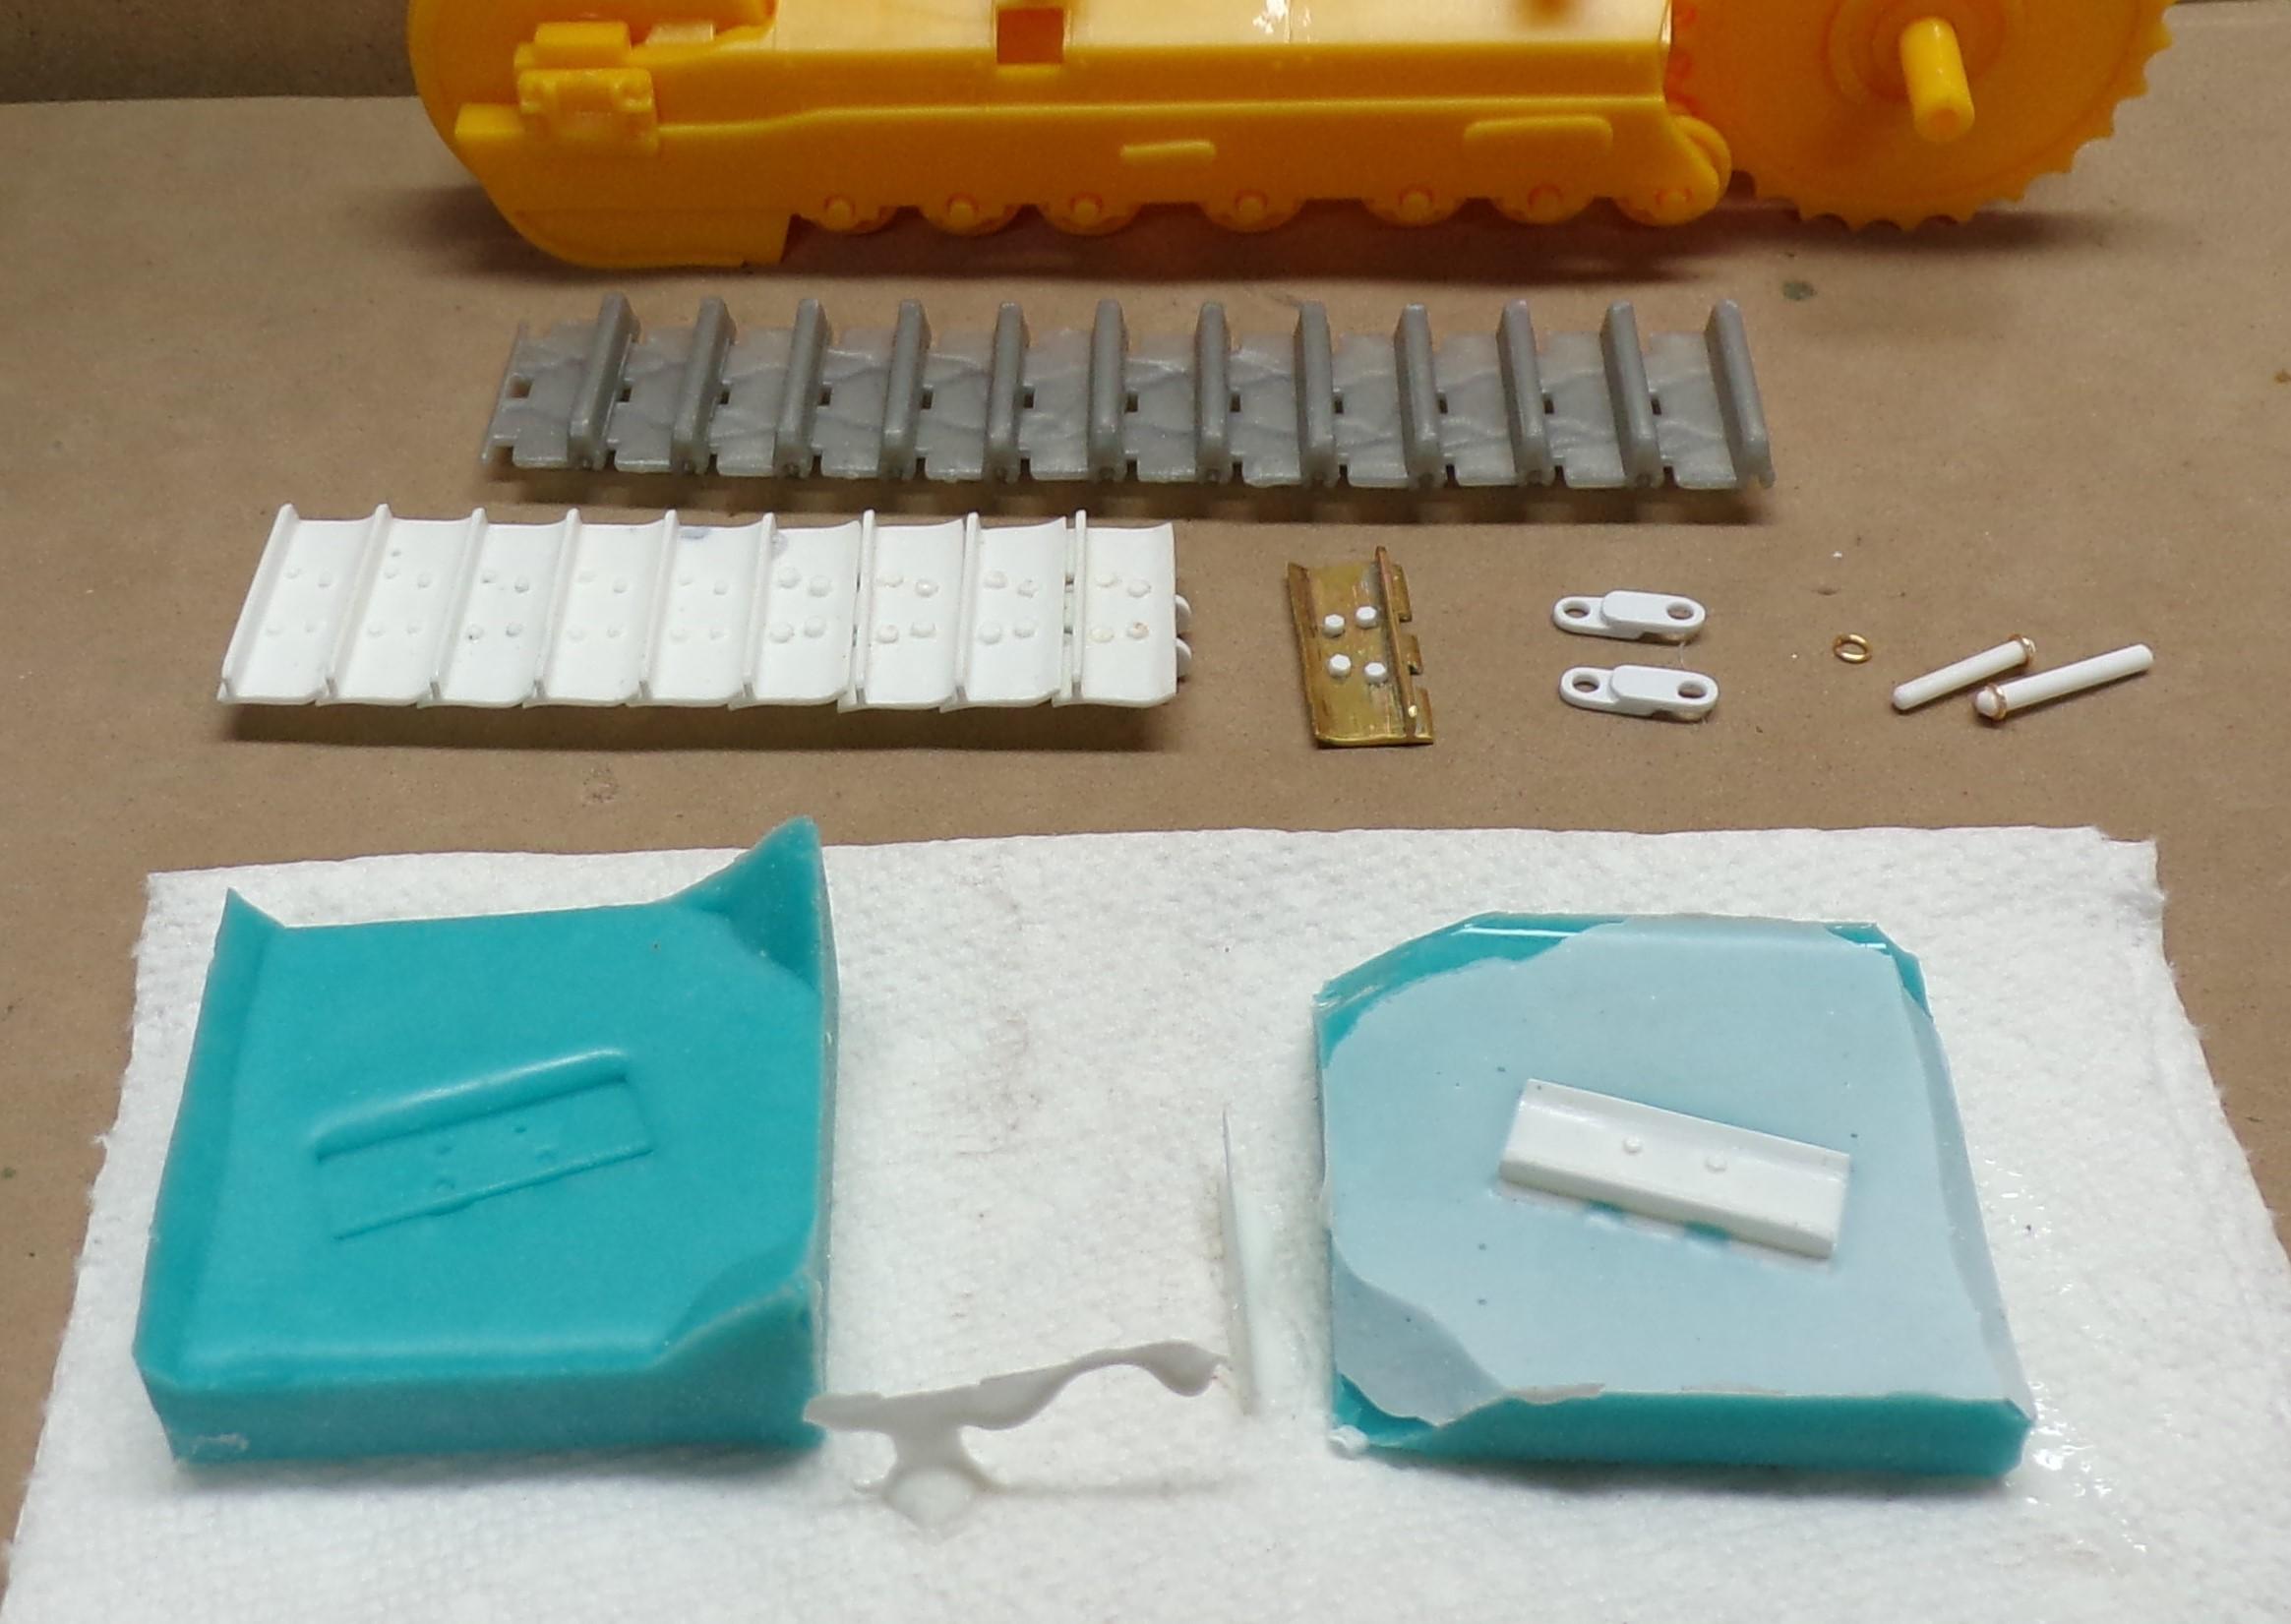
The Diamond T M-20 prime mover is going to be hauling a load eventually. Right now the trailer is in the initial stages of being designed for construction. Tire and wheels are ready for multiple castings. In the meantime I opened up one of the old AMT Caterpillar D-8 kits to see if it could be modified into a D-7 cable hoist bulldozer that was used during WW II. The M-20 hauled these as well as other goods and munitions so it made sense to try and make one up for a loaded trailer. AMT did the Cat D-8 but its tracks are awful. Not only do they not look right, they go together wrong as well. Each track should be connected to the next one with links that are bolted to the track plate above. After a bit of thought I came up with a way to make new tracks that not only looked right but also went together right as well. One of the side frames of the AMT D-8 is in the background with the kit tracks in front of it. In front of them is a first start at making a new set of tracks. The master track plate was made of brass and plastic hex rods were cut for bolt heads that hold the links to the plate. The ones you see are too large so before the final track master was made I sanded them off and used a smaller size of hex rod. The initial mold is on the left for the track plate. To the right is the second mold that casts the plate and the links all as one. This makes it possible to do many track plates and links that are all the same. The links are held together with plastic rods. In this second photo a first casting of the combined track plate and links has been done. This is how it looks with the top of the mold removed. Lots of thin flash but it comes off easily. Out of the mold the completed track plate looks ok. But it has some minor flaws that need correcting. When the mold is filled with liquid resin if it does not completely fill the hidden voids in the mold air pockets result and in turn an incomplete casting. It happened this time but not severely. I can fix the void with a bit of putty. The next casting hopefully will be better. It just takes patience. The back side of the link shows that the ends of the links on one side did not get fully formed. Not serious but this needs to be avoided as much as possible. In the photos above are the cast tracks so far. The five completed tracks on the left are from the final mold. The right four are as I initially made them attempting to make the links separately and then gluing the plates to them. These first attempts are not as good. And you can see, reducing the size of the bolt heads made them better as well. It will take a while to do enough to complete a full set like what is on the left but I'm in no hurry. I think there is somewhat of an improvement anyway. ?
-
Western Star 4900 FA plow truck
Chariots of Fire replied to BK9300's topic in WIP: Model Trucks: Big Rigs and Heavy Equipment
And to think that a lot of that extraordinary detail is going to be covered up by a body and cab! That is just outstanding work!! Knowing your subject matter is very much on display here but the execution is what makes it stand out. -
Up and running very nicely! No sluggishness at all.
-
Yes, looking Good! Sitting just right!
-
Since you have responded and indicated that this is your first time building I encourage you not to worry so much about some type of rating but rather to explain what you did in deciding to build the kit (it's obviously not a scratch built project). Tell us what you liked about the process, what you found difficult or challenging to do and how you overcame that. The more you build the more experience you will gain and your confidence in developing your skills will increase along with it. In time you may find a type of modeling that you really like. When you do, go for it, challenge yourself to try new techniques, develop some ideas of your own and above all have fun doing it. If you need help, ask for it here. There are many modelers looking on who are only waiting to help out in a positive way.
-
Not sure how to rate this. How would you like it to be rated? On what basis? kit or scratch, skill level necessary to construct, etc.? Did you do the work? Are you a new builder or an experienced one? These are all things that go into the process of what you asked to be done.