Chariots of Fire
-
Posts
2,788 -
Joined
-
Last visited
Content Type
Profiles
Forums
Events
Gallery
Everything posted by Chariots of Fire
-
 I figured as much. Especially for something as cumbersome as B-B. HO engines that have DCC power these days are getting expensive.
 -
Hey, Jim. I've never looked into making a running conversion of this or any other locomotive kit. Any thoughts on how much of a project that might become? Motor and gearing for the drivers would be a problem of course but how about the valve gear and drive rods?
-
That's cool, Jim. I have a couple of those 0-6-0's kicking around as well. So much action with those old steamers, especially with something as big and complicated as the Big Boy is.
-
What?? Nobody commented on the Big Boy sitting in the background in that second pic! Are you a model railroader as well, Jim?
-
Hello everyone, from North Vancouver
Chariots of Fire replied to BK9300's topic in Welcome! Introduce Yourself
Welcome, Brian. Have been watching your build elsewhere on the forum. That is some serious work and a lot of it! Never a dull moment around here. Don't know much about the north country but you have to get serious snow to put that rig into action. We might need a wing plow now and then but most of our roads are done with single axle and tandem axle trucks with just the front plow. Hope you have a great time on the forum and keep up the good work! -
Western Star 4900 FA plow truck
Chariots of Fire replied to BK9300's topic in WIP: Model Trucks: Big Rigs and Heavy Equipment
Ok, now we're talking model building! But that doesn't just happen. Personal experience in the field, a knowledge of mechanics, a couple of good steady hands and a patient frame of mind are at the heart of it. Fabulous work with authenticity and an attention to detail make this build a special one to watch. -
Thanks, Bob! I heard there is something else that can move mountains. Someone said that if we have faith the size of a mustard seed we could say to that mountain "move from here to there" and it would be done. Hmmm! Anybody remember who that was?? Pretty sure the mustard seed is one of the smallest if not the smallest of all seeds.☺️
-
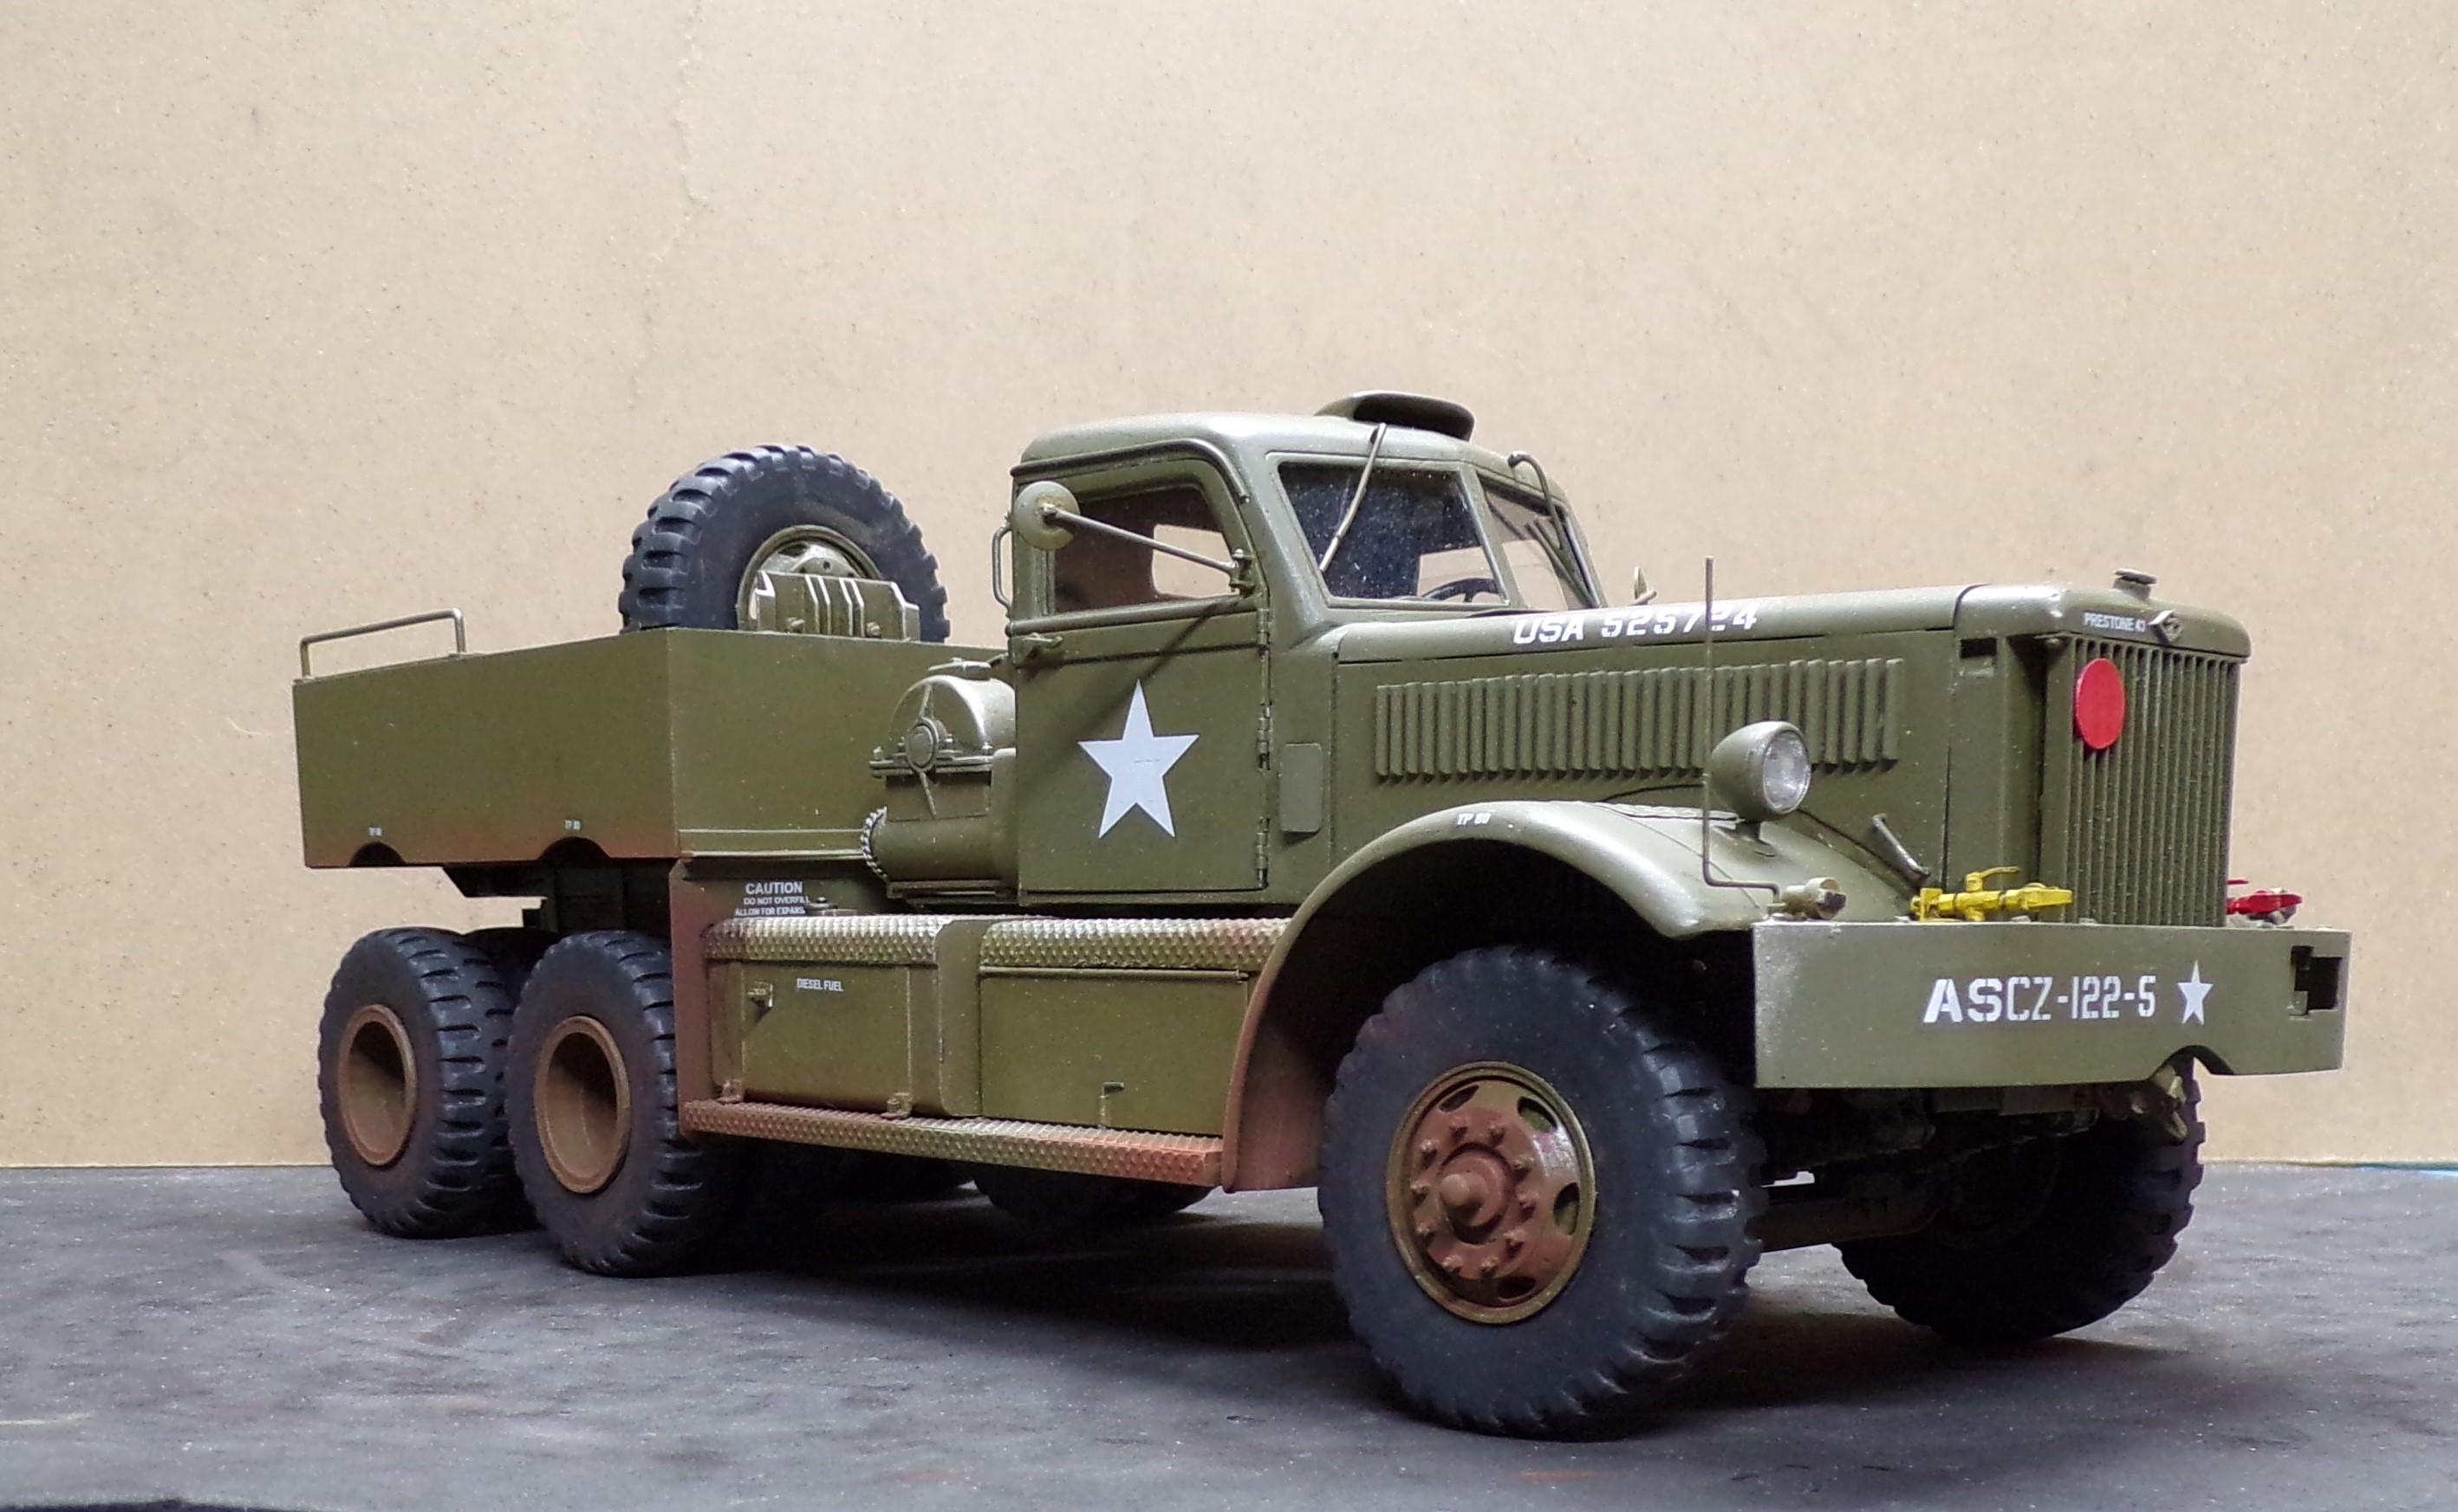
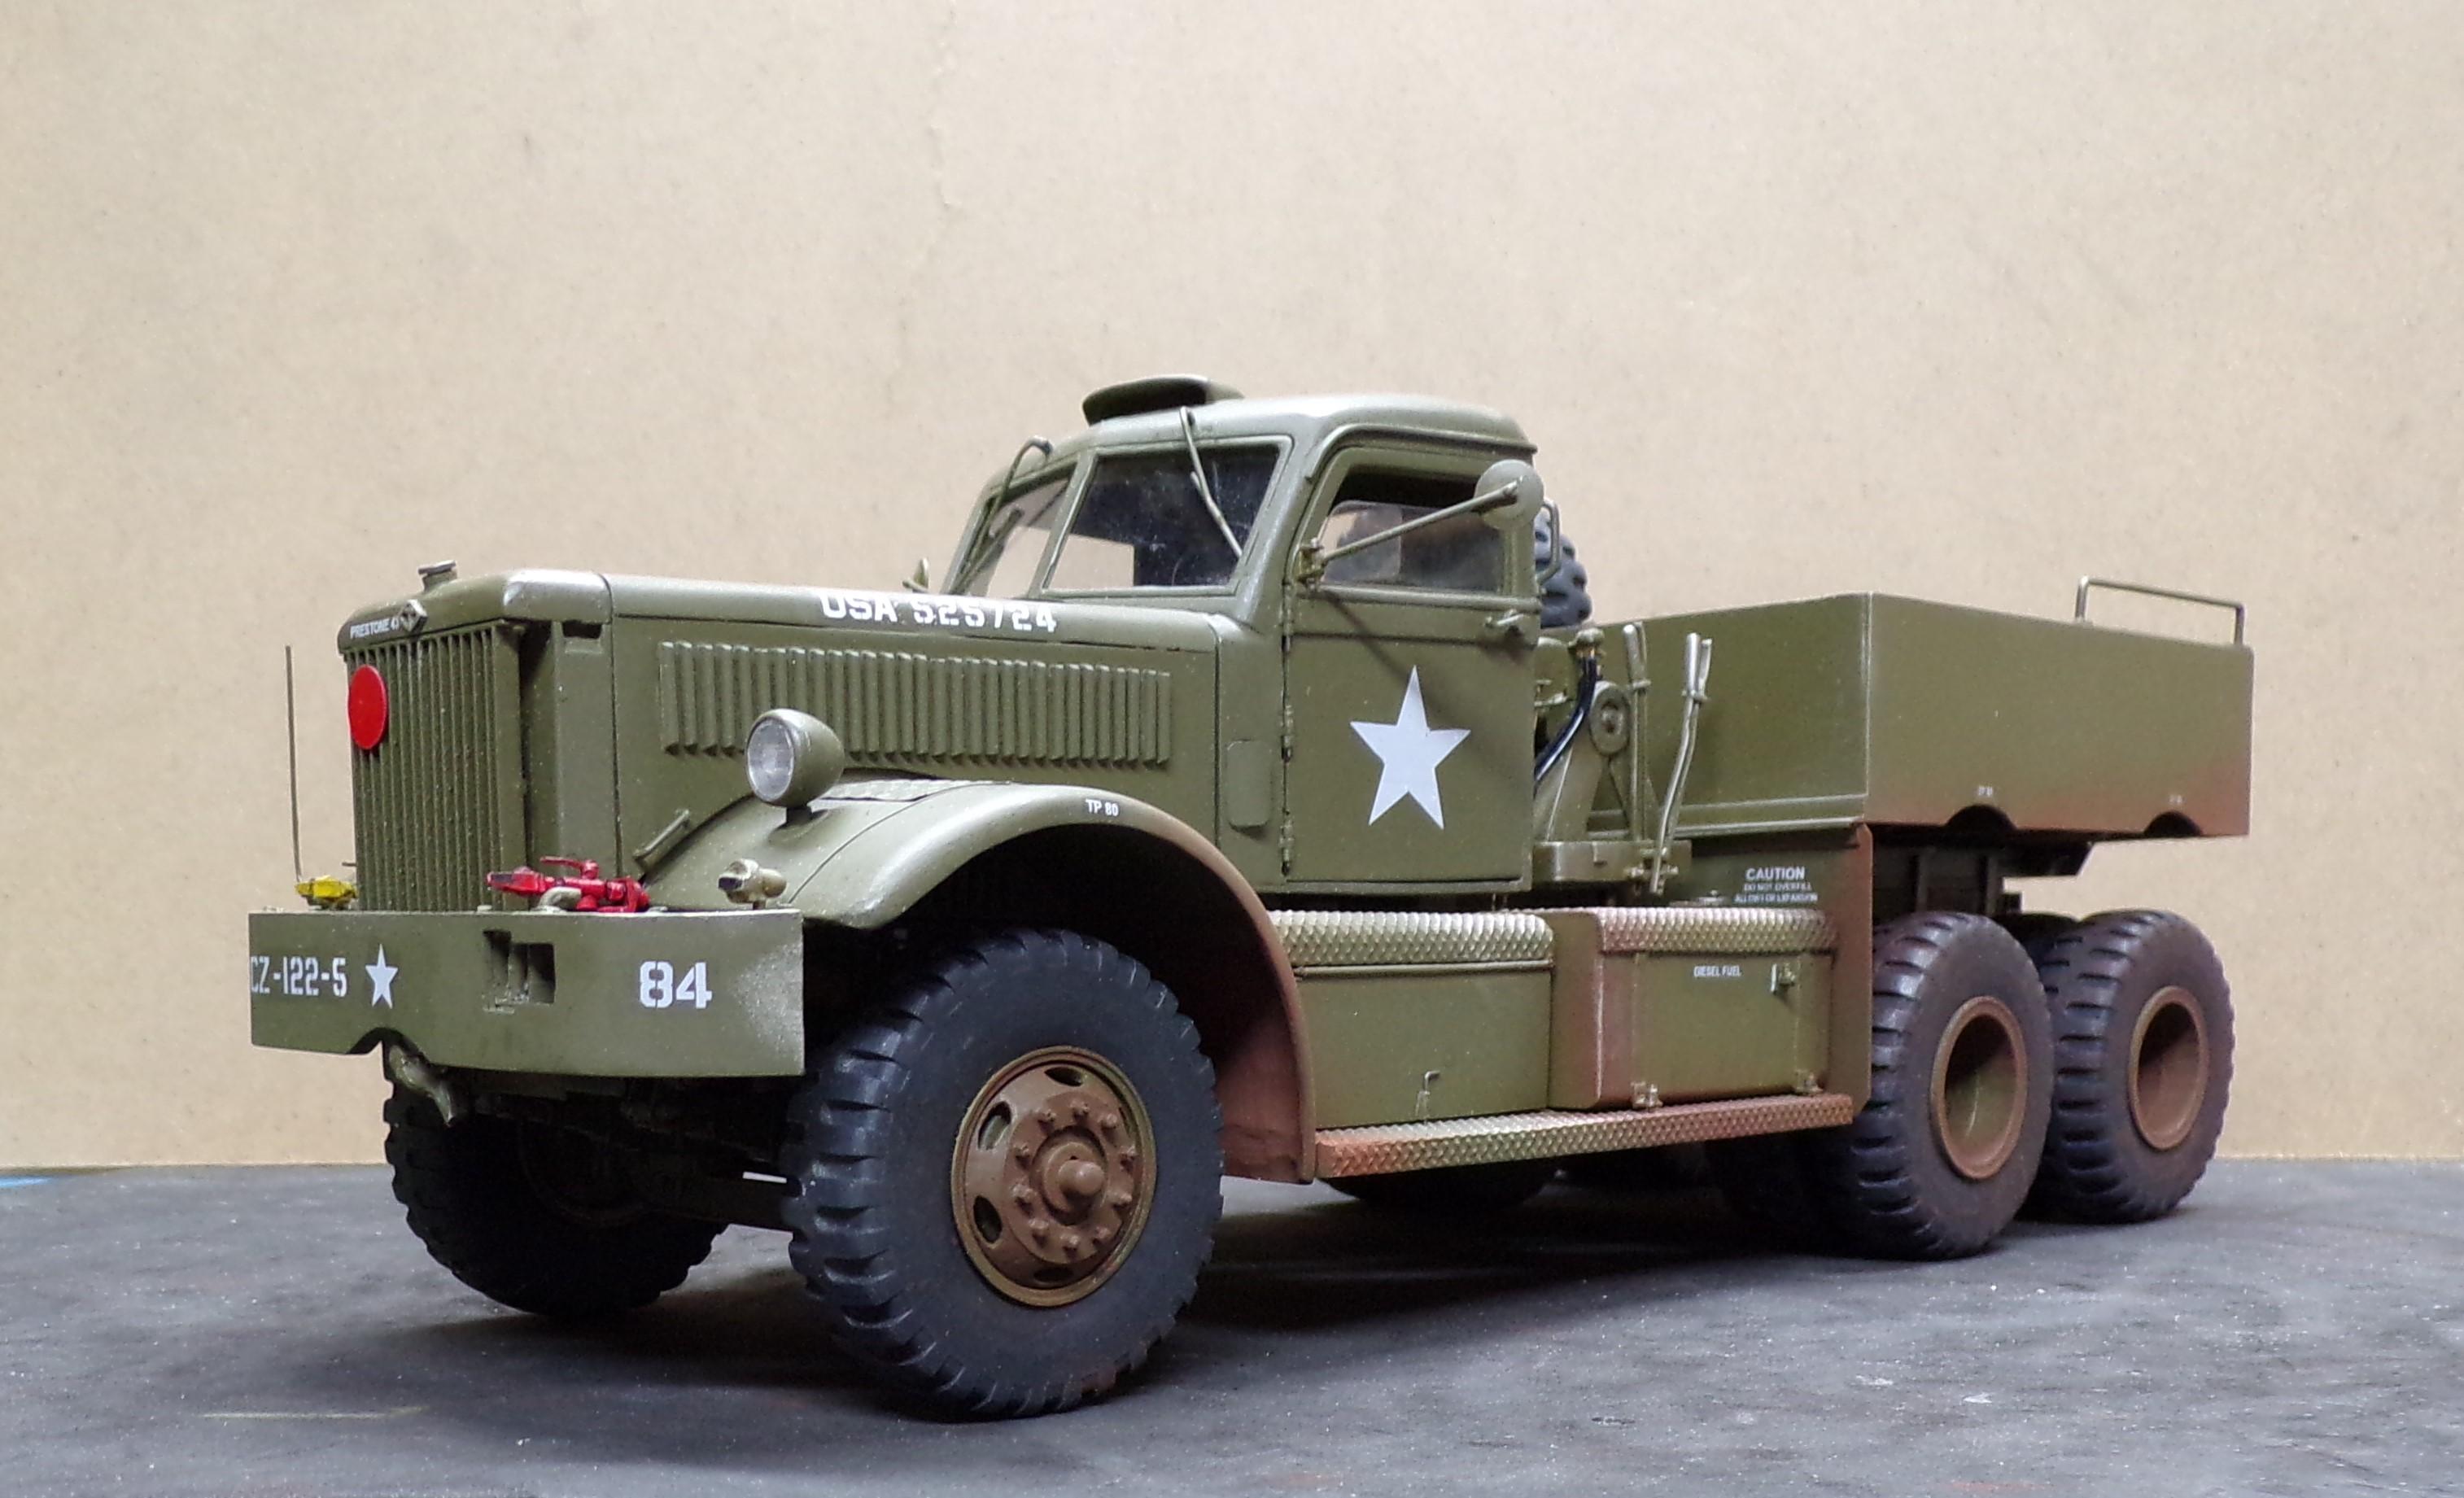
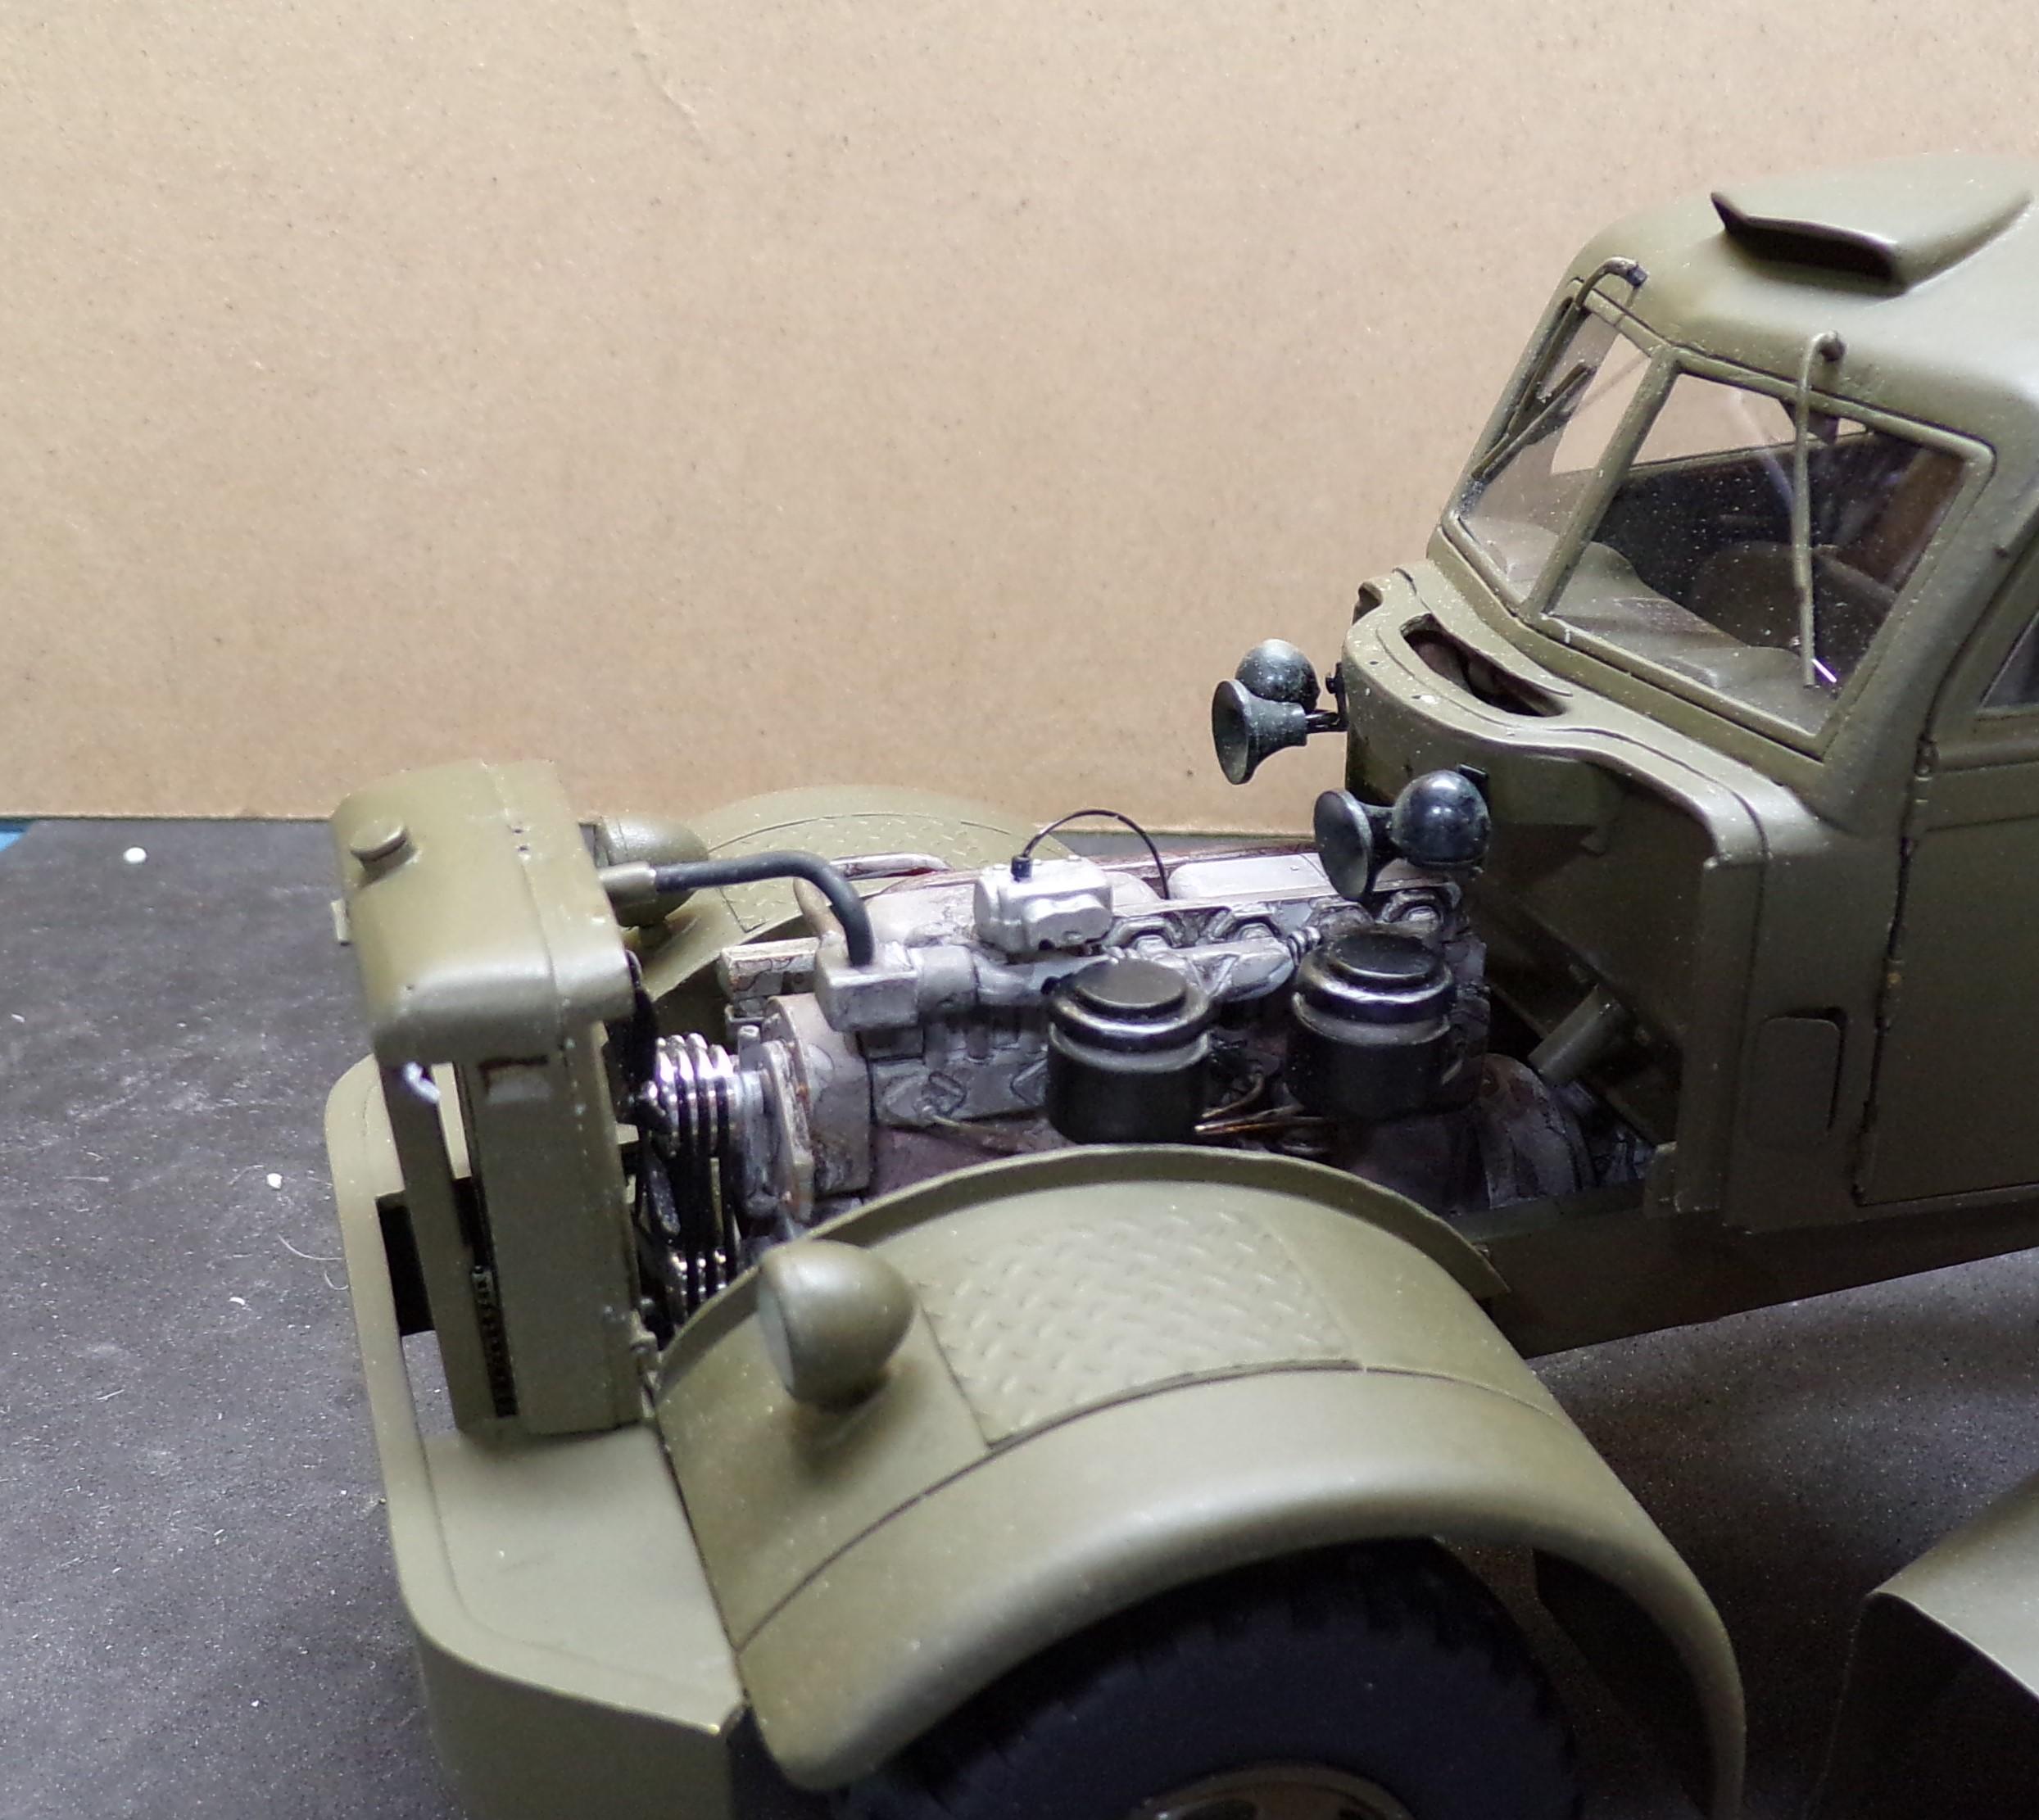
Thank you, Bren. A bit of a struggle at times. Took forever to get the right shape of the cab. The Diamond T has quite a rake on the windshield, narrow windows and rounded roof that took time to develop. And normally I would have made the frame of brass channel stock. But that is fast disappearing so I had to contend with building it up with strip plastic. Not the best choice for rigidity at first but when all of the cross members were put in place and components were screwed on it turned out ok. (The radiator and cab are screwed on from below and the fenders are screwed on from brackets on the side of the frame and on top of it just inside the hood.) Because the model is of a large sized truck it became quite heavy when everything was put together.
-
M-20 Prime Mover
Chariots of Fire replied to Chariots of Fire's topic in WIP: Model Trucks: Big Rigs and Heavy Equipment
That gives me an idea. I have some outside photos I might try and print out as a background. -
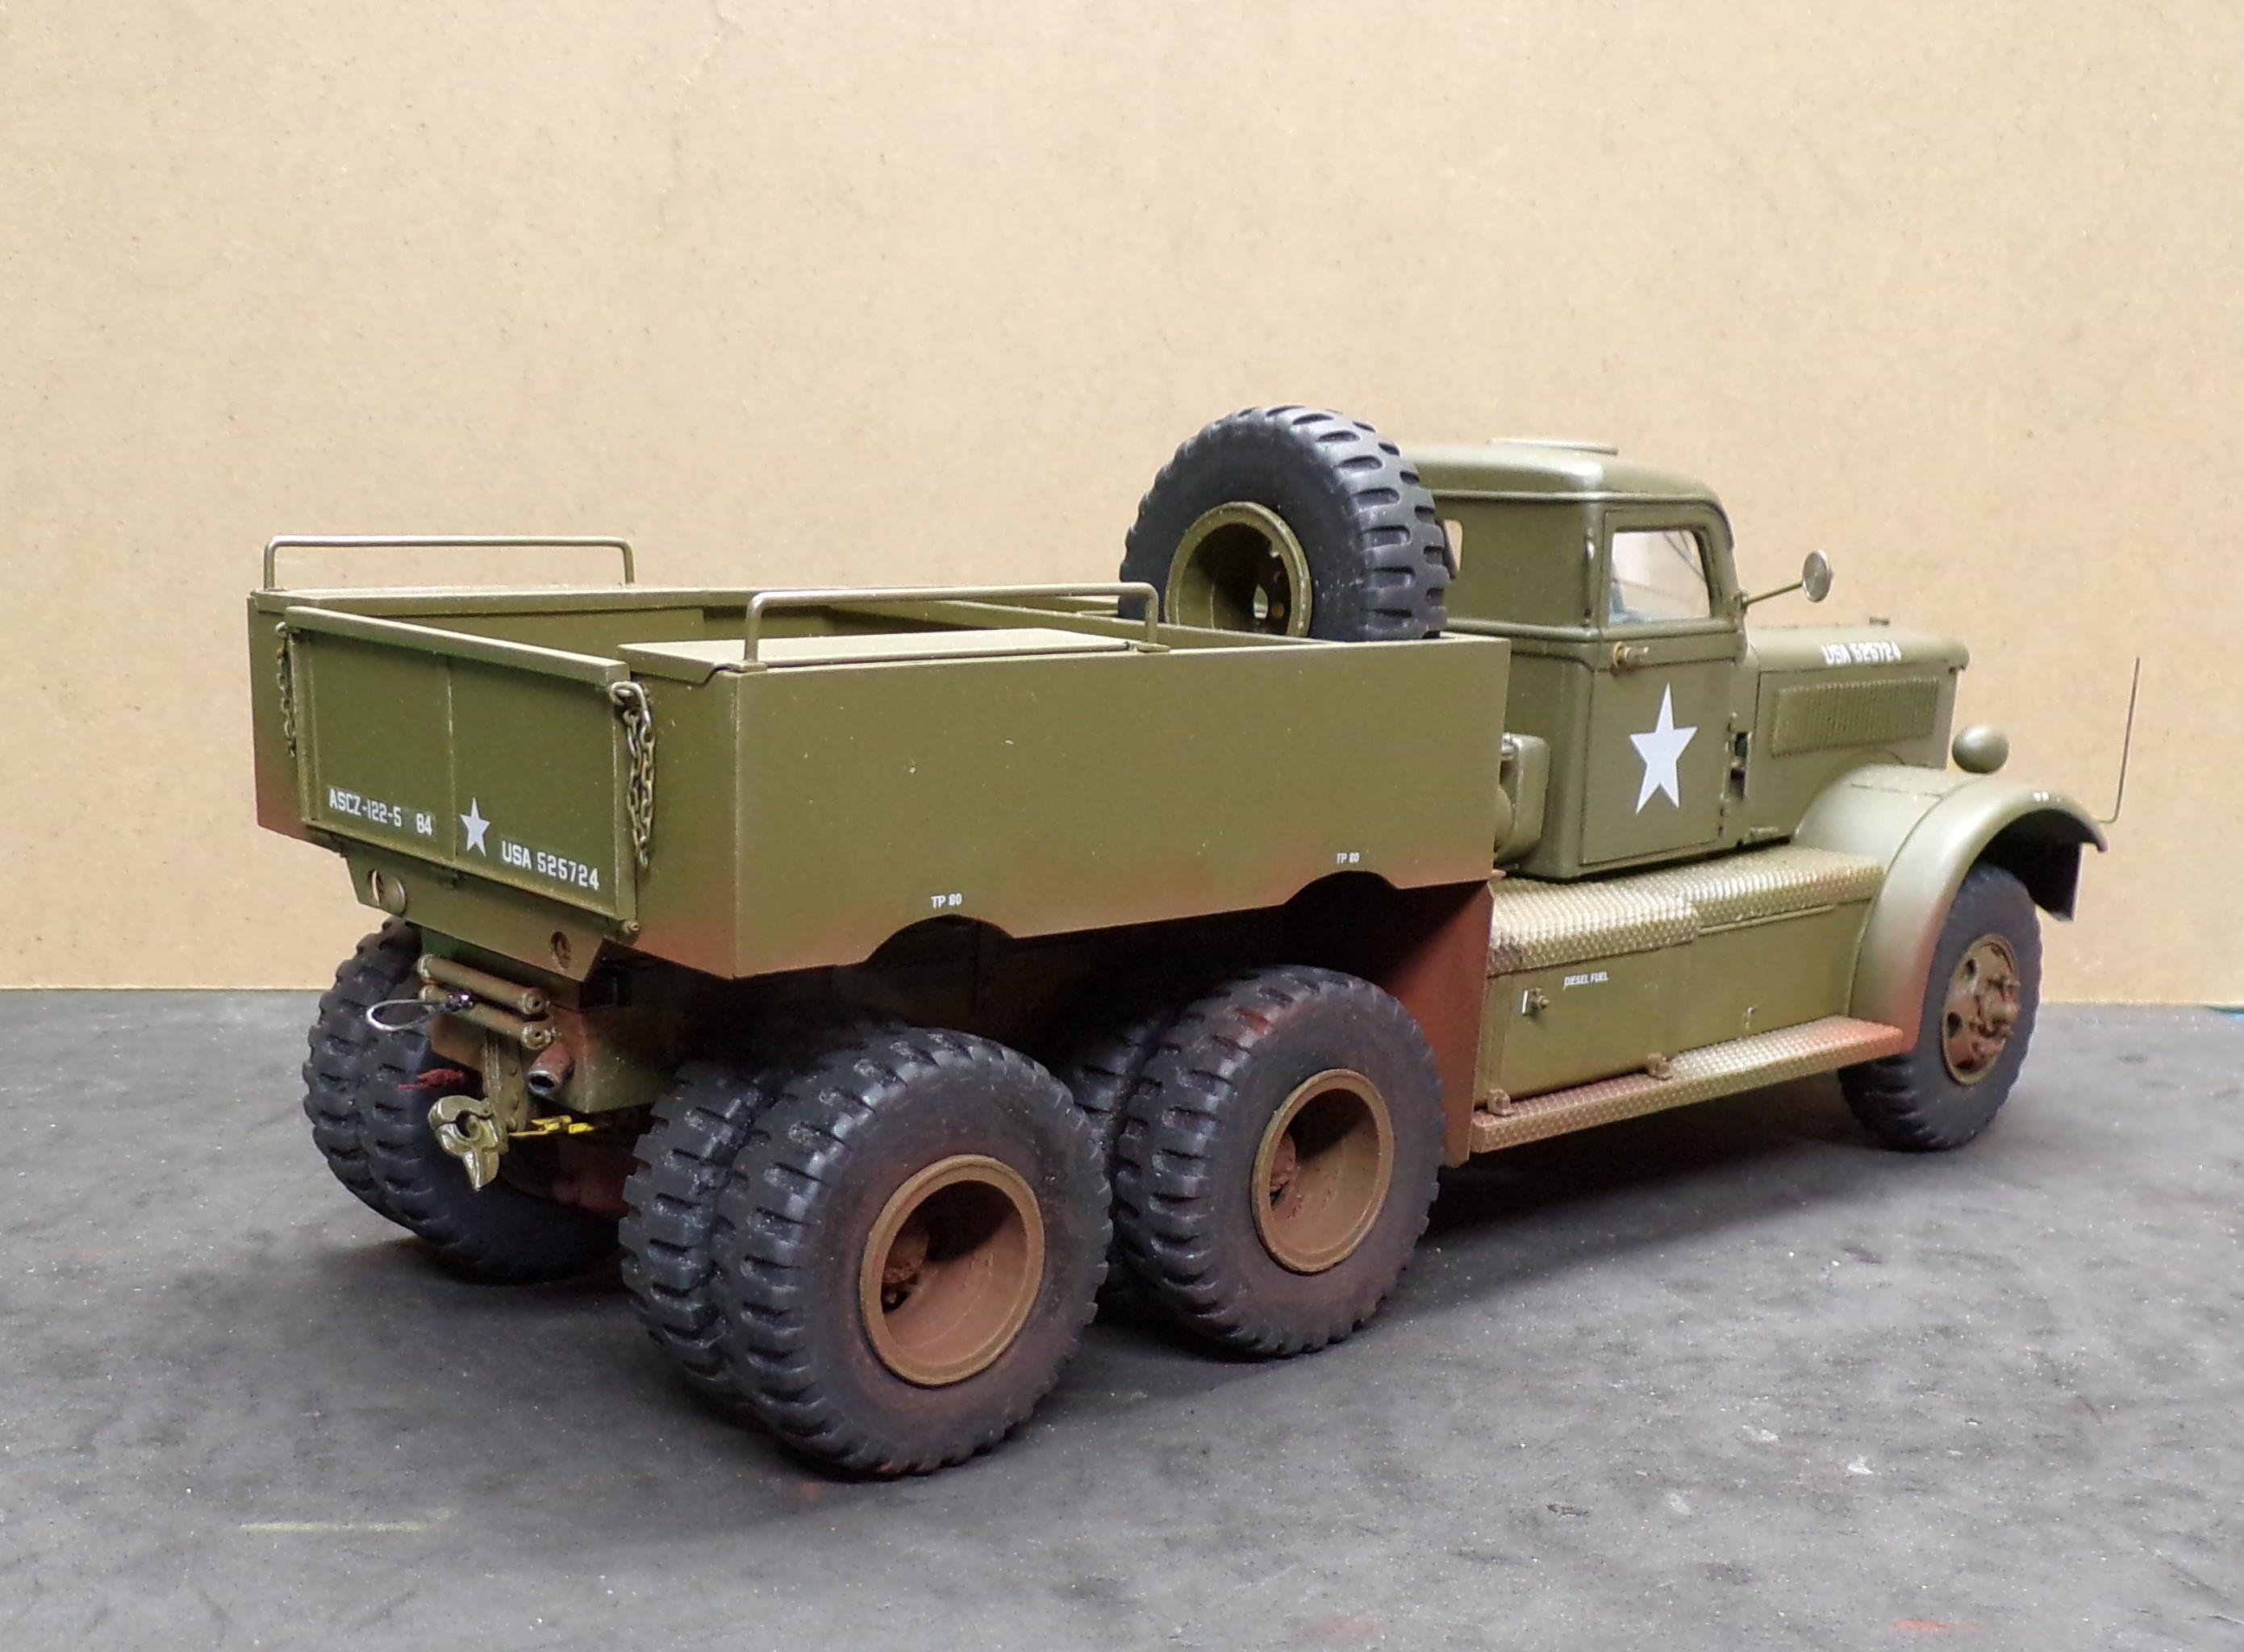
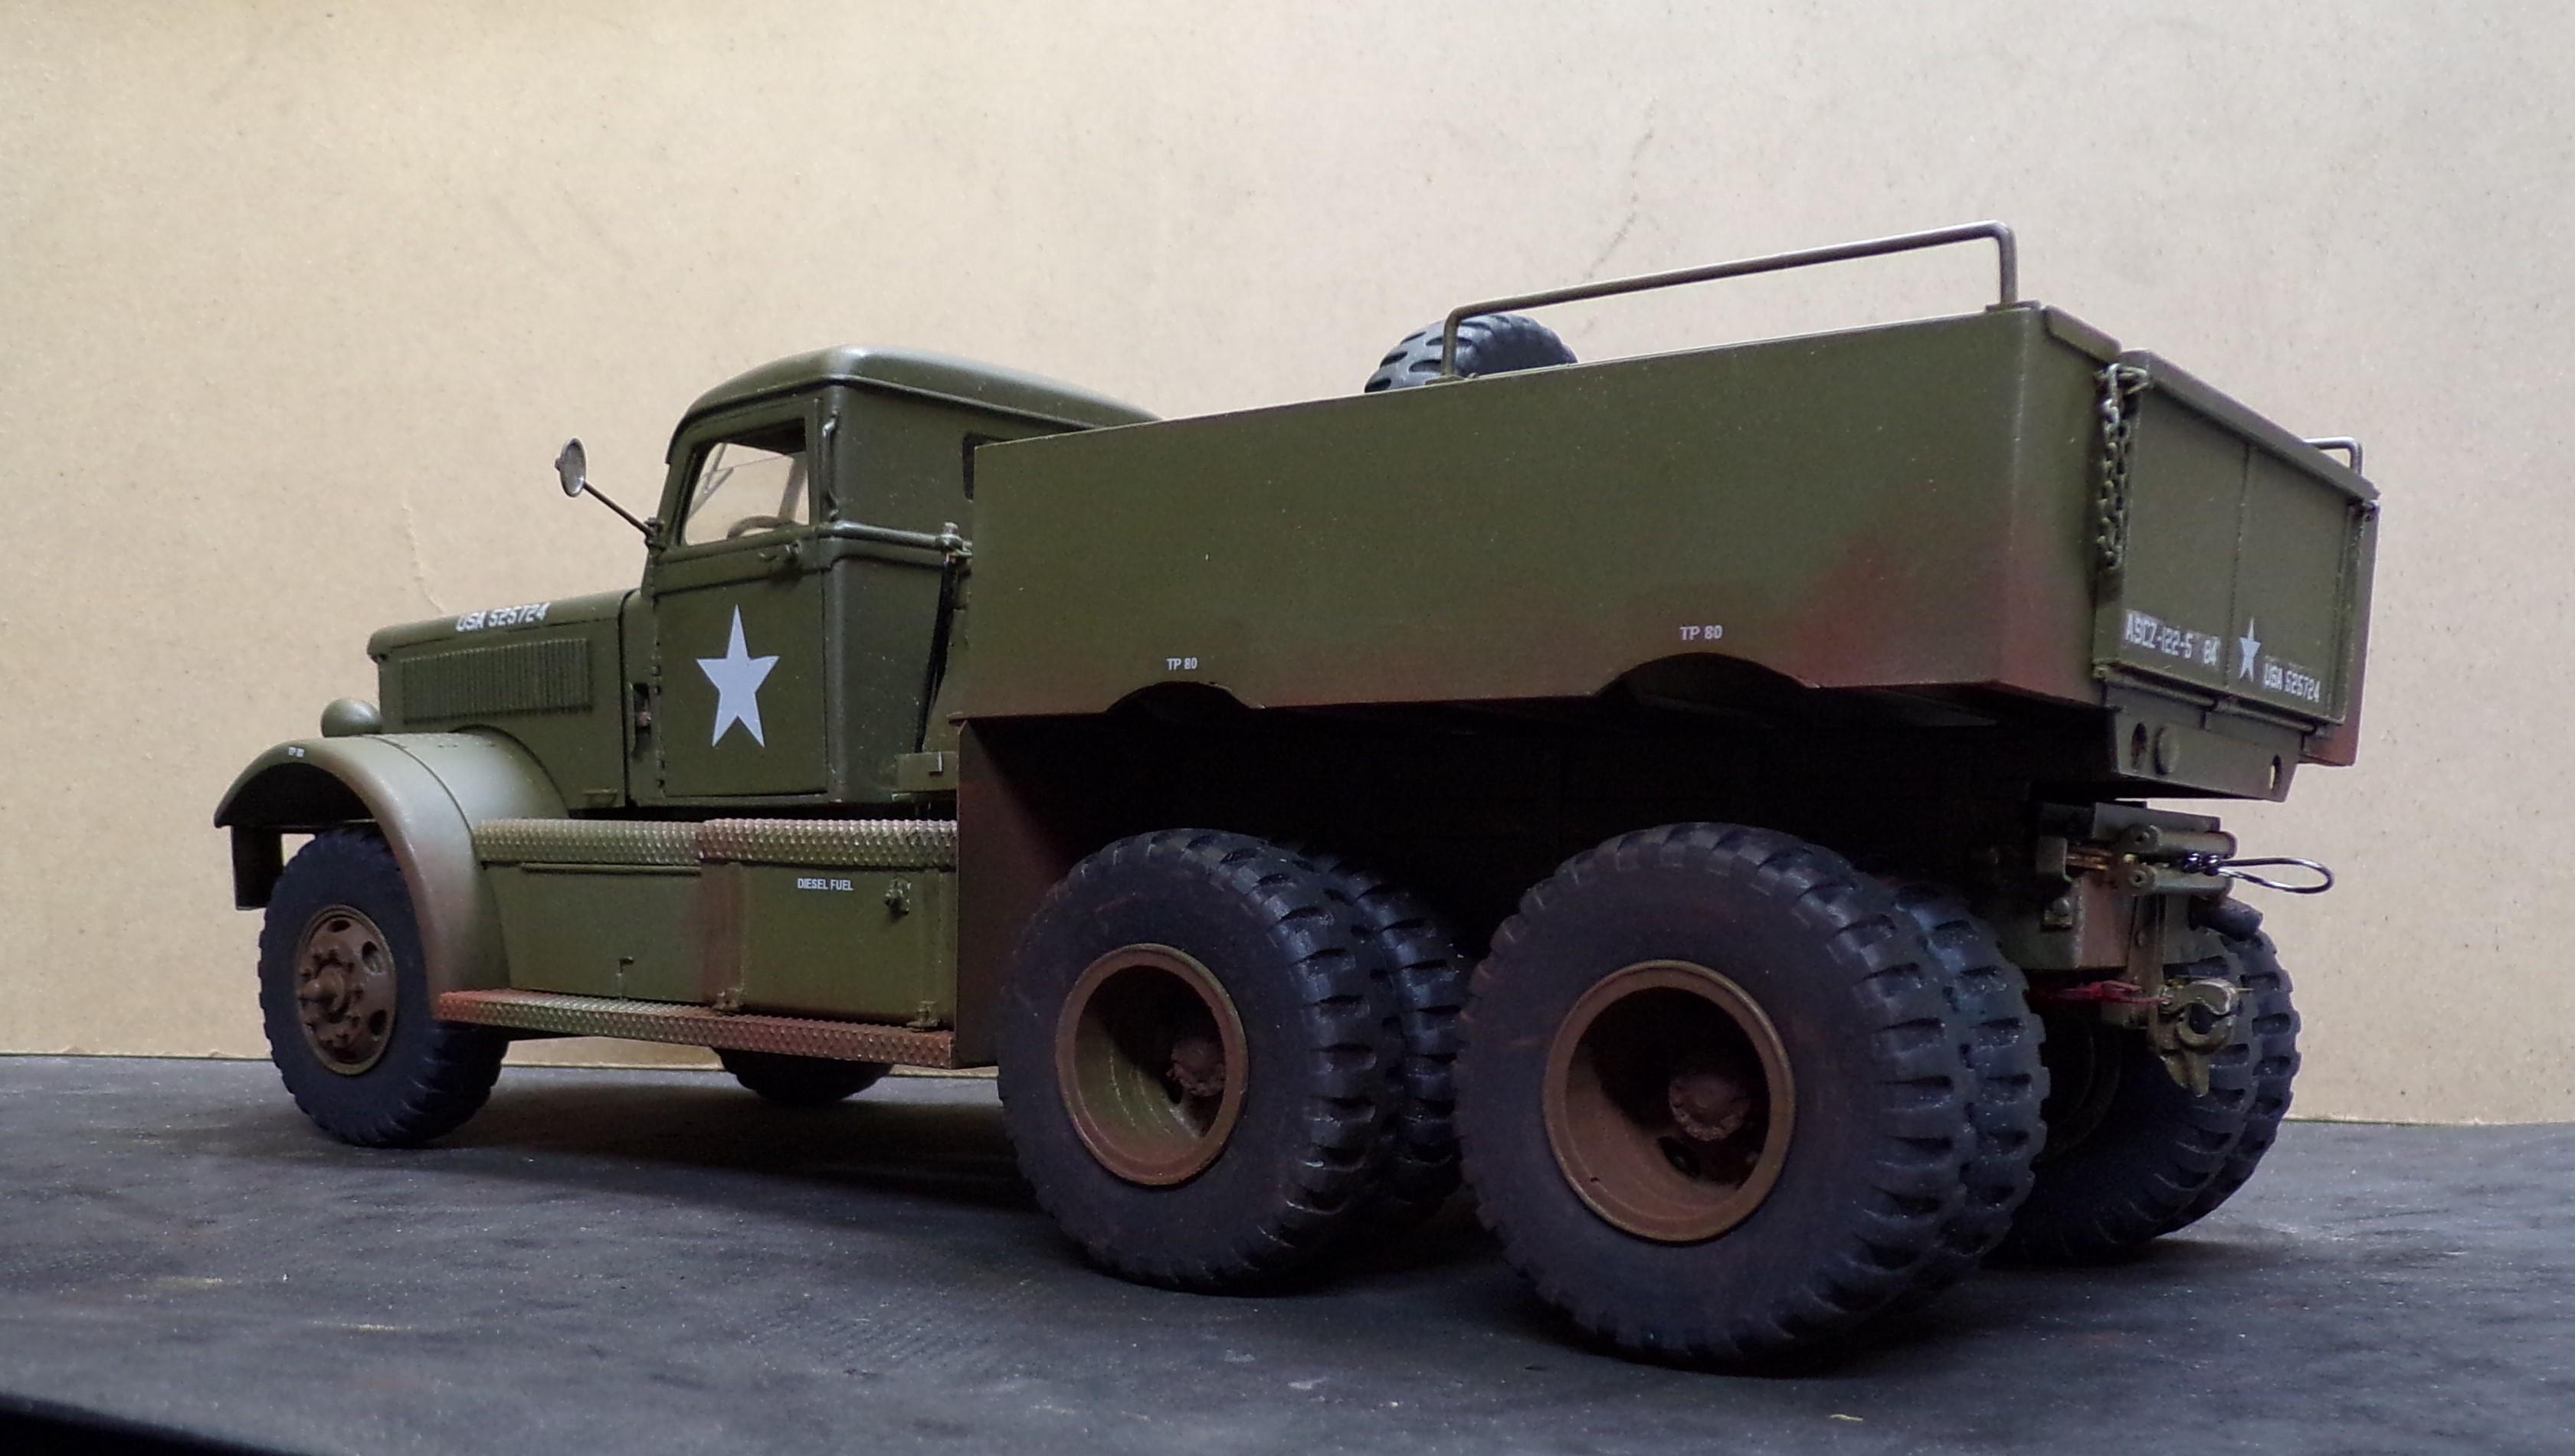
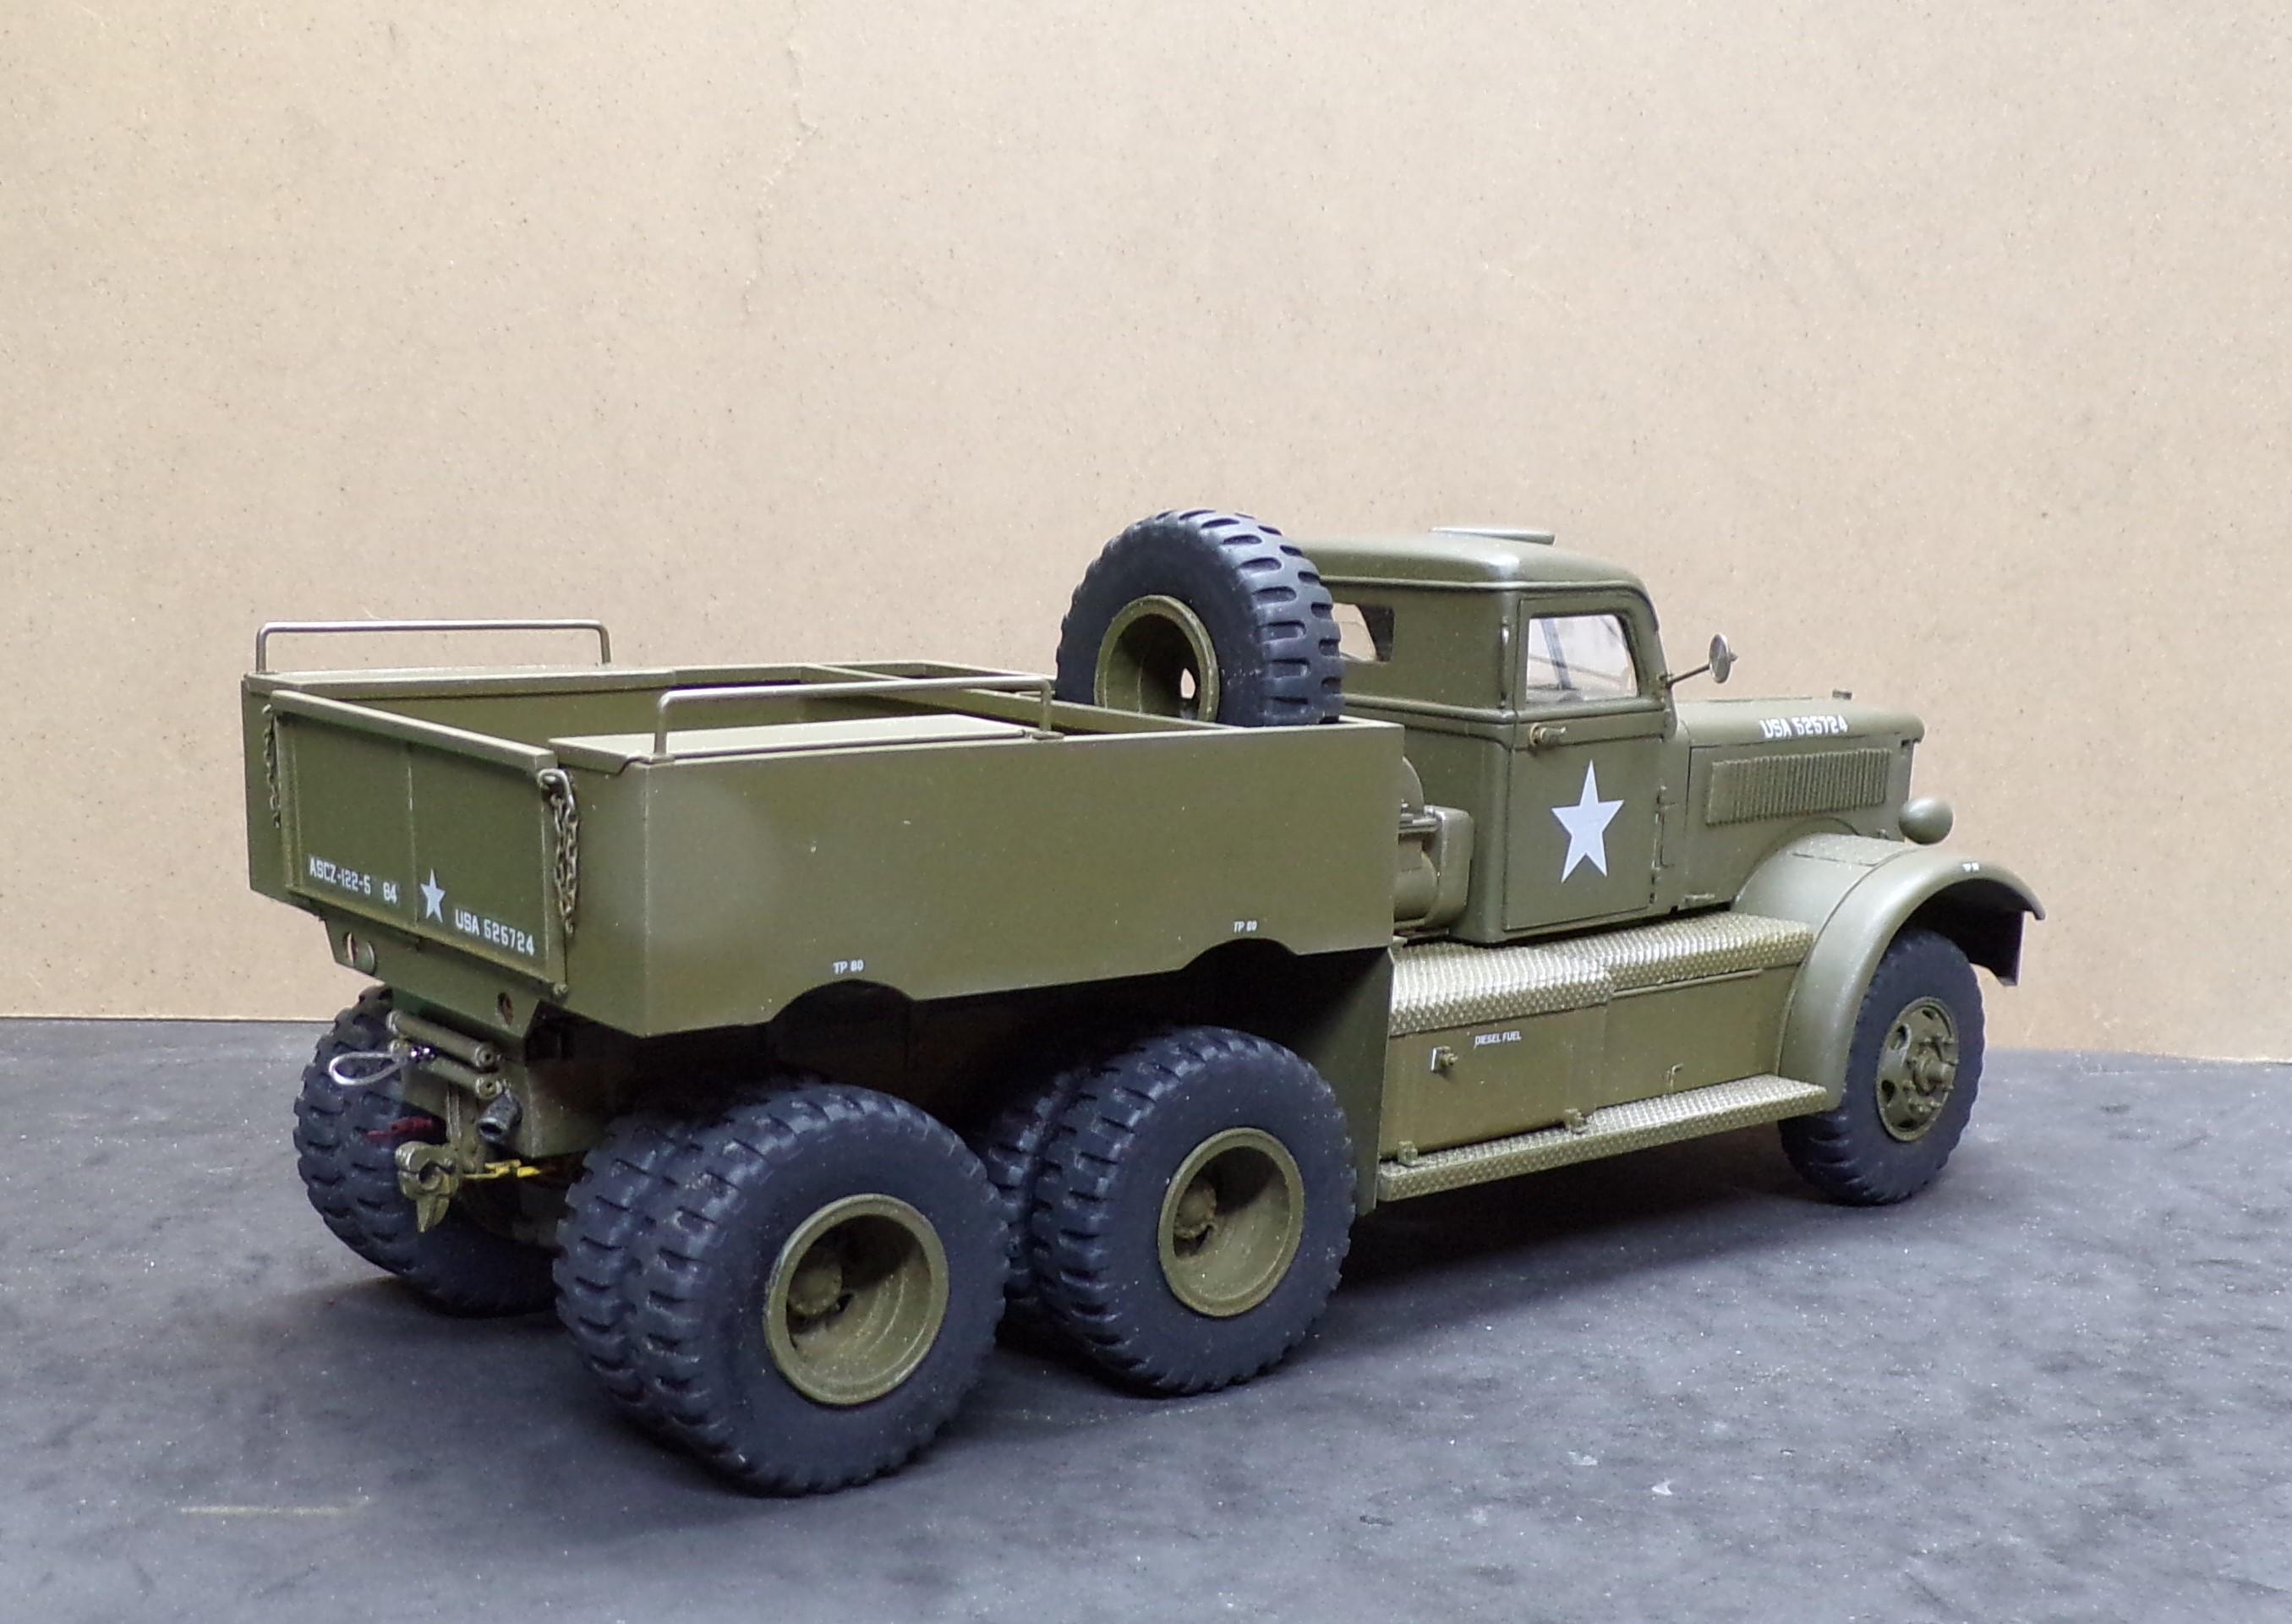
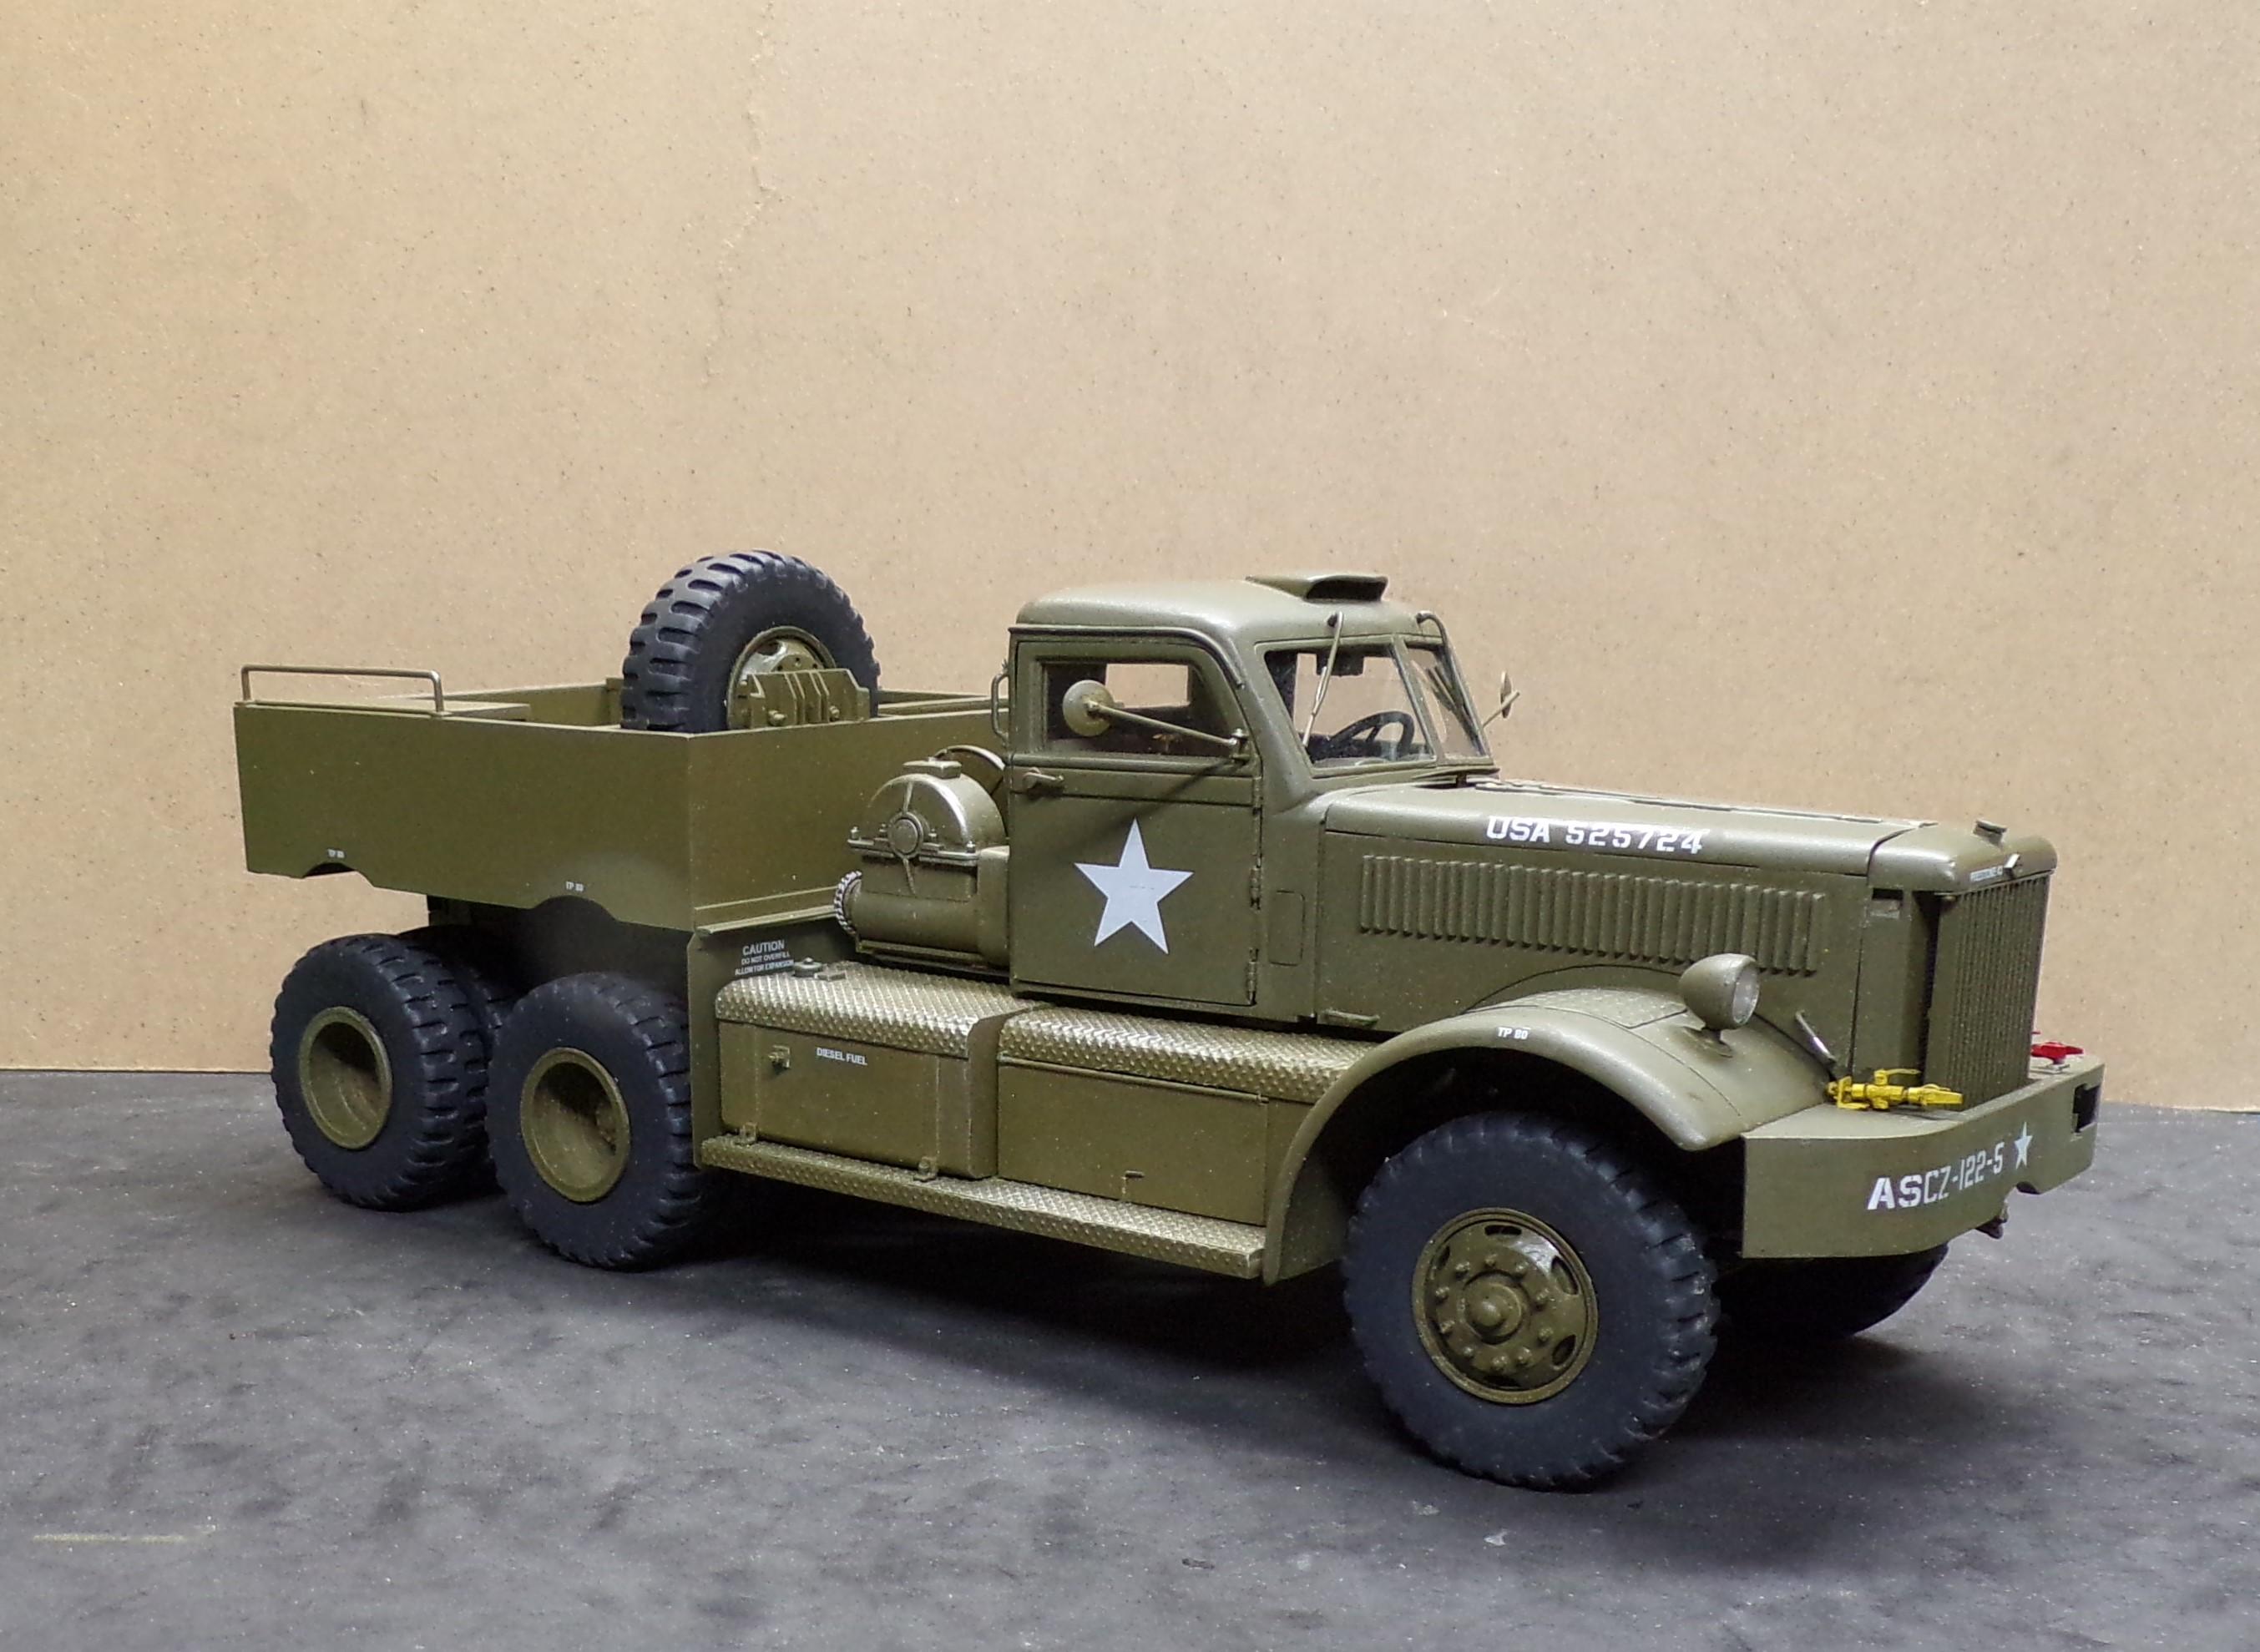
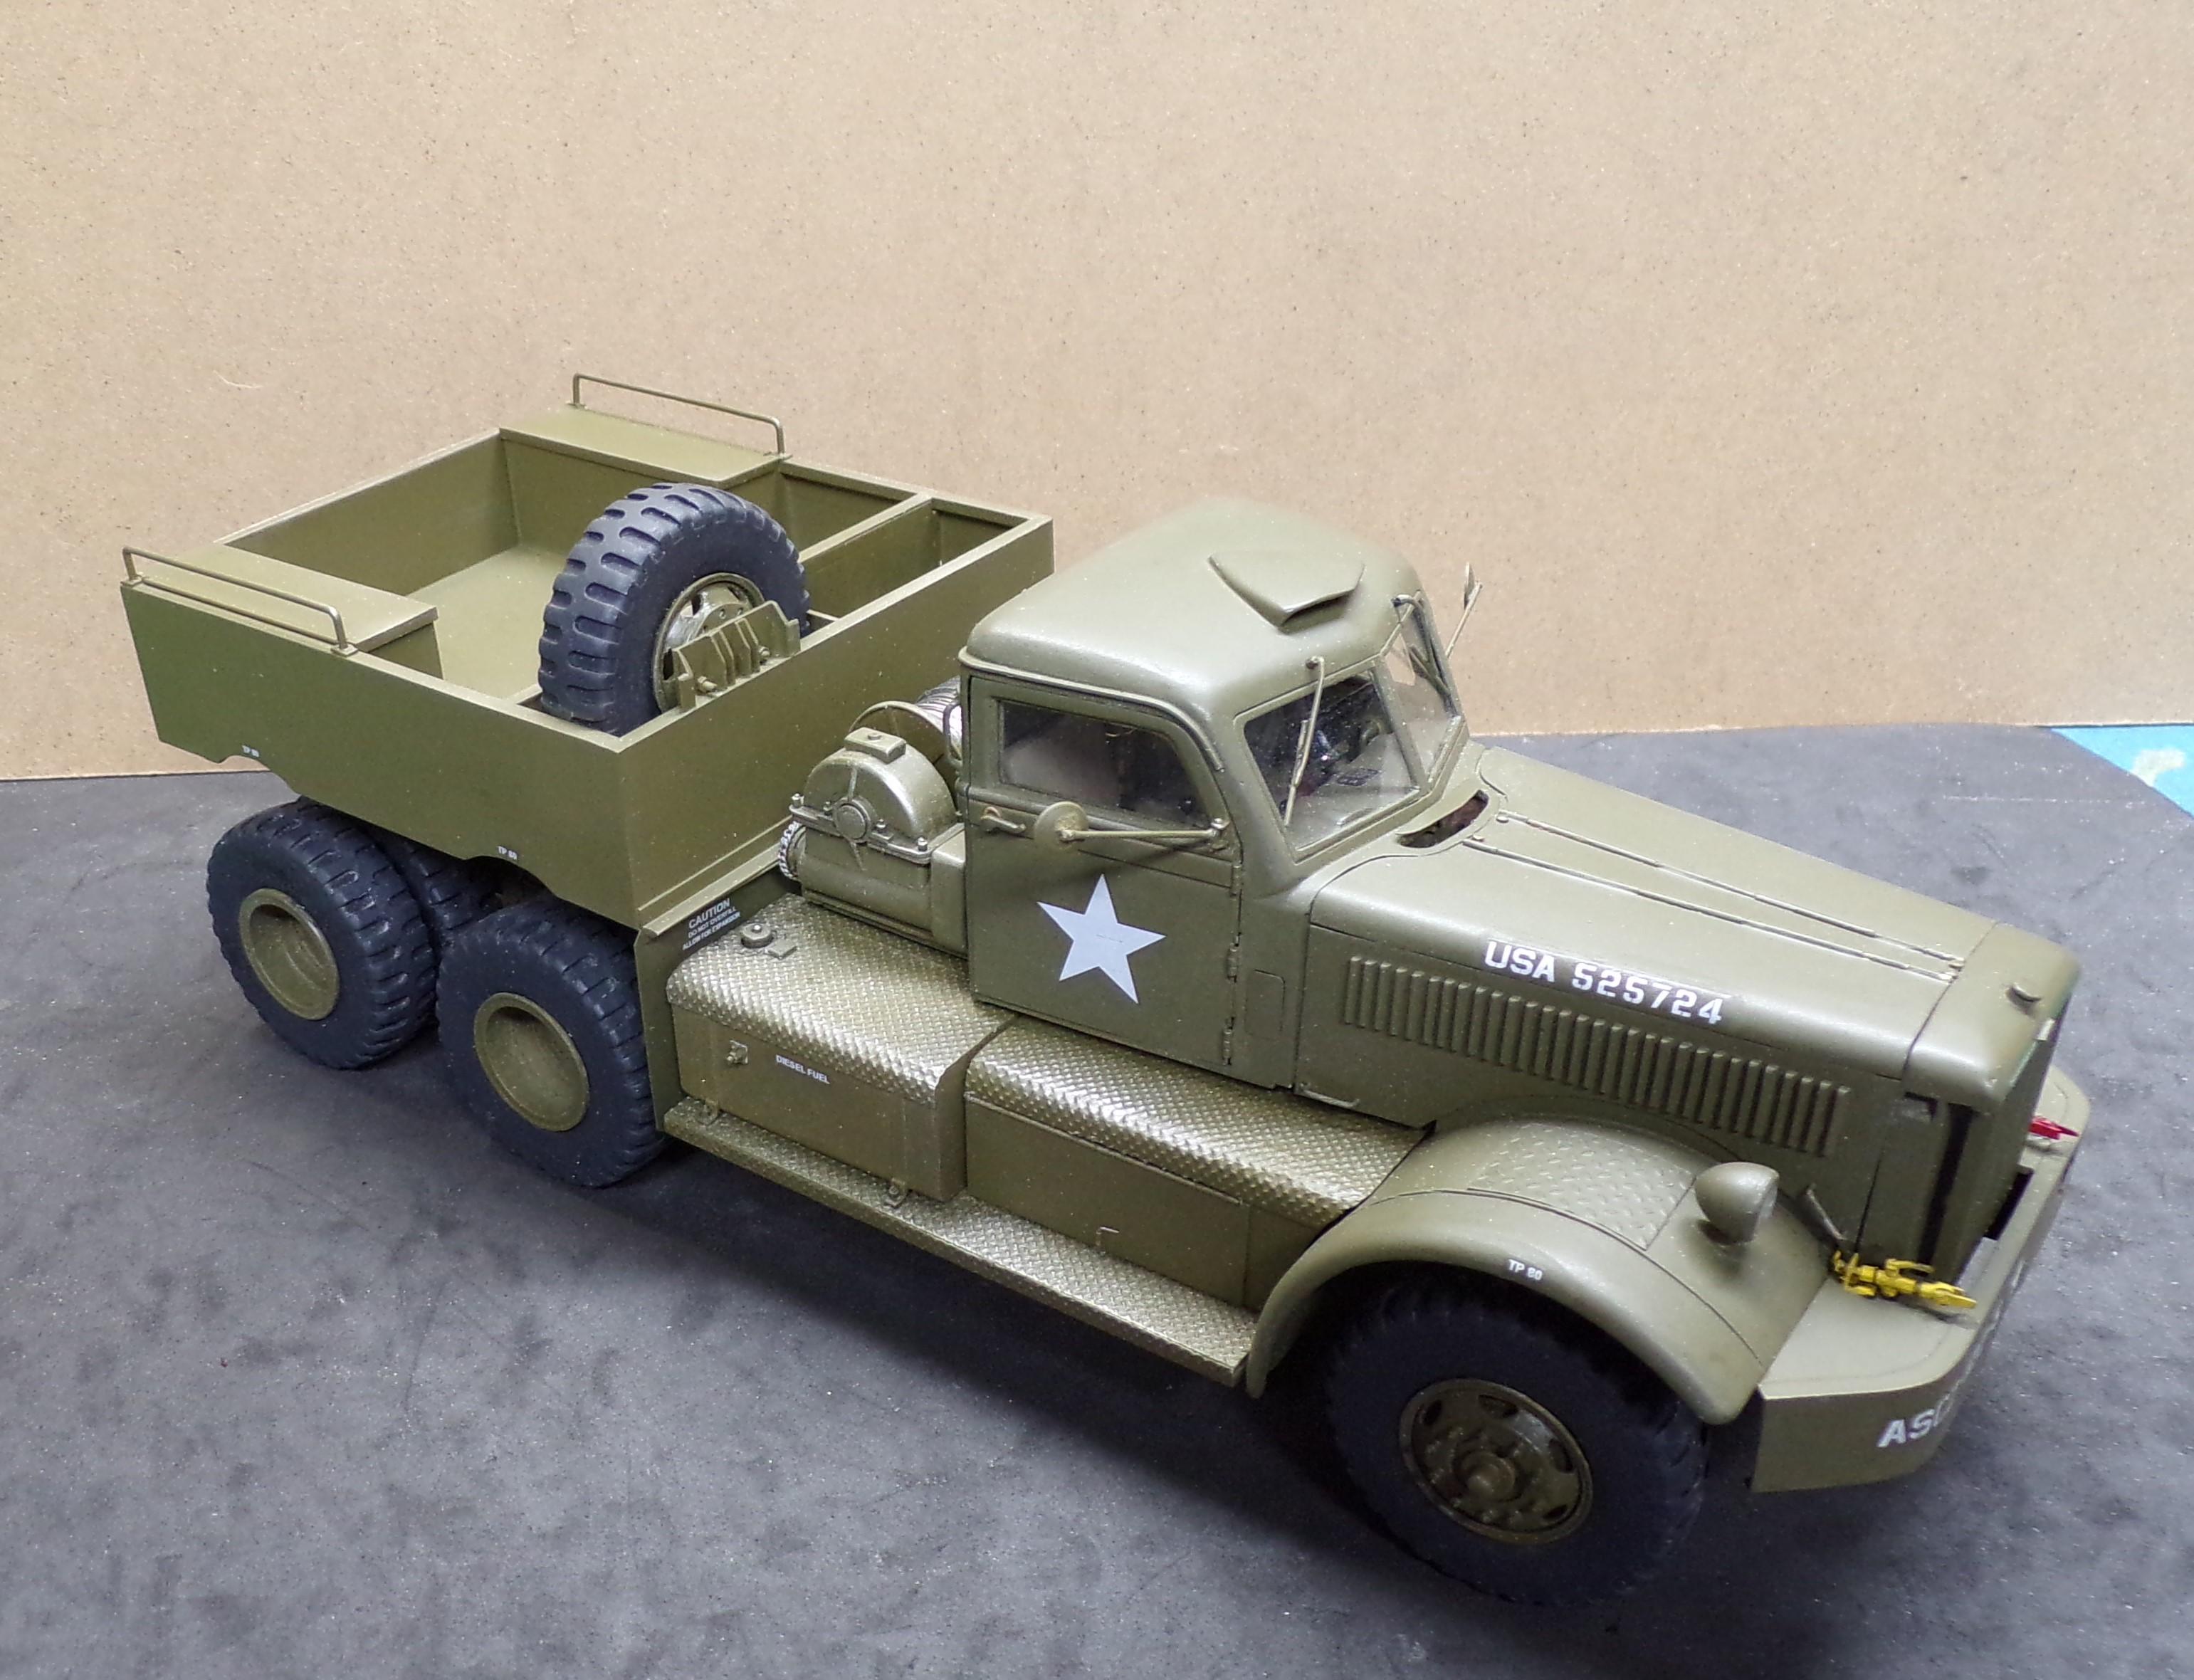
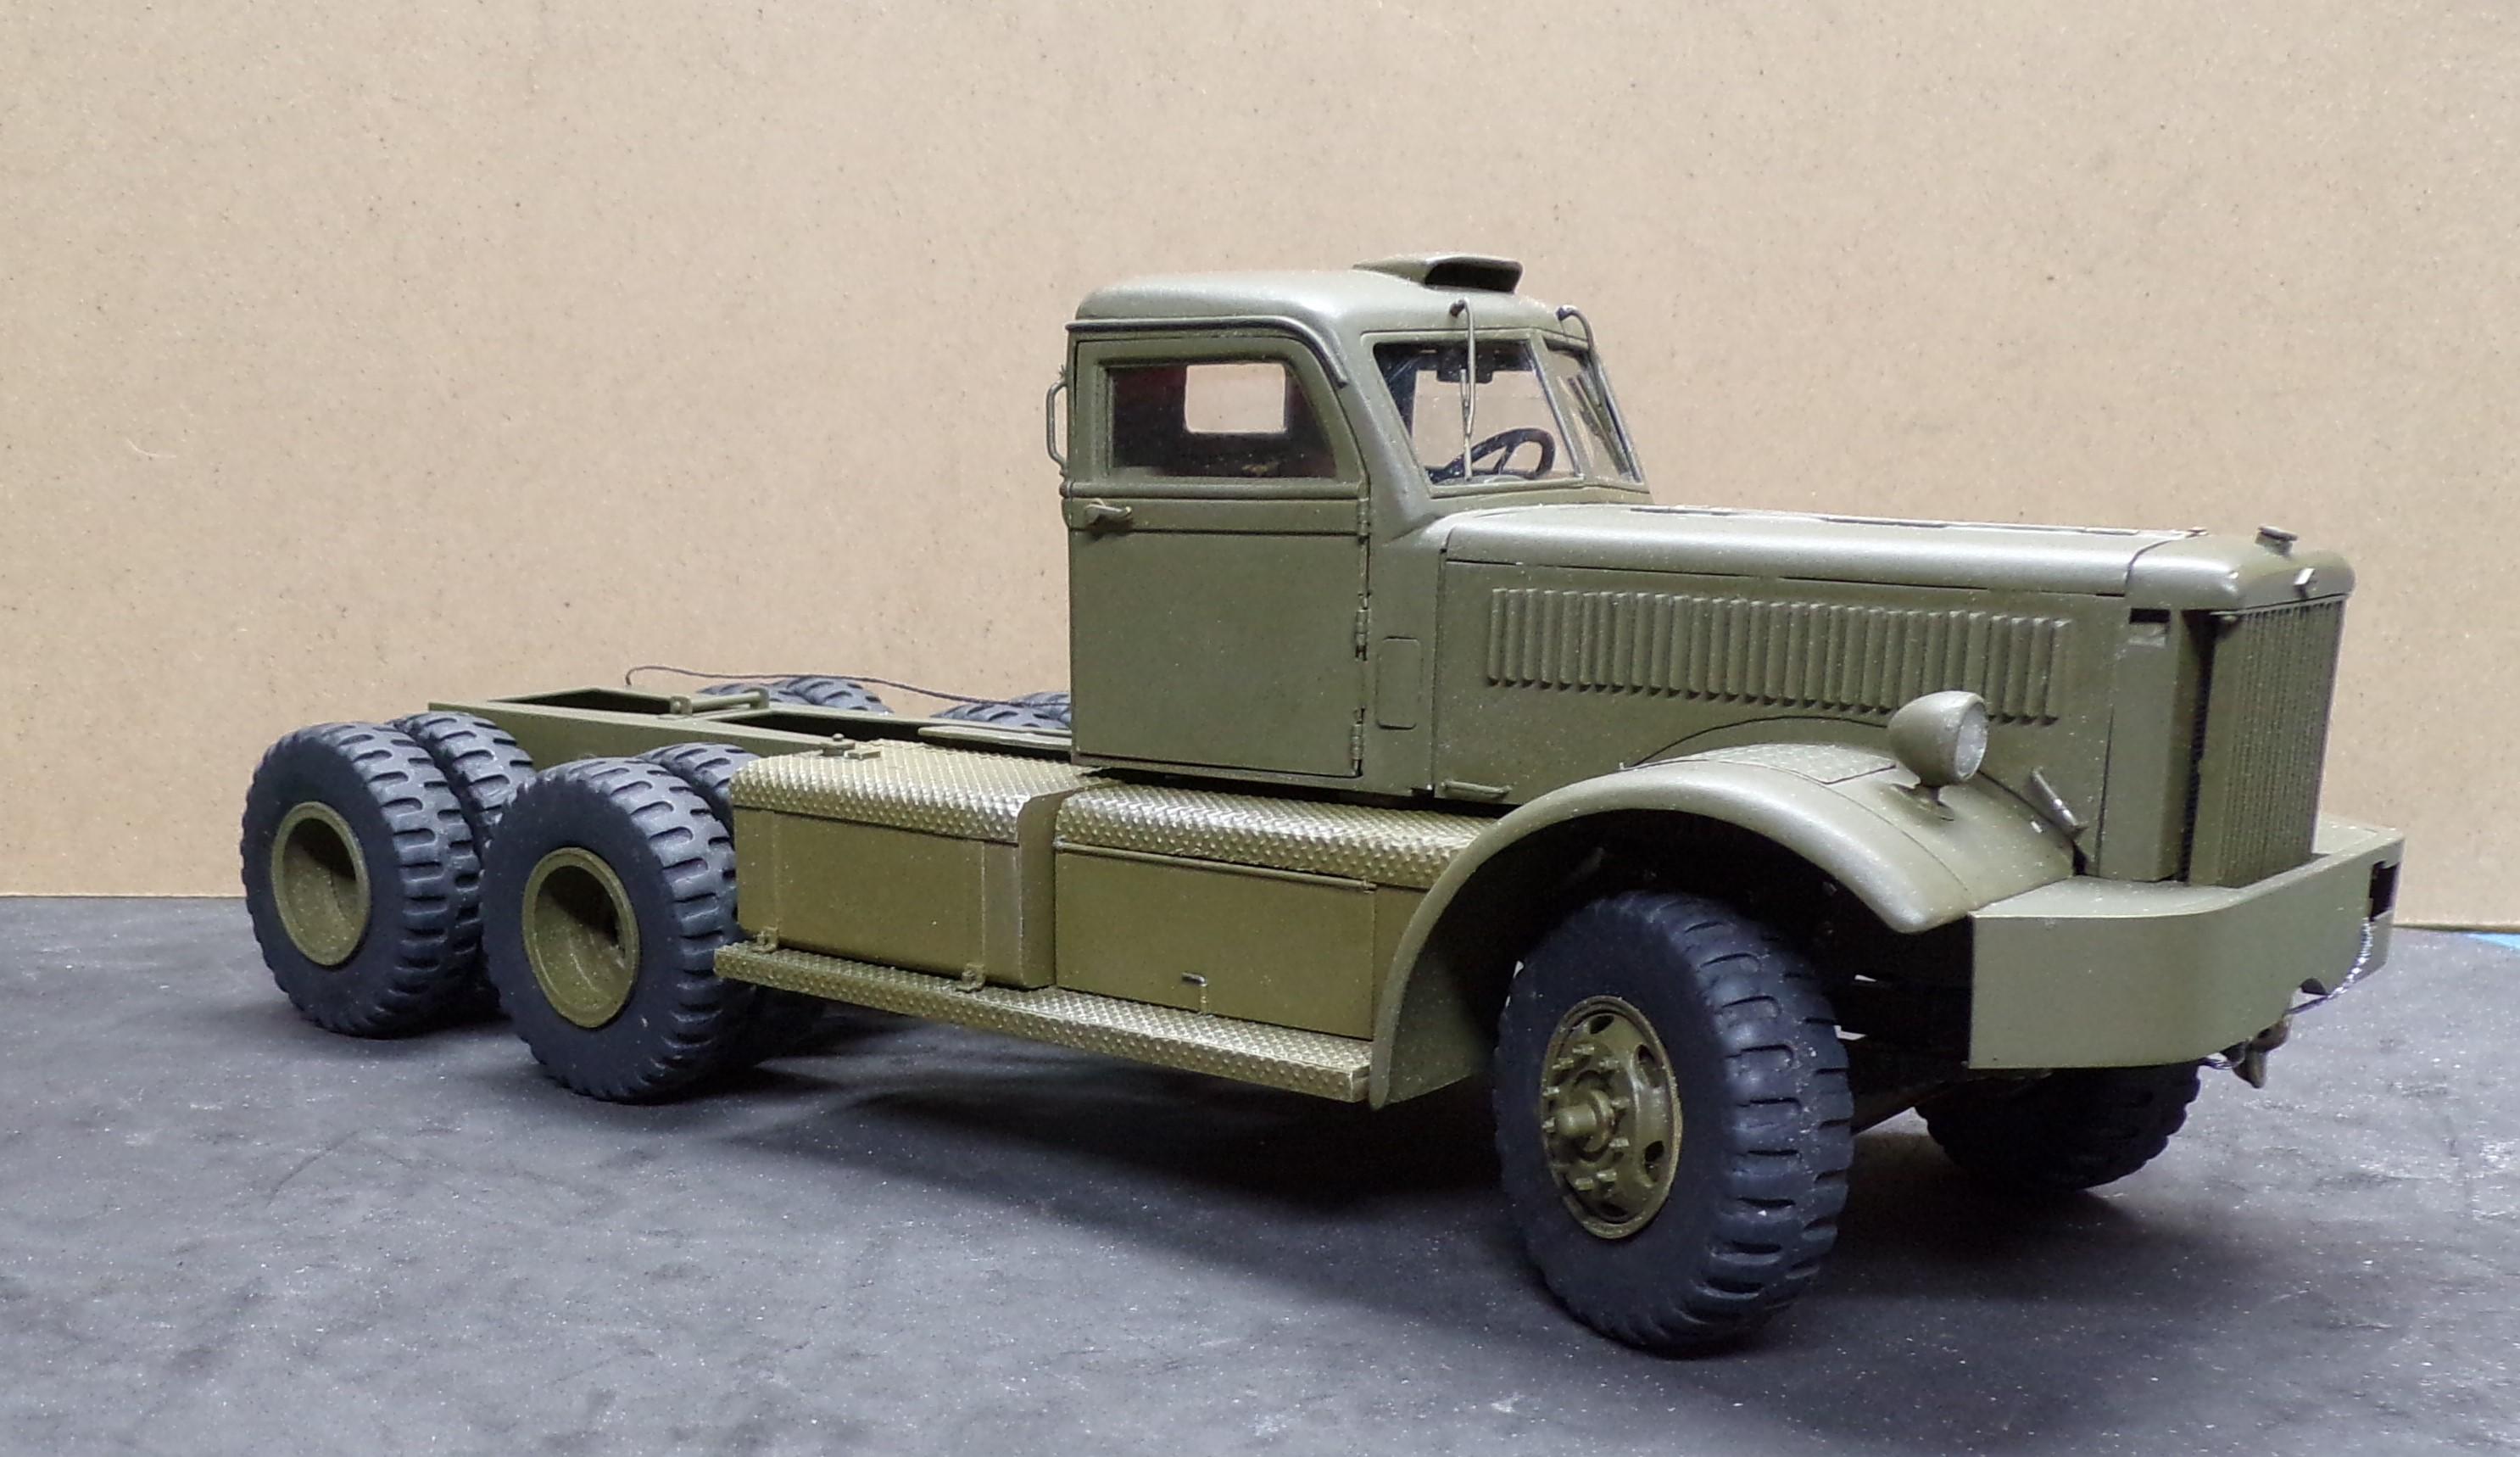
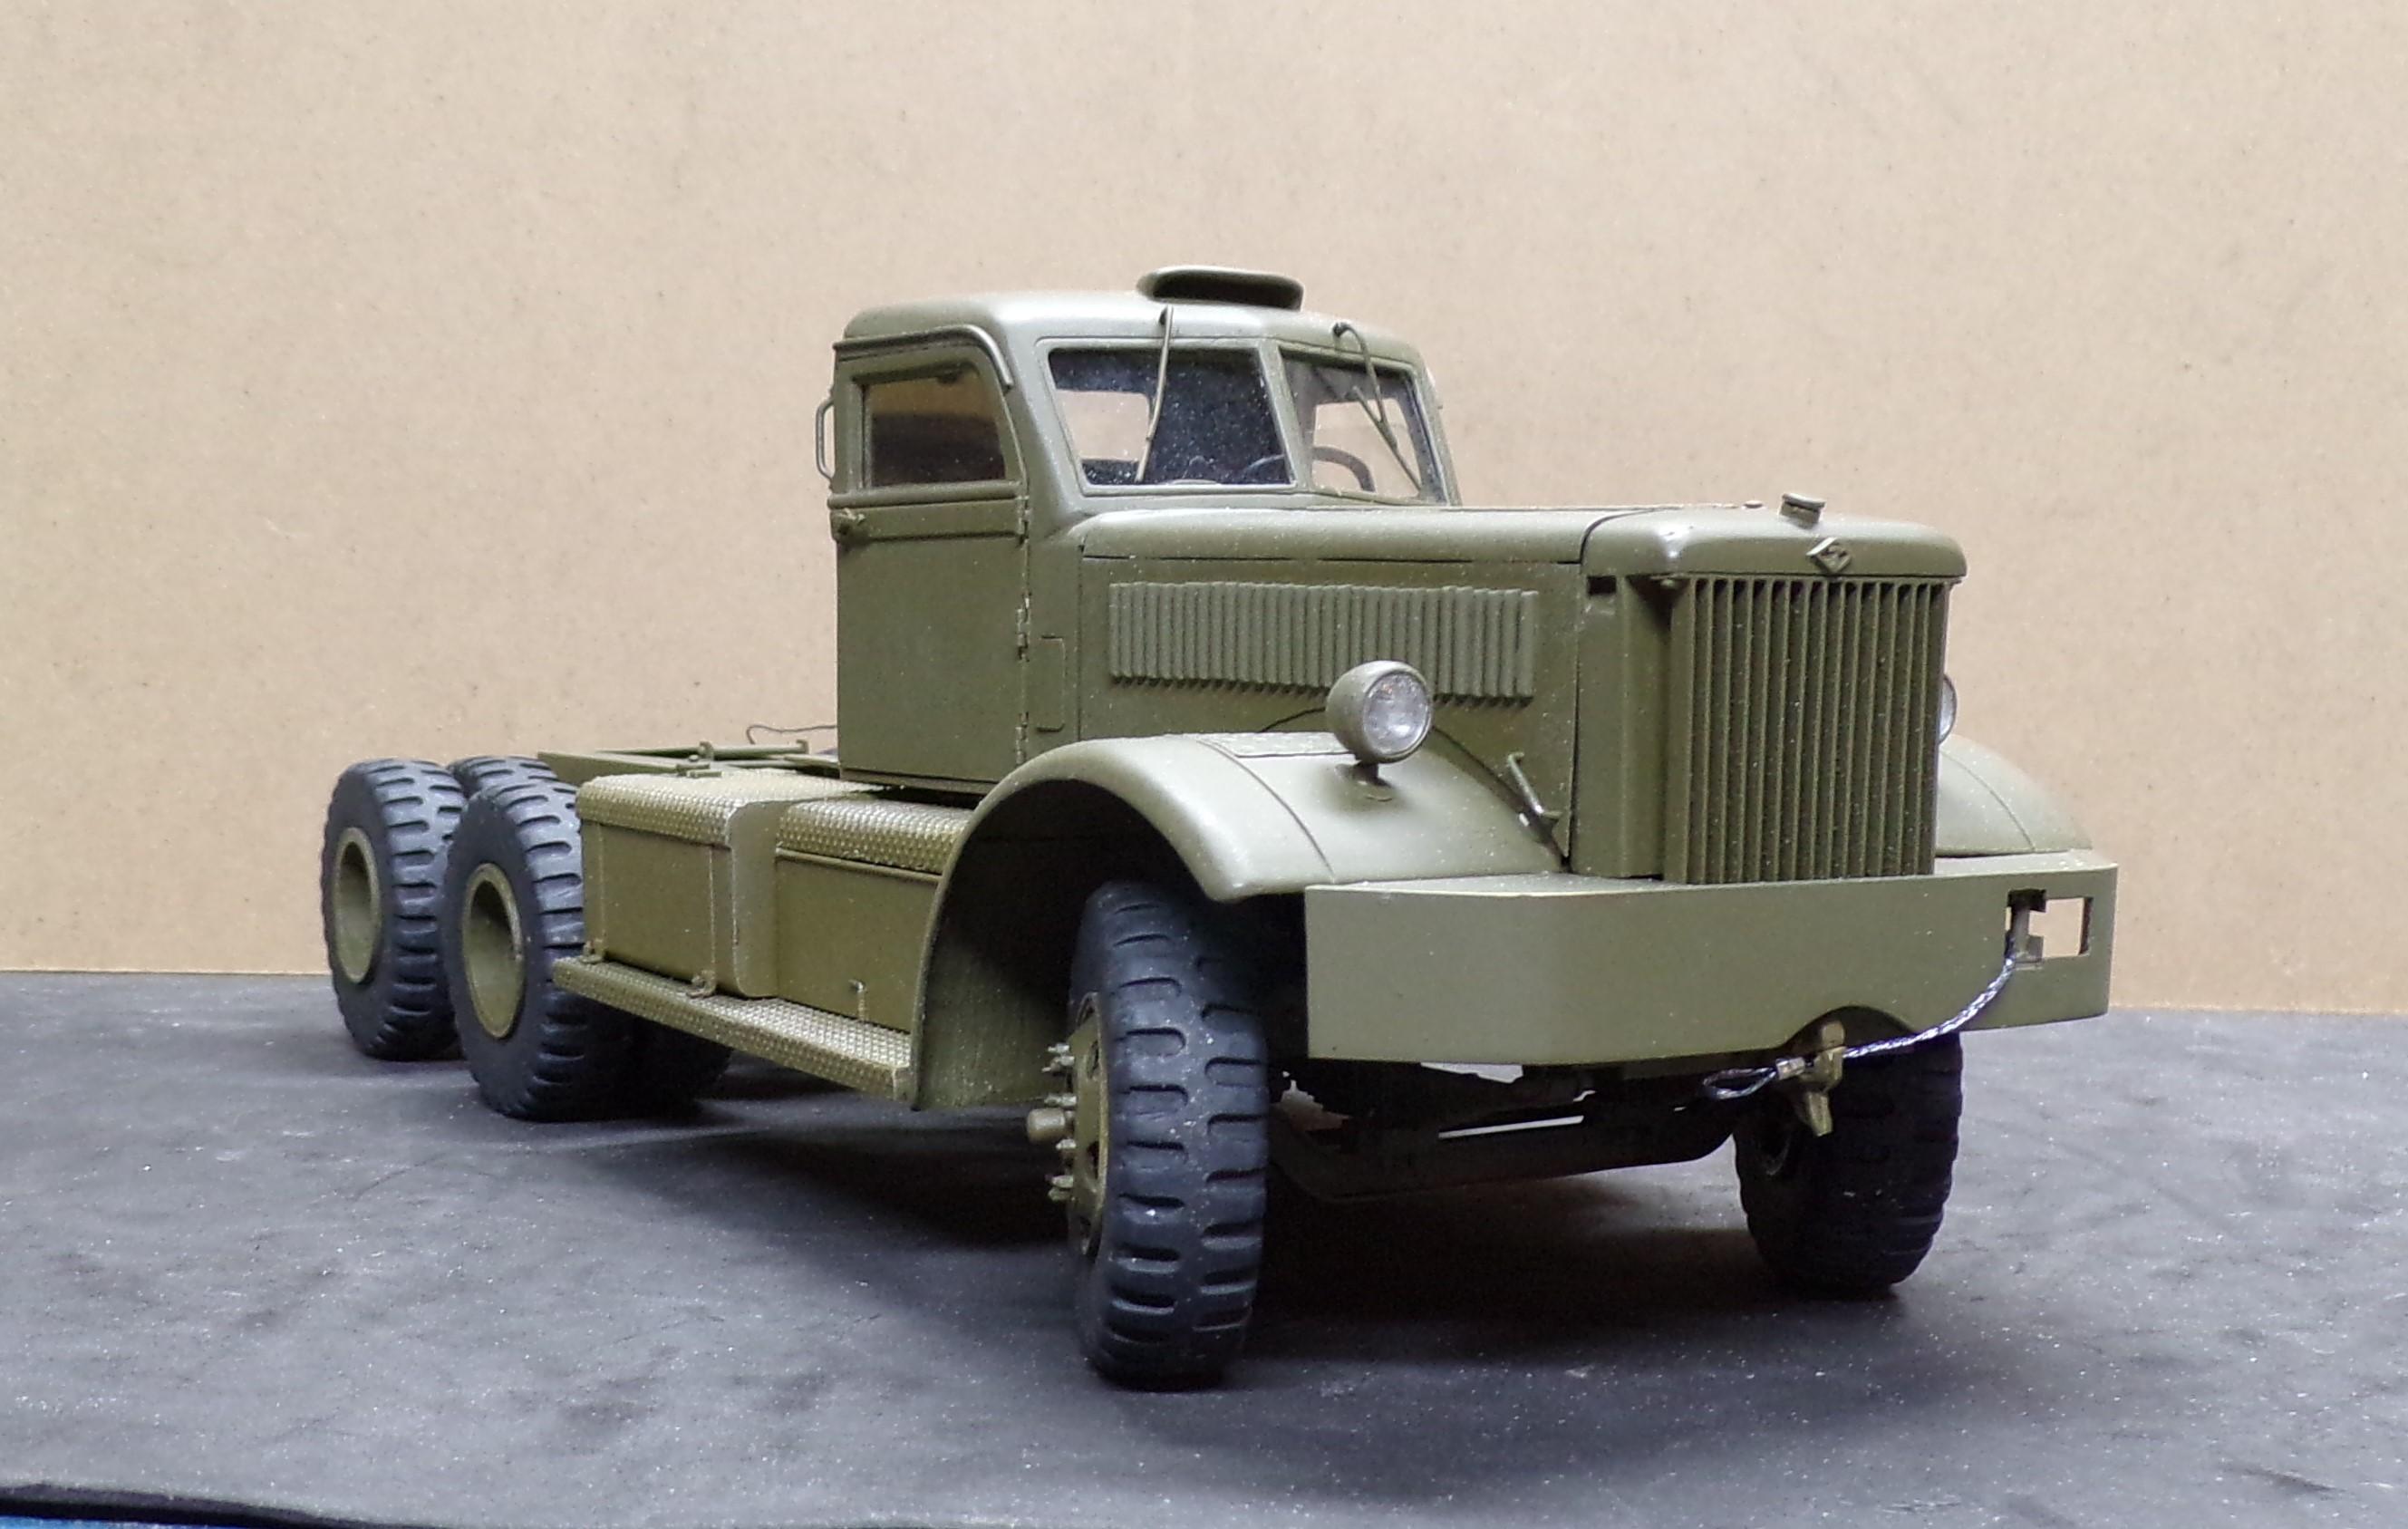
This 1944 Diamond T M-20 Prime Mover is now finished. The boxes have tools, and the fuel tanks are "full". Ready to resume the haul.

-
M-20 Prime Mover
Chariots of Fire replied to Chariots of Fire's topic in WIP: Model Trucks: Big Rigs and Heavy Equipment
It wasn't quite finished in those pics above. But here is what it looks line now. Am working on some tools to put in the compartments in the body.
-
M-20 Prime Mover
Chariots of Fire replied to Chariots of Fire's topic in WIP: Model Trucks: Big Rigs and Heavy Equipment
Close to being done. Just a few small details here and there and it is finished except for some dusting and light dirt under the fenders and along the sides. Can't be too clean!
-
M-20 Prime Mover
Chariots of Fire replied to Chariots of Fire's topic in WIP: Model Trucks: Big Rigs and Heavy Equipment
Hello, Jurgen: The chain I used is just some cheap necklace type chain I found in a craft store. I would have used a piece of bicycle chain if it had been small enough. A little paint and a black wash helps to make it plausible. -
M-20 Prime Mover
Chariots of Fire replied to Chariots of Fire's topic in WIP: Model Trucks: Big Rigs and Heavy Equipment
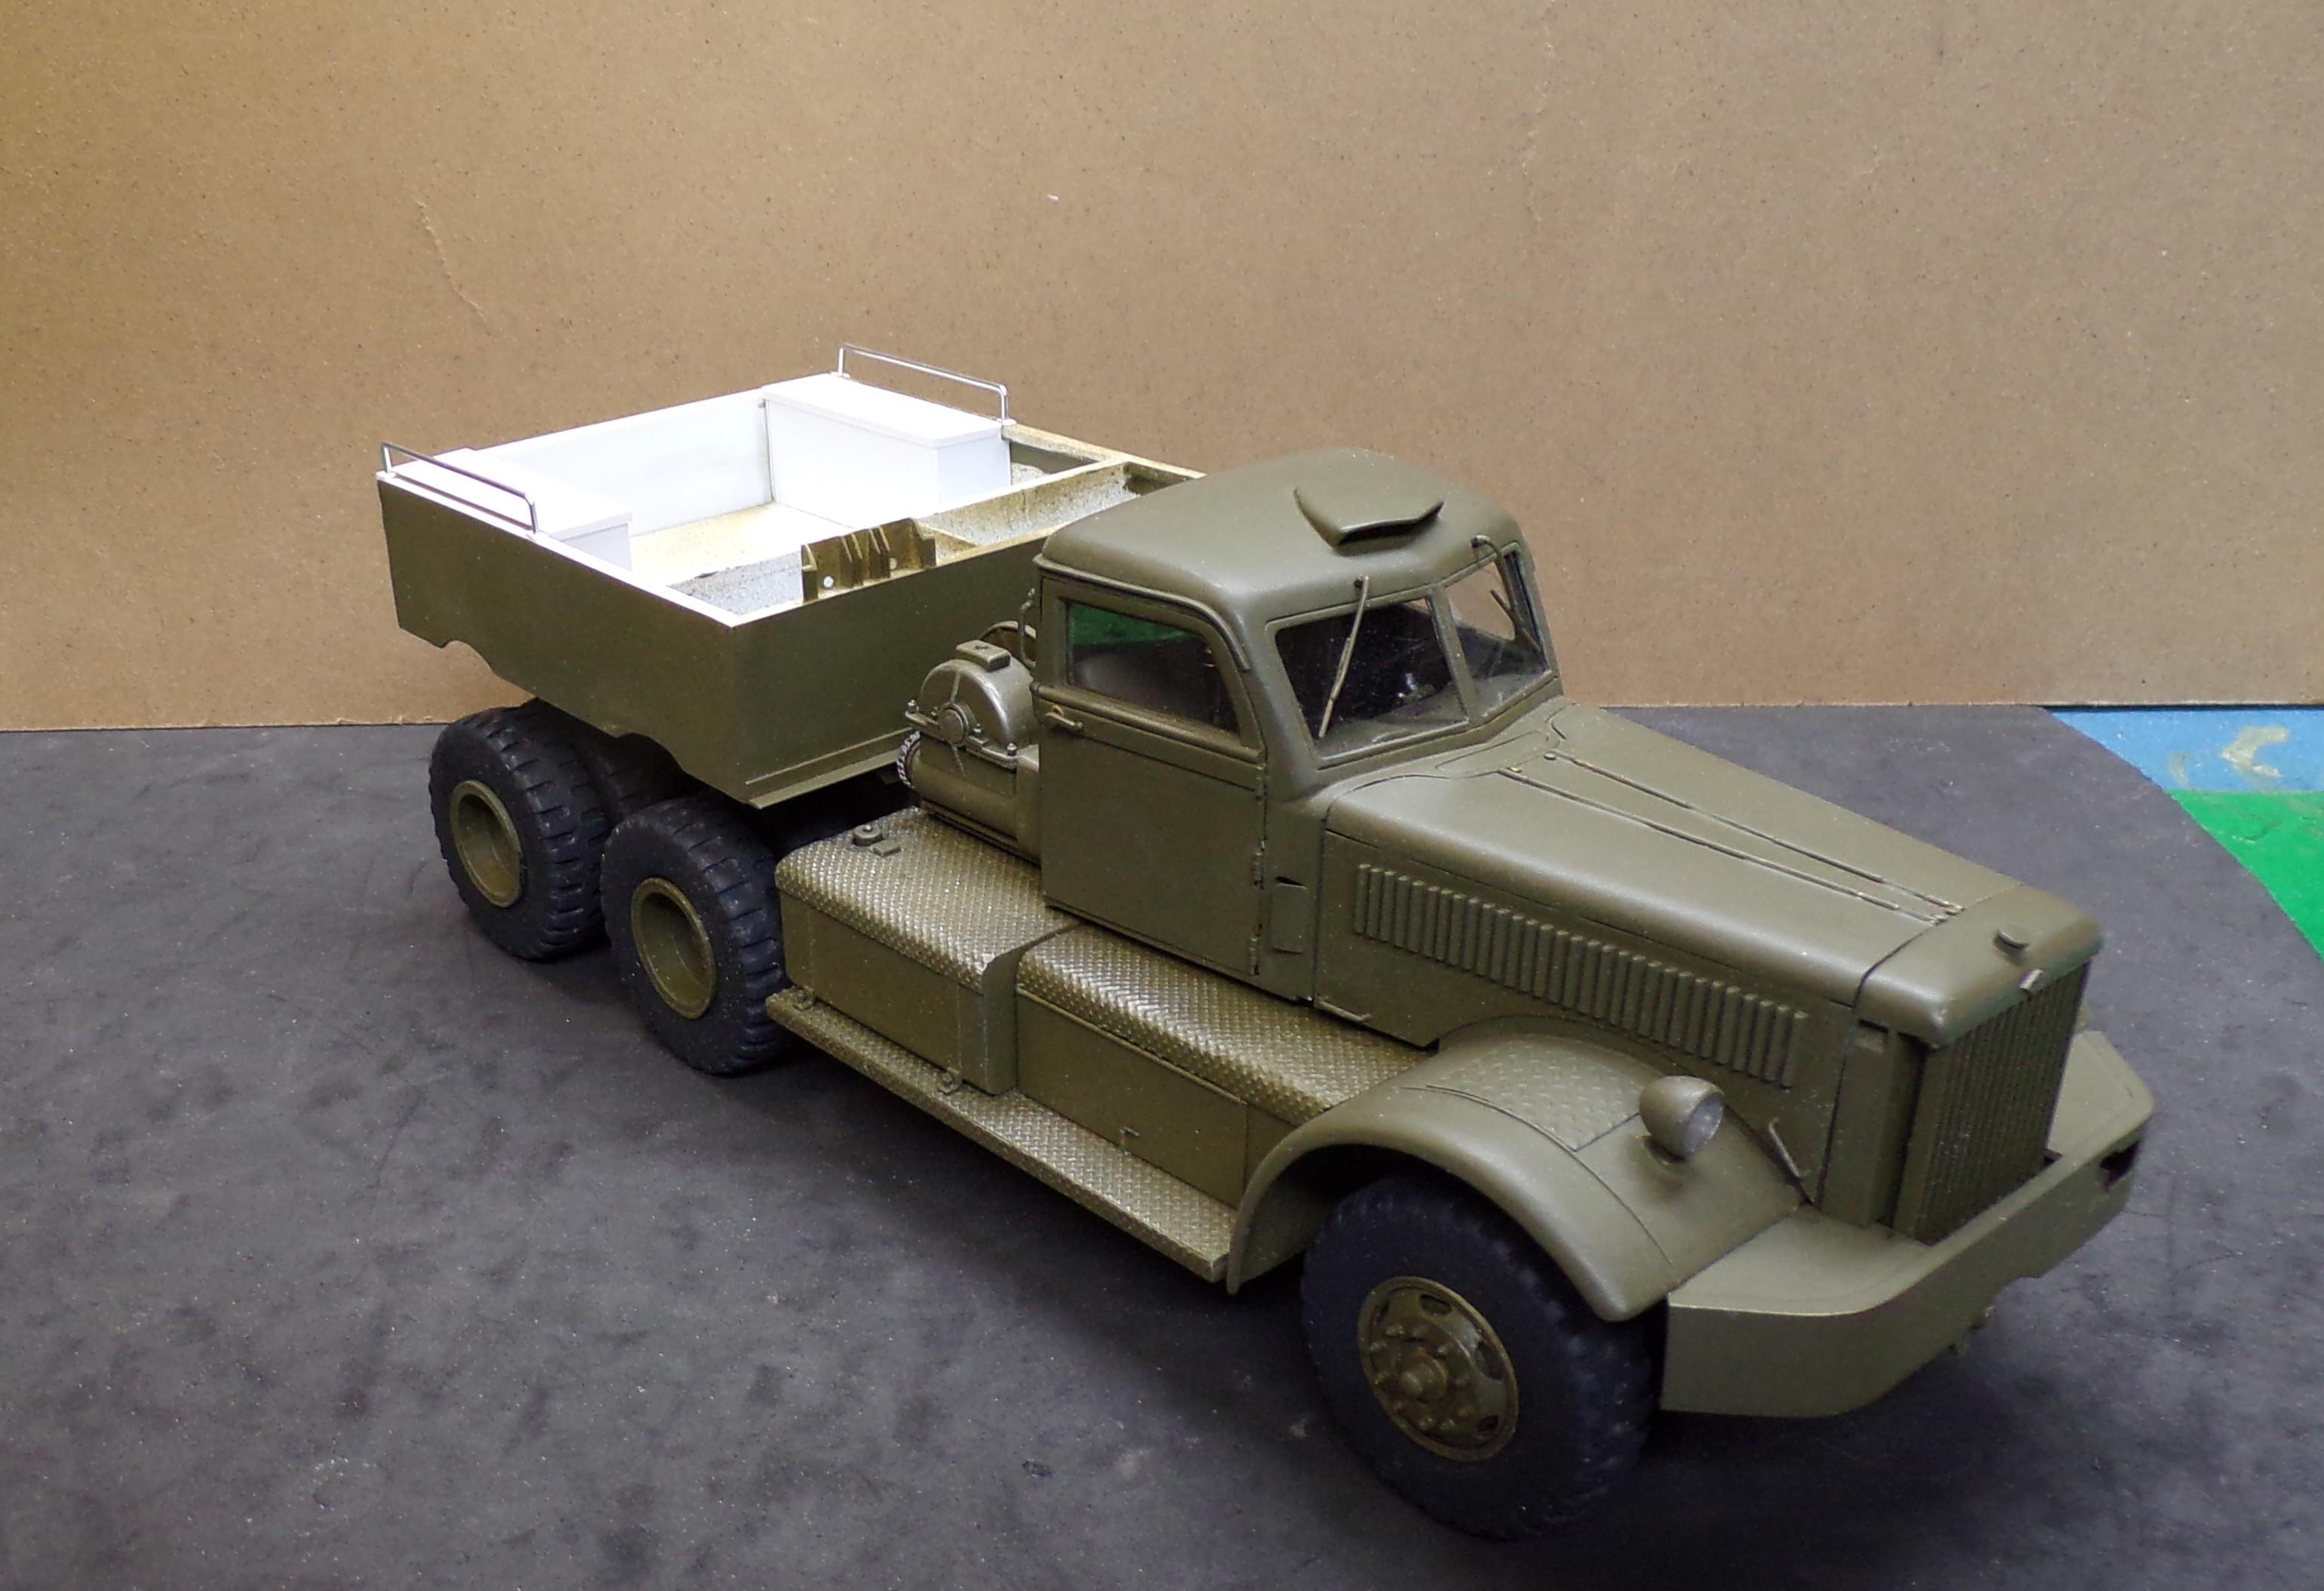
Got the tool boxes build with opening covers and the side rails are installed. Covers can be removed for painting as can the tailgate. That will be next.
-
M-20 Prime Mover
Chariots of Fire replied to Chariots of Fire's topic in WIP: Model Trucks: Big Rigs and Heavy Equipment
The box was nothing more than a container for weight. Either stone, rocks, sand, or other heavy things that gave the truck traction. The two small storage bins that I have yet to build were for tools. -
M-20 Prime Mover
Chariots of Fire replied to Chariots of Fire's topic in WIP: Model Trucks: Big Rigs and Heavy Equipment
Yeah, They were'nt speed demons!☺️ -
M-20 Prime Mover
Chariots of Fire replied to Chariots of Fire's topic in WIP: Model Trucks: Big Rigs and Heavy Equipment
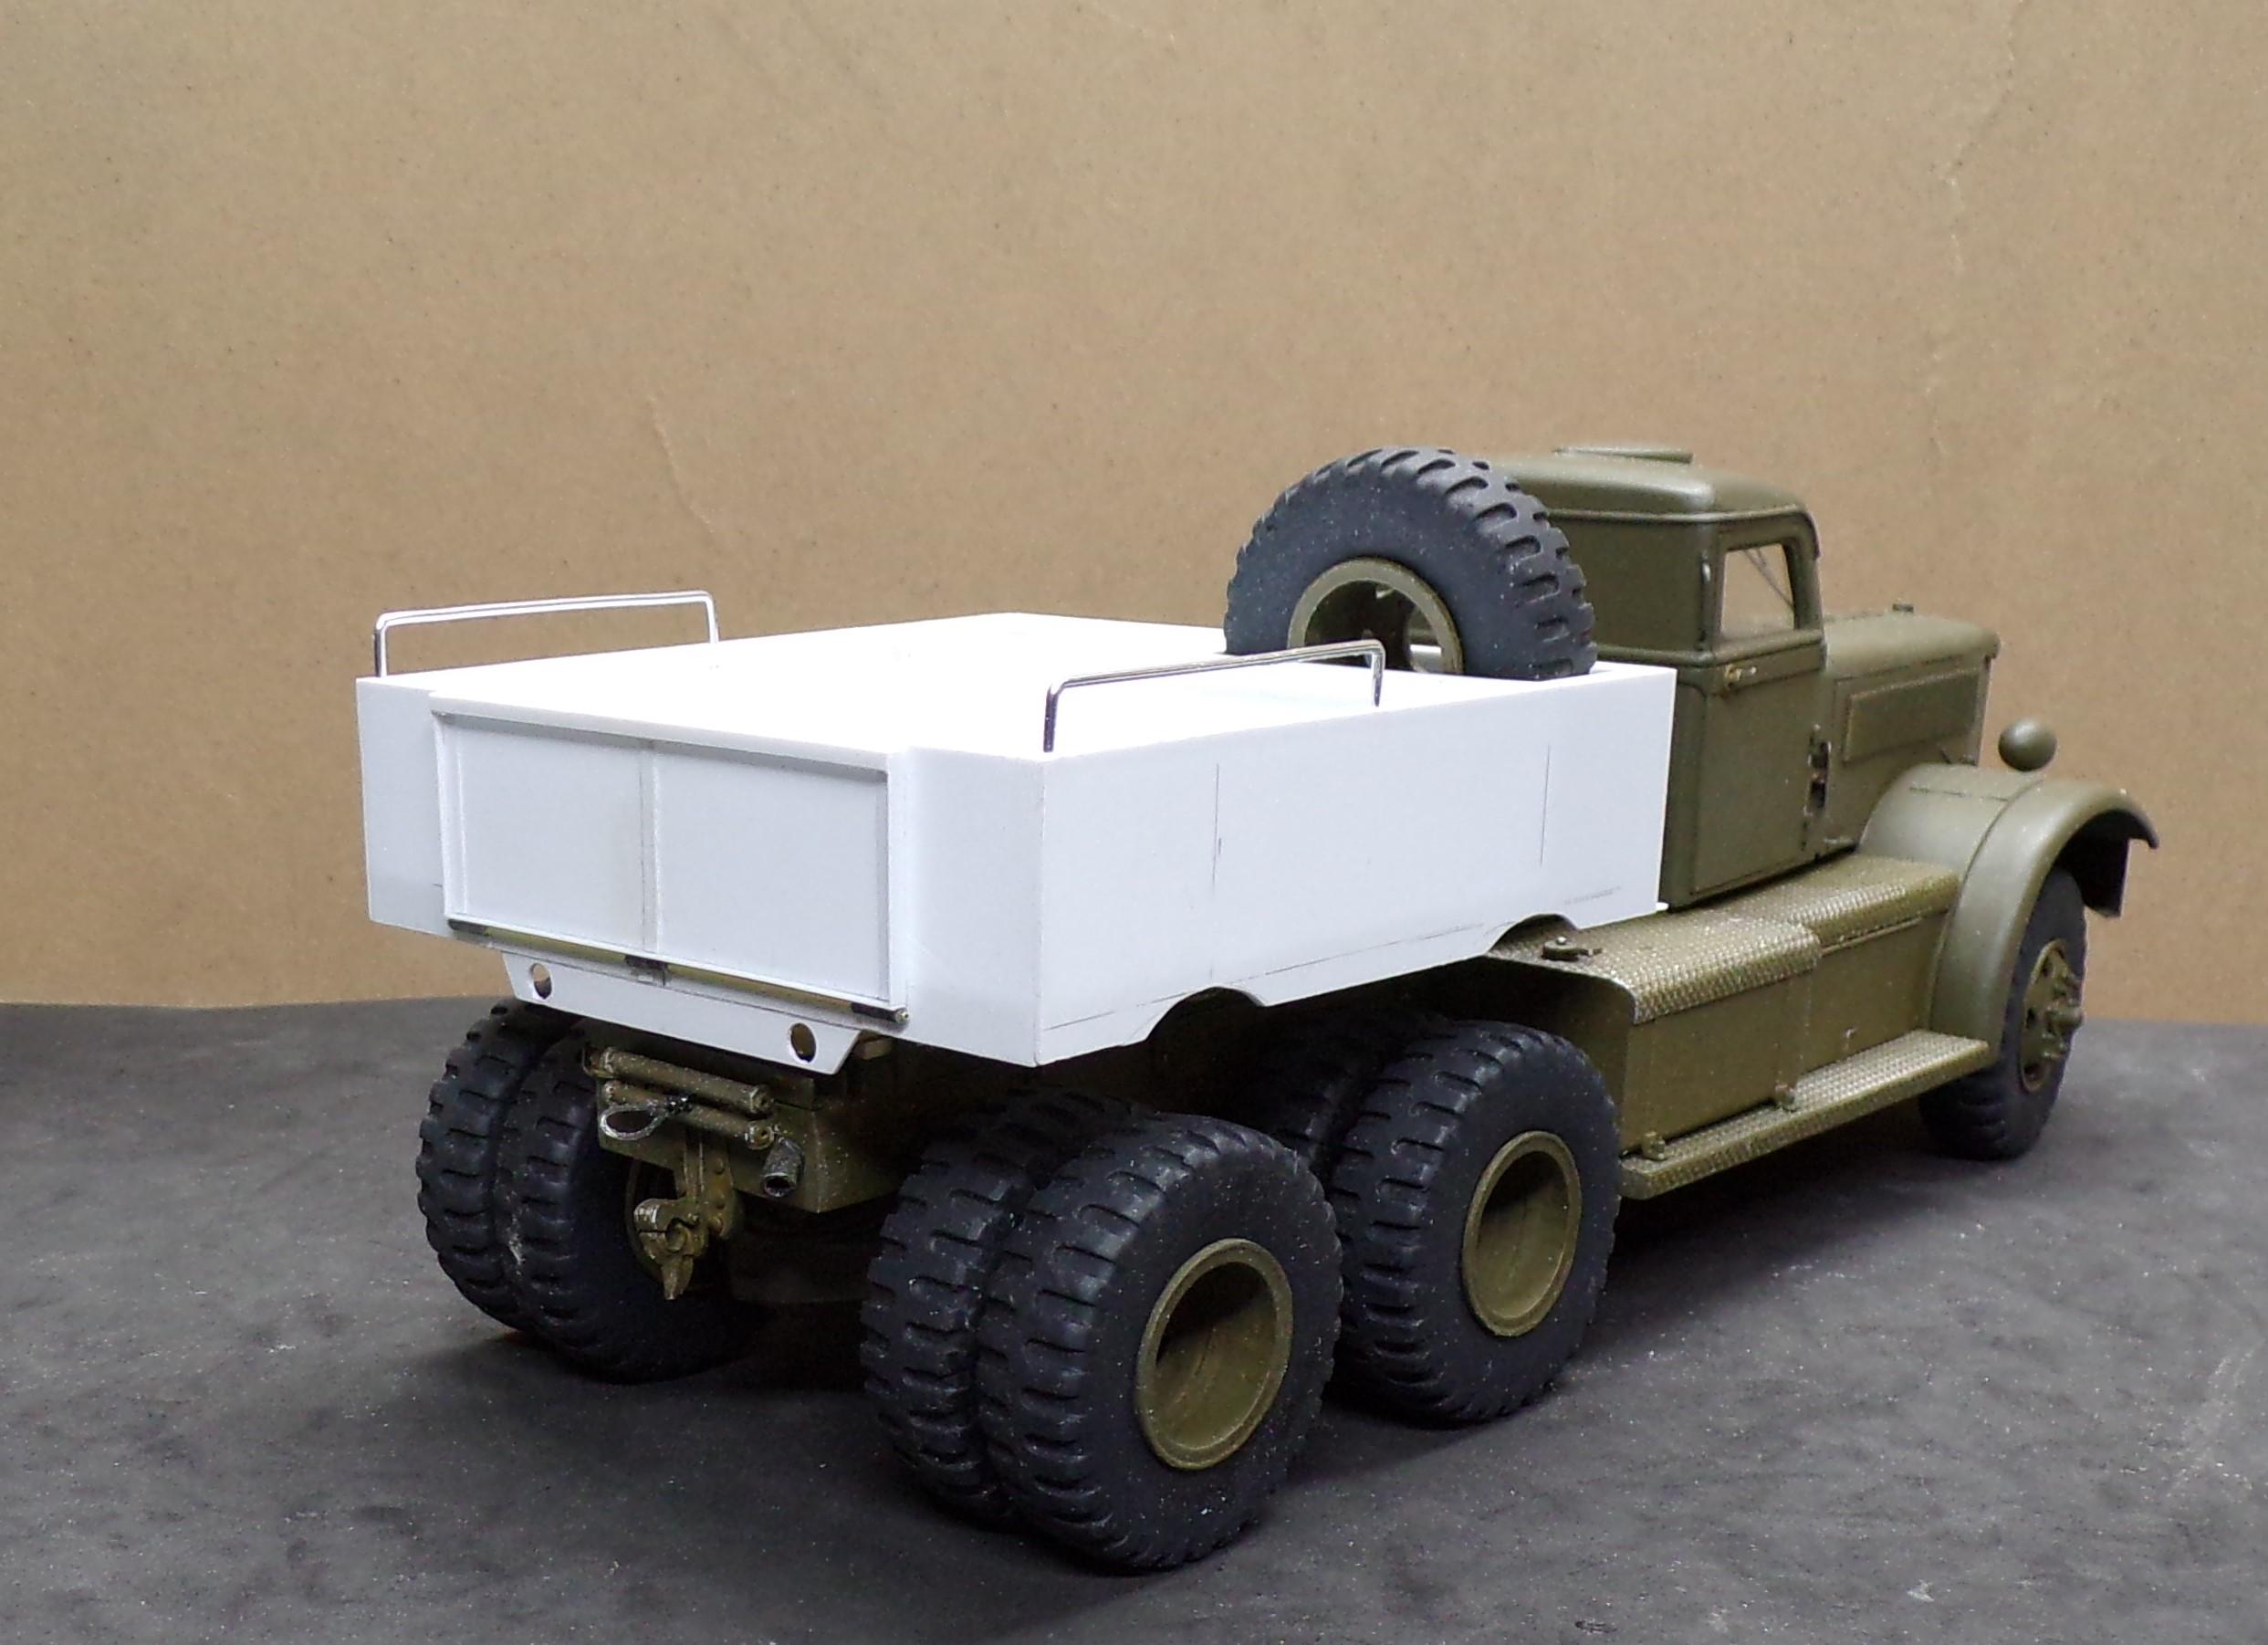
Got to work on the body the last couple of days. This part of the build is simple but squaring it up is most important. Checking to be sure that opposite sides are the same size, the corners are square, etc. Sides, front and rear were cut of 0.030" sheet stock and then the floor of the body was glued in. The back panel was cut open for the tailgate. An interior bulkhead separates the spare tire space from the rest of the body. Next up are two compartments that open from the top. They will be located on each side of the tailgate and will extend as far forward as the long grab handles. The bottom has cross members and two stringers that run from front to rear so that the body sits on the frame. The tailgate was made of similar 0.030" sheet stock and trimmed in 0.010" x 0.080" strip stock. To make the hinges, small pieces of flexible tubing were cut on my chopper all to the same length; 3 for the tailgate and 3 for the body. A piece of brass wire was inserted into each tube section to keep the alignment and then the sections were glued to the appropriate areas. Most difficult part was making sure that the sections weren't glued to each other, the wrong part or to the brass wire. More to follow.
-
International Scout II
Chariots of Fire replied to mrmike's topic in WIP: Model Trucks: Pickups, Vans, SUVs, Light Commercial
Best wishes on this project. I had some Monogram Mack fire truck kits in yellow and had trouble with the yellow bleeding through the primer. Hopefully whatever Ertl used will be ok. My problem was sporadic, though. It did not happen on all of the yellow kits I had. -
M-20 Prime Mover
Chariots of Fire replied to Chariots of Fire's topic in WIP: Model Trucks: Big Rigs and Heavy Equipment
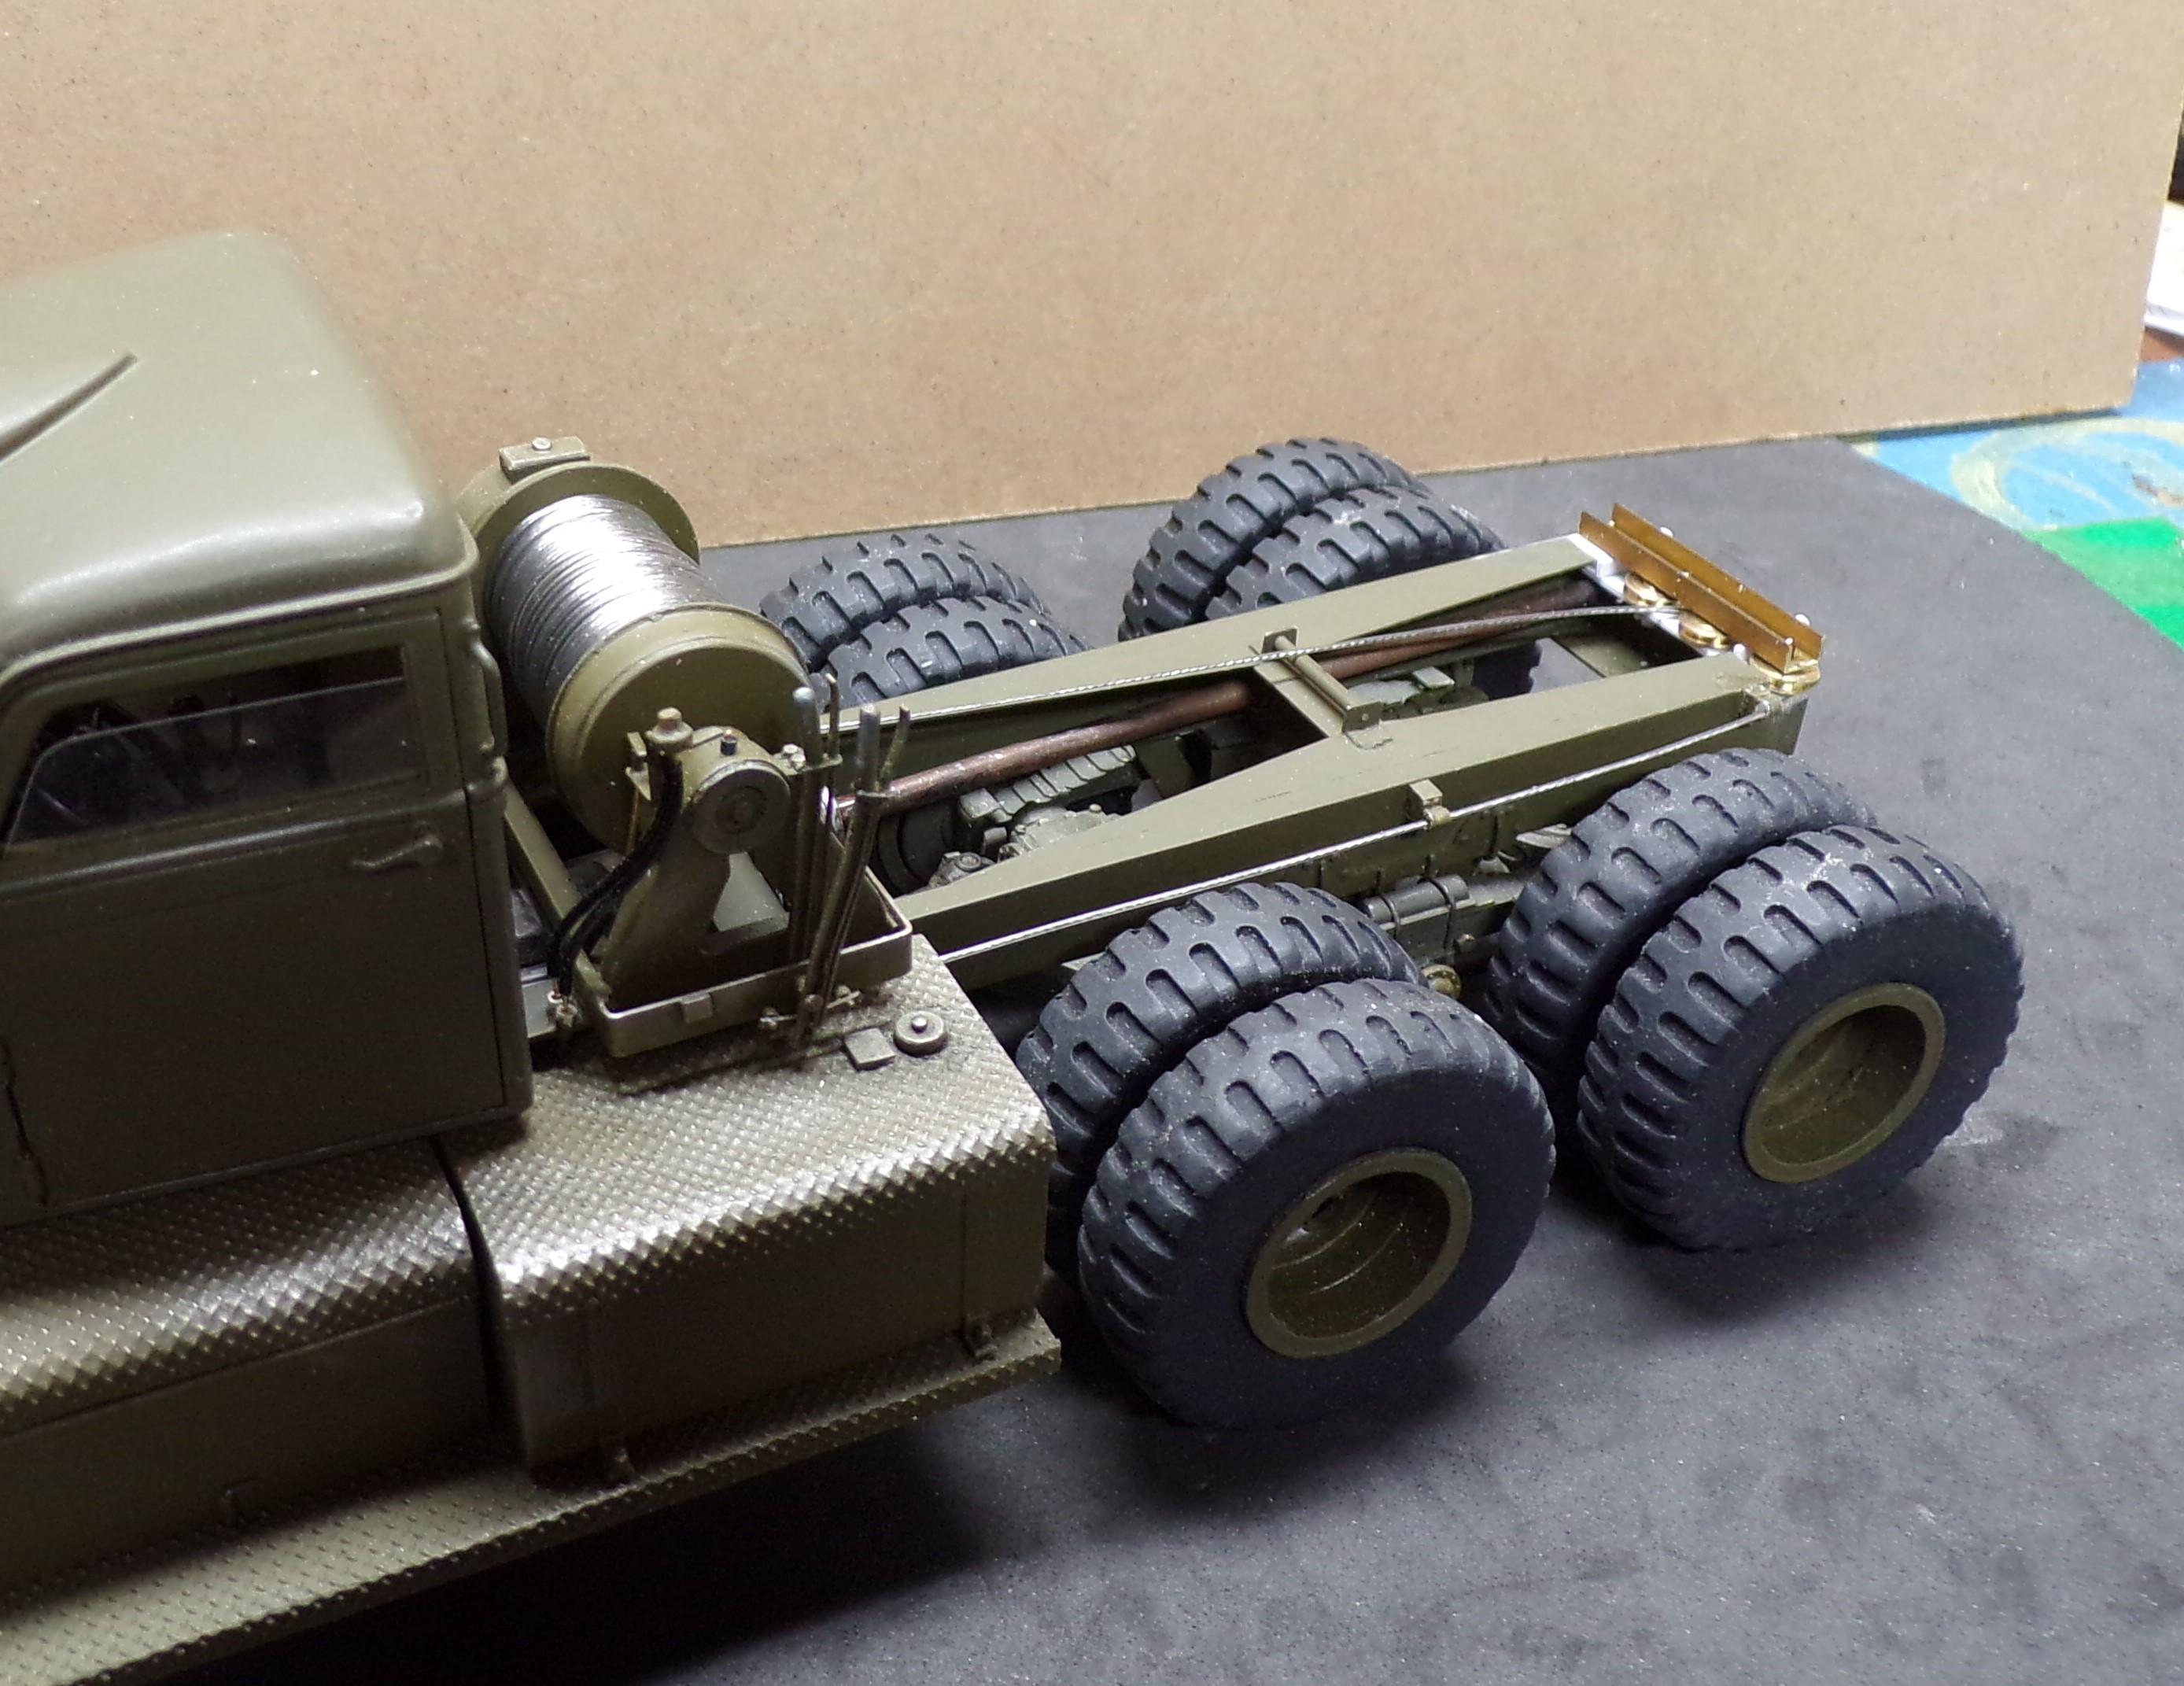
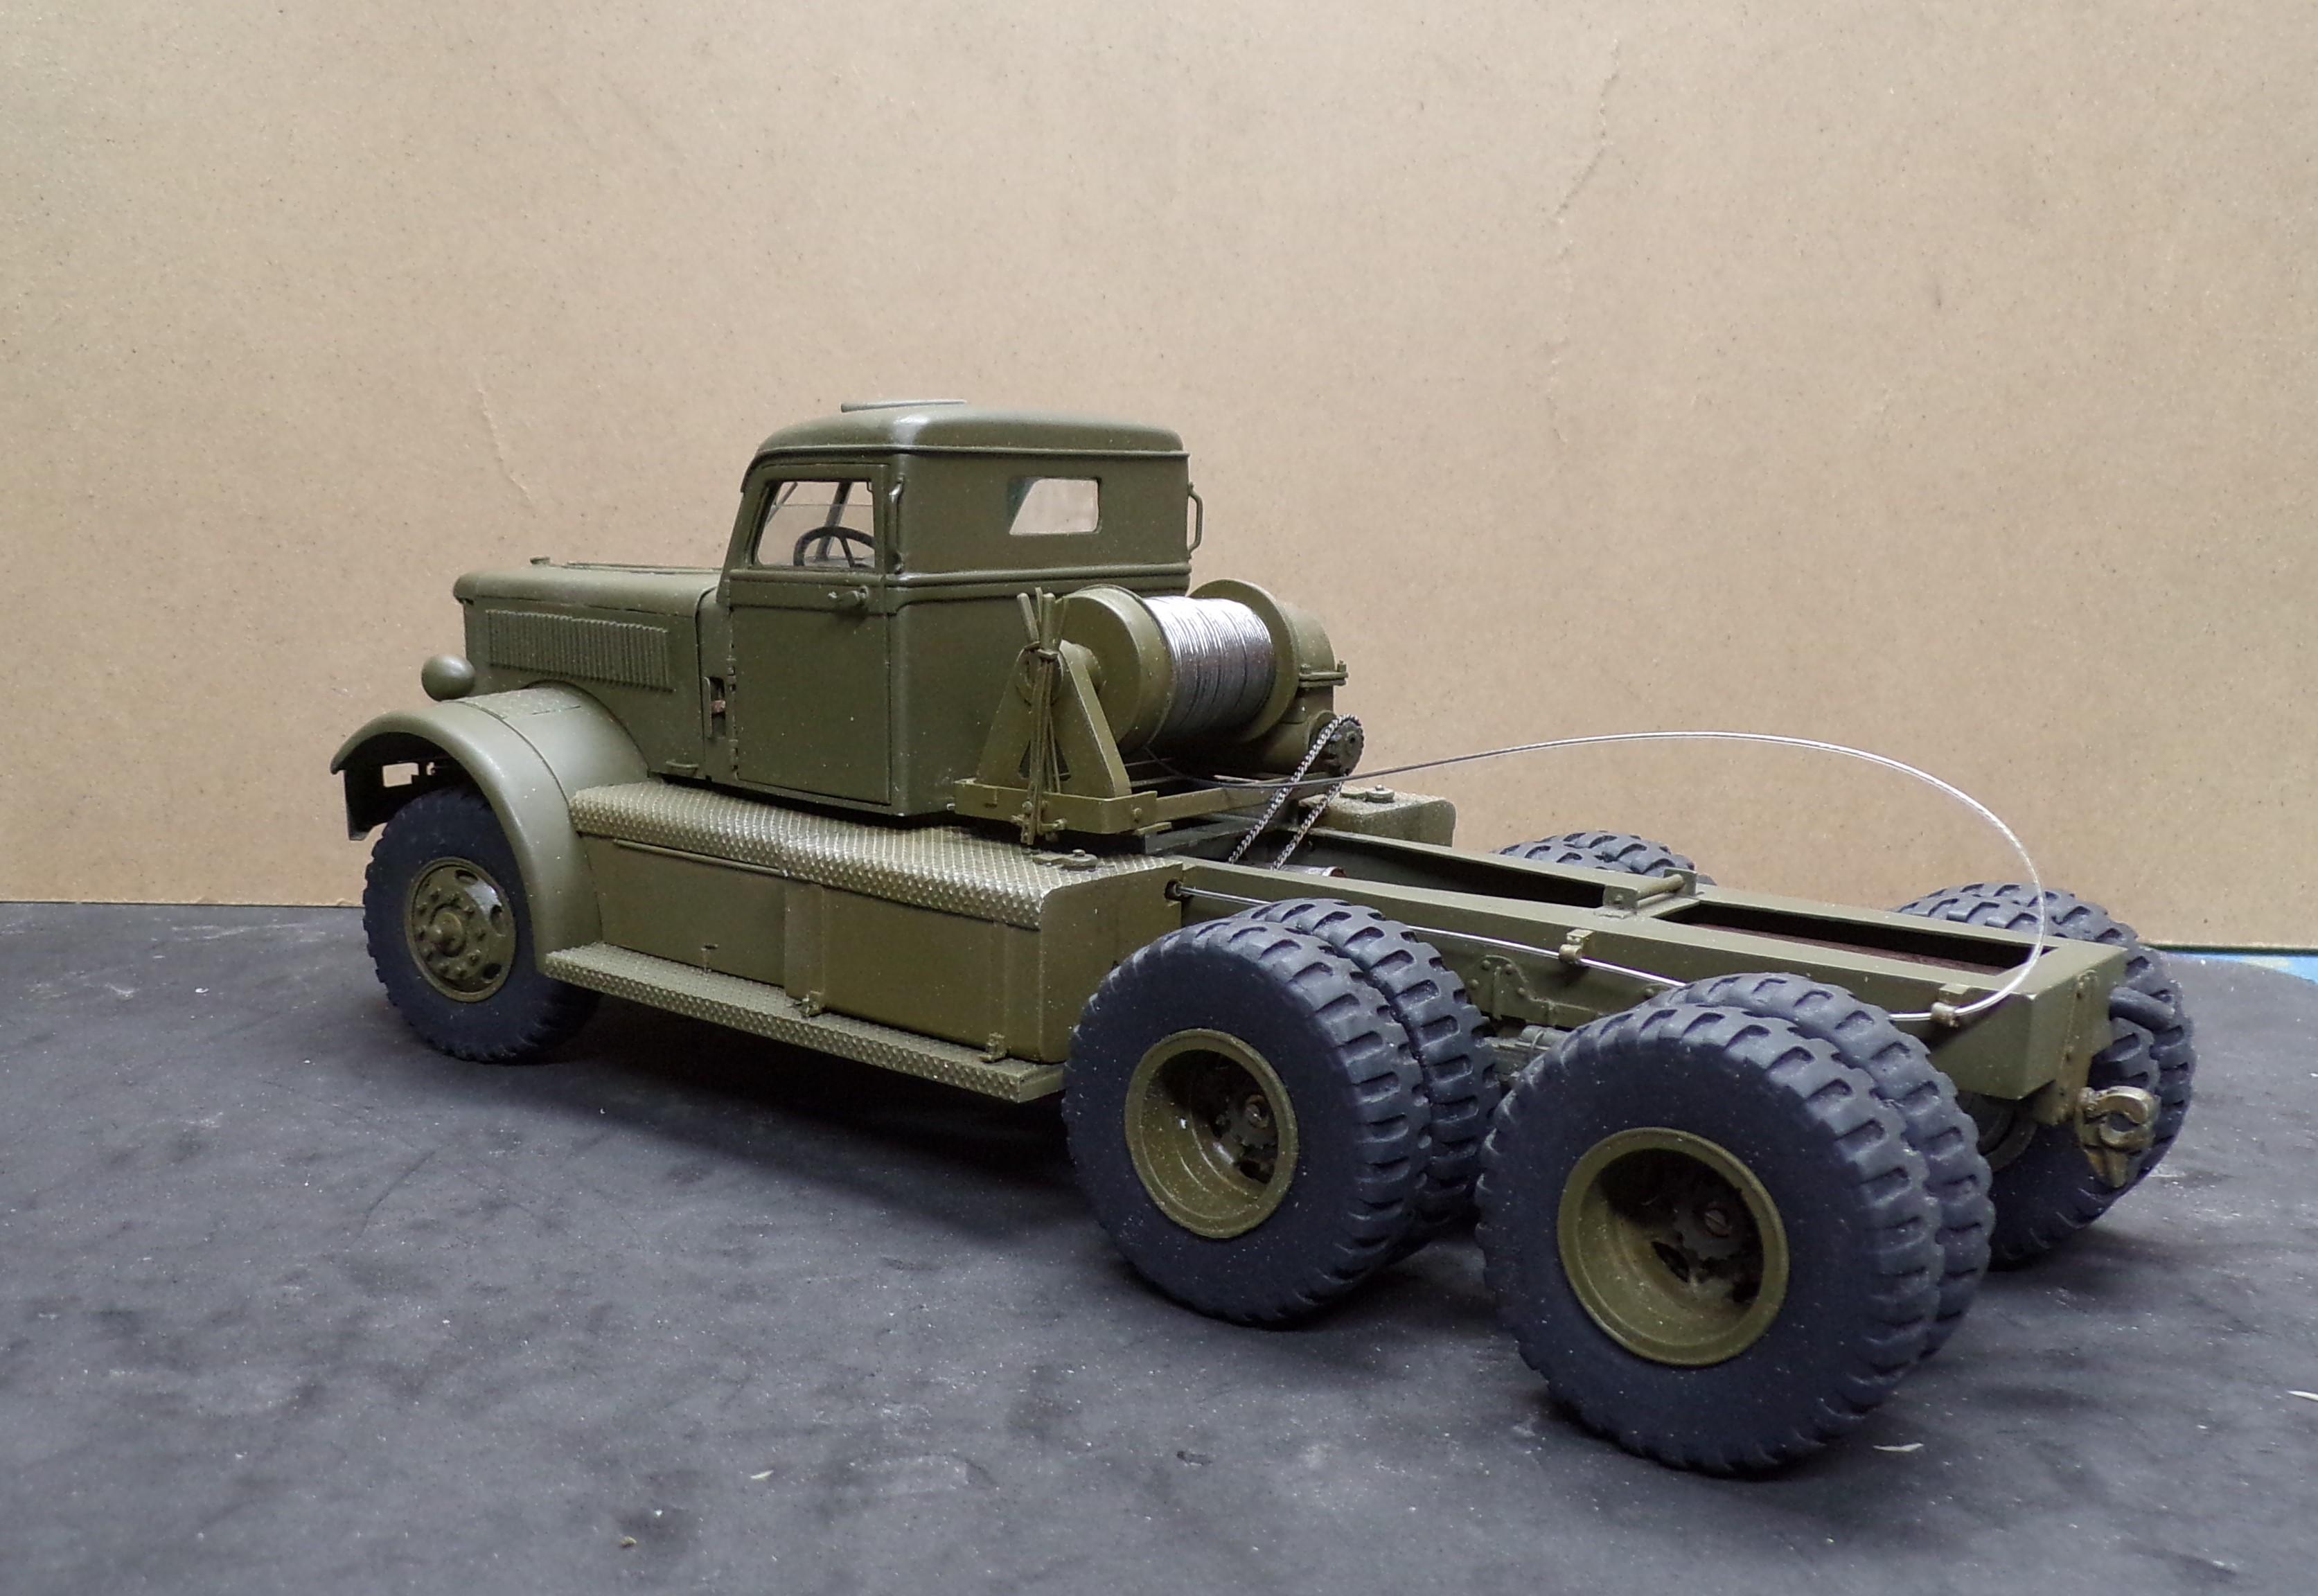
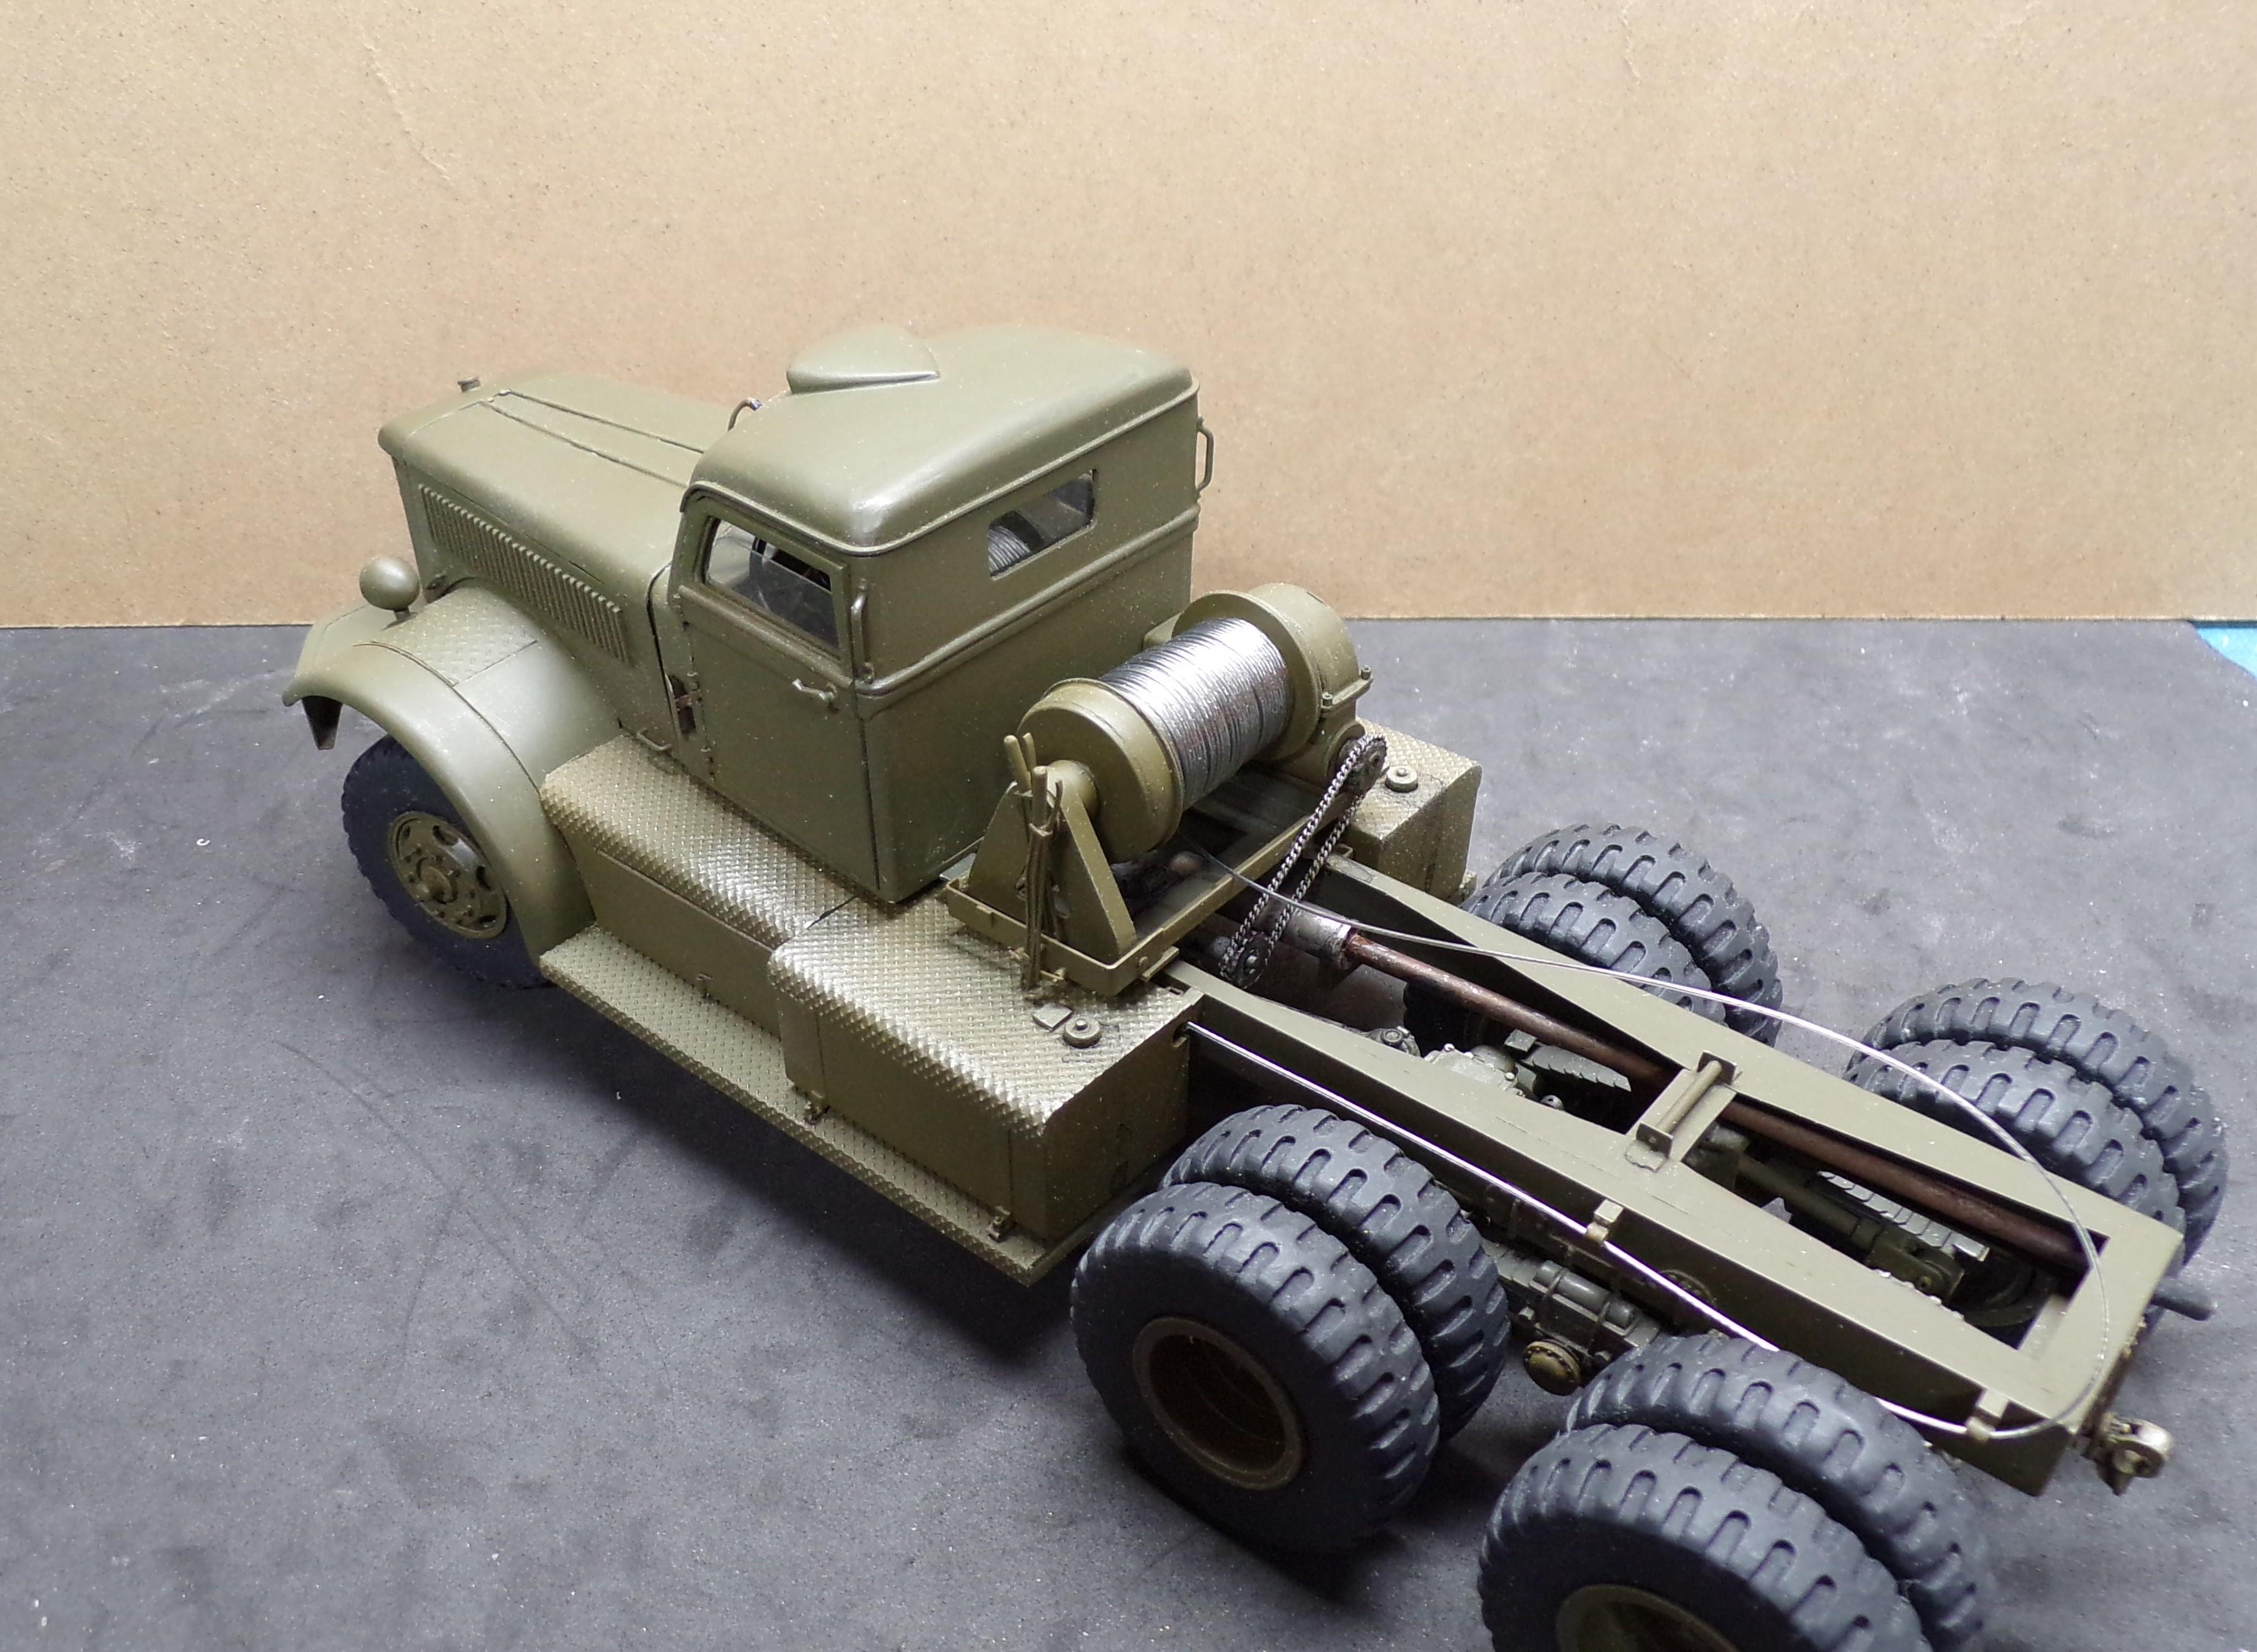
Here's the last of the rigging that had to be done for the winch. What remains will be part of the body work. There are 3 brass turned sheaves at the back of the frame. Two center ones guide the cable when it is used to pull or tow from the rear. The third one assists in returning the cable around the corner and back along the frame where it eventually runs through the bumper for pulling or towing from the front. The rollers keep the cable in line with the slots in each of the center sheaves but allow it to move right and left during the pulling process.
-
M-20 Prime Mover
Chariots of Fire replied to Chariots of Fire's topic in WIP: Model Trucks: Big Rigs and Heavy Equipment
Pintle hook was made of brass with two pieces. The bottom and the part that opens. Then I made a mold for the parts and cast them in resin. I did have to add some 0.010" plastic to the side of the upper part because it was too fragile for drilling. But what you see is the resin casting. It opens up. The front one is the same thing but it was made solid and doesn't open up. I finished up the rear 3 pulleys (sheaves) and they are now mounted at the back above the pintle hook. Will take photos to share before the painting is done. -
M-20 Prime Mover
Chariots of Fire replied to Chariots of Fire's topic in WIP: Model Trucks: Big Rigs and Heavy Equipment
Work done on the winch but with a few details to go. PVC pipe section, plastic sheet stock went into the build. Now to get the pulleys made up and installed at the rear of the frame. Will mean cutting off the top of the pintle hook bracket but that is how it was done on the real rig anyway. I found some mylar coated wire for the cable. 24 gauge. Seemed to work close enough to the actual size. Better than the embroidery thread I had used earlier.
-
M-20 Prime Mover
Chariots of Fire replied to Chariots of Fire's topic in WIP: Model Trucks: Big Rigs and Heavy Equipment
Haven't done any real weathering on it yet. Just trying to get the basic building done. I'll do the underside of the fenders, put some dirt and dust on the back of the fuel tanks, and dust up the frame. Need to do the decaling first, though. -
2× Chevy Bison
Chariots of Fire replied to Rockford's topic in WIP: Model Trucks: Big Rigs and Heavy Equipment
I had the same issue with the Monogram hollow back tires. Since I had several extras, I sliced off the front sidewalls of the spares and glued them to the back of the tires and then sanded down the edges. Made all the difference in the world on how the tires looked. -
M-20 Prime Mover
Chariots of Fire replied to Chariots of Fire's topic in WIP: Model Trucks: Big Rigs and Heavy Equipment
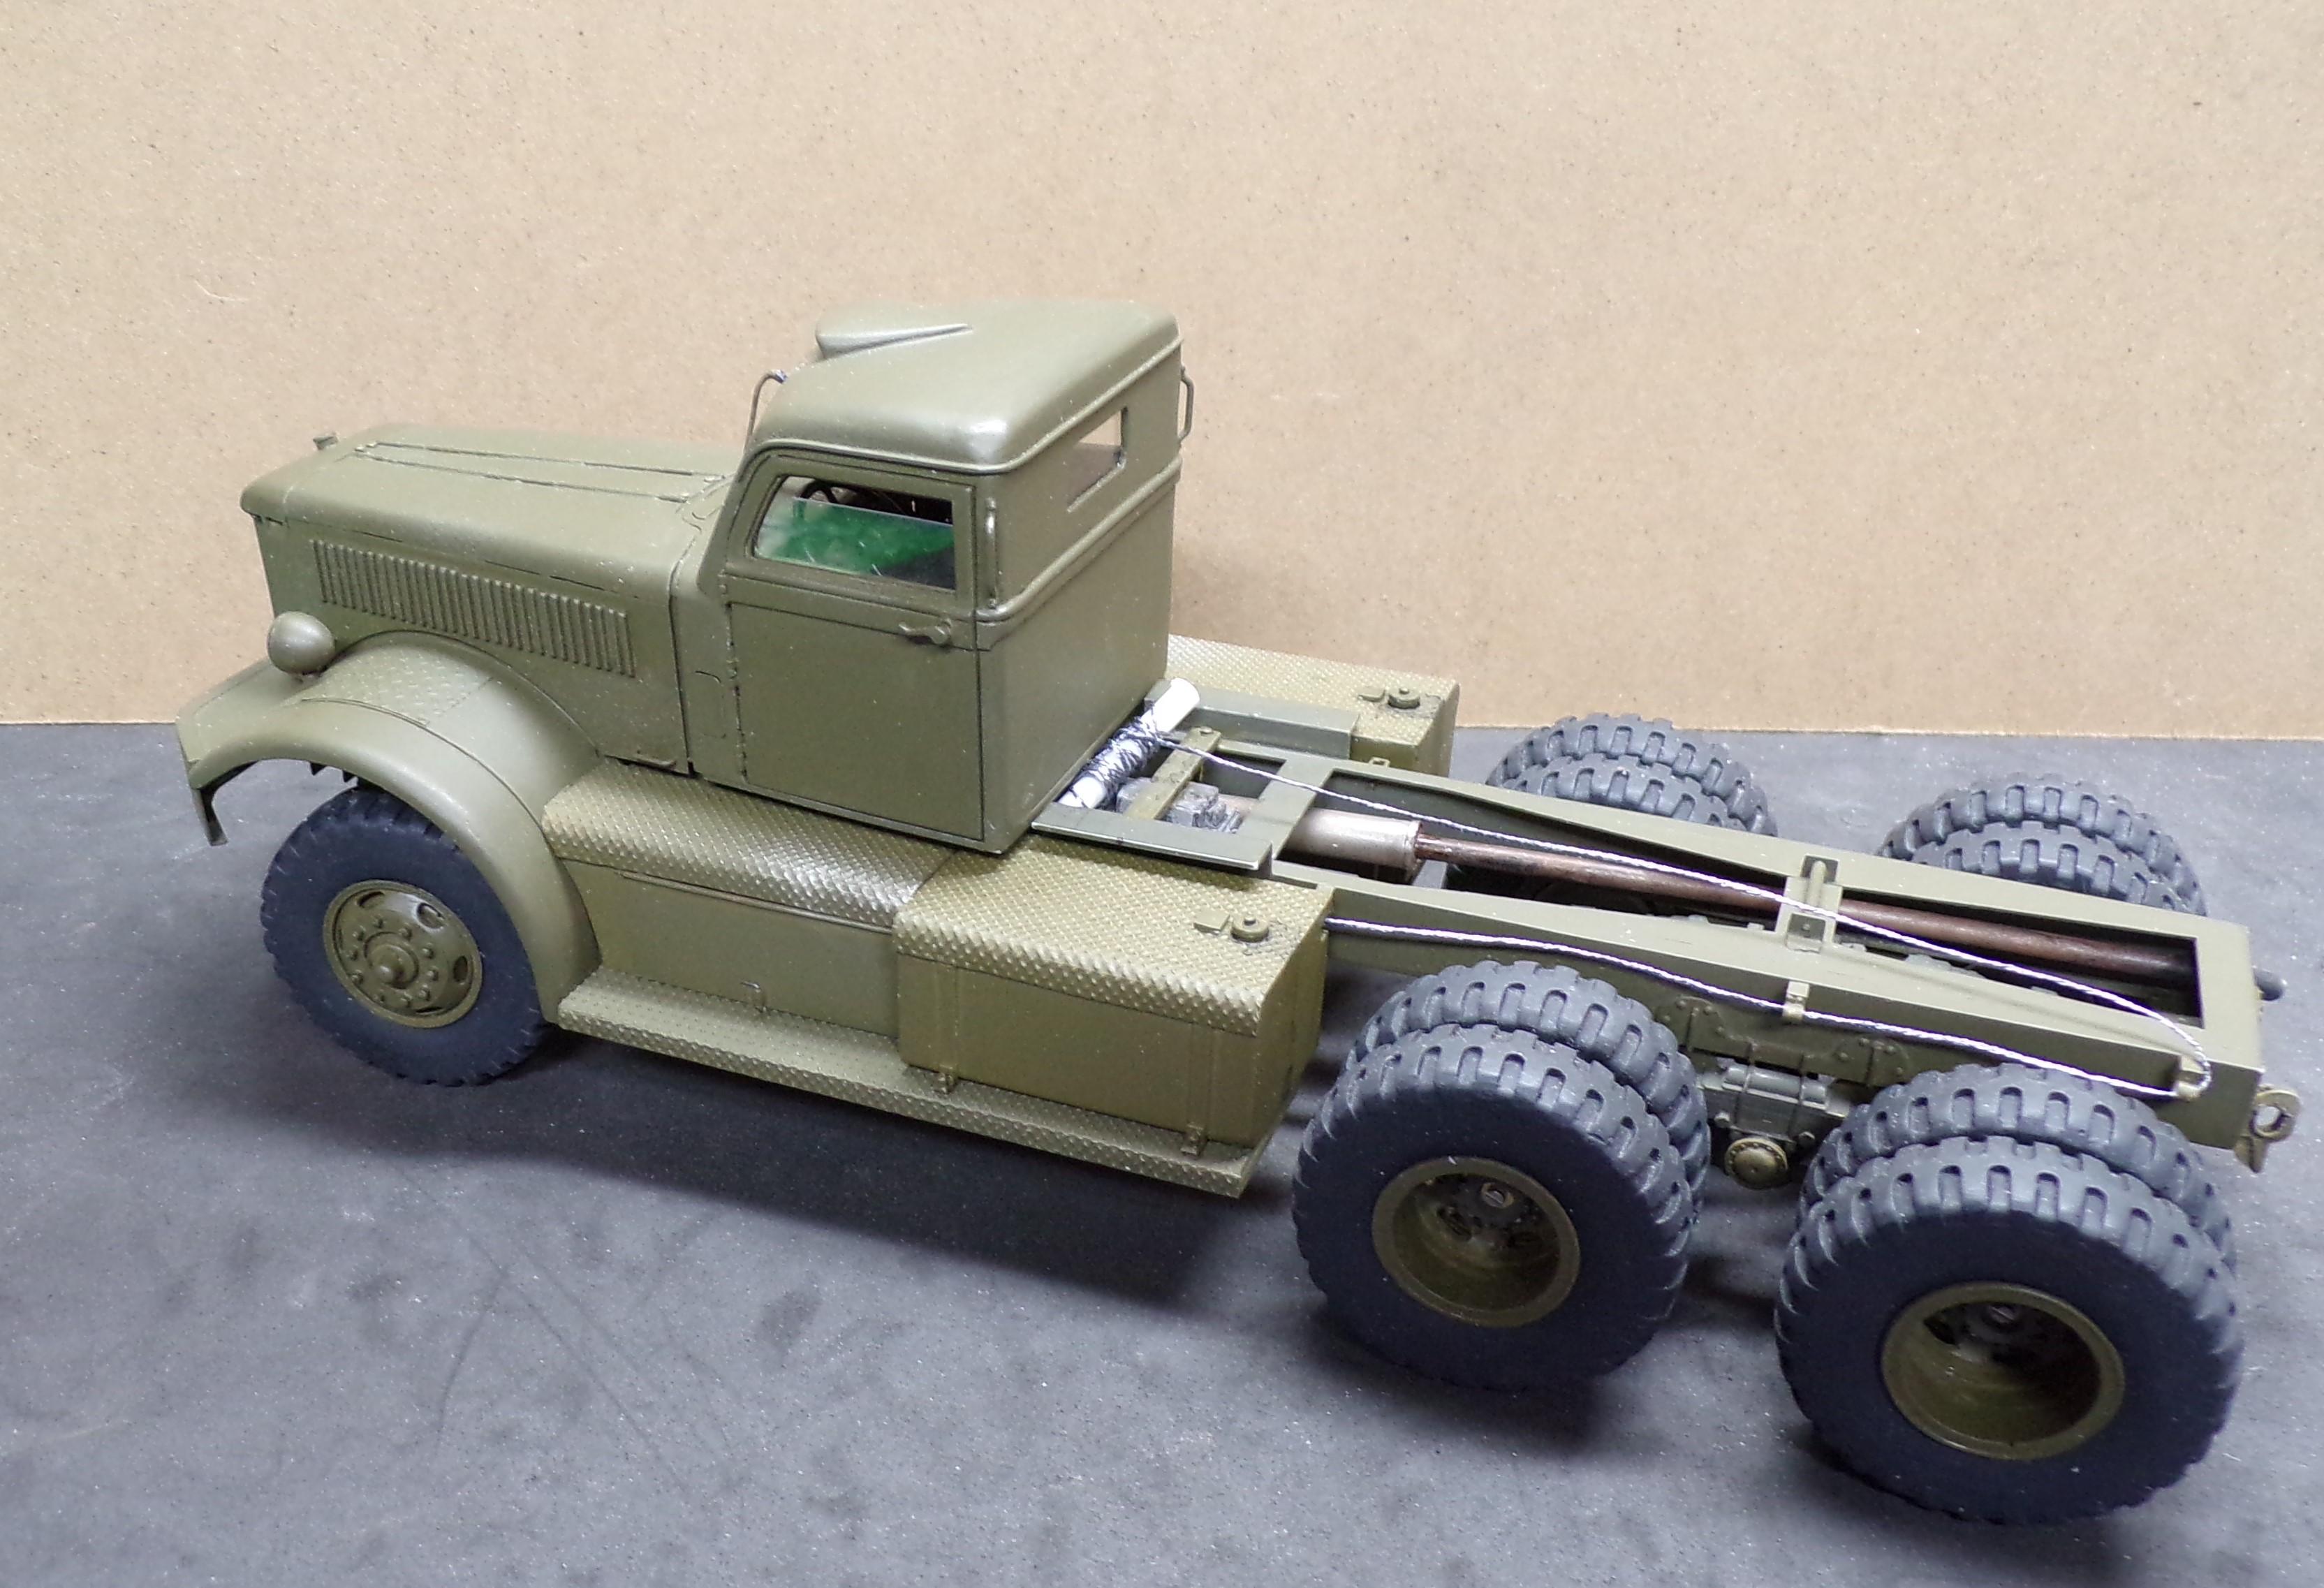
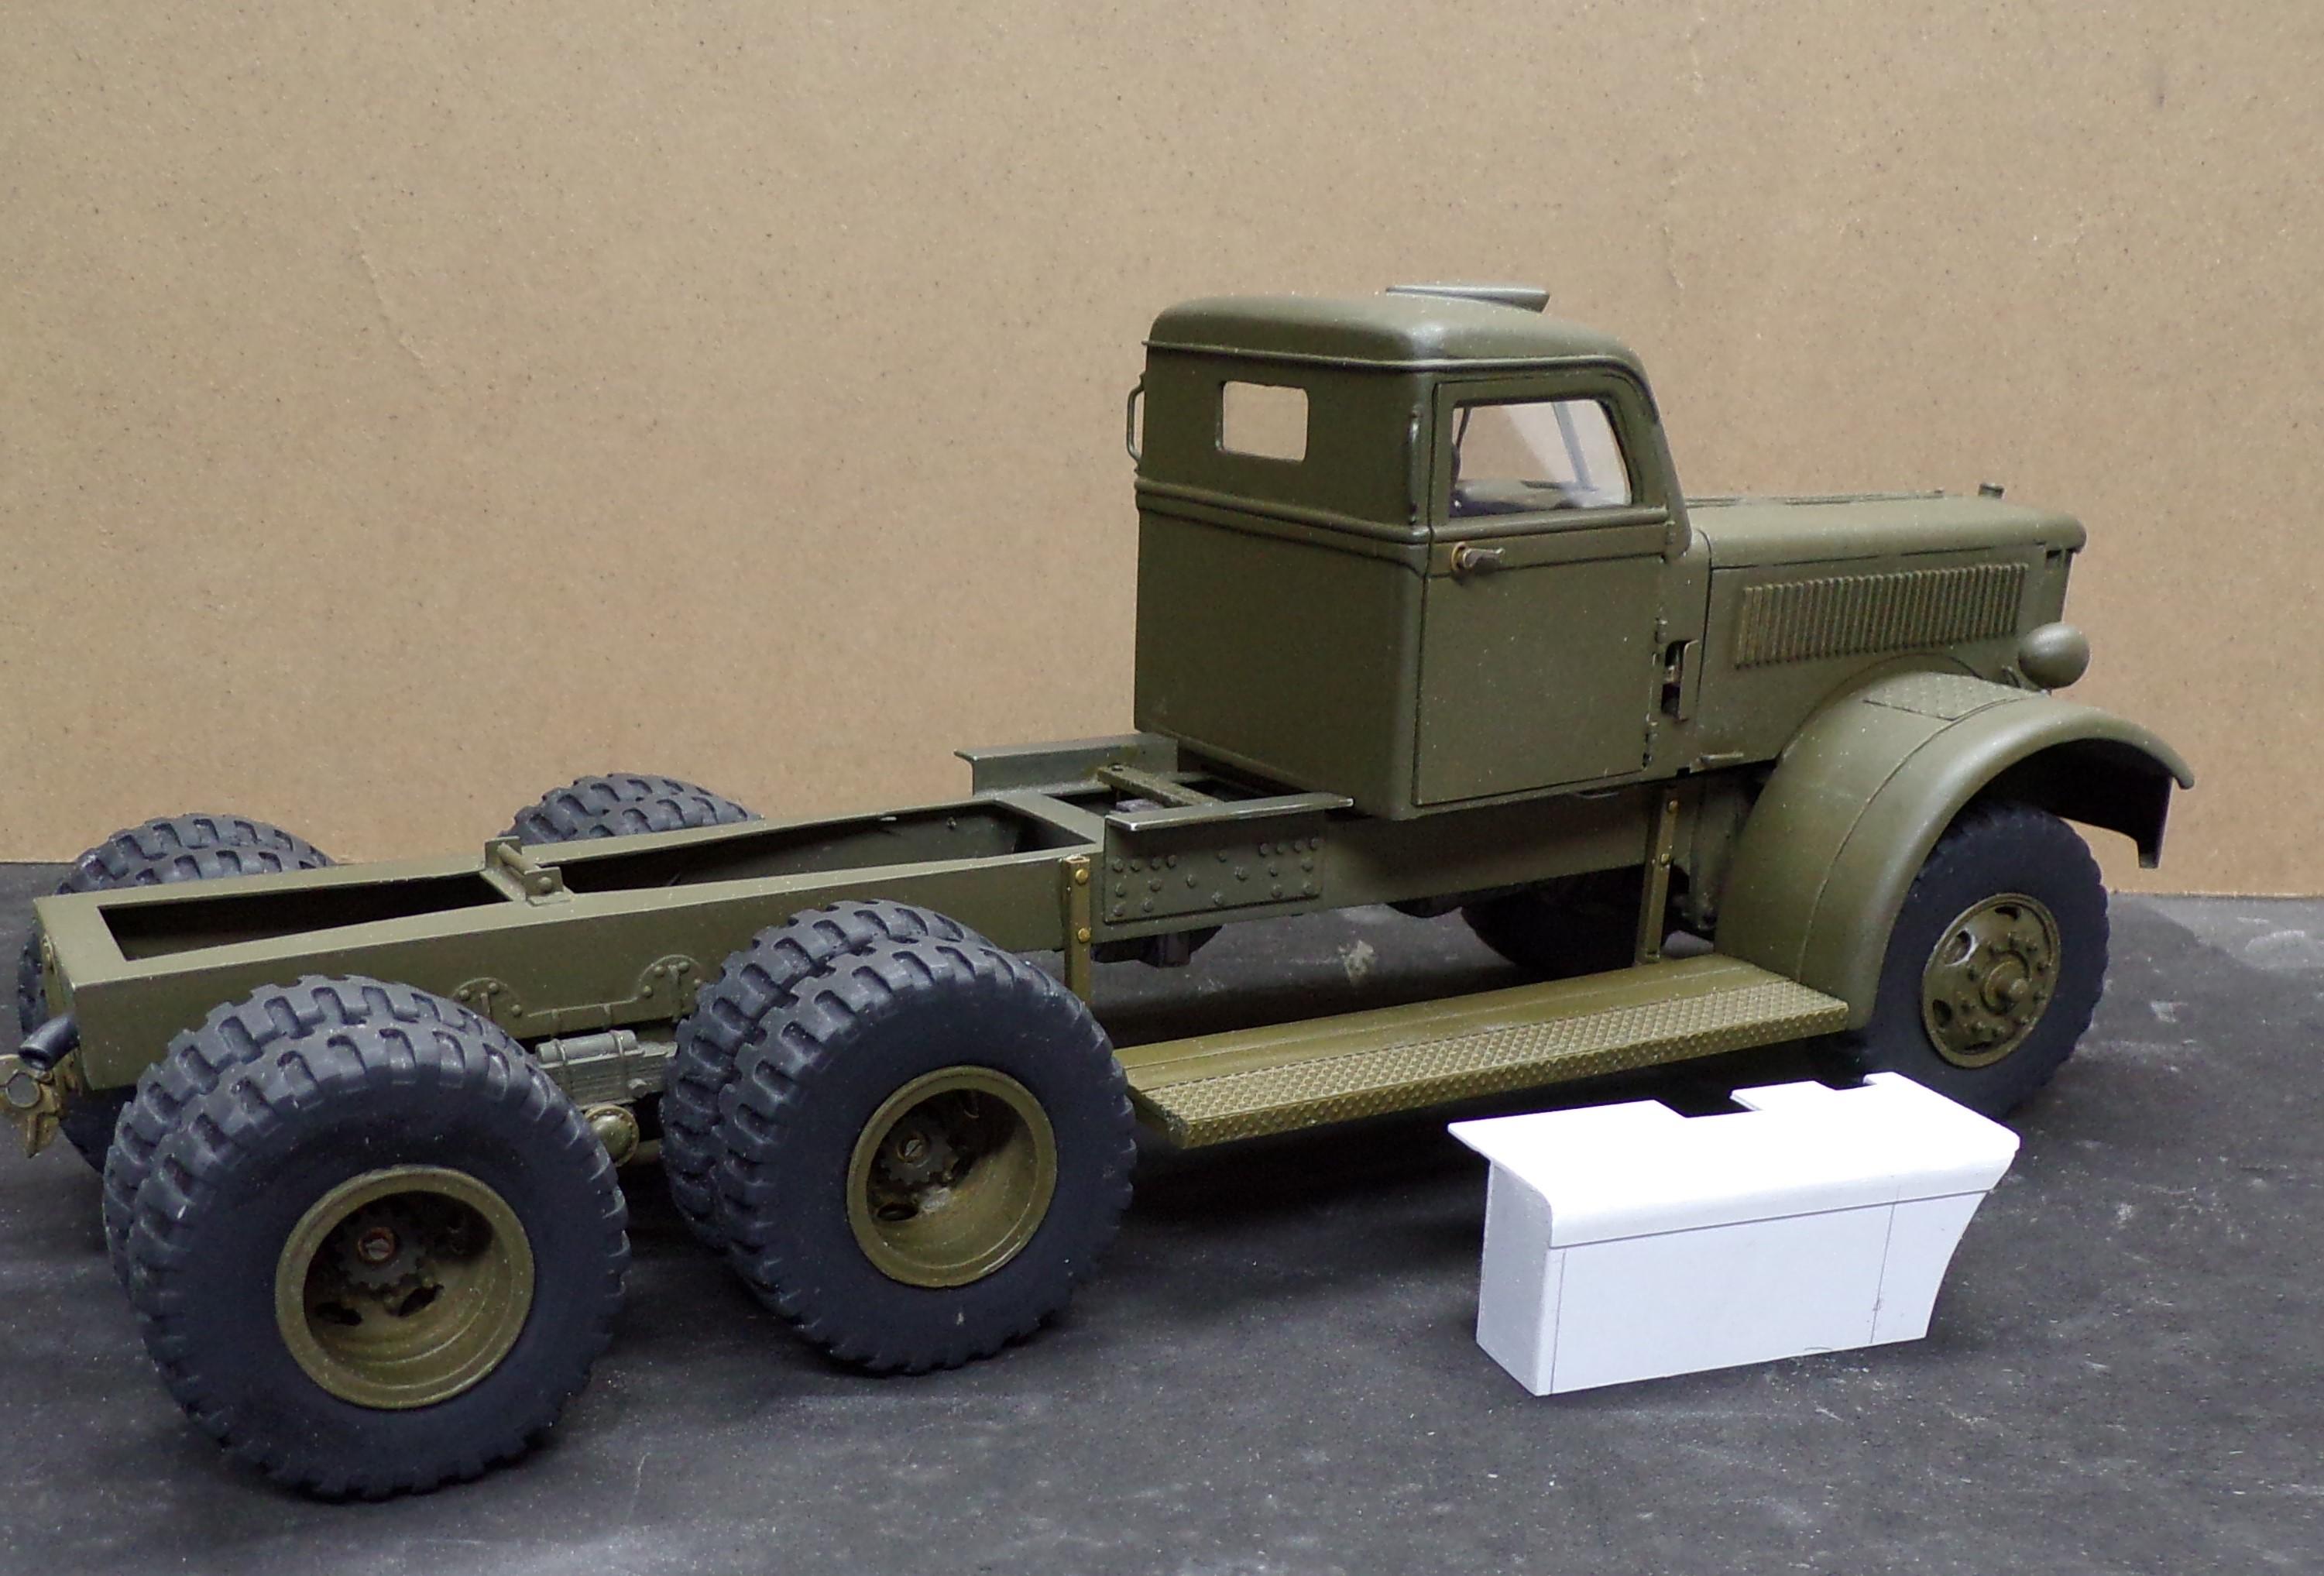
Both sides are complete now. Fuel tanks done and installed. The auxiliary transmission is in place along with all connecting driveshafts. Will have to take a pic of the underside to show them all. The cable has been run from front to rear on the left side. The winch build will be next which will take the slack out of the cable.
-
M-20 Prime Mover
Chariots of Fire replied to Chariots of Fire's topic in WIP: Model Trucks: Big Rigs and Heavy Equipment
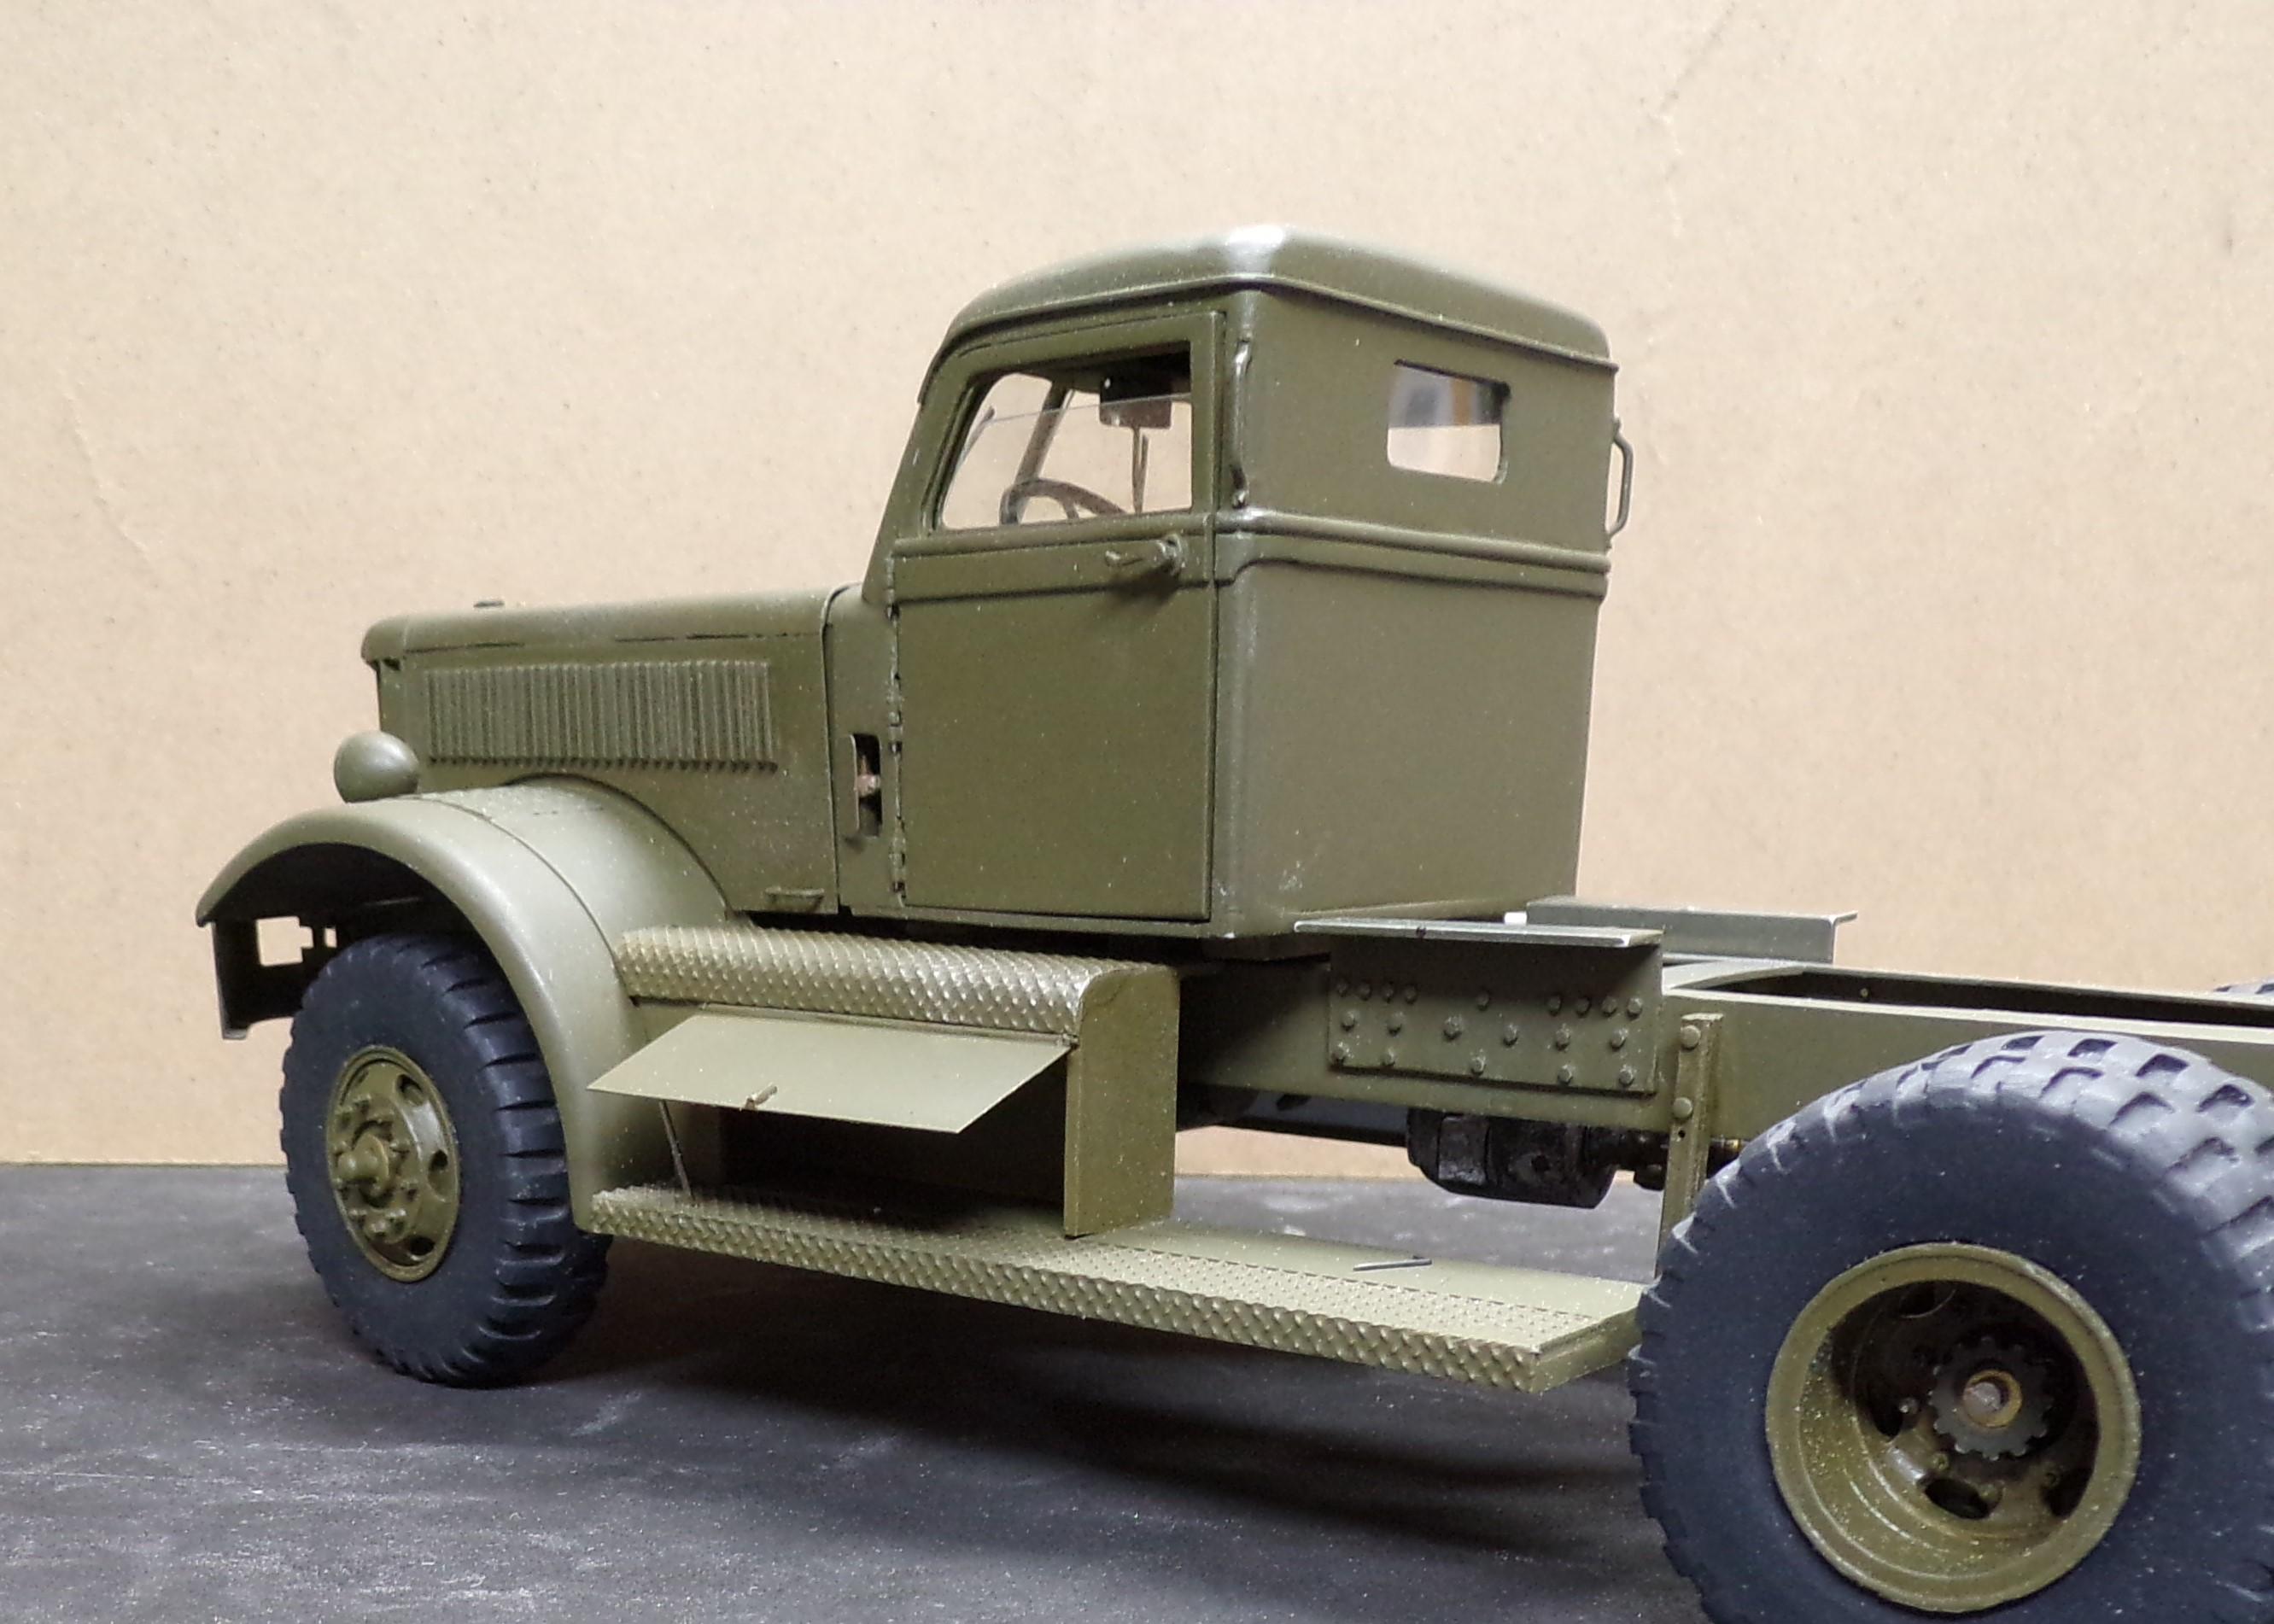
Well, the engine is done and has been installed in the chassis. Things are beginning to get wrapped up as far as the basic truck is concerned. The winch and body will be the next things to get done. In the meantime work has begun on the running boards, battery boxes and then the fuel tanks. The running boards are made of standard treadplate for the top. To get the treadplate on the face of the running board, I rough trimmed a piece of aluminum foil, embossed it on a piece of the treadplate and superglued it to the edge. After it was dry the edges were cut with a new Xacto knife blade. It's about the only way to get a nice crisp edge. The battery box is just some sheet stock built up. The top edge was rounded off and the same foil technique was used to round off the edge. Then the face was cut open and a piece of brass shim stock was made into a door with a hinge at the top and a pin latch at the bottom. Now it's time to finish up the other side.