Chariots of Fire
-
Posts
2,782 -
Joined
-
Last visited
Content Type
Profiles
Forums
Events
Gallery
Everything posted by Chariots of Fire
-
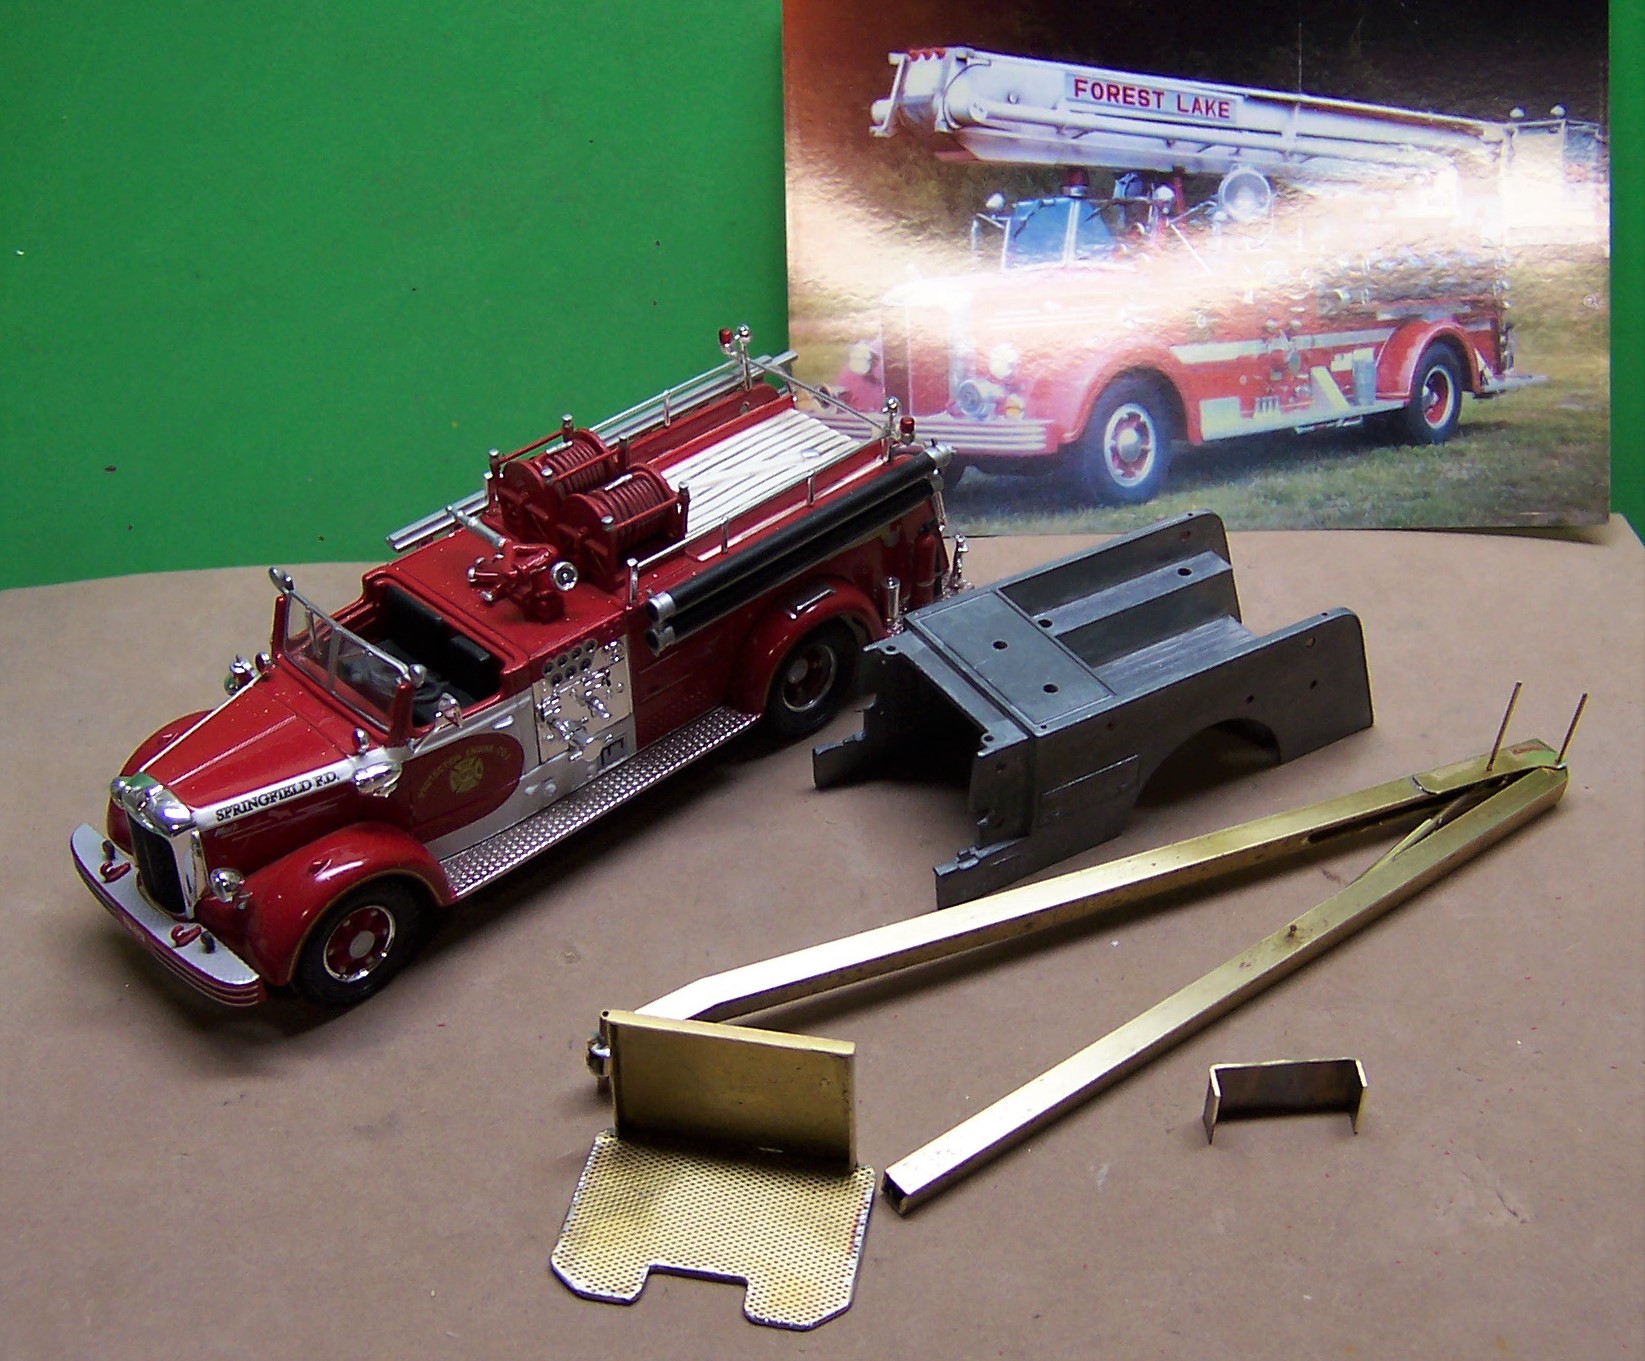
 This is a new build in a scale that I am not used to building in. 1:50 scale. Exactly half of 1/25 in overall size. But this Mack L pumper had a Snorkel worked into it so we are giving it a try in brass.
-
Mack L with a Snorkel
Chariots of Fire replied to Chariots of Fire's topic in Model Trucks: Big Rigs and Heavy Equipment
I put this in the wrong section. Should be in the WIP area! Future posts will be there. -
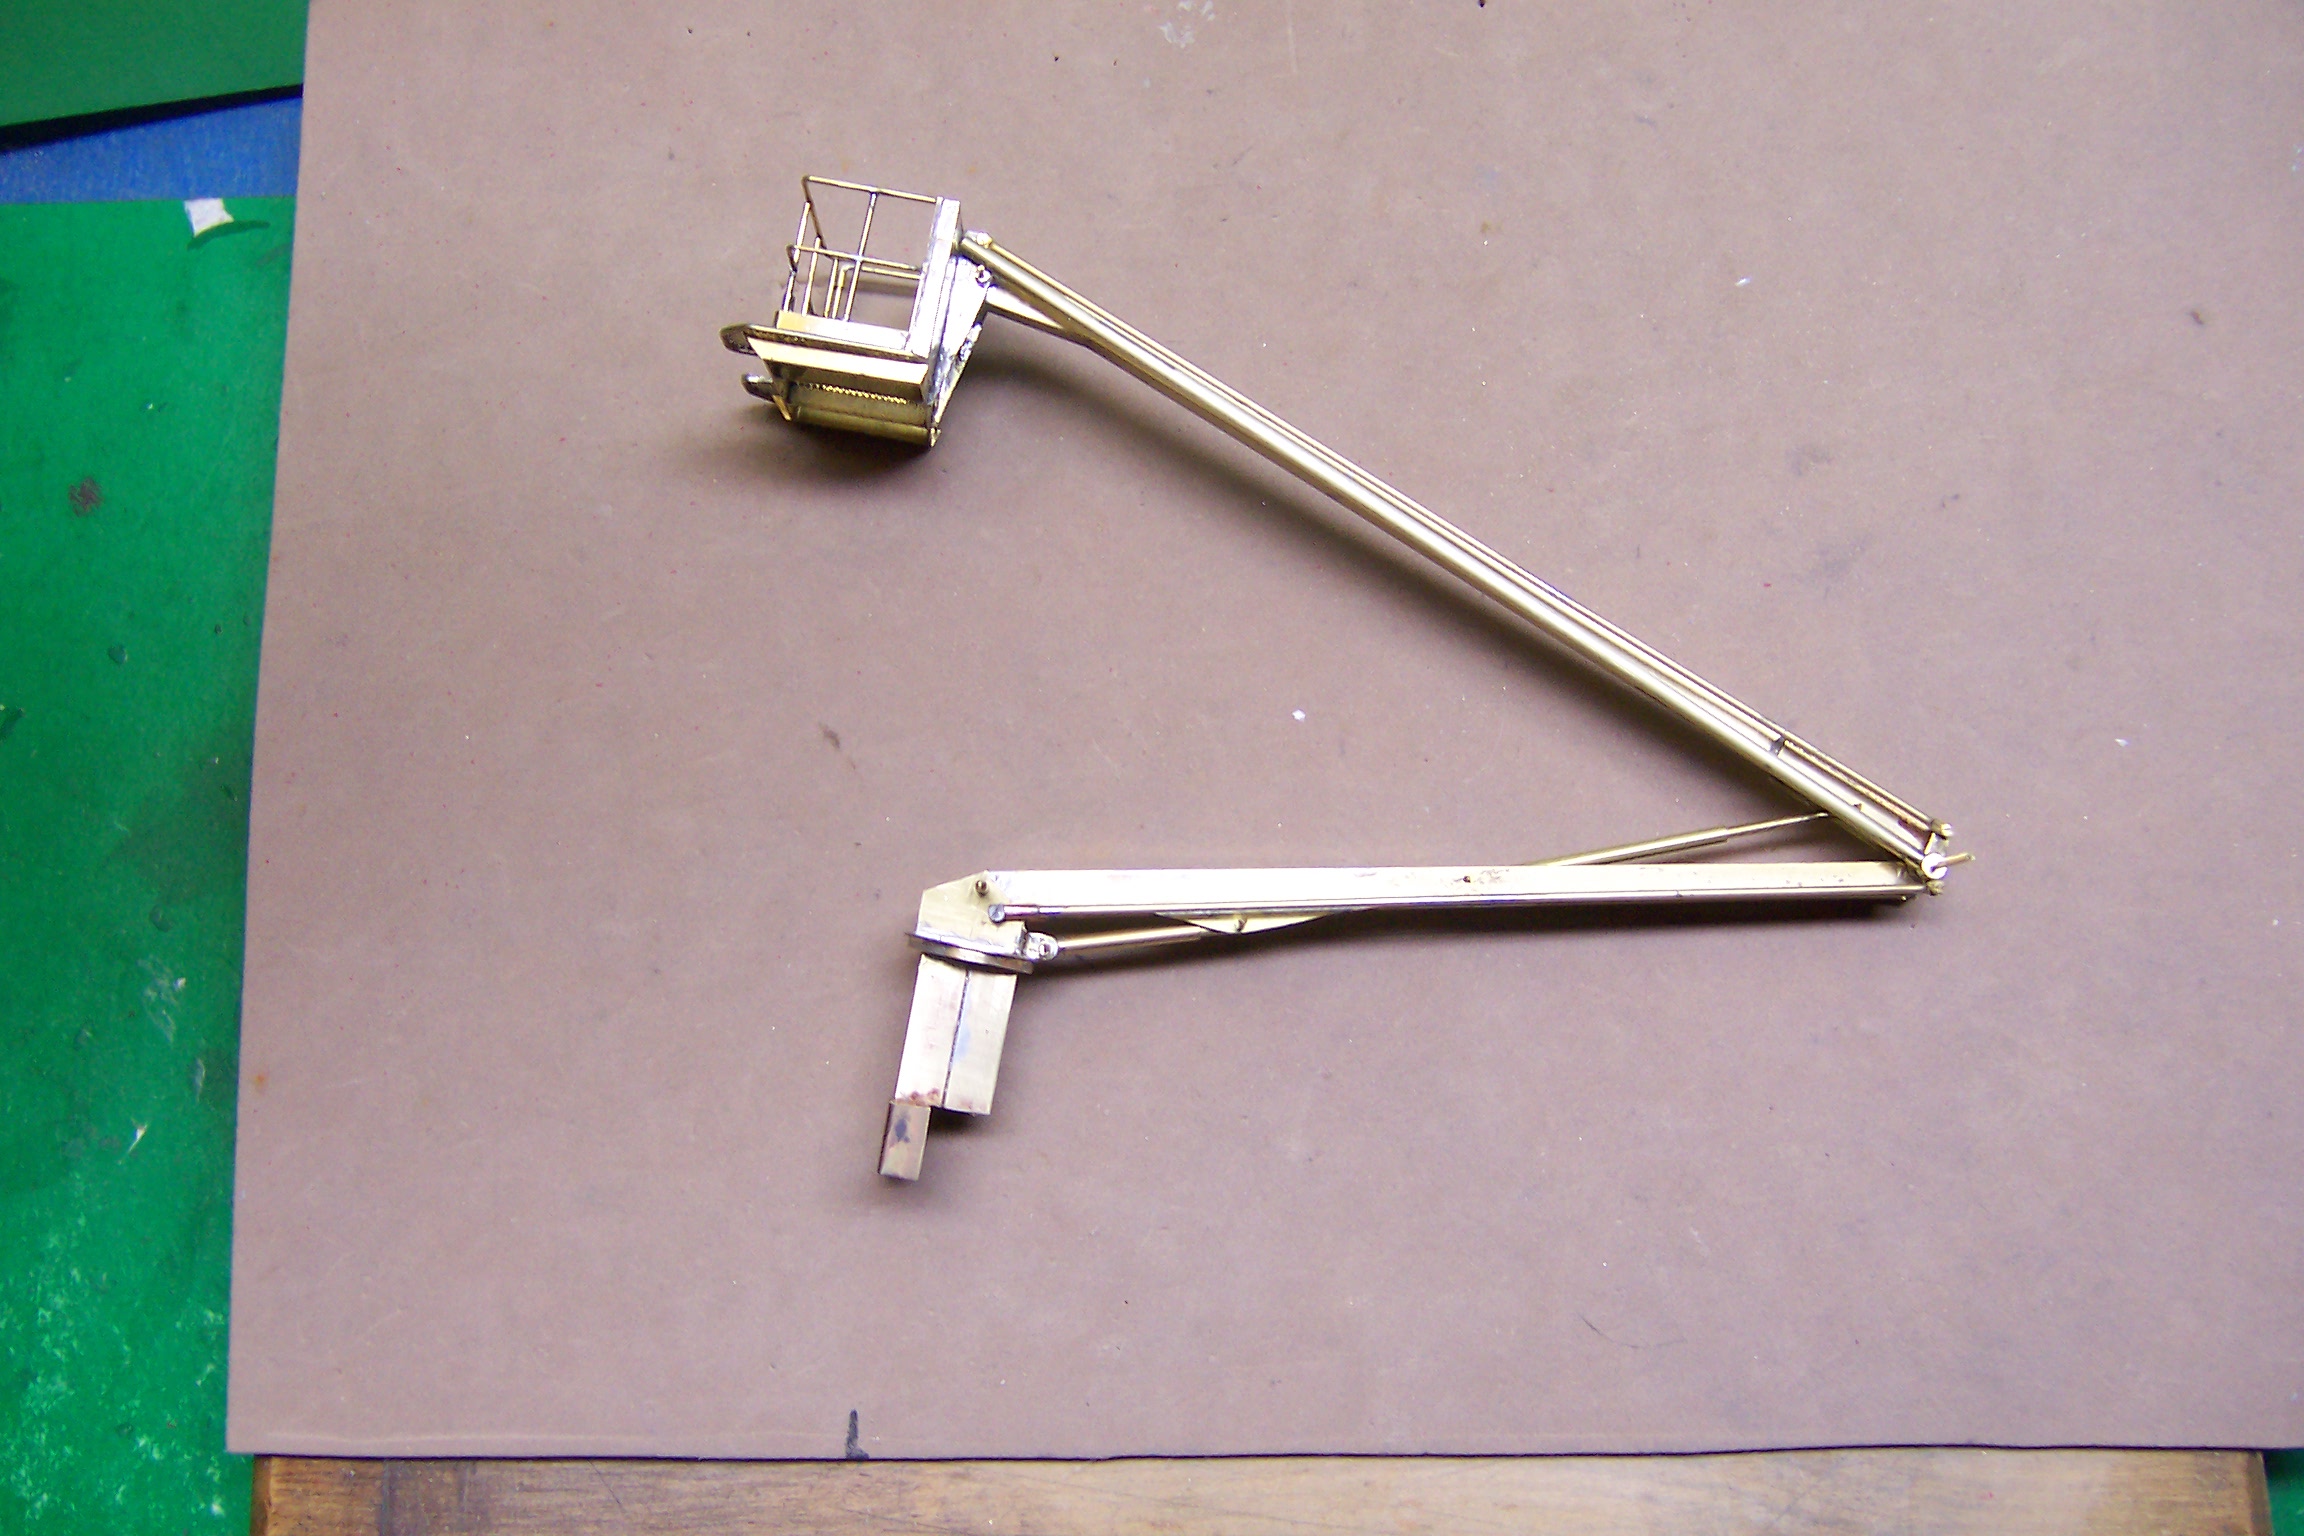
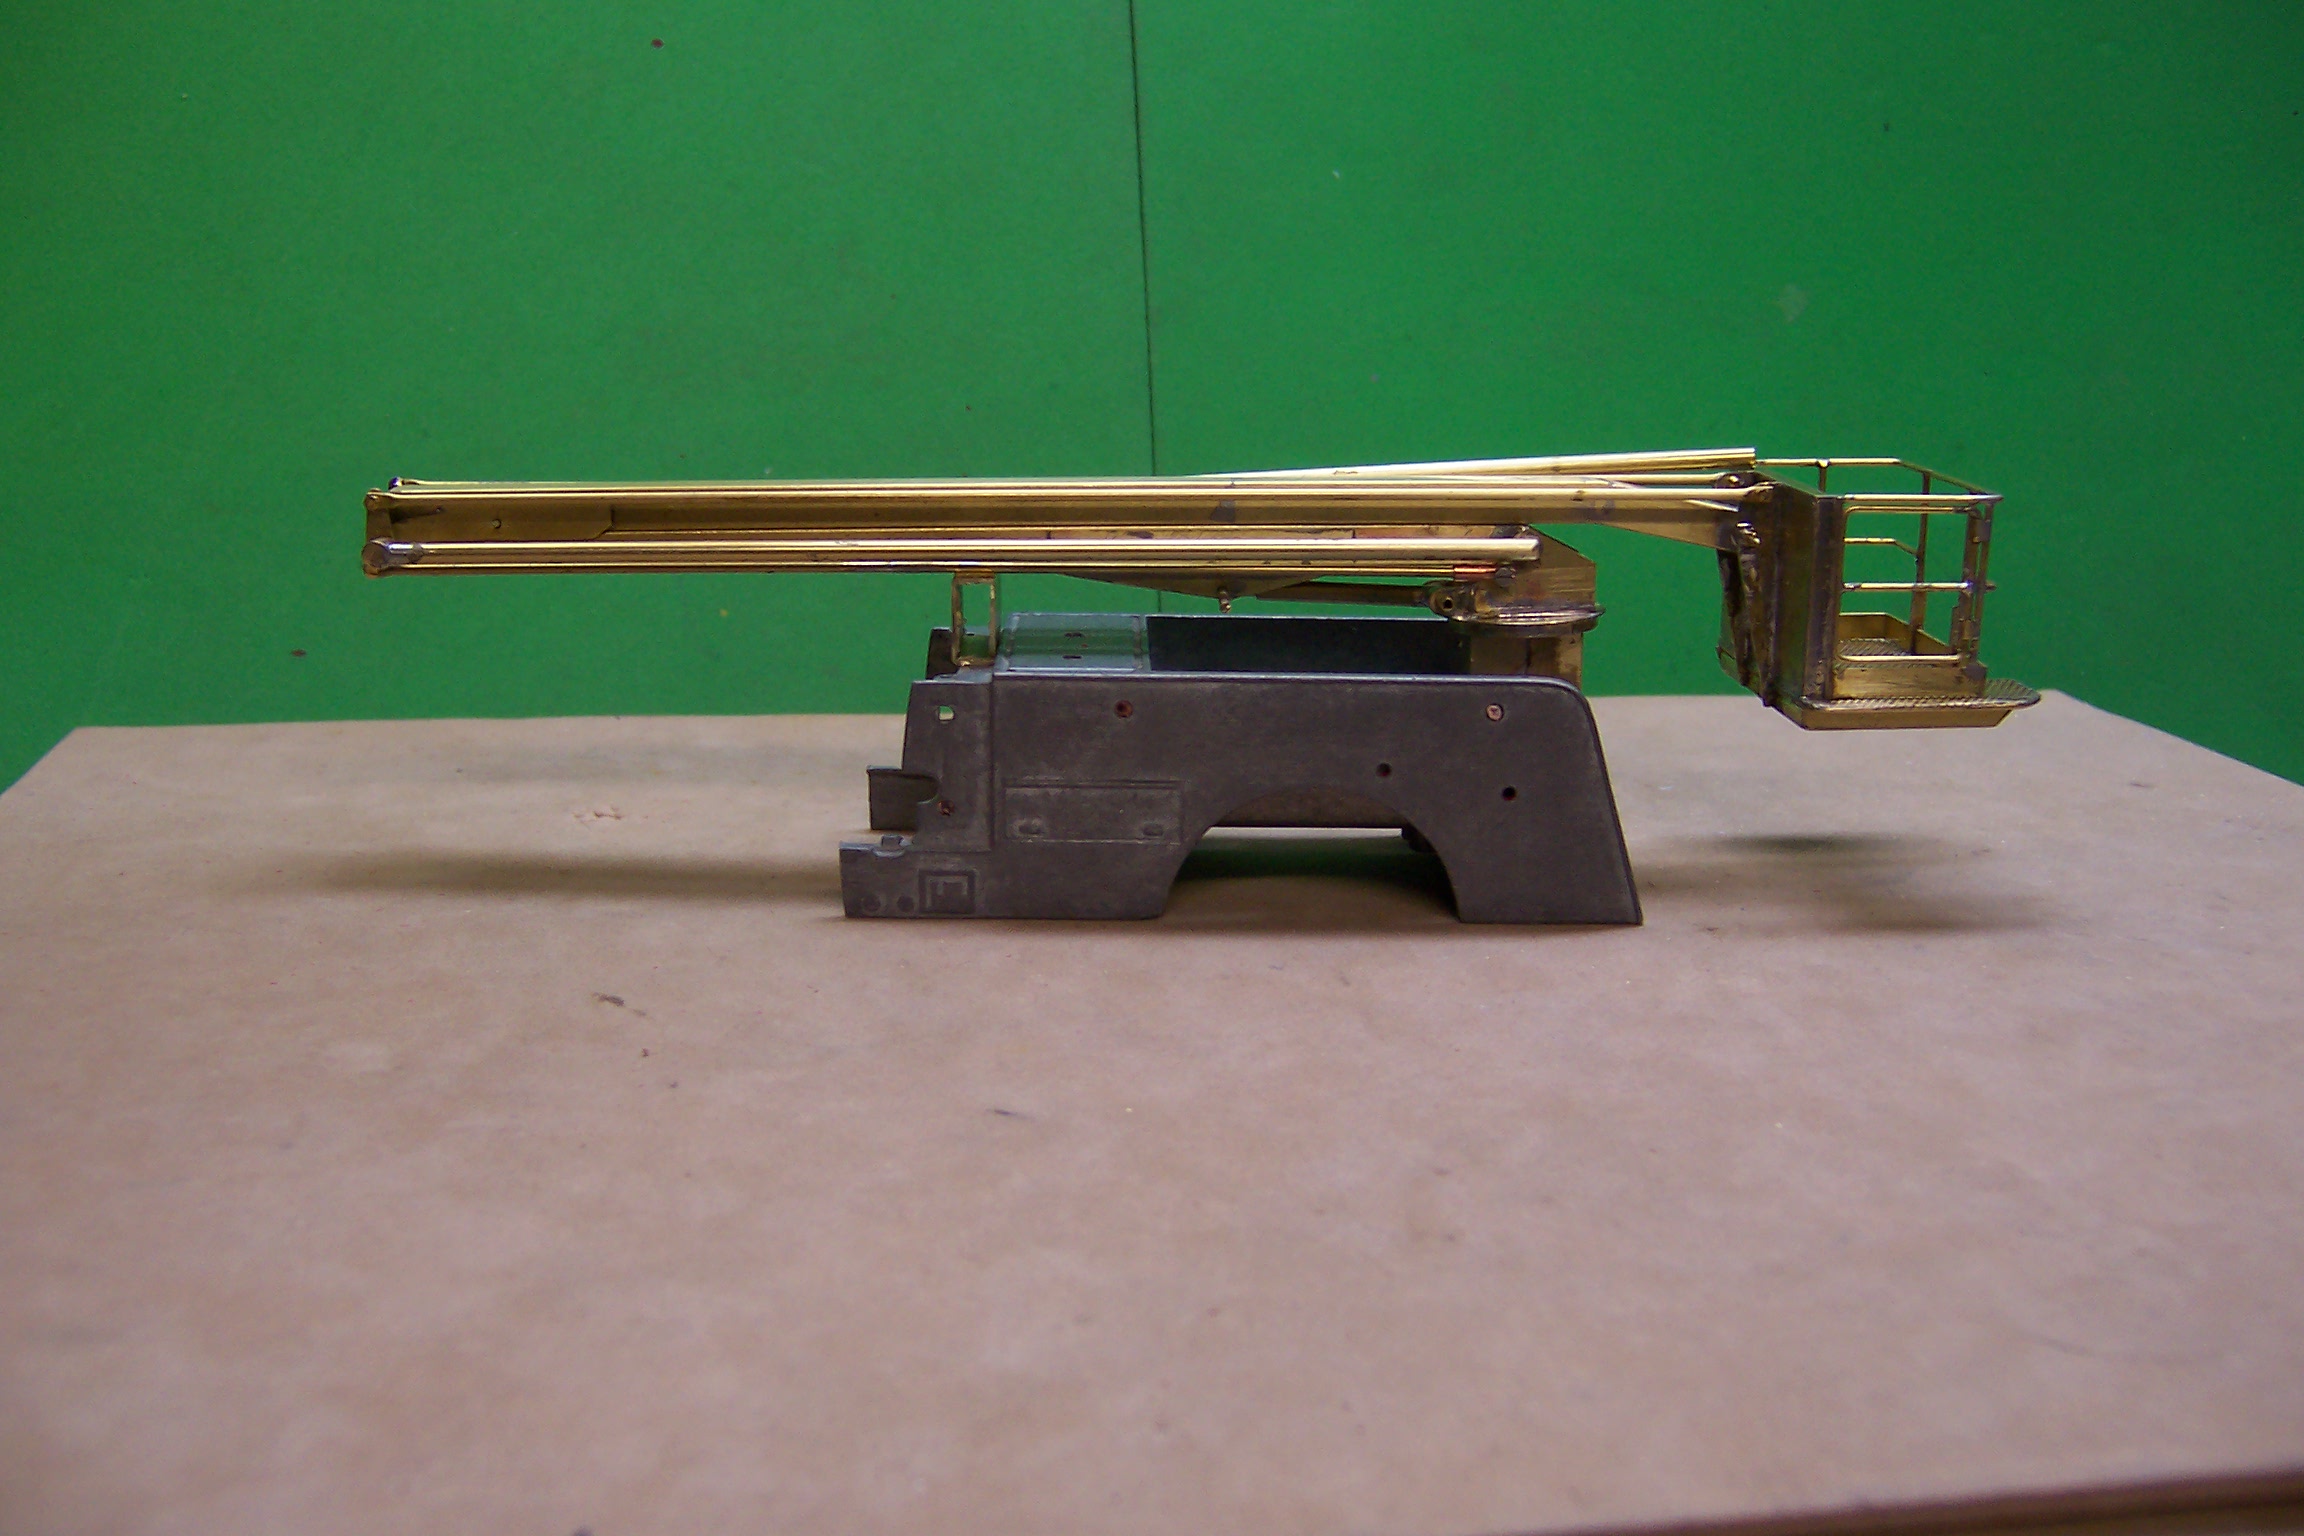
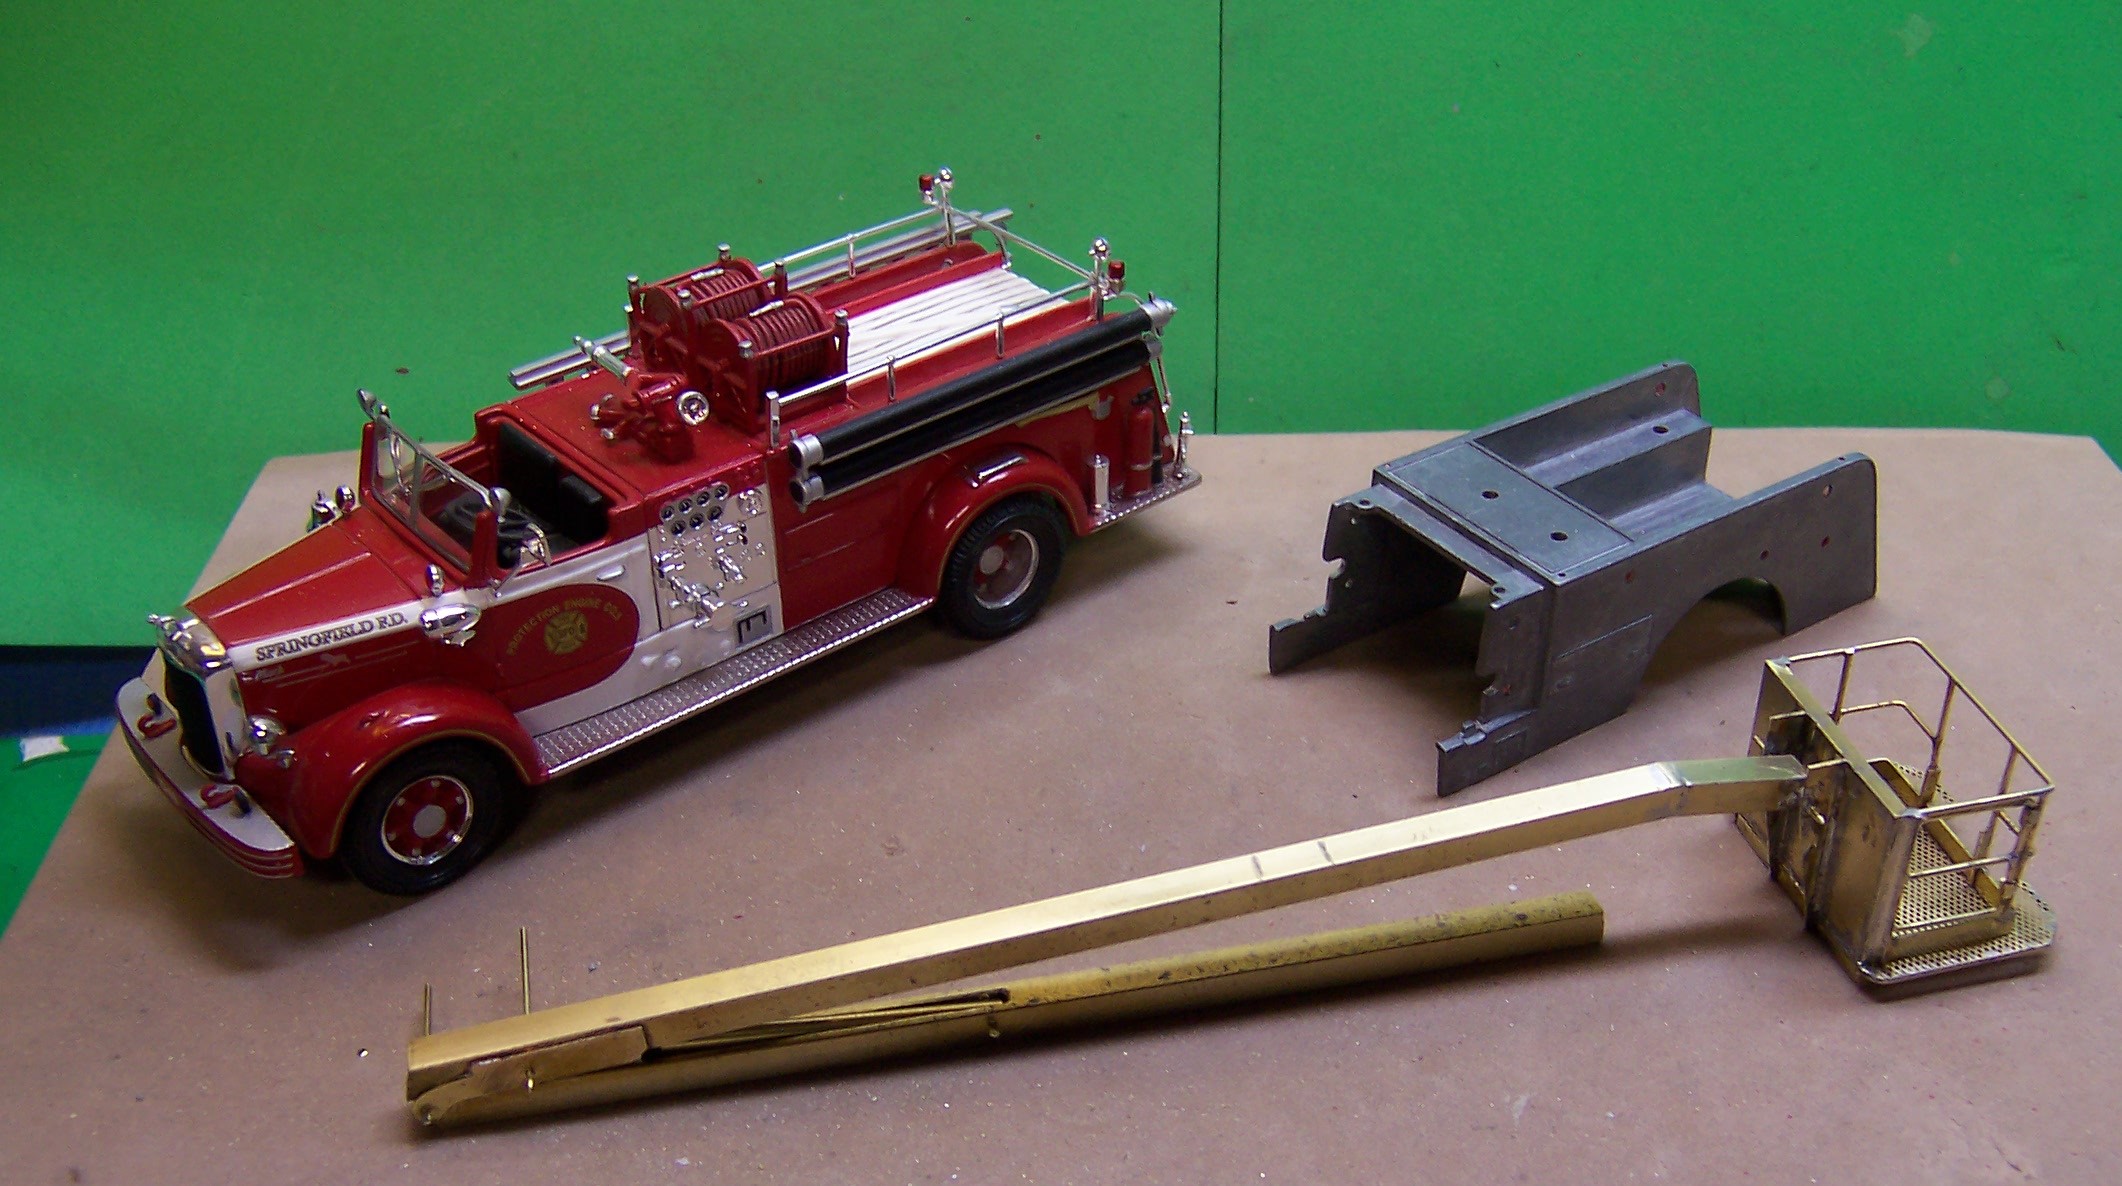
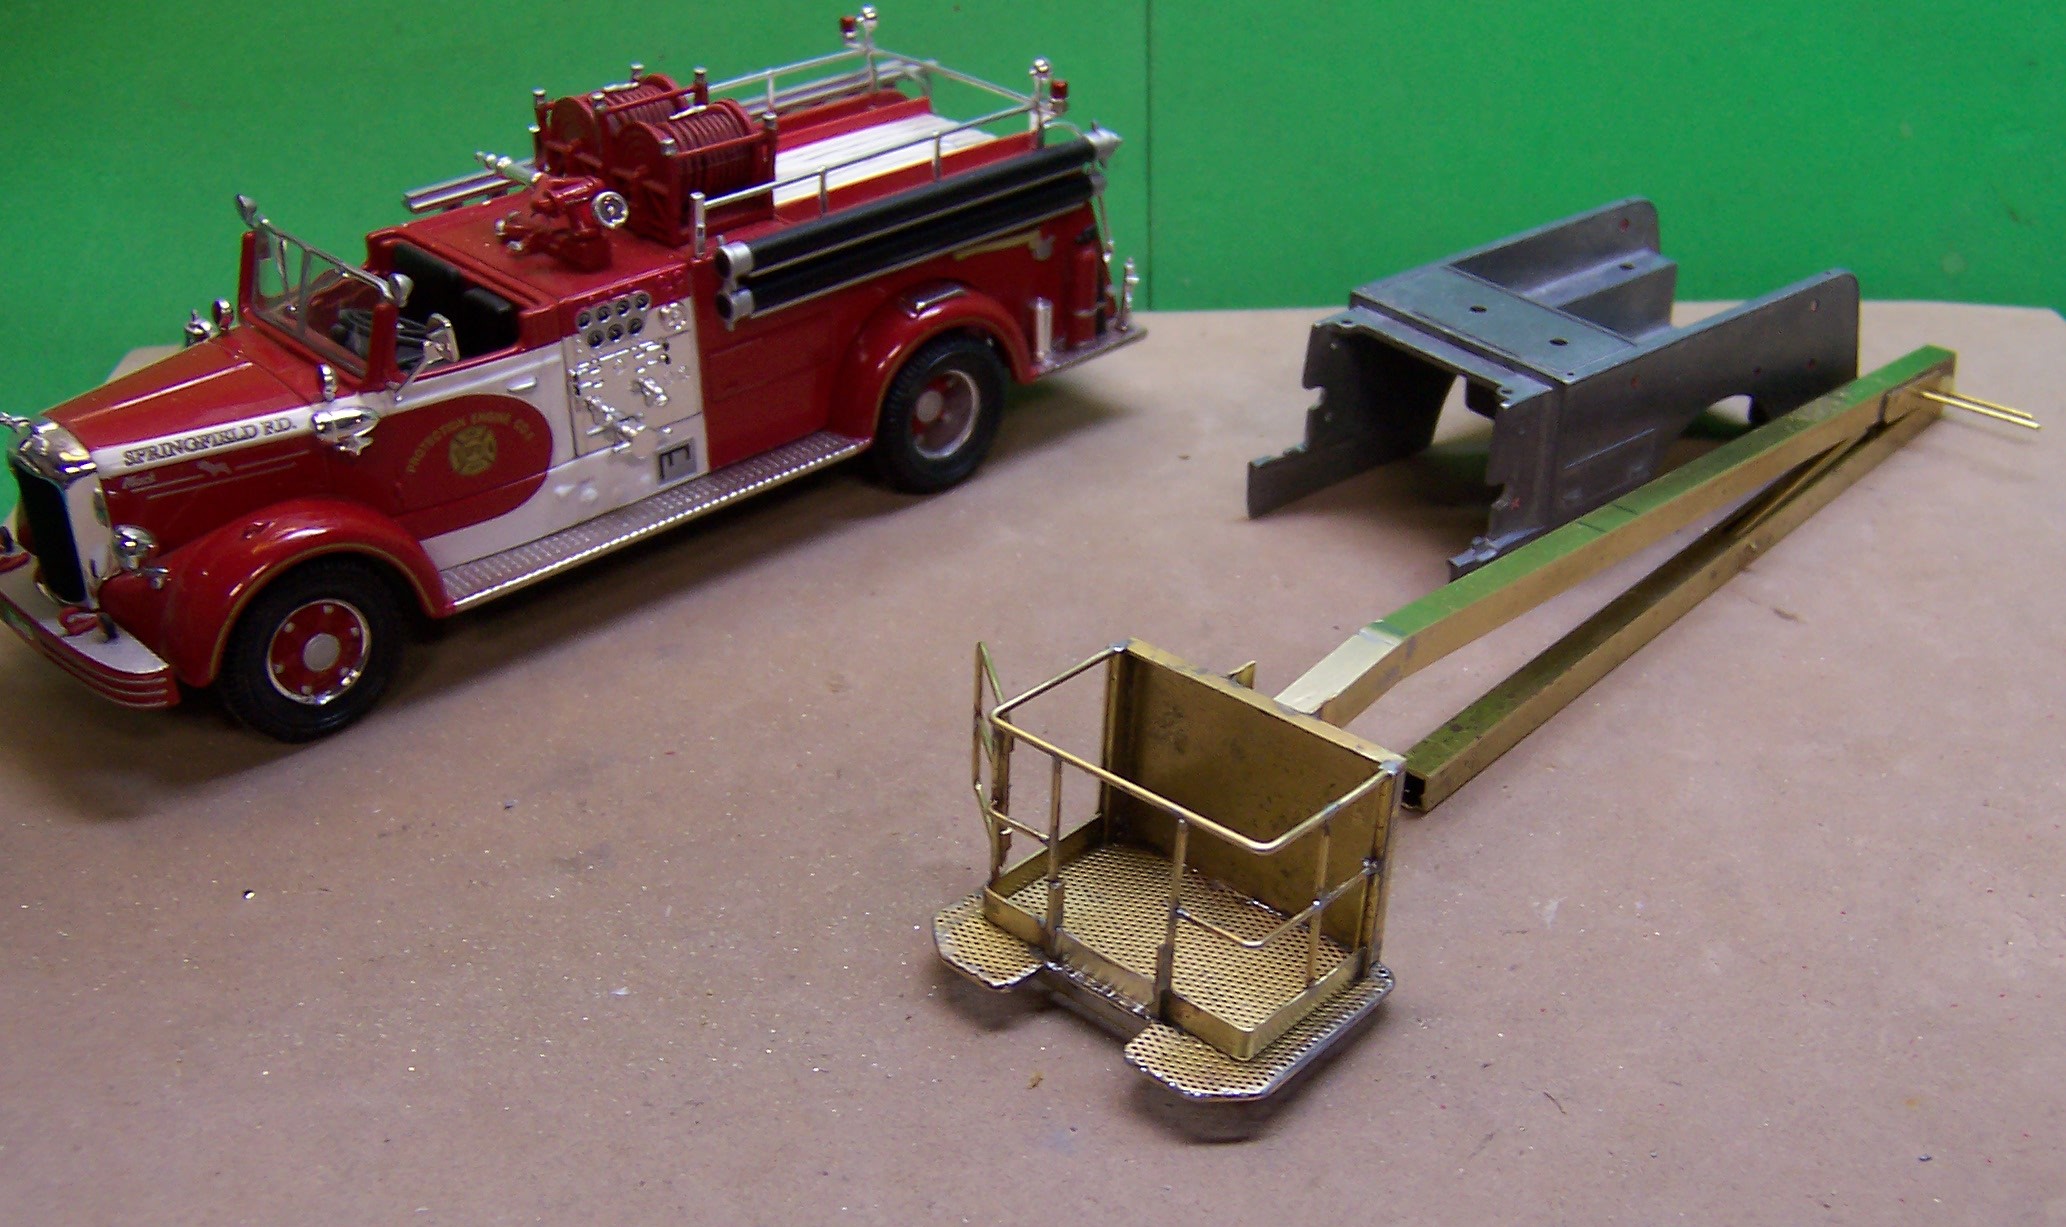
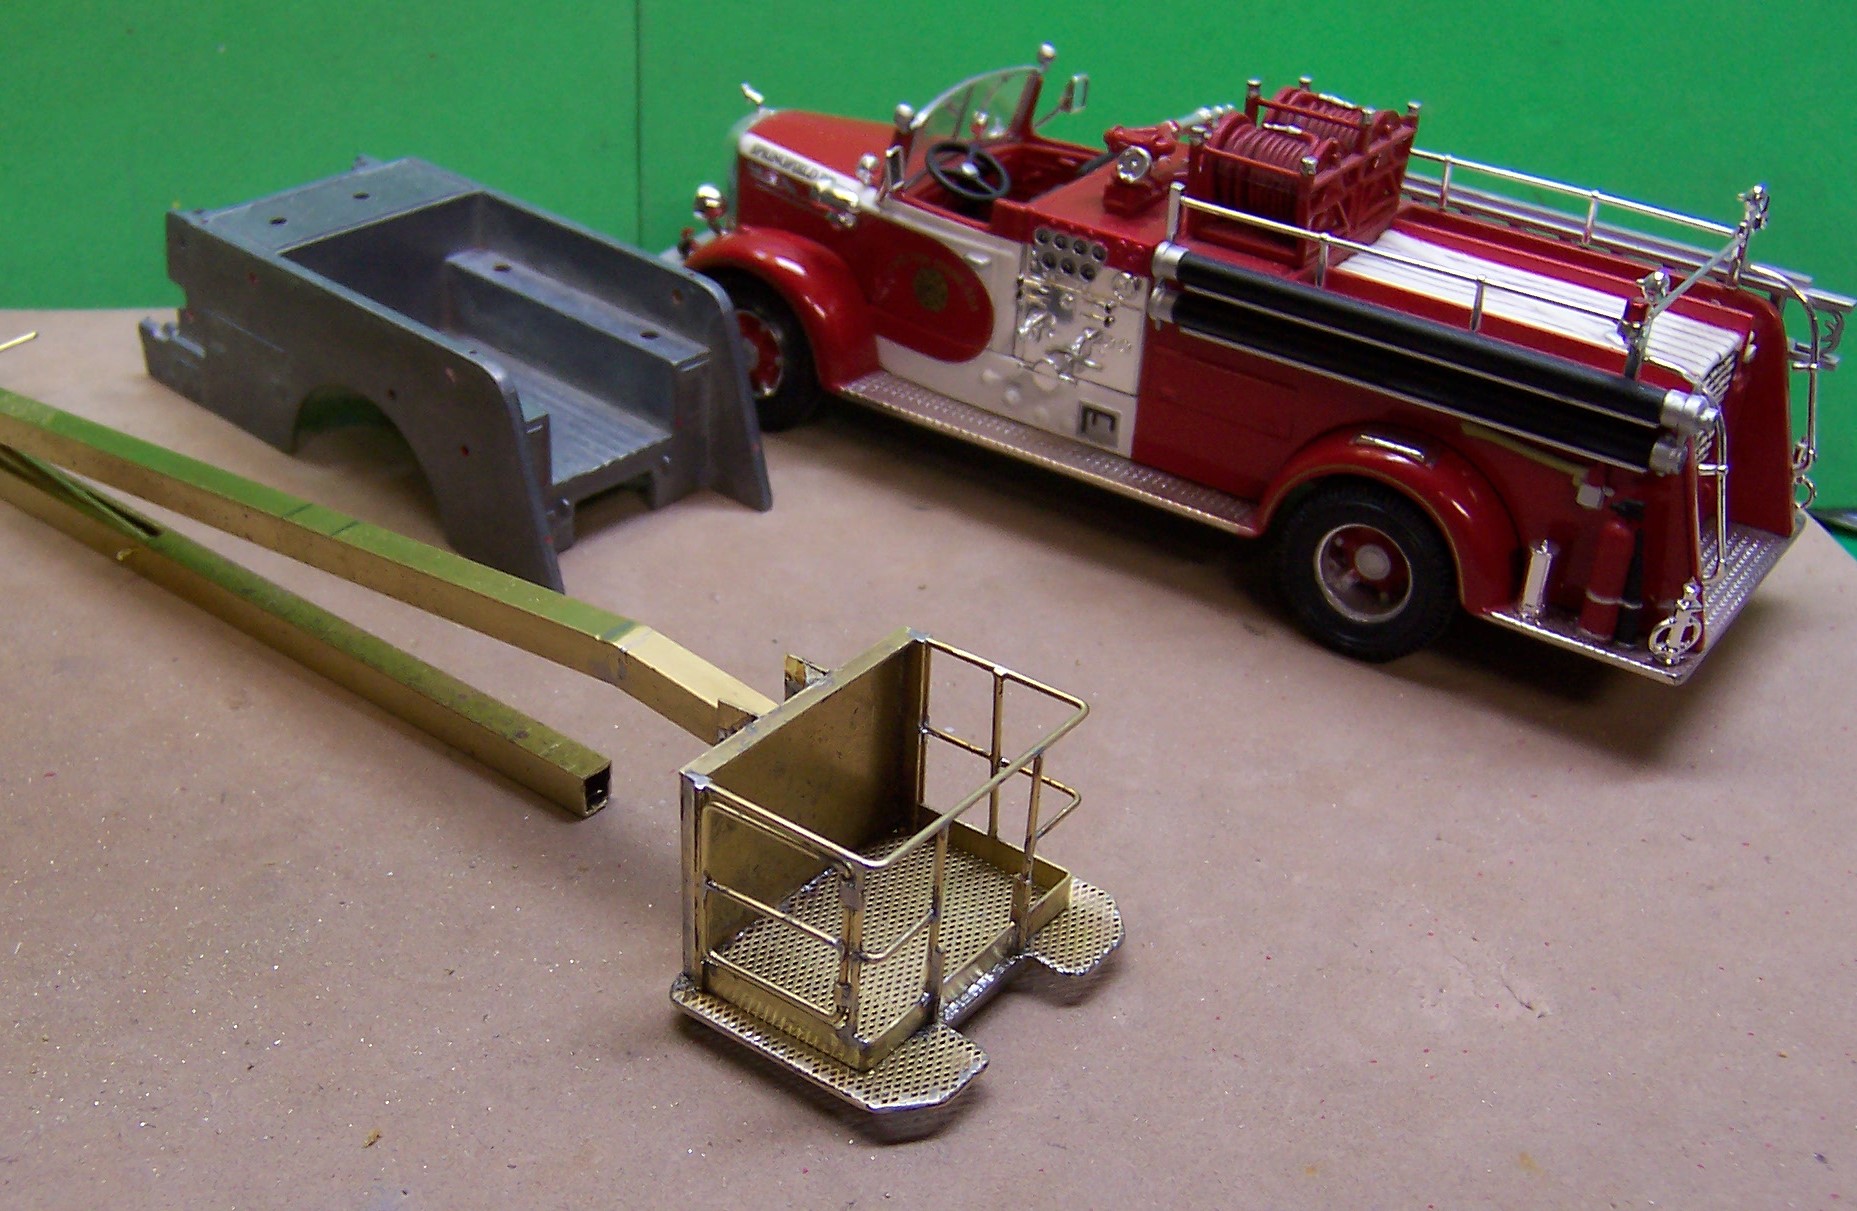
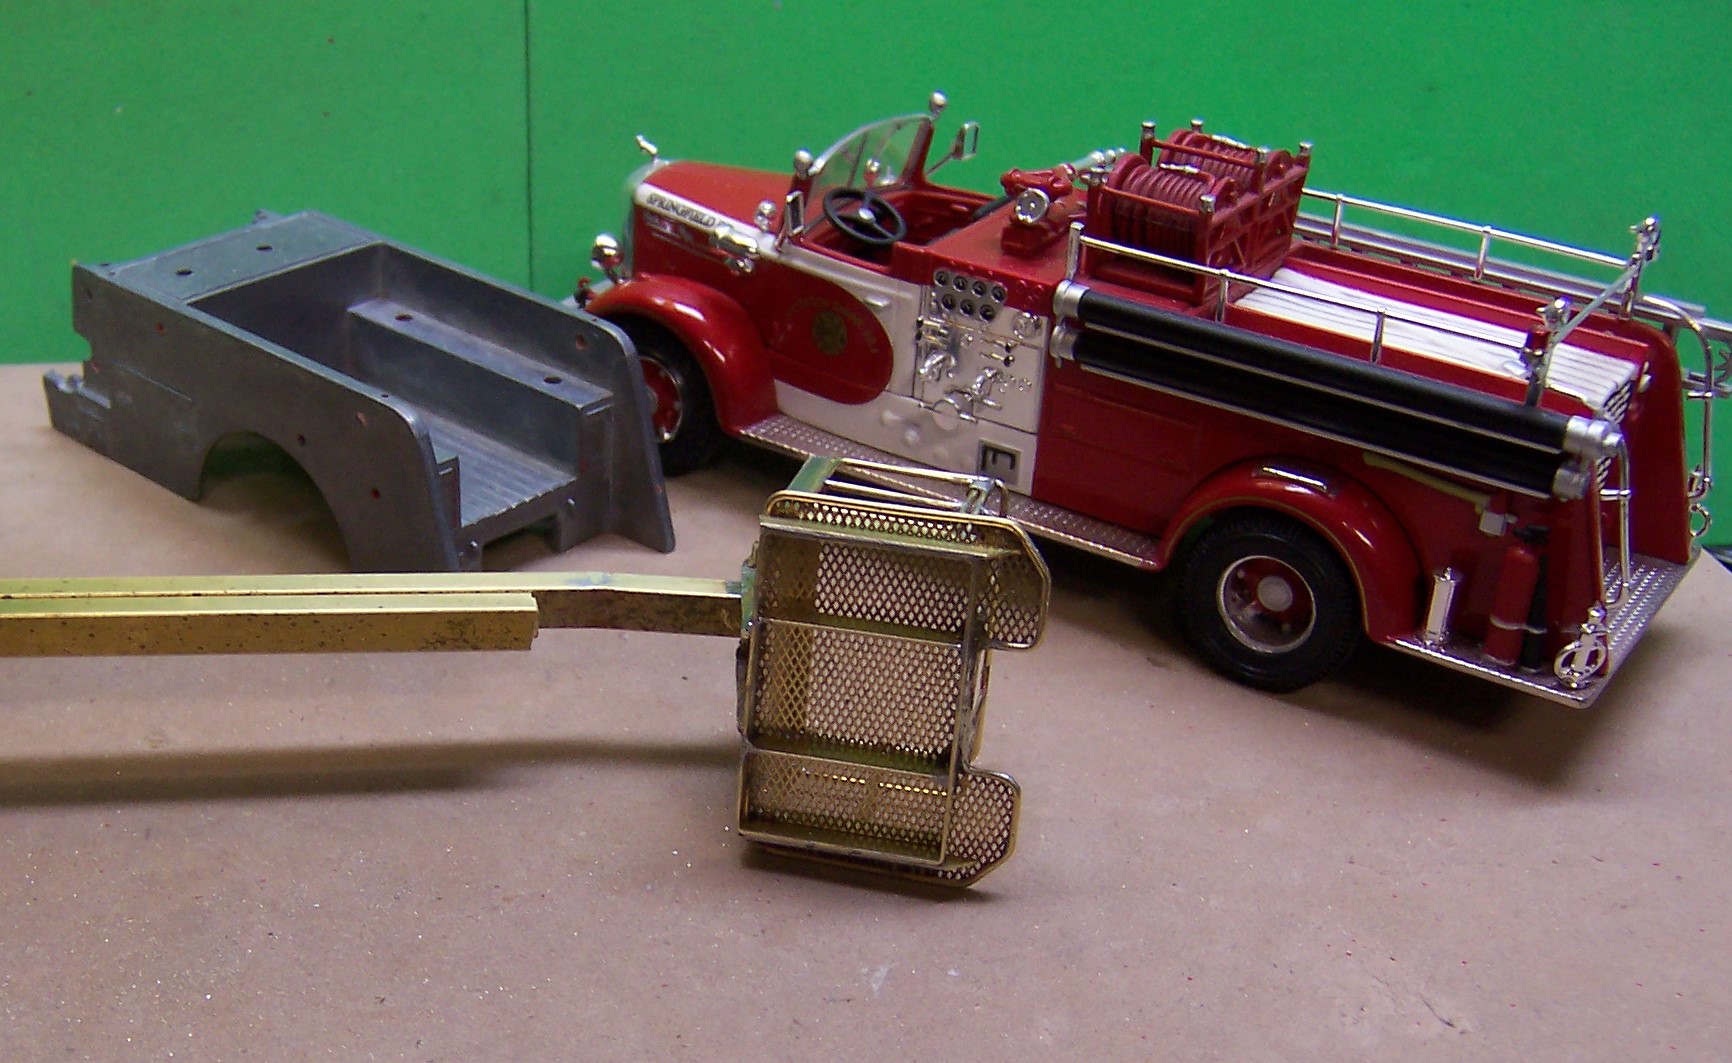
have had a request to build a snorkel in 1:50 scale. The snorkel will go on the back of a Corgi L model Mack pumper that will be modified accordingly. I have the blank body from which to get measurements for the mounting of the base. The Springfield Mack is the correct size so I measured the wheelbase and adjusted the photo of the Forest Lake rig to match it. The photo above is lousy, I know. But I have a profile shot of a similar one that was transferred to a CAD program for sizing. Here's the beginning of the boom and basket made of soldered brass. The basket construction is of soldered brass using strip stock, sheet stock and rod stock. The boom is made using square brass tubing. The two lines in the upper boom section indicate how much has to be cut from it to get the correct length. Square brass stock telescopes nicely so a short section will be inserted in the boom after it is cut to maintain alignment when it's soldered back together. A similar amount needs to come off the bottom section as well but that will have to wait until the supports for the body are done. A piece of brass rod was bent to form a rectangle for the door. Sections of brass tubing were slid on and then were soldered to the upright on the basket. Now the door opens. The soldering around the edges of the basket are still rough but a little tlc will clean them up. Some of the holes near the edge need to be filled. The basket and boom will be painted white.
-
Bending plastic for trim curves
Chariots of Fire replied to Len Woodruff's topic in Model Building Questions and Answers
Len: Can you give us a look at what you are trying to do? That would help. There are several alternatives to trying to bend plastic that do not end in the plastic being in a stressed condition. Ok. Now I see. I have done similar things but I first try and take some of the stiffness out of the plastic by dragging the plastic over something round roughly where I want the bend to go. I do this several times until it becomes more pliable. Then I glue that portion of the strip that is the straightest first and then a little at a time wrap the strip in the direction I want it to go. Looks like you accomplished that. -
Bending plastic for trim curves
Chariots of Fire replied to Len Woodruff's topic in Model Building Questions and Answers
Len: Can you give us a look at what you are trying to do? That would help. There are several alternatives to trying to bend plastic that do not end in the plastic being in a stressed condition. -
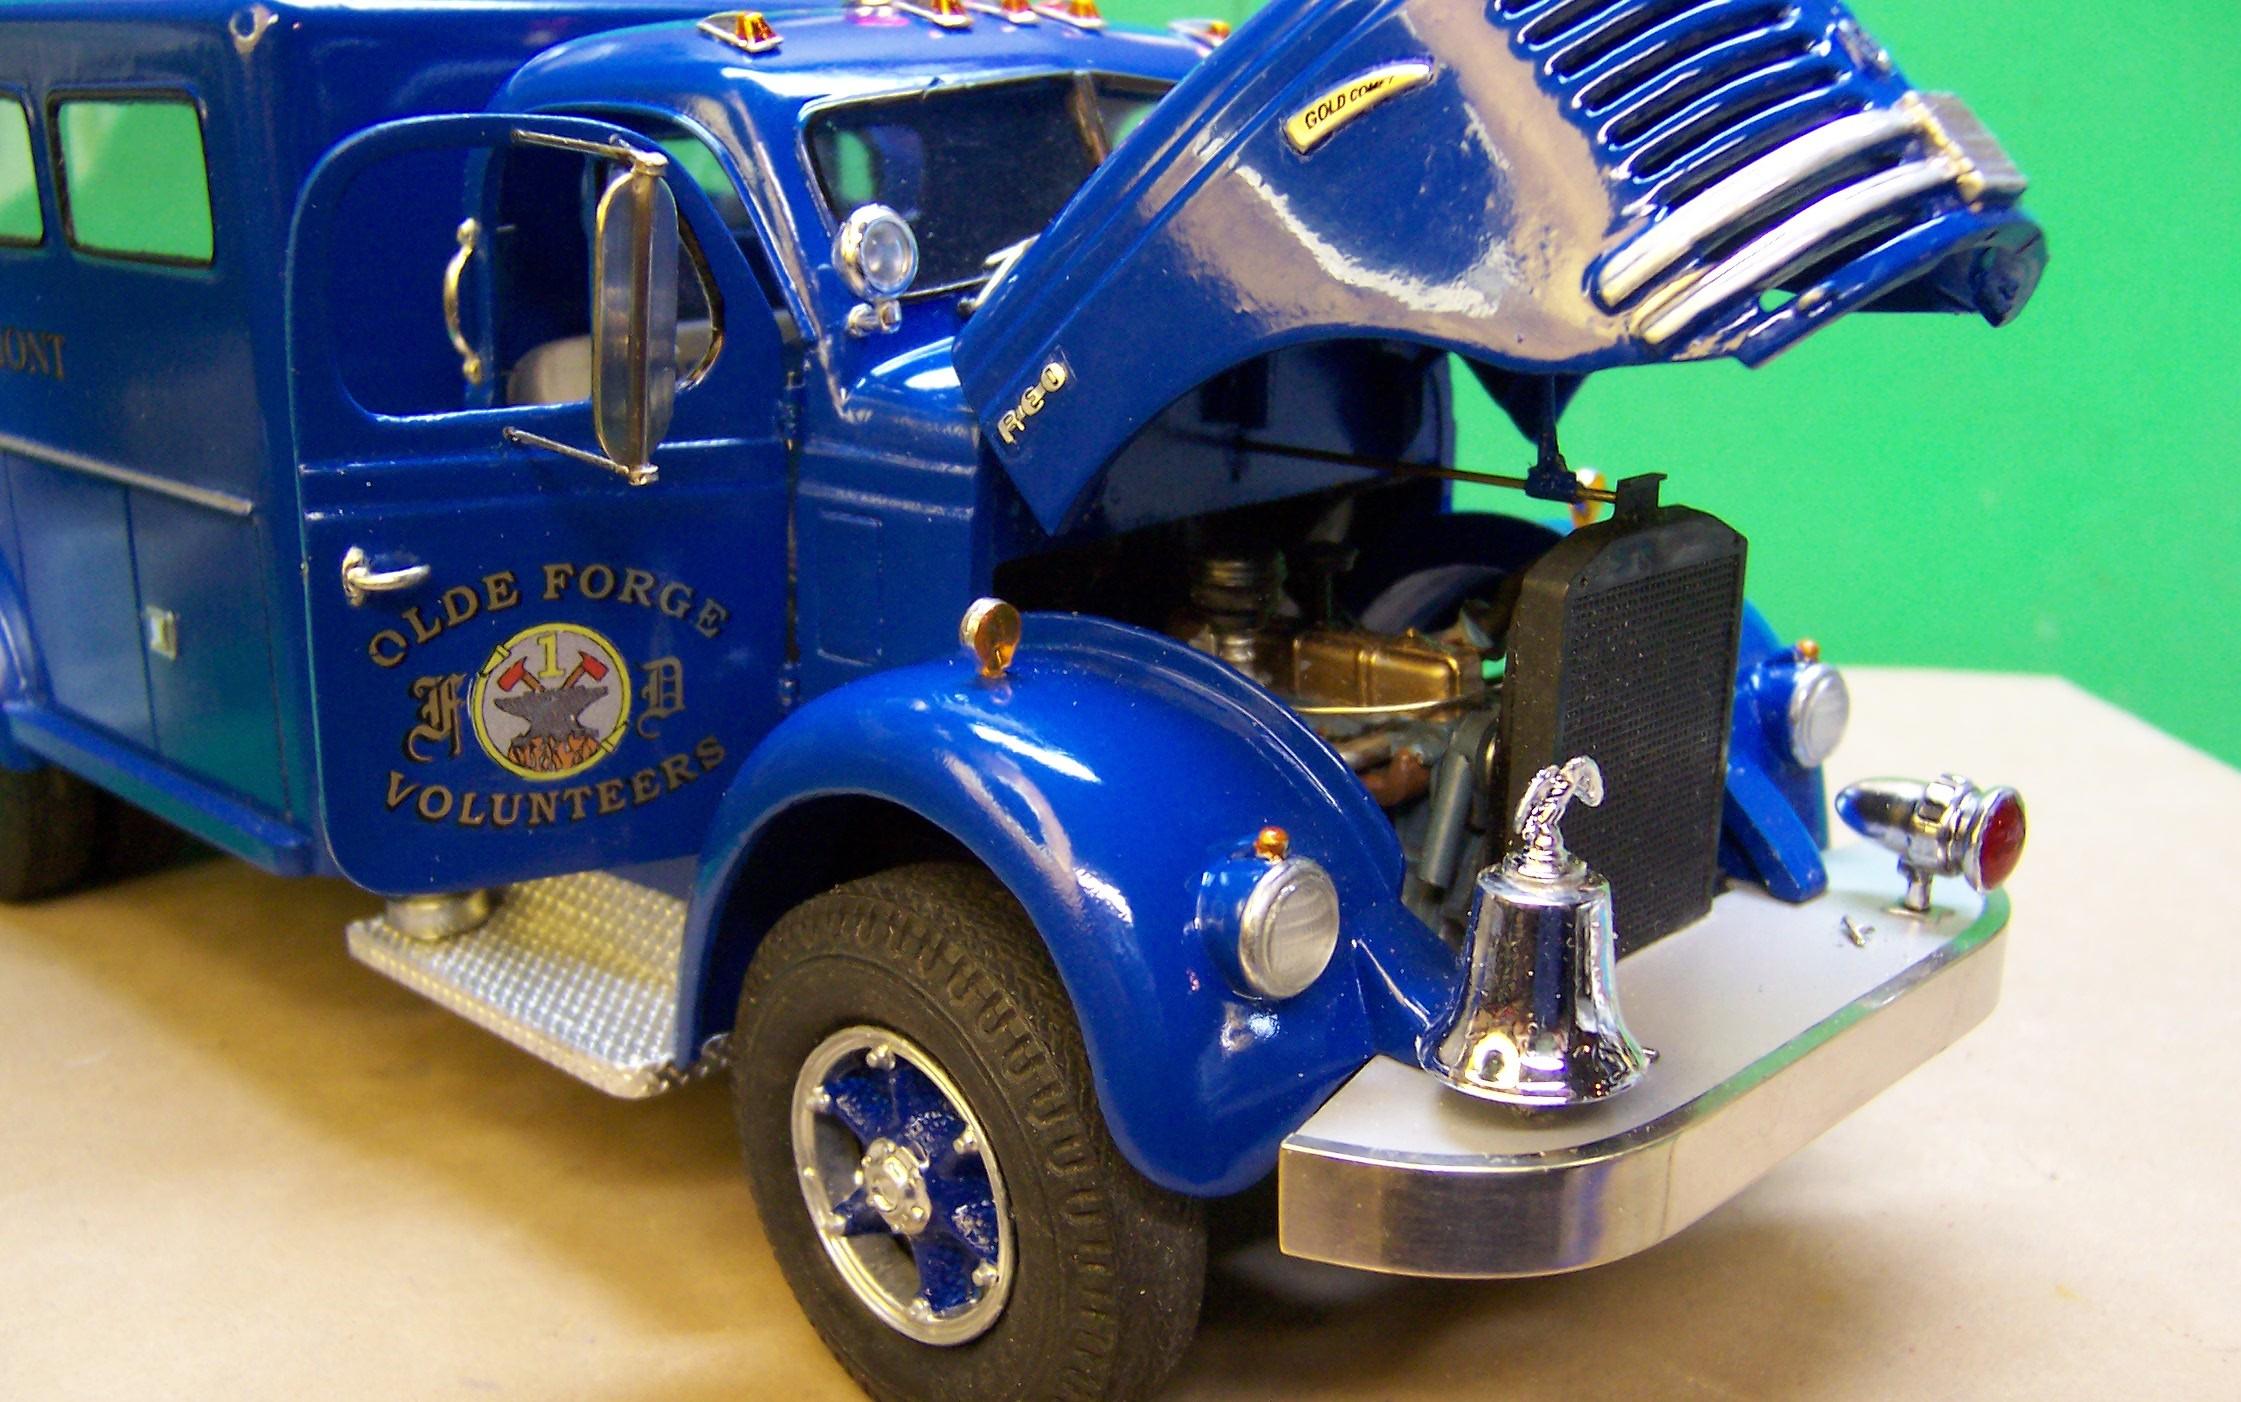
Hi, Charlie: I found some VHT engine blue at Auto Zone. Closest I was able to find to the blue on the actual truck. Laid on nicely.
-
Watched the progress on this build from almost the beginning. Weathering is top notch and the craftsmanship is clean. A super job on one of the toughest old trucks around. Thanks for sharing, Daniel! Much appreciated!?
-
No, I know you weren't and I didn't take it as a criticism!? Meshanticut Fire Company in Warwick, RI had a blue Hahn back in the 1970's/80's that was pretty sharp. They are unusual, that is for sure.
-
I know, Peter but that's what the real one's color was and it just looked right. It's a close match. Lot's of things like that in the area it is from.
-
Monogram 1926 Mack
Chariots of Fire replied to Straightliner59's topic in WIP: Model Trucks: Big Rigs and Heavy Equipment
Believe it or not, masking tape works for a canvas roof. I have some wide painters tape that I used on a couple of projects. After painting it with some flat black and doing a bit of weathering, the texture looks just right. At least it does to me. -
I think that is what attracted me to it, Bob. The styling. So classic for that period. It could have been built on a Mack chassis as well either a B model, L or LJ!
-
One thing to consider when soldering the brass would be to use a piece of aluminum rod or some other non-ferous material that would not become soldered to the hinge itself. After soldering is complete then the rod could be removed and be replaced with the rod section of brass or other material for additional strength.
-
What New (Modeling) Technique Did You Try Today?
Chariots of Fire replied to Snake45's topic in Tips, Tricks, and Tutorials
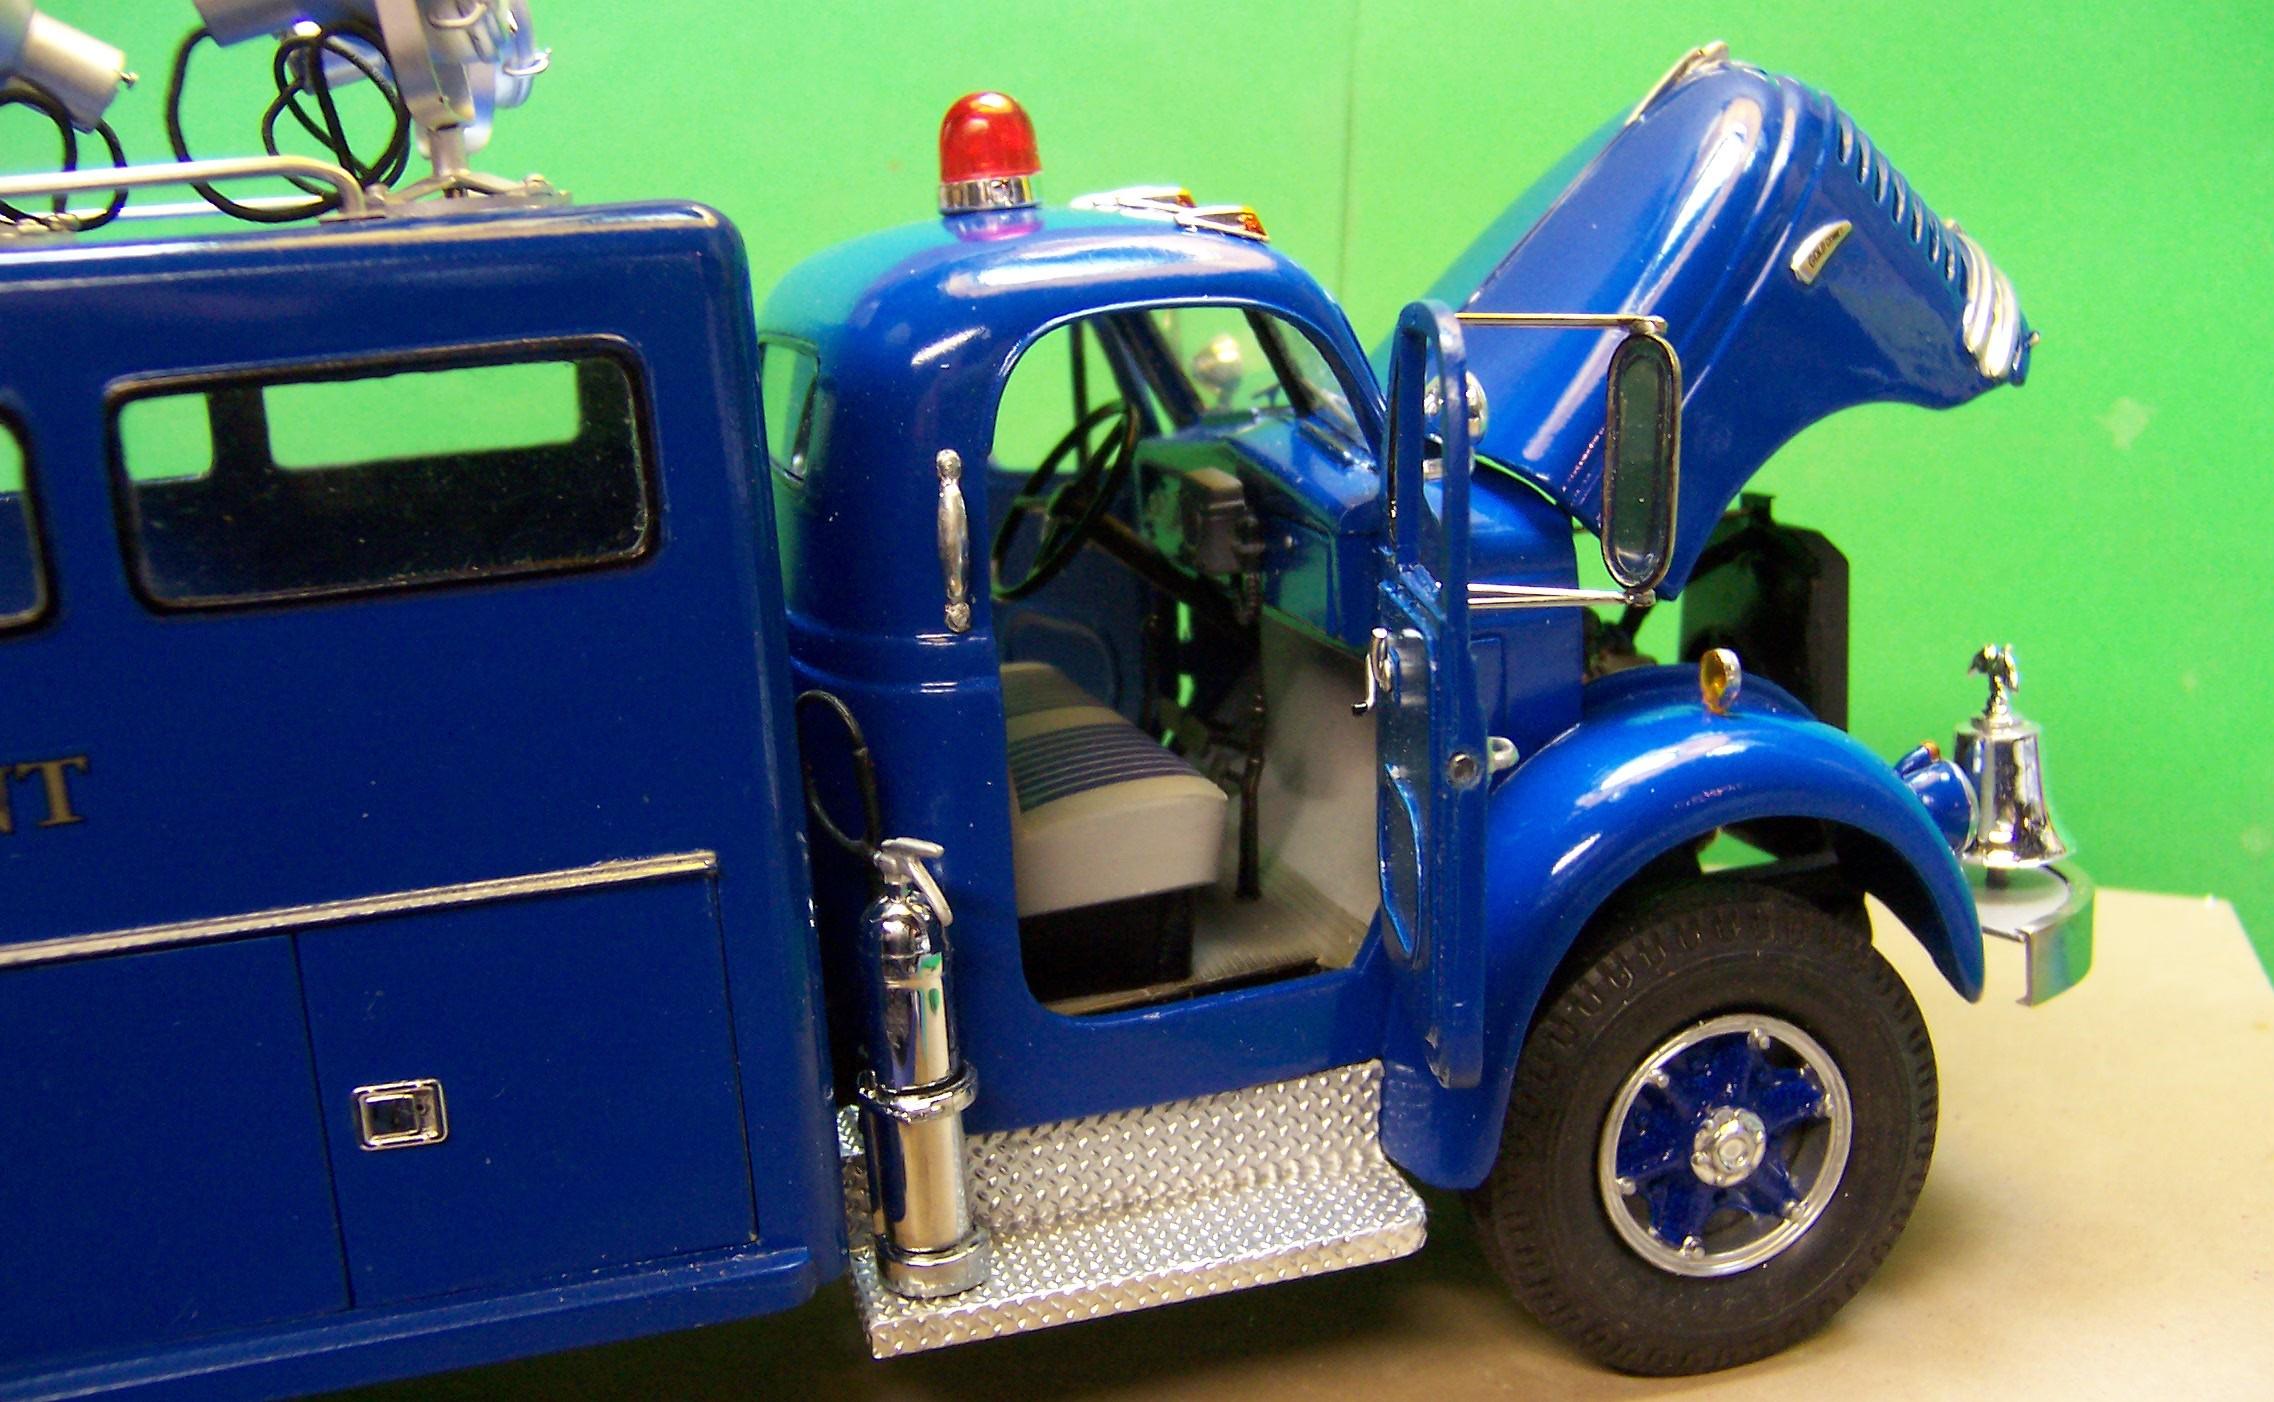
I recently made some seat covers on the Reo project I was doing. The seat came from a Chevy p/u and had to be narrowed up some to fit in the cab. I sprayed the seats primer gray and then made an alternating blue striped decal leaving a clear space between the blue stripes. The entire seat was then sprayed with Dullcote. And a similar thing was done for this 1953 Ford Victoria hardtop.
-
That's nice work, Daniel! I used to get some real fine piano hinges from Great Britain but then the manufacturer stopped making them. Been out of luck ever since. Best I've been able to come up with is some real small brass tubing and some stainless steel wire.
-
Reo Gold Comet
Chariots of Fire replied to Chariots of Fire's topic in WIP: Model Trucks: Big Rigs and Heavy Equipment
Amazing what some masking tape, some weathered black paint and some powders will do!? -
Any plans for a combined show like what you contemplated last Sept.? Or will you just wait till next year?
-
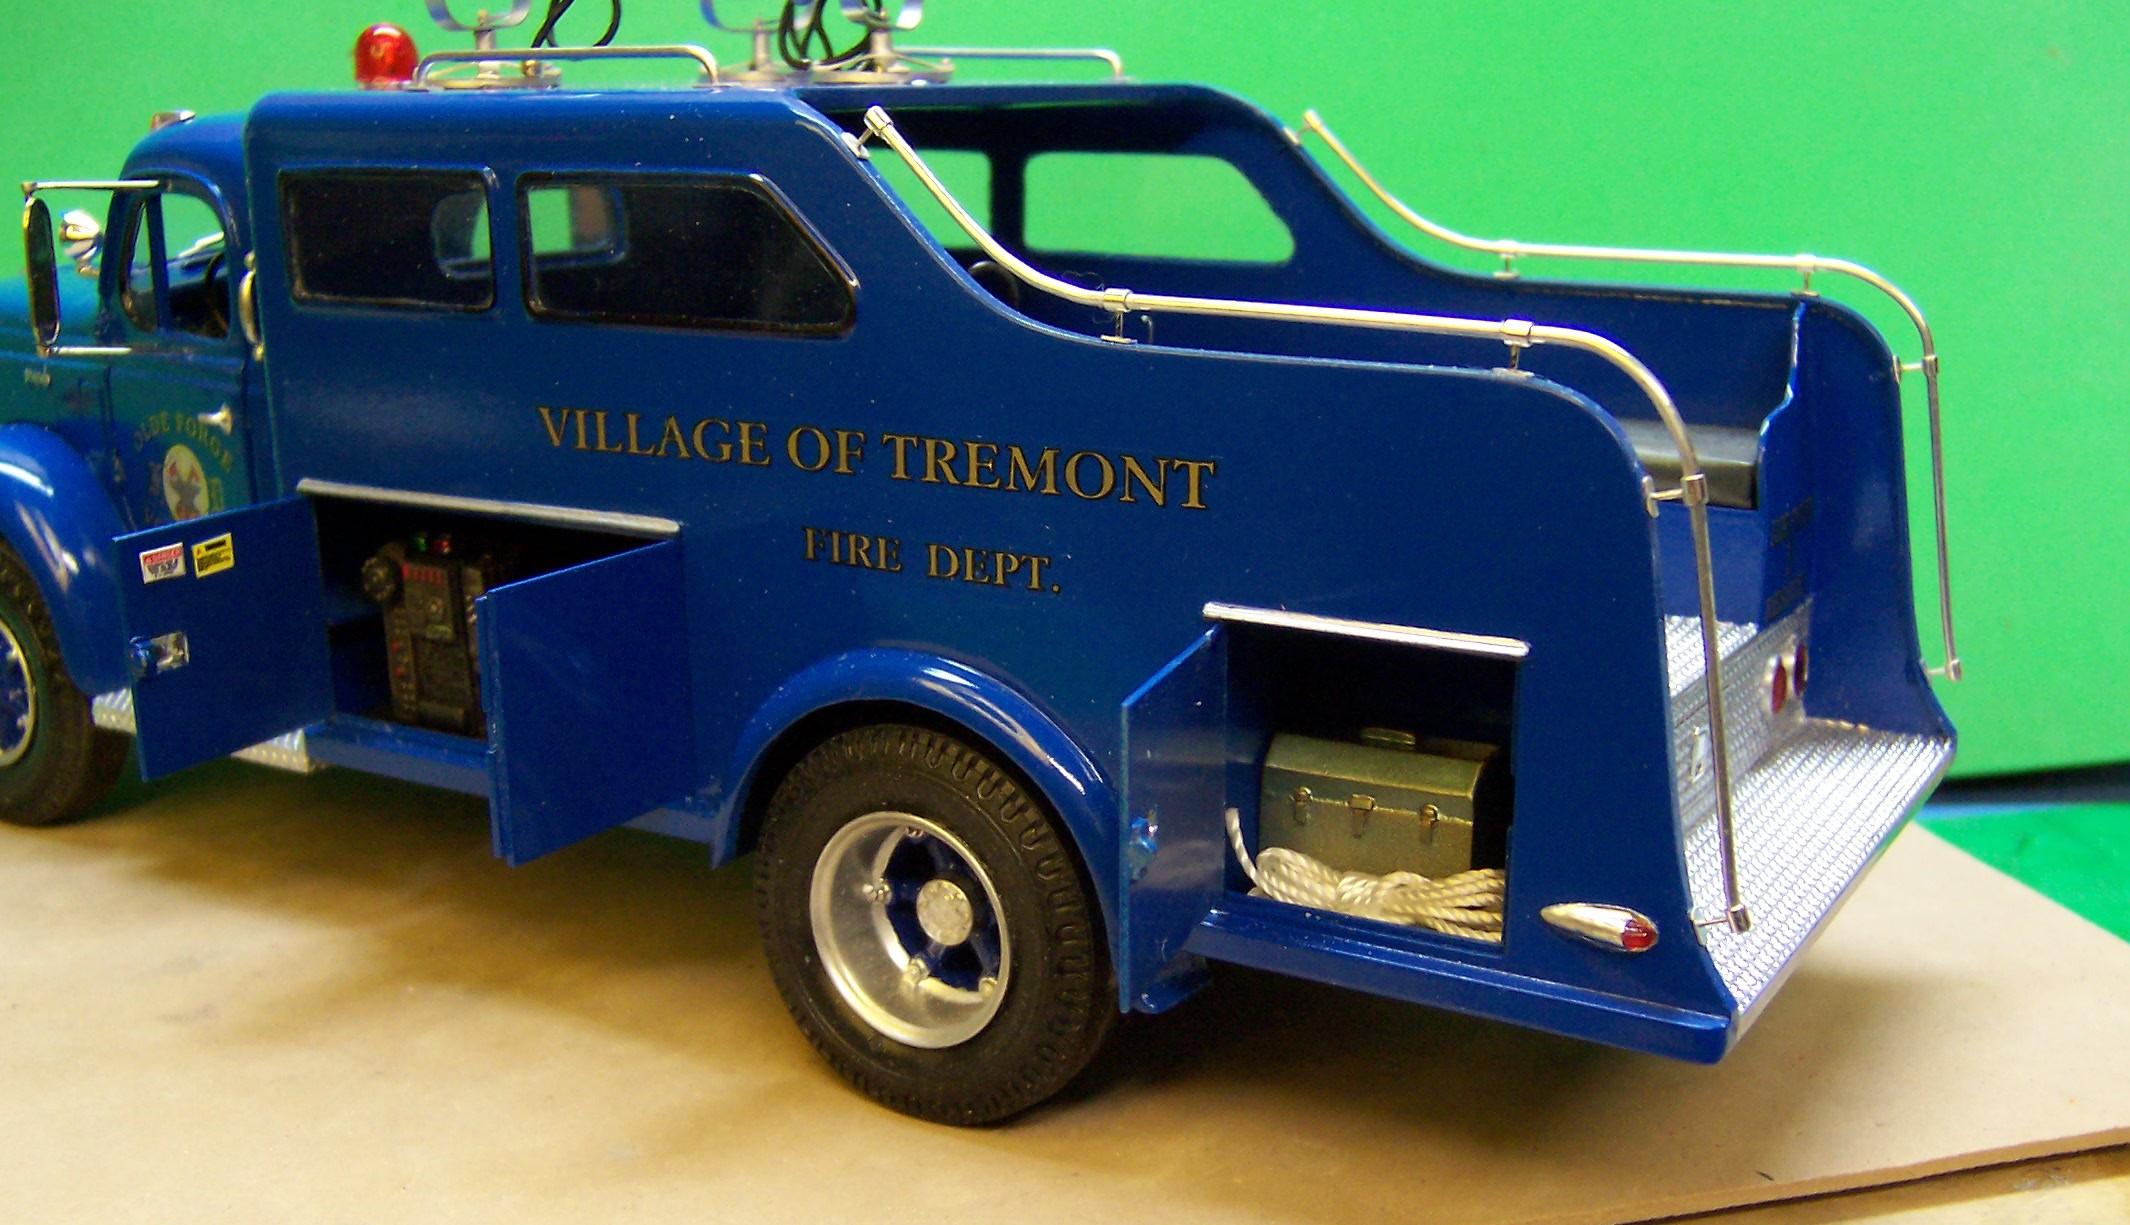
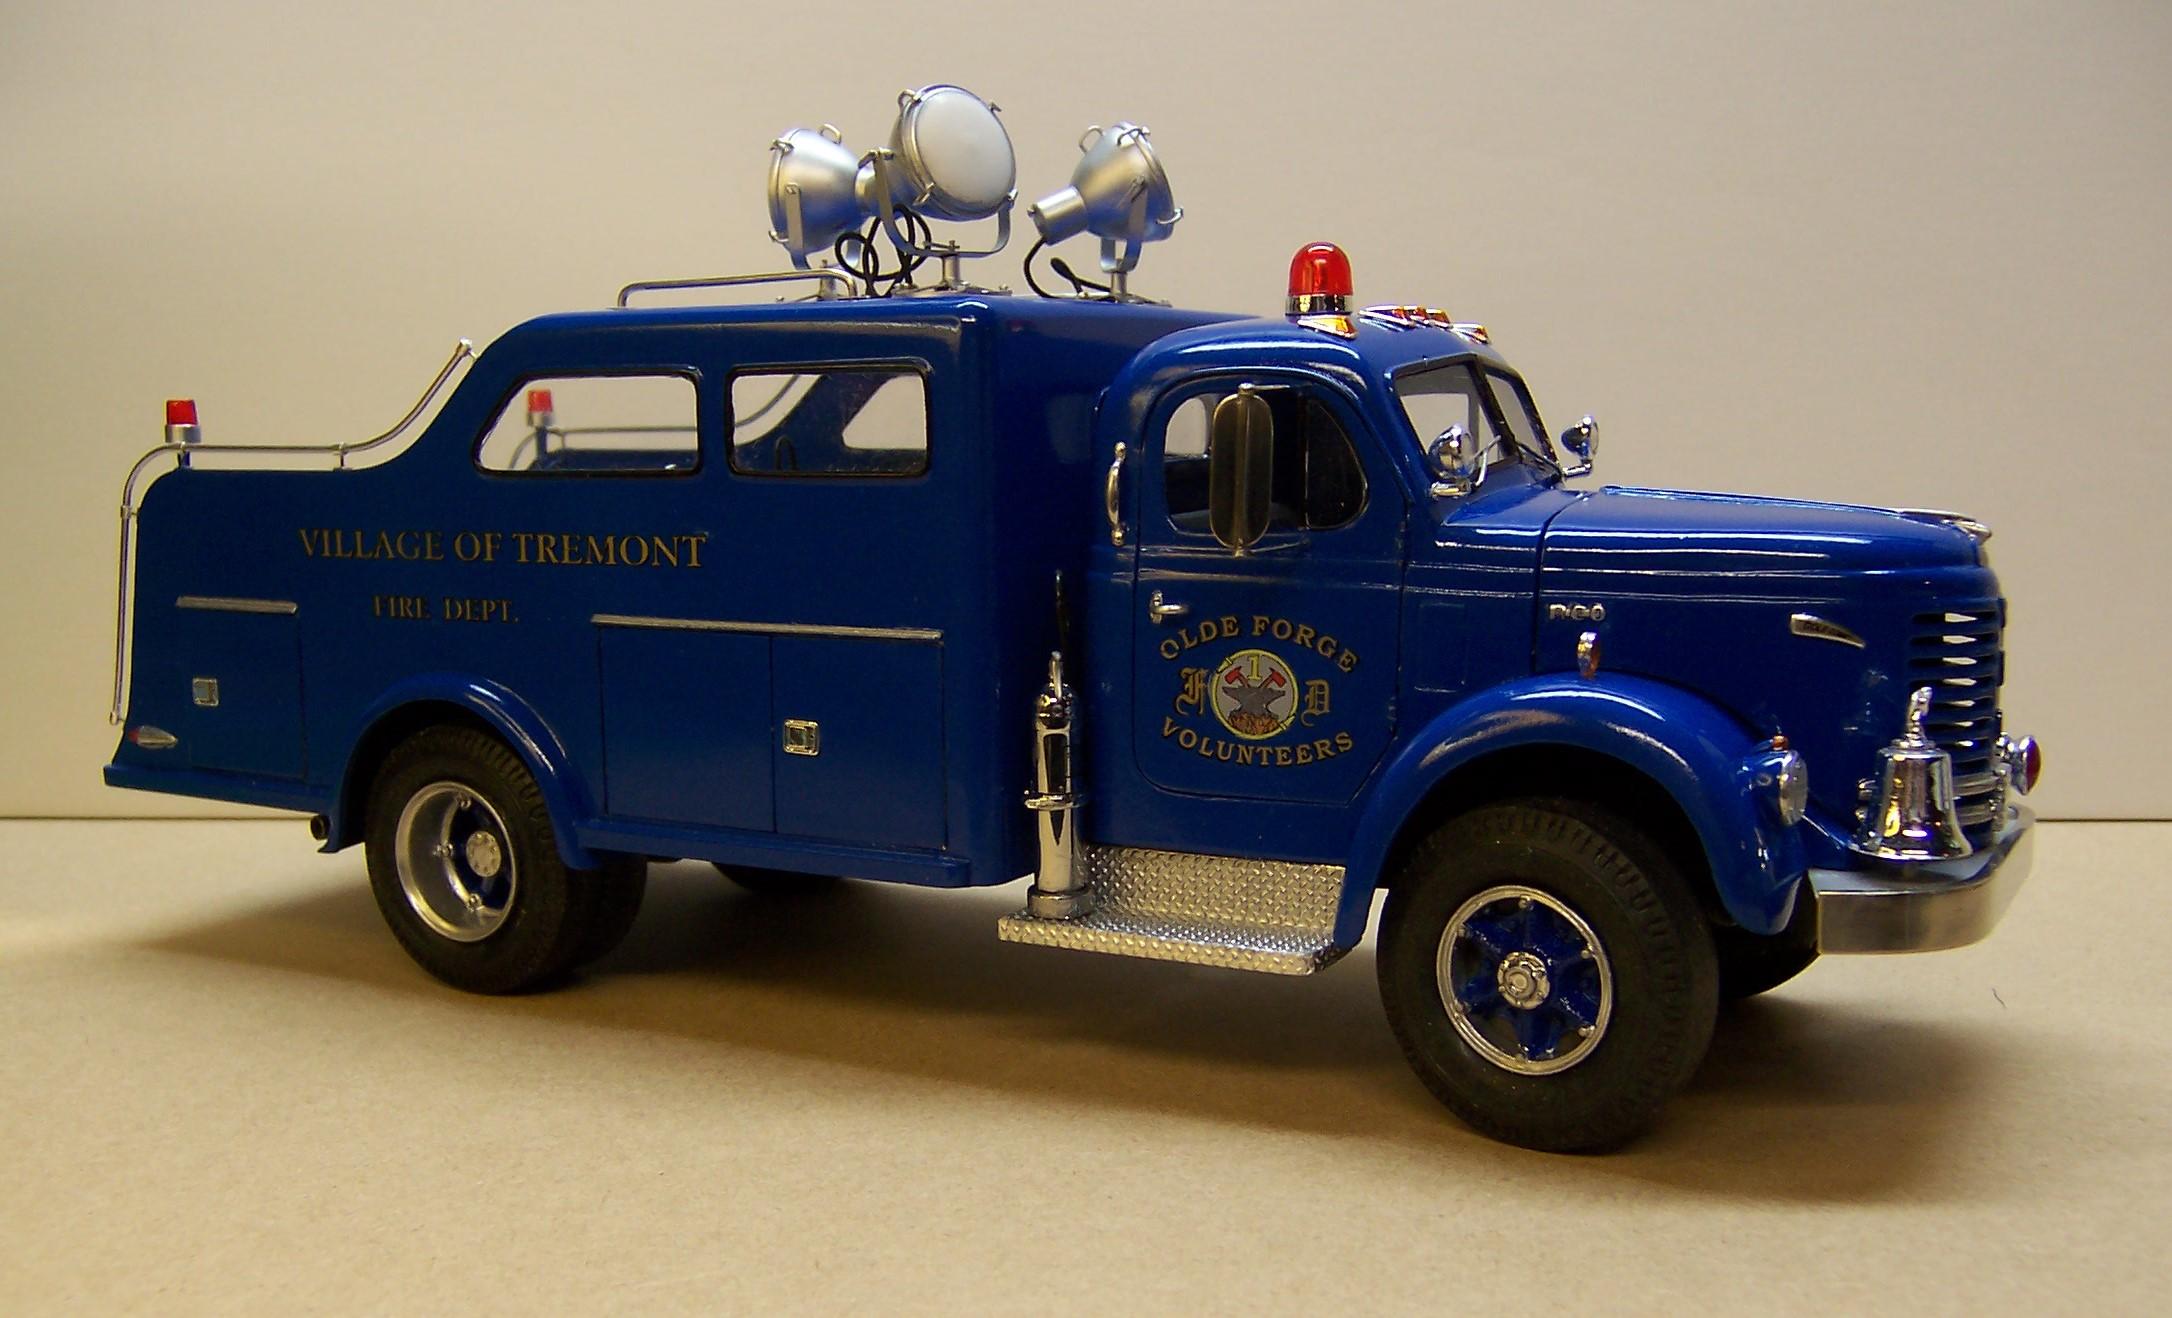
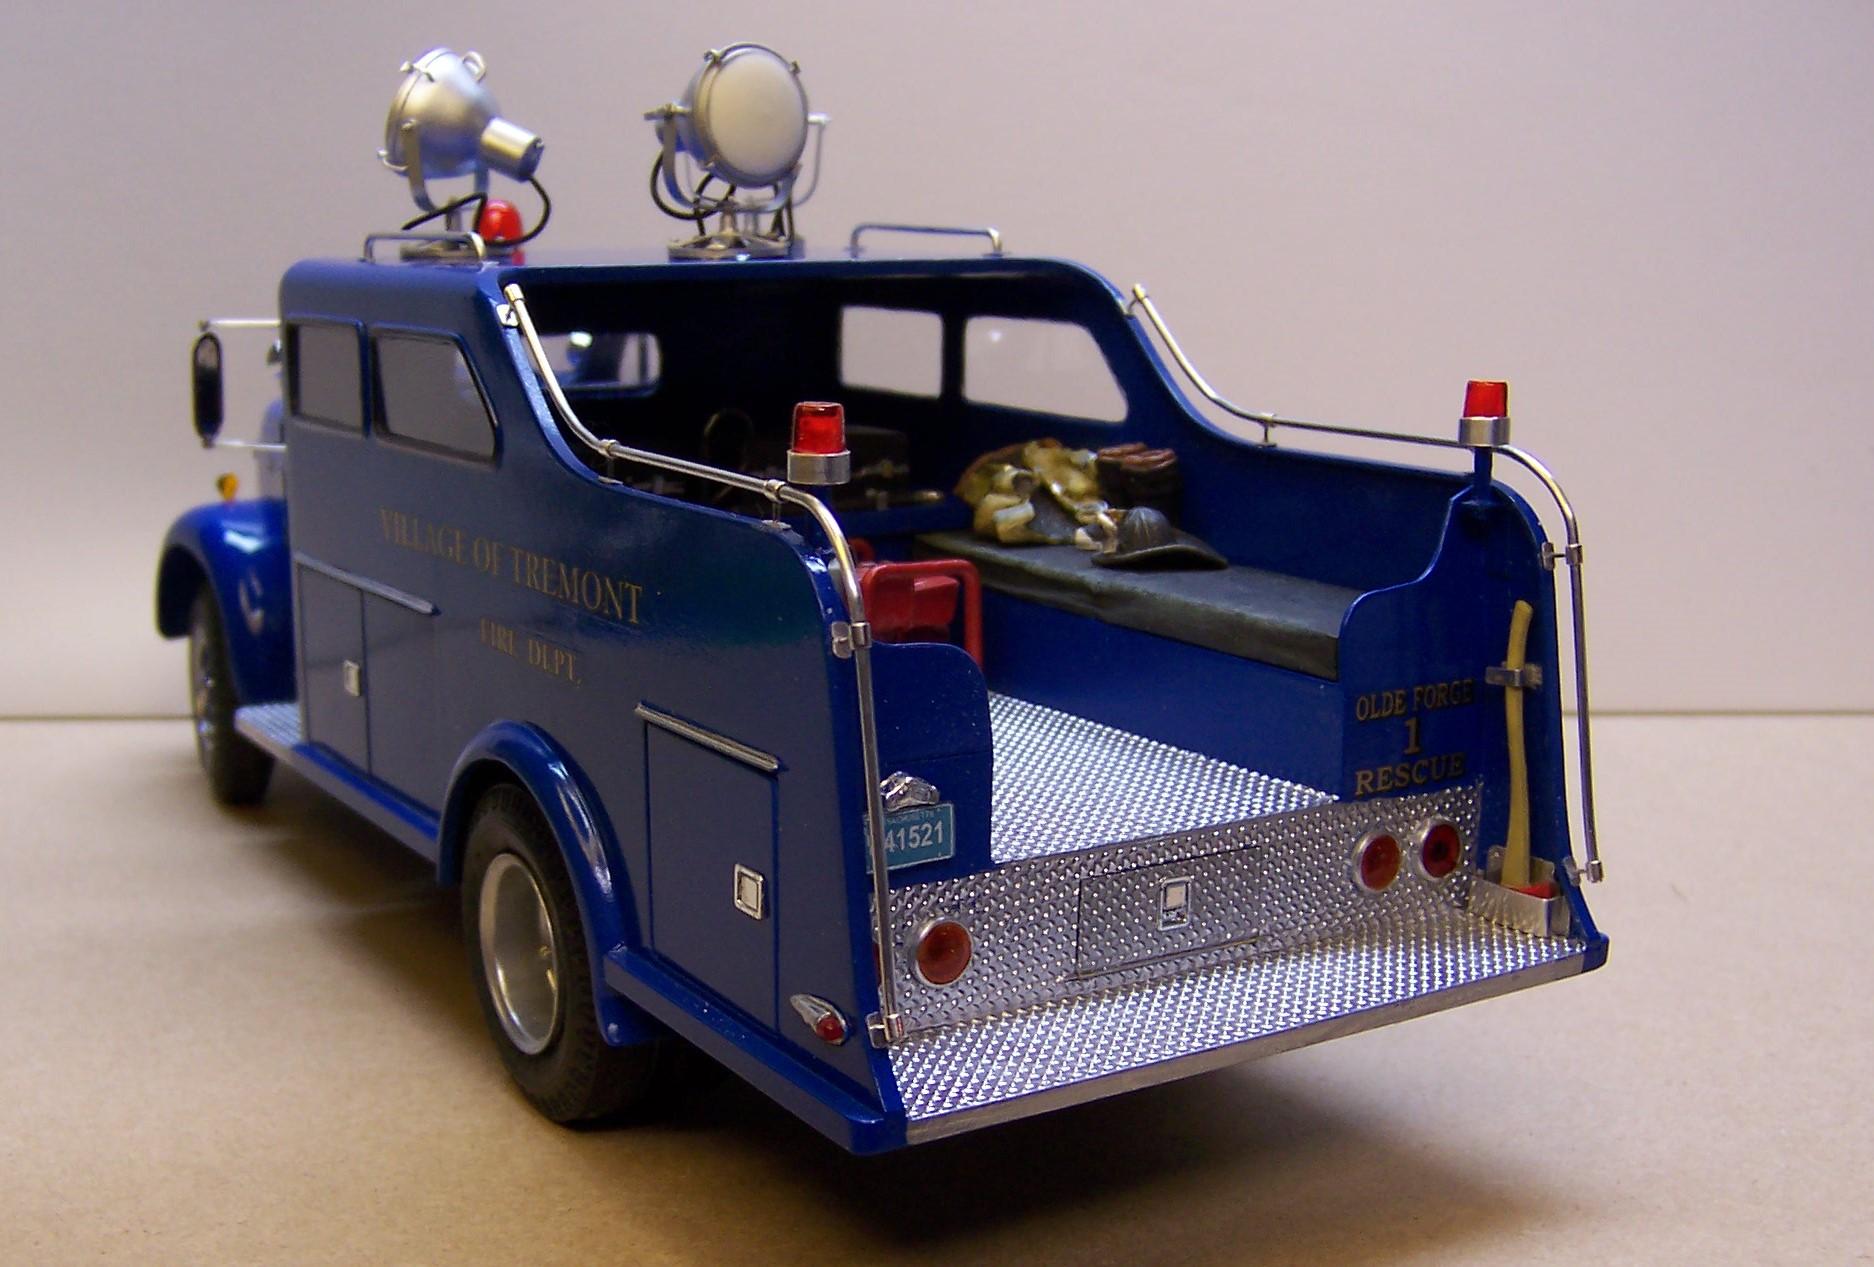
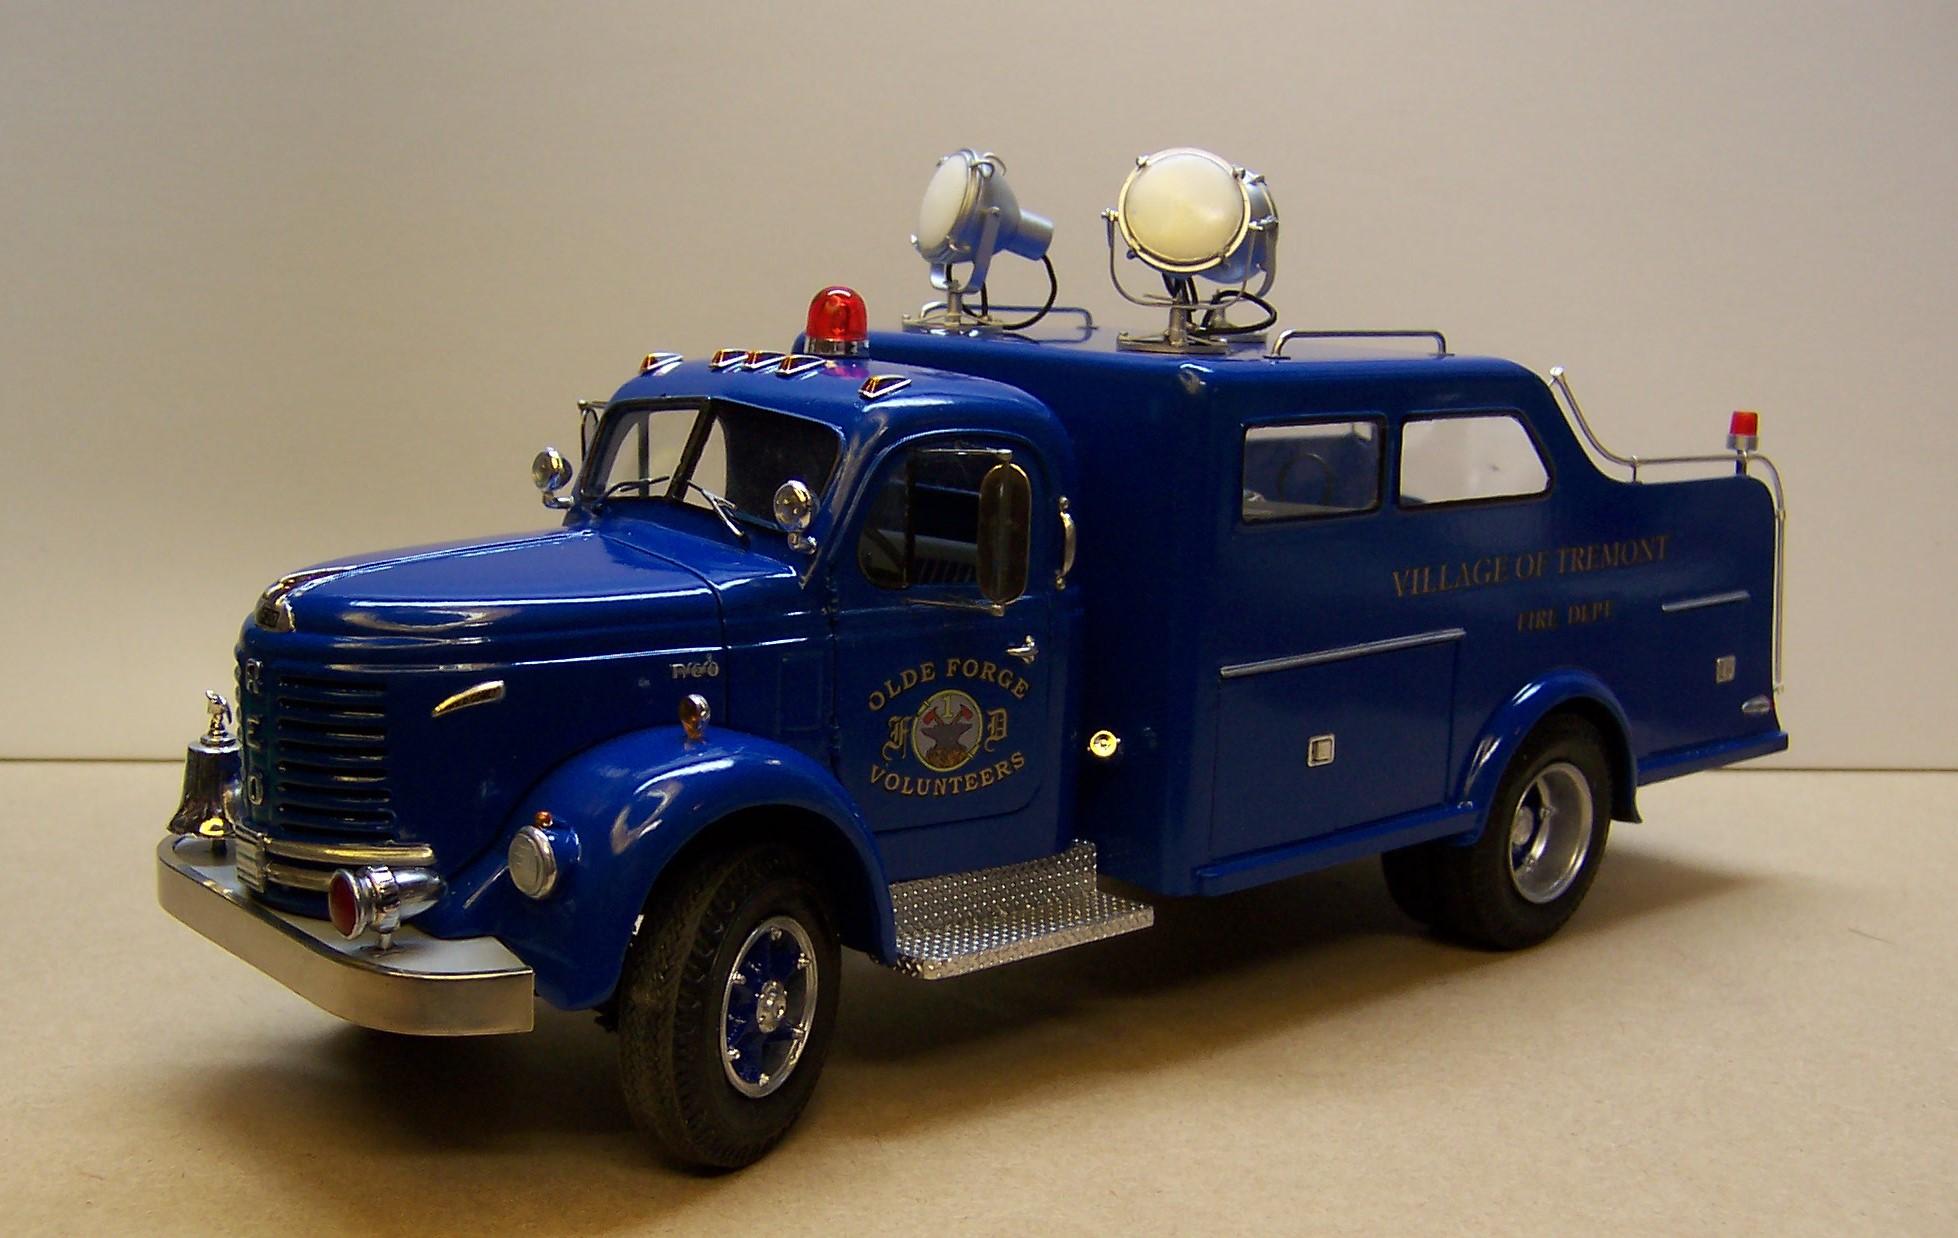
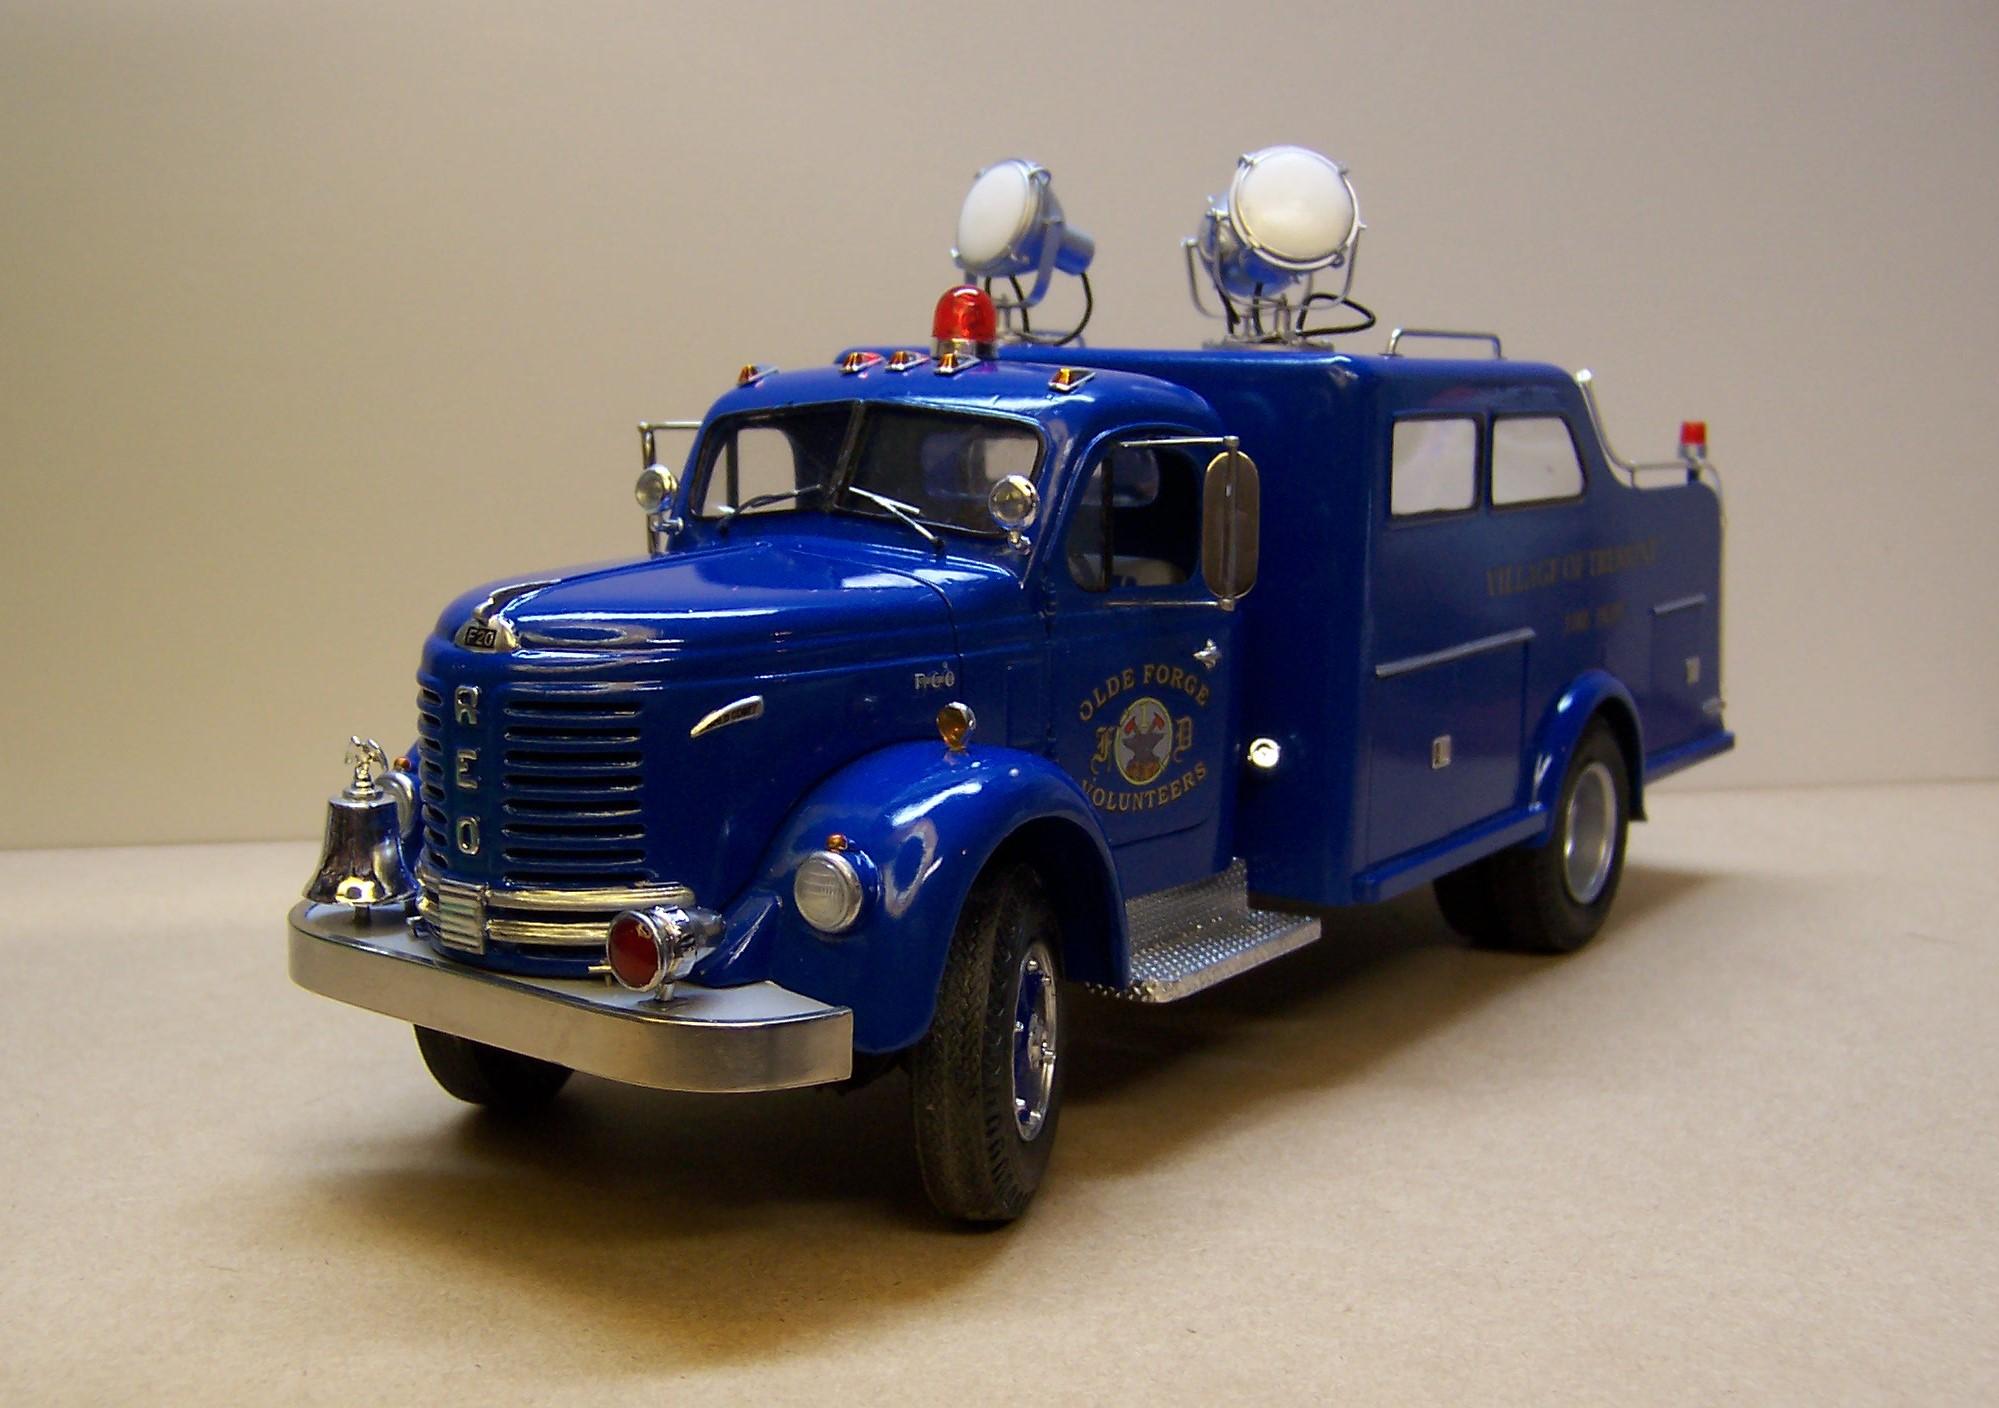
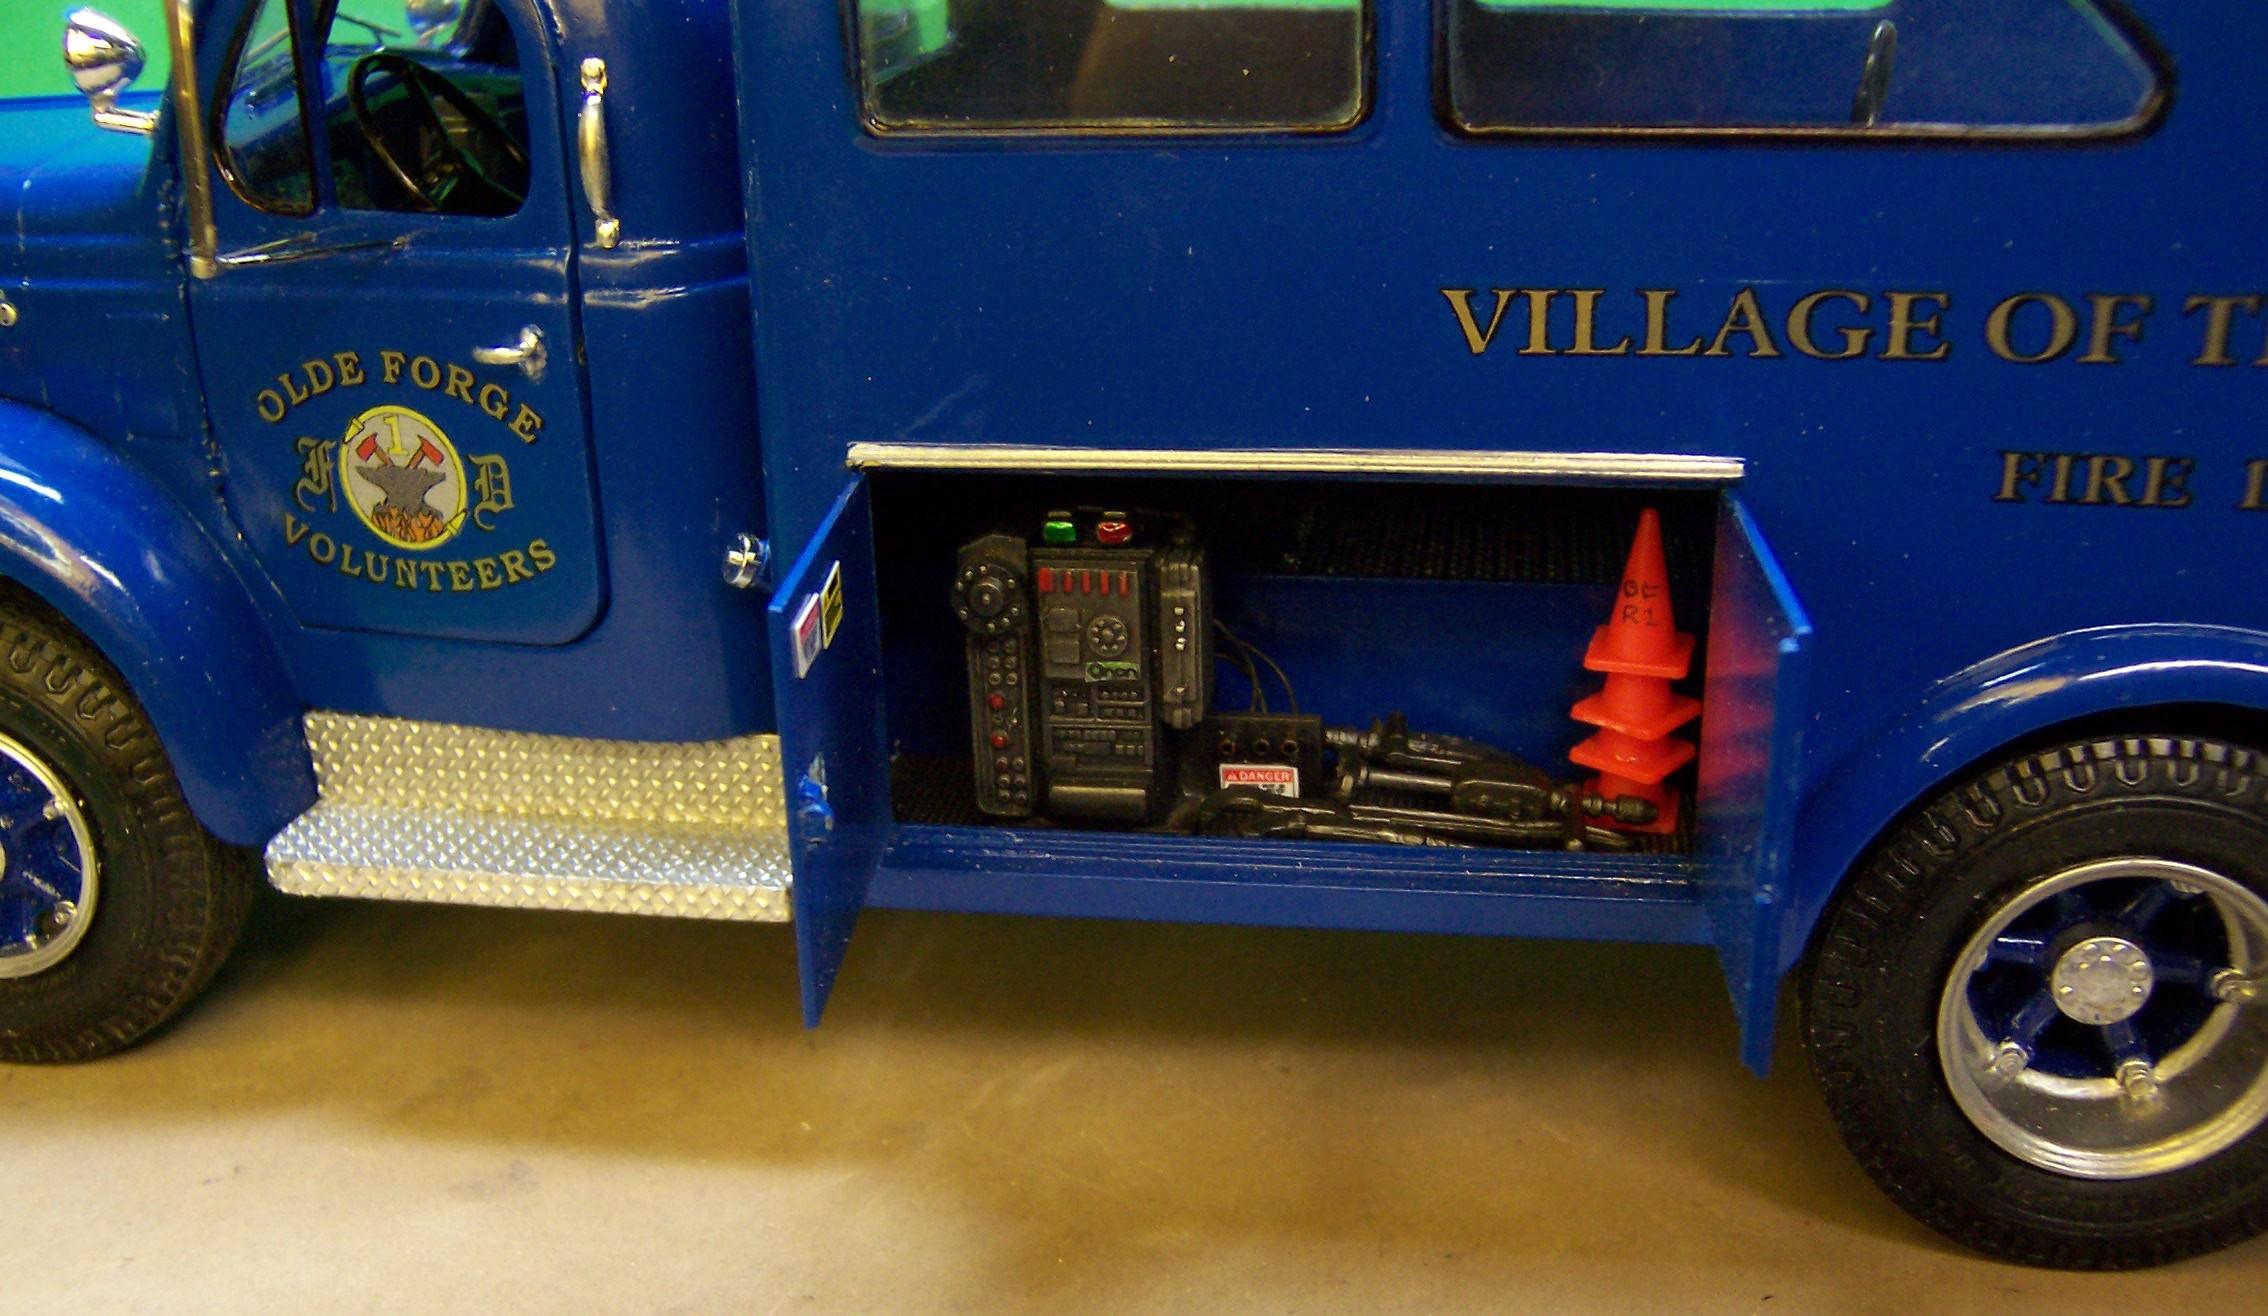
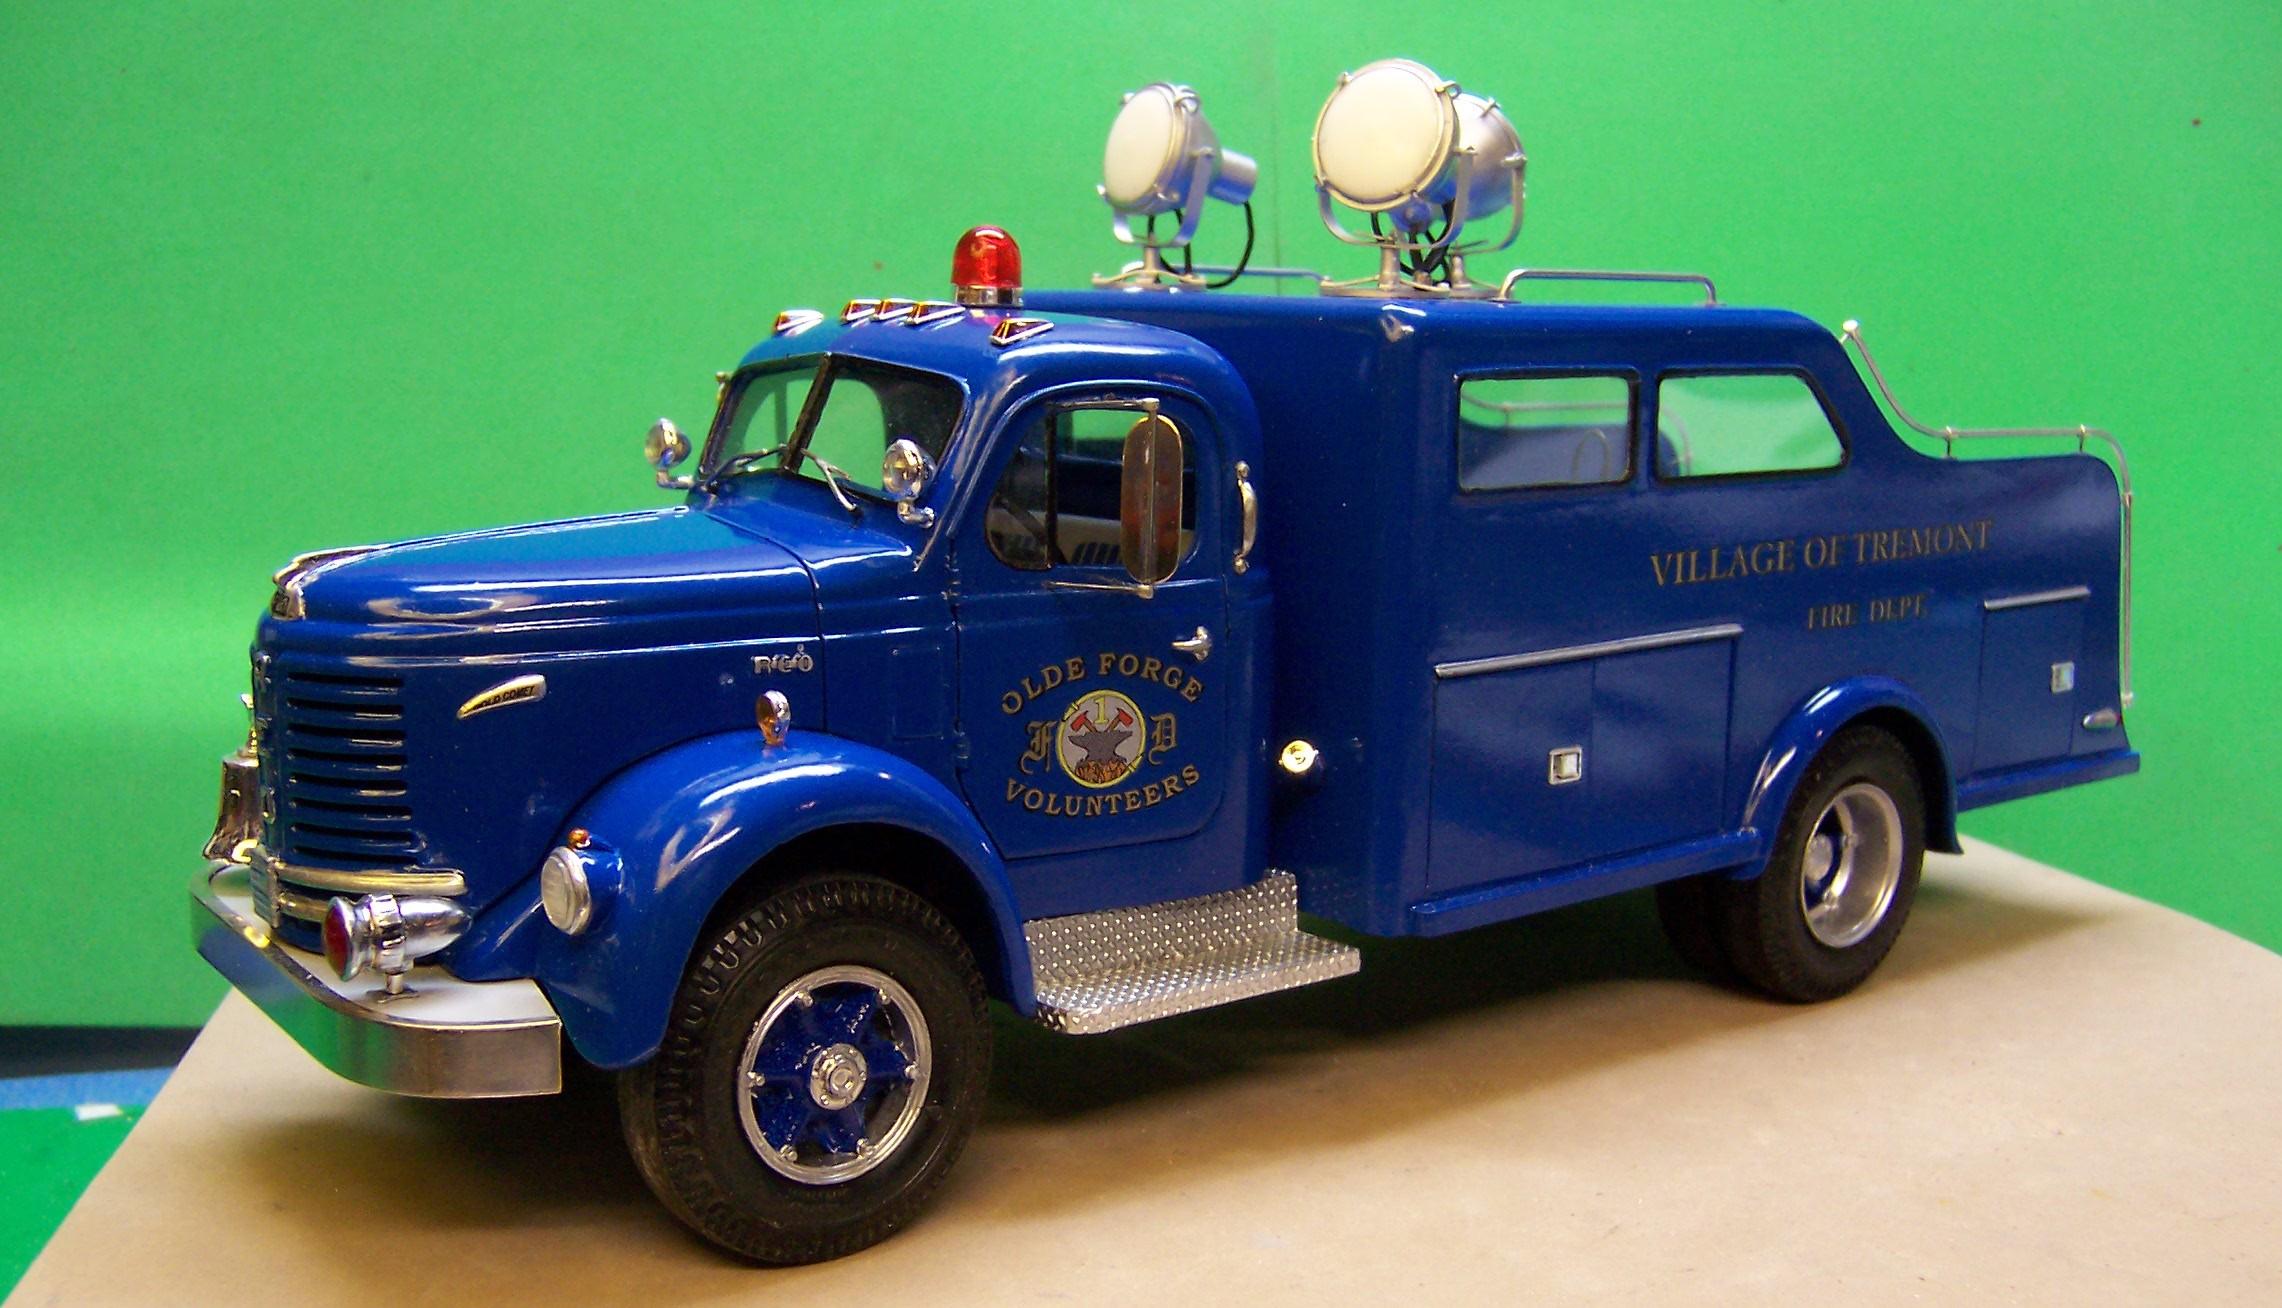
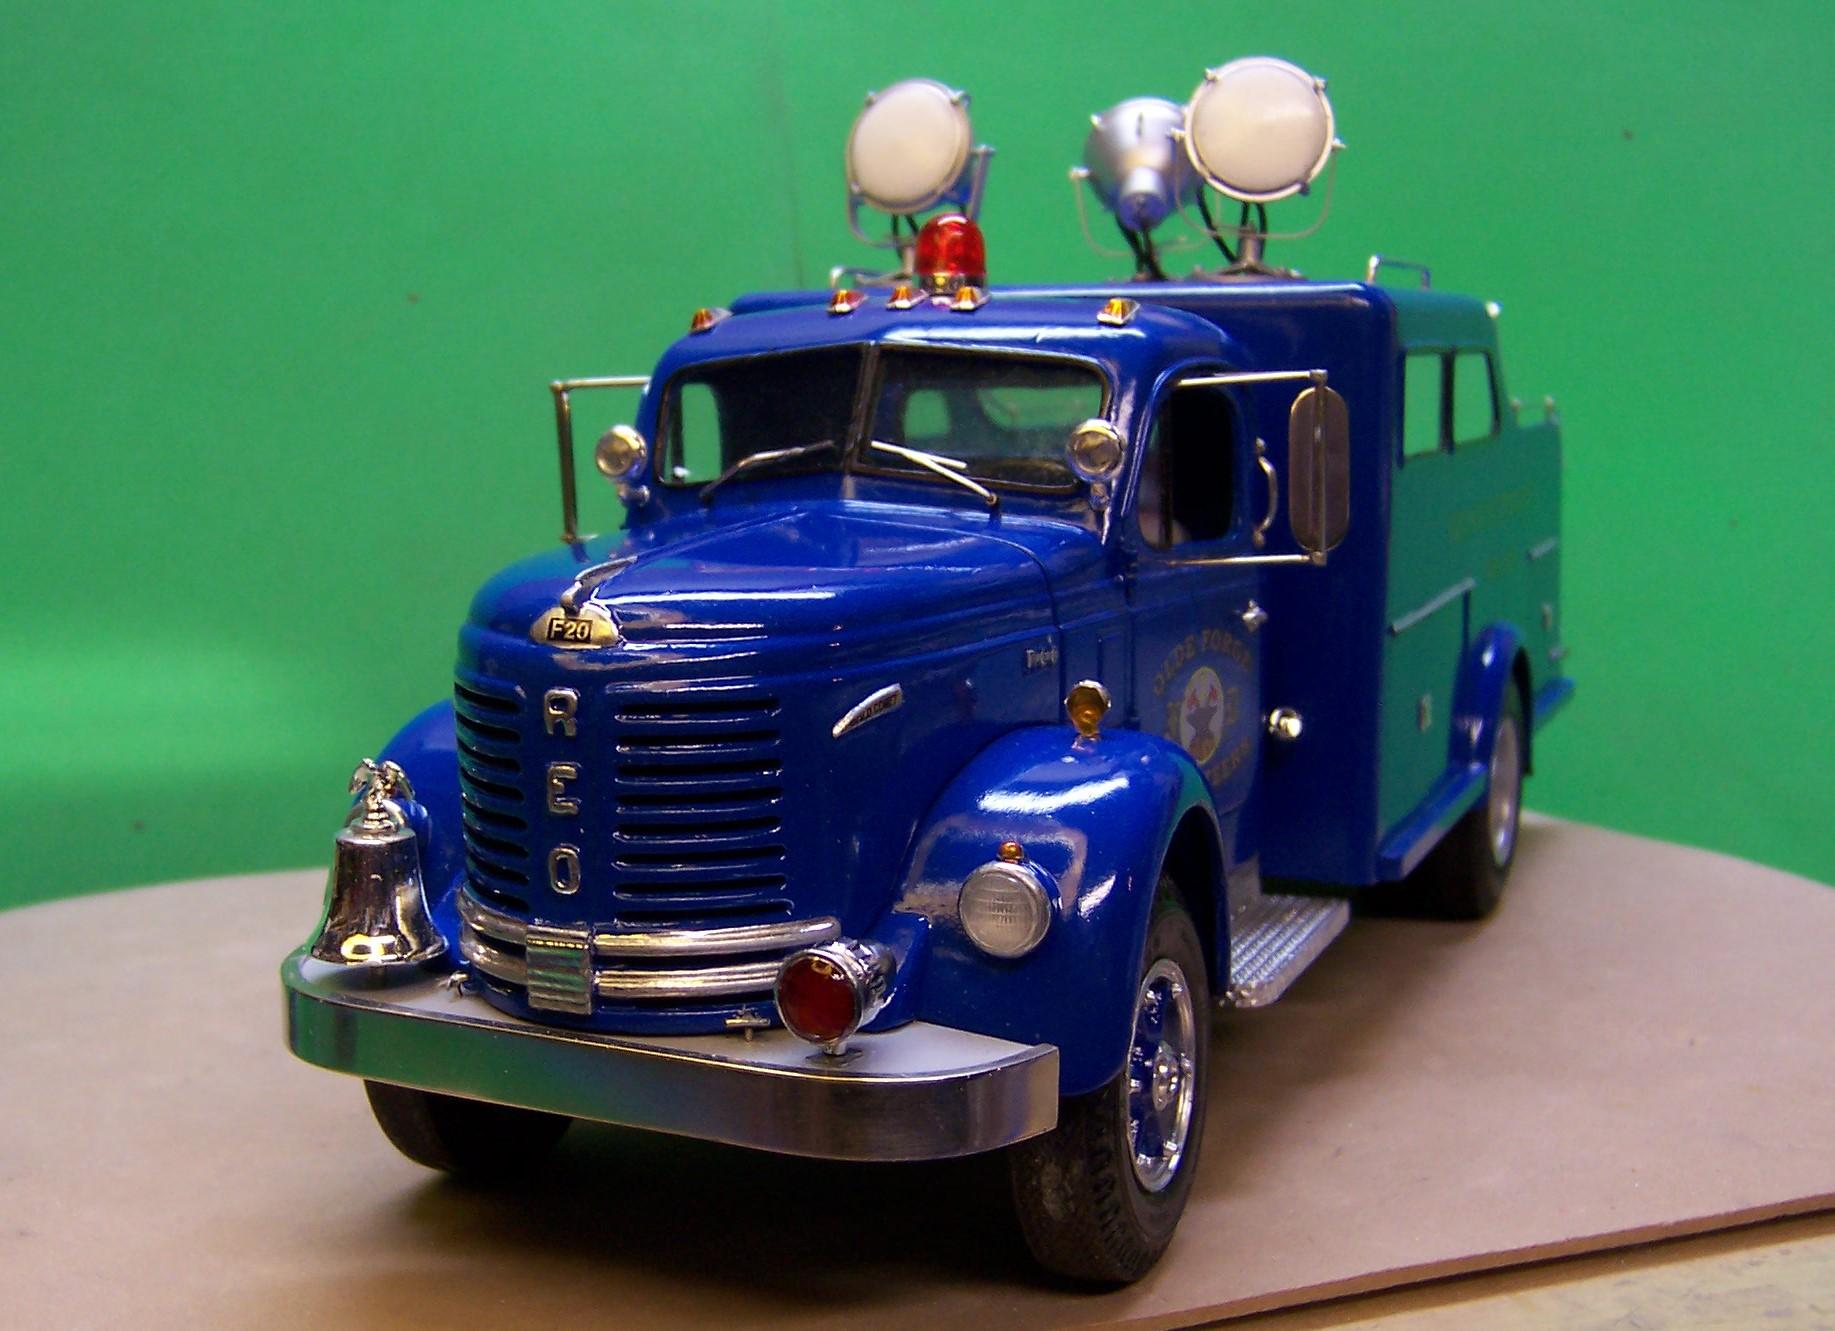
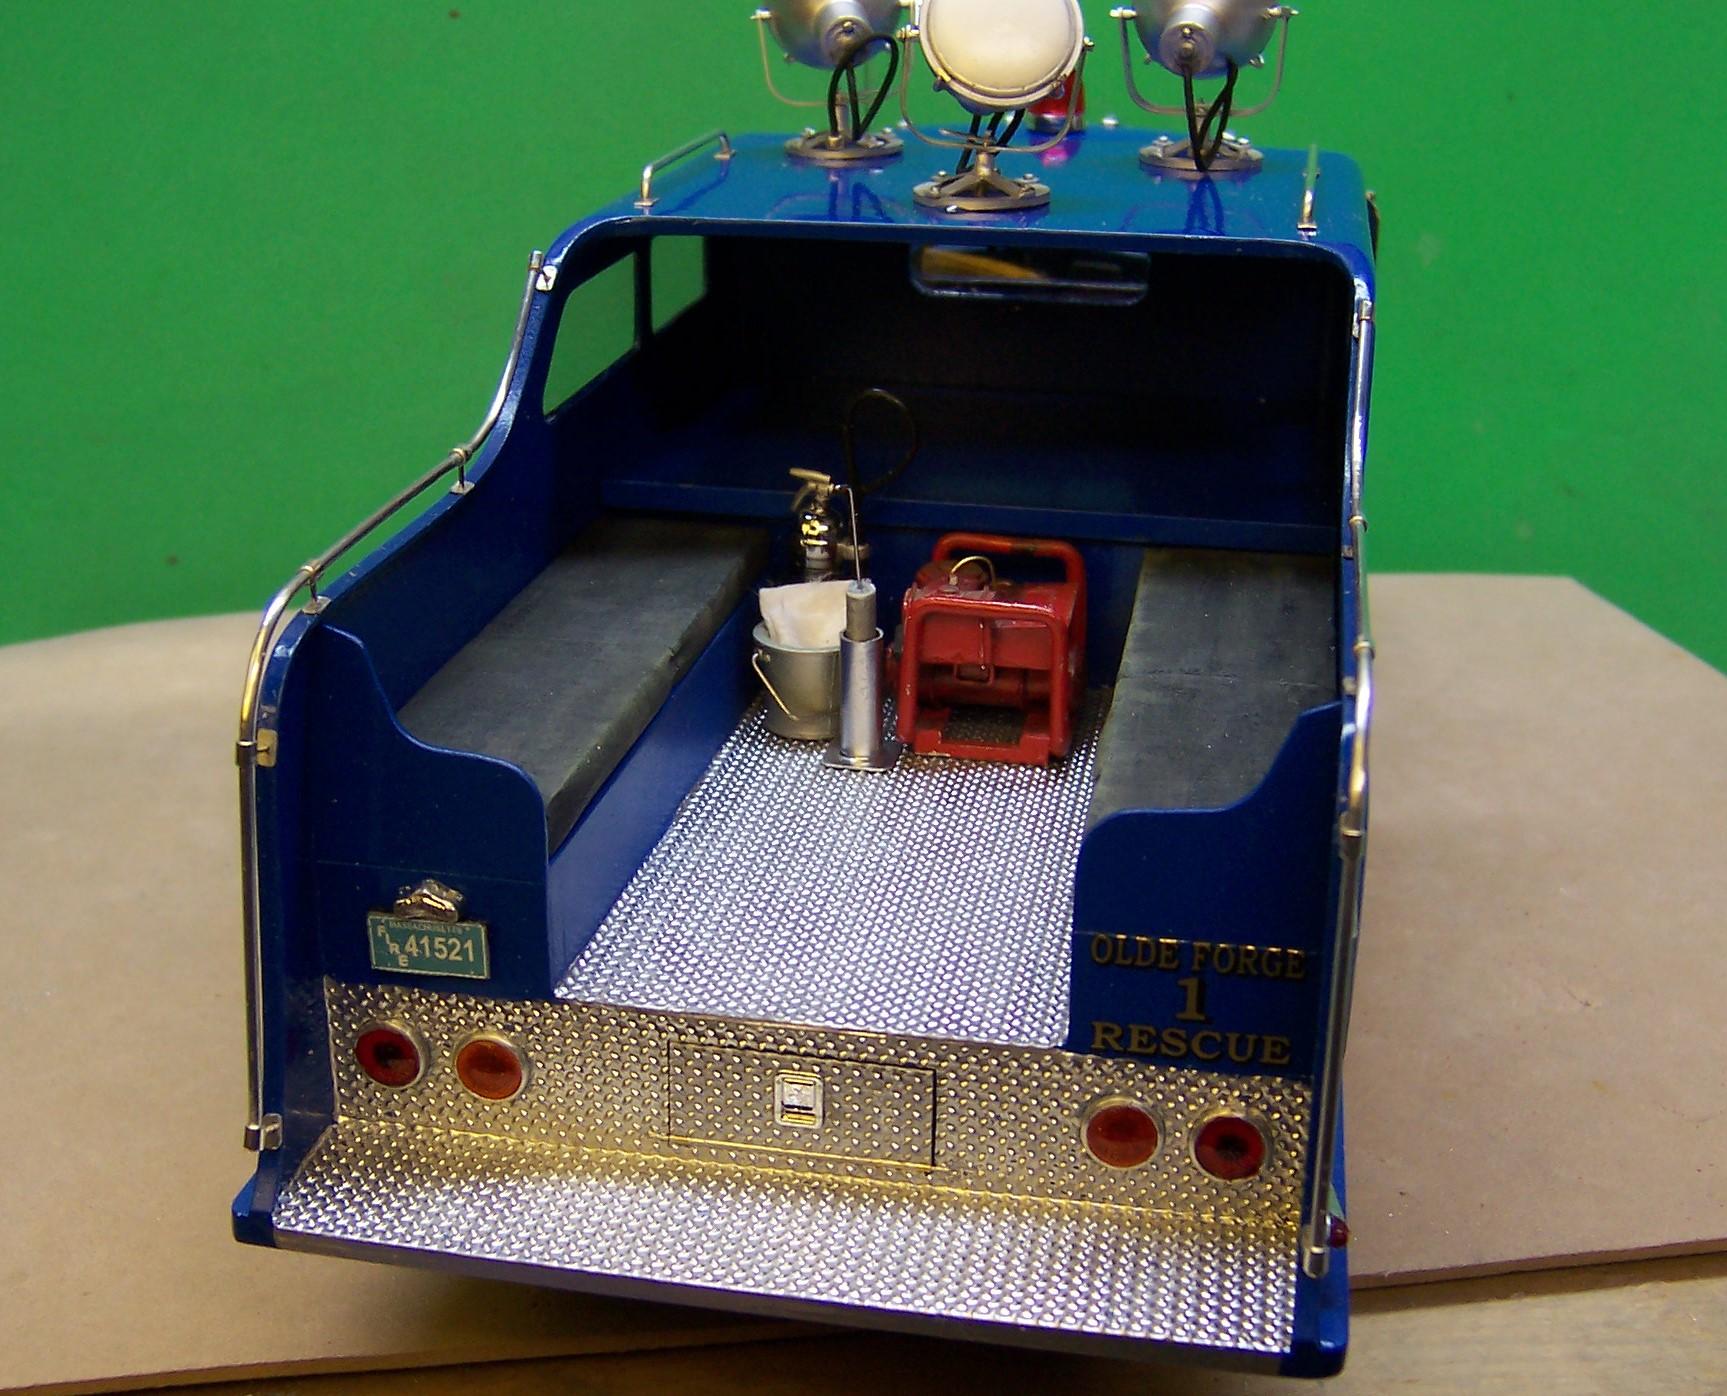
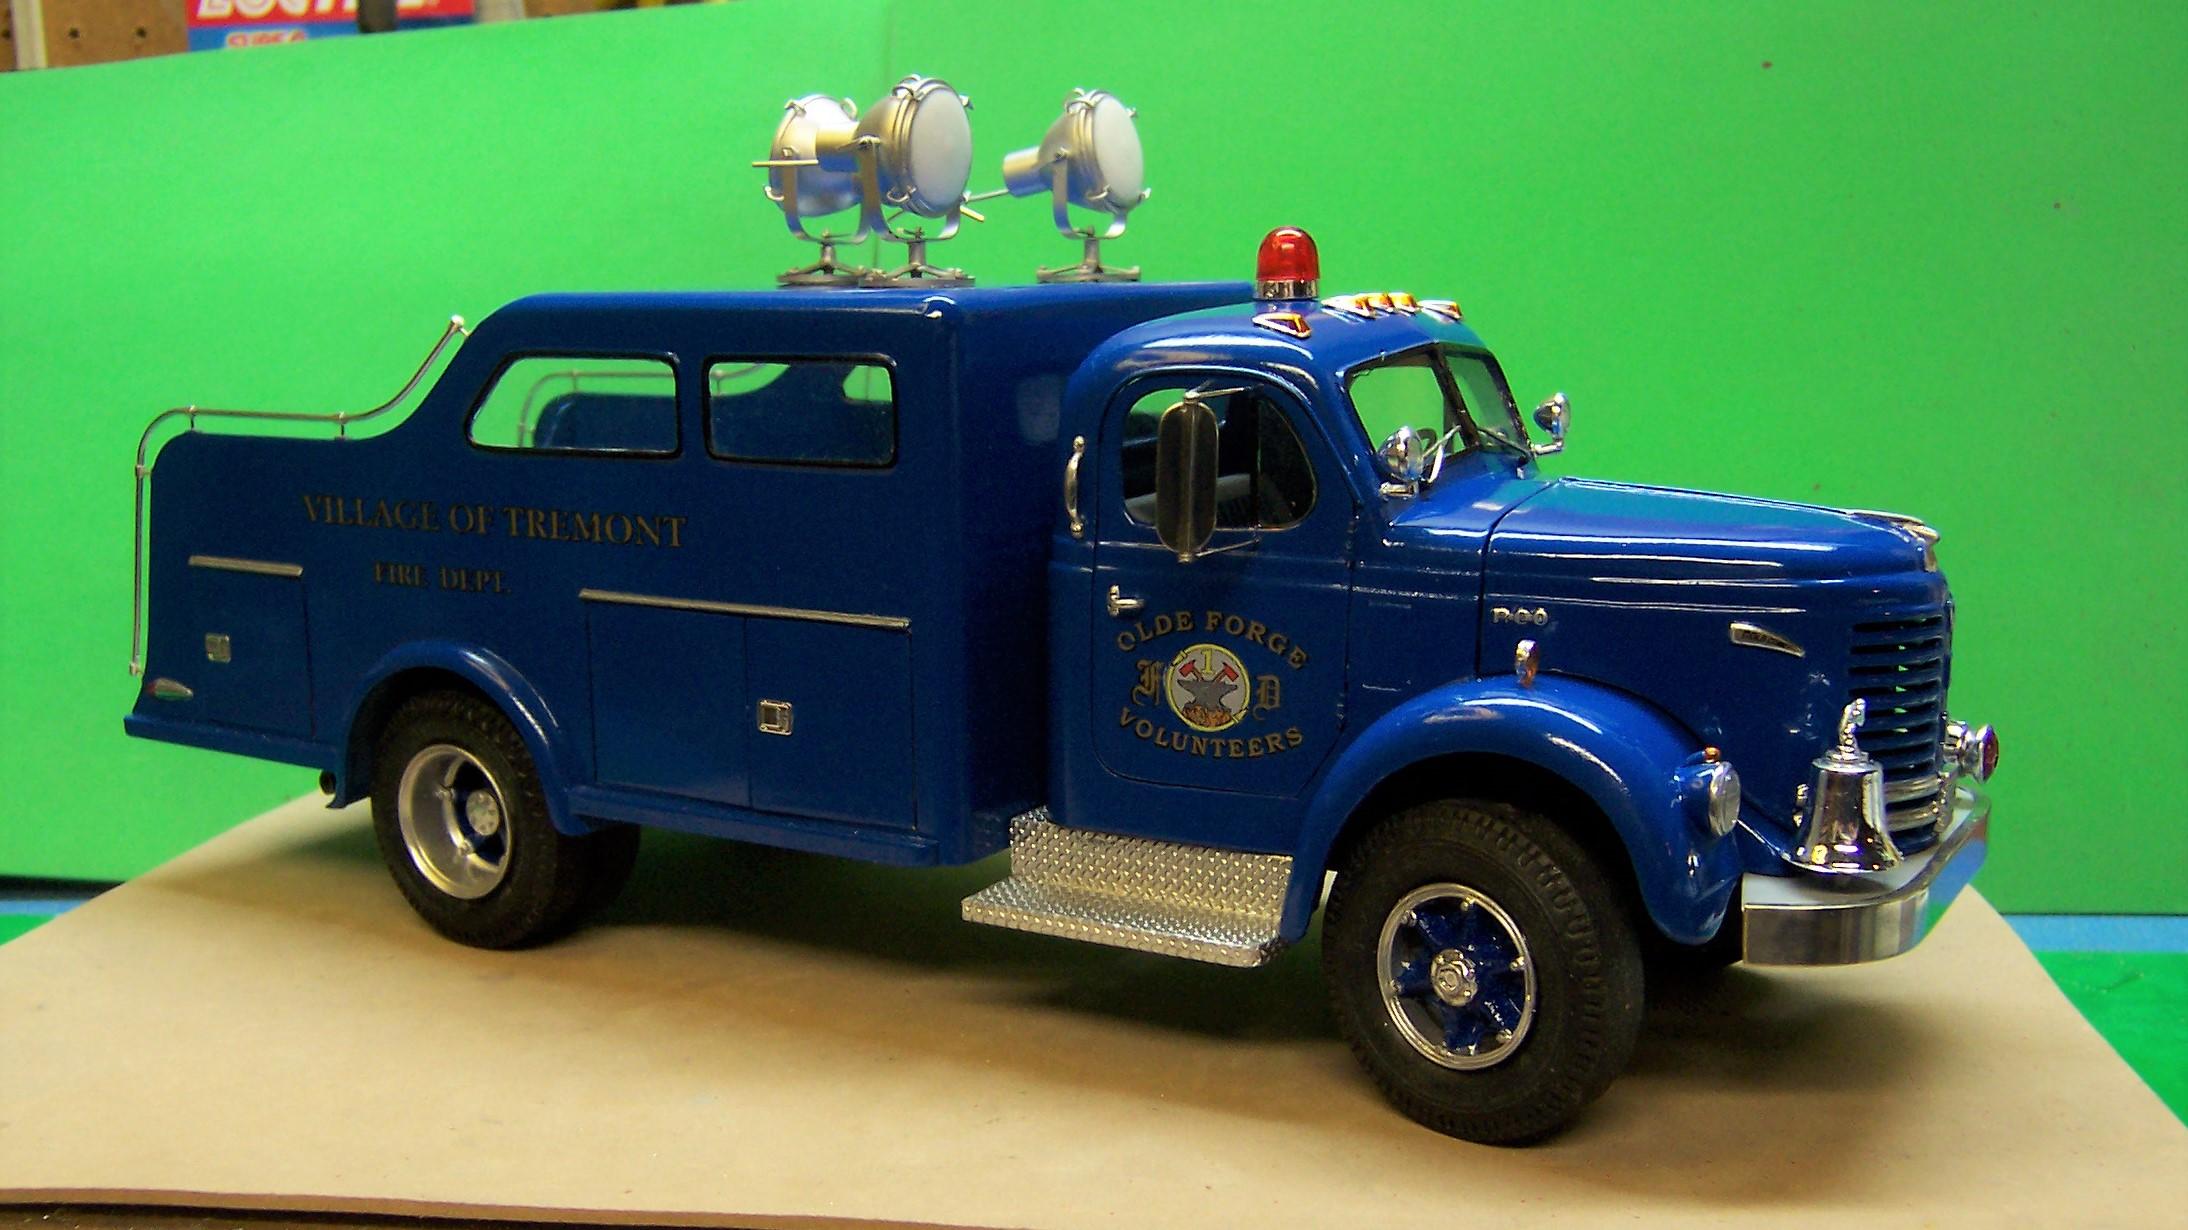
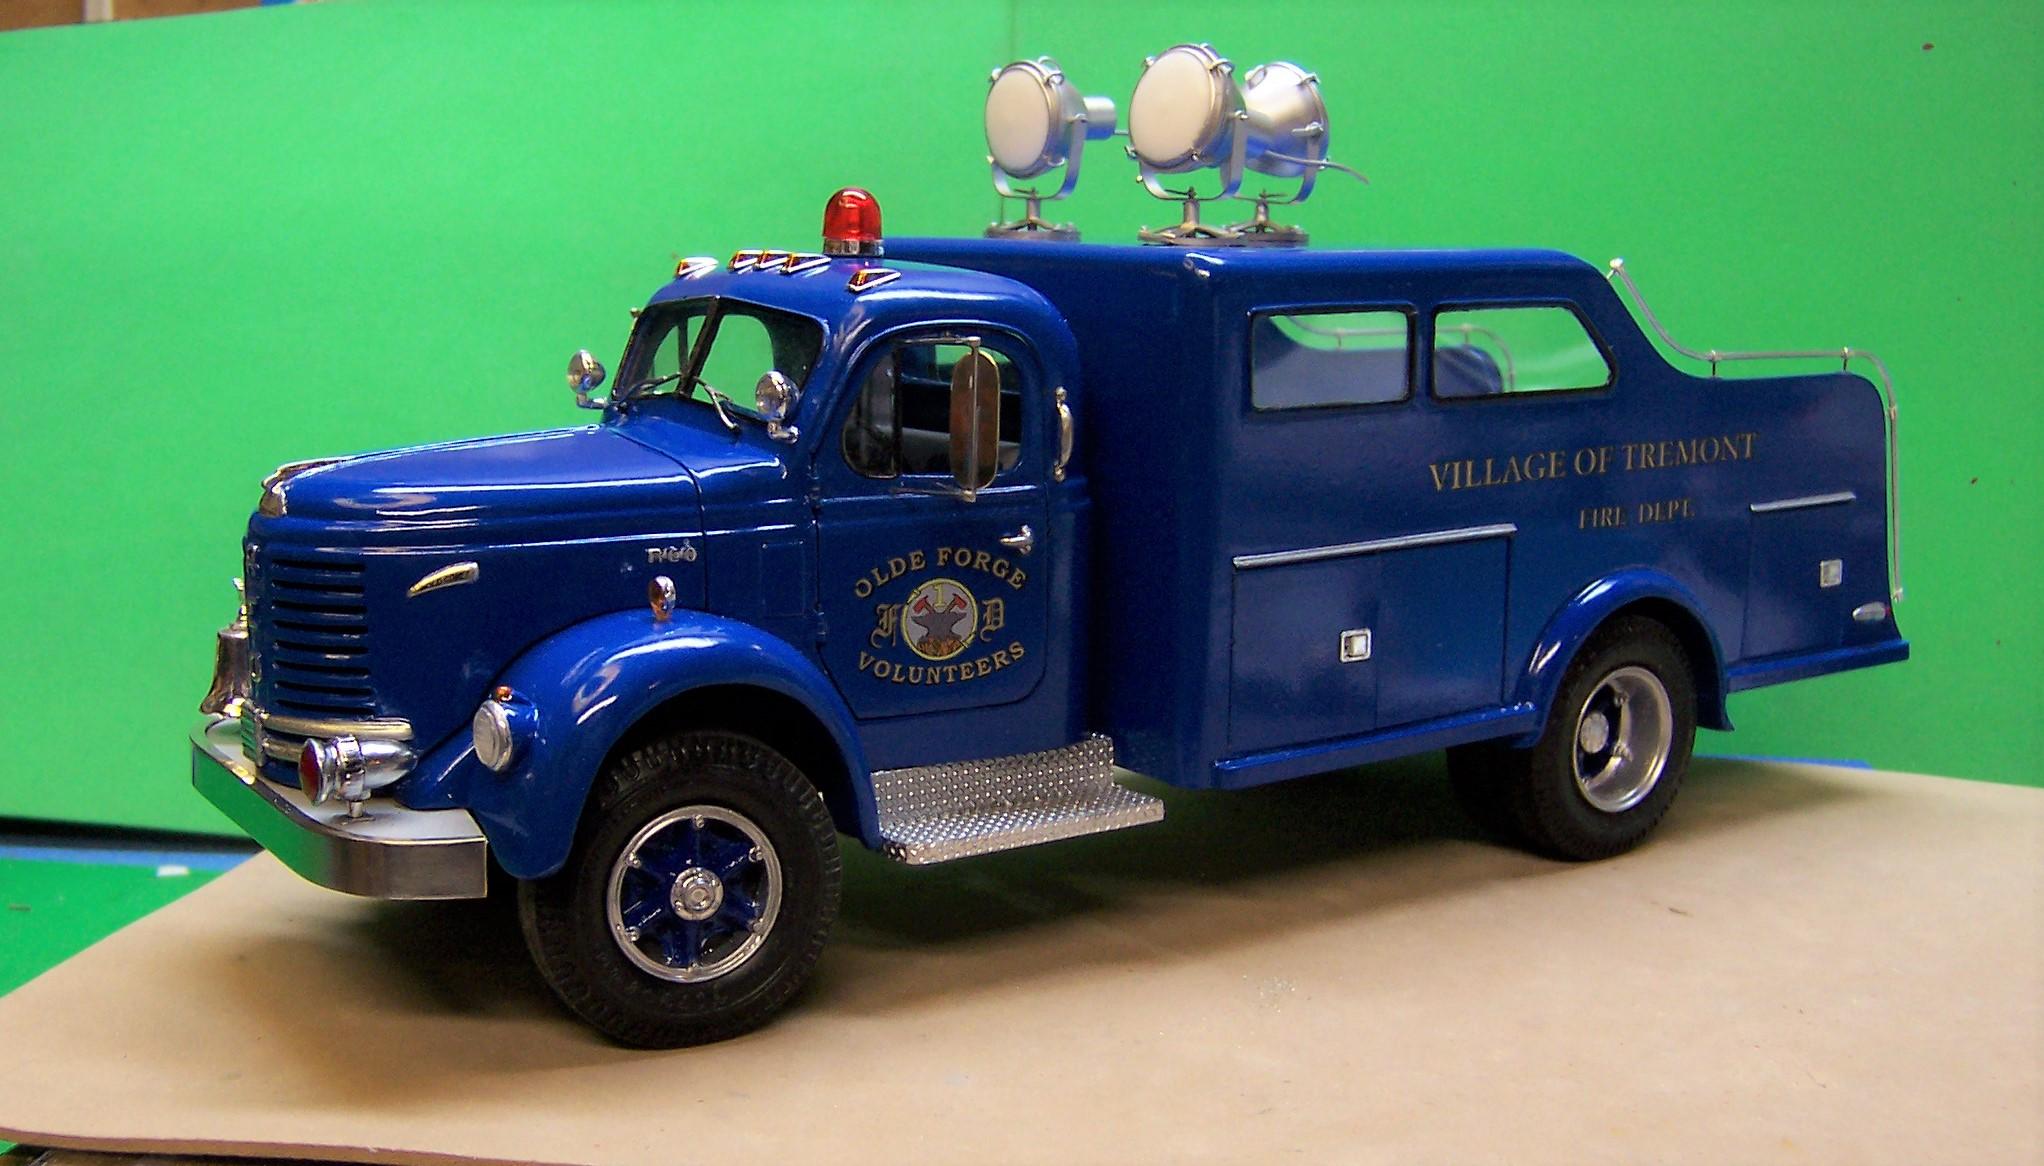
Work is done on the 1953 Reo Gold Comet Rescue. It's full size protégé is the rig from Port Vue, PA. But I took some liberty with the build to put my own livery on it. The outside styling is close but the cab interior and what I put in the compartments is my own idea since I had no idea as to what Port Vue actually carried. Anyway here it is in photo form. The rig is now in the display case. On to the next one, whatever it may be.
-
Philadelphia fire department Aero Chief
Chariots of Fire replied to Nxr's topic in Model Trucks: Big Rigs and Heavy Equipment
Can anyone read the small letters that are above the red Mack logo on the yellow truck above? C85? C95? That's a cool rig! -
Reo Gold Comet
Chariots of Fire replied to Chariots of Fire's topic in WIP: Model Trucks: Big Rigs and Heavy Equipment
We are almost there. The flood lights are finished and some detailing has been added to the compartment interiors. Still thinking about what will go under the roof area.
-
Monogram 1926 Mack
Chariots of Fire replied to Straightliner59's topic in WIP: Model Trucks: Big Rigs and Heavy Equipment
Lookin' good, Daniel! -
Reo Gold Comet
Chariots of Fire replied to Chariots of Fire's topic in WIP: Model Trucks: Big Rigs and Heavy Equipment
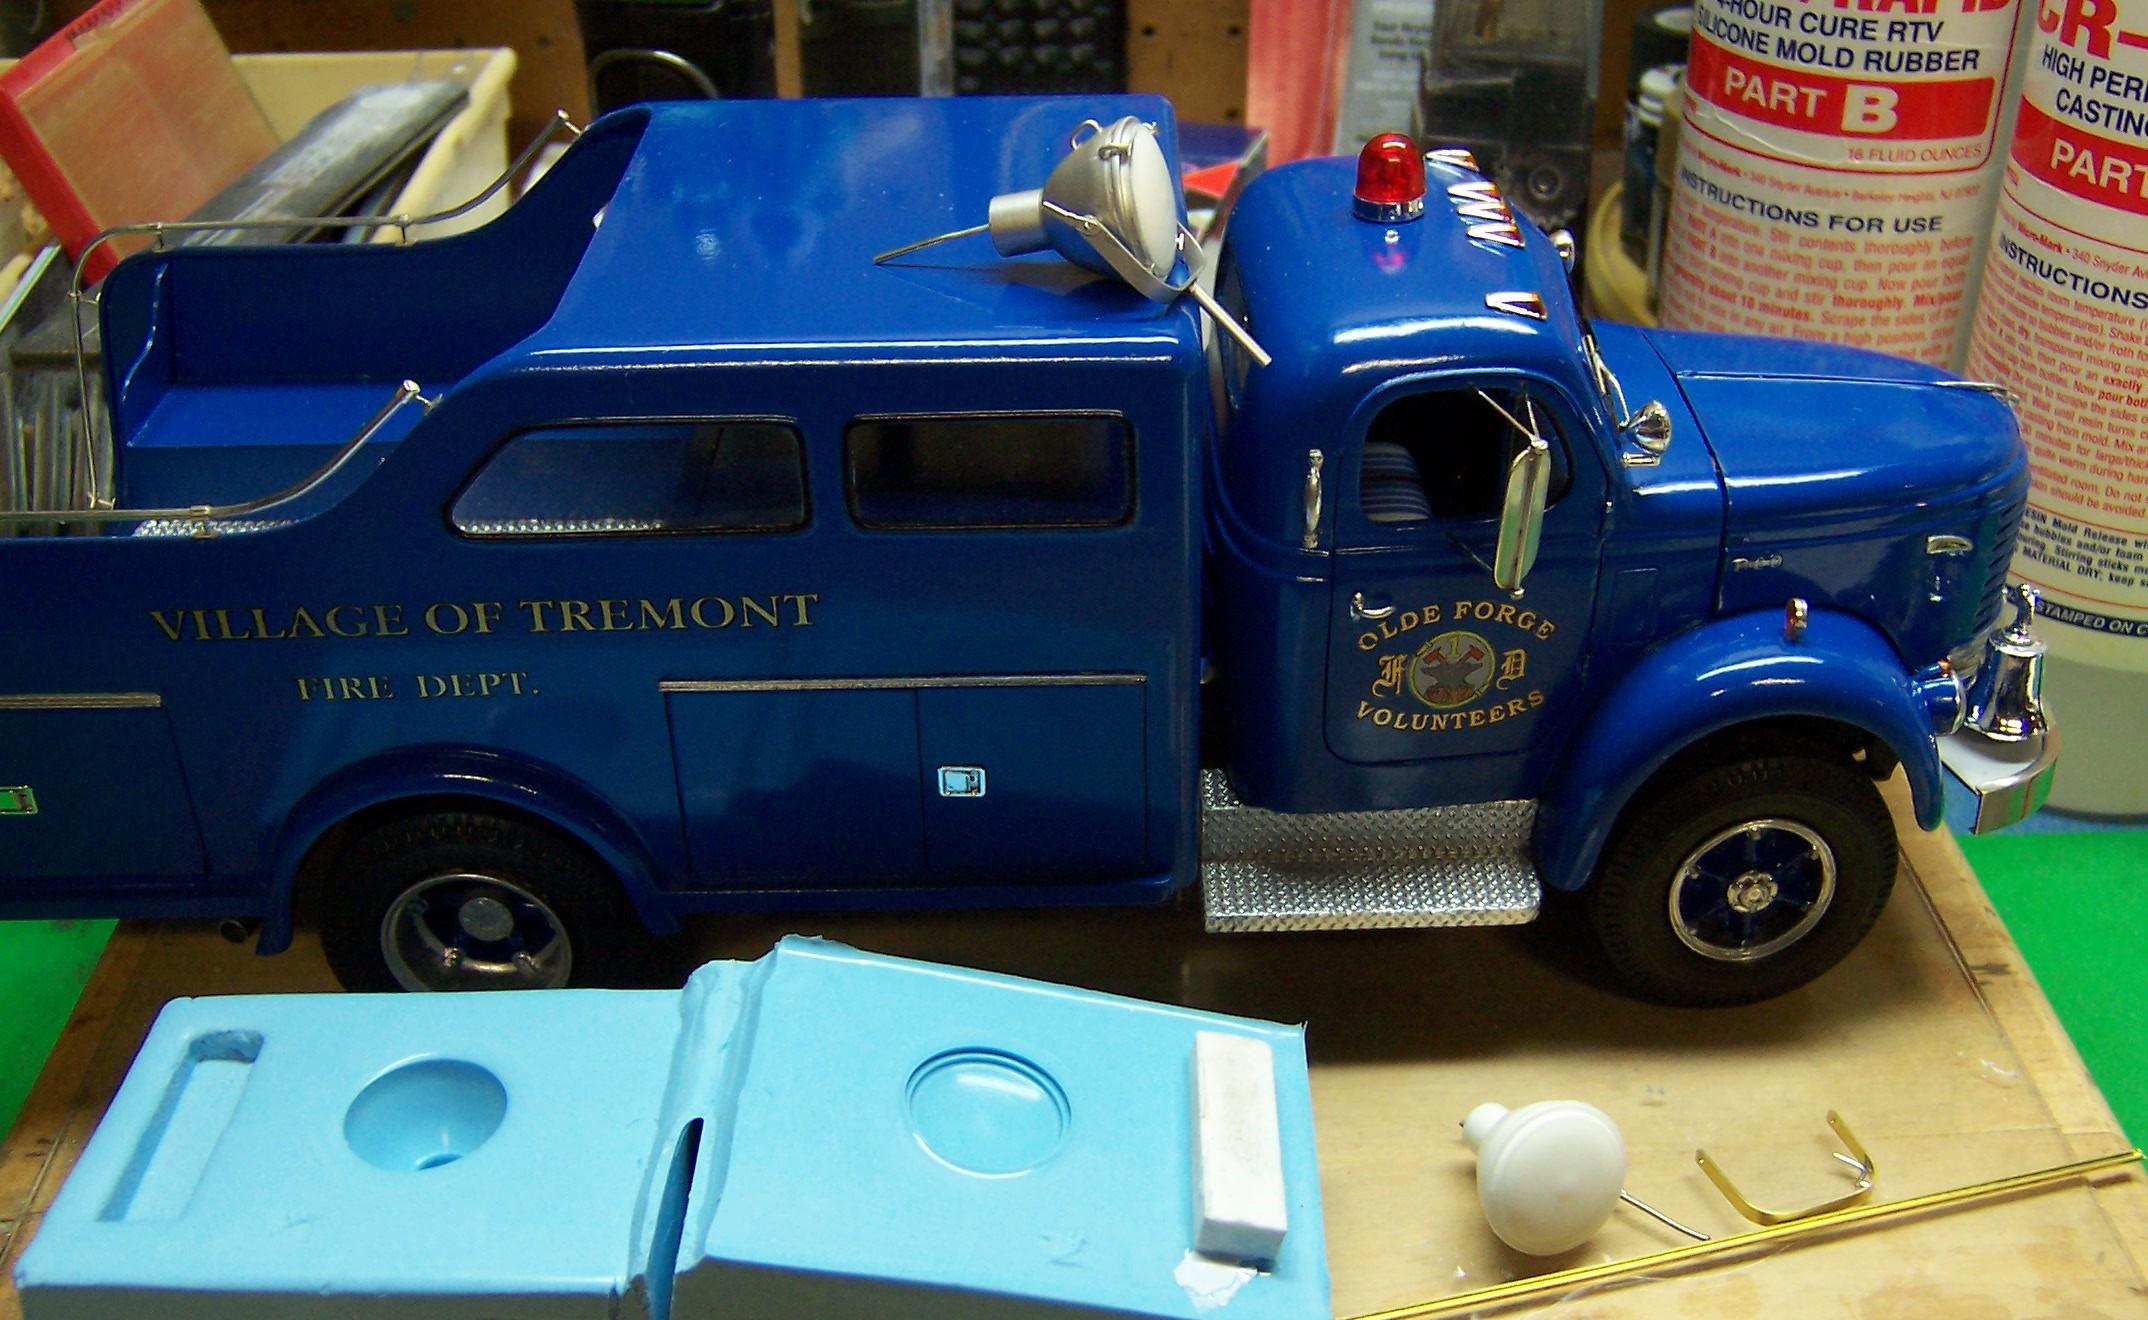
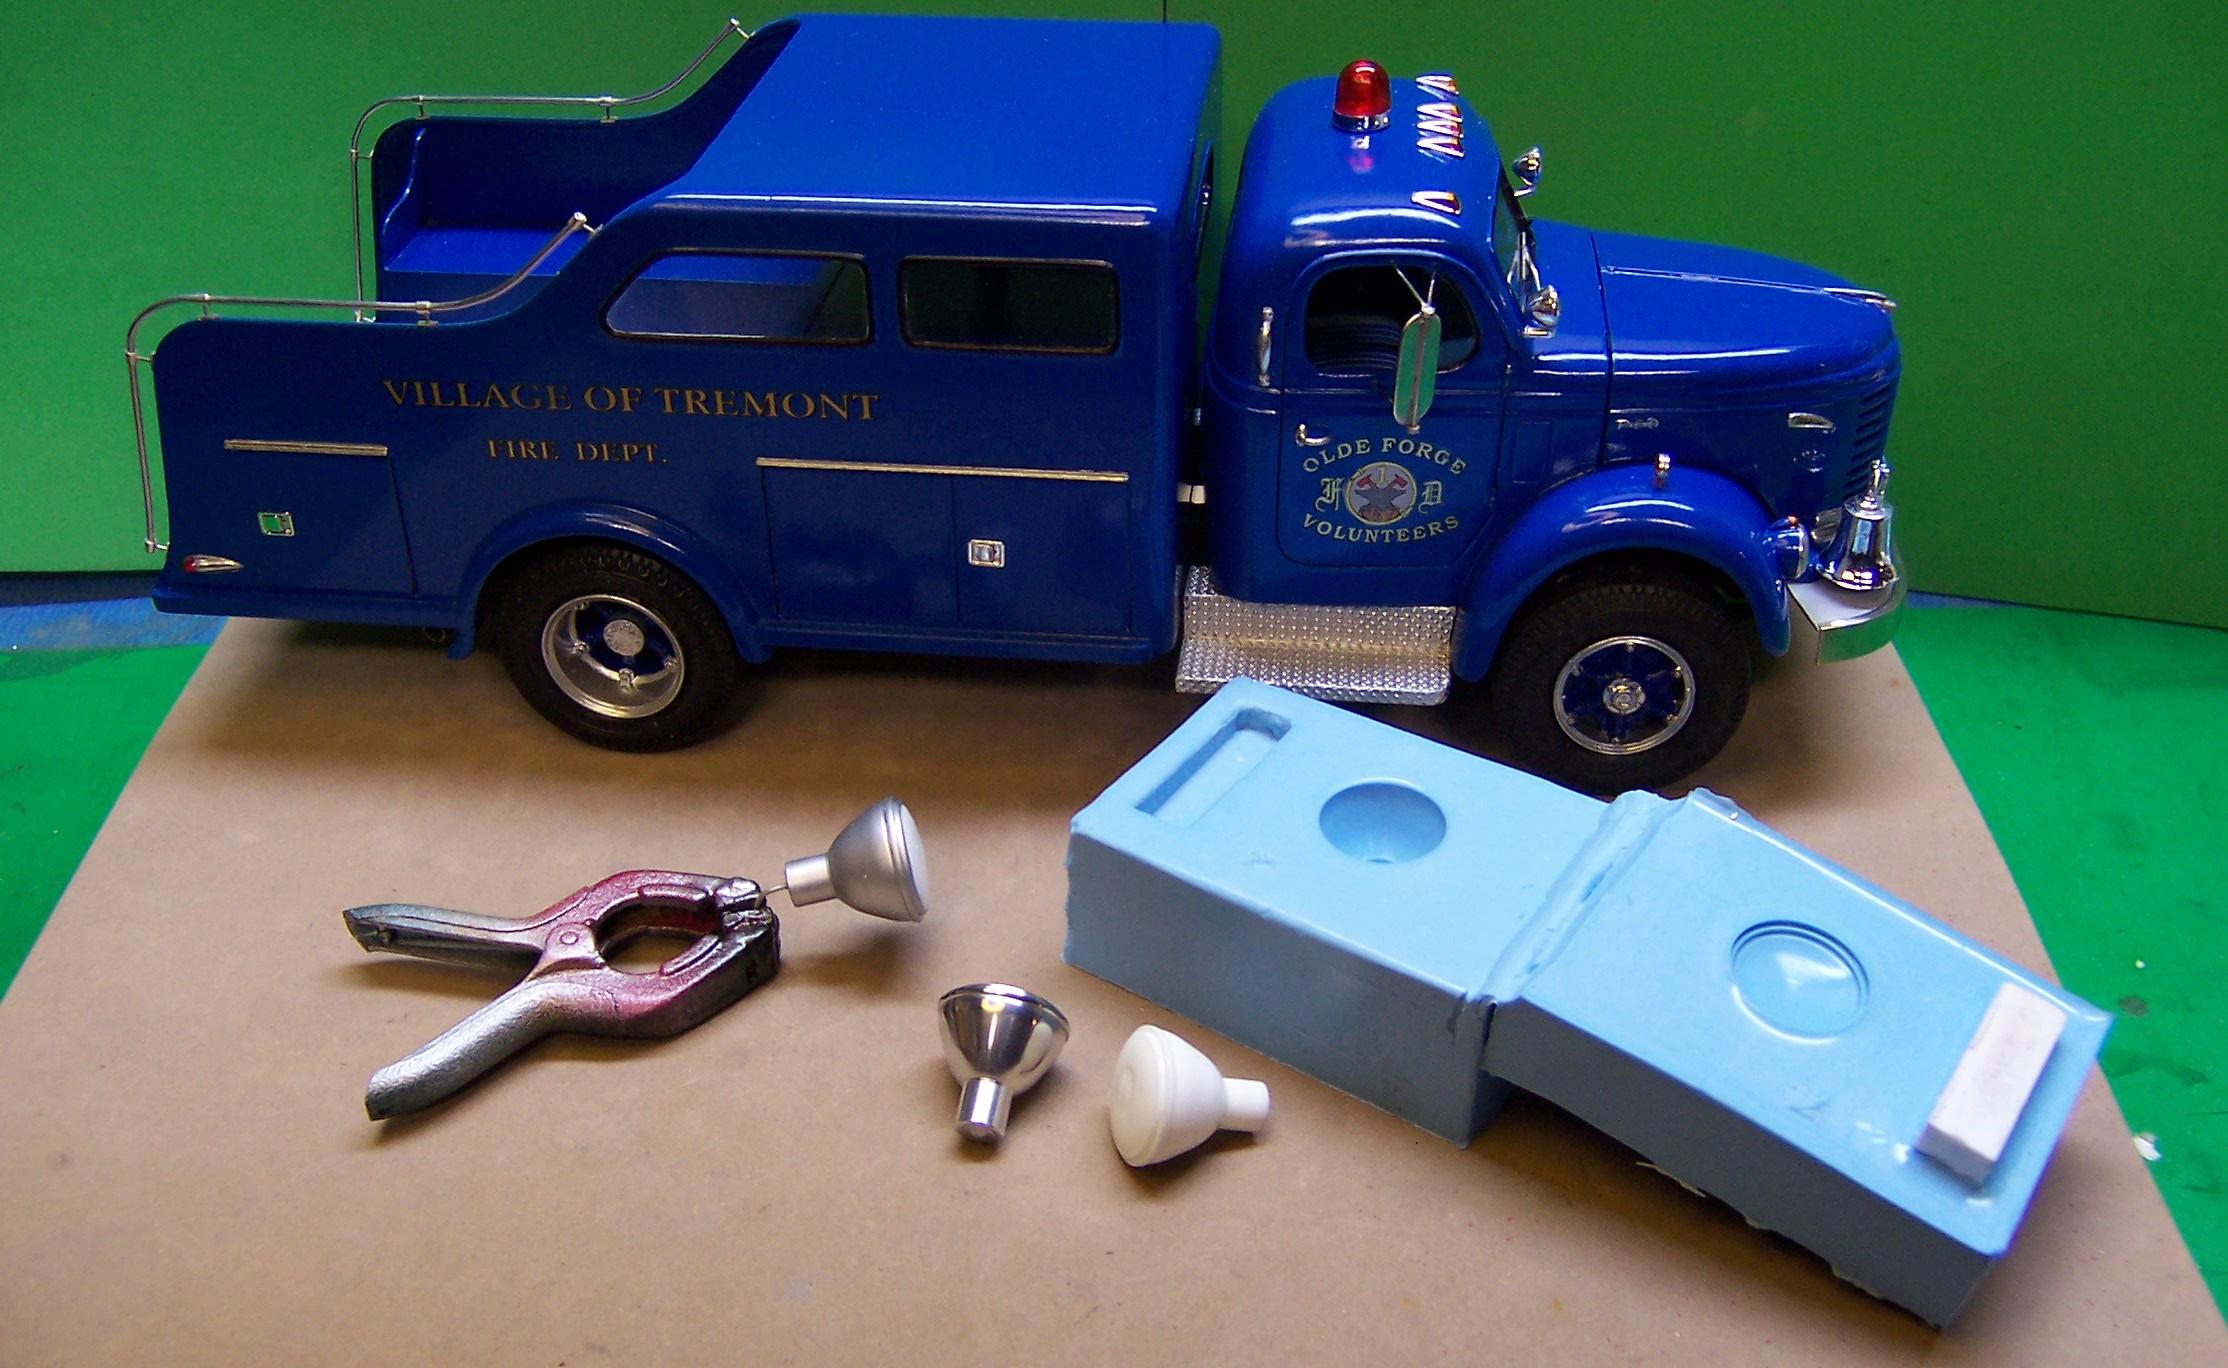
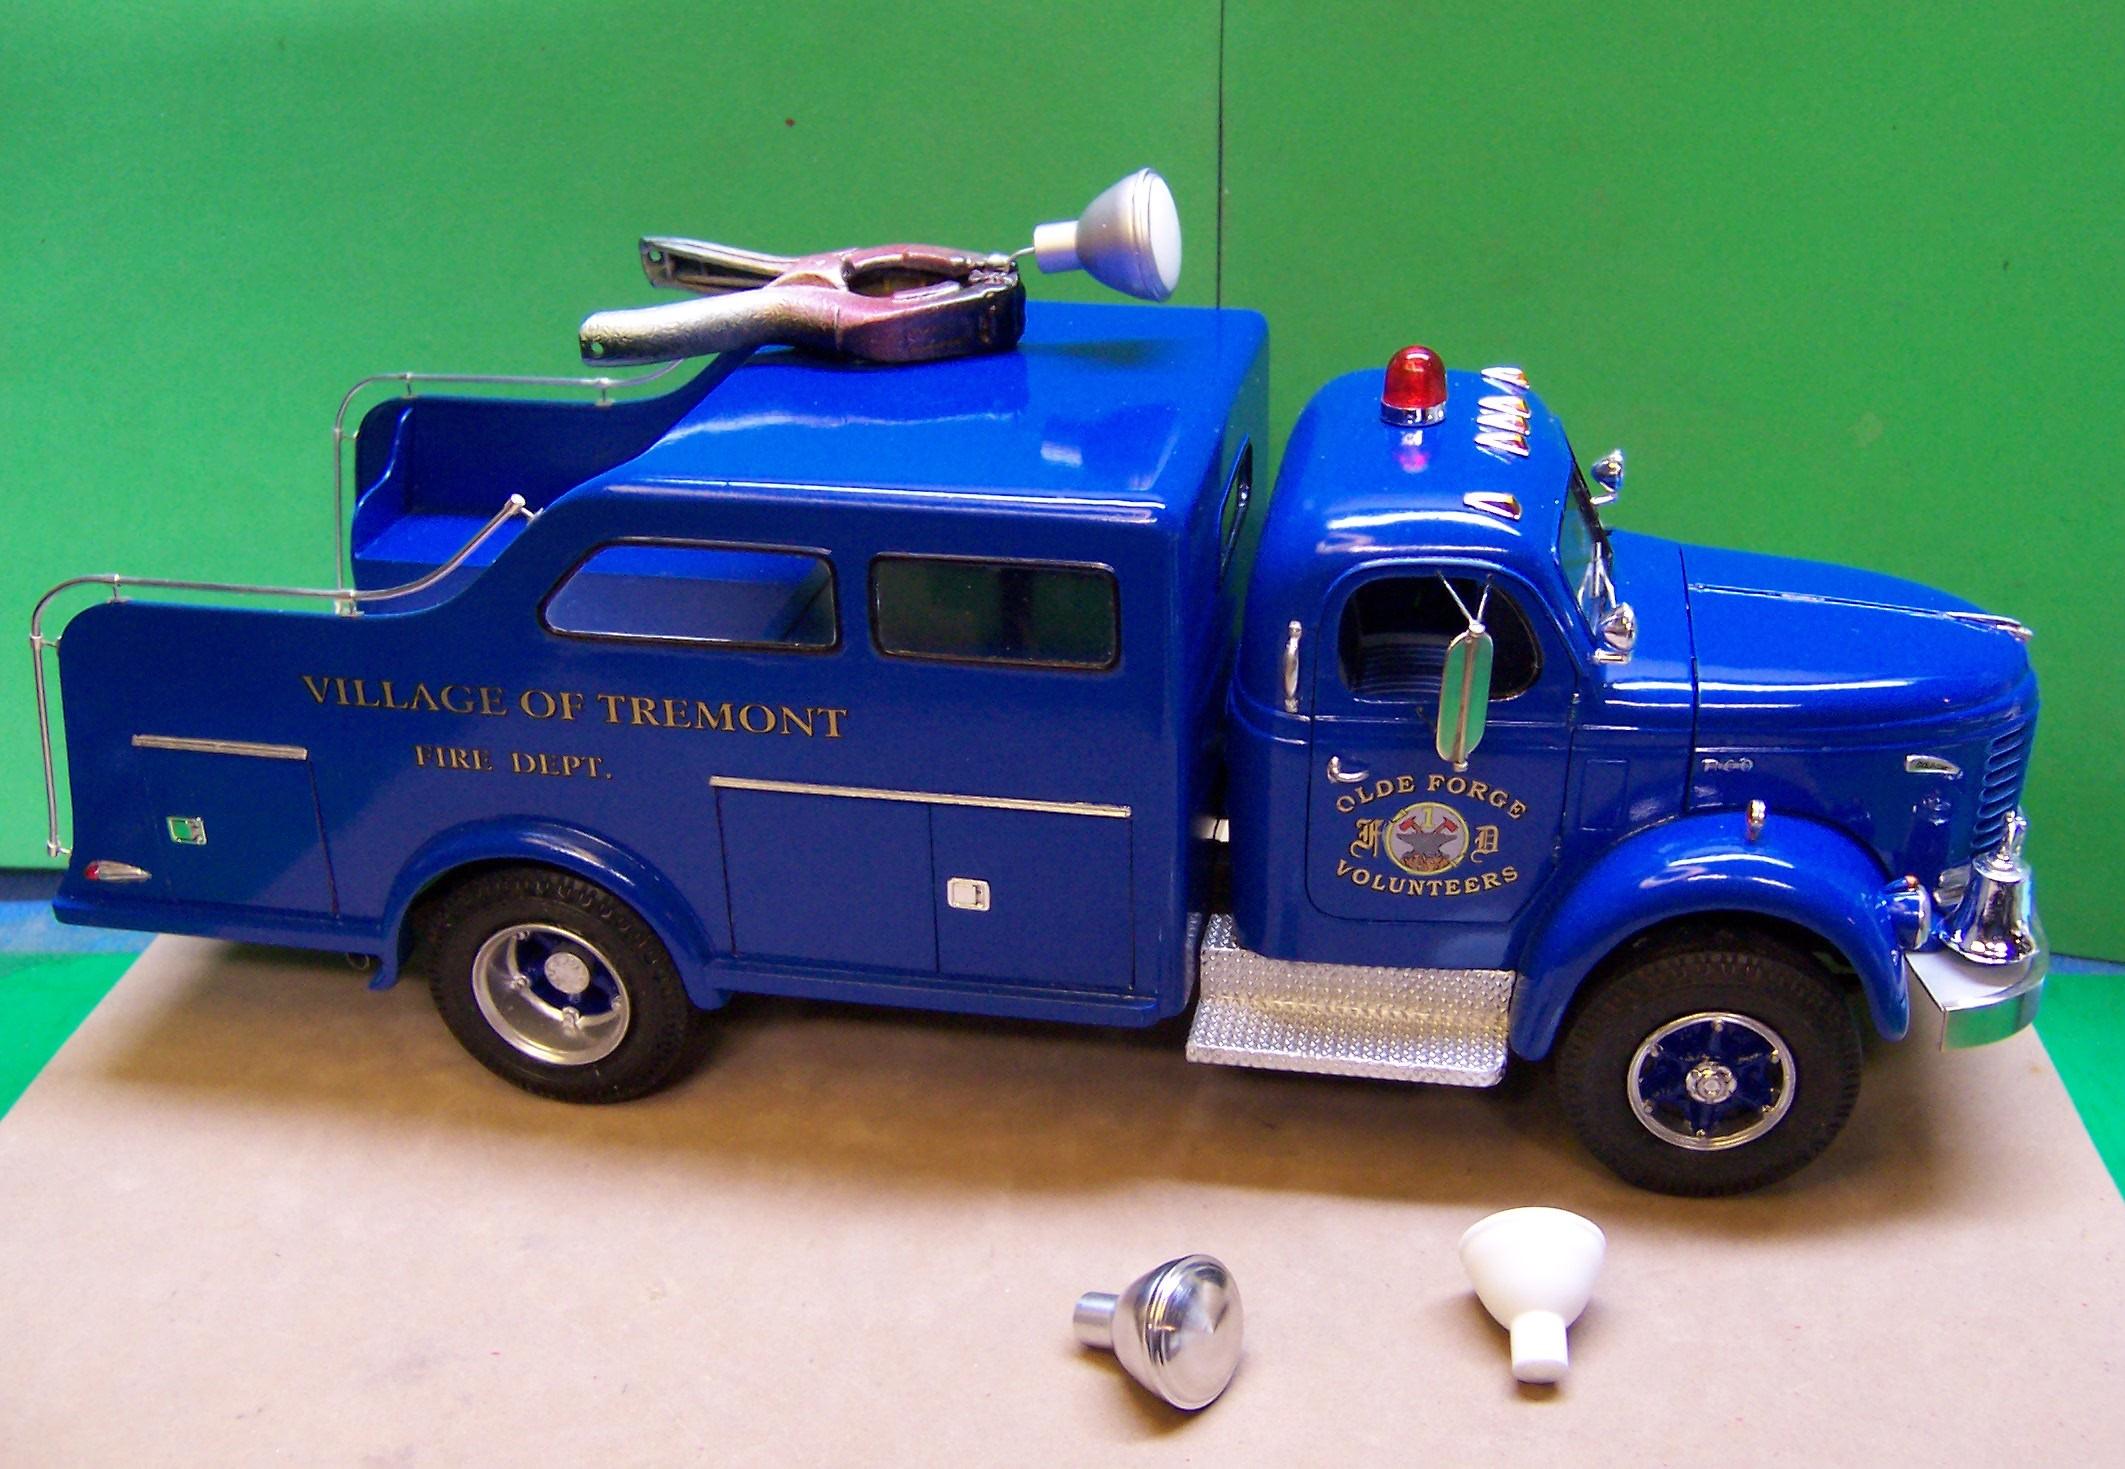
Got the flood lights done today. Still have to "wire" them up but the construction is done. I put BMF on the lens to cover it and then sprayed the entire light unit silver. Then the BMF was removed leaving the white resin as the lens. Common pins were used for the clamps that hold the lens cover in place. The mounting platform is made of strip brass and a thin section of PVC pipe.
-
Reo Gold Comet
Chariots of Fire replied to Chariots of Fire's topic in WIP: Model Trucks: Big Rigs and Heavy Equipment
A little more progress on the flood lights. Two more to go!?
-
That's a great restoration job! Thanks for sharing the work. How about showing us the bumper! Maybe we can come up with a way to get a new one.?
-
Reo Gold Comet
Chariots of Fire replied to Chariots of Fire's topic in WIP: Model Trucks: Big Rigs and Heavy Equipment
Got started on the flood lights for the top of the body. The first thing was to make a master that could be copied so that all three lights are the same. I found some light images on line along with general dimensions. This helped me to turn a master from aluminum and then do the mold. In the photo below is the master in the middle, a first resin casting to the right and a second casting in the clamp that has been sprayed silver. The unpainted casting is no good as it has a bubble in the middle of the lens but that is easily corrected with two more like the painted one. I kept the face of the light in the white resin as it seems to look like a translucent lens that these lights had. The lights will be mounted as seen in the photo below after mounting brackets are made for each one. They will be "wired" through the top of the body.
-
Monogram 1926 Mack
Chariots of Fire replied to Straightliner59's topic in WIP: Model Trucks: Big Rigs and Heavy Equipment
This has been a great project to follow. Lots of interesting detailing all the way along. Is the cab roof going to remain dark faded paint? Any plans for a canvas overlay? Just wondering.