Warren D
-
Posts
1,839 -
Joined
-
Last visited
Content Type
Profiles
Forums
Events
Gallery
Everything posted by Warren D
-
B-61 Mack Resin
Warren D replied to michaelbaskett's topic in Truck Aftermarket / Resin / 3D Printed
X3! -
Heil garbage truck, 1970s
Warren D replied to Repstock's topic in Model Trucks: Big Rigs and Heavy Equipment
Very well done, I agree the Heil looks better than the Garwood. -
Orange Crush Huskie
Warren D replied to Warren D's topic in WIP: Model Trucks: Big Rigs and Heavy Equipment
Sun finally made an appearance, took the cab out to see what it looks like in the sun. It does pop.....
-
Orange Crush Huskie
Warren D replied to Warren D's topic in WIP: Model Trucks: Big Rigs and Heavy Equipment
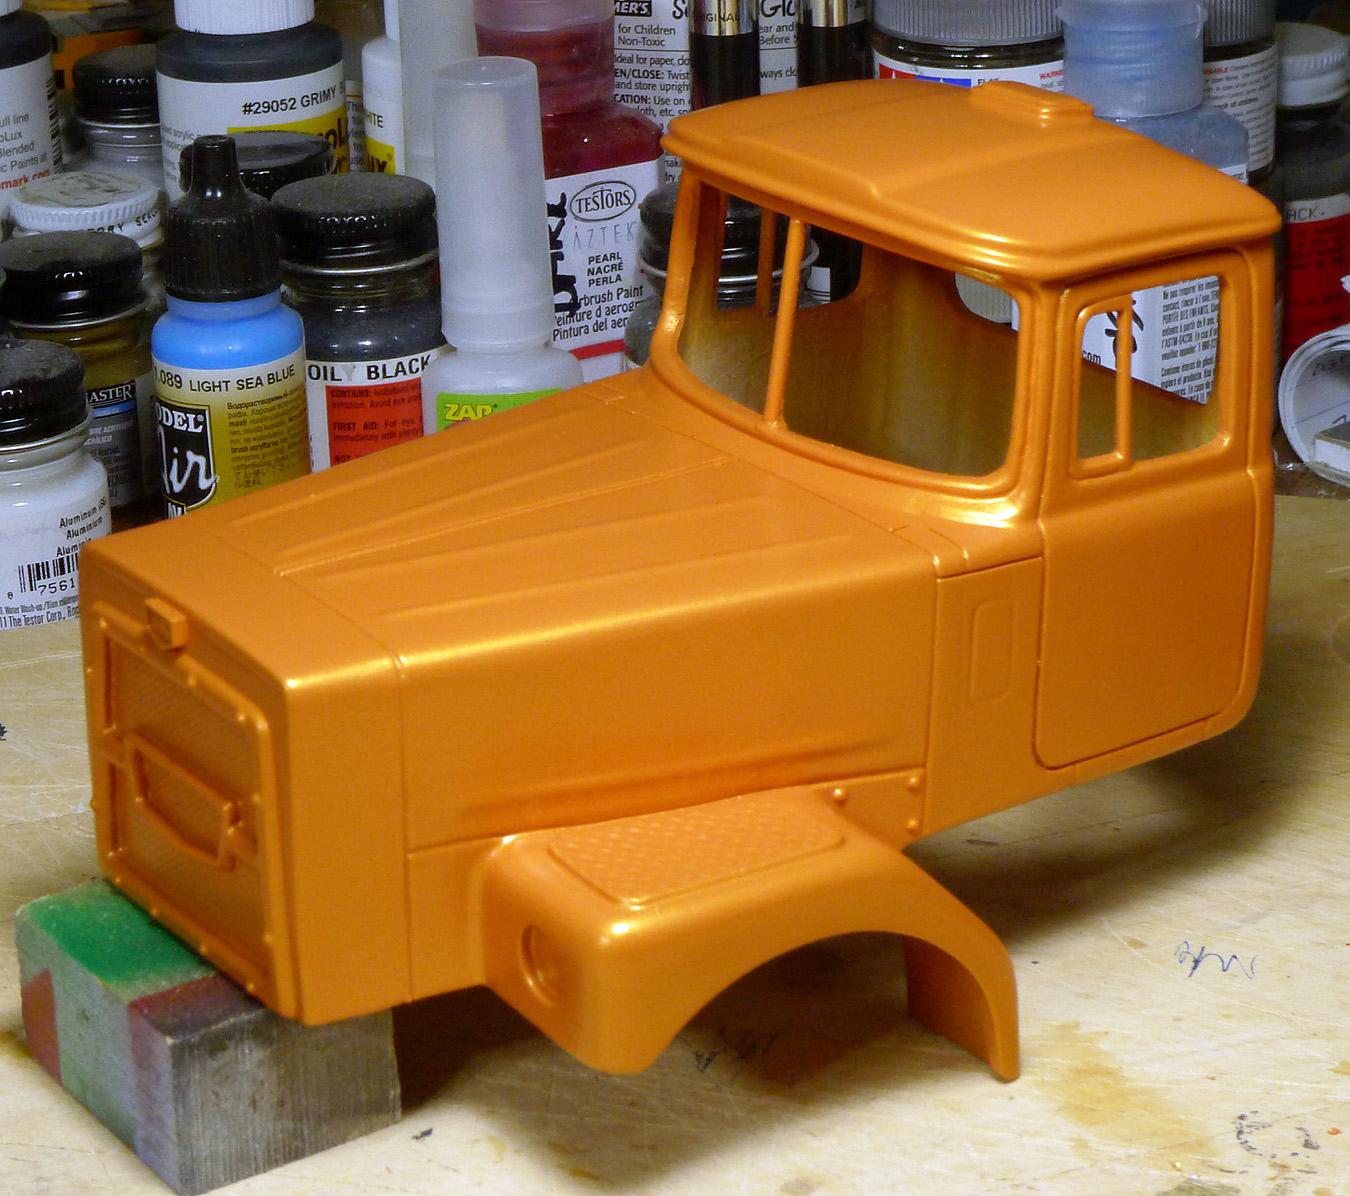
It's a mix of Testors Aztek line, acrylics. Yellow, flour. yellow, red and gold pearl metallic. Took about 4 tries and the gold flake pearl does dull the intensity of the orange. Not an exact match but as close as I'm going to get. -
Orange Crush Huskie
Warren D replied to Warren D's topic in WIP: Model Trucks: Big Rigs and Heavy Equipment
I finally got the color on the cab. Took 4 tries but this is as close as I can come from memory and my photos. Like the real one, it doesn't photograph well, the metallic pearl looks dull in the pics. It'll be a few days before I can see it in the sun, not much sun here of late, but it should really pop.
-
Brbo 2021 Brockway 361 mixer tribute
Warren D replied to gotnitro?'s topic in WIP: Model Trucks: Big Rigs and Heavy Equipment
I really like your wipers, care to make me a dozen sets? LOL! -
Autocar A64B Car Transporter
Warren D replied to Mopar - D's topic in WIP: Model Trucks: Big Rigs and Heavy Equipment
If you want to go retro, AITM has a hood conversion for the A-car that looks close to the photos. I used one with my A-Car mixer many moons ago. -
Basic work truck White Freightliner
Warren D replied to TruckerAL's topic in Model Trucks: Big Rigs and Heavy Equipment
Looks good, well done! -
Tandem axle Haul Away car transporter
Warren D replied to Mopar - D's topic in Model Trucks: Big Rigs and Heavy Equipment
Came out great! -
MPC gravel hauler
Warren D replied to the goon's topic in Model Trucks: Big Rigs and Heavy Equipment
Looks good, goes well with the A-car! -
Do the parts have a clear protective film on them?
-
AMT GMC General Question
Warren D replied to Warren D's topic in WIP: Model Trucks: Big Rigs and Heavy Equipment
Thanks! -
90's GMC TopKick C7500
Warren D replied to Sergey's topic in Model Trucks: Big Rigs and Heavy Equipment
Very well done! -
Not sure if this is the best place for this, but it is truck specific, so here goes. (This is planning for a future build) Can someone measure the spacing of the rear axles on this kit? Looking for axle center to axle center on either side (they should be the same!) Thanks!
-
Another great build! Love the attention to details.
-
Nice fleet! I think you need a Bee Model Mack!
-
1926 Mack AC Coal Truck
Warren D replied to Karl LaFong's topic in Model Trucks: Big Rigs and Heavy Equipment
Well done and yes, the model RR coal is real coal! -
Orange Crush Huskie
Warren D replied to Warren D's topic in WIP: Model Trucks: Big Rigs and Heavy Equipment
No problem, I vapor-locked when I first saw it. That paint just doesn't reproduce in photos. Like the Grand Canyon, you can only truly appreciate it if you see it in person! -
Orange Crush Huskie
Warren D replied to Warren D's topic in WIP: Model Trucks: Big Rigs and Heavy Equipment
I've got plenty of detail shots that I took. When I saw it, it didn't have the logos. -
DWA Trucking KW Take 2
Warren D replied to Warren D's topic in WIP: Model Trucks: Big Rigs and Heavy Equipment
Done, new post in the finished forum. -
Starting my next build, a Brockway 761 that I saw at the Bethlehem, CT truck show a few months back. I have the 761 cab from AITM, Autocar A64B for the chassis and misc parts from AITM. Looking at tire options, A-car rear wheels look good and I could use the kit tires unless I have something else kicking around. I need to source the tool boxes, but have time as I think the chassis will need to be shortened. I may have a donor for the front wheels. The paint will be challenging, photos don't capture the pearl, flake and depth of the real deal. Here's the real one: https://pbase.com/baywing/image/171720520
-
Calling this one done,might add a couple more details in time. AMT KW kit, moved the vent windows and filled the door ditch window. Battery boxes from AITM, rear wheels and tires from Moluminum. Filled the door latch holes and added photo etched door latches and hood badges. Decals from Model Truckin'. Front bumper from the snap kit, filled the fog lights. Quarter fenders from the snap kit.
-
Well done!
-
International F- 2674 w/Montone dump body
Warren D replied to Mopar - D's topic in Model Trucks: Big Rigs and Heavy Equipment
Well done, I'm sensing a theme.... ;^) -
Looking good. Have you thought about adding a tag axle? You have the room, that open space seems begging to be filled!