Anglia105E
-
Posts
3,486 -
Joined
-
Last visited
Content Type
Profiles
Forums
Events
Gallery
Everything posted by Anglia105E
-

Rolls-Royce No Chemicals, No Paint, No Harmful Glues
Anglia105E replied to Anglia105E's topic in WIP: Model Cars
Thank you for your concern Jose, but don't worry, I have stopped aerosol spray painting, airbrush painting and brushed on enamels painting around six months ago now . . . This is why I am hoping to polish the bare plastic and avoid using paints . . . David -
You are absolutely right about the meds and the patient having to pay close attention to lifestyle, diet and exercise. Encouraging words indeed. When you think that Rolls-Royce put a V12 in the pre-war Phantom III, and then later put the V8 in the Silver Cloud II, you do wonder why they put a straight six engine in the Silver Cloud I . . . Actually, many owners of these wonderful motor cars do say that the inline 6 runs smoother and quieter than the later V8. Certainly, if I win the National Lottery, I shall treat myself to a Silver Cloud I with the 6 cylinder engine between 1955 and 1959 . . . The 1955 and 1956 versions did not have power steering, whereas the cars built from 1957 to 1959 did have the much needed power assisted steering. I have had the pleasure of driving a 1957 Silver Cloud on grass, and you cannot steer such a large heavy car without PAS . . . David W.
-
Rolls-Royce No Chemicals, No Paint, No Harmful Glues
Anglia105E replied to Anglia105E's topic in WIP: Model Cars
Goodness me John, you were lucky to survive that experience, and I am pleased to hear that you are okay now . . . I shall be 72 years of age this October, so I have to take precautions and follow my doctor's expert advice . . . David -
Rolls-Royce No Chemicals, No Paint, No Harmful Glues
Anglia105E replied to Anglia105E's topic in WIP: Model Cars
Ha, Ha . . . You are not far wrong there David . . . Even more surprising is that I cannot find any Revell kits for the Silver Cloud either. Apart from those three Hubley kits sitting there in France, there are no RRSC kits anywhere in the World . . . Those kits in France have been on Ebay for around three years at least, and the prices have not come down in all that time. The sellers haven't even changed their listing from ' Buy it Now ' to ' Make an Offer ' . . . How can items on Ebay be posted Free from China, and yet they want £20.00 GBP to post from France to UK ? ( £20.00 GBP is US$. 26.88 ) Someone on MCM mentioned that Tamiya acrylics do contain a harmful solvent ingredient, which is a shame because they are nice paints. They also have a strong smell, which my wife would pick up in the house and give me a severe telling off ! David W. -
Rolls-Royce No Chemicals, No Paint, No Harmful Glues
Anglia105E replied to Anglia105E's topic in WIP: Model Cars
Many thanks John . . . We don't seem to have Createx products here in the UK, but the Vallejo paint products are widely available here for sure. I shall be carrying out a few experimental applications during the coming weeks . . . Thanks for following this topic. David -
Rolls-Royce No Chemicals, No Paint, No Harmful Glues
Anglia105E replied to Anglia105E's topic in WIP: Model Cars
Thanks Anton . . . I might try using Vallejo acrylic paints for this project at some point. The body parts of this model are moulded in black plastic, so I thought maybe painting the body in black might not be absolutely necessary. I would like to try polishing the body to begin with, and see how it looks . . . This could involve using Meguiars Carnauba Wax if it does not contain any harmful chemicals, or perhaps natural beeswax polish, applied with micro fibre cloths . . . David -
Rolls-Royce No Chemicals, No Paint, No Harmful Glues
Anglia105E replied to Anglia105E's topic in WIP: Model Cars
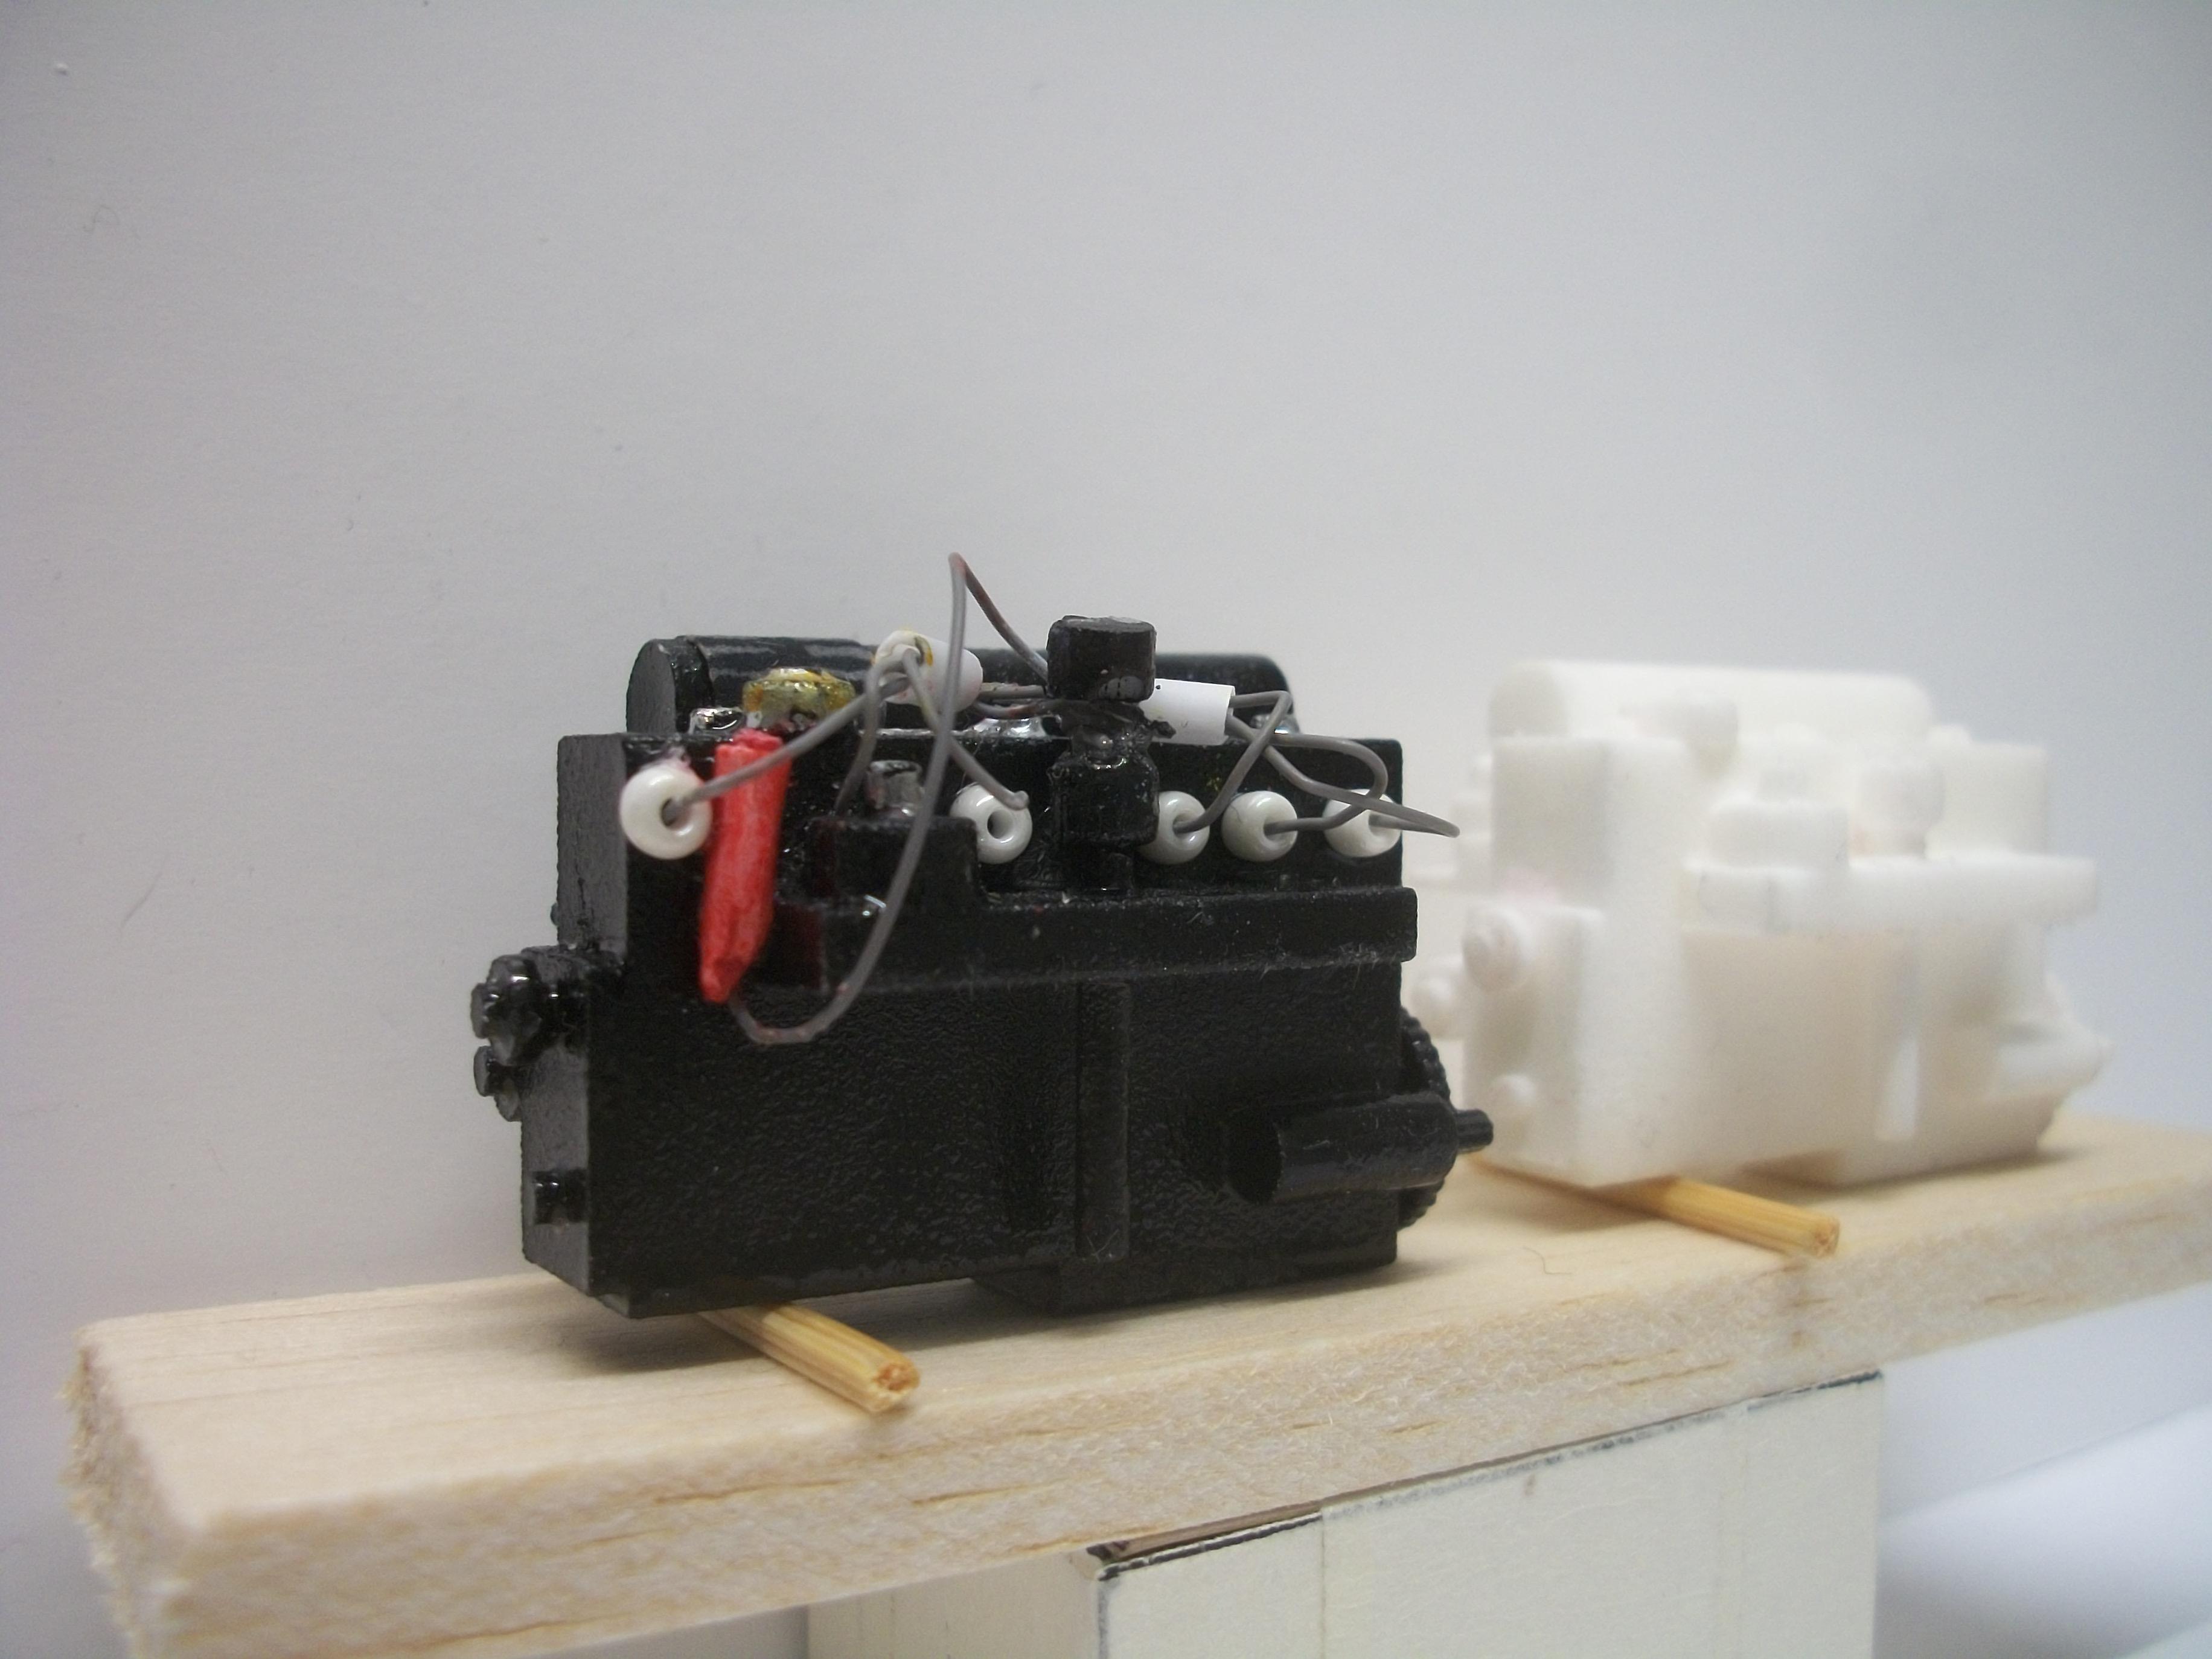
Thank you Fabrizio . . . The Rolls-Royce straight 6 cylinder engine was 3D printed by Shapeways in Holland around 3 years ago now, and at that time I primer painted the engine, as well as fully painting the engine also . . . This engine has been sitting on my shelf in the loft workshop for more than 2 years, so I the part should be safe to handle now ! You are right in saying that super glue ( CA ) is harmful to someone like me who has a lung infection, so this is why I am attempting to use PVA for the assembly of this plastic model car. As other members have pointed out, the PVA may not work with plastic properly . . . Again, if possible I will not be using paint on the bodywork of this car, unless I can use Vallejo acrylics brushed on . . . Thanks for reading my topic Fabrizio, David -
Rolls-Royce No Chemicals, No Paint, No Harmful Glues
Anglia105E replied to Anglia105E's topic in WIP: Model Cars
Okay fair enough . . . Understood, thanks Topher. David -
Rolls-Royce No Chemicals, No Paint, No Harmful Glues
Anglia105E replied to Anglia105E's topic in WIP: Model Cars
Thanks a lot for your concern Pierre . . . I do have a collection of Vallejo acrylics, but what I found was that you cannot simply wash the brush out with water. I had to use Isopropyl Alcohol to fully clean the brush. There is no way my lung can get anywhere near that chemical. Do you know if some acrylic paints can be fully cleaned with just water ? . . . Maybe the Tamiya spray acrylics could be an option ? David -
Rolls-Royce No Chemicals, No Paint, No Harmful Glues
Anglia105E replied to Anglia105E's topic in WIP: Model Cars
Thanks Topher . . . I do have a collection of Vallejo acrylics, but what I found was that you cannot simply wash the brush out with water. I had to use Isopropyl Alcohol to fully clean the brush. There is no way my lung can get anywhere near that chemical. Do you know if some acrylic paints can be fully cleaned with just water ? Oh yes, I do have quite an obsession with the Silver Cloud, especially 1955 - 1959 . . . I have built 8 of them over the past 7 years, so this one will be 9, and as well as the kit built ones I have several Franklin Mint diecast versions of the car, and an original Hubley promo . . . For one of the kits I moulded and cast a resin body shell and chassis, which turned out really well. I am not able to use resin mixing materials nowadays of course. David -
I do appreciate your concern David, and although life is a bit of a daily struggle at the moment I do try to remain positive . . . It is all very well for a doctor to say stop making model cars, and avoid this hobby, but I have already stopped driving cars just over two years ago, and I feel that at least if I can build model cars and dioramas then this should improve my quality of life, so to speak . . . The good thing is that my brain is fully active and constantly coming up with new ideas. I would like to build this Rolls-Royce if it can be done without using all those chemicals that the doctor has warned me against . . . I do have one 3D printed 6 cylinder engine that was printed by Shapeways from my own design using FreeCAD software. What has surprised me is that there are no Minicraft or Revell kits listed on Ebay for the Silver Cloud at this time. The Hubley kits that are available from Ebay sellers in France are moulded in grey plastic, and although they are quite nice, the price is way too high for me. The antibiotics medication that I am advised to take is supposed to manage the lung infection, but cannot remove the infection. I have been prescribed with Lansoprazole medication recently, which deals with acid reflux and stomach disorders. Both type of medication make me feel worse and not better. I would rather find natural remedies as opposed to pharmacy meds . . . Walking, fresh air and drinking lots of water should help also. David

-
Thanks Paul, and myself I am not sure how well PVA will work with plastic. We shall see ! David
-
Okay thanks, I will have a look online for a supplier of this tape . . . ( I can't really afford expensive though, the wife does NOT like me spending money ! ) David
-
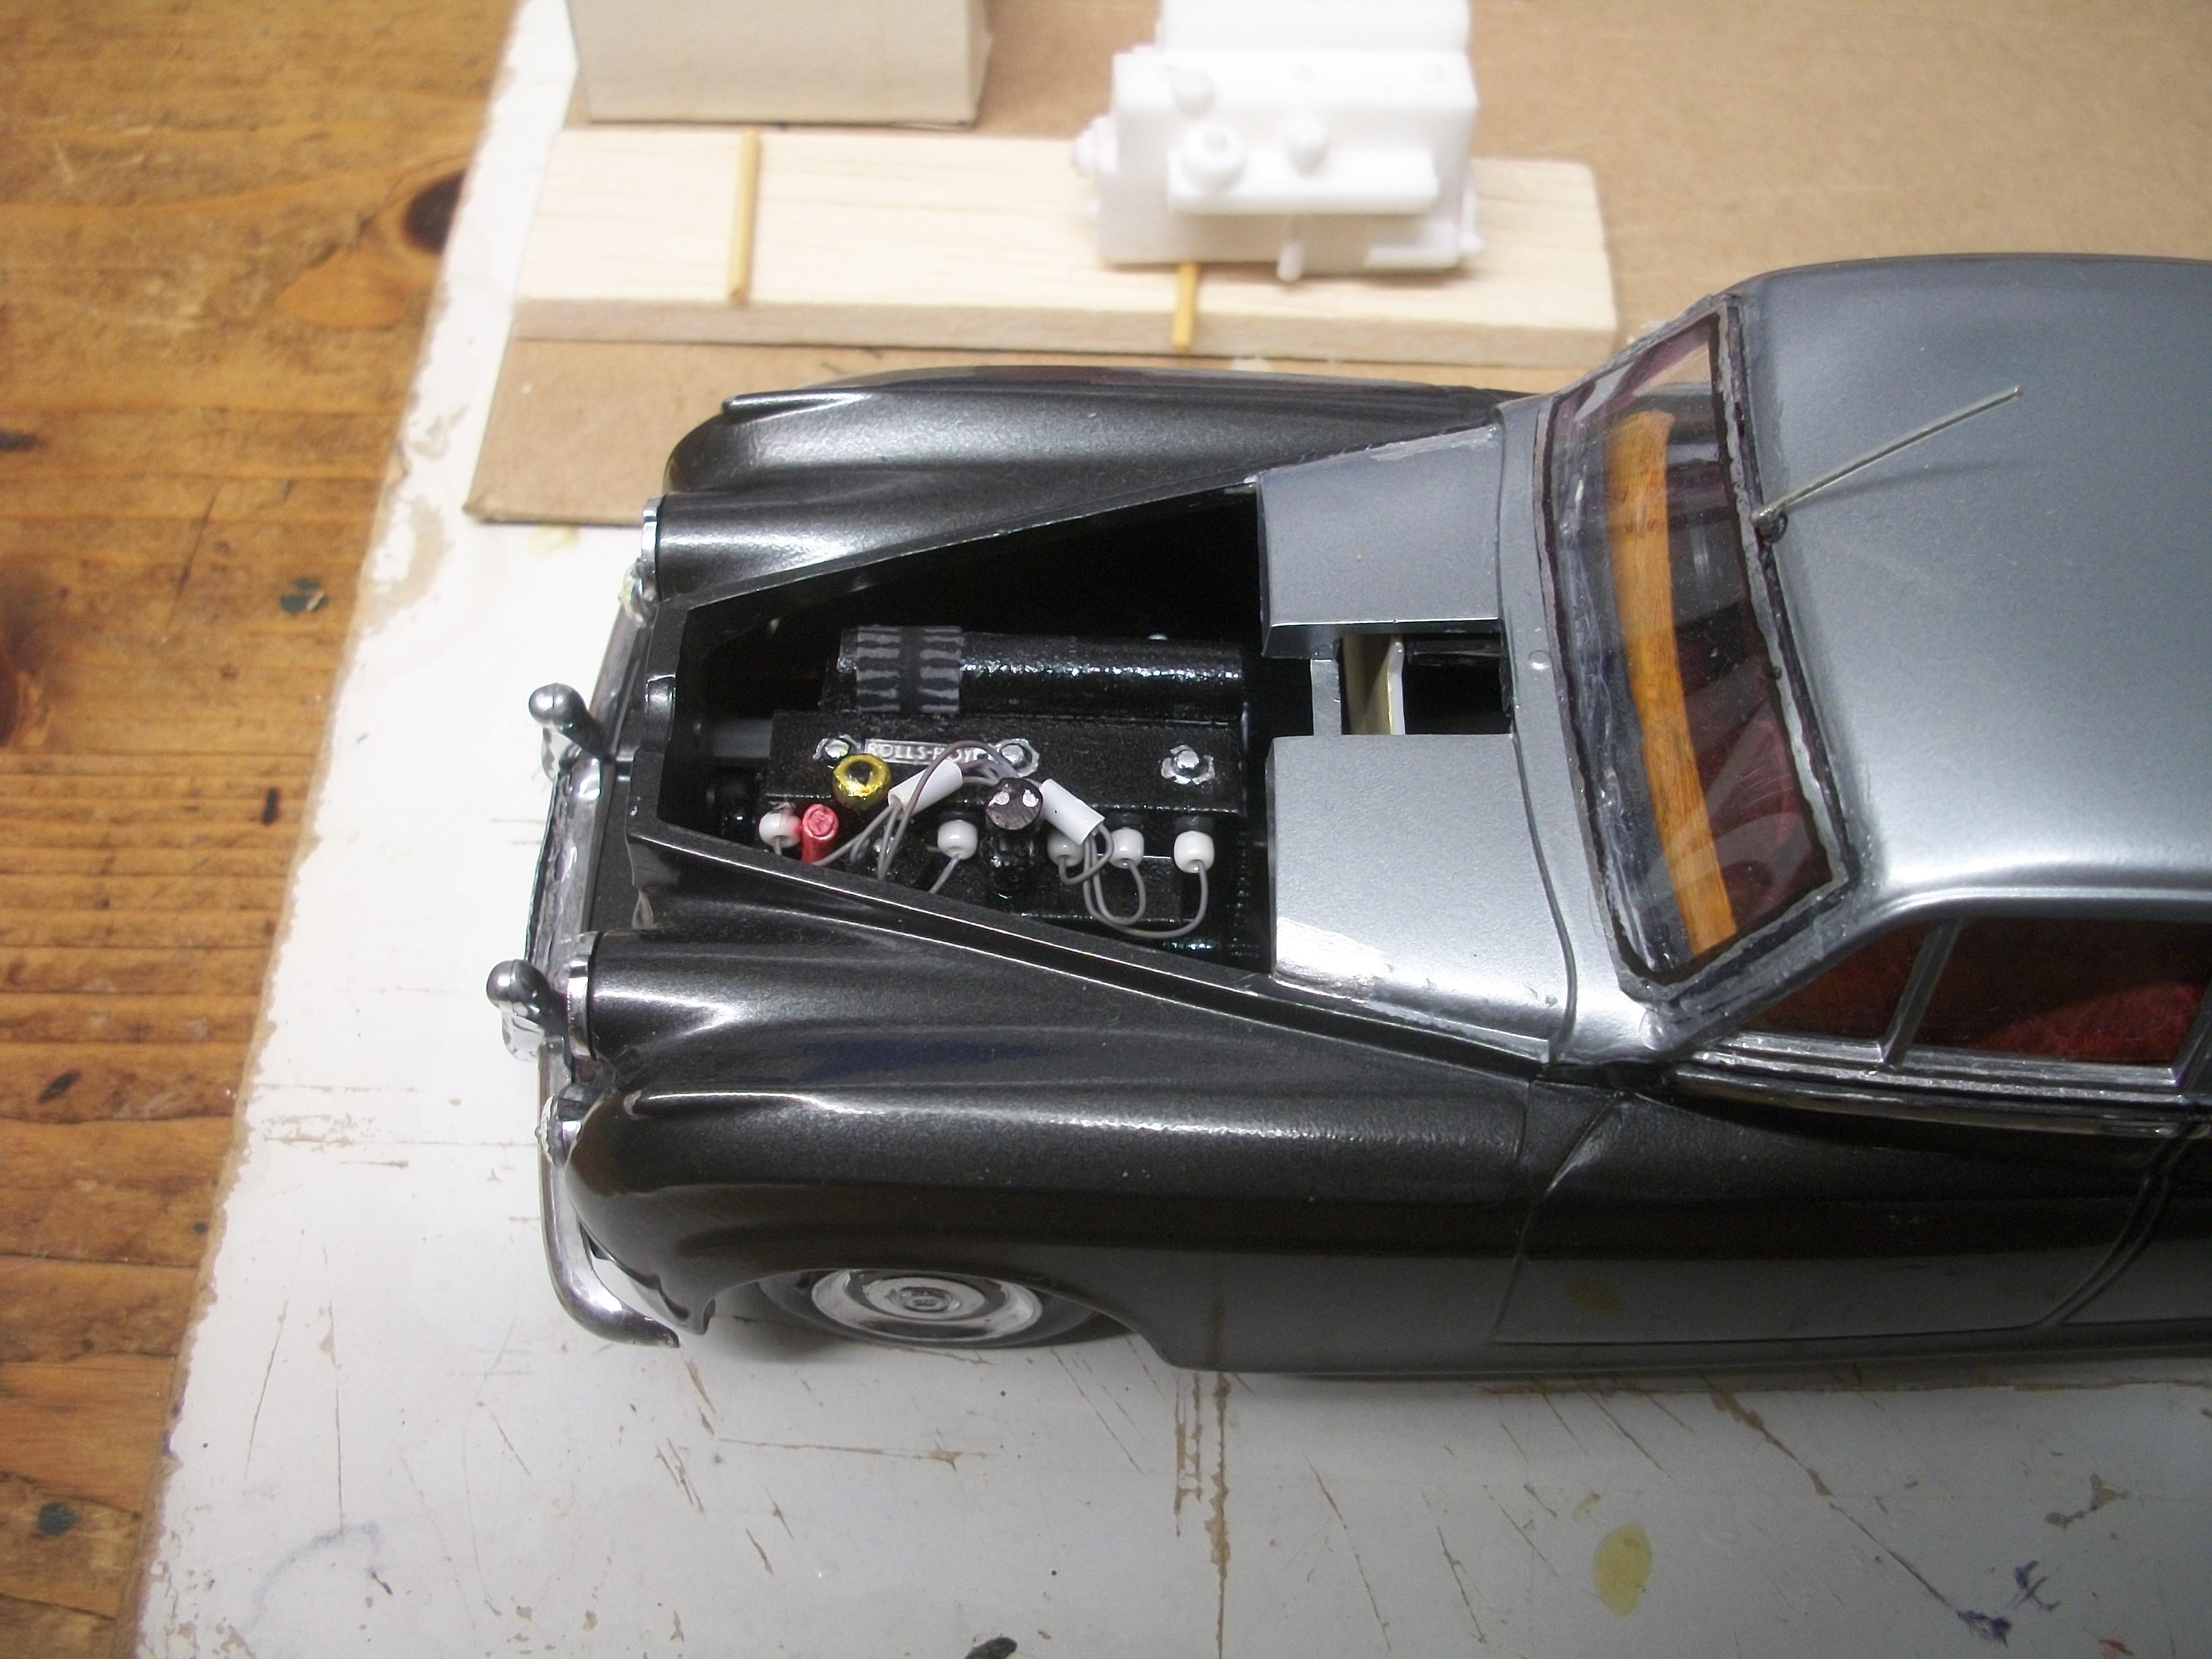
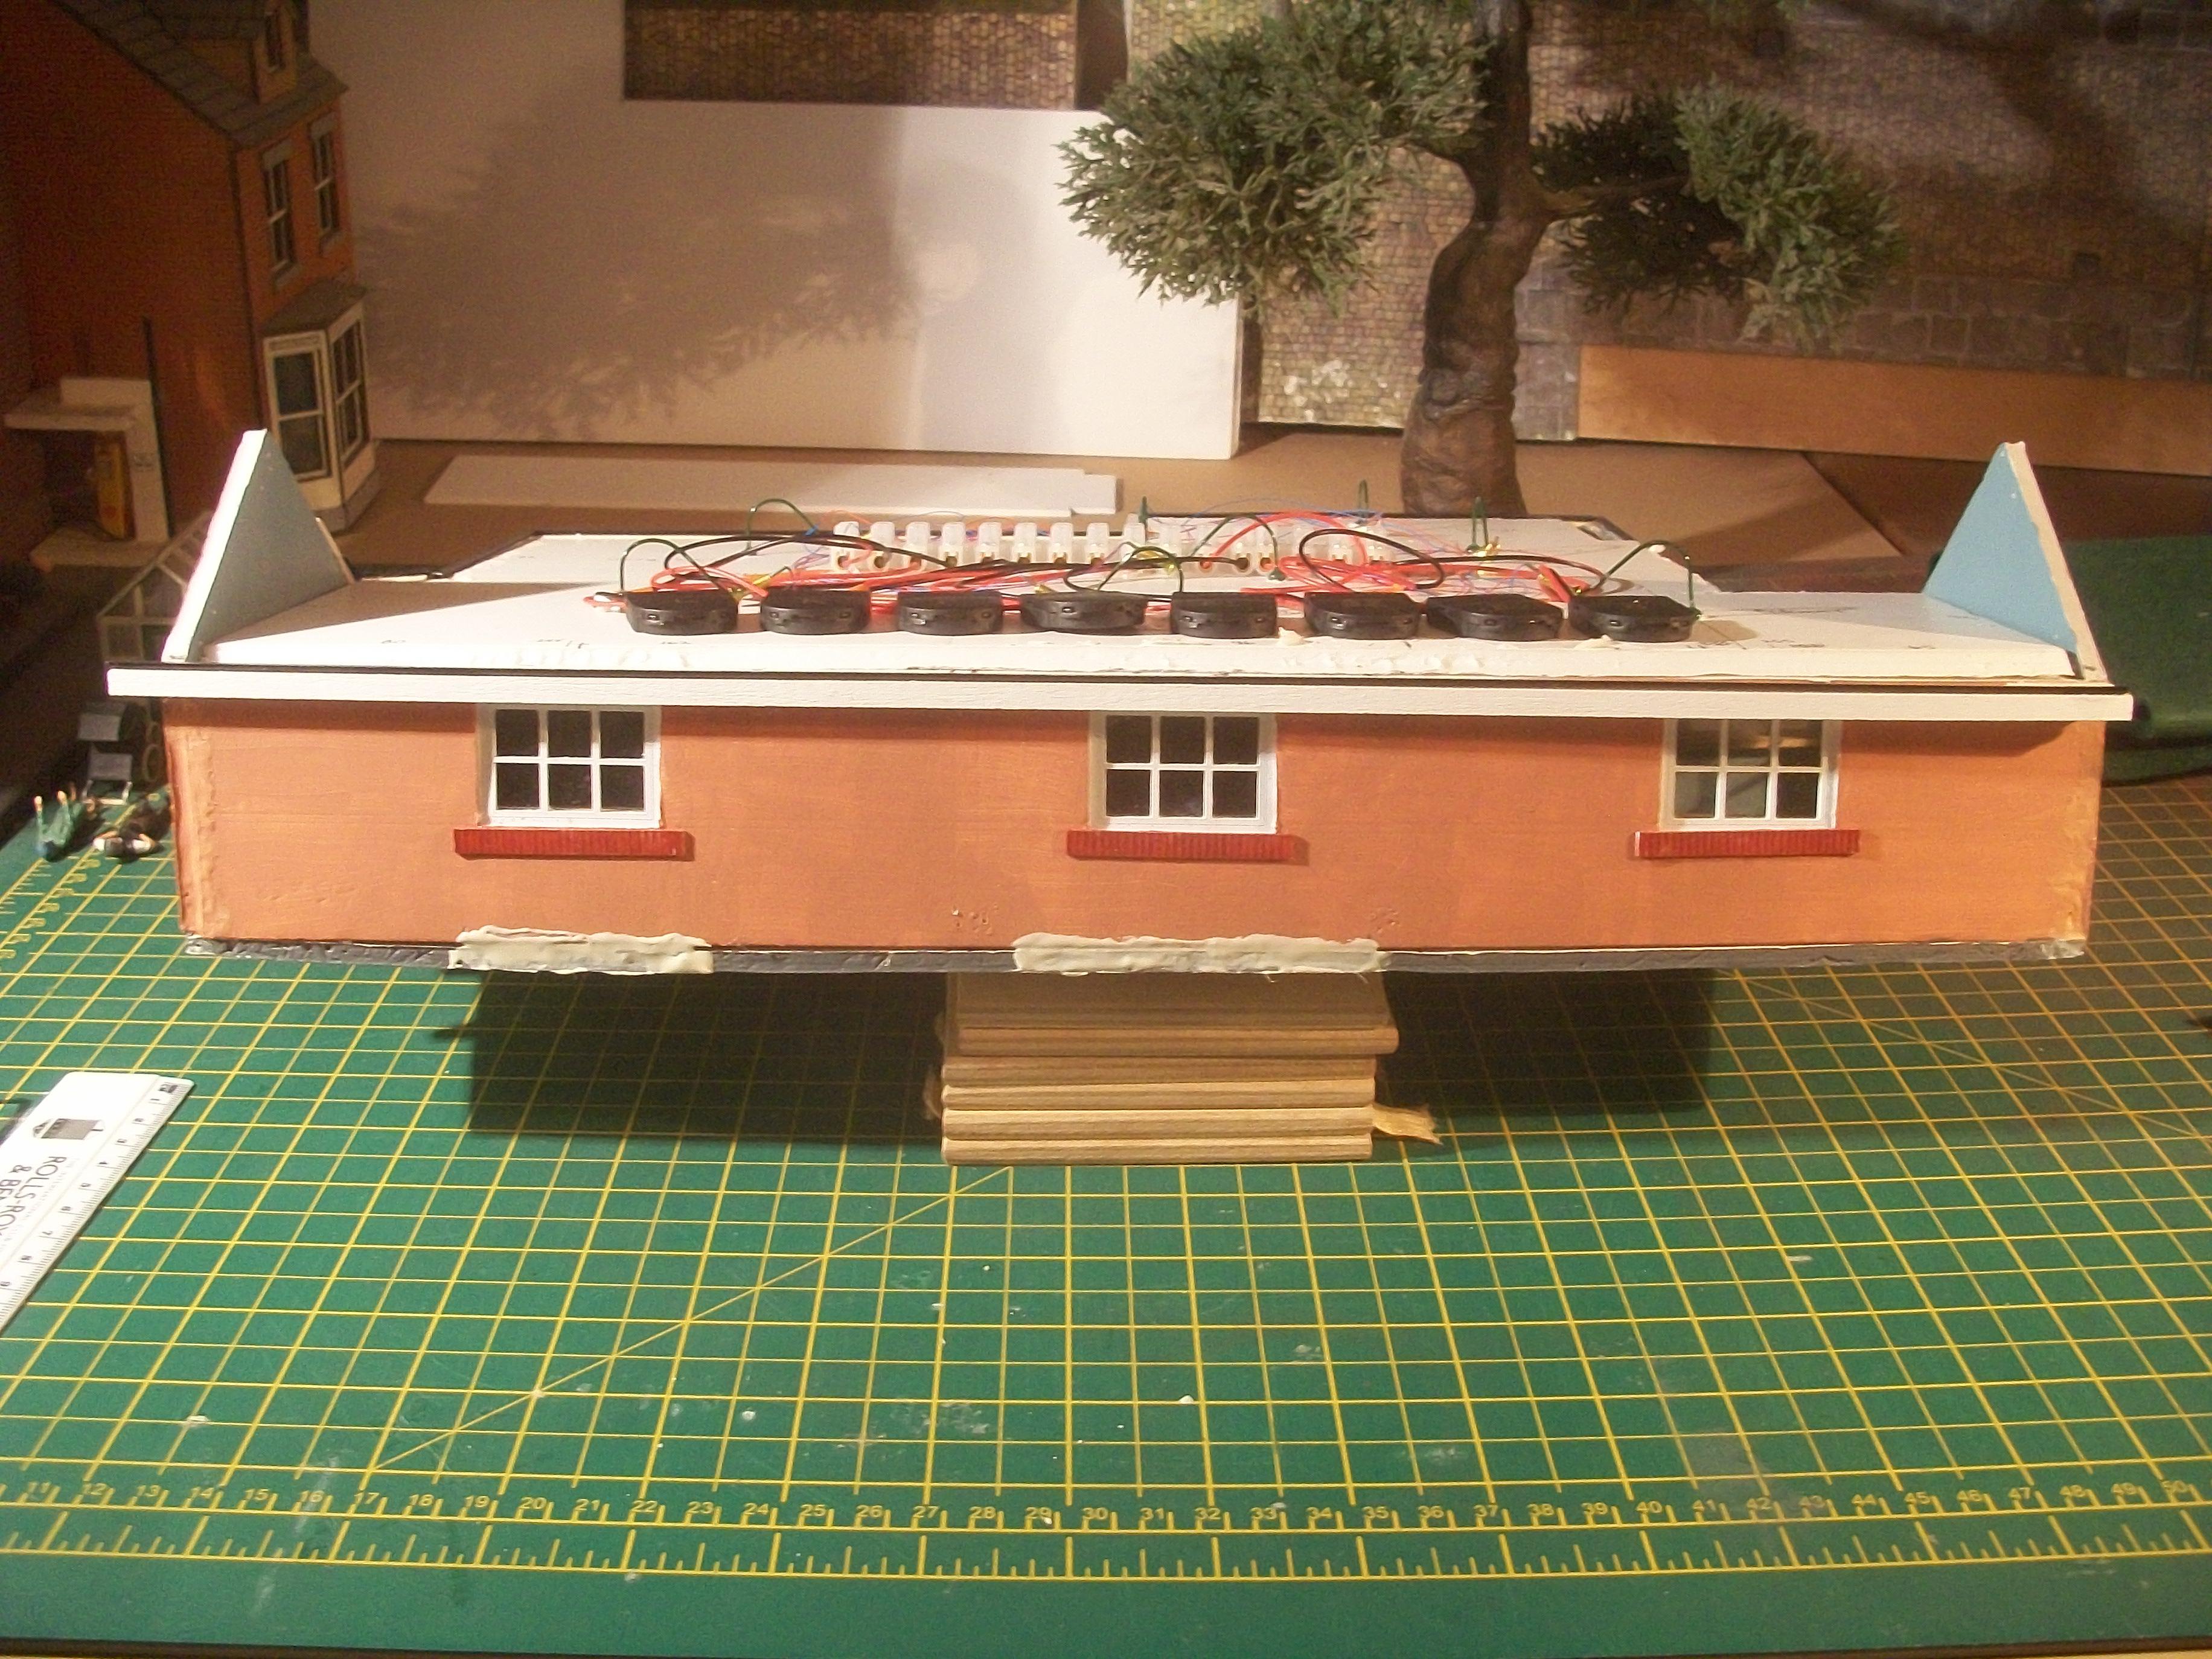
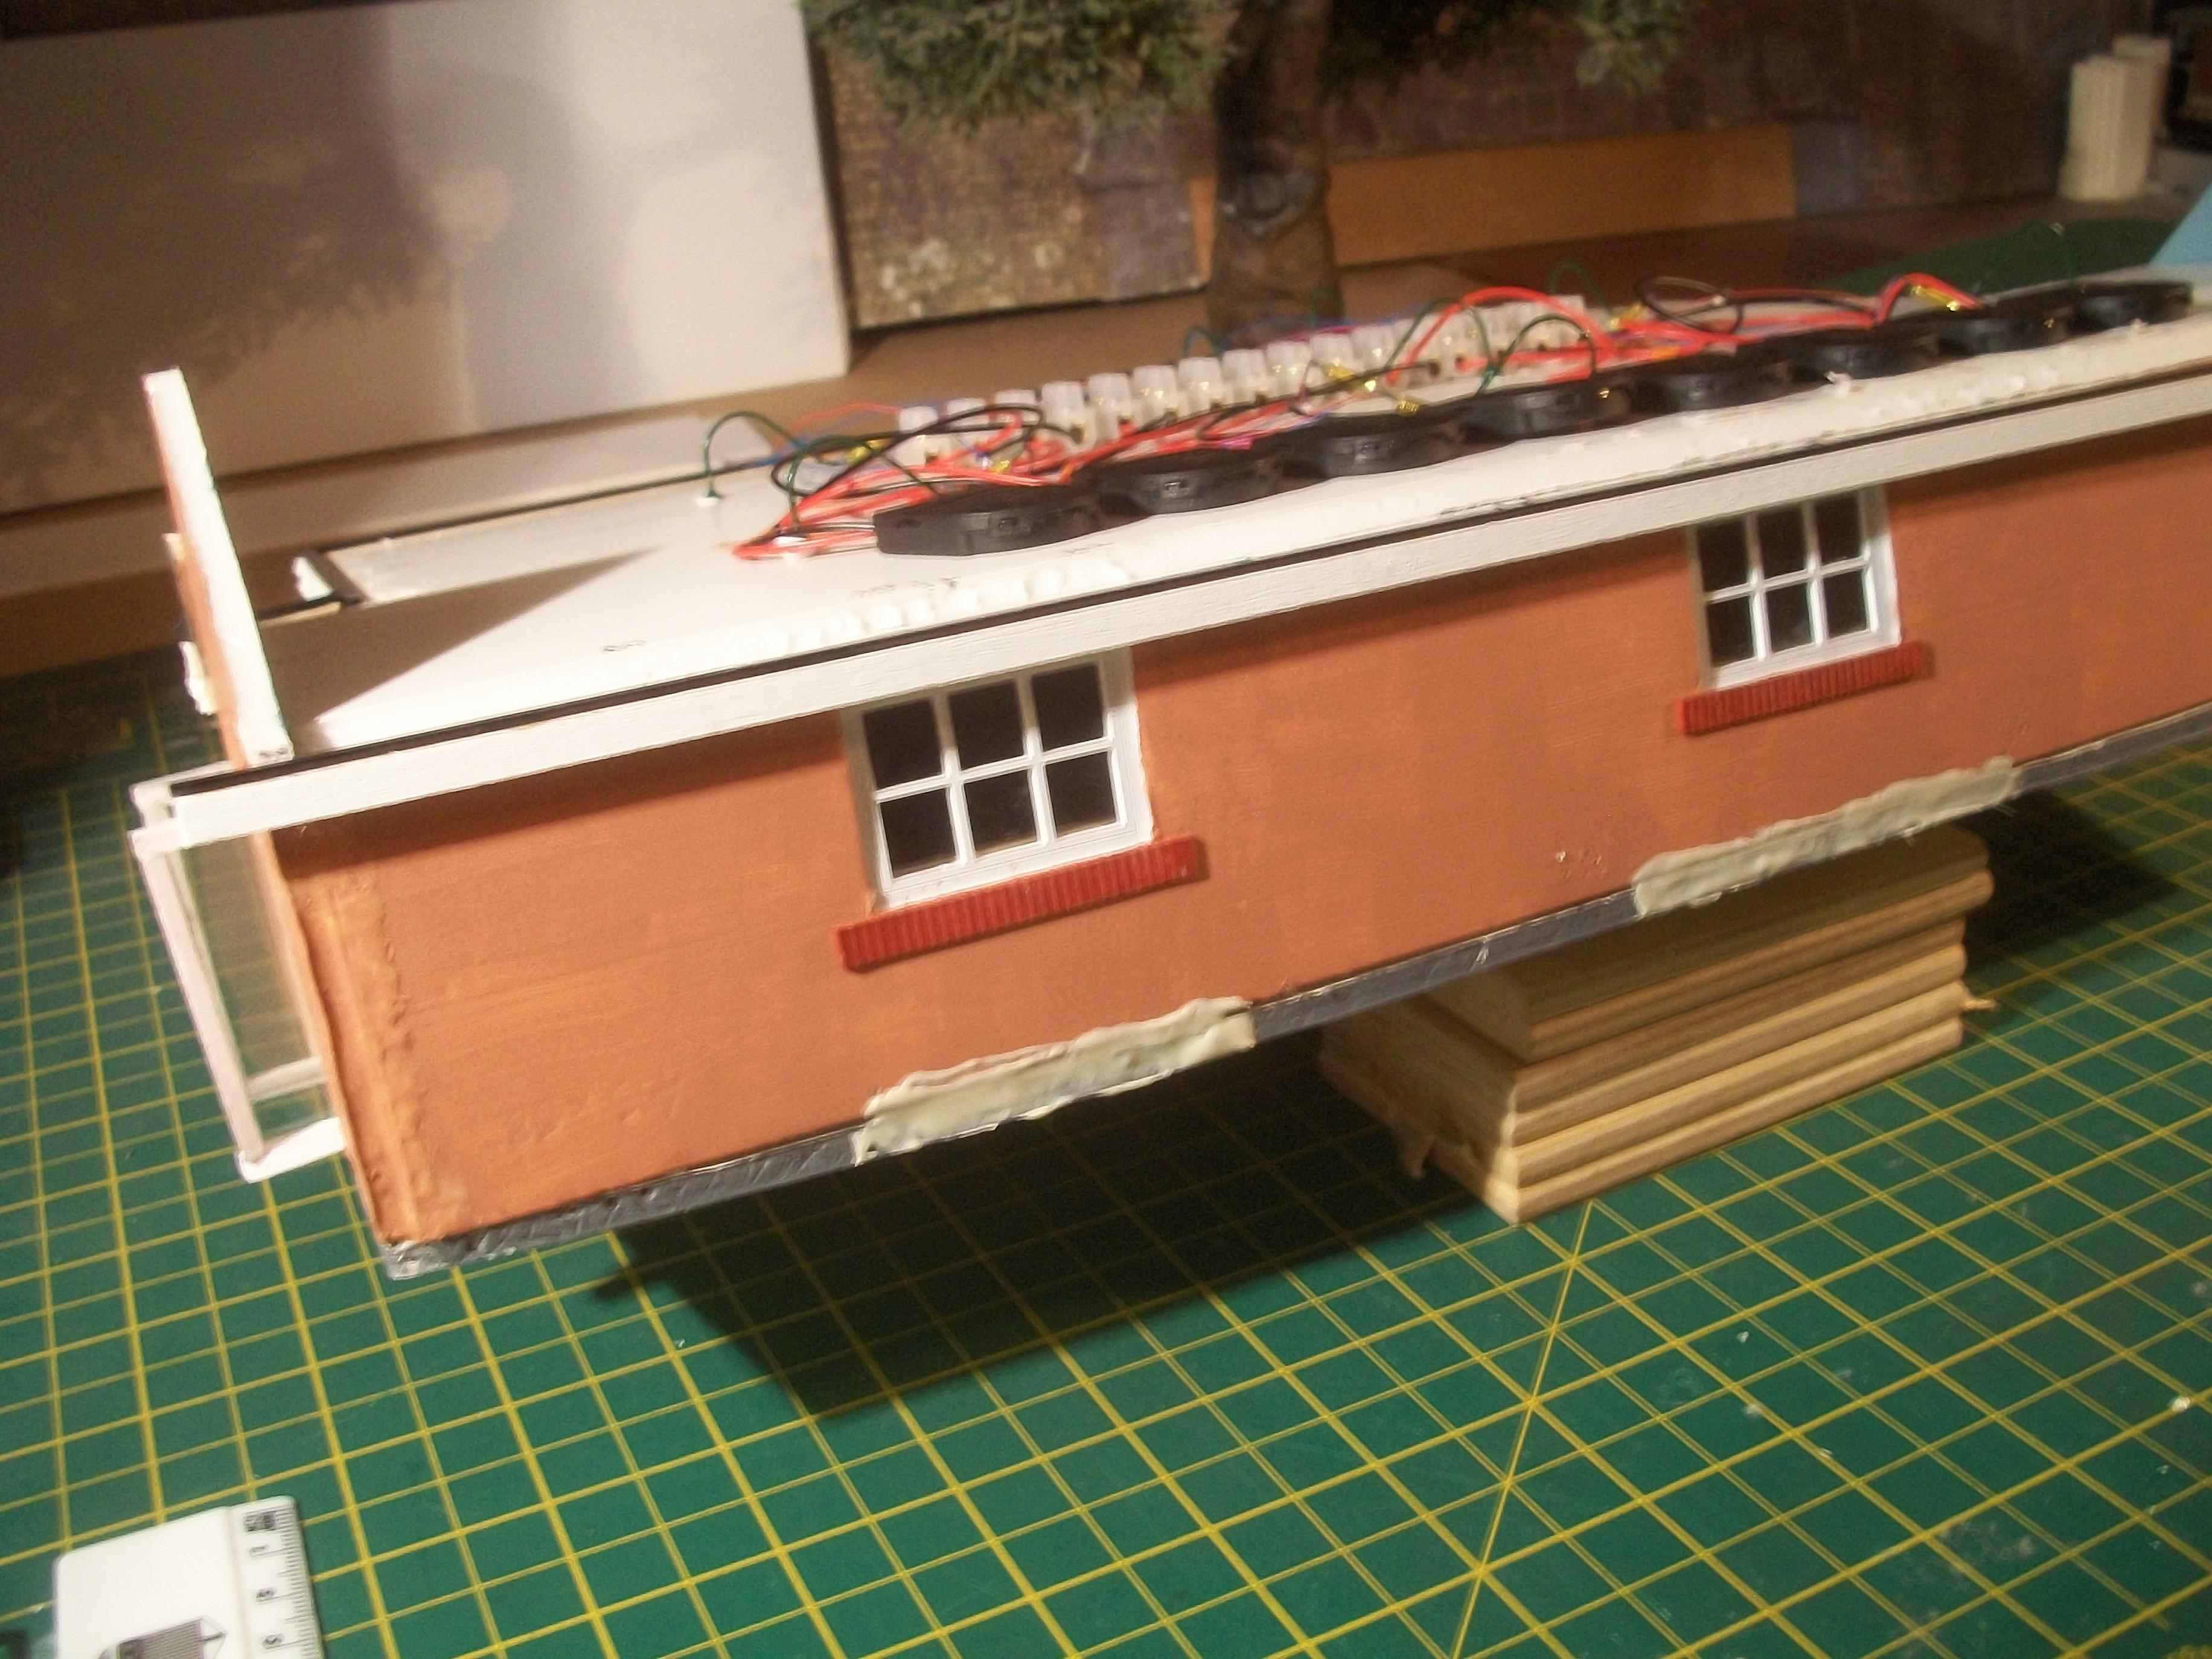
That is most interesting about the tape Les, so is this for repairing mobile phones? The PVA glue has been surprisingly strong for the building of my 1:43 scale bungalow, because once or twice I have needed to pull apart sections of the building and this required more force than I was expecting. I had always regarded PVA as being a weak bond adhesive . . . You mentioned window glass fitting, and I shall be cutting out the Silver Cloud windscreen from thin clear acetate, which is then fitted from the outside of the model car . . . The kit glass for the windscreen is way too thick, and fits from the inside of the model, which looks completely wrong. Many thanks Les . . . David
-
Rolls-Royce No Chemicals, No Paint, No Harmful Glues
Anglia105E replied to Anglia105E's topic in WIP: Model Cars
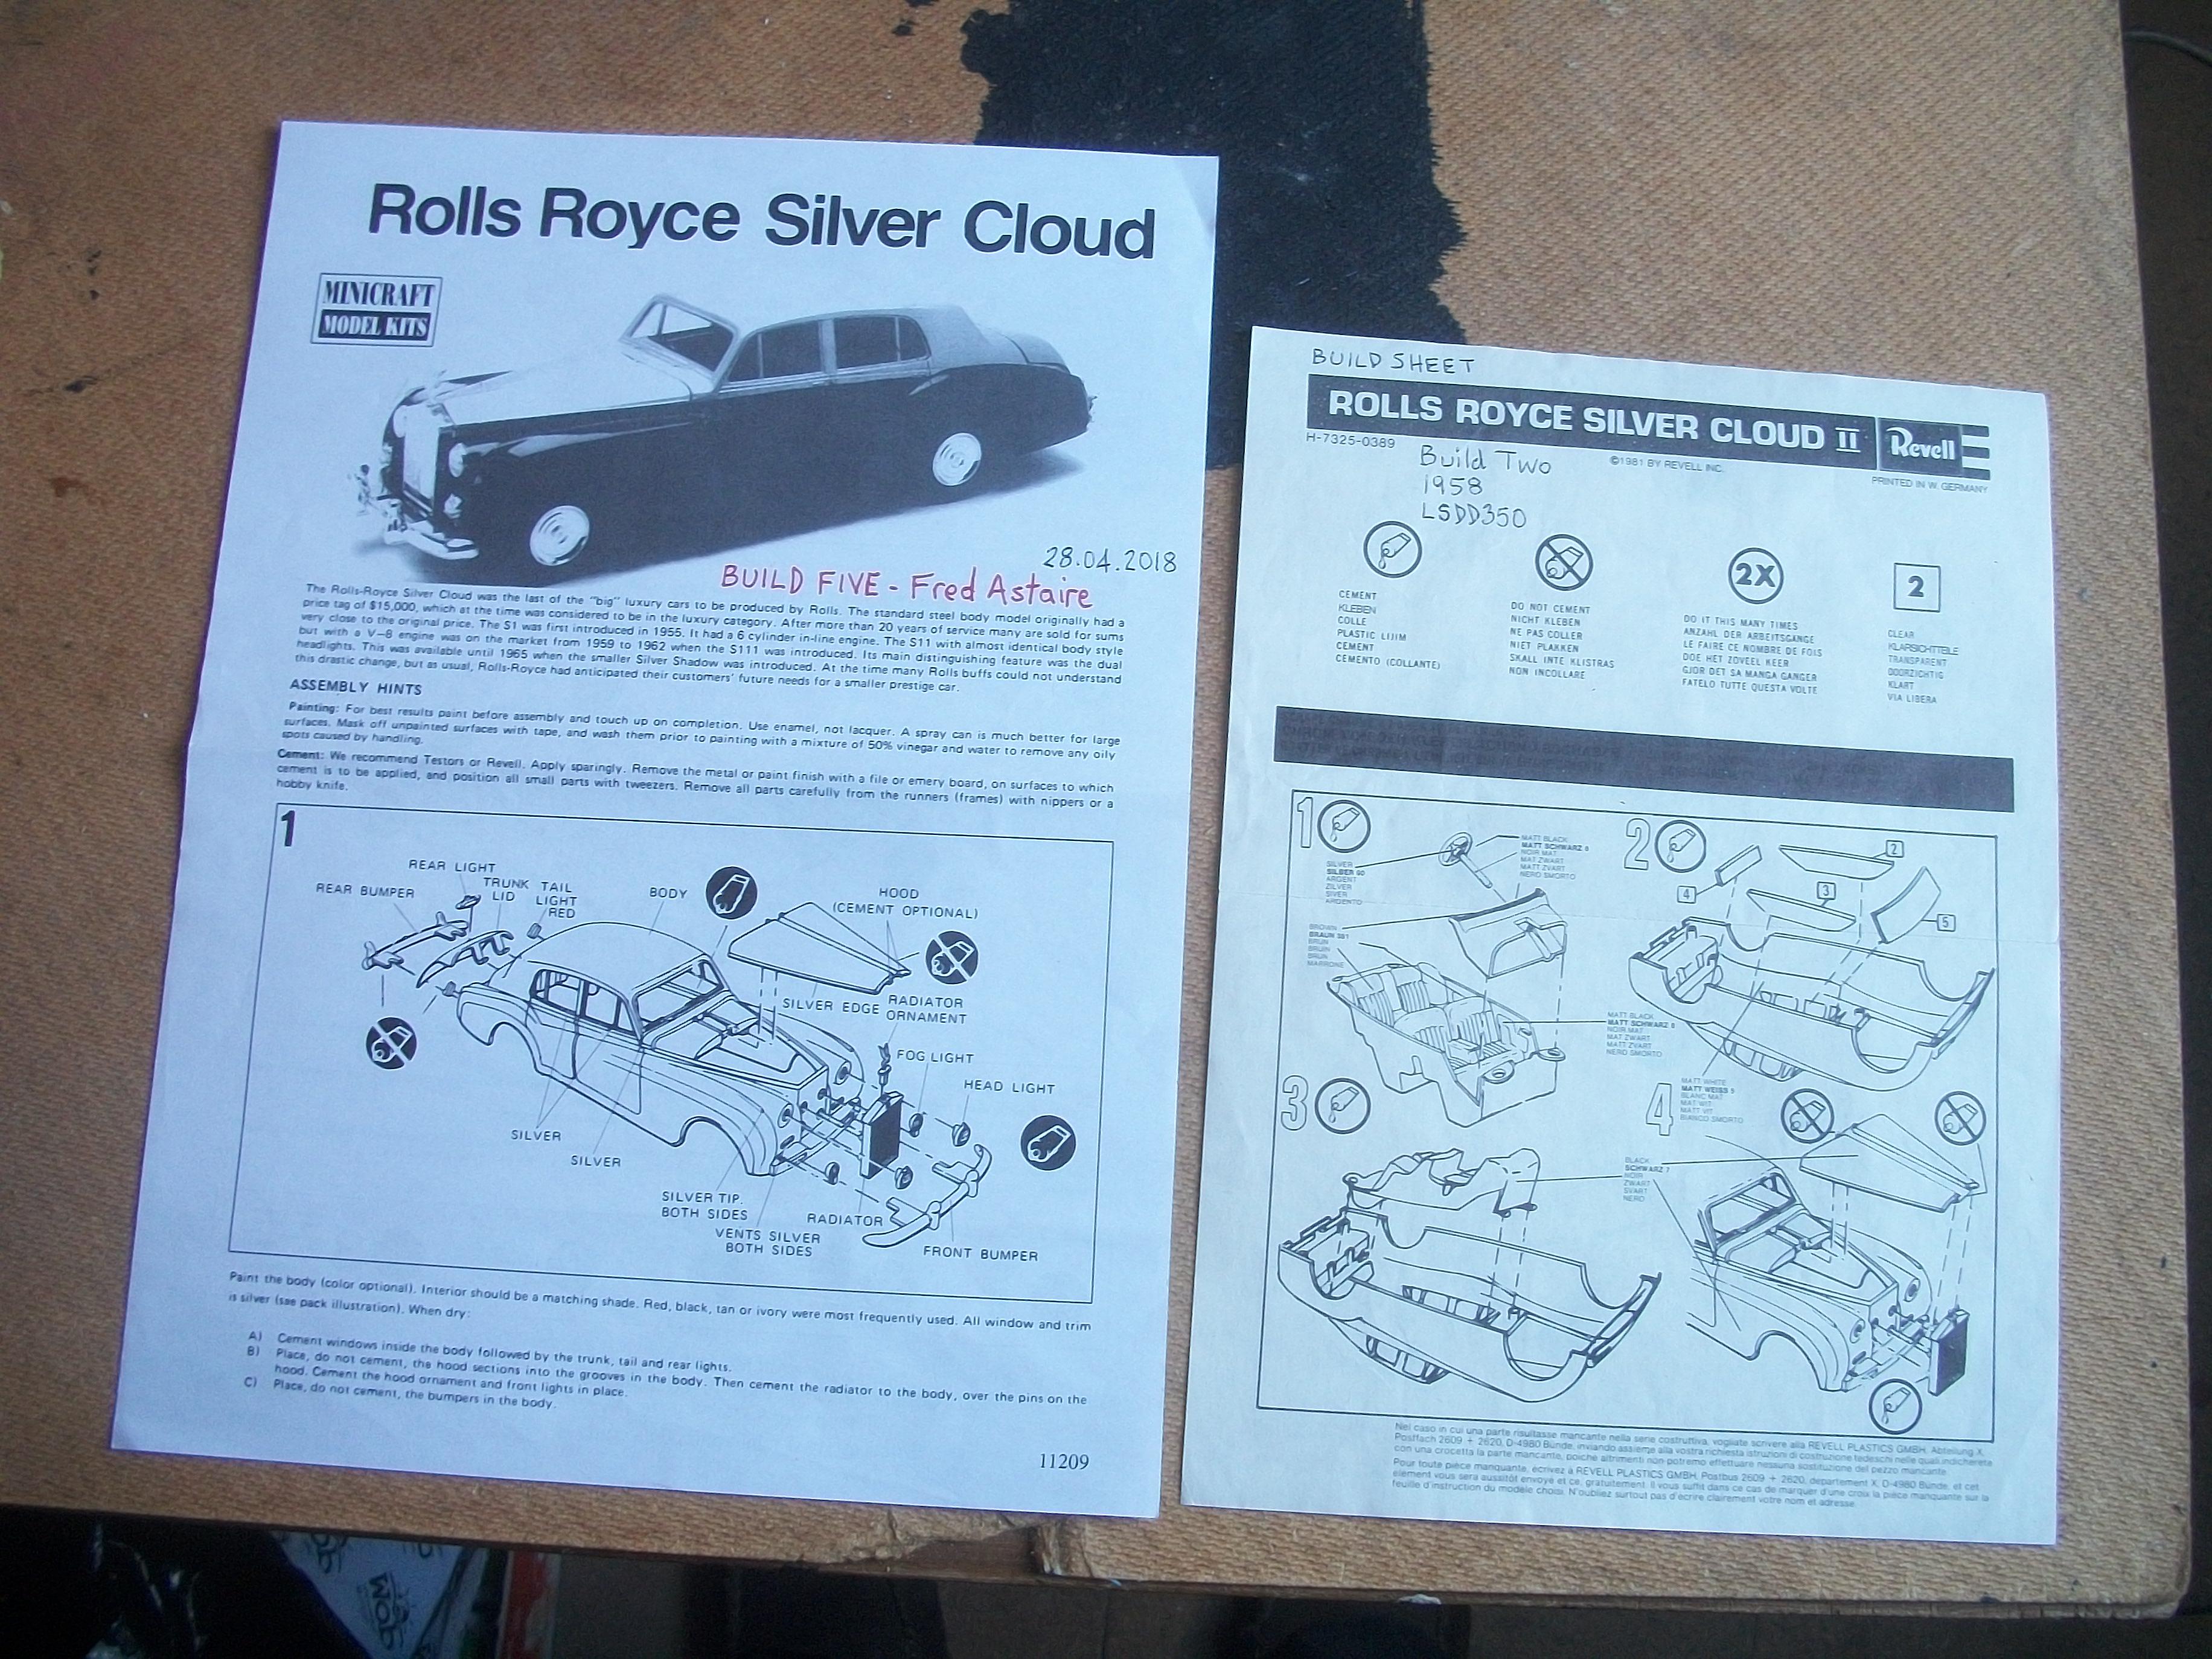
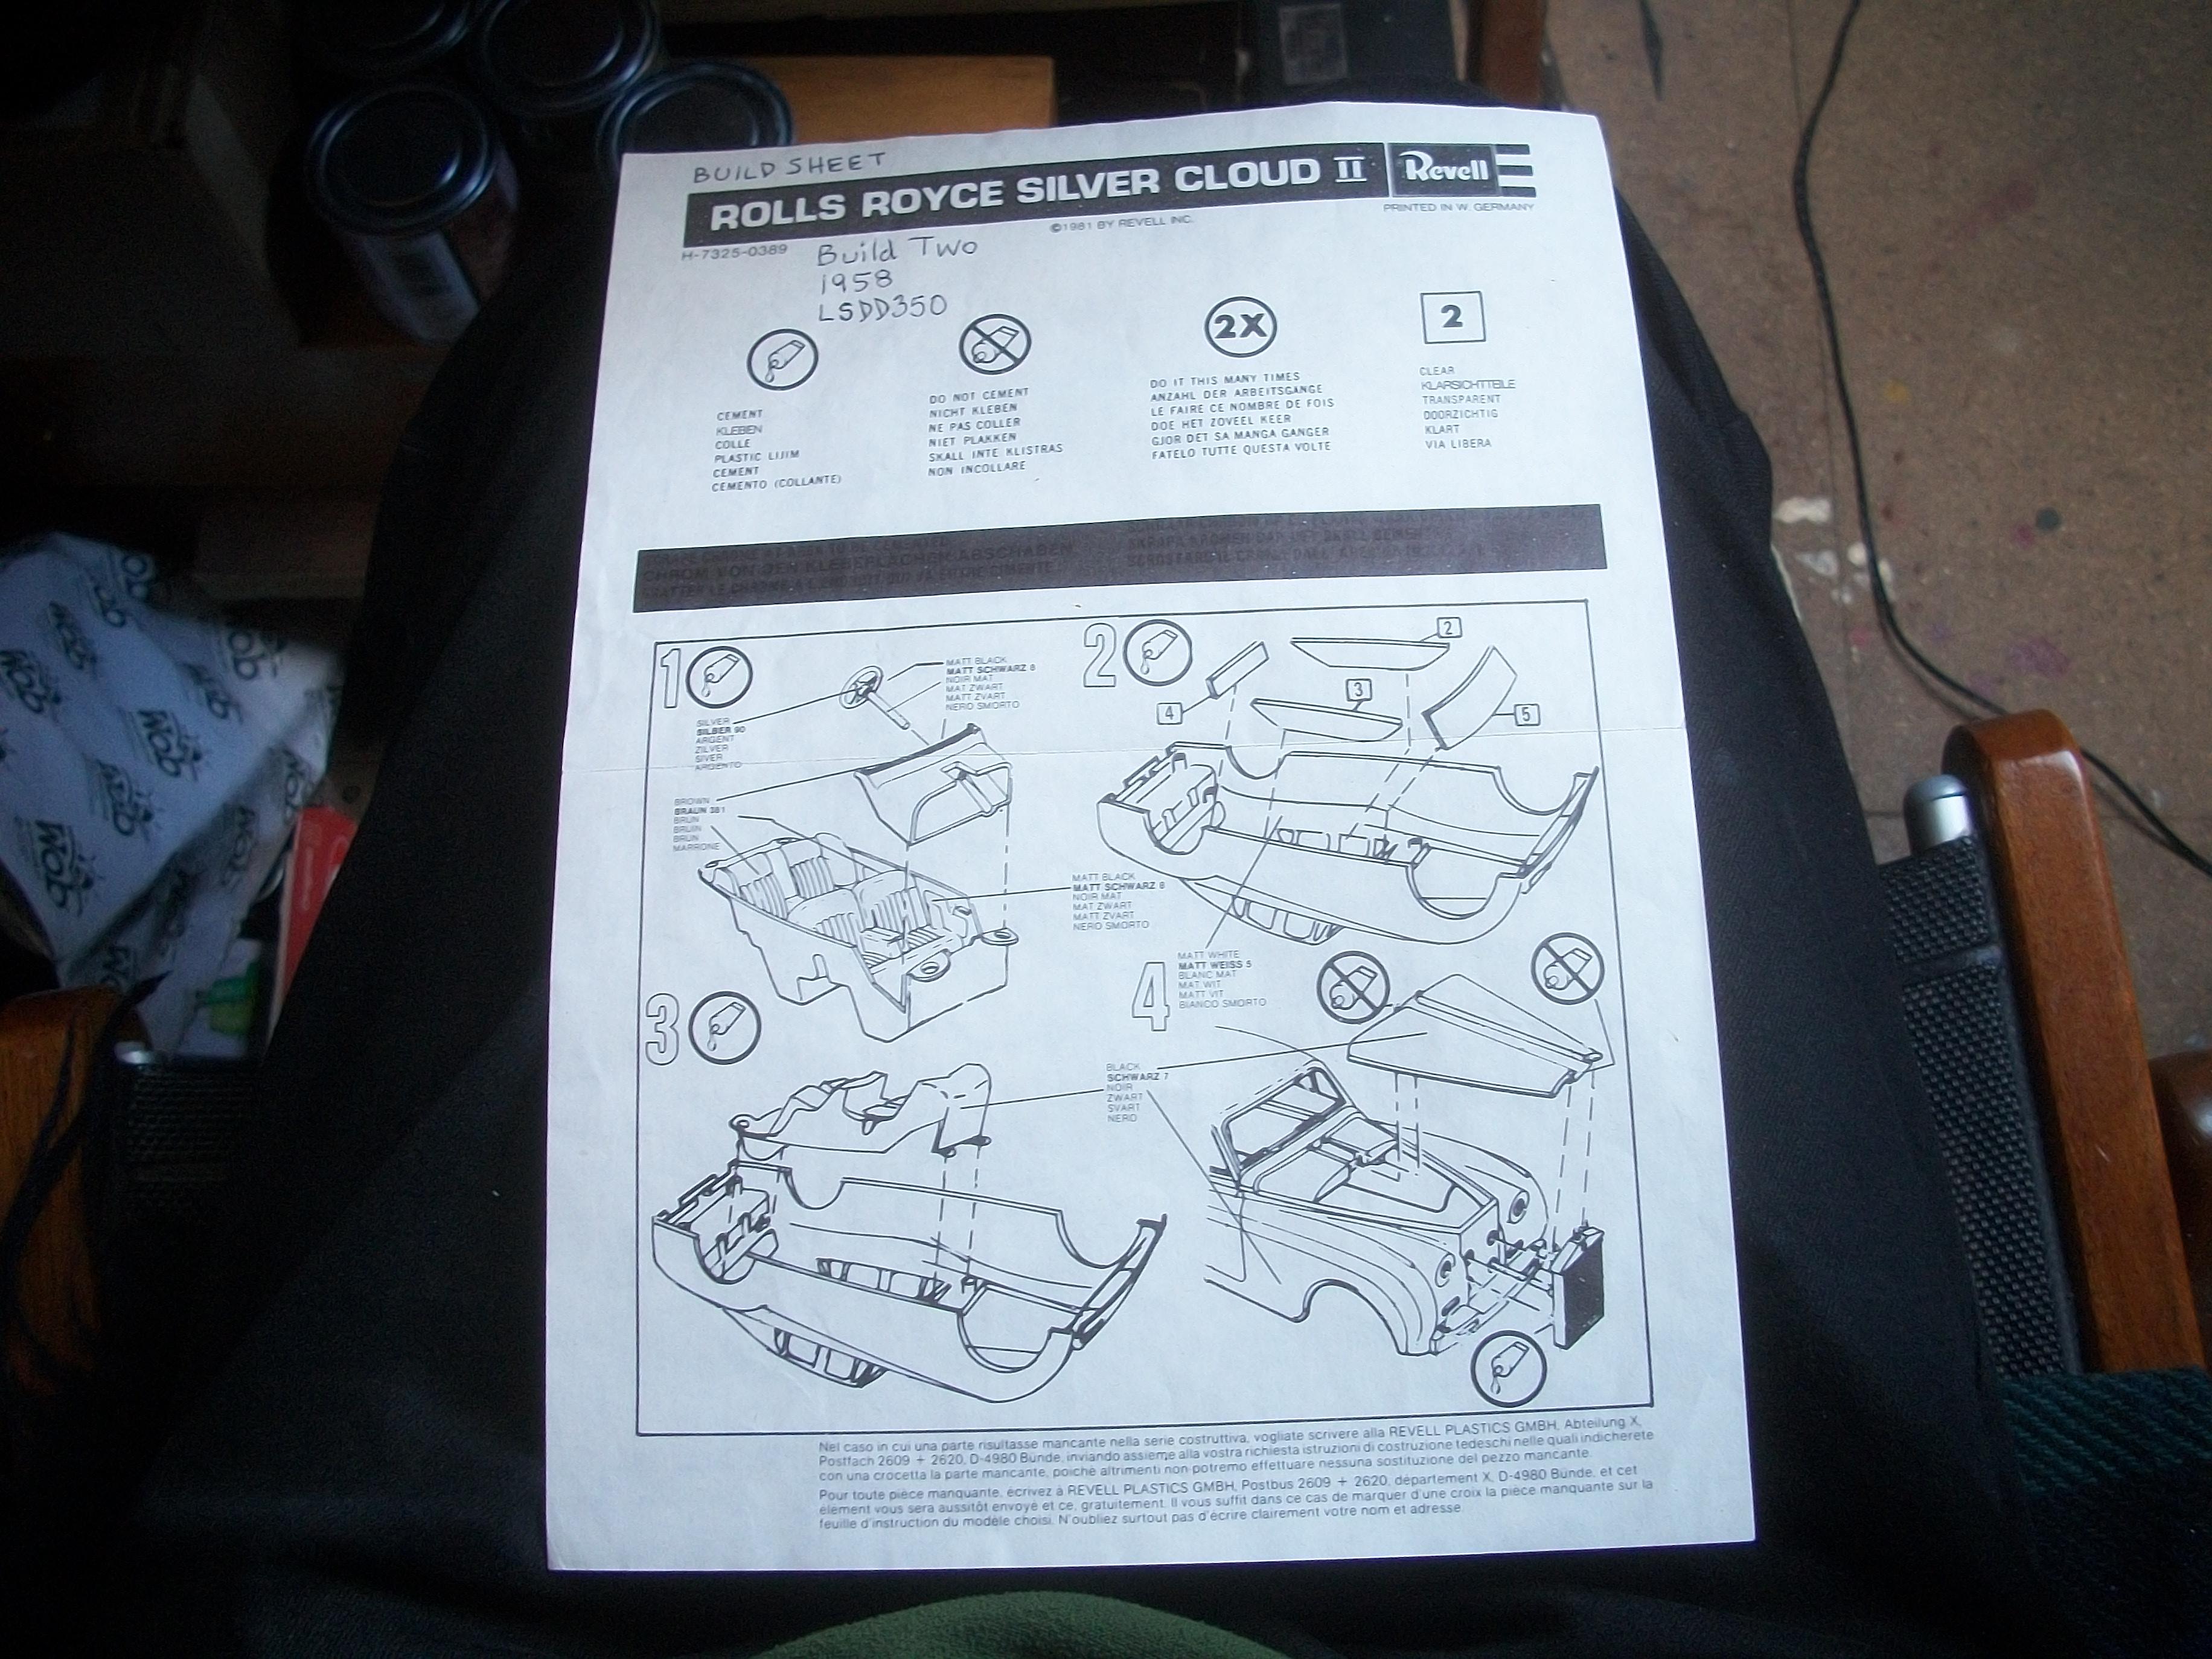
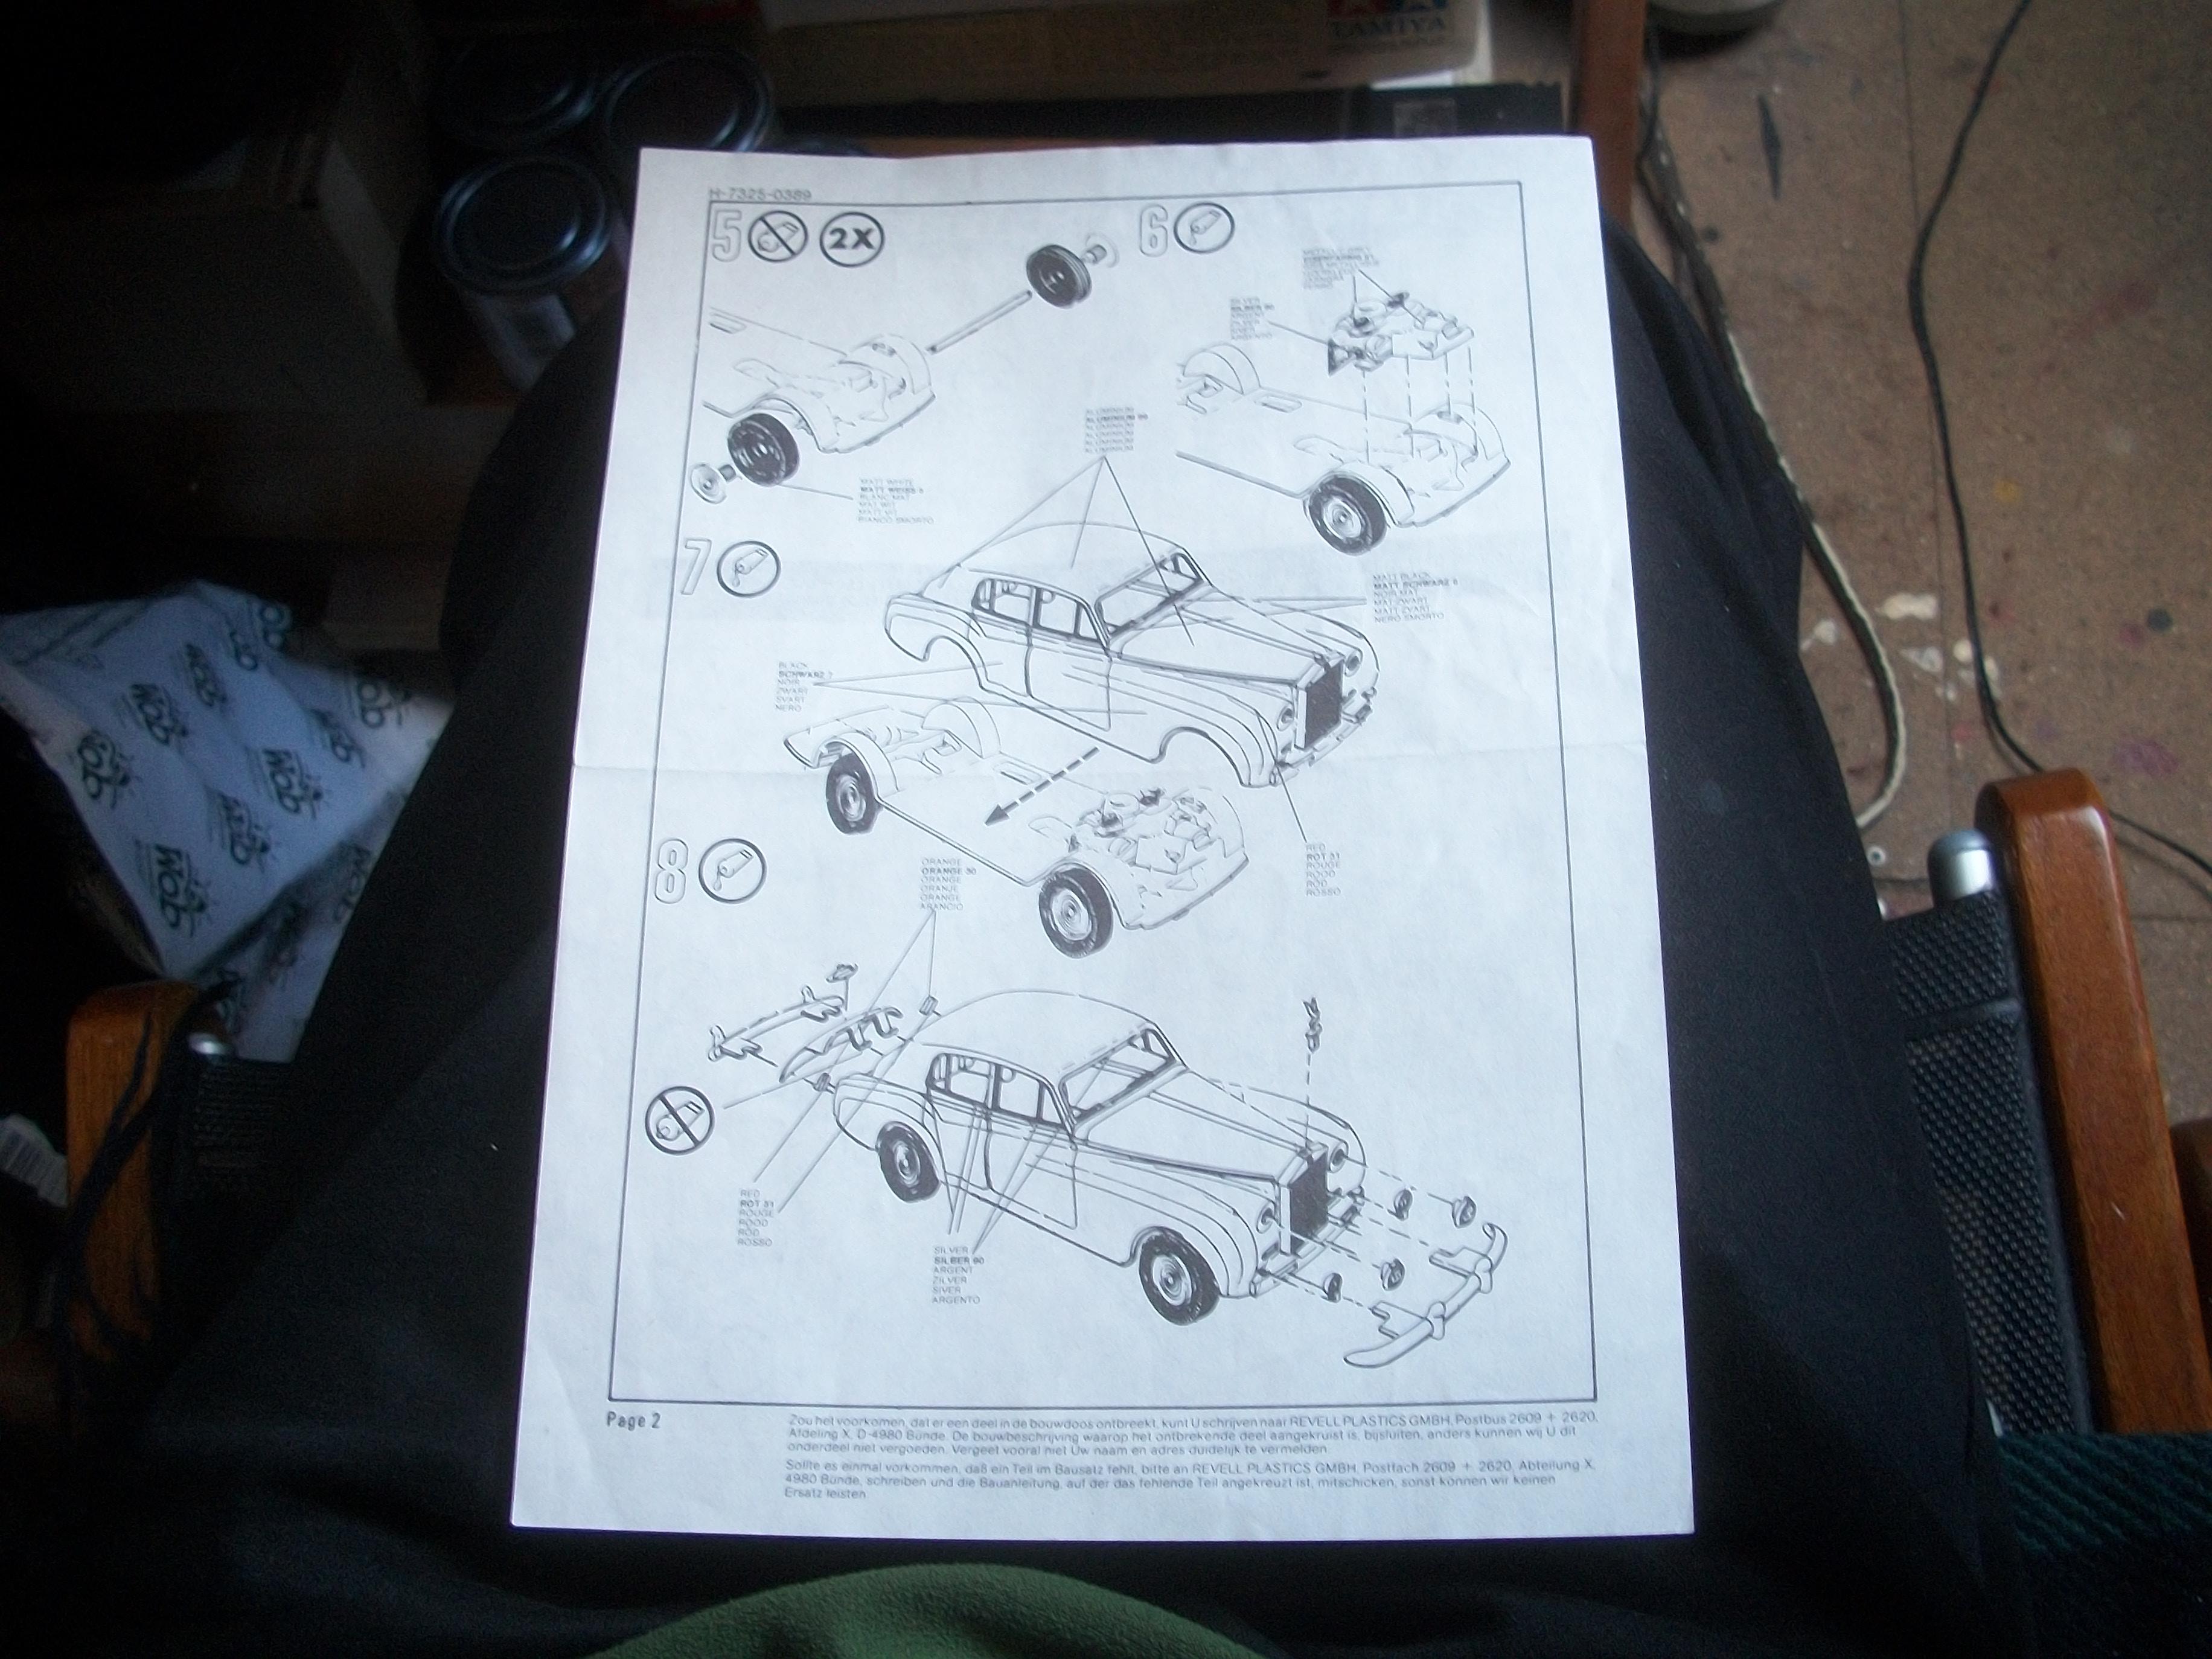
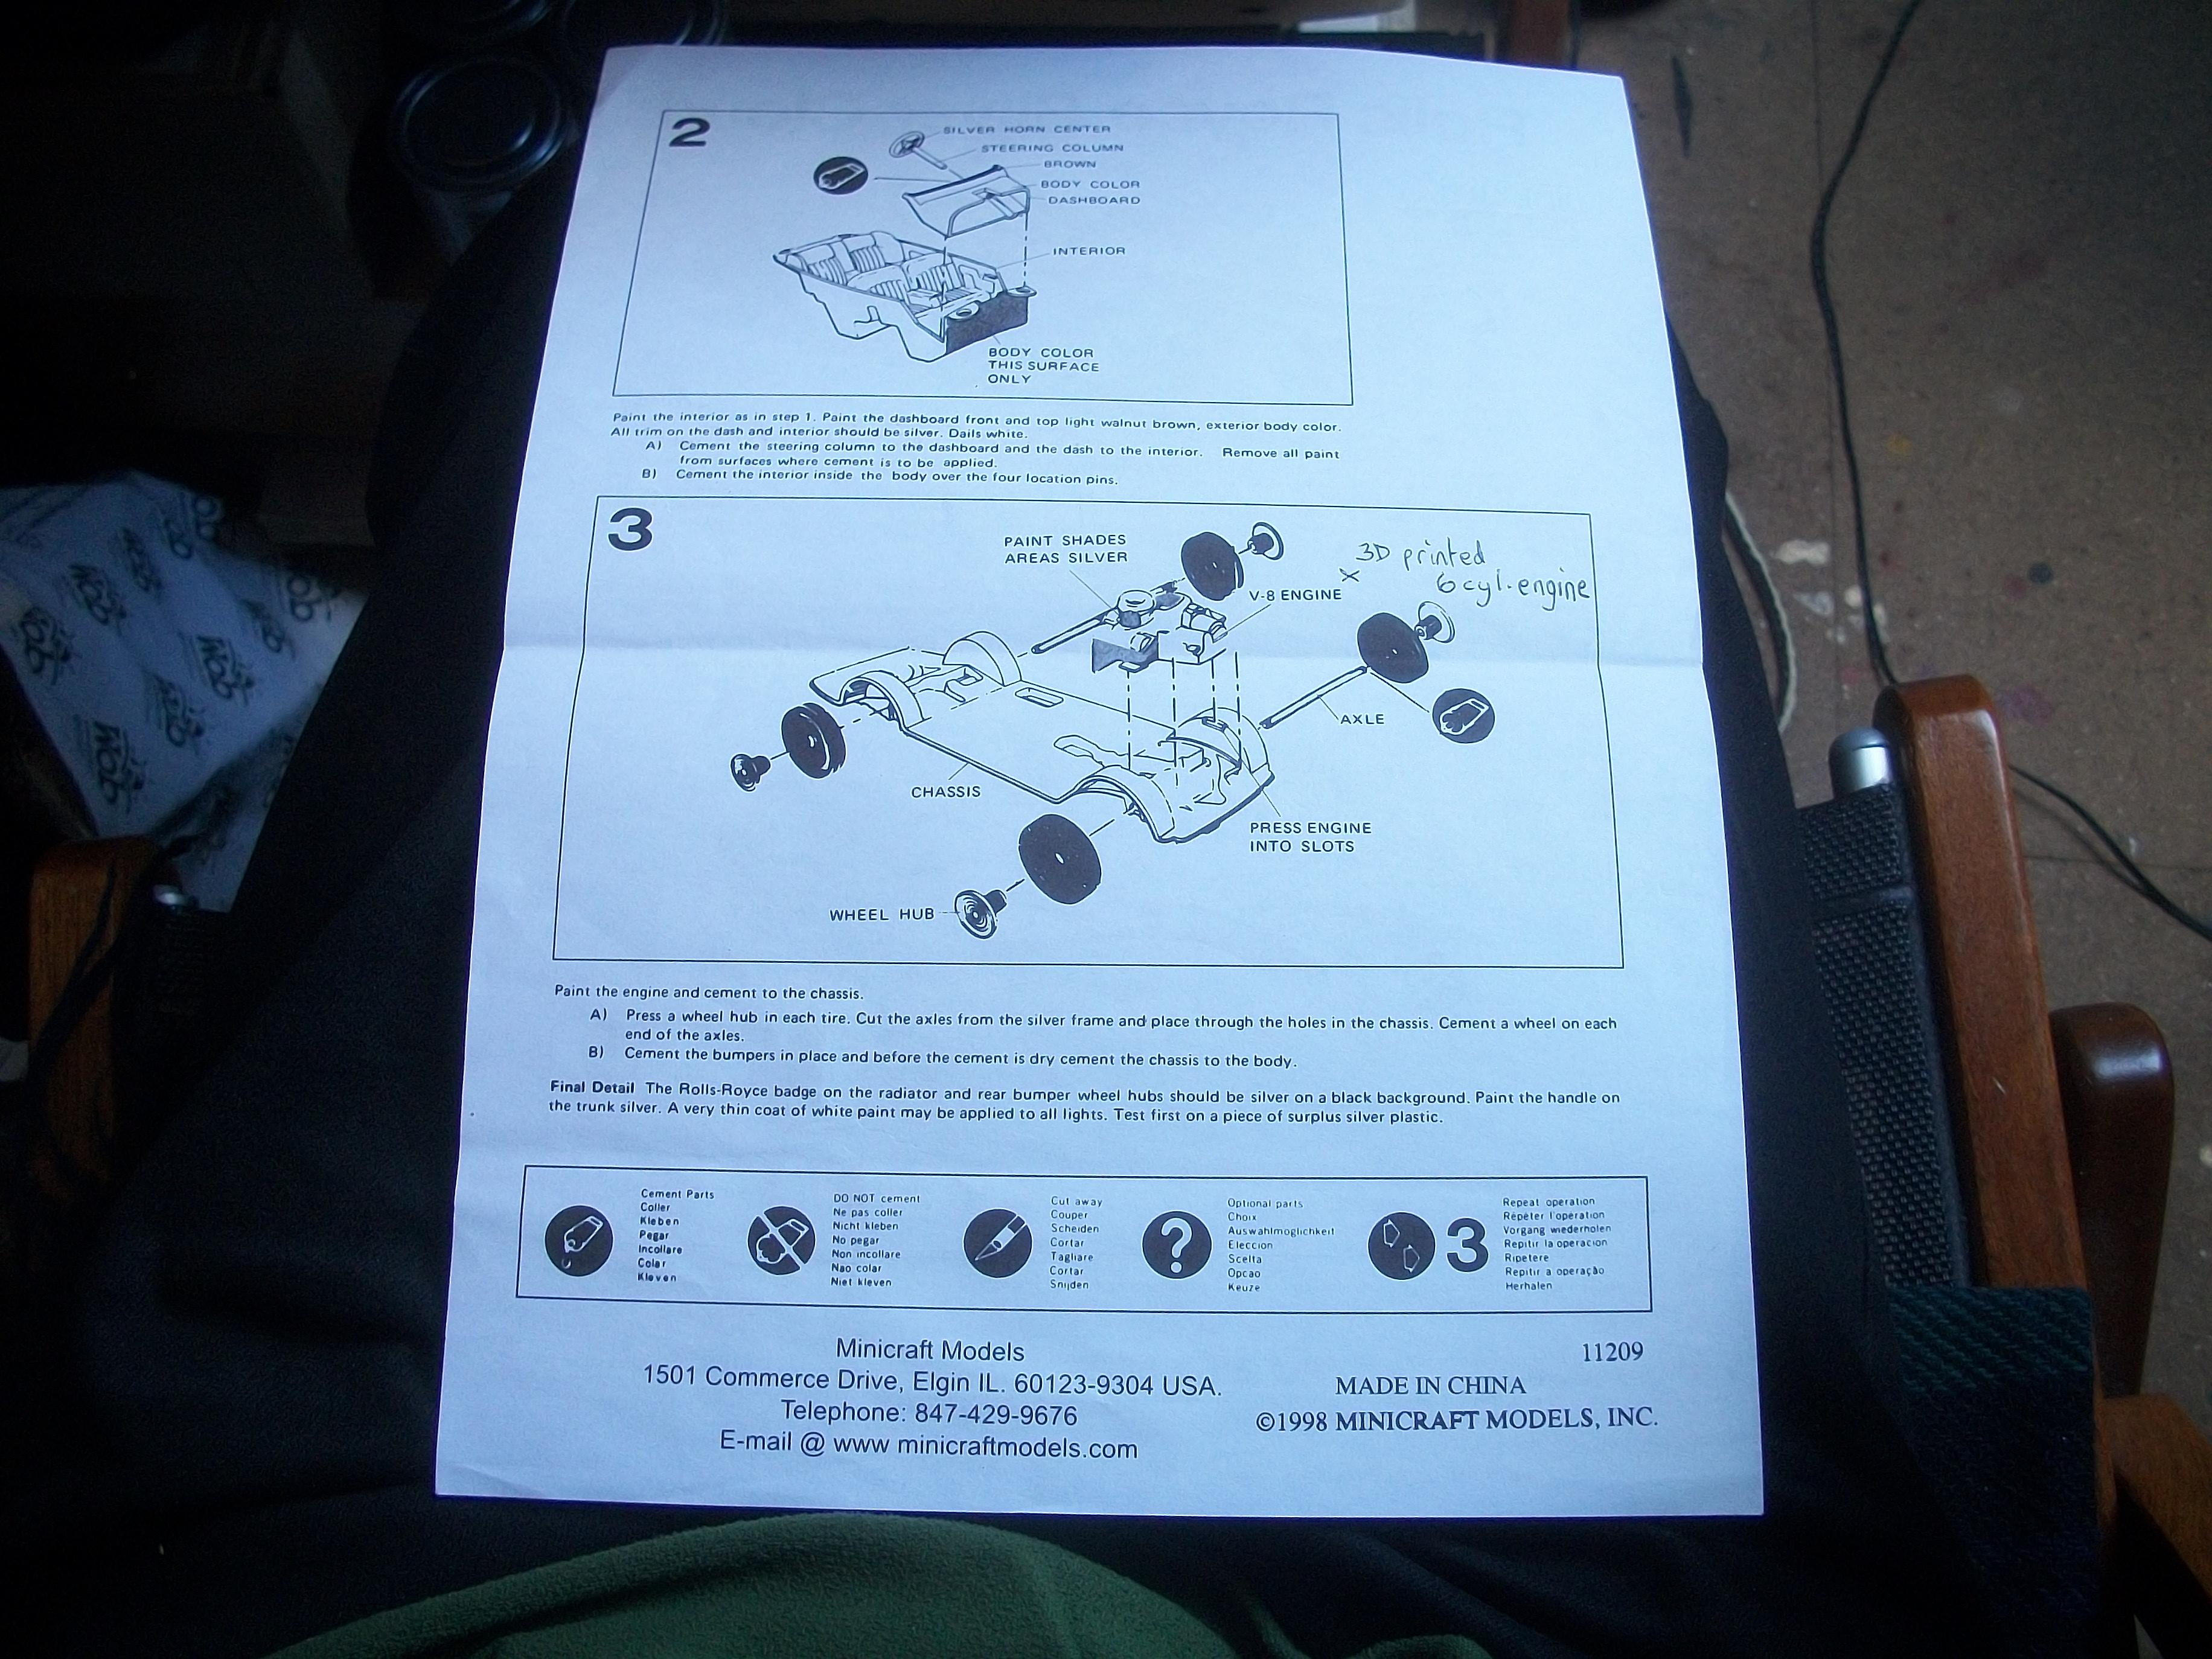
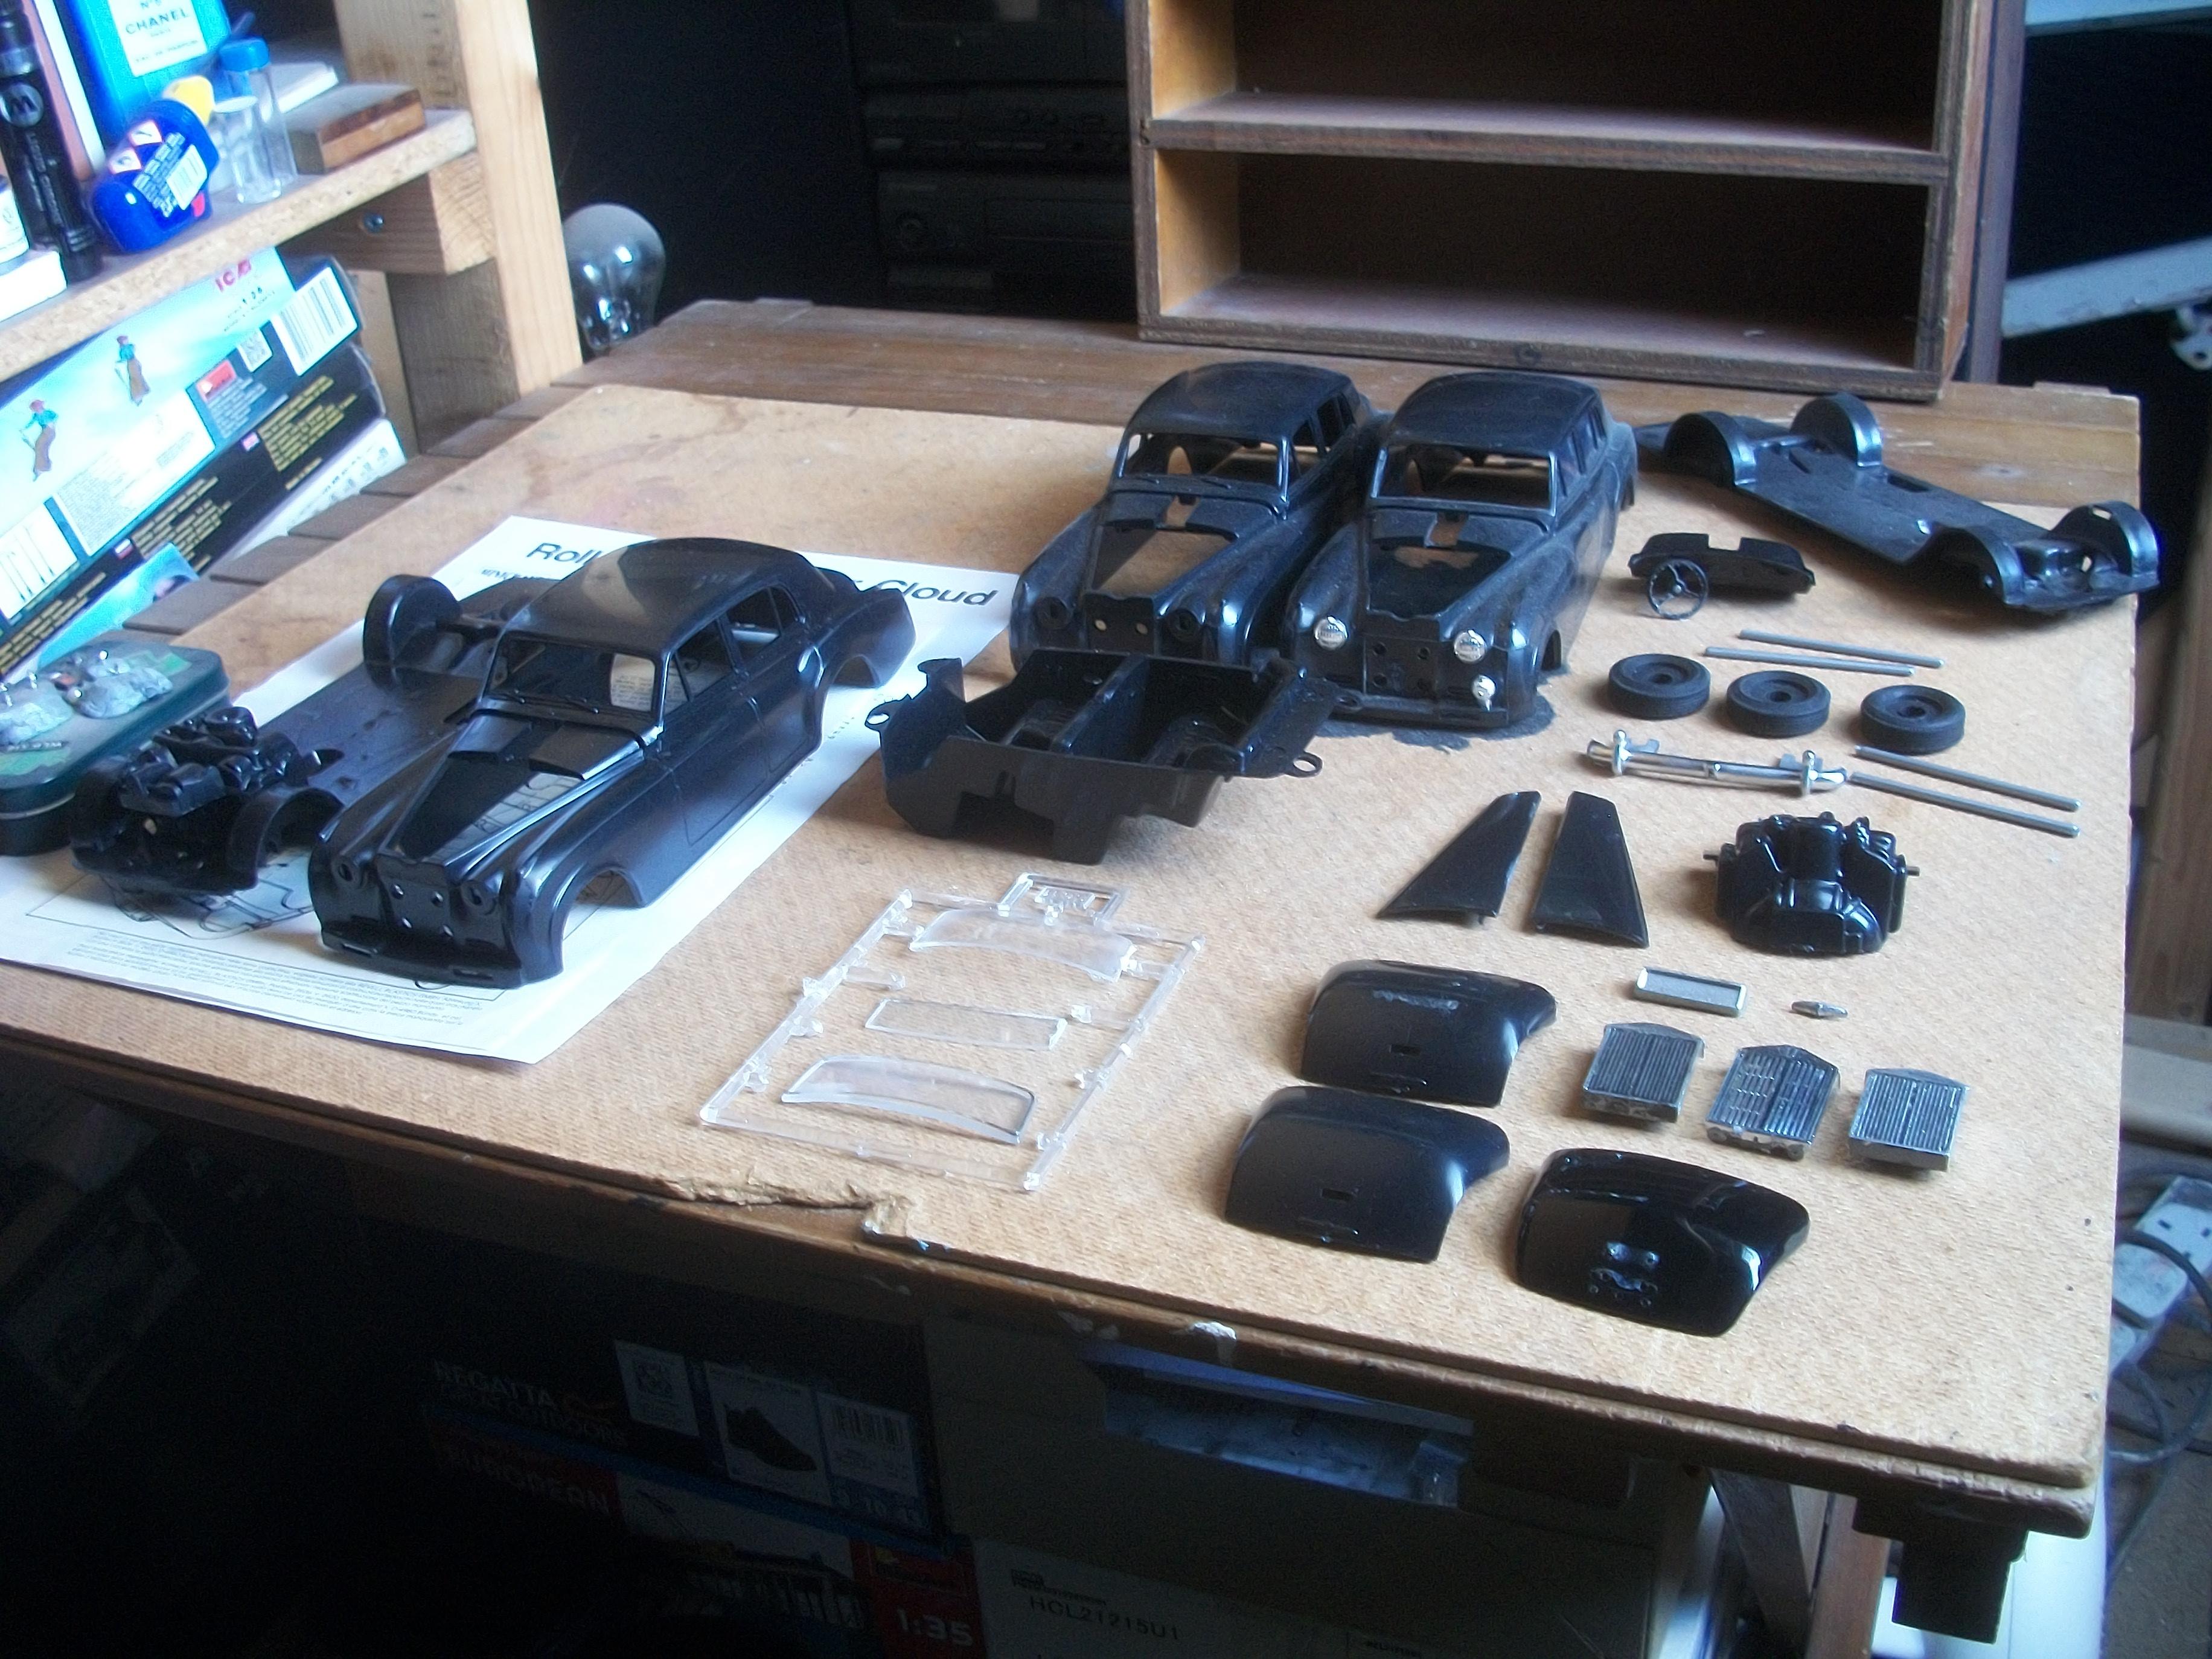
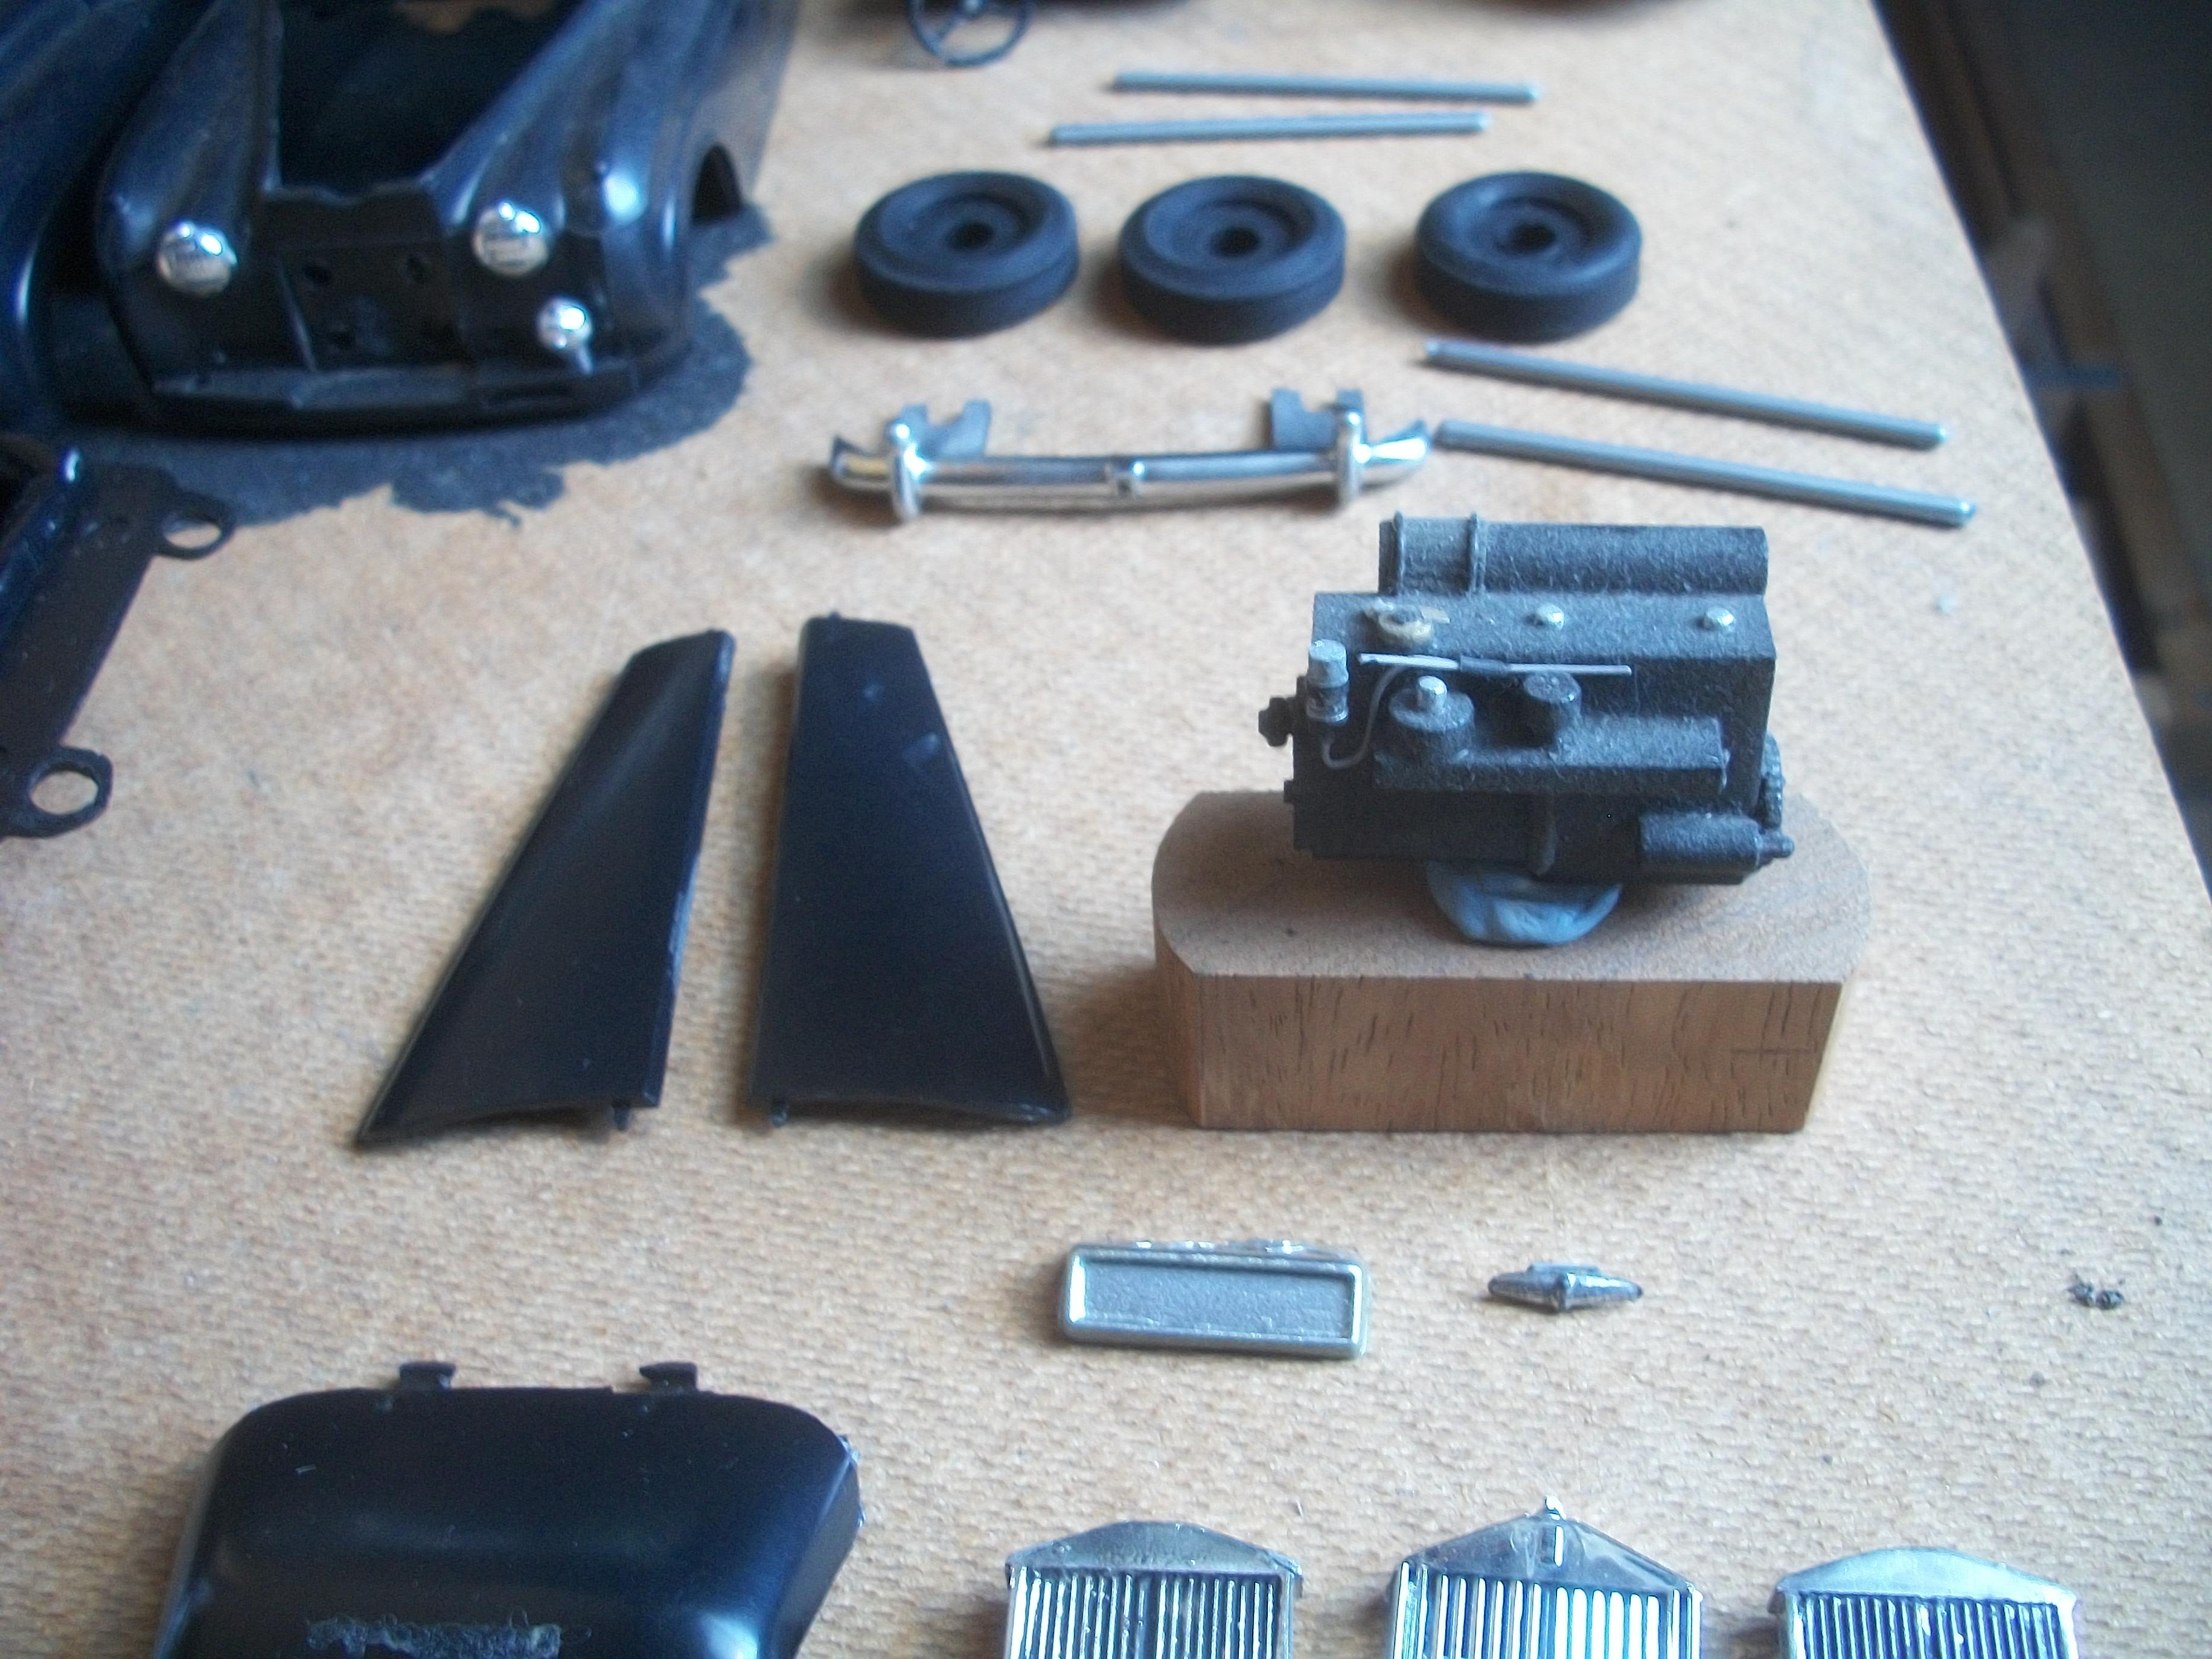
This evening I sat down at the table and conducted a feasibility study, to determine if I have the necessary parts to build this car . . . Here are some photos that show the instruction sheets for both Revell and Minicraft, as well as the parts that I have managed to find so far. What I don't seem to have is 5 wheels and 2 tyres, also one front bumper and one fog lamp. Otherwise it is all there . . . I checked on Ebay, and there are no Silver Cloud kits listed in 1:24 scale, apart from several Hubley kits in France which are quite expensive, with high shipping costs to the UK . . . There is one more box in the loft that I need to look in tomorrow, which should contain some further Rolls-Royce parts. David
-
Rolls-Royce No Chemicals, No Paint, No Harmful Glues
Anglia105E replied to Anglia105E's topic in WIP: Model Cars
Thanks a lot Trevor . . . I am hoping that I can find ways round the obvious applications, as you say. Over in the W.I.P. Dioramas section I have posted a copy of this new topic. This is under the title of The Bungalow in Foamboard, which is the project that I have been working on over the previous 7 months. That one was completed using foam board, PVA glue and emulsion paint primarily . . . David -
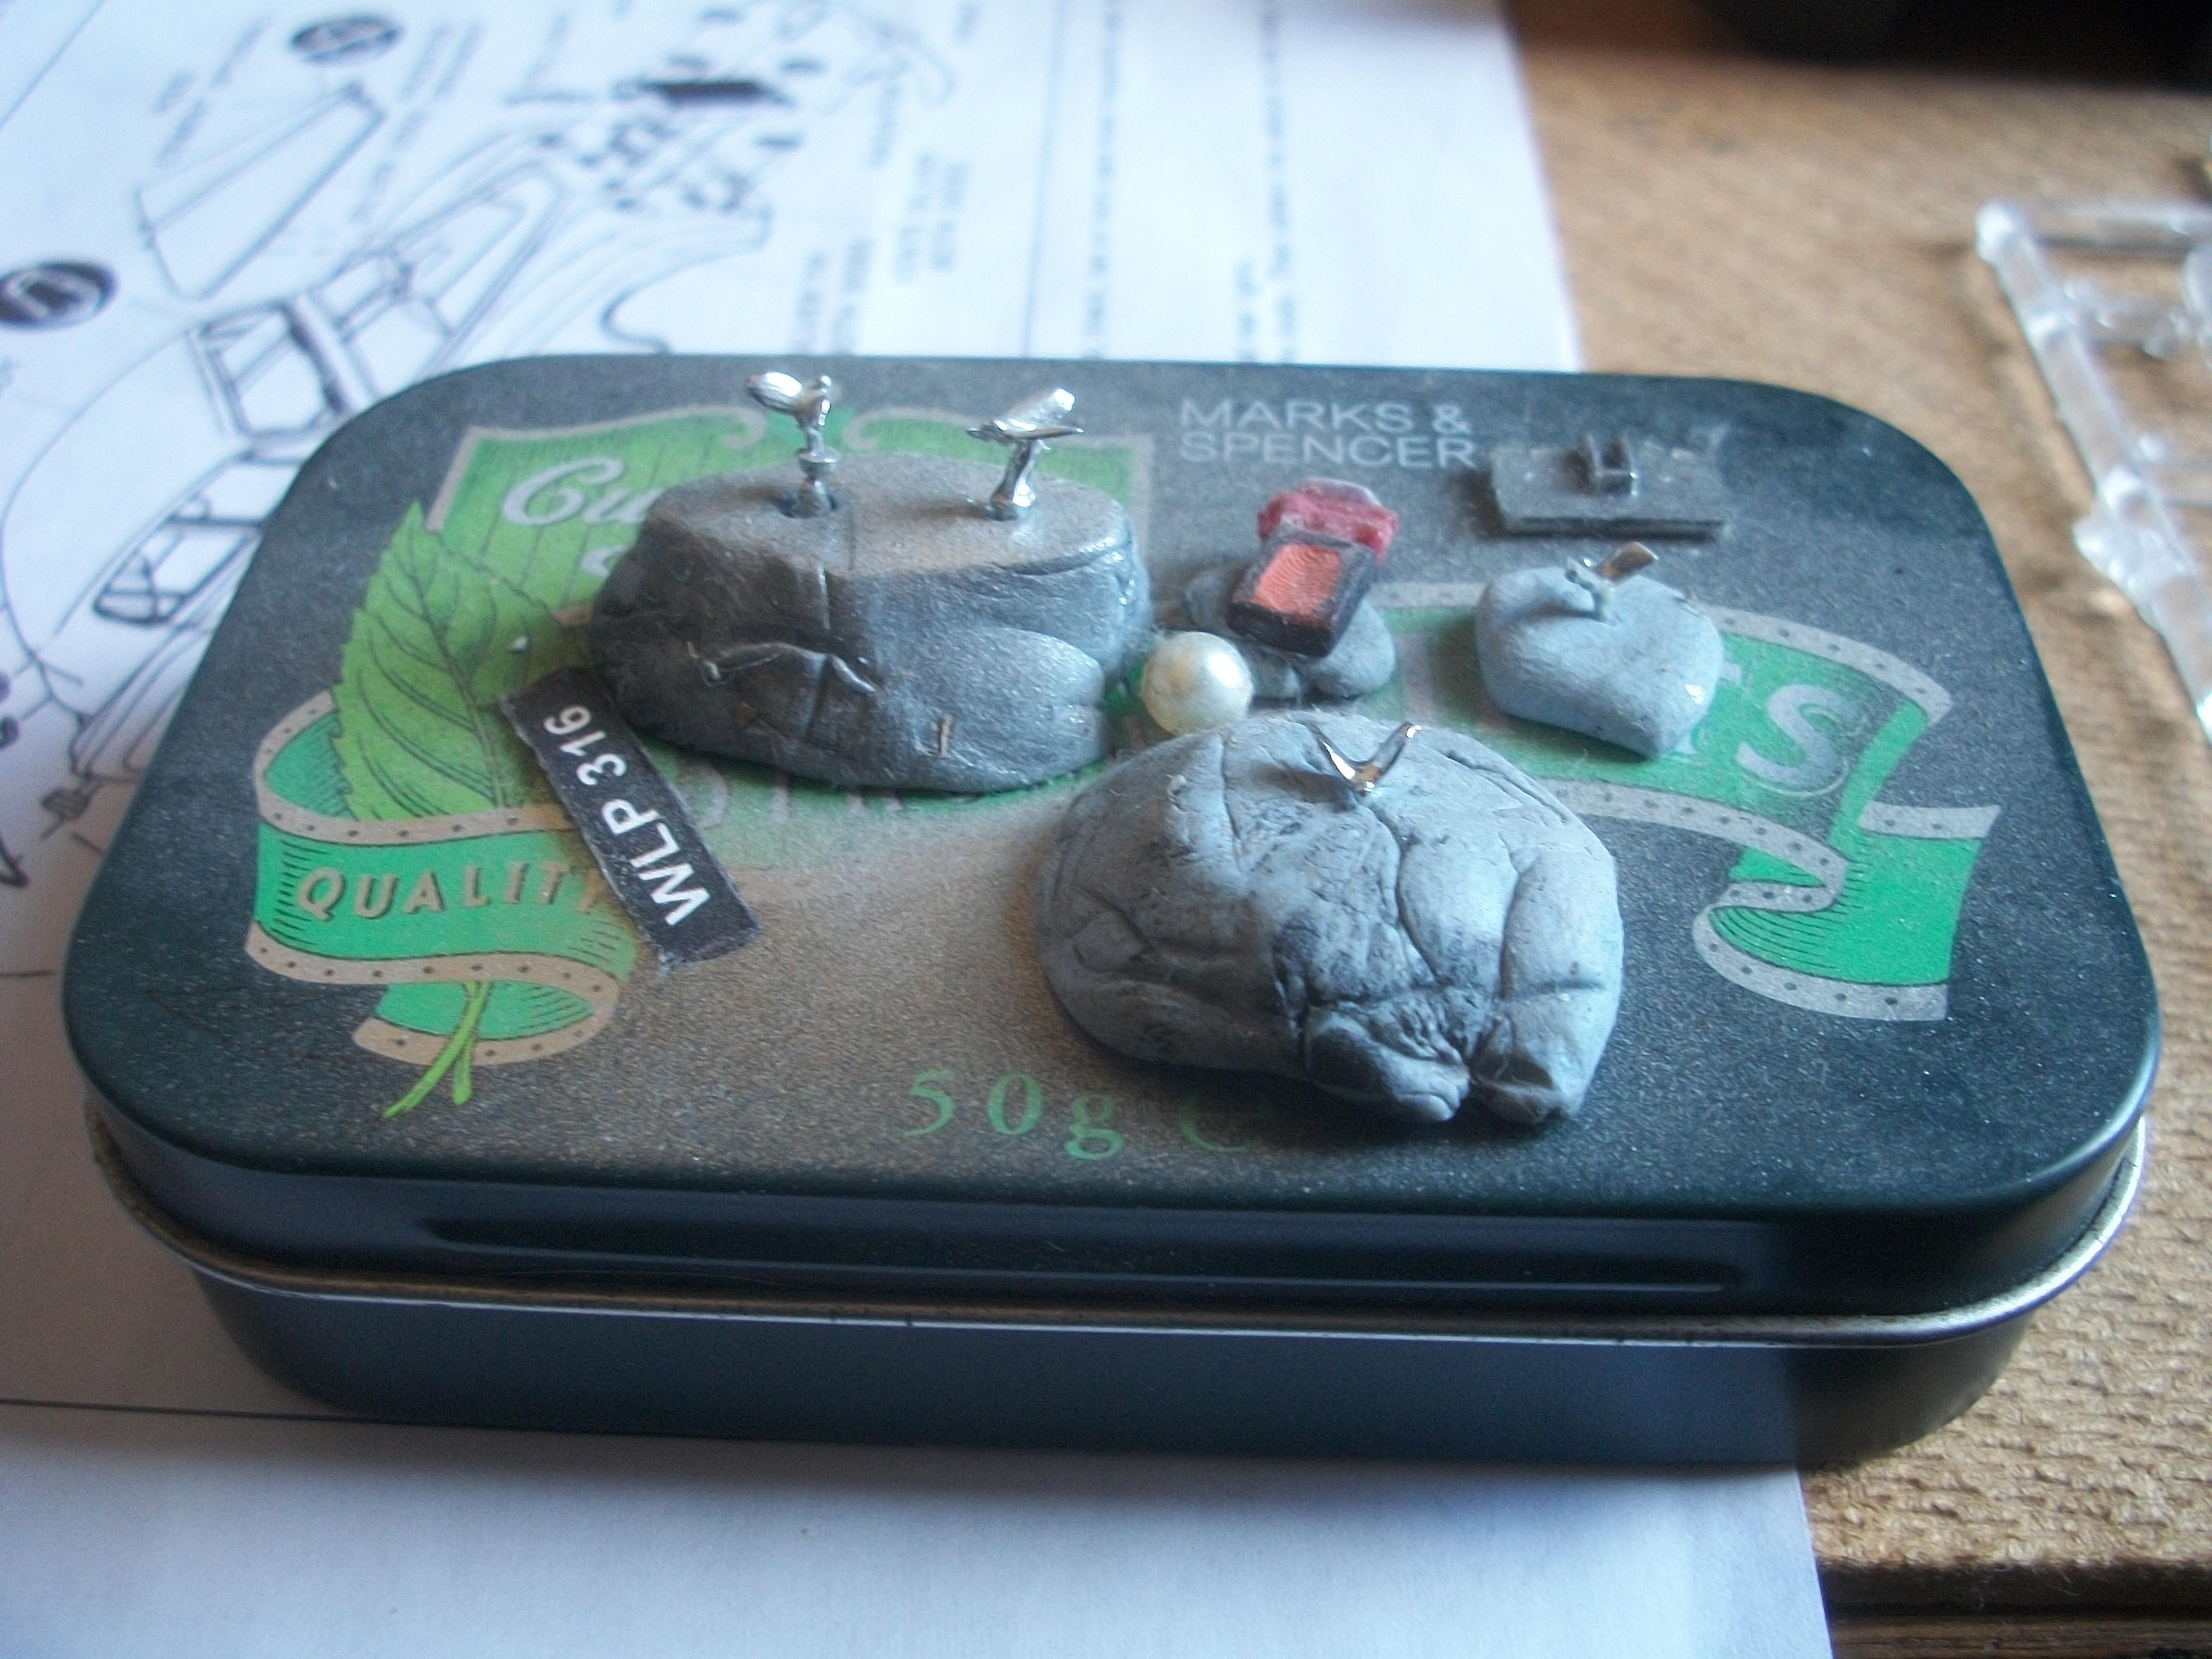
I have been diagnosed as having a lung condition known as Bronchiectasis, which is affecting my right lung only . . . A senior respiratory physician at the Derby Royal Hospital has sent a letter to my local GP doctor which includes these words ' I have strongly encouraged Mr. Watson to avoid his hobby of model car making. ' I cannot stop building model cars, and I do not want to stop building model cars . . . The consultant doctor has warned me of the dangers of using chemicals such as acetone, spray paints, enamel thinners, resins and strong glues. During the past seven years I have been wearing a mask (FFP3) while working in my loft room with the VELUX window fully open, and this has usually been for only ten minutes or so, and then leaving the room where fumes might have accumulated . . . Now I have had an idea, and I don't know if this can work, or indeed if it is even possible . . . I intend to build a 1:24 scale Rolls-Royce Silver Cloud from a Revell kit or a Minicraft kit, using parts that I have already, so I don't need to purchase another kit. My plan is to use washable PVA glue that is child friendly, also the bare black plastic of the body panels will be highly polished with no paint applied whatsoever. I can use BMF for any chrome work, so no Molotow Liquid Chrome or silver or chrome paint. The interior seats upholstery can be given a coat of PVA glue to simulate the leather material, and then coated with water based emulsion paint to provide the chosen colour. The PVA glue does take a long while to set fully, but when it does set this glue does achieve quite a strong bond if handled with care. The polish that I intend to use will be Meguiars Carnauba Wax, or alternatively natural Beeswax, so no toxic chemicals. There are only 26 parts in the kit and I can scratch make clear plastic window glass, as well as any other modified parts that are required for this build . . . I would be very interested to hear the thoughts and opinions from fellow MCM Forums members regarding this project, and maybe this idea has been attempted previously? David Watson
-
Wow ! That is quite a stash closet you have there David . . . There must be a couple of kits hidden away in there . . . David W.
-
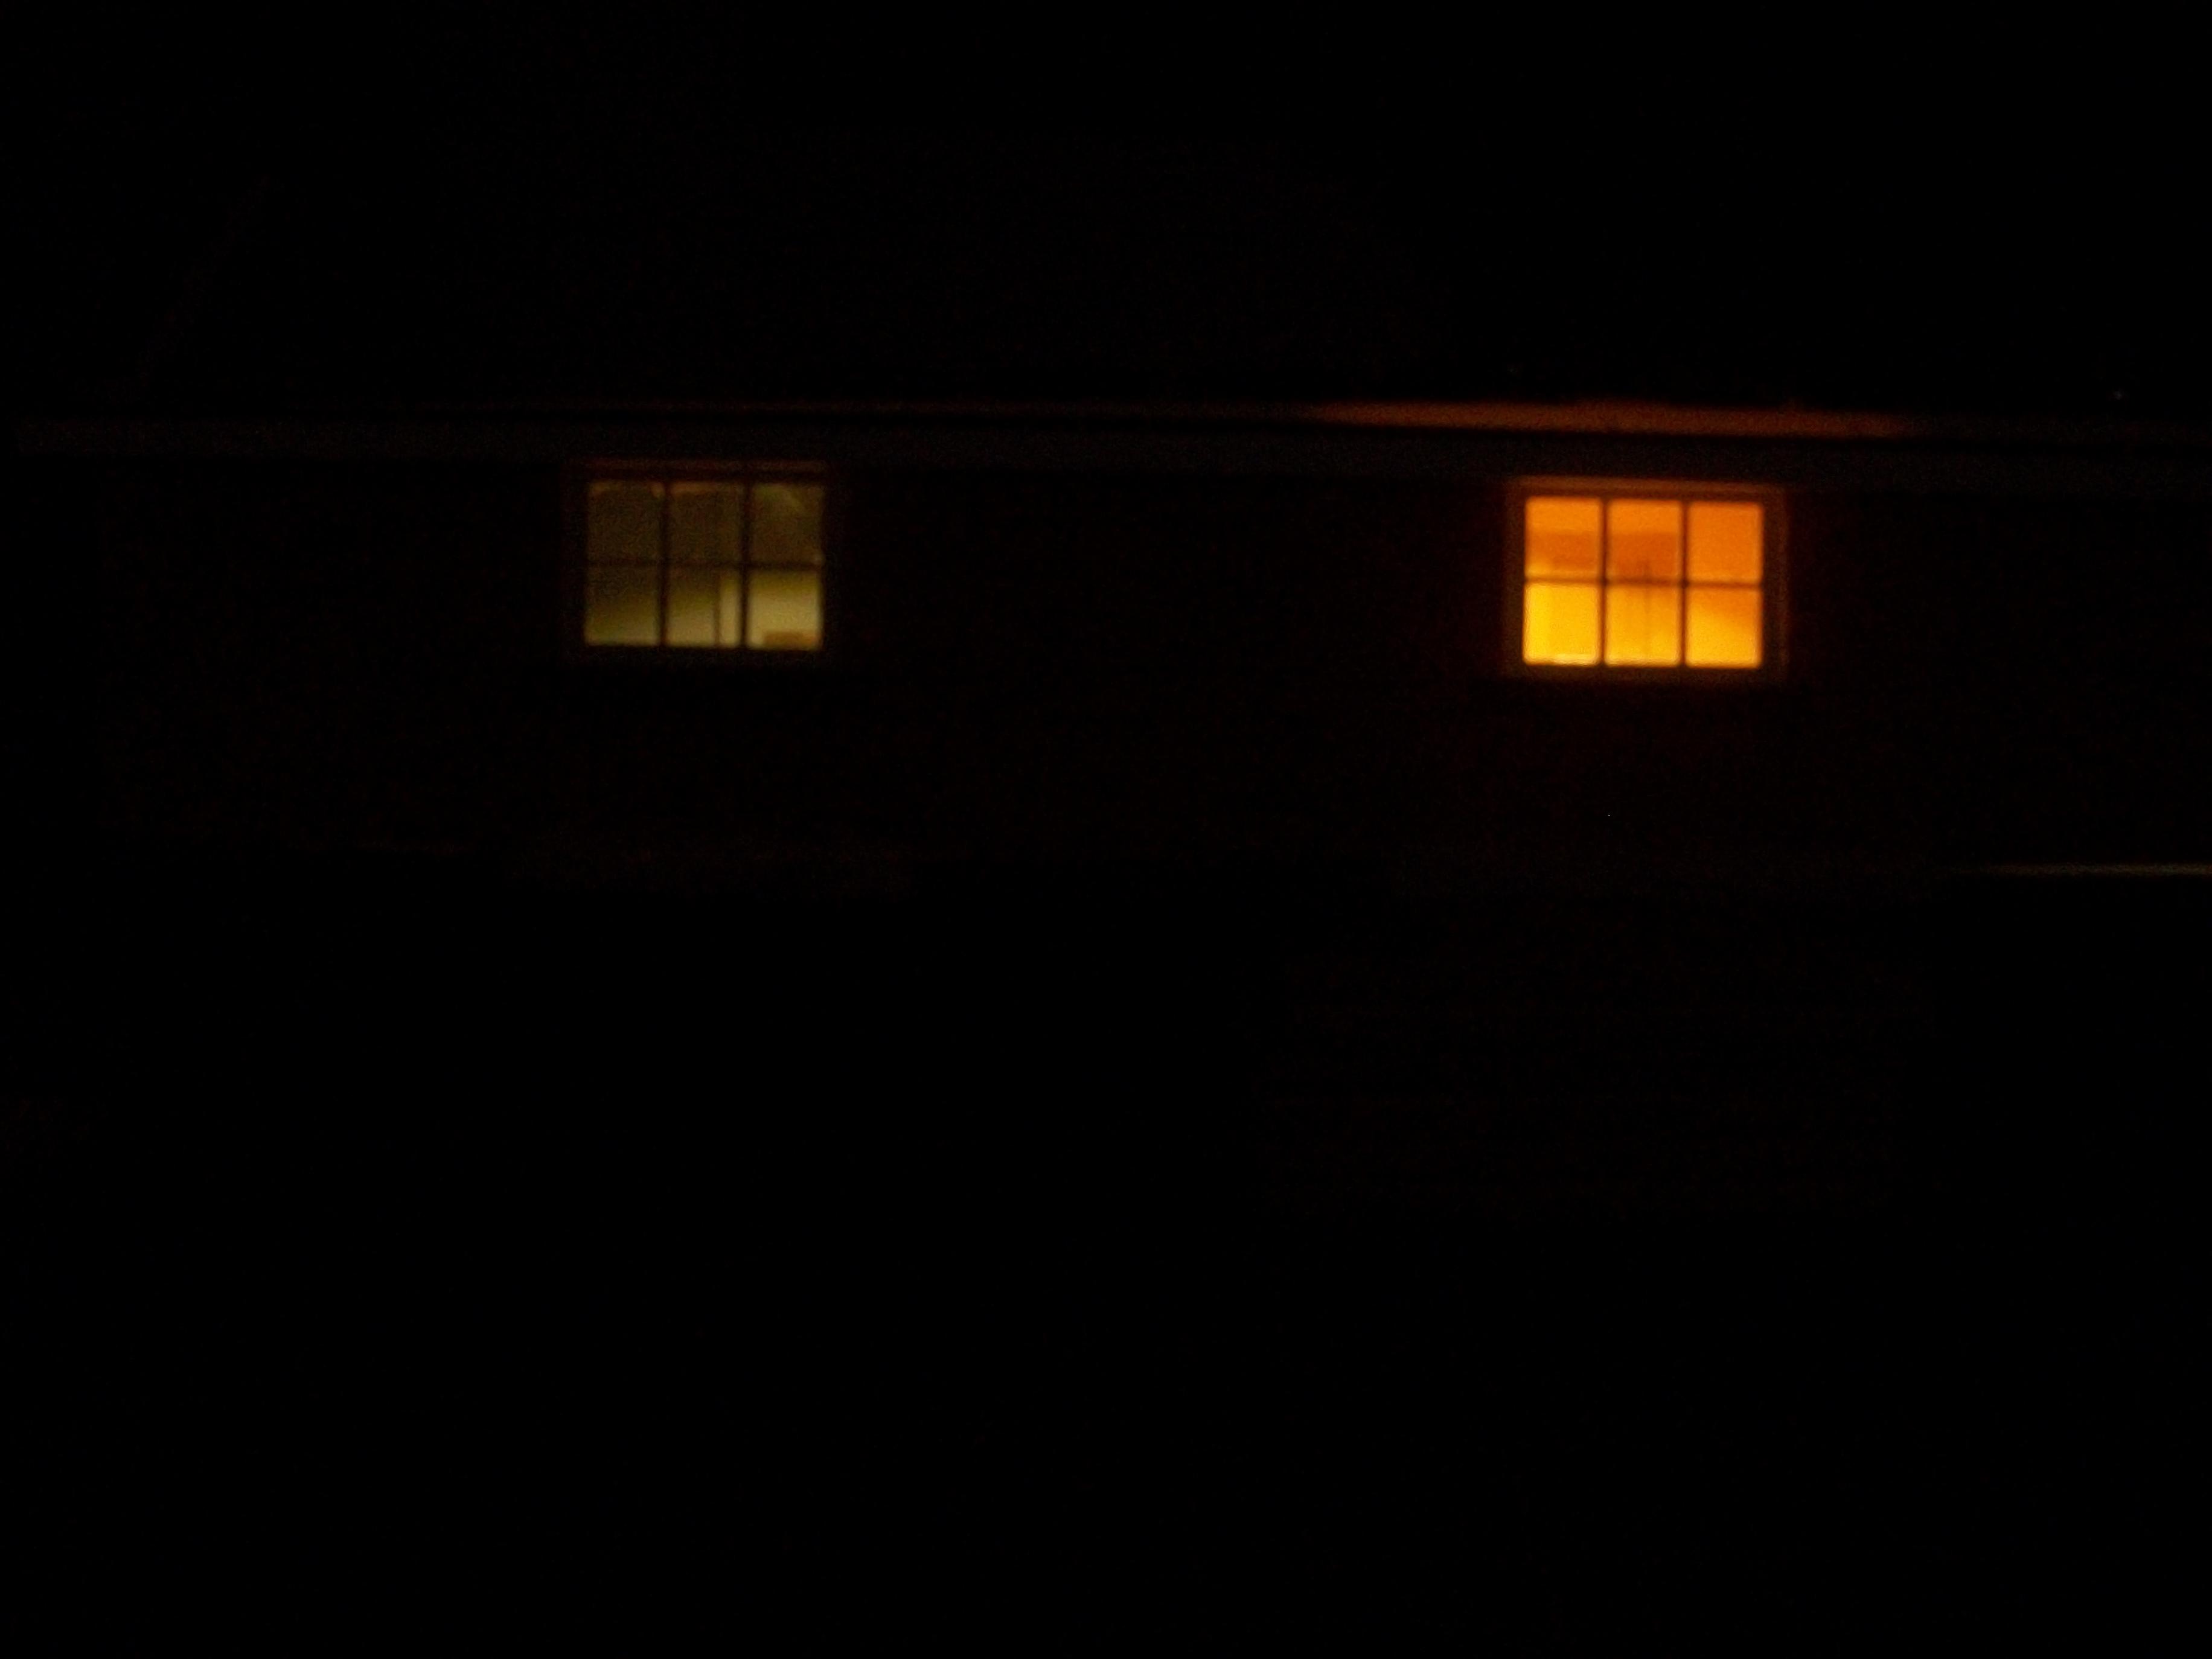
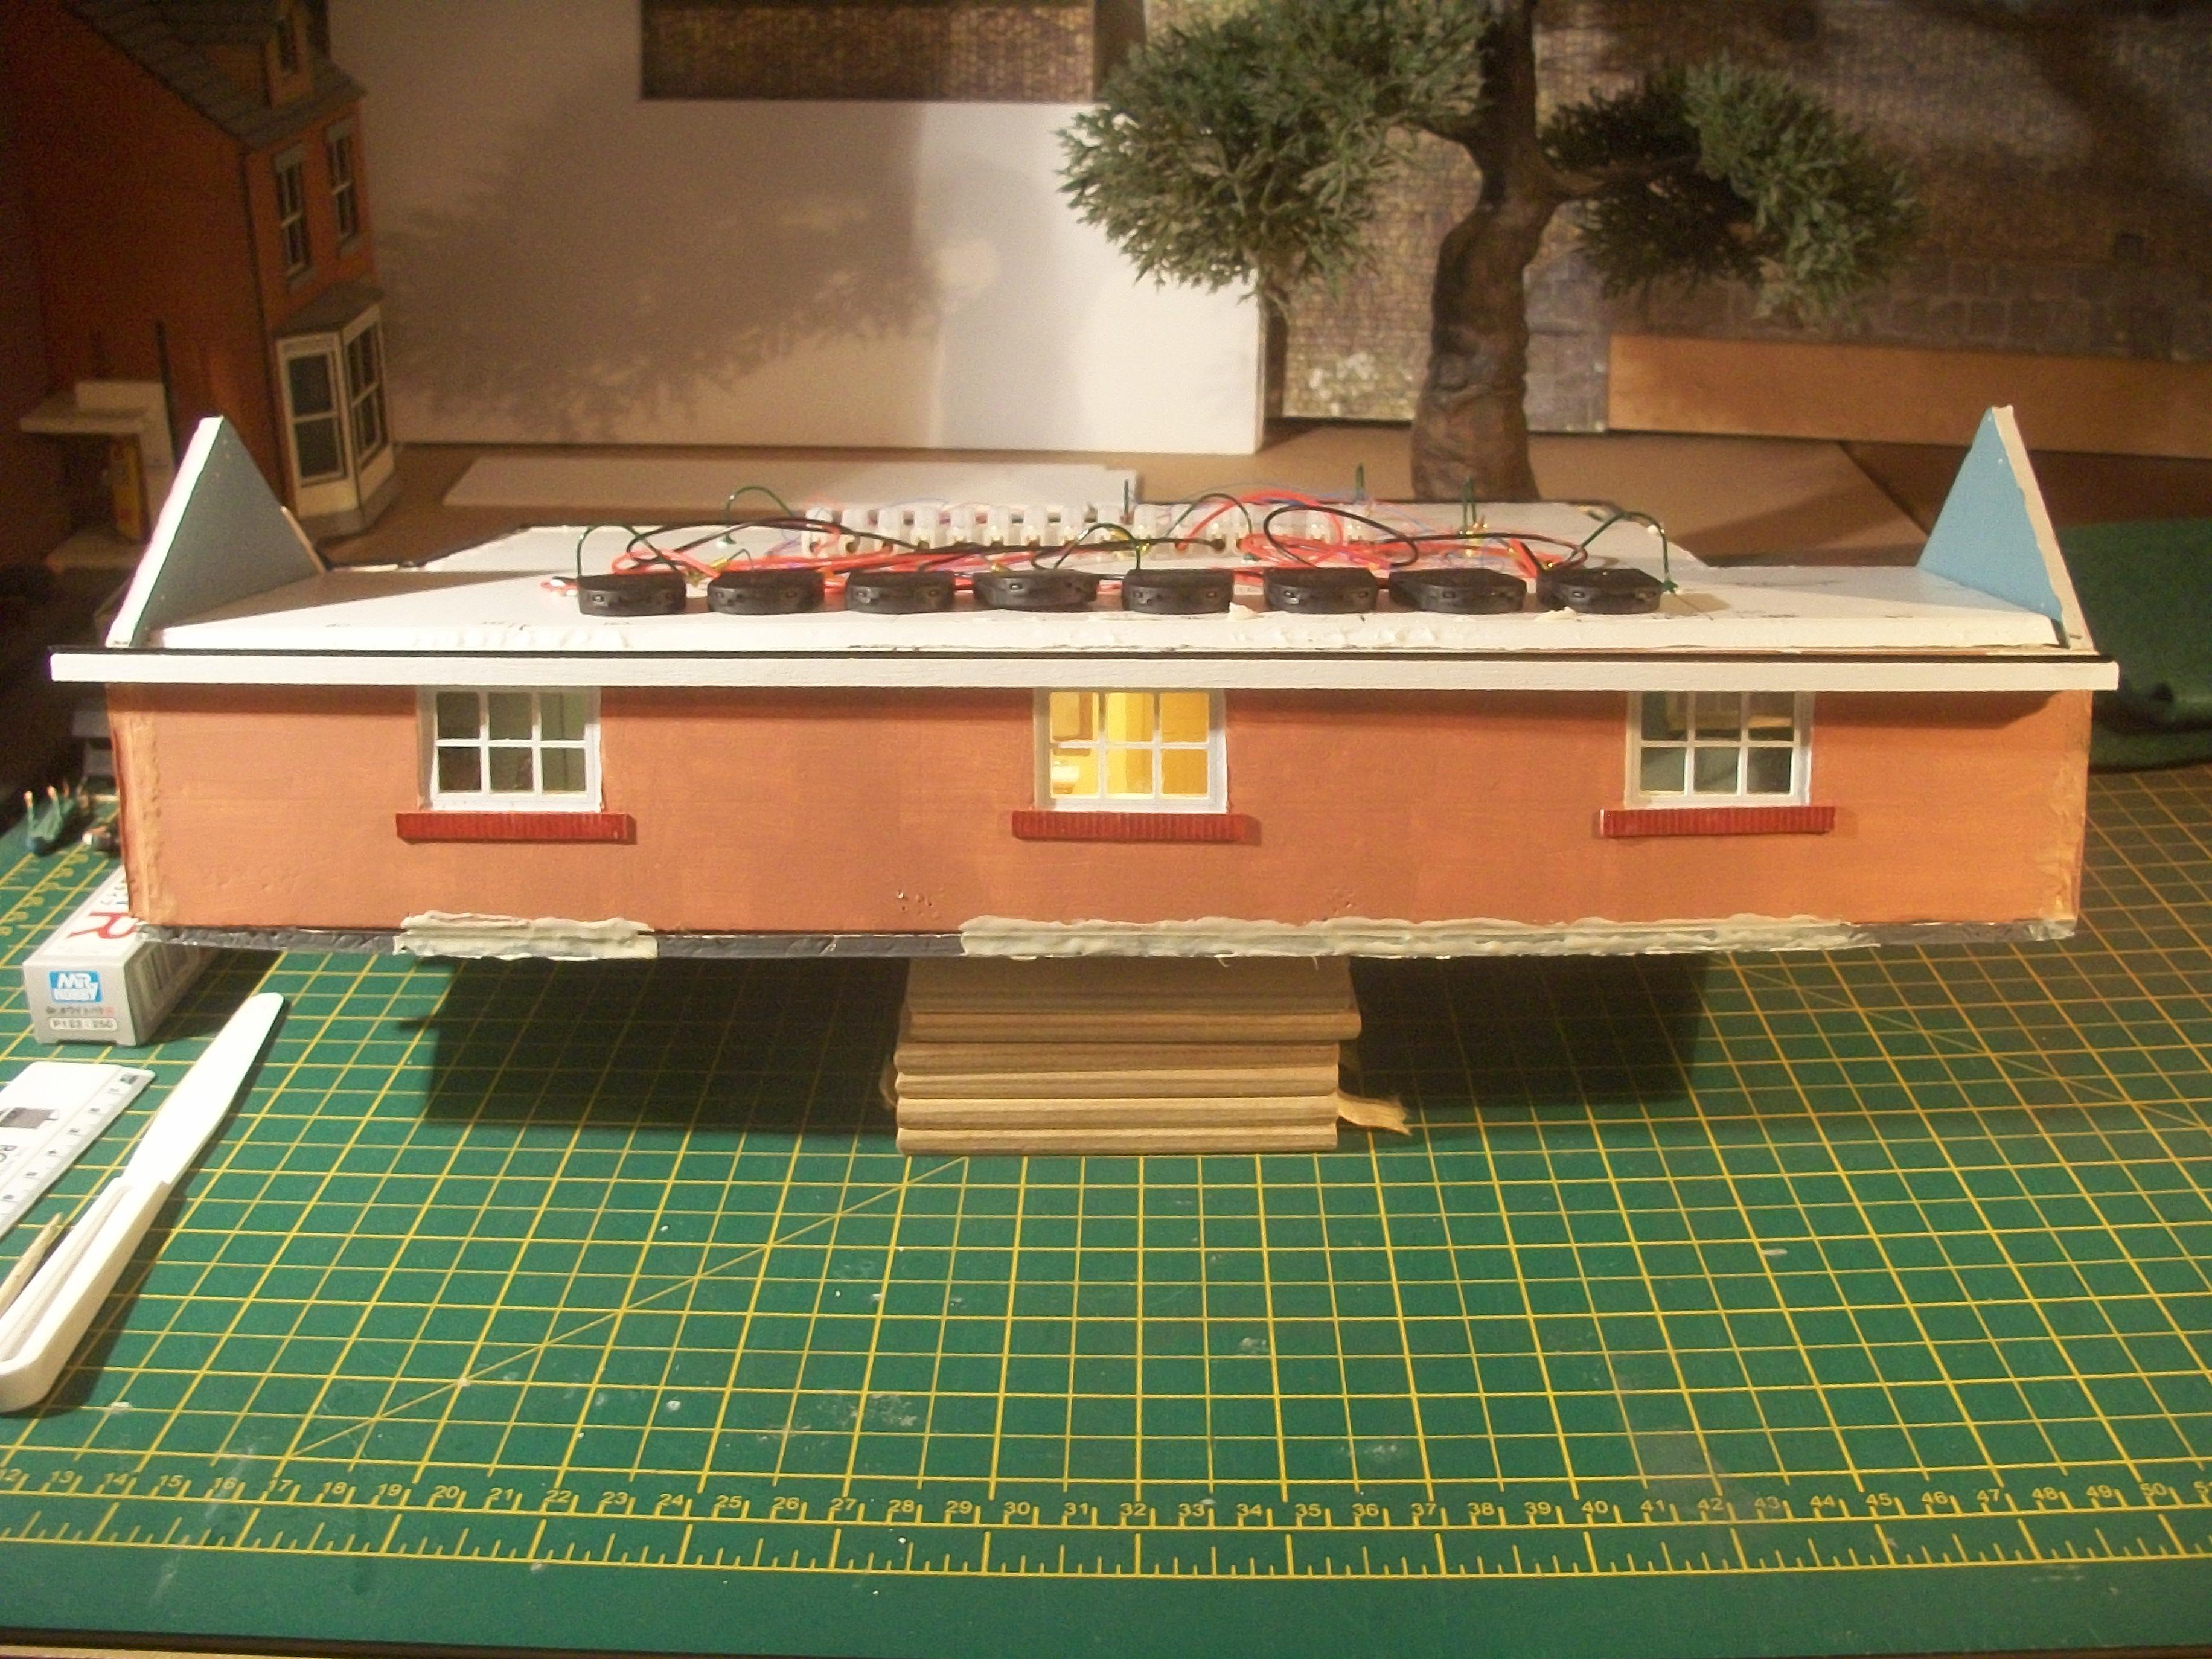
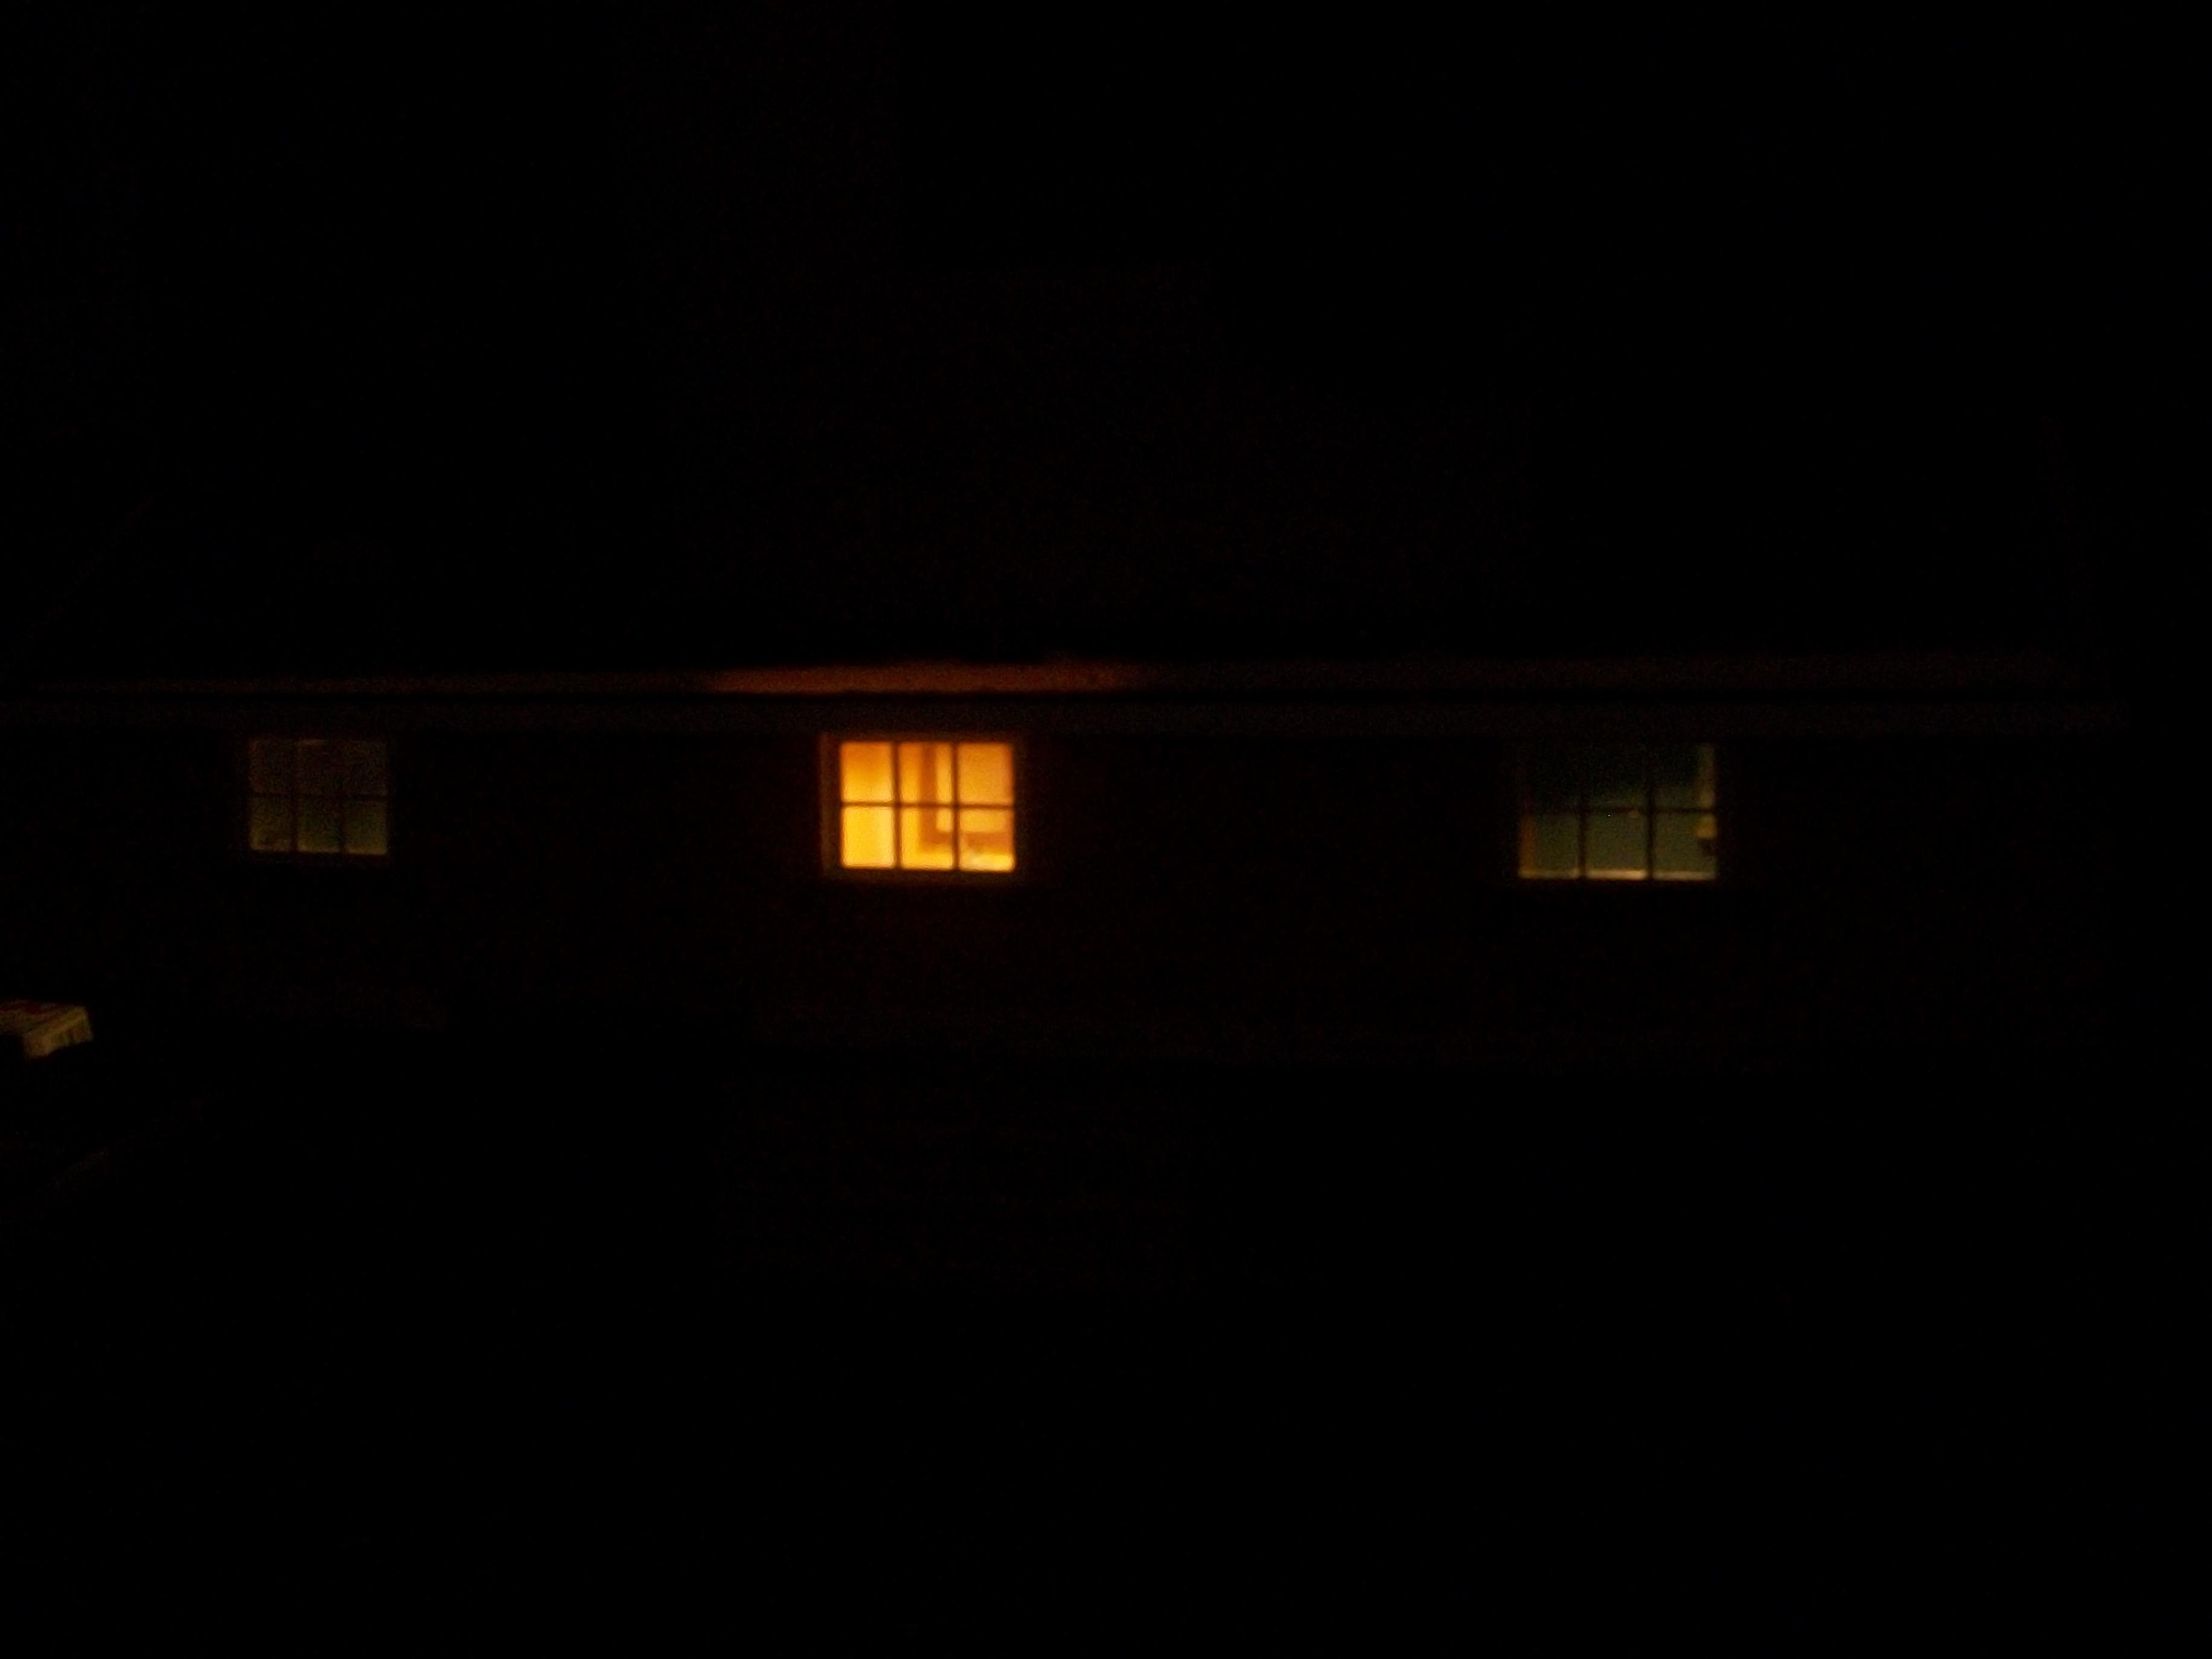
Finally got around to filling those gaps along the lower edge of the long wall today . . . Using Mr WHITE PUTTY R filler, I applied a small amount to the areas that I had previously marked in pencil . . . This will be left overnight to set, and can then be sanded a little with an emery board . . . The filled areas will be painted with the rose pink colour for the wall and the grey colour for the outer edge of the baseboard . . . I checked the filled gaps with the exterior room light switched off, and the interior lights of the model switched on. Thanks for your patience while following this build. David
-
Hi David . . . I think detail painting was probably a good idea, partly to lift your own spirits, and also to bring out some interesting aspects of the ship model. I am guessing that you would like to get this one out of the way and off the workbench pretty soon ! Any thoughts on what you might bring to the table for your next project ? David W.
-
Using that Minicraft kit of the Rolls-Royce Silver Cloud you have the basic setup from which to build your hot rod idea Billy . . . Although a hot rod version of this fine motor car is not my ' cup of tea ' really, I shall be interested to see how you get on ! David
-
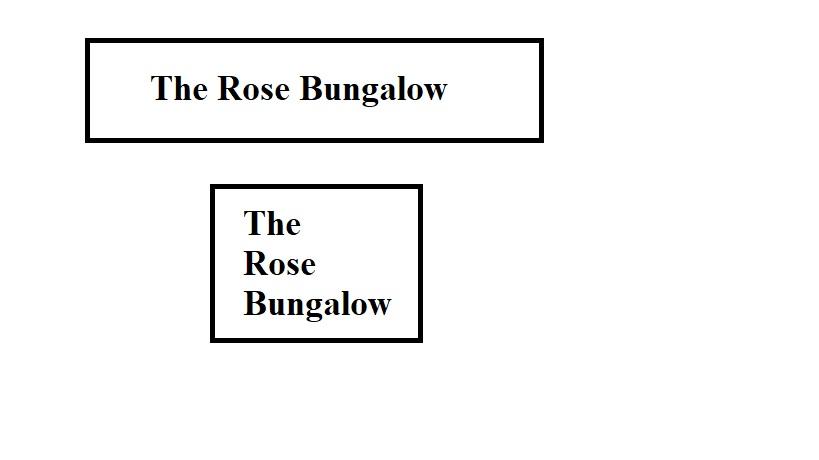
Your suggestion to have the placard at the base of the diorama, as opposed to having the placard as a house sign is something that I can consider certainly. When I mentioned arranging the words of the sign vertically, I was thinking of them as being centrally aligned, as shown below . . . David W.
-
Thanks David G. . . . My first reaction to seeing the slight gaps was to go in with the filler, and then paint over the filled areas. Then I had the idea of using ground cover in the form of flowered tufts, which works well where there is a area of baseboard. Over on the other side of the bungalow there is no baseboard beyond the base of the wall, so the use of filler here would be a better option . . . I have only used three of the twenty-one flowered tufts, so more of these could be positioned along the lower walls where desired. My feeling is that ' The Rose Bungalow ' sign near to the front entrance of the property is too large. Also, I would prefer this sign to have the words arranged vertically rather than horizontally, as shown in the image below . . .
-
I am sure that you must have discovered the clever use of scenery while working on your own farm diorama . . . We have to use our skills wisely . . . David