camaro69
-
Posts
272 -
Joined
-
Last visited
Content Type
Profiles
Forums
Events
Gallery
Everything posted by camaro69
-
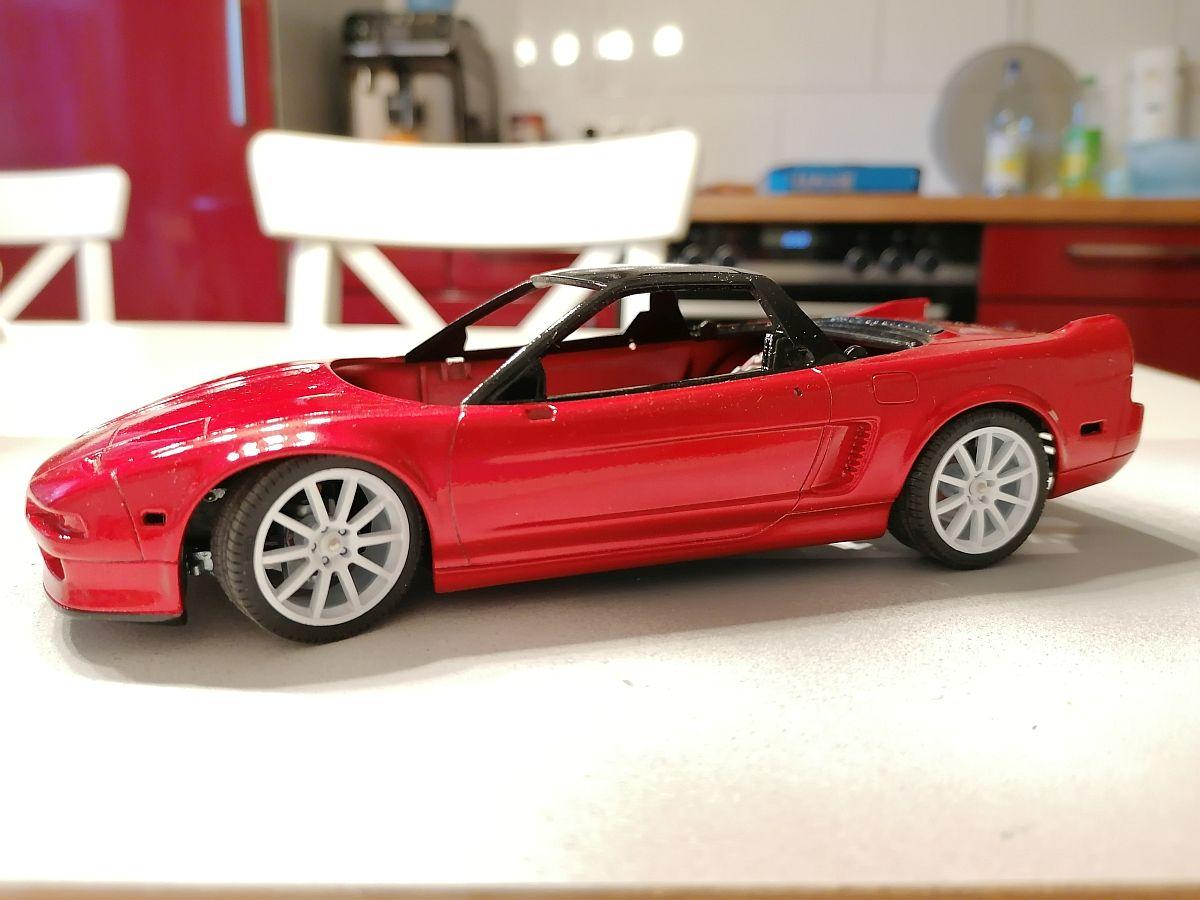
Finally finished this one today. More pics under glass, Rico

-
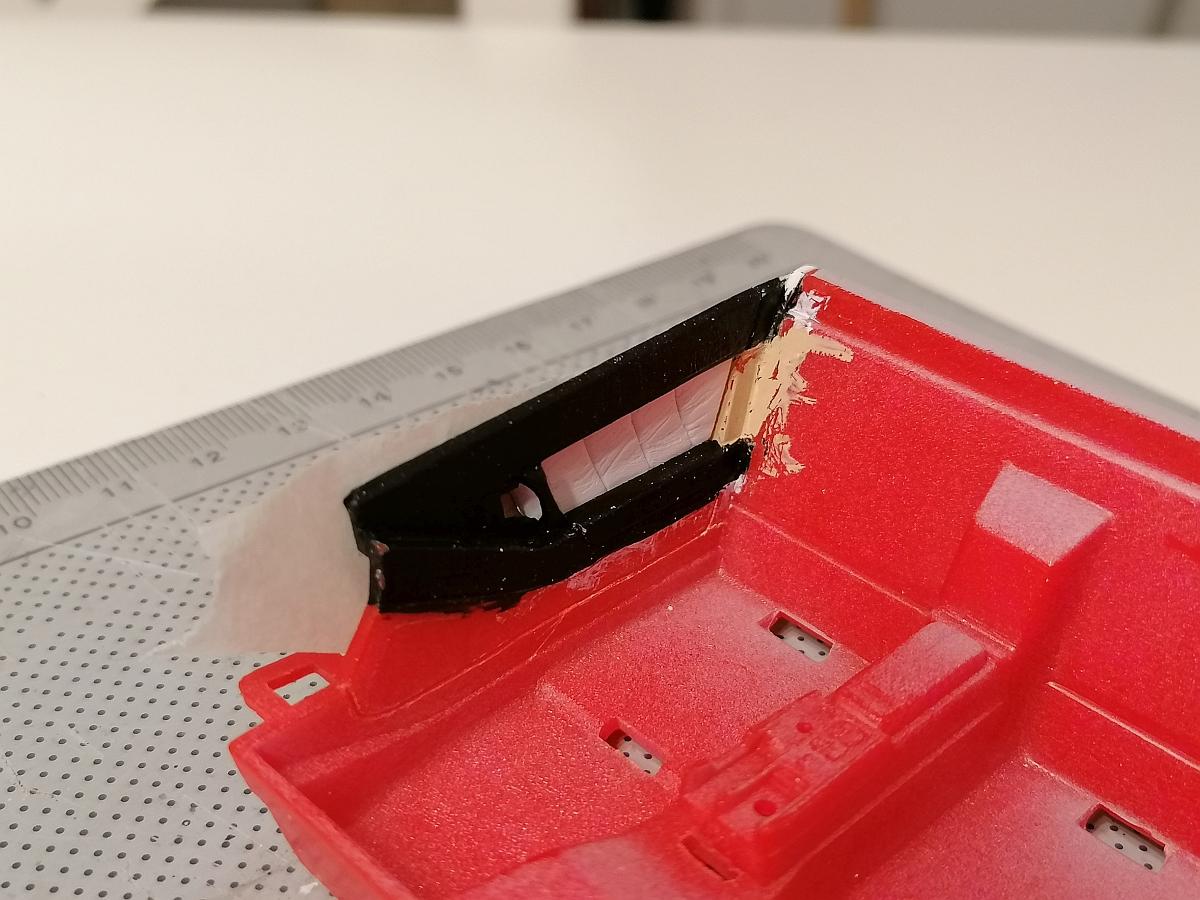
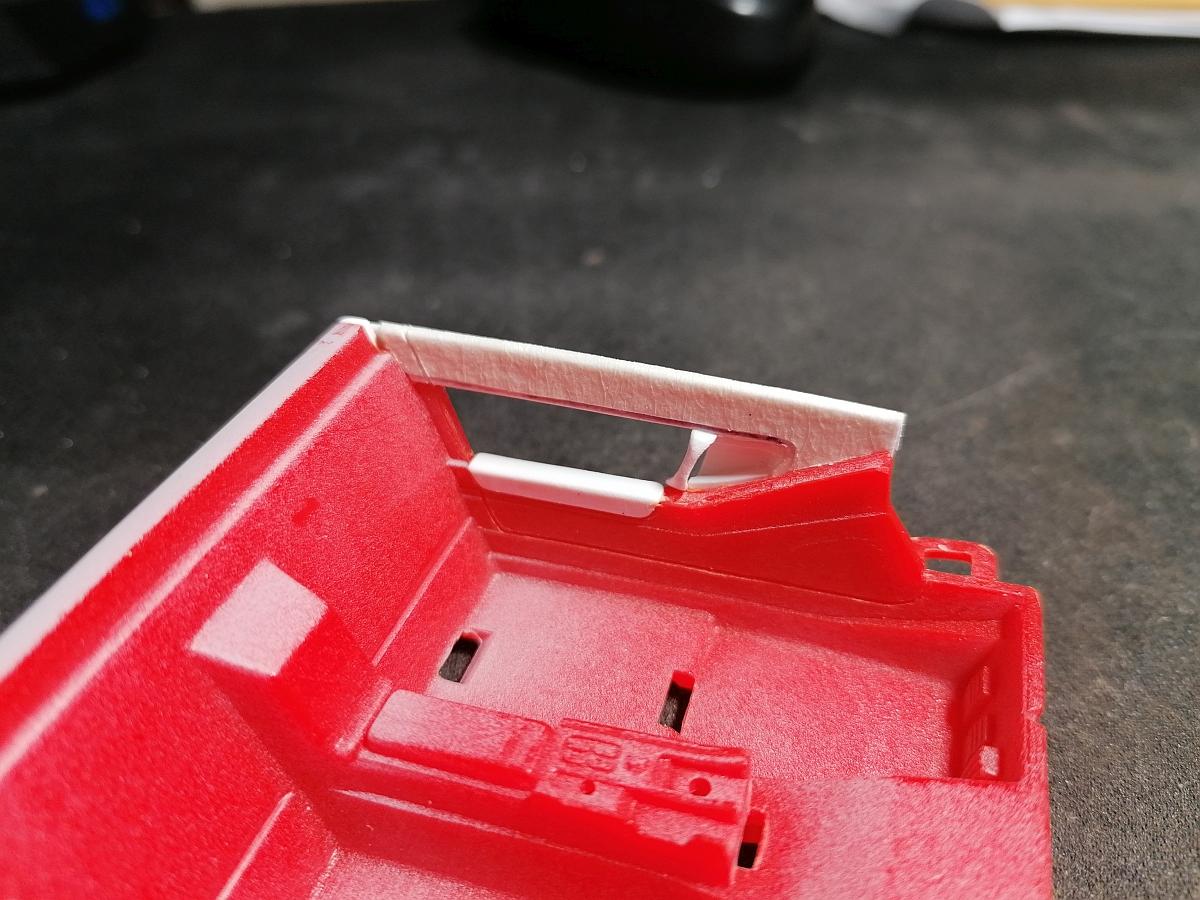
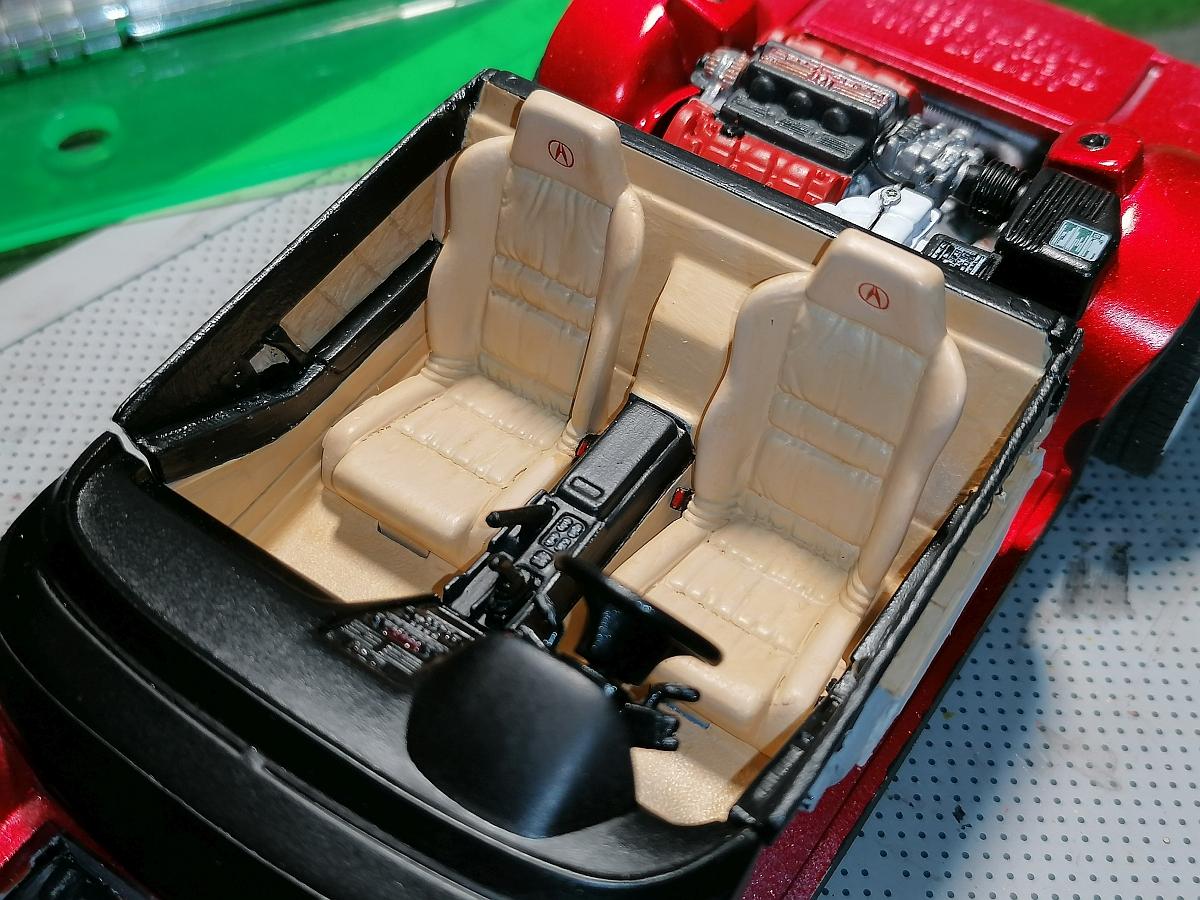
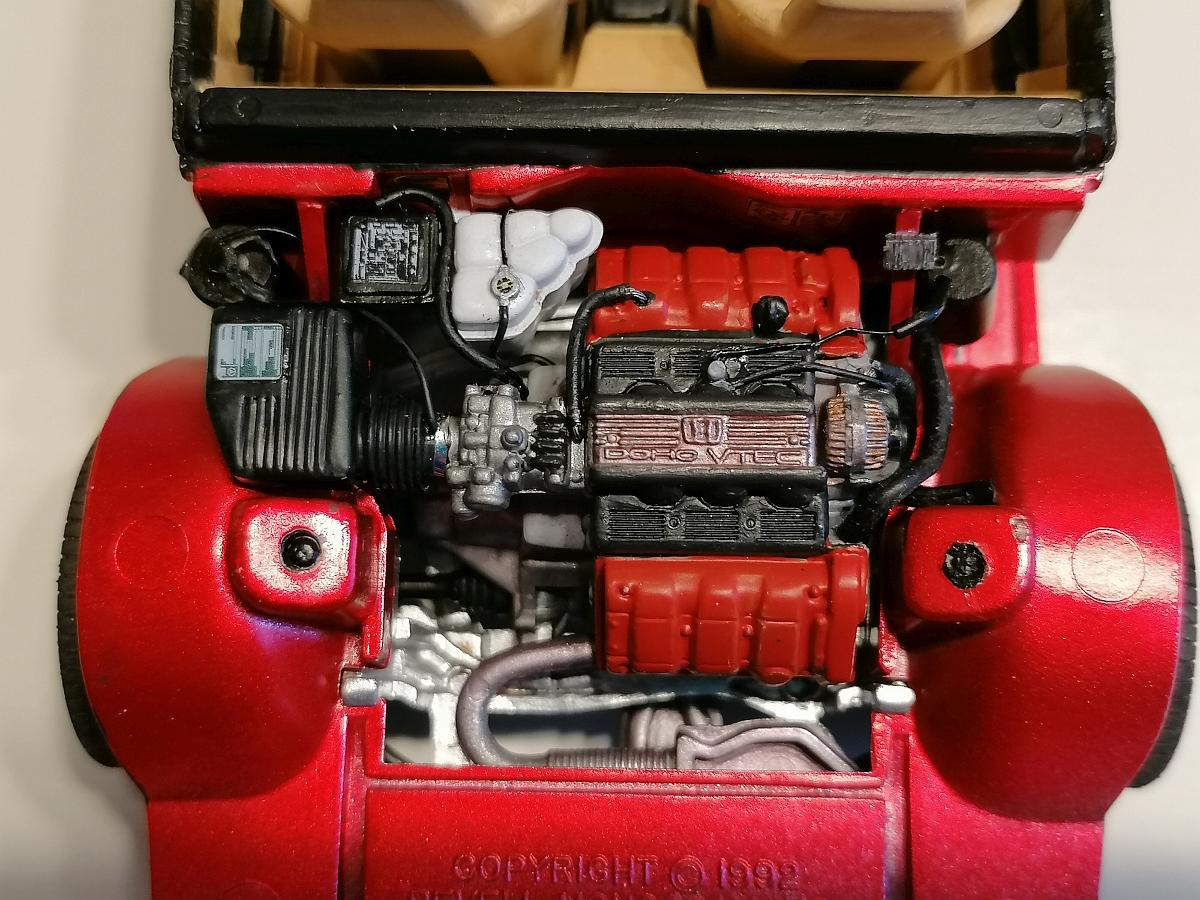
Some other small things done on this one. First built some new upper door panels from scratch. Cutted out the kit ones... rebuilt the upper panel and the door handle... made new upholstery parts out of styrene stripes... Then the rest of the interior got it´s color, seats got seat belt buckles also from scratch... After that I detailed the engine a bit using different sizes of black wire and scratchbuilt charcoal filters. Also the bracings left and right were added using some styrene profile. That´s for today. Hope you´ll like it. Rico
-
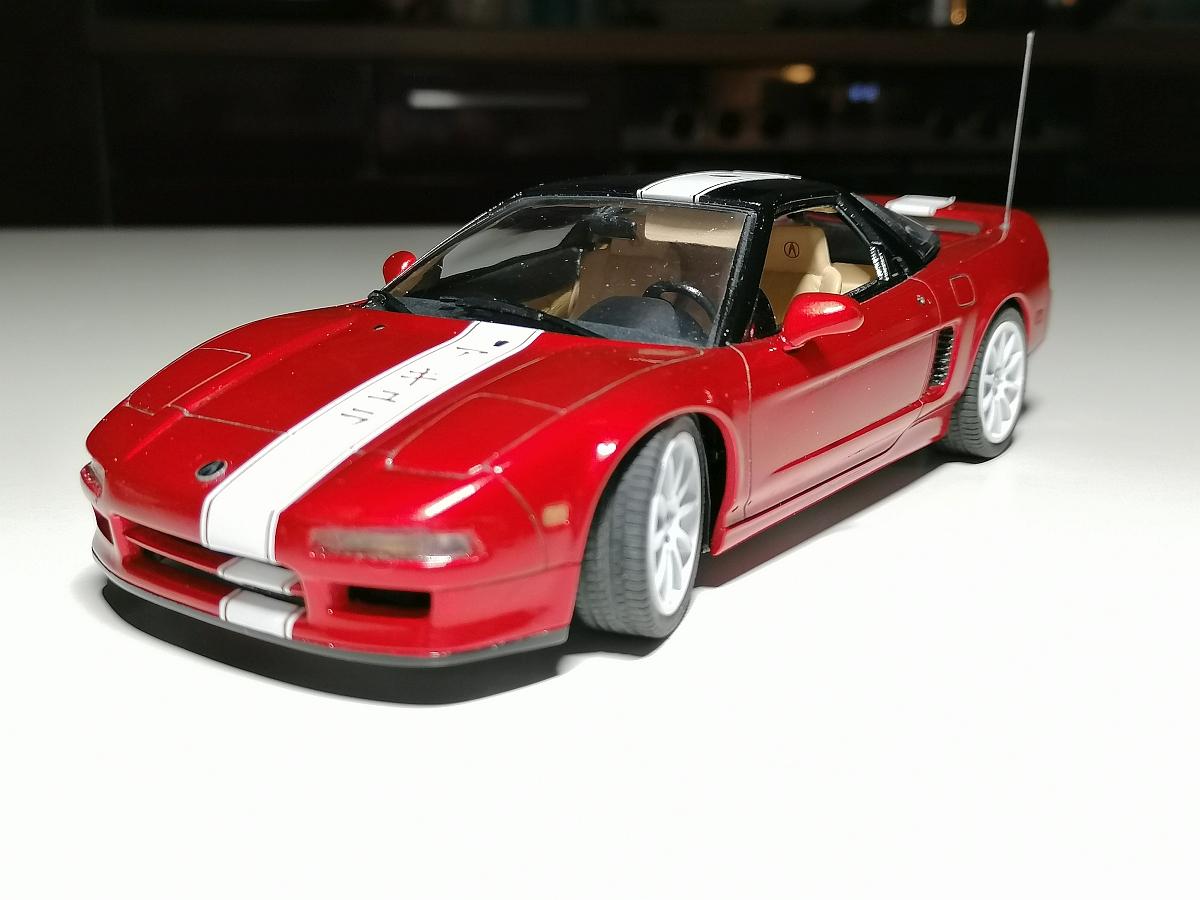
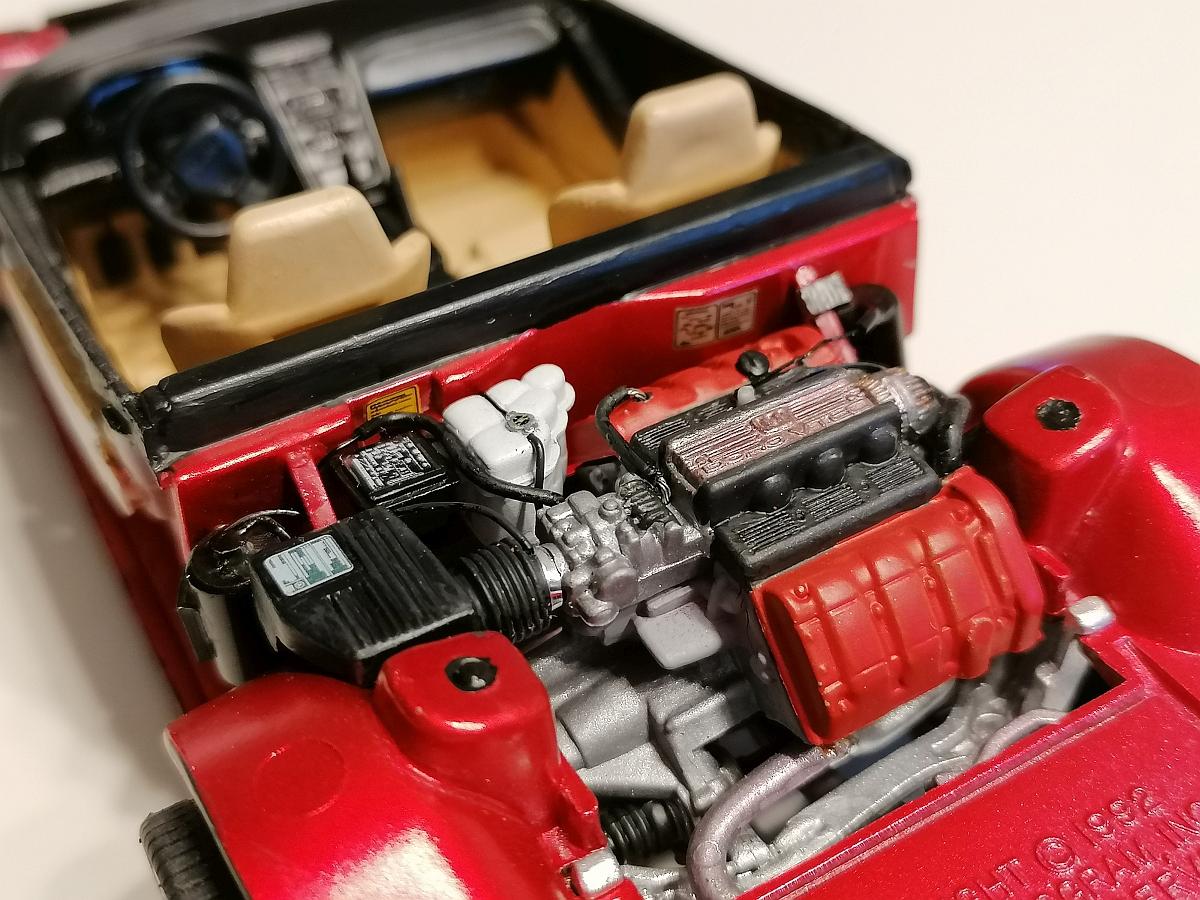
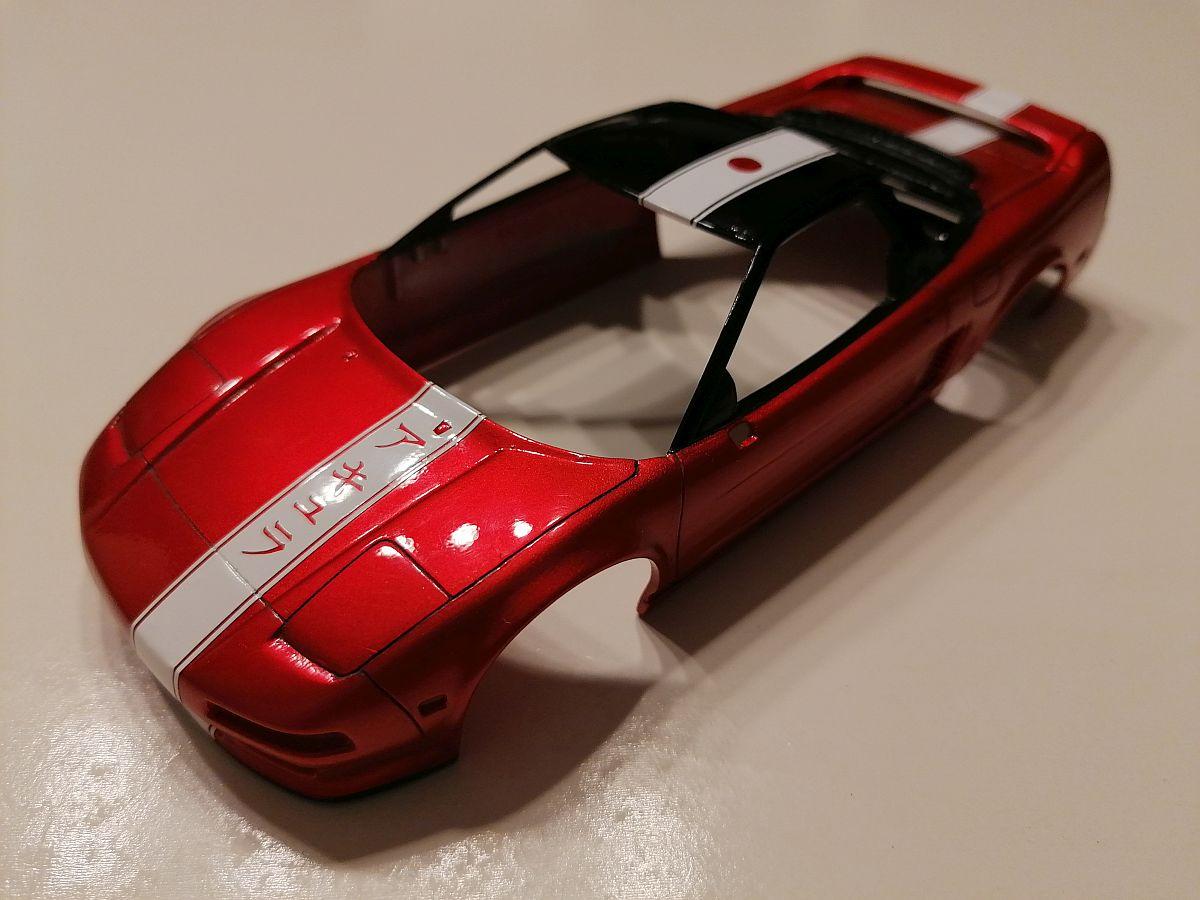
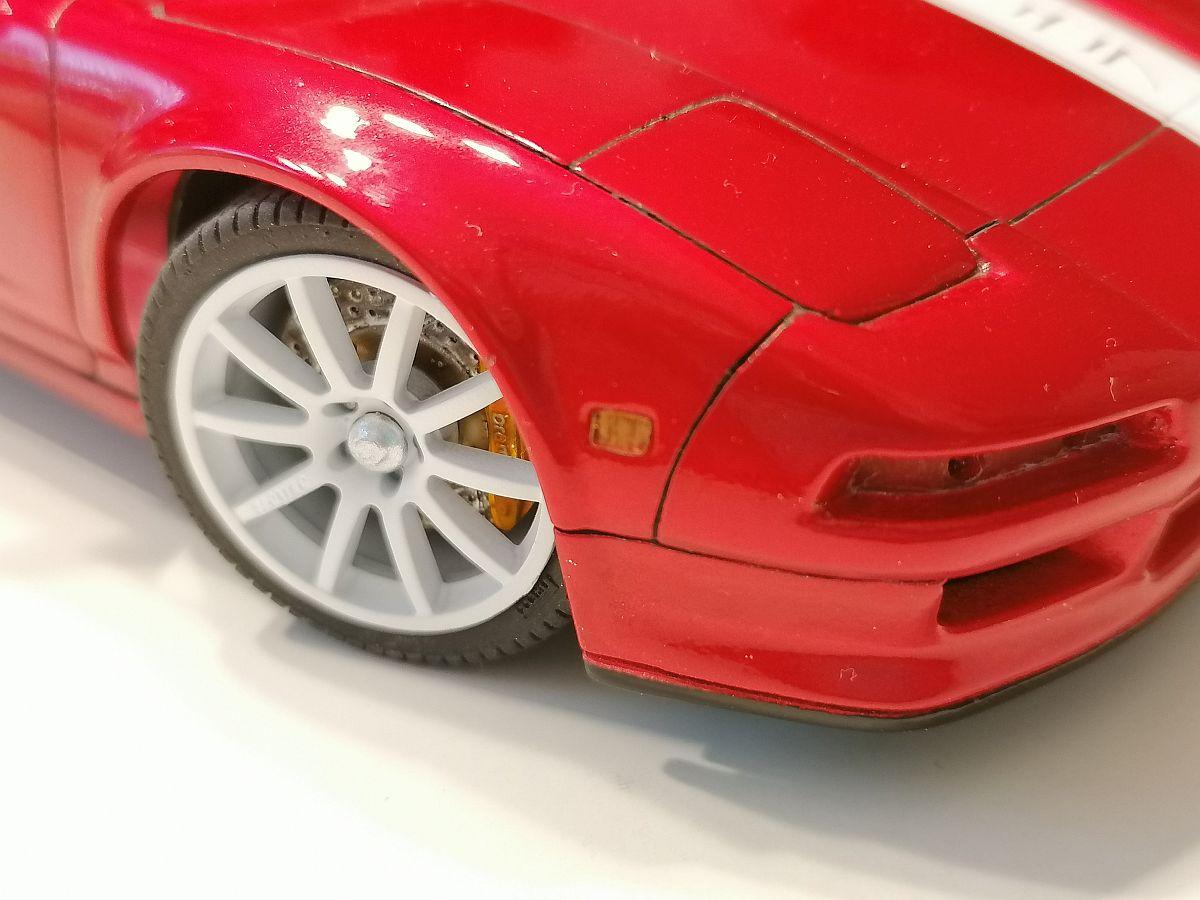
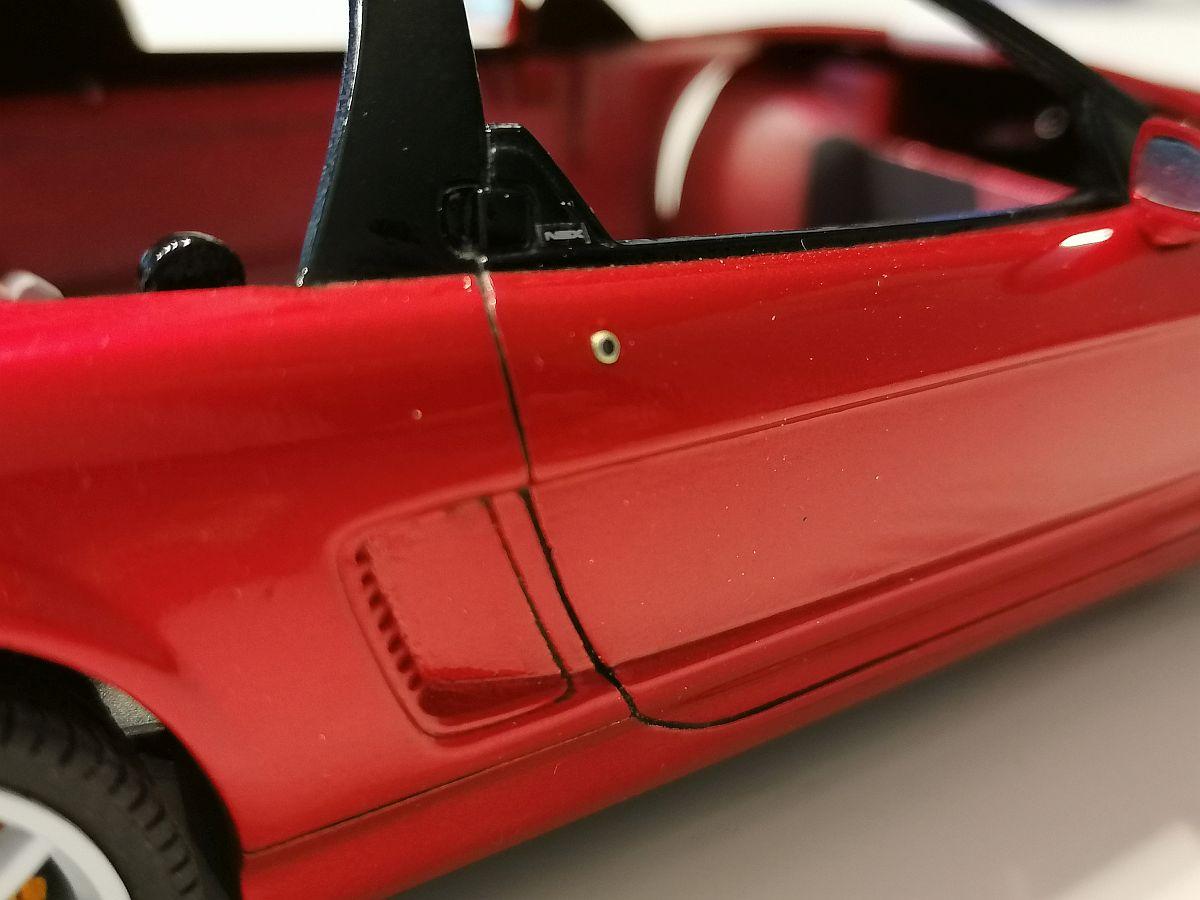
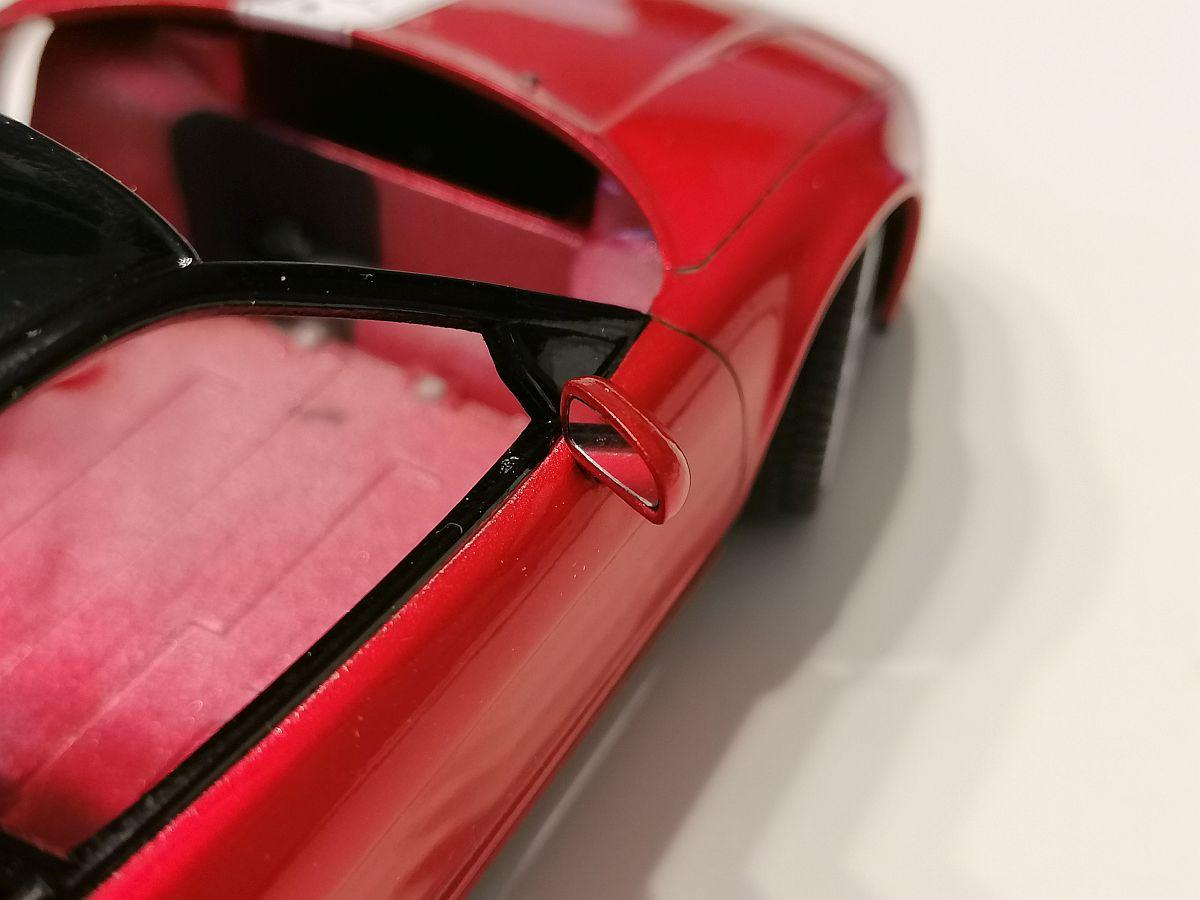
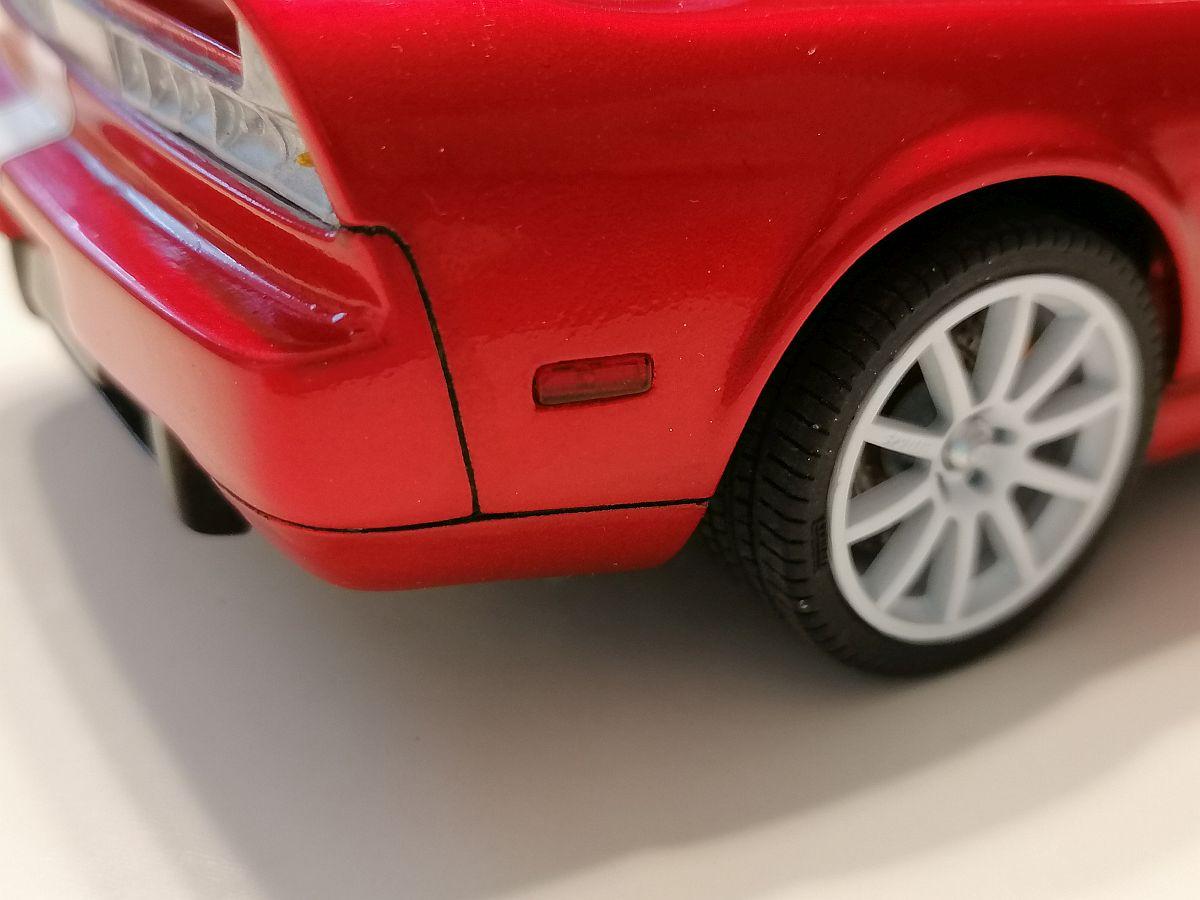
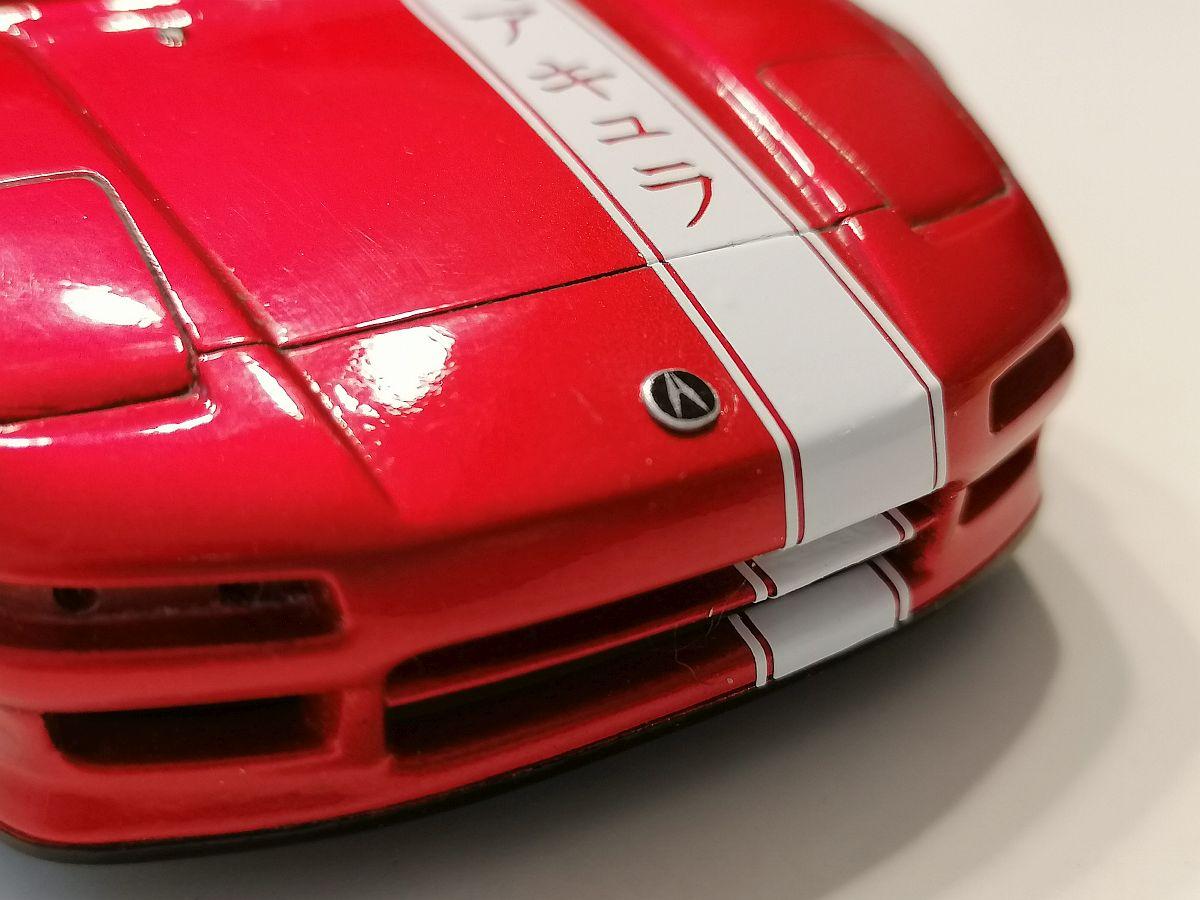
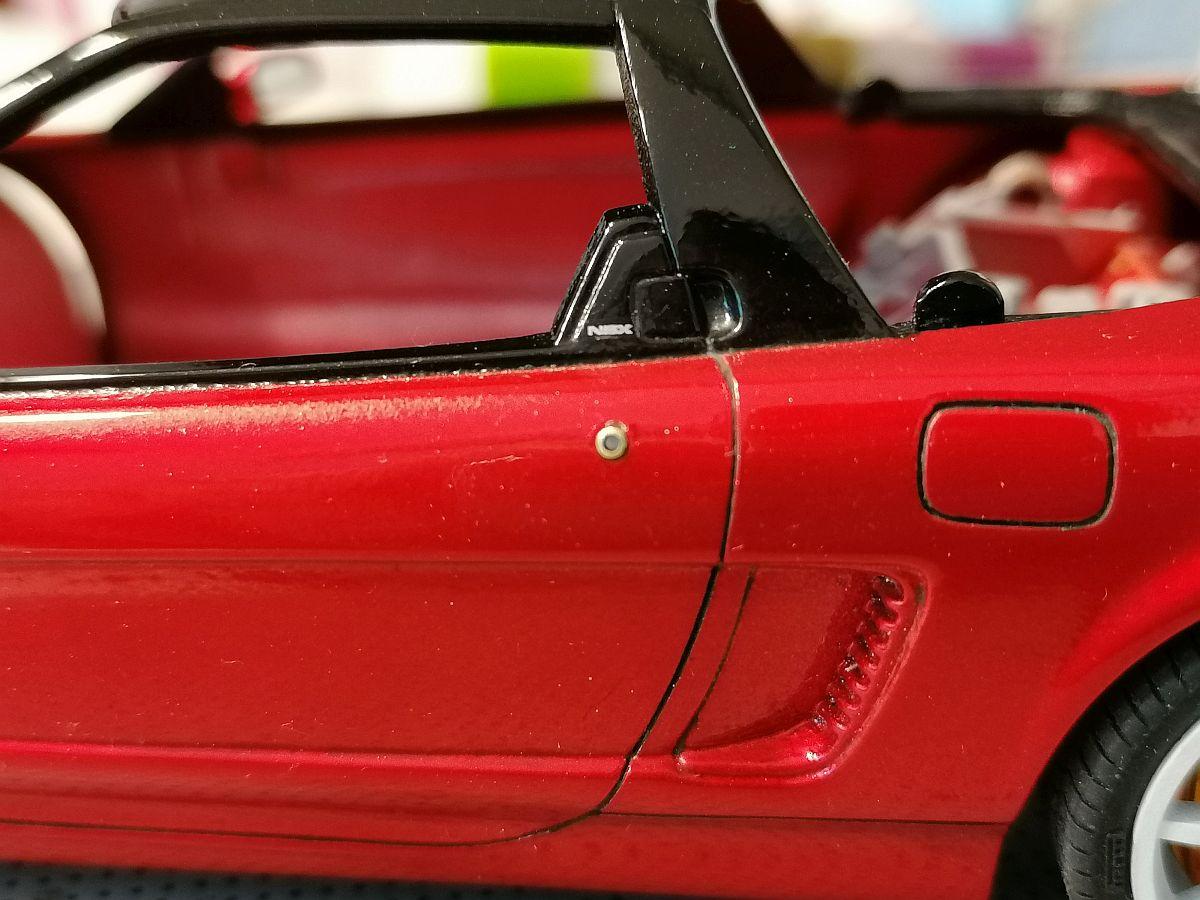
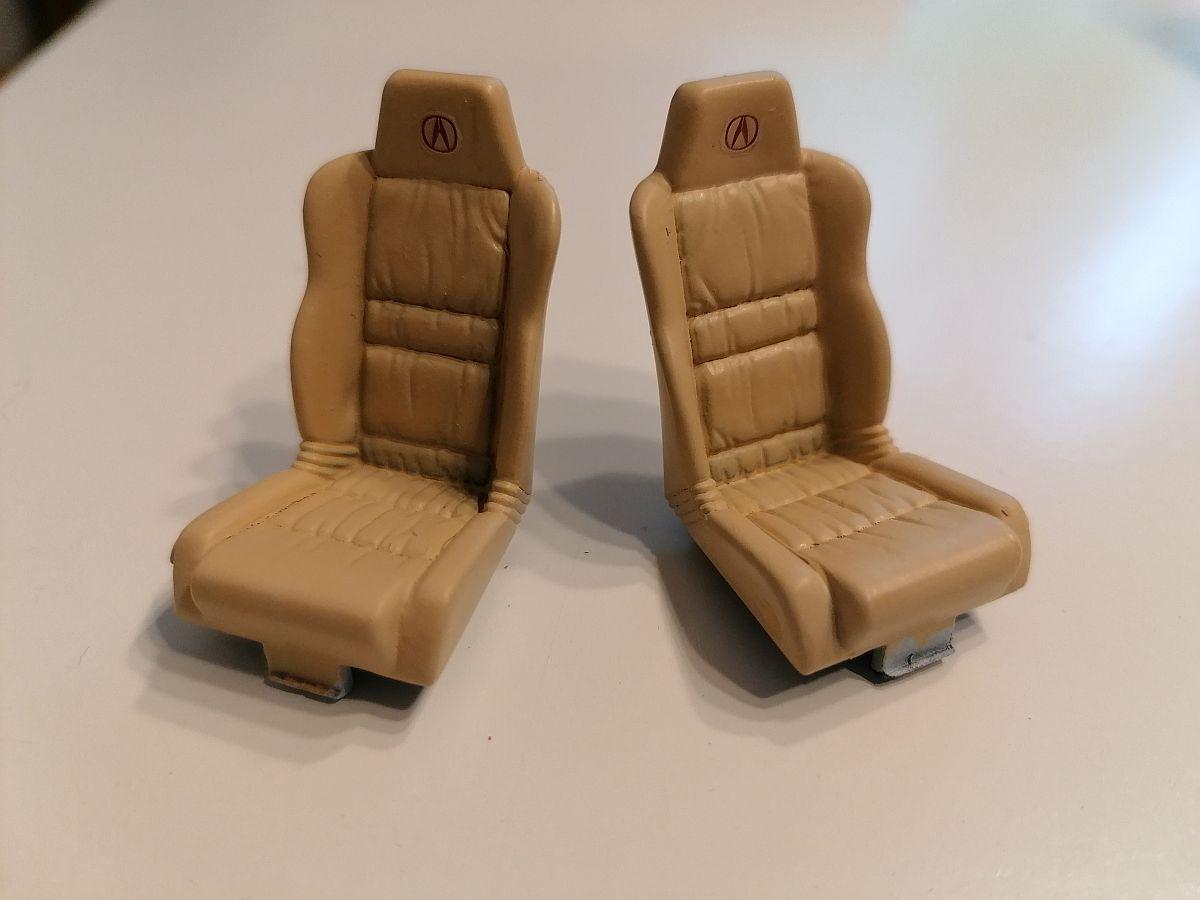
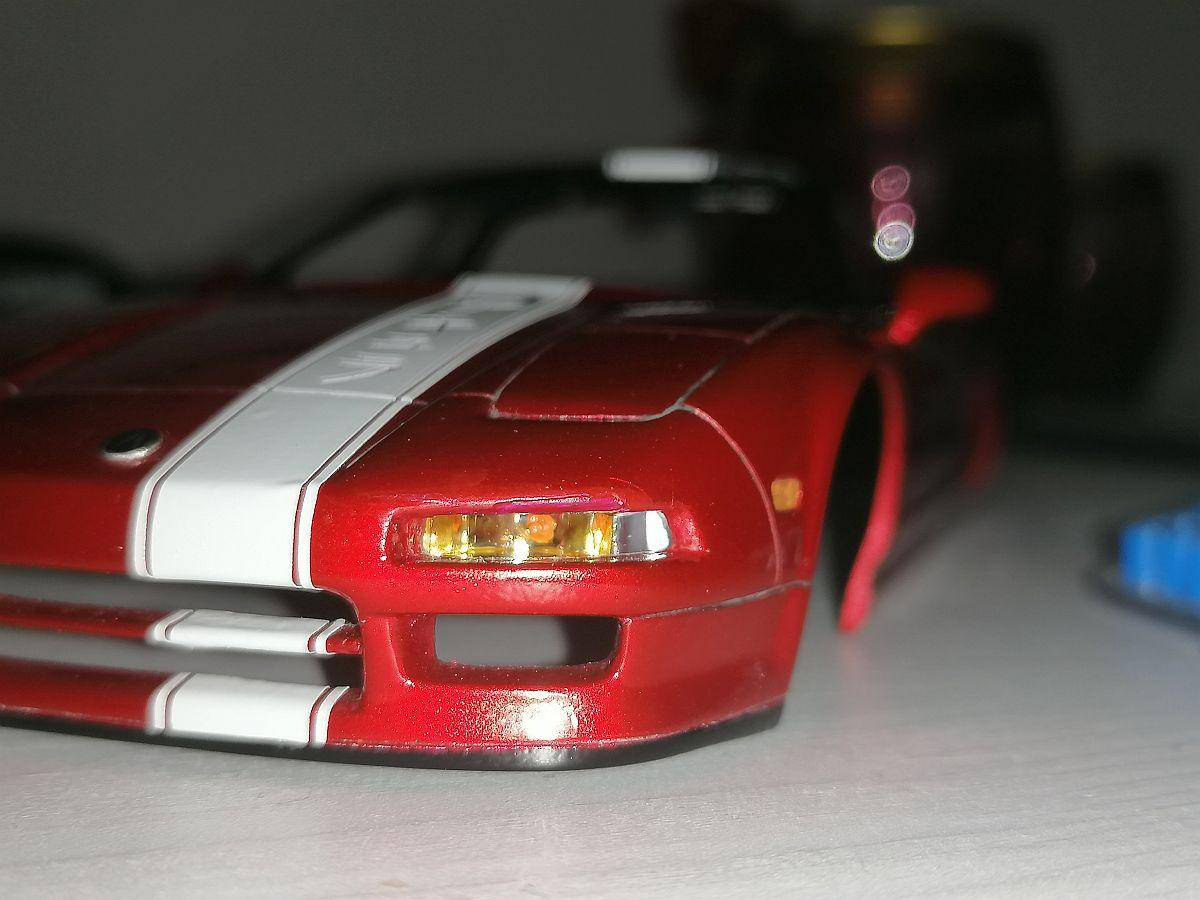
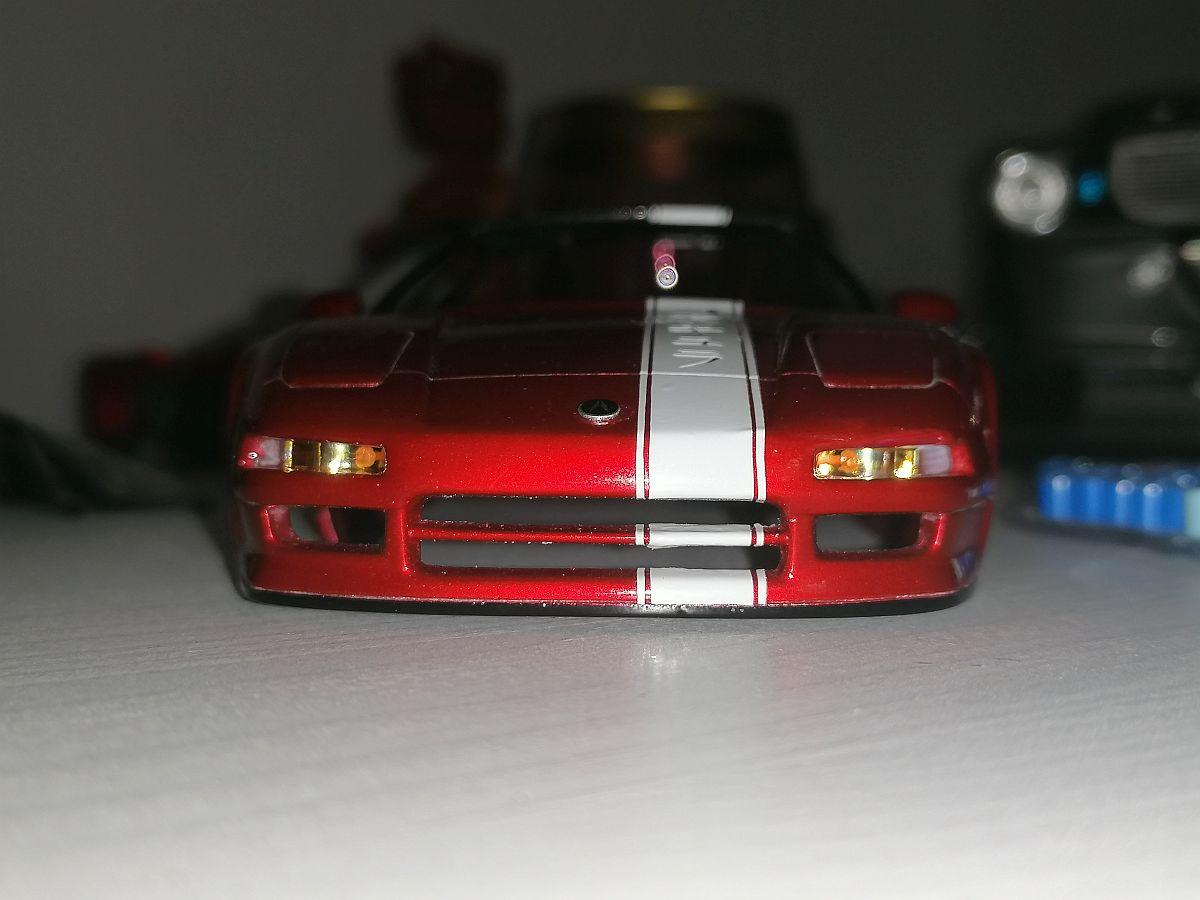
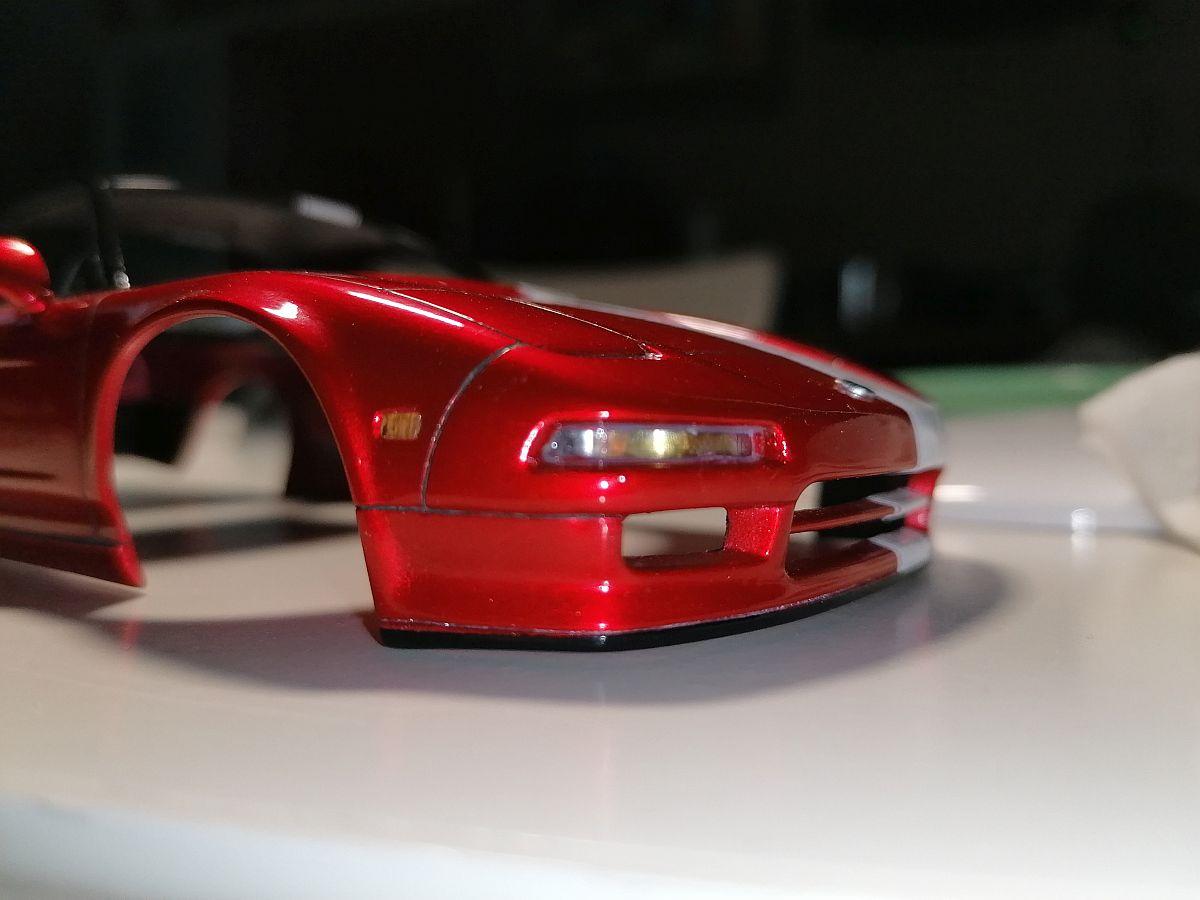
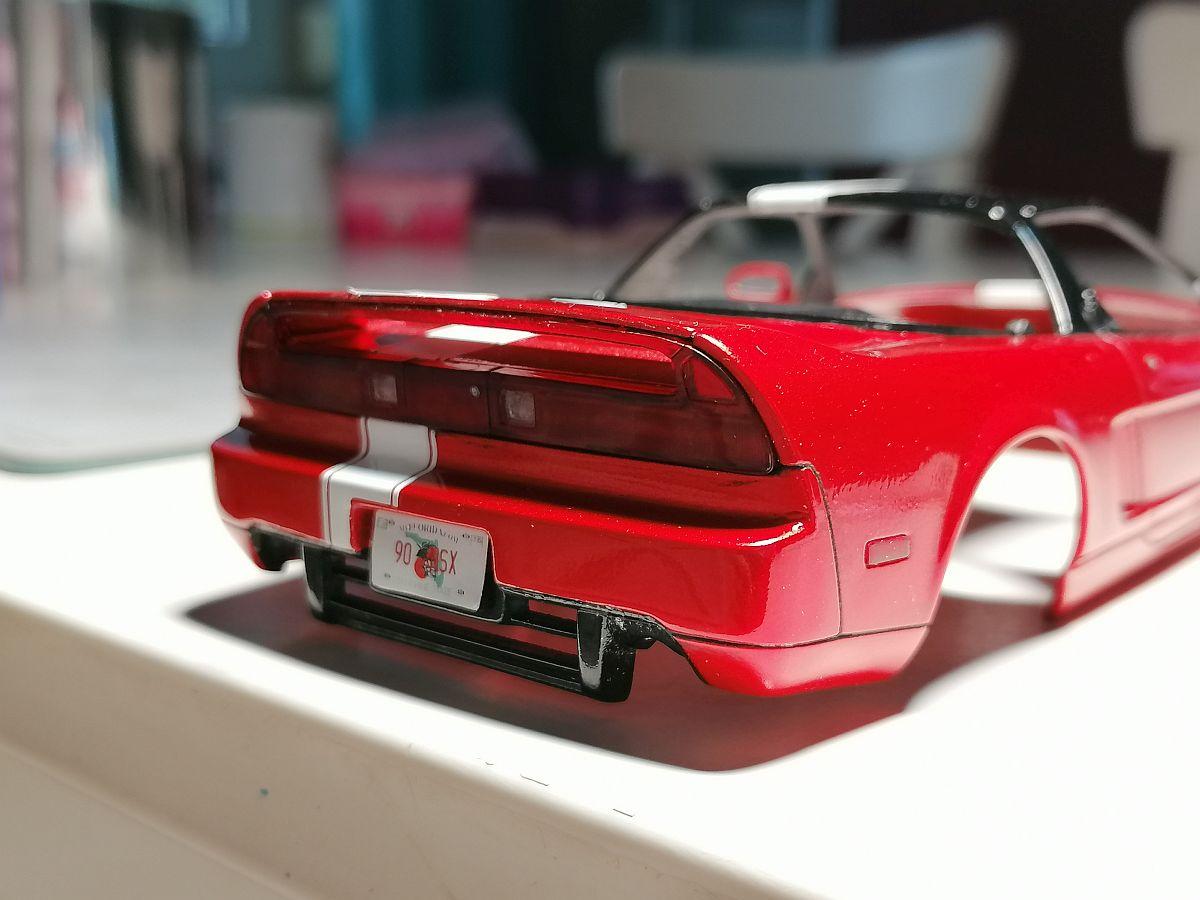
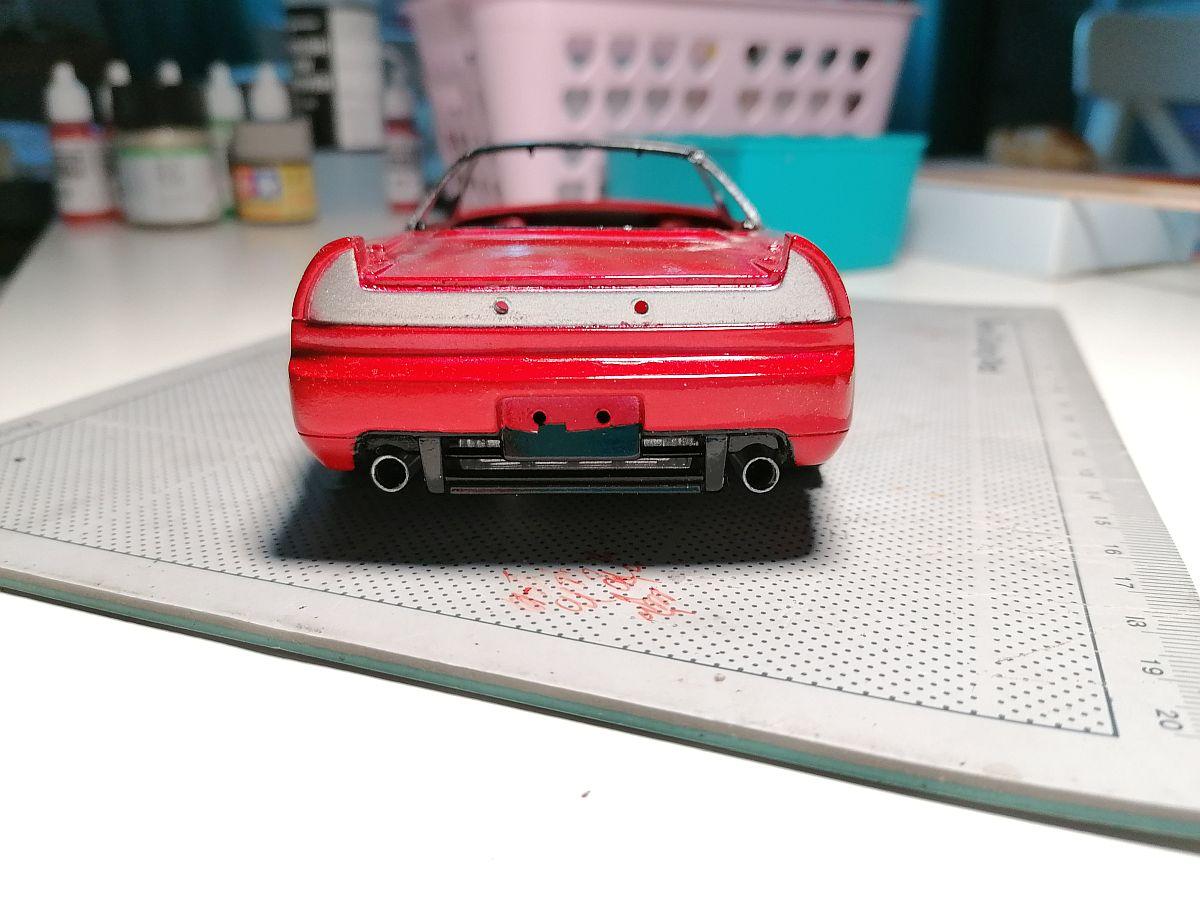
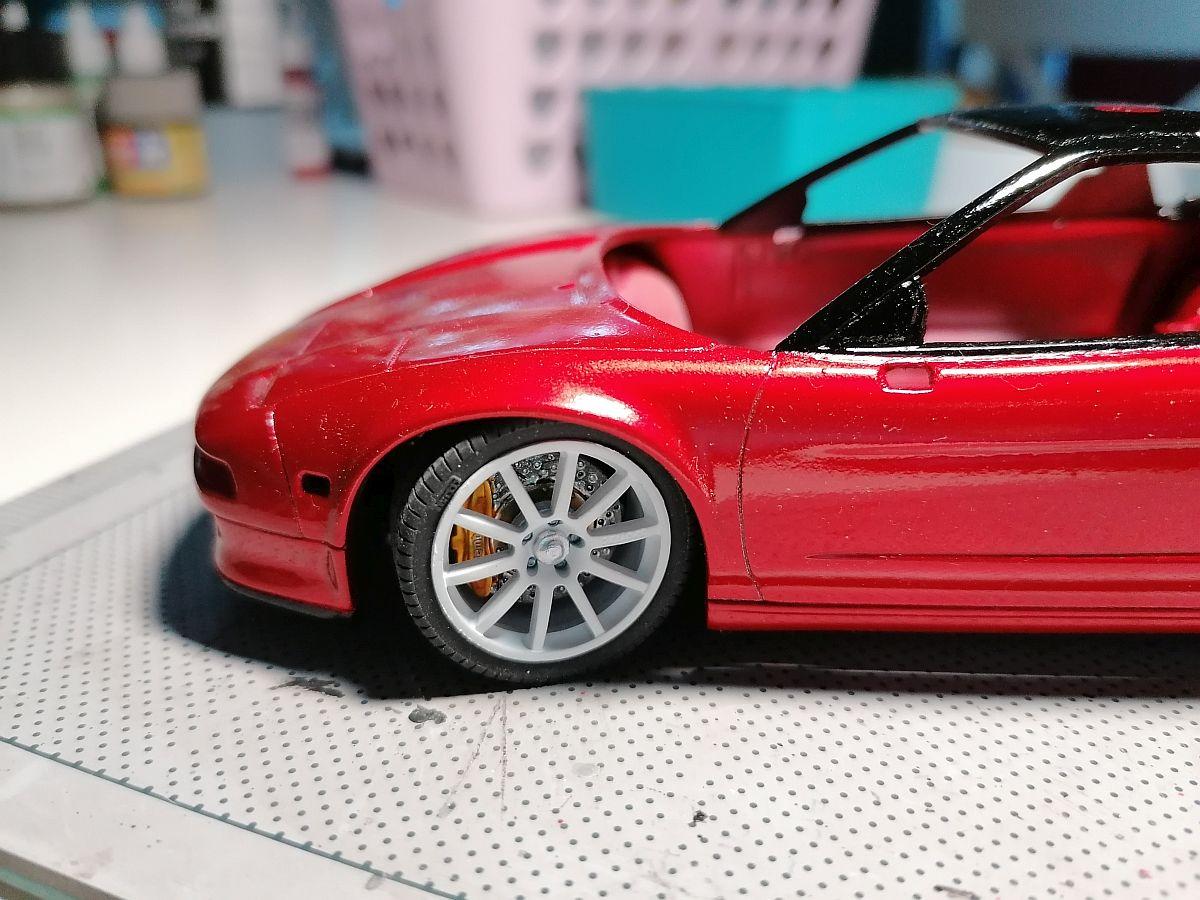
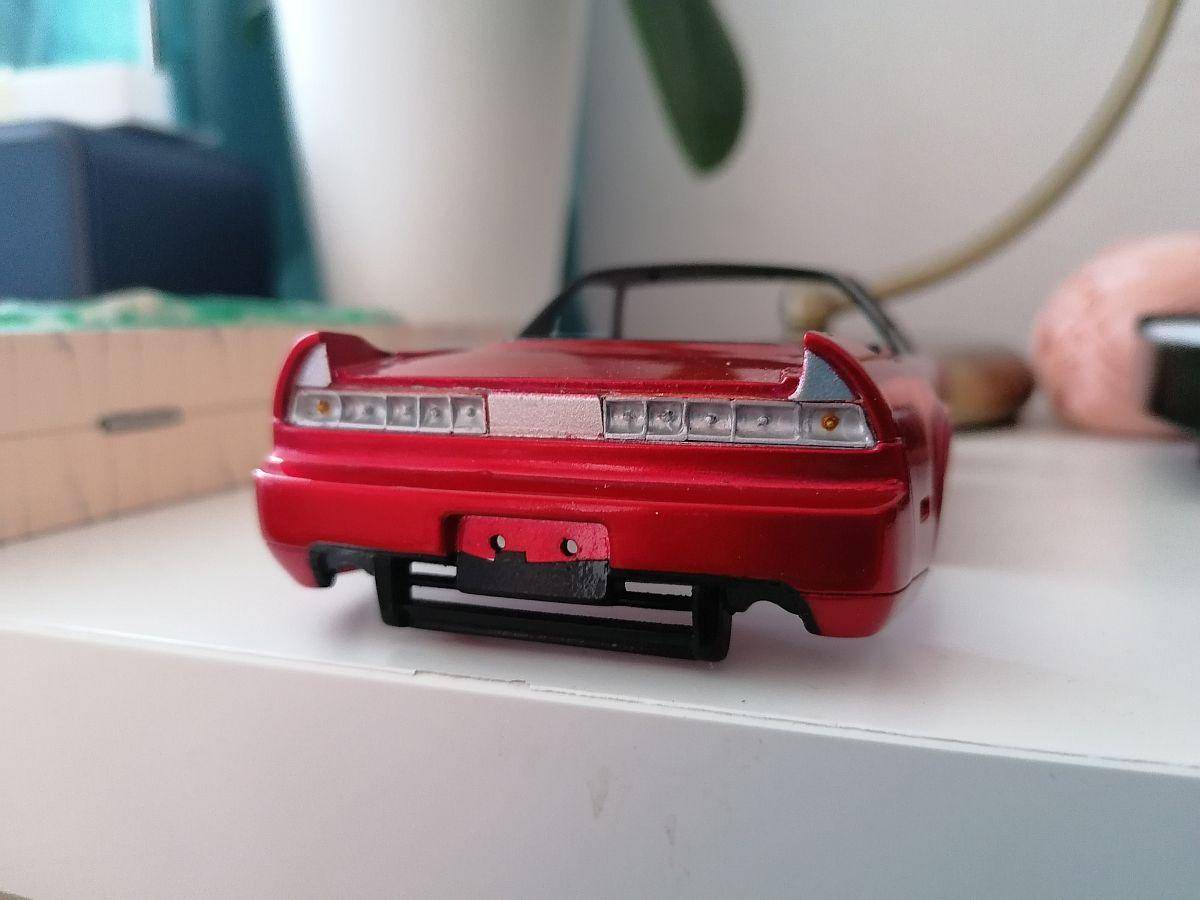
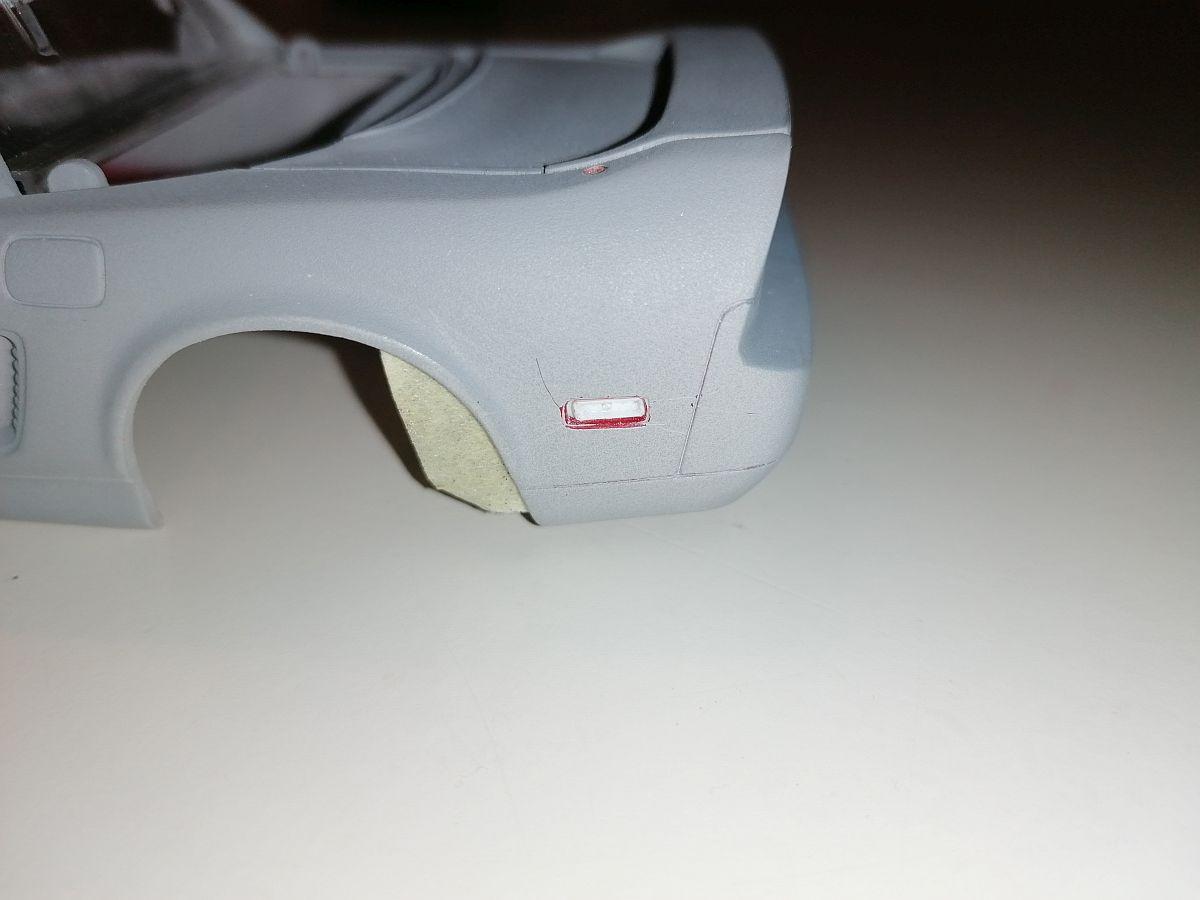
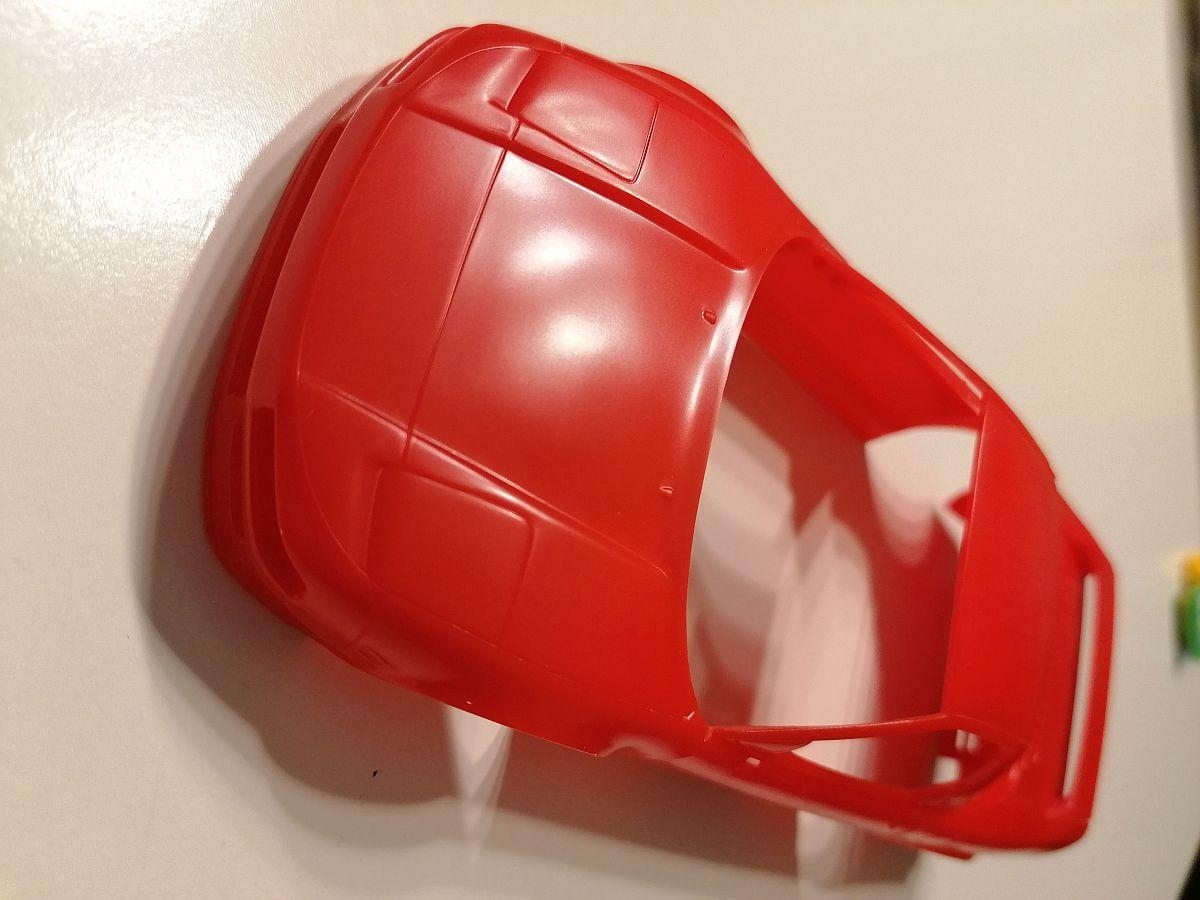
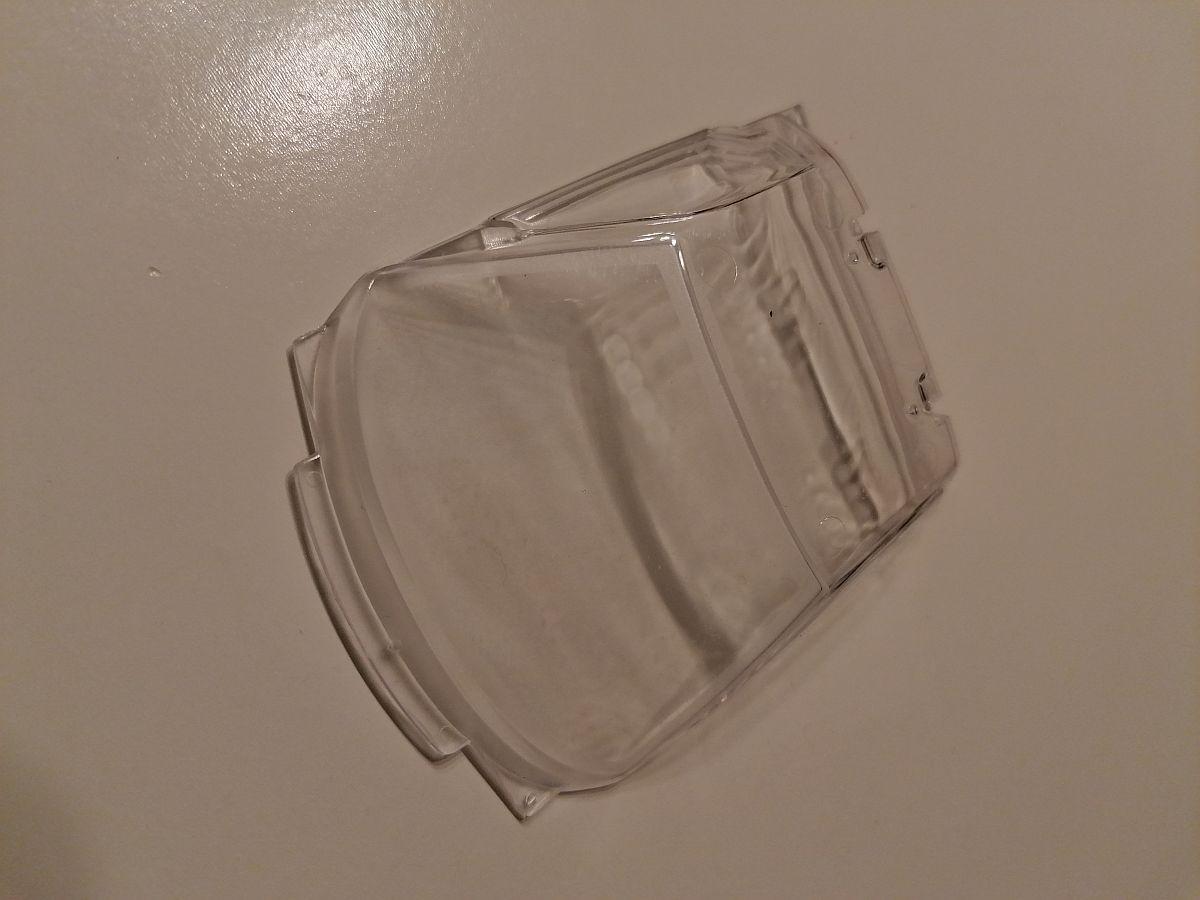
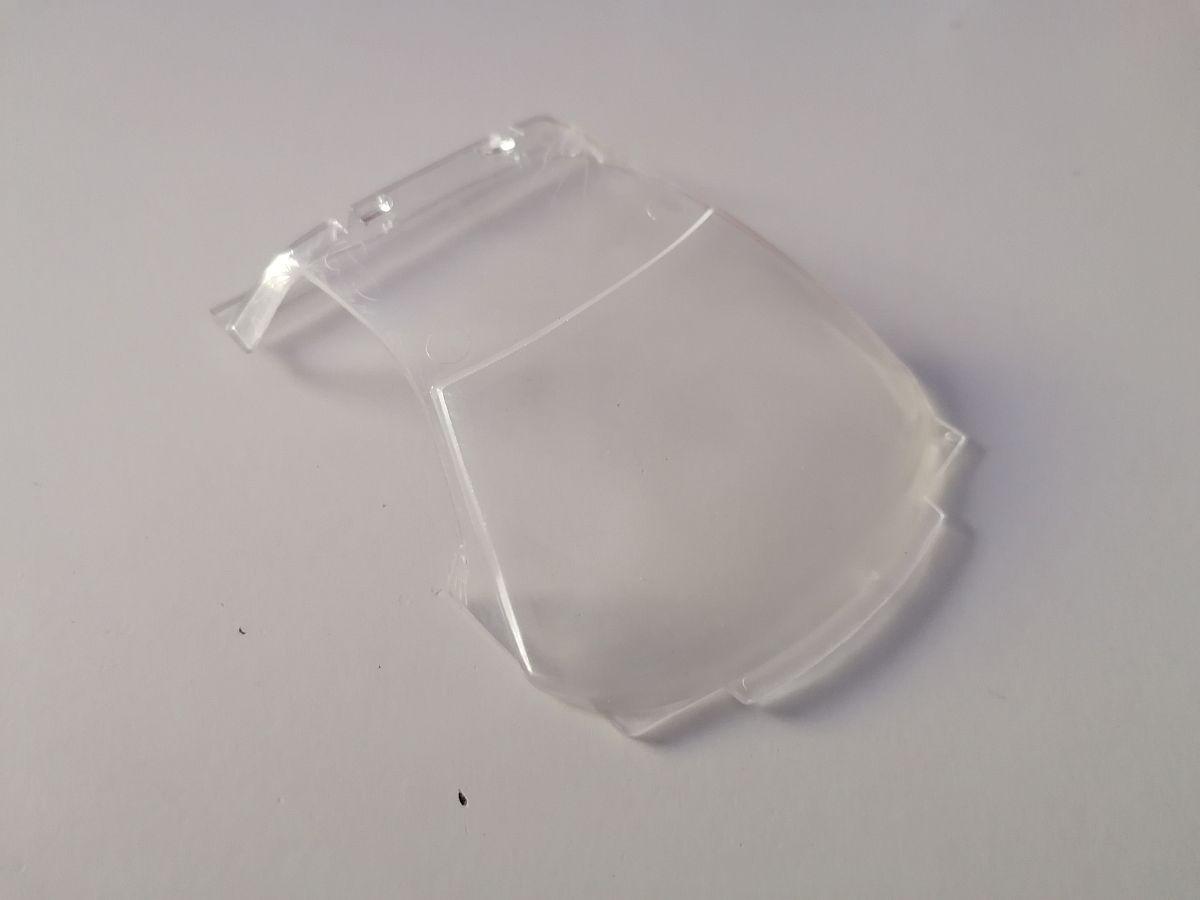
Hey guys, five !!! months without an update. Please bear with me but it was a very busy time. Anyway I could manage some things at the NSX over the time. The decals I´ve drawn didn´t want lay down like they should so I decided to do the stripes out of self adhesive vinyl foil like used on real cars. It´s a little bit thick but looks great IMO. scratchbuilt the Acura emblem on the front using some polished 0.4mm alumium plate and a self drawn black decal... ... finished the sidemarker lights as mentioned before... ... scratchbuilt some door locks to and used real mirroring foil for the mirrors. The small NSX decals at the door handles are self drawn too... ... painted the seats beige and used self drawn decals for the headrests. Last two days I worked on the front turn signals. First I scratchbuilt some bezels out of styrene covered with self adhesive alumium foil for the mirror effect... Then removed the pins from the lenses and glued them with clear acrylic laquer in place, then covered them with clear uv-resin for better adhesive. Meanwhile the lenses are clear all over, no milky shine visible anymore. After finishing the turn signals I started the taillight lenses. Cutted out the reverse light lenses and filled the holes with clear uv-resin. Used the same alumium foil as before for the reflectors beside the wing. Then installed the lenses using clear acrylic laquer and some Revell Contacta Clear. The license plate is also a self drawn decal. And that´s it for today. Thanks for looking, Rico
-
 Thank you guys for the suggestions. Found out that I can use Autodesk Fusion too.
 -
Hey everybody, i was wondering how and with which software you cut the bodies into two halfes. Any help would be much appreciated. Thanks in advance, Rico
-
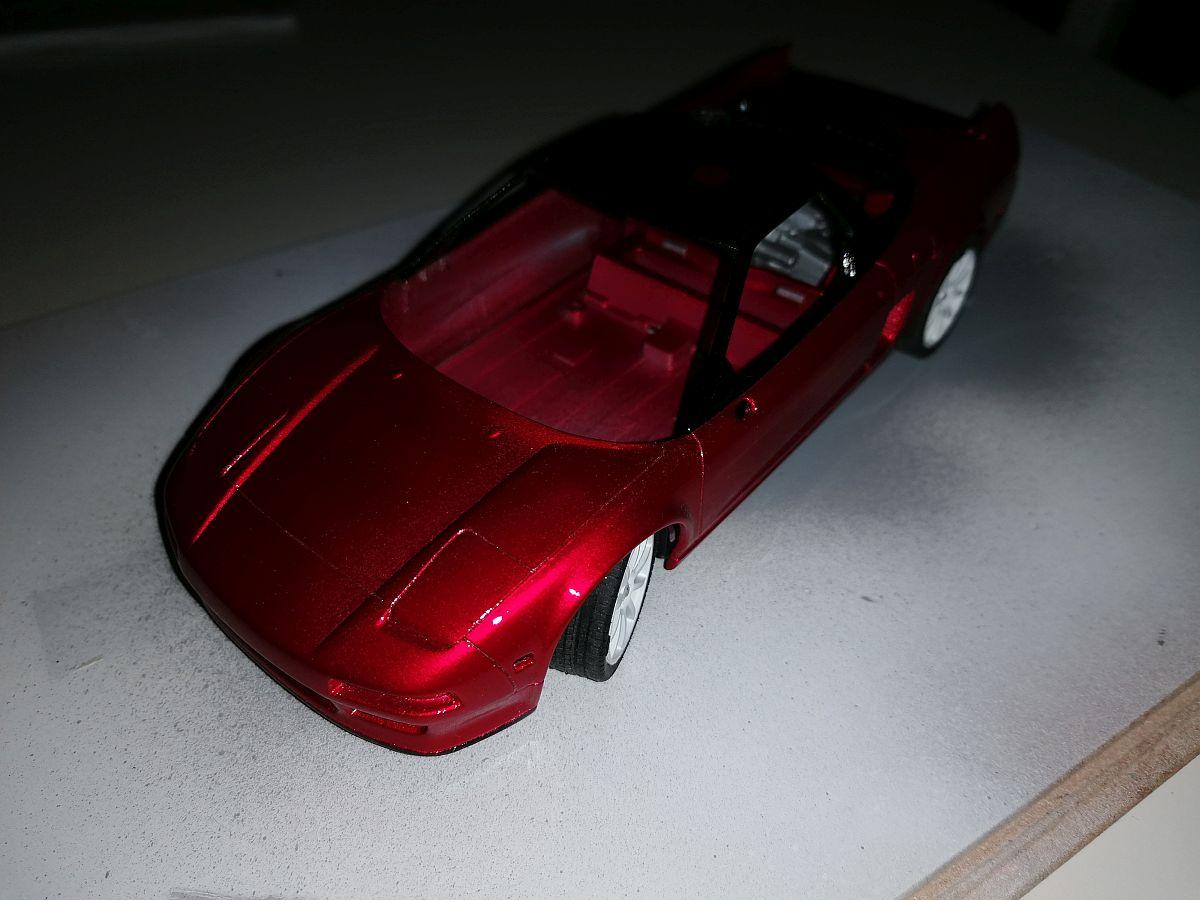
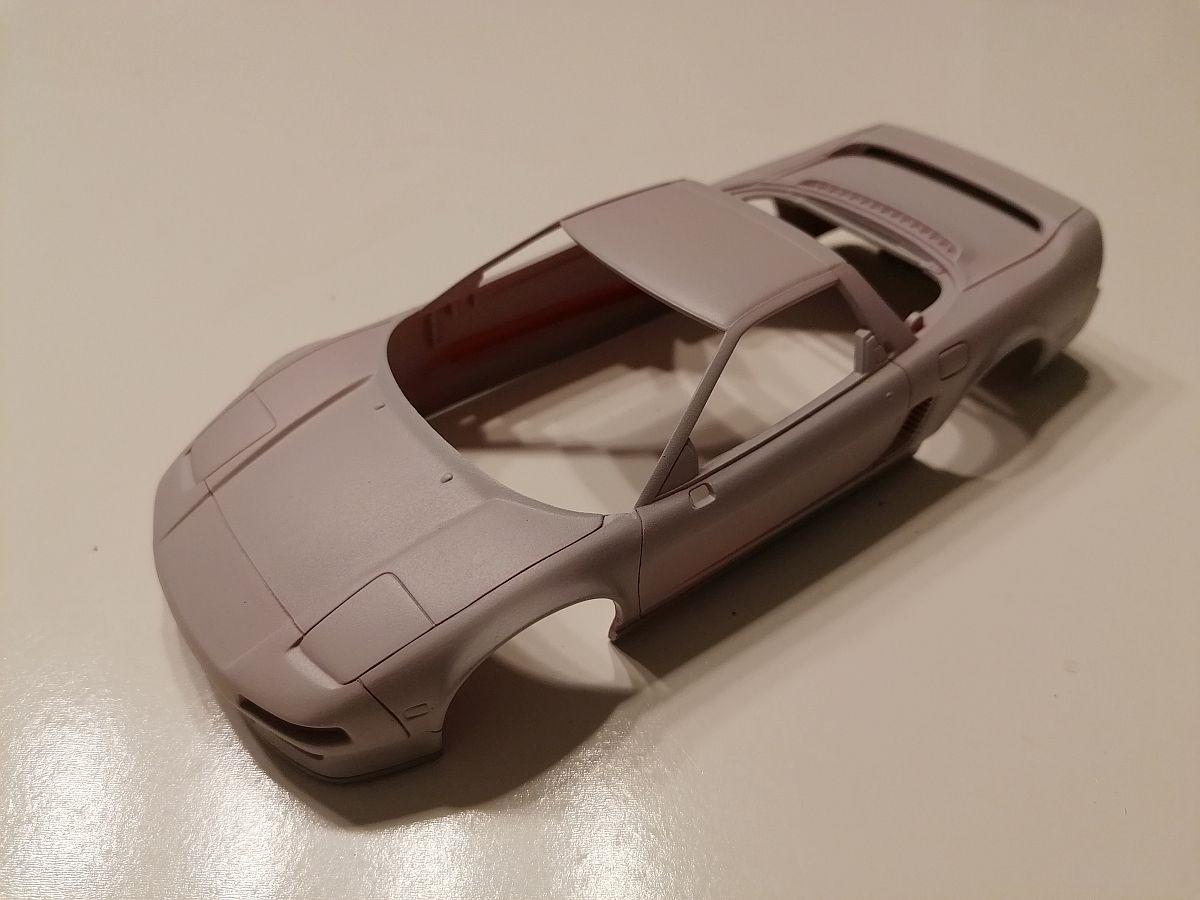
Me too. Thanks. And it goes on... Here it is in color now. Used silver-bronce from a near craft store as basecoat over the primer followed by Tamiya transparent red. After some days of drying I clearcoated it with automotive clear acrylic laquer right out of a rattle can. Couldn´t resist a quick mock up with the corrected wheelbase. Here under normal light... ... and with flash. Then I did the brakes and fabricated some exhaust pipe ends out of styrene. Then how crazy must I be. I thought "Why have you done the sidemarker bezels and didn´t the taillight bezels?" So this was the next step. Each side is made out of 17 single styrene parts, glued together and spray painted. Then came the difficult part, opening the body to make the bezels fit but I´m pleased with how it turned out. All areas on the next pics missing the color are already recolored. Next update soon. Rico
-
This is a really nice and clean build. ?
-
Thank you guys. This means a lot to me.
-
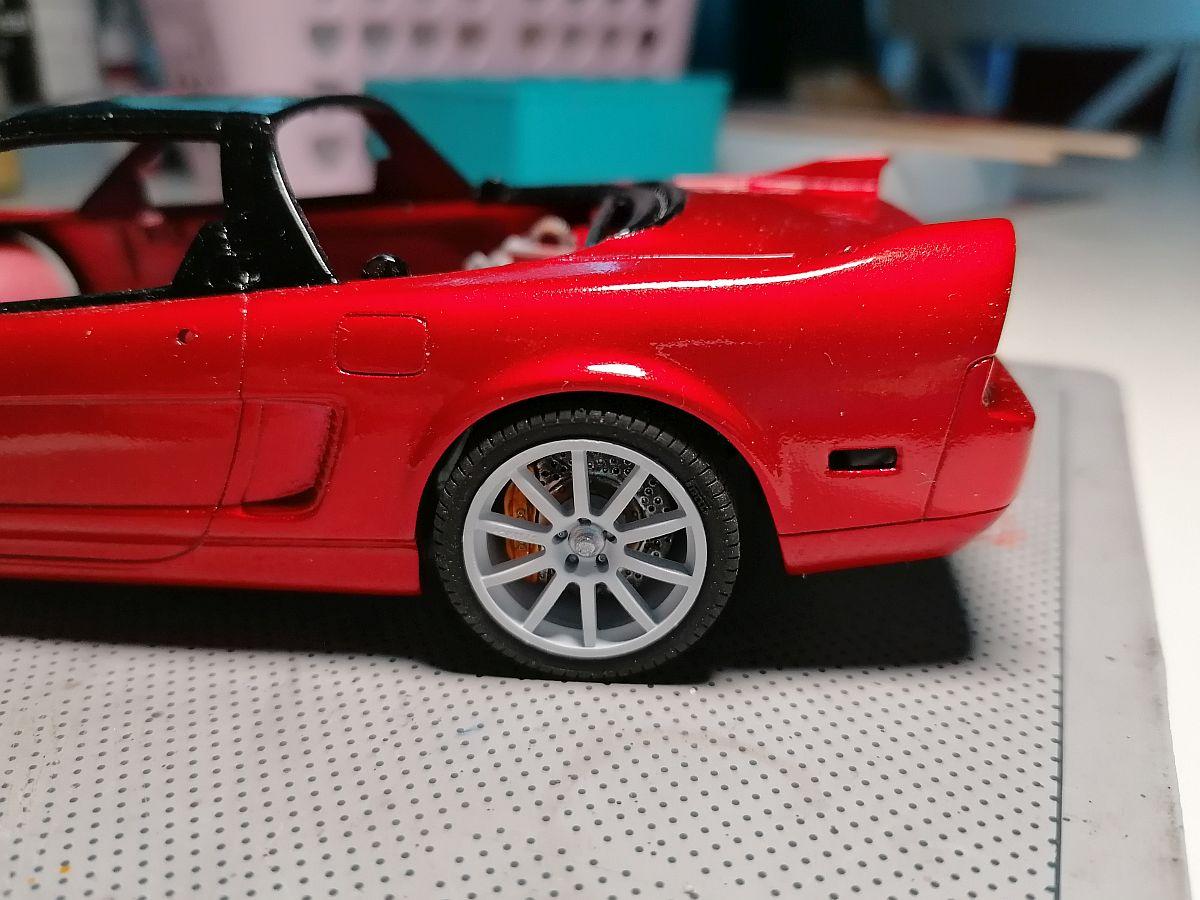
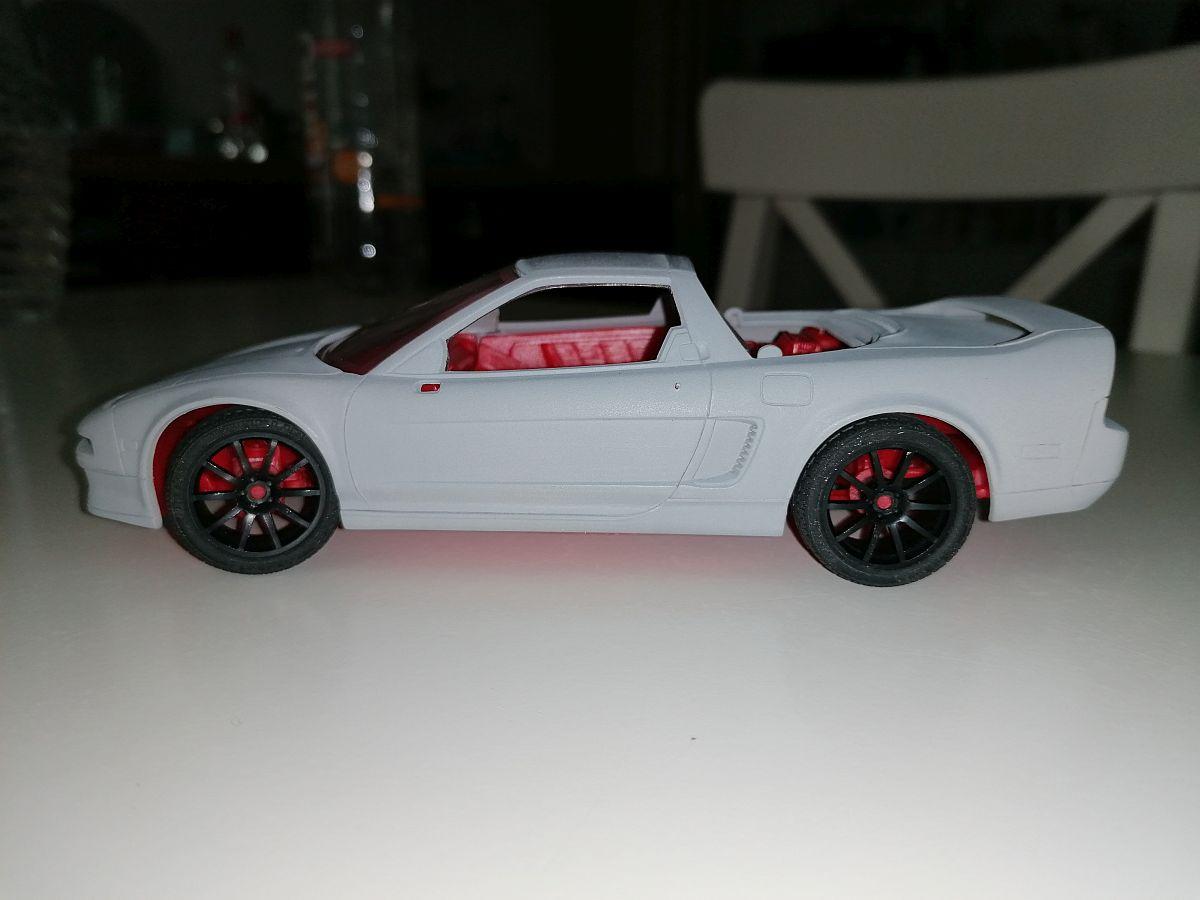
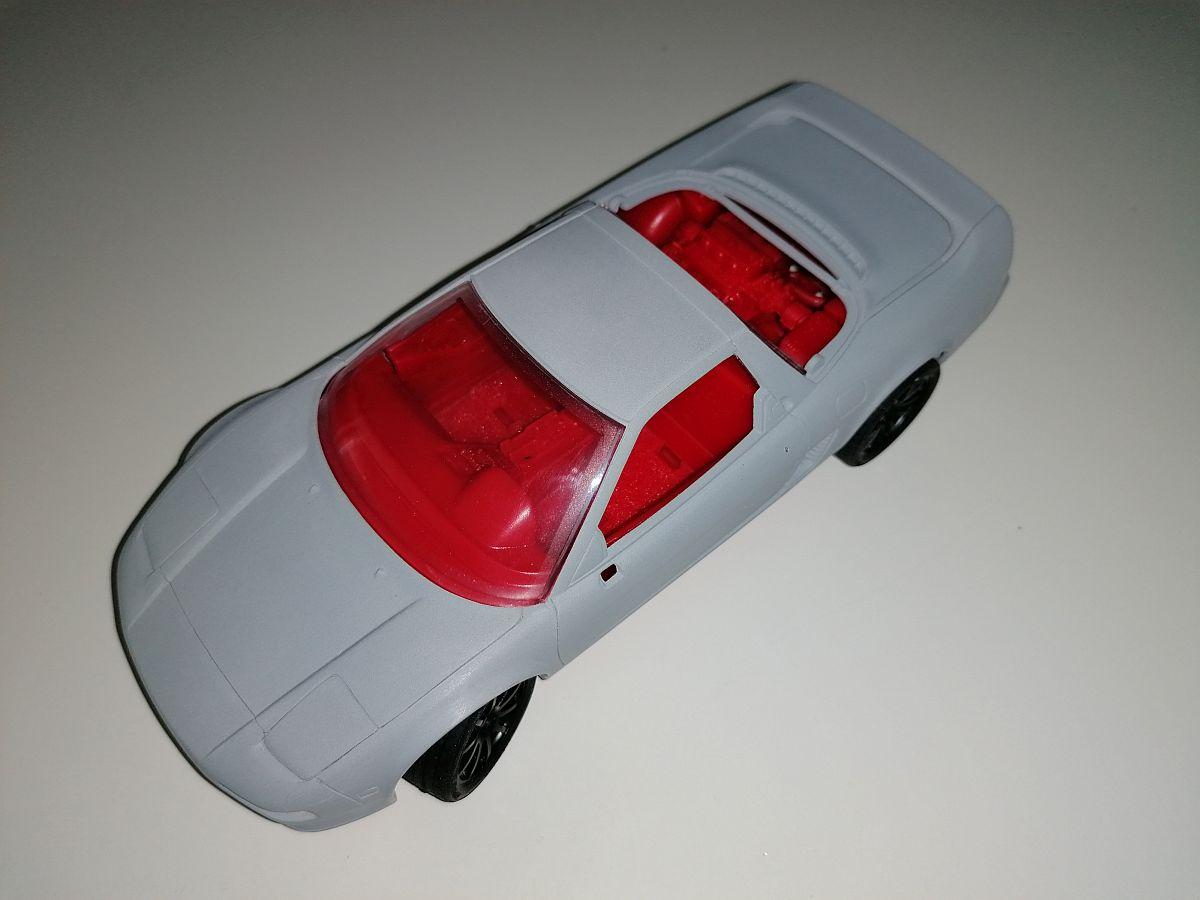
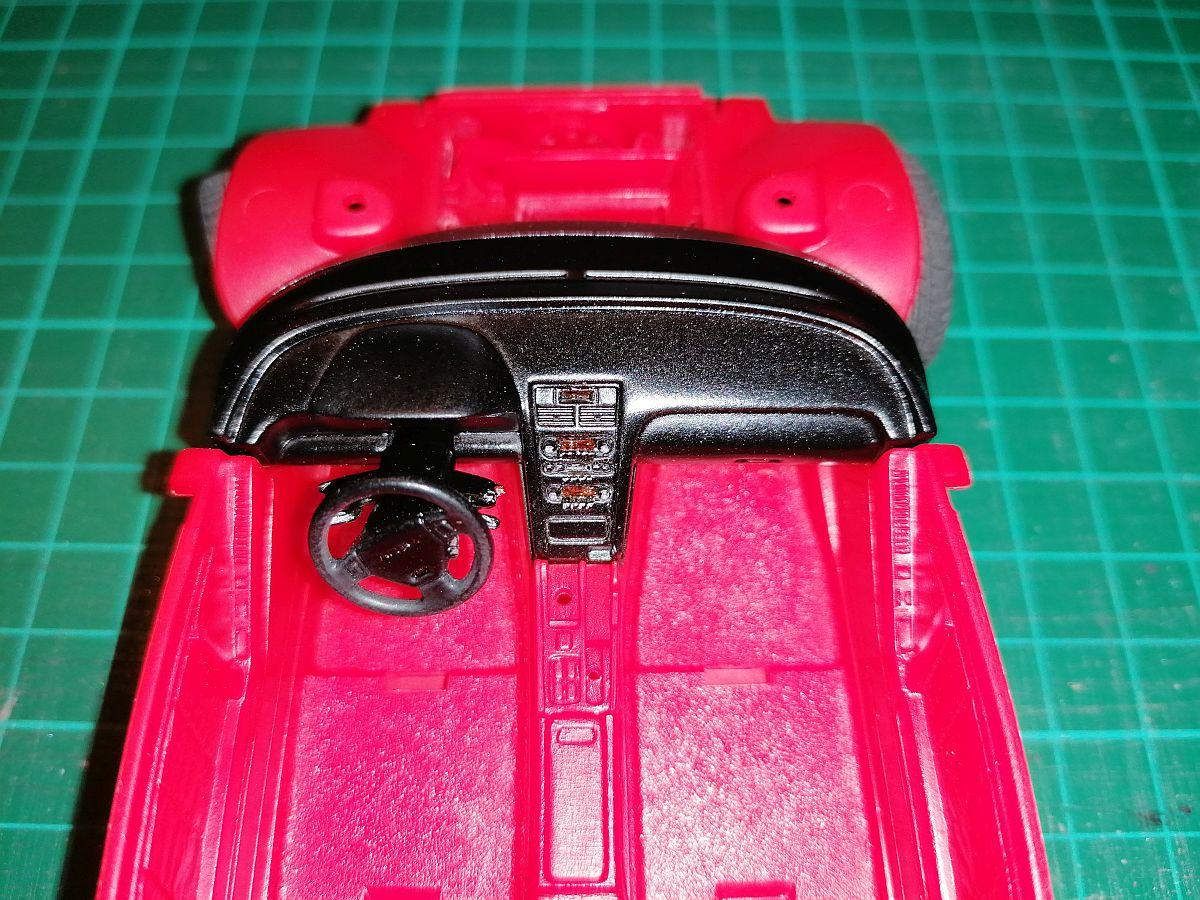
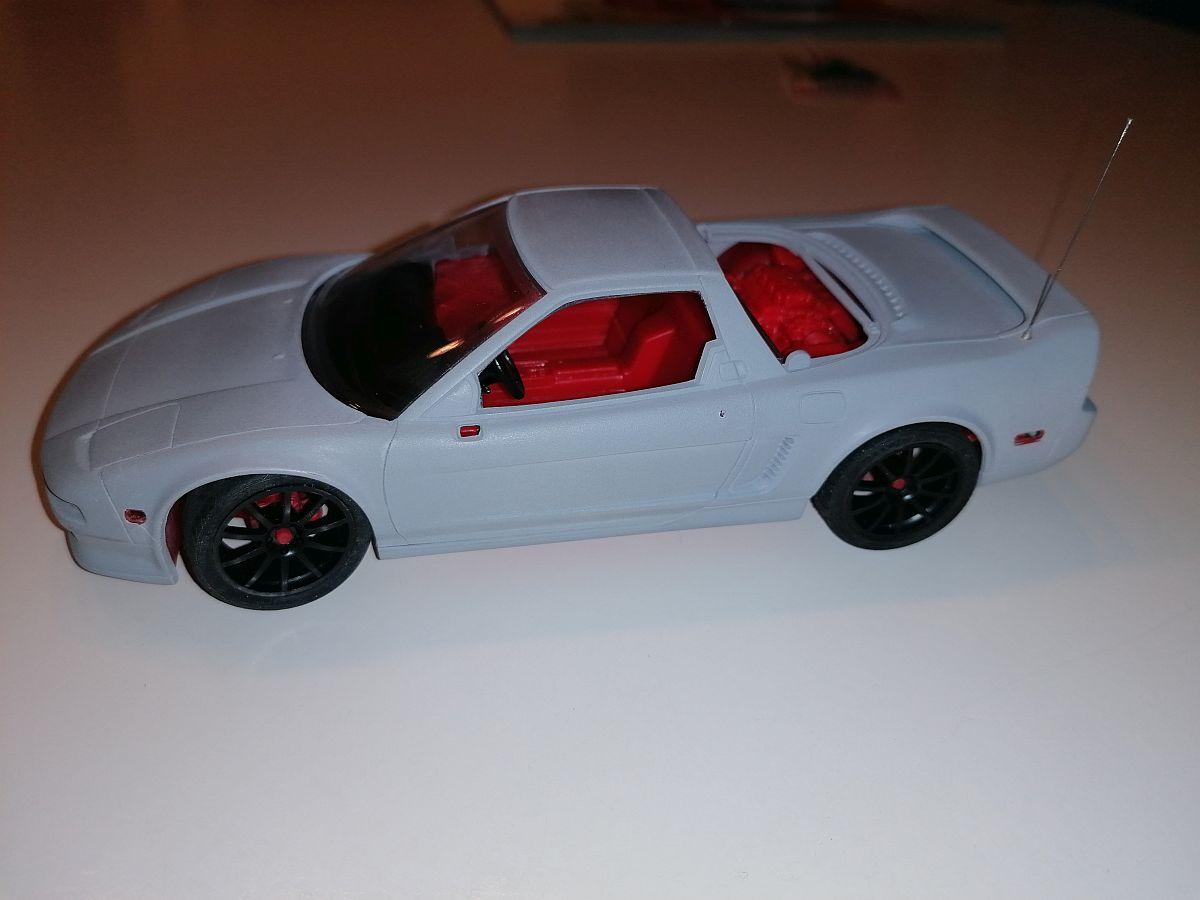
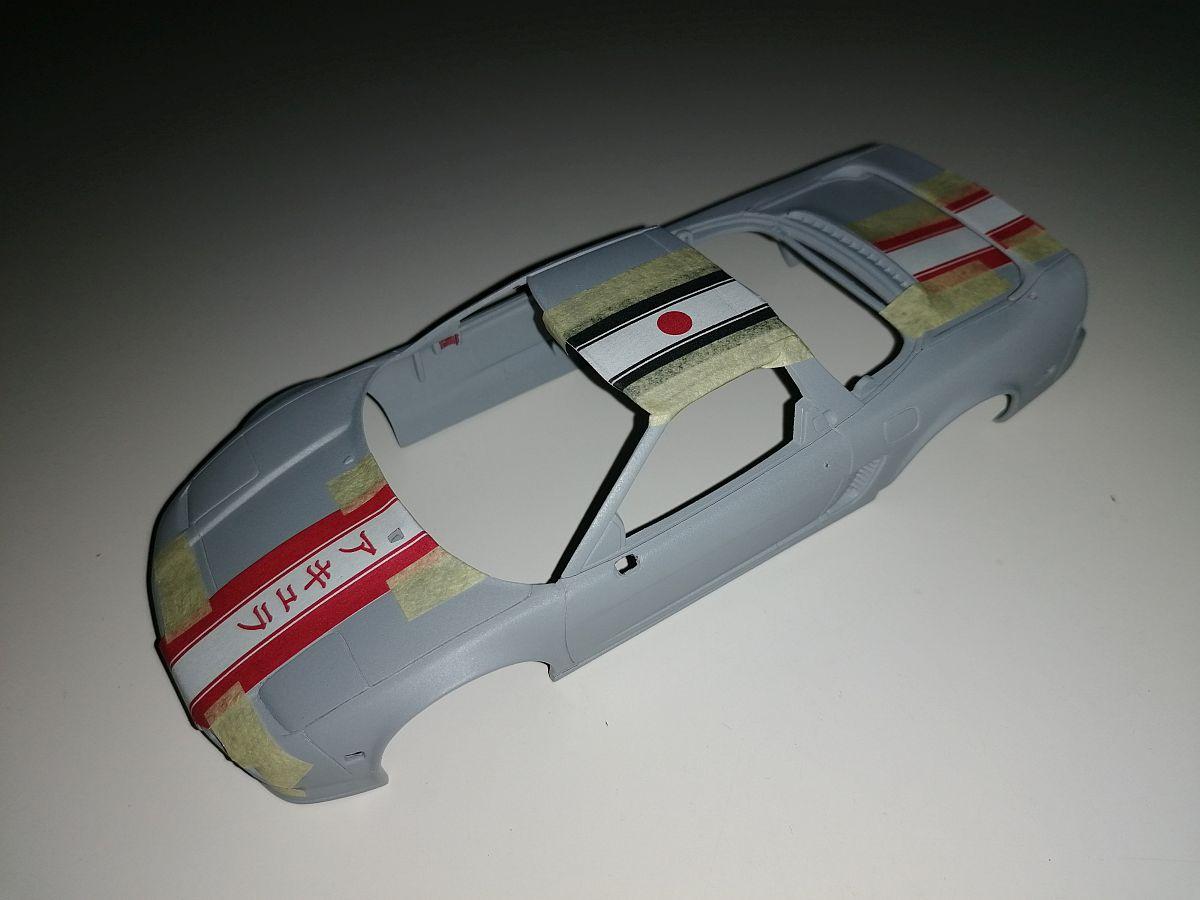
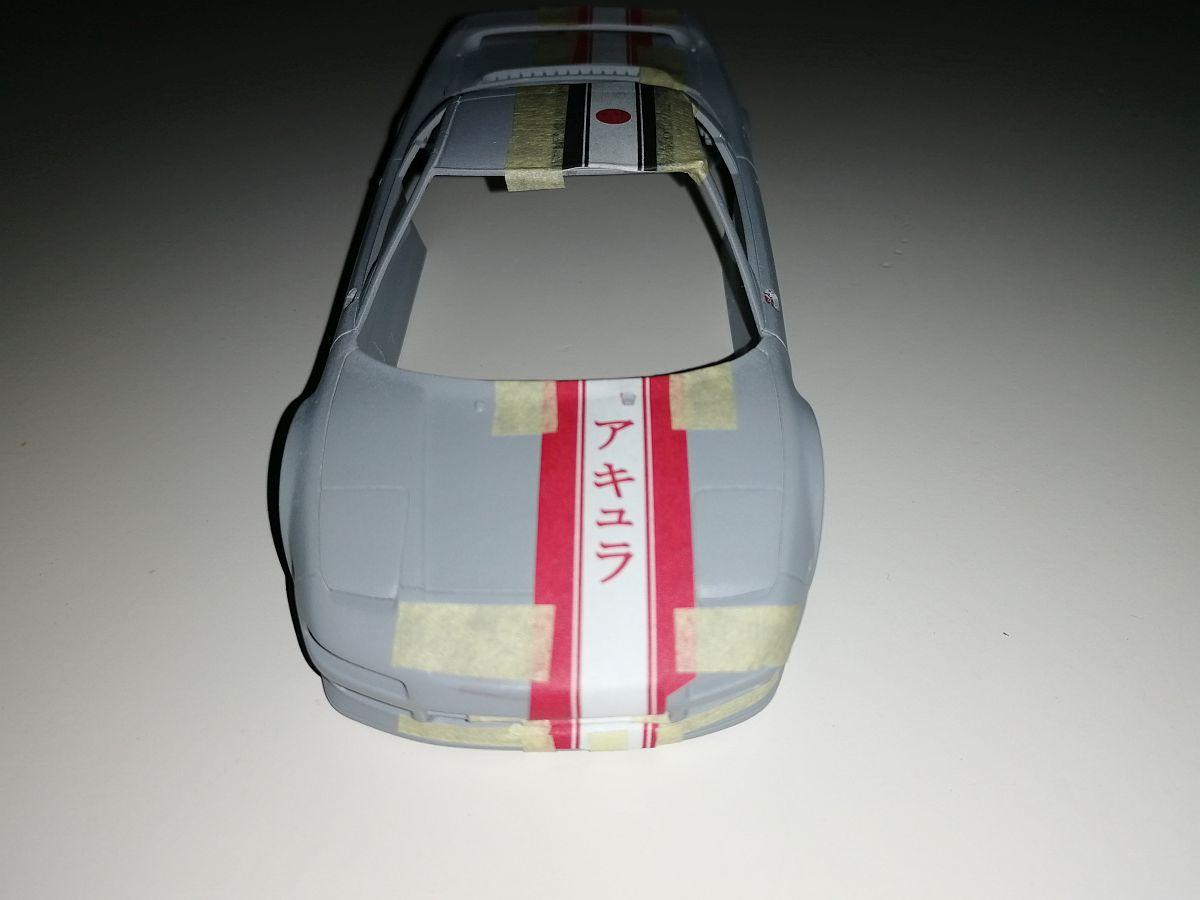
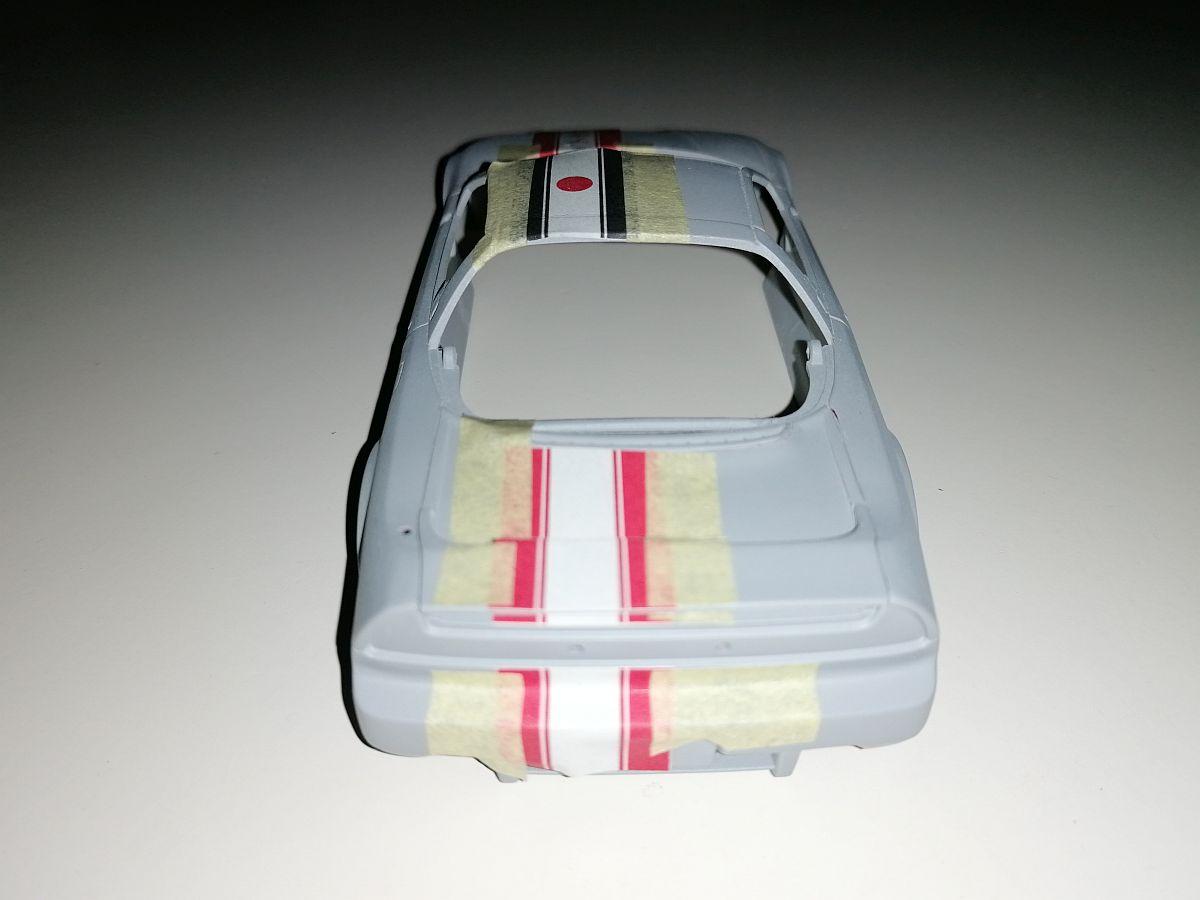
Yeah, that´s it. And the build goes on... Next was to find some suitable wheels. Found some 19inch Fujimi Sportec Mono 10. As I said this kit has lots of room for improvement so I decided to make the front wheels steerable with a rotating steering wheel. A simple mechanism like usually used at toy cars did the job. Meanwhile the dash was painted and detailed too. Next was cutting the sidemarker lights out of the body and building a simple antenna. New sidemarker bezels were made out of evergreen U-profile closed with 0.01" stripes. Added a small piece of 0.025" round as the lightbulb. Front... Rear... Sidemarker lenses were made ot of production flags (clear red and orange) from an Aoshima Skyline kit. Here still hidden by tape... For a long time I wasn´t sure about the color scheme. After hours of thinking about it I decided to go with white rims. They are only coated with Tamiya white primer. Then the color scheme was in my head. This one will get a nearly standard look. It will become red metallic (with a candy look) and a black top. Because I wanted something special I designed stripes on my own. The front stripe includes the japanese characters which mean ACURA and the stripe on the top got a red point to simulate the japanese flag. Here´s the design printed on paper and hold in place by masking tape to get a feel for the look. Any comments and critism welcome as always. Next update will come soon. Rico
-
The 2022 Cannonball Run Year of Birth Build Thread
camaro69 replied to disconovaman's topic in Community Builds
Sorry guys, I have to quit my entry for this year because of missing spare time and wanting myself to much detail for this build. Hope that I can take part next year again. I appreciate all the good modelers who build a model here and definitely will vote for my favorite. Thanks you all for your inspiring work. Model on, Rico -
Thanks. It´s the original Chevrolet Bright Yellow out of a rattle can.
-
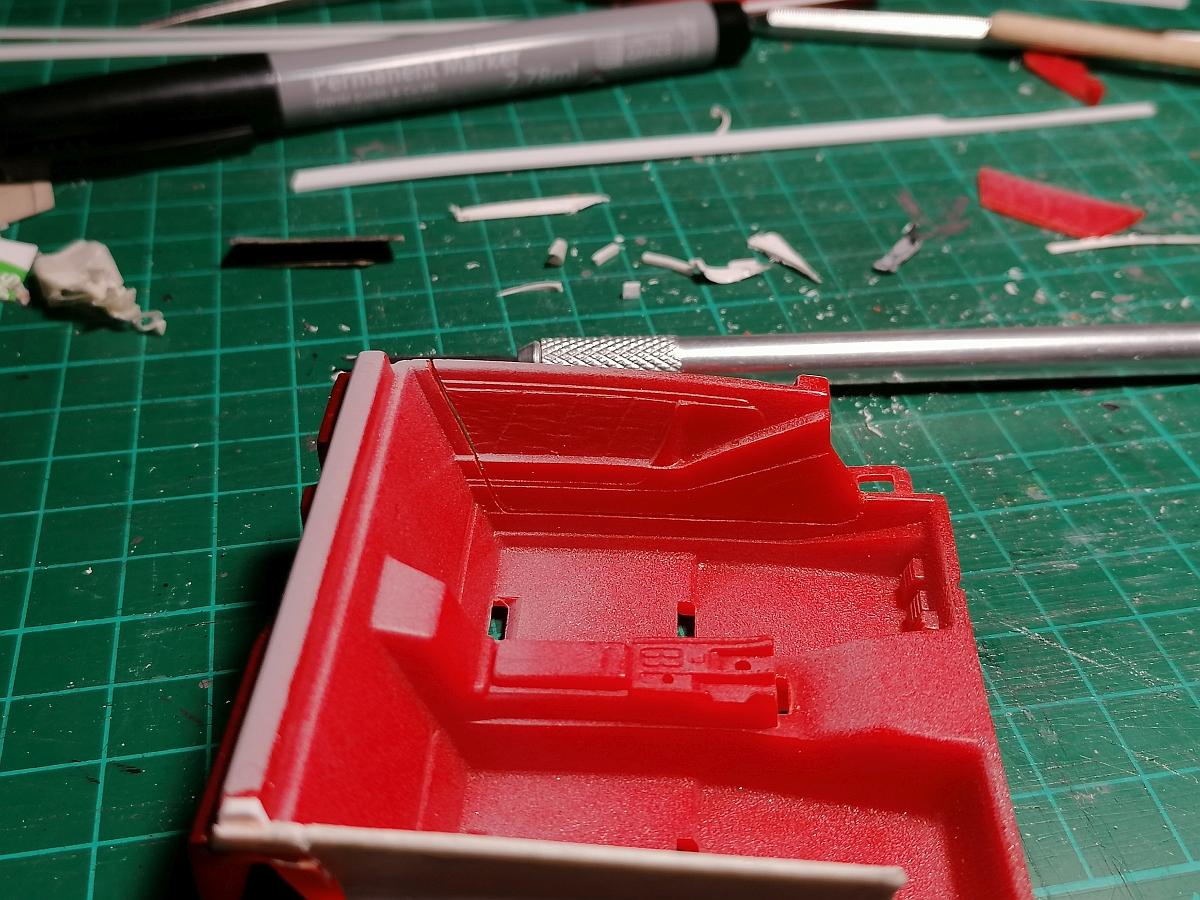
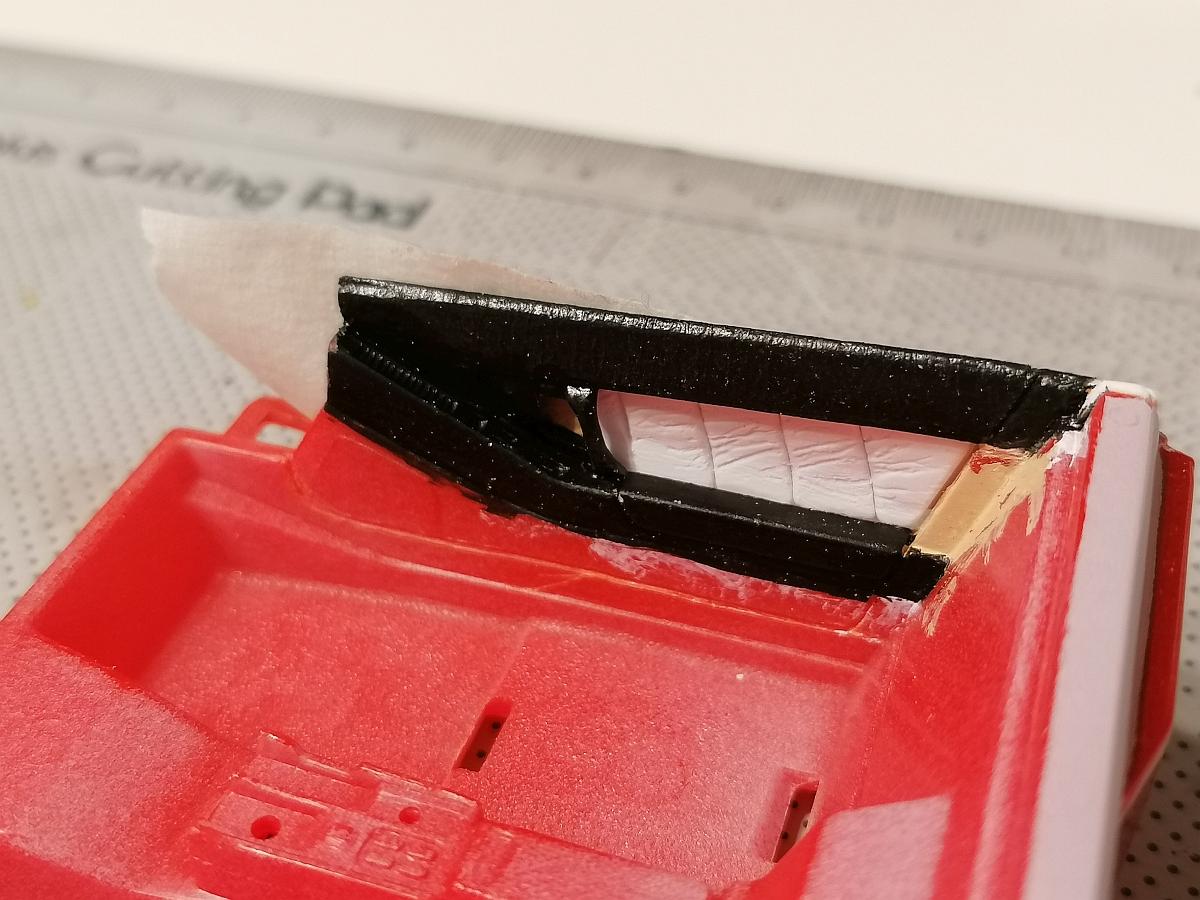
Hello fellow modellers, started this one some weeks ago but hadn´t the time to start the build thread. But here it goes. Will post more progress pictures soon. It´s the "good" old Revell Snapkit once declared as 1/24 scale in the US once as 1/25 scale in Germany. After I did some measuring I can say it´s 1/24 scale. A really nice kit with lots of room for improvement. Initial situation... A lot of seams that have to go and a clear part with side windows made out of armored glass? After some hours of sanding down the seams and graving the panel lines it got the first coat of grey tamiya primer. Side windows were cut out. That´s it for today. Rico
-
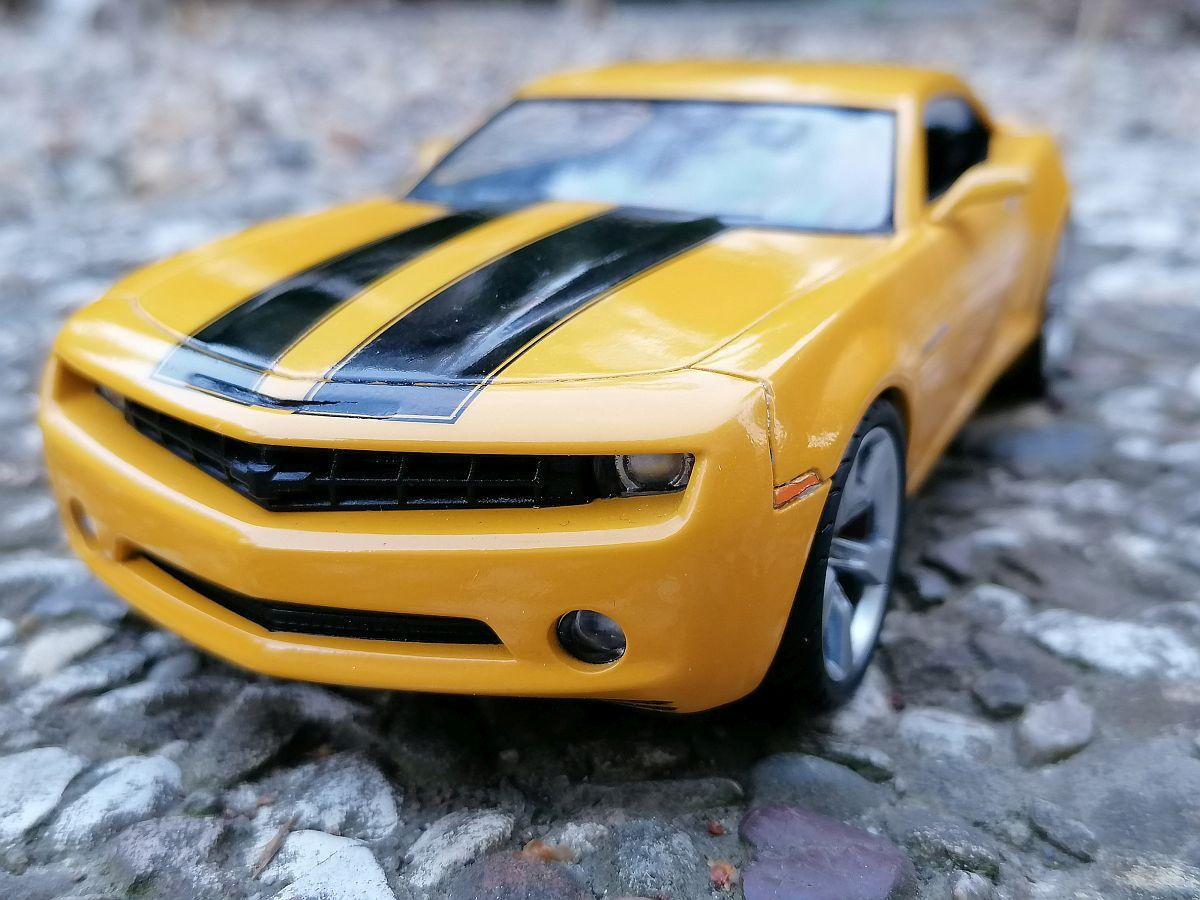
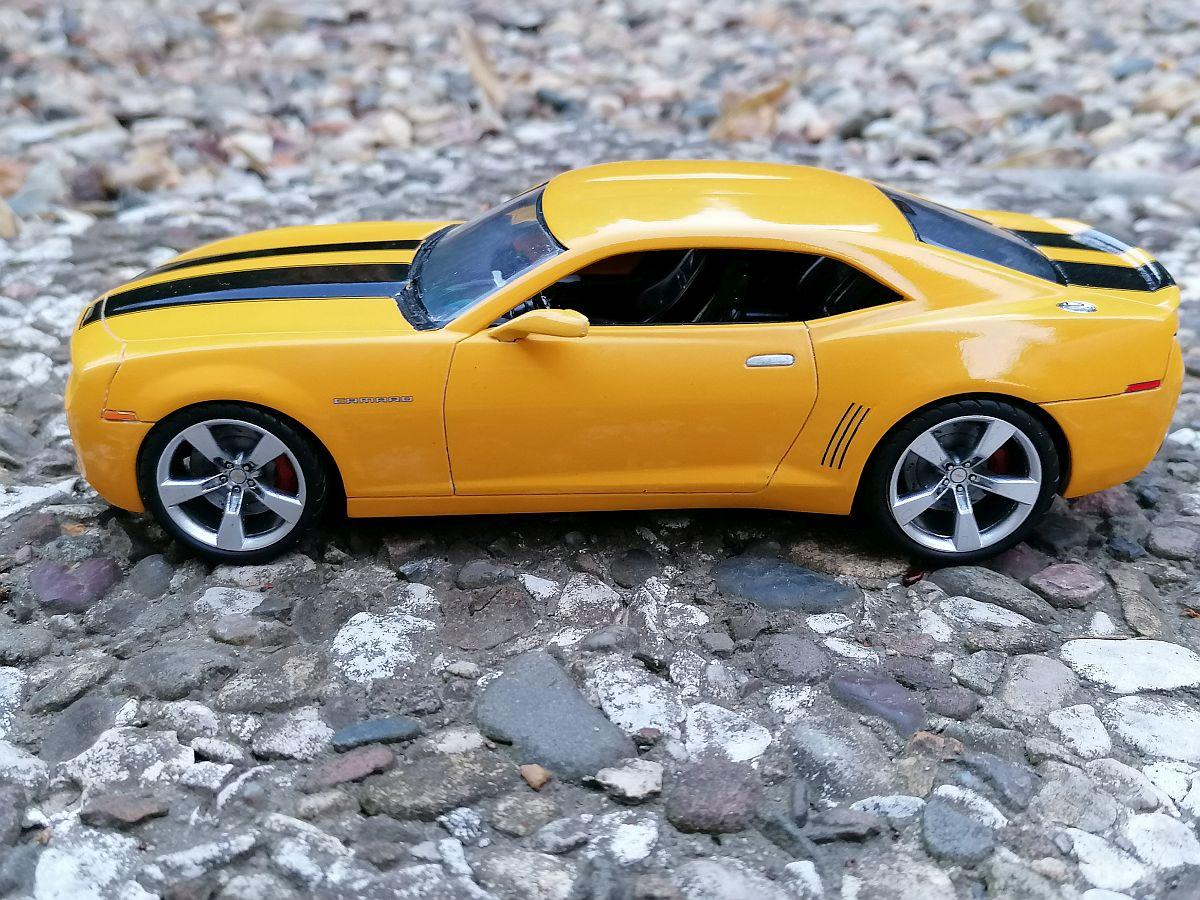
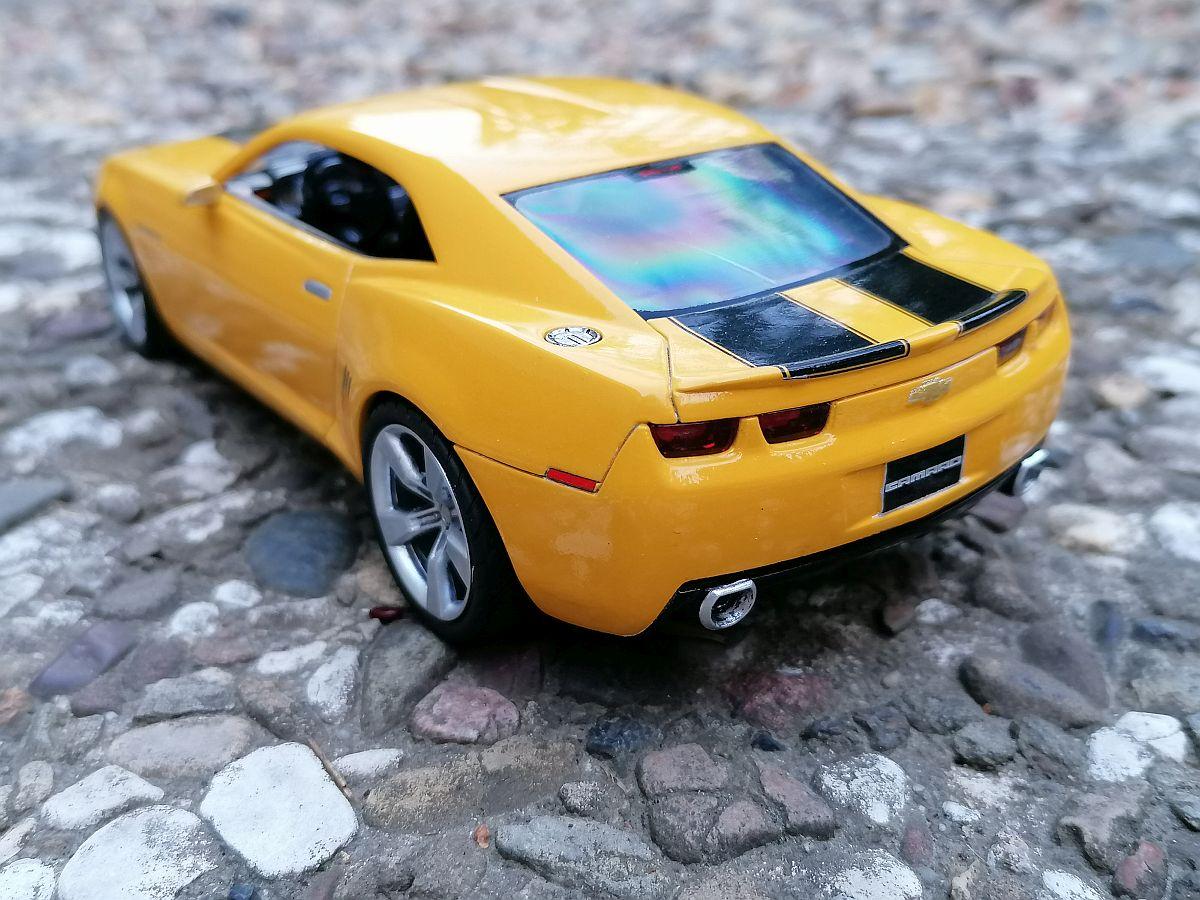
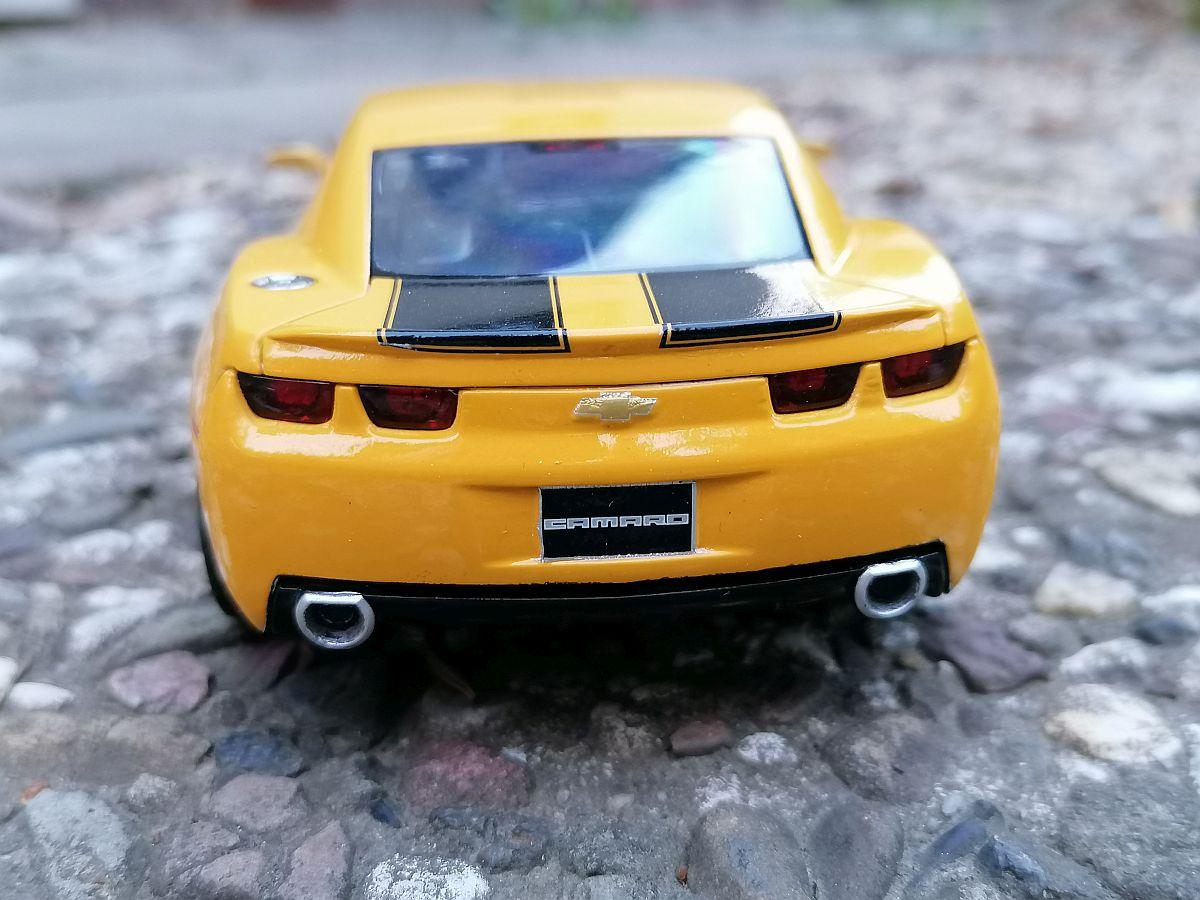
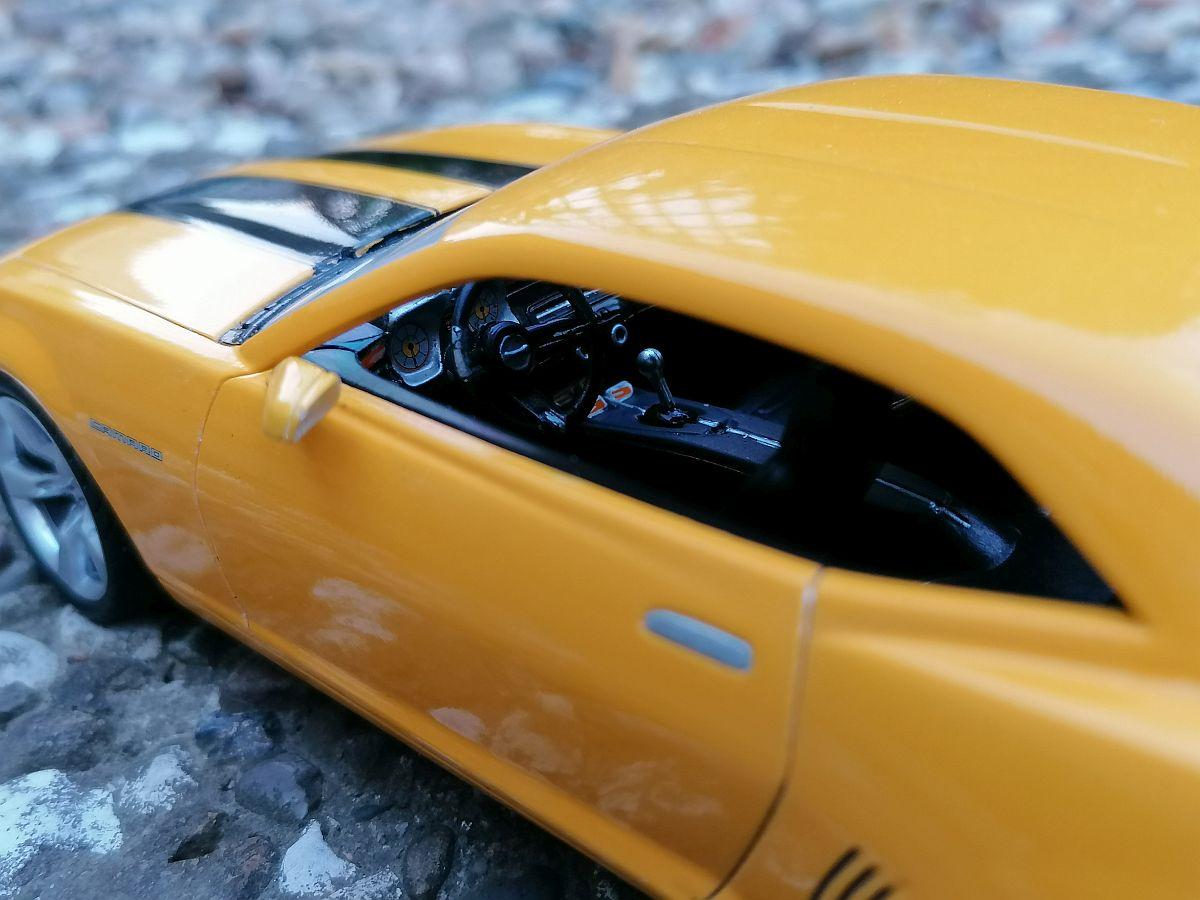
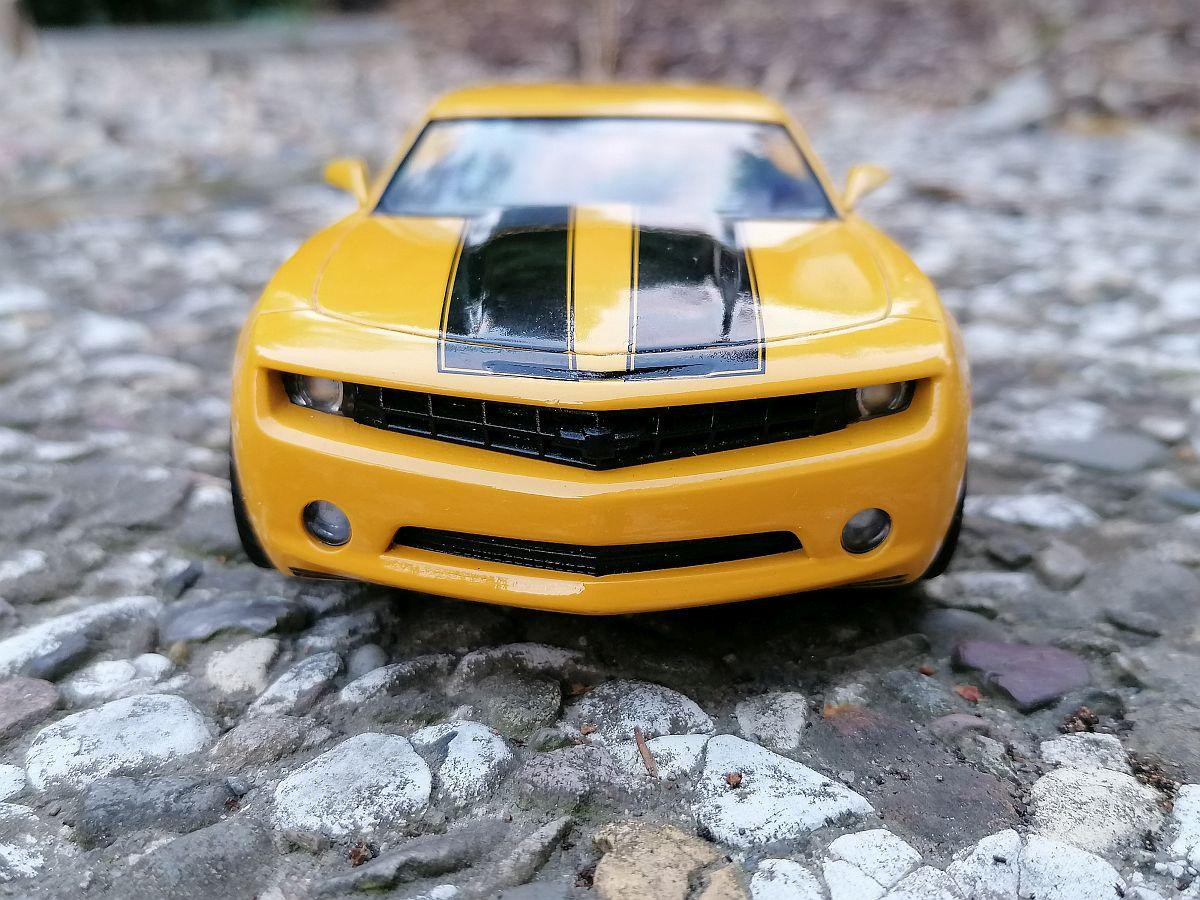
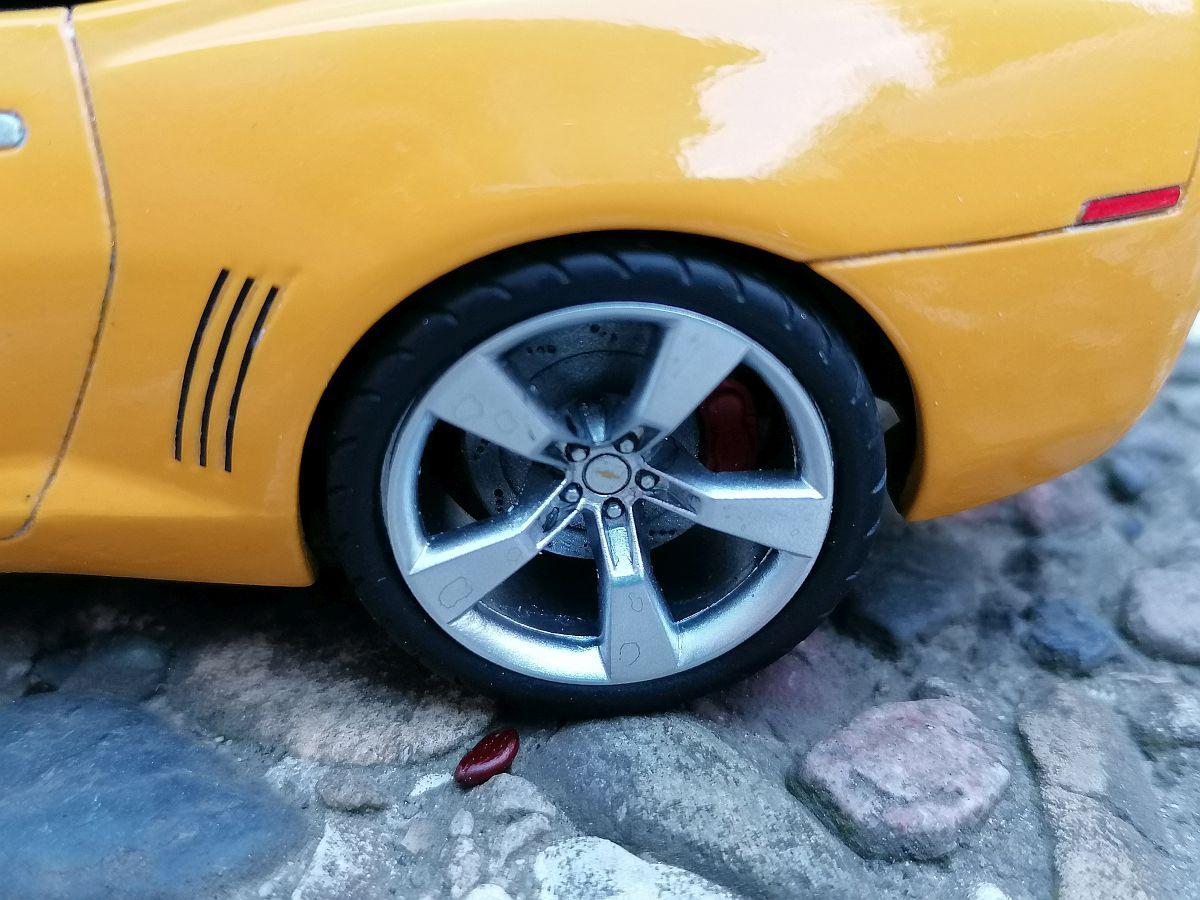
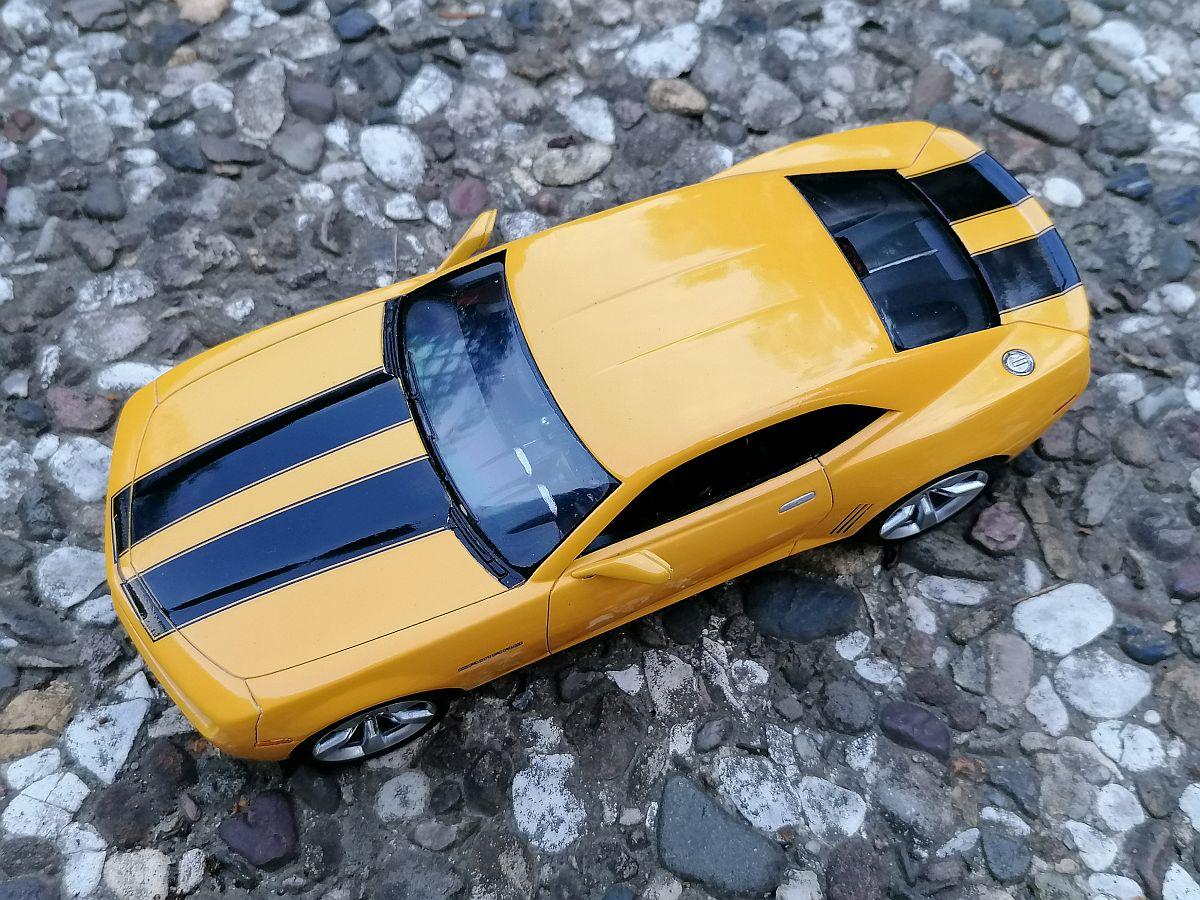
Hey guys, would like to share my Bumblebee inspired Camaro Concept with you. Built this one during my summer holidays. It´s a really nice kit although it´s a snaptite. There´s always some potential for improvement so I did the 3rd brake light included in the rear window and added mirror foil behind the tail lights. The rest of this one is build right out of the box excepting the coloring. Front grille decal is still missing but will come. Here the pics... Hope you´ll like it. Feel free to leave a comment or critism. Happy modelling to everyone. Rico
-
Also wrote them. I can´t await a rerelease.
-
1961 Mercedes Benz 190SL - Revell with a few modifications
camaro69 replied to 89AKurt's topic in WIP: Model Cars
To me the angle of the engine looks quite good. That's why I think rotating the lower half of the intake should solve the problem mostly.. -
1961 Mercedes Benz 190SL - Revell with a few modifications
camaro69 replied to 89AKurt's topic in WIP: Model Cars
Great build, Kurt... Just a thought. But maybe you only have to cut the intake headers in the middle and rotate the lower half for 180 degrees so the mounts to the engine become the same angle. Maybe this requires adding some material to the center section of the headers but I think that´s an easy fix. As I said only a thought. Rico -
AJ Foyt '66 Ford Mustang T/A
camaro69 replied to afx's topic in Other Racing: Road Racing, Salt Flat Racers
You did an amazing job again. Hope you can help me with mine once I have the time to start with it. -
'66 Shelby Mustang Group II
camaro69 replied to afx's topic in WIP: Other Racing: Road Racing, Land Speed Racers
I´m mostly a silent reader on here but your builds are always really enjoying and inspireing to me. Keep up the great work. -
Here´s what I made out of this. Sure not 100% accurate but I like it as it is especially because it´s so small on this car in 1/25...?
-
Hey guys, thank you all for your help. I think this is a disc brake with caliper nearly on top. I will go with this and try to replicate it. The first pic showes it well enough for me. Rico
-
72 Buick Riviera Boattail (Update 18/12/26)
camaro69 replied to camaro69's topic in Car Aftermarket / Resin / 3D Printed
Sorry Steve, no updates yet. Everytime I think I would get some more time for the hobby my workload becomes more and more. I definitely will finish it and it´s meant to be cast after all the corrections but it´s a hard and long way to go. I Will keep all of you updated... Rico -
The 2022 Cannonball Run Year of Birth Build Thread
camaro69 replied to disconovaman's topic in Community Builds
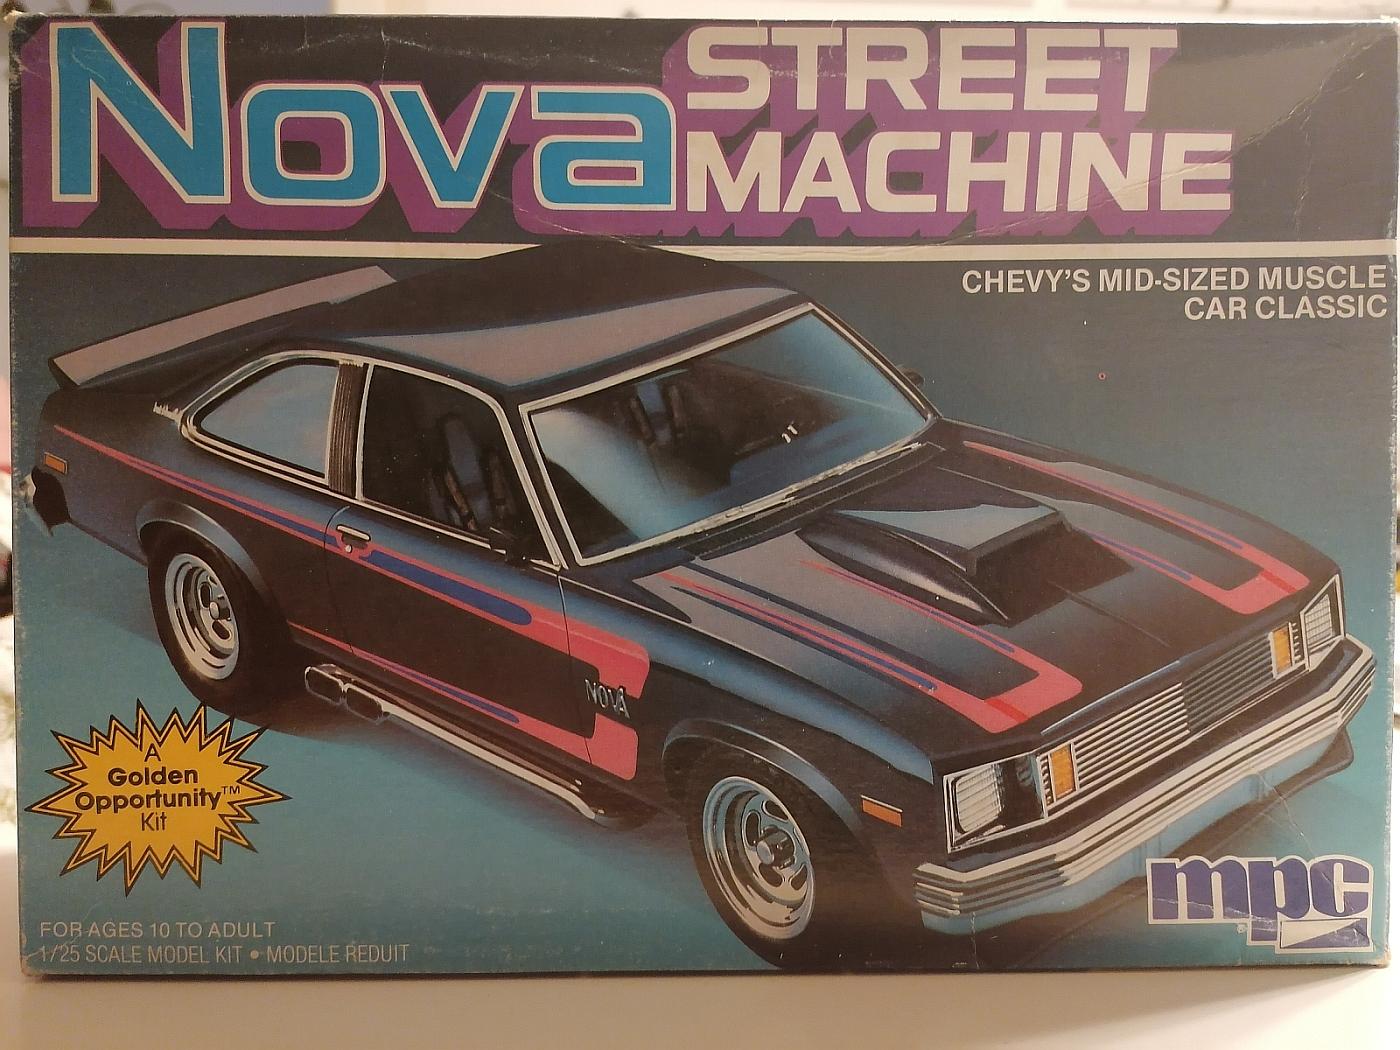
Haven´t changed my mind on the car but on the kit I´ll use as a base so count me in with my try to create a ´77 Chevy Nova 4 door Pro Touring. Body and most other parts will come from the MPC ´79 Nova Street Machine. Some parts like the bumpers will come from the ´76 AMT... I also will 3d print a new grille and some original style rims with a larger diameter to get the Pro Touring look. Here´s is the base... (a testprint of the new grille can be seen on pic 3 already ?) Happy modeling to everybody who participates and a special thanks to Anthony and Mike to make this CBR possible again. Rico
-
2022 Cannonball Group Build theme suggestion thread
camaro69 replied to Fat Brian's topic in Community Builds
I know about this one. Seems to be as nice as the Crown Victoria I have already from him but at the moment I don´t have the bucks to buy it. I have the chance to get a 1979 MPC kit from a friend so I will try to do the same conversion Dwayne did for the resin kit. Selfmade man...? -
2022 Cannonball Group Build theme suggestion thread
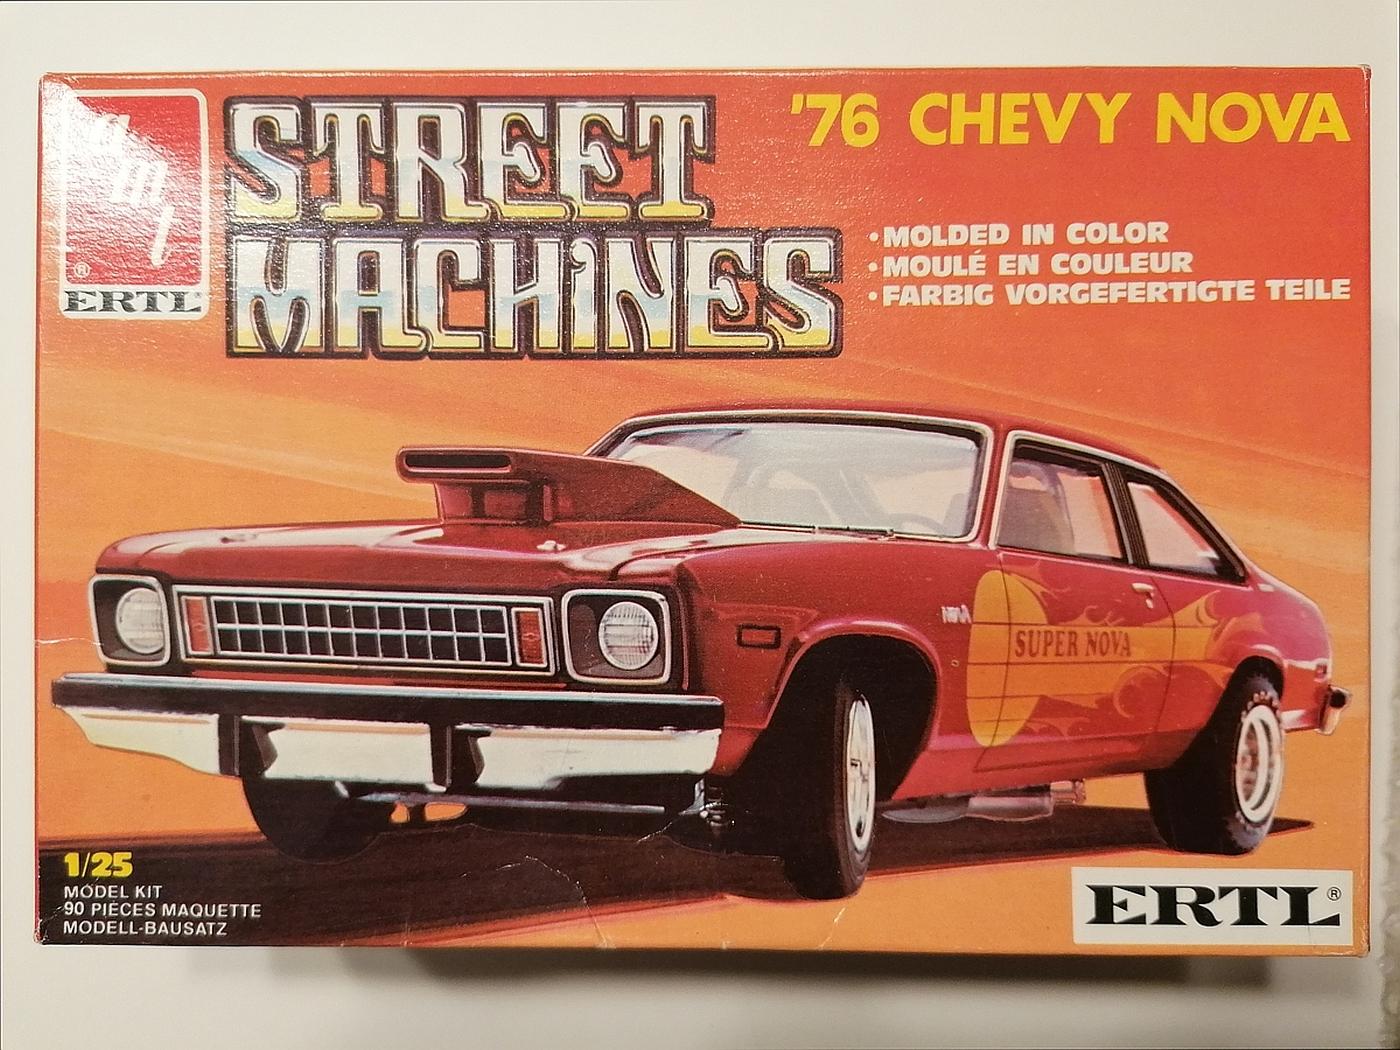
camaro69 replied to Fat Brian's topic in Community Builds
Got my project for the next run in the mail today. AMT Street Machines ´76 Chevy Nova Plan is to convert it into a ´77 4door (because of my year of birth). Maybe as a Pro Touring as well because of the street machine parts. Interior should become mostly stock eventually with modern seats.
-
Great work on the Supra, Anton! I think it´s as fast as you built it!? Bill and Anthony: Thank you for the positive feedback.