ShakyCraftsman
-
Posts
797 -
Joined
-
Last visited
Content Type
Profiles
Forums
Events
Gallery
Everything posted by ShakyCraftsman
-

Mack B-61 Dump Body
ShakyCraftsman replied to Scott Eriksen's topic in WIP: Model Trucks: Big Rigs and Heavy Equipment
I thought that the Revell chrome was fairly durable.🤔 does it come off? Did you add a clear coat to it? Ron G -
Western Star 4900 FA plow truck
ShakyCraftsman replied to BK9300's topic in WIP: Model Trucks: Big Rigs and Heavy Equipment
I trust you will figure it out with your abilities. Ron G -
Hey Gary Any progress on this build? I'm going to be doing a AMT "Cross Country" Peterbilt soon. I'm going to be using a KFS Cat 1693 in it, and probably one of Casey's long hoods. Ron G
-
Kenworth W-925
ShakyCraftsman replied to Brenton's topic in WIP: Model Trucks: Big Rigs and Heavy Equipment
The brake drums will take up some of the distance, but I think you might be cutting the axles.😪 It's hard to tell from your picture. Ron G -
Kenworth W-925
ShakyCraftsman replied to Brenton's topic in WIP: Model Trucks: Big Rigs and Heavy Equipment
Do you have the brake drums on? If yes you will probably have to trim the metal axles. You will need a good pair of hard wire cutters, or a cut off wheel in a dremel tool. Ron G -
Kenworth W-925
ShakyCraftsman replied to Brenton's topic in WIP: Model Trucks: Big Rigs and Heavy Equipment
Your welcome. What ever you need just ask we are all here to help. Ron G -
1970 Ford C 600
ShakyCraftsman replied to Biggu's topic in WIP: Model Trucks: Big Rigs and Heavy Equipment
Hey Pal What are you going to use for the tar that will be slobbered all over this.🤔🙄😁 Ron G -
Kenworth W-925
ShakyCraftsman replied to Brenton's topic in WIP: Model Trucks: Big Rigs and Heavy Equipment
Hey Brenton Your doing great. Here are some pictures on detailing the Cummins NTA-370 engine. Ron G
-
Kenworth W-925
ShakyCraftsman replied to Brenton's topic in WIP: Model Trucks: Big Rigs and Heavy Equipment
Hello Brenton Don't stress to much. There are plenty of people here to help if you get stuck on something. It looks like you got a good start on it so far. Ron G -
Mack B-61 Dump Body
ShakyCraftsman replied to Scott Eriksen's topic in WIP: Model Trucks: Big Rigs and Heavy Equipment
It's really coming together Scott. I'm loving this build.😉😁 Ron G -
Mack B-61 Dump Body
ShakyCraftsman replied to Scott Eriksen's topic in WIP: Model Trucks: Big Rigs and Heavy Equipment
That's looking real sweet Scott. Ron G -
Paystar 5000 tractor by ERTL.
ShakyCraftsman replied to landman's topic in WIP: Model Trucks: Big Rigs and Heavy Equipment
Yep, either a C-15 or 3406A -
Day cab astro 95
ShakyCraftsman replied to 53gmc's topic in WIP: Model Trucks: Big Rigs and Heavy Equipment
I live in the Detroit area. I remember those going in and out of the Strohs brewery back in the day. They had a tour of the plant for people if they were interested. It started in the brew hall. Lots of free 🍺 🍻 beer!...lol Ron G -
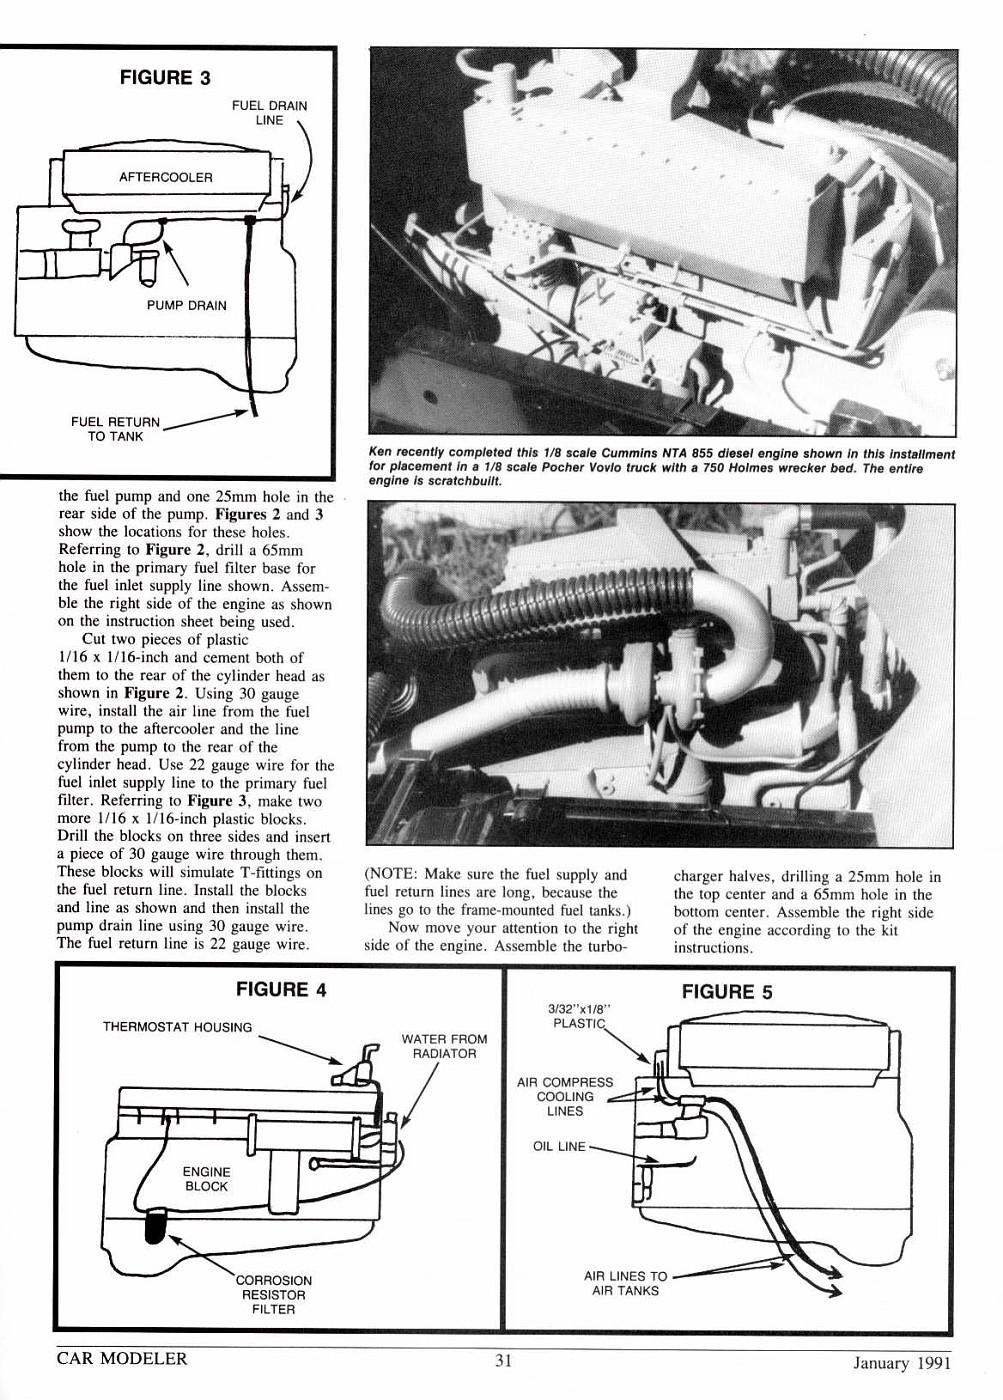
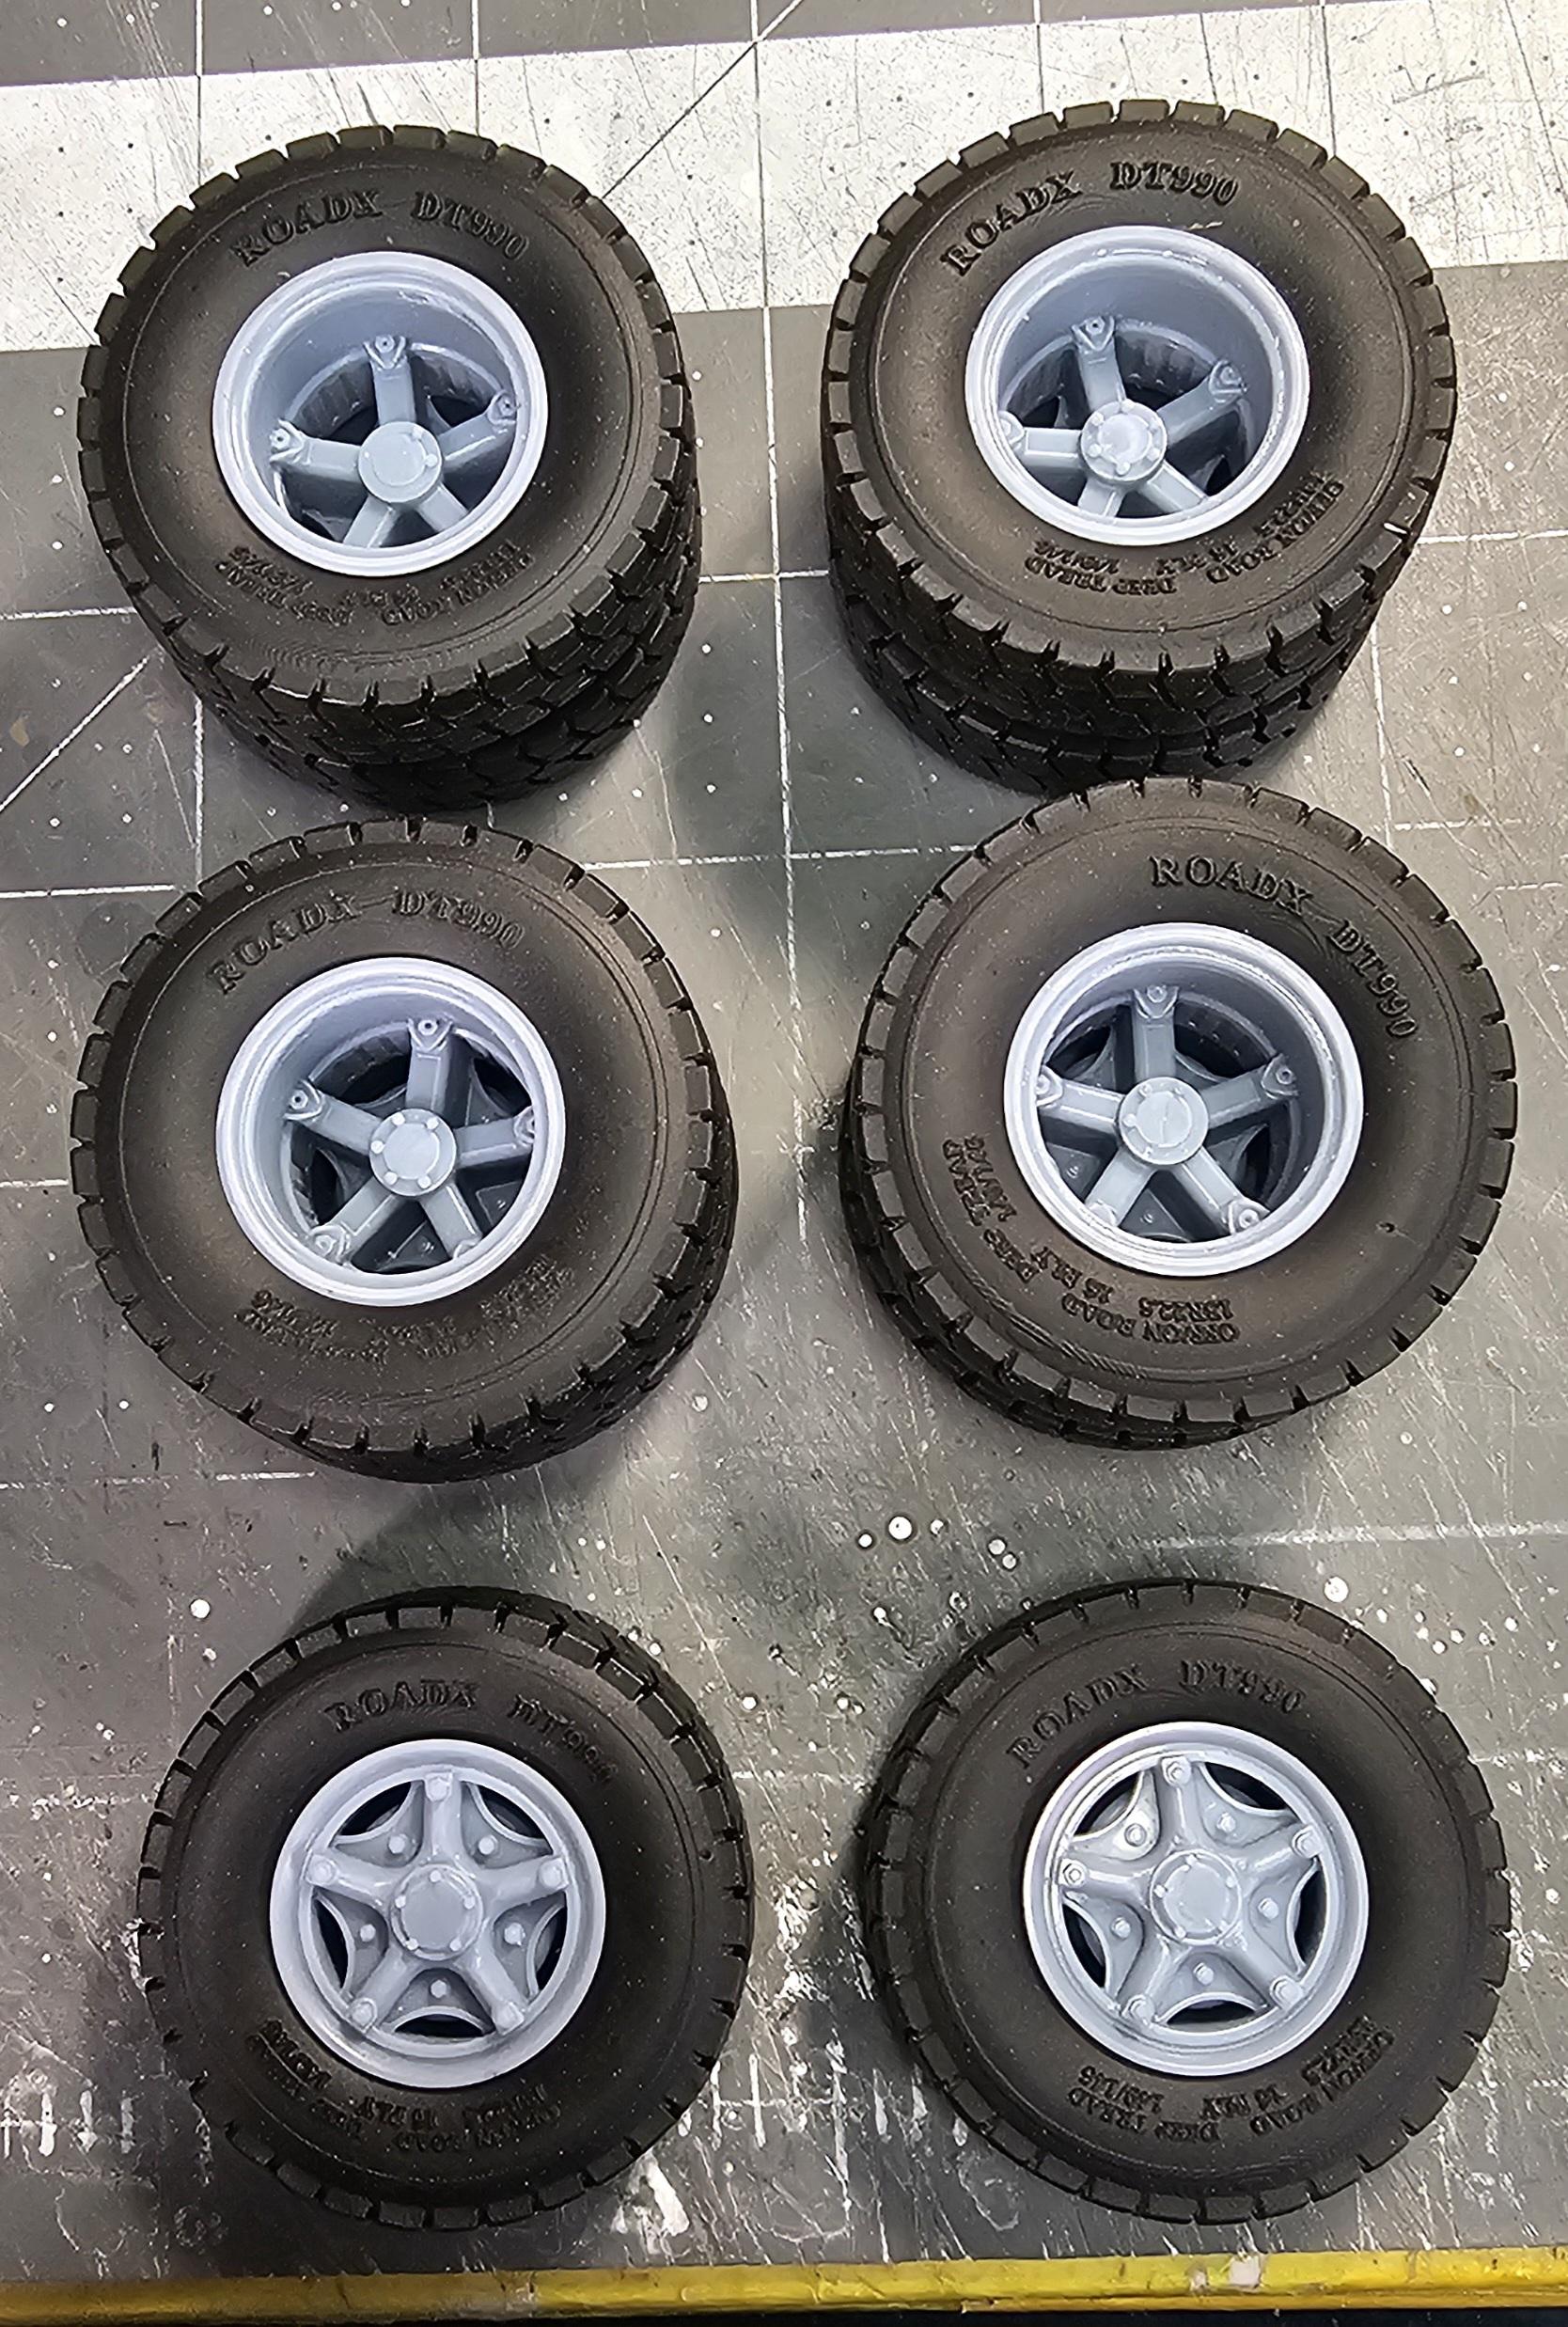
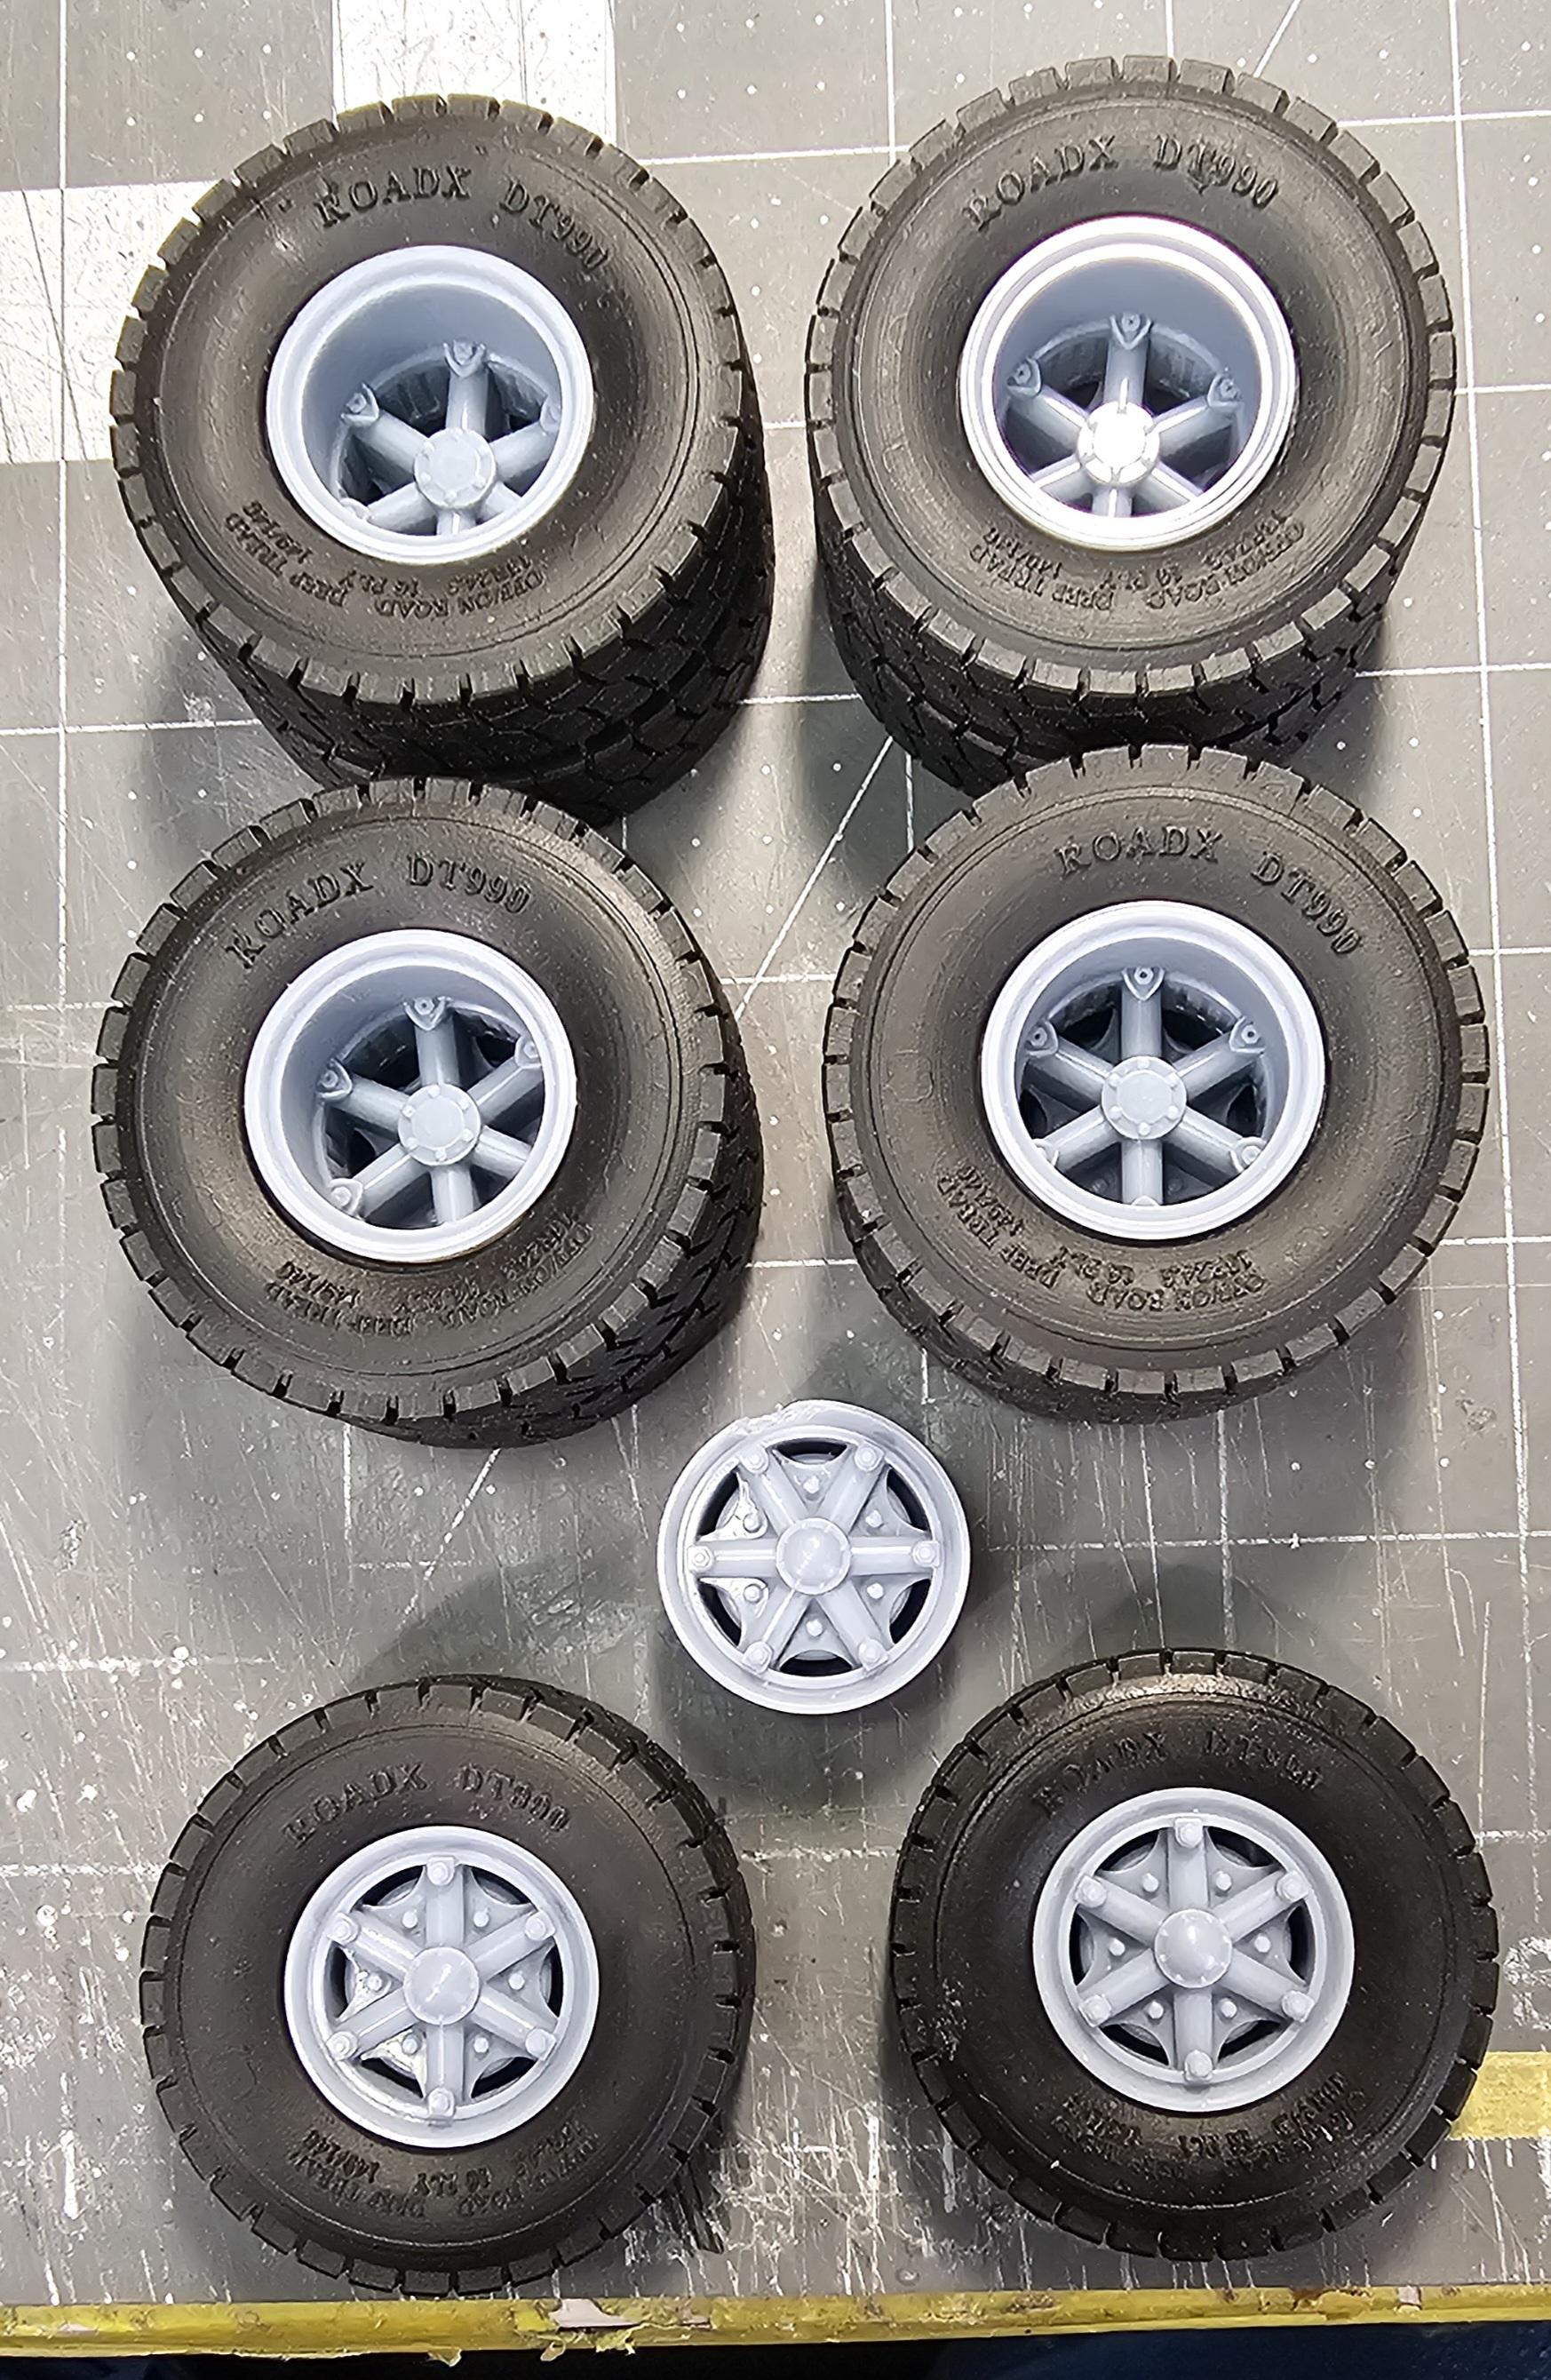
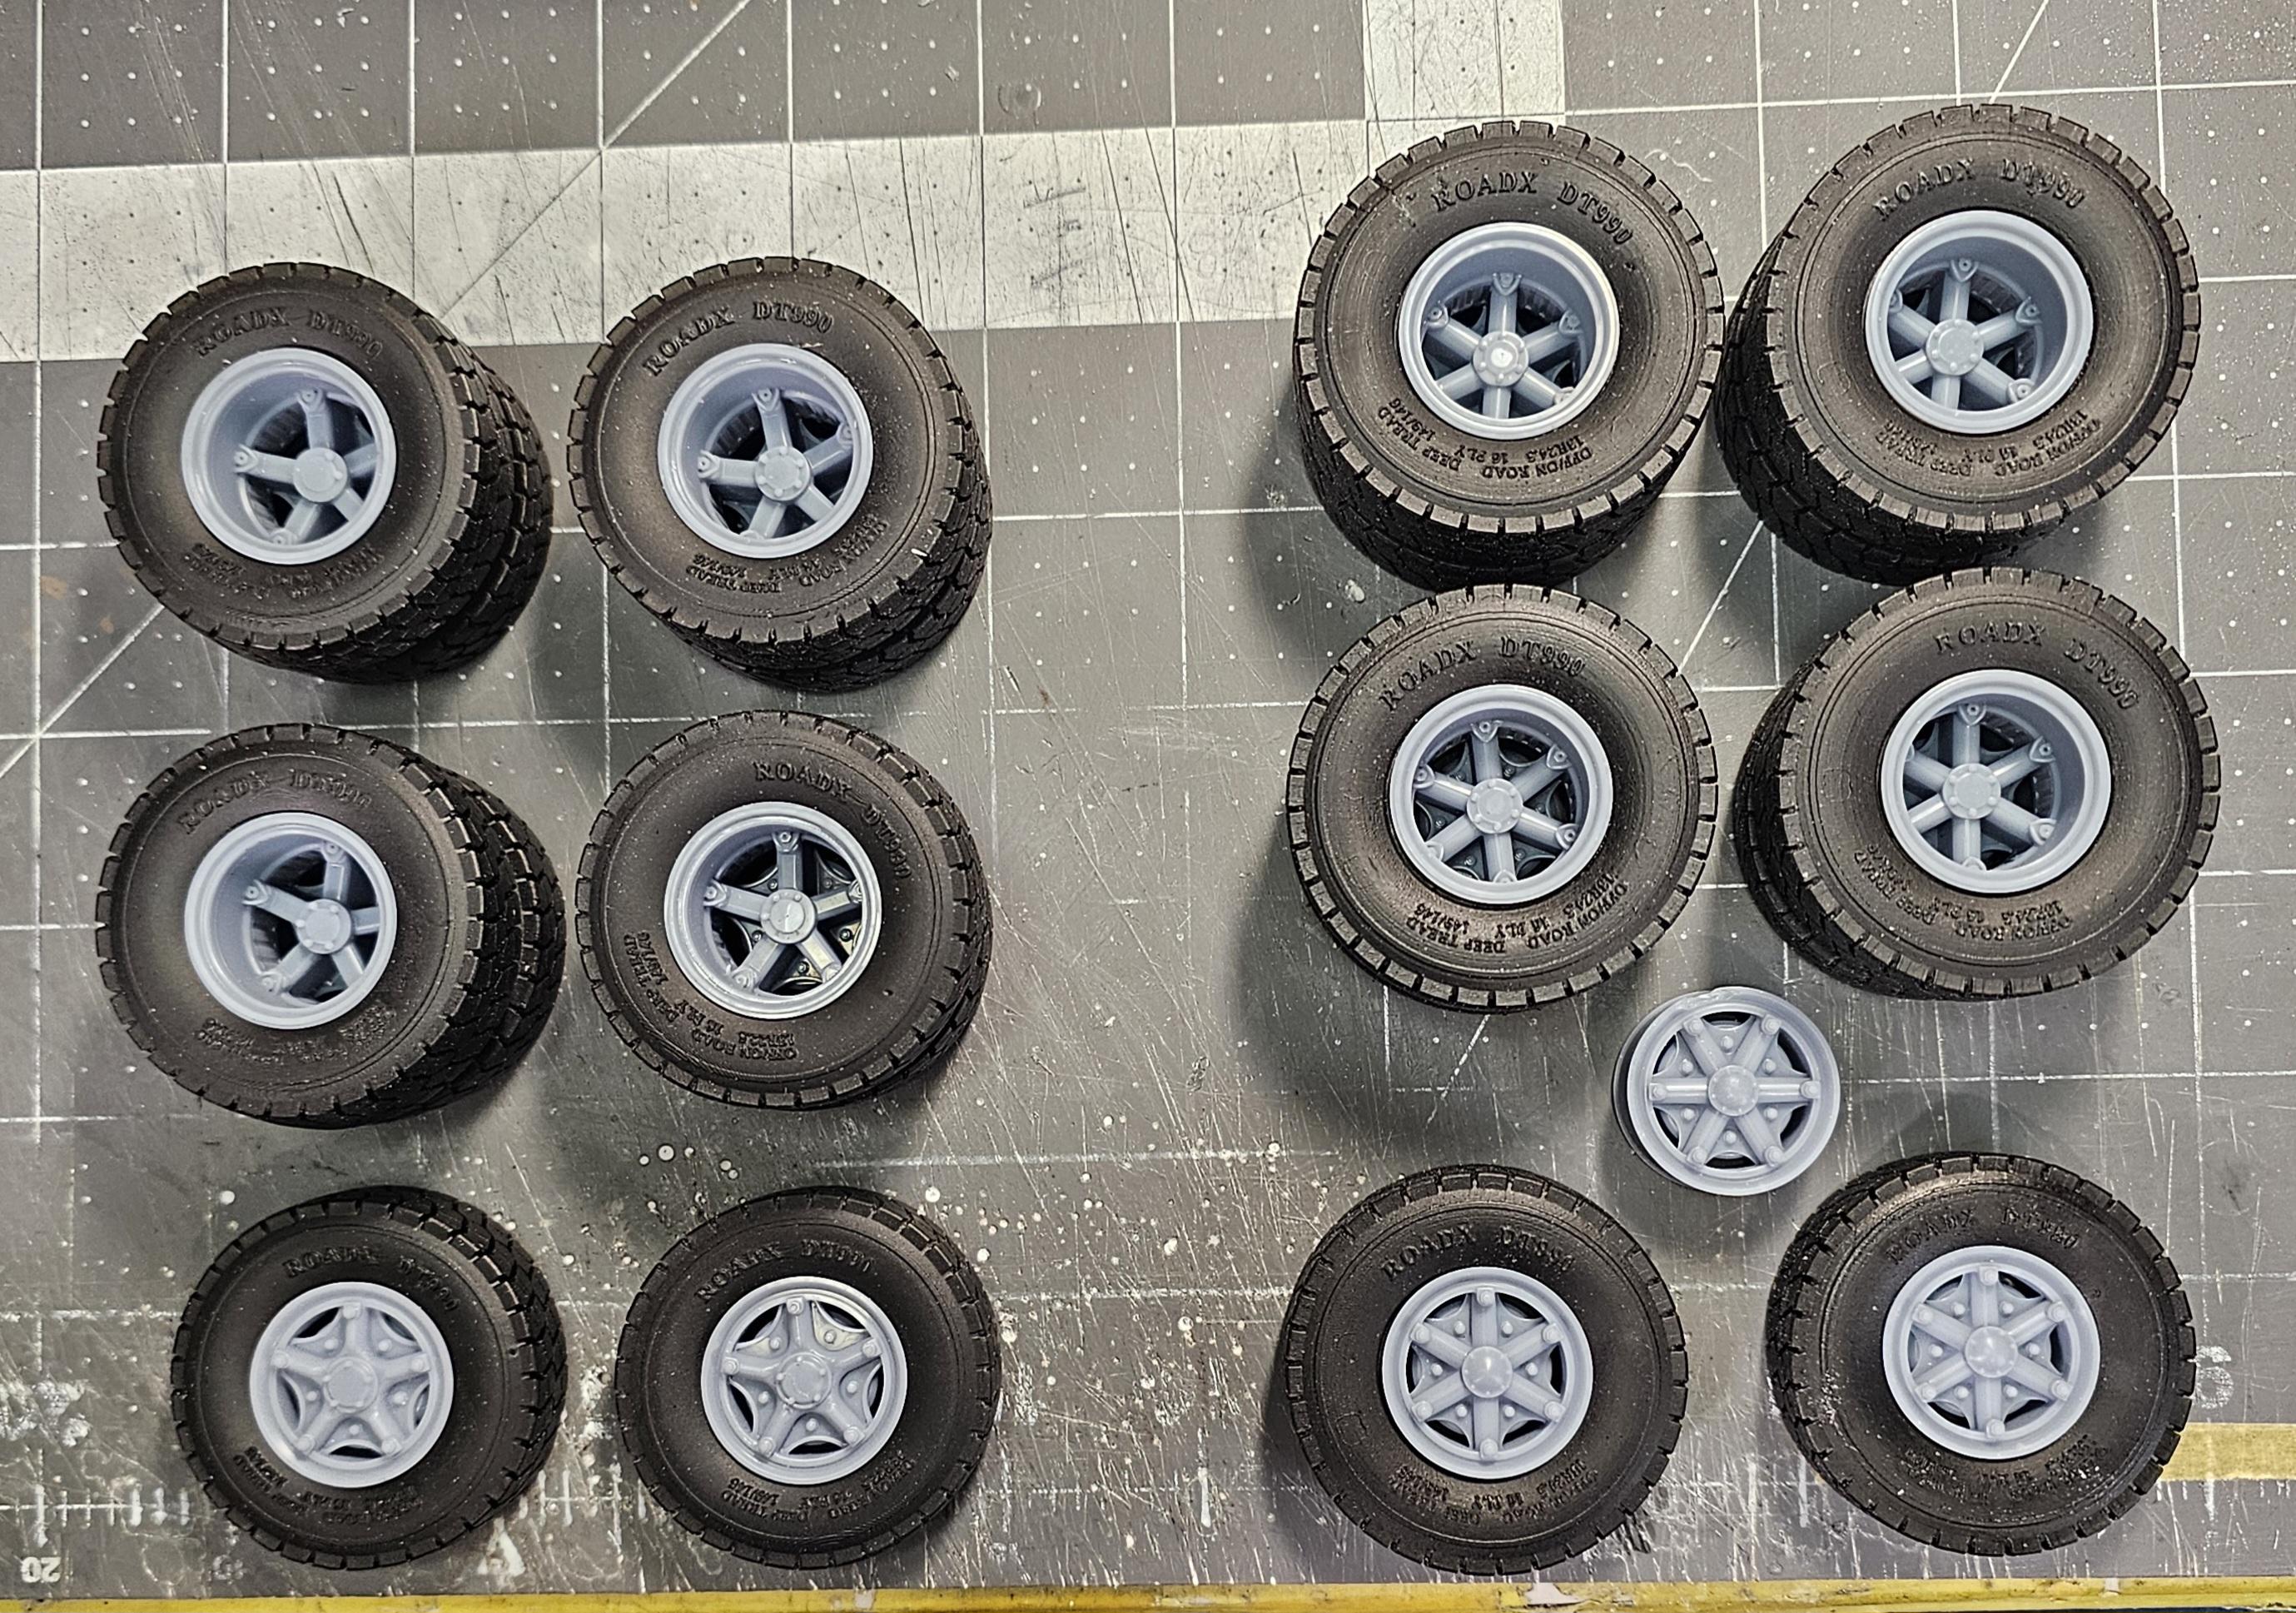
Hey Alan Thanks for your comment. The rear tires are a Michelin XZL copy. Paul at ST Supply doesn't have part numbers. They are what he calls deep tread tires. He has a 8 pack going for I think $20.00 bucks right now. The fronts are a Bridgestone 375 float. He has a pair with 5 spoke daytons on sale right now. The rear wheels you will have to see if Paul has any, or you could try Auslowe in Australia. You could check Ebay for wheels from the AMT Autocar DC-9964B dump truck kit. They are a bigger diameter (tire I.D.) then regular AMT wheels. Also 3D Concepts in Alberta, Canada has some real nice Dayton 5 and 6 spoke wheels they also have float wheels in 5 or 6 spokes. From them you can get them in different diameter sizes depending on what tires you are using. Here is a picture with them with Paul's 22.5 & 24.5 RoadX DT990 tires on them. Strictly off road tires. (Future logging truck W/T's.😁 These are the 5 spokes with the 22.5's. They are cast as a dual with a corrugated spacer, pretty cool! These are the 6 spokes with the 24.5's. They also have corrugated spacers. This is a picture of them side by side for comparison. Paul is out of these tires, not sure if he is going to get any back in though. On the rain caps, just use his search button, type in rain caps and they will show up two different sizes. Hope this helps. Ron G
-
Thanks Brian, coming from a master of your class this is much appreciated. Thank you very much. Ron G
-
Hey Ron 1/25-24 trailers for Australia are very hard to find. All that is available right now are American trailers and European trailers. Auslowe may have some, but you'll have to get in touch with them because I believe they are one offs. You could scratch up some, lots of work though. I looked into doing a 4 trailer ore dumpper for my Aussy Superliner, but I couldn’t find anything. The closes I could get to one was the Italeri dummper, but it is not a side dump. Ron G
-
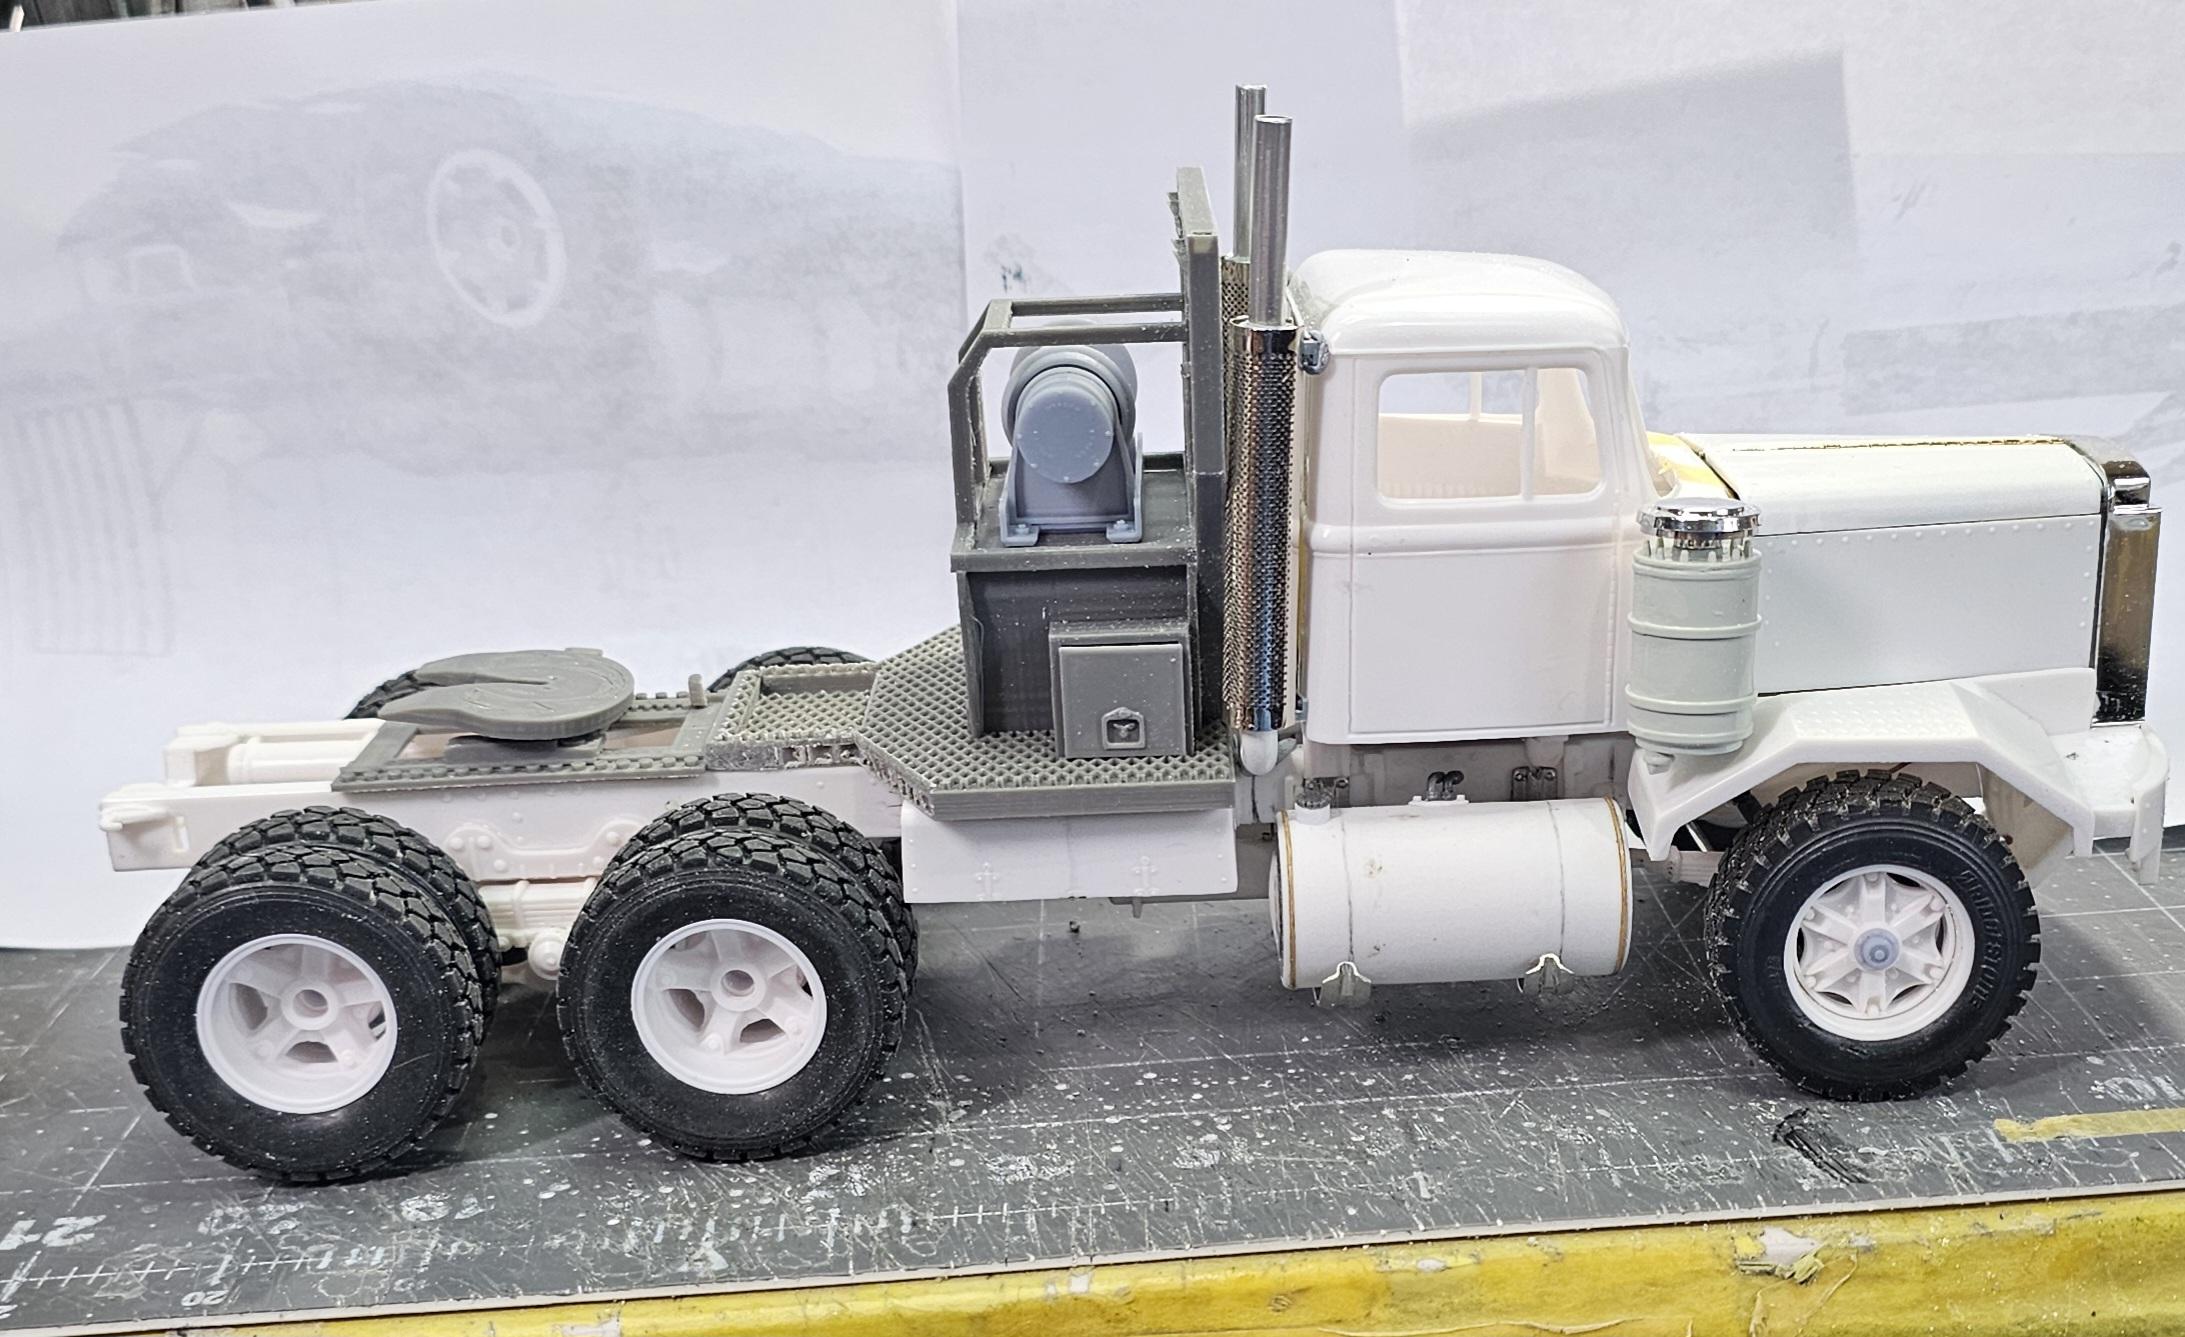
Hey all Not a big update today. Been feeling a little under the weather lately, but better now. This view shows the headache rack from 3D Concepts, but as you can see it's to long. It interferes with the front duals and pushes the fifth wheel back to far. This view shows the modifications I did to it. I shortened it by a scale 18" and cut a foot of of both sides to get clearance for the rear tires. Now that looks way better. This is going to be one bad a double s truck. Well that's it for now be back soon. Ron G
-
Mack B-61 Dump Body
ShakyCraftsman replied to Scott Eriksen's topic in WIP: Model Trucks: Big Rigs and Heavy Equipment
Hinge looks good Scott. Ron G -
Thank you Gary. They still need a little tweaking here and there, but look way better then the first ones. Ron G
-
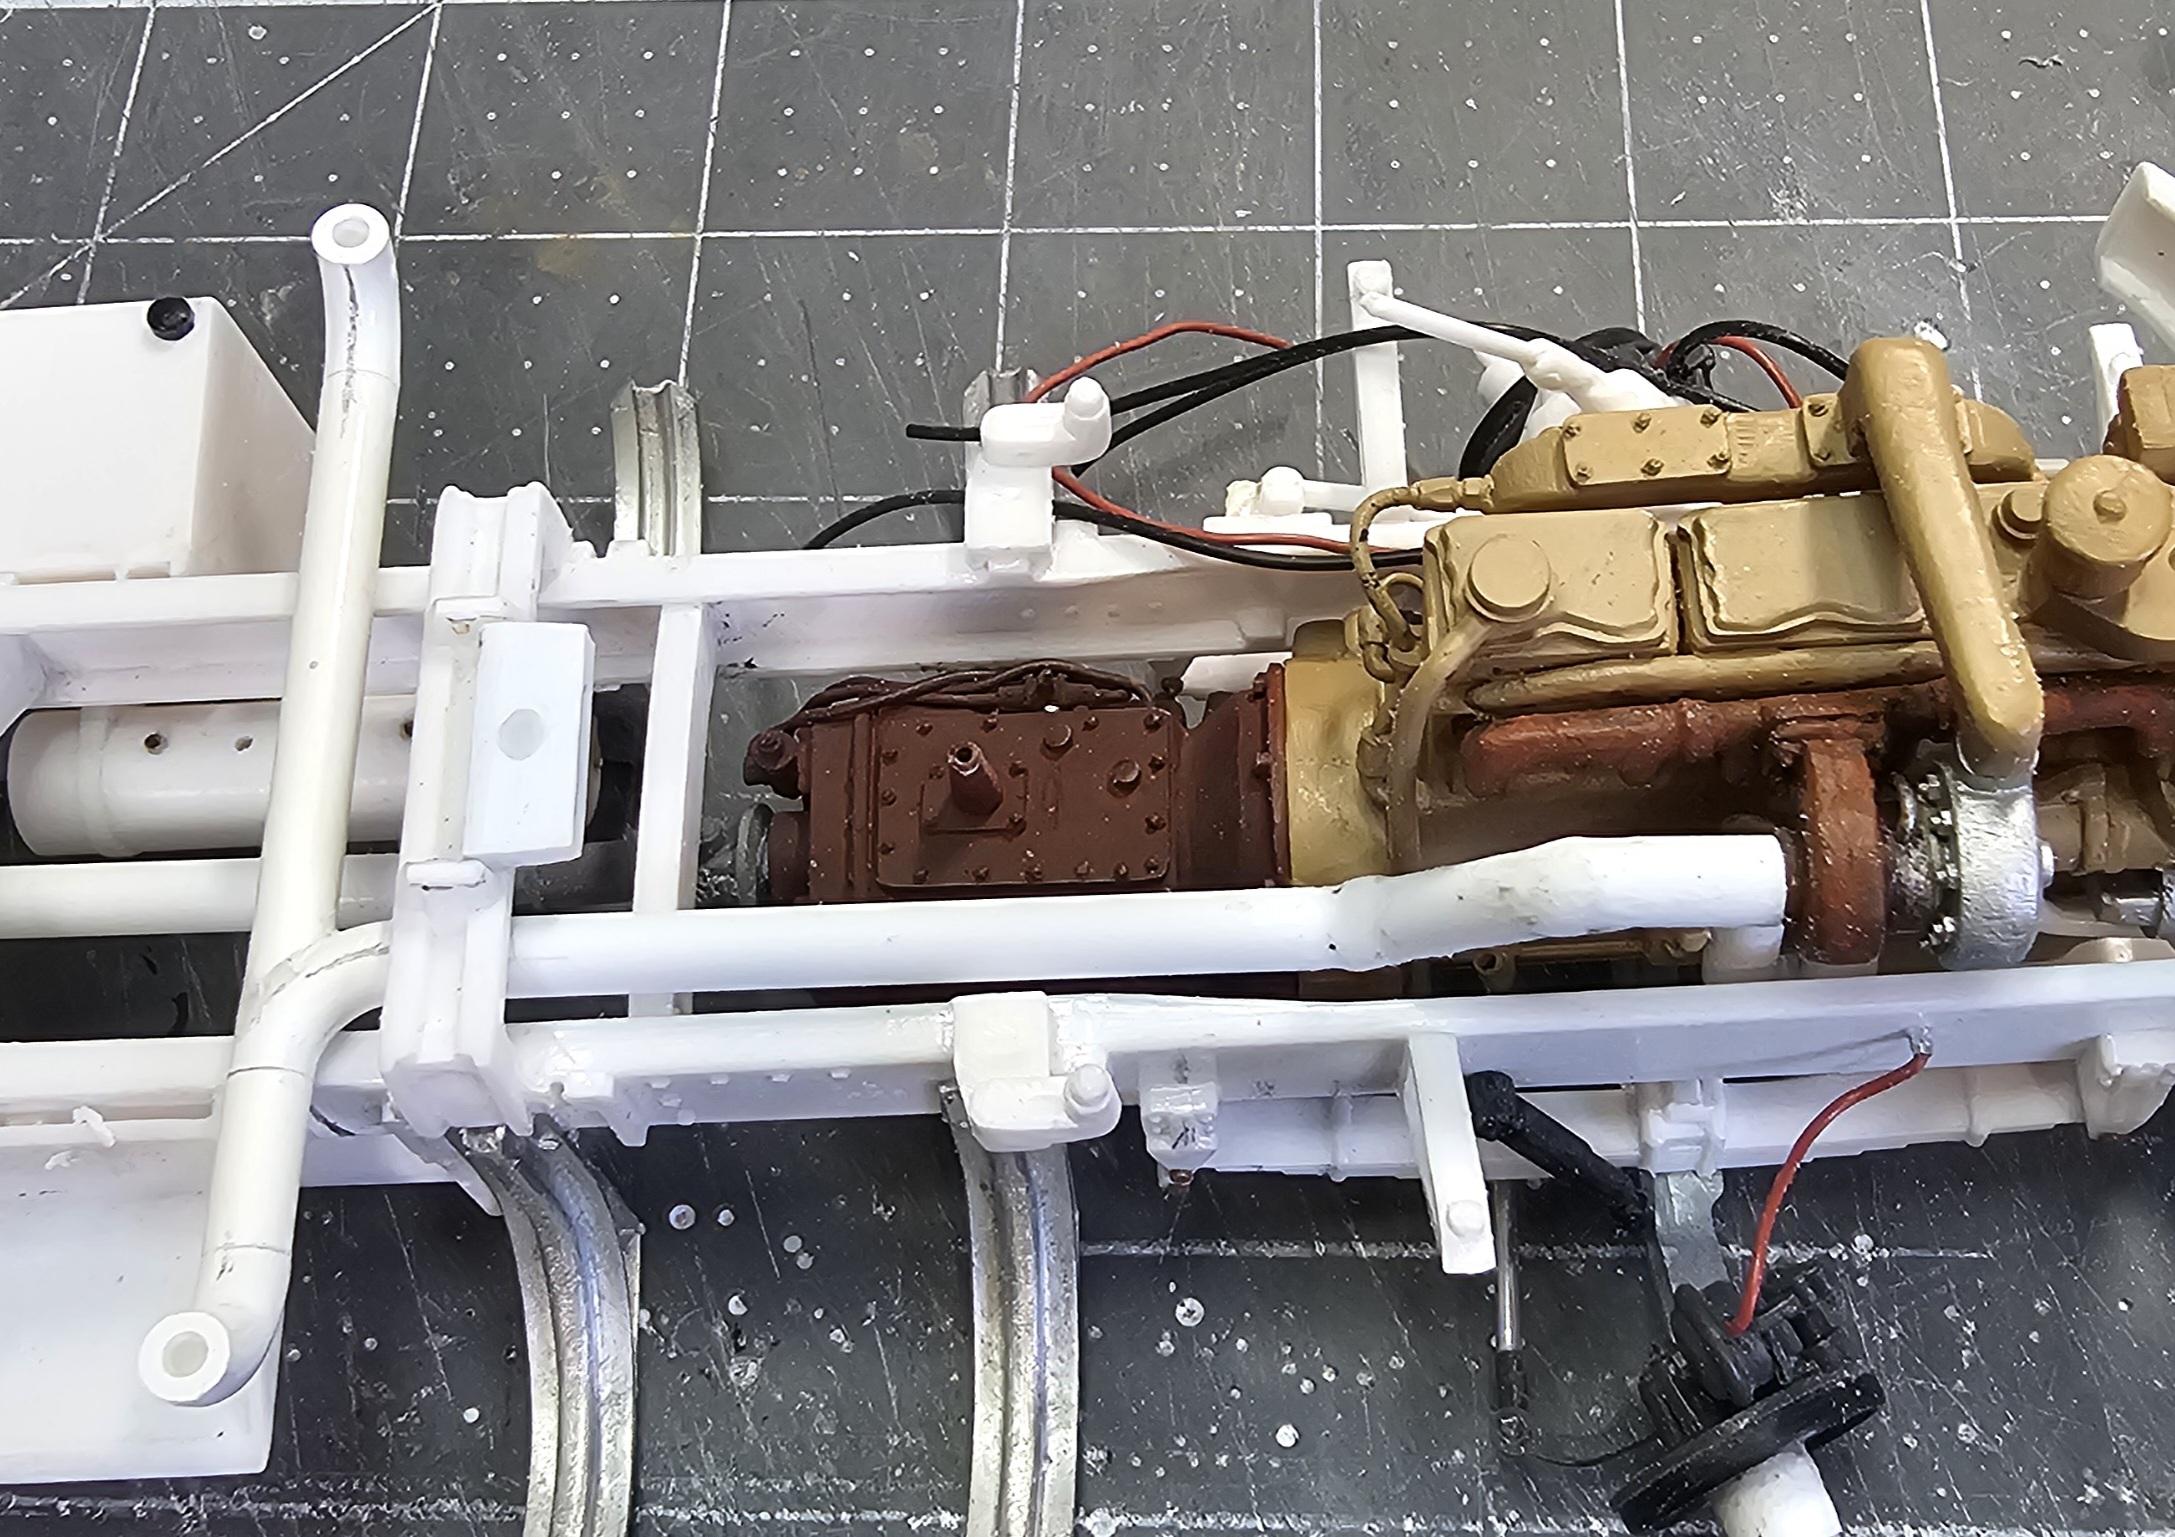
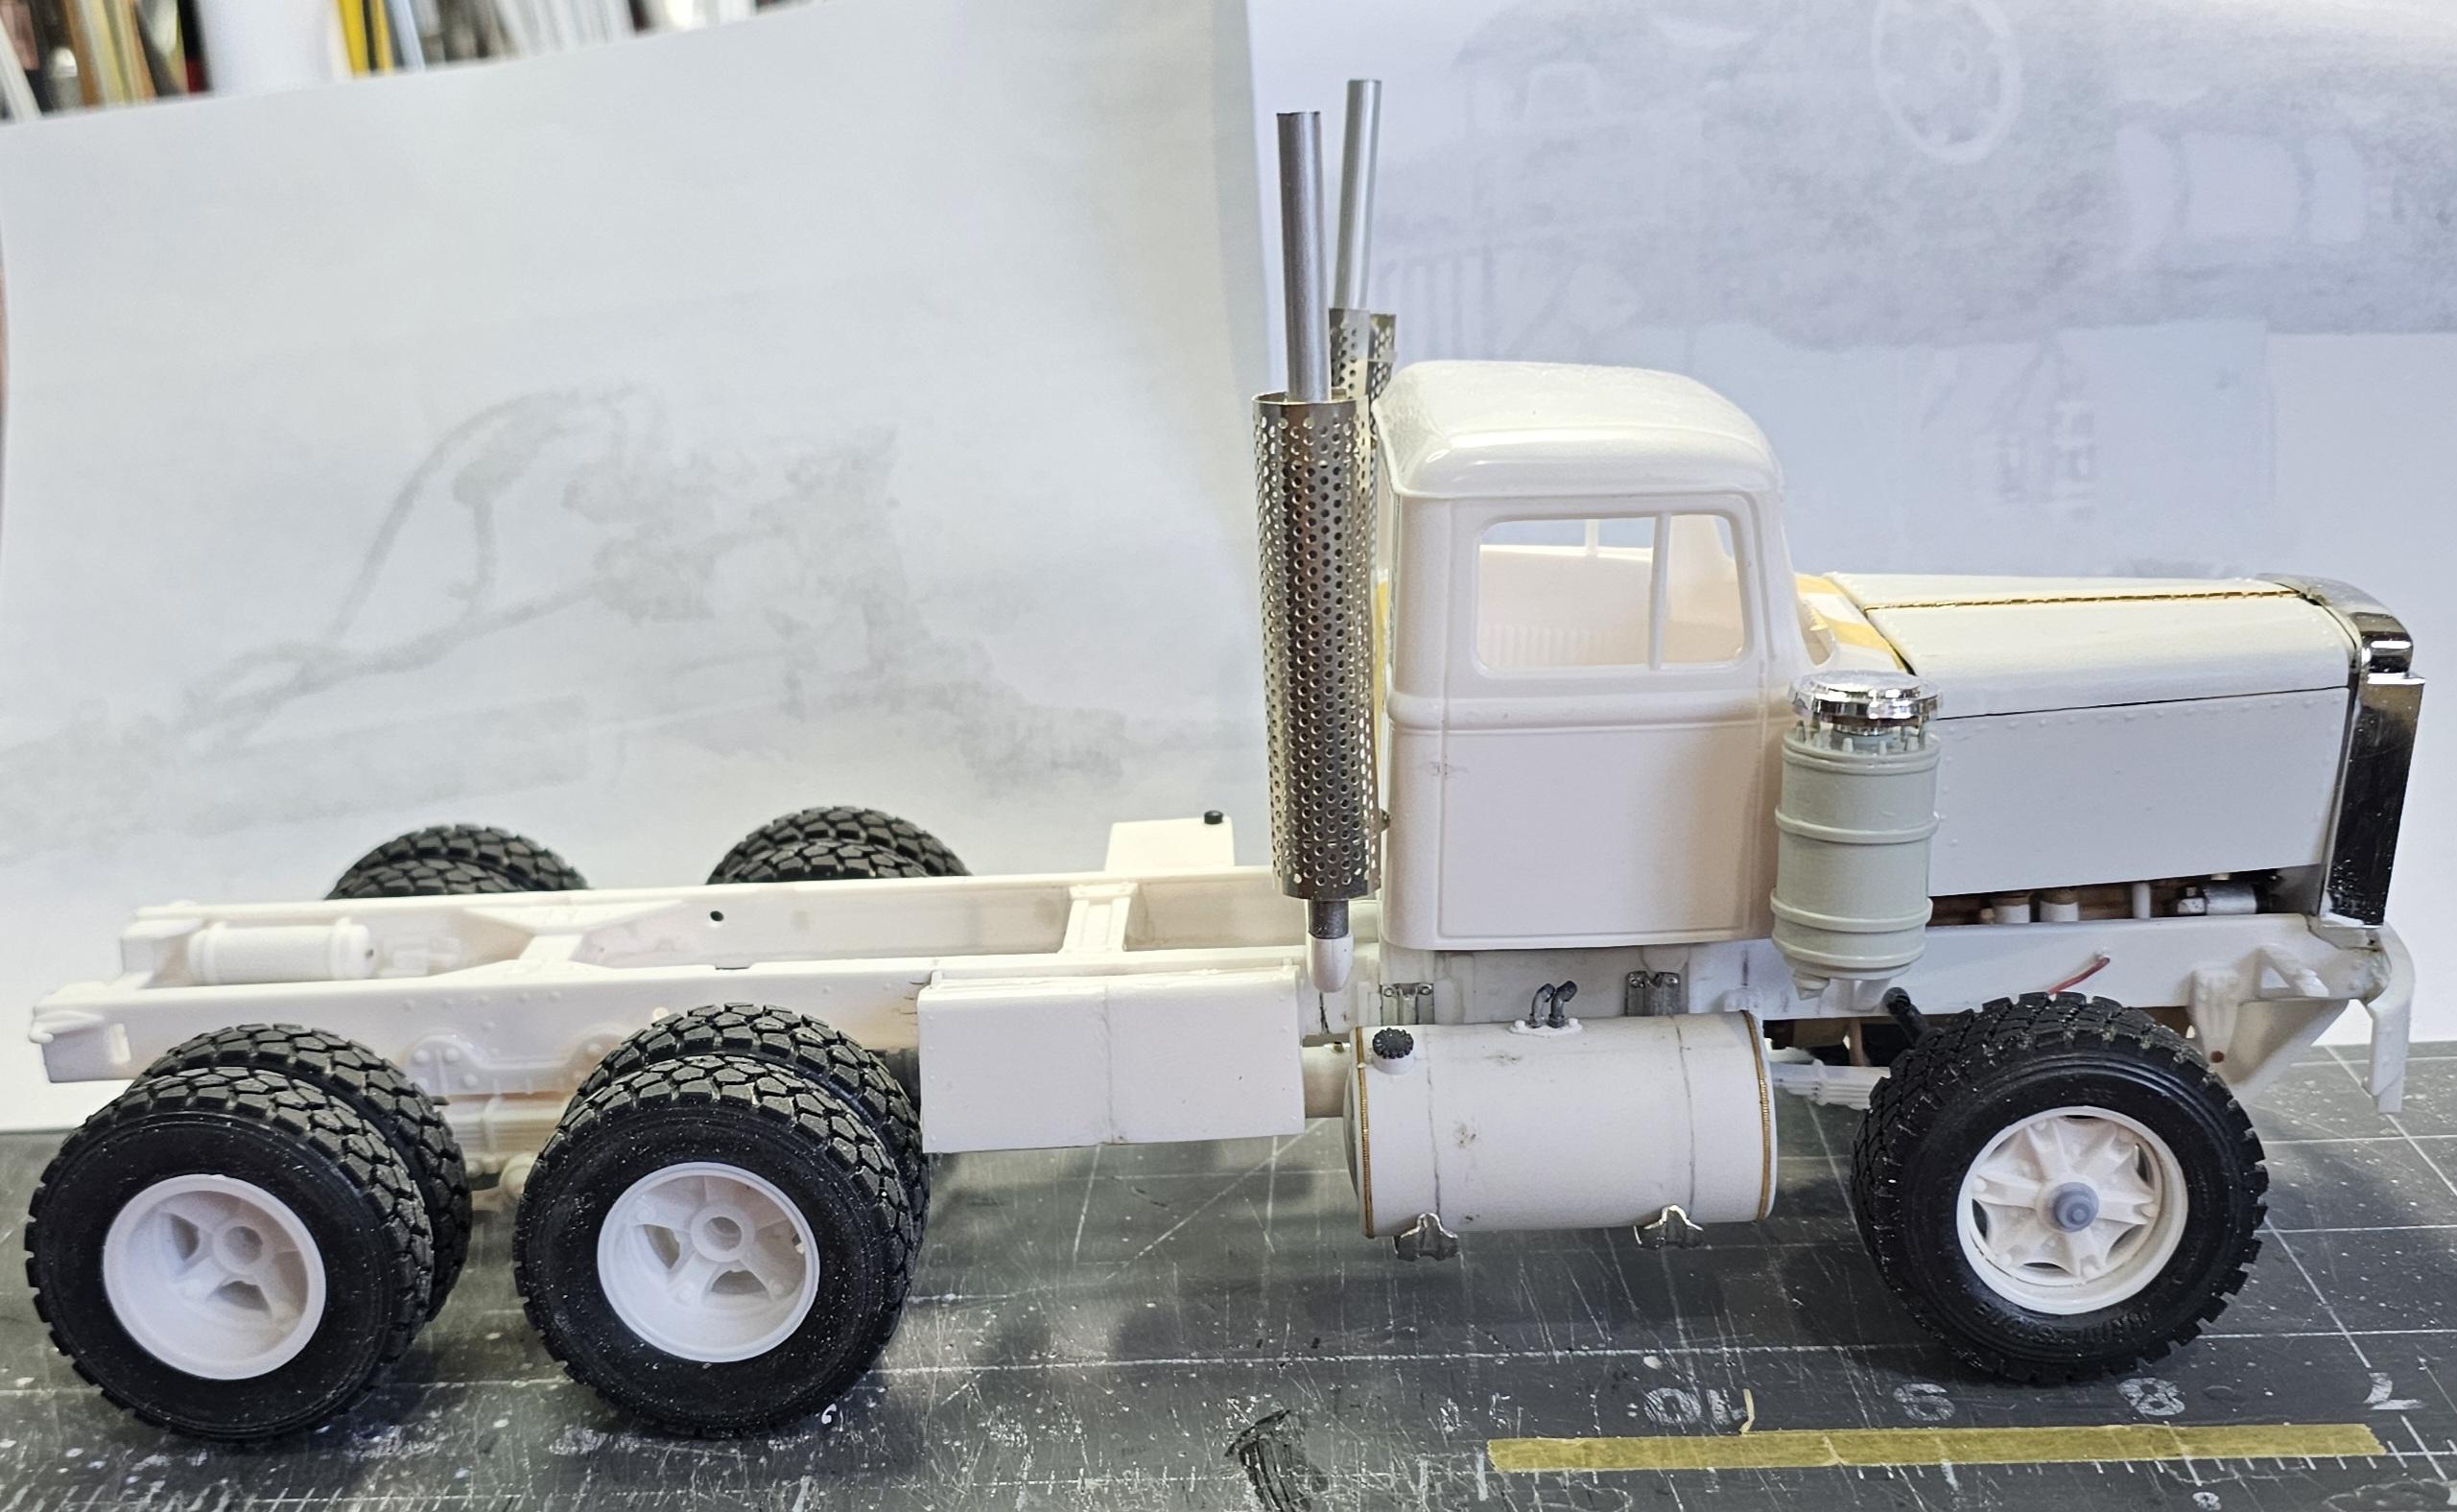
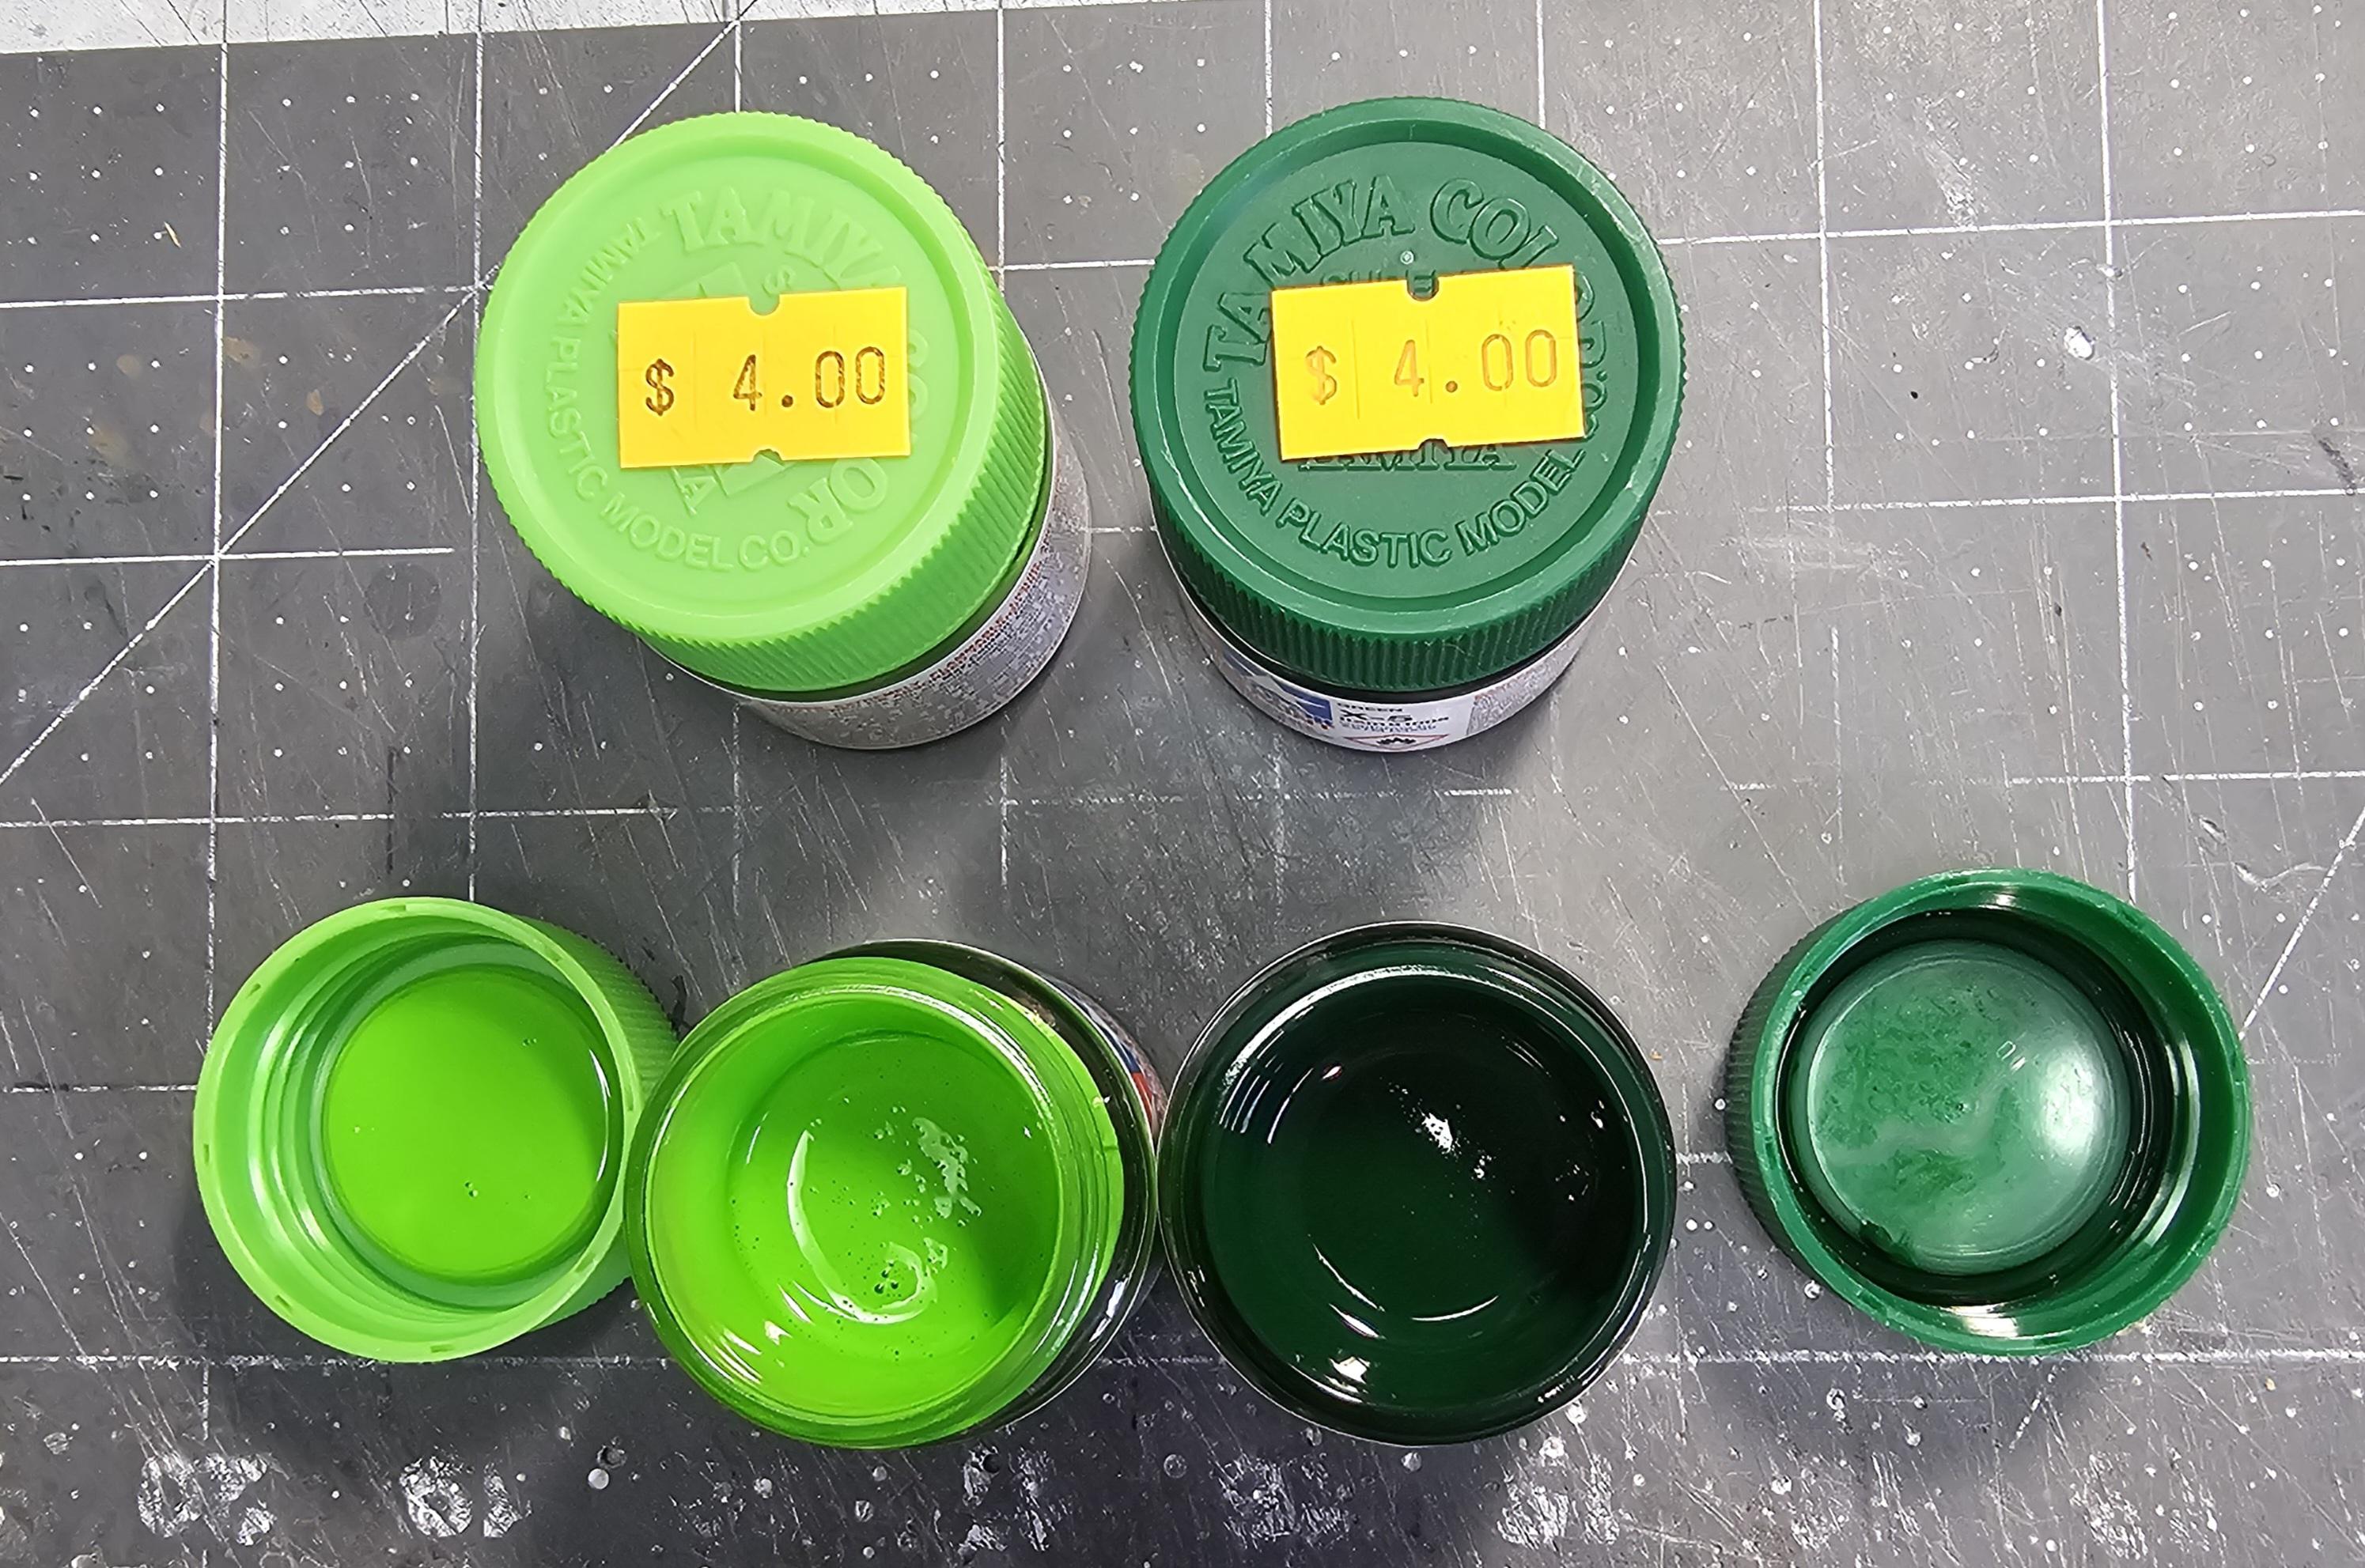
Hey all I got a little bit more done on this build today. I've been trying to work out the exhaust system for this truck. It has not been easy because of me using larger fuel tanks and a longer battery box there wasn't room for the exhaust to come up from under the frame. But it all worked out in the end. This view shows the custom made exhaust pipe from the turbo to the exhaust crossover. And the custom made exhaust cross pipe. I need to lengthen the drivers side of the cross pipe a bit so the stacks go on in a vertical postion. This view shows the exhaust cross pipe. It also shows my first attempt with a exhaust set from KFS, but this turned out to be to tall. Plus they are 1/24 scale and just look to big for this truck. I'm going to try and use them on my 1/24 Alberta oilfield bed truck build. This view shows that the whole mounting situation was not going to work, plus you can see they are just to big. In this view you can also see that there is no room for the exhaust between the tank and box. These are the colors I'm going to use for this build. Tamiya X-5 & X-15. I'm going to see how it all looks when I finish the painting. I my add a coat or two of clear pearl over the cab & hood for a little pop! This view shows the Auslowe round hole exhaust kit I'm using for this. I just cut off the top peice of resin pipe and replaced it with a peice of 3/16" aluminum tube. And this view shows the final set-up for the exhaust. I added some rain caps (from Paul at ST Supply) Well that's it for now be back soon with more updates for you all to look at. Ron G
-
Mack B-61 Dump Body
ShakyCraftsman replied to Scott Eriksen's topic in WIP: Model Trucks: Big Rigs and Heavy Equipment
Okay -
Mack B-61 Dump Body
ShakyCraftsman replied to Scott Eriksen's topic in WIP: Model Trucks: Big Rigs and Heavy Equipment
Hey Scott I think thats the one the redneckrigger used on one of his doors, it's a little big for 1/25. I used that hinge on my 1/16 Peterbilt 359. As you can see it's perfect for 1/16 scale but a triffle large for 1/25-24 scales. Ron G
-
Mack B-61 Dump Body
ShakyCraftsman replied to Scott Eriksen's topic in WIP: Model Trucks: Big Rigs and Heavy Equipment
Hey Scott You should use the hinges I used on my Autocar build, they will work way better then those fiddly model car garage ones, they are to delicate. Go to Micromark for the little hinges. Ron G -
Looking good Ron.👍 Ron G
-
Ask the wife if you can put shelfs up in the living room...😆 🤣 😂 that should go over good.😁😉 Actually finding space is difficult with big long models.😳😲😏🙄 Ron G