.png.6a103870c23e0adb3b56c369ad325048.png)
Flat32
-
Posts
577 -
Joined
-
Last visited
Content Type
Profiles
Forums
Events
Gallery
Everything posted by Flat32
-
.thumb.png.e64ca4fead948adbdf6a111229b6cf2f.png)
The Hot Rod Lincoln Story
Flat32 replied to regular guy's topic in General Automotive Talk (Trucks and Cars)
Some good block detail in this photo from H&H. -
The day will come when you start doing your own printing. You can design and print fixtures to hold all of your brass tubes in exact position for soldering. I use dental scrapers on layer lines to shave them down. Works better than sanding or filing for me because I can see where the cutting edge is cutting.
-
Where did you get those spark plugs??
-
Different styles of "Budd" disc wheels
Flat32 replied to leafsprings's topic in General Automotive Talk (Trucks and Cars)
There were two hole Budd wheels on some mid twenties Macks. -
Detailing hose clamps was a major concern for me because I don't have the painting skills to do it to my satisfaction. Cleaning my kitchen sink I stumbled upon a wrinkled up strand of wife's stainless steel scouring pad. Pulled that thing between my finger and the back edge of a knife to straighten it out and it curled right up into a loop. It is only .014" wide so looks like a shy 3/8" wide 1:1. The screw part I can leave as a 3D printed detail that I can easily hit with the Molotow pen after painting the hoses and it black. Going to buy pads from different makers to see if widths are different.
-
1975 Chevy “Bocephus” Blazer
Flat32 replied to Gerald Haney's topic in Model Trucks: Pickups, Vans, SUVs, Light Commercial
Passion driven talent always a pleasure to observe and admire. -
Rear Tail light conversion
Flat32 replied to Snoopy47's topic in Model Building Questions and Answers
Personally I think the Tempest/LeMans tail lights look more attractive than the GTO ones and if they aren't available from any kit then here's where 3D printing can be turned to. They look to be a relatively simple design to CAD model providing one has access to a 1:1 example. They do turn up on ebay so it's not like hen's teeth. Mastering CAD modelling may seem daunting to an old phart, but it is not to younger people, even kids. For them it could even lead to a well paying career. Sorry for the hijack. I'll climb off my soapbox now with the hope some grandchild gets some potentially useful guidance beyond violent video games. -
I was also bugged by the front fender and now that you found one that matches another detail shows up as different from the Chrysler. Namely the windshield visor. Your Whippet photo is different in the visor and headlight details, but if you narrow it down to a 1928 everything seems to match. Briggs made the bodies for both.
-
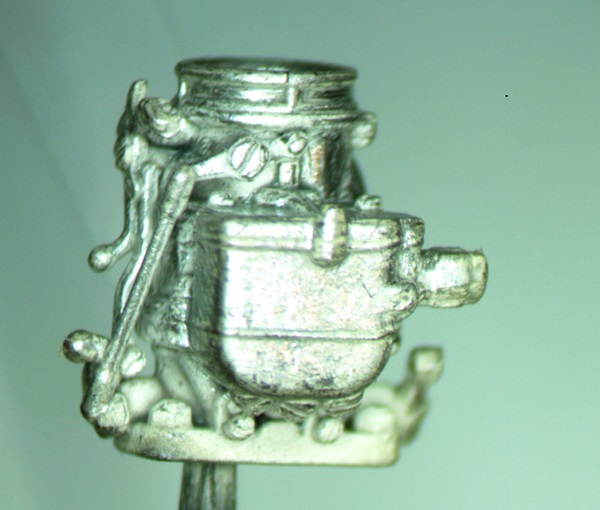
Got my heated magnetic stirrer today for my next attempt at electroless nickel. Expectations not high. Not easy to scale a relatively finicky industrial process. Getting ready to follow Daddy Mack's suggestion and start putting electricity to this whole deal. Will have to anyway for doing the electroforming I need to strengthen my thin resin parts. Especially the 1932 Ford front spindles I want to articulate and the Model T chassis that tends to warp. I'm pretty darned certain the spoon video is silver and not nickel. The carb is my attempt to 3D print a better representation of the somewhat famous Stromberg 97 than what is currently available.Trying to color detail it without having to become an artist. Using silvering in place of primer paint has worked out very well and using inks instead of paints is easier for me. I haven't even attempted a model build that needs paint, yet.
-
First try at electroless nickel on resin failed. I have no idea why. I'll try again, but three failures in a row will be all I'll tolerate with electroless. This is a process that I can't promote as DIY.
-
Gather 1:1 reference photos showing every detail you'd like to include and survey the casting for what may be missing before painting. Clean the casting using methods prescribed by the resin manufacturer. Verify the scale accuracy of the casting.
-
1926 Mack AC Dump Truck
Flat32 replied to Jim B's topic in WIP: Model Trucks: Big Rigs and Heavy Equipment
Some of the green will go if you paint the wheel hubs like the box art. Steering column was black. Interesting from the Montville book is a comment on Mack being the first to have a sleeper cab and first to have cargo containers.back in the 1920's. Ac Macks used by tire companies had pneumatic tires on theirs to promote their use in the early twenties. -
1926 Mack AC Dump Truck
Flat32 replied to Jim B's topic in WIP: Model Trucks: Big Rigs and Heavy Equipment
I'm still reading the John Montville book while your build progresses. If my Mom knew how to spell it she'd have given me procrastination as a middle name. -
BRBO International Paystar 5000
Flat32 replied to landman's topic in Model Trucks: Big Rigs and Heavy Equipment
Lost the license plate eh? With an articulating crane how do you keep from playing with it?? Any plans to identify the owner?? Where are the outrigger pads stowed? Oh yeah, I like it. -
Looks better in person, but getting closer to goal.

-
Junior Fueler--More Of These (Darn) Injectors?! 02/01/19
Flat32 replied to Straightliner59's topic in WIP: Drag Racing Models
I like following the build progress and seeing skills being developed. Would hate to see this model fall short of what the original vision was just to finish it quickly. Pride in each step guarantees pride at the finish. -
Just discovered my matte finish responds to burnishing.
-
I drove Toyota Corolla coupes, '73 and ''74 vintage, that were similar looking and had the mirrors in the same position. Drove in Taiwan very crowded city traffic among people, bicycles, scooters and motorcycles. Mirror placement allowed you to see alongside while looking forward through the windshield. They were great. Mine weren't black bullet nosed things, but nice small chrome ones that didn't spoil the car's style. Also note that in the rainy season closed side windows get spattered with rain obscuring your view through door mounted mirrors.
-
Where is this list Greg was checking??
-
Ran my first plating experiment and got the result I expected. Got what looks like gray primer completely covering the red resin. It is a matte finish because I hit it with pumice in the air eraser to start with. Then a dip in wetting solution followed by a dip in tin sensitizer solution for 30 seconds. Rinsed with distilled water and then into a silver solution for 5 minutes. The surface I have is conductive so I could electroplate nickel or copper on it, but I just want it to be like a primer with full coverage and no buildup. Next will be the electroless nickel where I want to get a metallic looking surface that can be buffed, painted or metalized. The first method only a very thin silver coating that cannot be buffed. The EN method allows a thicker nickel coating that can be buffed or given a subsequent bright nickel plate.
-
I'm almost 76 now and got started with 3D printing at 71. Seeing that Doug is farther along than me I wonder when he started. Happy Birthday Greg
-
Bigger number is smaller bead according to Delica listings. I ordered the smallest, #15, and it measures .048" across the flats. Although that'd be 1.2" 1:1 they look small enough for hose fittings or truck lugnuts in 1:25 scale. I bought them to use for larger scales. Bought the smallest hex styrene for my 1:25 efforts. I have no experience using any of this yet so cannot advise on what's good. Do a site search for that.
-
Some airlines tout their "special handling" of checked in pets. Totally off the wall, but if you packed the models in a pet carrier along with a pup riding shotgun perhaps they'd have a better chance.
-
I ordered from the website and delivery time was reasonable. I believe Delica makes the smallest and sharpest cornered ones.
-
Go to Fusionbeads.com and select seed beads. Then select Delica and then hex Delica seed beads. Various colors and sizes.