-
Posts
4,030 -
Joined
-
Last visited
Content Type
Profiles
Forums
Events
Gallery
Everything posted by GeeBee
-
Very nice work, looking forward to seeing it finished, I bet your friend is going to be over the moon with it ...
-

I used to love building models
GeeBee replied to dettrucker's topic in General Automotive Talk (Trucks and Cars)
I know what your going through ... I suffer from Muscular Dystrophy and nerve damage in both hands, plus the failing eyesight, I'm on painkillers (Tramadol) and anti inflammatories, someday I can't even pick up my tools without dropping them, but I will never give in, I may have a rest from going in the hobby room for a few days, but I won't let it beat me .... -
Another one added to the stash ... I really should stop going on eBay !
- 39,276 replies
-
- johan
- glue bombs
-
(and 1 more)
Tagged with:
-

WESTERN STAR LOGGER..
GeeBee replied to Swamp Dog's topic in Model Trucks: Big Rigs and Heavy Equipment
Superb work .... -
Superb build, like the way you went with the gold wheels, and nice idea of going with the two bucket seats .... That's the bottle for the windscreen washer fluid
-
Superb build, nice and clean, nice job on the vinyl roof and chrome trim ....
-

Another pair of Ferraris -- Italeri 365 Daytona and Revell 599 GTO
GeeBee replied to Matt Bacon's topic in WIP: Model Cars
Looking good, your putting a lot of work into these builds, I'm sure the final result will be worth all the effort -
Superb finish on the paintwork, I might give the fingernail polish a go on the Meyer's Manx beach buggy
-
I can see a lot of hard work went into the build, and it's so worthy of the award you got with it ...
-

Looking for flat or "matte" light blue spray paint
GeeBee replied to Ben's topic in General Automotive Talk (Trucks and Cars)
Taken from Tamiya's website Tamiya Color Spray For Aircraft (AS) These spray paints are specially developed for finishing aircraft models. Each color is formulated to provide the authentic tone to 1/32 and 1/48 scale model aircraft. now, the subtle shades can be easily obtained on your models by simple spraying. Each can contains 100ml of synthetic lacquer paint. Tamiya Color Spray Paints (TS) These cans of spray paint are extremely useful for painting large surfaces. The paint is synthetic lacquer that cures in a short period of time. Each can contains 100ml of paint, which is enough to fully cover 2 or 3, 1/24 scale sized car bodies. Tamiya spray paints are not affected by acrylic or enamel paints. Therefor, following the painting of the entire assembly, details can be added or picked out using enamel and/or acrylic paints. By combining of three different paints, the decoration of plastic models will become simpler and more effective. -
Very impressive work, those must have took you sometime to wire up ..
-
Very nice build, paintwork looks superb ...
-
The reg' number only depicts when the car was first registered, not made, so if in 1966 there was still old stock in the compound, no... Before 1967, a new year for car registration started on the 1st of january, so a D plate went from January 1966, to January 1967, so the new bodyshell would have only just have been started at the factory
-
Another one arrived today .... Because one Mini is never enough !
- 39,276 replies
-
- johan
- glue bombs
-
(and 1 more)
Tagged with:
-
When I've finished my current build (Fujimi Porsche 911 Convertible) I'm going to make a start on the Revell Mini ...
-
Nice clean build, loving the diorama too ...
-

Fireball XL5
GeeBee replied to roadhawg's topic in WIP: All The Rest: Motorcycles, Aviation, Military, Sci-Fi, Figures
Superb build, and another t.v programe from my childhood -

Check these out!
GeeBee replied to realgone58's topic in WIP: All The Rest: Motorcycles, Aviation, Military, Sci-Fi, Figures
Superb, I love these Airstream trailers, I would have though someone would have done them in resin by now .... -
Looking forward to seeing more, I have this in the stash, hopefully I'll pick up some tips here ...
-

Paasche Single Action - Which Tip?
GeeBee replied to Ken McGuire's topic in Model Building Questions and Answers
I use the Paasche H for all my car bodies and found the # 5 set up was the way to go with automotive lacquer, the # 3 is great with the Tamiya acylics, but for fine detail I use my F1 -
Here's some Alclad work I did on my '32 Chrysler, it took me some time to get a good finish using the stuff, but I think I have it now, I use about 15 p.s.i, and a Paasche F1 airbrush over Testors gloss black thinned using lacquer thinners, you need to get the black so glossy and go on with the Alclad with real thin coats, leave to dry, back on with the Alclad, ect until you get the shine, then stop, as any further coats it will start to loose it's shine.
-
The TR3 had a front grille fitted and a slightly more powerful engine than the TR2
-
Cracking build, I really like the GS kits, although to date I've only built the one, a A-H Frogeye Sprite, I have the TR3 in my stash ...
-
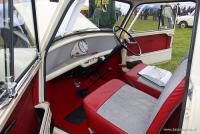
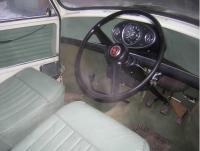
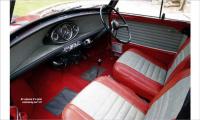
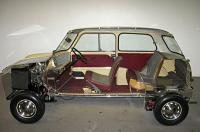
I'm off for a short stay in hospital later today, but when I get back home I will get a Tamiya kit out of the stash and do a side by side comparison, and measure them both. The Gearstick I mentioned was fitted to the early Mini's which didn't have the remote change that was fitted to the Coopers, it made the gearchange more positive, as with the old long stick sometimes you had trouble finding the gears, if you look underneath a Cooper you will see an extension coming off the back of the gearbox going under the floor and ending where the gear lever is situated inside the car, later in the Mini development they did away with the old long stick gearchange, and went with a rod linkage to the gearlever. Early Mini with Straight long gearlever Later (Bent) Gearlever Cooper (Remote) Gearlever So as Revell has indluded the very early gearlever I'm sure they have plans of releasing a kit of an early MK1 Morris or Austin Mini, I will be looking forward to that if it happens Here a photo of the Mini cutaway, and you can see where the gearlever goes straight into the back of the gearbox
-
Yes, there is options to build it LHD or RHD ...

