Misha
-
Posts
1,032 -
Joined
-
Last visited
Content Type
Profiles
Forums
Events
Gallery
Everything posted by Misha
-
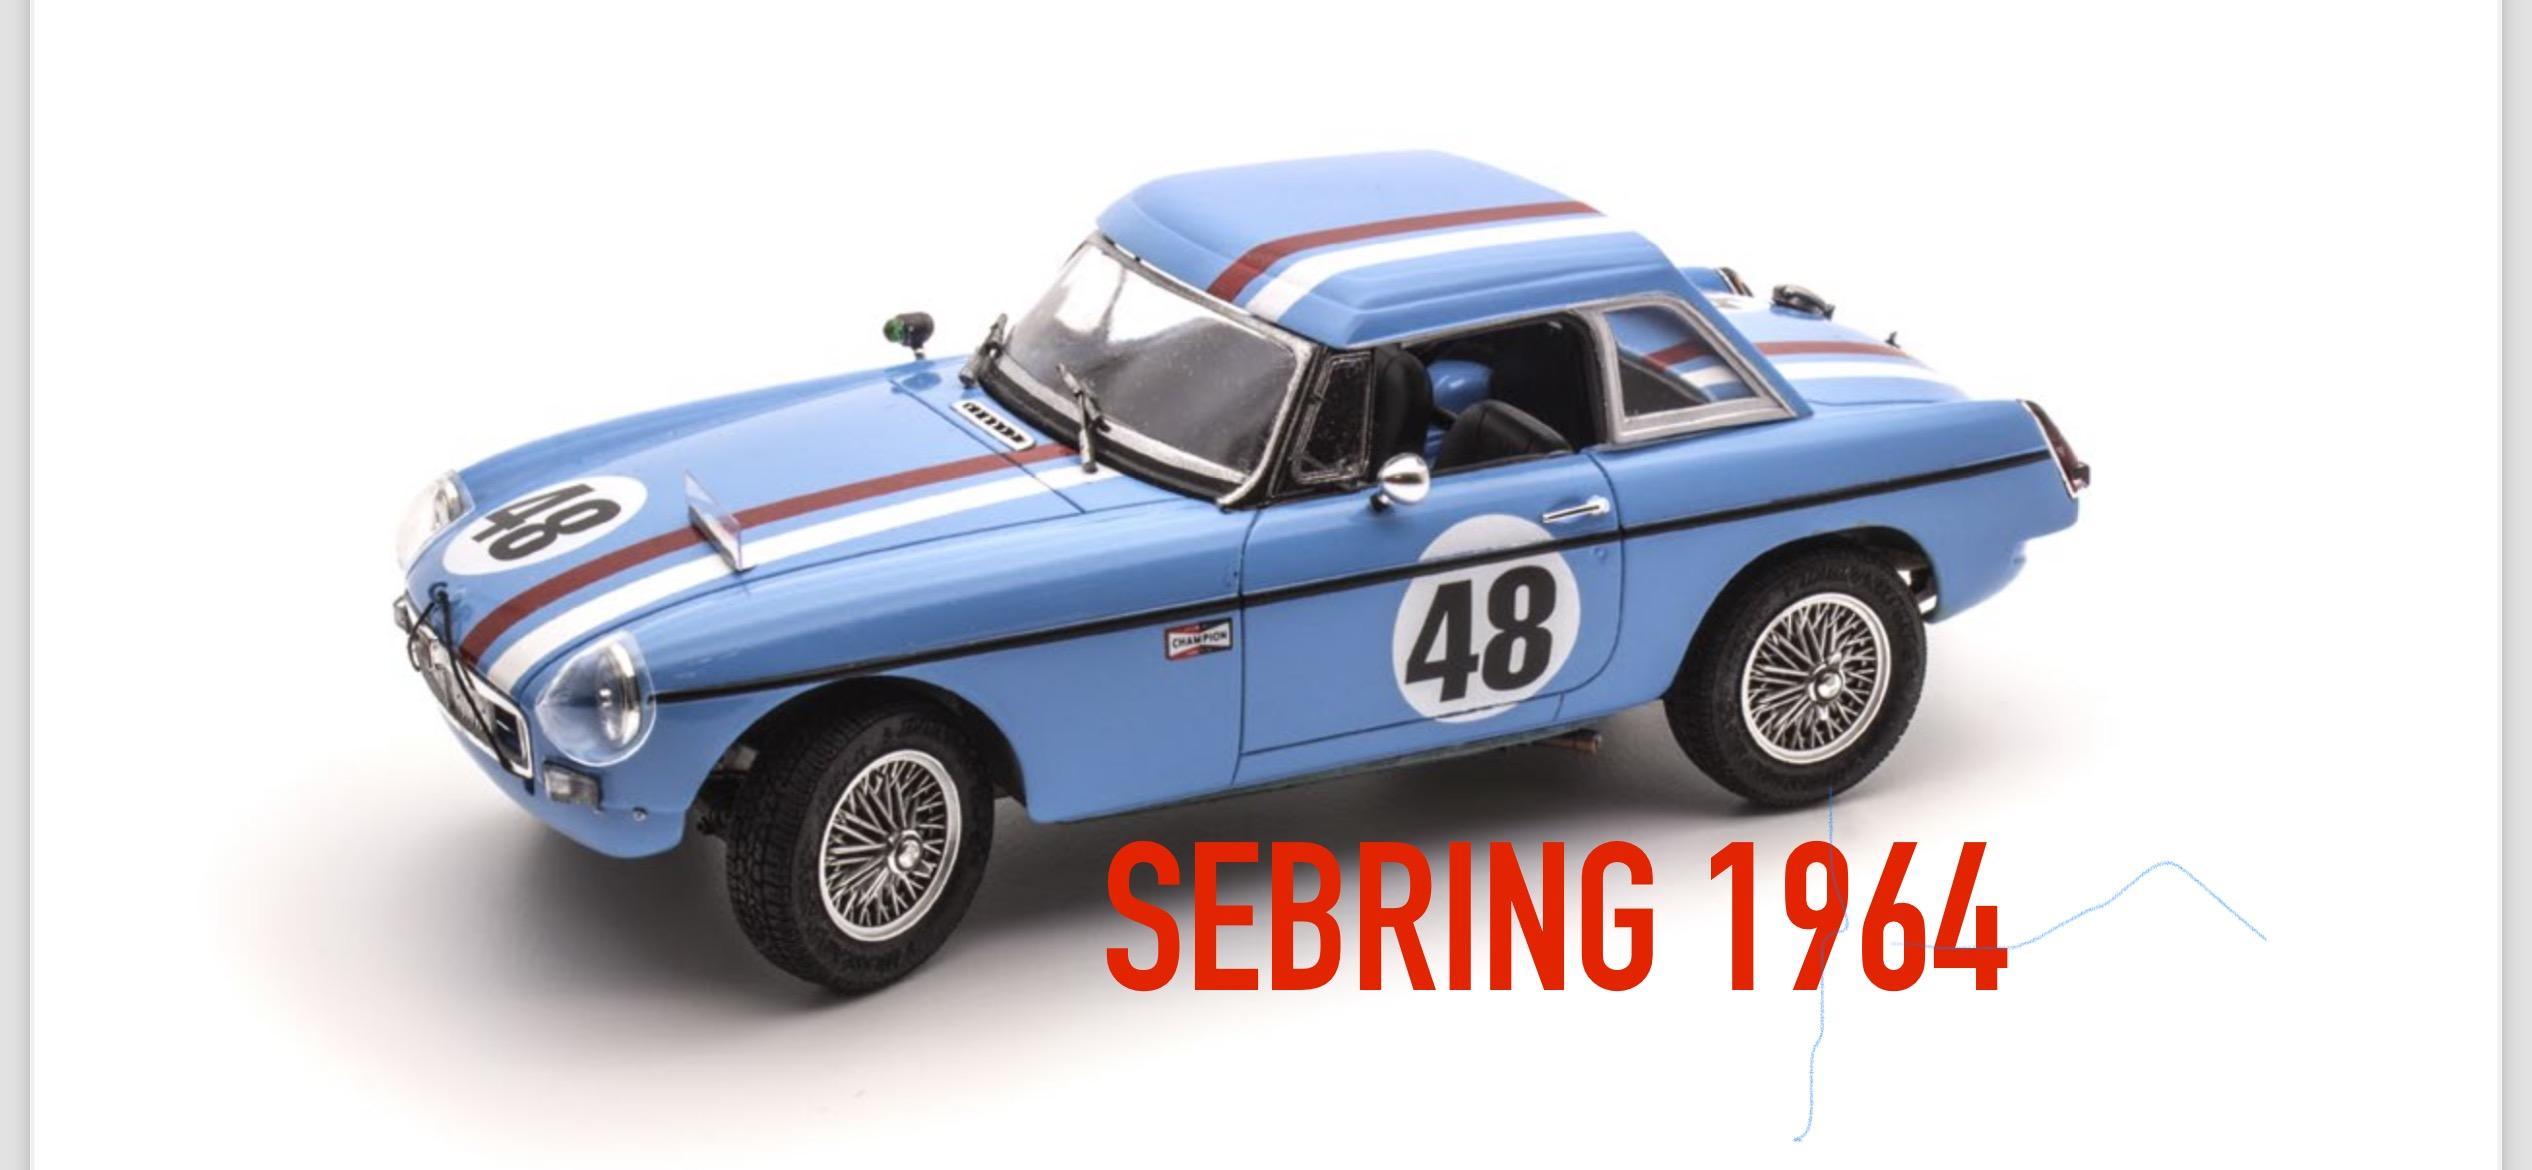
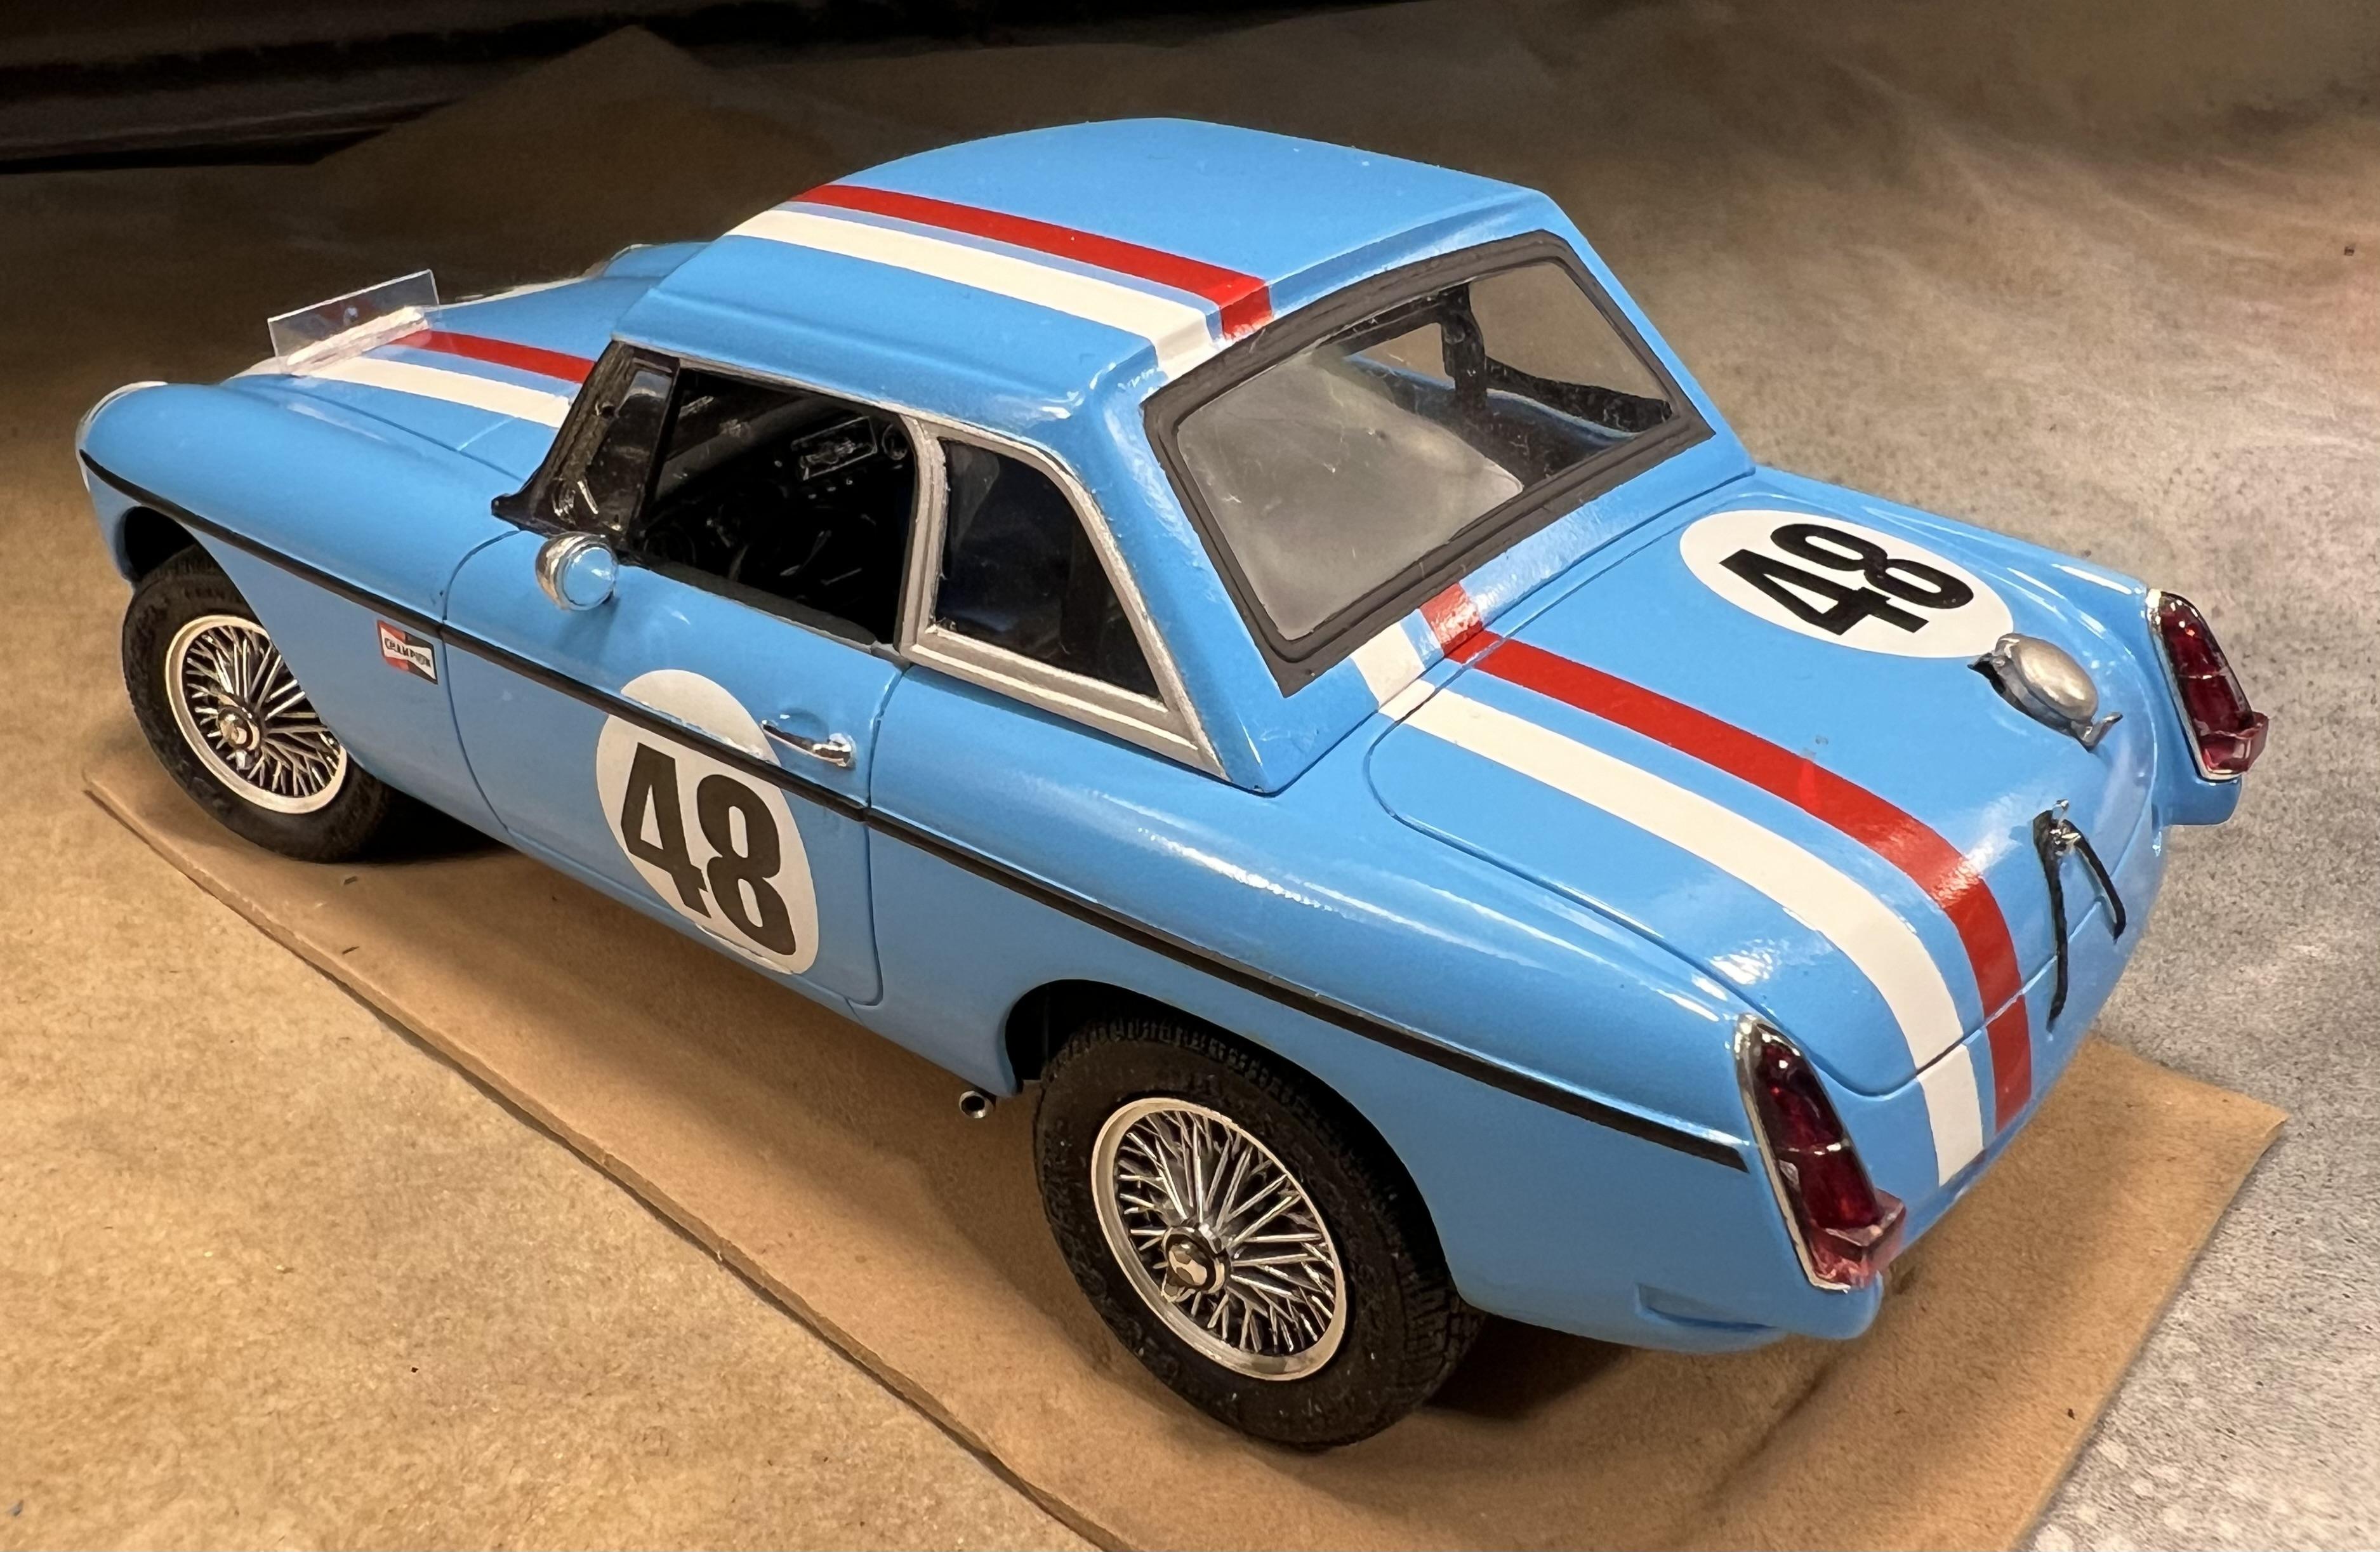
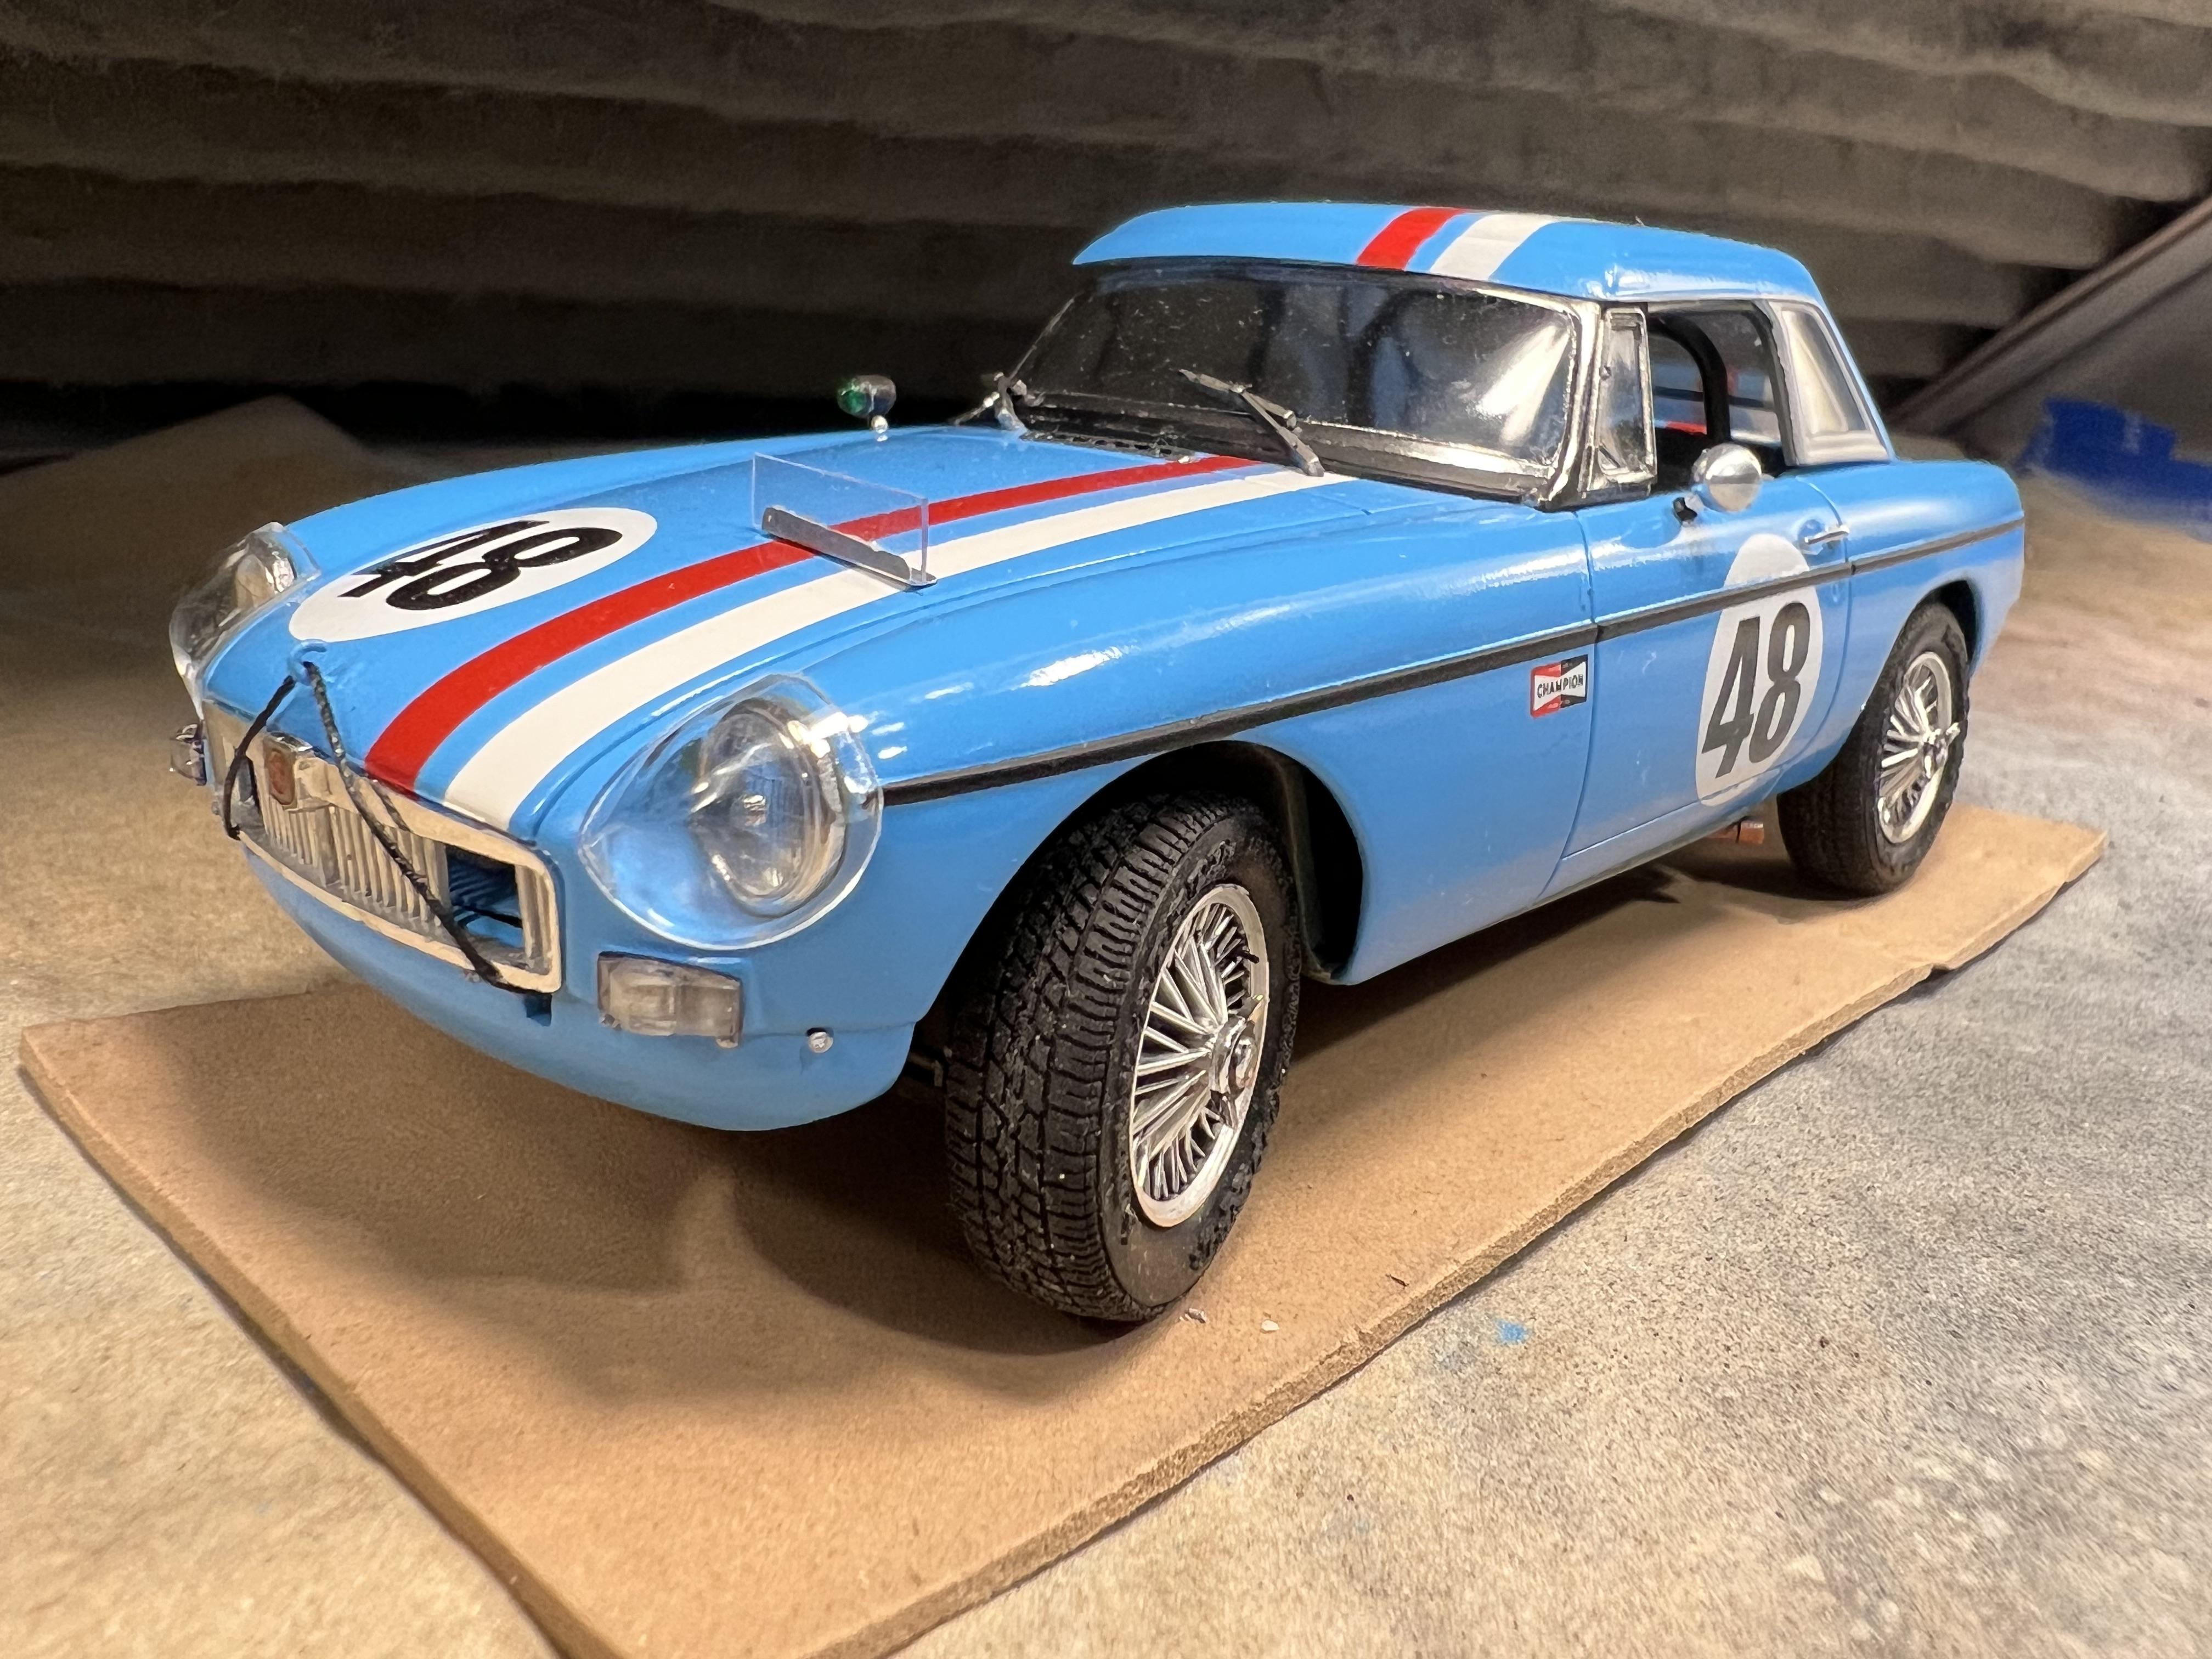
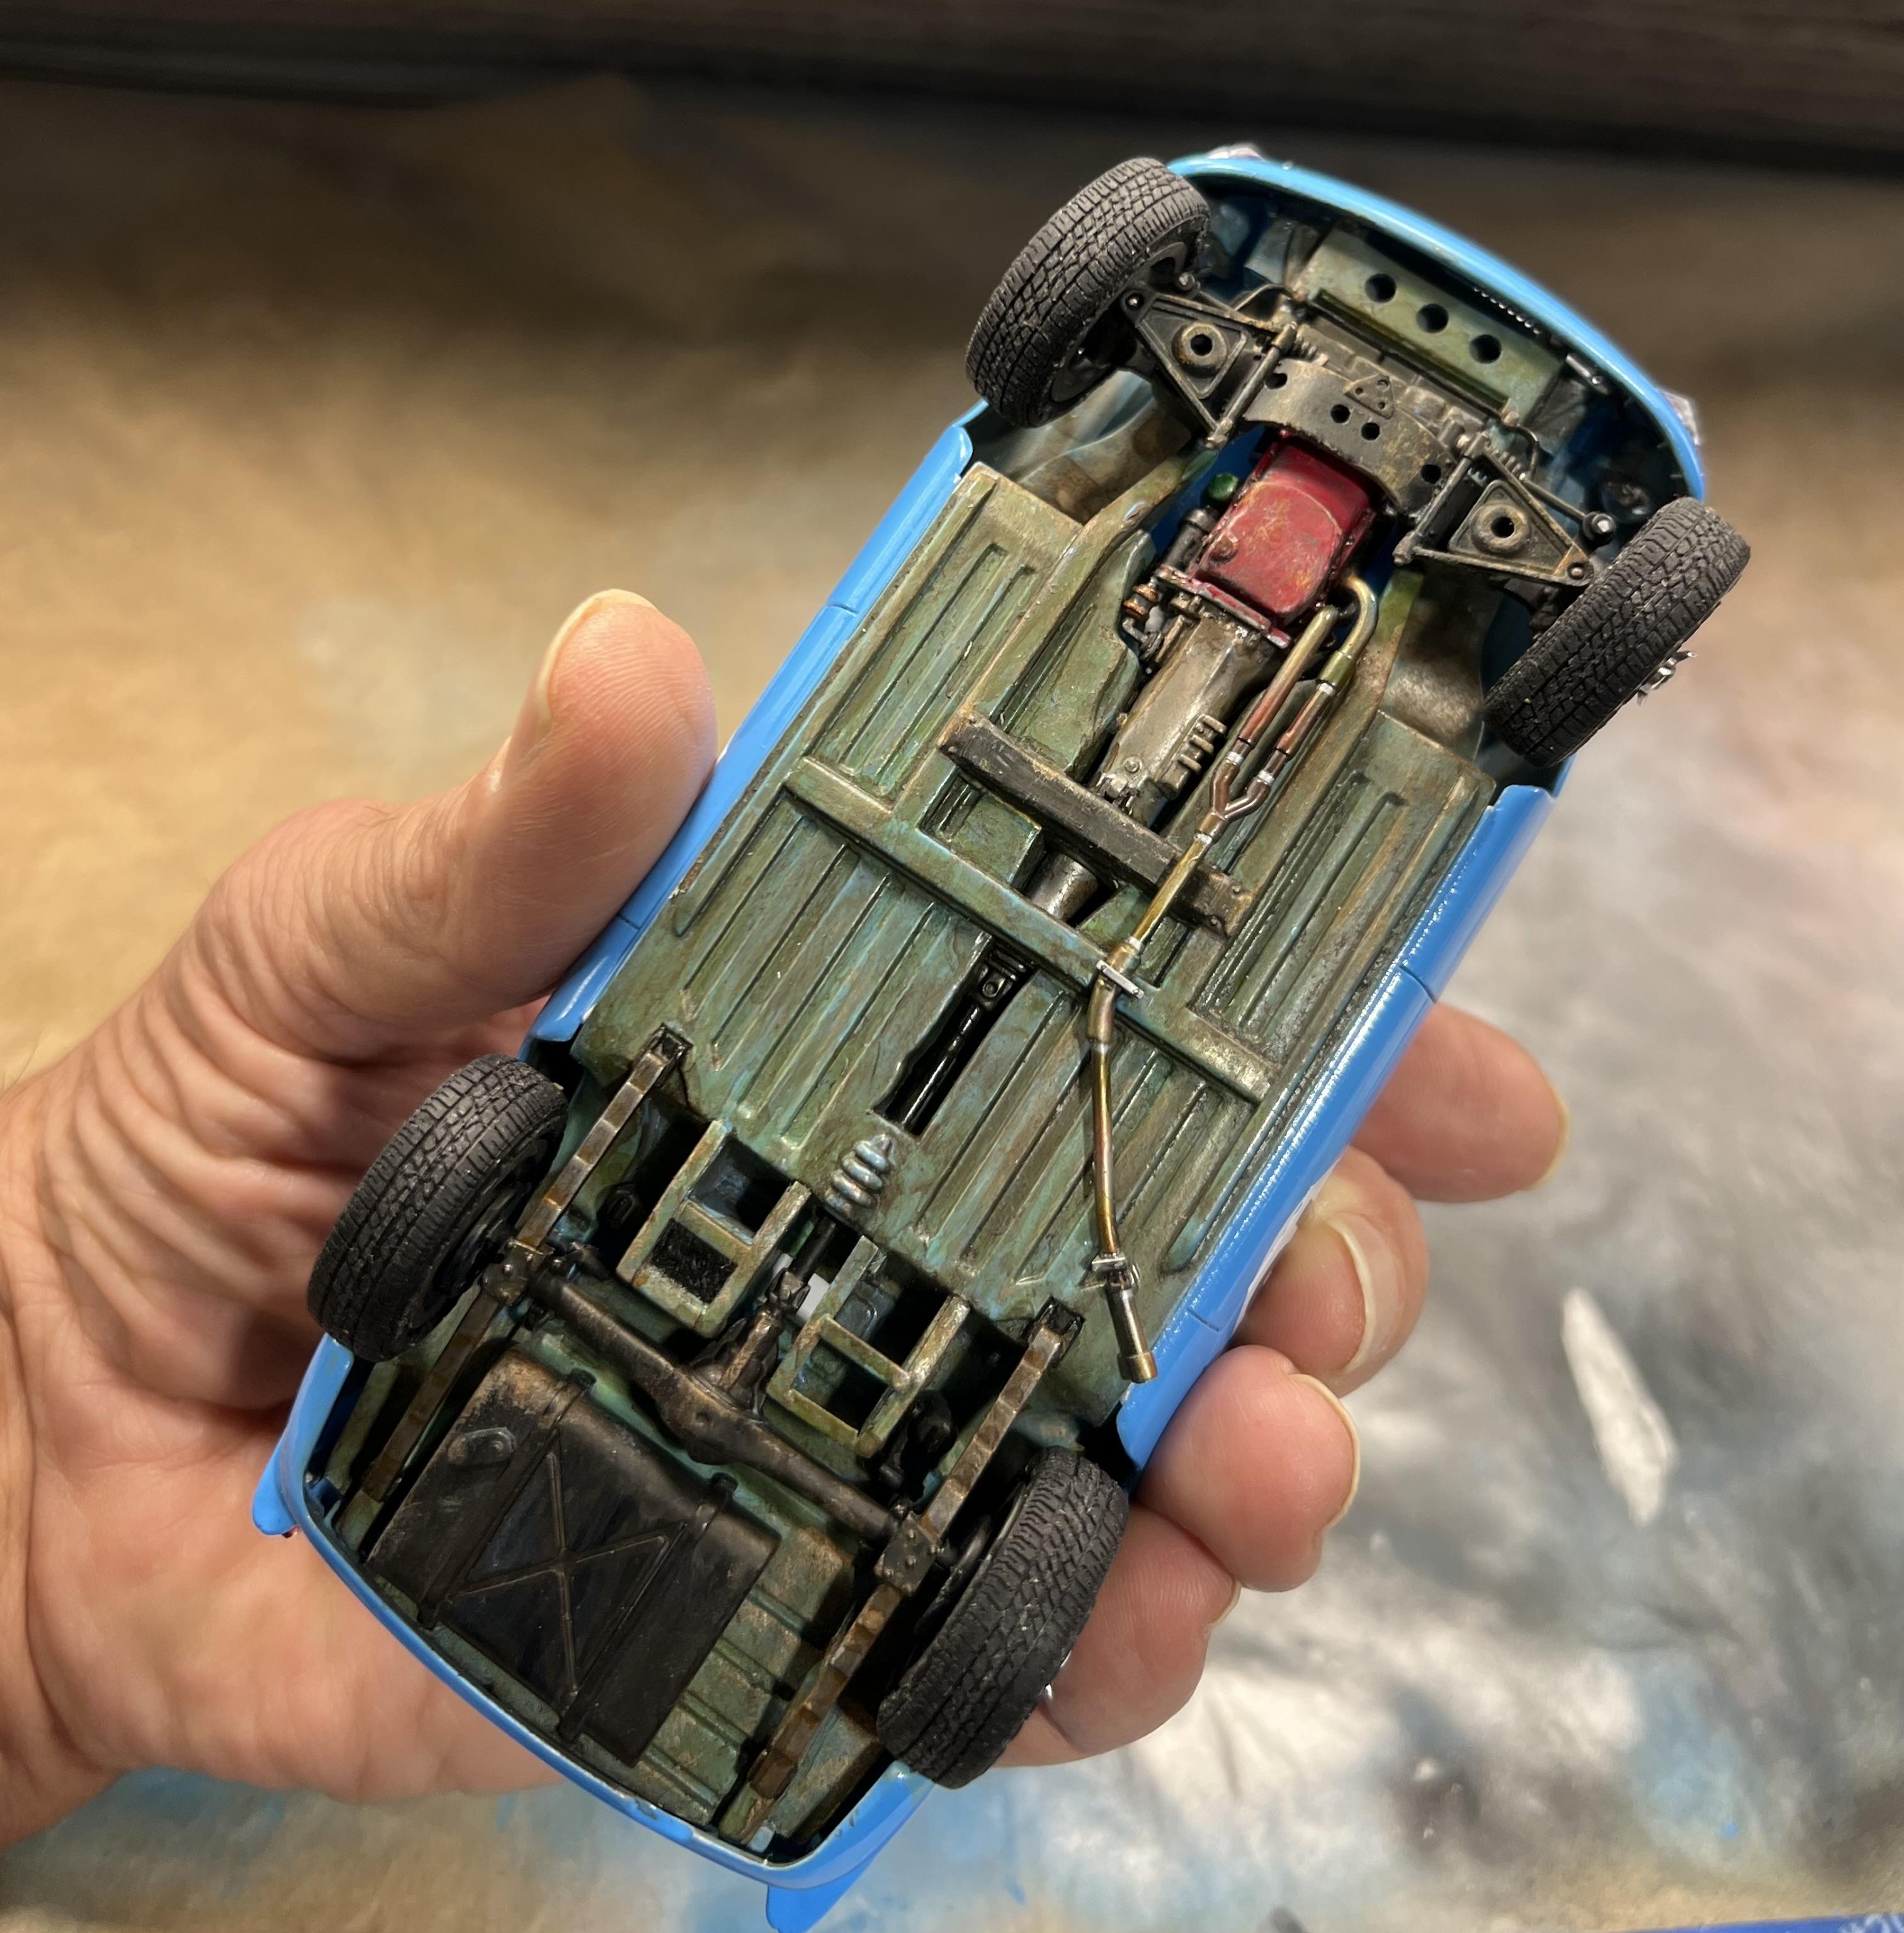
This past year has been fraught with health issues with a minor heart attack in March leading up to a pacemaker installed in November. As a result my work bench time produced only a single model, an MGB replica of a three car entry by the company in the 1964 Sebring Endurance Race. It was begun the previous year as part of a Forum community build celebrating its sixtieth anniversary and completed in March in time for the 2024 running in Florida. I enjoyed doing the research on the car and searching through visual references. Auction sites provide great photo details, although one needs to be mindful of changes made to historic vehicles to have them comply with current heritage race regulations when building a replica. I was also fortunate to have the club racing kit version with the hardtop and perspex headlight covers included. Being a curbside most of the detailing effort was spent on the chassis and interior. The body colour needed to be custom mixed using the limited range of Tamiya acrylics. Overall the Aoshima kit offered very well detailed and delicate parts along with great fit, resulting in a smooth and enjoyable build! Looking forward to the new year with another replica build of a Porsche 911T entered in the 1975 Cannonball Run for the Forum’s 50th Anniversary community build, and a Deuce Woody for this summer’s Deuce Days in Victoria, BC. While wintering in AZ, with limited workshop resources, I’ve begun prepping a Fiat Abarth 605 SS, another curbside build that I’ve started to lean towards. Wishing all a great year of model construction! Cheers Misha

-
Great paint & detailing work Simo! The kit offers a lot of detail I was unaware of before. Always room for another Bug. I’ll be following along, Cheers & Happy New Year, Misha
-

2025 Cannonball Run - 50 years since the 1975 run.
Misha replied to Mattilacken's topic in Community Builds
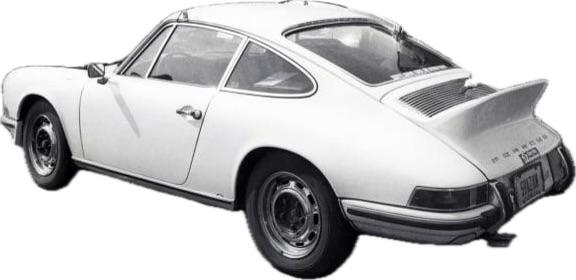
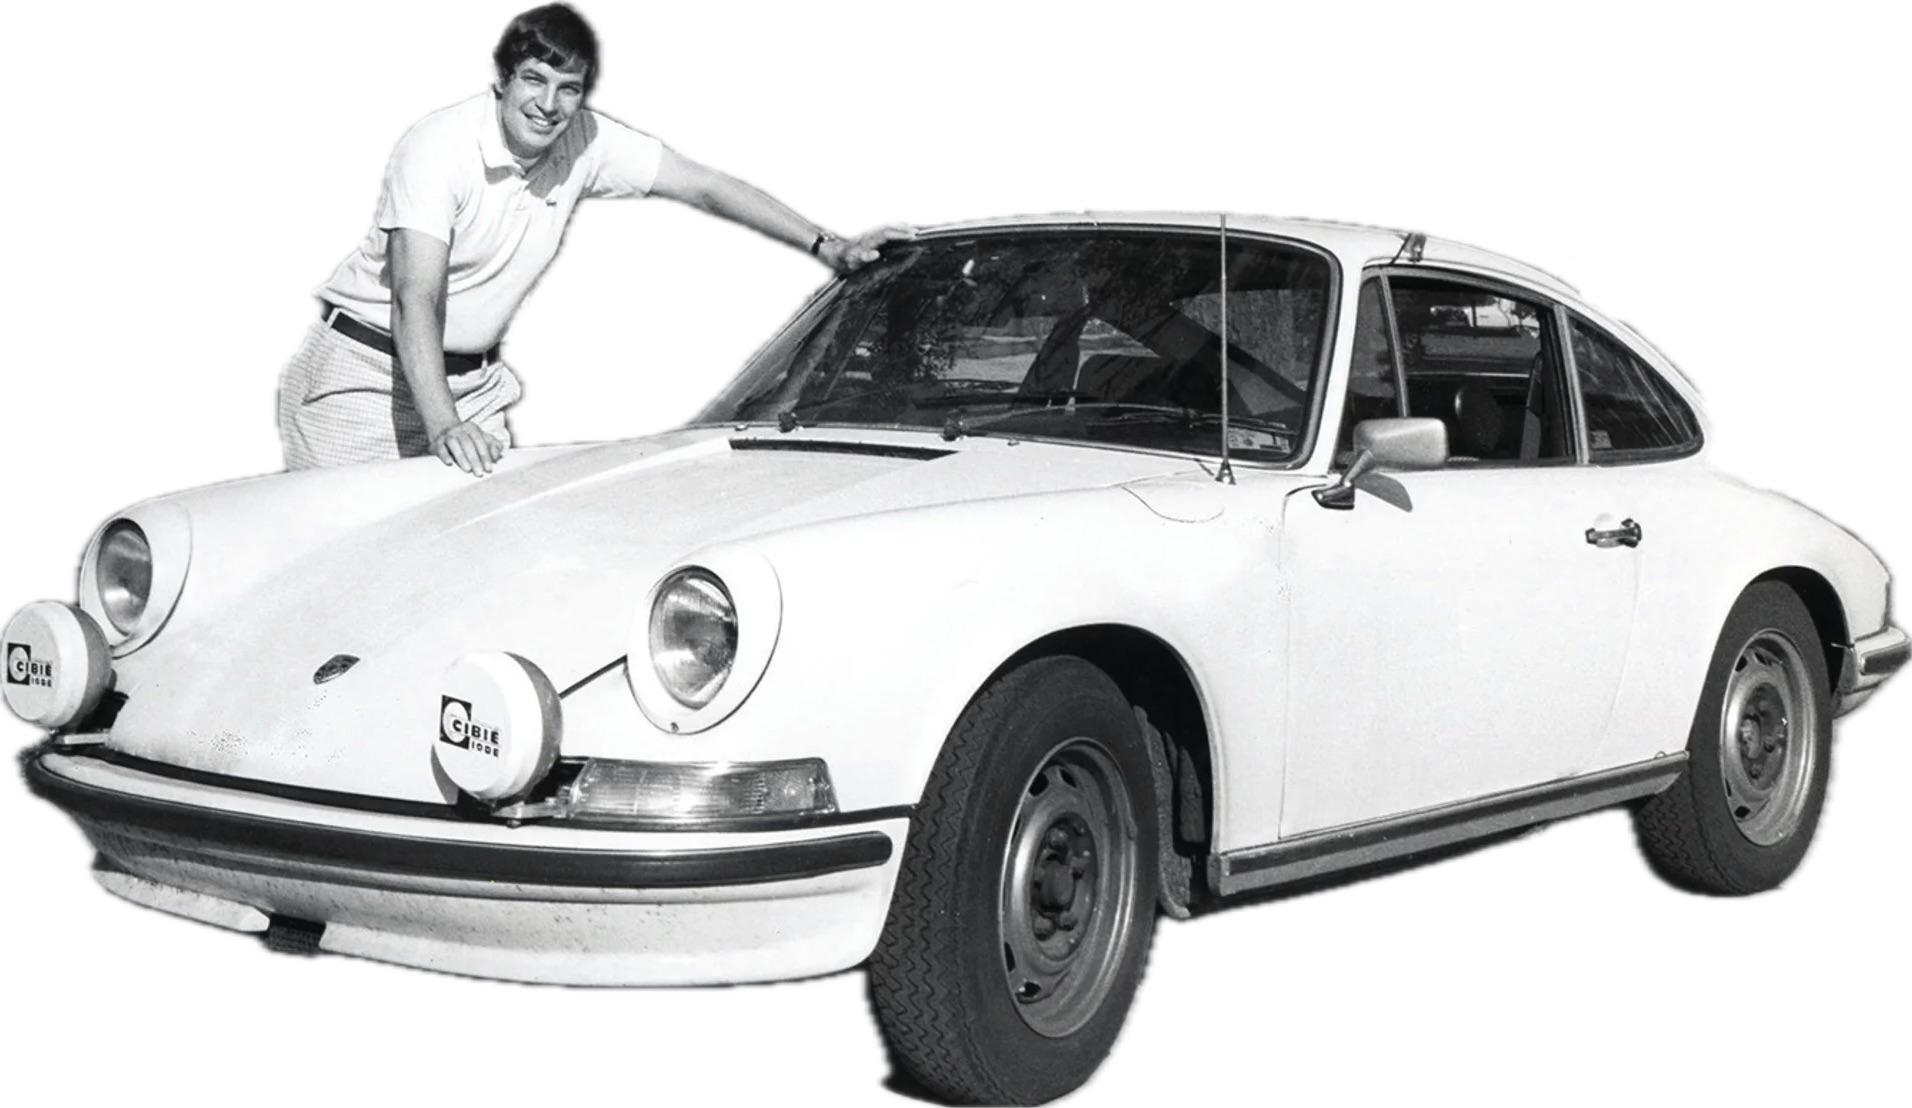
Count me in! As the theme is the 50 anniversary of the 1975 Cannonball, I’ve decided to build a replica of the 71 Porsche T entered by Bill “Captain Marvel” Warner and co-driver Tom Nehl. I participated in the Sebring 60th Anniversary build with my MGB build and thoroughly enjoyed researching the vehicle so as to accomplish a replica build. The plan is to follow a similar method and to focus on the detail rather than scratch building, which always takes me down a rabbit hole. I’ll be using an EM Fujimi kit of the early Porsche which offers great accuracy and detail. While I’m in Arizona for the winter I’ll be gathering reference sources of the Warner/Nehl entry and upon my return to my Vancouver Island workbench the build will commence! Cheers Misha
-
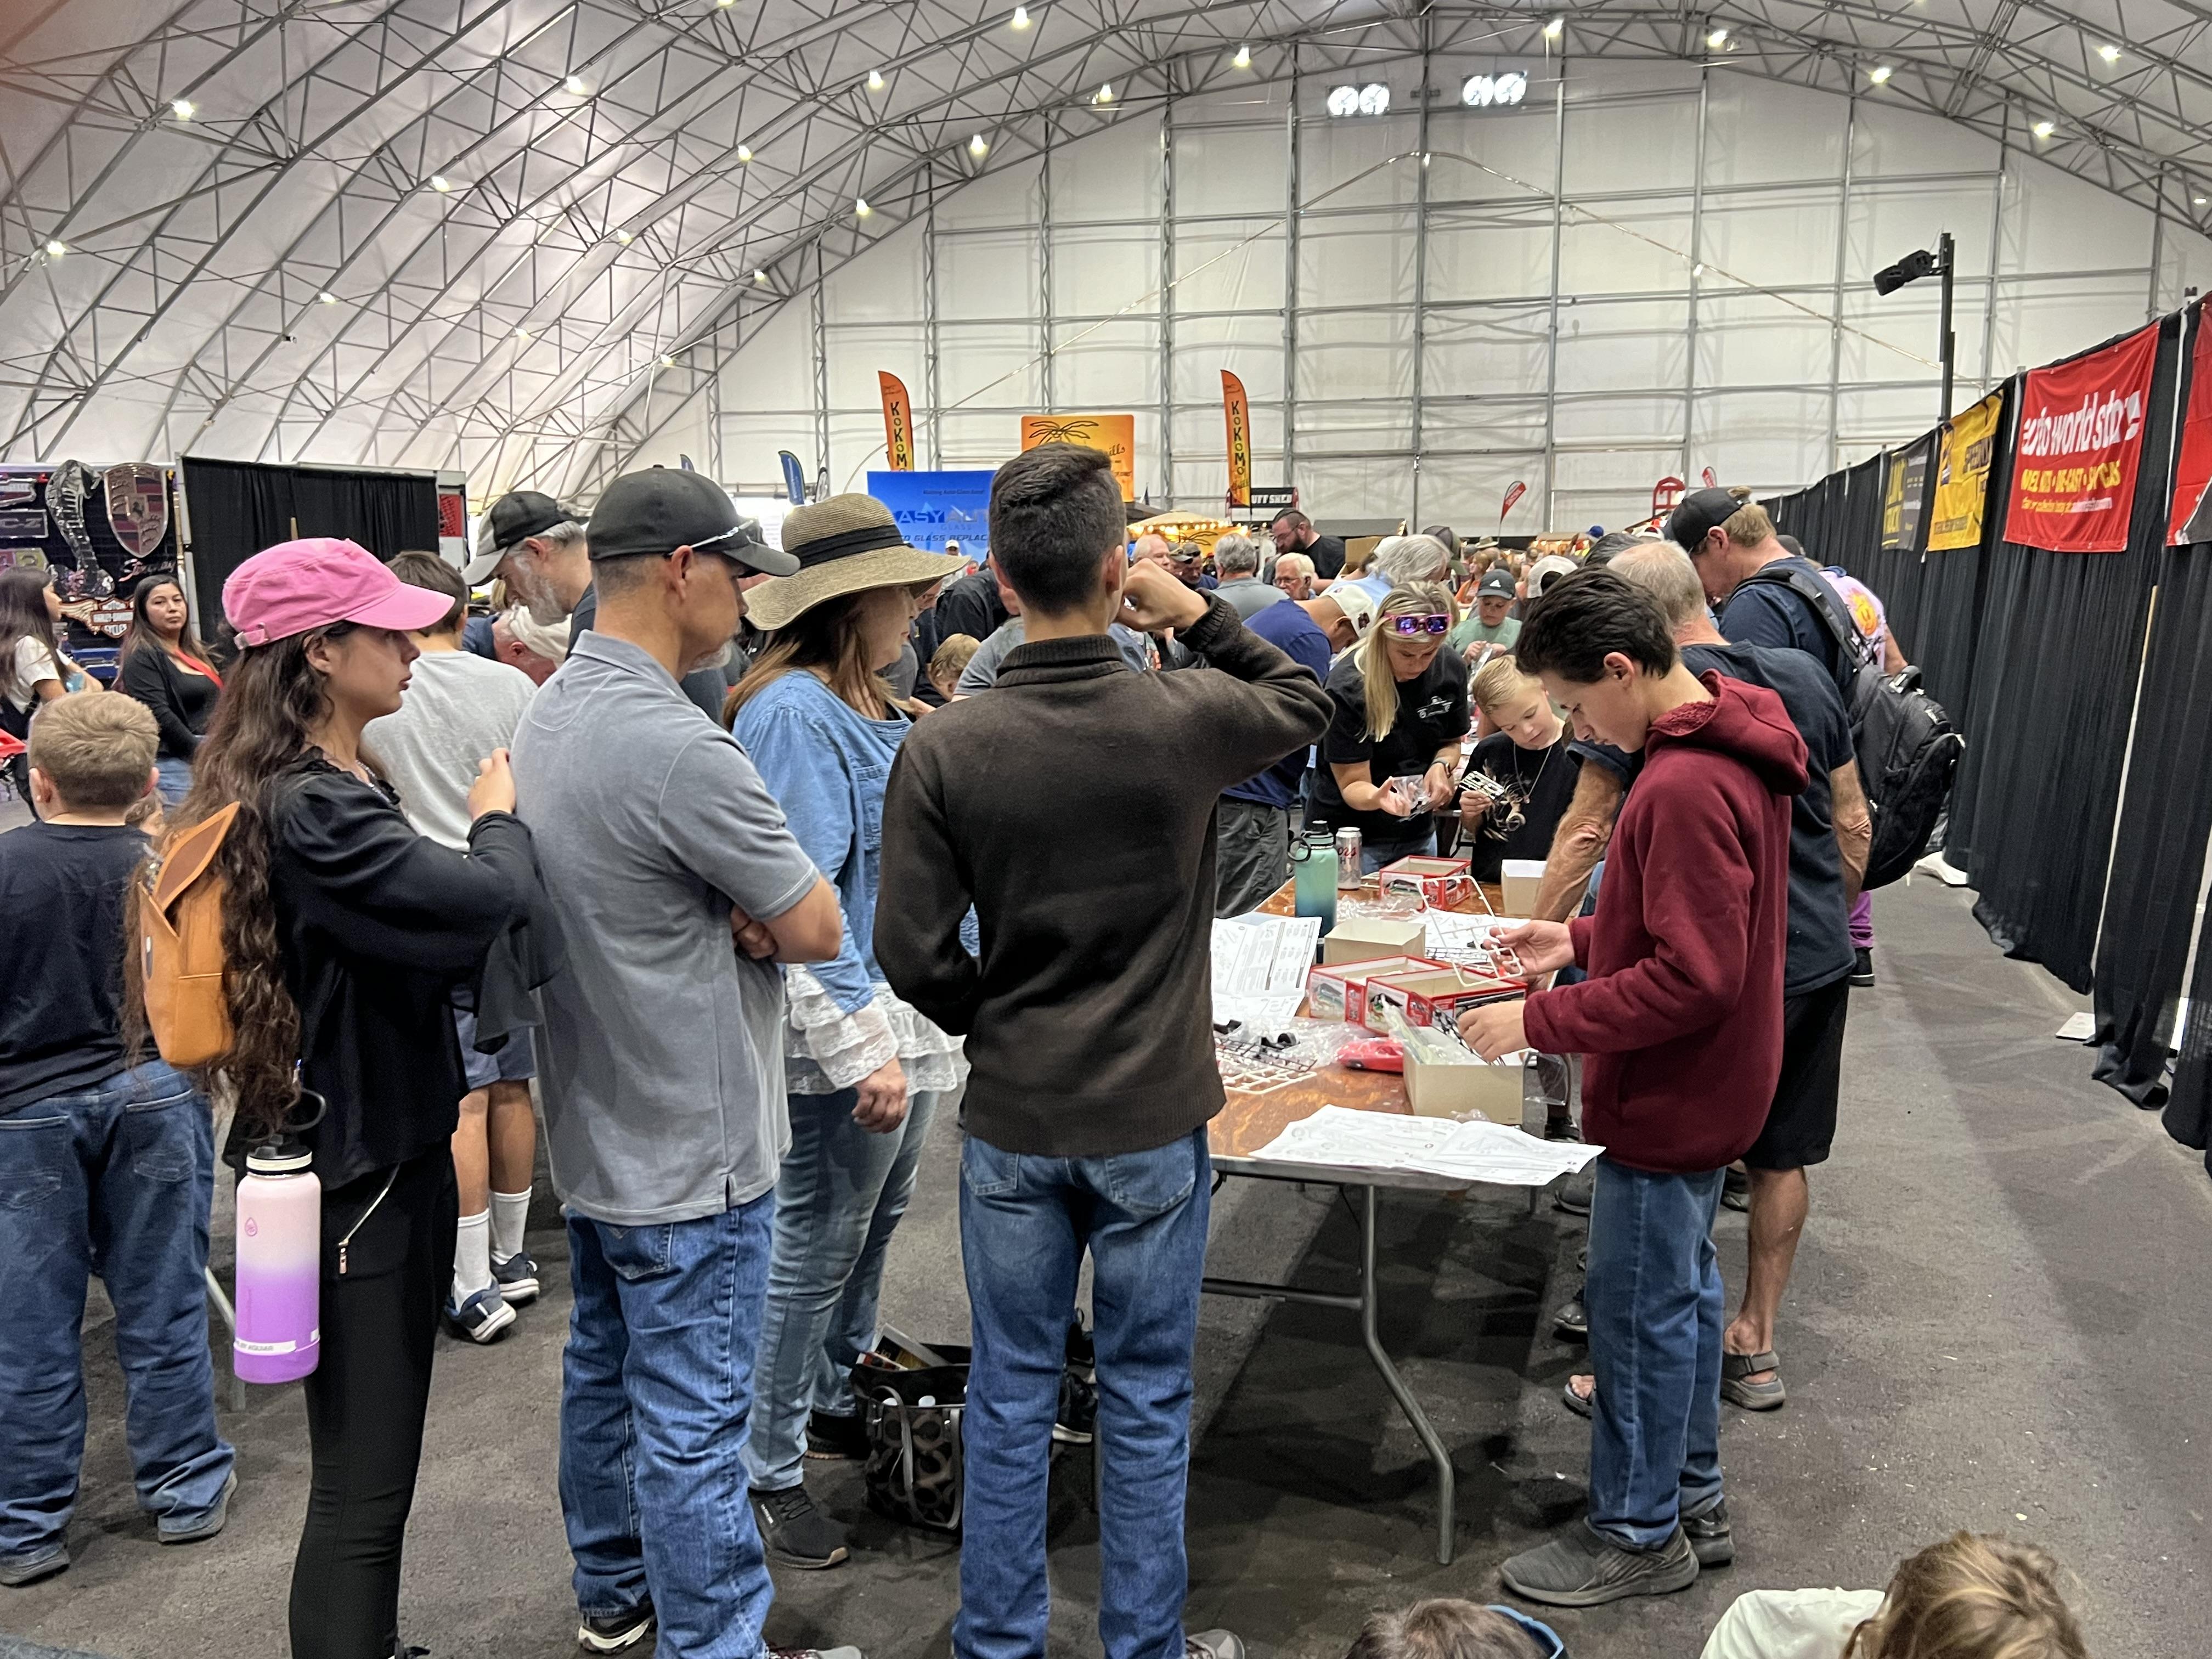
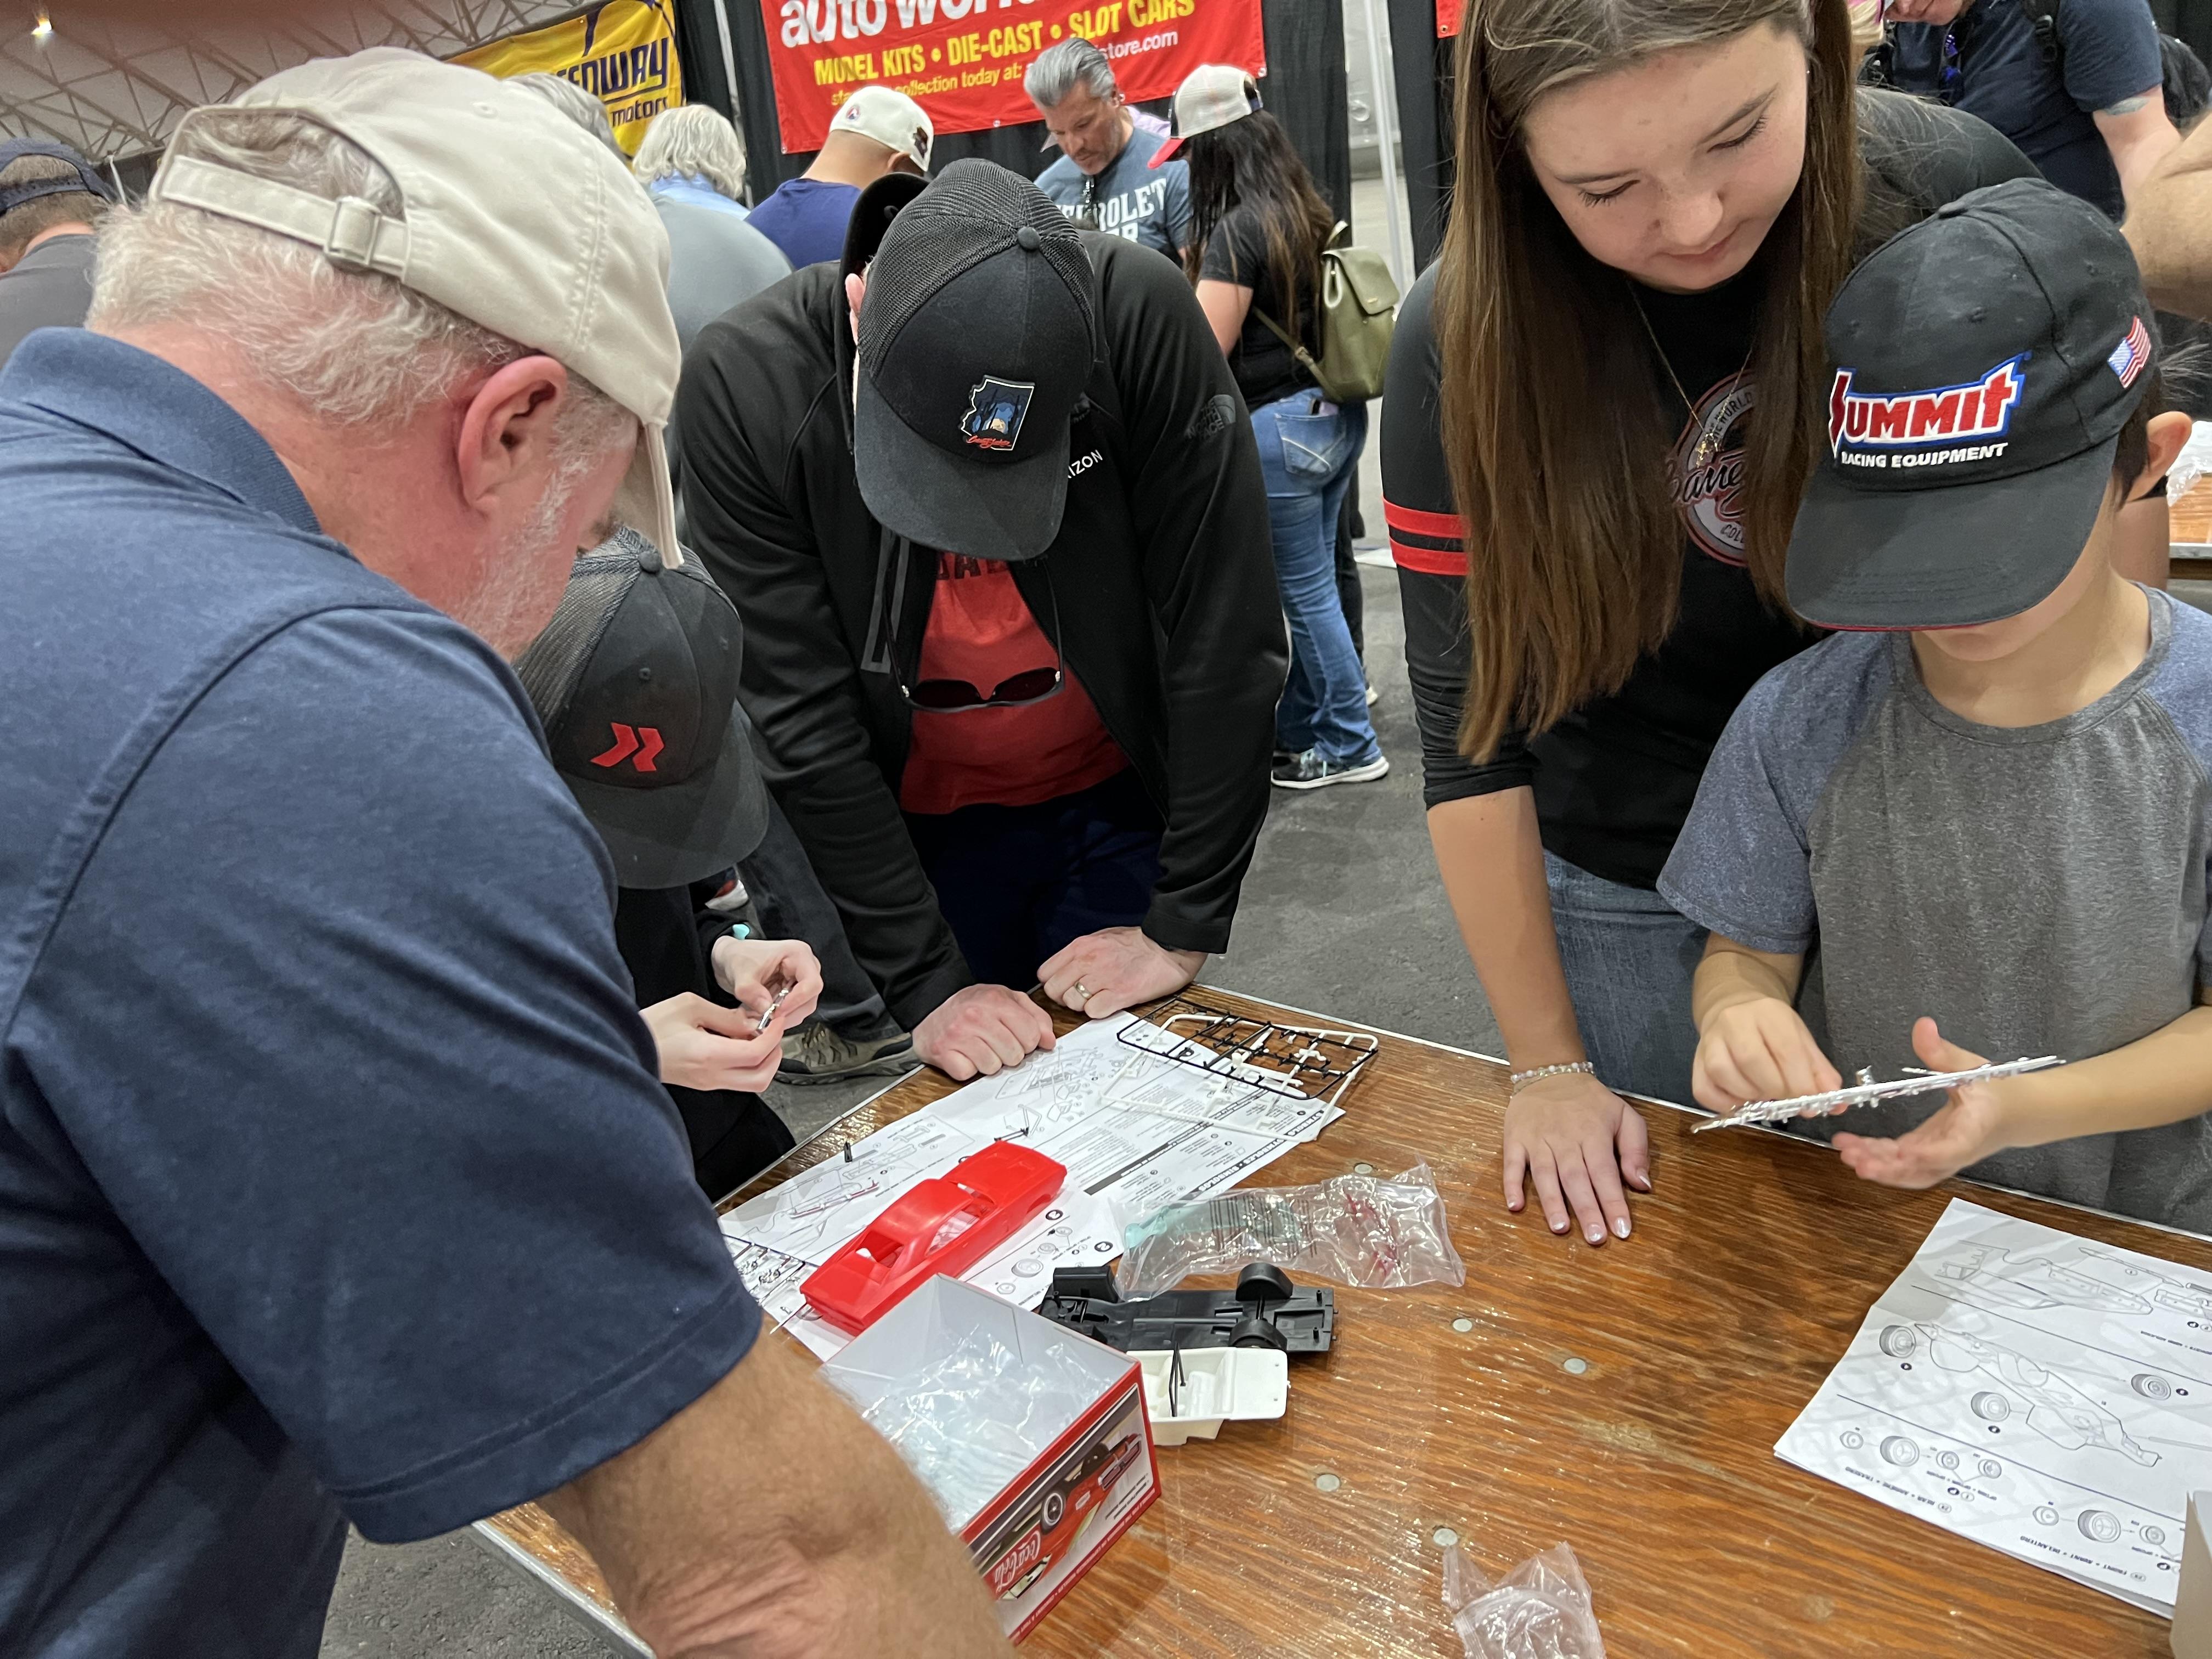
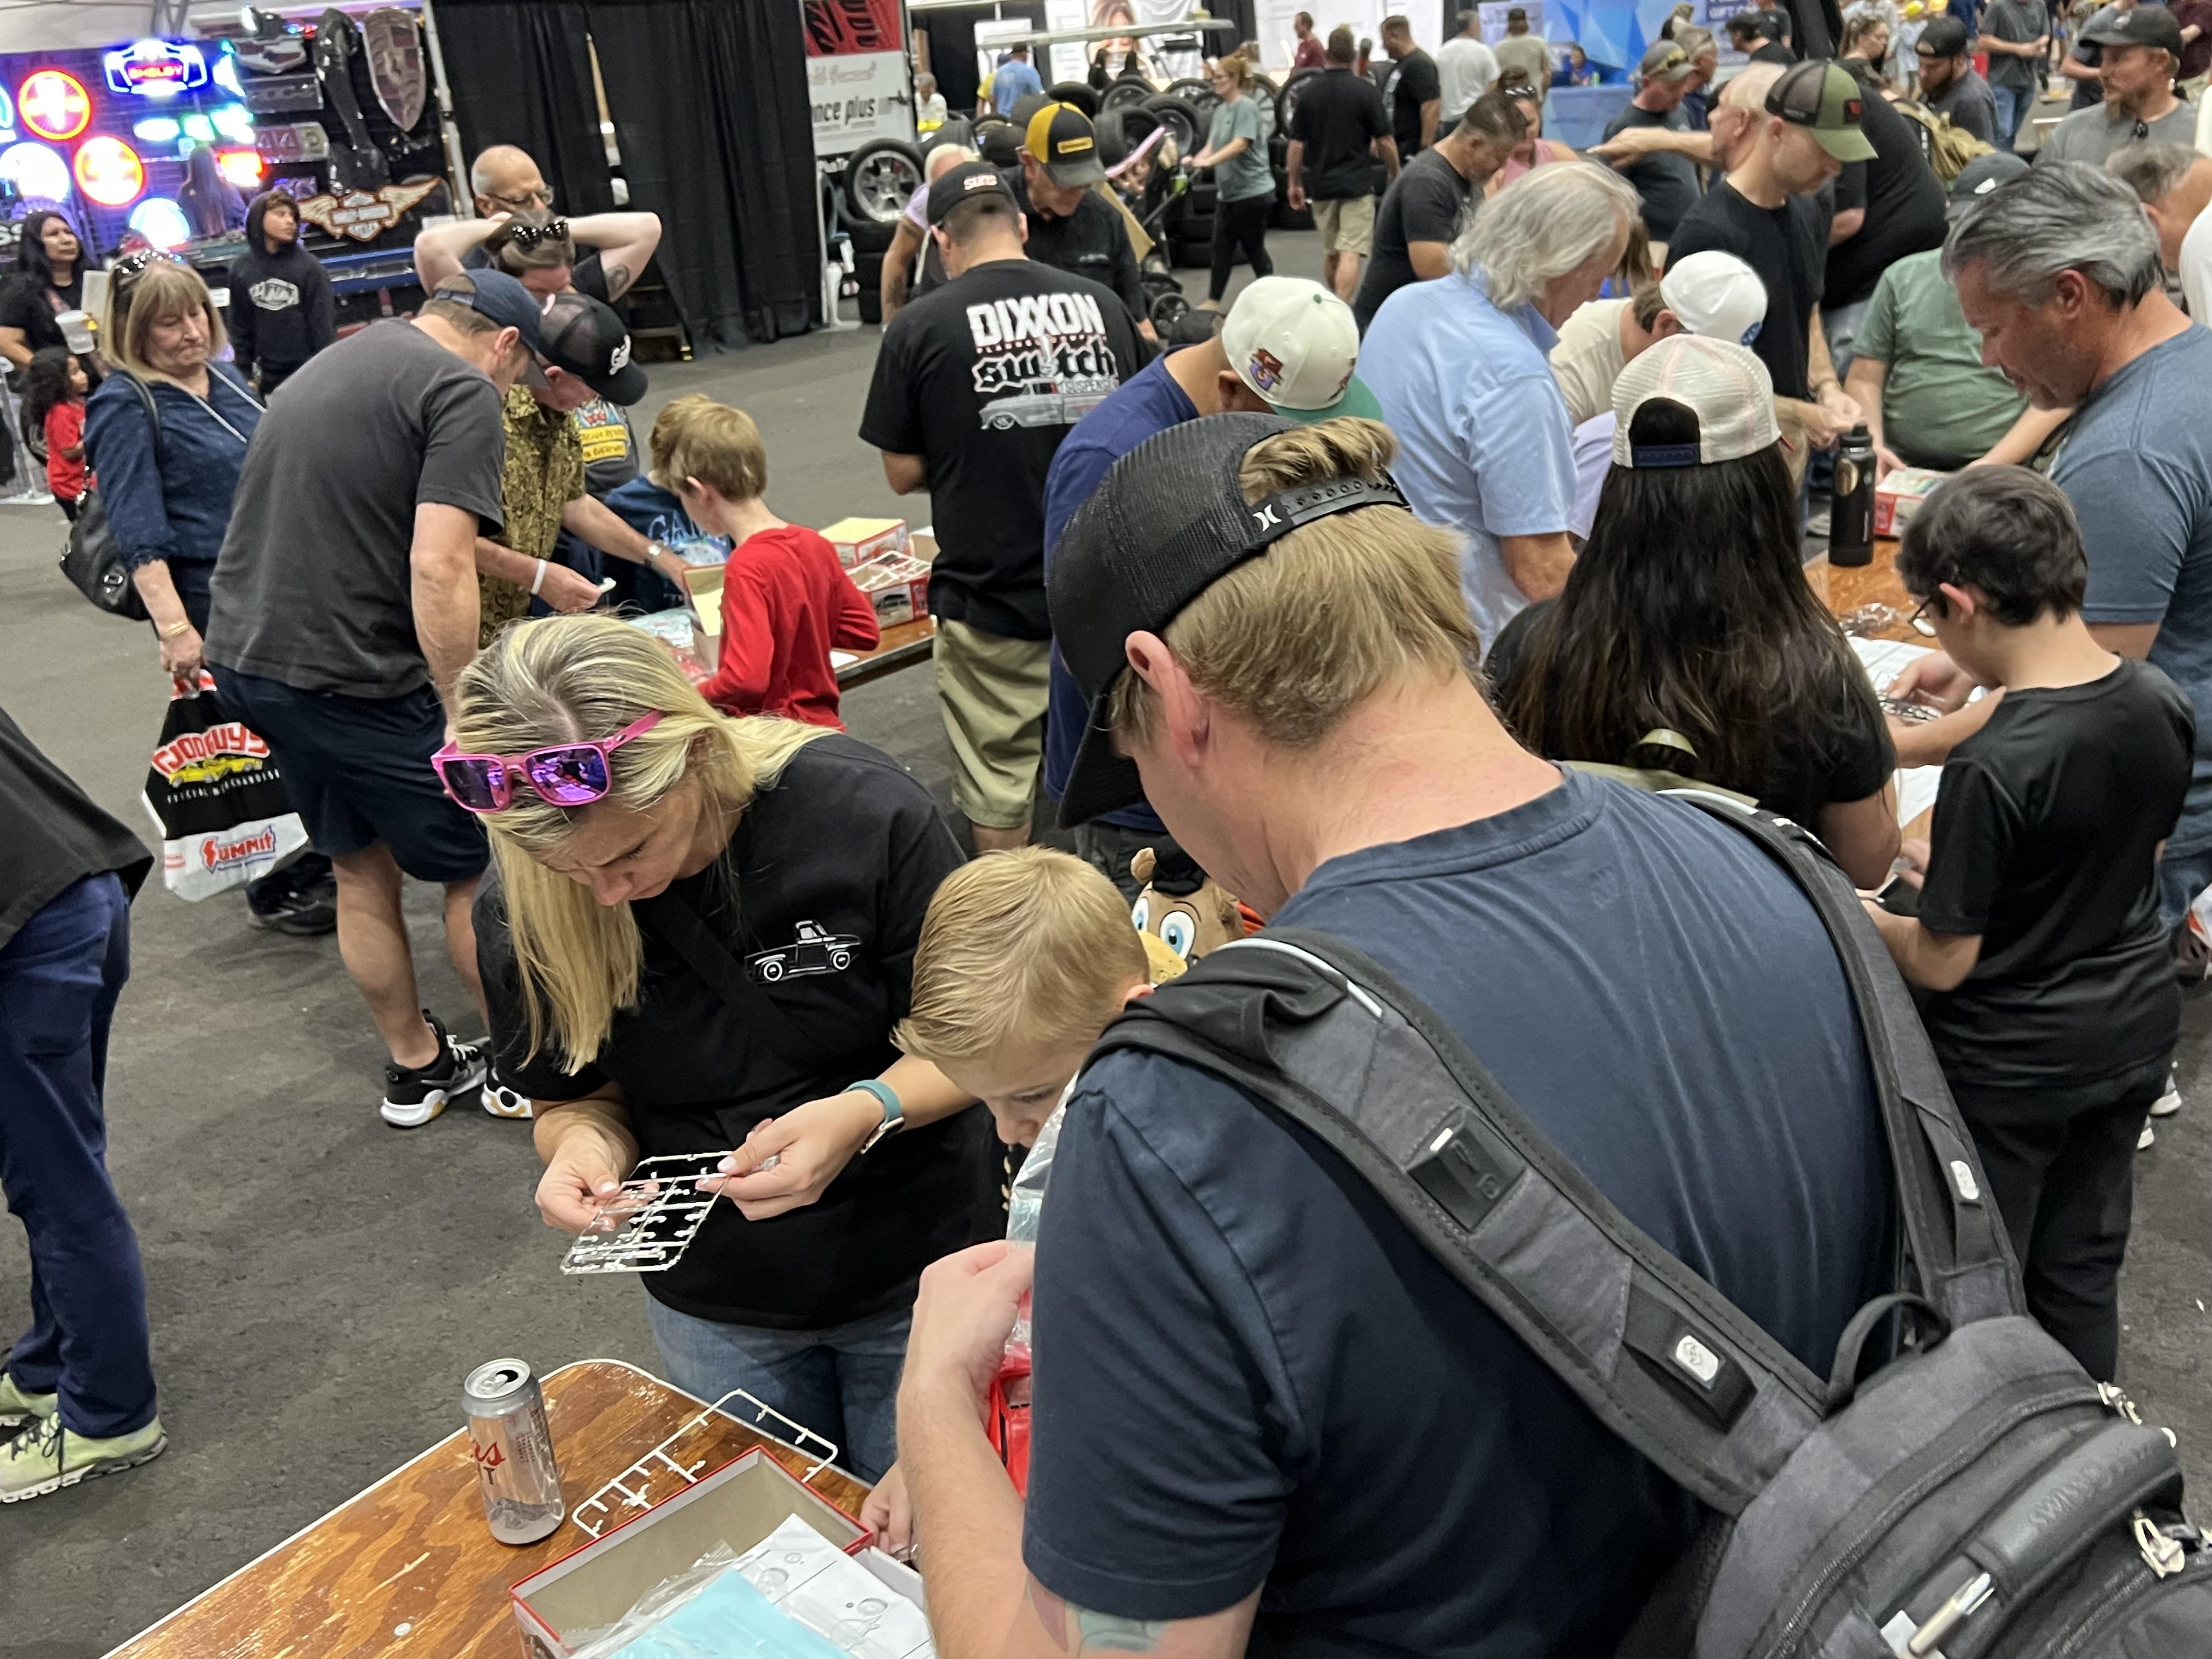
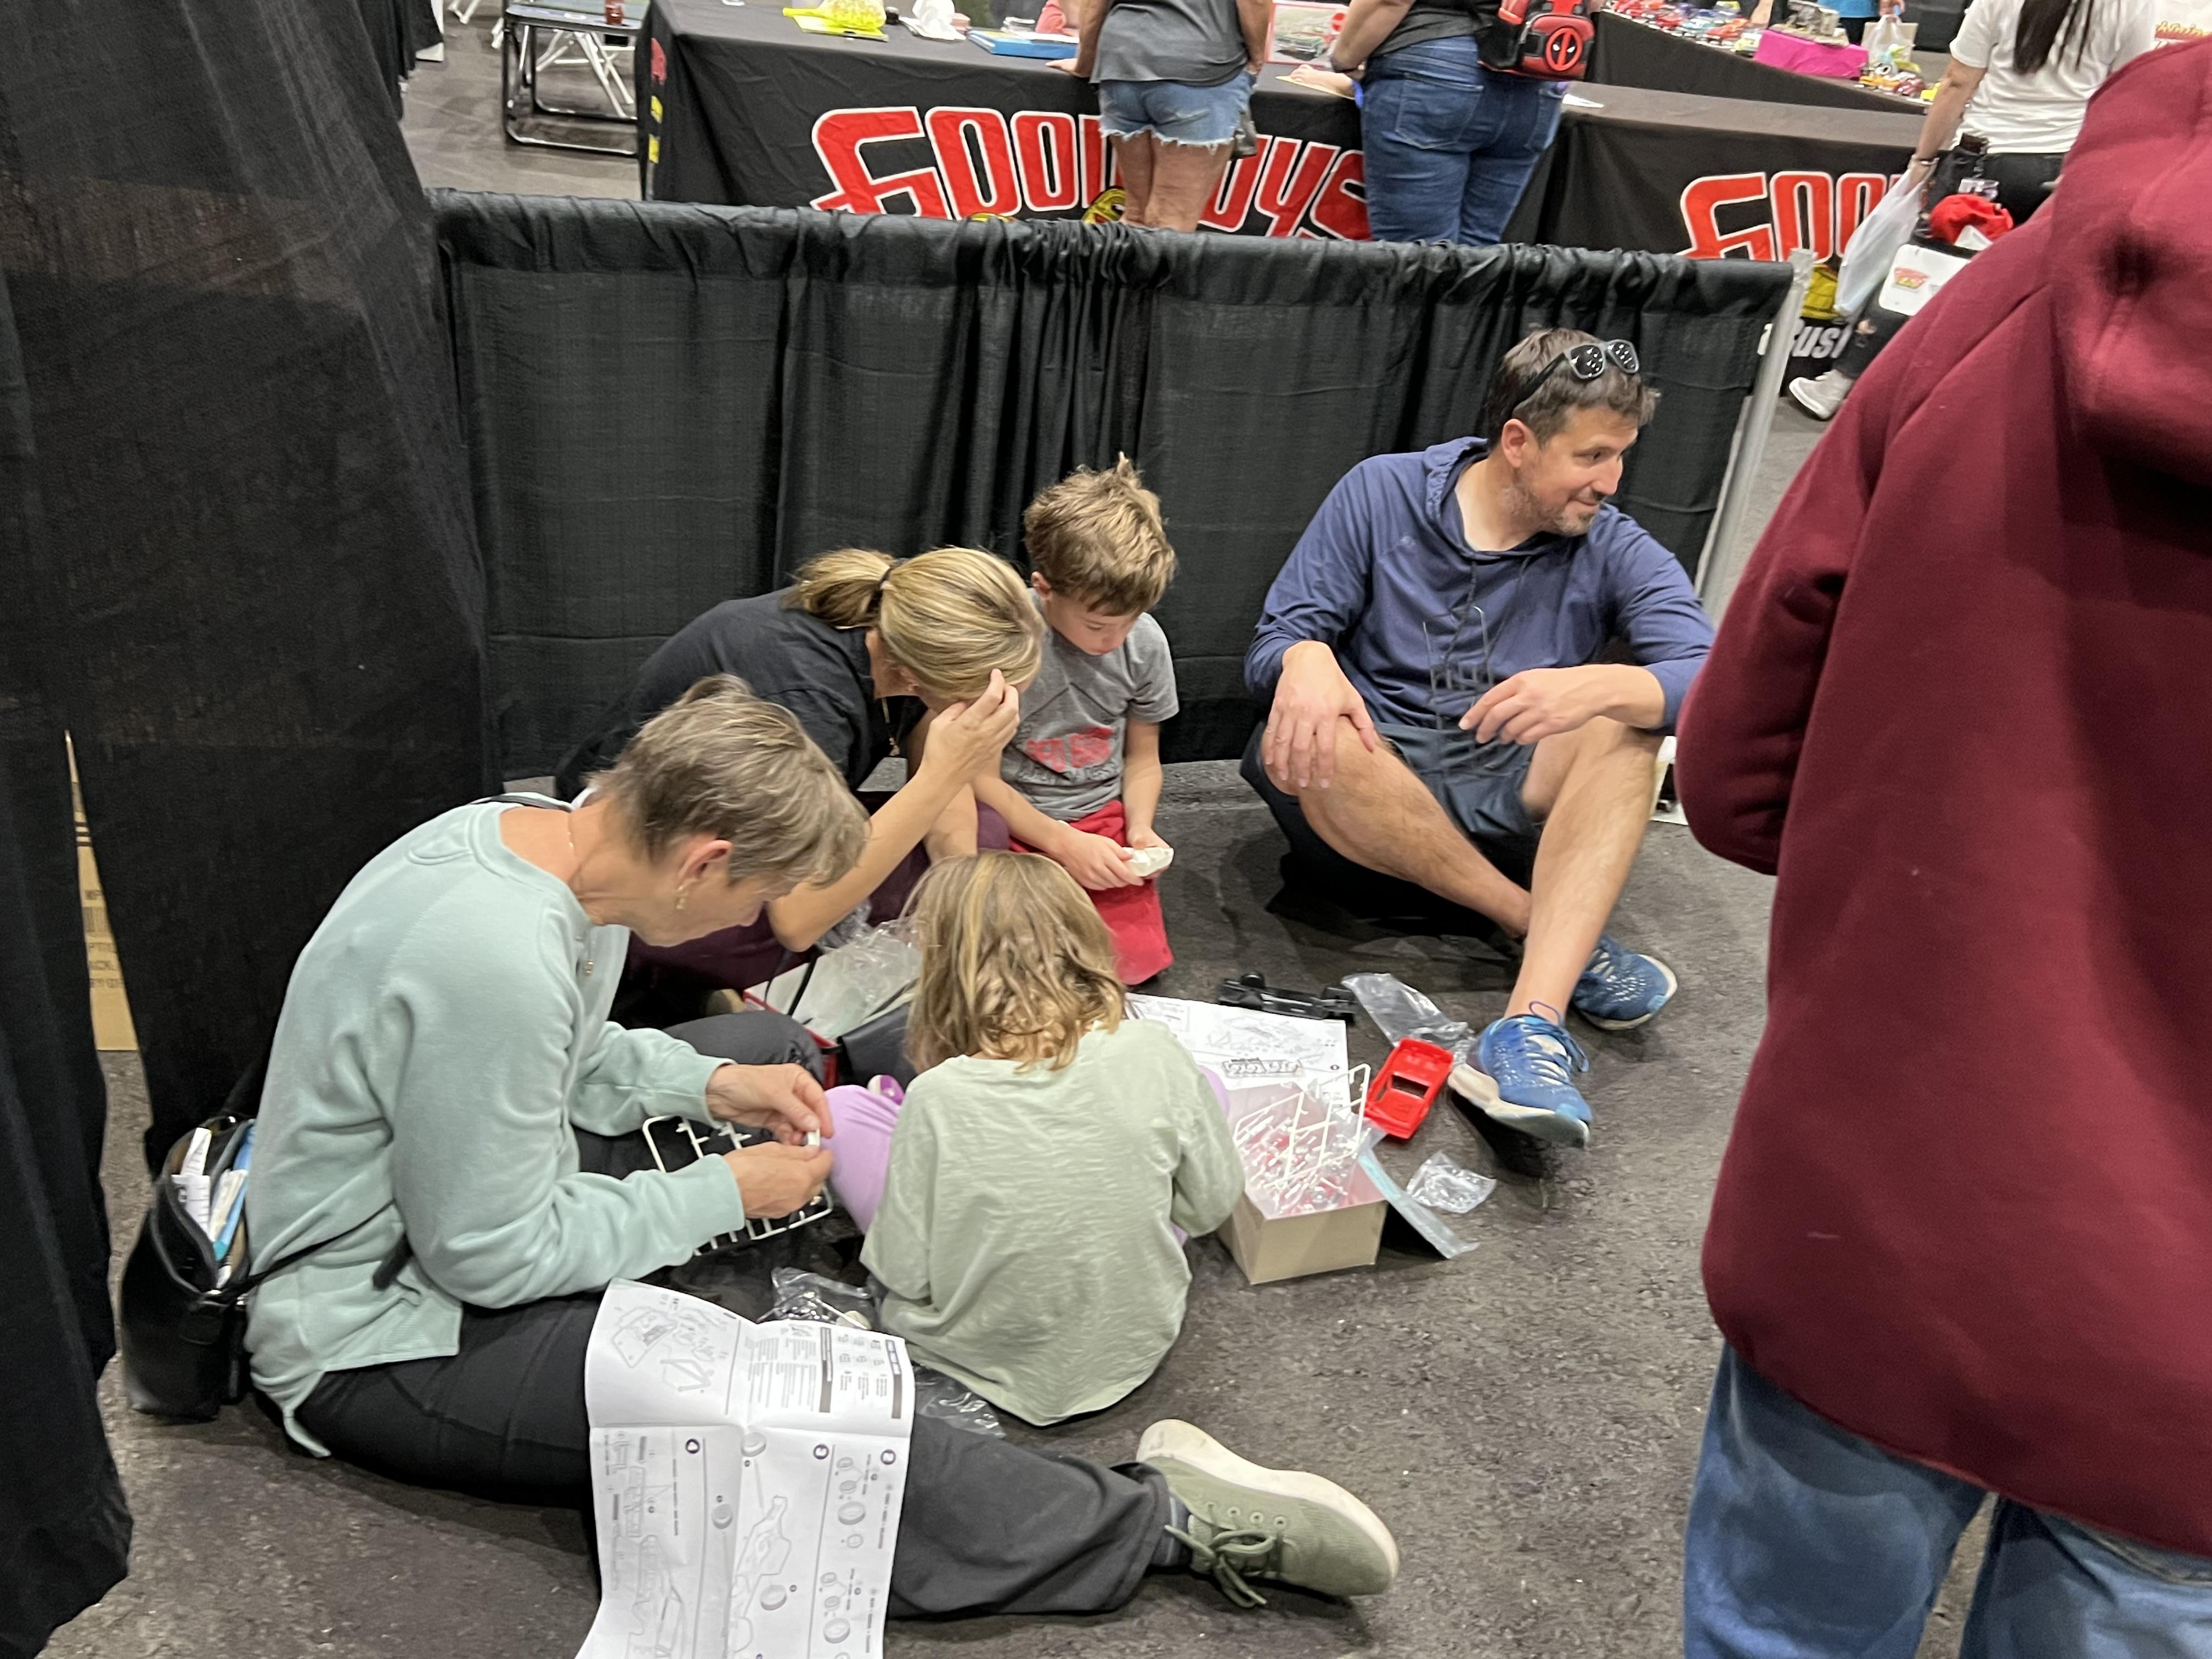
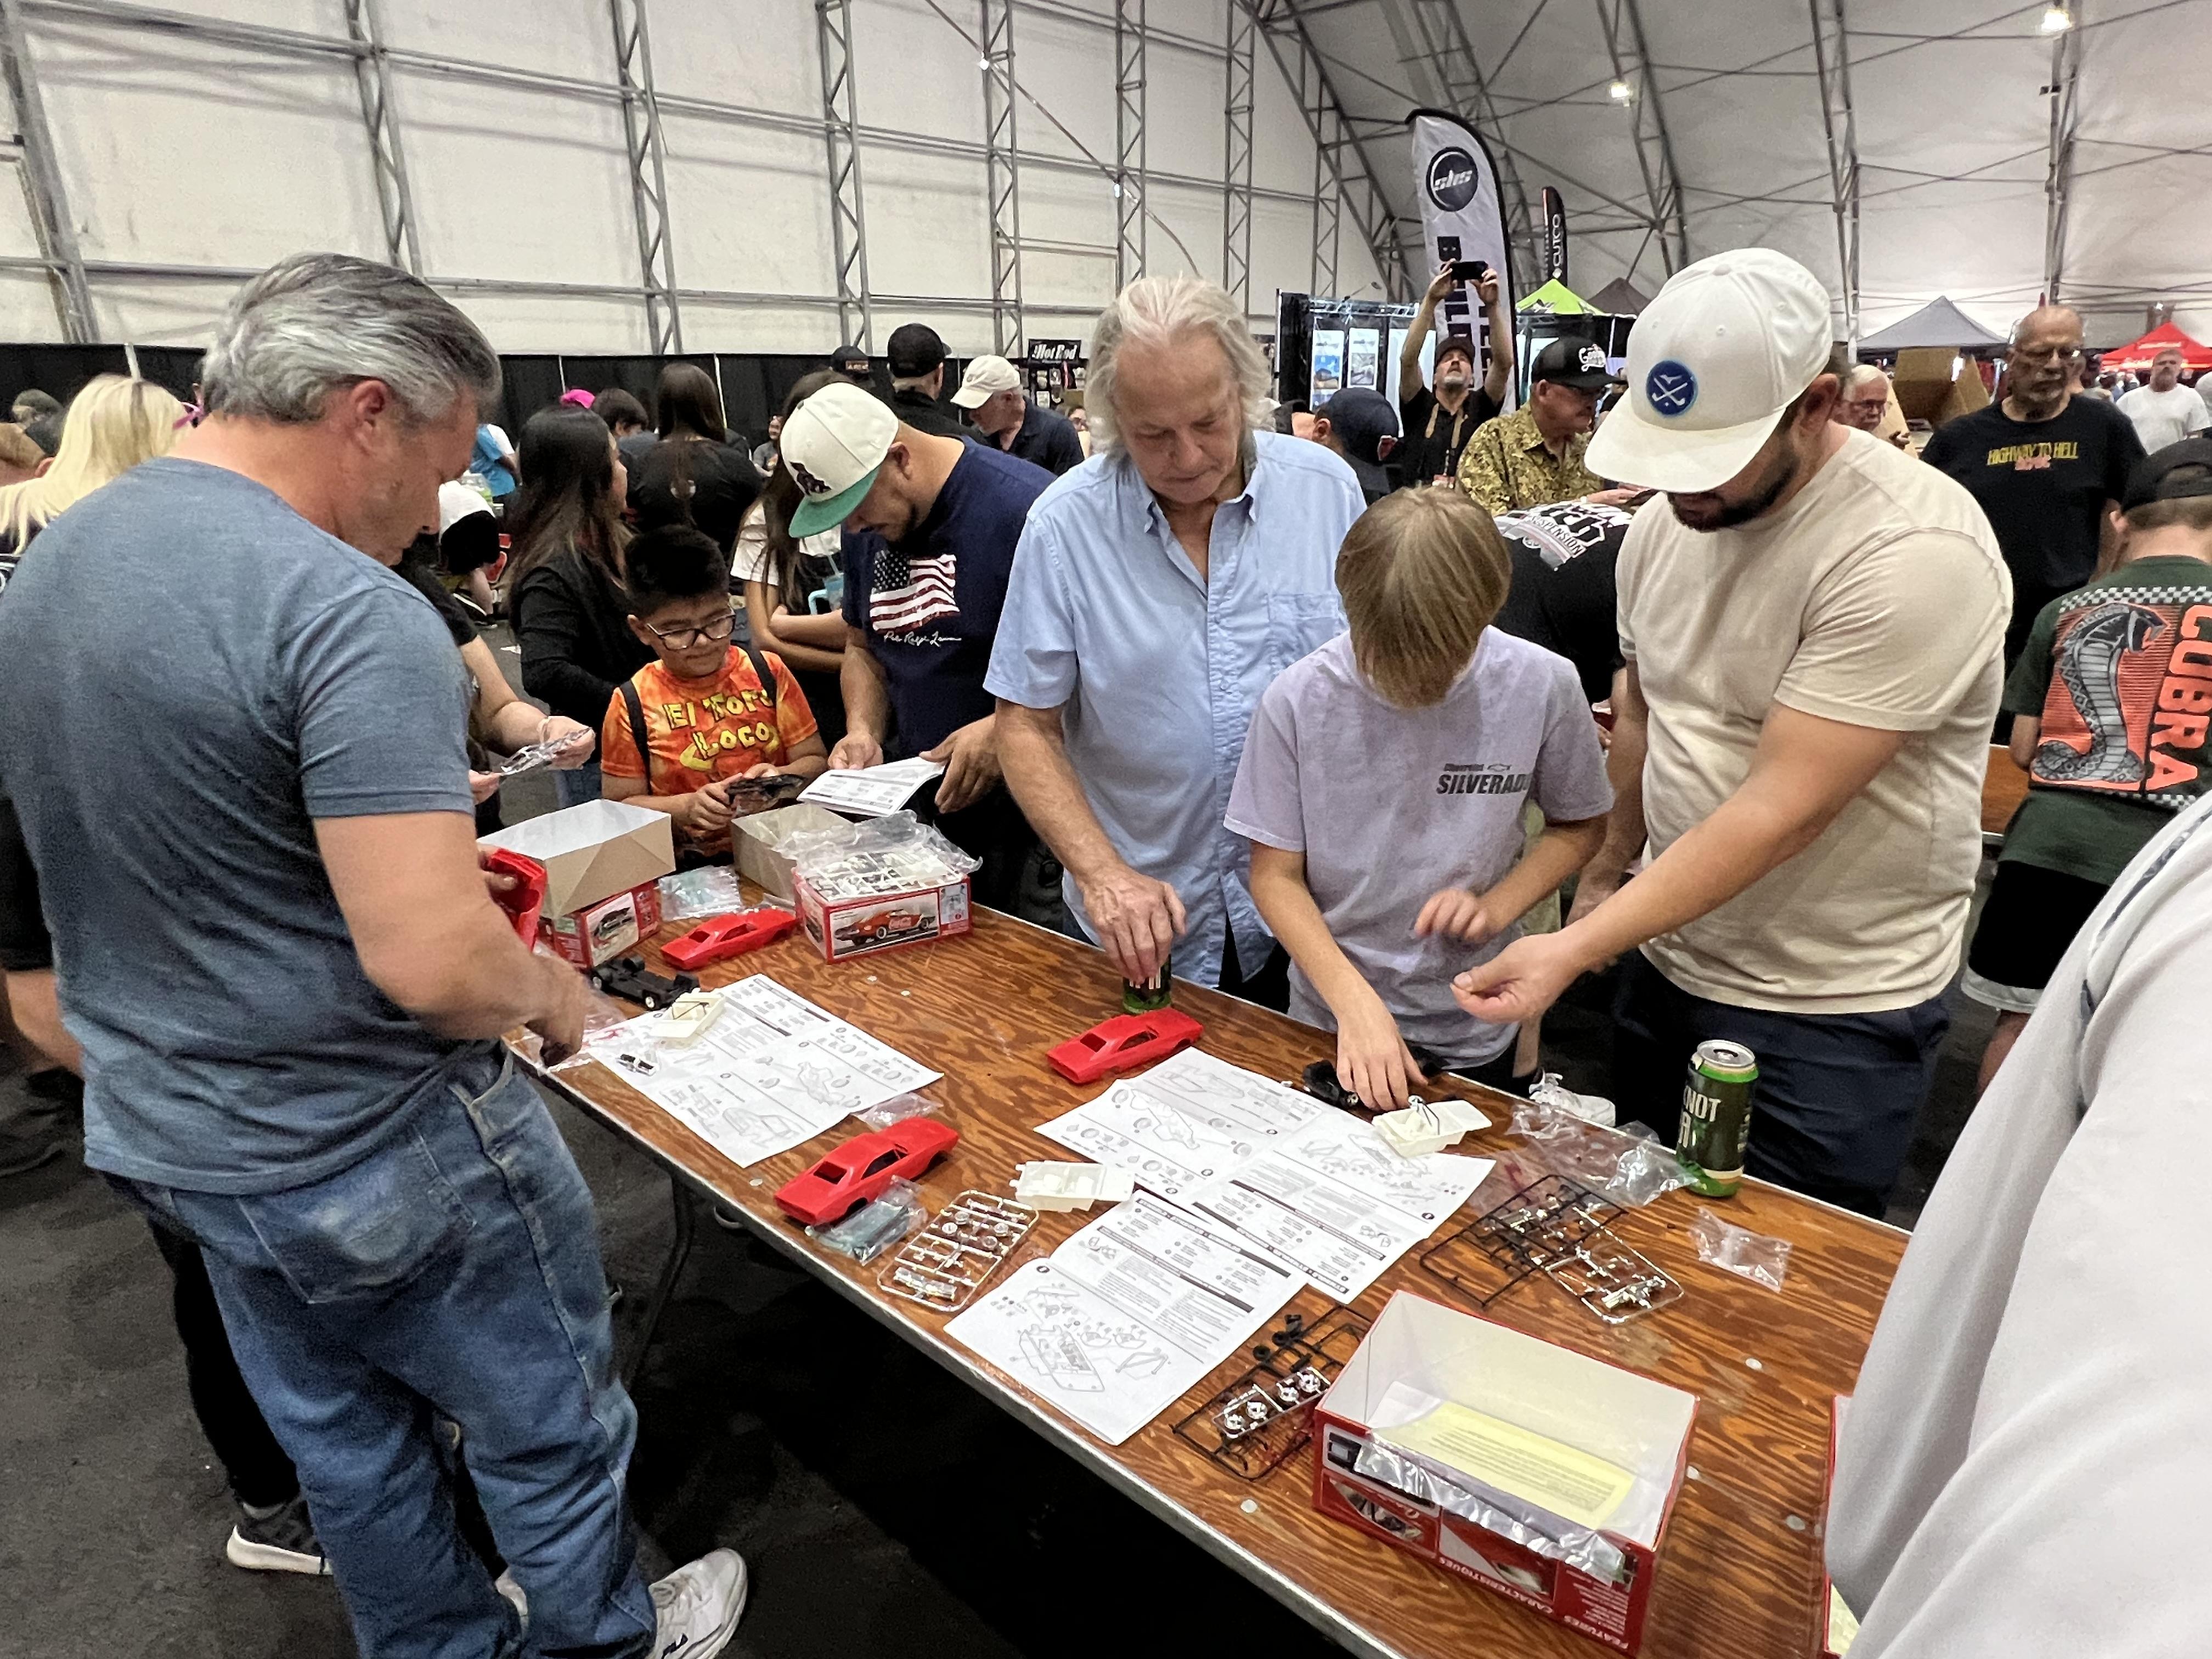
As Dan mentioned above the Make ‘n’ Take at the Scottsdale GoodGuys shows are popular event with the crowds. Here are some photos from the fall show… Cheers Misha
-
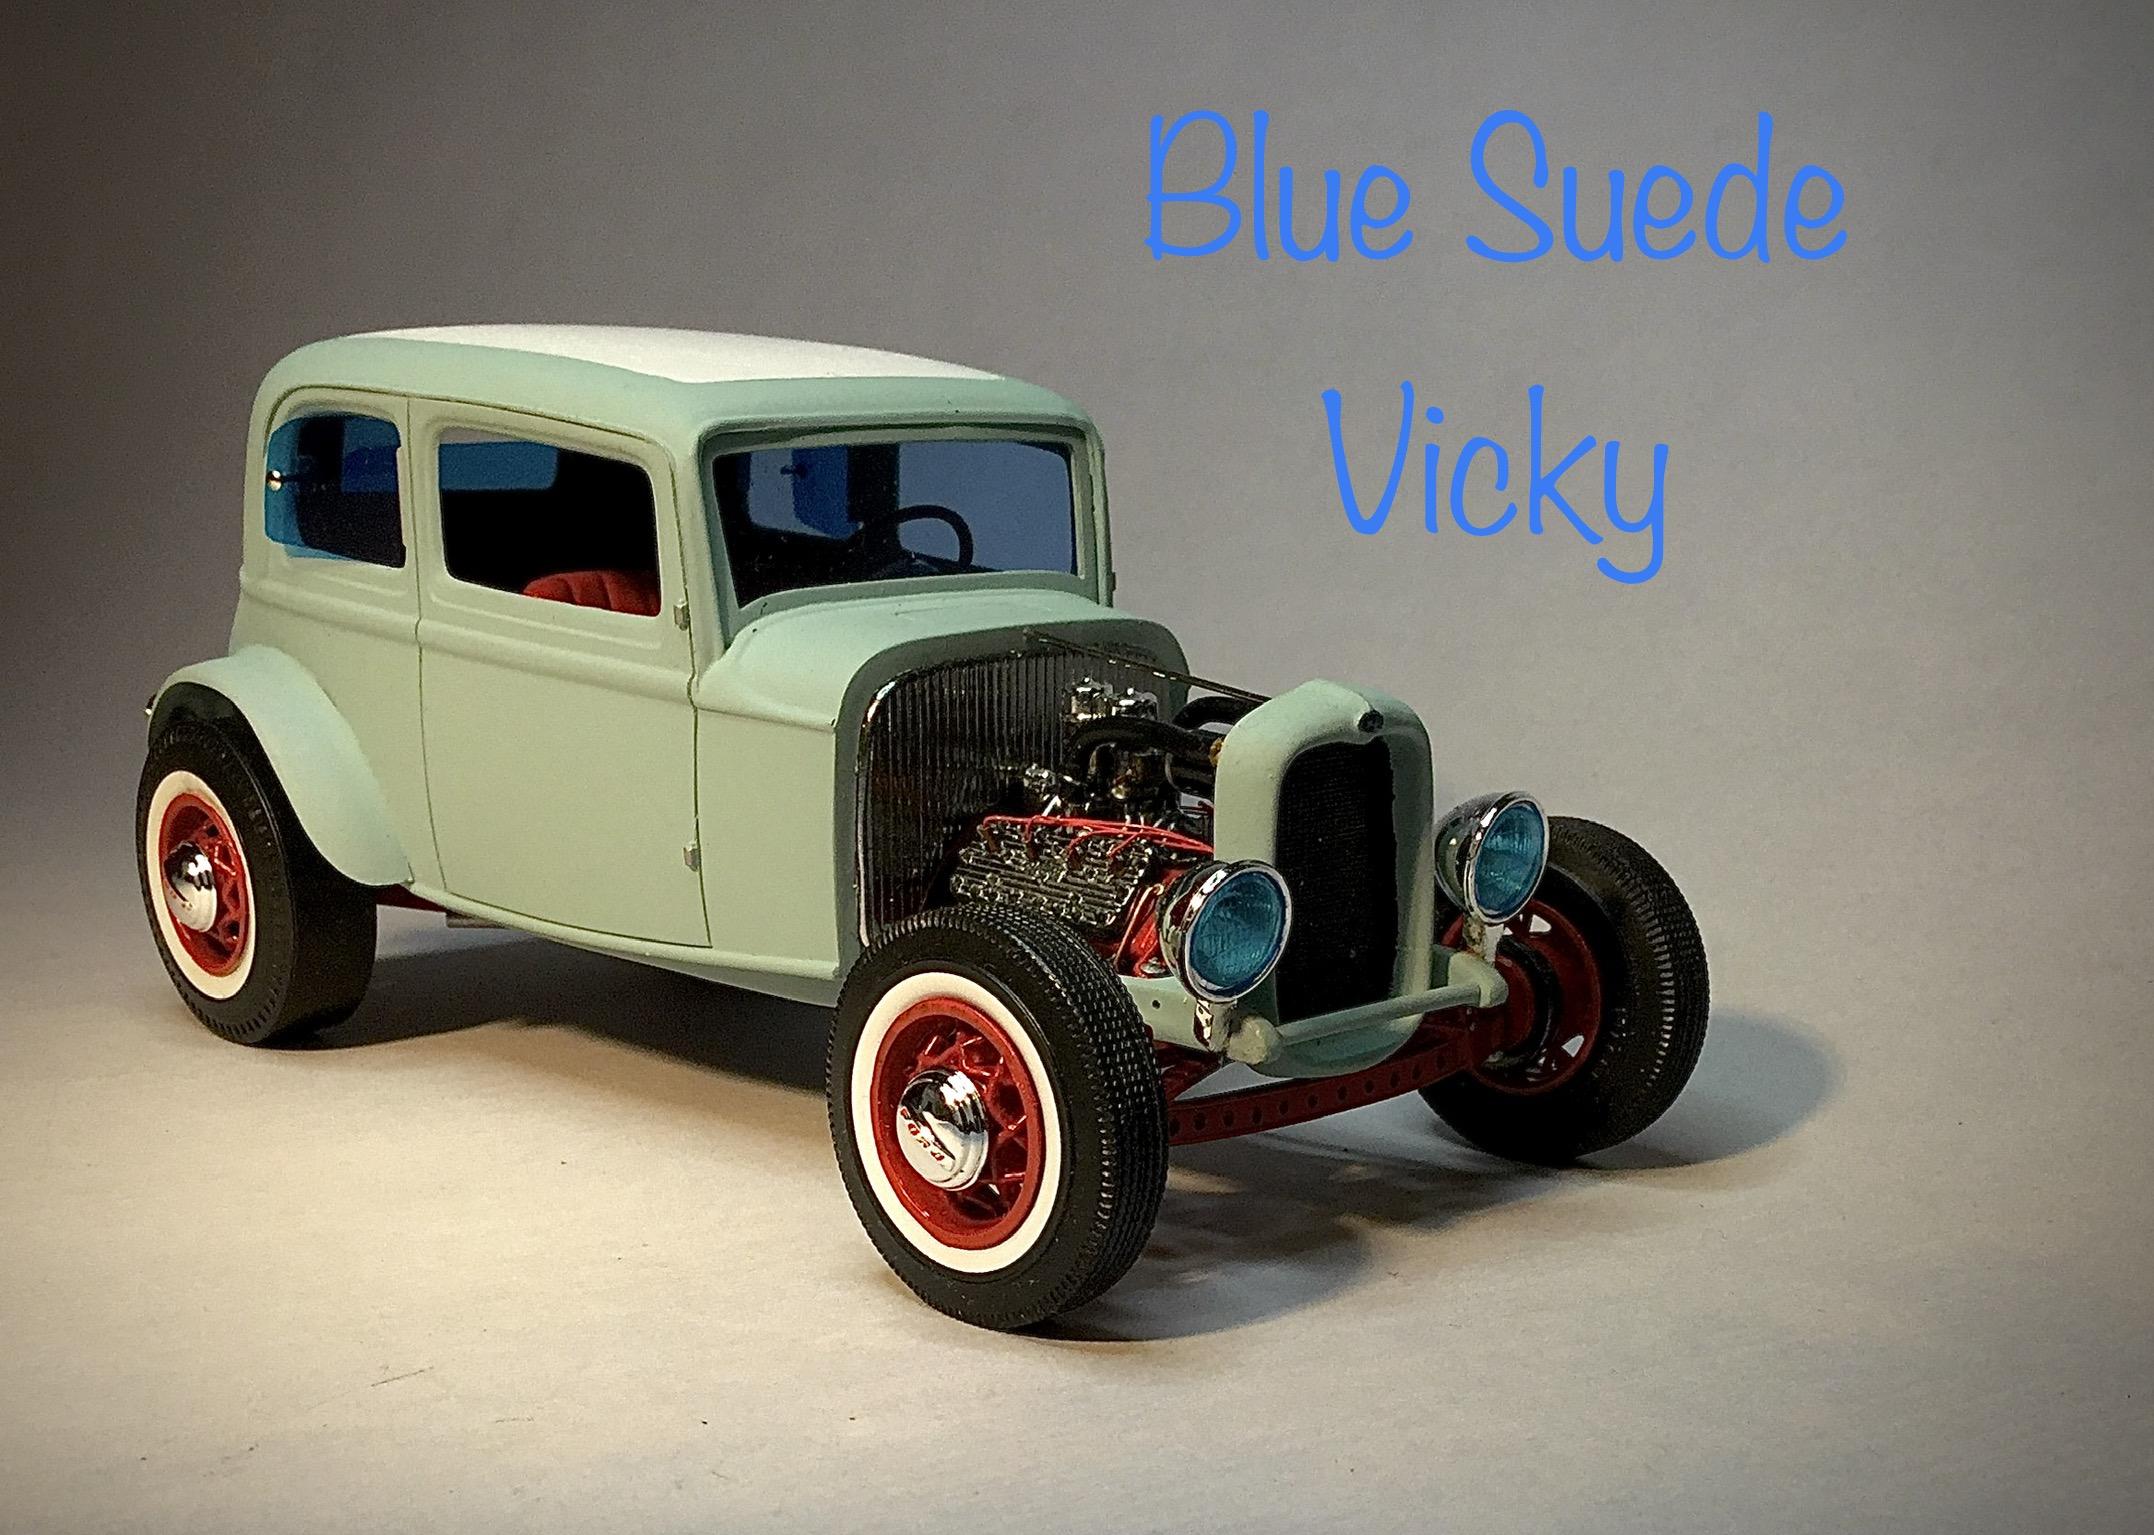
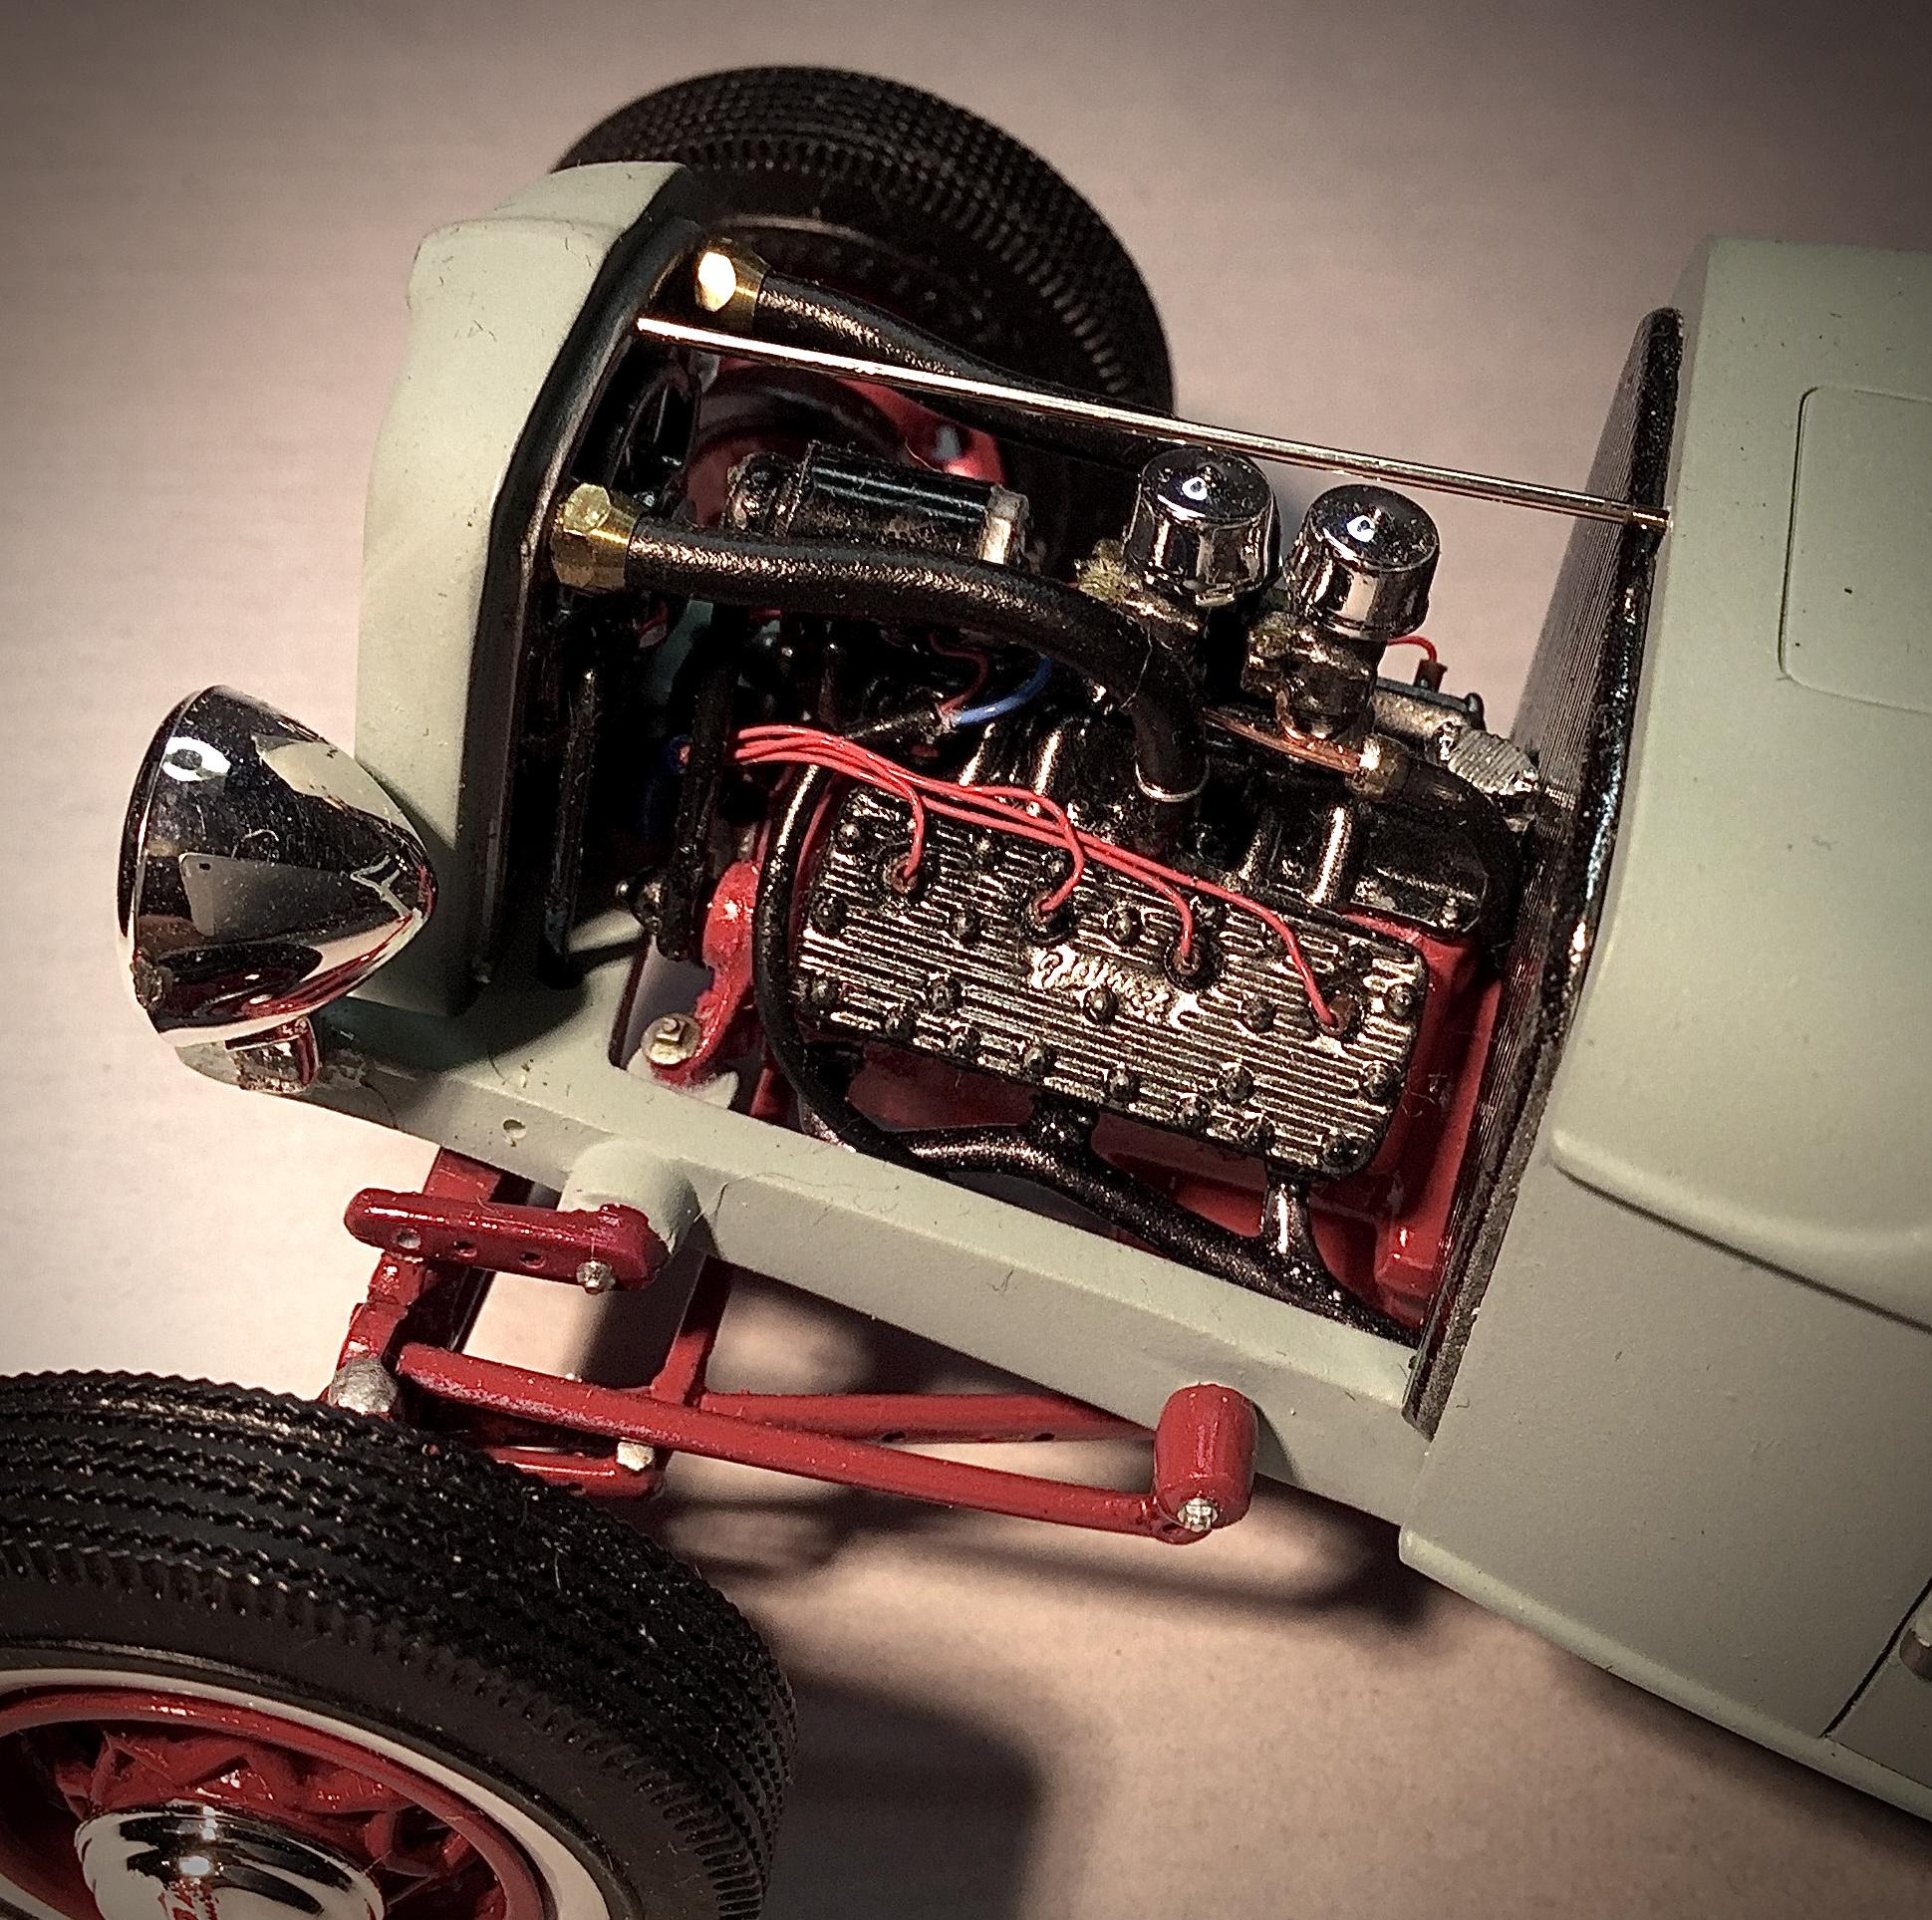
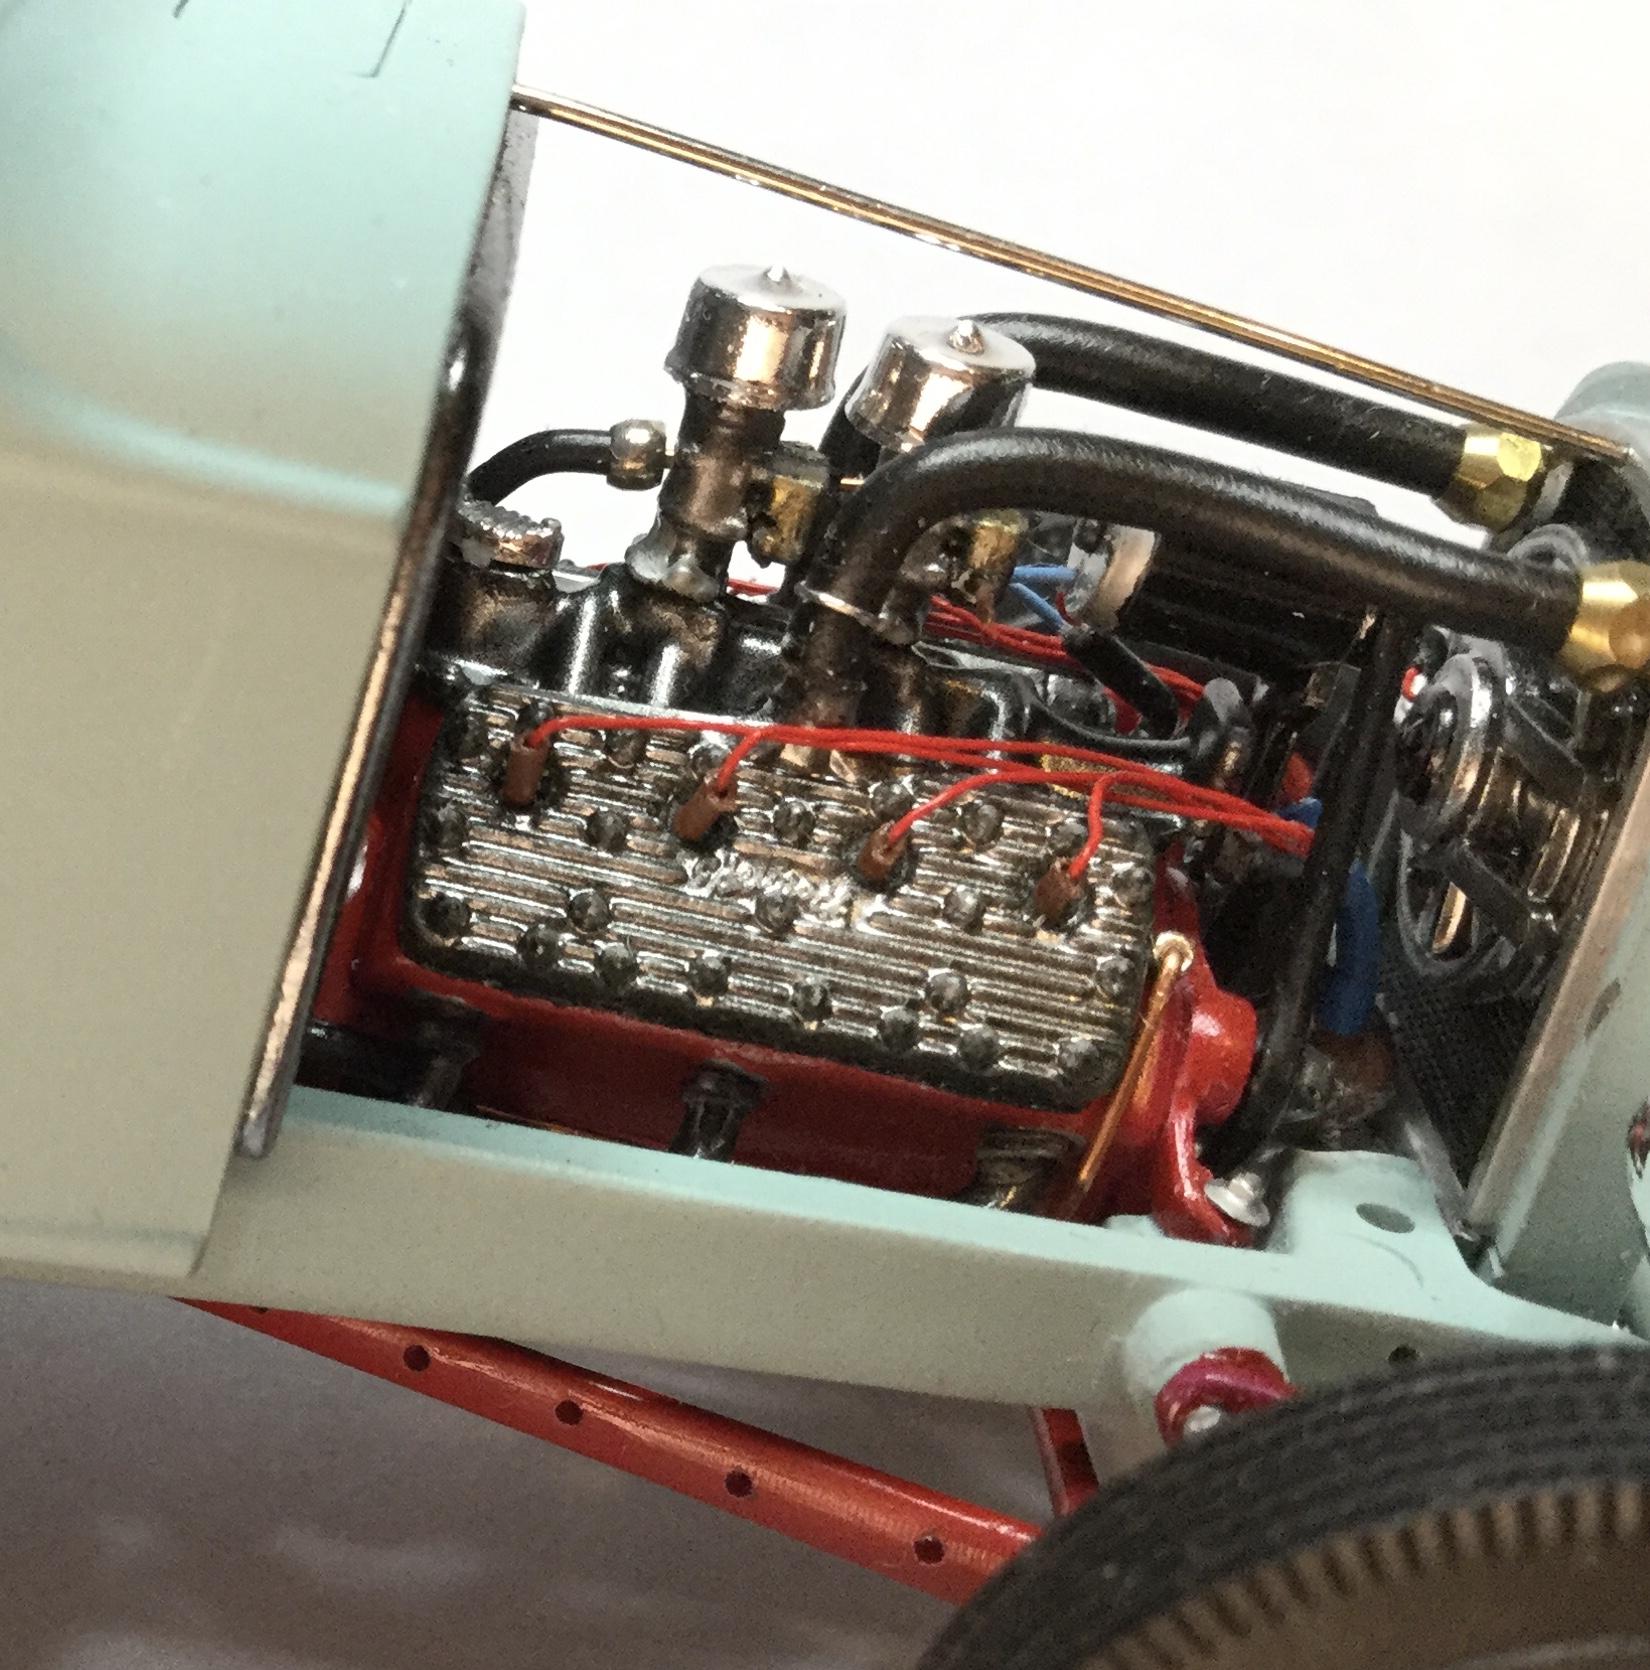
Final Ford motivated hot rod is the Blue Suede Vicky built for the 2016 Deuce Days. It features the finely detailed Flathead engine from the 37 truck kit, complete with period correct speed parts for the post war era. This engine was also wrangled into the AMT chassis from the Victoria Deuce kit. Cheers Misha
-
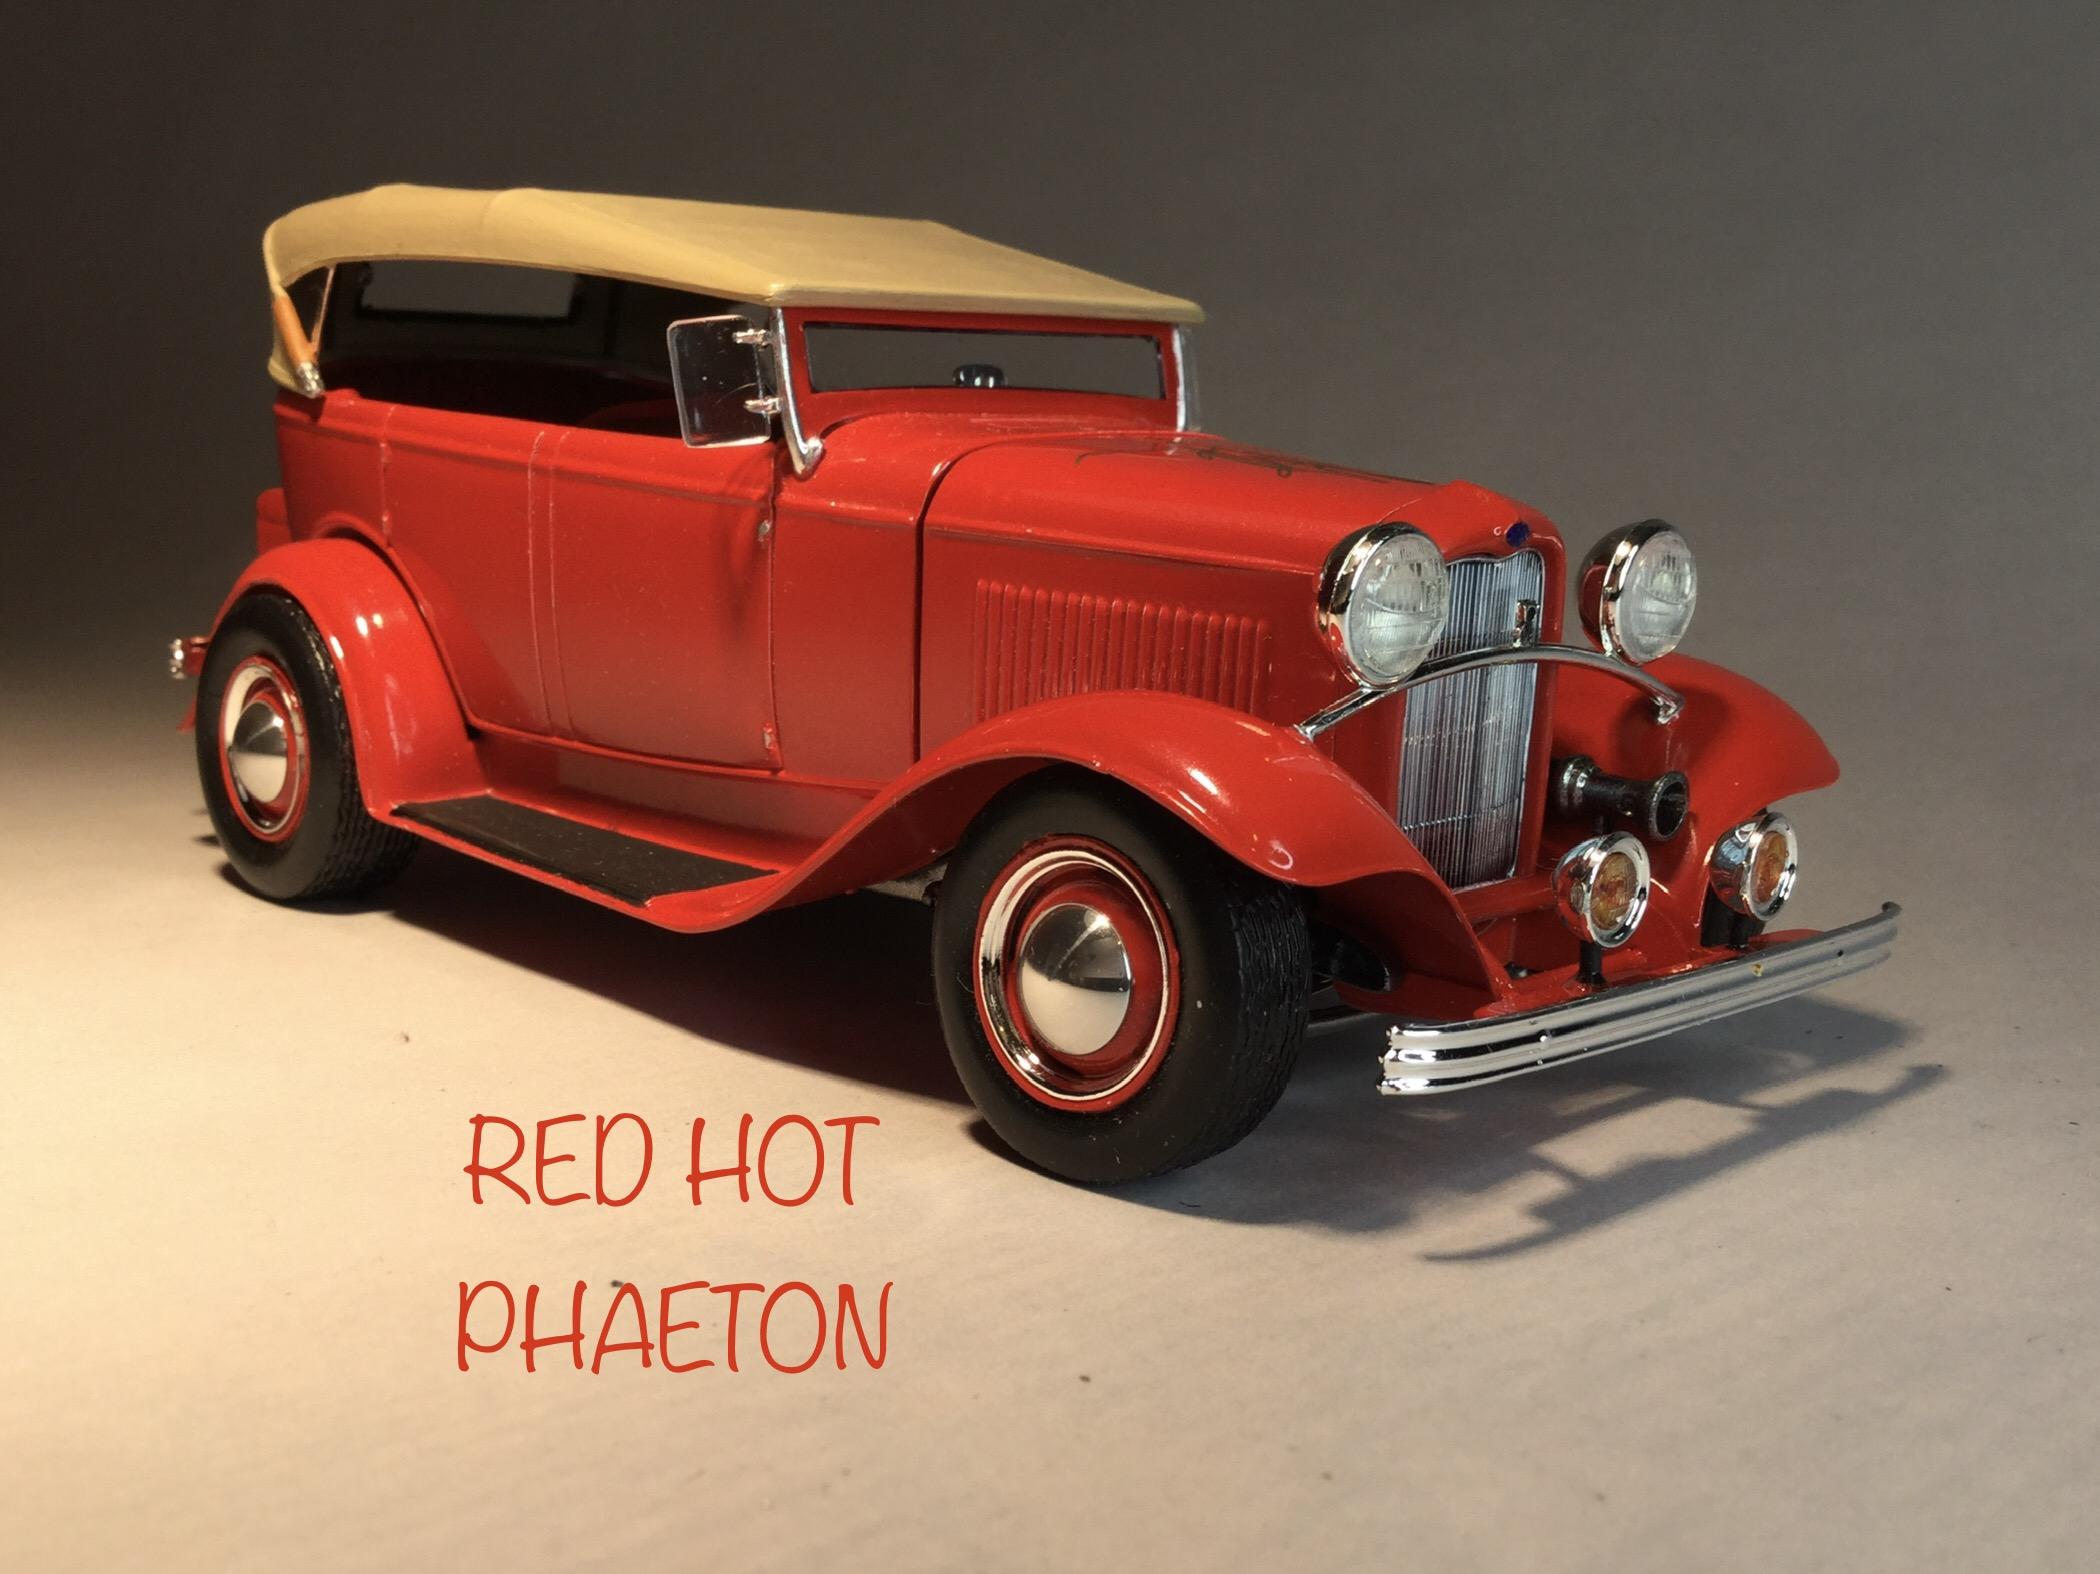
Another “Ford Powered by Ford” is the Red Hot Phaeton built for Deuce Days 2019 utilizing the modern R/M 302 from their line 32 Fords to fit into the now vintage AMT frame. Great engine to detail straight from the box. Cheers Misha
-
Hi Harry, If I remember correctly, the valve cover decals come with the R/M 57 Ford along with the Y block engine that I used for this project. Cheers Misha
-
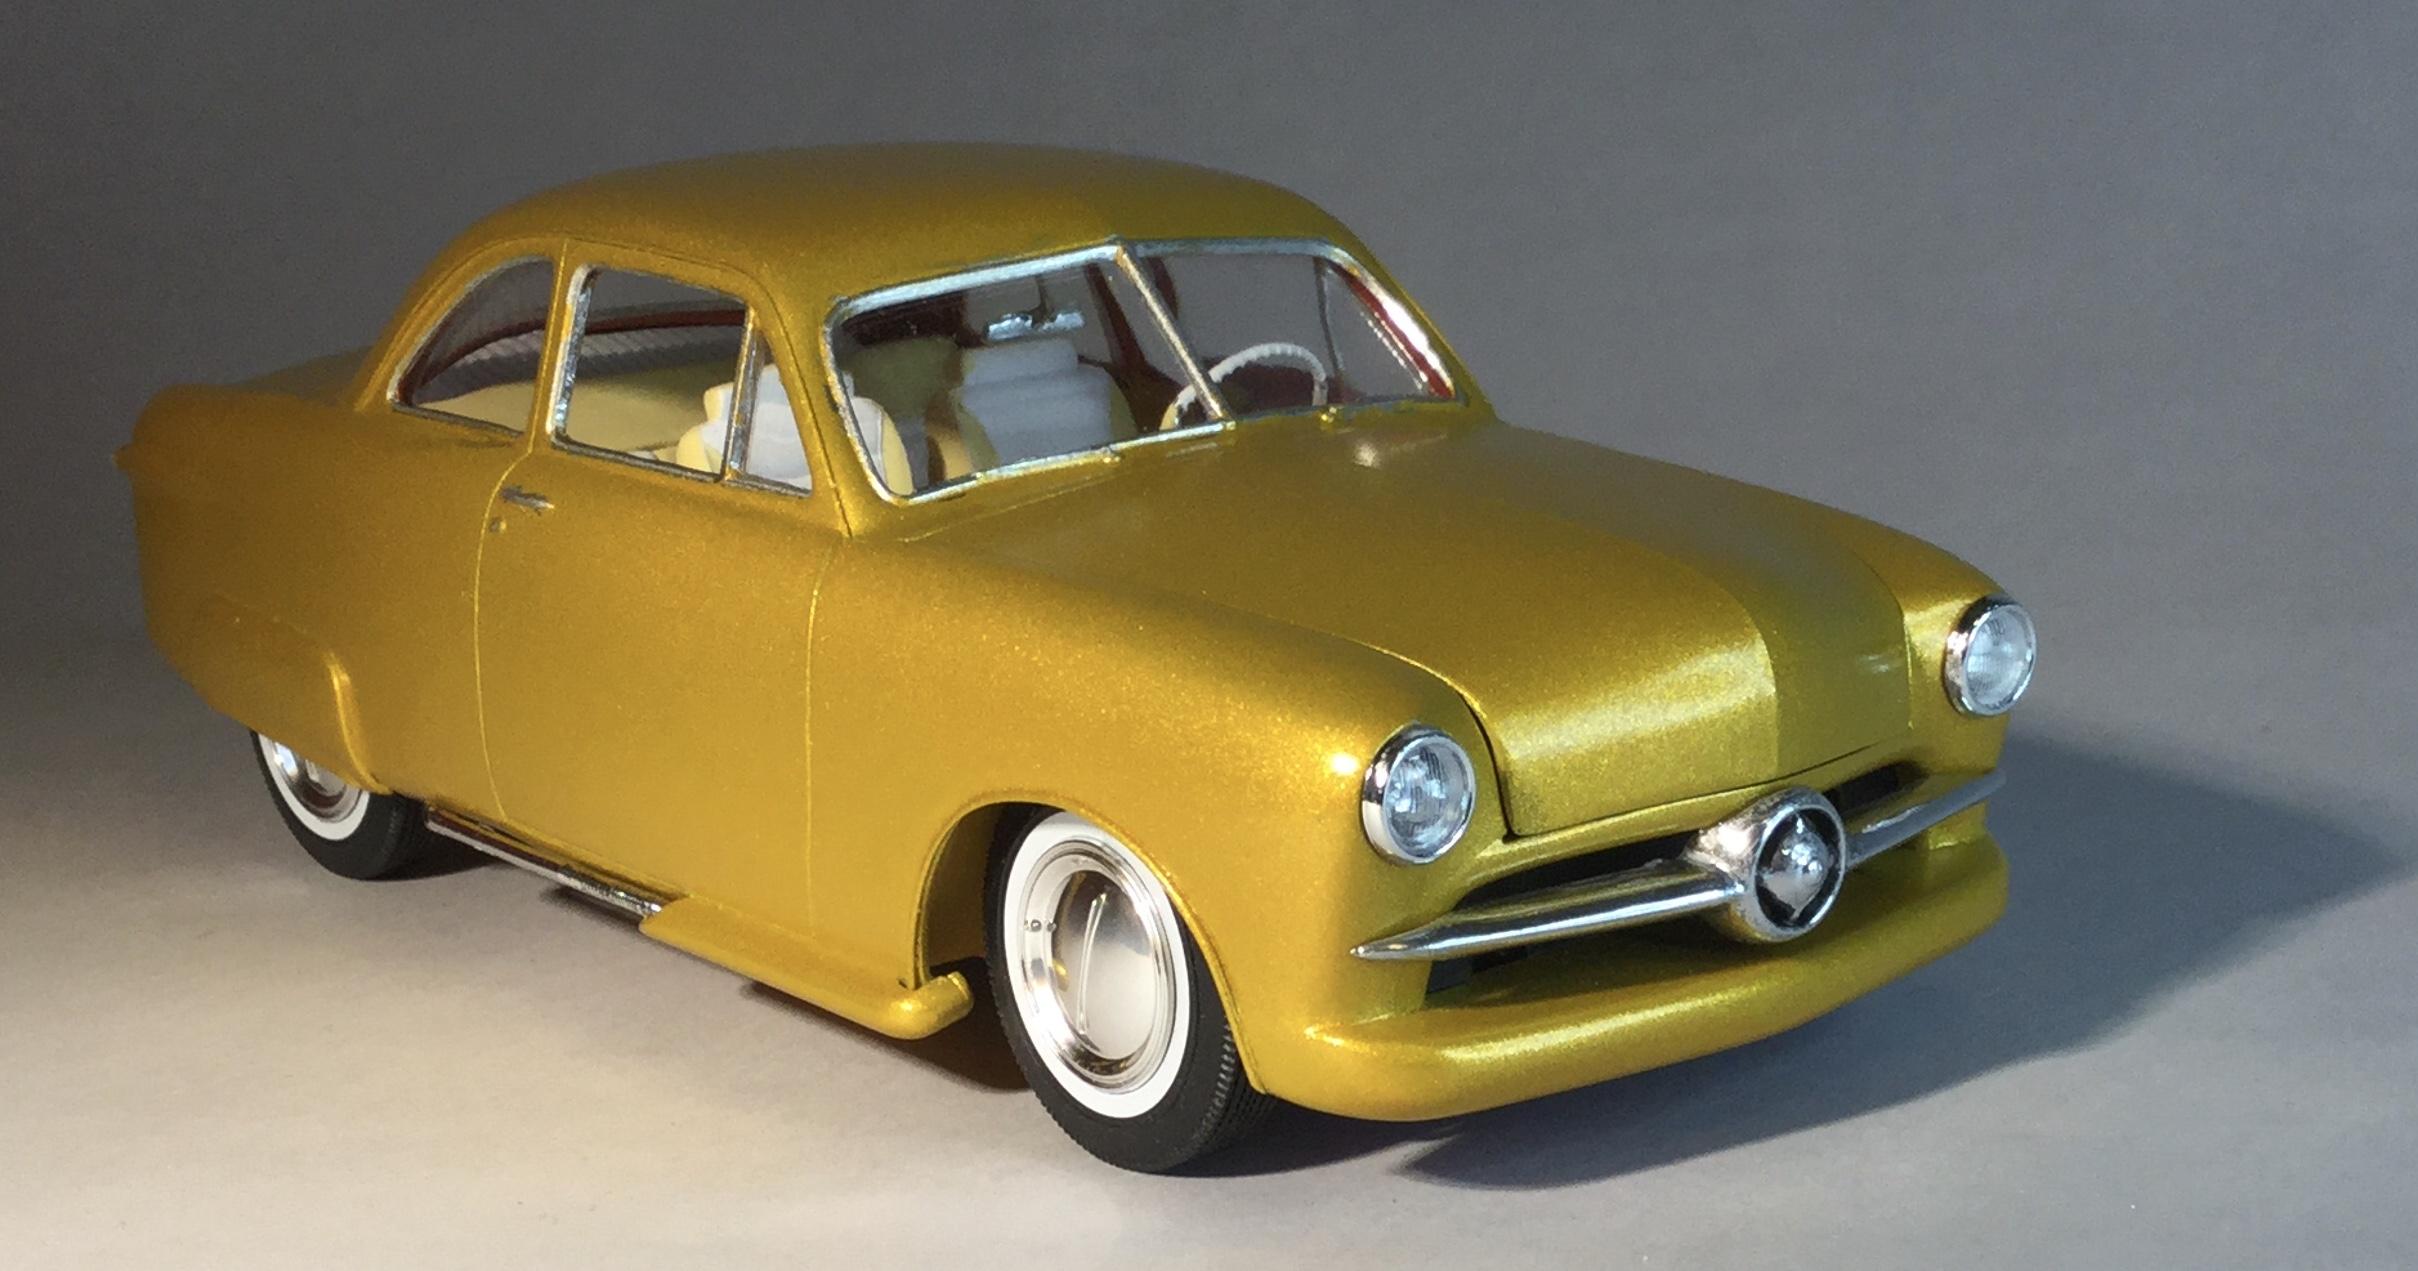
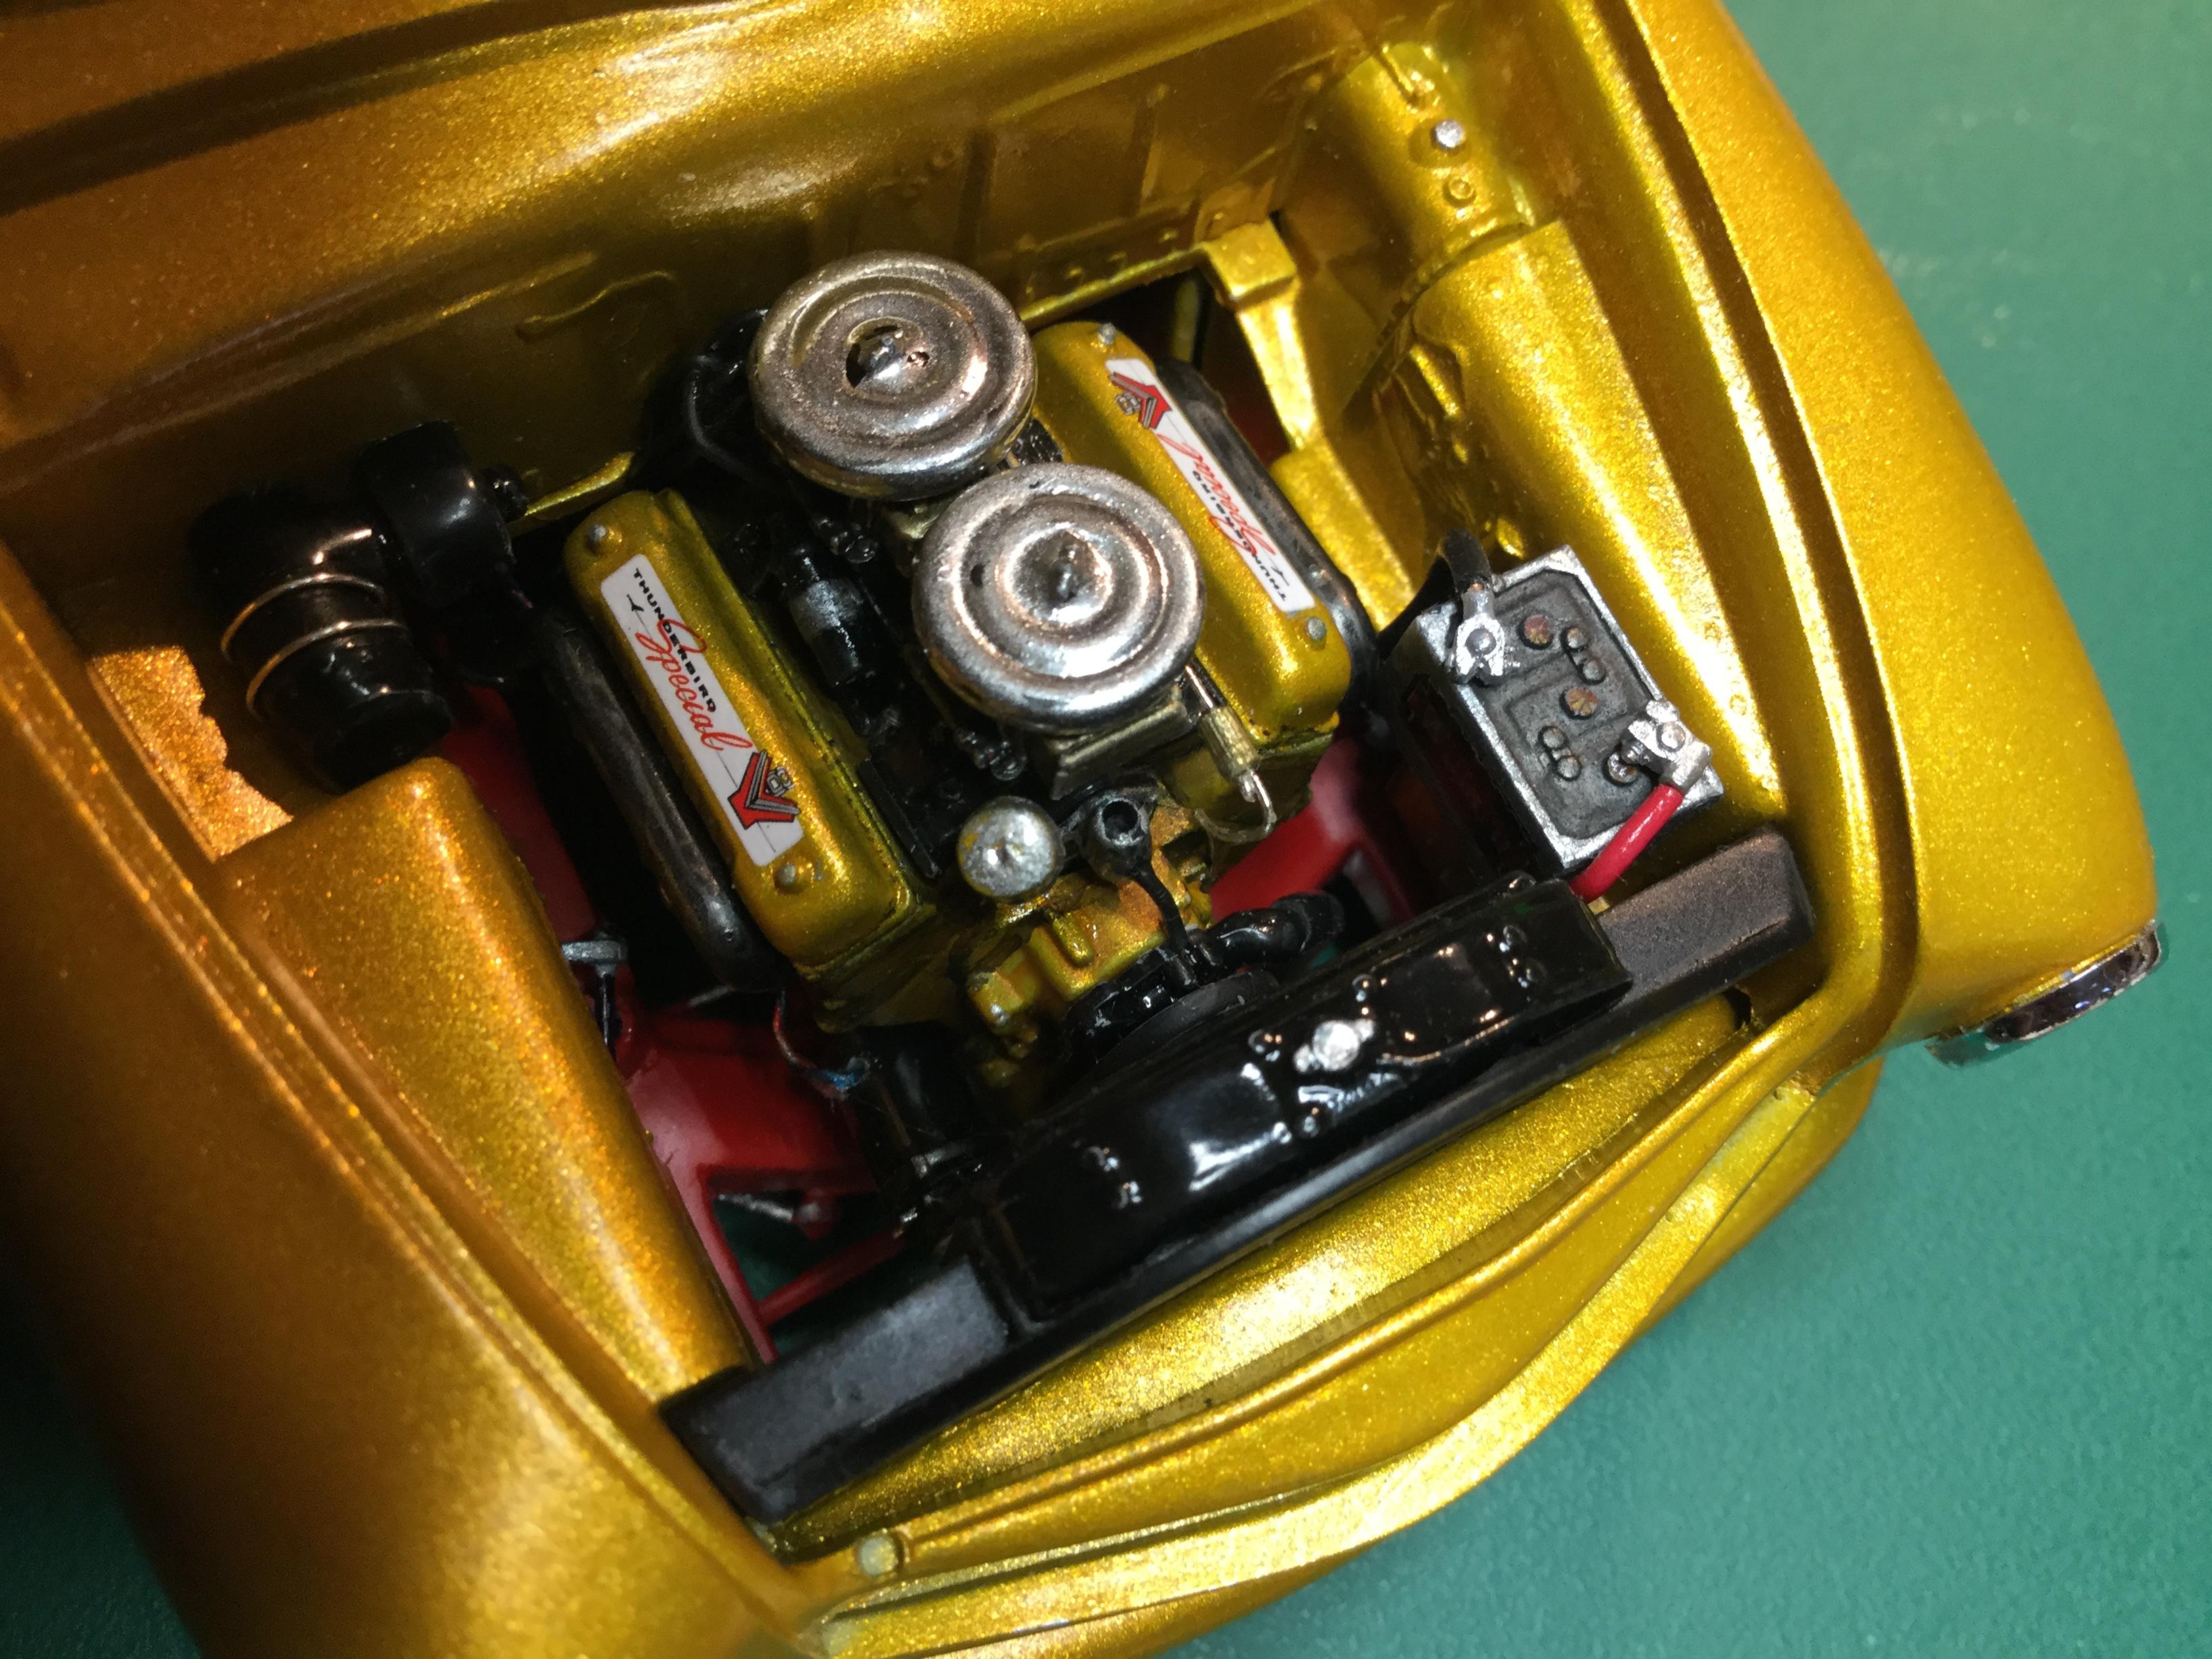
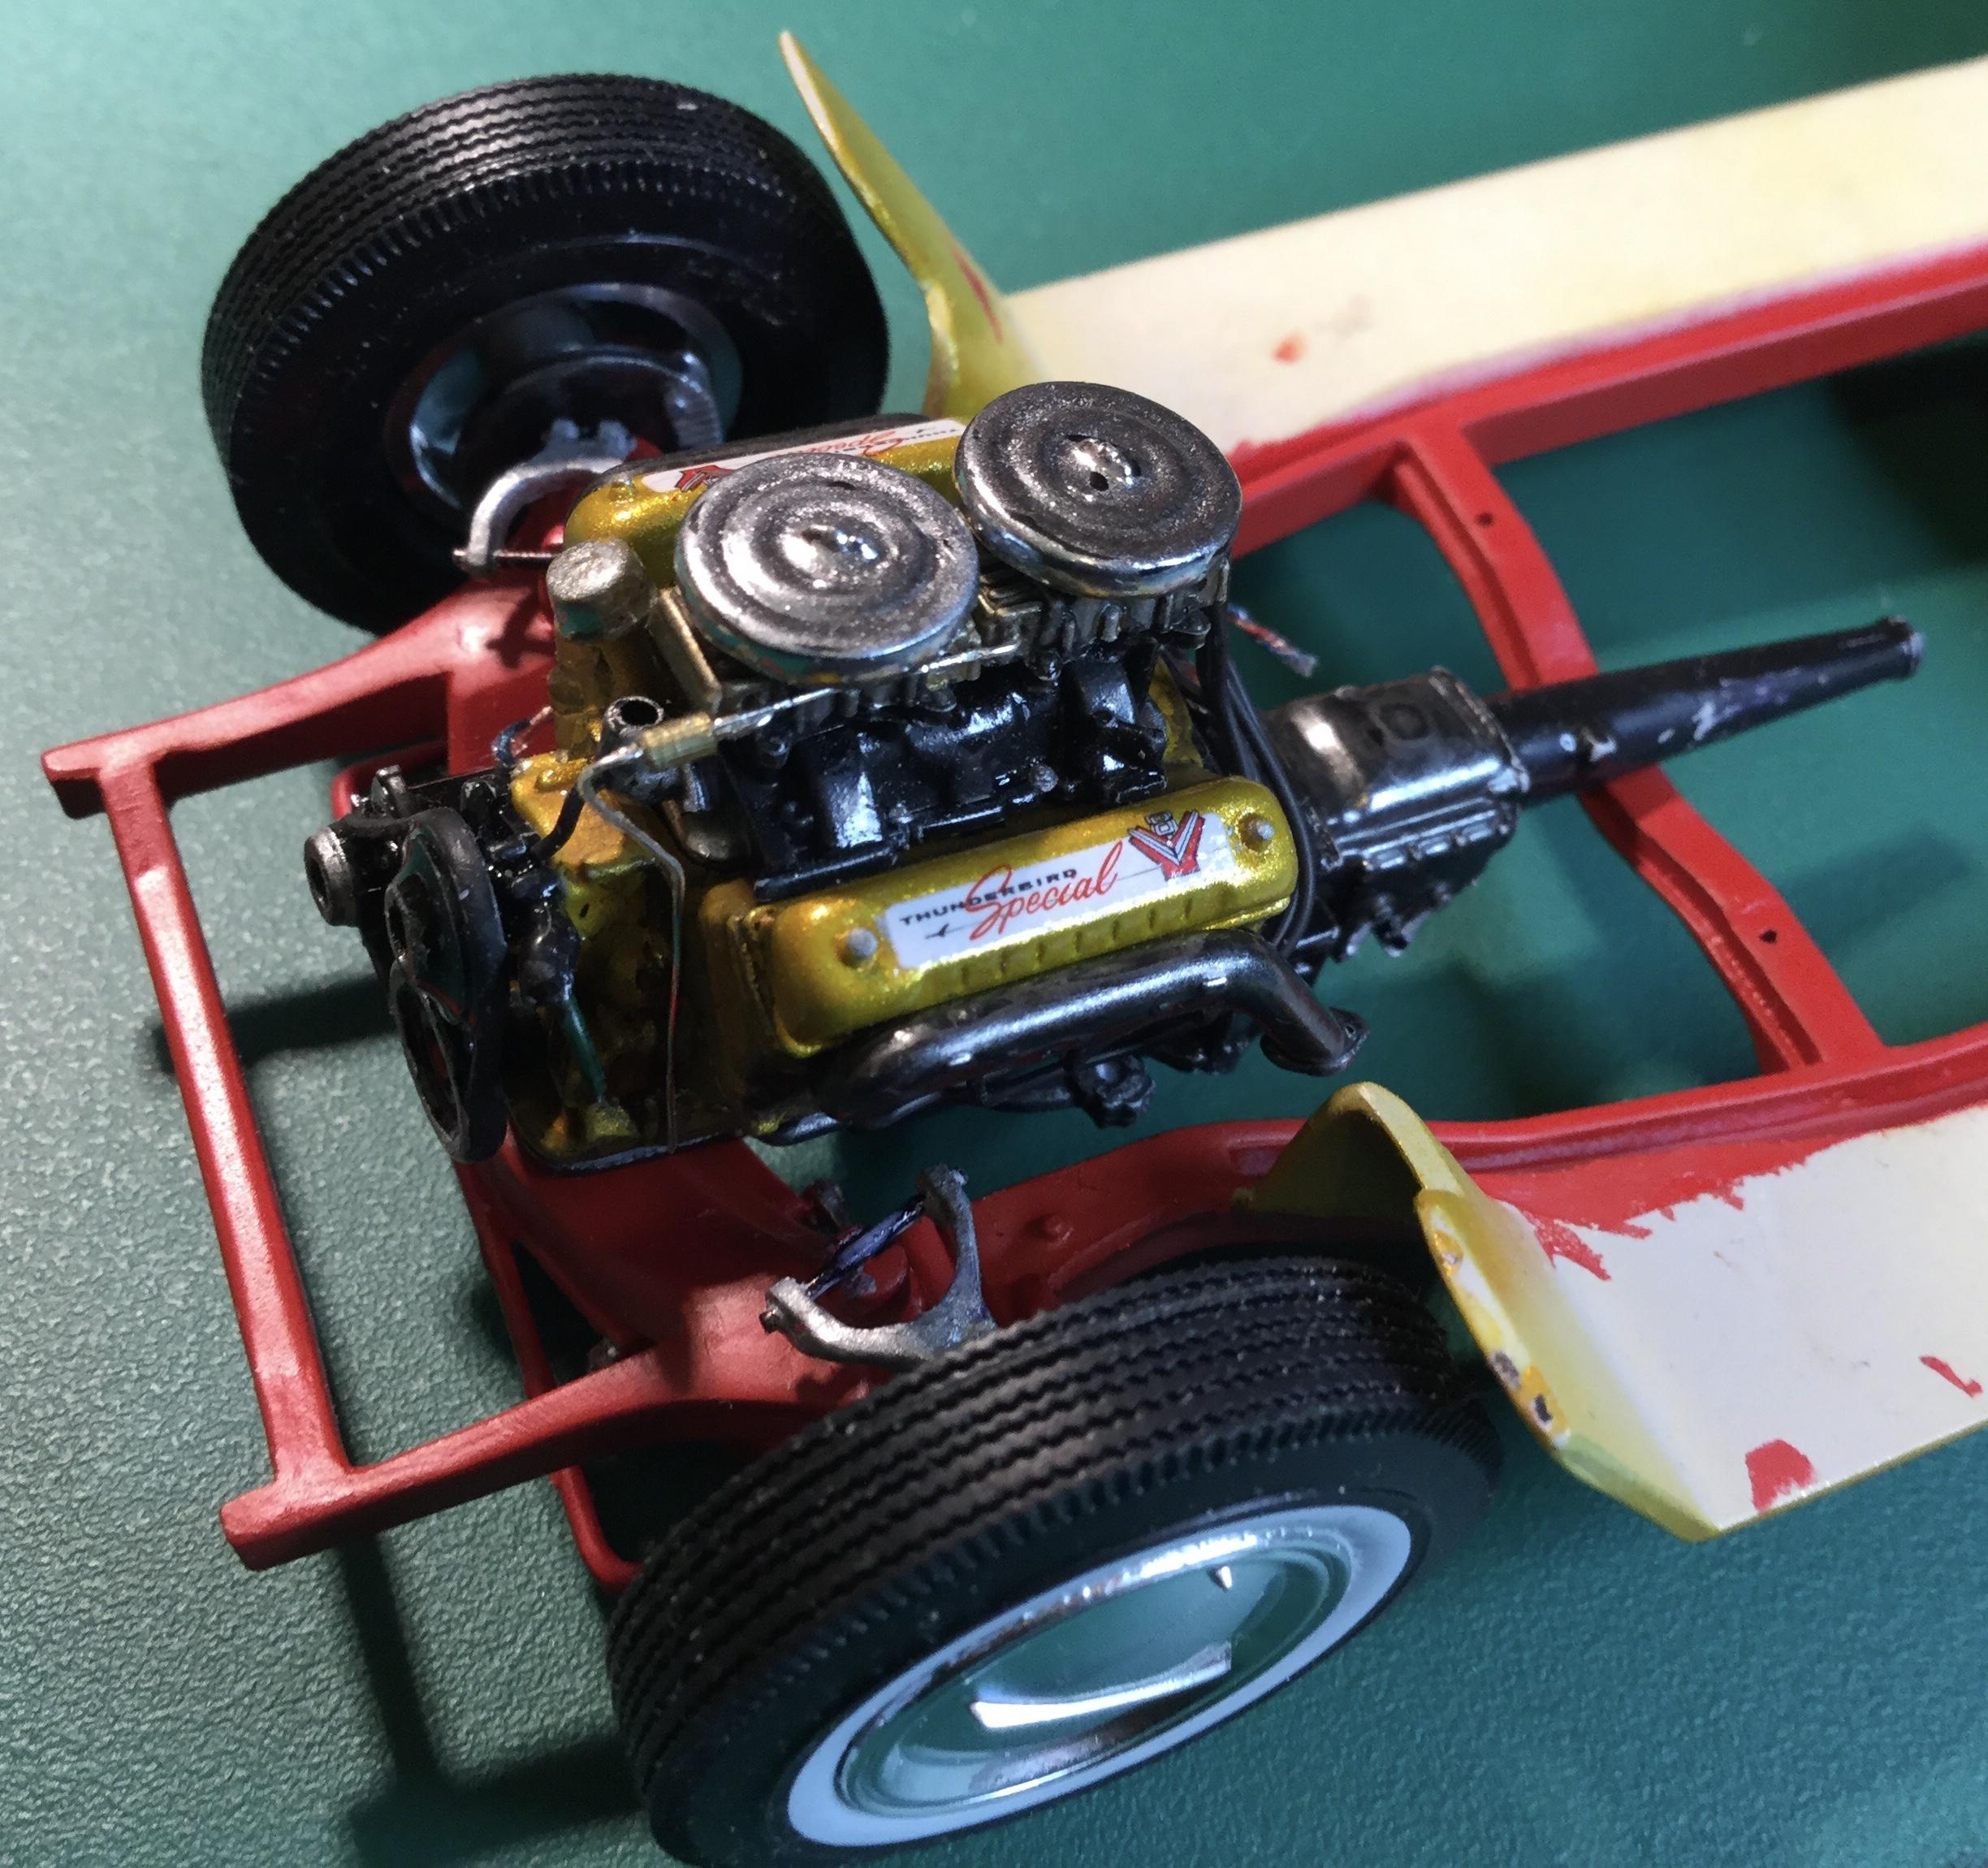
For the twin’s birthday Grandpa had decided to give the boys a shoebox. He had bought the green Ford coupe brand new, being the newest post-war design. The fenders merged into the body lines to become one smooth, aerodynamic shape, or a “Shoebox!” It was 1949, the same year that Don and Jim were born, and now they were turning eighteen. Their Dad had spent most of the war in the Pacific servicing and maintaining naval aircraft aboard American carriers. Afterwards, returning to Tucson he continued to modify and race, an early Hot Rodder! The boys developed a gear-head mentality early with soap box derbies and later go-carts and motor- bikes. In high school Don excelled in auto mechanics while Jim was becoming quite a body man. Grandpa’s car was a treasure as its main uses were ceremonial or religious duties, as Gramps preferred his F-1 pick up as his ride - “What’s the use of it, if it can’t haul”. Don had already salvaged a Y-block out of a rear ended 57 Fairlane and Jim began smoothing out the body with plans for mild custom touches front and back. The local club had access to a paint booth where the final gold metalflake would be applied. While being built for “Go”, it was also for “Show”. A custom interior was the ticket and fortunately a number of Tucson upholstery shops had begun to specialize in leather car interiors. The next couple of years would be spent creating the “Inca Jewel” - a mild custom built by hand with part-time jobs funding it and help wrenching from friends and club members. Many evenings and weekends spent in the garage...
-
BMW 507 Cabrio 1957 - Elvis Presley's one - Revell old kit 1:24
Misha replied to CrazyCrank's topic in WIP: Model Cars
Amazing progress! The thought and focus combined with imagination and artistry with the technical building skills is exceptional! Thank you for your detailed descriptions and photos; there is so much useful information for all of us. Congratulations & cheers, Misha- 118 replies
-
- 1
-

-
- bmw 507 cabrio
- elvis presley
- (and 2 more)
-
I was fortunate to have a close look at Phil’s build a few days ago at our SPAM club meeting and can attest to it being a real jewel! Phil has been putting together a replica collection of local hot rods and customs based on his experience and knowledge of the Pacific Nor’ West auto scene. He’s a prolific builder with something new to show each time. Congrats Phil on this latest addition. Cheers Misha
-
Cyber punk ‘88 Dodge Daytona/Mercedes C9 kit bash
Misha replied to Steve H's topic in WIP: Model Cars
Hi Steve, looking forward to your build as it is a very intriguing combination. Planning to drive out on Sunday to see what you’re up to for the SPAM meeting and Show’n’Shine! Cheers Misha -
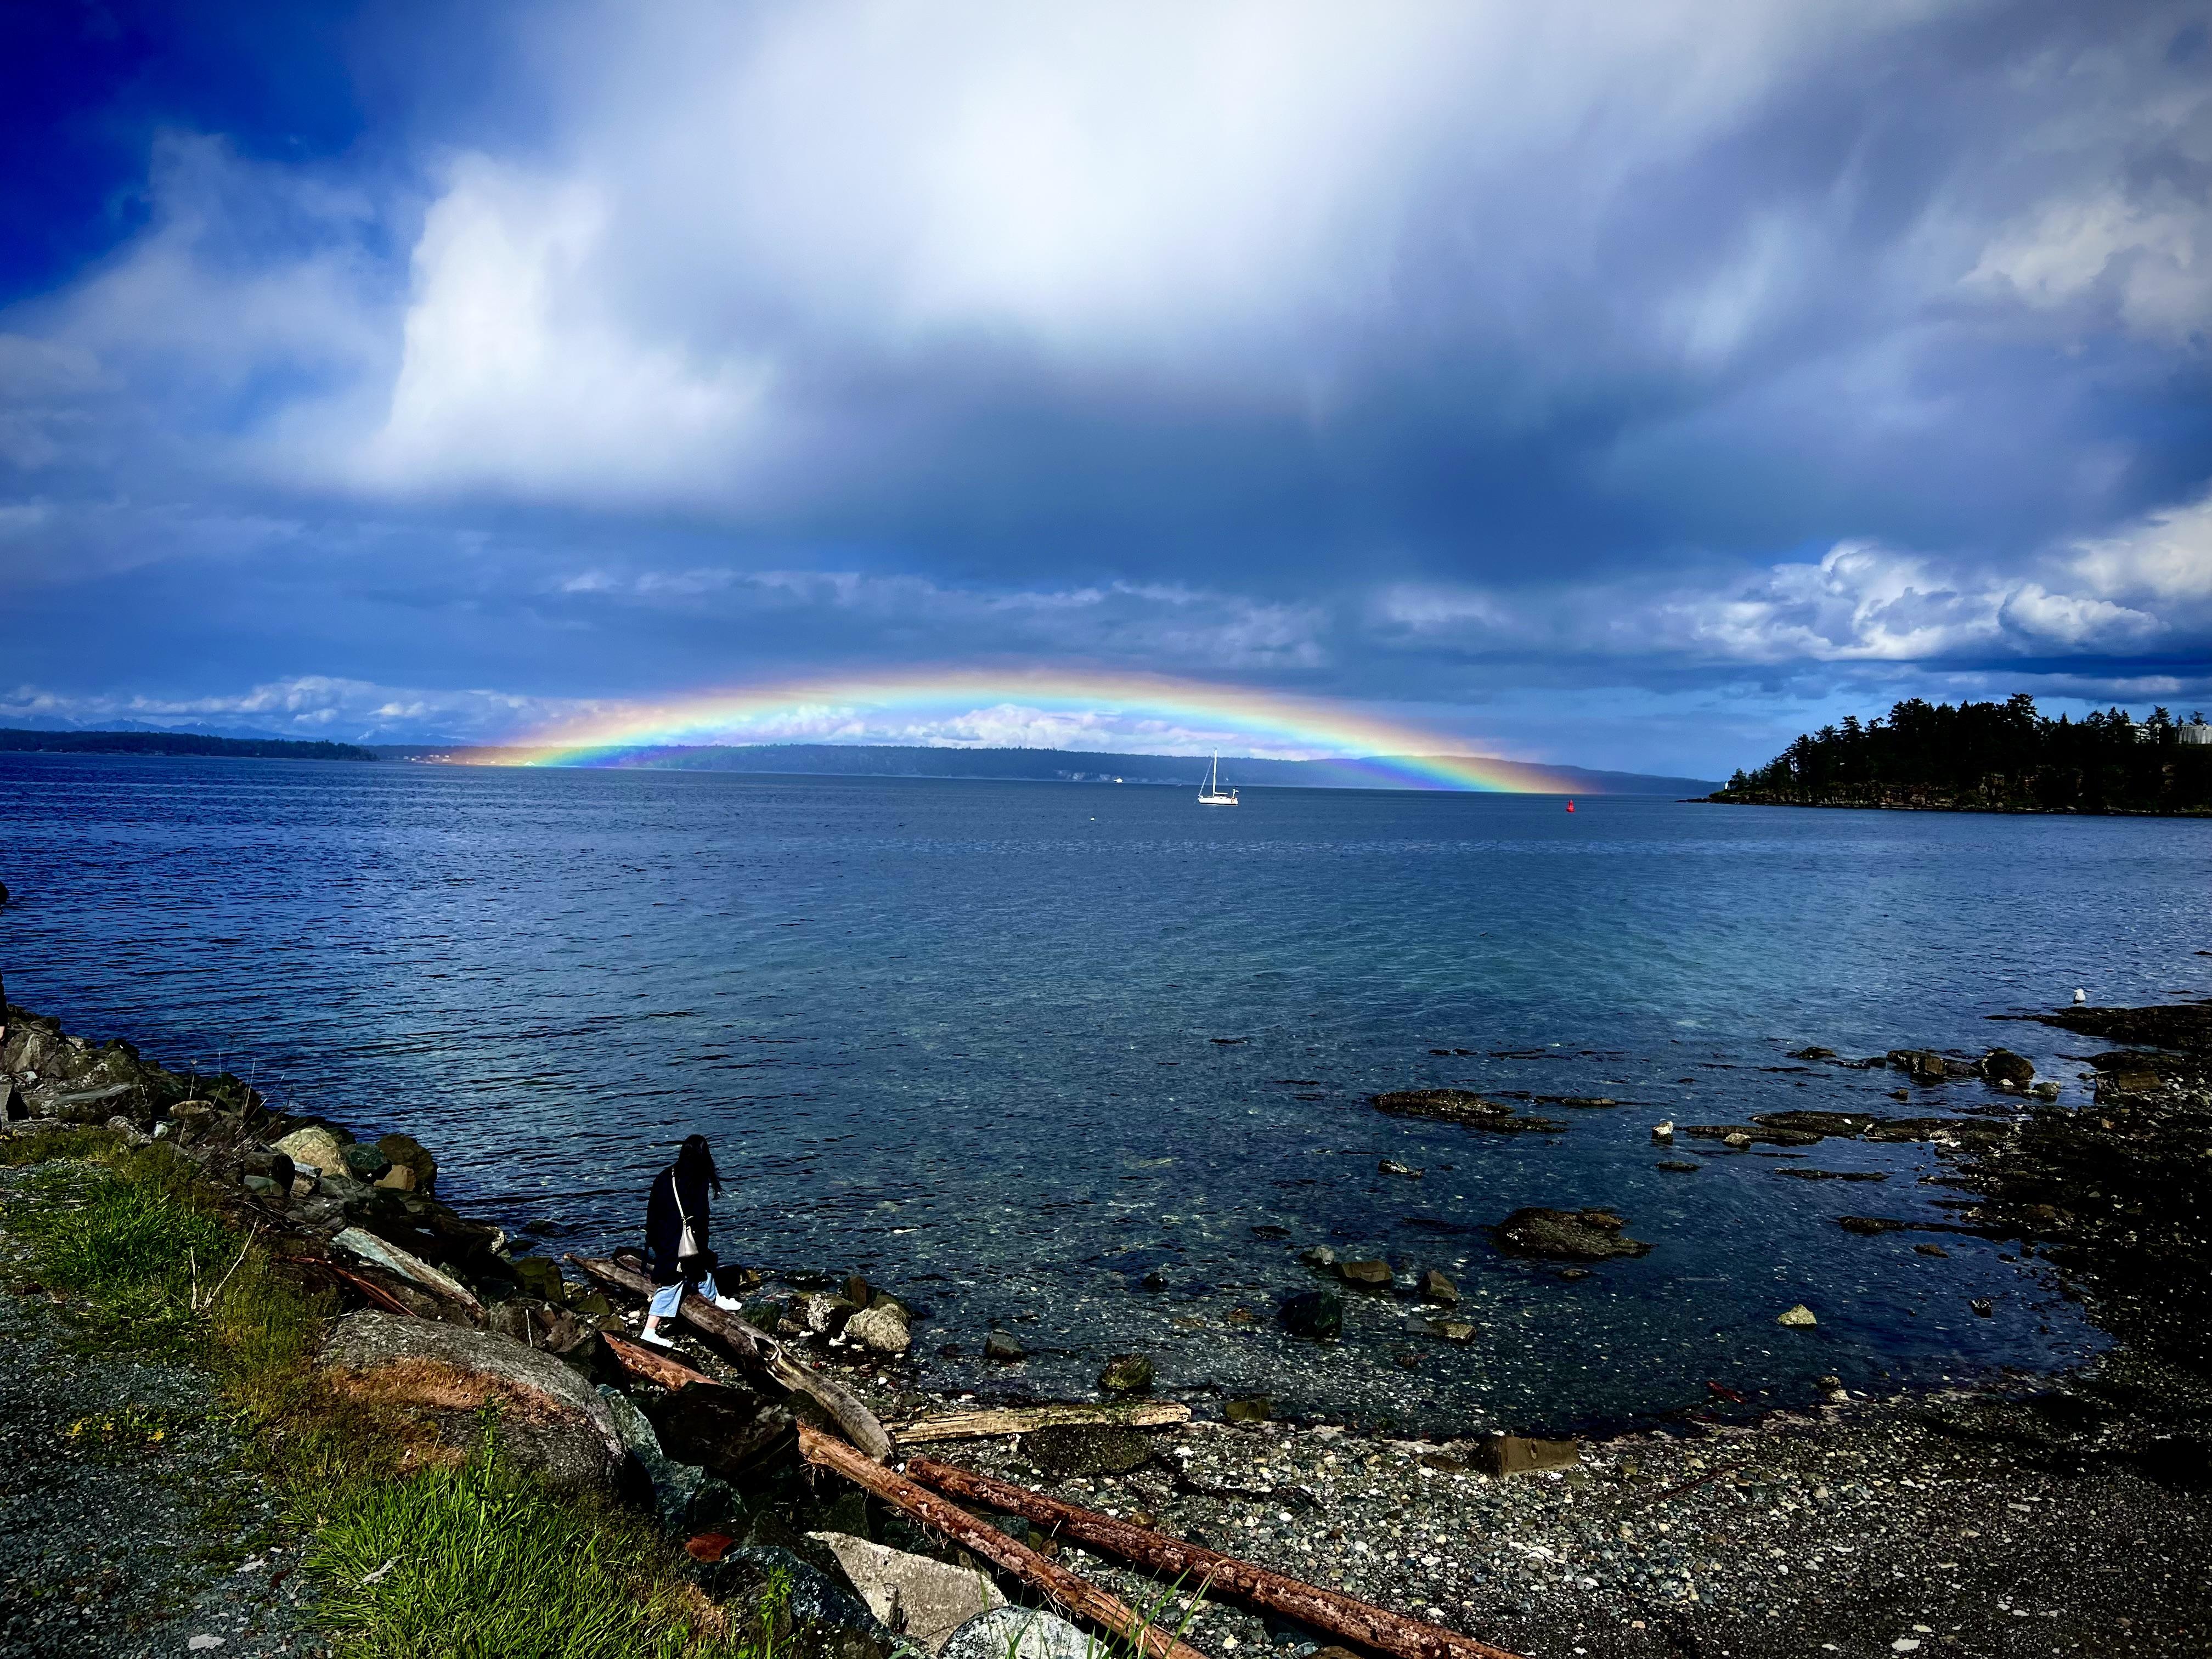
End of the Rainbow
Misha replied to Rich Chernosky's topic in General Automotive Talk (Trucks and Cars)
End to end rainbow ? on the water from Chemainus on Vancouver Island over the Salish Sea. Photo taken earlier this summer, a first for me to see a complete arc of magical light! Cheers Misha
-
It seems that the Labour Day long weekend heralds the return to building as the outside chores diminish. Couple of days ago I tidied the workbench as I have been away from it since my March heart attack during which time I haven’t picked up an x-acto or brush. So I looking forward to seeing your work on the Ferrari and getting back into building myself. Cheers Misha
-
Hi Jeremy, I have a similar experience having carted around my car mags with me. Although it was in the early sixties that I began. They were a huge factor in my becoming a Gearhead! Enjoy your find, Cheers Misha
-
Hi Andrew, moving right along, looking great ??! Cheering you on, Misha
-
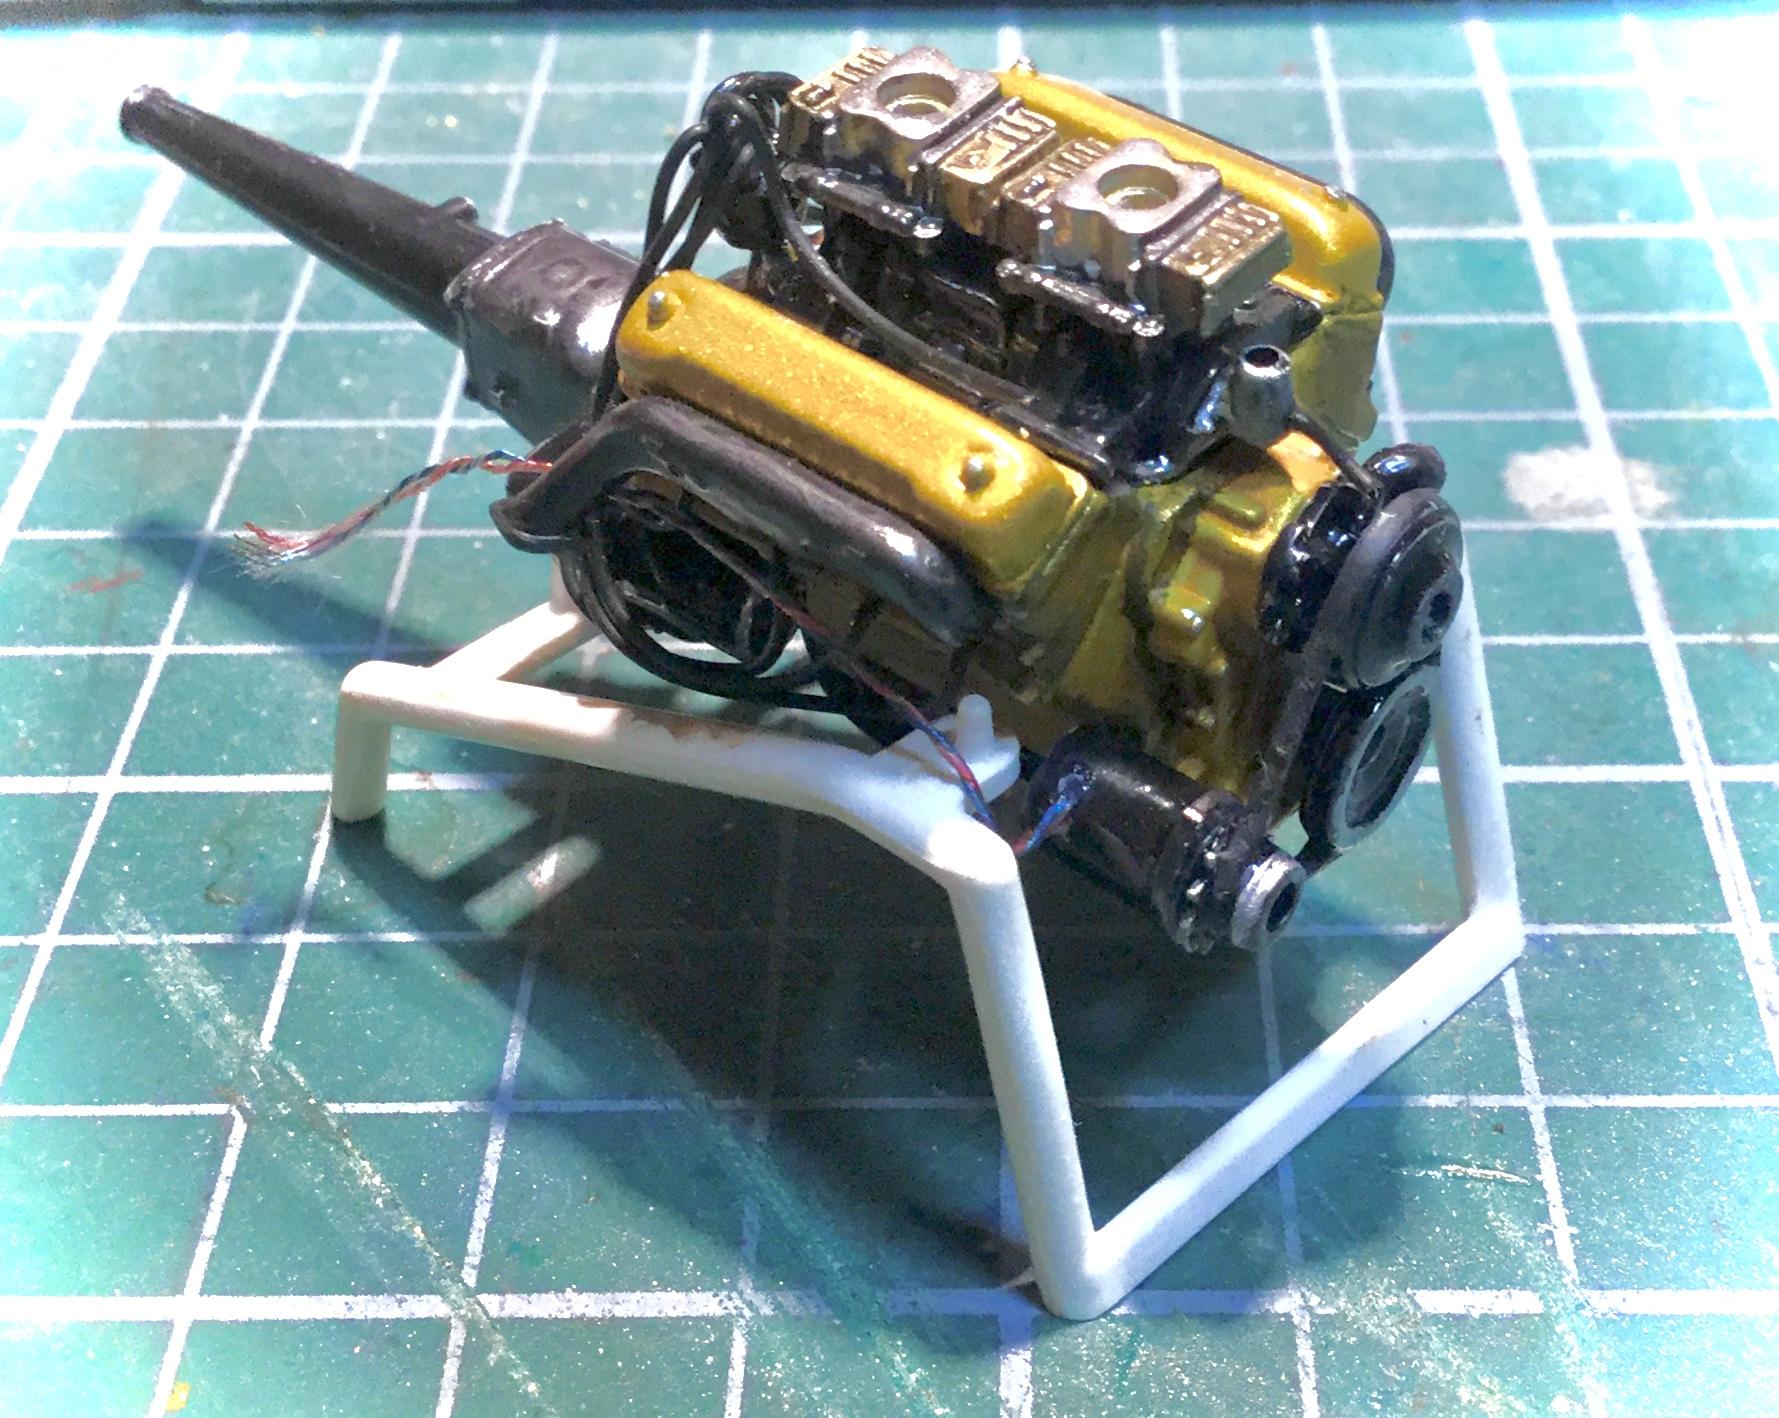
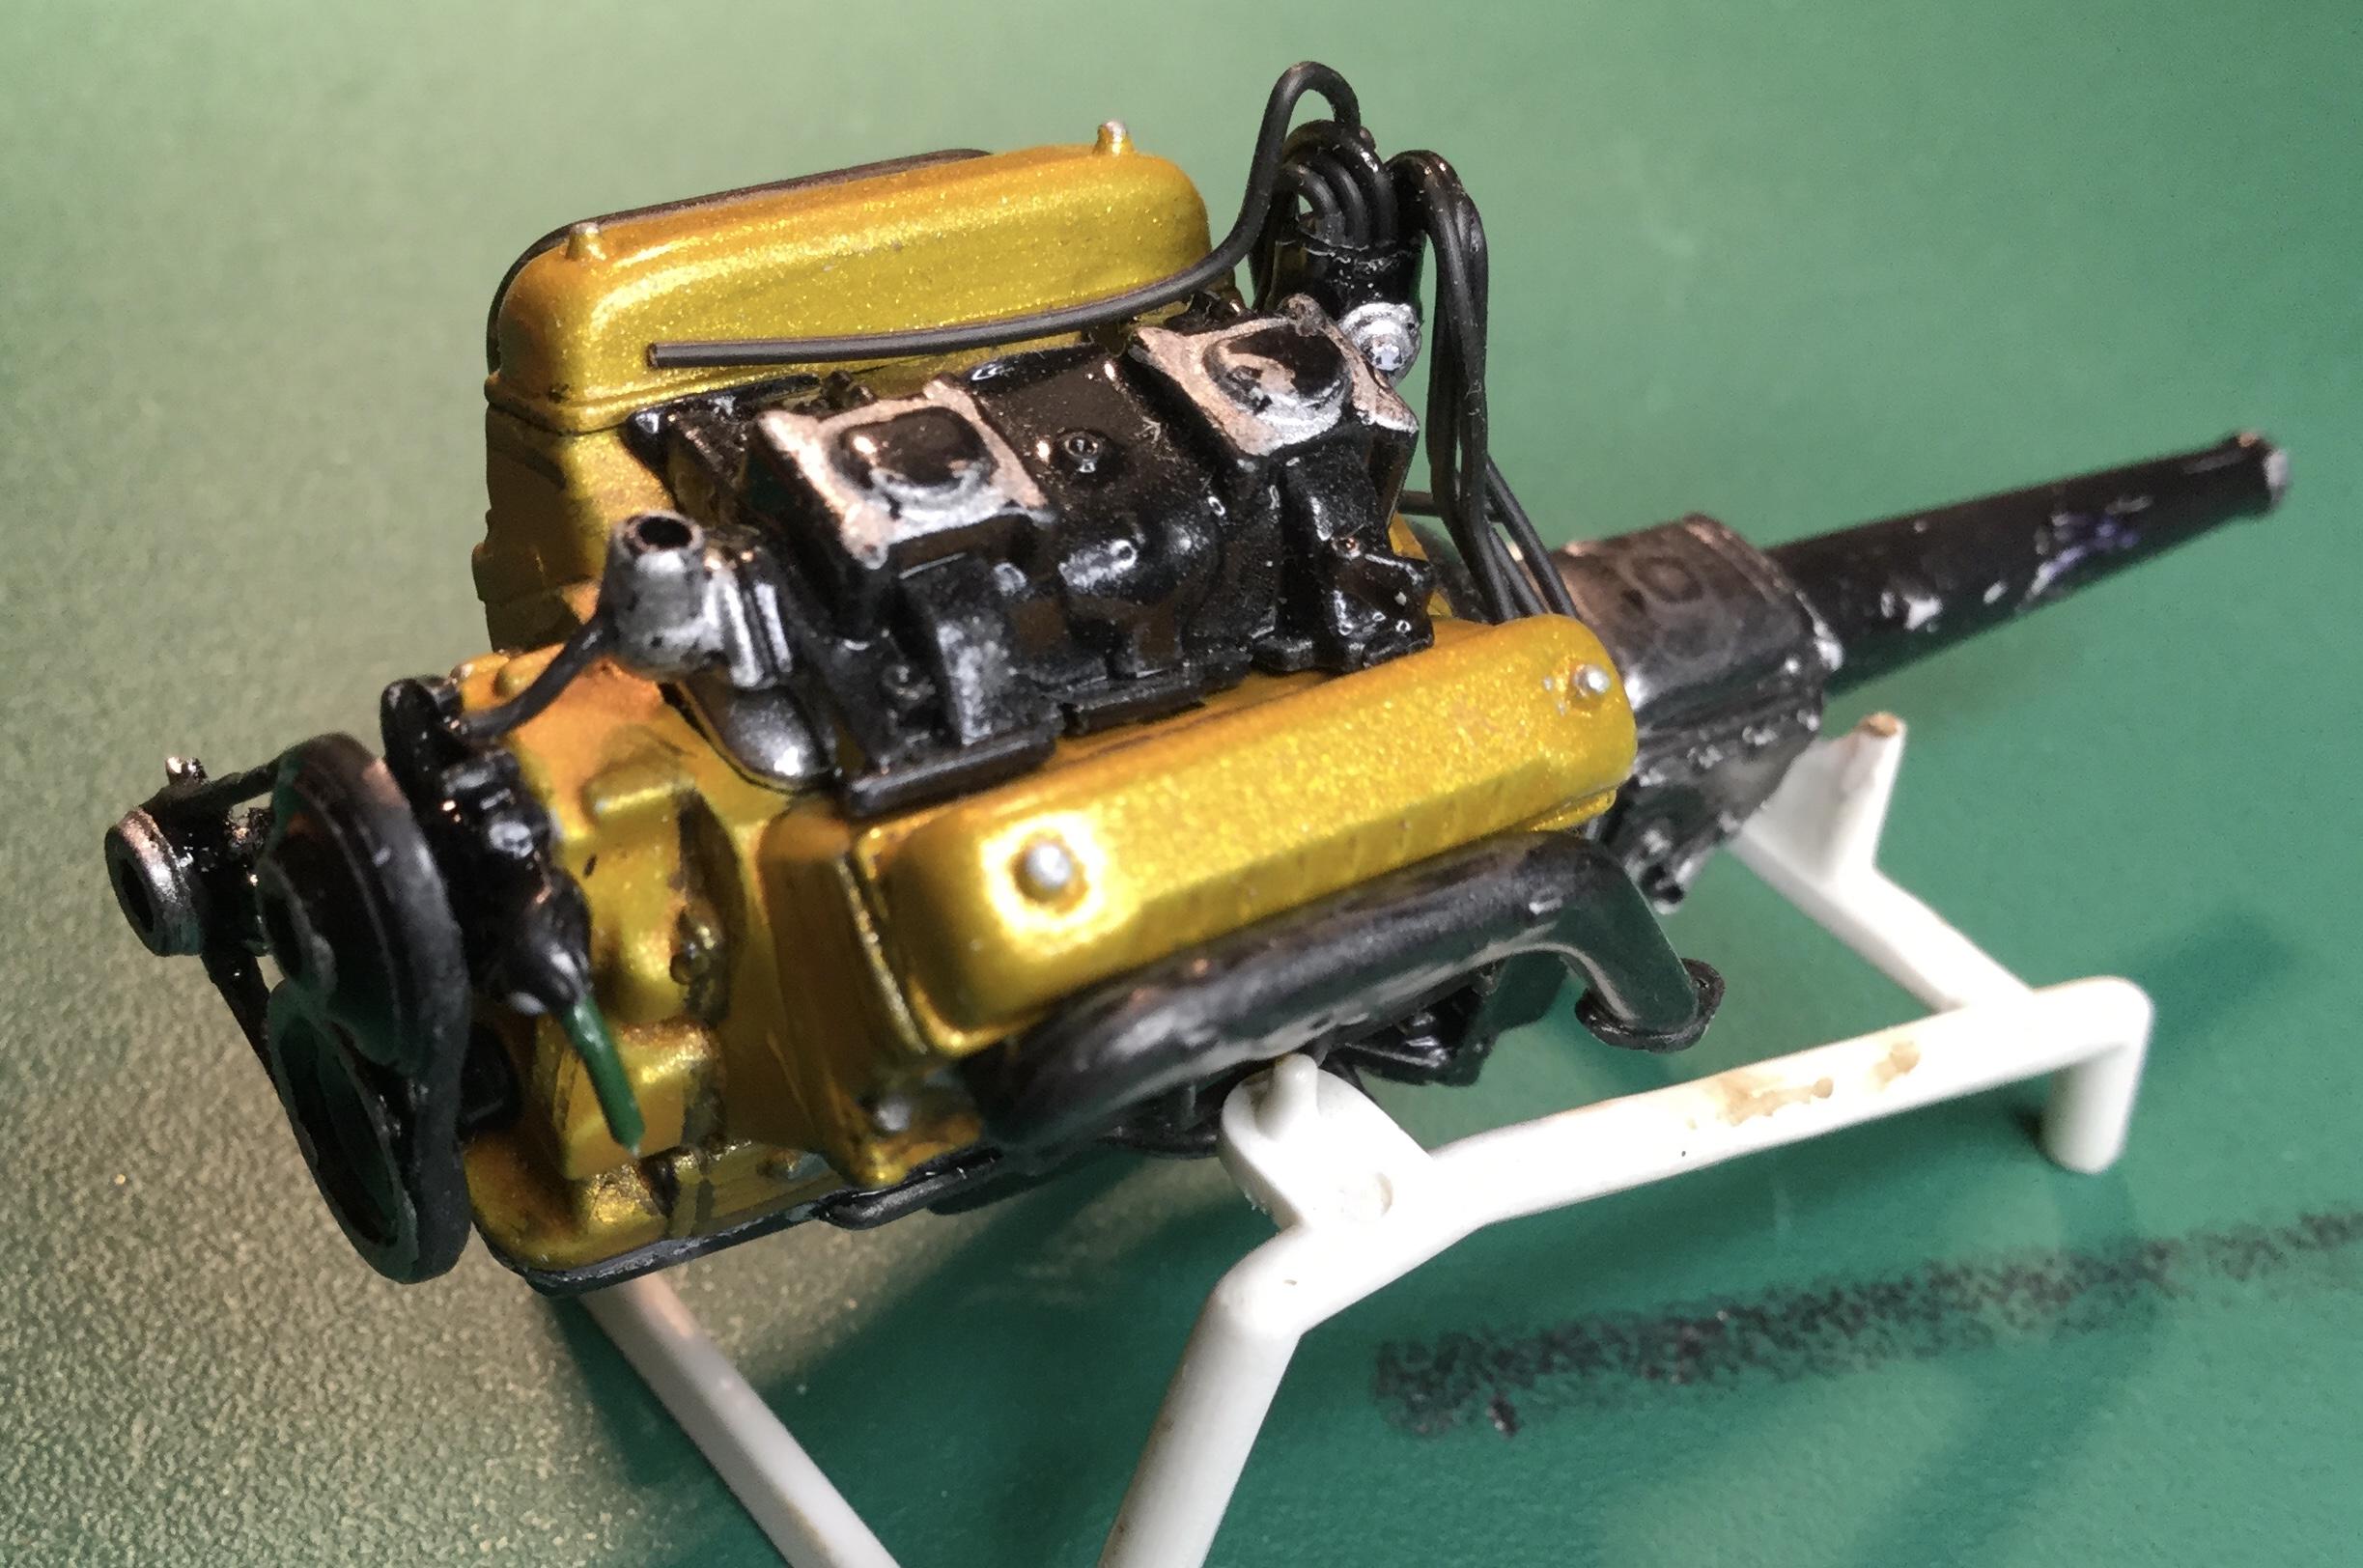
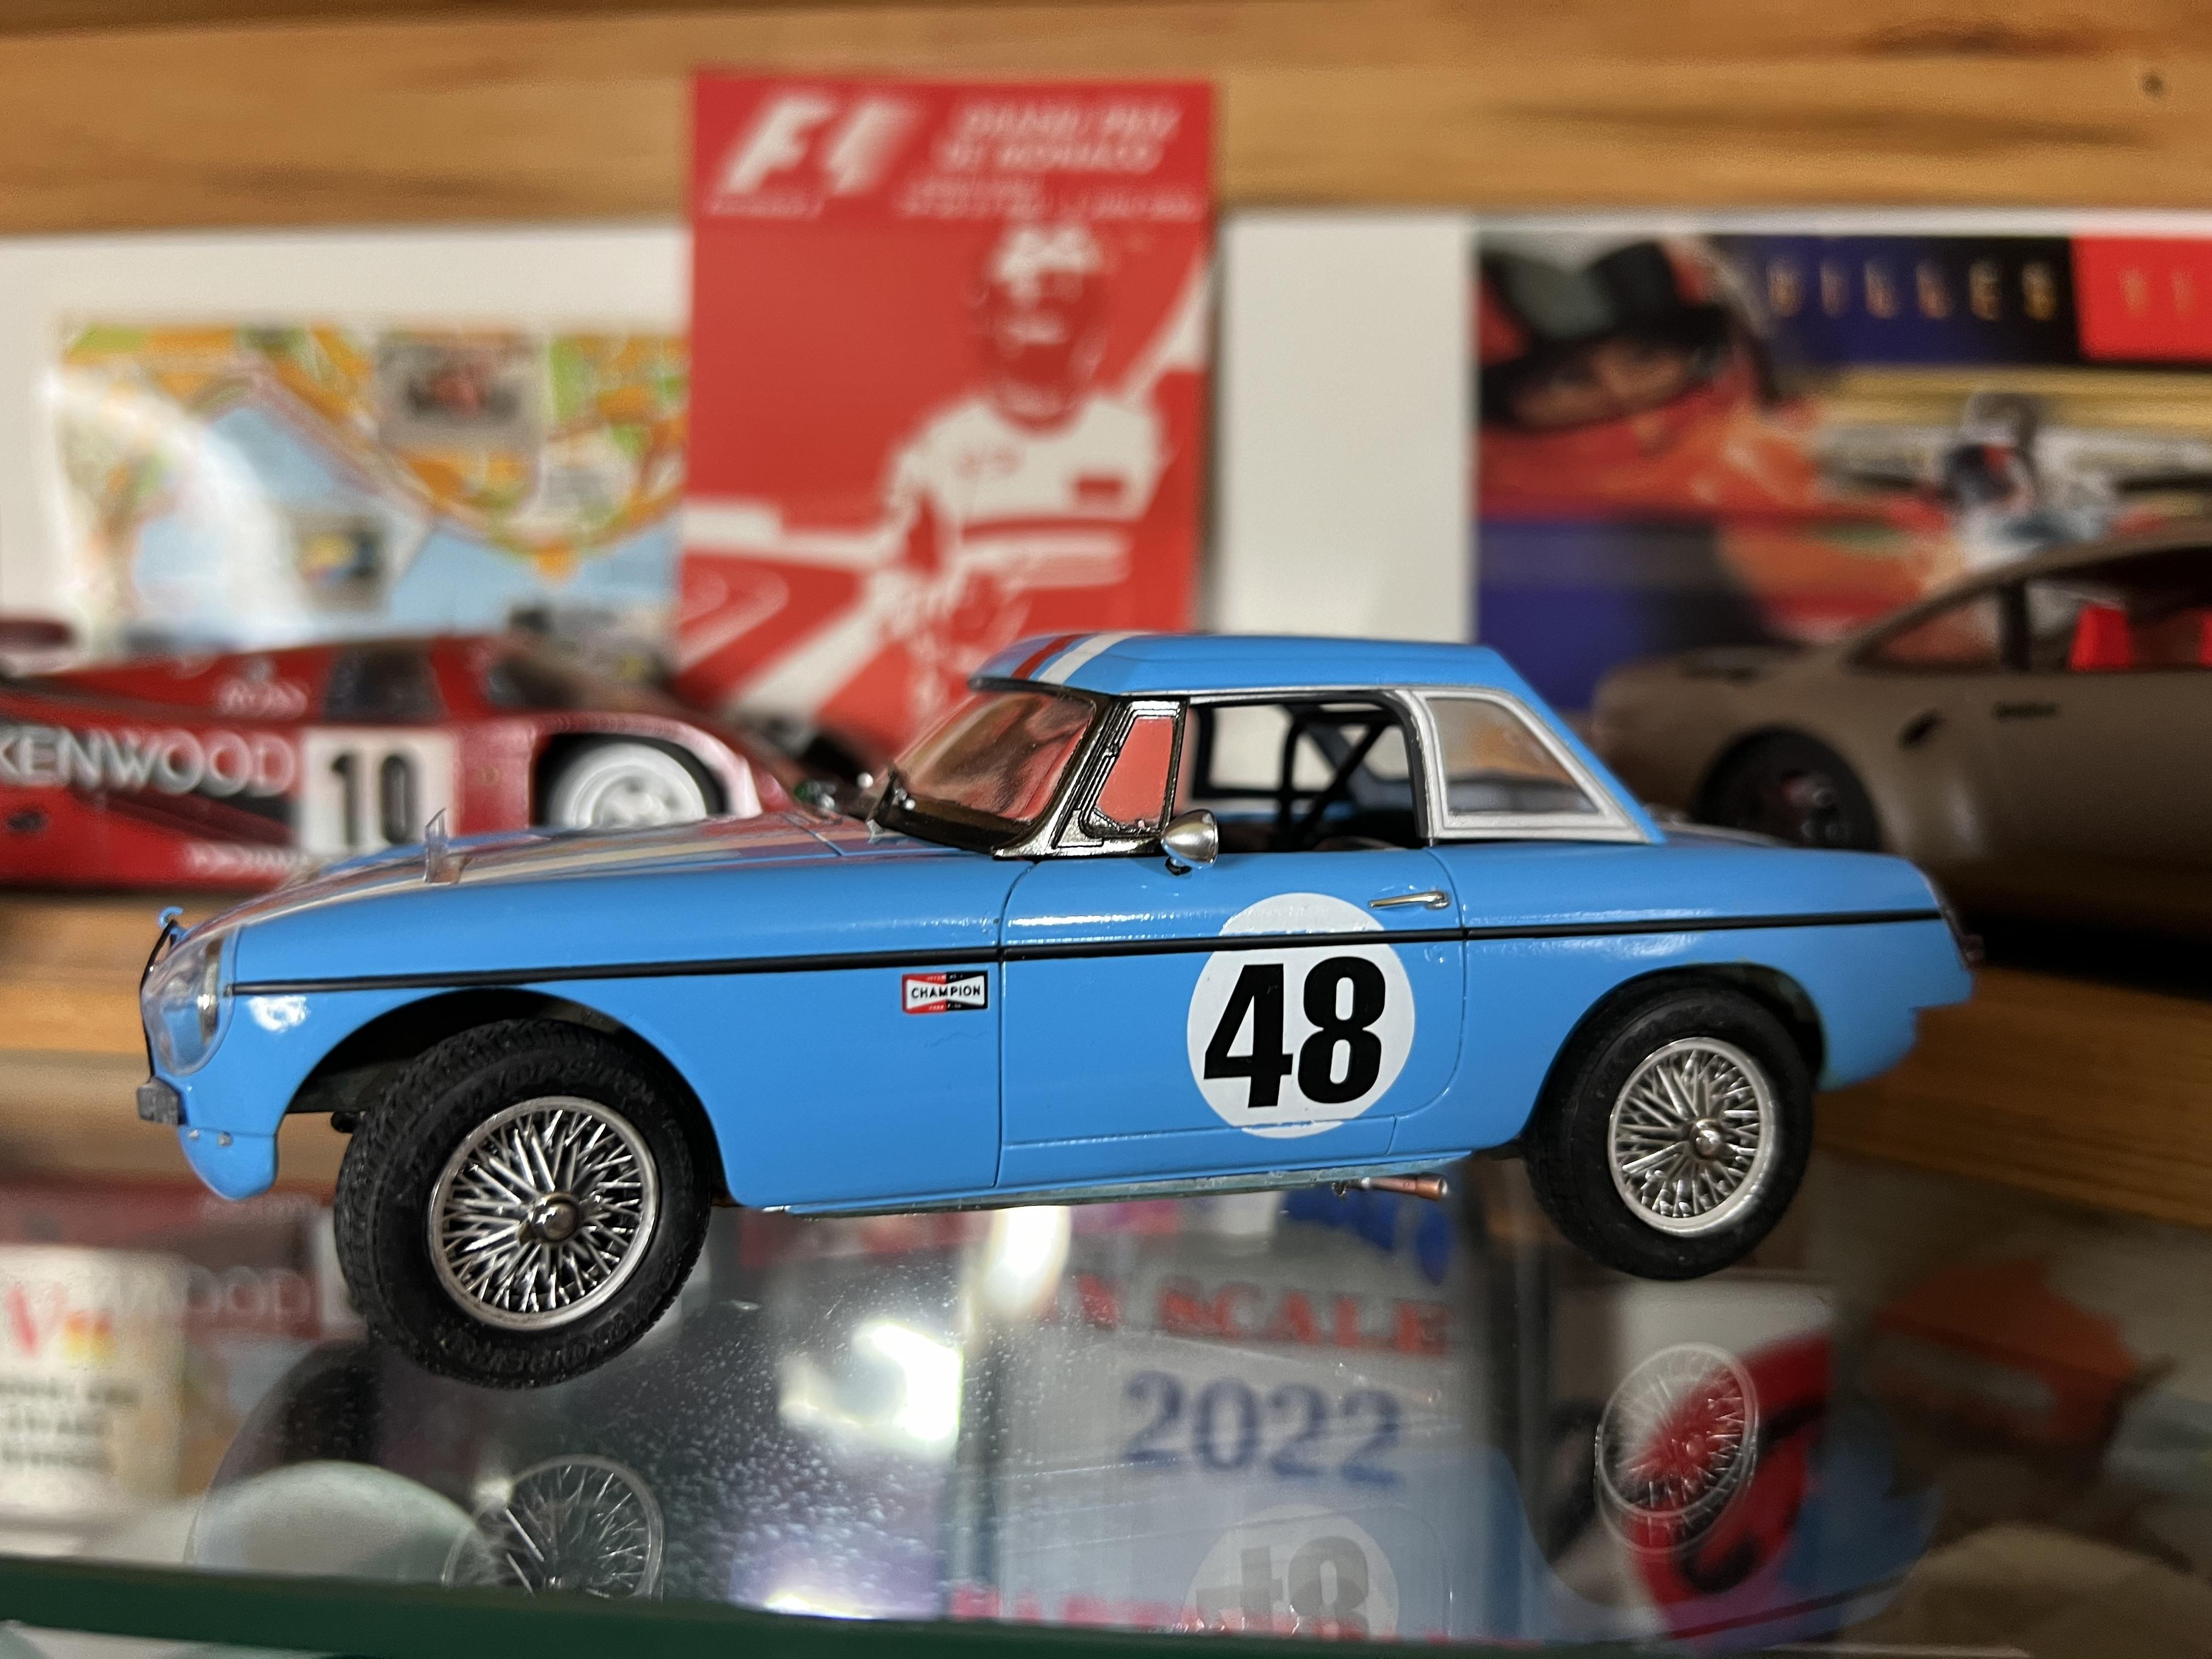
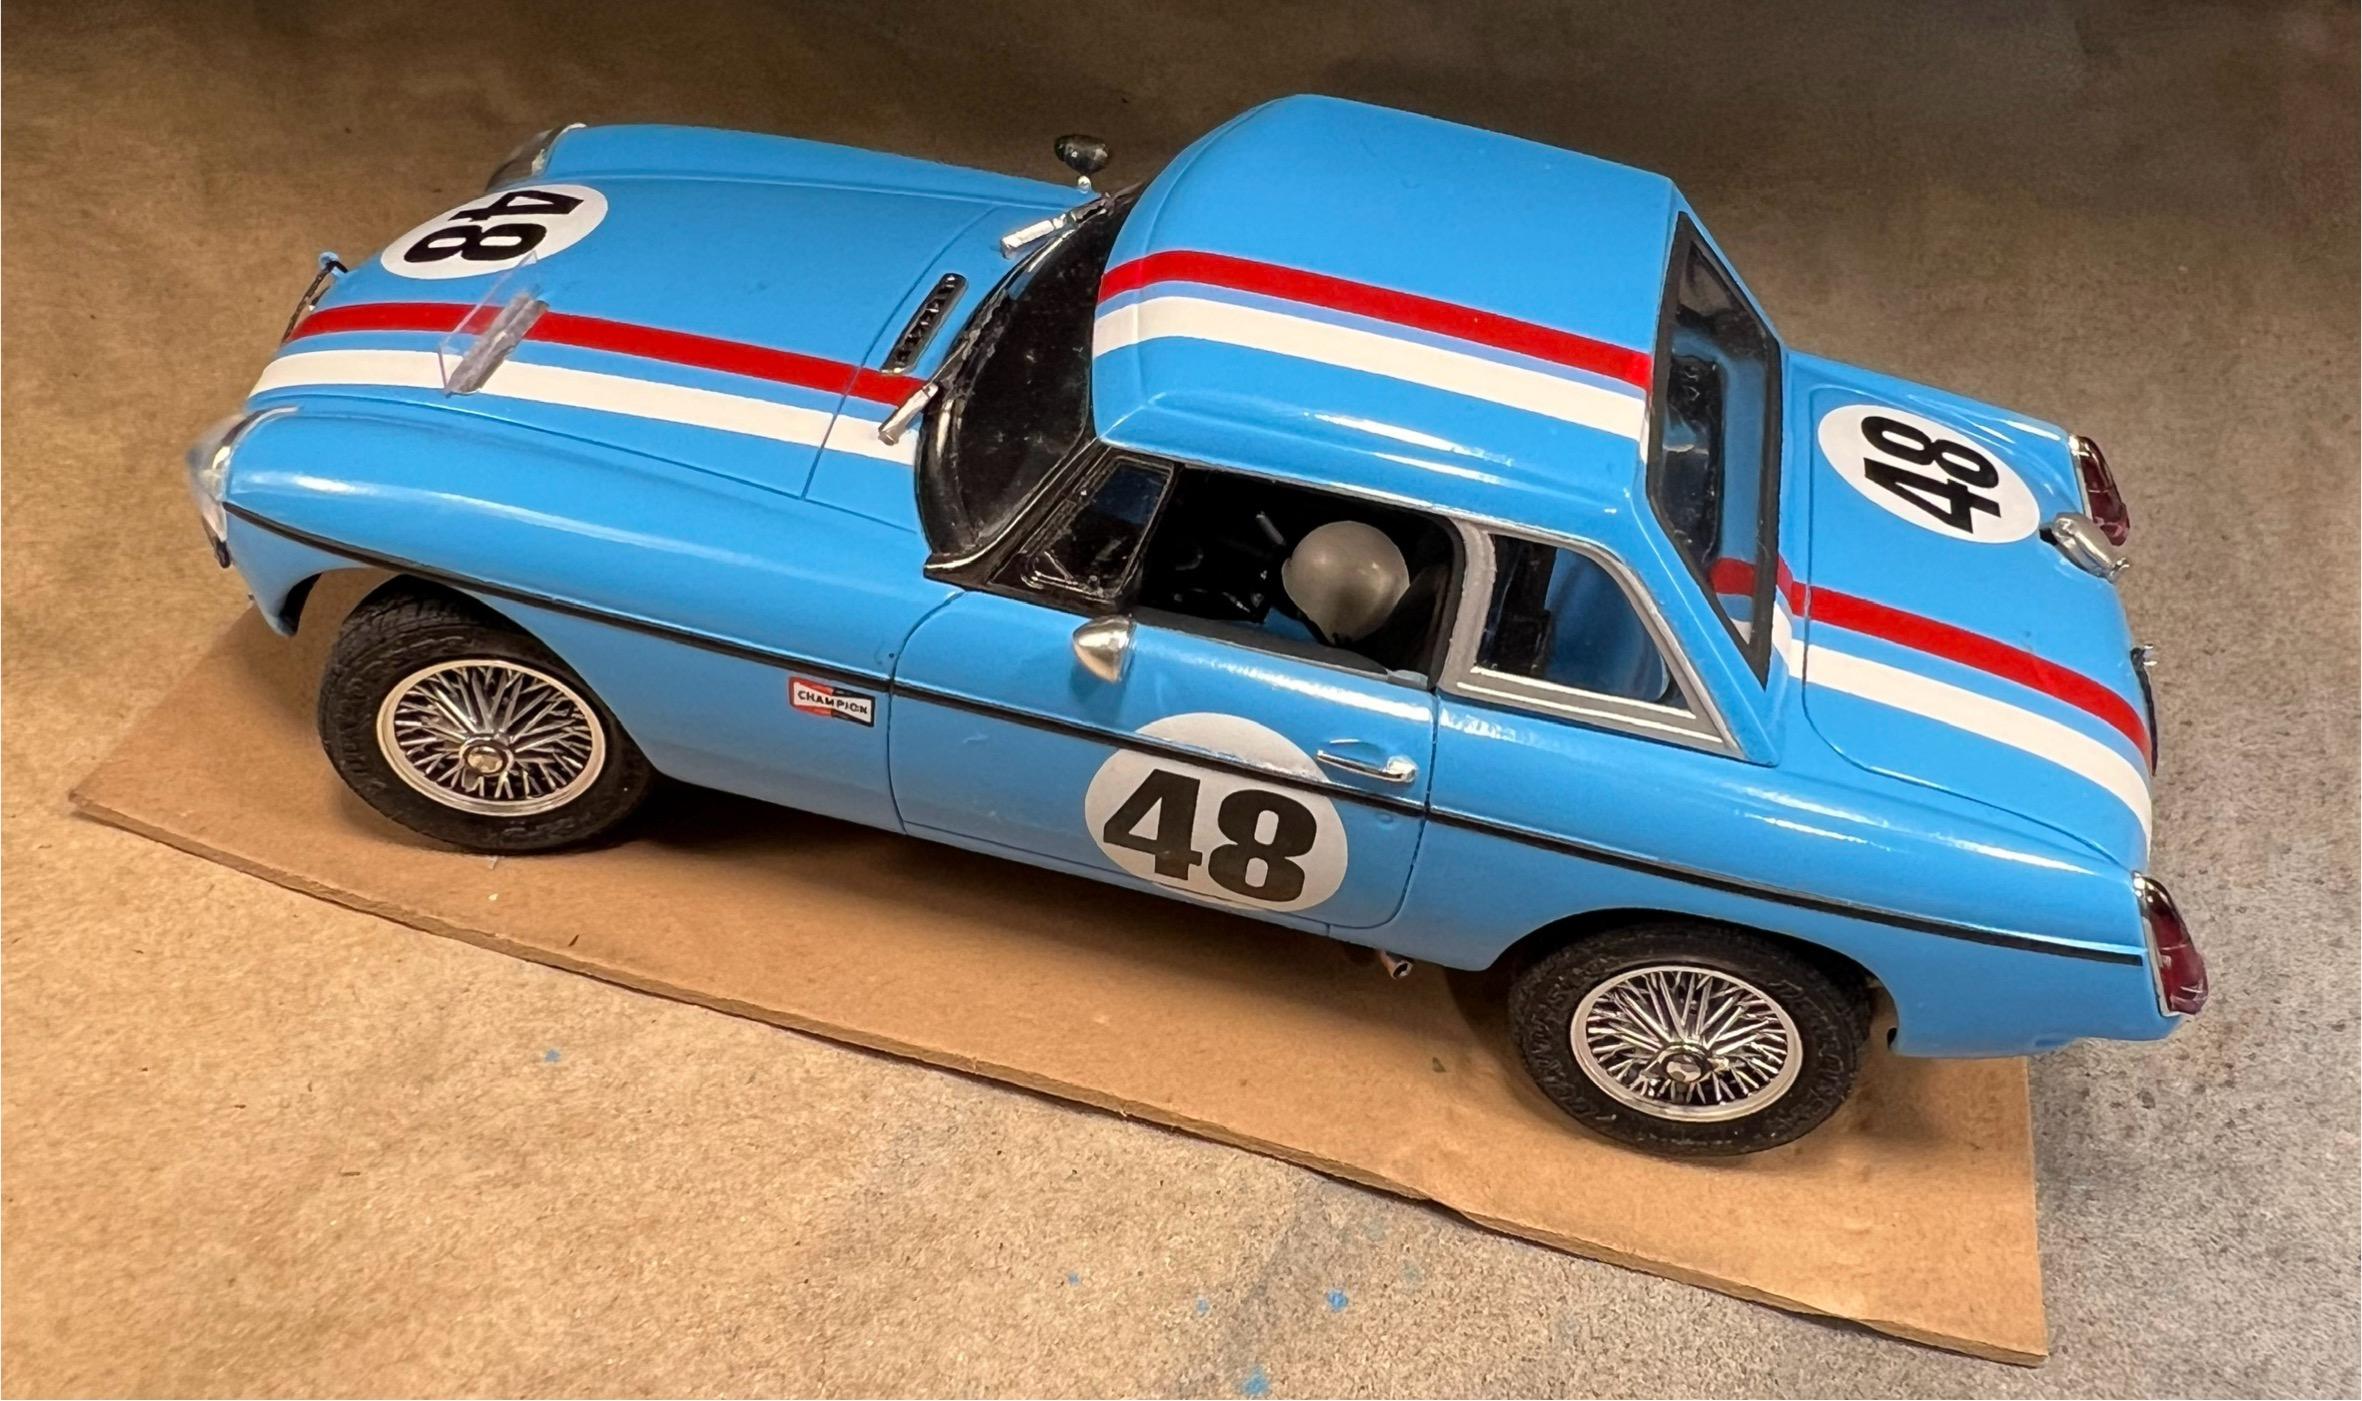
Thank you for your comment Pierre, it was an enjoyable build and it’s great to hear responses on it. Having finished it in time to join you and the others on the starting grid in a few days is a rush as well! Thank you Helmut for comments and it’s great to hear that you followed along! Lately my choices have been curbsides with the result that the time spent on engine compartments is now gone into chassis detail. The exhaust pipe was actually the focus of my efforts by trying out a multi-stage airbrushing and masking for the first time. The visual differences between the race day body and the rather well worn chassis has an historical background. All three Sebring MGs were 1962 models that were originally shipped over for the California dealer. These three were the only ones to have had some corrosion damage on the voyage and were relegated to the back of the lot. Morris Garage has had a century long history of competitive activity and kept to its original slogan of MG - Safety Fast. From hill climbs to land speed records the company has provided an economical and practical sports car. In the1956 Sebring the firm entered the new MGA, a distinctly fresh and modern post war design. In its run up to the 1962 season the cars remained competitive in class and most importantly never suffered a DNF during the twelve hour event. With the introduction of the MGB late in 62 the firm undertook the prep of the racers in house to have them ready for the 63 Sebring rather than having essentially American hot rodders that we’re responsible for the MGA as before. The result was dismal as the two car team scored DNF, failing to run the course. For the next season (60 years ago) a three car team prepared by the California dealership using the three sitting in the back. The amazing factor in these entries was their stark stock appearance yet in competition with much more sophisticated cars as Porches, Ferrari, and of course the GS Vette! This was achieved with aluminum panels, reinforced wire wheels, and meticulous blue printing, polishing and assembly of the engine by Joe Huffaker in his early days before Indianapolis. Researching a competition car to build a replica reveals such interesting details in addition visual information. This was another enjoyable aspect of this build. Looking forward to seeing all the entries! Cheers Misha
-
Thanks Gary “Gramps46” for following along on the build. Encouragement is always welcomed in our hobby/passion which tends to be a solitary activity. Thanks Randy, it’s great to get it done on time. The subject matter was a big draw, an MGB racing at Sebring against the Goliath's of the day. Having the Club Sport kit was an added inventive with the perfect parts required. Thanks Andrew, Hope the weather holds out in Florida. Bit of a drive all the way from Vancouver Island. Your build is an inspiration to all gearhead detail fanatics, you’re getting close… gonna be following along! Cheers. Thanks Phil, we’re headed out in the morning hopefully, so I’ll be in town for our meeting, along with the MG. Now it’s on to building a Deuce woodie in time for Summer 2025 Pacific Nor’West Deuce Days in Victoria BC! A plug for the upcoming 20th anniversary for the Desert Scale Classic in Phoenix this spring. Our club Scale Plastic Automotive Modellers SPAM, along with the Cactus Model Club are sponsoring the Best Deuce Class. Check it out. Thanks Dan for following along on this build and the congrats ?. When I do finish I usually treat myself to a new build to start, except I often end up beginning three rather than just one! My WIPs increase exponentially. Looking at finishing my 53 Ford from a previous Cannonball, and the Cheezoom Corvair F/C. Cheers! Thanks to all who peek in on this thread. Next stop is Under the Glass! Cheers Misha
-
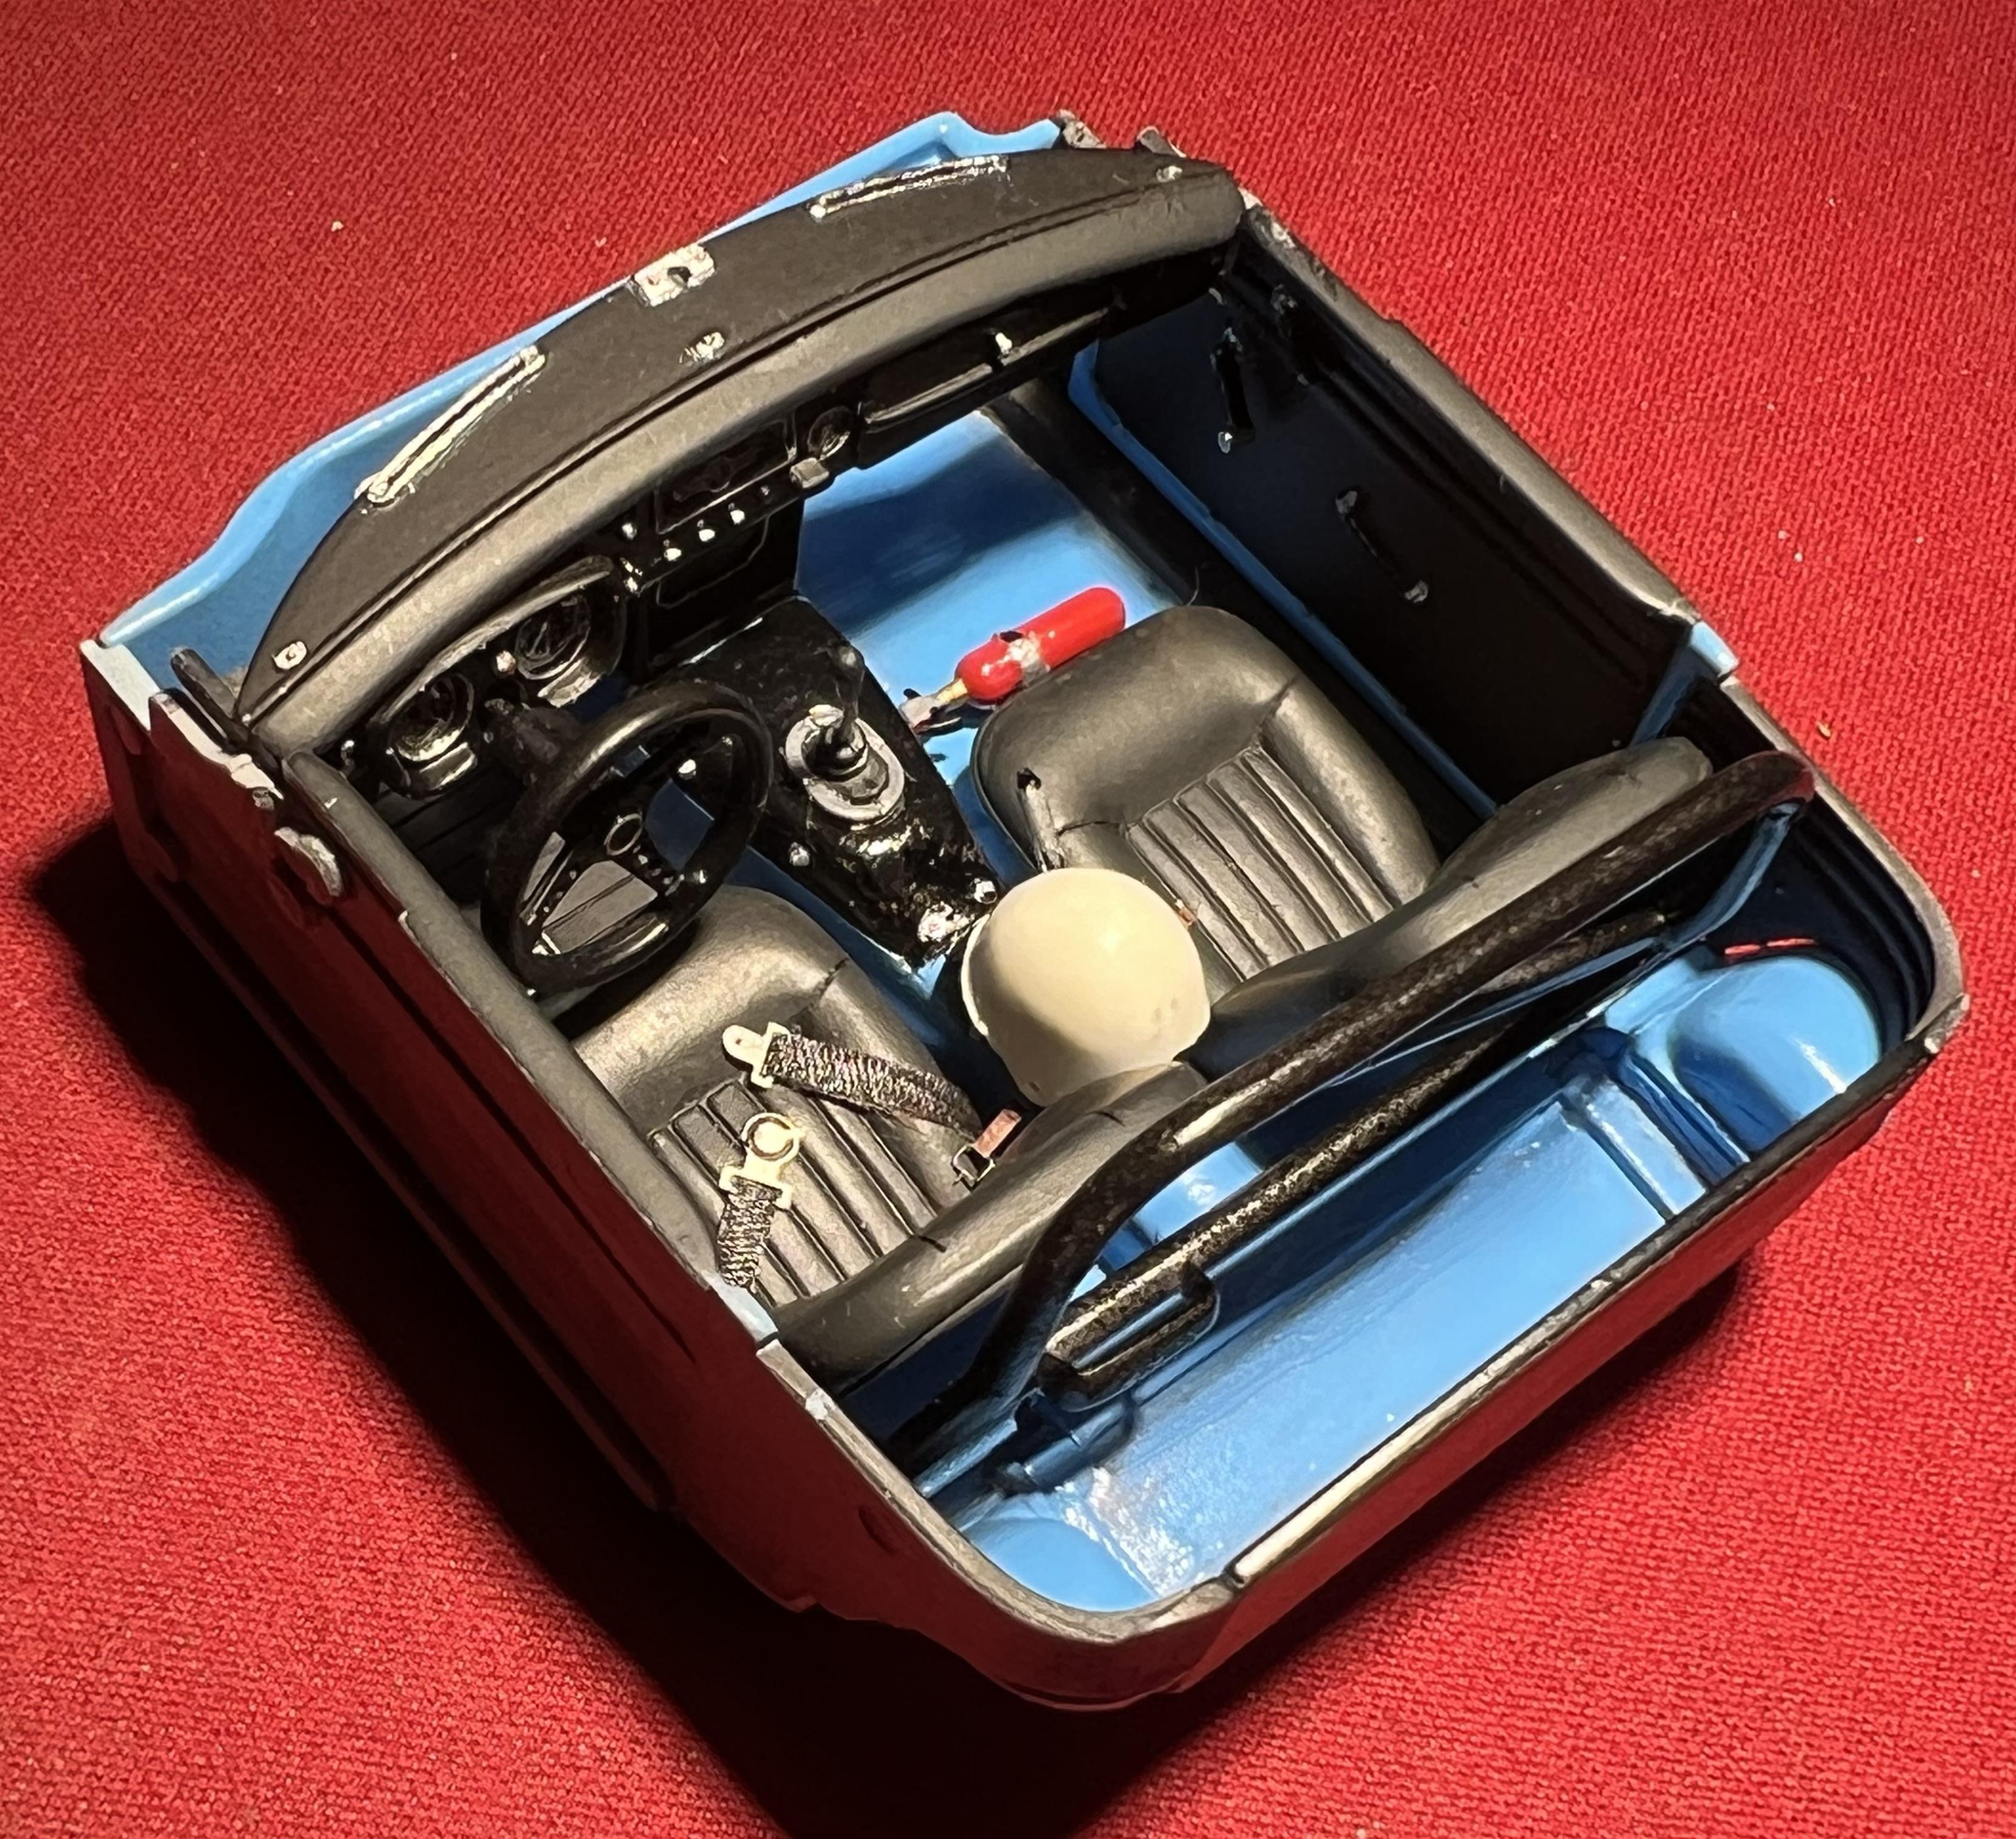
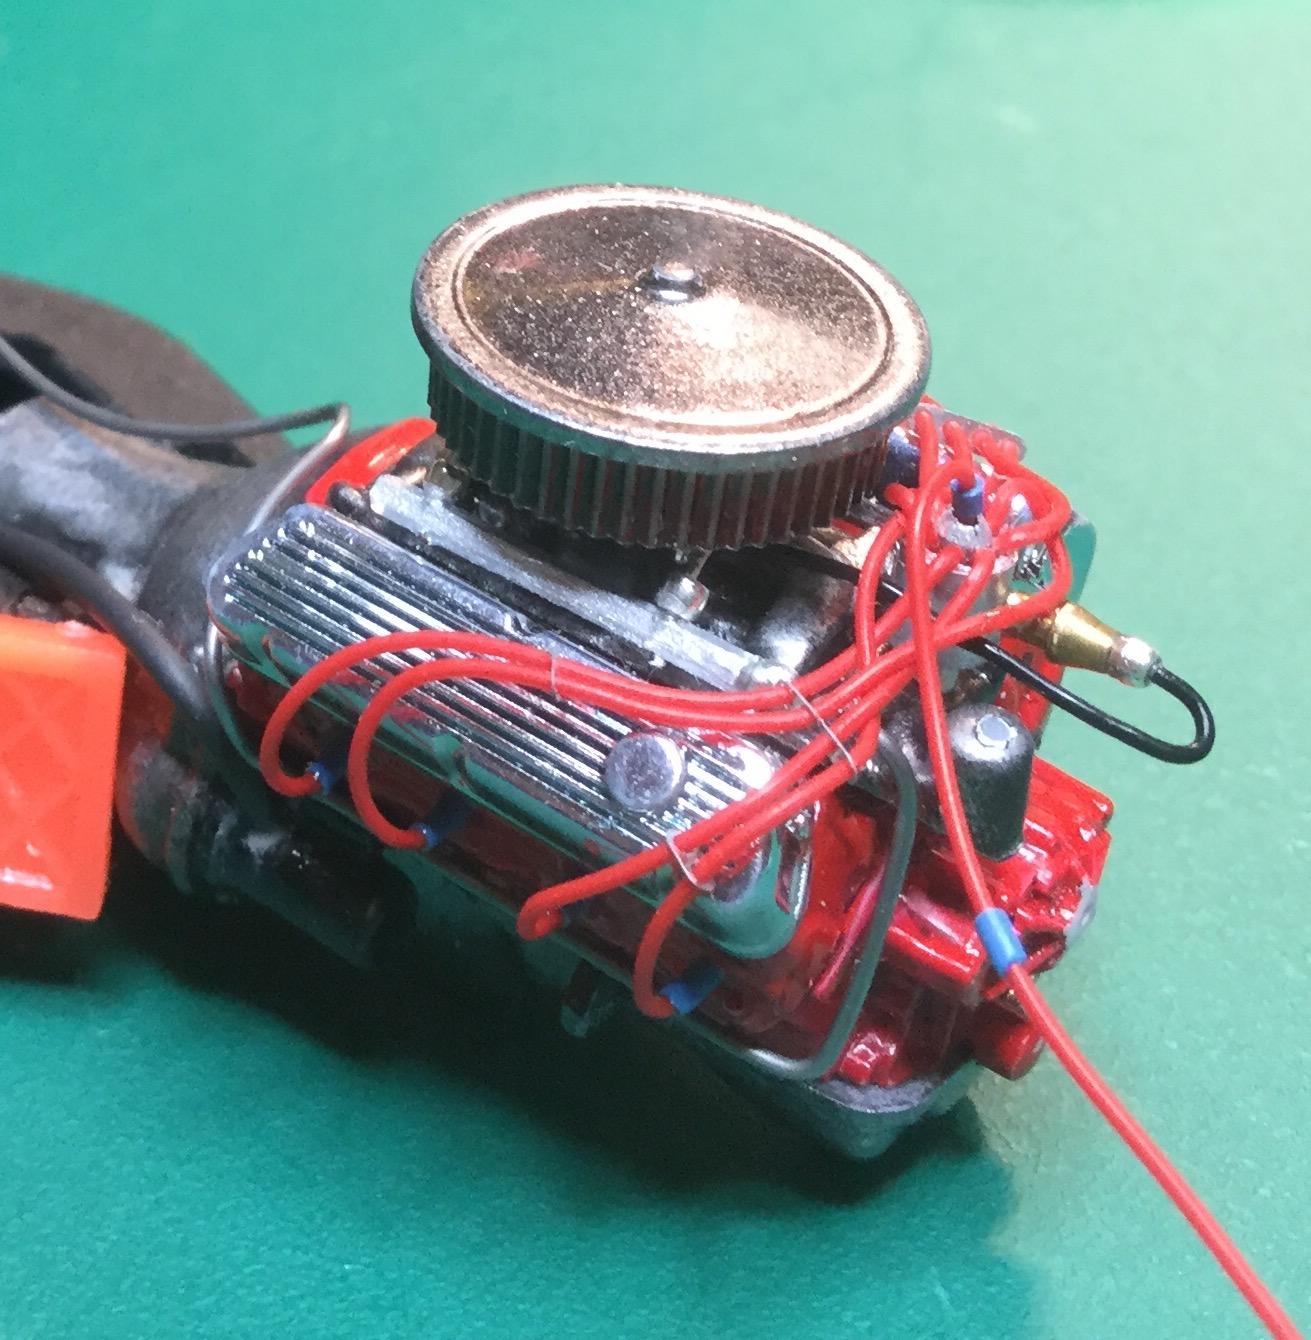
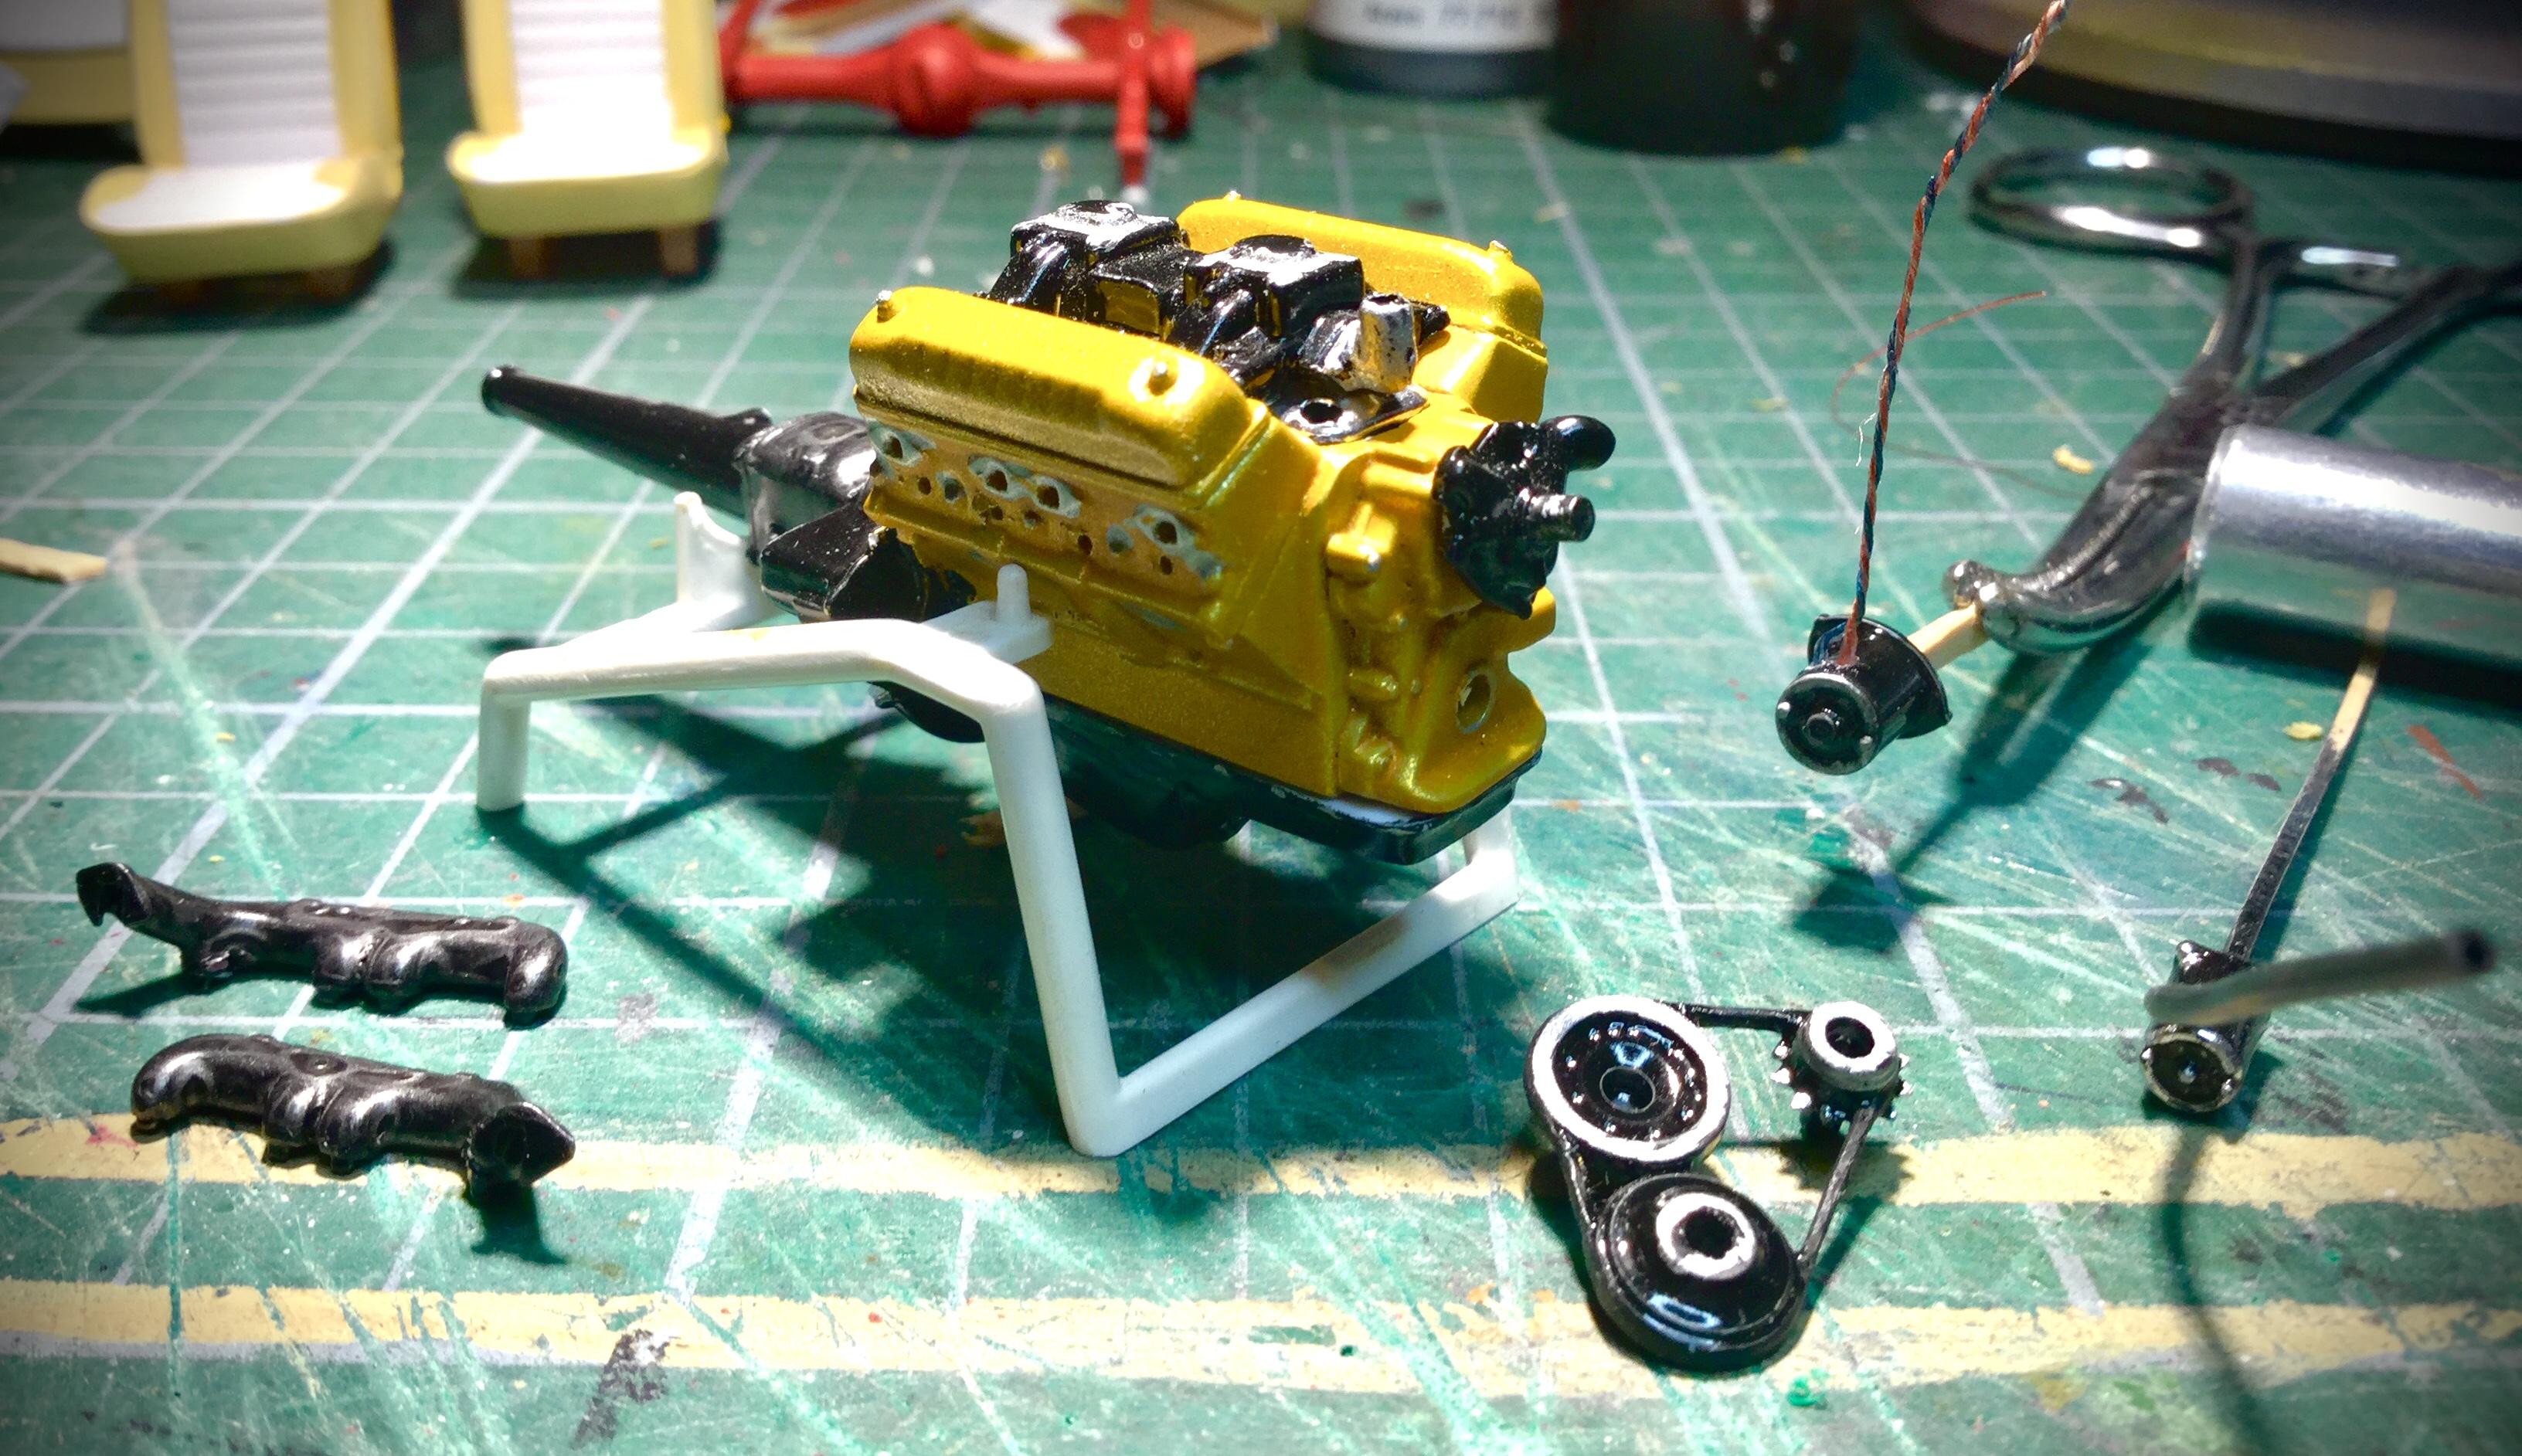
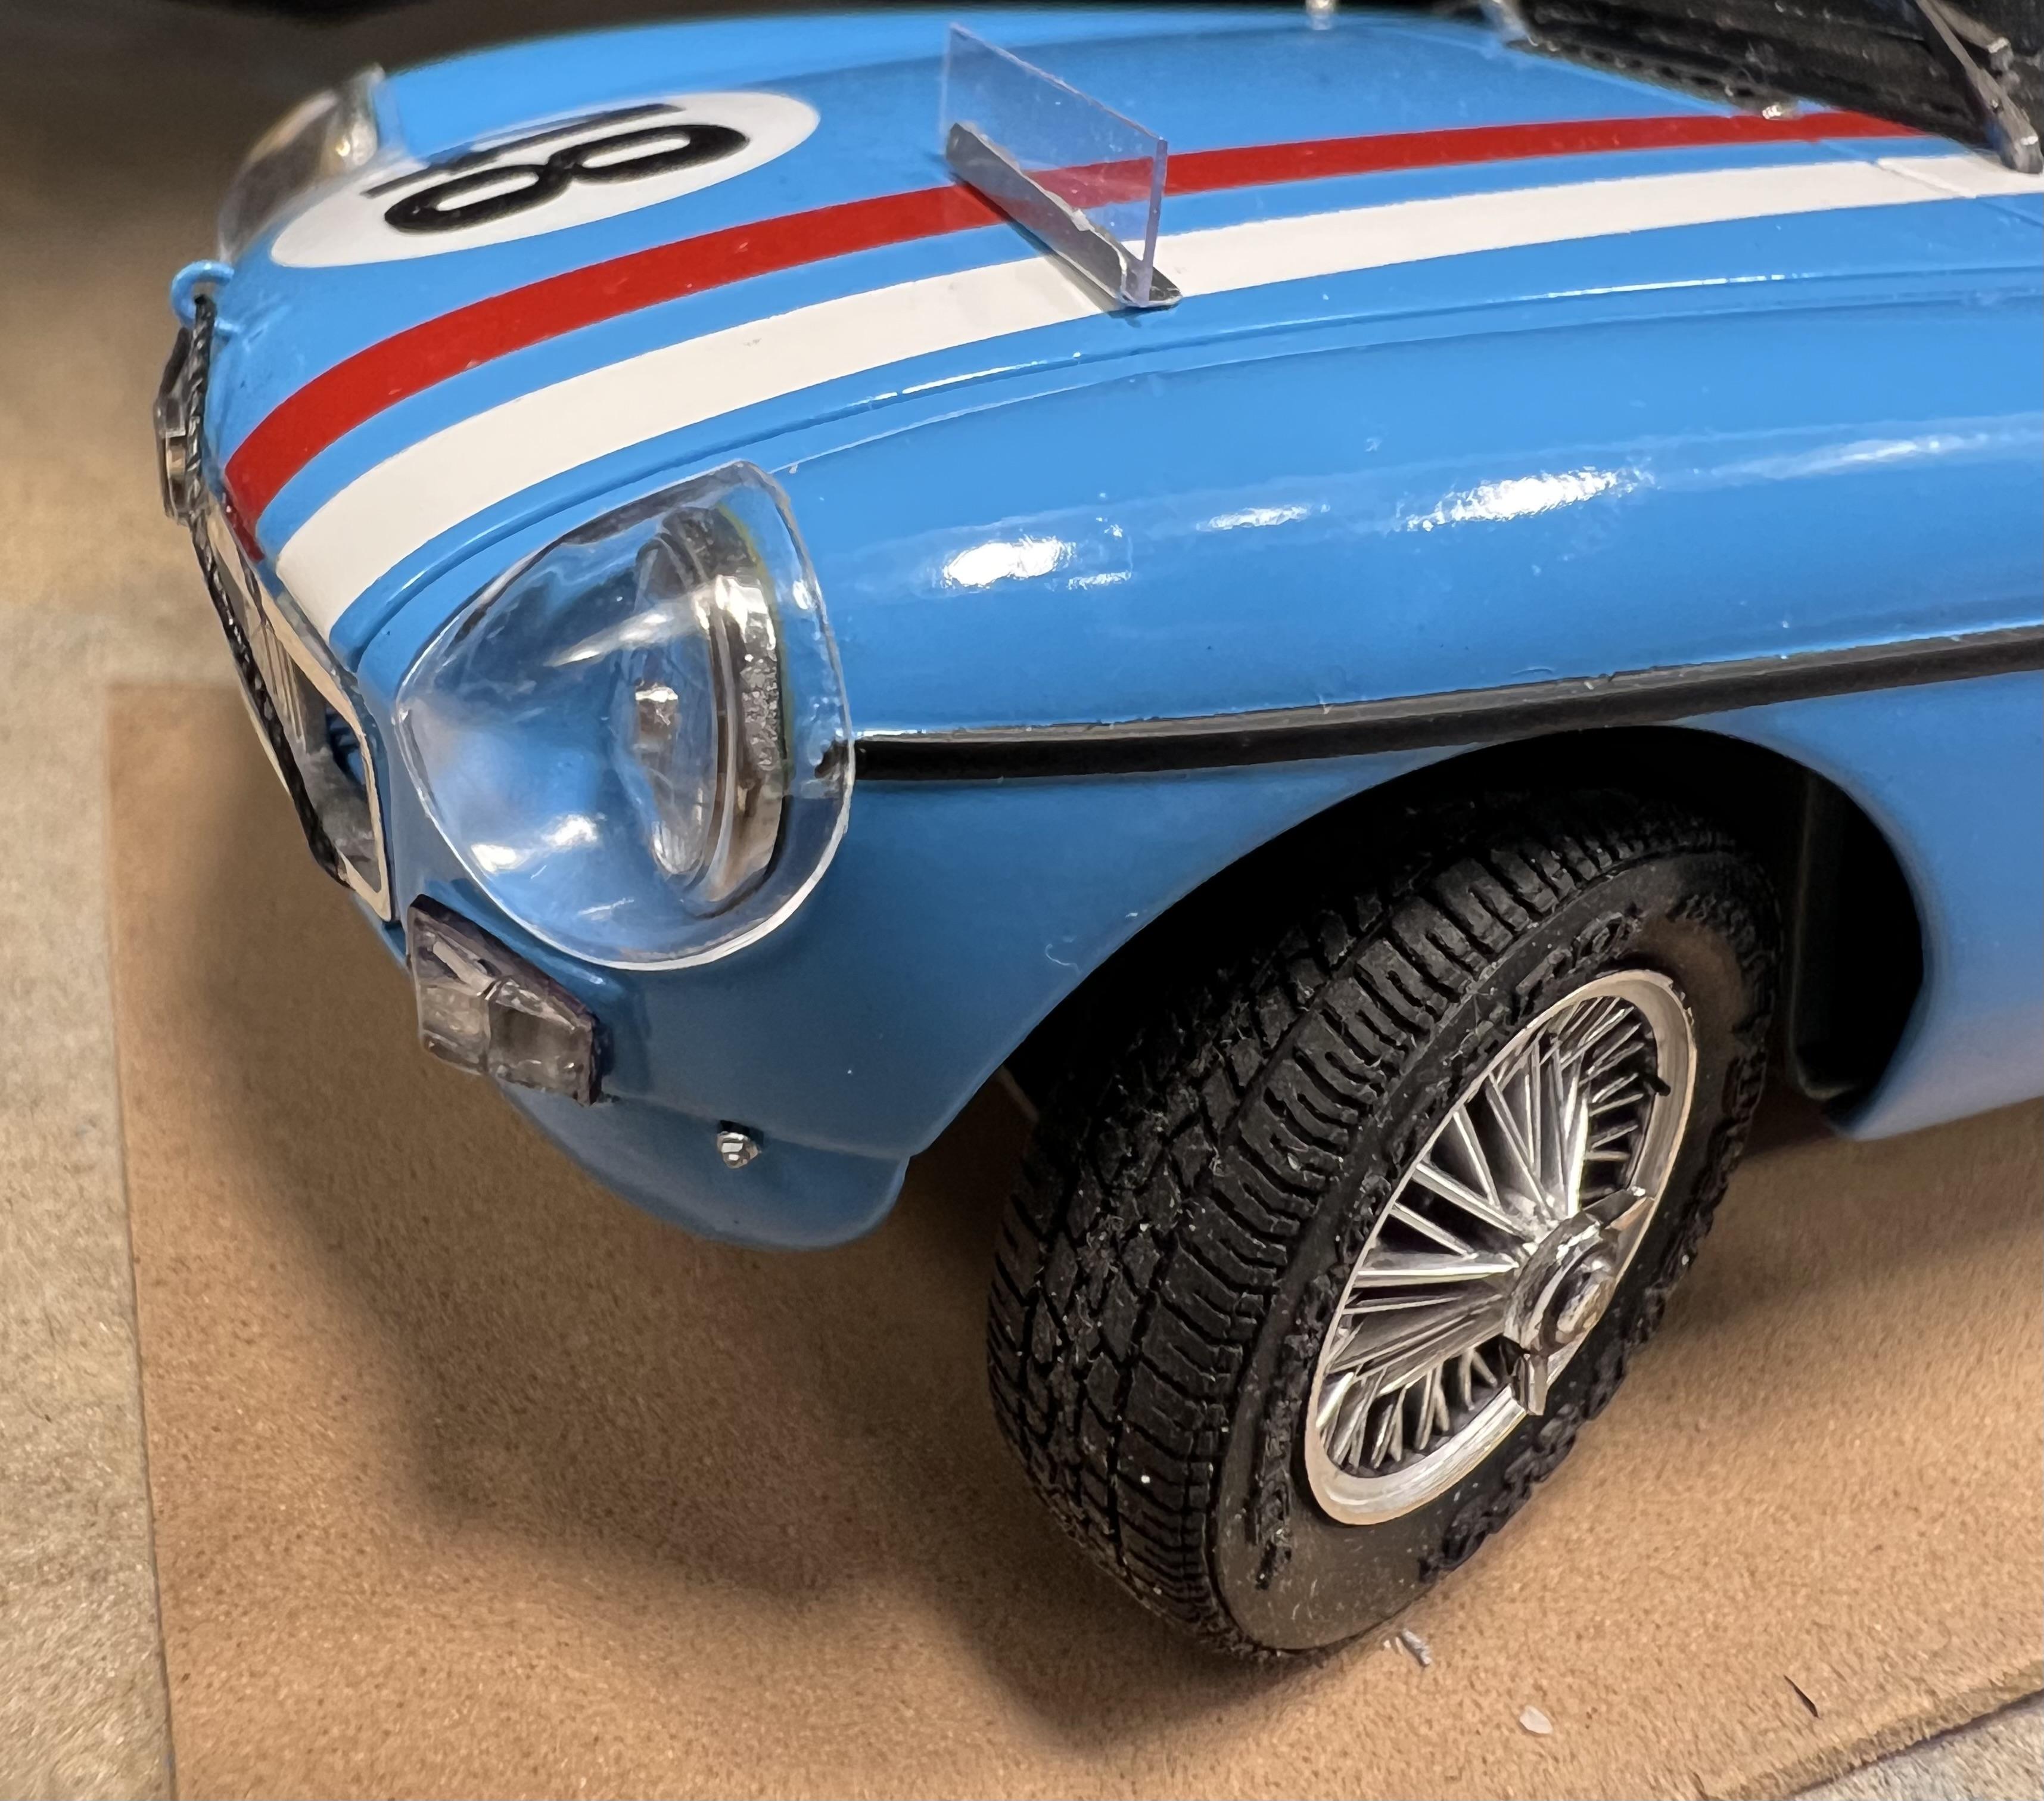
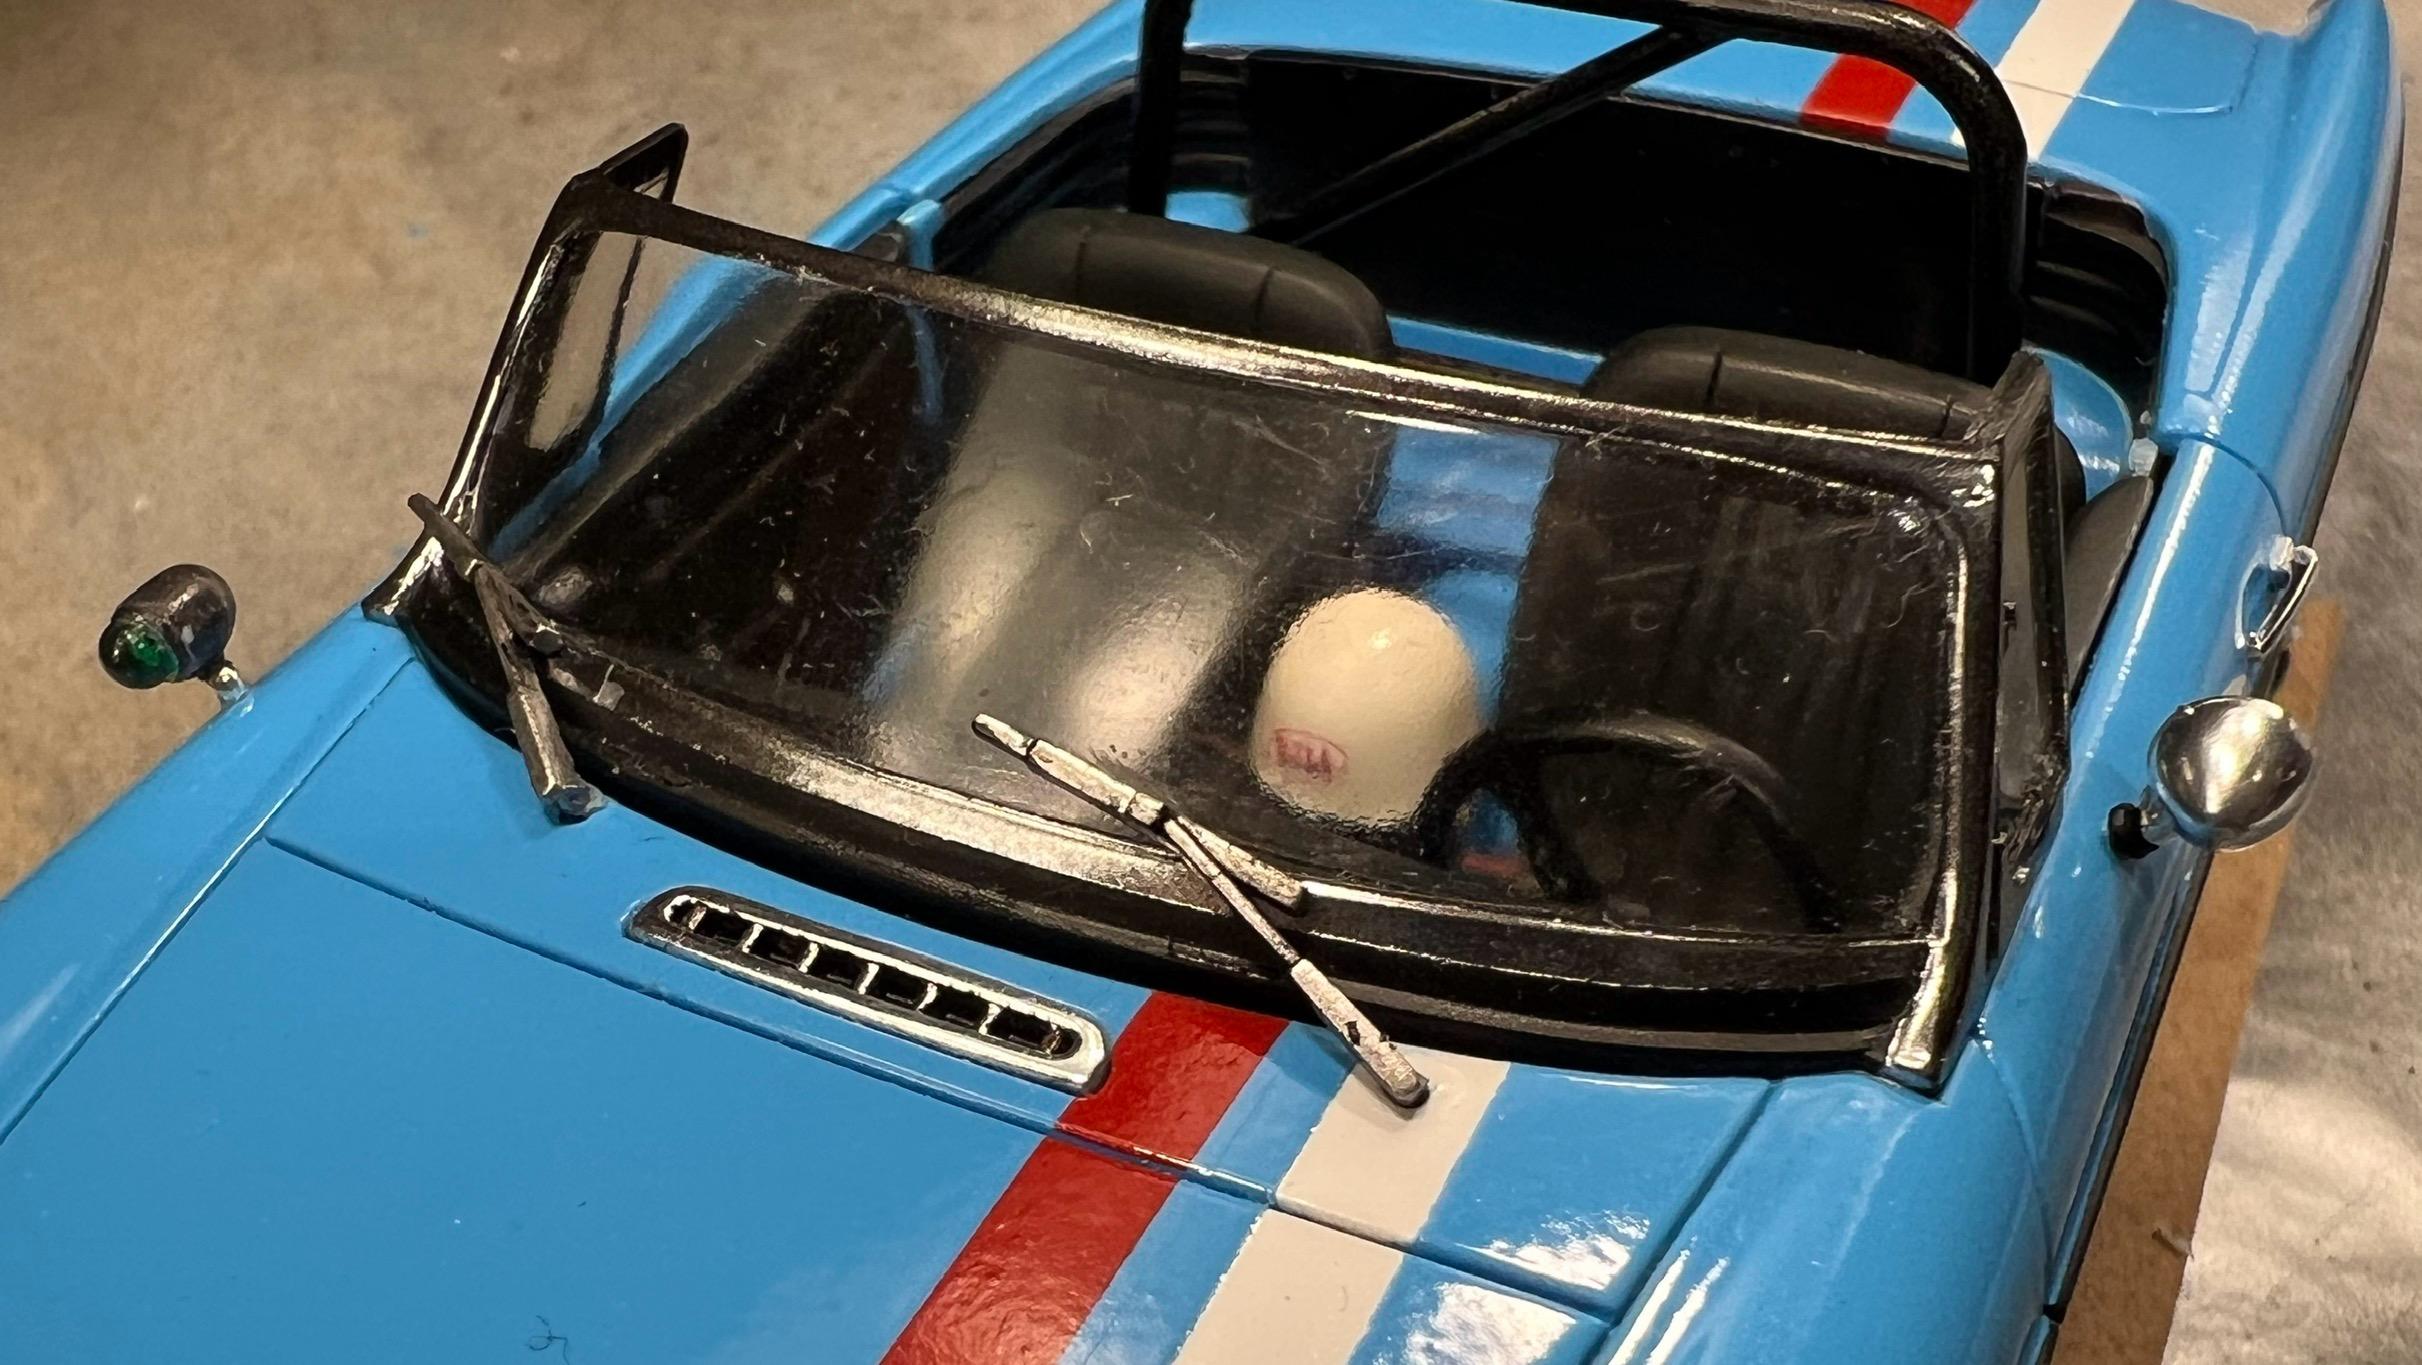
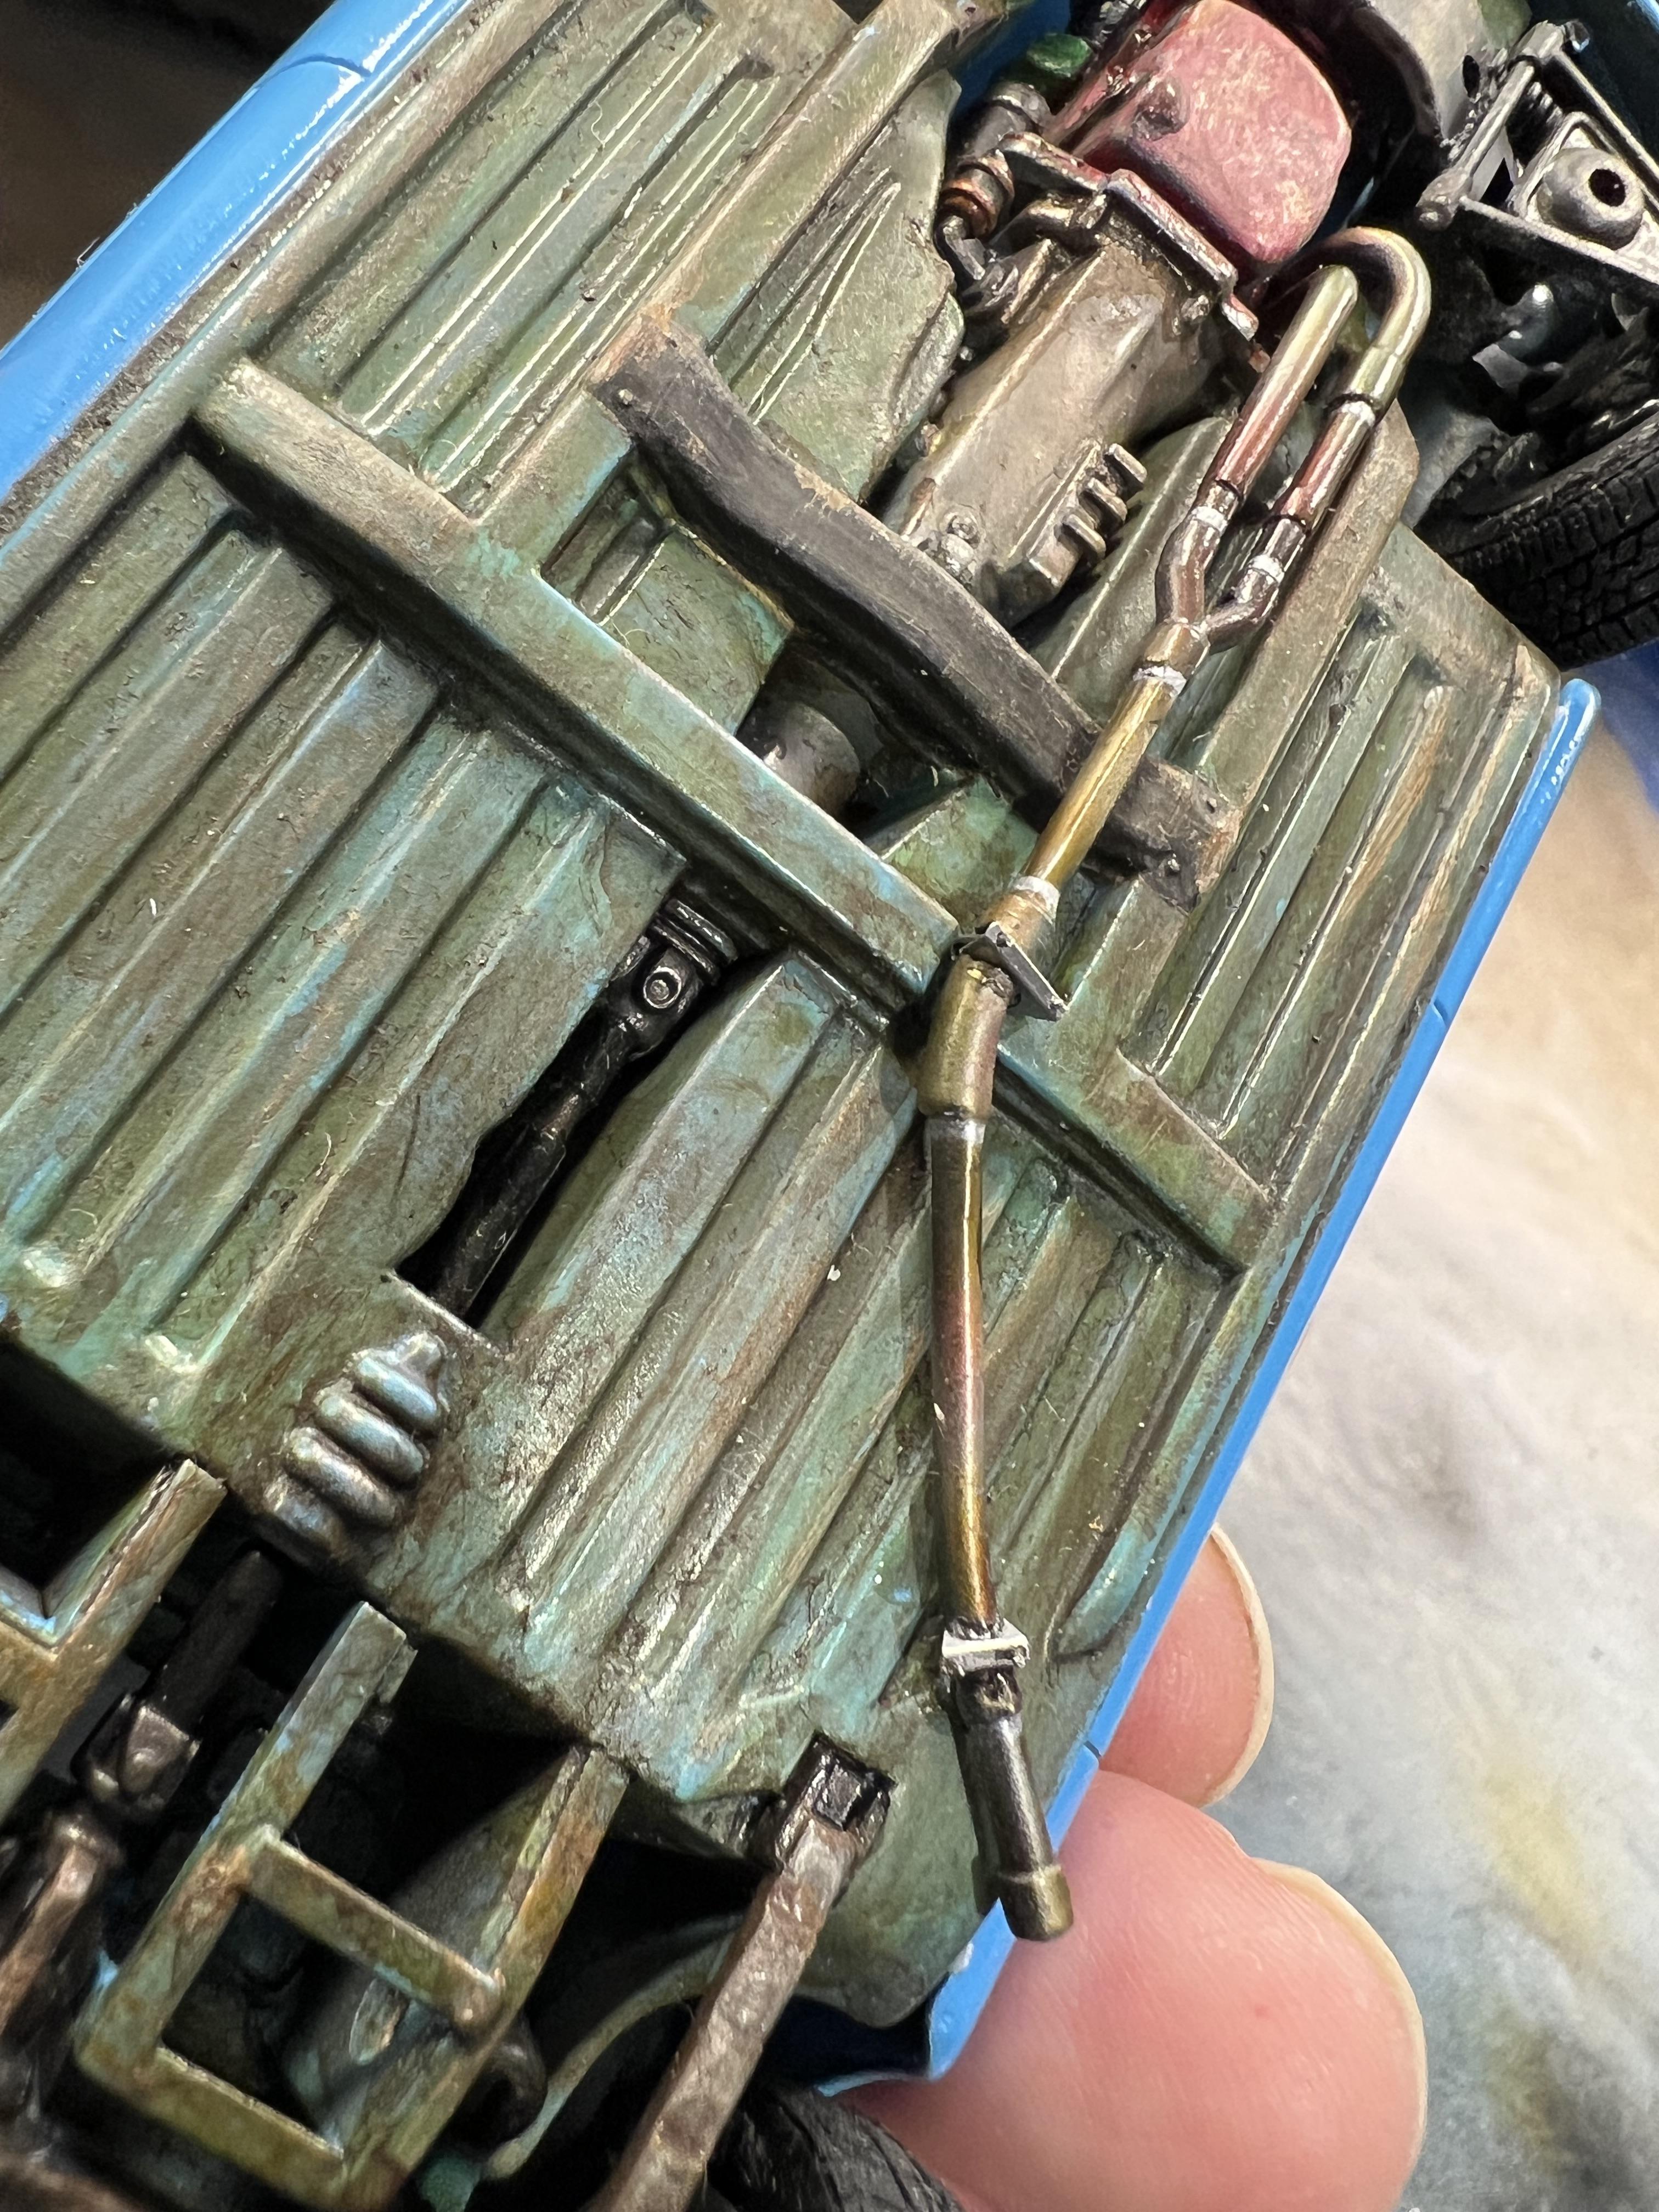
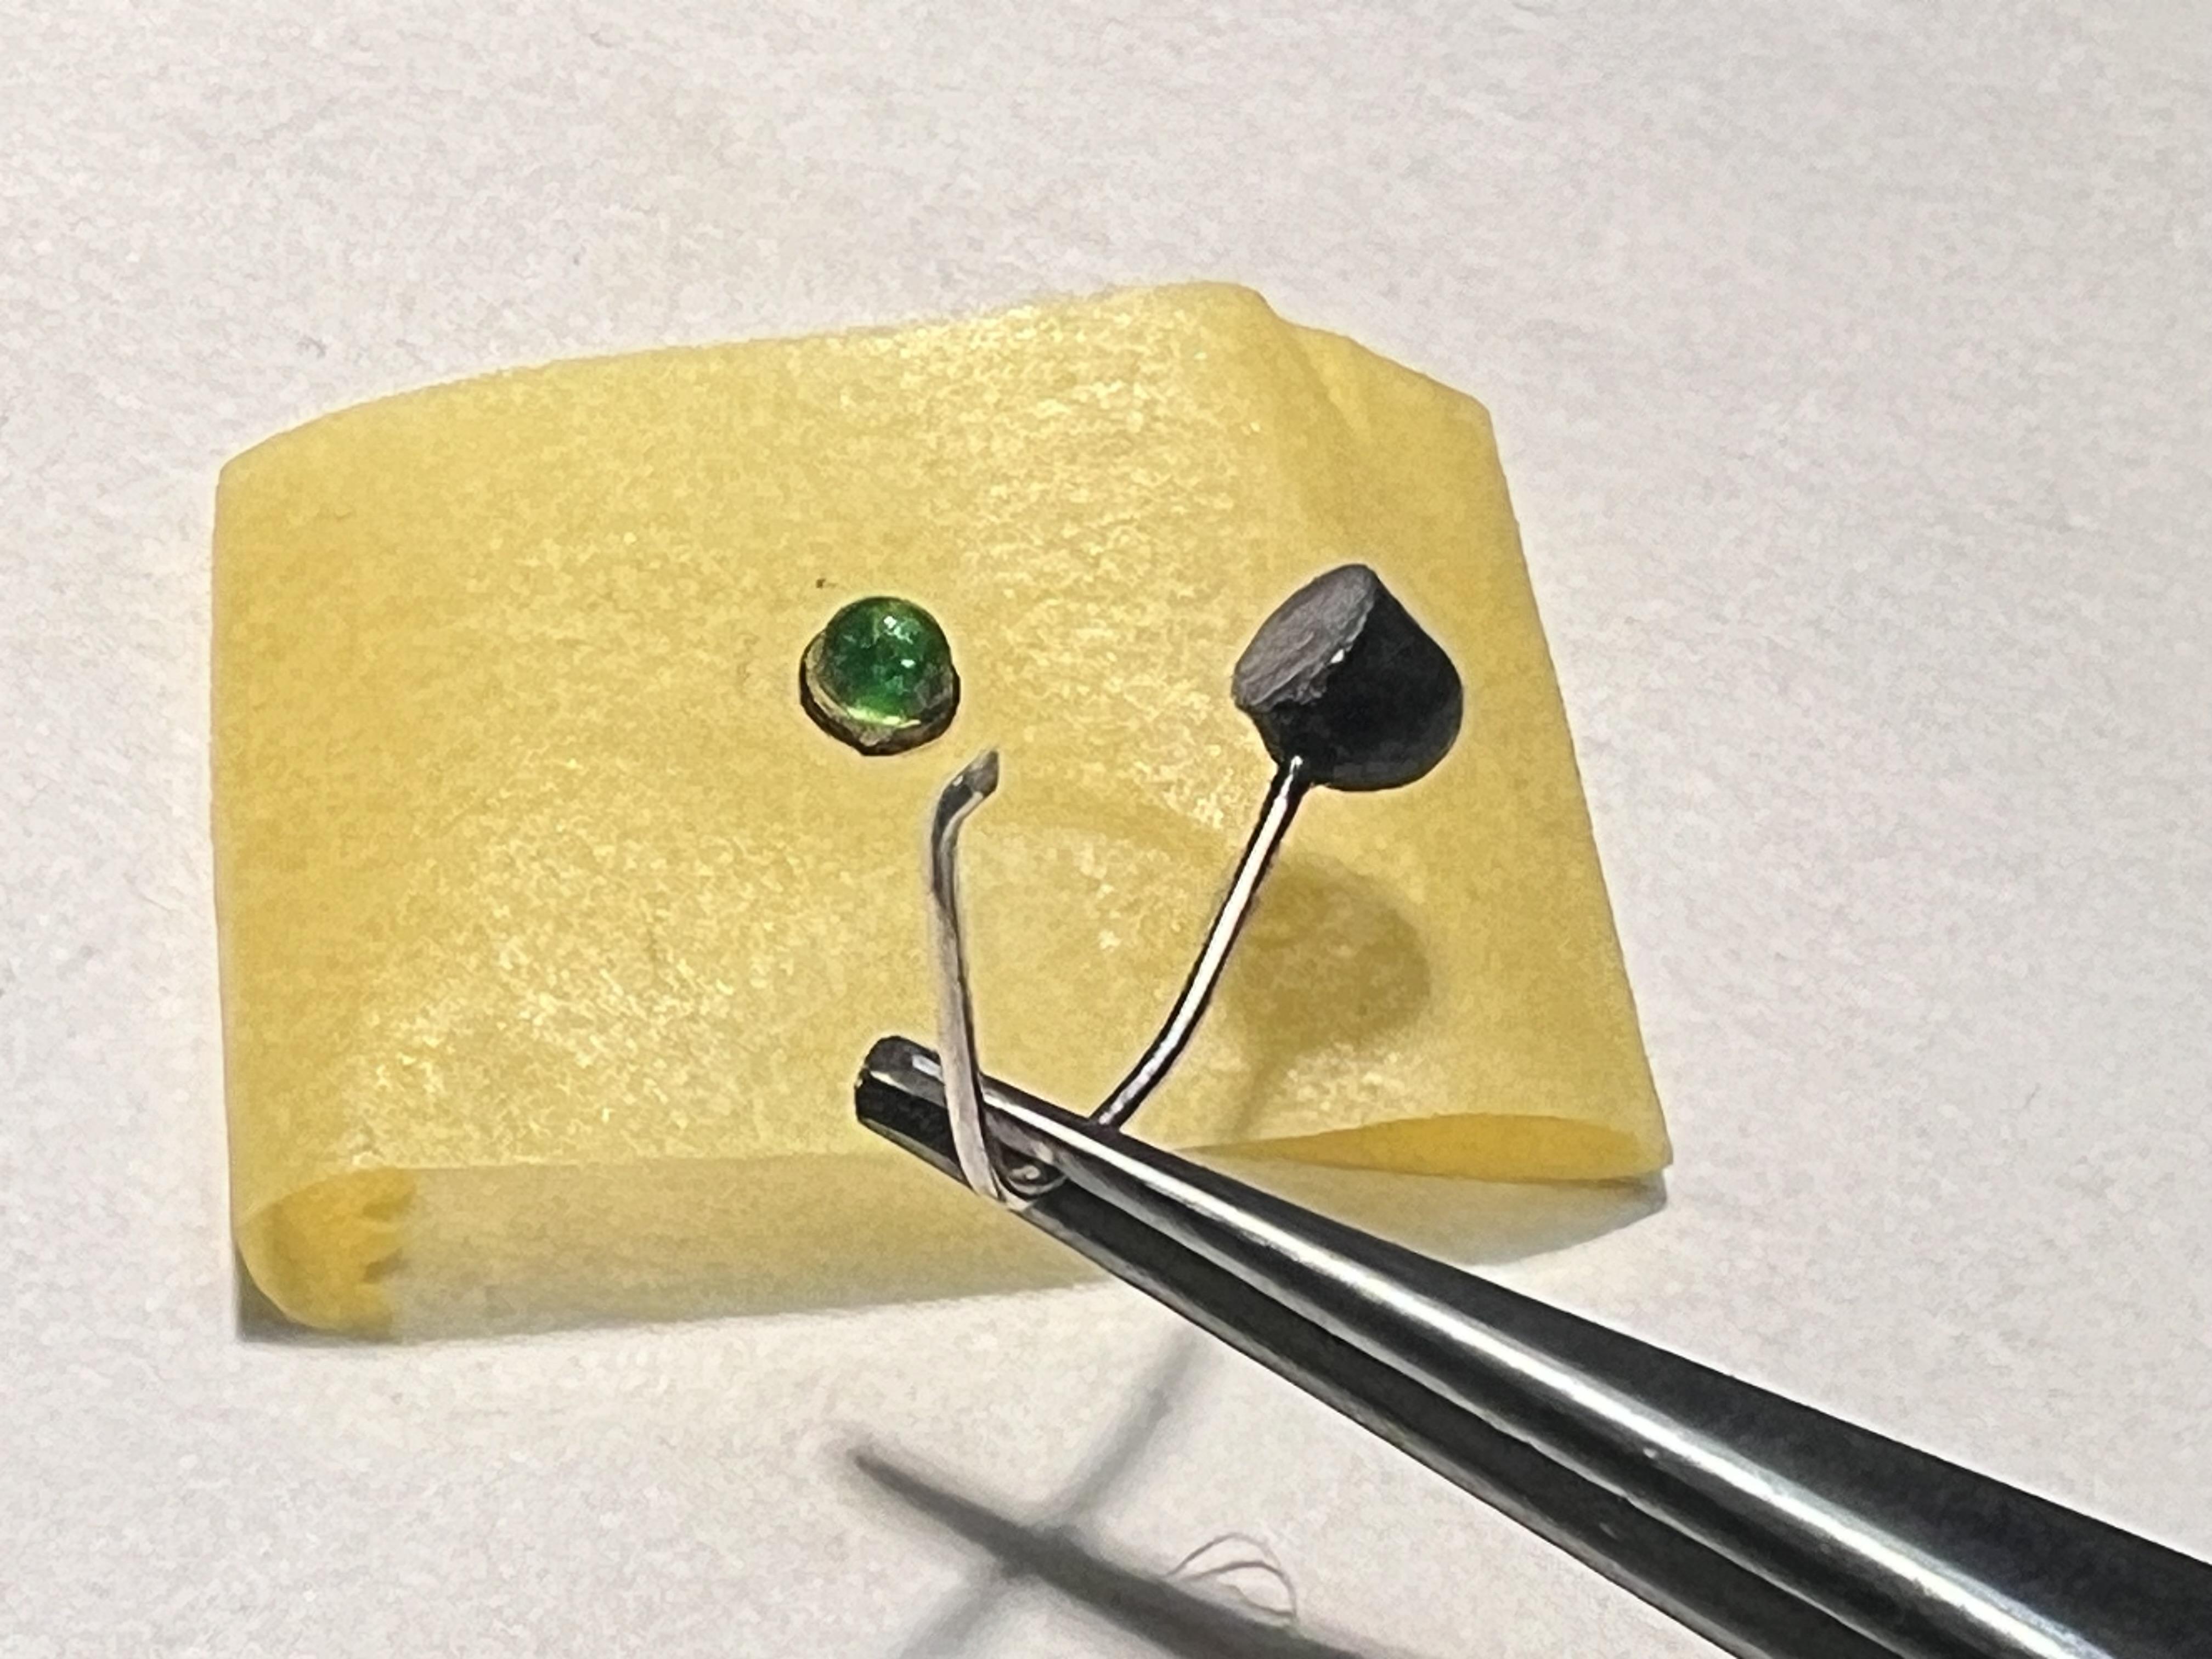
Been awhile since the latest update, so this is the last one as entry #48 has entered the grid! There were a number of final bits to install on the MGB to make it race ready. The green light that was used to communicate with the pit board held by a crewman needed to be built using the kit’s clear lens. Fitting a suitable diameter of plastic rod into the Dremel, I fashioned a housing for the light. The kit provides three clear lenses which feature a raised rim for the rubber seal. Mixing clear blue & yellow acrylic provided the green colour. While often used on roof tops the MG mounted the signal light on the passenger front fender, in line with the leading edge of the windshield. The companion piece is the light installed to illuminate the entry number on the same side to be visible to the pits. I was fortunate to have some white metal castings with amazing detail that I had come across a few decades ago. With the body on the chassis it was time to complete the exhaust pipe with P/E pipe clamps. The Detail Master fret offers three sizes of clamps. It really brings a lot of realism to the chassis in a subtle way. After installing the windscreen I encountered perhaps the most difficult part of the build; installing the wipers. With the aid of tweezers, magnifier, in combination with shakey hands and failing eyesight, it took some time to get it to look okay. Another gem ? in the Club Racing version are two very thin clear “perspex” headlight covers to reduce aerodynamic drag of the original design. I installed them with Aleene’s Tacky Glue which drys clear. Most often used to mock up assemblies as it’s dissolvable with warm water. The last panic, #4, occurred when the very delicate passenger side door handle snapped in two when I was removing from the sprue! The solution was to rob from the second, stock kit thankfully. The last item was to repair the red stripe on the hardtop with a small bit of remaining decal, leaving just a tiny sliver. Now the MGB is ready to make the grid! Next step is to post in Under Glass after some hero shots and reflections on the build. Thanks to all that have been following the community build. Also to all the builders taking part, offering their work in writing and photos. Cheers Misha
-
Well, That’s a great video Phil! Besides being in Doug’s workshop, he offered so many hints along the build one needs to take notes. It really is the best presentation I’ve watched on “how to build” along with Doug’s easy going style, loved the part of him blowing on the parts he just glued. Well, it can be done, bravo ?! Cheers Misha
-
Wow, welcome to the grid participants Gary! In addition to a separate thread, I’d encourage you to post along here as there aren’t that many right now and a number have completed their builds. At this juncture I would choose the curbside kit that was originally part of their slot car series. It offers a decent body outline, although check the visual sources for your particular vehicle, an opportunity for interior detail and creative paint detailing of the chassis. The other kit was originally produced by Aurora in the line with a Chapparal, Aston Martin, Avanti, etc. Great kit for detail as front and rear compartments open. The engine if memory serves me is the four cylinder pan cake, which may not be suitable as some entires were the sixes. The rear has a complicated structure for raising the body component. The interior has decent detail for even current standards, yet it, along with all the other detail is best checked against visual sources. This can be a frustrating build, often with the result of leaving the rear opened up because of its fragility. I have lately been building curbsides, largely because of subject matter, yet I seem to enjoy putting greater effort now into paint and chassis detail, as engine compartments, while I enjoy detailing, can be a long process. Your choice of the 904 is a great addition to the grid. I’m looking forward to your progress, Cheers Misha
-
Amazing! I agree heartily with Mark; top shelf work on an amazing replica Andrew. Cheers Misha
-
Thank you Pierre & Mark for your comments, much appreciated, and for the suggestion of using paint to repair the red stripe, which I’m leaning towards. The clear on the top is TS 13 a lacquer, so would an acrylic red be my best choice as any goof ups could be easily dealt with. I would follow with a few dabs of Future, thankfully my bottle of it is half full which ought to last. Thanks again for the tips, Cheers Misha
-
What an amazing replica Pierre! I heartily agree with the previous comments, this is an amazing build that I return to for the visuals and conversations. Combined with my recent read of Brock Yates’ description of the era in his Ferrari bio, has made it all exciting! Cheers Misha
-
Congrats on your new digs Allan! It makes such a difference to have a comfortable work space. My own work bench is nearly identical and was my Dad’s office desk. I do wish to caution you on your choice of a “quick and easy build” being a Fujimi EM or Enthusiast’s Model with great detail and many sub assemblies. Your choice of building a replica Porsche is great and thanks for the link to the decals. In building this kit I would recommend a deep familiarity with the instructions and drawings, including paint details. I often write or put sticky notes all over my sheets. The other is an often heard phrase, yet it rings so true; treat each sub assembly as a model on its own. This kit requires great patience and study, especially combined with visual research of the original car. Your on a good start, looking forward to your progress and your further postings on this special 911! Cheers Misha
-
Hoping you’ve recovered from your malady over the holidays Bill. Looking forward to your progress with the build! Cheers Misha