Rich Chernosky
-
Posts
2,108 -
Joined
-
Last visited
Content Type
Profiles
Forums
Events
Gallery
Everything posted by Rich Chernosky
-
Harry...now that made me smile. Nooooo...I don't. I usually do a test swatch over white cardboard. I will lay down a variety of base coats then spray over all of them and pick the one I like best. Most of my nail polish has come from ex-girlfriends and ex-wifes of which I have a few. I have a lot of extra and you are welcome to it as most women never even come close to using it all. This will save you the embarassment of having to go to the store and buy it.
-
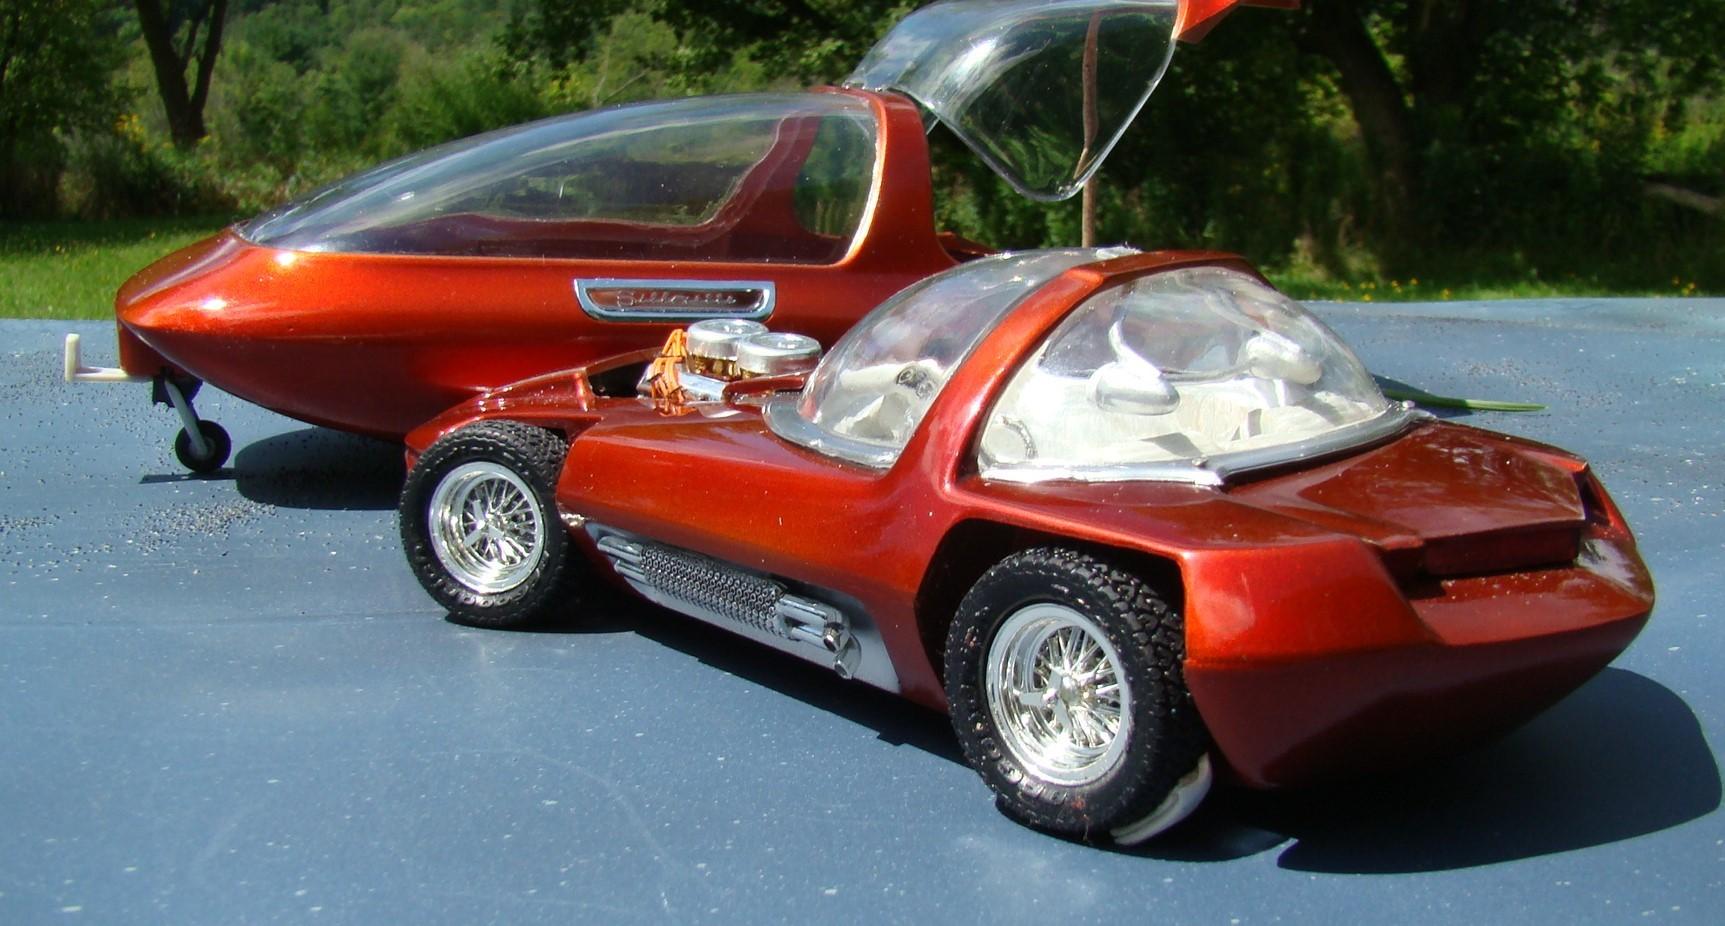
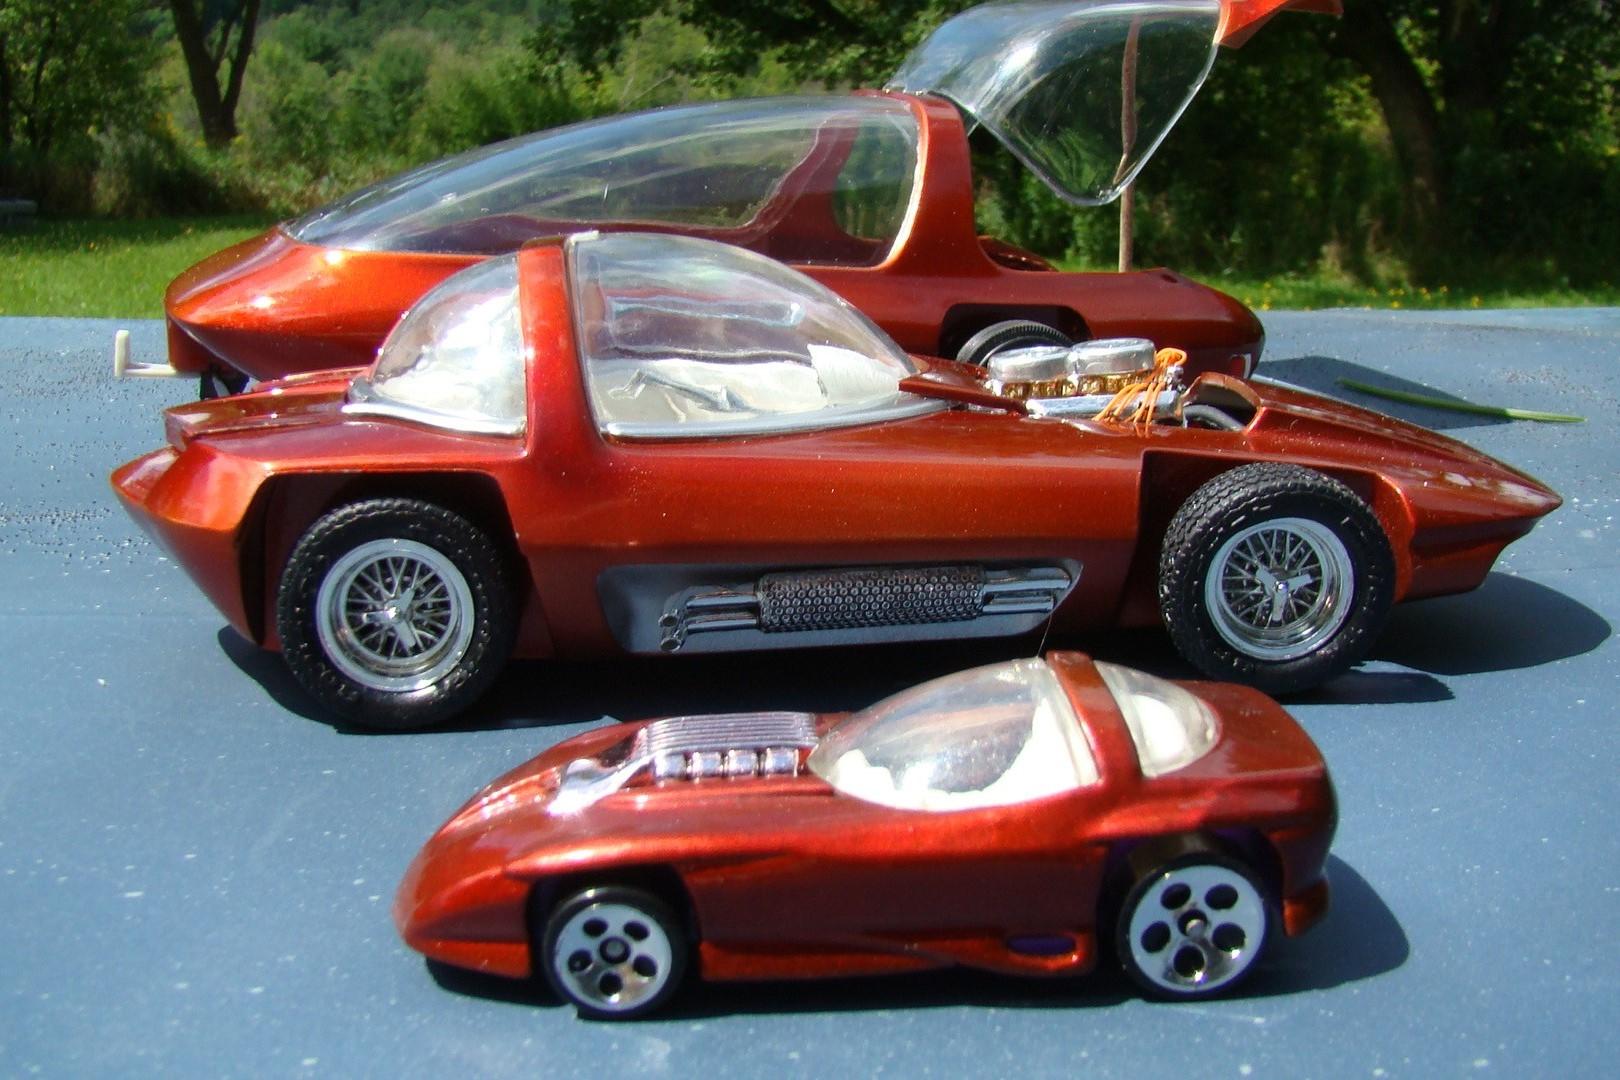
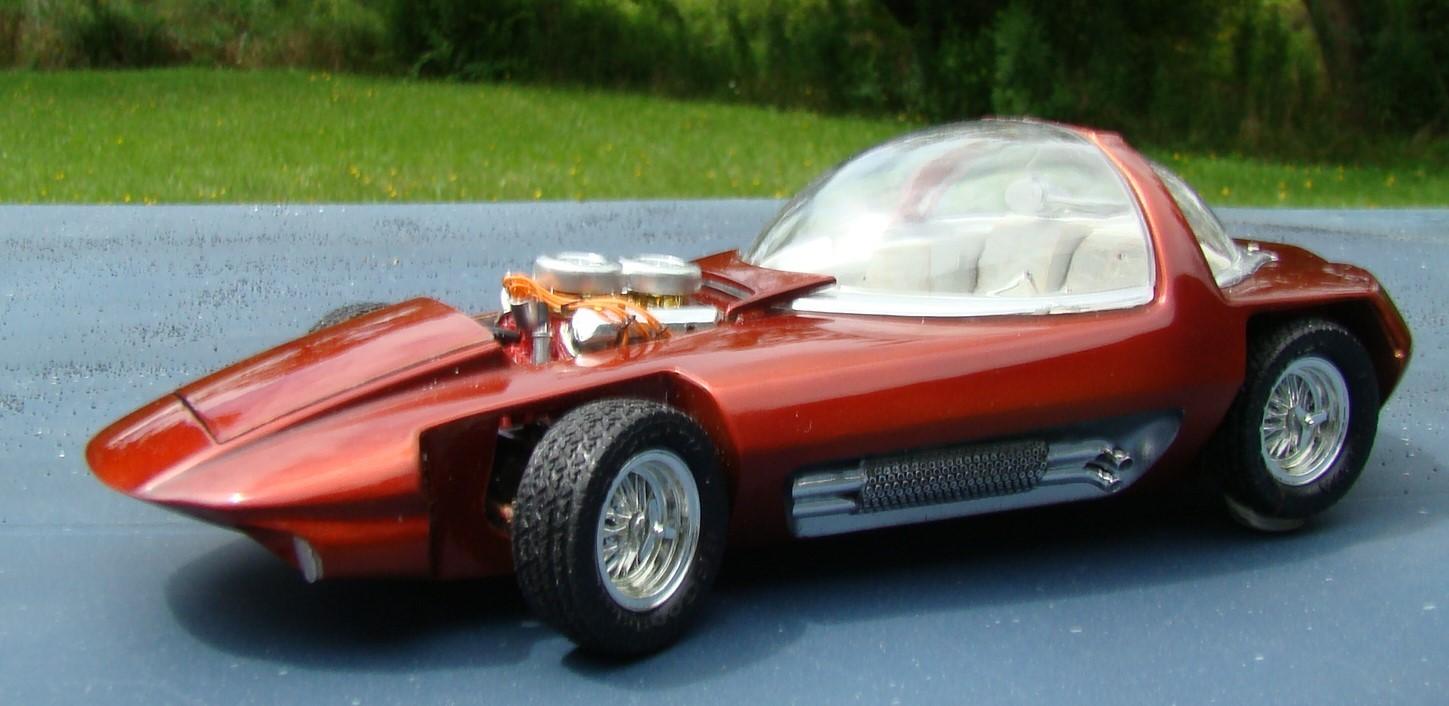
Here is a re-visit to my earliest days of car modeling. Back then, anything sporty or custom looking really caught my eye. Saw this kit in my local department store. Had to have it, had to build it. It looked like nothing on the road and I was hooked. This turned out to be the 2nd model car for me. The build, the paint, everything thing turned out horrible and it was eventually discarded save for some pieces. This kit has since be re-issued at least three times and finally I decided to take another shot at it. 50 years of building might make a difference. I have actually worked on this on and off over the past 15yrs and finally decided it was time to finish. Paint finish on this is Pactra Candy Apple Red. (so was the original) A note on the paint. I had saved a can from 1964. It was decanted and airbrushed. It was still good. Pactra Candy Undercoat Gold (also saved) was used. Along the way I discovered why this kit didn't turn out so well. It had a two piece body shell and in order to get a smooth seam between the upper and lower halves the interior, engine, frame and suspension all had to be completed and installed. This would mean some careful masking later on. Much more details on this build are in the picture captions. Thanks for looking. Completed car in its trailer. This trailer was AMT's idea and never part of Cushenbery's original build. It had lots of fit problems all by itself. The top hinge in particular had to be re-engineered. Car is a tight fit BTW \Finished car on its wheels. Several items in the kit were left off. Those included the front and rear nerf bars, engine fairings, and a few other bits. I feels they ruined the sleek look of the car and looked awkward. Getting the front wheels to steer was fairly easy. Had to make a tie-rod though. All three pieces to this project. The Hot Wheels diecast is a stylized version of this car and it was painted to match. Allegedly Bill Cushenbery had planned a Silhouette II and it might have looked like this. Never happened. Imagine seeing this baby on the road even today. Wire wheels were my choice and still are some of the best I have sever seen in a plastic kit. I even have the originals from my first build. Picture was taken in my backyard. the sun finally co-operated. This is a 427 engine that was not originally in the car. It was a later addition. It was a very tight fit. Distributor was a pre-wired unit. Interior is Tamiya flat white with some detailing accents. Note the interesting steering yoke. A little history on the Silhouette. It was revolutionary in the fact that it was the very first "from the ground up" custom. Frame and suspension was a shortened Buick and Cushenbery hammered the body out of sheet steel. The car was a hit of the show car scene in the mid 60's. It was also featured in the movie Beach Ball in 1965 and also in 1968 on the Wide World of Wheels driven and narrated by Lloyd Bridges. After that it resided on a trailer in Cushenbery's shop where it slowly fell into dis-repair. It was stolen in 1983 and never recovered. Someone apparently wanted the trailer or the 427 engine. Rumor has it the the bubble tops have been found but that is unconfirmed.

-
SCCA Camaro Trans Am Set
Rich Chernosky replied to Scale-Master's topic in WIP: Other Racing: Road Racing, Land Speed Racers
Mark...I can well apprecite your struggles with this one having done this kit myself. Of course my decals wern't as old as yours having done this about 15yrs ago. But matching paint to printed decals is no easy task. It takes a lot of resources, a lot of patience and skill with a brush. From all indications you have pulled this one off as well. Looks very good. Do you ever coat your old decals?. I use Liquitex Gloss Polymer medium thinned and brushed on. -
Michael...this is one outstanding model. The carbon fibre work alone, is beyond compare. I have this kit and your post will definetly help me on my way. I also read with great interest the history of Pagani and your struggles with the model. This isn't just a great model but an exceptional post as well. Thank you for your contribution.
-
-
This project started back in 2008 when I aquired the Revell of Germany berlinetta kit. It was sprayed then. When I aquired the spyder kit a few years later I stripped the berlinetta and painted them both the same. Color is a Wet "n" Wild nail polish called Bijou blue. It was sprayed over Mr Color #8 gold (70%) and Mr Color 317 grey (30%). Nail polish is slightly translucent so some of the base shows through. Both kits were polished last year and that was the incentive to finish them. While both kits were made by Revell and look like they might share some parts there was very little they actually had in common other than being able to paint a lot of the parts at the same time. Assembly was a little time consuming because of the differences. But both kits came out to my liking . More info in the picture captions. This is the v8 engine in the berlinetta. The spyder has a v-12 in it. Very little of this shows in the opening engine covers of both cars. But it has some nice detail. Interior of the spyder. There were many simialarities in this area so they were painted the same. Color is a mix of Tamiya LP's to get a soft blue grey. Brown insert is also and LP color. Side view of the berlinetta. I did not care for the dark "sail panel" that is in the middle of the real car. I filled in the lines and scribed a new panel line. Gives it a cleaner look in my opinion. Back end of the berlinetta. Som,e nice detail here. The tail light over the rear engine cover was a real pain to fit. Ride height and chassis fit on both kits was spot on and assembled no problems. Same for the spyder. Note the different wheels on both cars. Spyder has a seperate insert to cover the bolt pattern. Kinda cool. Window frame and rear louvers on the spyder were AK Stainless steel. This stuff airbrushes sooo good. Spyder came with a removable soft top which I sprayed to match interior inserts. Both kits together. If I had a choice between both models it would be a hard decision.
-
SCCA Camaro Trans Am Set
Rich Chernosky replied to Scale-Master's topic in WIP: Other Racing: Road Racing, Land Speed Racers
Mark...the Sunoco car looks real good. That is one tough kit to paint and decal but you really pulled it off. Good luck on the Hot Wheels. -
I have this kit kit built stock right from the box many many years ago. Burt this is a very cool concept. I will be watching.
-
1/20 Nissan R381-II Coupe
Rich Chernosky replied to Rich Chernosky's topic in Other Racing: Road Racing, Salt Flat Racers
Helmut....some very interesting observations. Thank you for your input. I have other un-built Japanese kits of Can-Am and Endurance cars raced in the All Japan series at the same time as the Can-am. It would seem they borrowed very heavily on the current cars, both Can-Am and Endurance. One car in particular, the Toyota-7 started life as a re-bodied Mclaren chassis with a v-8 Toyota engine. They later made their own chassis. These cars were very popular in Japan in the 60's and the model companies followed suit by issuing kits of these. Many found their way to the states. I have found most of mine on Ebay over the years with some coming straight from Japan. Had to pay dearly for a couple. Still wish there was more info on these facinating cars. -
Revell Corvette C5.R Decal Placement
Rich Chernosky replied to Jim B's topic in Model Building Questions and Answers
Jim..I airbrushed de-canted Tamiya TS spray straight over white plastic. Start with hi-pressure , low nozzle and work your way to open nozzle, low pressure. 4 light coats should do it. Tamiya TS decanted and airbrushed is almost fool proof. -
Hasegawa Toyota 88C "Taka-Q"
Rich Chernosky replied to galaxyg's topic in Other Racing: Road Racing, Salt Flat Racers
Both models are a masking and decal challenge, but it looks like you mastered it. Good job...on both. -
Revell Corvette C5.R Decal Placement
Rich Chernosky replied to Jim B's topic in Model Building Questions and Answers
Jim...I built this kit and it is clearly a mistake on the instruction sheet. Trevor is correct and go with carbon or paint it semi-black with a little silver added. Race cars are changed from race to race and placement of smaller details is often left up to the artist. Model companies are never perfect so use your judgement. The kit goes together well and makes a nice model. Don't let this slow you down. Enjoy yourself. Look forward to your build. -
1/20 Nissan R381-II Coupe
Rich Chernosky replied to Rich Chernosky's topic in Other Racing: Road Racing, Salt Flat Racers
-
1/12 Trumpeter GT40 Kensar style
Rich Chernosky replied to kensar's topic in Other Racing: Road Racing, Salt Flat Racers
Ken this was truly a labor of love..and I love it. Followed your WIP and picked up many tips, for when I build mine. I have seen a few builds of this kit but I must say yours tops the list. Very well done. -
Alan Mann Racing Ford F3L/P68
Rich Chernosky replied to Dave B's topic in Other Racing: Road Racing, Salt Flat Racers
Dave....this was a joy to follow and even better to see it finished. Your skills and ingenuity are well show cased in this model. Congratulations on a very successful project. -
John...I think this is one of your finer efforts. Followed your WIP as you know. Man!!...that paint really shines. For a quickie project this is outstanding.
-
1/20 Nissan R381-II Coupe
Rich Chernosky replied to Rich Chernosky's topic in Other Racing: Road Racing, Salt Flat Racers
-
Did the bodywork and painted this awhile back. Ti8me to finish it. This is Nissan's R381 coupe which was a test version of their highly successful R381 group 7 machine which won the Japan GP in 1968. Not much information on the web although several companies make models of this car in various scales. This one is 1/20 and is made by Eidai and imported into the USA by AHM. Color is Tamiya TS7 racing white. Several working features include the steering, opening doors and rear deck and the kit was motorized. The original R380 had and inline 6 motor by Prince and it was later swapped out for a 5.5 litre Chevy V8 in the R382. Later versions (R383) used Nissans own V-12. More comments on the model in the picture captions. Comments welcome. I chose to go with the kit engine even though it is totally wrong. Too much work to find a suitable 1/20 Chevy V8 and Hewland transmission. I has a bit of interesting detail but the model will be display with the cover closed. Thise wonderful working gullwing doors. The hinge had to be re-worked and much filling and sanding to get them to fit. They work quite well though and stay shut. Side veiw. Much fitting was done to get the body to this point. Extra tabs glued on, pins fitted. That latch a the rear works and hold the cover down tight. Rear veiw shows the hydraulically operated split wing which was a feature of the R381 can am. It was never raced in the Can-am as working wings were banned. The original car had dive plane type wings at the front but wern't included in the kit. I would have omitted them anyway as I didn't like the looks. Front suspension had to be lowered by almost 3mm. Ther battery box slid up into the chassis from the bottom and held the front suspension and wheels. Not very well engineered BTW. My whole tribe of Nissan R380's. In the back Tamiya's version of the 381 open top car in 1/18, The R380 6 cyl car in 1/16 by Eidai/Grip, yellow group 7 v12 version (R383) by Otaki in 1/28 scale and the same in 1/64 diecast by Tomica.
-
SCCA Camaro Trans Am Set
Rich Chernosky replied to Scale-Master's topic in WIP: Other Racing: Road Racing, Land Speed Racers
Mark...I had exactly the same problem with mine. Cutting the front and rear decals into 3 pieces solved some of the installation problems for me. Looks like you have suffered through it OK. This looks good and I think some of the yellow shows on the real car so you should be OK there too. It took me two tries on the Hot Wheels car so you can expect some of the same issues with the decals there too. Good luck, this is a great project so far. -
-
A good coat of wax works for me. Do both sides. In some cases for heavier scratches dip it in some Future. There is a product that's called "Looks Like Glass" that is even better than Future. Its actually made to re-purpose glass.
-
Really nice job on this kit Thomas. You nailed that red color. And amazing decal work...especially over the front louvers. The first time (and only time) I saw a Stratos in person I fell in love with it. A worthy addition to your collection..indeed. Thanks for the tip on TS101. I have been eyeballing it at my LHS and now know its worth the purchase.
-
Simon...from my earliest days of modeling to now...I have always enjoyed making things work. One of my pet peeves is non-steering wheels. If it looks like it will work I will give it a shot as was the case with this kit. Mclarens just seem to look good in orange....for some unknown reason. <G> Thanks for the comment and compliment.
-
-
This is Revell of Germany's 1/24 Mclaren 570S. Kit is mostly box stock except for the hinged and opening doors. What a nice little kit that went together without too many fitment issues. This kit has a wonderful v-8 twin turbo engine that as many pieces. Very well detailed except someone forgot to take a picture. It is visible through the clear rear deck but just barely. Color on this is a custom mix of Tamiya X-26 clear orange (80%) and X-27 clear red (20%) over Mr Color SM209 super copper. More comments in the picture captions. Completed car on its wheels and in the sun. Just a hint of the copper color shows through her in this light. rear view and the carbon fibre decals (kit issue) really show. This side. Wheels were sprayed Tamiya X-18 then highlighted with a chrome marker. Door fit was exceptional and the kit gave the option of either closed or open. I chose both. Drivers side door open. Making the hinge and getting it to work properly were almost more trouble than it was worth. Magnets hold the doors closed. Interior was very nice on this kit and "someone" probably should of taken a picture of that also...sigh. Comments welcome.