RCprofile.JPG.6b95b19b856bf00a3becd6aeaaa48f3b.JPG)
Ian McLaren
-
Posts
1,360 -
Joined
-
Last visited
Content Type
Profiles
Forums
Events
Gallery
Everything posted by Ian McLaren
-
RCprofile.thumb.JPG.1691ea753d0f0897fdc1b2510cf06775.JPG)
1/16th Scale Top Fuel Dragster Eddie Hill 4:99
Ian McLaren replied to Ian McLaren's topic in WIP: Drag Racing Models
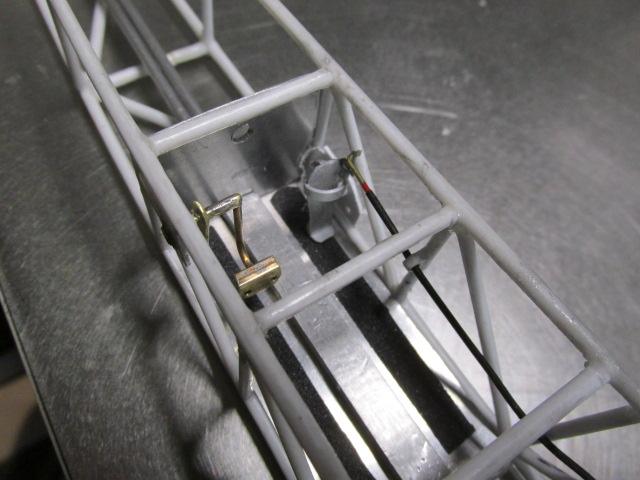
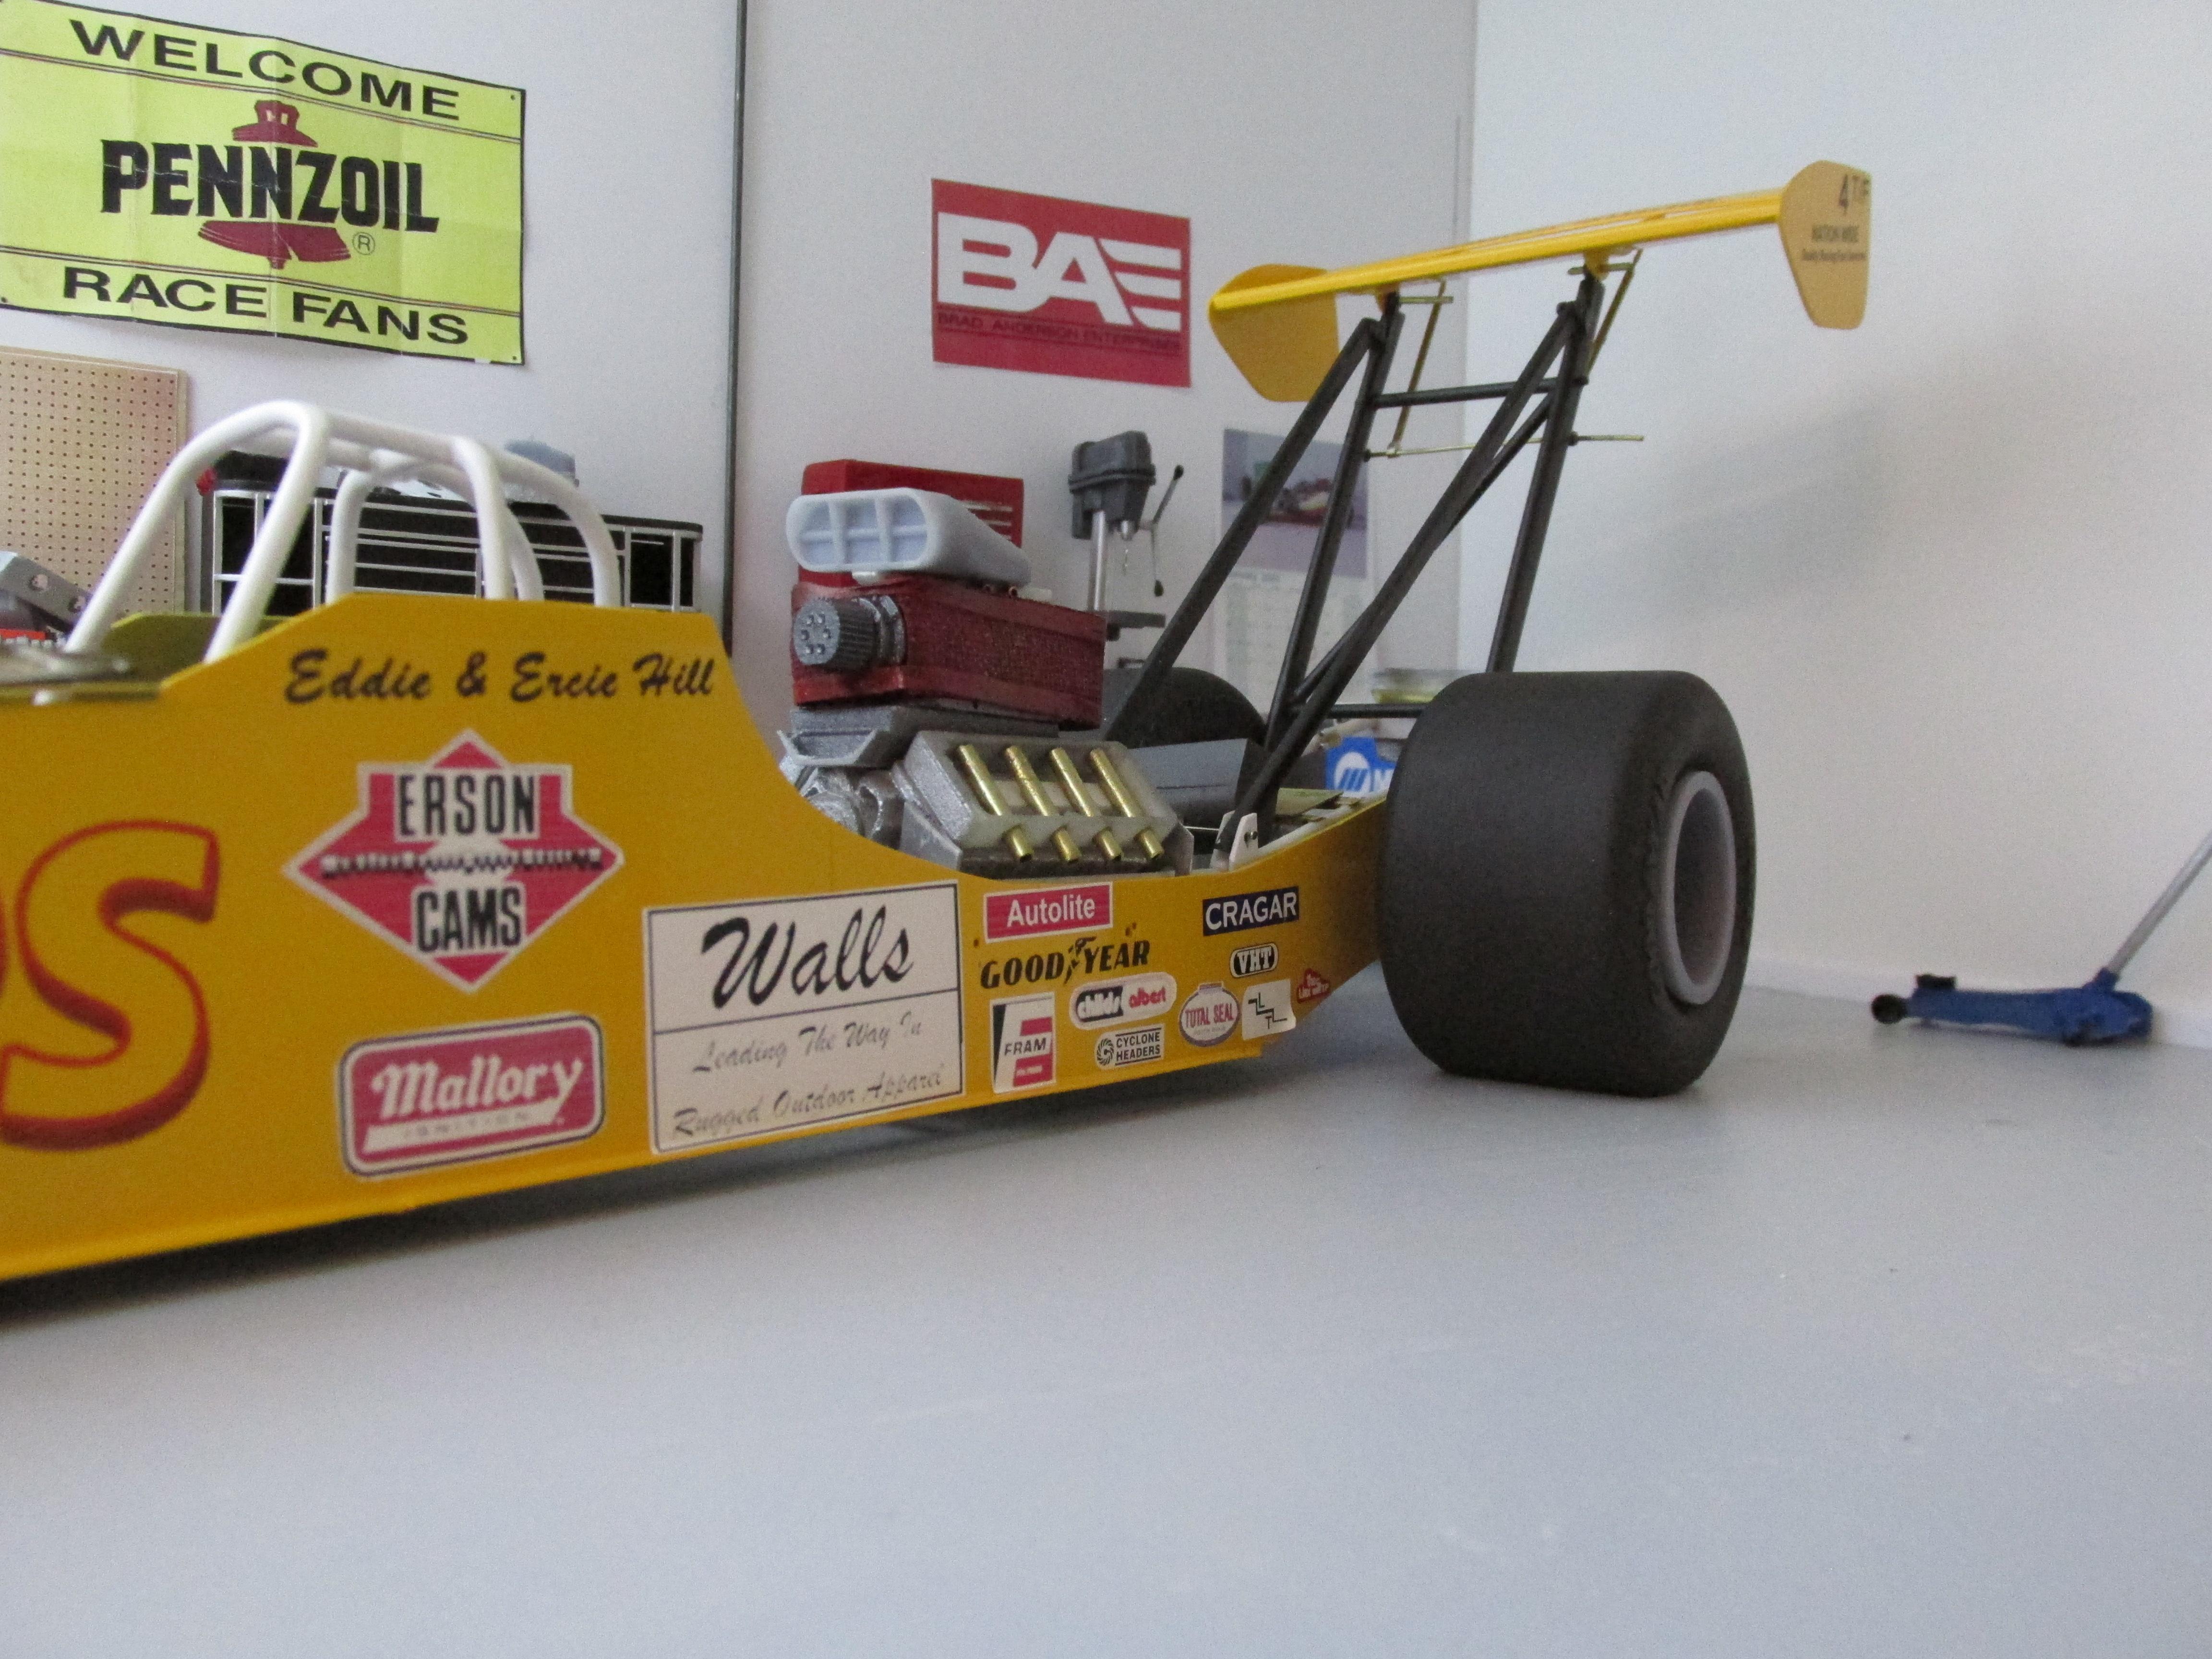
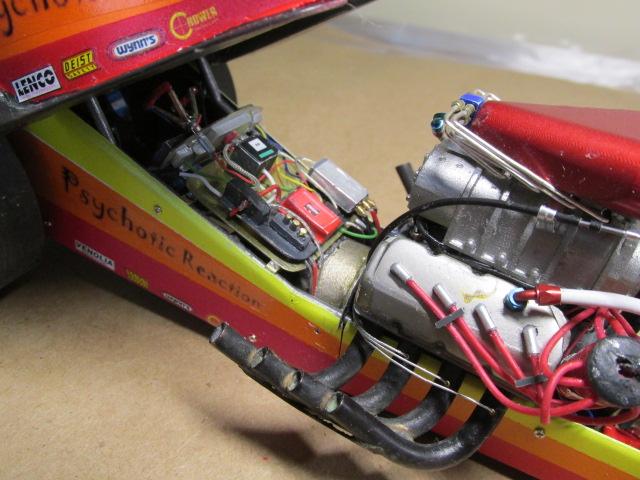
Pump assy plumbed for dual barrel valve system, pump saver returns with dual idle bypass returns added. Main fuel lines out to the barrel valves in the center, some of the injector plumbing shown and some drivetrain additions s well as the ceramic coated headers with thermocouple fittings installed
- 78 replies
-
- 2
-

-
- scratch built
- super shops
- (and 2 more)
-
1/16th Scale Top Fuel Dragster Eddie Hill 4:99
Ian McLaren replied to Ian McLaren's topic in WIP: Drag Racing Models
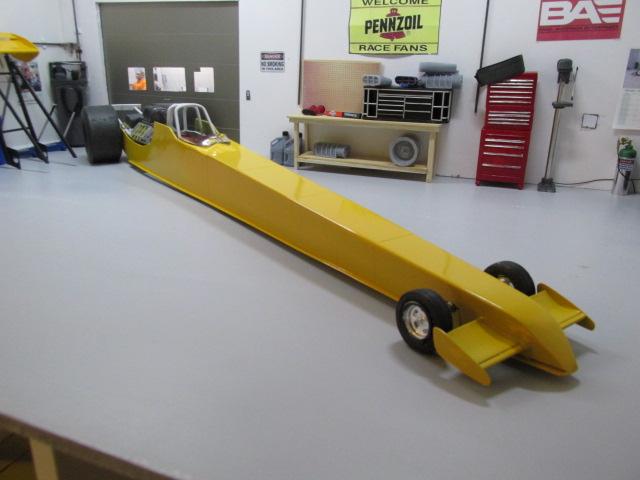
Well I got some color on the chassis late this afternoon, and in hindsight it was not my brightest move. Last Thursday I tested positive for Covid and my wife fell ill as well even though she tested negative twice. It's been a tough few days but both of us I think, can count ourselves as lucky it was not worse than it was. We both seem to be slowly on the mend ( me a little quicker). This morning I woke up feeling not too bad and rested all day and later this afternoon I figured I was OK to spray the chassis (I have a resperator) and a good outside venting spray booth. Its an airbrush, how hard can it be? Too hard, this stuff takes a lot more out of you that I gave it credit for. So everything is put away and I'm going to behave myself for the rest of the week. Here is the result and I'm quite pleased but I am firmly back on the couch for a while!
-
Nostalgia Fuel Dragster--Blower Manifold (01/28/23)
Ian McLaren replied to Straightliner59's topic in WIP: Drag Racing Models
This model just keeps getting better and better and has long since passed the landmark stage! -
’72 Dodge Demon Drag Racer 1/25 scale
Ian McLaren replied to AmericanMuscleFan's topic in WIP: Drag Racing Models
Deceptivly simple part, untill you take into account all the different surfaces and compound curves all in a very small area. This is scratch building at it's finest. Very well done Francis!! -
1/16th Scale Top Fuel Dragster Eddie Hill 4:99
Ian McLaren replied to Ian McLaren's topic in WIP: Drag Racing Models
Progress on the engine , blower bag and injector lines, also working to the fuel pumps to finalize the connection points on the chassis
- 78 replies
-
- 2
-
-
- scratch built
- super shops
- (and 2 more)
-
Nostalgia Fuel Dragster--Blower Manifold (01/28/23)
Ian McLaren replied to Straightliner59's topic in WIP: Drag Racing Models
Here is a mount you may like, I saw it on a T/F car years ago may use it on the Hill car. Sorry for the quality it's a picture of a picture
-
1/16th Scale Top Fuel Dragster Eddie Hill 4:99
Ian McLaren replied to Ian McLaren's topic in WIP: Drag Racing Models
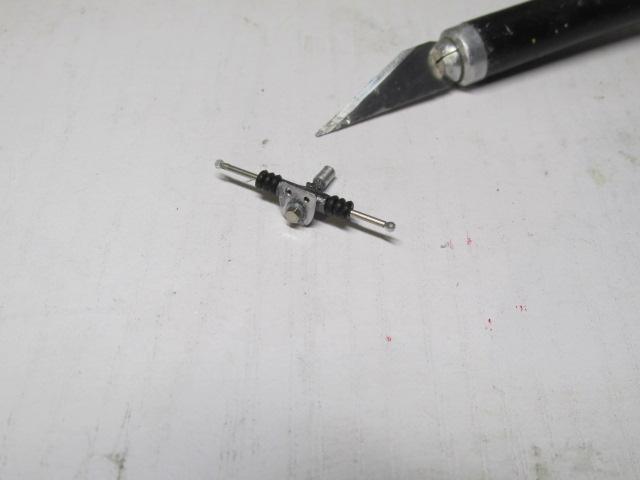
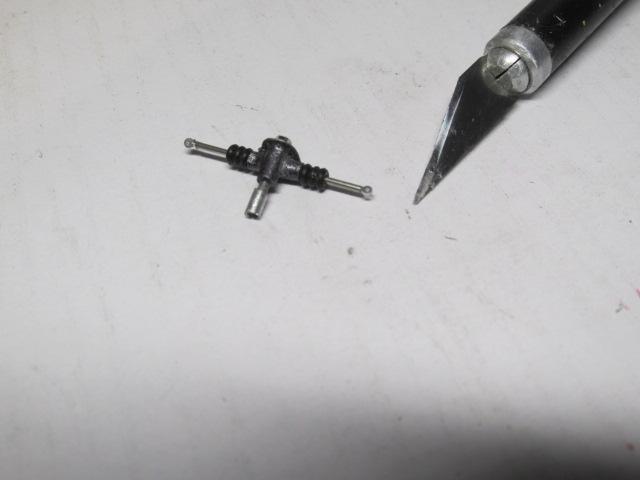
Thank you Daniel, but the only secret is have enough different sizes of metal tubing, notch two for the cross and everything else is simply cut to length, a few size 0 O-rings and a couple of small RB Motion rod ends -
1/16th Scale Top Fuel Dragster Eddie Hill 4:99
Ian McLaren replied to Ian McLaren's topic in WIP: Drag Racing Models
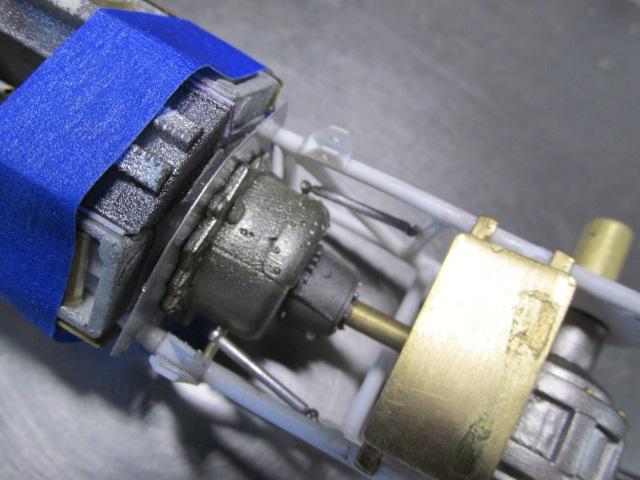
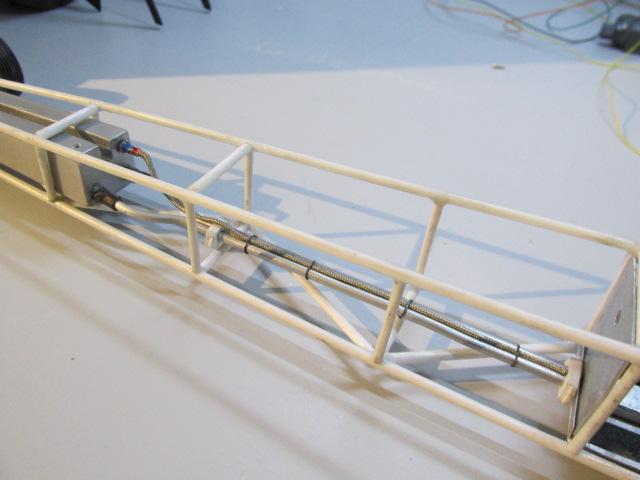
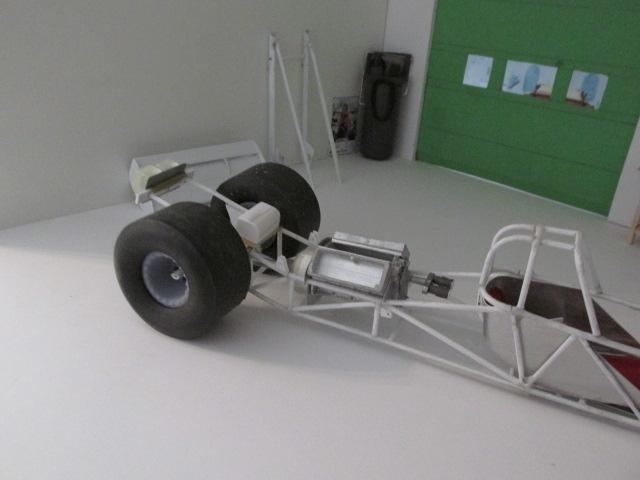
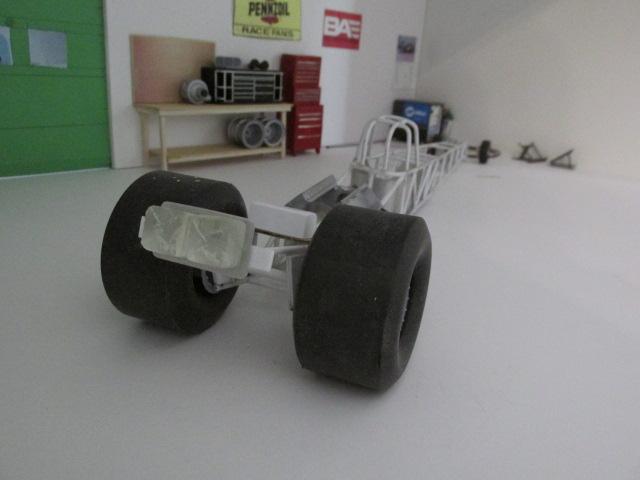
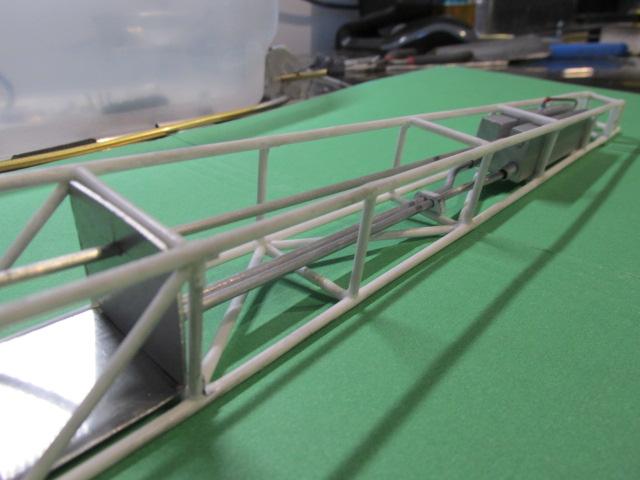
Clutch and throttle (both scratch built) test mounted in the chassis, anti blow back braces fabricated and test fit. Scratch built steering rack ready to mount now front support bracket has been built and installed as well as a -8 return line back to the fuel tank has been added to the front portion of the fuel system nesteled between the two main fuel delivery pipes and secured with four tie wraps. Starting on the motor accessories this week, and once their mounting brackets are attached to the chassis I can probably get it ready for paint.
- 78 replies
-
- 1
-
-
- scratch built
- super shops
- (and 2 more)
-
1/16th Scale Top Fuel Dragster Eddie Hill 4:99
Ian McLaren replied to Ian McLaren's topic in WIP: Drag Racing Models
Thank you very much John, yes I'm now to the point that the progress is starting to show more with each update. -
Nostalgia Fuel Dragster--Blower Manifold (01/28/23)
Ian McLaren replied to Straightliner59's topic in WIP: Drag Racing Models
Daniel those packs look fantastic, you have captured the look of the real ones extremely well. Certainly one of the best efforts I have seen over the years, perhaps the best, very well done my friend! -
Nostalgia Fuel Dragster--Blower Manifold (01/28/23)
Ian McLaren replied to Straightliner59's topic in WIP: Drag Racing Models
Absolutely, especially on a big project, the bar continues to go up during the process, and second or third attemps usually seem to produce better results. This model is a perfect illustration of that process. Outstanding! -
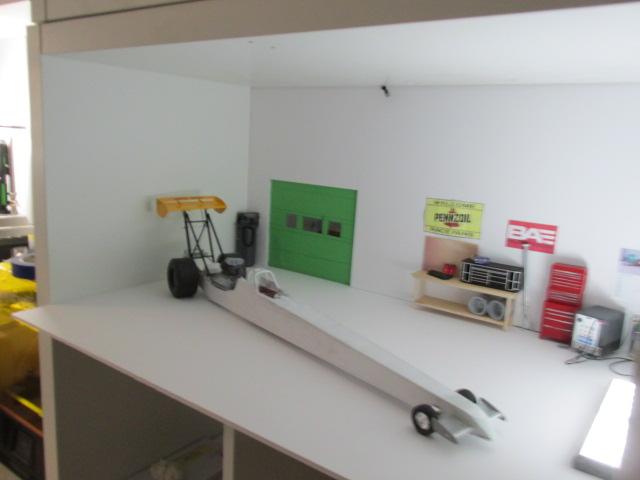
Shop and current project both moving forward, chassis dyno room in the rear is up and running.
- 7 replies
-
- 3
-
-
- scratch built
- 16th scale
- (and 1 more)
-
1/16th Scale Top Fuel Dragster Eddie Hill 4:99
Ian McLaren replied to Ian McLaren's topic in WIP: Drag Racing Models
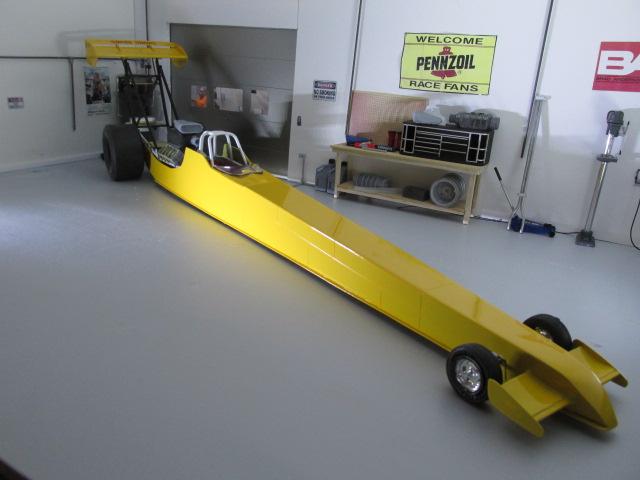
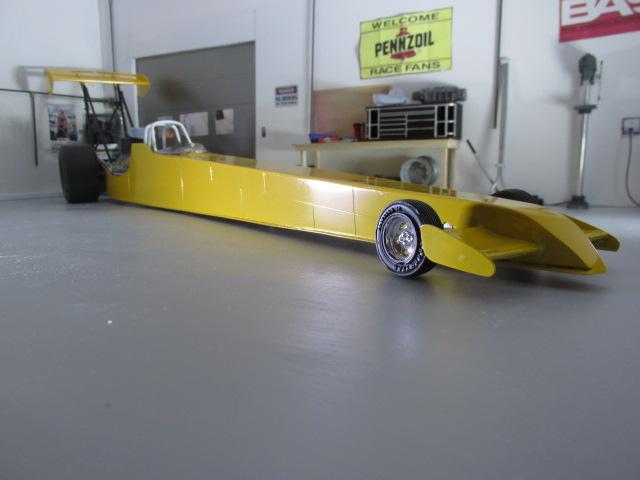
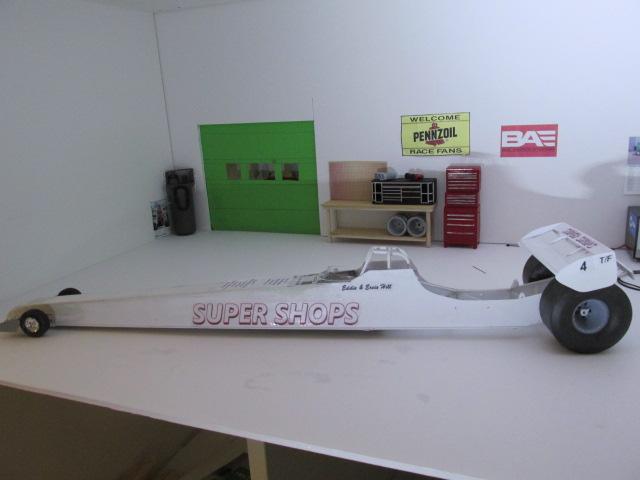
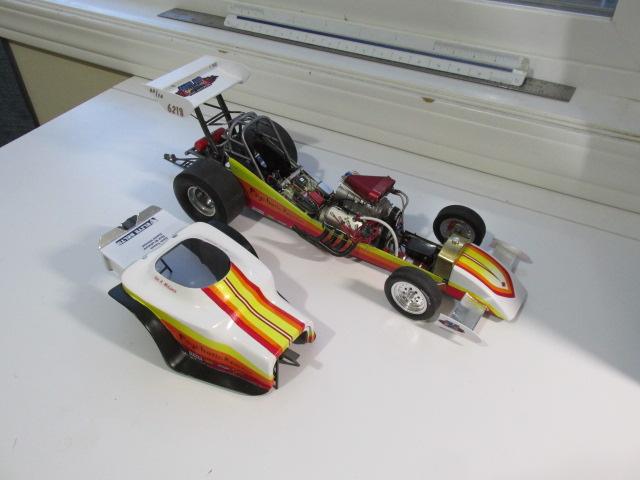
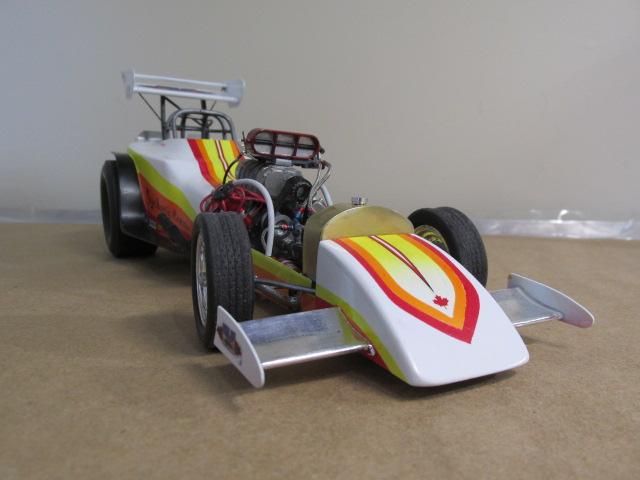
As I said earlier I'm going to basicly finish the majority of the body, here it is with most of the decals printed and installed. Except for a couple of minor sponsor decals everything else was producde in GIMP and printed by me at home.
-
1/16th Scale Top Fuel Dragster Eddie Hill 4:99
Ian McLaren replied to Ian McLaren's topic in WIP: Drag Racing Models
Thank you Francis, This is the beginning of my most ambitious fuel system to date but I think I have a workable plan in place to complete it, again something a little out of the ordinary but true to the original car. -
1/16th Scale Top Fuel Dragster Eddie Hill 4:99
Ian McLaren replied to Ian McLaren's topic in WIP: Drag Racing Models
Photo one, first color coat checking surfaces, next two photos repair don't and panel lines scribed, rear wheels with front beads narrowed, and sprayed (may get redone). The video shows the injector scoop for the dual fuel pump and dual barrel valve system employed on this car. This system was the interm solution to the need these motors had developed due to other advancements in the power train (ignition and clutches primarily). Soon the high flow dual inlet barrel valves arrived simplifying the fuel systems while still delivering the fuel in the required quantities. None the less this was the setup that put these cars into the 4 second bracket. MVI_0191[1].MOV
- 78 replies
-
- 3
-
-
- scratch built
- super shops
- (and 2 more)
-
1/16th Scale Top Fuel Dragster Eddie Hill 4:99
Ian McLaren replied to Ian McLaren's topic in WIP: Drag Racing Models
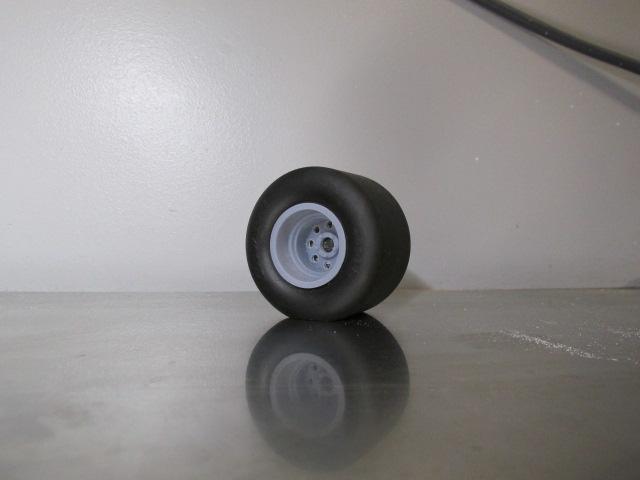
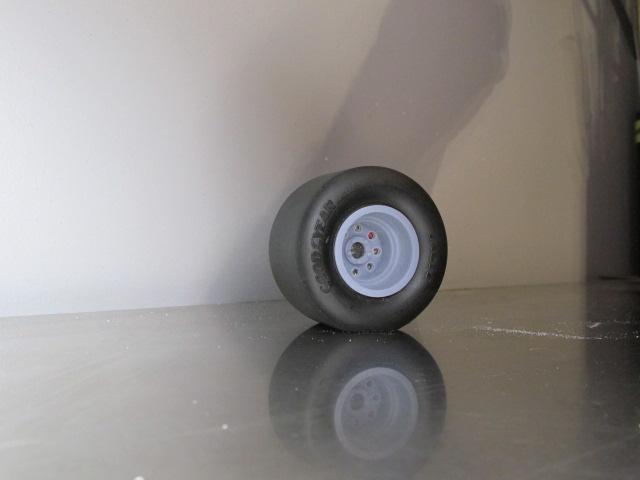
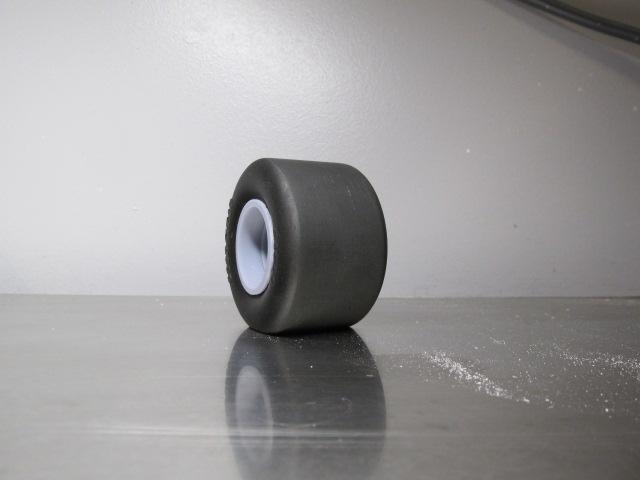
Correct Goodryear D-2184 D-2 slicks and Cragar 8 hole wheels as well as rear rotors and calipers are now printed. Tires are airbrushed with Tamiya Semi Gloss Black for the sidewalls and Tamiya Nato Black for the tread area after it was roughted up with 220 grit. Just trying to deciede which chrome finish to use on the wheels, keeping in mind they were polished aluminum and not chrome.
- 78 replies
-
- 1
-
-
- scratch built
- super shops
- (and 2 more)
-
1/16th Scale Top Fuel Dragster Eddie Hill 4:99
Ian McLaren replied to Ian McLaren's topic in WIP: Drag Racing Models
Correct Goodryear D-2184 D-2 slicks and Cragar 8 hole wheels as well as rear rotors and calipers are now printed. Tires are airbrushed with Tamiya Semi Gloss Black for the sidewalls and Tamiya Nato Black for the tread area after it was roughted up with 220 grit. Just trying to deceide which chrome finish to use on the wheels, keeping in mind they were polished aluminum and not chrome.
-
1/16th Scale Top Fuel Dragster Eddie Hill 4:99
Ian McLaren replied to Ian McLaren's topic in WIP: Drag Racing Models
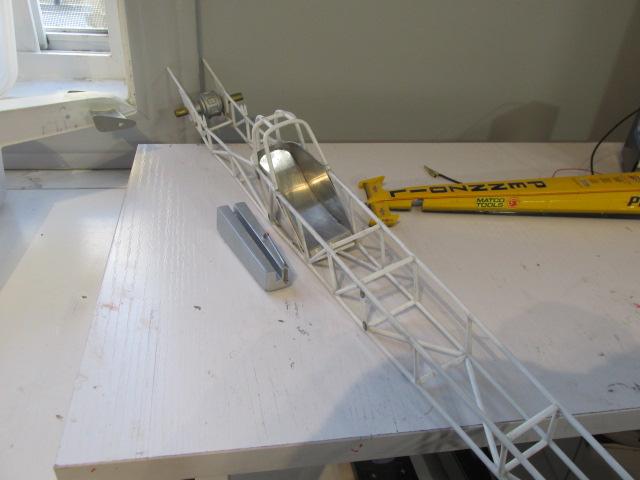
OK I kind of digressed on the last update, I had already found out the template windscreen was not going to work, the optional windscreen from a 1/12th Tamiya MP4-6 McLaren F1 car was pressed into service requiring a change in the contour of the panel.. Rear wing assy mocked up, roll cage added roughed in and a color test on the wing element. Work started on the decal sheets. Also fabricated the puke tank and cast a couple of parachute packs from a carving I did for a previous model. I'm going to go another direction on this build and work on finishing the body for the most part as it just slips on and off without affecting the chassis. After that is completed the focus will shift to the chassis, drive train and other details. Thanks for watching and comments, questions , are always welcome.
- 78 replies
-
- 3
-
-
- scratch built
- super shops
- (and 2 more)
-
1/16th Scale Top Fuel Dragster Eddie Hill 4:99
Ian McLaren replied to Ian McLaren's topic in WIP: Drag Racing Models
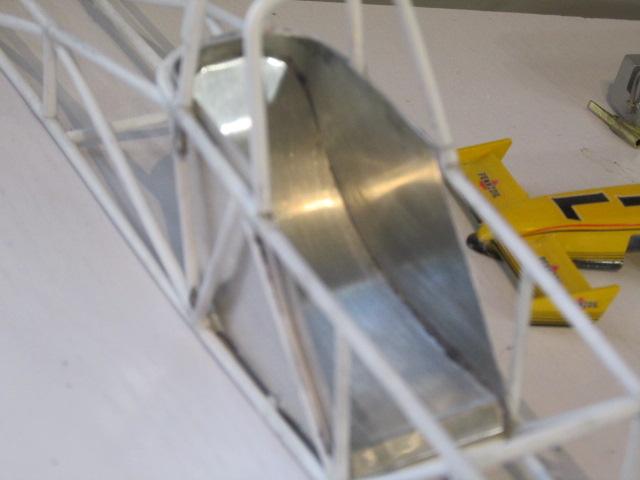
Another update, front fuel feed lines fabricated, tin for drivers compartment started,alignment for steering shaft set and the driver seat is started. I have also started on the cowl and windshield panel but may have to rethink the approach
- 78 replies
-
- 1
-
-
- scratch built
- super shops
- (and 2 more)
-
’72 Dodge Demon Drag Racer 1/25 scale
Ian McLaren replied to AmericanMuscleFan's topic in WIP: Drag Racing Models
A simple but elegant solution to the embossing, as with Daniel that's going in the hard drive. As usual the rest of the work on the front clip is off the charts for precision. -
Nostalgia Fuel Dragster--Blower Manifold (01/28/23)
Ian McLaren replied to Straightliner59's topic in WIP: Drag Racing Models
Daniel, I am blown away by the job you did on the headers, I'm hoping to at least come close to what you have accomplished here but I think the bar is now just out of reach. Fantastic work my friend!!! -
1/16th Scale Top Fuel Dragster Eddie Hill 4:99
Ian McLaren replied to Ian McLaren's topic in WIP: Drag Racing Models
Thank you very much Chris, Here's better photos of the altered
- 78 replies
-
- 2
-
-
- scratch built
- super shops
- (and 2 more)
-
’72 Dodge Demon Drag Racer 1/25 scale
Ian McLaren replied to AmericanMuscleFan's topic in WIP: Drag Racing Models
Hi Francis, I'm very glad you are back on the bench, I just got caught up on your project and it's obvious the the lay off did not affect your skills.The dash and front clip are spot on and very appropriate for your premise of the kind of car this will be, I know the decision for the dash has been made, but yes to the aluminum. I do have some distressing news regarding you "Plastic TIG" I think you have been beaten to the punch on this one.
-
Thank you so much Donato, except for the black stripes on the hood and deck lid (air brushed to keep the film thickness down), all of the primer, basecoat, body color, pearl and clear coats are straight out of the Tamiya spray cans. Only a very limited amount of polishing was done after the fact.
-
1/16th Scale Top Fuel Dragster Eddie Hill 4:99
Ian McLaren replied to Ian McLaren's topic in WIP: Drag Racing Models
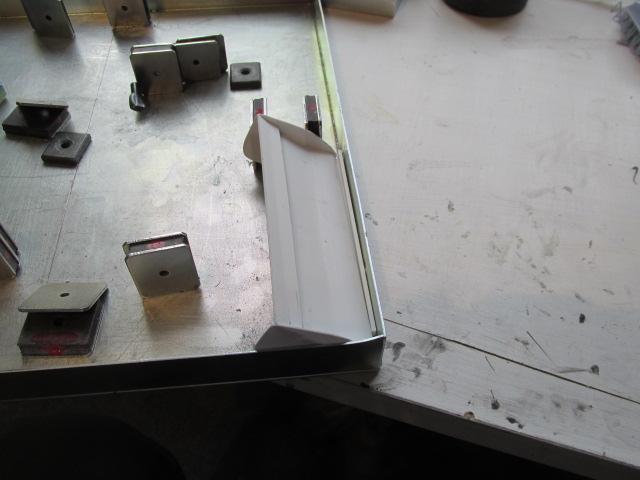
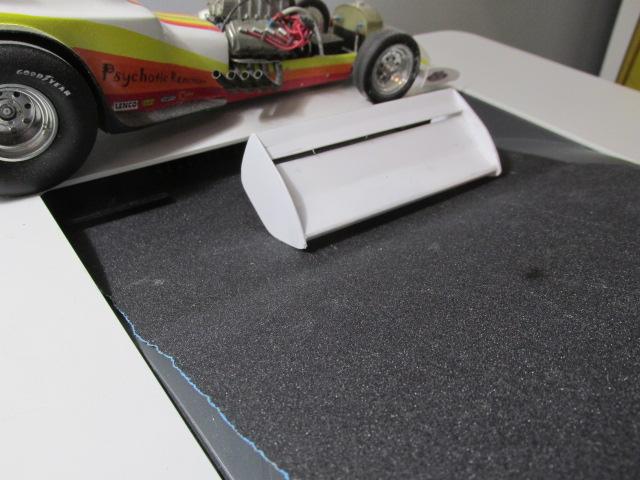
-More wing progress
- 78 replies
-
- 1
-
-
- scratch built
- super shops
- (and 2 more)