RCprofile.JPG.6b95b19b856bf00a3becd6aeaaa48f3b.JPG)
Ian McLaren
-
Posts
1,360 -
Joined
-
Last visited
Content Type
Profiles
Forums
Events
Gallery
Everything posted by Ian McLaren
-
RCprofile.thumb.JPG.1691ea753d0f0897fdc1b2510cf06775.JPG)
full detail 1/16th Gordie Bonin BubbleUp Trans Am Funnycar
Ian McLaren replied to Ian McLaren's topic in WIP: Drag Racing Models
Thank you Brian, thank fully it won't, but it will raise the back end a bit. This era of cars were fairly high at the rear anyway. As far as the tin goes, I had to make some modifications to accomodate the added details on the chassis, so it requires some additions refinishing regardless, so any additional changes to restore the body ride height would not be as painful were it fully completed.- 190 replies
-
- 1
-

-
- scratch built
- brass chassis
- (and 1 more)
-
1/16th Scale 1980 Reher-Morrison Pro Stock Camaro
Ian McLaren replied to Ian McLaren's topic in WIP: Drag Racing Models
While waiting for a couple of things to print for the 57 Corvette, I decieded to start some of the minor corrections to the Rehr-Morrison Camaro. Opened up the rear wheel wells some (it may require some more once i get the correct sized slicks printed) Printed the Weld Wheel Drag Lites and front tires (with the extra space on a build plate for the Corvette. I also removed and filled the side fender Z28 vents and well as removing the mirrors and fill the resultins divits. Lots of body work to do yet, primarily removing the front spoiler which is going to take a bit of work to get correct. It's going back up on the shelf now as I concentrate on the 57 Corvette
- 32 replies
-
- 4
-

-
- scratchbuild
- 3d
- (and 1 more)
-
Just when I'm getting used to the level of your detailing you go and jack up the bar another notch or two, the shifter and steering wheel look tremendous. This has become a truly exceptional model my friend!
-
full detail 1/16th Gordie Bonin BubbleUp Trans Am Funnycar
Ian McLaren replied to Ian McLaren's topic in WIP: Drag Racing Models
I have gone as far as I can on the Bonin Swindahl chassis, the body is just waiting for some refinements and the final graphics. I also encountered a issue I have never dealt with before, once the chassis was assembled there is almost no ground clearance at the rear motor plate. I had checked the angles and every measurement I could be sure of but couldn't find the issue. A message for another modeler about a funnycar with what appeared to be a similar chassis led me to some further research. The article was an acount of the restoration of a well known funnycar that pretty much covered the complete car. When they assembled the car they found exactly the same problem I was facing (no ground clearance). It turns out that the car was originally designed around the taller Top Fuel slicks of the day. This probably should not have come as a shock as Al. was always primarily a Top Fuel guy. It also seems to have contributed to the unusally large rear wheel openings these cars had. Long story quick measurements confirm if I print a set of taller tires my problem will also dissappear. Sometimes the answer just comes from a source you never considdered I will be concentrating on the 57 Corvette Super Gas car for the forseeable future.
- 190 replies
-
- 3
-
-
- scratch built
- brass chassis
- (and 1 more)
-
full detail 1/16th Gordie Bonin BubbleUp Trans Am Funnycar
Ian McLaren replied to Ian McLaren's topic in WIP: Drag Racing Models
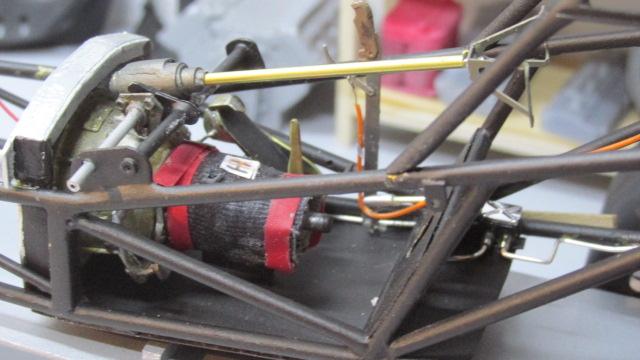
Ready for the engine and pumbing, firebottles and lines, steering arm and rods plus a few other odds and ends. The front suspension is the stand out feature of this Swindahl design
- 190 replies
-
- 2
-
-
- scratch built
- brass chassis
- (and 1 more)
-
full detail 1/16th Gordie Bonin BubbleUp Trans Am Funnycar
Ian McLaren replied to Ian McLaren's topic in WIP: Drag Racing Models
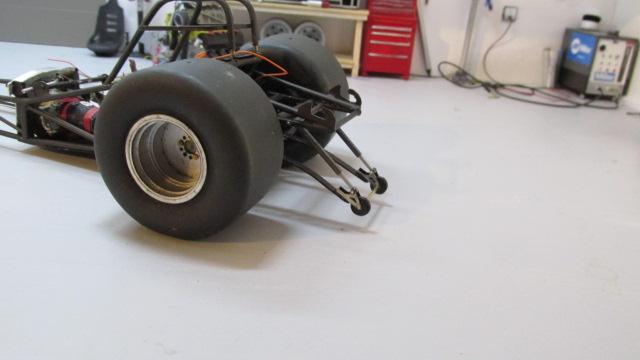
Finished the wheelie bar assy tonight.
- 190 replies
-
- 2
-
-
- scratch built
- brass chassis
- (and 1 more)
-
1/16th Scale 1980 Reher-Morrison Pro Stock Camaro
Ian McLaren replied to Ian McLaren's topic in WIP: Drag Racing Models
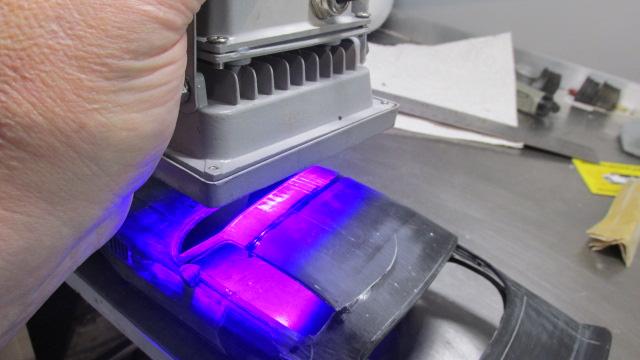
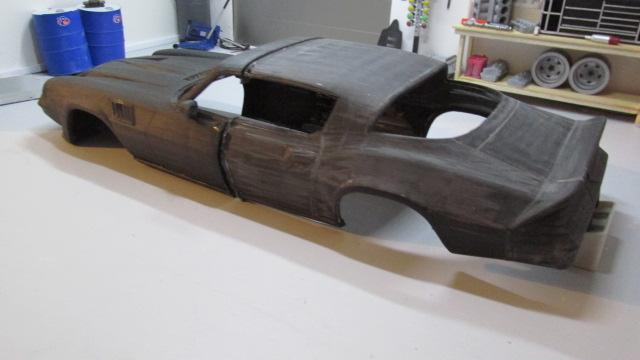
It's at least together and very soild, and the roof is close to the correct profile with just a moderate amount of labour. Working with resin and a paint brush with using an ultraviolet curing lamp works very well for glueing the halfs together. It also works suprisingly well as a filler for low spots and blending contours, almost instant body putty, but you have to work in very thin layers and cure as you go. The main advantage is that once cured (just a few seconds under the light) it sands exactly like the body material (which is actually is). Feathering edges is a breeze. Setting this aside now but it has been a valuable learning experience. In the mean time I'll look at the changes that need to be done and develop a plan of attack. I am working on modifying one of the files to print a second hood rather than having to remove the existing hood without damageing it. Photos are captioned. Marking the scribe line with Dymo tape as a guide Cutting off the leading edge of the rood with a Tamiya Scriber II, great tool easy to use stays sharp seemingly forever Finishing the very ends of the cuts where the thickness is a bit much for the scriber Body fitting together with virtually no sanding adjustments required and the Ultra Violet curing lamp I use. Curing a joint and a couple of low spots I filled The body together with the roof fairly close, and the side seems just glued with the resin but not finished or dressed.
- 32 replies
-
- 5
-
-
- scratchbuild
- 3d
- (and 1 more)
-
1/16th Scale 1980 Reher-Morrison Pro Stock Camaro
Ian McLaren replied to Ian McLaren's topic in WIP: Drag Racing Models
The front half printed with no drama. The two together are about 6 scale inches too long in the doors and roof. I left this overlap purposely to try and get a near perfect match before starting the body work.. Now to glue the frant and back together, I have never done this before with photoresin. Any words of wisdom would be most welcome!
- 32 replies
-
- 8
-
-
- scratchbuild
- 3d
- (and 1 more)
-
full detail 1/16th Gordie Bonin BubbleUp Trans Am Funnycar
Ian McLaren replied to Ian McLaren's topic in WIP: Drag Racing Models
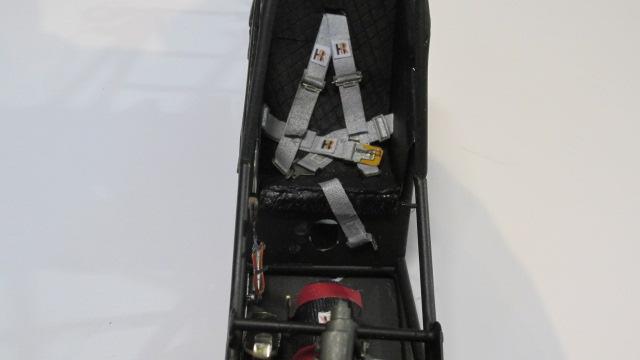
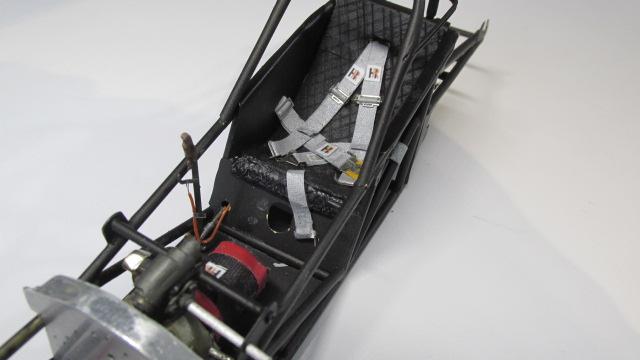
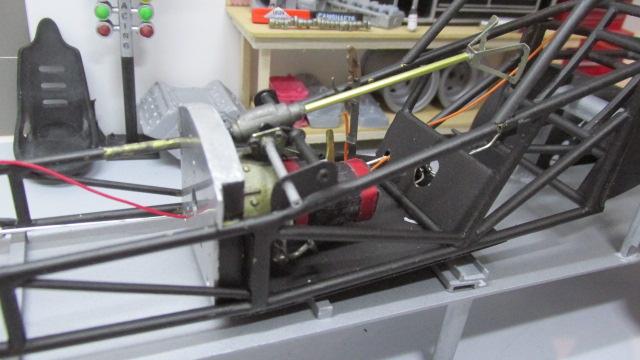
The seat belts are in and secured
-
1/16th Scale 1980 Reher-Morrison Pro Stock Camaro
Ian McLaren replied to Ian McLaren's topic in WIP: Drag Racing Models
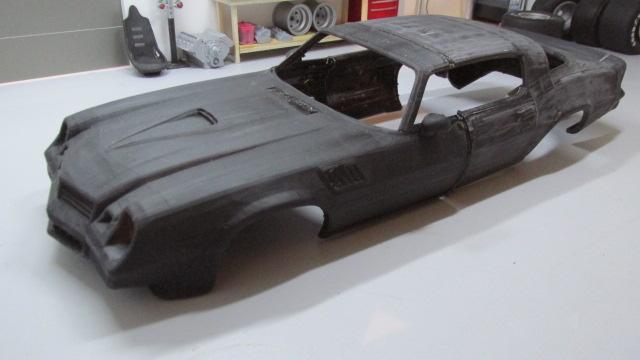
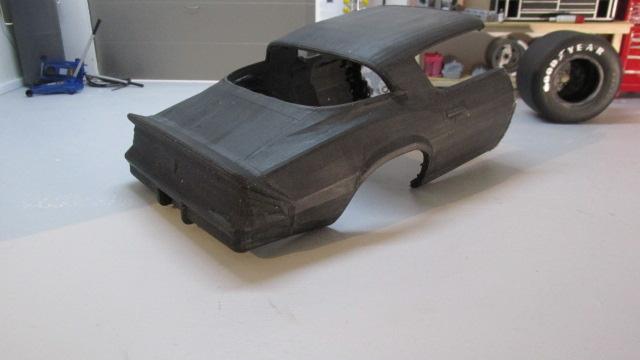
Well it ain't pretty but I have worked with worse. My first attempt at printing a body and I learned a bunch. This is for a future Reher-Morrison ProStock Camaro. What have I learned, the STL file I chose to print is not very good, a series of flat planes to form a curved surface so there is going to be extensive body work above joining the two halfs together (going to print the front tomorrow). I will say that although rough, the size and overall proportions don't appear too bad. I think I used way too many supports, but I always have and I still haven't experienced a print failure. Have I been able to use every one, no, but that all comes down to opperator error and the necessary learning curve, never had anything fall off the build plate. The extra resin used for the supports is way less money and aggrivation than a failed 8 hour print. Also learned that printing your own bodies is not for the faint of heart or inexperienced modeler and may be best left to the professionals who sell printed bodies. You guys know who you are. I may be in over my head on this onw.
- 32 replies
-
- 3
-
-
- scratchbuild
- 3d
- (and 1 more)
-
full detail 1/16th Gordie Bonin BubbleUp Trans Am Funnycar
Ian McLaren replied to Ian McLaren's topic in WIP: Drag Racing Models
Starting to come together, I have the correct steering shaft housing but have misplaced it, using brass just to show its placement
-
full detail 1/16th Gordie Bonin BubbleUp Trans Am Funnycar
Ian McLaren replied to Ian McLaren's topic in WIP: Drag Racing Models
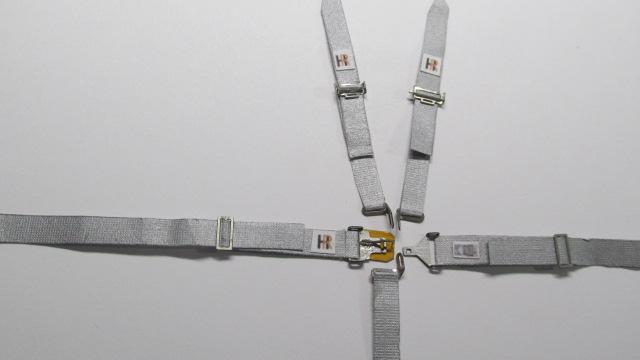
Still building bits for the chassis, todays project was the seat belts. Hall Racing Products belts are now ready to install, I used a combination of Future Attractions hardware, Pro Tech webbing material and custom designed and printed maunfacturer patches, done by me
- 190 replies
-
- 1
-
-
- scratch built
- brass chassis
- (and 1 more)
-
full detail 1/16th Gordie Bonin BubbleUp Trans Am Funnycar
Ian McLaren replied to Ian McLaren's topic in WIP: Drag Racing Models
Daniel Himmel . Thank you so much Daniel, in reply to your comments on another site , yes he was most noted for Top Fuel cars, and the funnycars from what I am told were mostly NHRA Division Six and Seven cars. Due to the distances involved only a few competed nationally which lead to the lack of documentation. As to the uniqueness of the chassis , I can't wait to unveil the front axle and suspension which is where the Swindahl influence is most apparent.- 190 replies
-
- 1
-
-
- scratch built
- brass chassis
- (and 1 more)
-
full detail 1/16th Gordie Bonin BubbleUp Trans Am Funnycar
Ian McLaren replied to Ian McLaren's topic in WIP: Drag Racing Models
LOL, yes the welding, it a deal going back a couple of years ago between Francis and myself on another project- 190 replies
-
- 1
-

-
- scratch built
- brass chassis
- (and 1 more)
-
full detail 1/16th Gordie Bonin BubbleUp Trans Am Funnycar
Ian McLaren replied to Ian McLaren's topic in WIP: Drag Racing Models
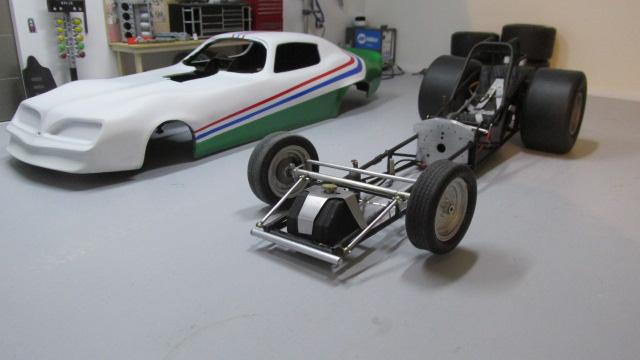
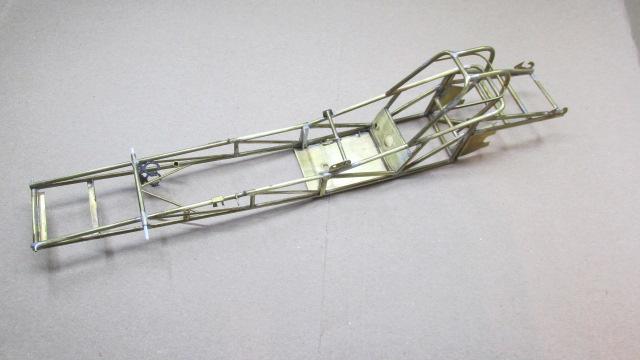
For the first time, as far as I can tell the late 70s Al Swindahl funny car chassis has been built in model form. I just completed applying the paint (Tamiya Dark Iron) to the fully scratch built brass chassis. As these chassis were not very plentiful reference photos and information were a huge challenge to piece togther a working drawing to base the model on. The break through came from Bryan Hodges (RIP) when he sent me the photos that I needed to make this project possible. From the way the driveline and other pieces fit and clear everything I believe I am quite close to the correct dimensions. With everthing I have build to date, getting to this point on this chassis is the high point of my modeling endevors. The challenge now is to finish the rest of the car to the same standard
- 190 replies
-
- 1
-
-
- scratch built
- brass chassis
- (and 1 more)
-
full detail 1/16th Gordie Bonin BubbleUp Trans Am Funnycar
Ian McLaren replied to Ian McLaren's topic in WIP: Drag Racing Models
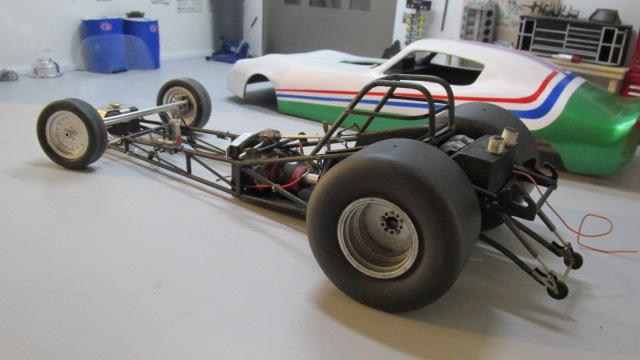
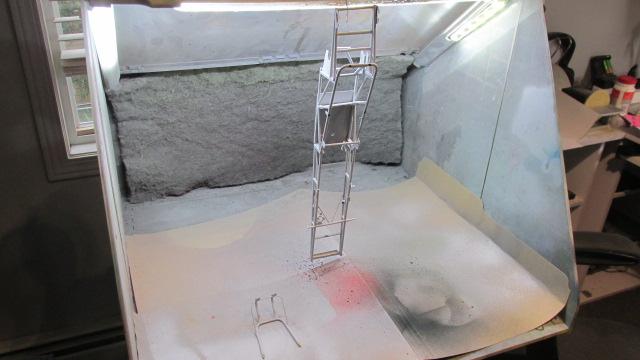
Final test fit before the color goes on the chassis tonight
- 190 replies
-
- 2
-
-
- scratch built
- brass chassis
- (and 1 more)
-
Daniel the fuel tank looks fantastic, you seem to be leaving no stone unturned, amazing!
-
full detail 1/16th Gordie Bonin BubbleUp Trans Am Funnycar
Ian McLaren replied to Ian McLaren's topic in WIP: Drag Racing Models
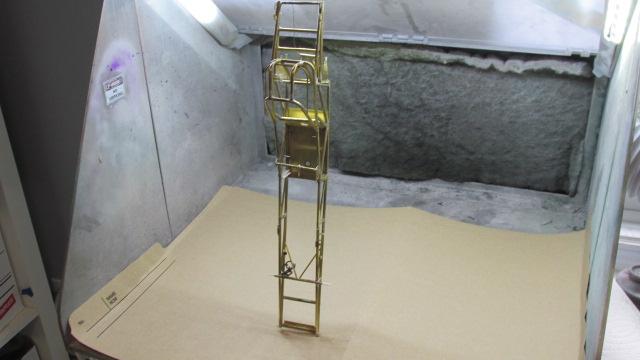
Big step forward on the BubbleUp Car chassis. All the holes are drilled and all the brackets are attached. Chassis was washed twice with dish soap, then wiped down with lacquar thinner and paper towels, the every joint and seam was scrubbed with Q tips and thinners till they came back out white. Compressed air dried,tubes blown out tack clothed. Ready for paint, thinish coat of self etching grey primer sprayed from all directions, hung to dry and will now sit for a day to harden. Then sanding any issues that remain and a final coat of primer and then spray the color (Tamiya Dark Iron)
- 190 replies
-
- 3
-
-
- scratch built
- brass chassis
- (and 1 more)
-
As if I didn't have enough on my plate, I was experimenting on wether or not I could print a 1/16th body on my Photon Mono 4K printer. I stumbled across an 80 Camaro body and I was hooked. It took all day but I did finally figure out how to split the file in two parts and get the body halfs to fit on the build plate. The body is a Z28 but the scoop and the flares can be handled easily. The BubbleUp car will take precedence and then the 57 Corvette Super Gas but when the oppertunity allows parts and reference materials will be copied, printed or purchased for this build. Having owned an 80 Camaro this has always been an "I should build that one" project. I have a 1/16th decal set for Grumpy's 1980 Camaro as well which is also very appealing. The cars are so similar in the details the decision could be made as late as the white paint is on, but I will probably go with Lee's car in the end
- 32 replies
-
- 6
-
-
- scratchbuild
- 3d
- (and 1 more)
-
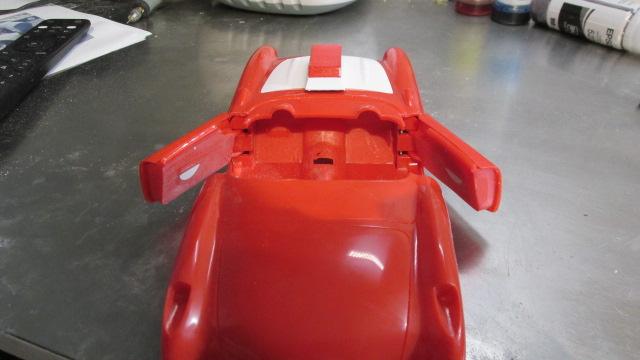
1/16th 1957 Corvette Super Gas 80's
Ian McLaren replied to Ian McLaren's topic in WIP: Drag Racing Models
I'm focusing primarily on the BubbleUp Trans Am, but this one keeps draging me back. There has been some progress while paint and glue dries on the other car. This is just the white primer coat with decal test shots on wetted plain paper, door are hinged and initial adjustments made and the roll bar/cage is started
- 47 replies
-
- 2
-
-
- bbc 5speed
- ladder bar
- (and 1 more)
-
Roger, I just spent the last hour going over your entire build from the start. What impresses is how clean and precise the model has been during the whole process, as well as the attention to stance and scale. As the model advances this care and attention is showing through as each area is wrapped up. I apologize for not paying attention sooner but I am now a confirmed follower and fan, well done!
-
full detail 1/16th Gordie Bonin BubbleUp Trans Am Funnycar
Ian McLaren replied to Ian McLaren's topic in WIP: Drag Racing Models
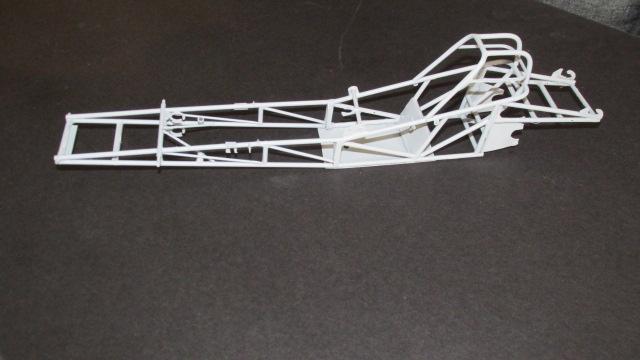
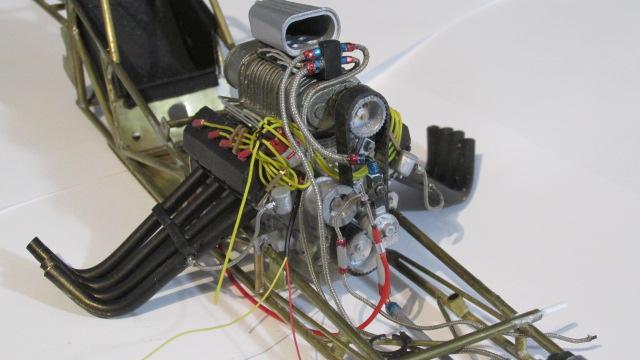
The BubbleUp car is marching towards completion of the chassis and driveline, Plumbing of the engine is progressing, wiring for the coil is in place as well as steam lines to the headers ( which are also permanently attached) coil mount has been added to the chassis. Which is just about ready for final cleanup and color. .
- 190 replies
-
- 4
-
-
- scratch built
- brass chassis
- (and 1 more)
-
full detail 1/16th Gordie Bonin BubbleUp Trans Am Funnycar
Ian McLaren replied to Ian McLaren's topic in WIP: Drag Racing Models
Thanks Tim, yes it can be a struggle to get everything all going the same direction on this kind of project as I'm sure you are well aware. -
Tim, that looks very good and I have to agree with Daniel about sheet metal especially when it's natural finish. There really is nothing that can replace real metal for a convincing finish. Very well done.
-
1/16th 1957 Corvette Super Gas 80's
Ian McLaren replied to Ian McLaren's topic in WIP: Drag Racing Models
Needed a break from the BubbleUp car so the Corvette came down from the shelf for a bit of work on the body, and to do some test shots of the proposed decals just on white paper
- 47 replies
-
- 2
-
-
- bbc 5speed
- ladder bar
- (and 1 more)