AmericanMuscleFan
-
Posts
3,058 -
Joined
-
Last visited
Content Type
Profiles
Forums
Events
Gallery
Everything posted by AmericanMuscleFan
-

’72 Dodge Demon Drag Racer 1/25 scale
AmericanMuscleFan replied to AmericanMuscleFan's topic in WIP: Drag Racing Models
It's nothing but styrene, aluminum and brass Rich, the marks of appreciation and camaraderie are priceless though! Francis -
67 Camaro B&R Performance C/SM
AmericanMuscleFan replied to Nitro330's topic in WIP: Drag Racing Models
I'm going to go see the final photos, you did a fantastic job Terry! ? -
I'm happy and excited to see you back in the saddle Tim, I was starting to miss your prowess and I'm certainly not the only one! ?
-
’72 Dodge Demon Drag Racer 1/25 scale
AmericanMuscleFan replied to AmericanMuscleFan's topic in WIP: Drag Racing Models
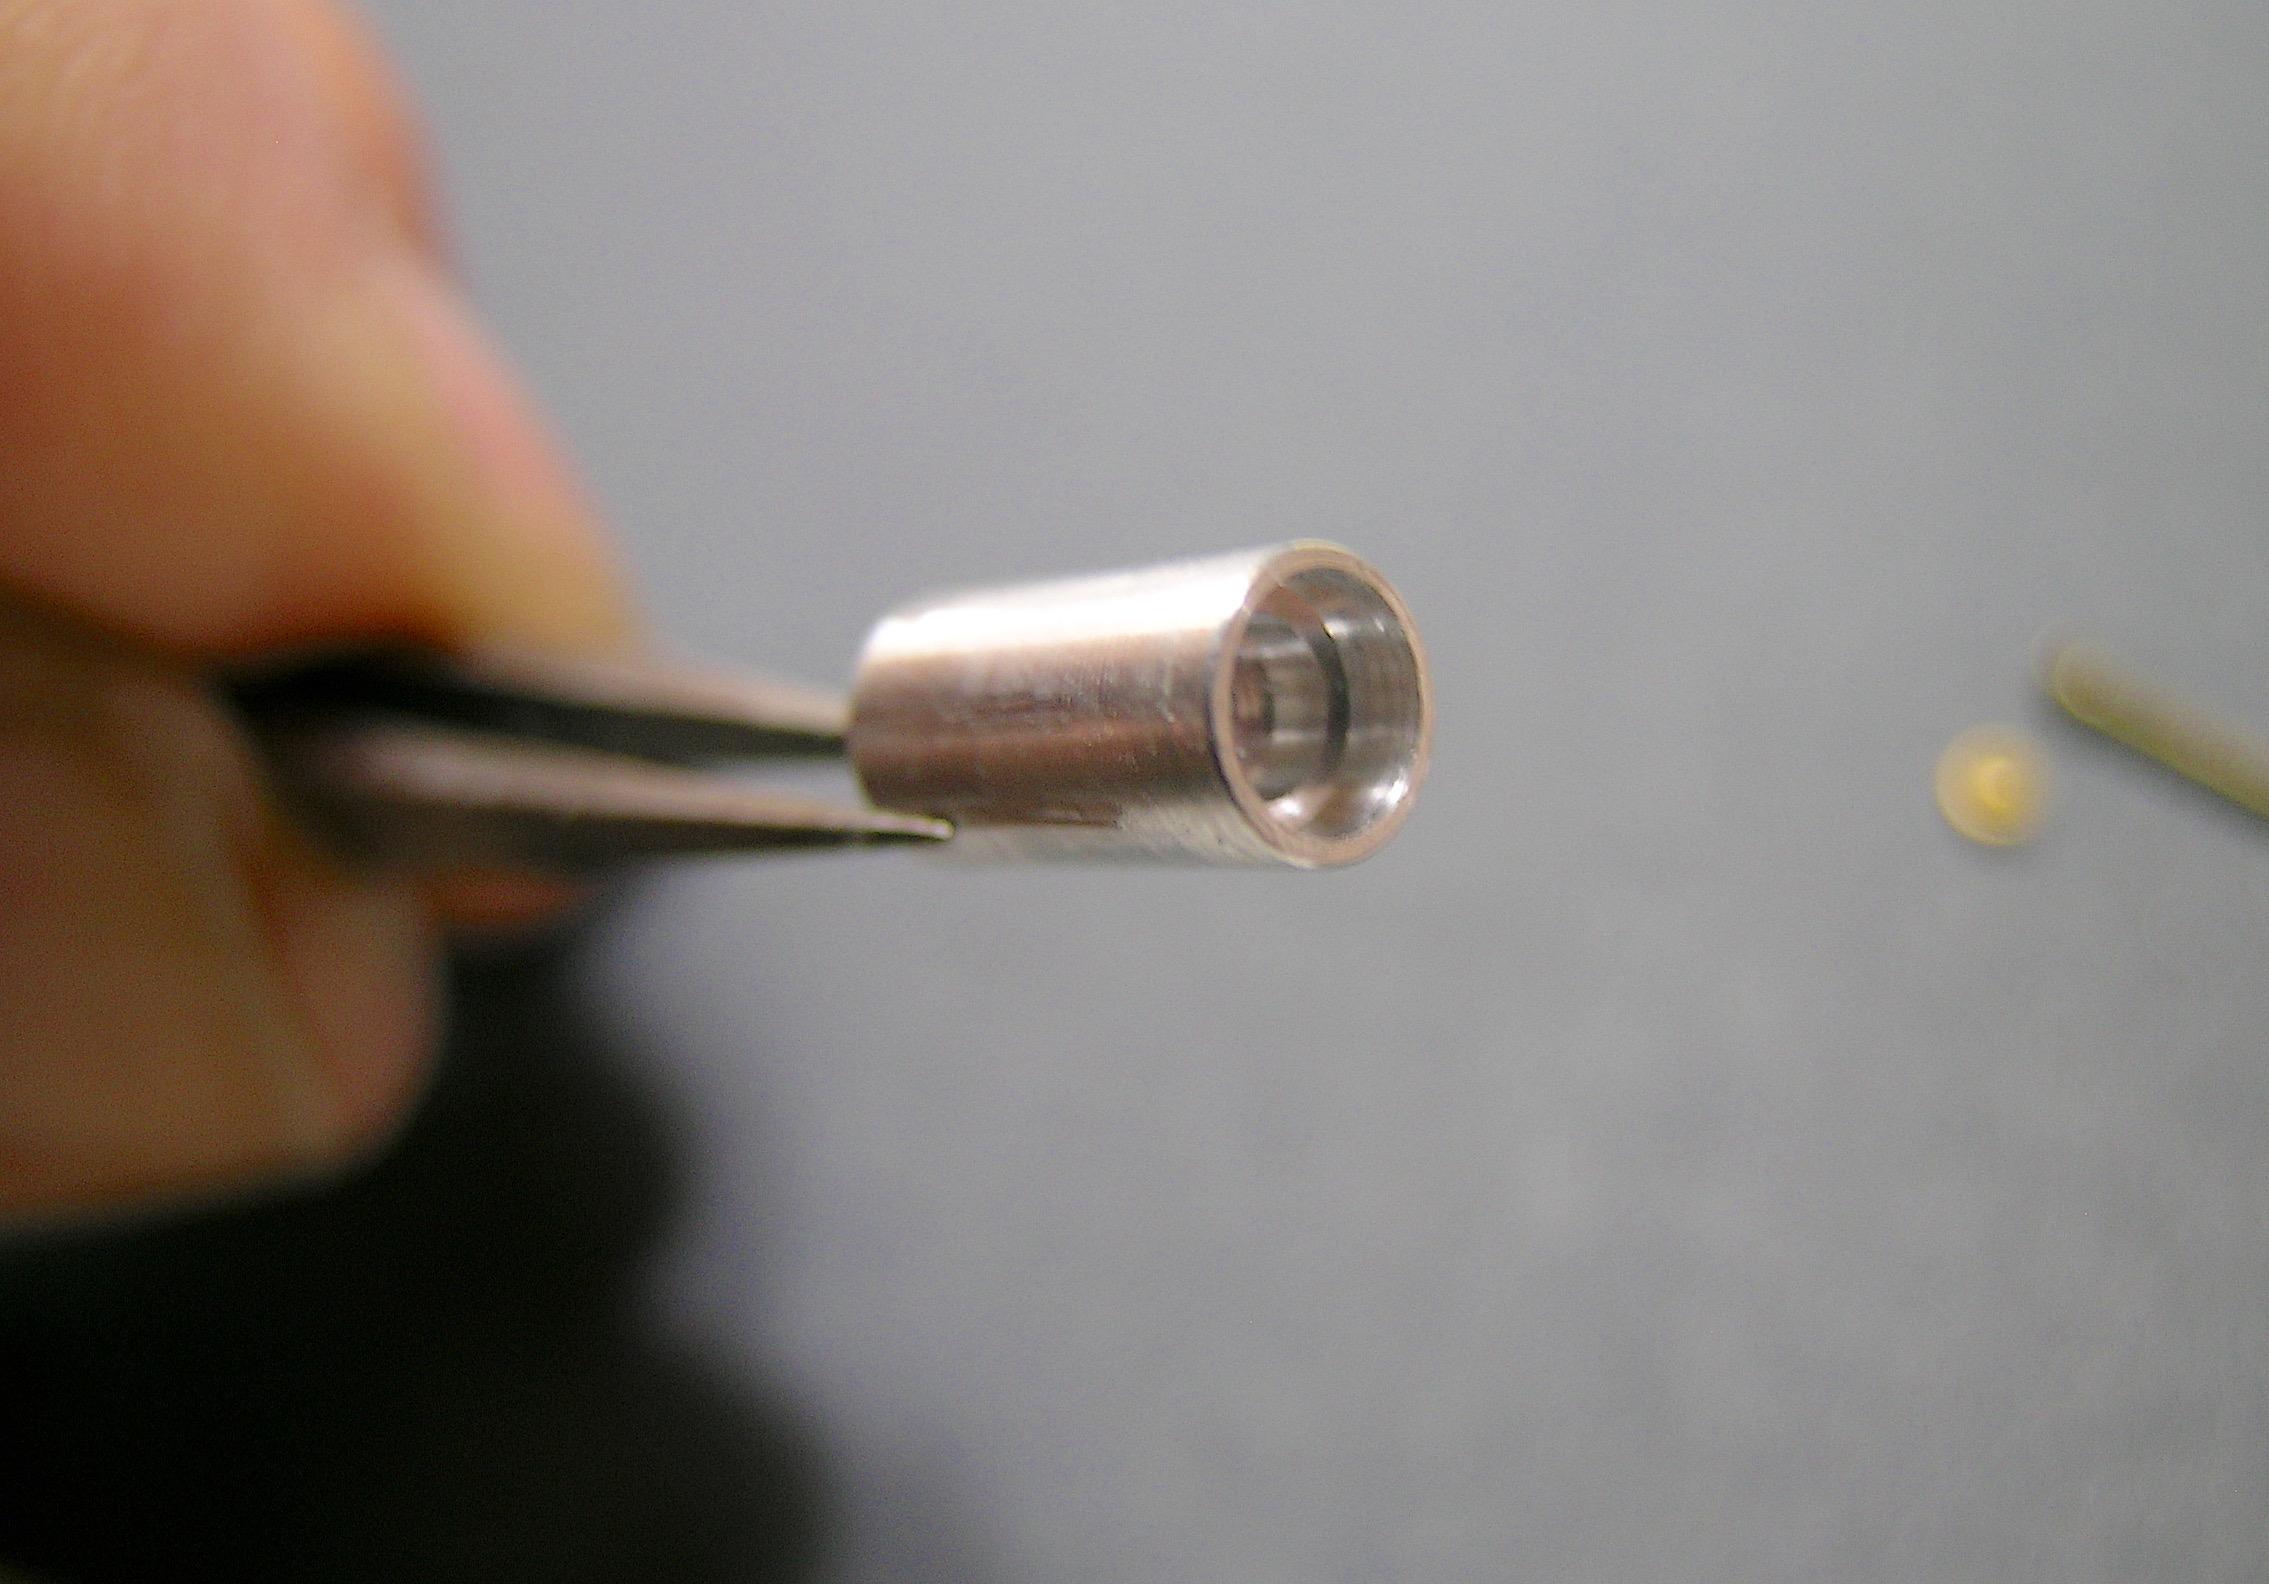
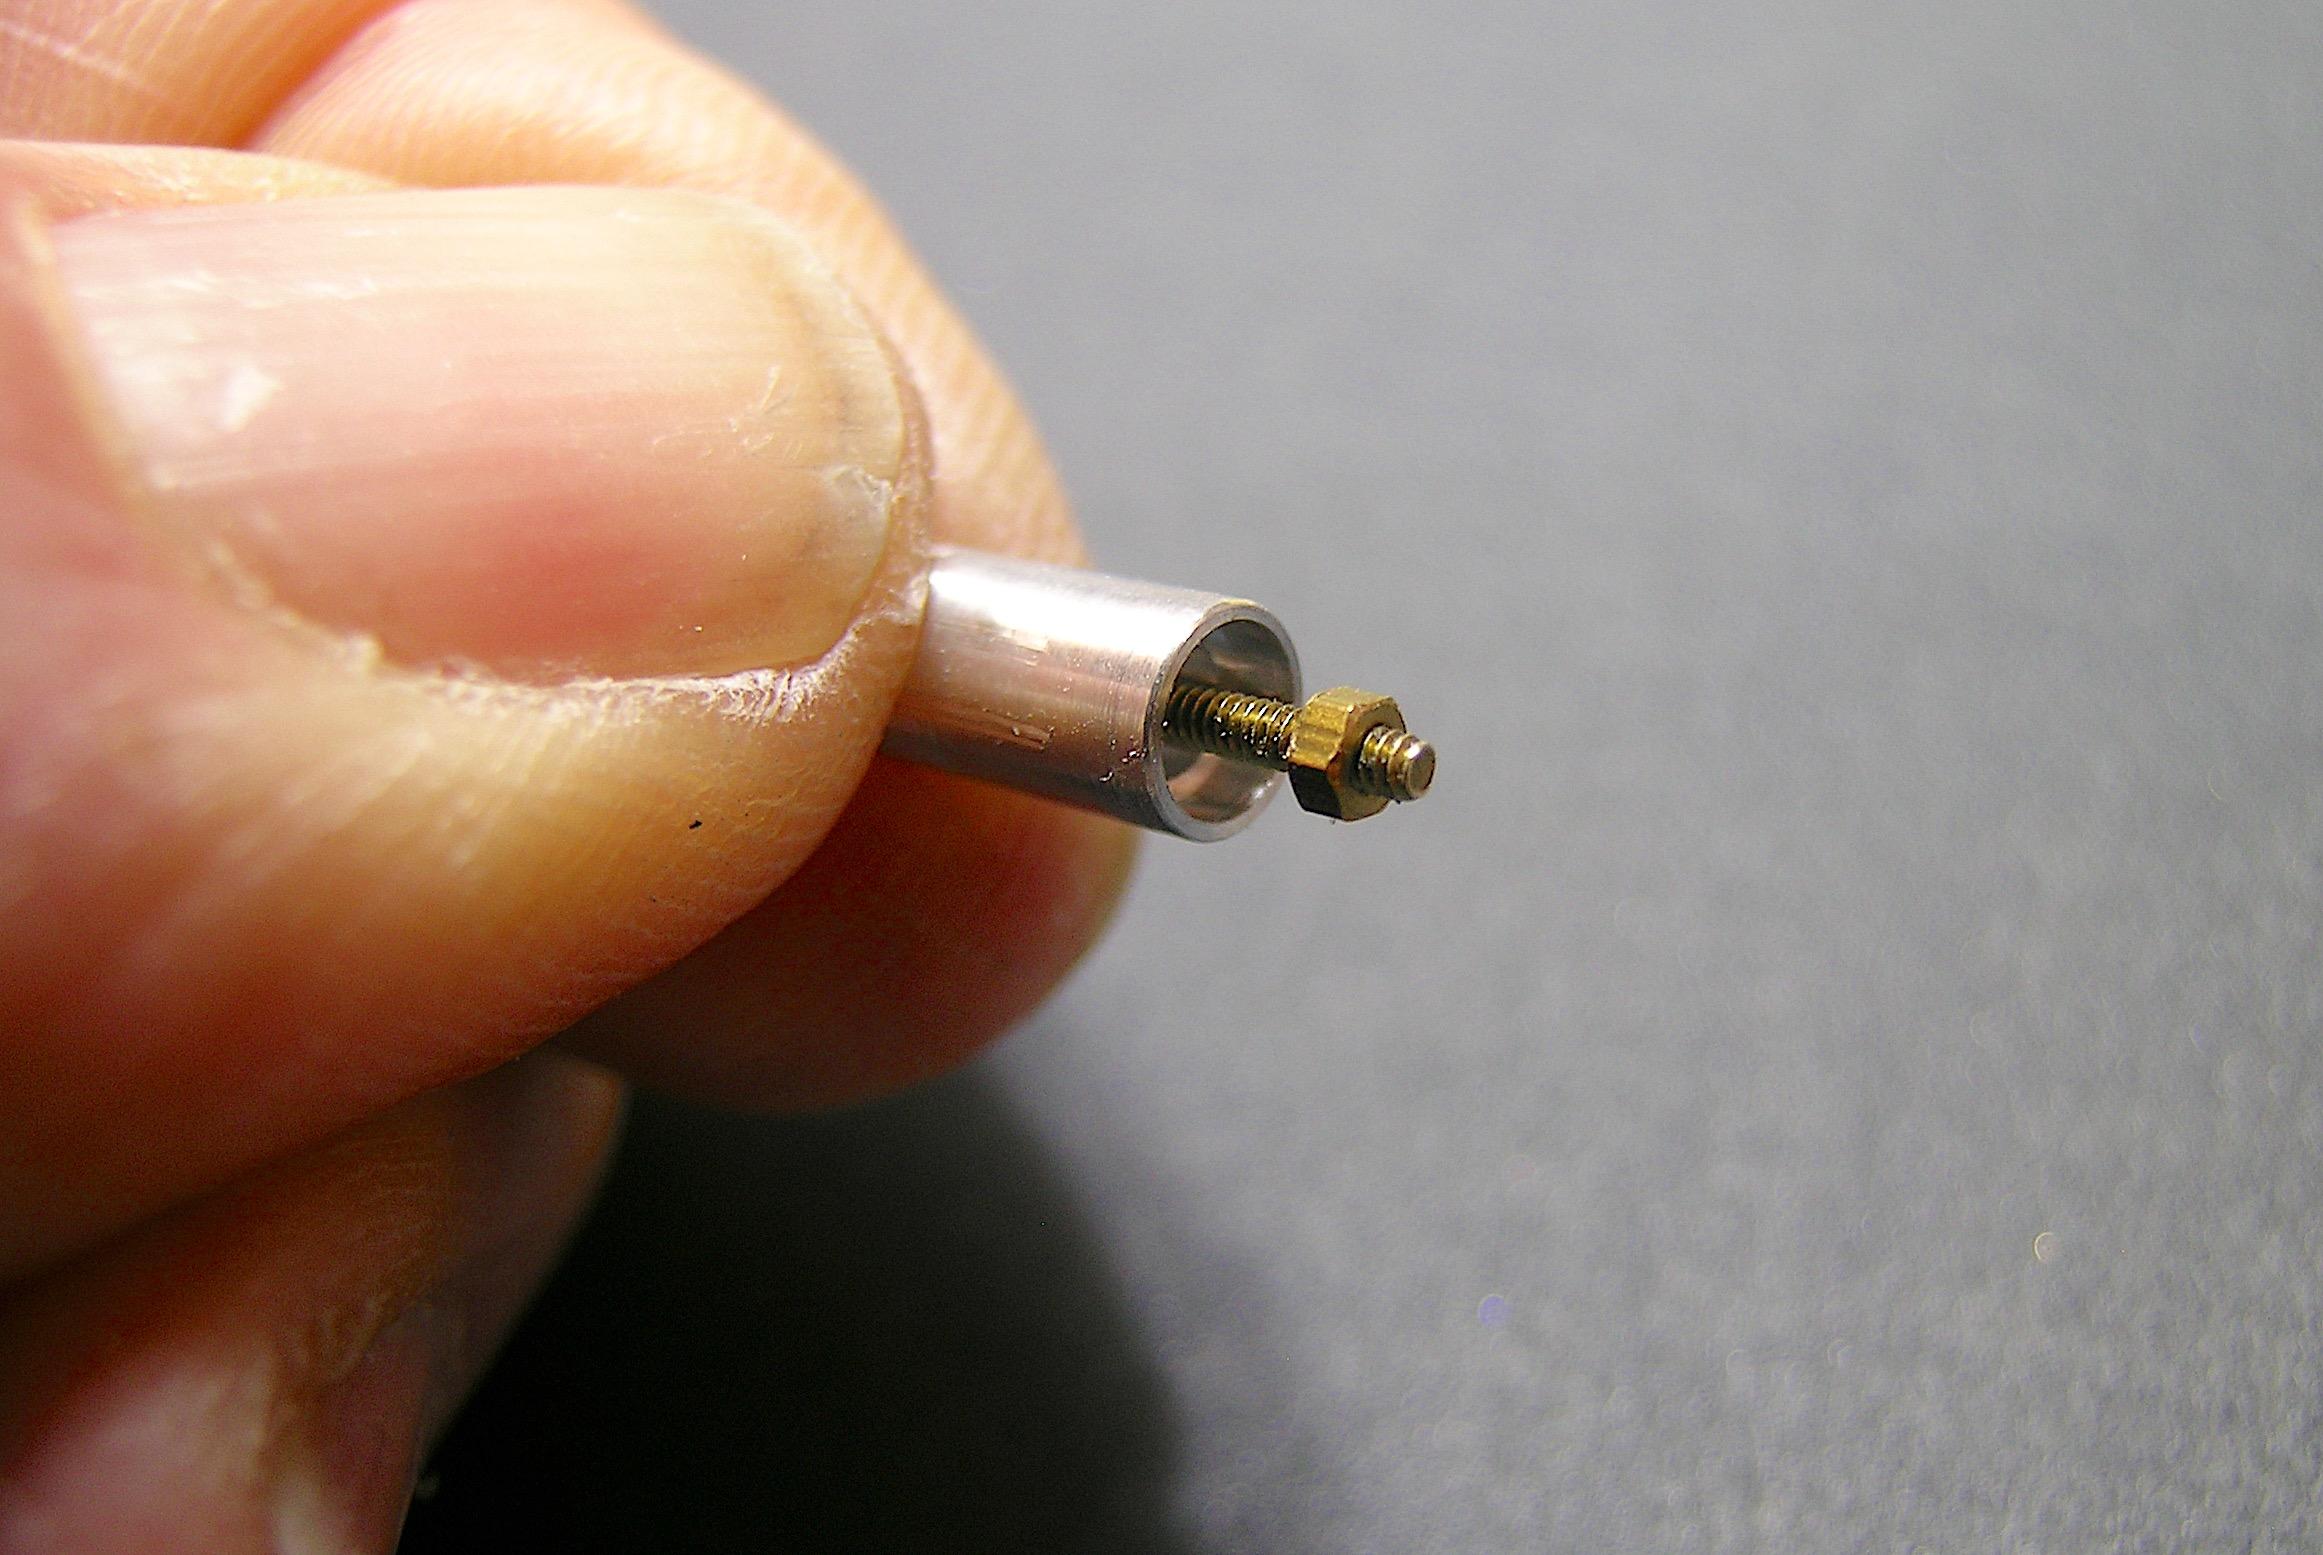
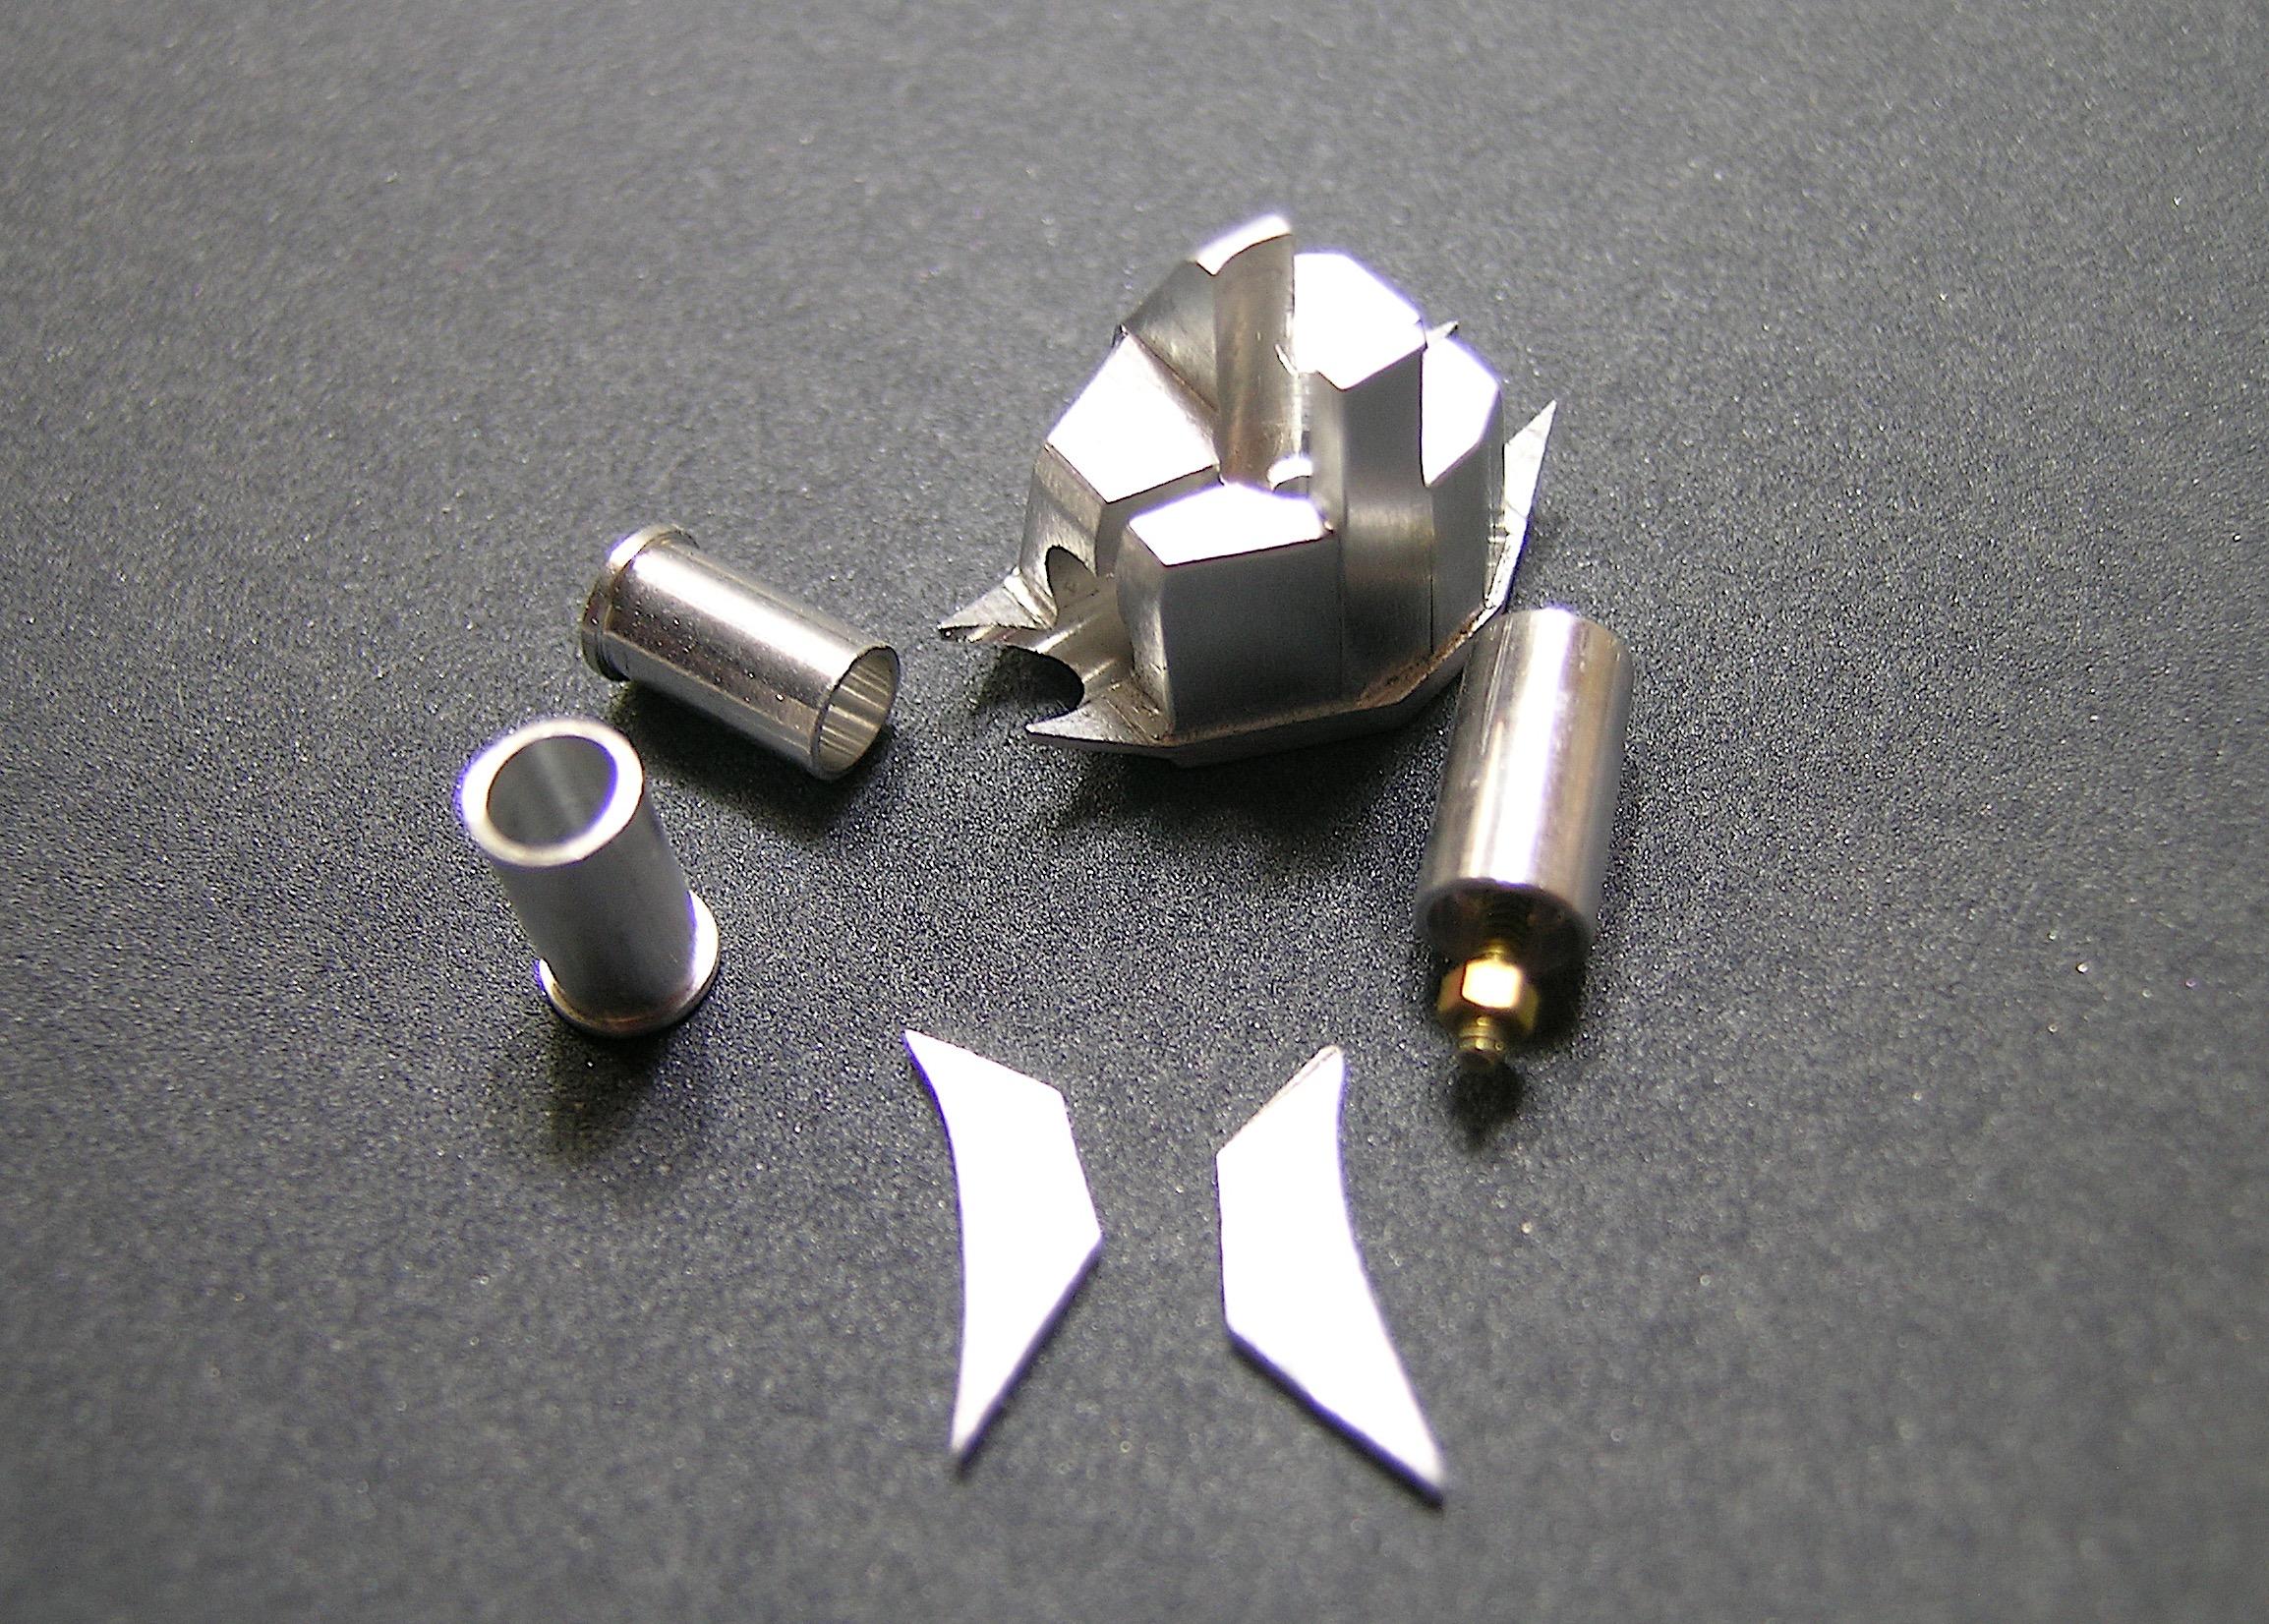
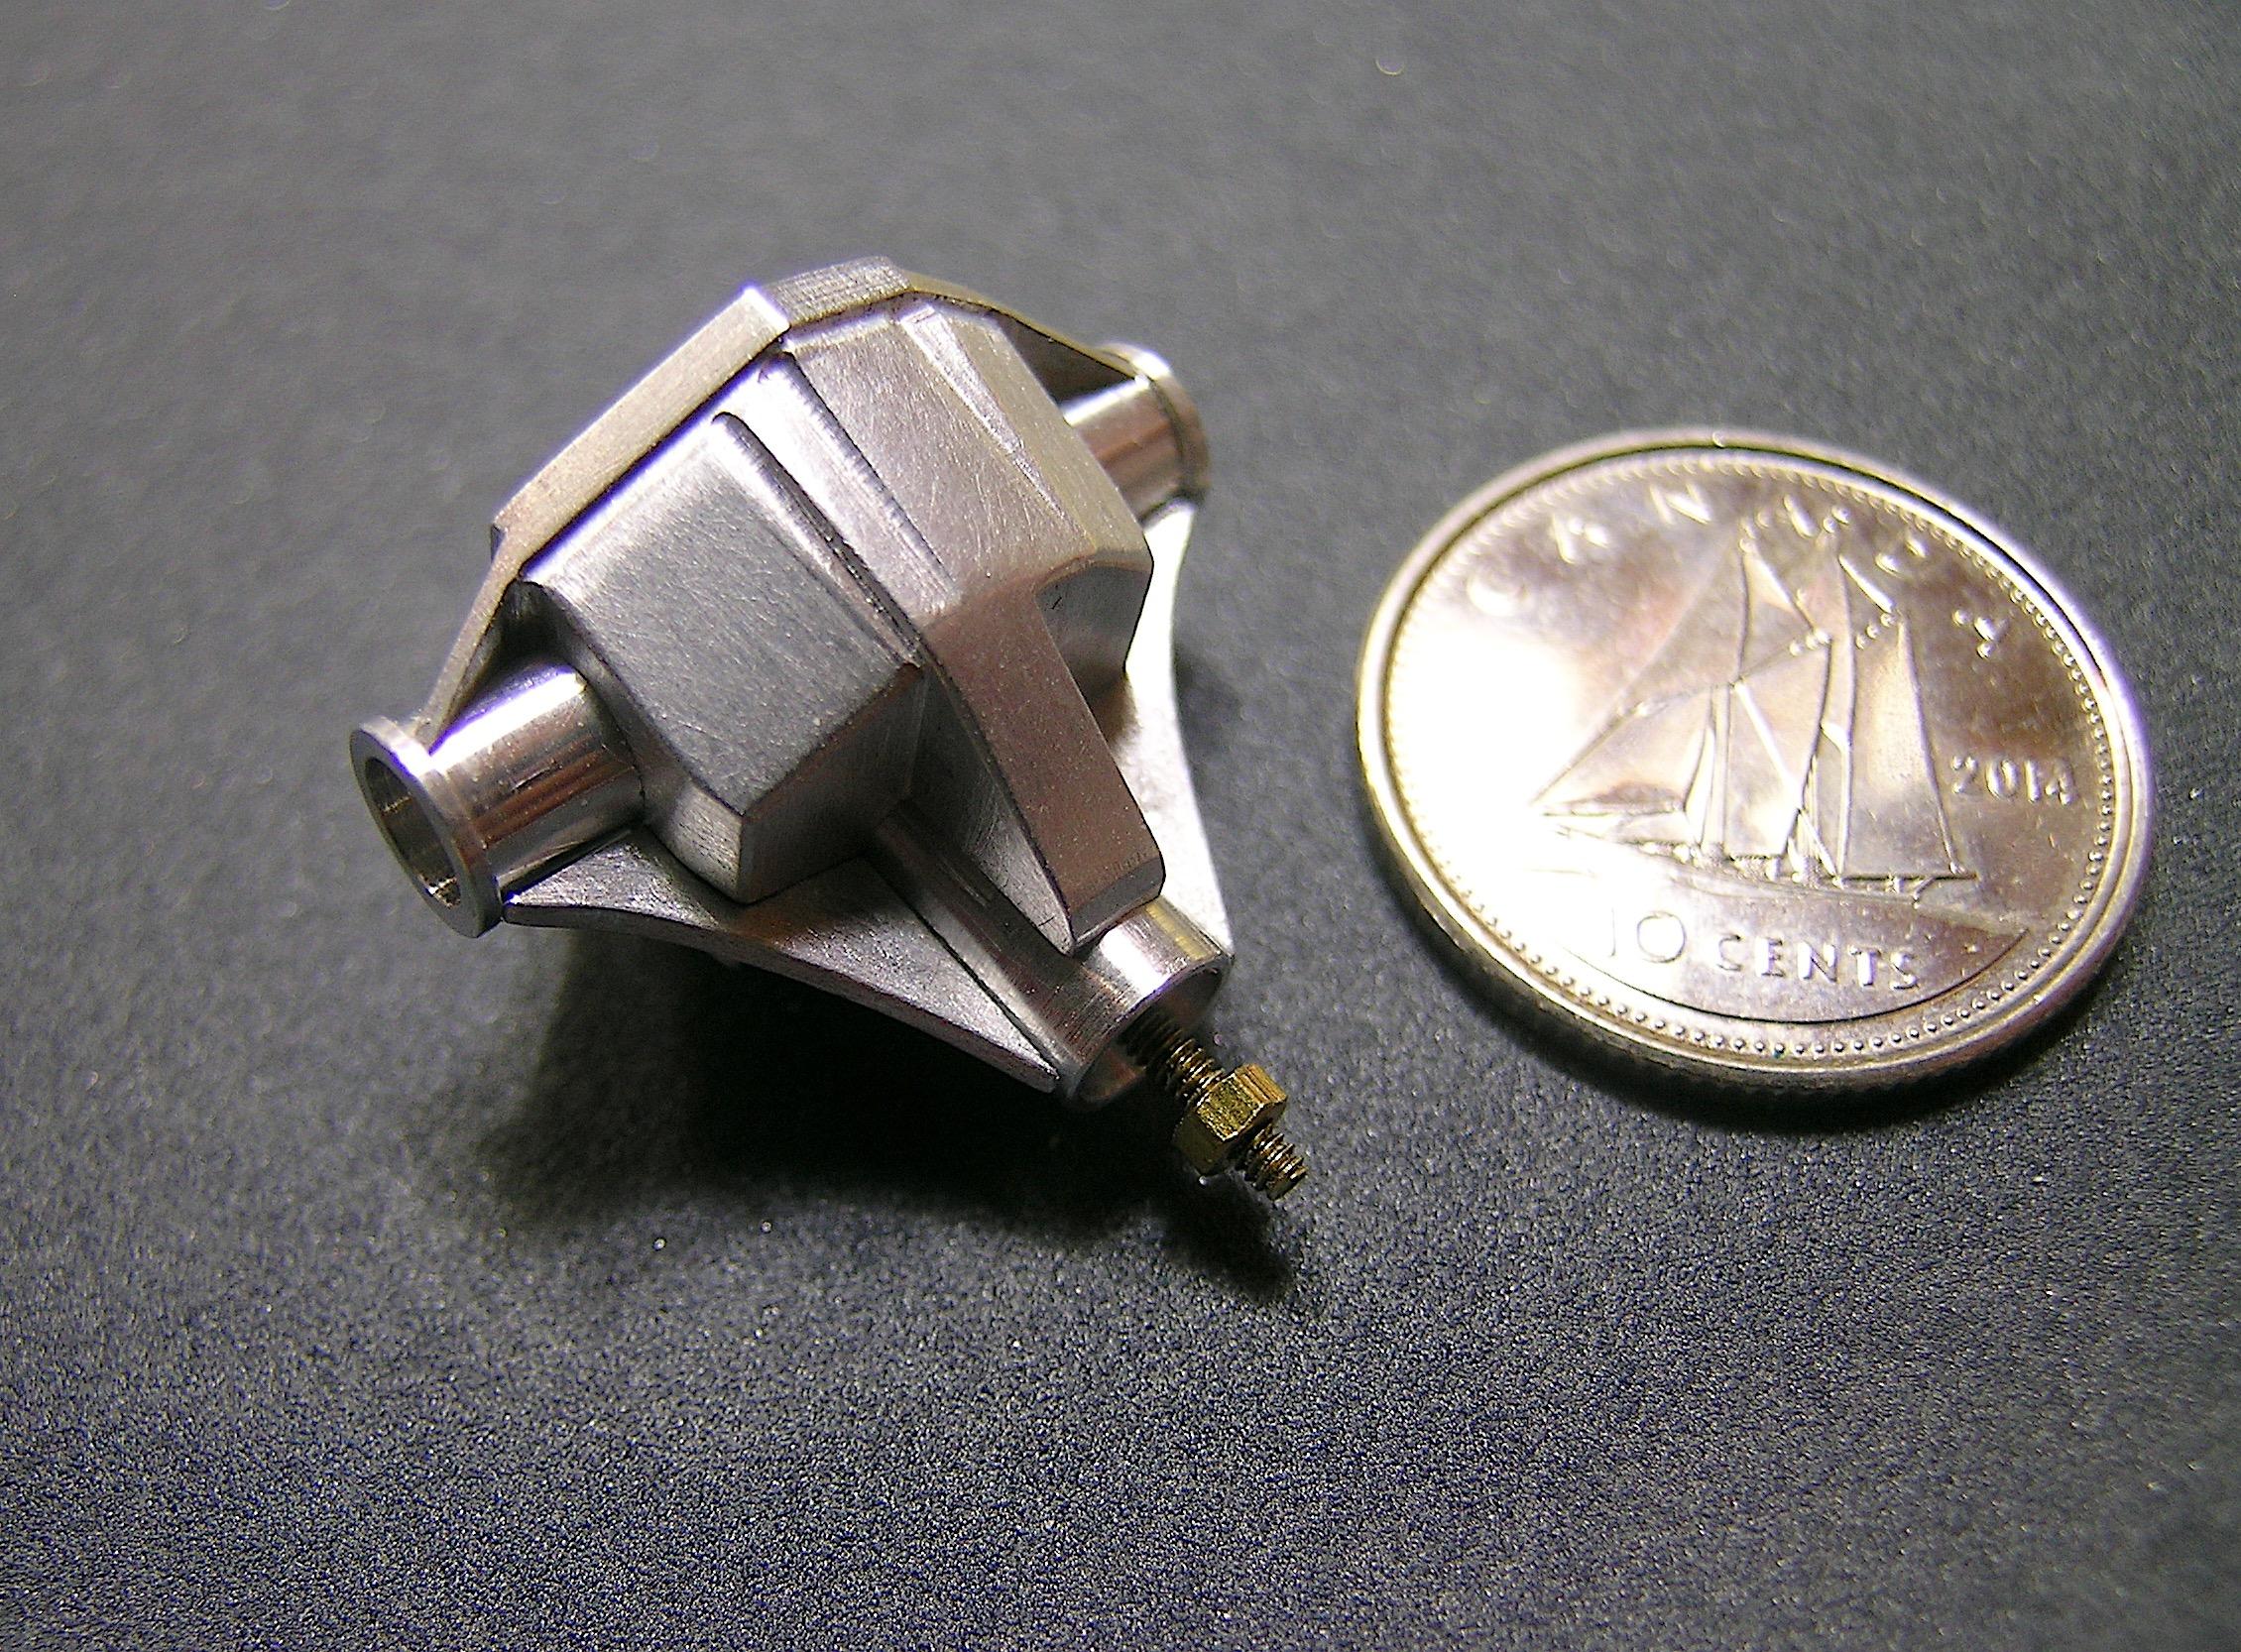
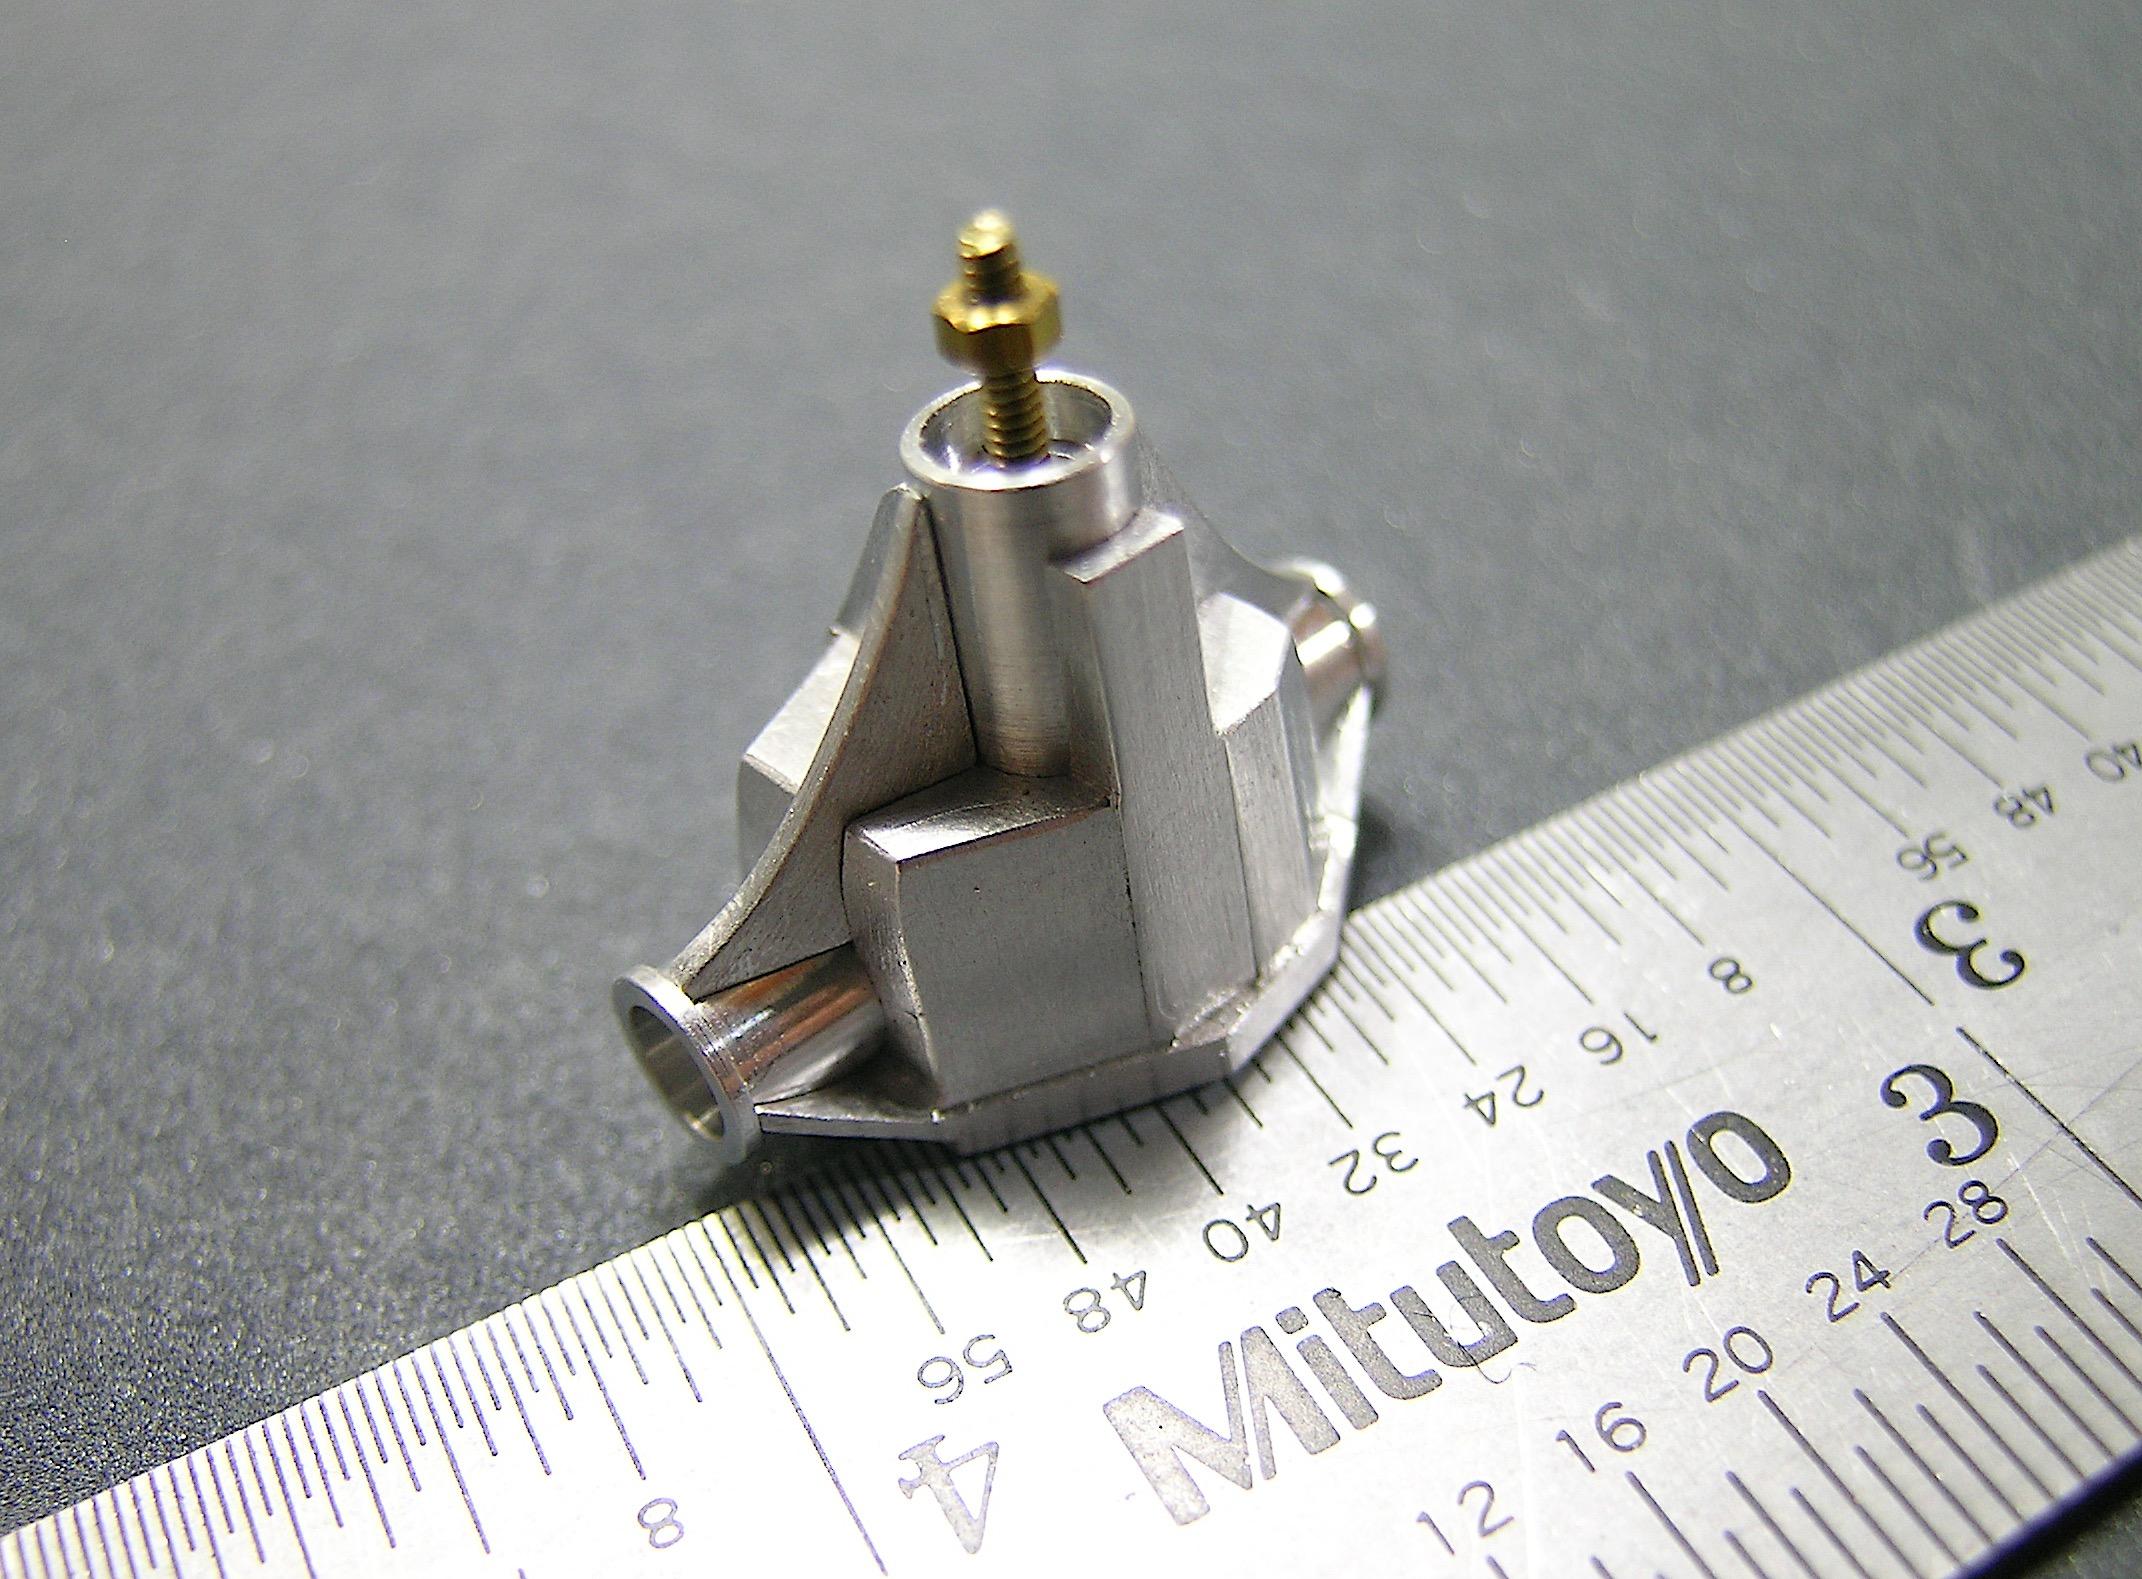
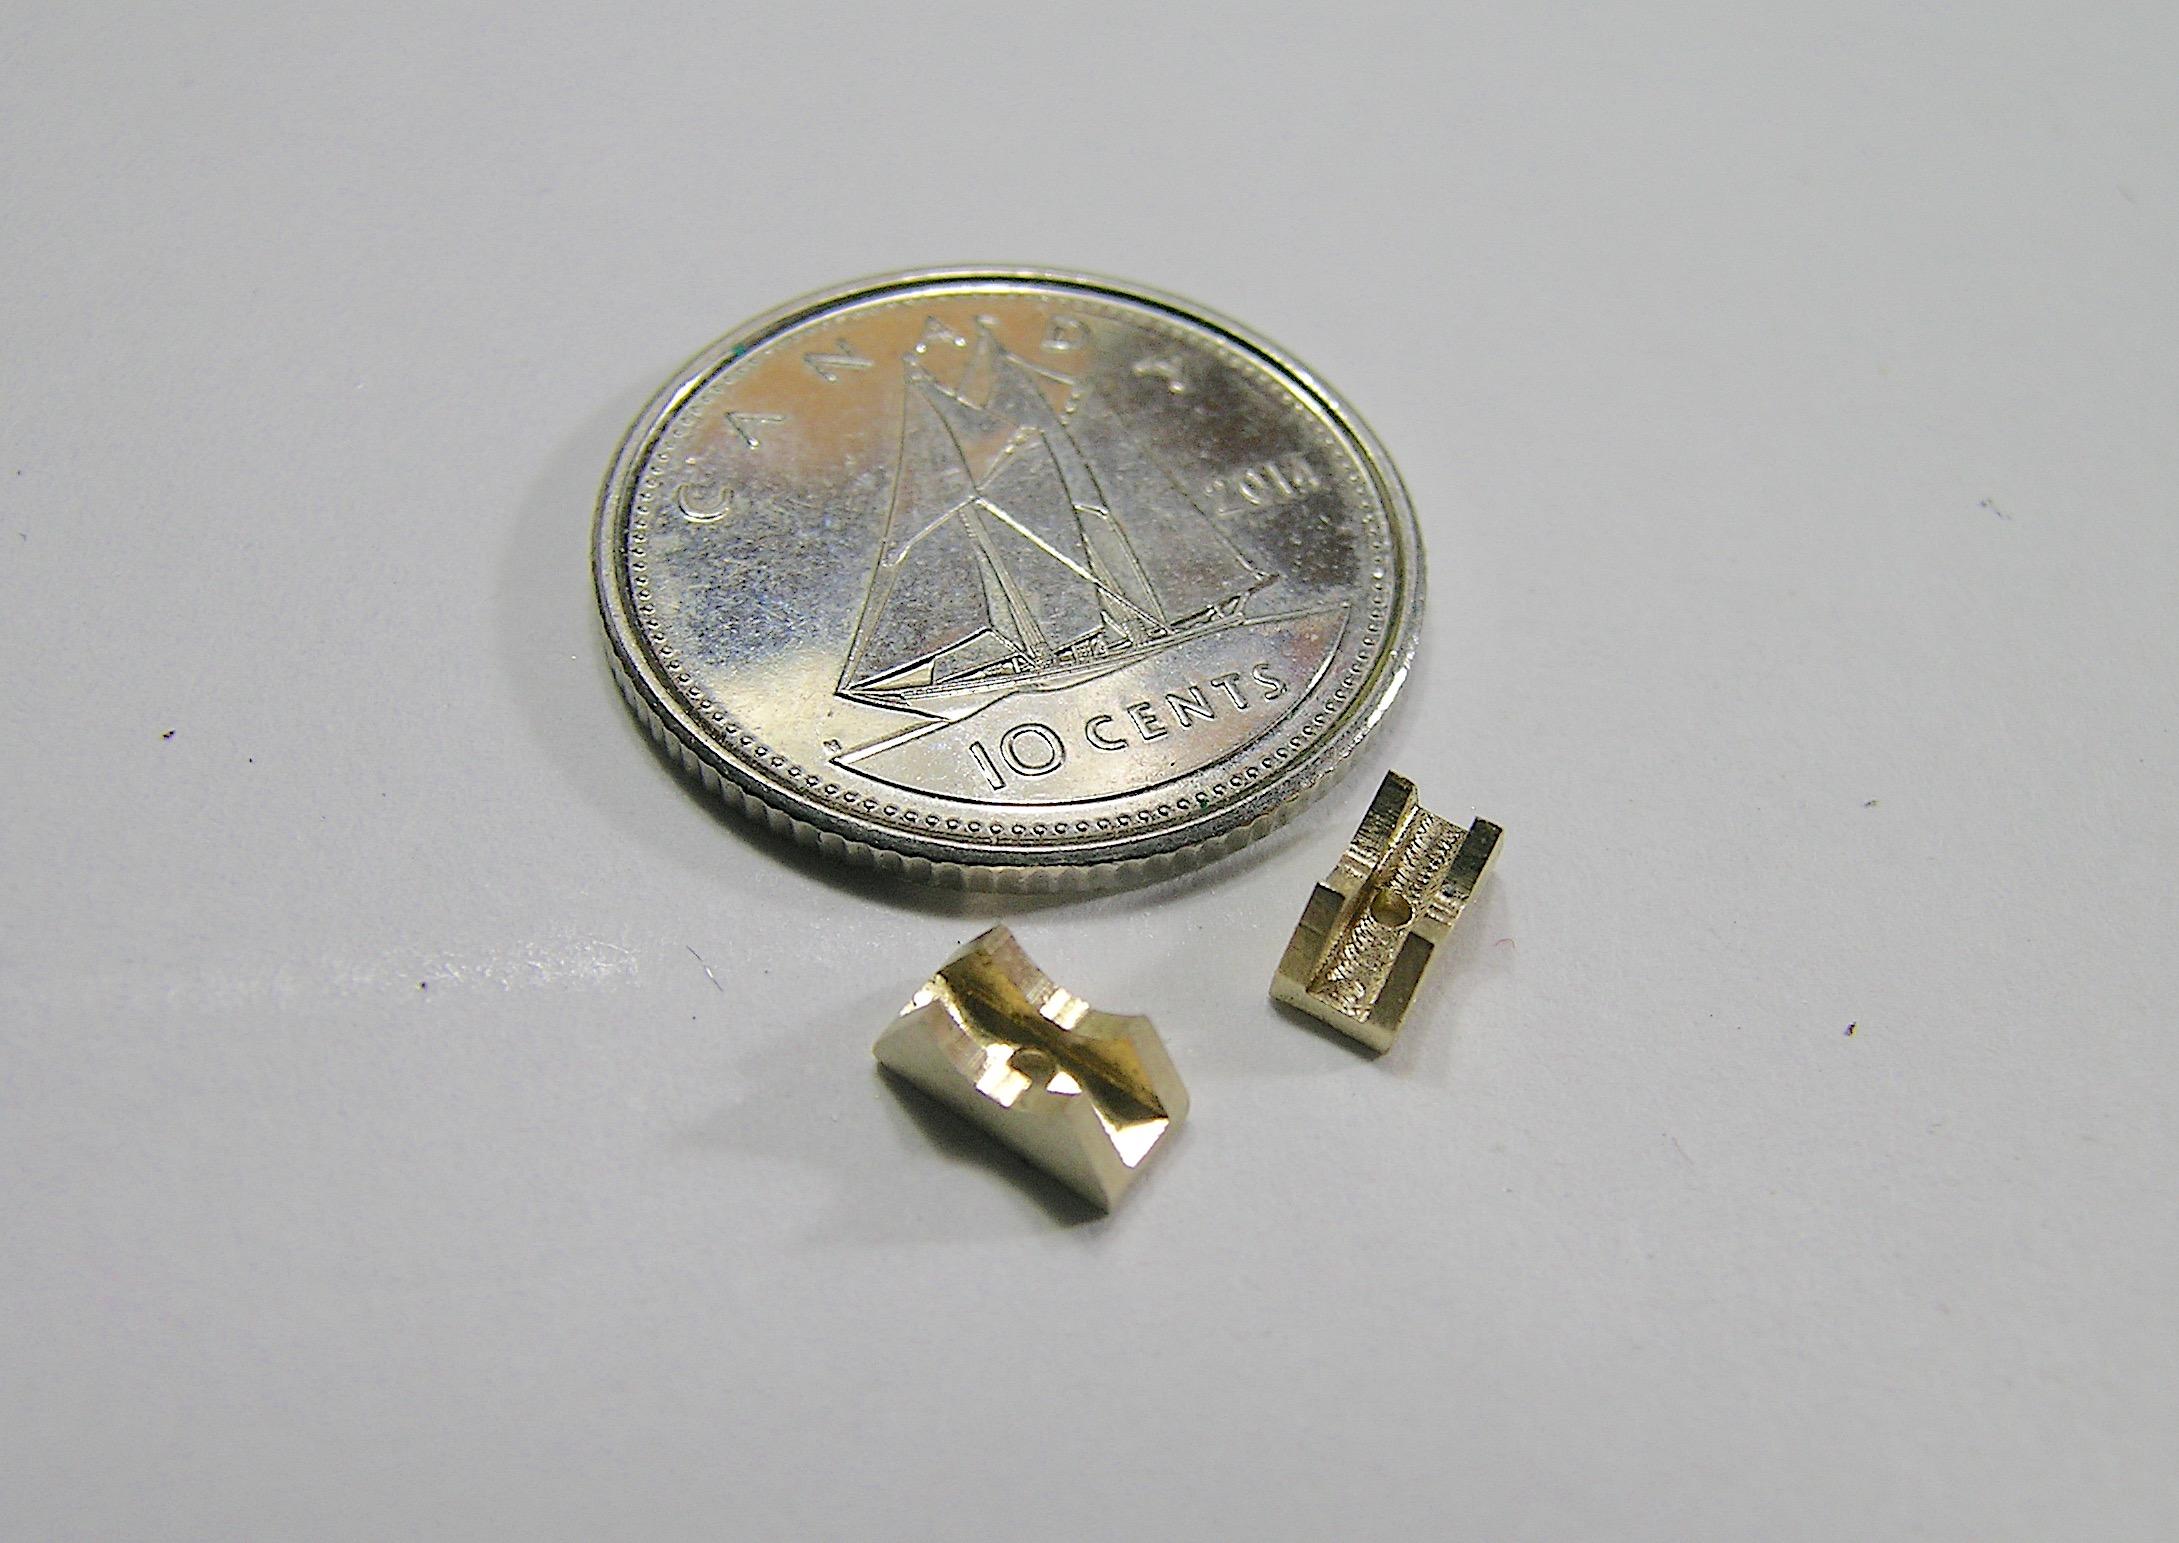
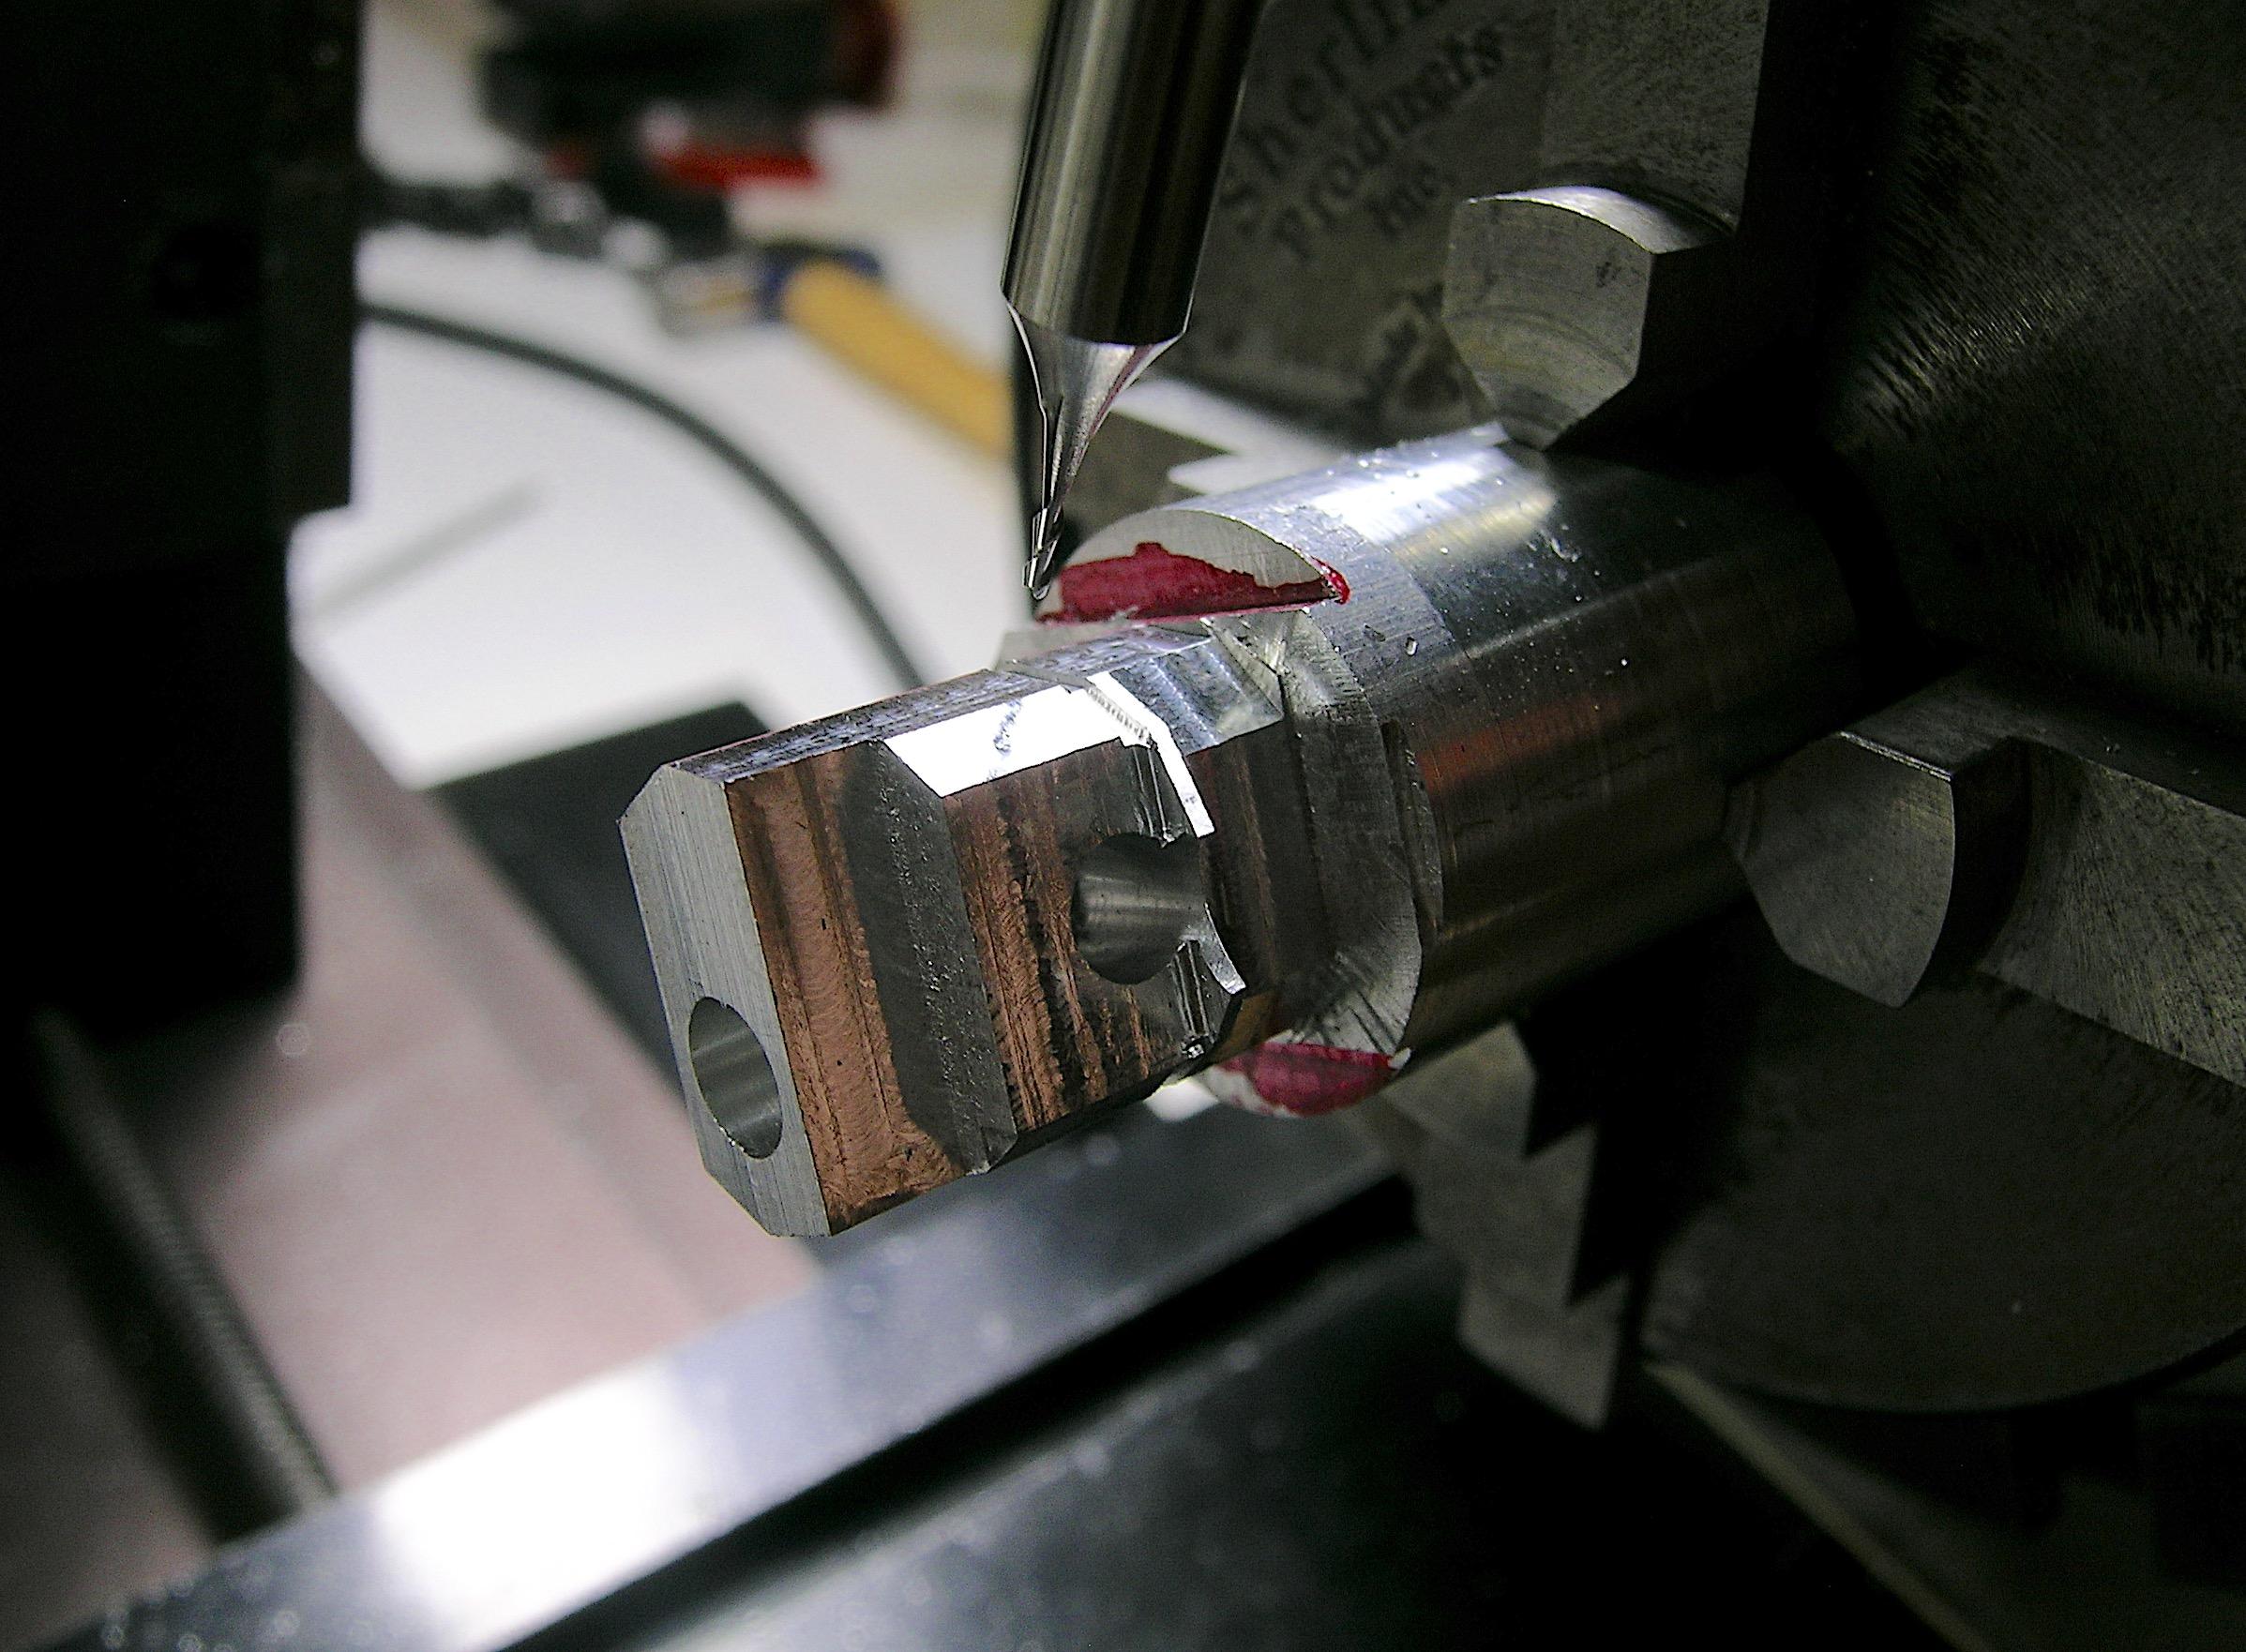
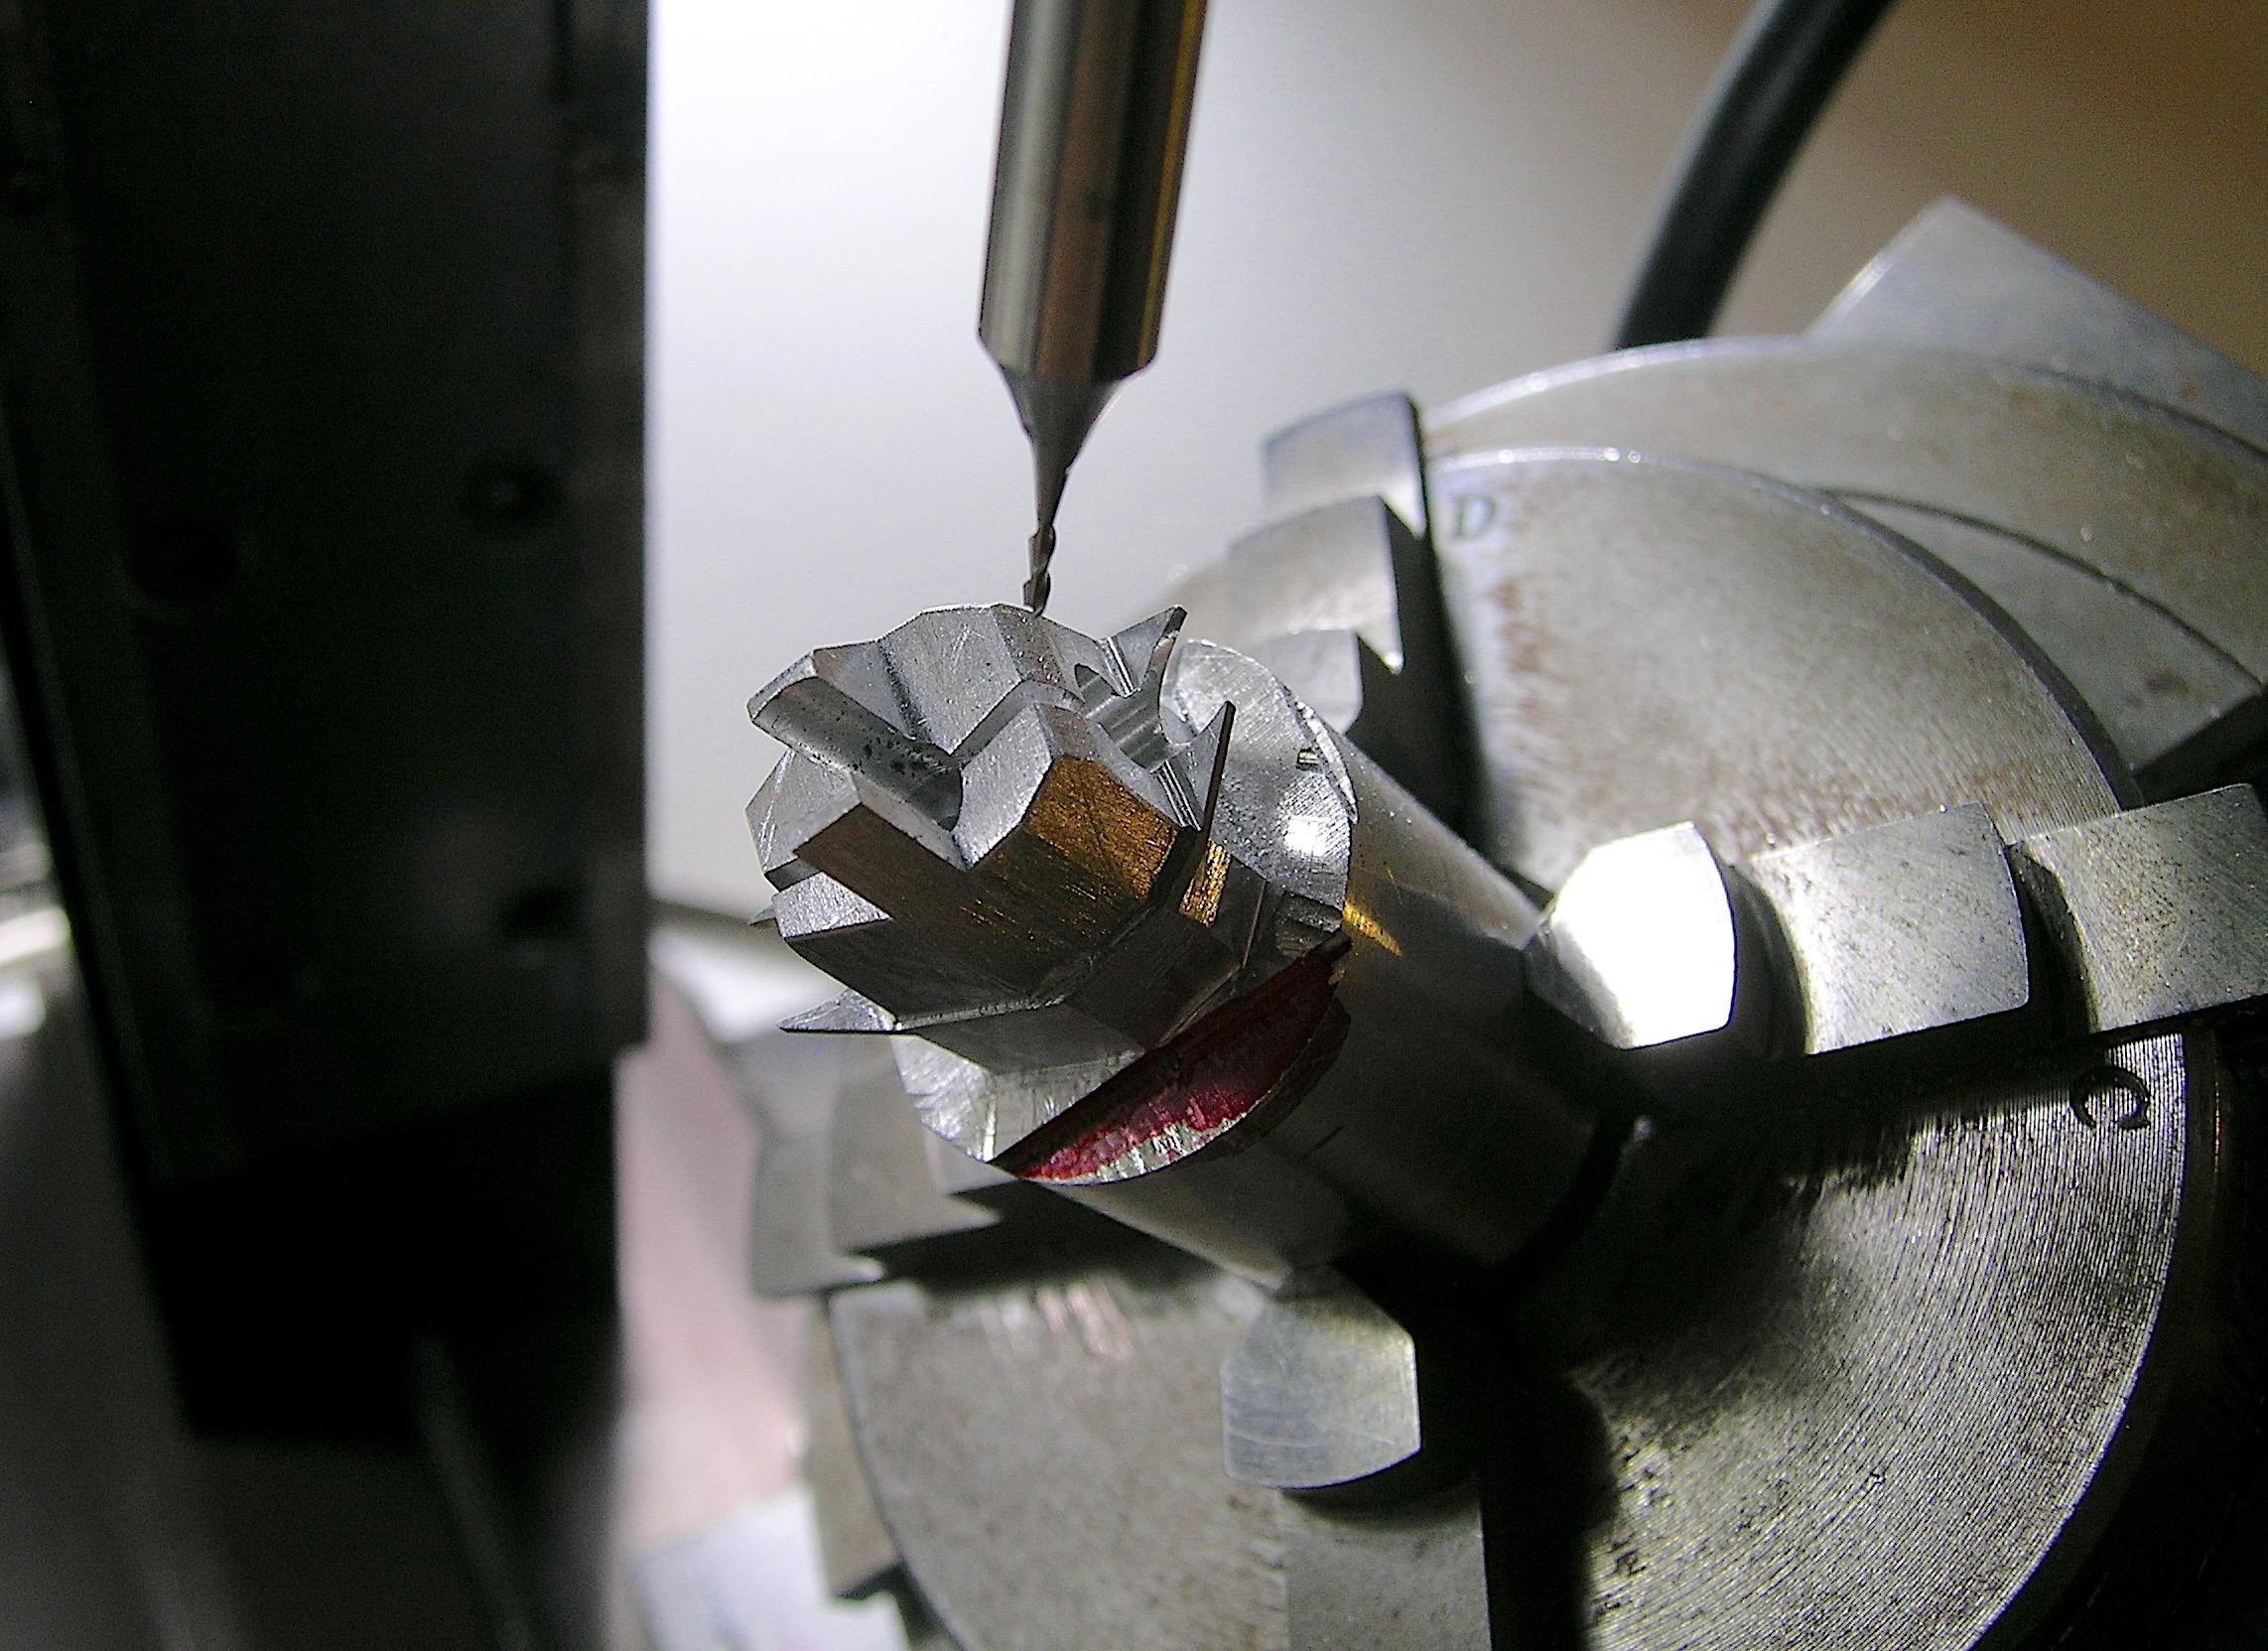
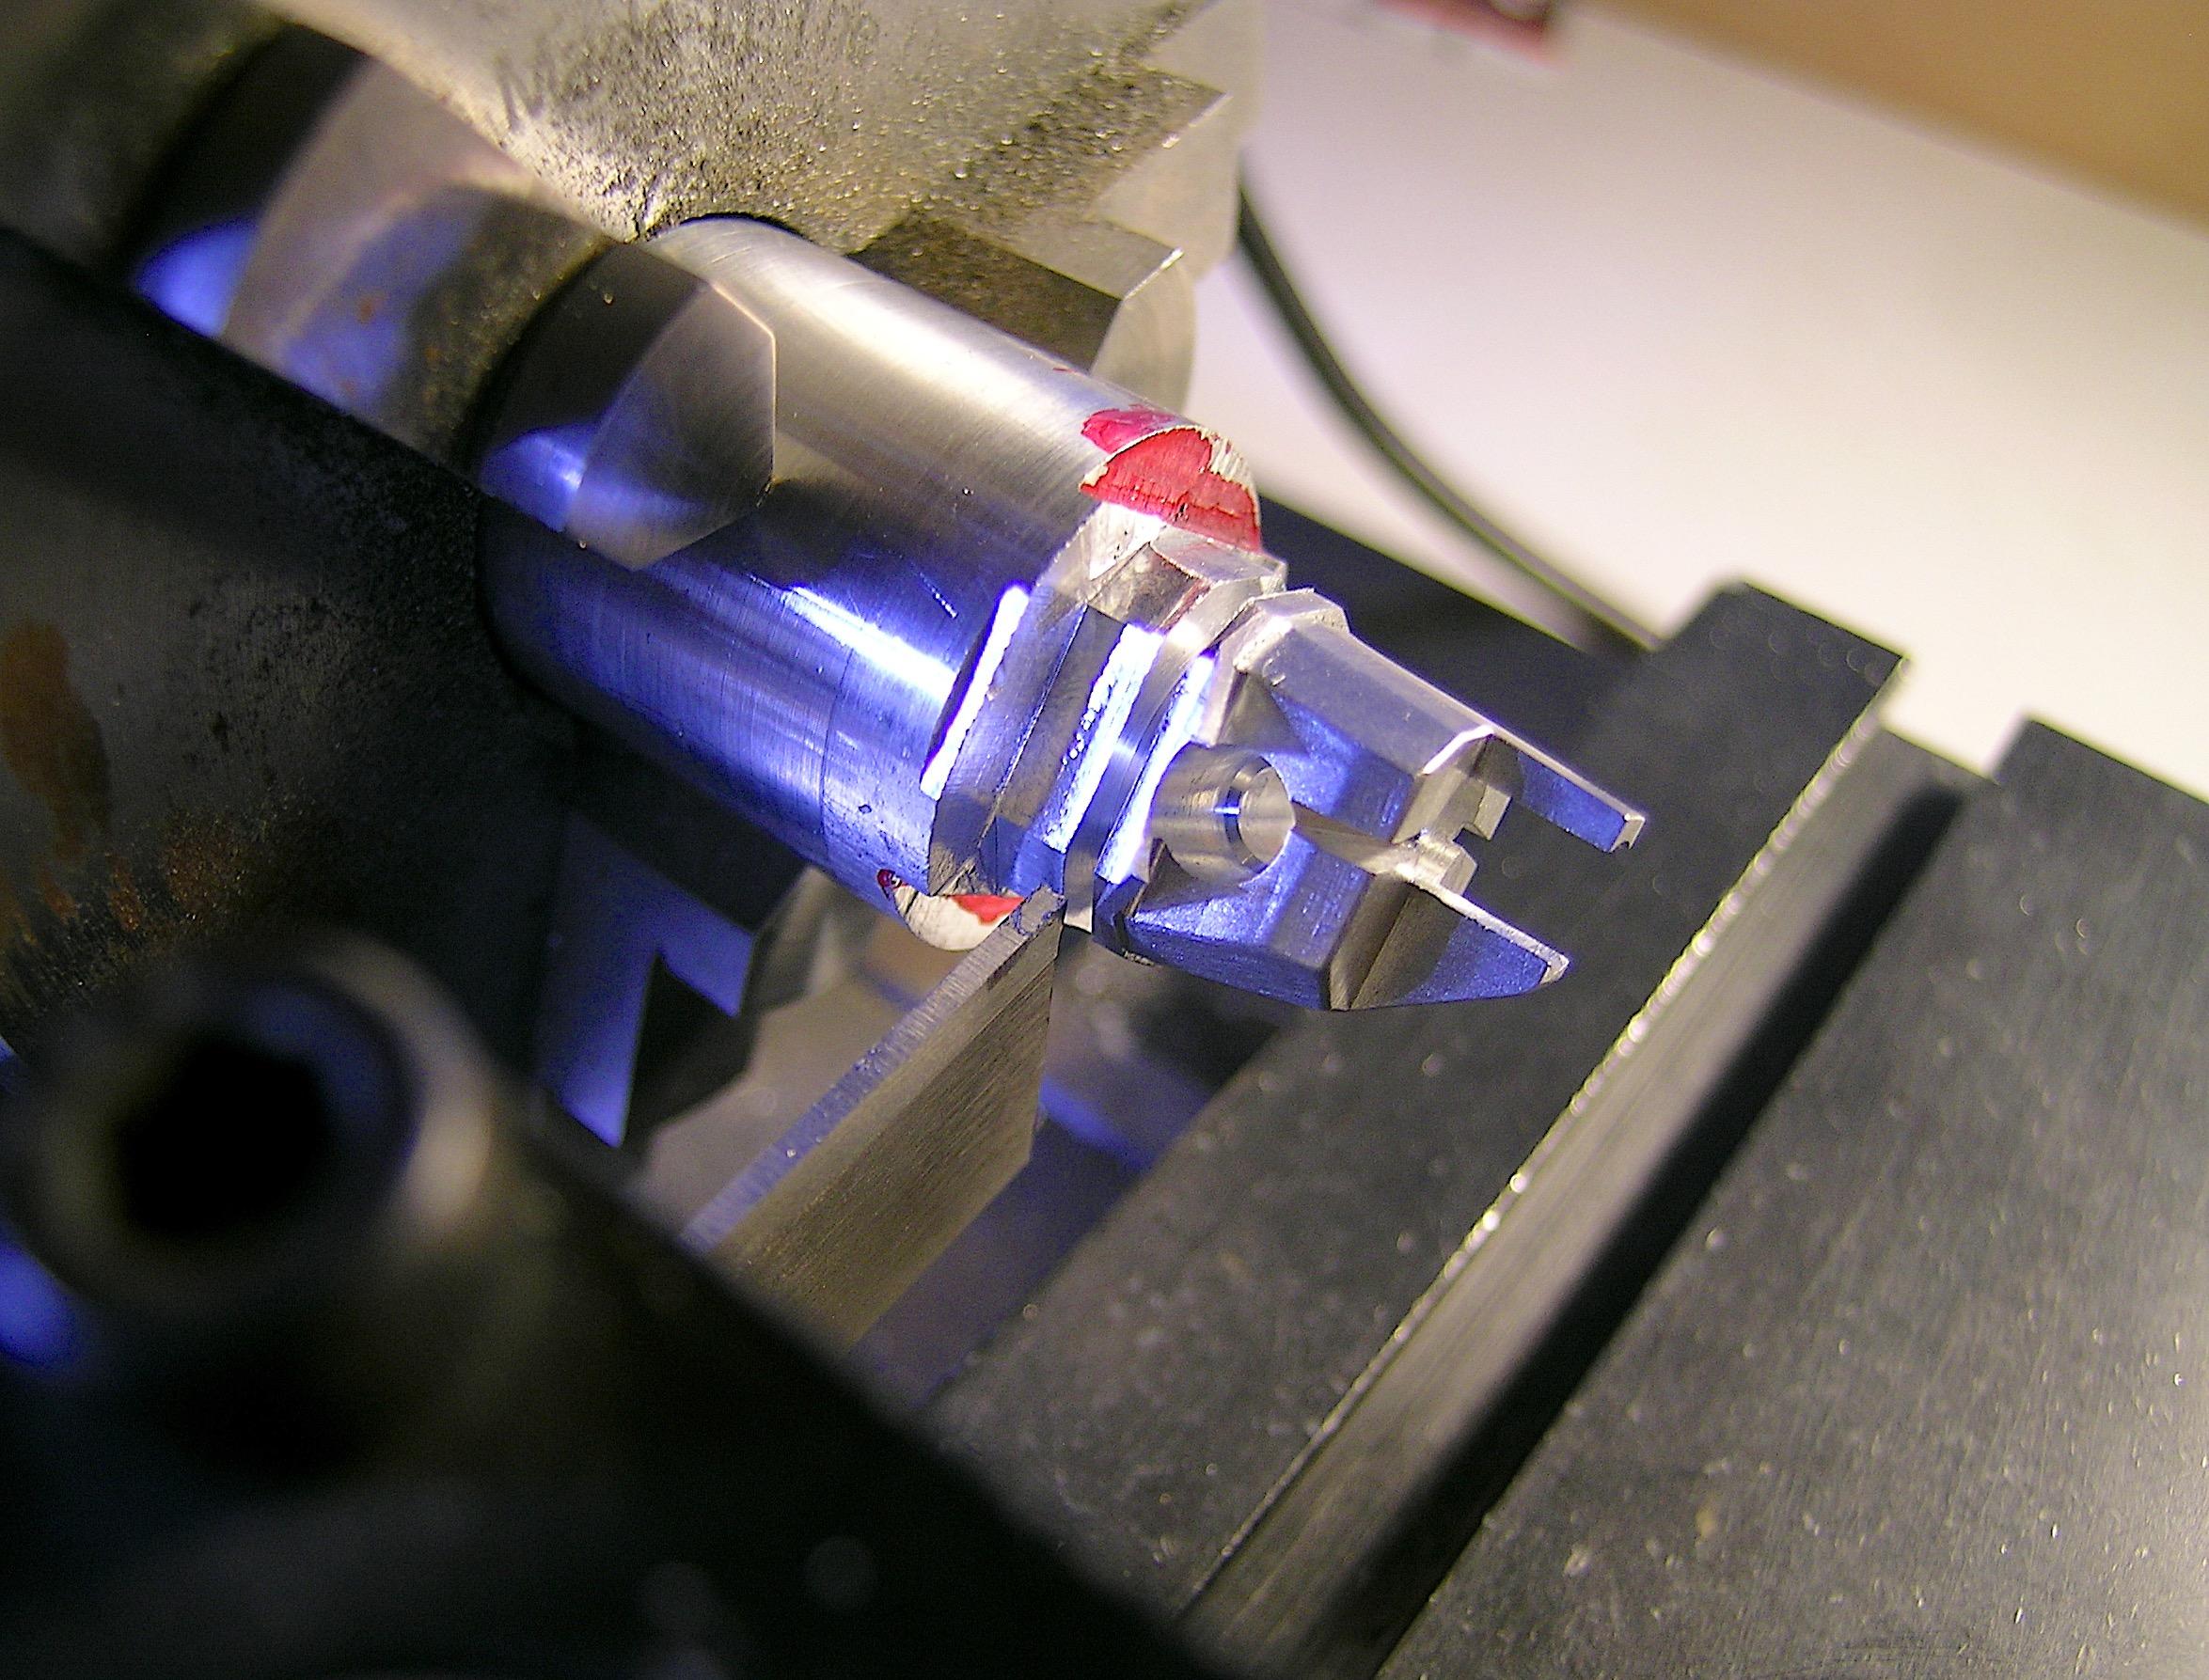
Hello everyone, Jimmy: I hope your expectations will be fulfilled. ? I made further progress on the Dana 60 last weekend and I'm showing you tonight what it looks like now. I'll probably have some minor tweaks to do but it's mainly done and I think it's my best one so far, in any case the measurements are according to the information I found on the subject. During machining I had the idea of simulating the thread of the pinion using a small brass bolt and I think it will make a great detail even if it will be barely visible but I think that you are starting to know me... ? Anyway, here are the new photos and let me know what you think if you feel like it. See you next week, Francis This is the cylindrical shape where the pinion is housed, I have made the opening for the yoke (to be made later). I used a small brass bolt to simulate the threaded end of the pinion, I will cut the screw to the desired length when the yoke is machined. I turned two pieces of aluminum to simulate the wider part where the axles are inserted and made the fins using an aluminum plate. The pieces are just put in place, nothing is definitively assembled. View from another angle.
-
’72 Dodge Demon Drag Racer 1/25 scale
AmericanMuscleFan replied to AmericanMuscleFan's topic in WIP: Drag Racing Models
Thanks Rich, everyone sees art in a different way, I just see it as DIY! ? Thanks Will ! Thanks Charles, I have to use it, it was so hard to find! ? Thanks Ian! I really liked your last project and I can't wait to follow your next opus. Thanks Scott, I thought this swear word was spelled with an "s"... ? Thanks Terry, I really like your 67 Camaro and you have done an incredible job in such a short time, something I could never accomplish! Thank you all for your words of encouragement, I hope to finish the Dana this week as the base part is quite advanced, I will update the thread if so. Francis -
’72 Dodge Demon Drag Racer 1/25 scale
AmericanMuscleFan replied to AmericanMuscleFan's topic in WIP: Drag Racing Models
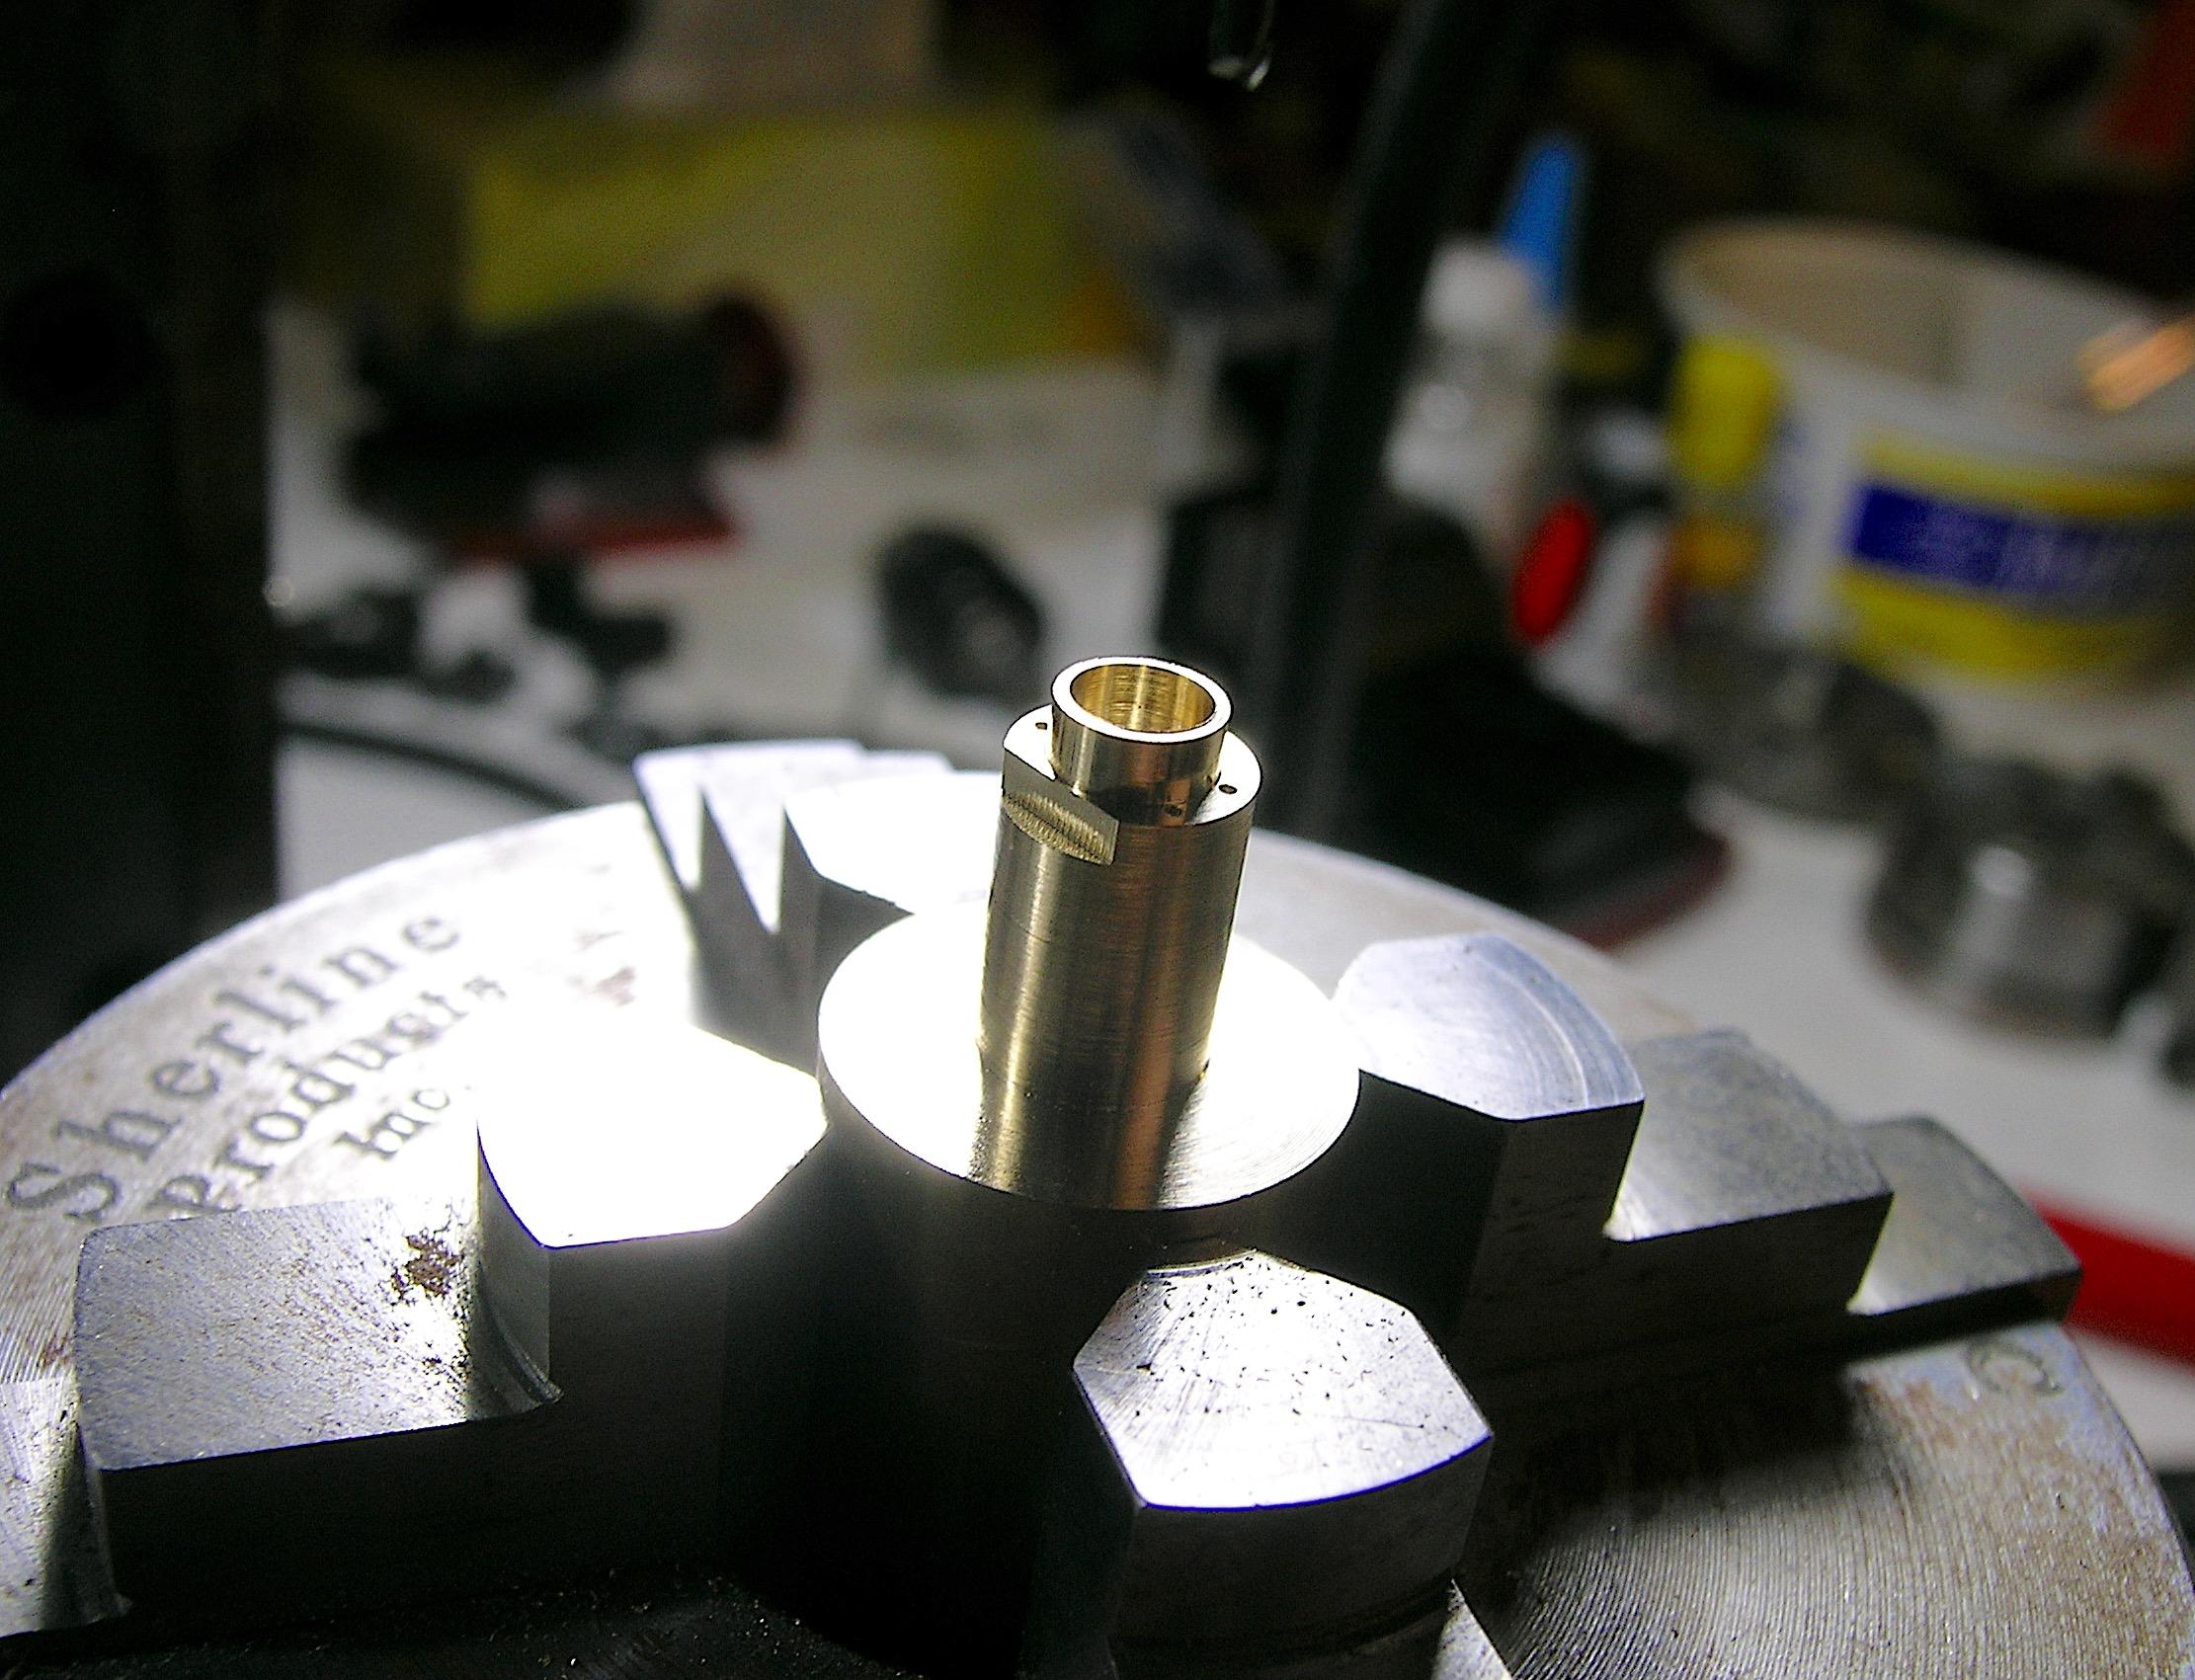
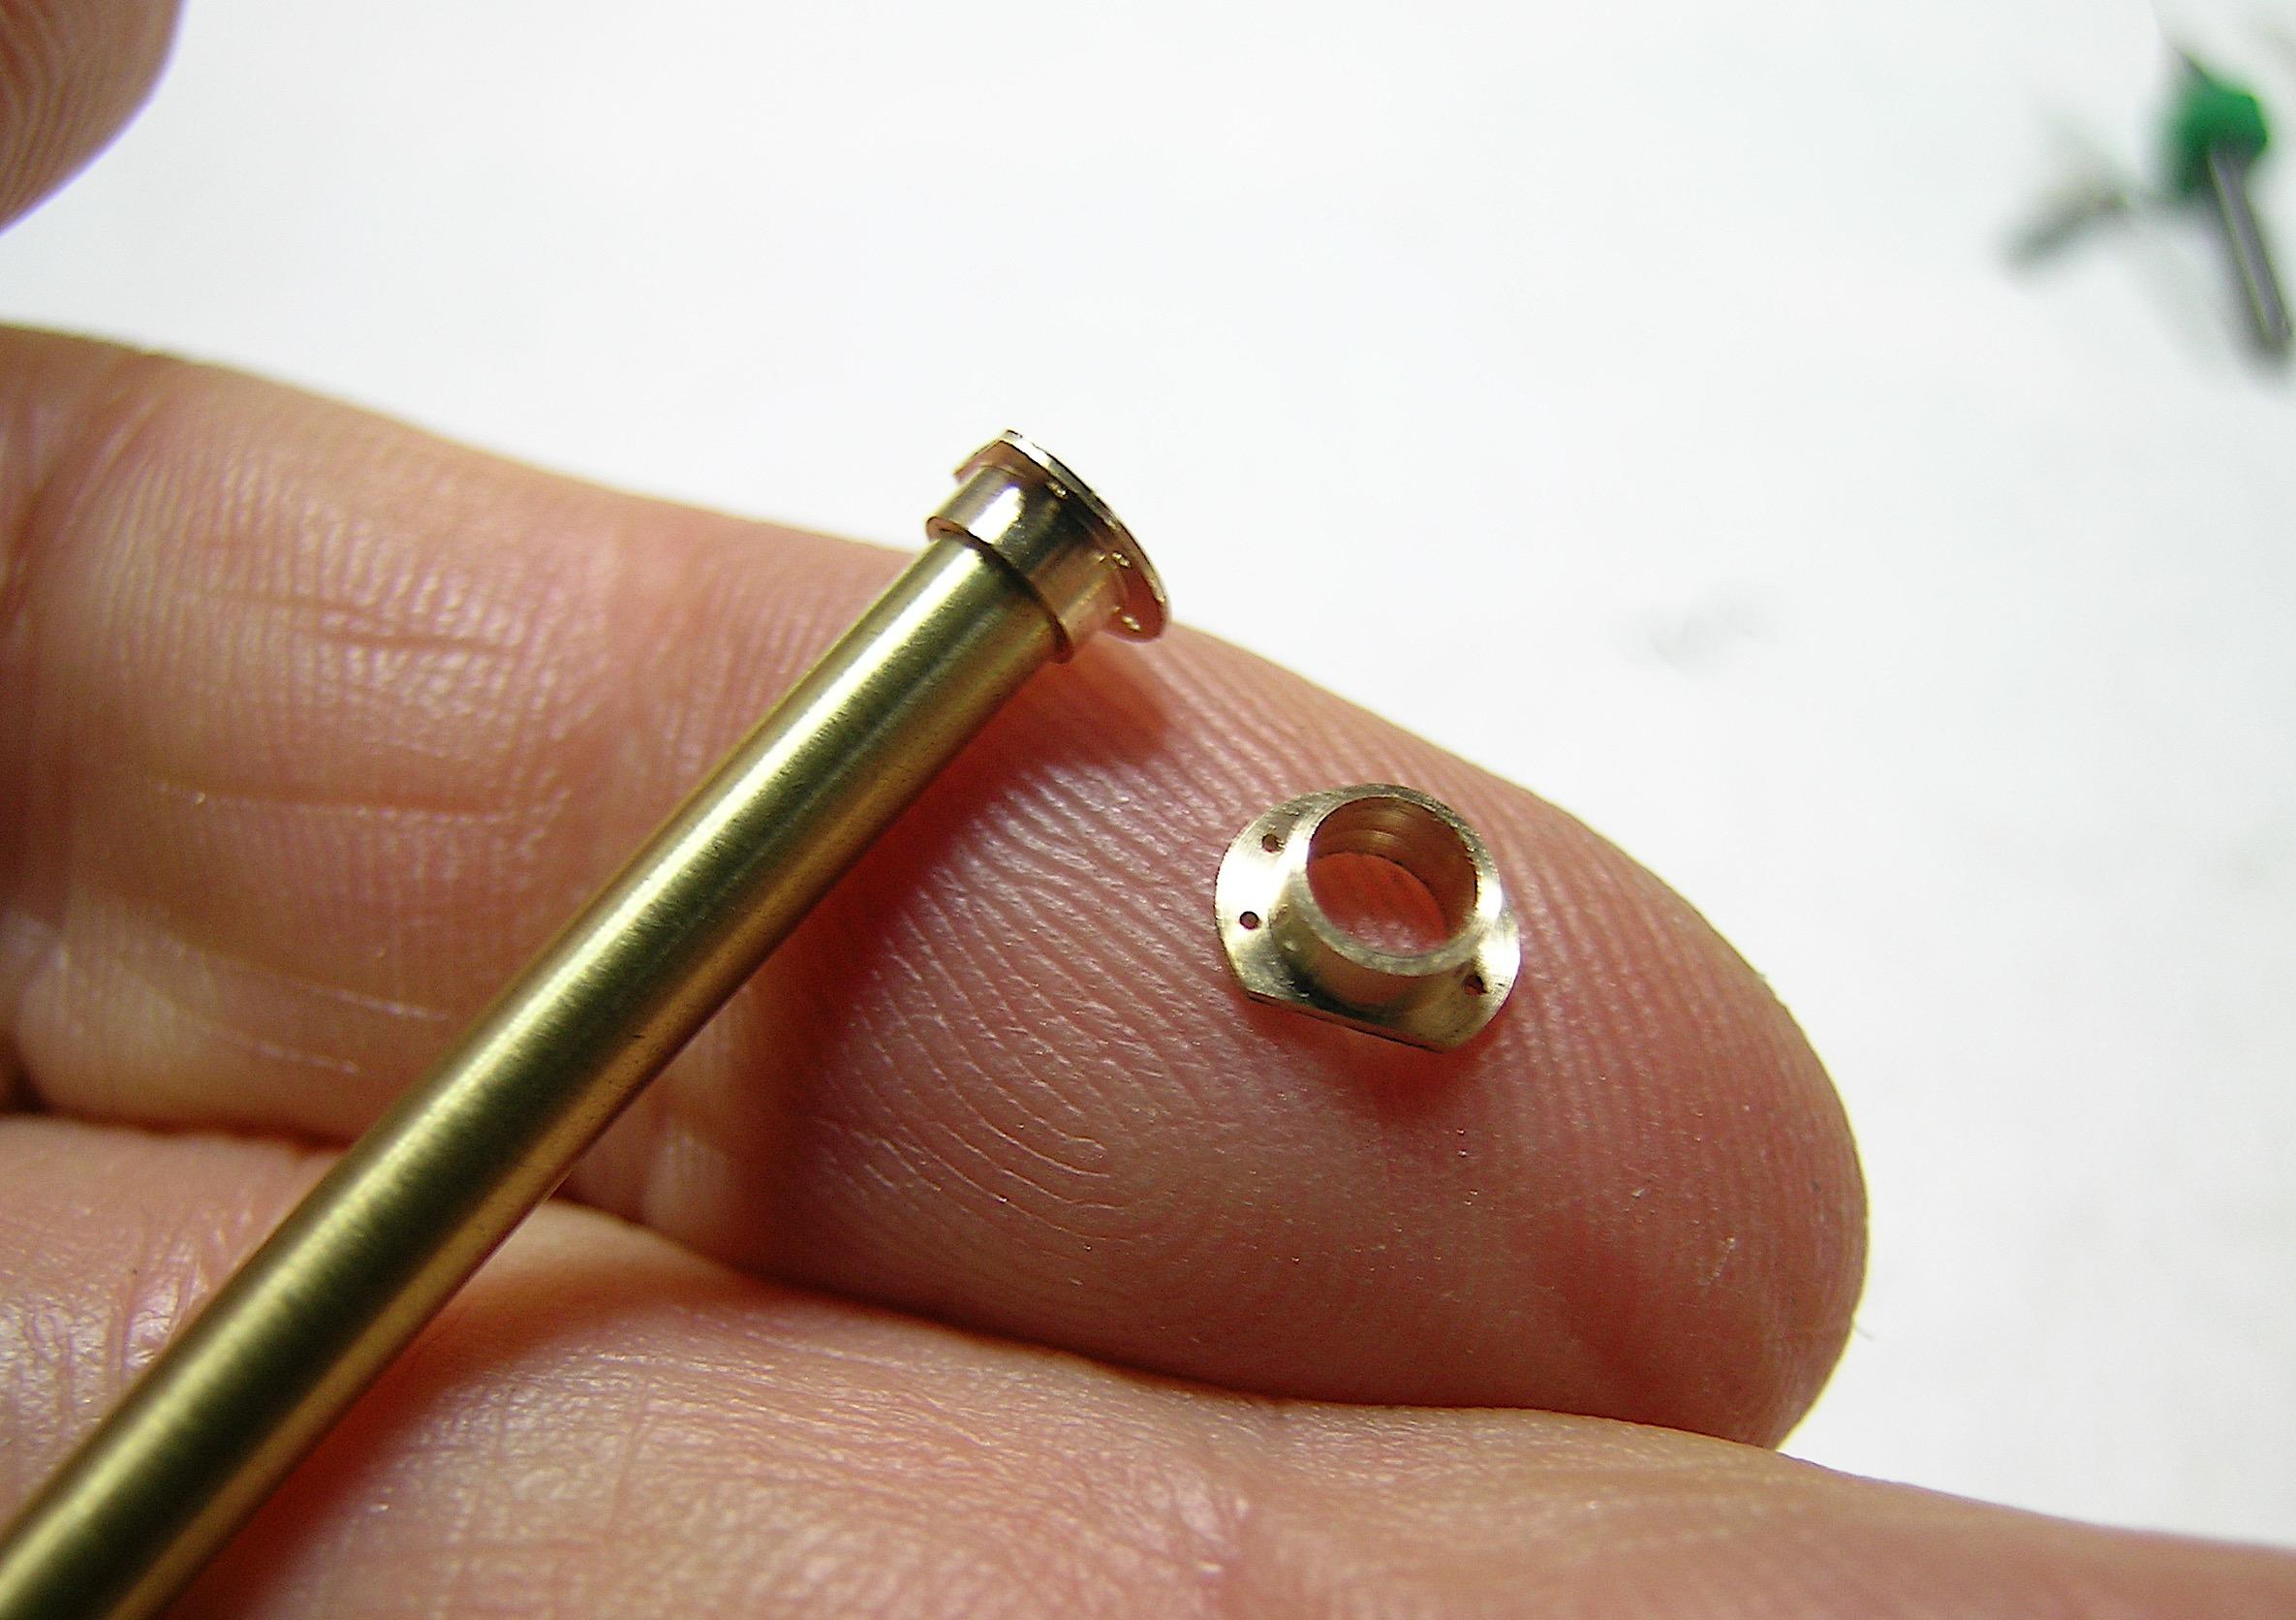
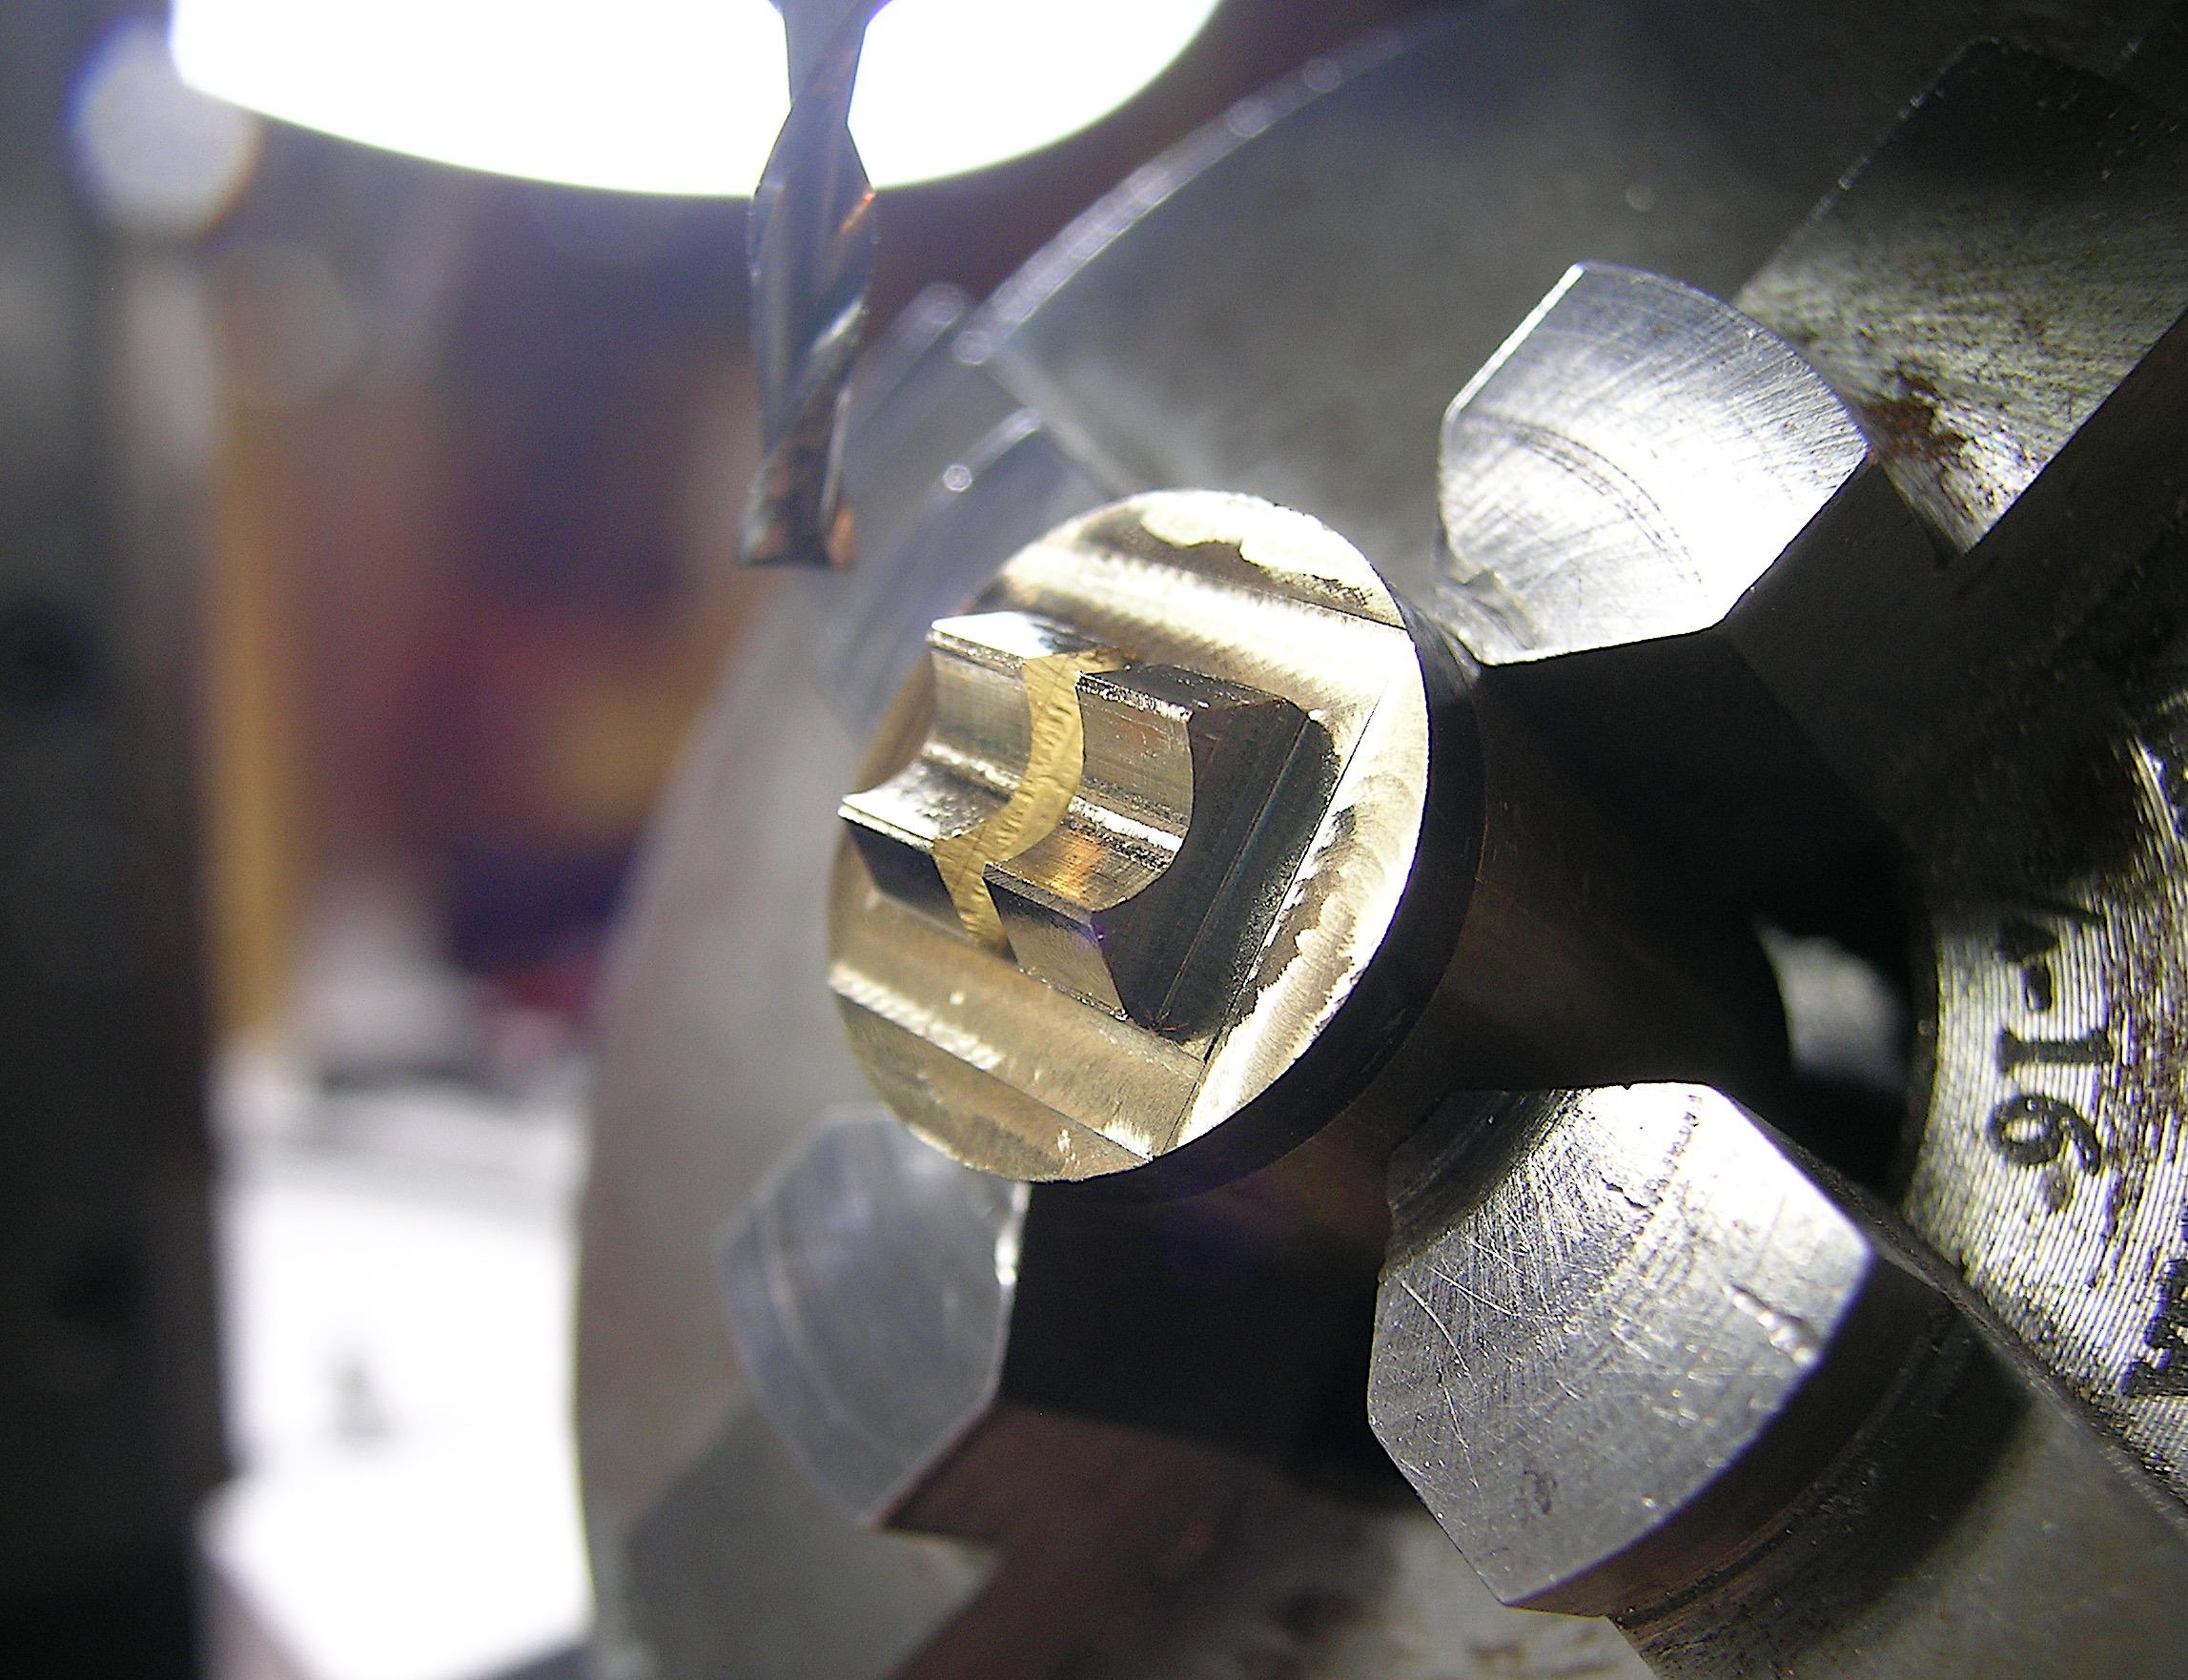
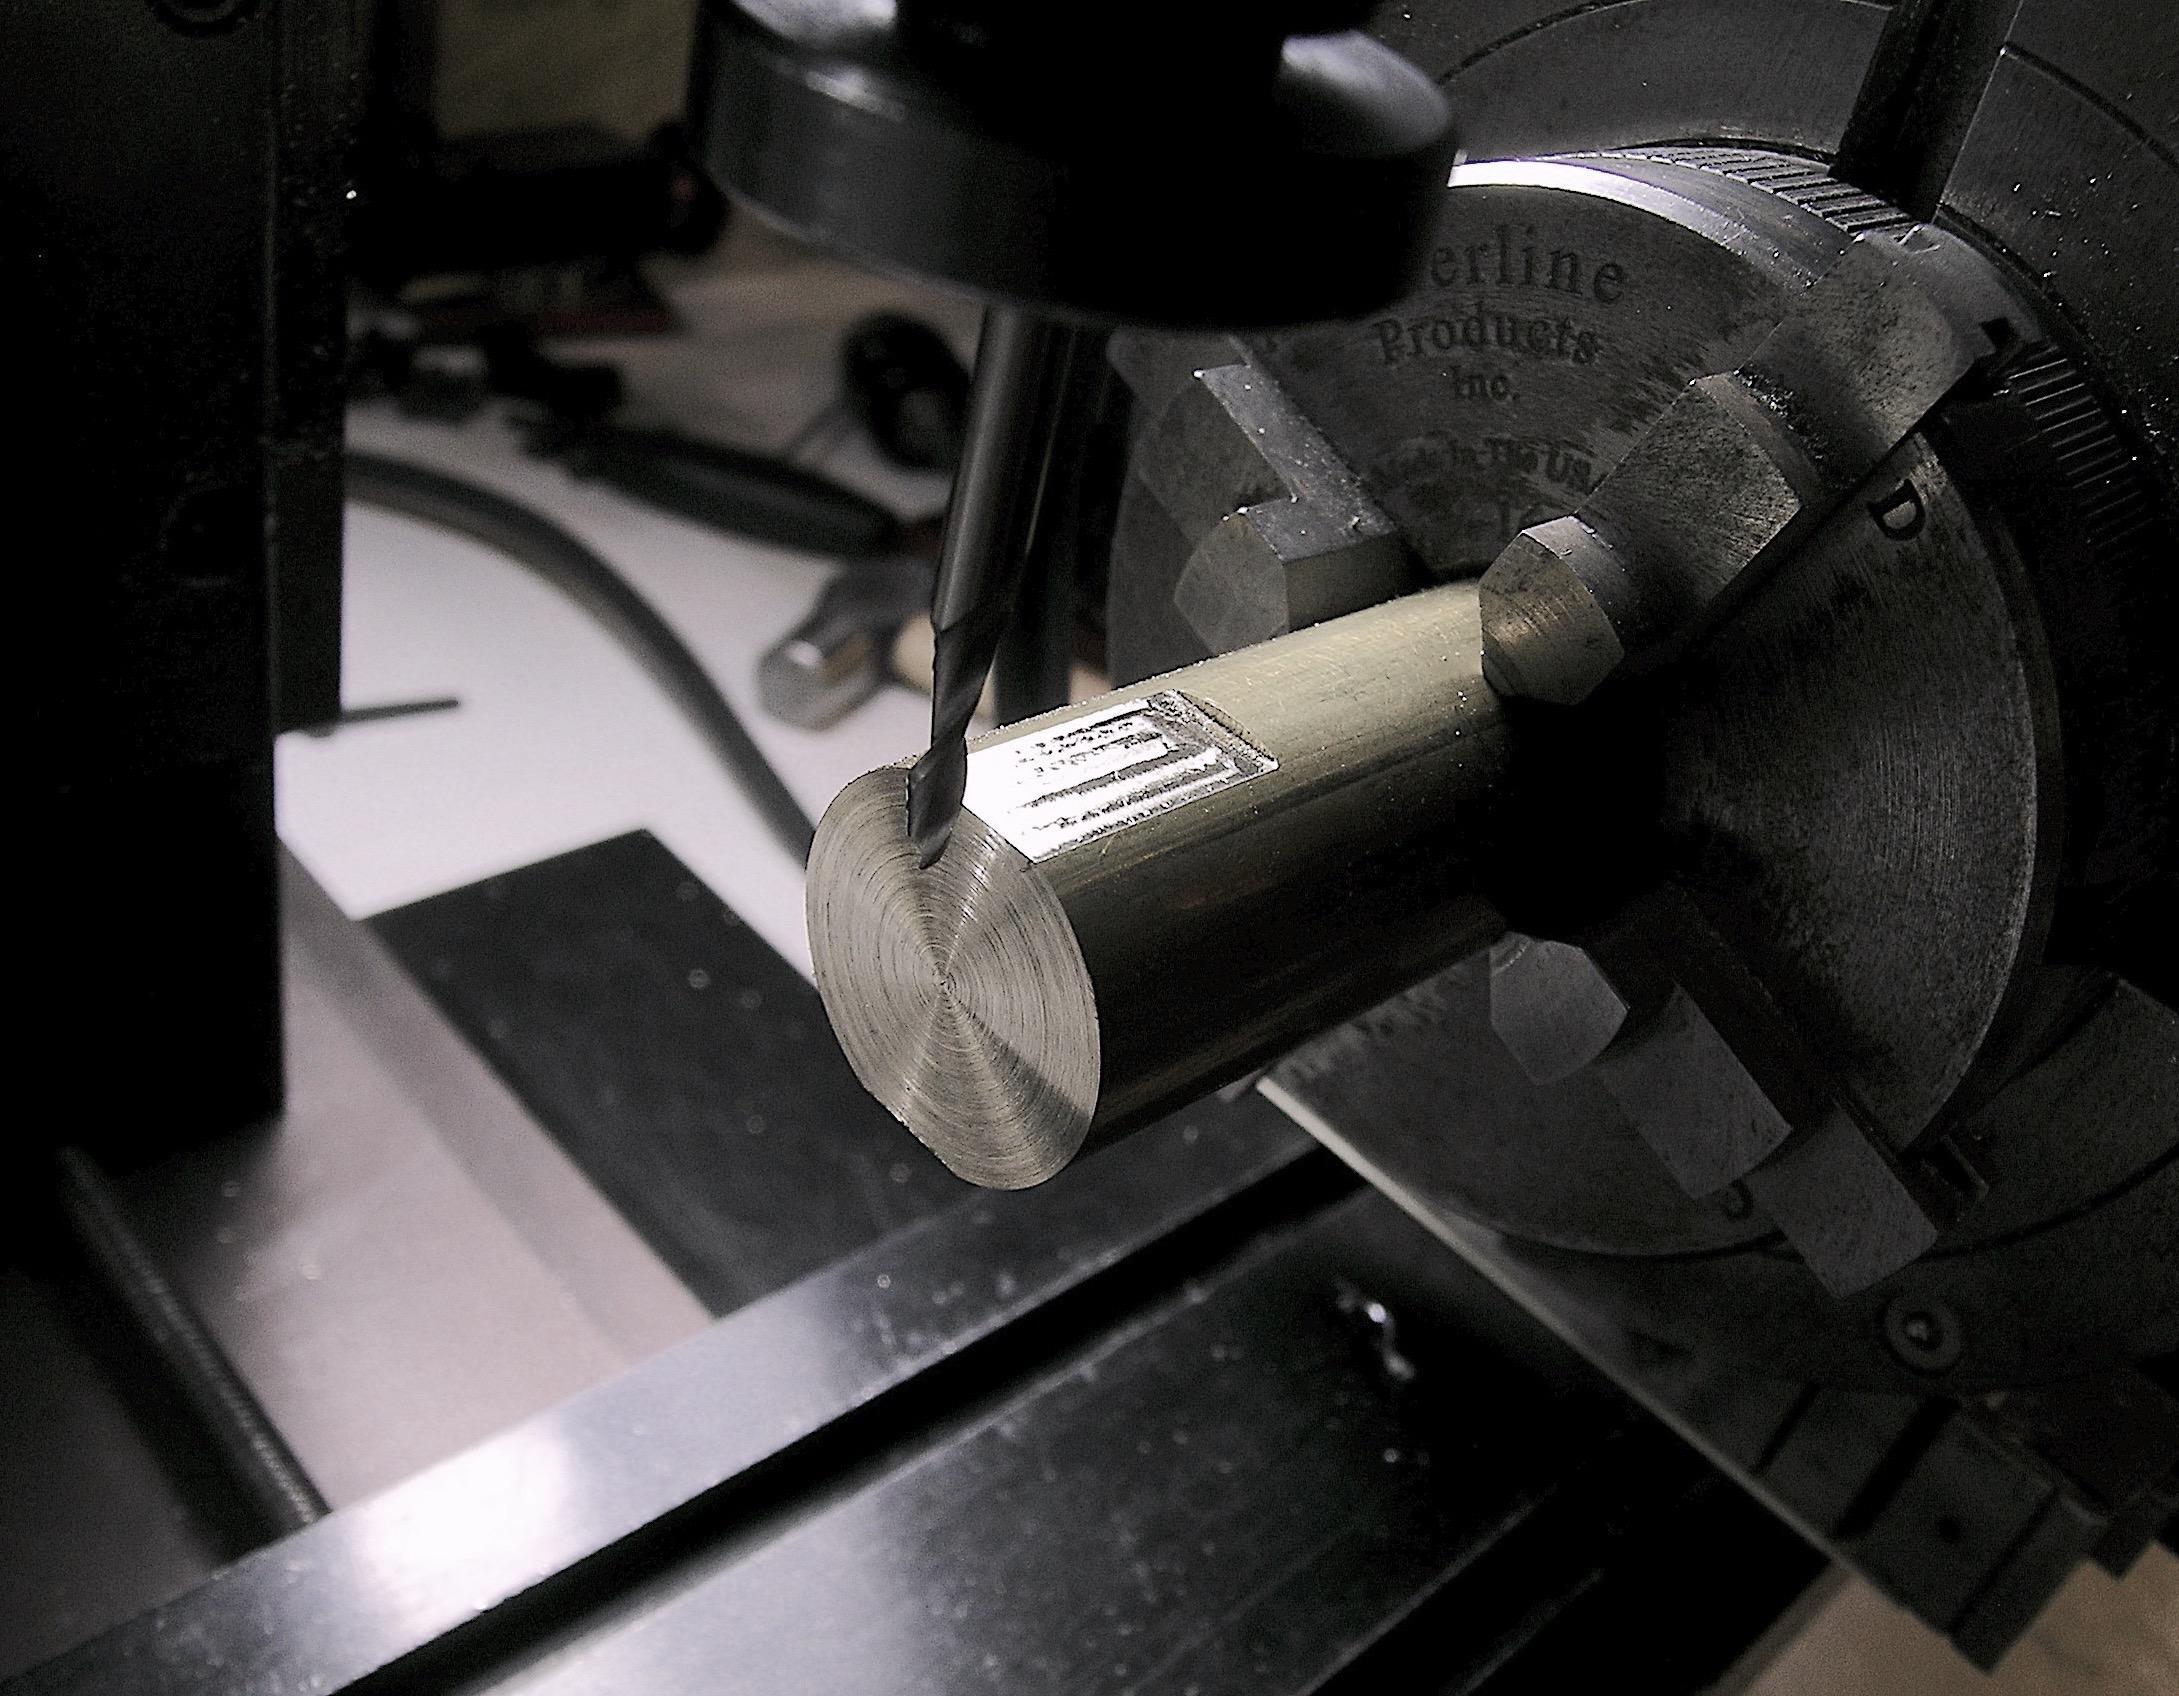
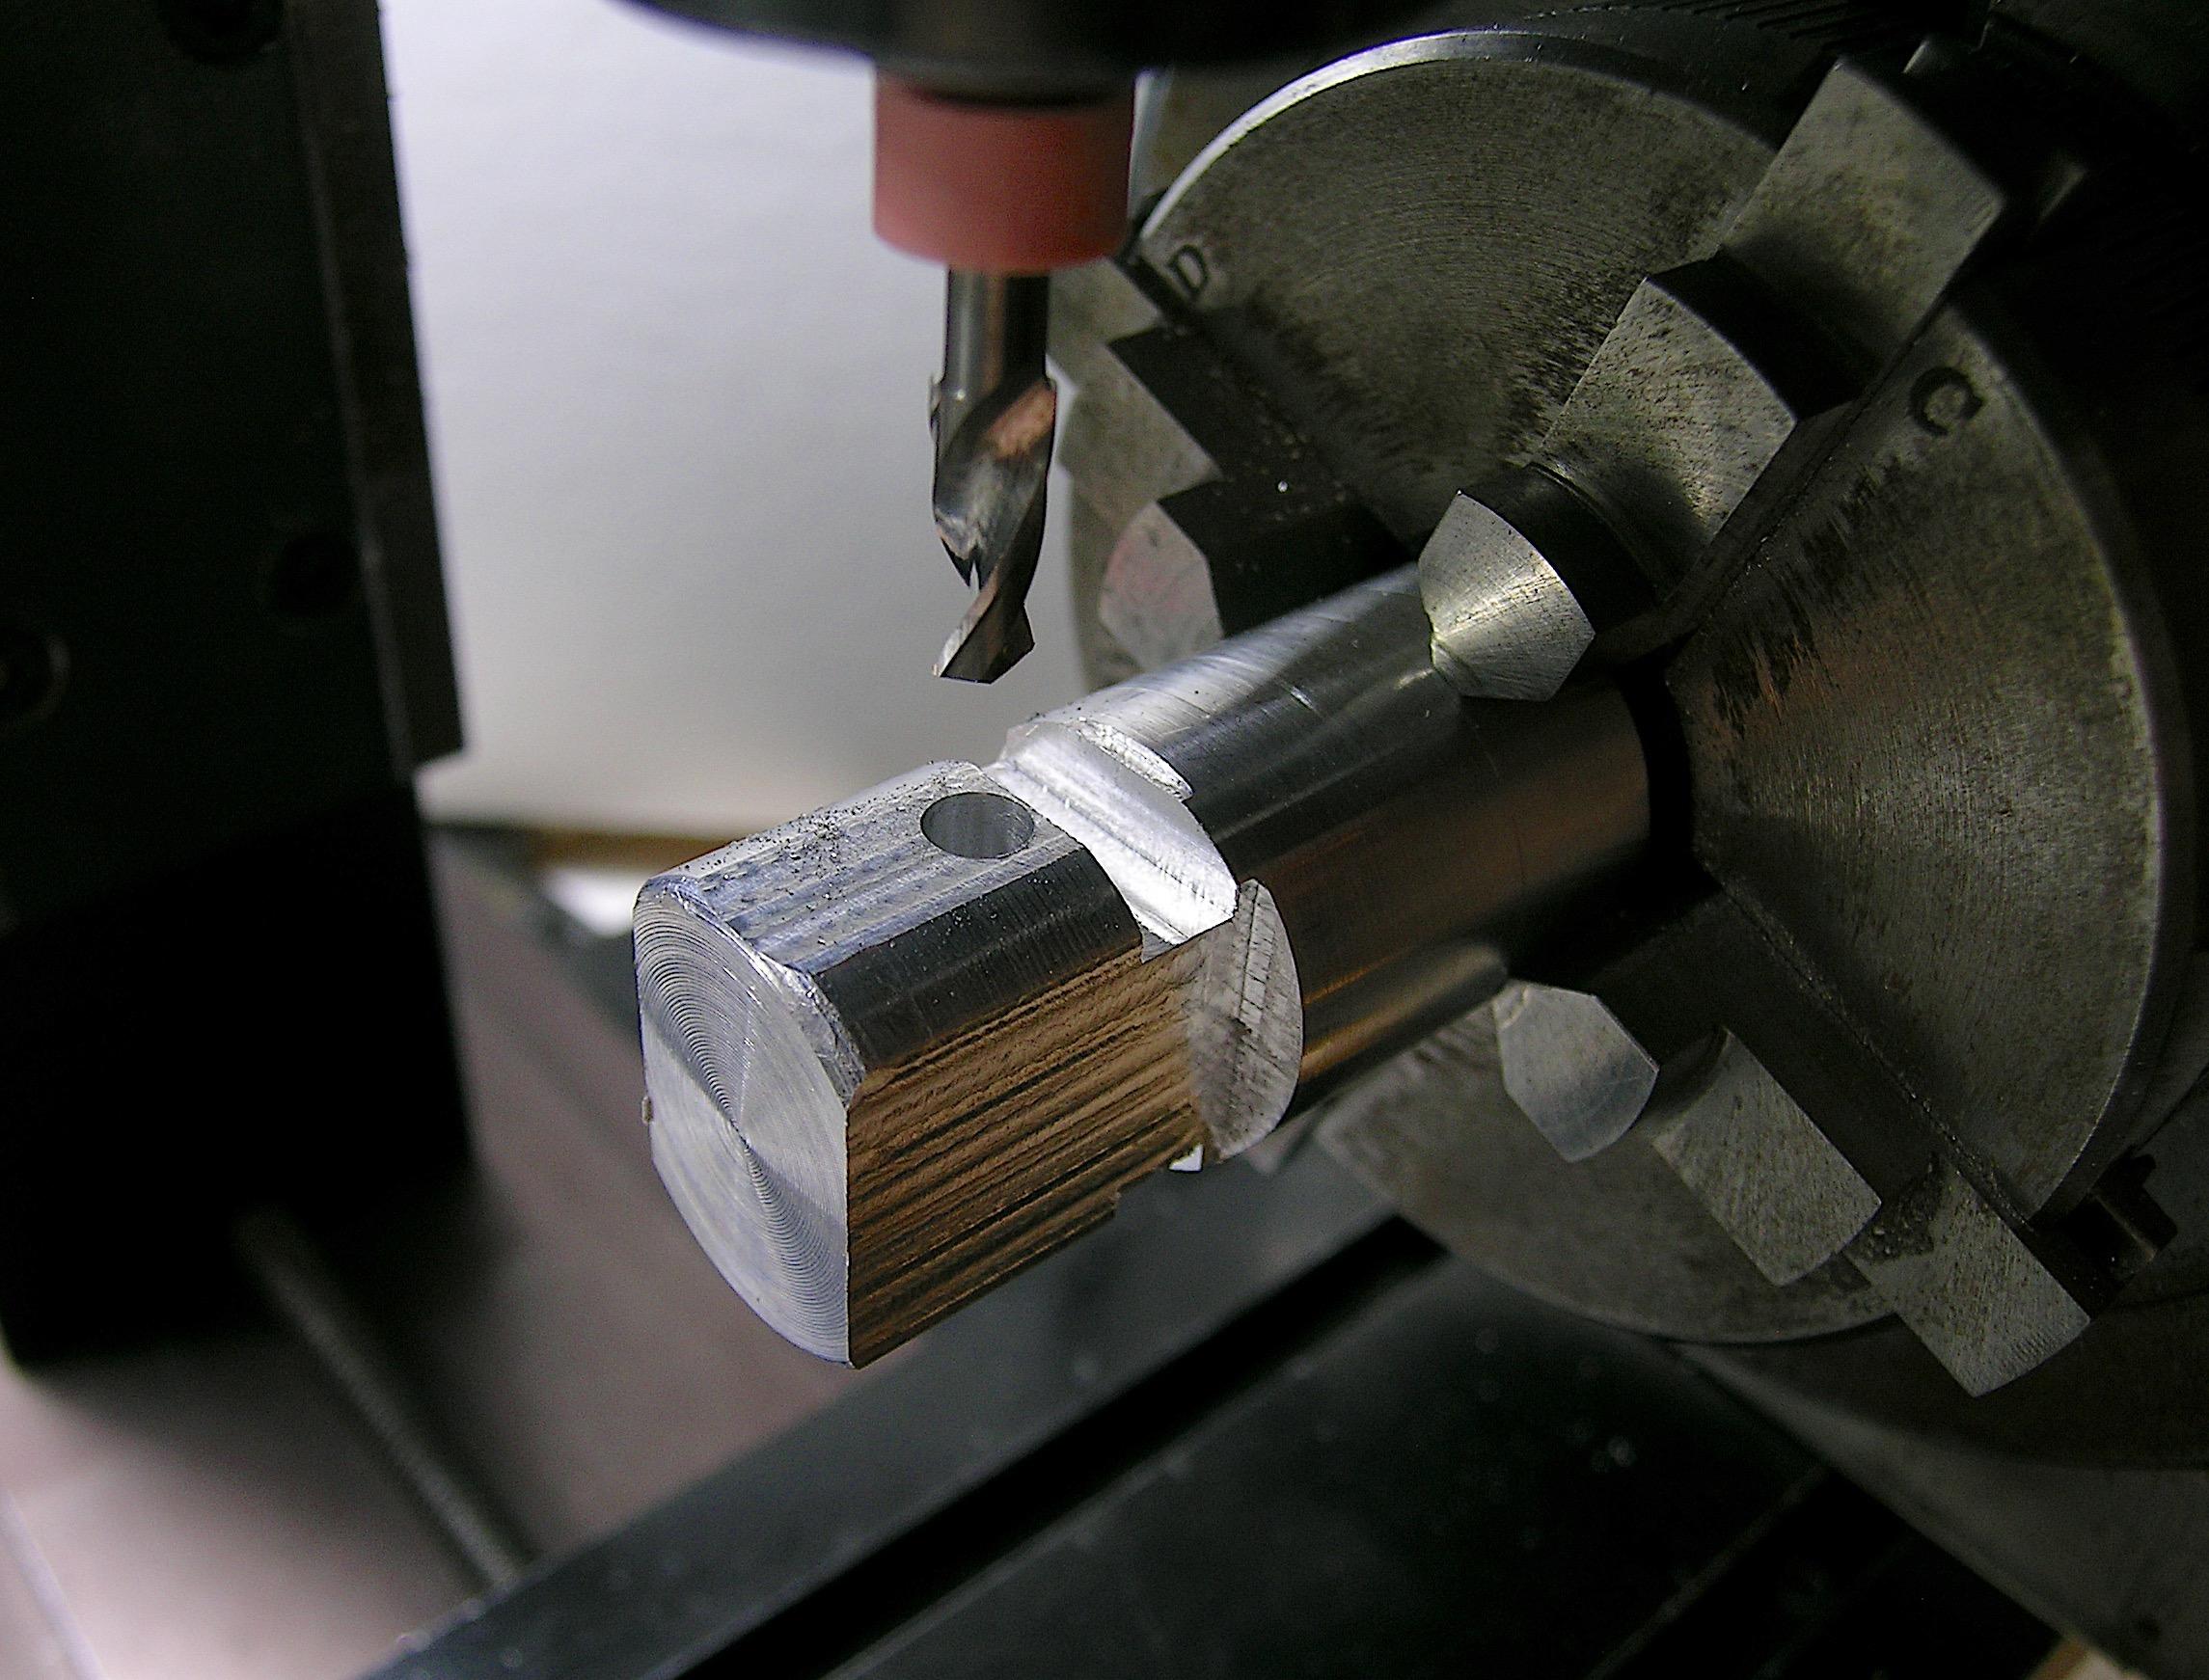
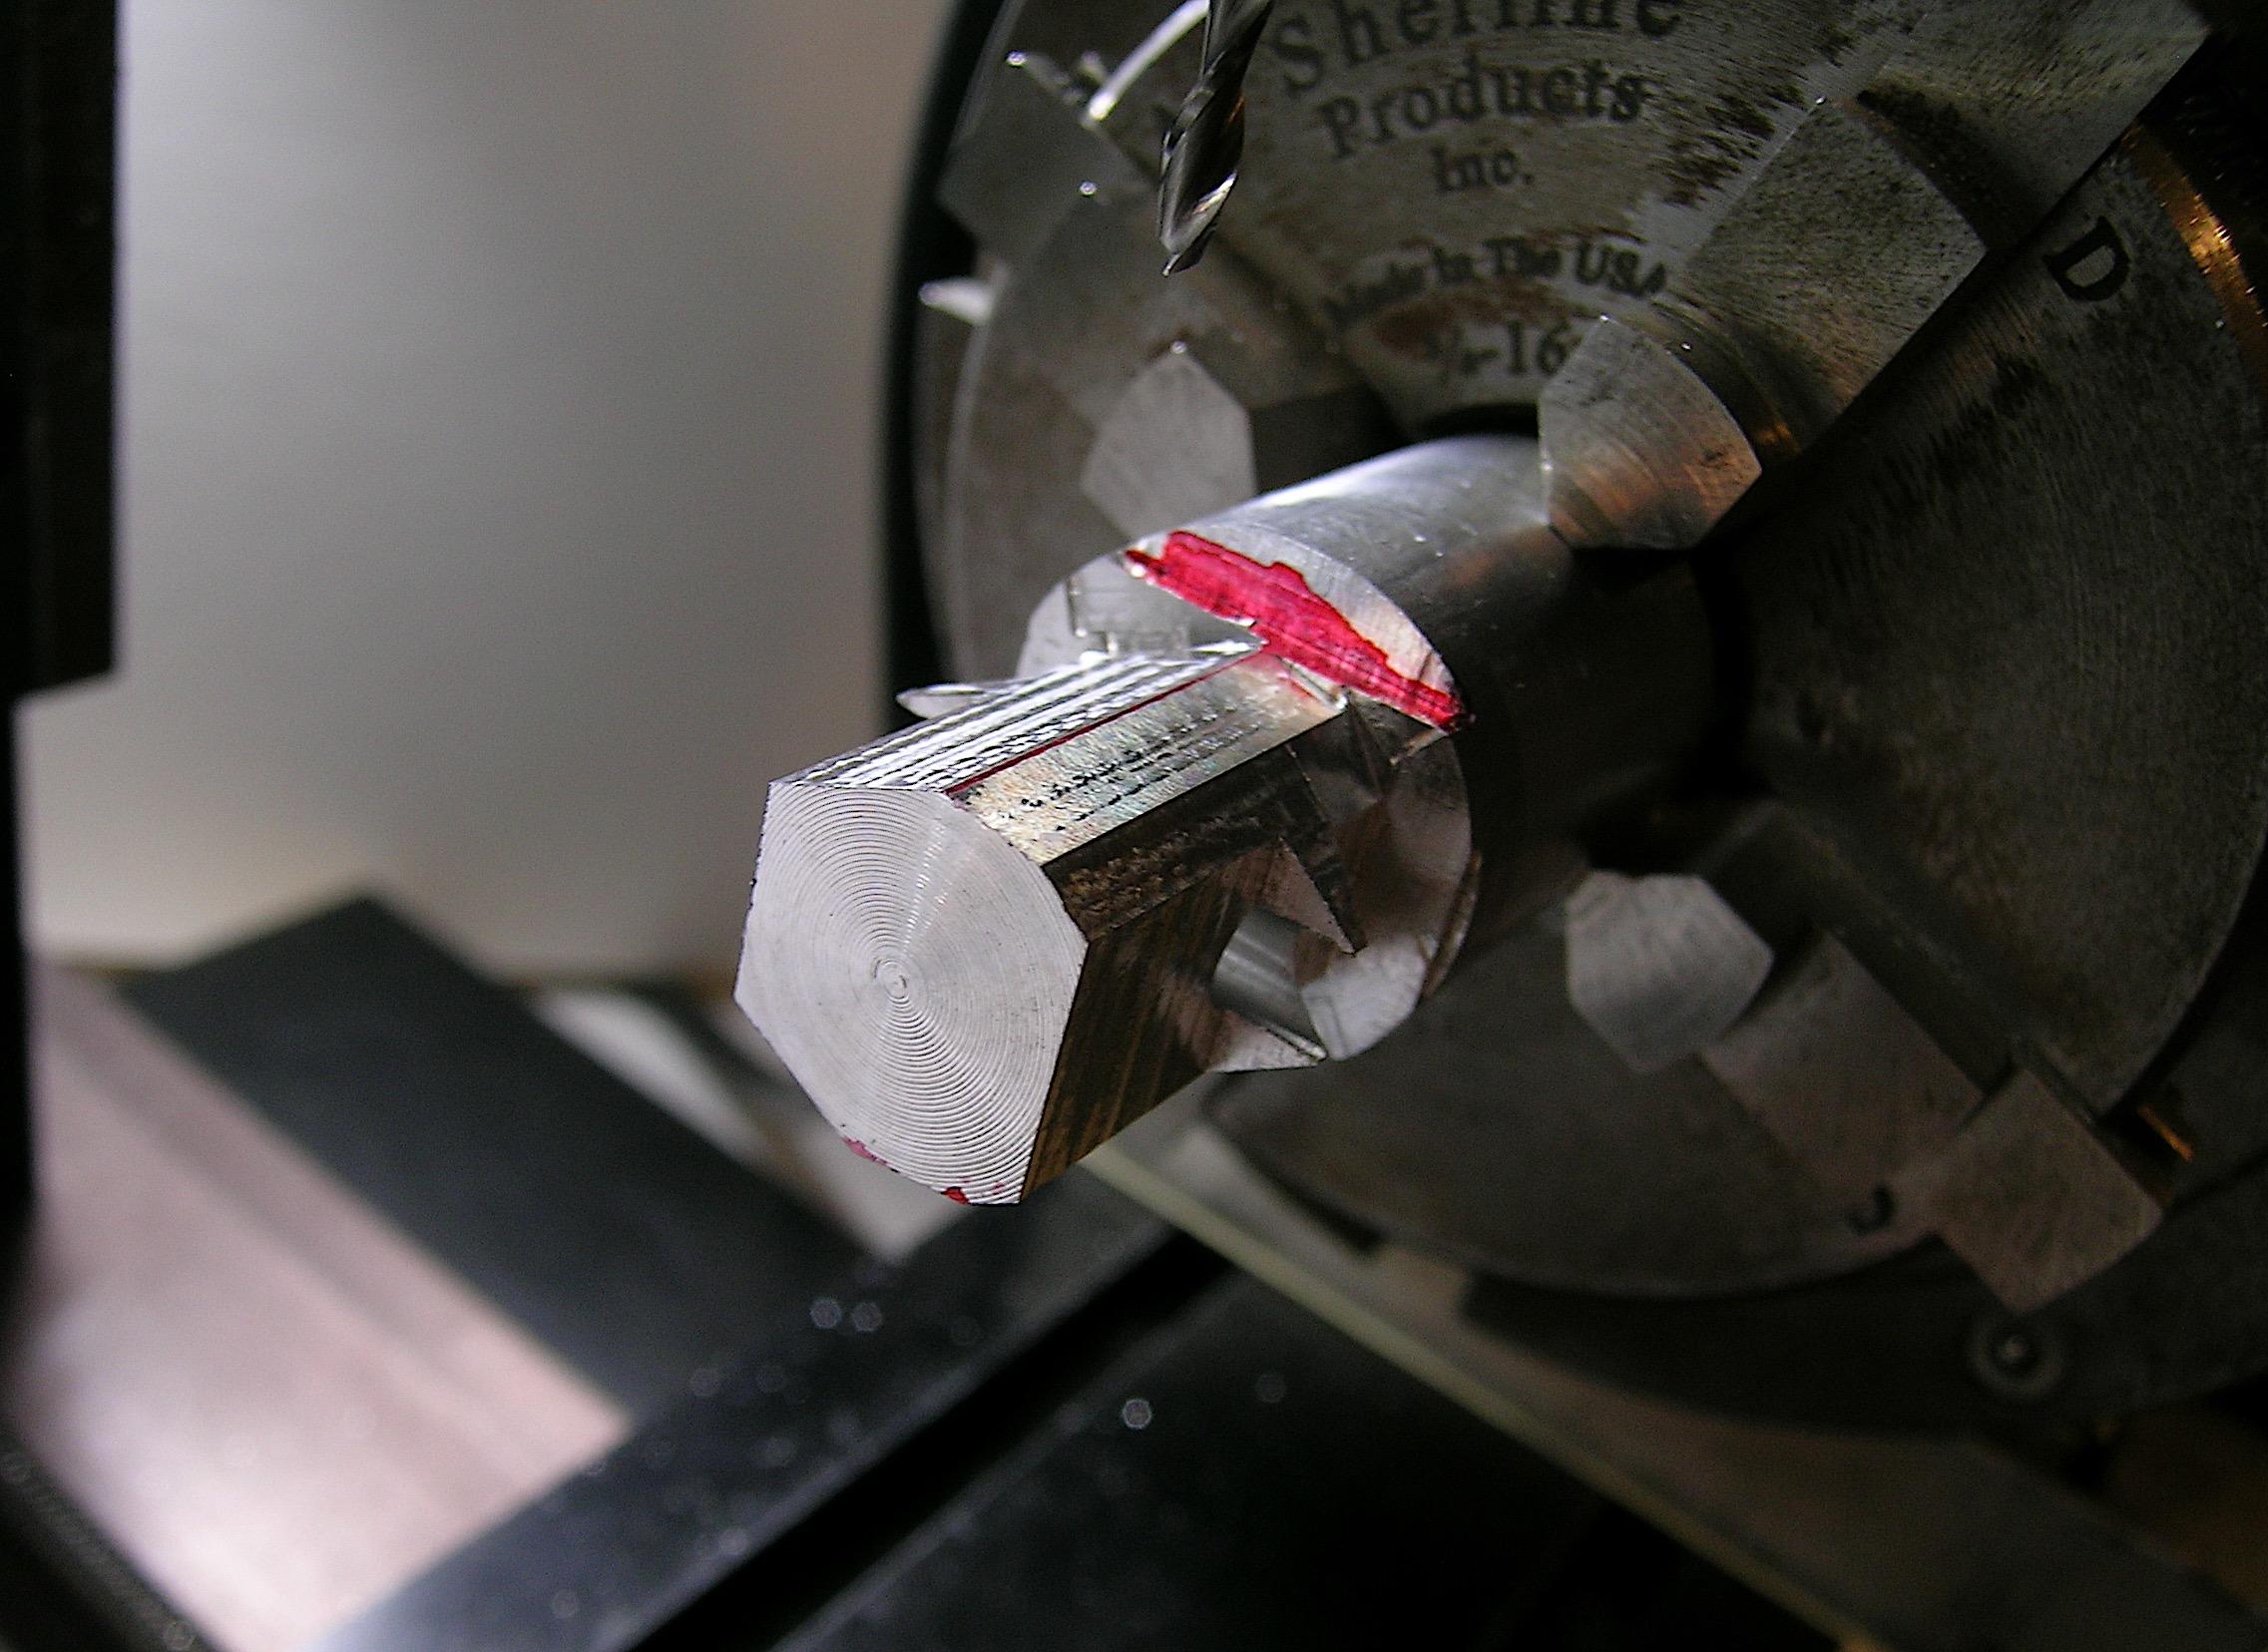
Hello everyone, Another small update. Once the wheel flanges and brake discs were completed, I was able to determine the exact width of the tube that will form the differential. I decided to use brass because many elements will be welded to the tube, it will be stronger than epoxy glue to assemble aluminum parts if I had used this material. I have made a few easy parts but the Dana 60 will be a different story, this will be one of the most difficult parts to make as it contains many angles, radii and ribs. I have already made one in the past, one for the GTX and the D100 among others but I wanted to have something more precise, I always remained hungry so I did some research and I finally found relevant technical information. I haven't finished the Dana yet but I'll show you what I've done so far. There will be a lot of parts to make so I think I will be working on the back of the car for several weeks... ? Francis One of the housing ends in the rotary table, I used brass for these parts as they will be welded to the differential tube. They fit perfectly on the tube, the holes will be used to bolt the brake caliper bracket (to be made later). Rear End Axle Spring Perches in the rotary table. I drilled a hole in the middle for the center pin. They are finished, they are a little thicker than I wanted but I need enough surface area to have a solid weld. The real work begins, the Dana 60, here are the first cuts. I determined the exact width and the hole for the tube was drilled. The rough shape is done. I machined the angles on the back that will be used for the rear cover seat. More cuts are made, it's a long process of endless rotation in all directions. It looks strange at the moment but I'm well on my way, with some more finishing cuts and sanding it should do the trick. The rest of the machining will resume next week!
-
’72 Dodge Demon Drag Racer 1/25 scale
AmericanMuscleFan replied to AmericanMuscleFan's topic in WIP: Drag Racing Models
Guitar strings could have been used to simulate threaded bolts but I don't know if the size would be realistic. Thanks Chris, I still have a lot of work to do until the finish line is another project that will take time to complete. Francis -
’72 Dodge Demon Drag Racer 1/25 scale
AmericanMuscleFan replied to AmericanMuscleFan's topic in WIP: Drag Racing Models
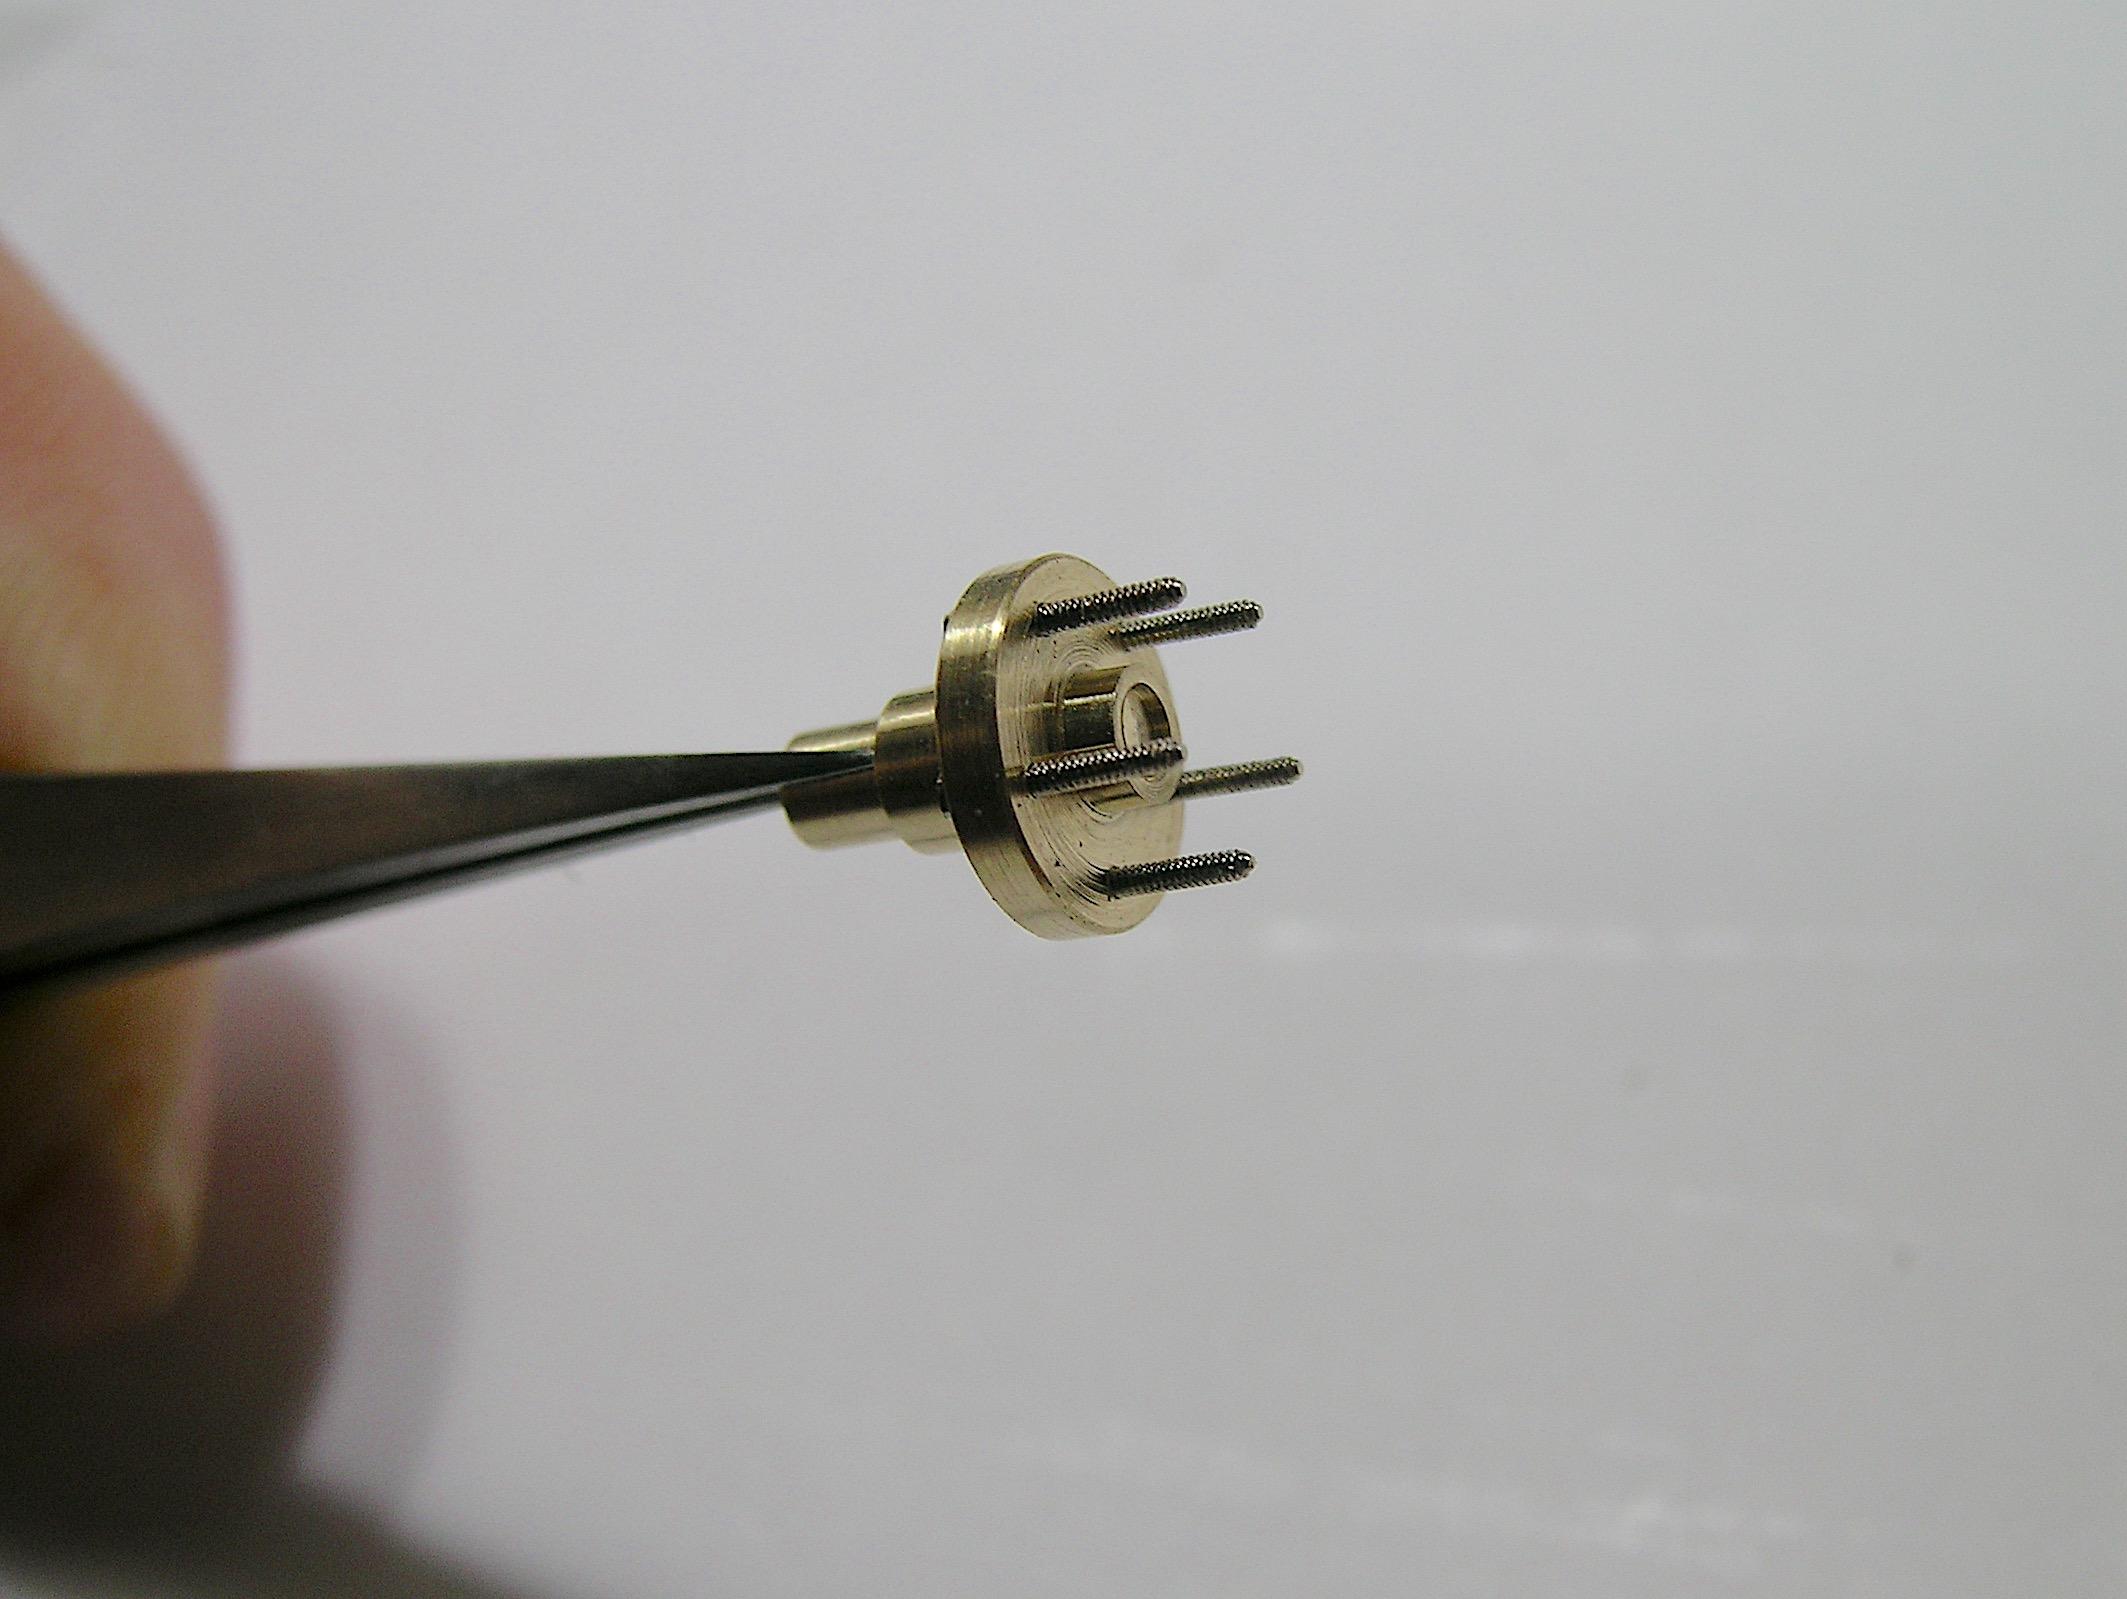
Thanks Keith! That was the easy part, the rest of the differential will be another story...LOL ? Thanks Rich, now is not a good time to lose your eyes, you have your own Demon project to finish! ? Thanks Daniel One of my teachers told me a long time ago that "calculation is worth the work", I haven't finished calculating! ? Thanks Will, the wheels studs are actually threaded brass bolts (you can see the head of the 5 bolts in one of the photos while I show the interior side of the assembly), the wheels will hold in place with screwed nuts like on a real car. I did the same technique on my '64 D100 pickup, you can check on page 3 of the thread (I copied the link). It's basically the same principle but I "improved the recipe" IMHO. https://www.modelcarsmag.com/forums/topic/148021-64-dodge-d100-pickup-pro-street/page/3/ Thanks for your encouragement guys, I'll be at work for the next 3 days, I'll be back at the end of the week! Francis -
It is very difficult if not impossible to bend an aluminum tube without kink in the curve, you must use a solid aluminum rod. It's easier to make the cage out of styrene and paint it aluminum. Don't give up, you'll get there! ?
-
’72 Dodge Demon Drag Racer 1/25 scale
AmericanMuscleFan replied to AmericanMuscleFan's topic in WIP: Drag Racing Models
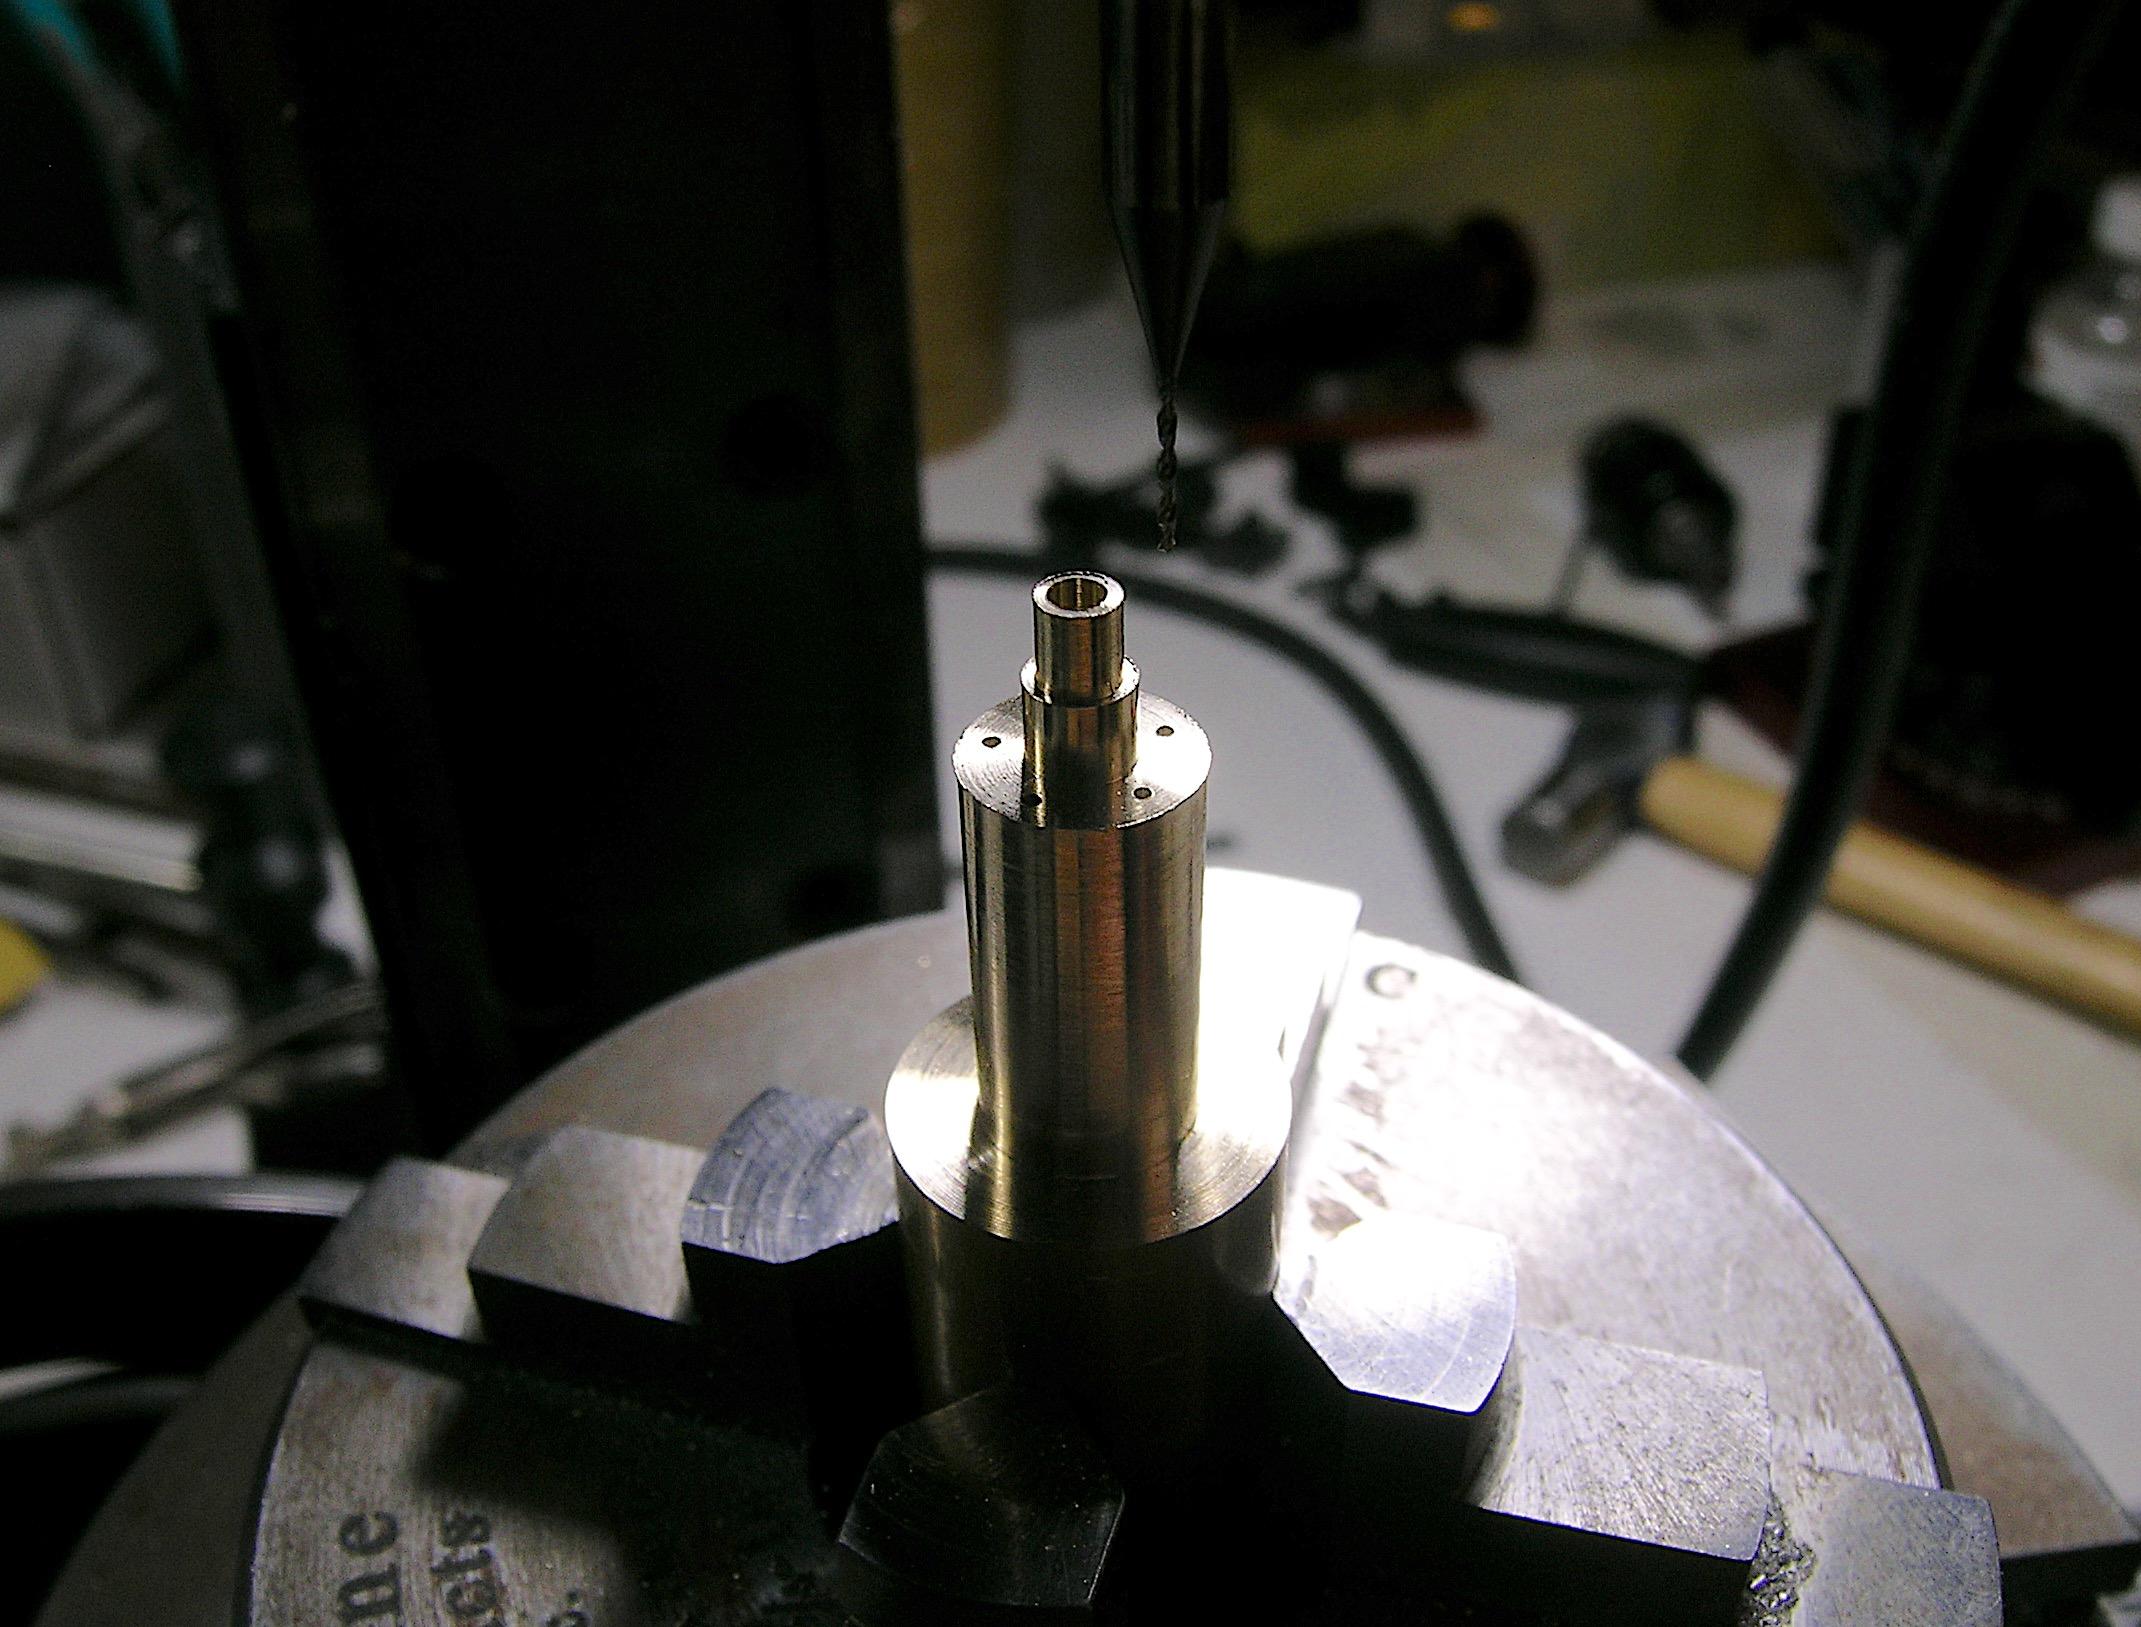
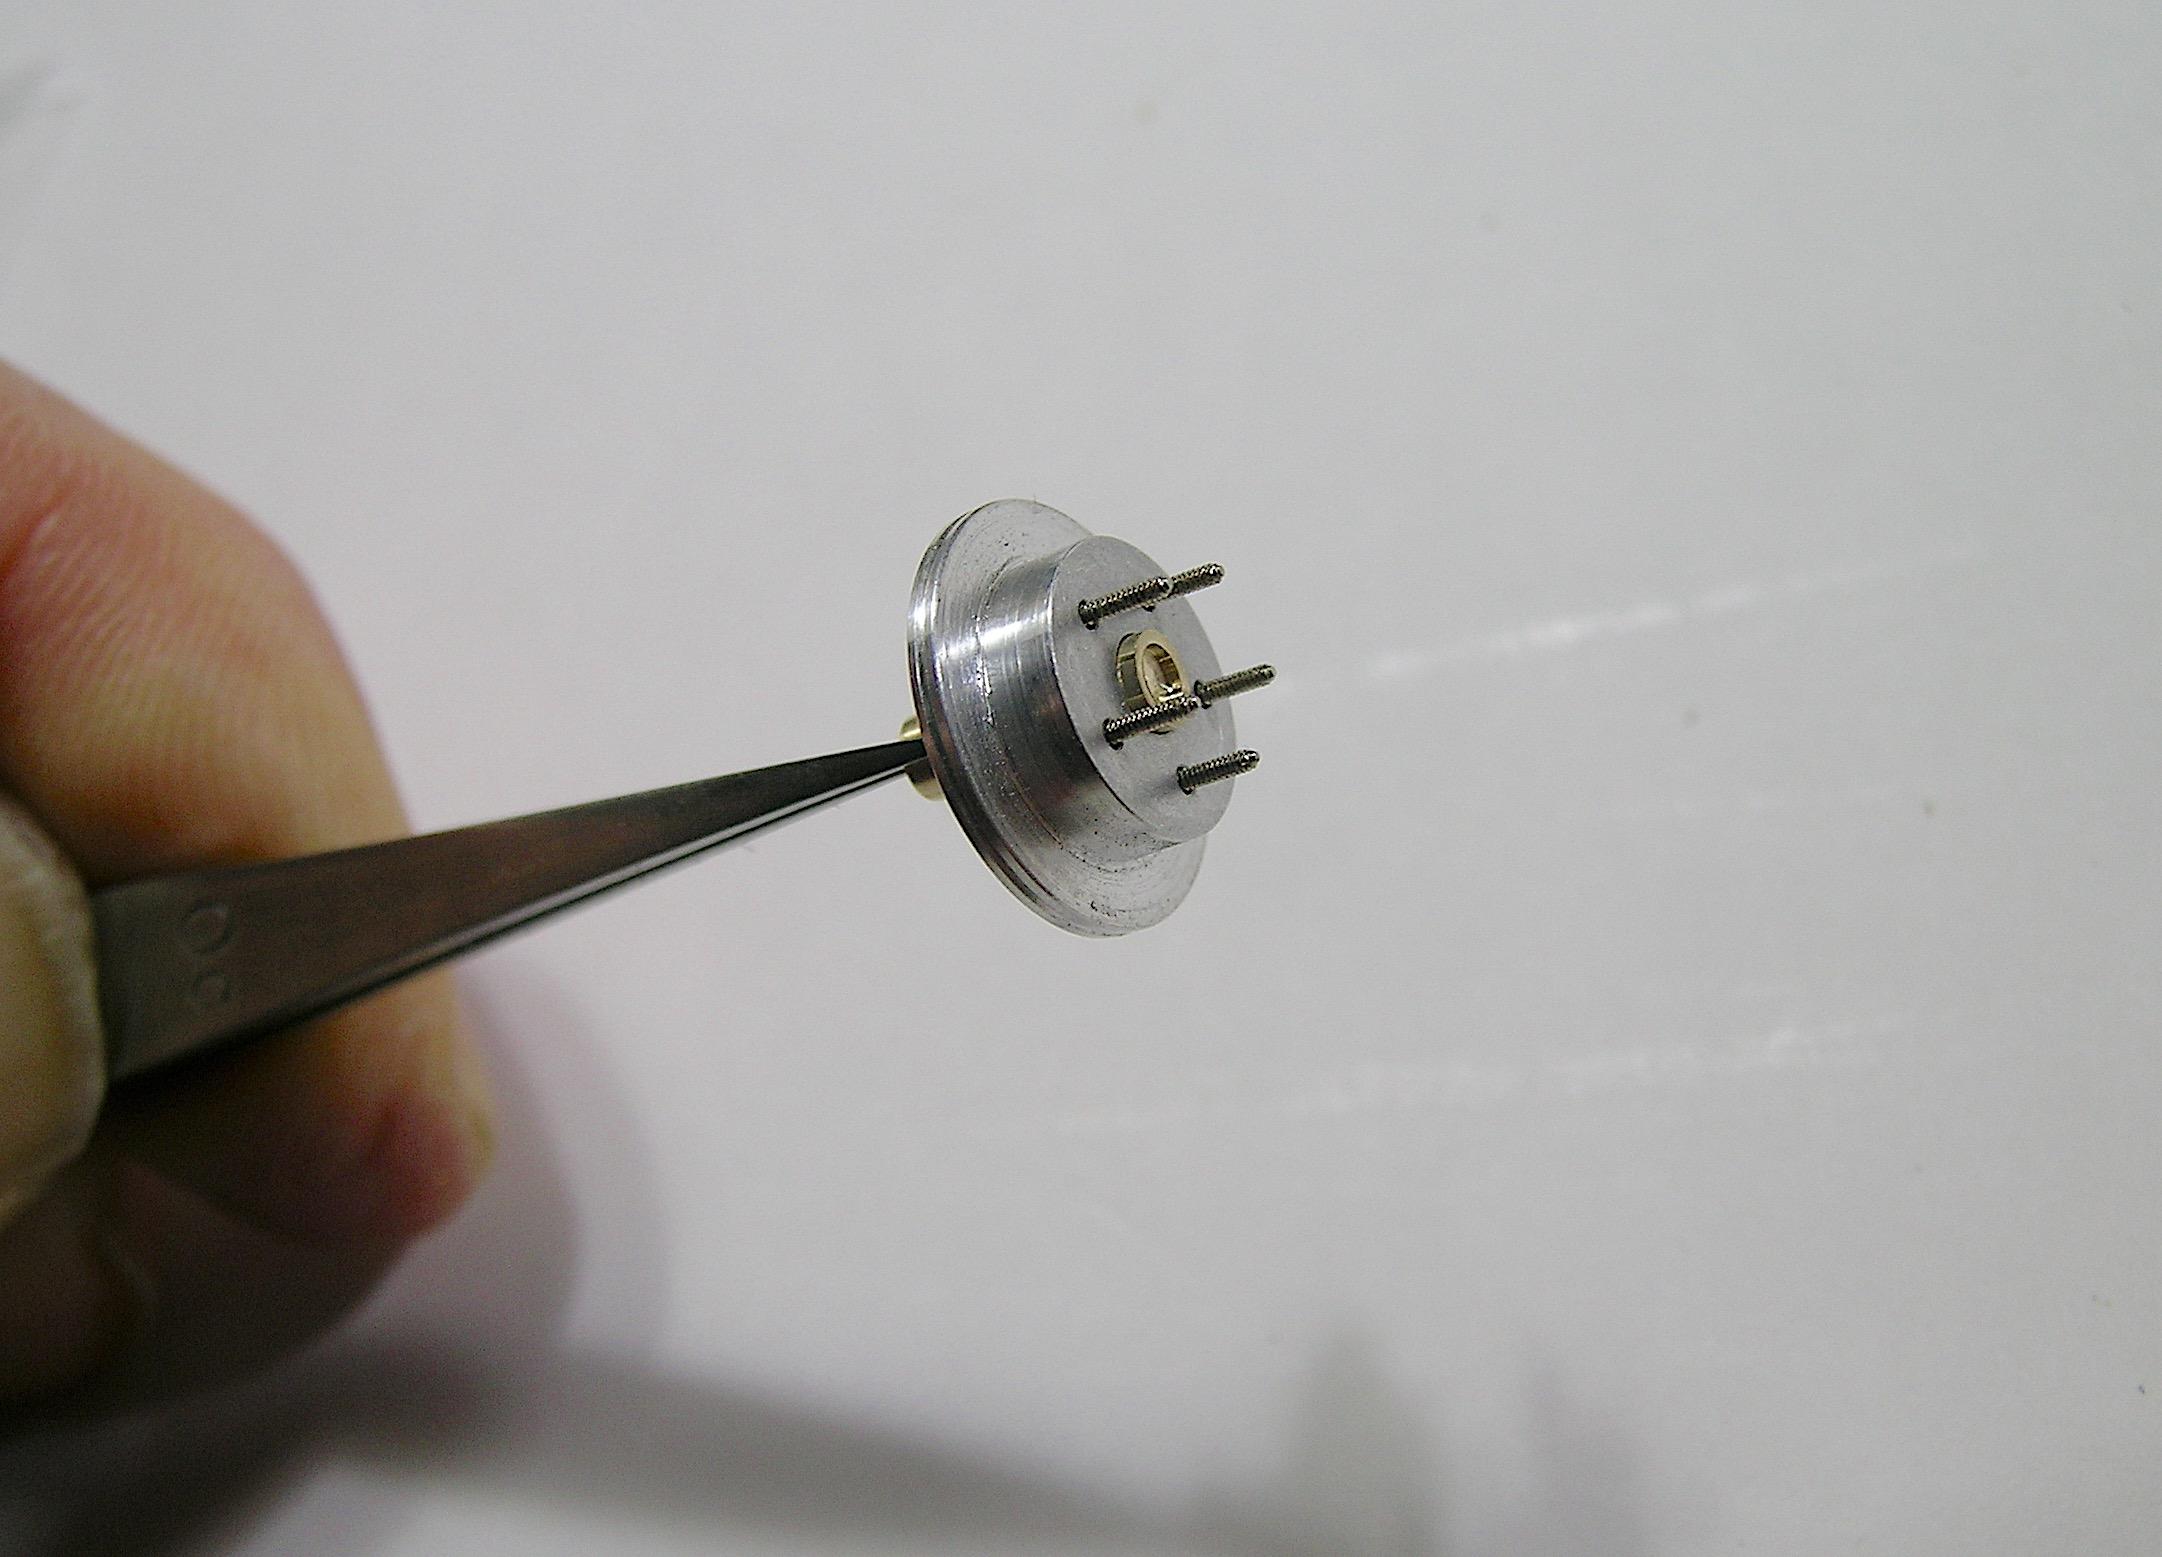
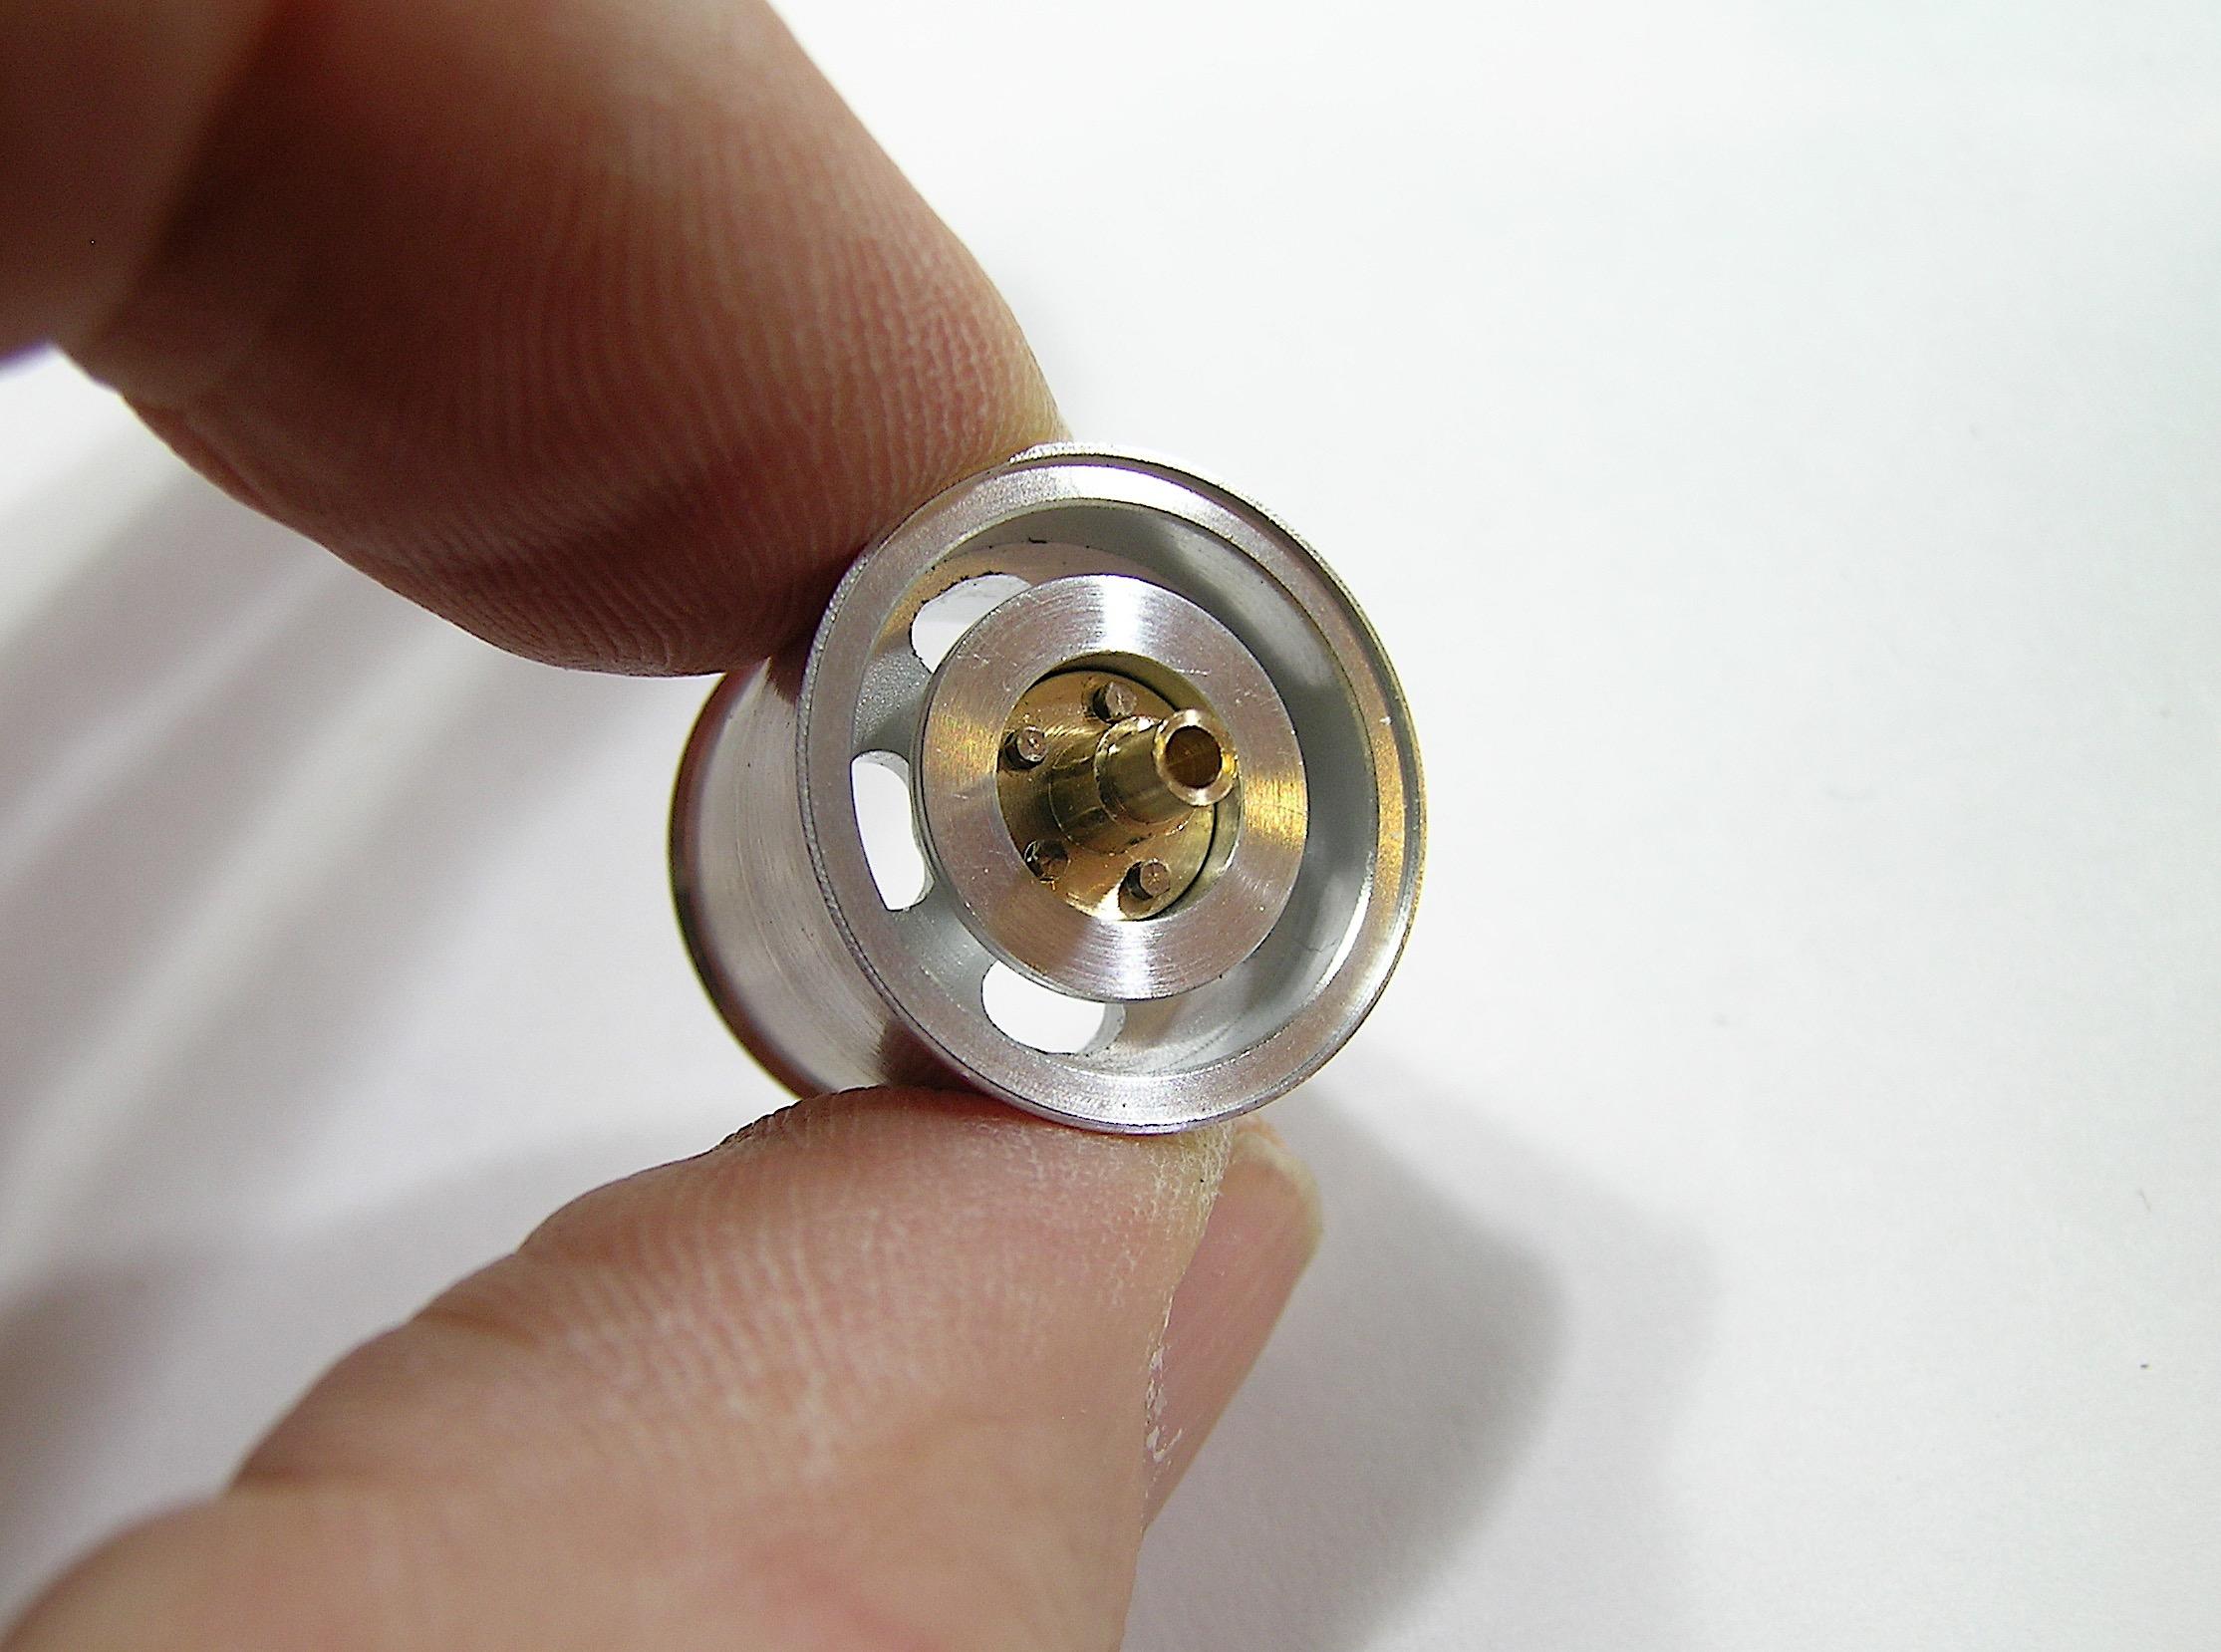
Hello everyone, I think it's high time for a new update guys!!! I took the time to think carefully about my next step and ultimately decided to start by making the differential and all of the rear suspension before the steering and front suspension. I've always liked the rear of Mopar cars with a high stance and when finished it will pave the way for the front, so I think it will be a logical "next step". So enough talking, let's take action, I show you the brake discs and axle flanges (I don't know if that's the right name). There will be a lot of parts to make so you know a little bit of what to expect. ? Francis Brake rotor at early stage. It look like the same picture but I have drilled the holes for the wheel studs. Final parts, probably the easiest to machine of the entire build. One of the rear axle flanges at the beginning of machining, looks like aluminum but is actually brass. Later on the rotary table for wheel studs drilling. The basic is done, now you can see they are made in brass. Viewed from the side that will contact with the disk brake rotor. The threaded wheel studs are inserted. The axle flange with the disk brake rotor. Now with the wheel, the fit is very good, I had noted the hole spacing when machining the wheels because it is super important for the rest of the parts in the set. I planned the clearance for the caliper, the disc brake measures 11.25 inches at scale. The fruit of my labor! ?
-
’72 Dodge Demon Drag Racer 1/25 scale
AmericanMuscleFan replied to AmericanMuscleFan's topic in WIP: Drag Racing Models
No problem Scott, your intervention speaks of a Mopar! ? -
’72 Dodge Demon Drag Racer 1/25 scale
AmericanMuscleFan replied to AmericanMuscleFan's topic in WIP: Drag Racing Models
Thanks Claude! I will limit my reply to your kind comment by saying that even if the situation you describe has already occurred, I prefer to concentrate with those who wonder and want to know more about my madness because I have long since learned that one cannot please to all. This hobby has allowed me to connect with great people and you are certainly one of them! As for "Keep at it", that should be the case because I have to make a return on my investments. ? Francis -
Superb job James, that's a really nice project, I love the stance! ? Sammy Hagar sang "I can't drive 55" but he would certainly drive your 55...! ?
-
71 Olds 442 W30 (replica of my brother in law’s car)
AmericanMuscleFan replied to Steve H's topic in WIP: Model Cars
These are all lovely details you added Steve, it will make all the difference on what you call a "mostly box stock build", I love your enthusiasm and passion, the results speak for themselves! ? -
’72 Dodge Demon Drag Racer 1/25 scale
AmericanMuscleFan replied to AmericanMuscleFan's topic in WIP: Drag Racing Models
You're so nice Keith but I'm afraid I'll disappoint you, I'm just an ordinary guy who likes to complicate his life by making a bunch of parts that you can only really see before they're assembled... ? By the way, I noticed you changed your profile icon photo, the '70 Coronet looks great but I hope you still like the Demon! ? -
Billy the Kid Demon Pro Stock
AmericanMuscleFan replied to dragcarz's topic in WIP: Drag Racing Models
It seems to me that the one marked 1971 in your photo is more precise and looks more like the real one, this is the one I would use. -
’72 Dodge Demon Drag Racer 1/25 scale
AmericanMuscleFan replied to AmericanMuscleFan's topic in WIP: Drag Racing Models
Thank you Roger, I'm not the most exuberant man and I'm sometimes surprised by the interest what I do can generate, camaraderie comes first but it's rewarding when what you do pleases others! I'll get back to you soon with my latest progress but even if I don't move forward quickly, I take the opportunity to appreciate the good work of others! ? Francis -
Congratulation Maurice, you put a big smile on my face, obviously we like the same thing but you own the real thing! The feeling of driving these monsters must be amazing, i will continue making my toys and i appreciate that a professional from your class can appreciate what I do! ? Francis
-
Nice work Maurice, very clean builds! I love Pro Stock cars, it was my favorite class of drag racing until they switched to fuel injection, it was more exciting in the days of carburetors in my opinion while all the Detroit manufacturers were in competition, it has changed a lot since then! ? Scale models are a good way to bring back to life these memories of the past where a lot of development was done directly on the track by good old mechanical enthusiasts. ?
-
72 Plymouth Roadrunner 426 HEMI 8 Pack
AmericanMuscleFan replied to AmericanMuscleFan's topic in WIP: Drag Racing Models
Thanks for your great comments Keith, I really appreciate your mark of appreciation of my models! Thanks Ace, that is indeed the case, all my models are heavier than normal but the Roadrunner is light weight compared to the '64 D100 because it contains a lot more aluminum and brass! ? Thanks Rich, although it's not my most elaborate build since I built it many years ago but I have to admit that it always brought a lot of good comments at model exhibitions. Thanks again to all of you guys. Francis -
72 Plymouth Roadrunner 426 HEMI 8 Pack
AmericanMuscleFan replied to AmericanMuscleFan's topic in WIP: Drag Racing Models
Hello Maurice and thank you for your kind comments! First of all, I would like to welcome you to the forum, you will certainly find many interesting builds to get your teeth into because there are lots of passionate people here. It's funny to see this old thread resurface but I admit that the finished product gives an interesting look, the color Plum Crazy has a lot to do with it because it's one of the most beautiful Mopar colors and it suits the Roadrunner perfectly. I have greatly improved my machining methods since that time and I modestly believe that what I do now is far superior but beauty is in the eye of the beholder. You can see some of them by clicking on the links at the bottom of my posts if you are interested. Francis -
71 Olds 442 W30 (replica of my brother in law’s car)
AmericanMuscleFan replied to Steve H's topic in WIP: Model Cars
I'm very happy to see you again with a new project Steve and what a great subject and what a good intention for your brother in law! I love the color of the engine, this kit is definitely in good hands. I will be following with interest as the '71 442 is one of my favorite GM cars. I have a weakness for the Buick GSX whose front end shows family resemblances and for the reason that one of my uncles owned one in my youth but the 442 and the Cutlass are superb cars, true classics. ? -
67 Camaro B&R Performance C/SM
AmericanMuscleFan replied to Nitro330's topic in WIP: Drag Racing Models
Fantastic job Terry! Your attention to detail is extraordinary and your talent obvious. As many others have mentioned, I wonder how I could have missed your project because it's my type of build. The grille is especially convincing among all these modifications which are just as convincing! ? -
’72 Dodge Demon Drag Racer 1/25 scale
AmericanMuscleFan replied to AmericanMuscleFan's topic in WIP: Drag Racing Models
Thank you my partner, you should easily cross the finish line before me so I will continue to machine other parts knowing that the race is lost in advance! We obviously share the same tastes for cars from this era and I admire your determination, you are certainly an example to follow my friend. -
Billy the Kid Demon Pro Stock
AmericanMuscleFan replied to dragcarz's topic in WIP: Drag Racing Models
Excellent work on the engine compartment Roger especially knowing how rare good shots of these old racers are. It's always a good challenge to fit a big HEMI between the fenders of these pony cars, but it's also very impressive and intimidating when the hood is open. ?