AmericanMuscleFan
-
Posts
3,058 -
Joined
-
Last visited
Content Type
Profiles
Forums
Events
Gallery
Everything posted by AmericanMuscleFan
-
 I'm glad to see you back at this ambitious and cool build Scott. An impressive number of hours have been invested so far and I'm sure your friend Louie will be impressed with the high quality of your work. ?
 -
’72 Dodge Demon Drag Racer 1/25 scale
AmericanMuscleFan replied to AmericanMuscleFan's topic in WIP: Drag Racing Models
Hey Joe, welcome and thank you for witnessing my new obsession, my friend! ? I don't know how it will turn out, but I know that all my past tricks and new ones will be needed to bring this project to life. Almost everything will have to be created from scratch, so the project could change during the build, but it will definitely have a lot of horsepower and big tires. ? Francis -
’72 Dodge Demon Drag Racer 1/25 scale
AmericanMuscleFan replied to AmericanMuscleFan's topic in WIP: Drag Racing Models
Thanks Ron, it would be hard to say that you don't like Dusters... I like them too but I chose a Demon for its rarity. Francis -
’72 Dodge Demon Drag Racer 1/25 scale
AmericanMuscleFan replied to AmericanMuscleFan's topic in WIP: Drag Racing Models
Thanks Claude! I feel lazy and I think I'm going to take a shortcut by using LEDs instead of incandescent bulbs, I have a lot of other details to make and I don't want to spend too much time on hidden details. ? Joyeuses fêtes à vous aussi mon ami ! Francis -
’72 Dodge Demon Drag Racer 1/25 scale
AmericanMuscleFan replied to AmericanMuscleFan's topic in WIP: Drag Racing Models
I am glad to know that another member is working on a similar project Mike. Do you have a Styrene or resin kit for your project? Have you started a thread or do you plan to post the final product when it is finished? As for the final look of mine, I'm far from it and not sure yet because I have hundreds of hours before me to create all the details of the body so I have plenty of time to think about it and change my mind several times... ? Thank you for your visit and come back anytime. Francis -
’72 Dodge Demon Drag Racer 1/25 scale
AmericanMuscleFan replied to AmericanMuscleFan's topic in WIP: Drag Racing Models
I just want to take this opportunity to wish you all a Merry Christmas and may you be safe with your families and friends. ? The holiday season has been particularly difficult for the past 2 years and the weather is acting up this year (in addition to the endless viruses in circulation), so we must appreciate every good moment that life brings us! Francis -
’72 Dodge Demon Drag Racer 1/25 scale
AmericanMuscleFan replied to AmericanMuscleFan's topic in WIP: Drag Racing Models
Thanks Ian, I really hope to have a productive new year too. Have a great holiday too, my friend. Thanks Joe! Thanks Scott! Thanks Ray, It's probably more madness than talent...? -
’72 Dodge Demon Drag Racer 1/25 scale
AmericanMuscleFan replied to AmericanMuscleFan's topic in WIP: Drag Racing Models
Thanks Bob, it is very difficult to take good pictures but the effect in person is even better, I guarantee it. Thanks Marcos, this is the kind of detail I like to do the most! Thanks Daniel, I think these pieces will be a nice addition to the details I plan to do in the trunk. Thanks Roger, I am well motivated to improve this kit and I think the back part is well on its way to being improved! Thanks Andrew! -
Merry Christmas to you too Tim. ?
-
’72 Dodge Demon Drag Racer 1/25 scale
AmericanMuscleFan replied to AmericanMuscleFan's topic in WIP: Drag Racing Models
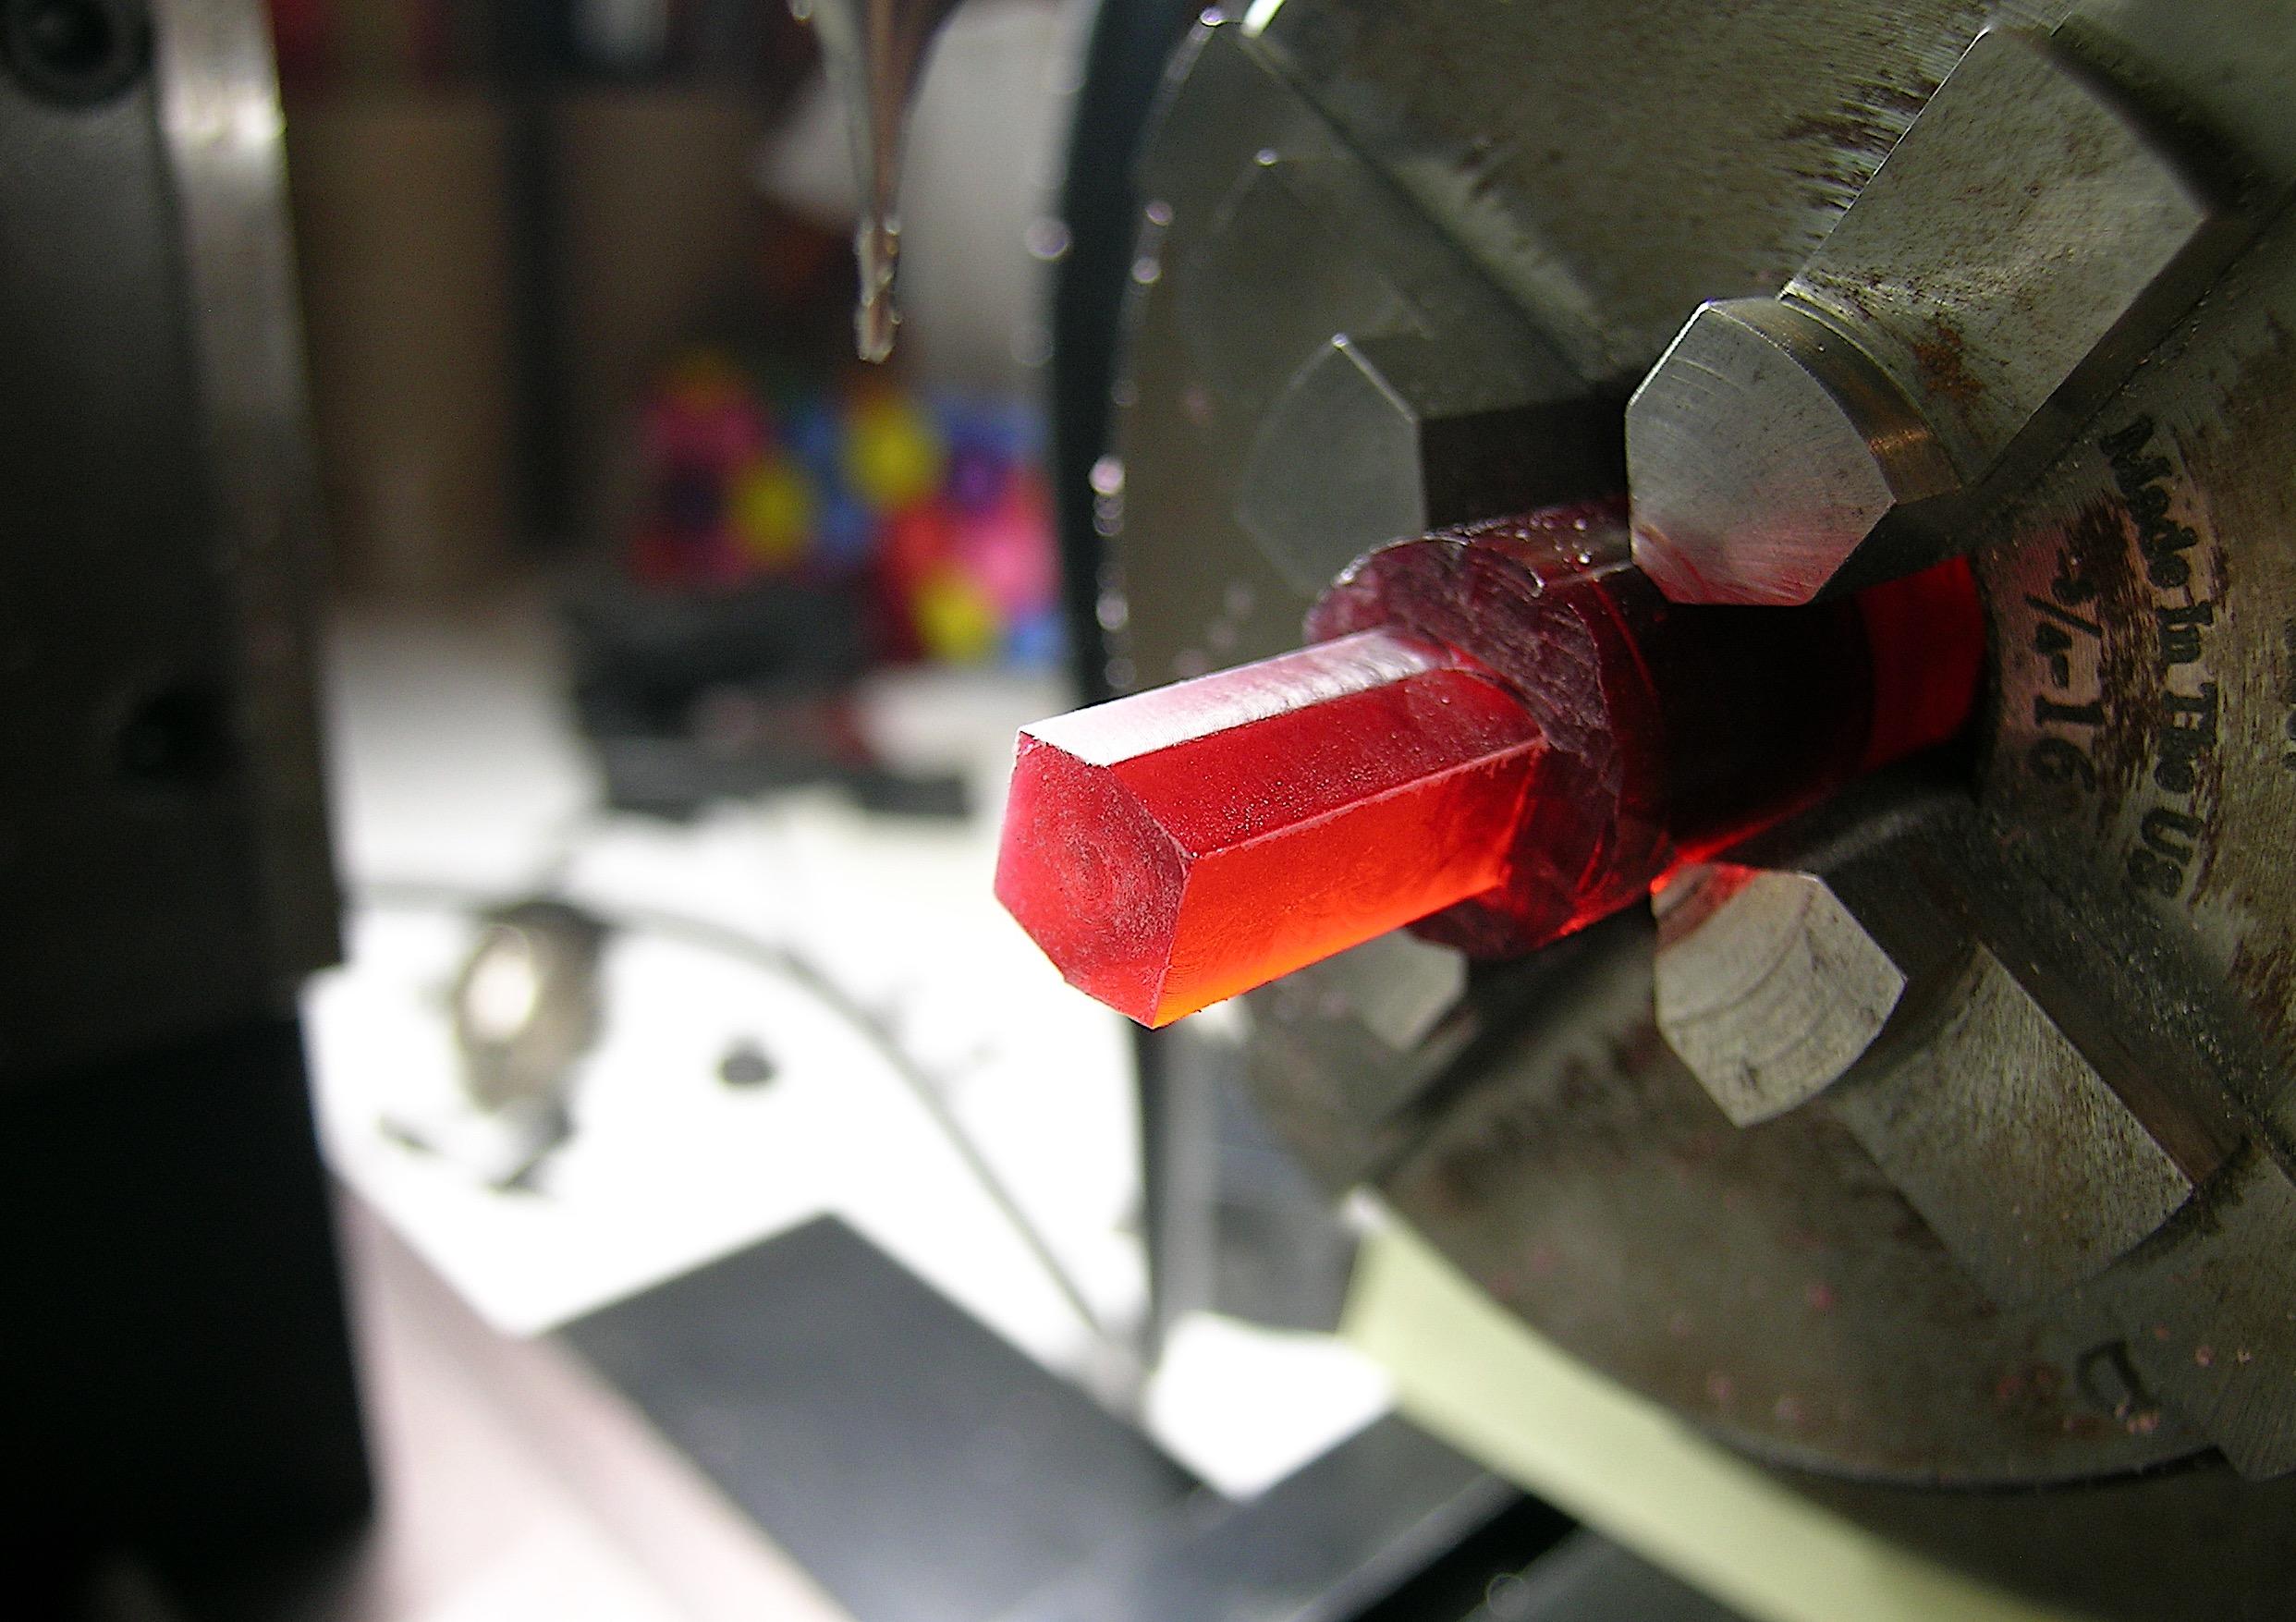
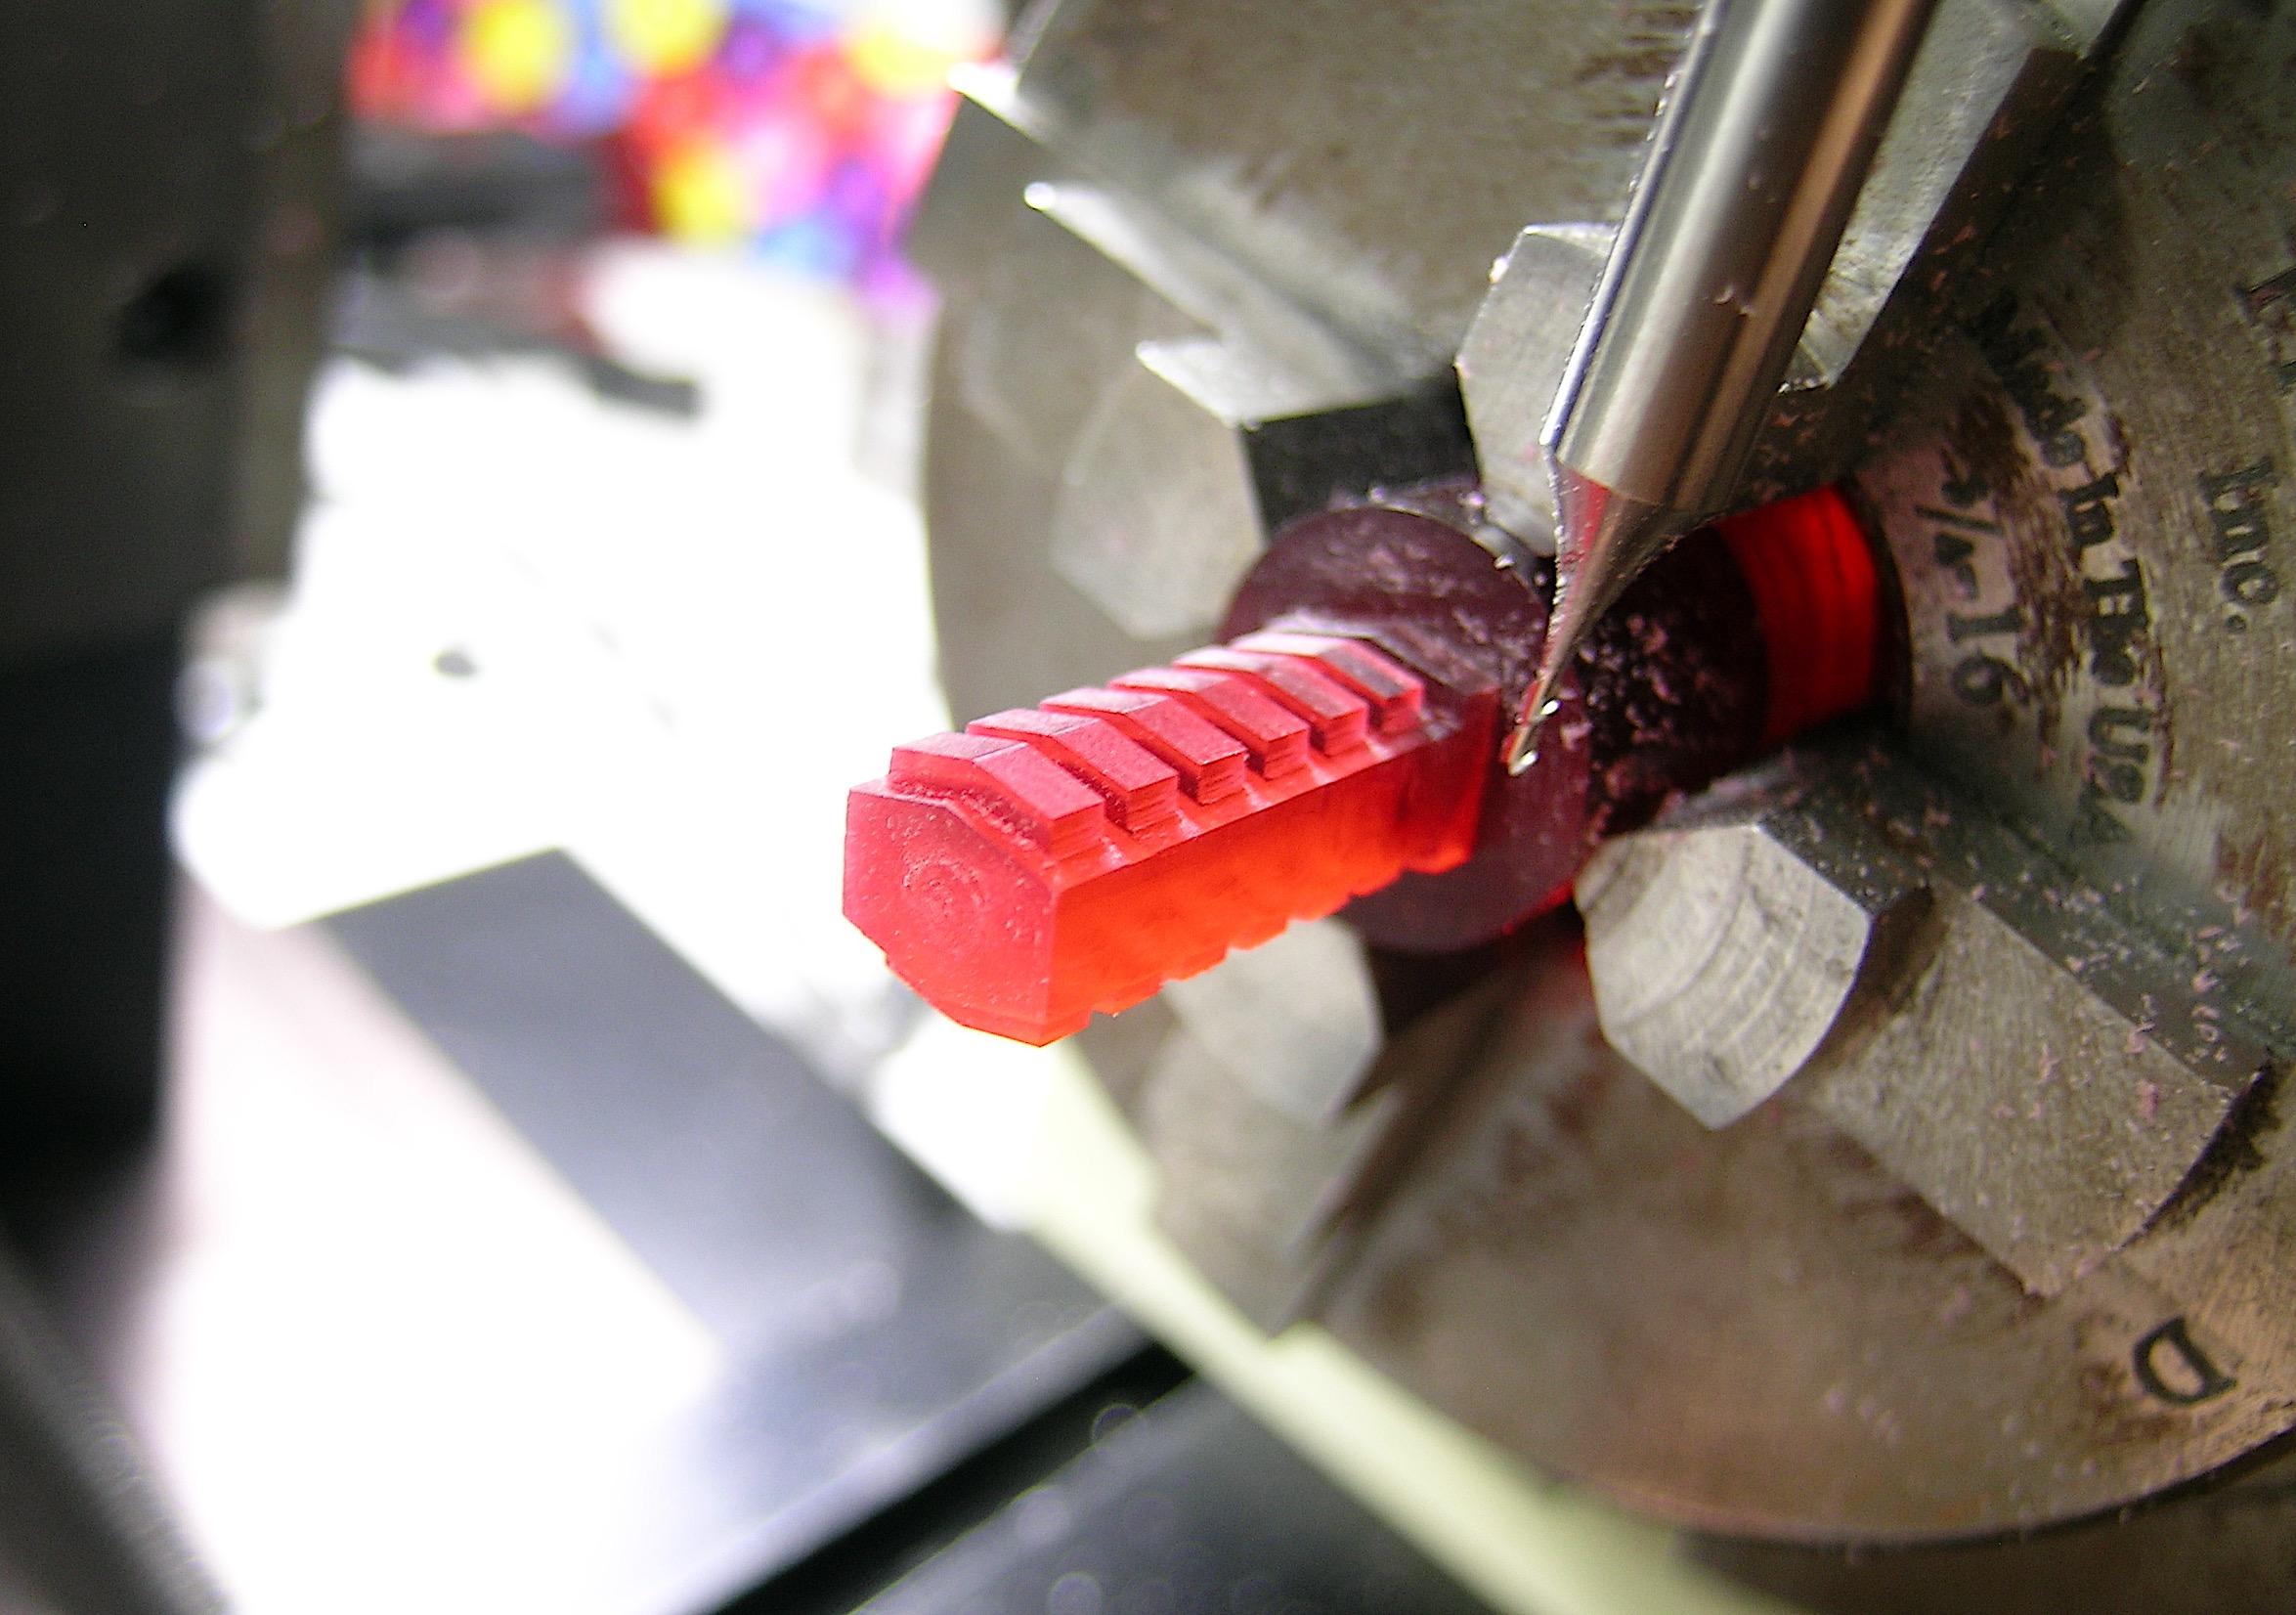
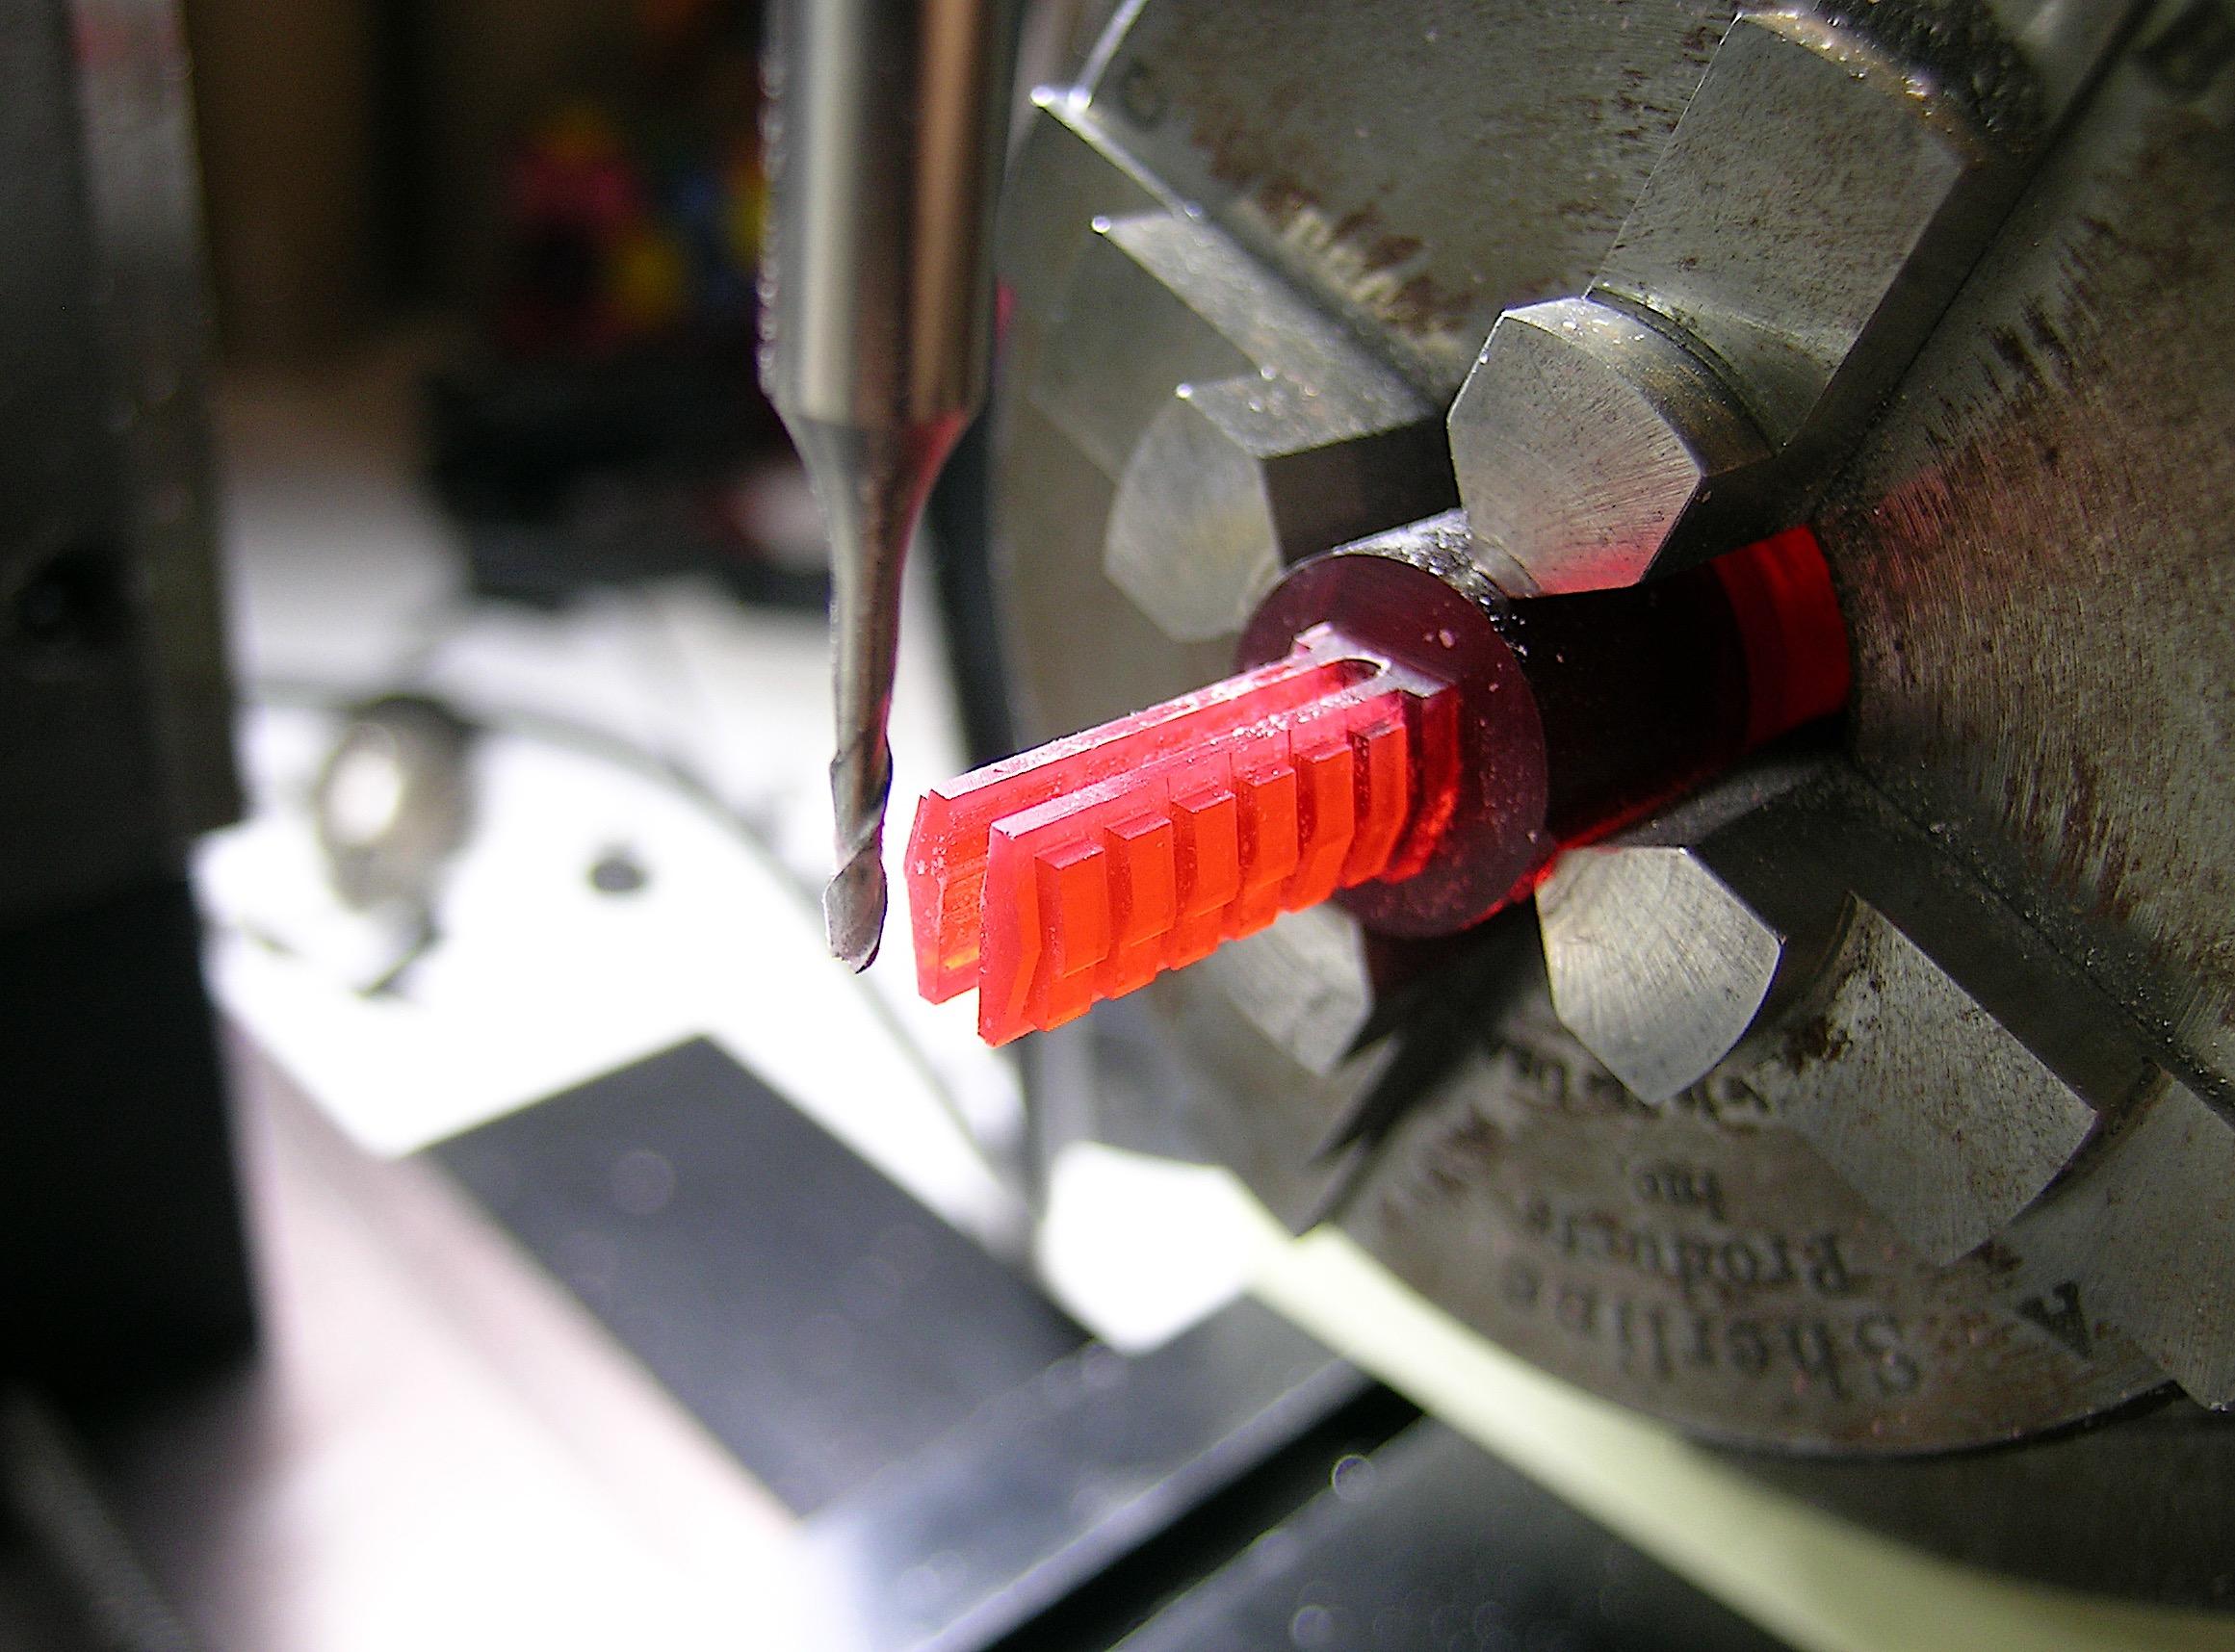
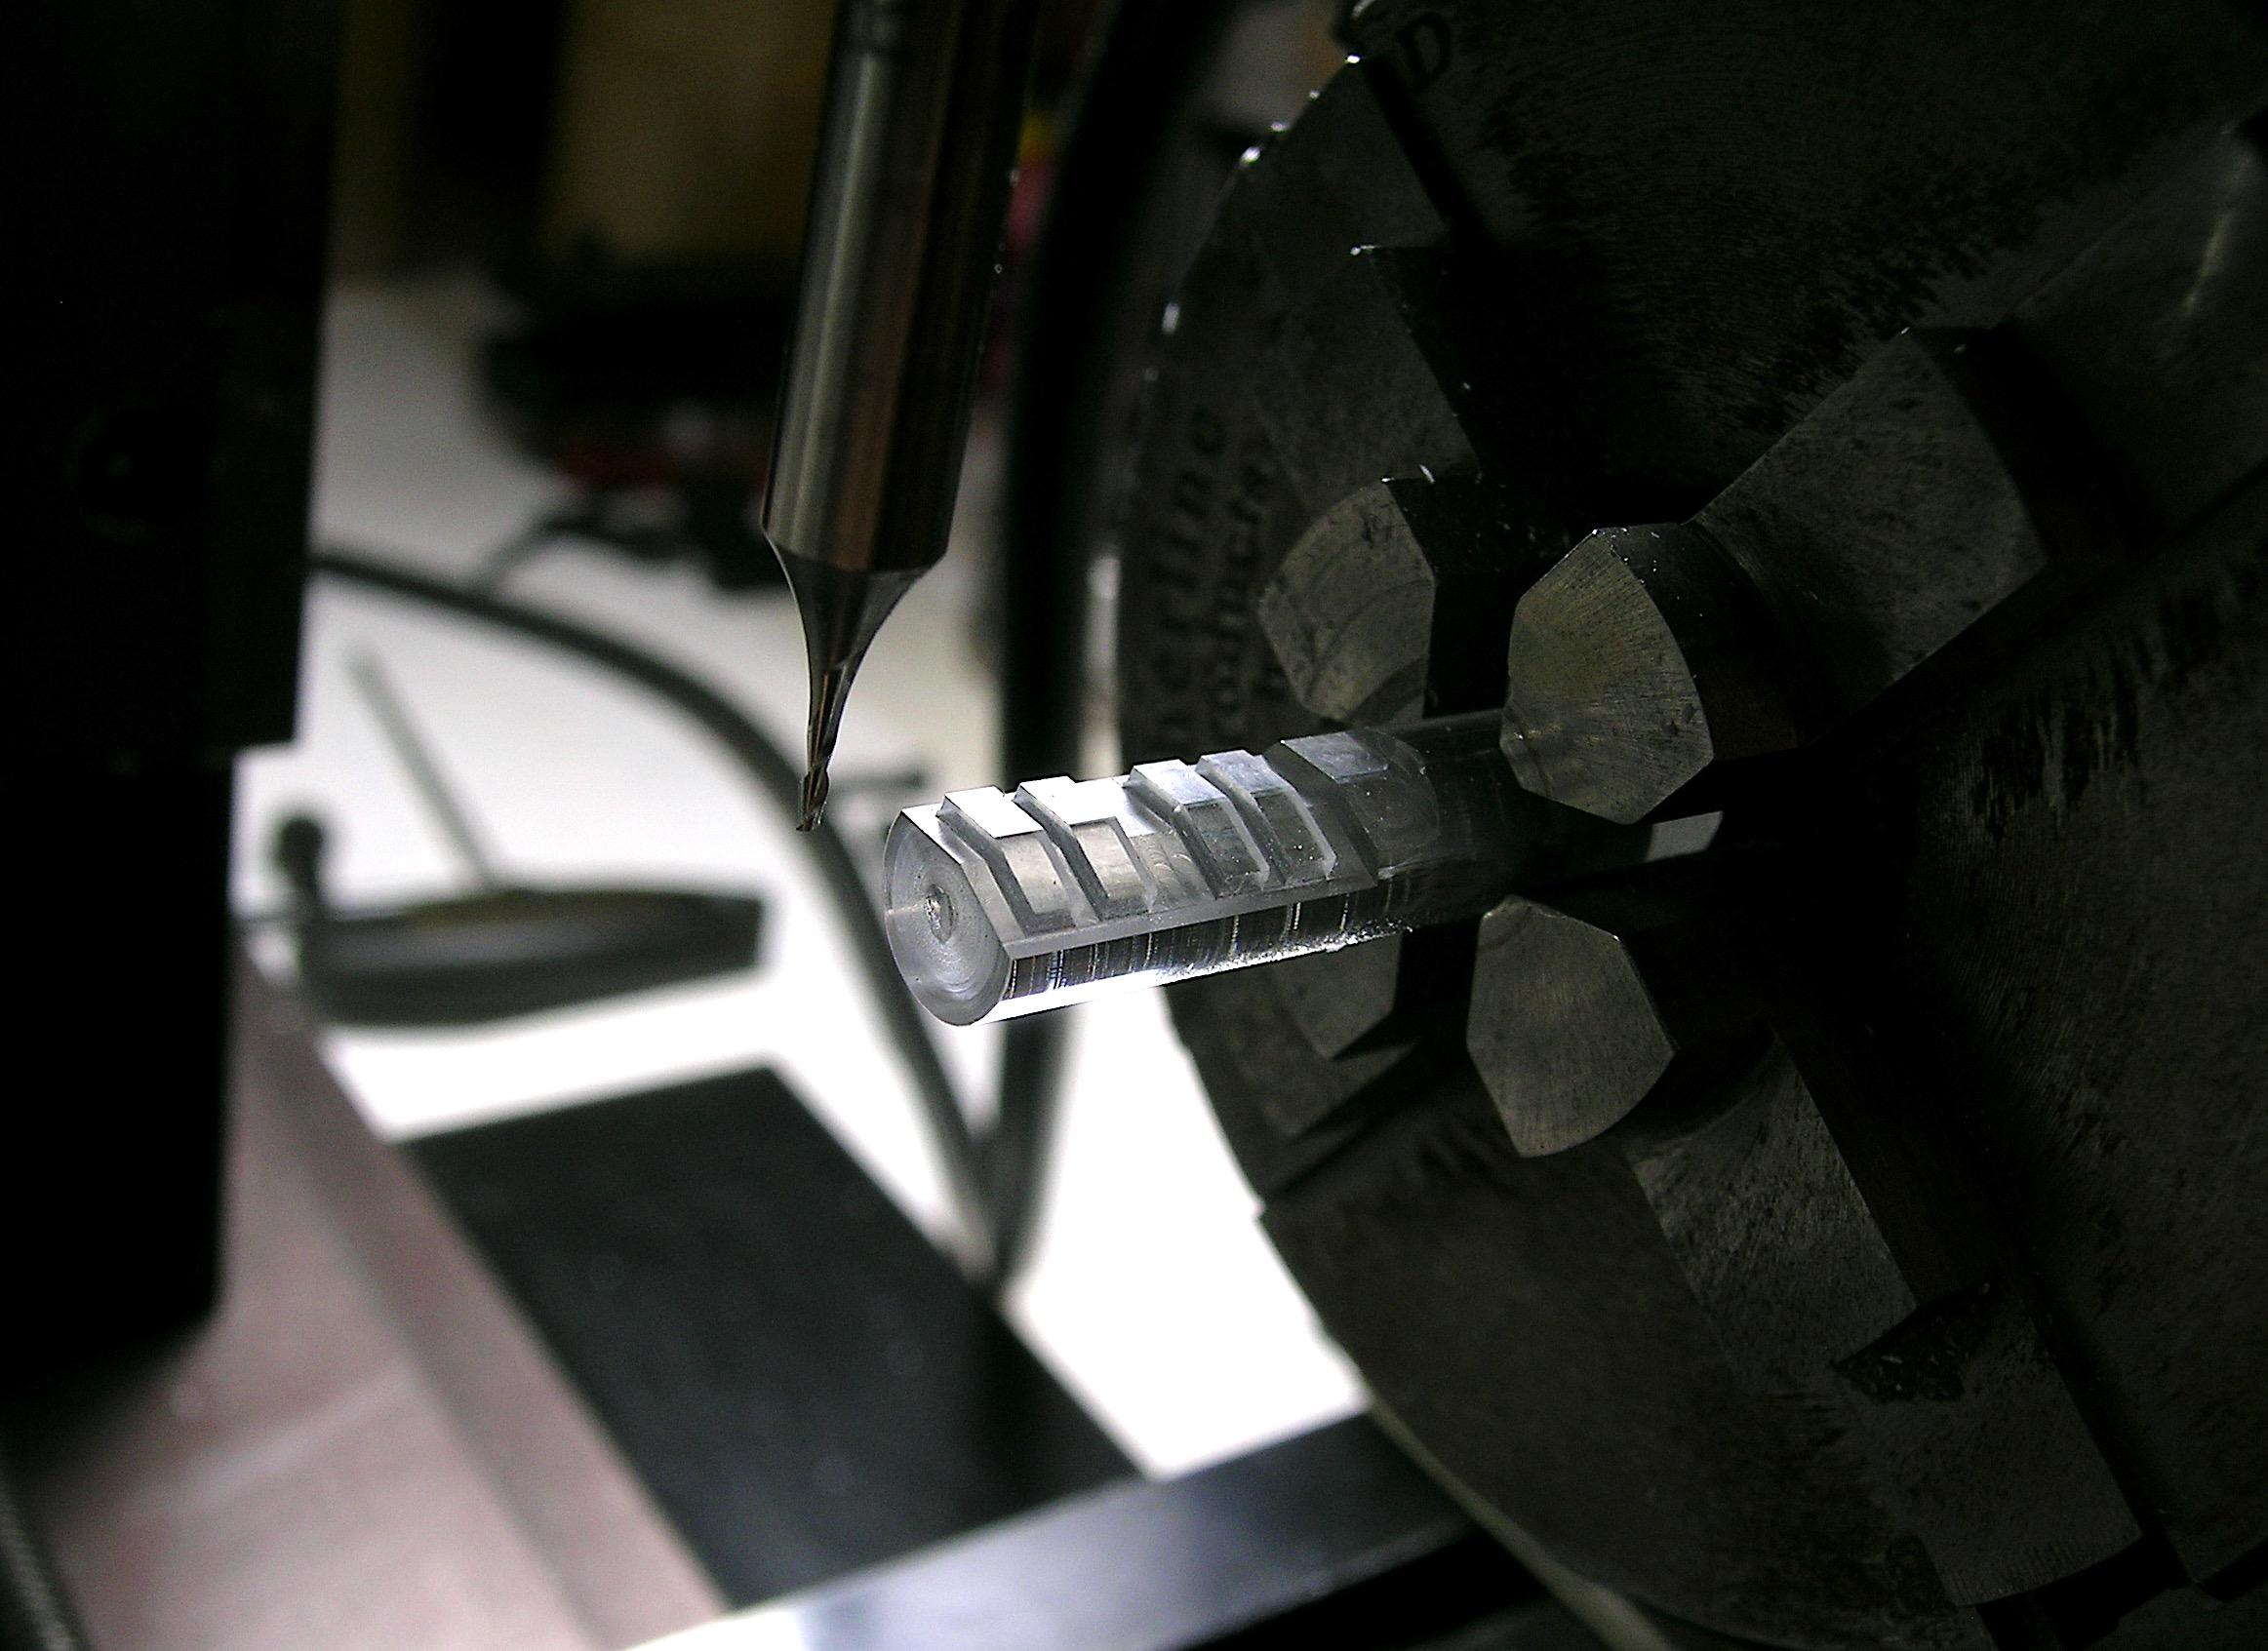
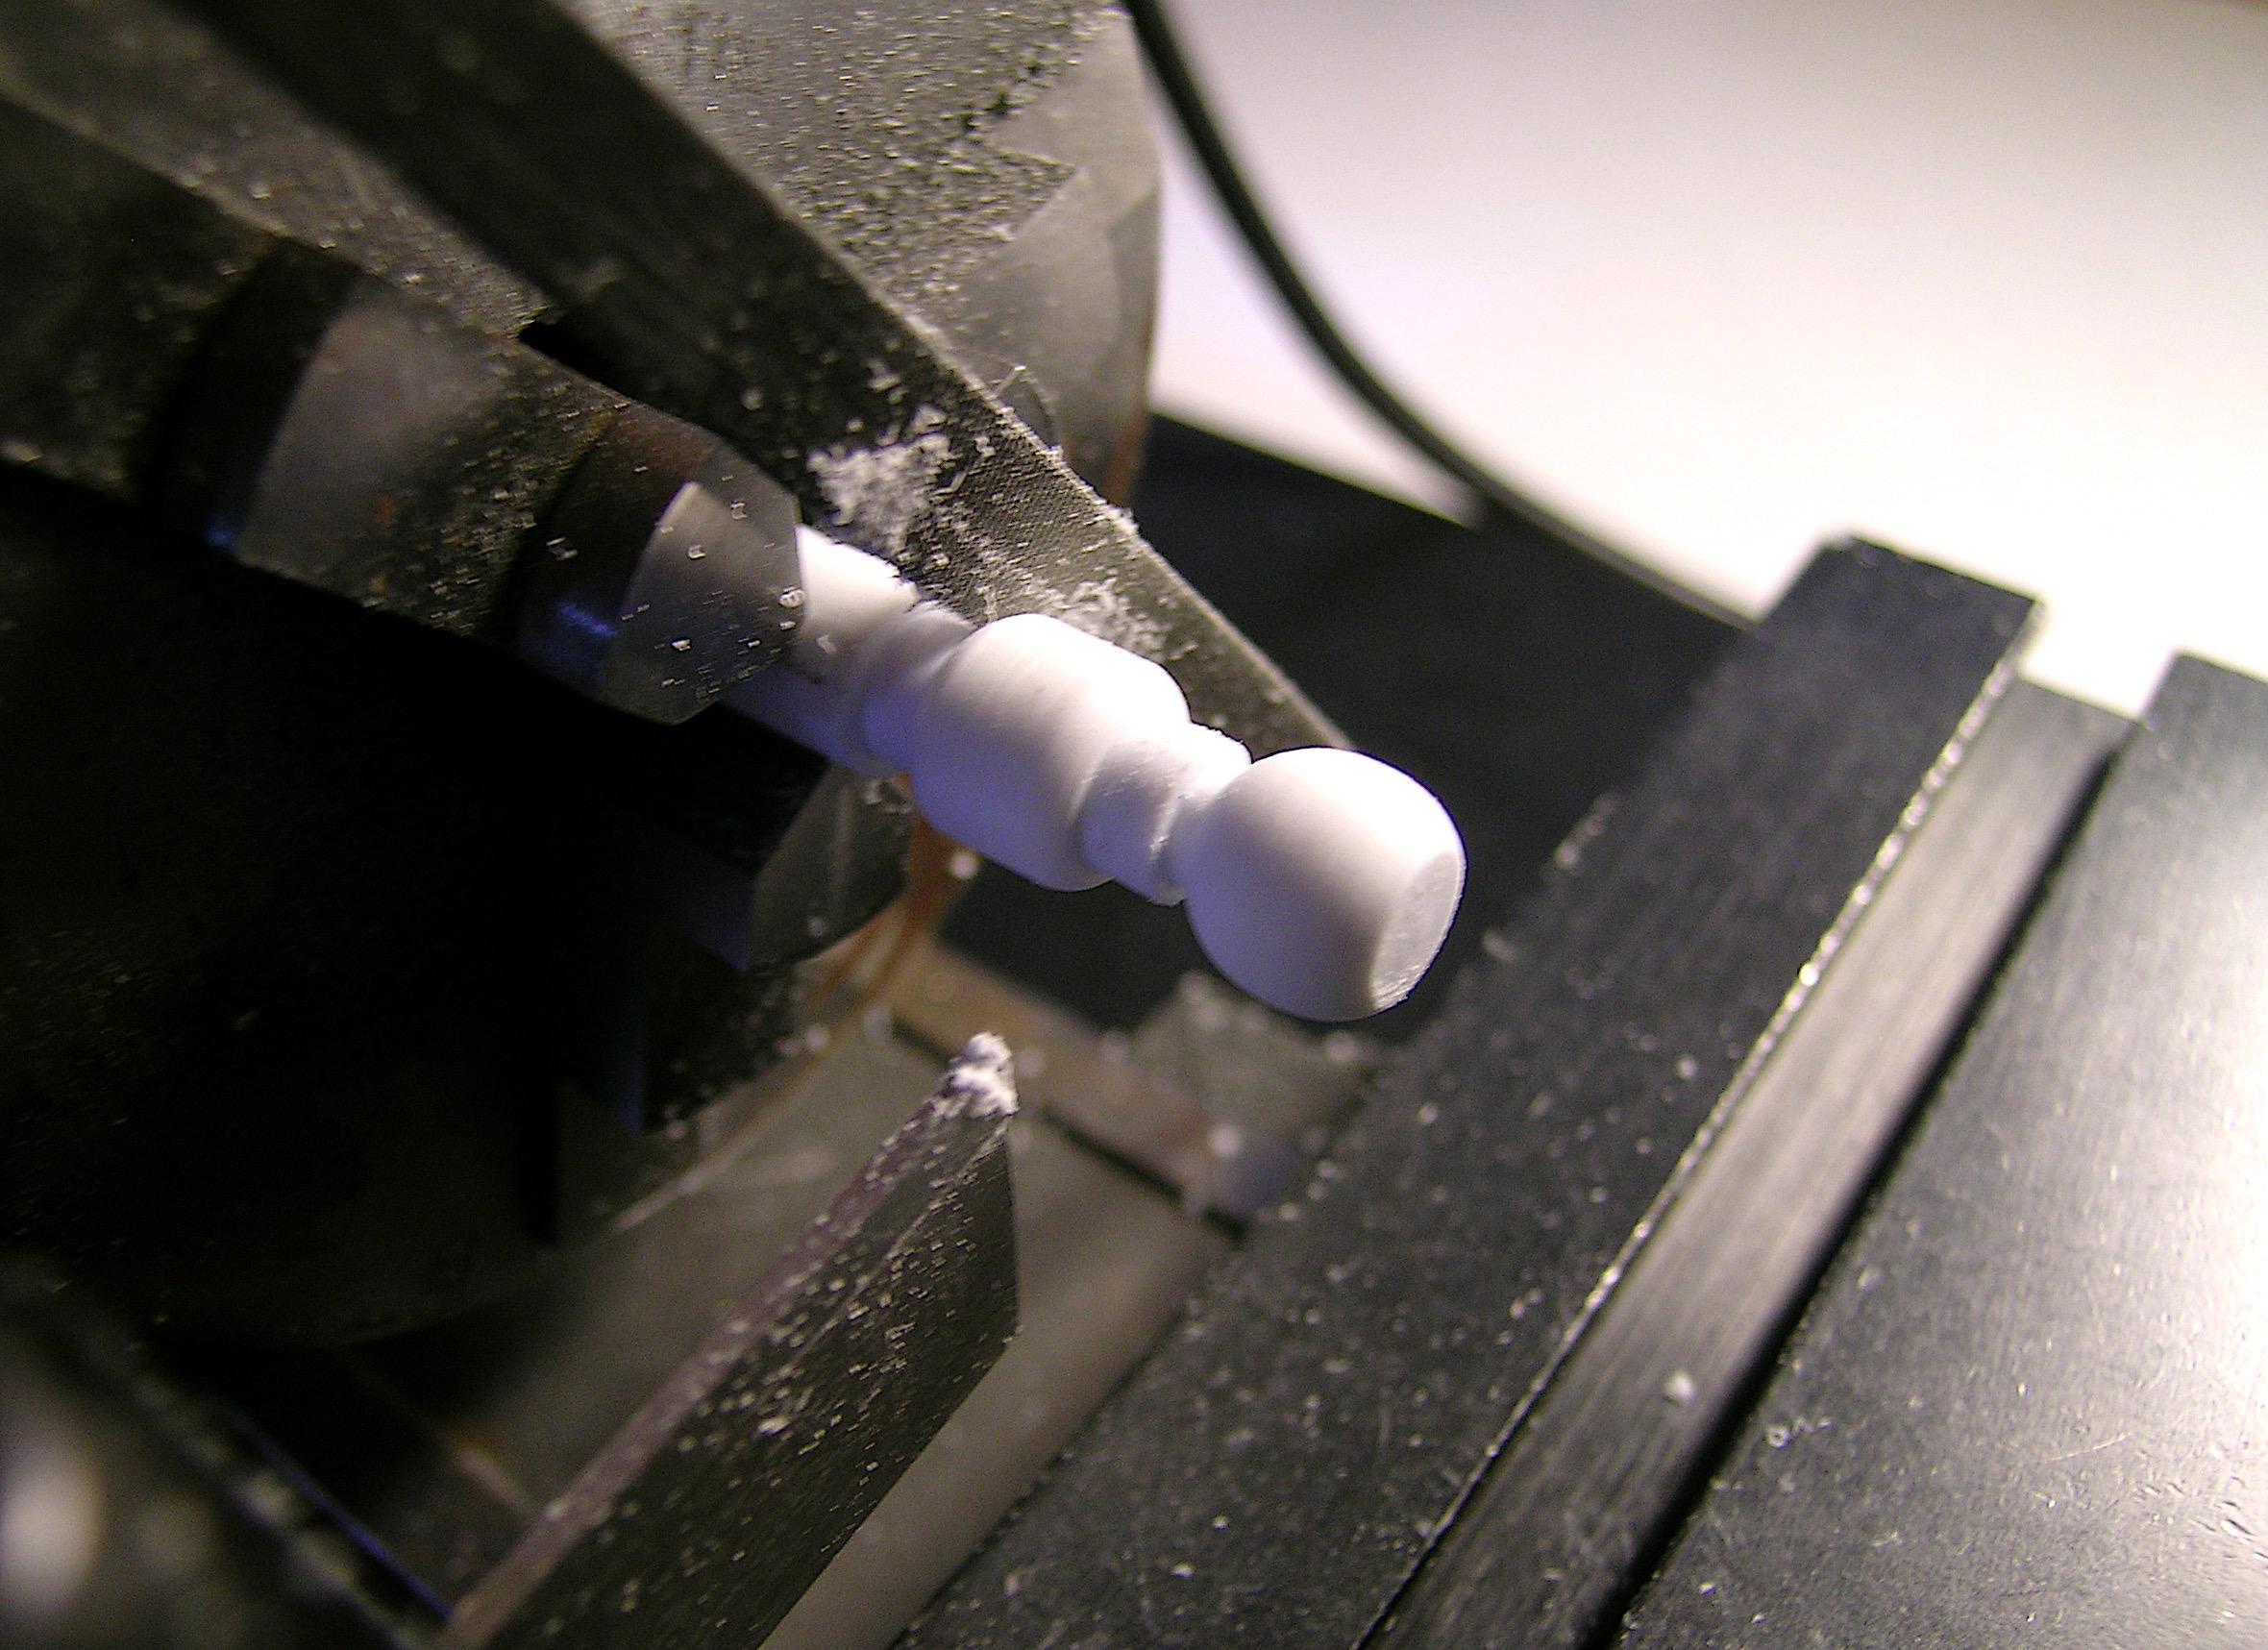
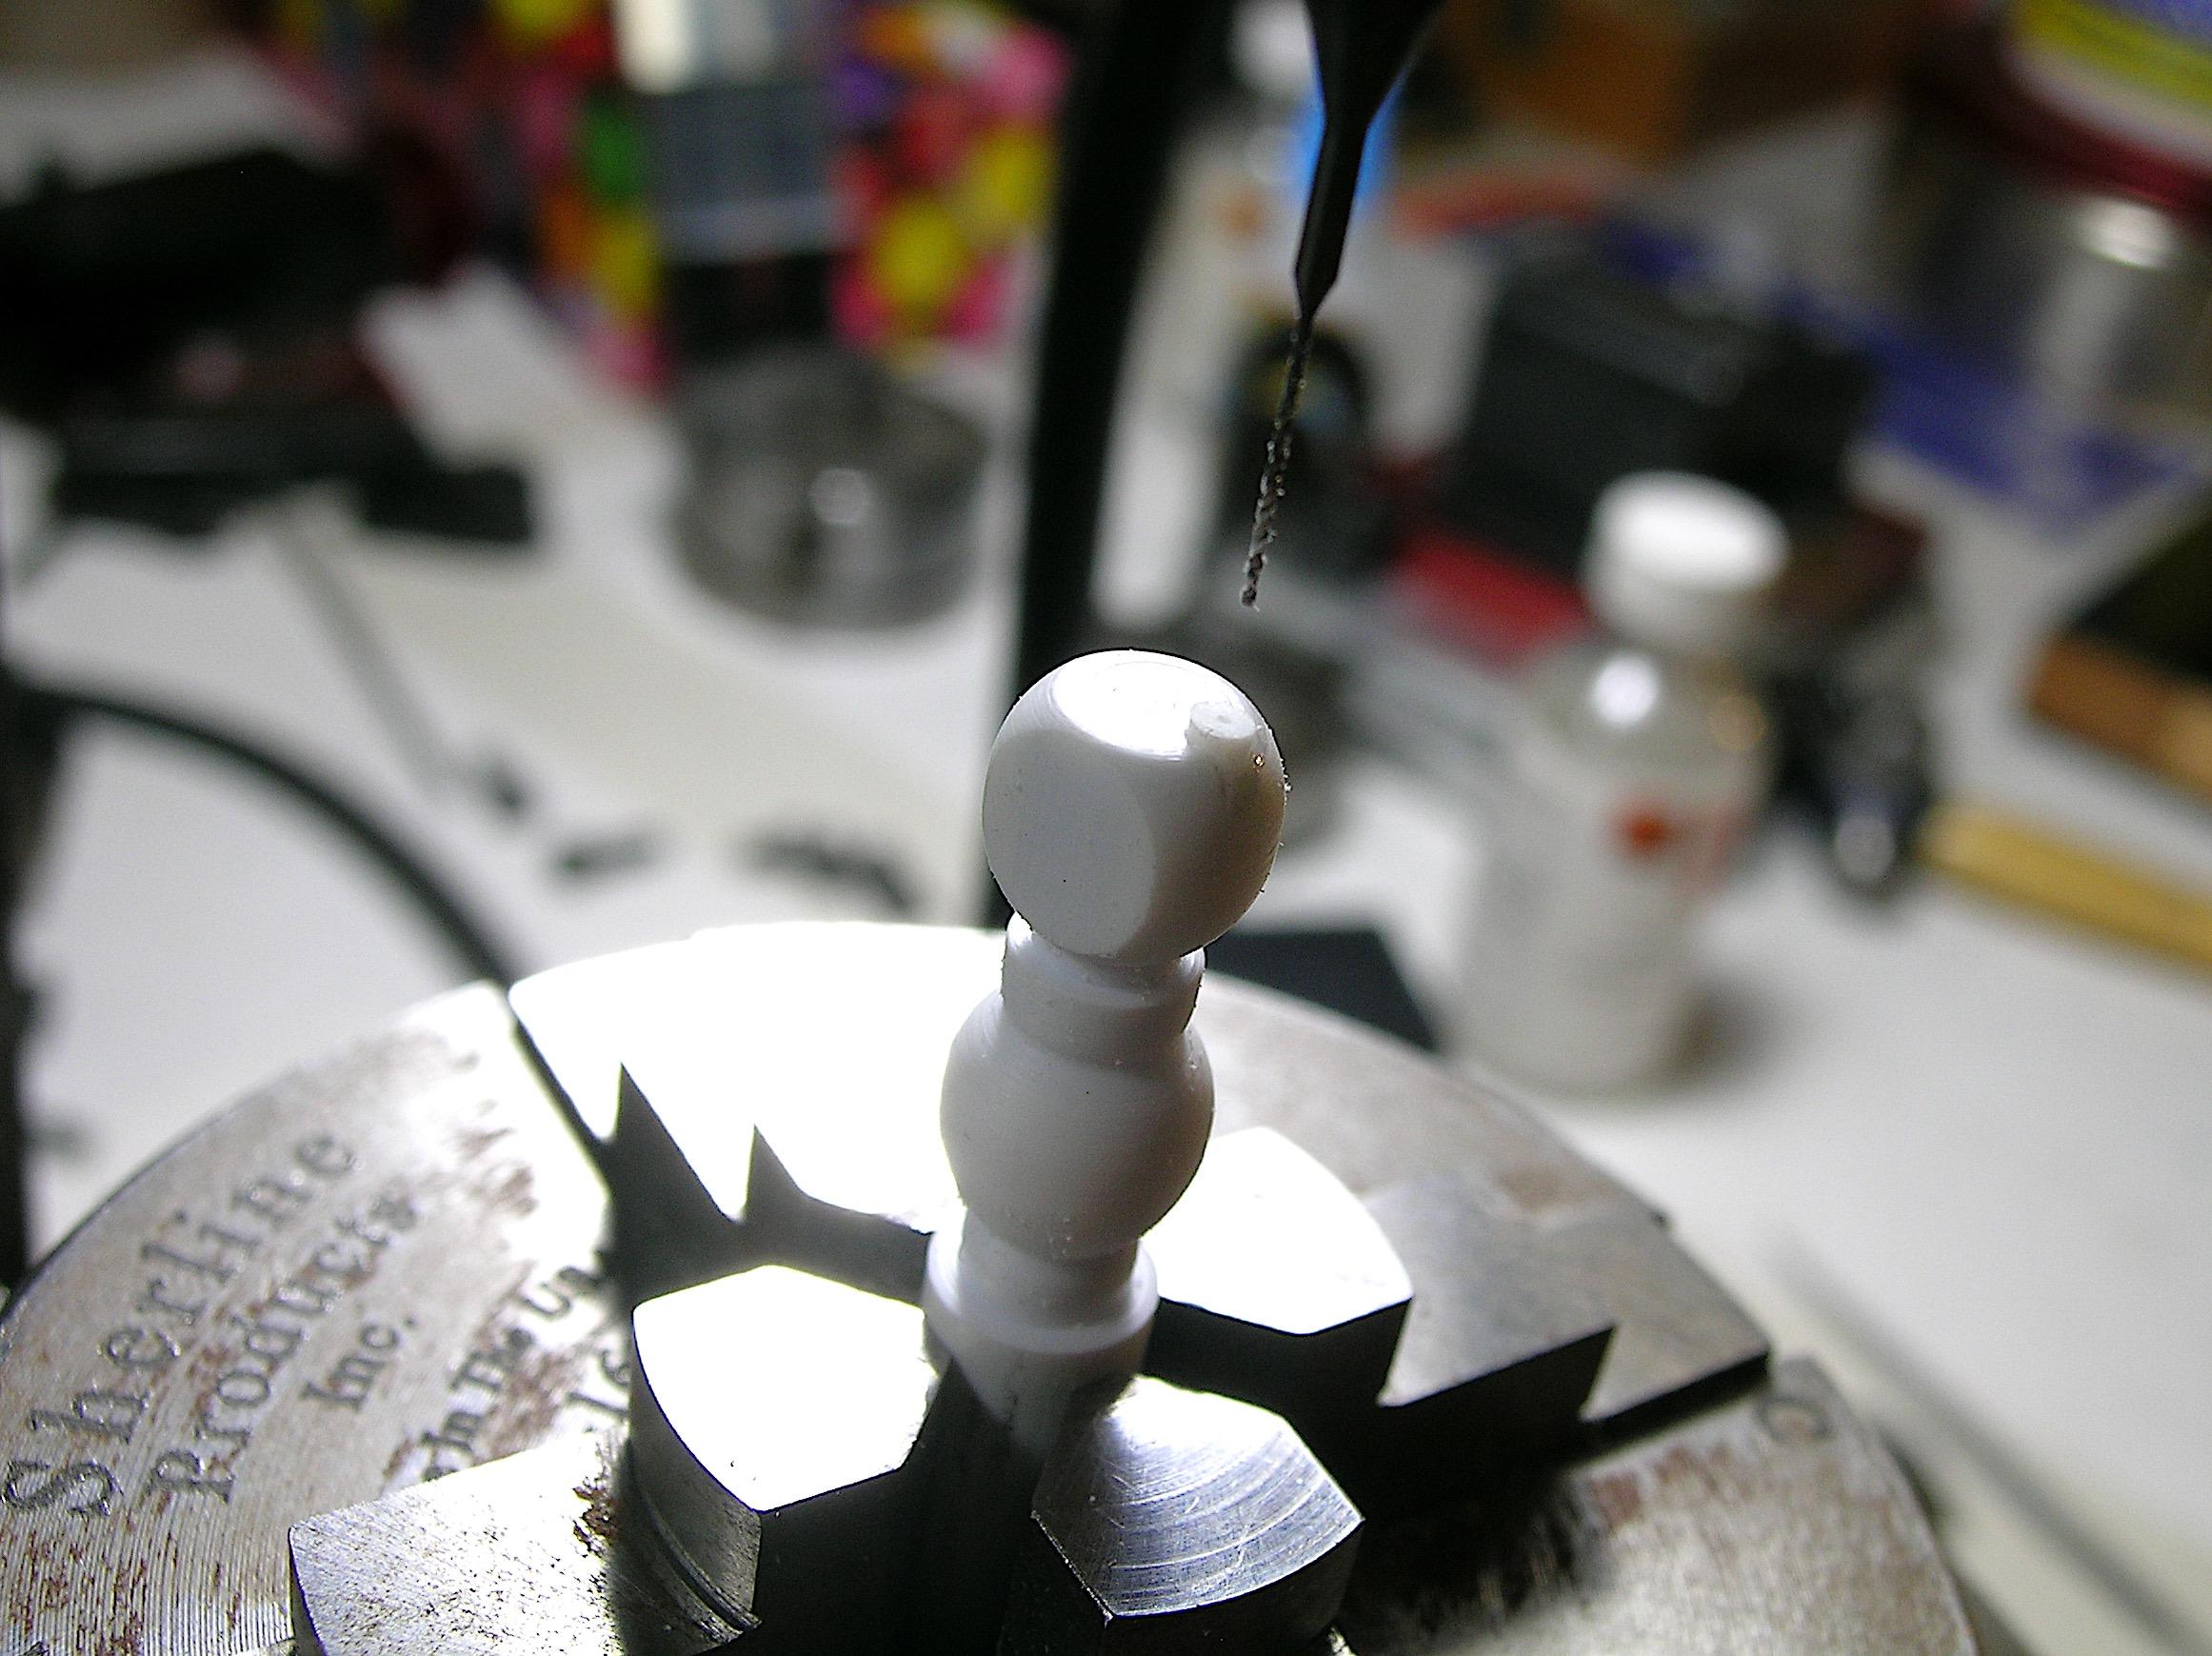
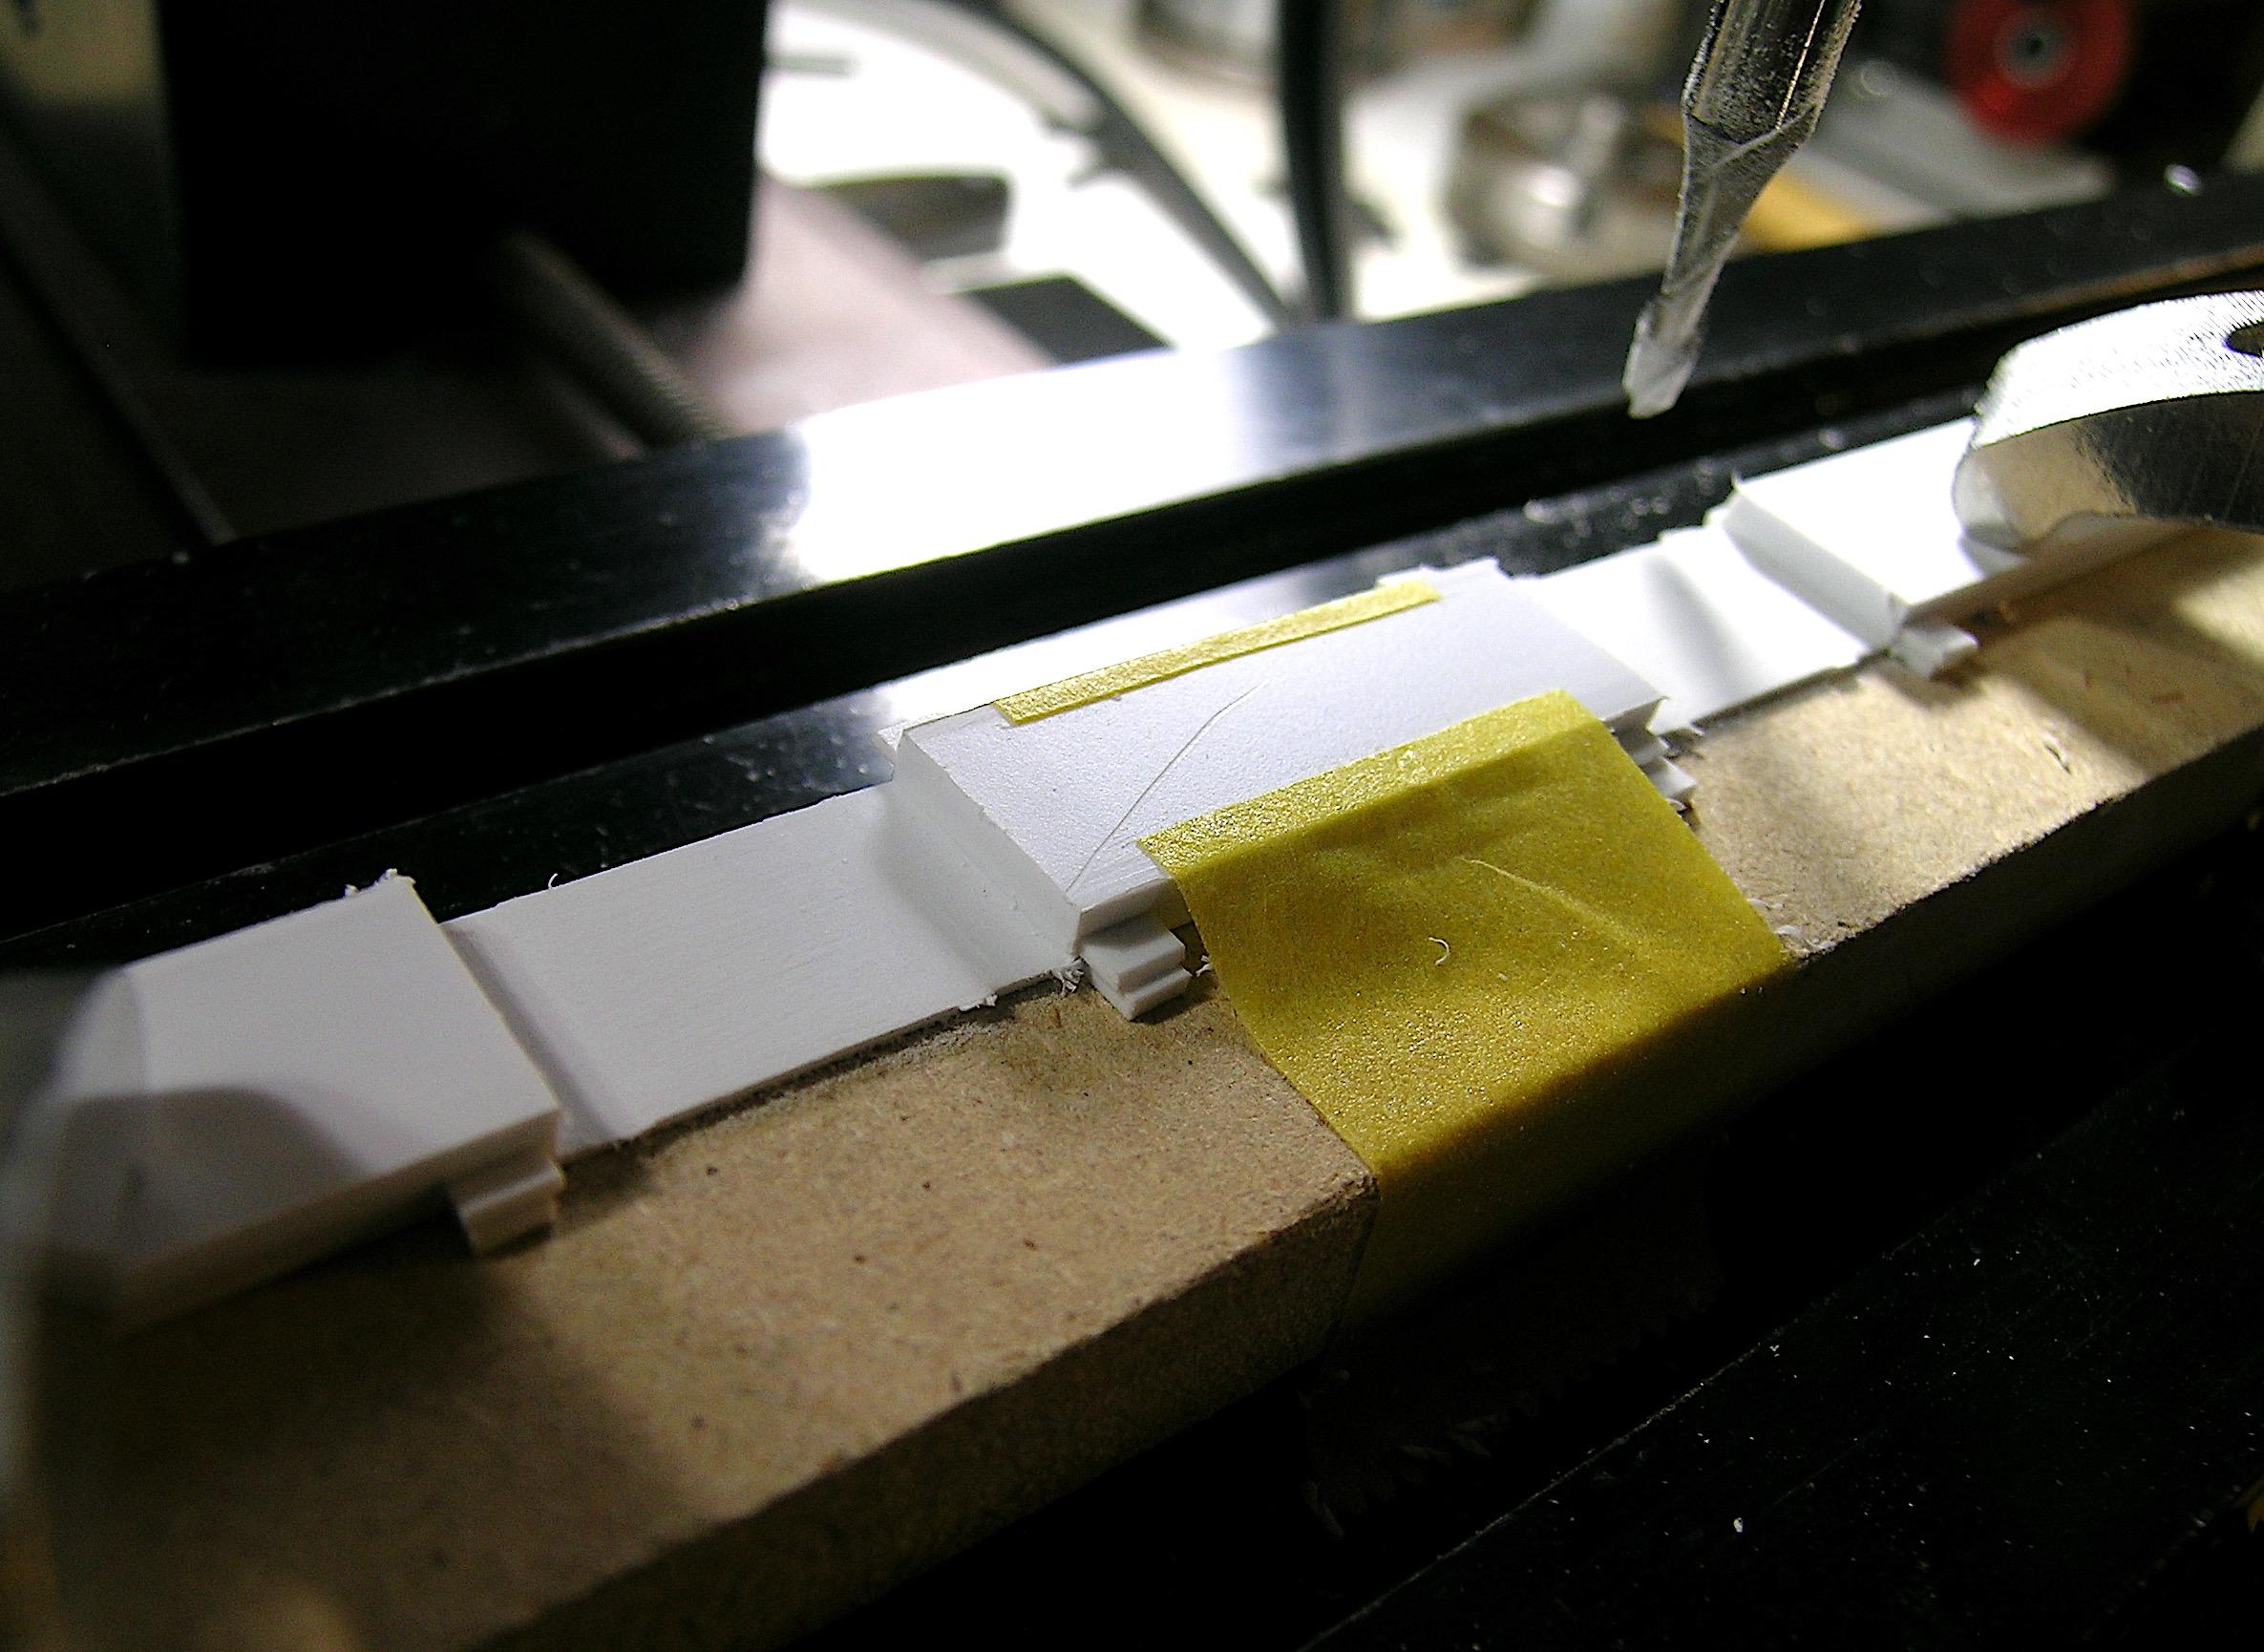
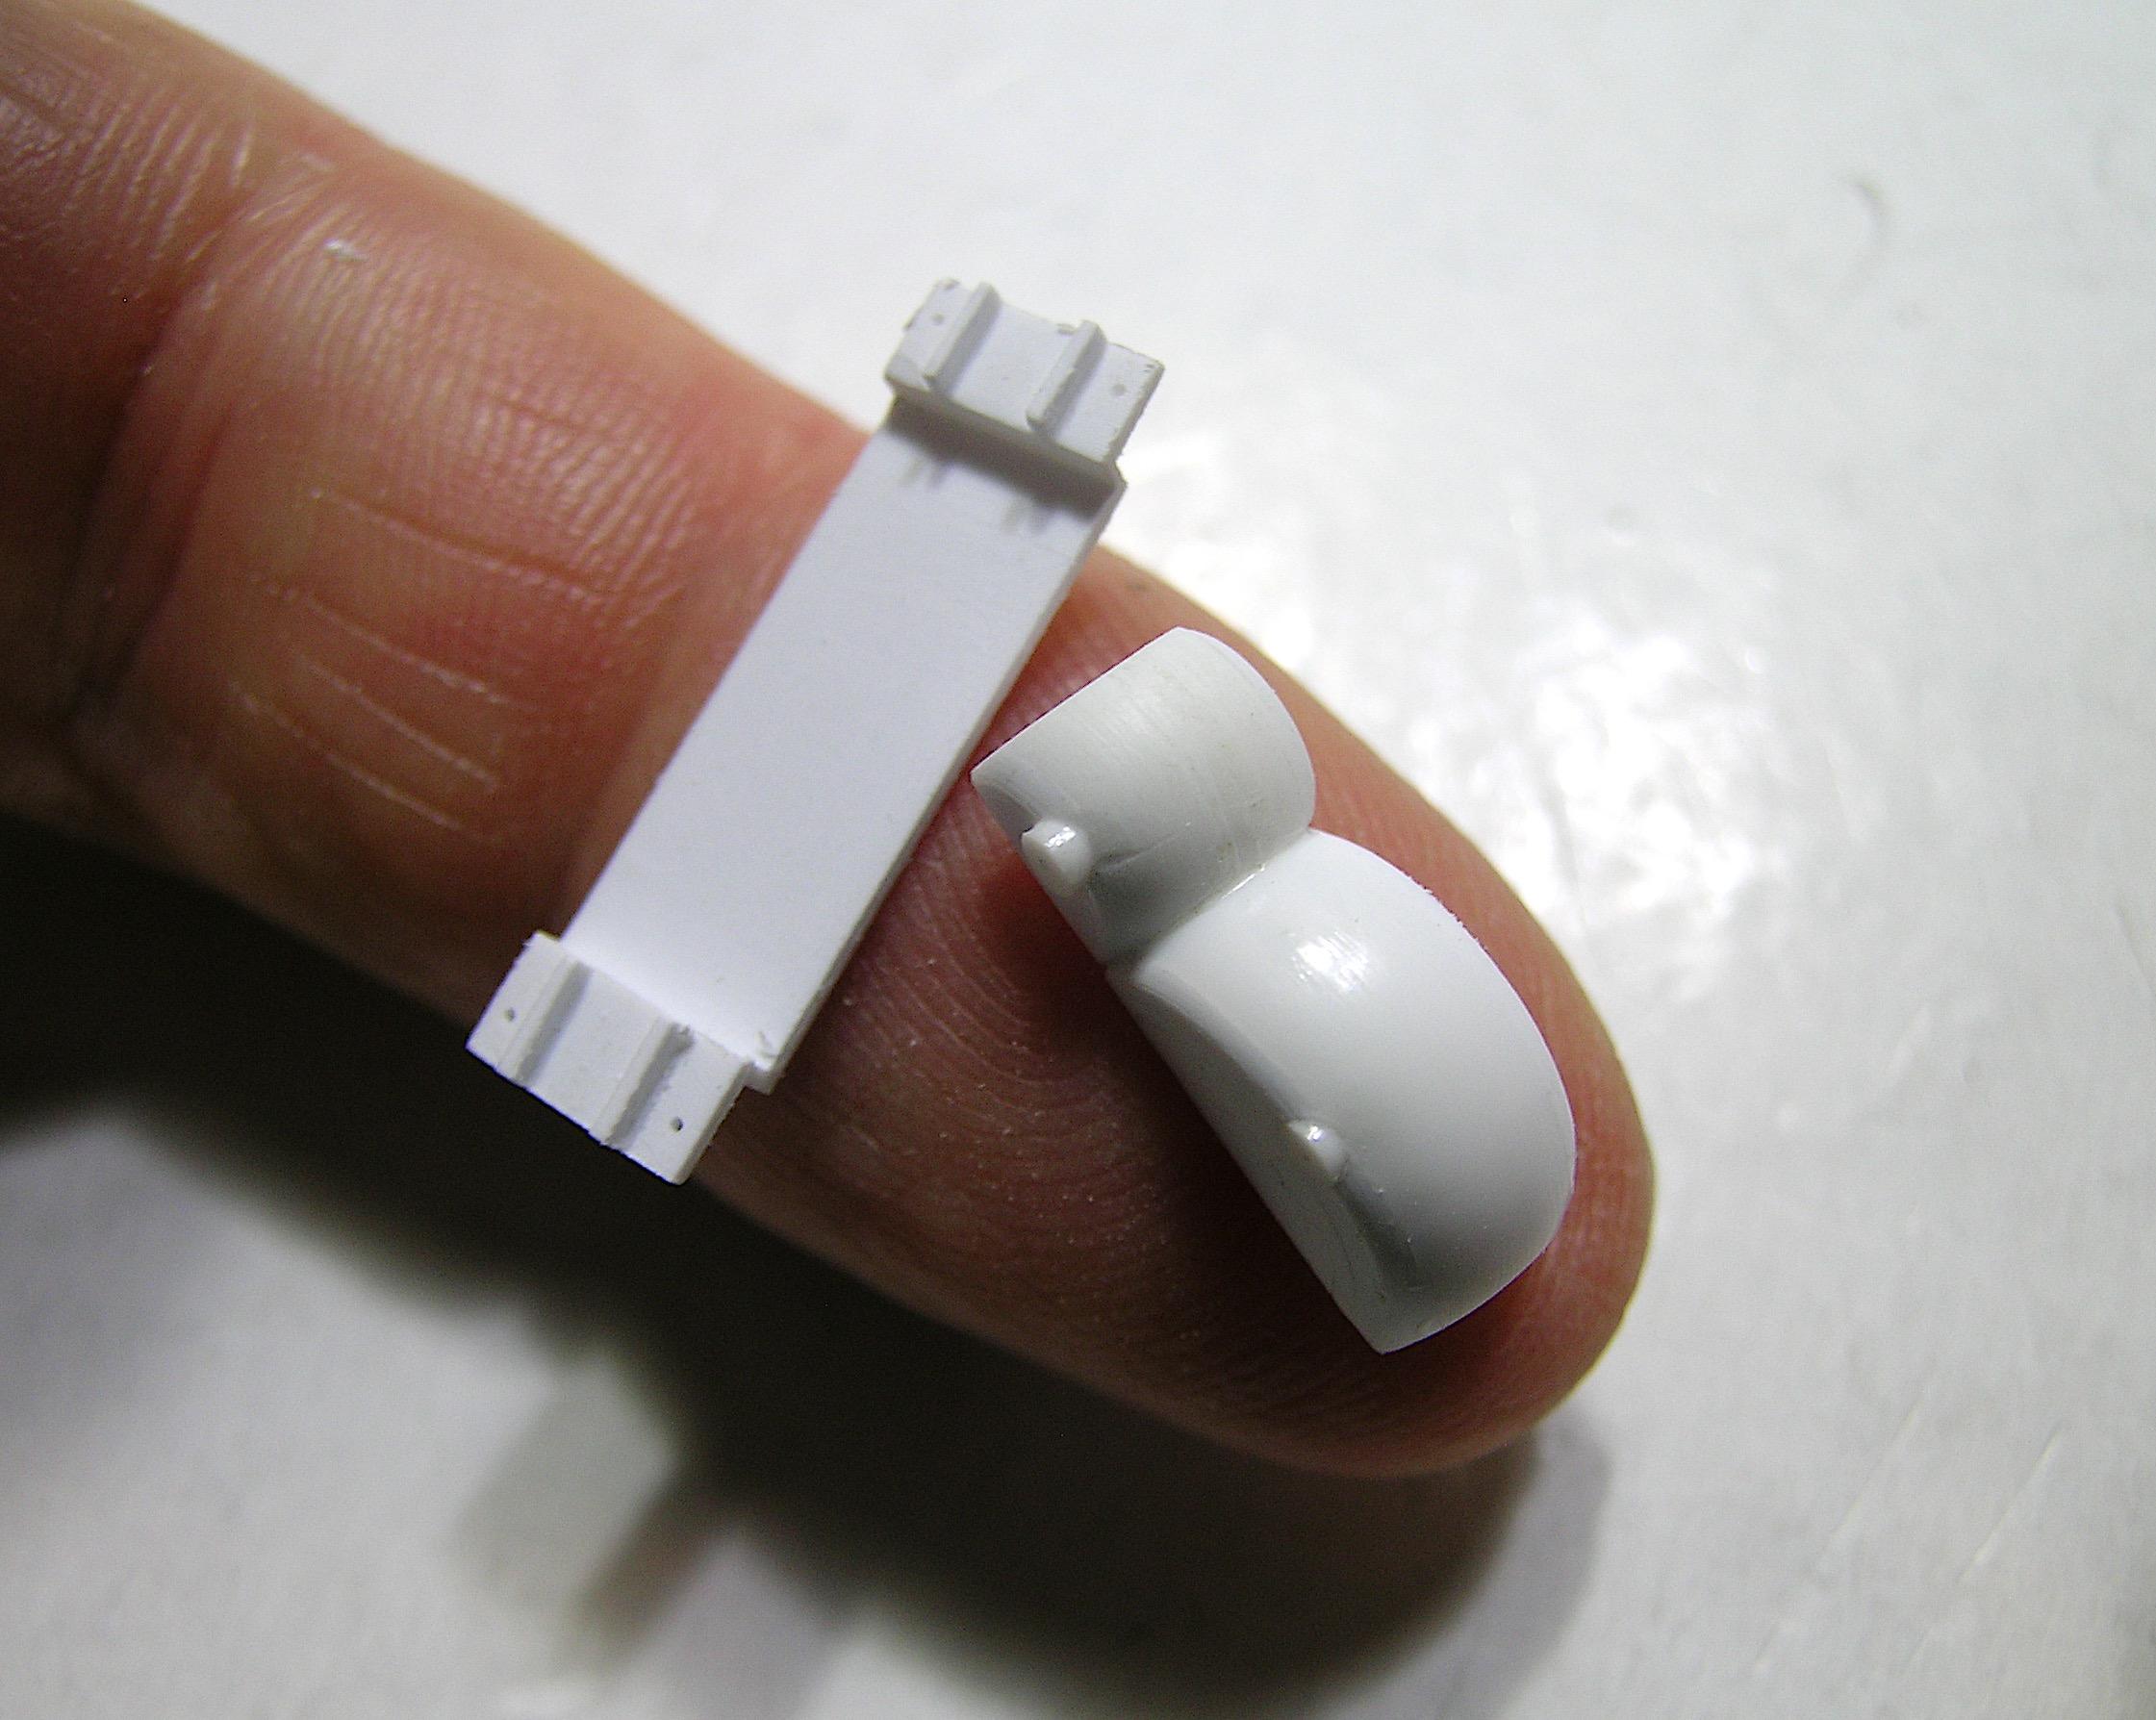
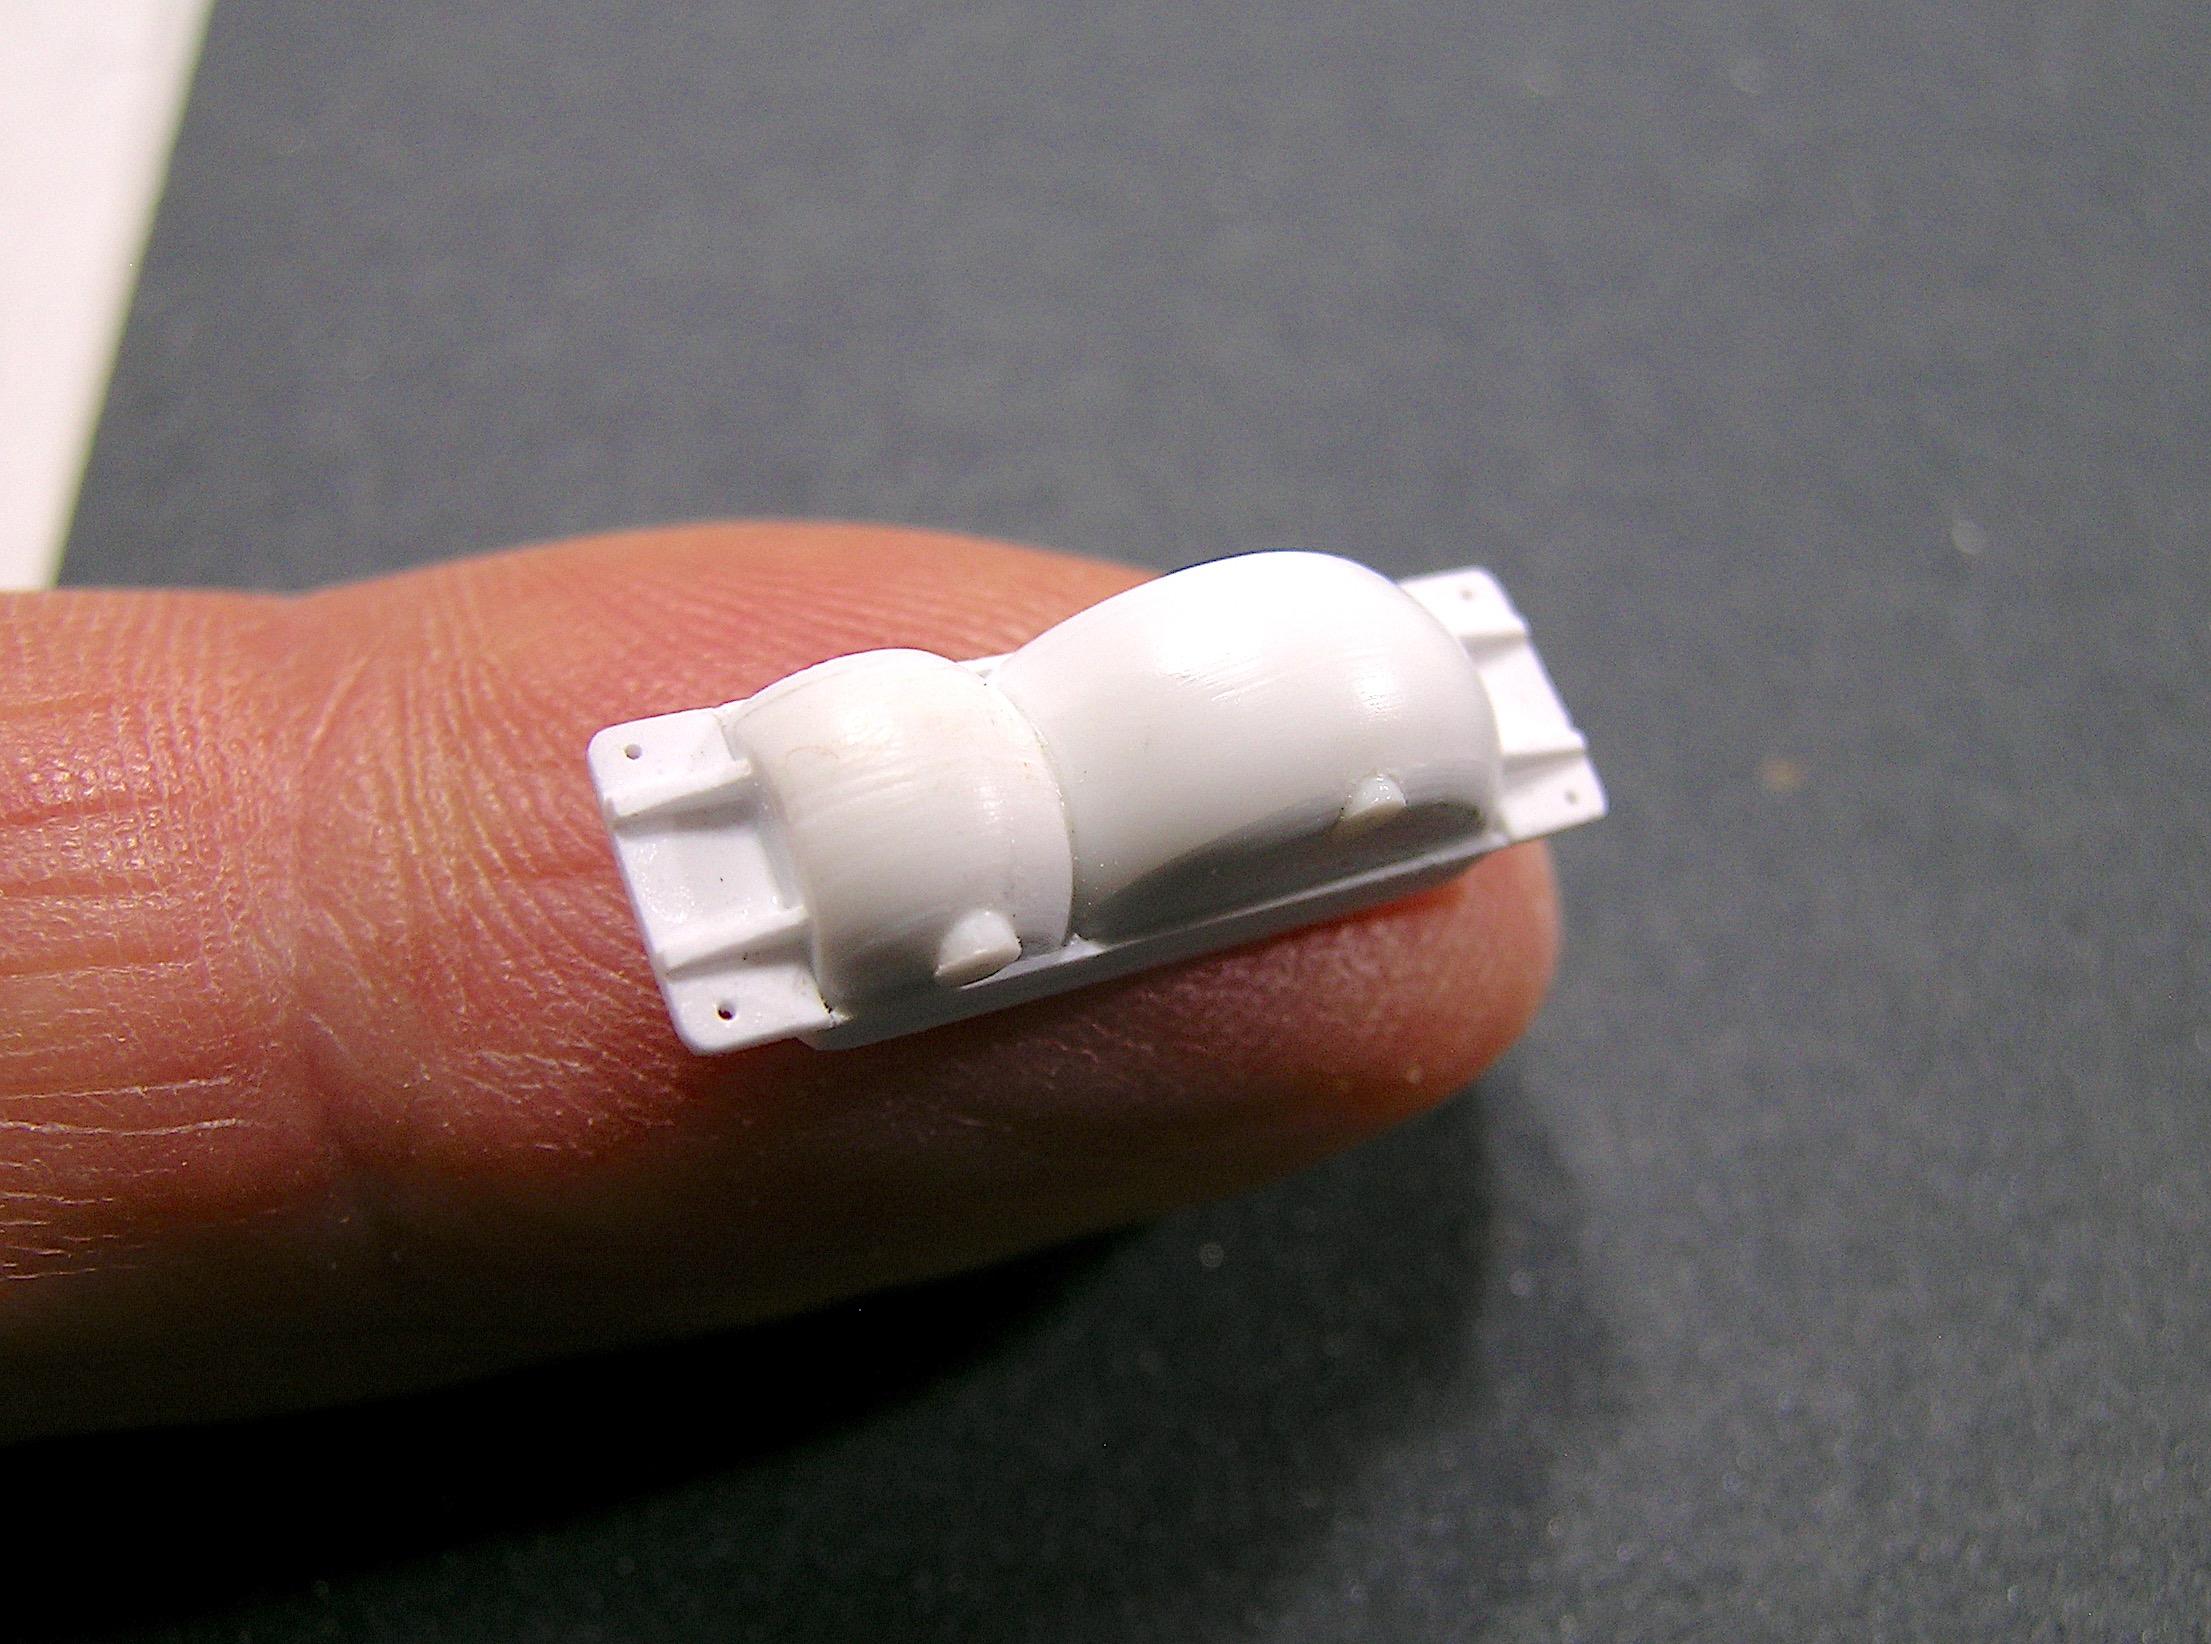
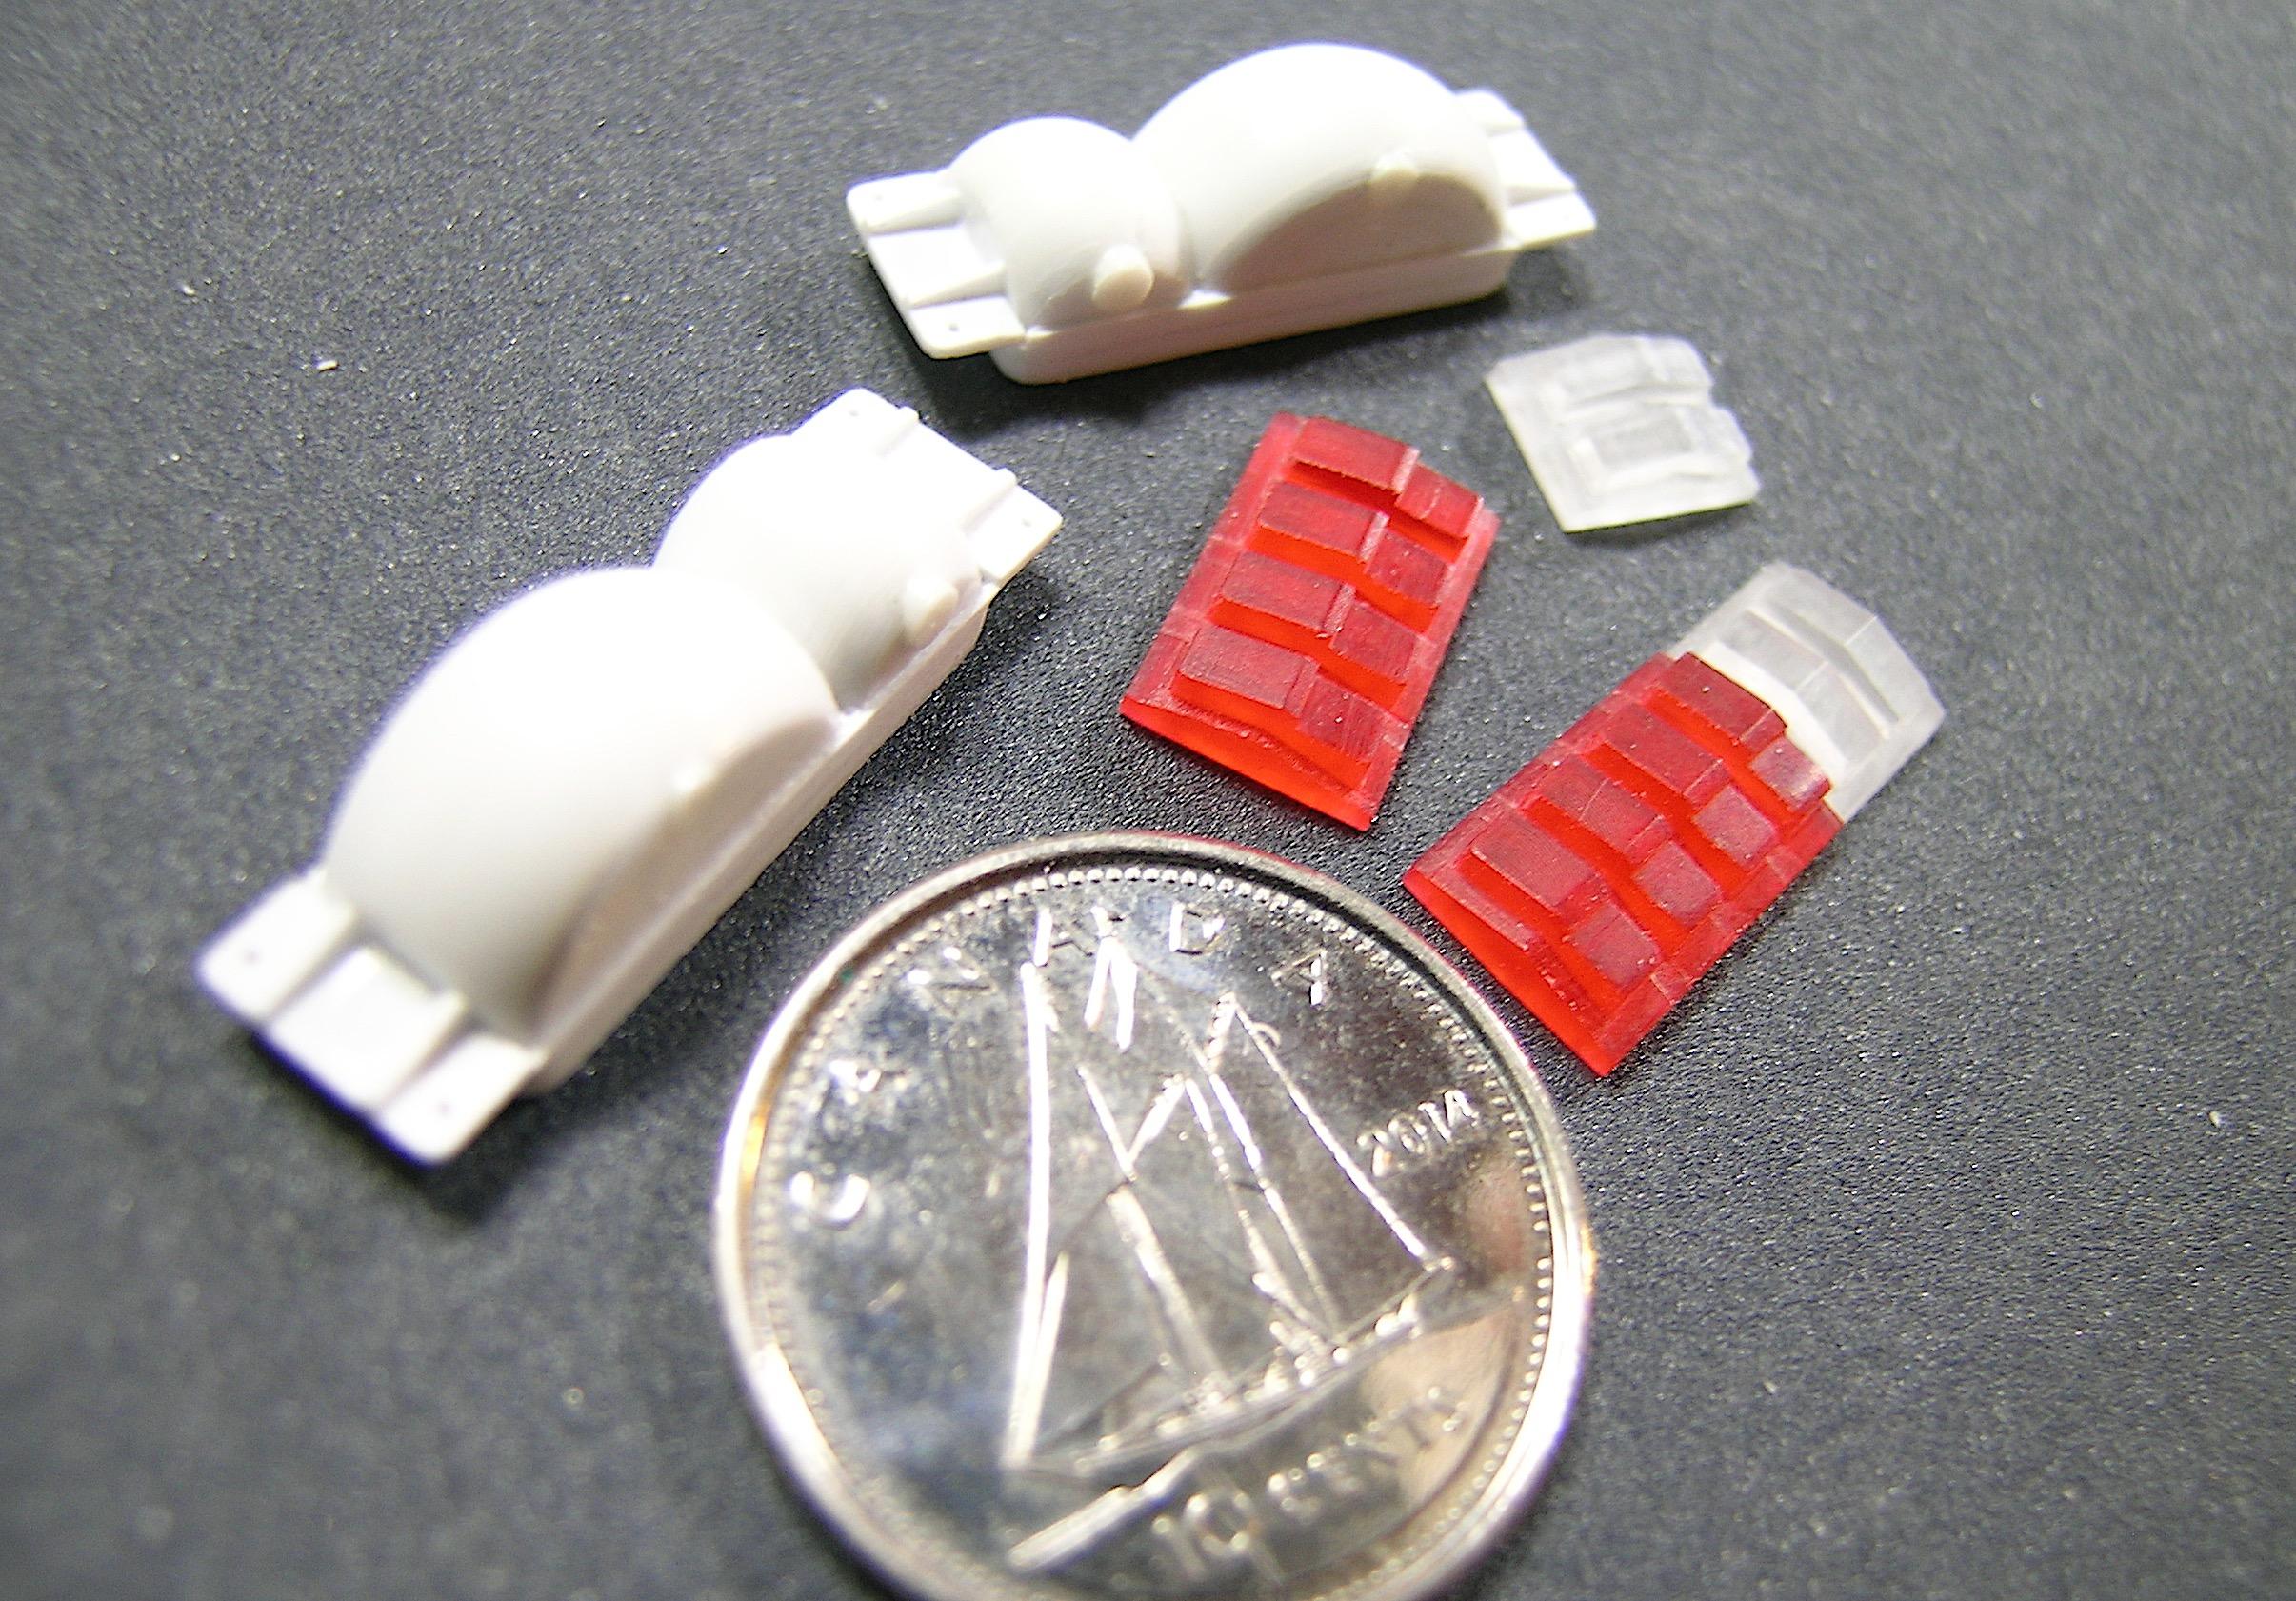
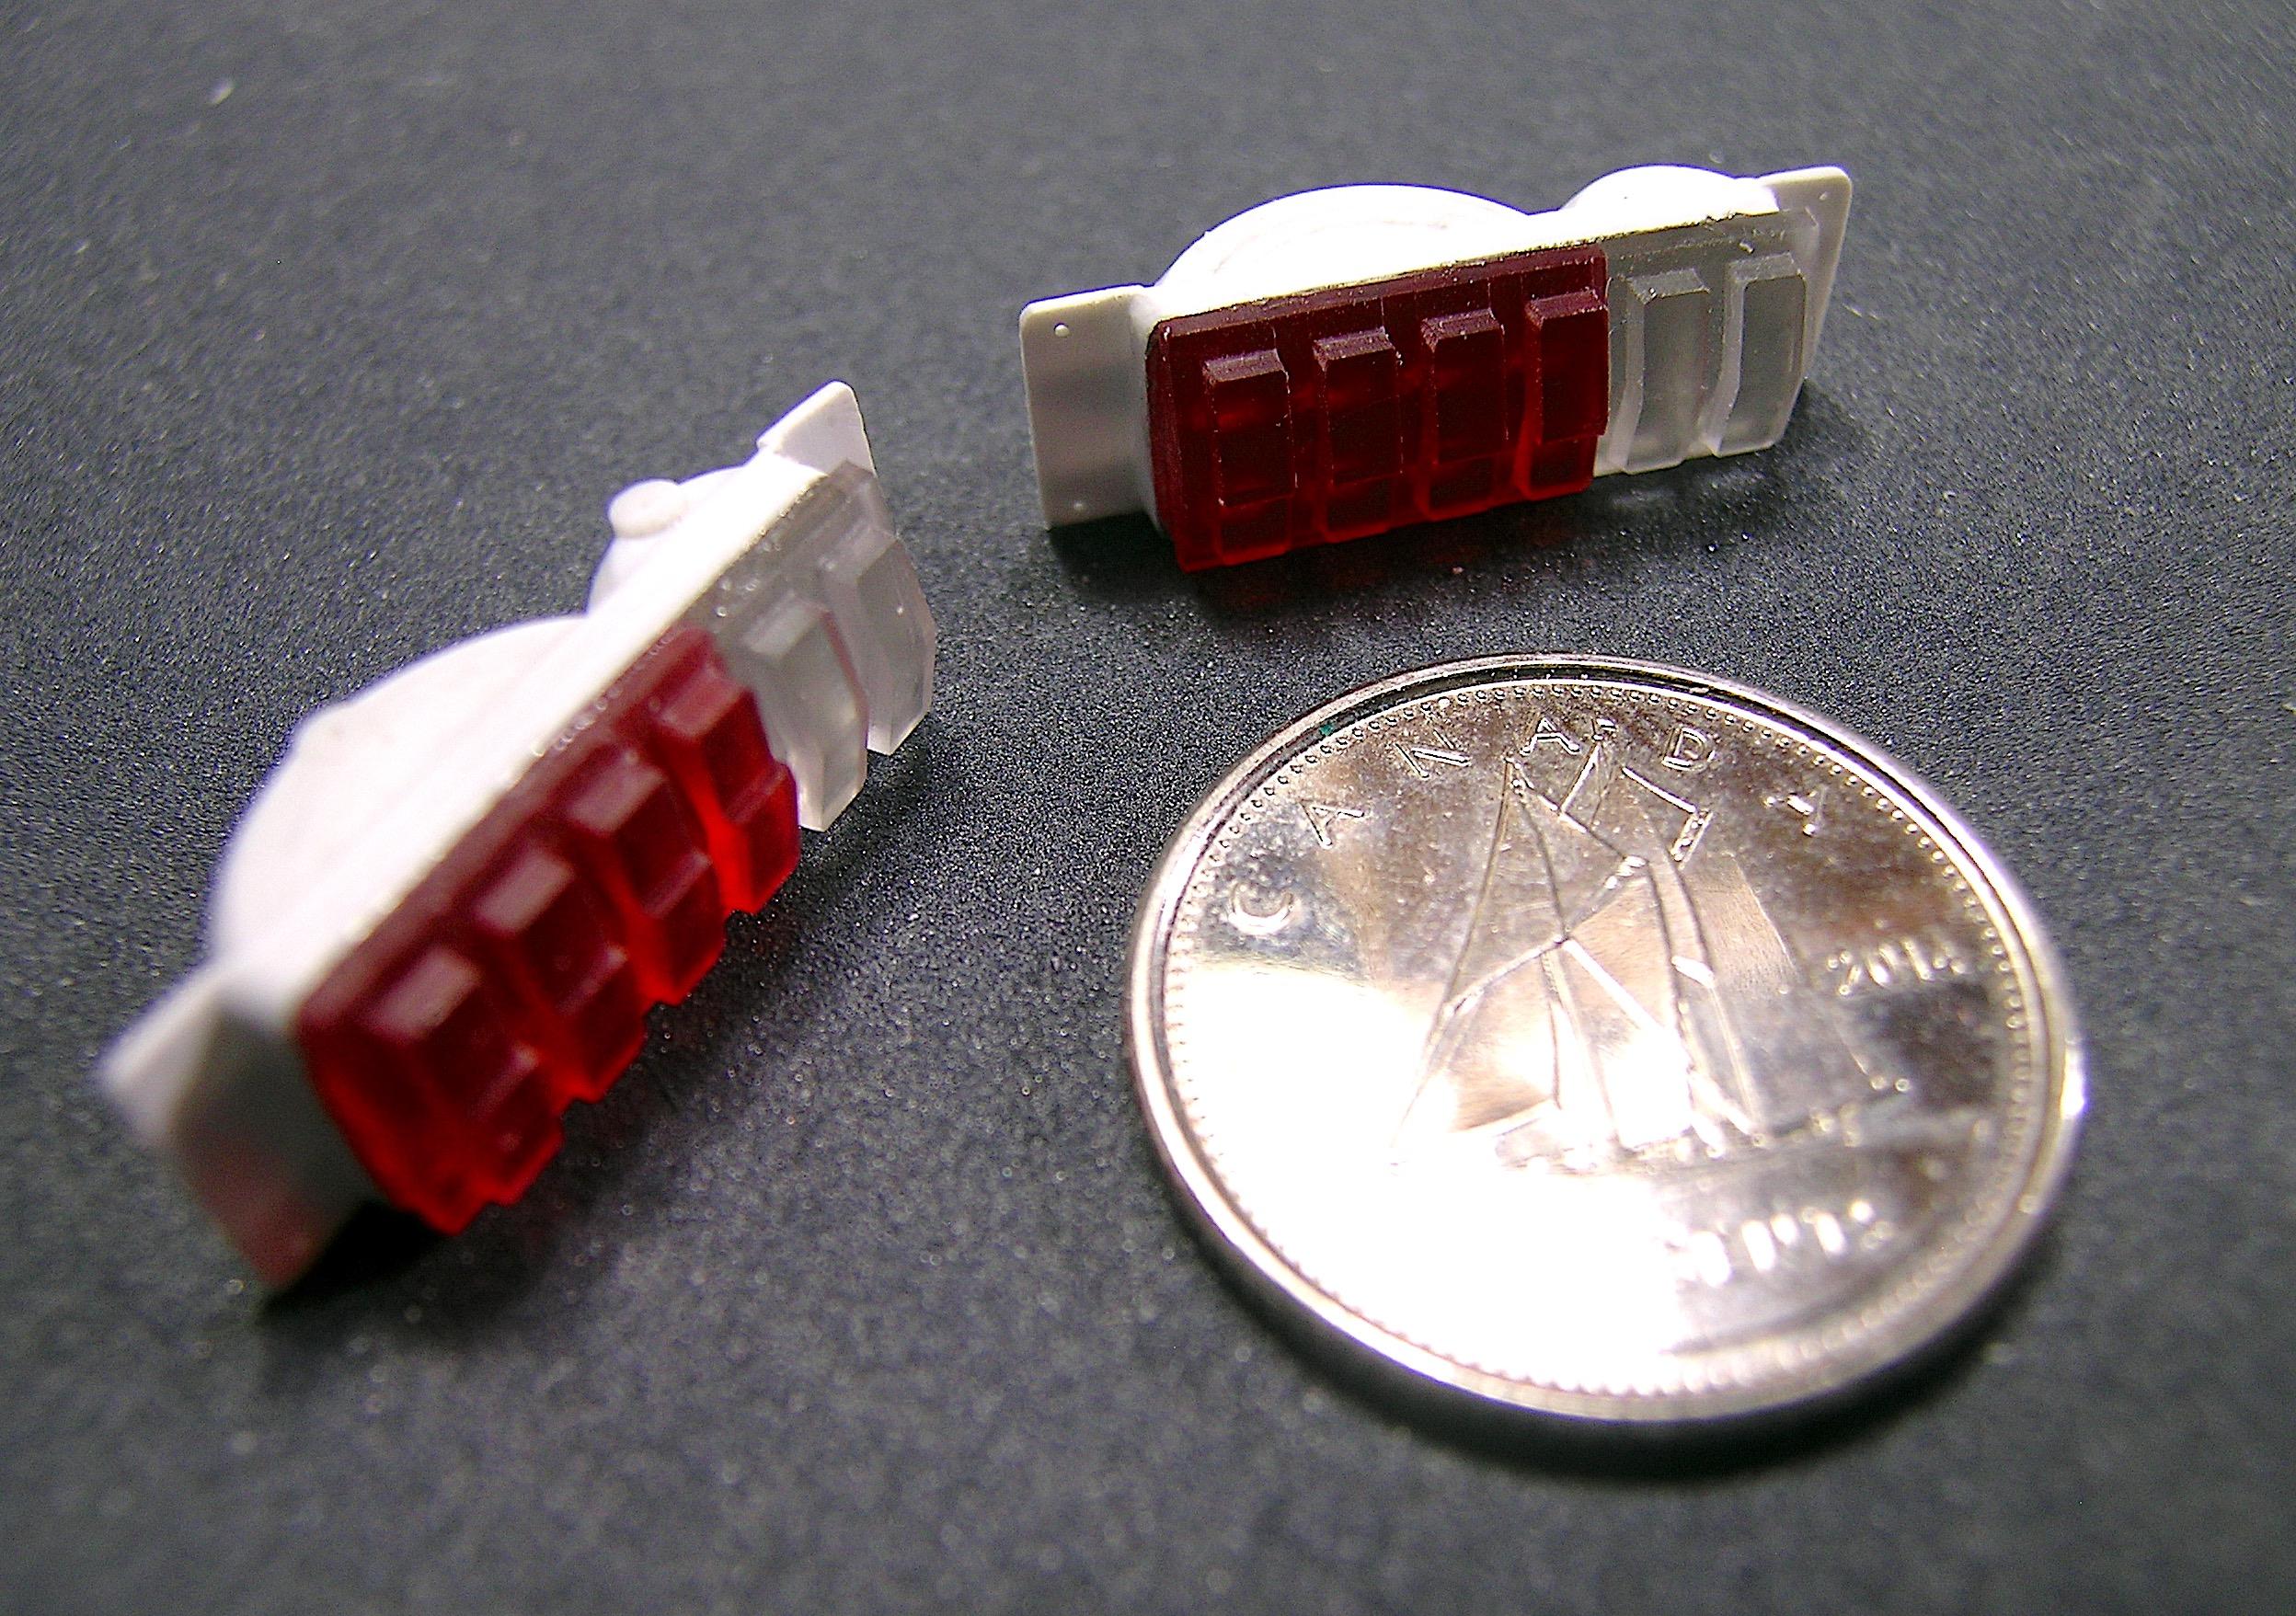
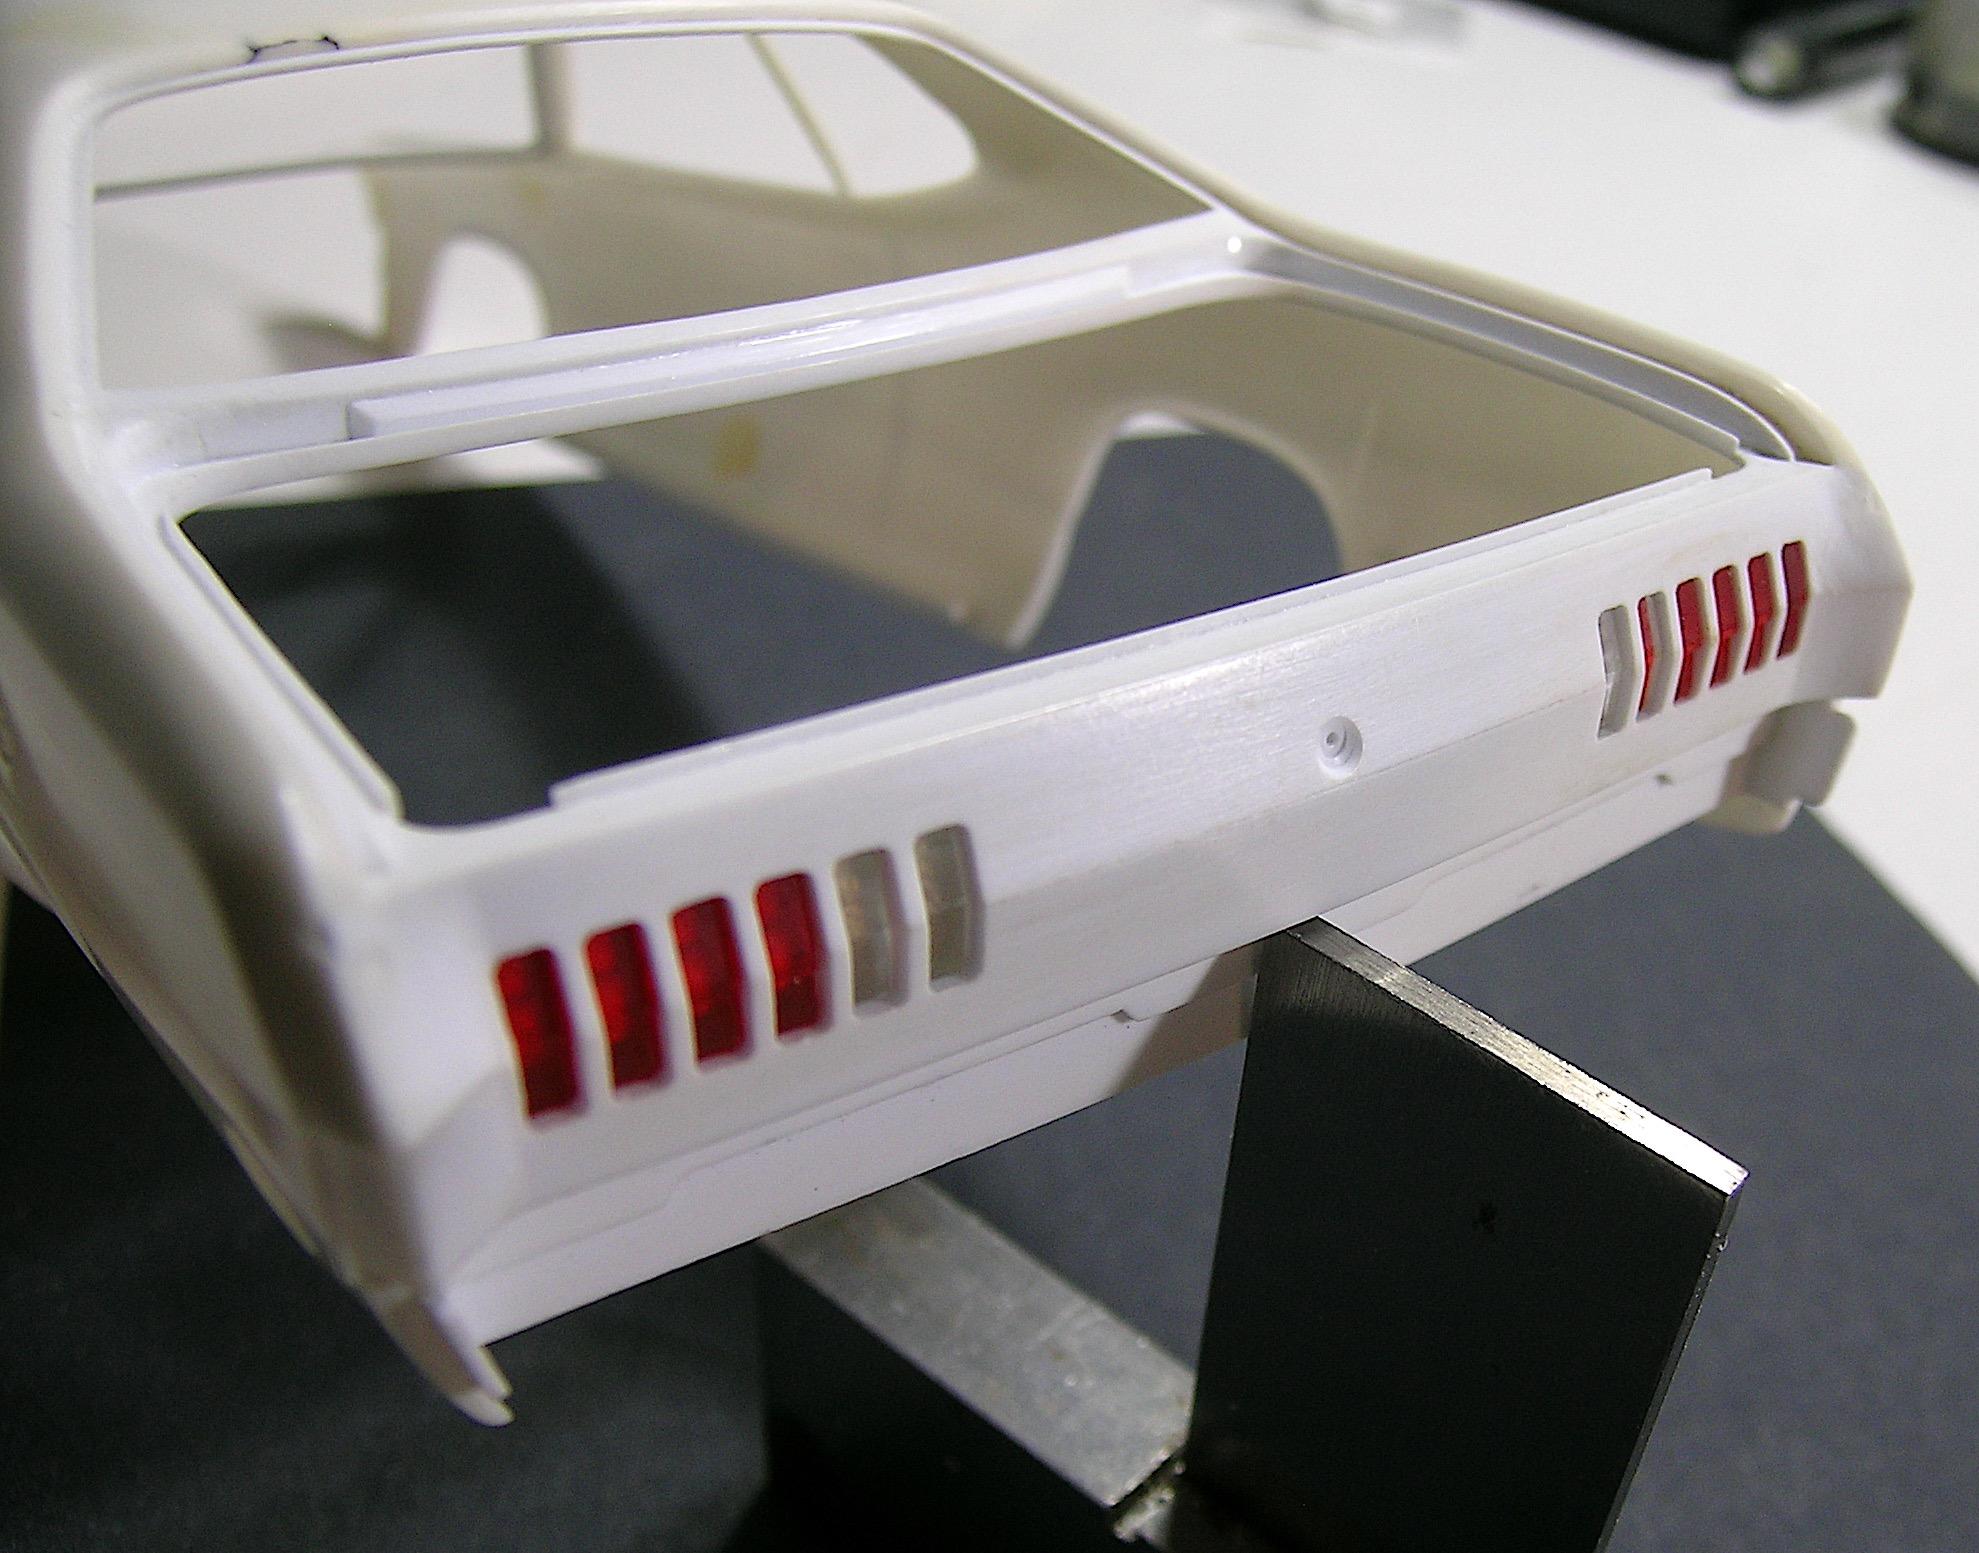
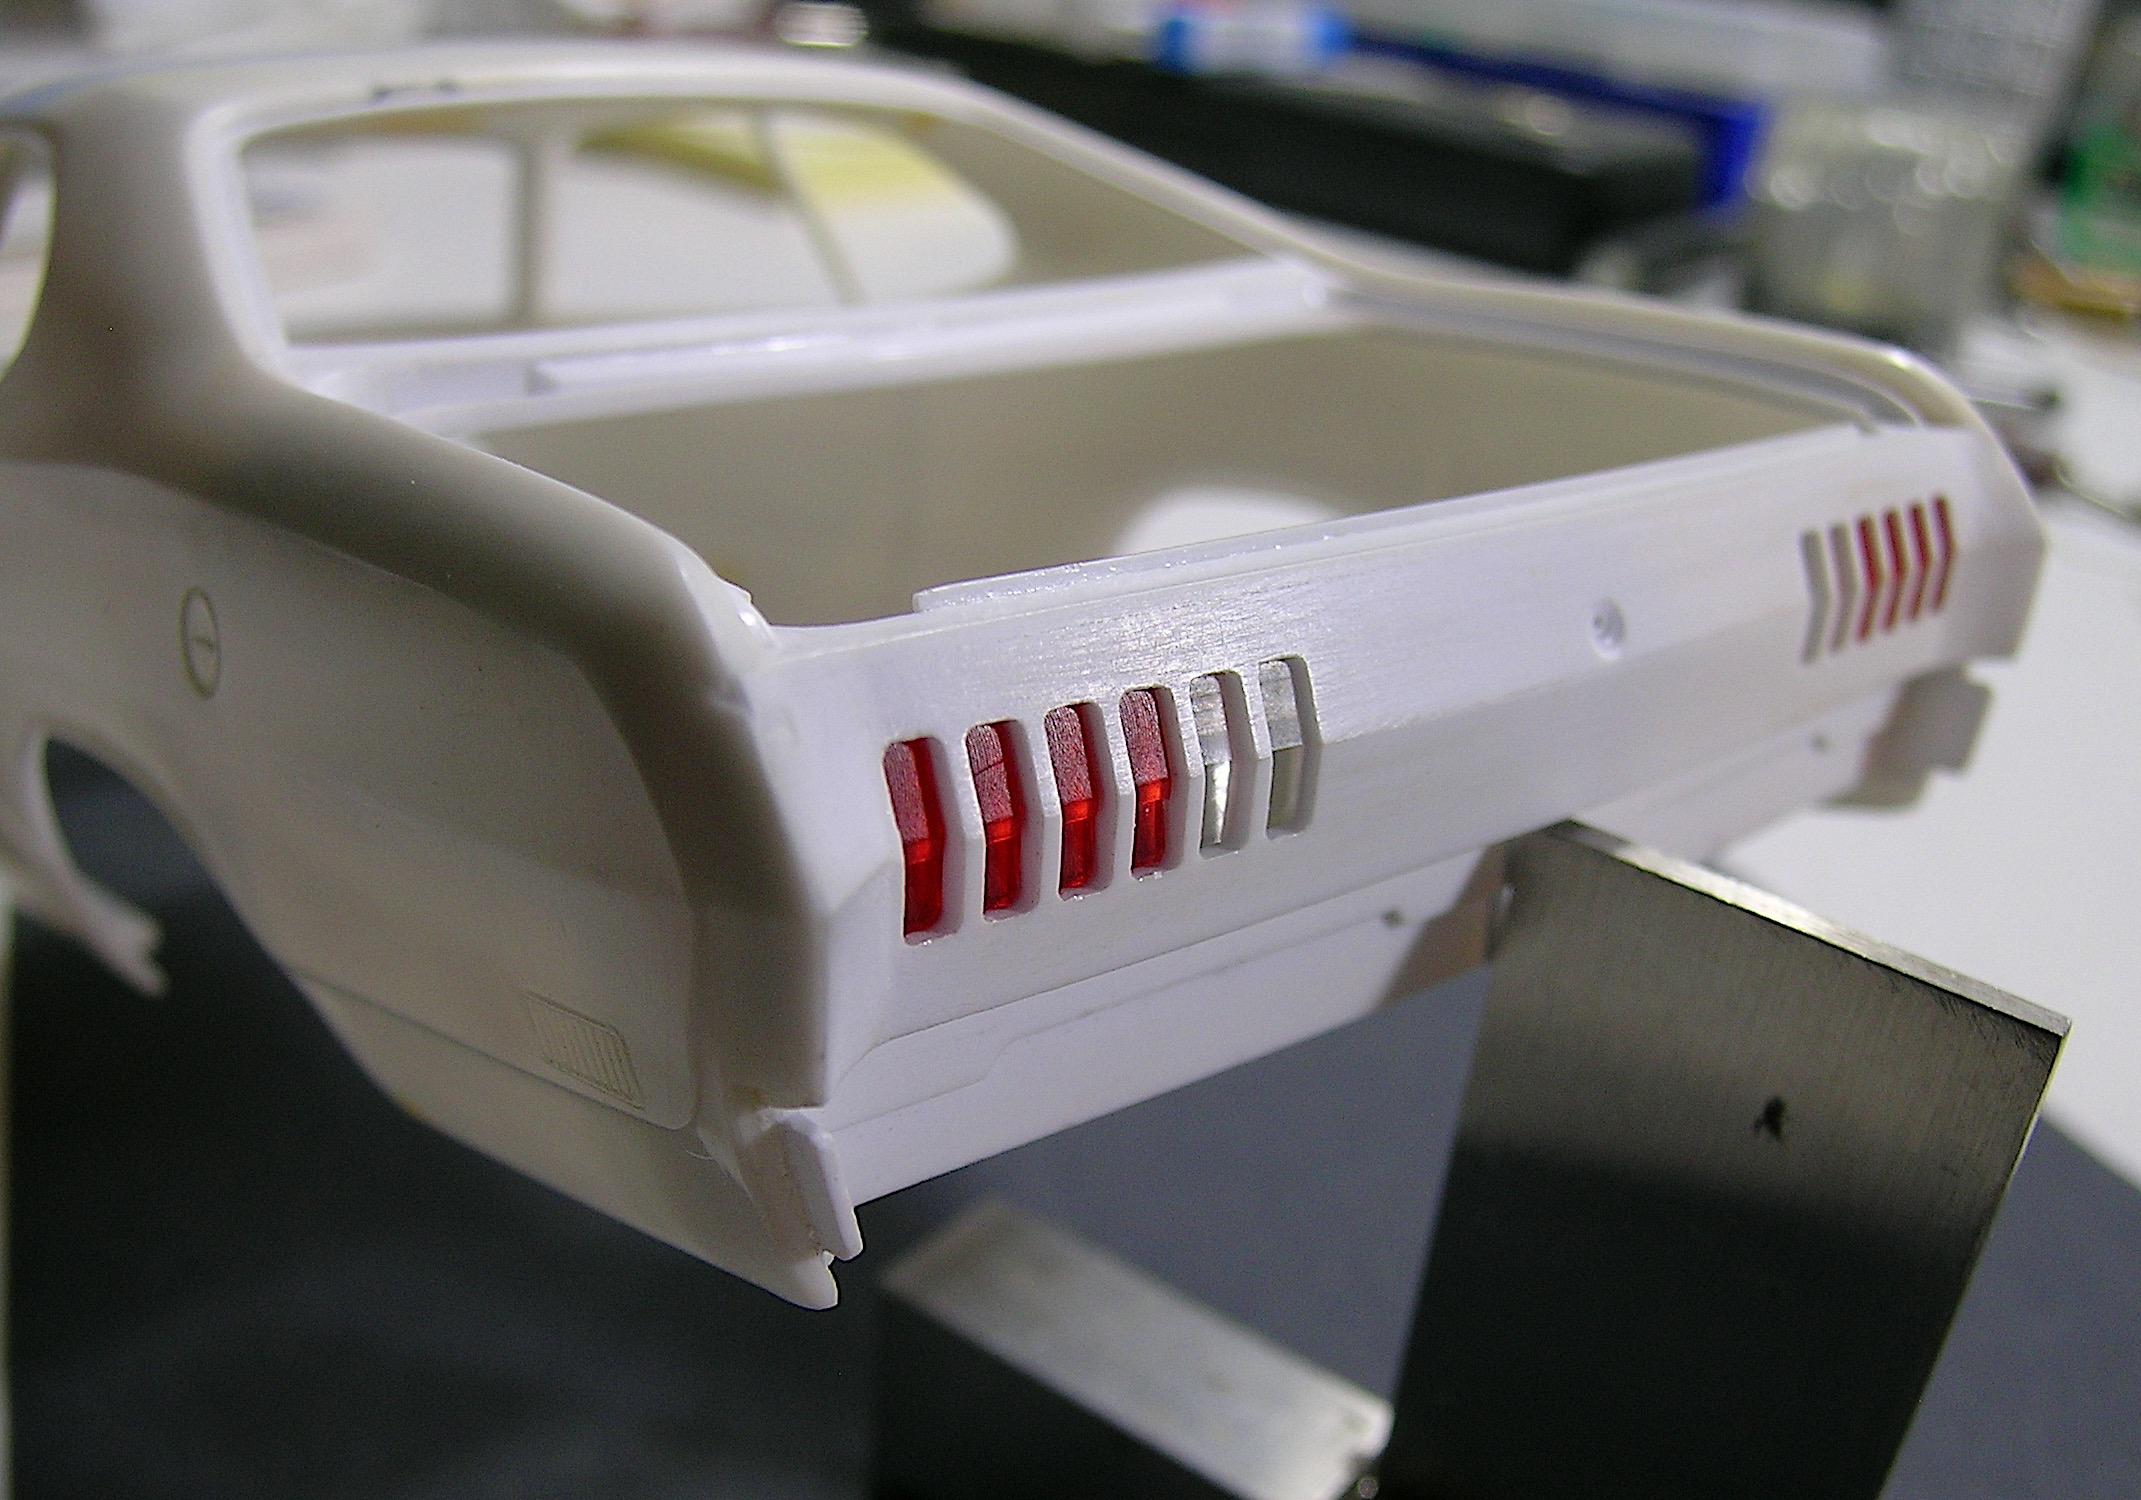
Hello everyone, It's crazy how fast time flies, just five days before Christmas and 2022 will soon be over but I don't think anyone will complain... Time for a last update before the Christmas weekend and I took the opportunity to add a little bit of red for the occasion. I spent the last few days working on the taillights with a part of the mounting brackets if I can call them that way. I machined the brake lenses and the back-up lights with acrylic rods by reversing the measures used to make the openings in the rear panel. I referred to photos on the internet for the basic shape, but I don't claim they are exact replicas, as many details are too small to be incorporated but the whole is quite convincing, an owner of the real car could be a better judge than me. I will then make the brackets to mount the units in the trunk and I think I will make them out of brass as they need to be very thin and rigid. Anyway, there is no shortage of choice when it comes to what to make, everything is to be made but I must admit that this is my favorite part of the hobby. ? Comments and suggestions are welcome. Francis Brake light at the beginning of machining with red acrylic on the rotary table. A little later with all the lens shapes machined. You can notice that I machined the 5 shapes because my first idea was to paint the back lights white. Turned 90 degrees to separate them into two identical parts I then decided to make the reverse light out of clear acrylic. Parabolic receptacles for bulbs in progress. At a later stage of fabrication, I drilled small holes for the wiring. Part of the brackets at early stage of machining. At a later stage. I glued the two parts together and refined the details. The parts before final assembly. You can see that I machined notches on the brake lenses because I think they act as replicators on the real lens? I put chrome (Bare Metal) and glued the acrylic lenses with 2-part epoxy. Test fit, not bad I think? I will probably add some black around the lens to create a tunnel effect as the acrylic is very transparent.
-
Fantastic job Daniel, the nuts on the wheels are always a nice addition and give a lot of realism. This is the kind of subtle detail that most enthusiasts love and I am one of them! ?
-
Demonstration of museum quality, your crafting techniques are unique and allow us to see an art that is being lost at the expense of the pre-made. Simply beautiful and addictive! ?
-
’72 Dodge Demon Drag Racer 1/25 scale
AmericanMuscleFan replied to AmericanMuscleFan's topic in WIP: Drag Racing Models
Thanks Bob! This is what I would call trying to turn a flaw into something better. ? Francis Thanks Chris! I am quite satisfied with the progress made so far, but I think the best is yet to come! Francis -
Beautiful work Ian! The Camaro loses nothing by waiting, a little break is sometimes beneficial for the continuation of things and this project so well started will only be a winner I am sure. Good luck with your new restaurant project and try to keep some free time to keep us entertained! ?
-
’72 Dodge Demon Drag Racer 1/25 scale
AmericanMuscleFan replied to AmericanMuscleFan's topic in WIP: Drag Racing Models
Thanks Ian! Thanks Marcos! -
’72 Dodge Demon Drag Racer 1/25 scale
AmericanMuscleFan replied to AmericanMuscleFan's topic in WIP: Drag Racing Models
Thanks Scott! -
’72 Dodge Demon Drag Racer 1/25 scale
AmericanMuscleFan replied to AmericanMuscleFan's topic in WIP: Drag Racing Models
Thanks Mike! You are a brave and passionate guy, I have tried working with a resin body before and it takes a lot of skill to get good results like the ones seen on the forum. I like to use solvent glues like Bondene or Tenax but they don't work with resin and that's sad because resin kits are often the most interesting subjects. I used double-stick tape (the kind that sticks to both sides) to hold the trunk lid in place and added masking tape on both sides as you can see in the photo. The plate on which the trunk lid is mounted is a 5" Rotary Tooling Plate (#3725) from Sherline, it is designed to mount unconventional or special parts on the rotary table, it is very useful and inexpensive. The possibilities are almost endless when it comes to making parts with the milling machine and the more you use it, the more you will discover that this tool is versatile, so don't let it intimidate you. ? Always a pleasure to help, Francis -
’72 Dodge Demon Drag Racer 1/25 scale
AmericanMuscleFan replied to AmericanMuscleFan's topic in WIP: Drag Racing Models
Thanks for your visit and kind words Trevor, the project is probably not as intense as the D100 at this stage but I will try to remedy that a little later in the build. ? Keep checking back, I expect to incorporate aluminum and brass on this one too. ? Francis -
’72 Dodge Demon Drag Racer 1/25 scale
AmericanMuscleFan replied to AmericanMuscleFan's topic in WIP: Drag Racing Models
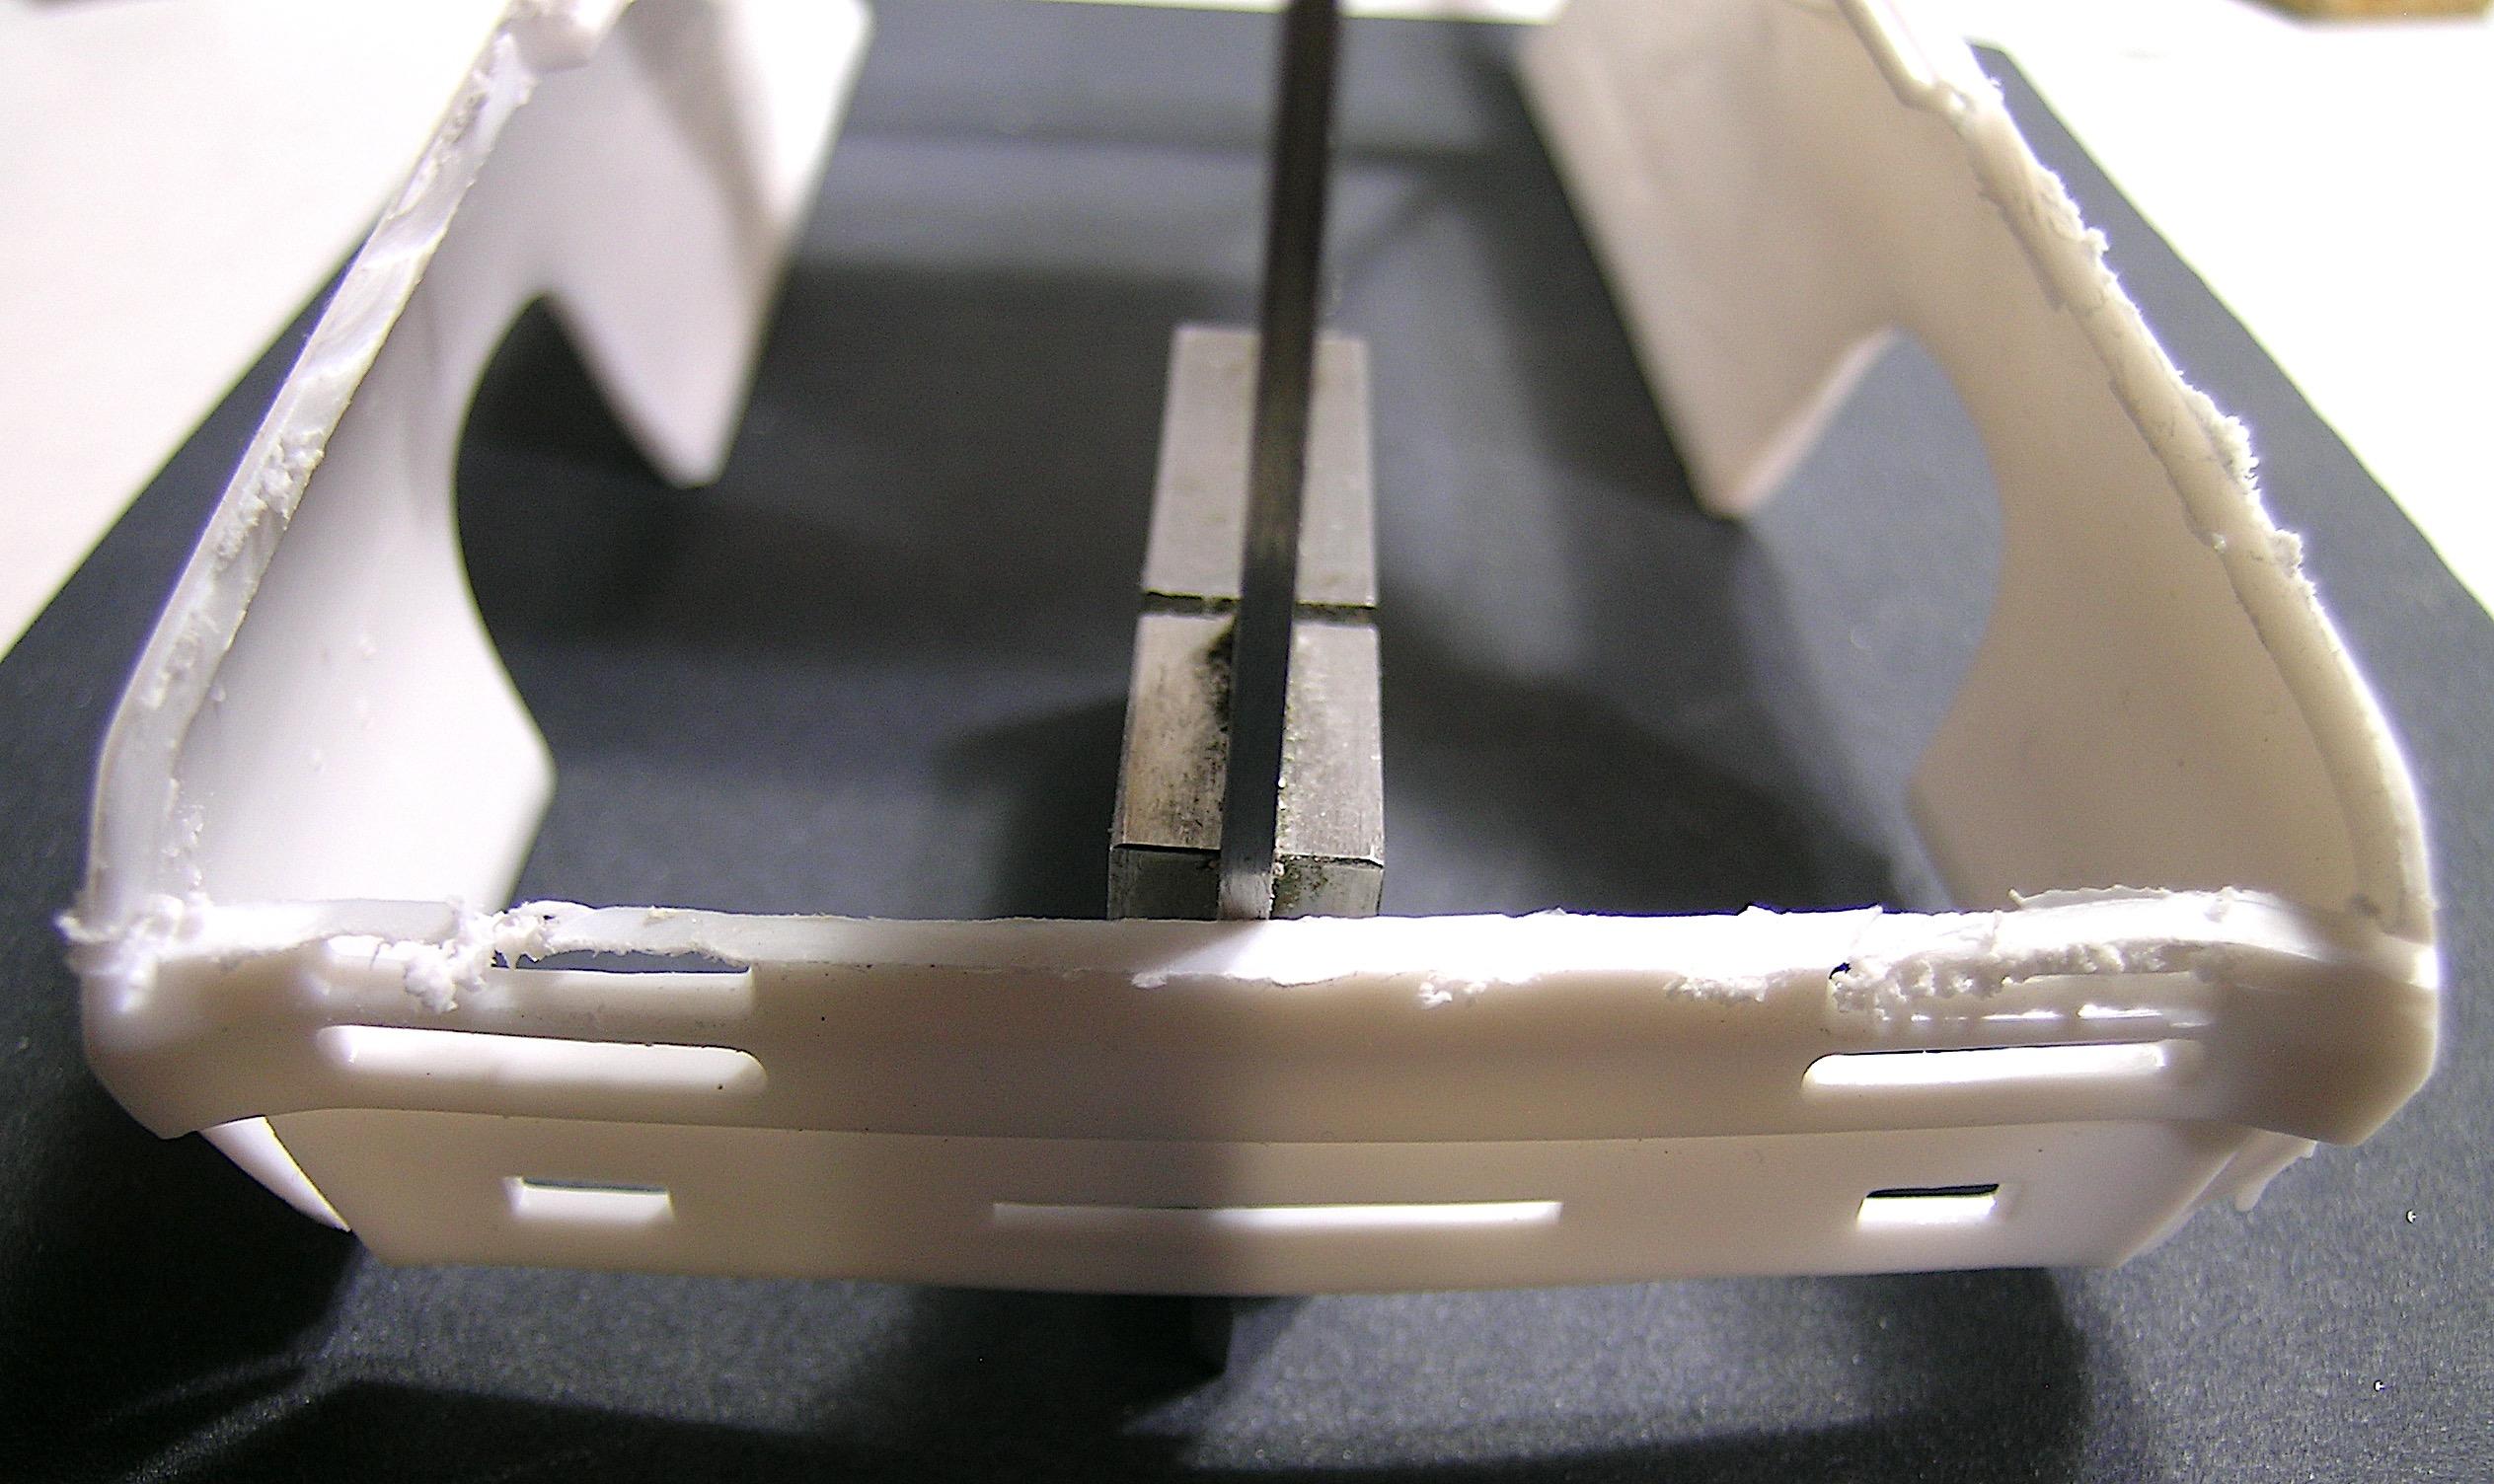
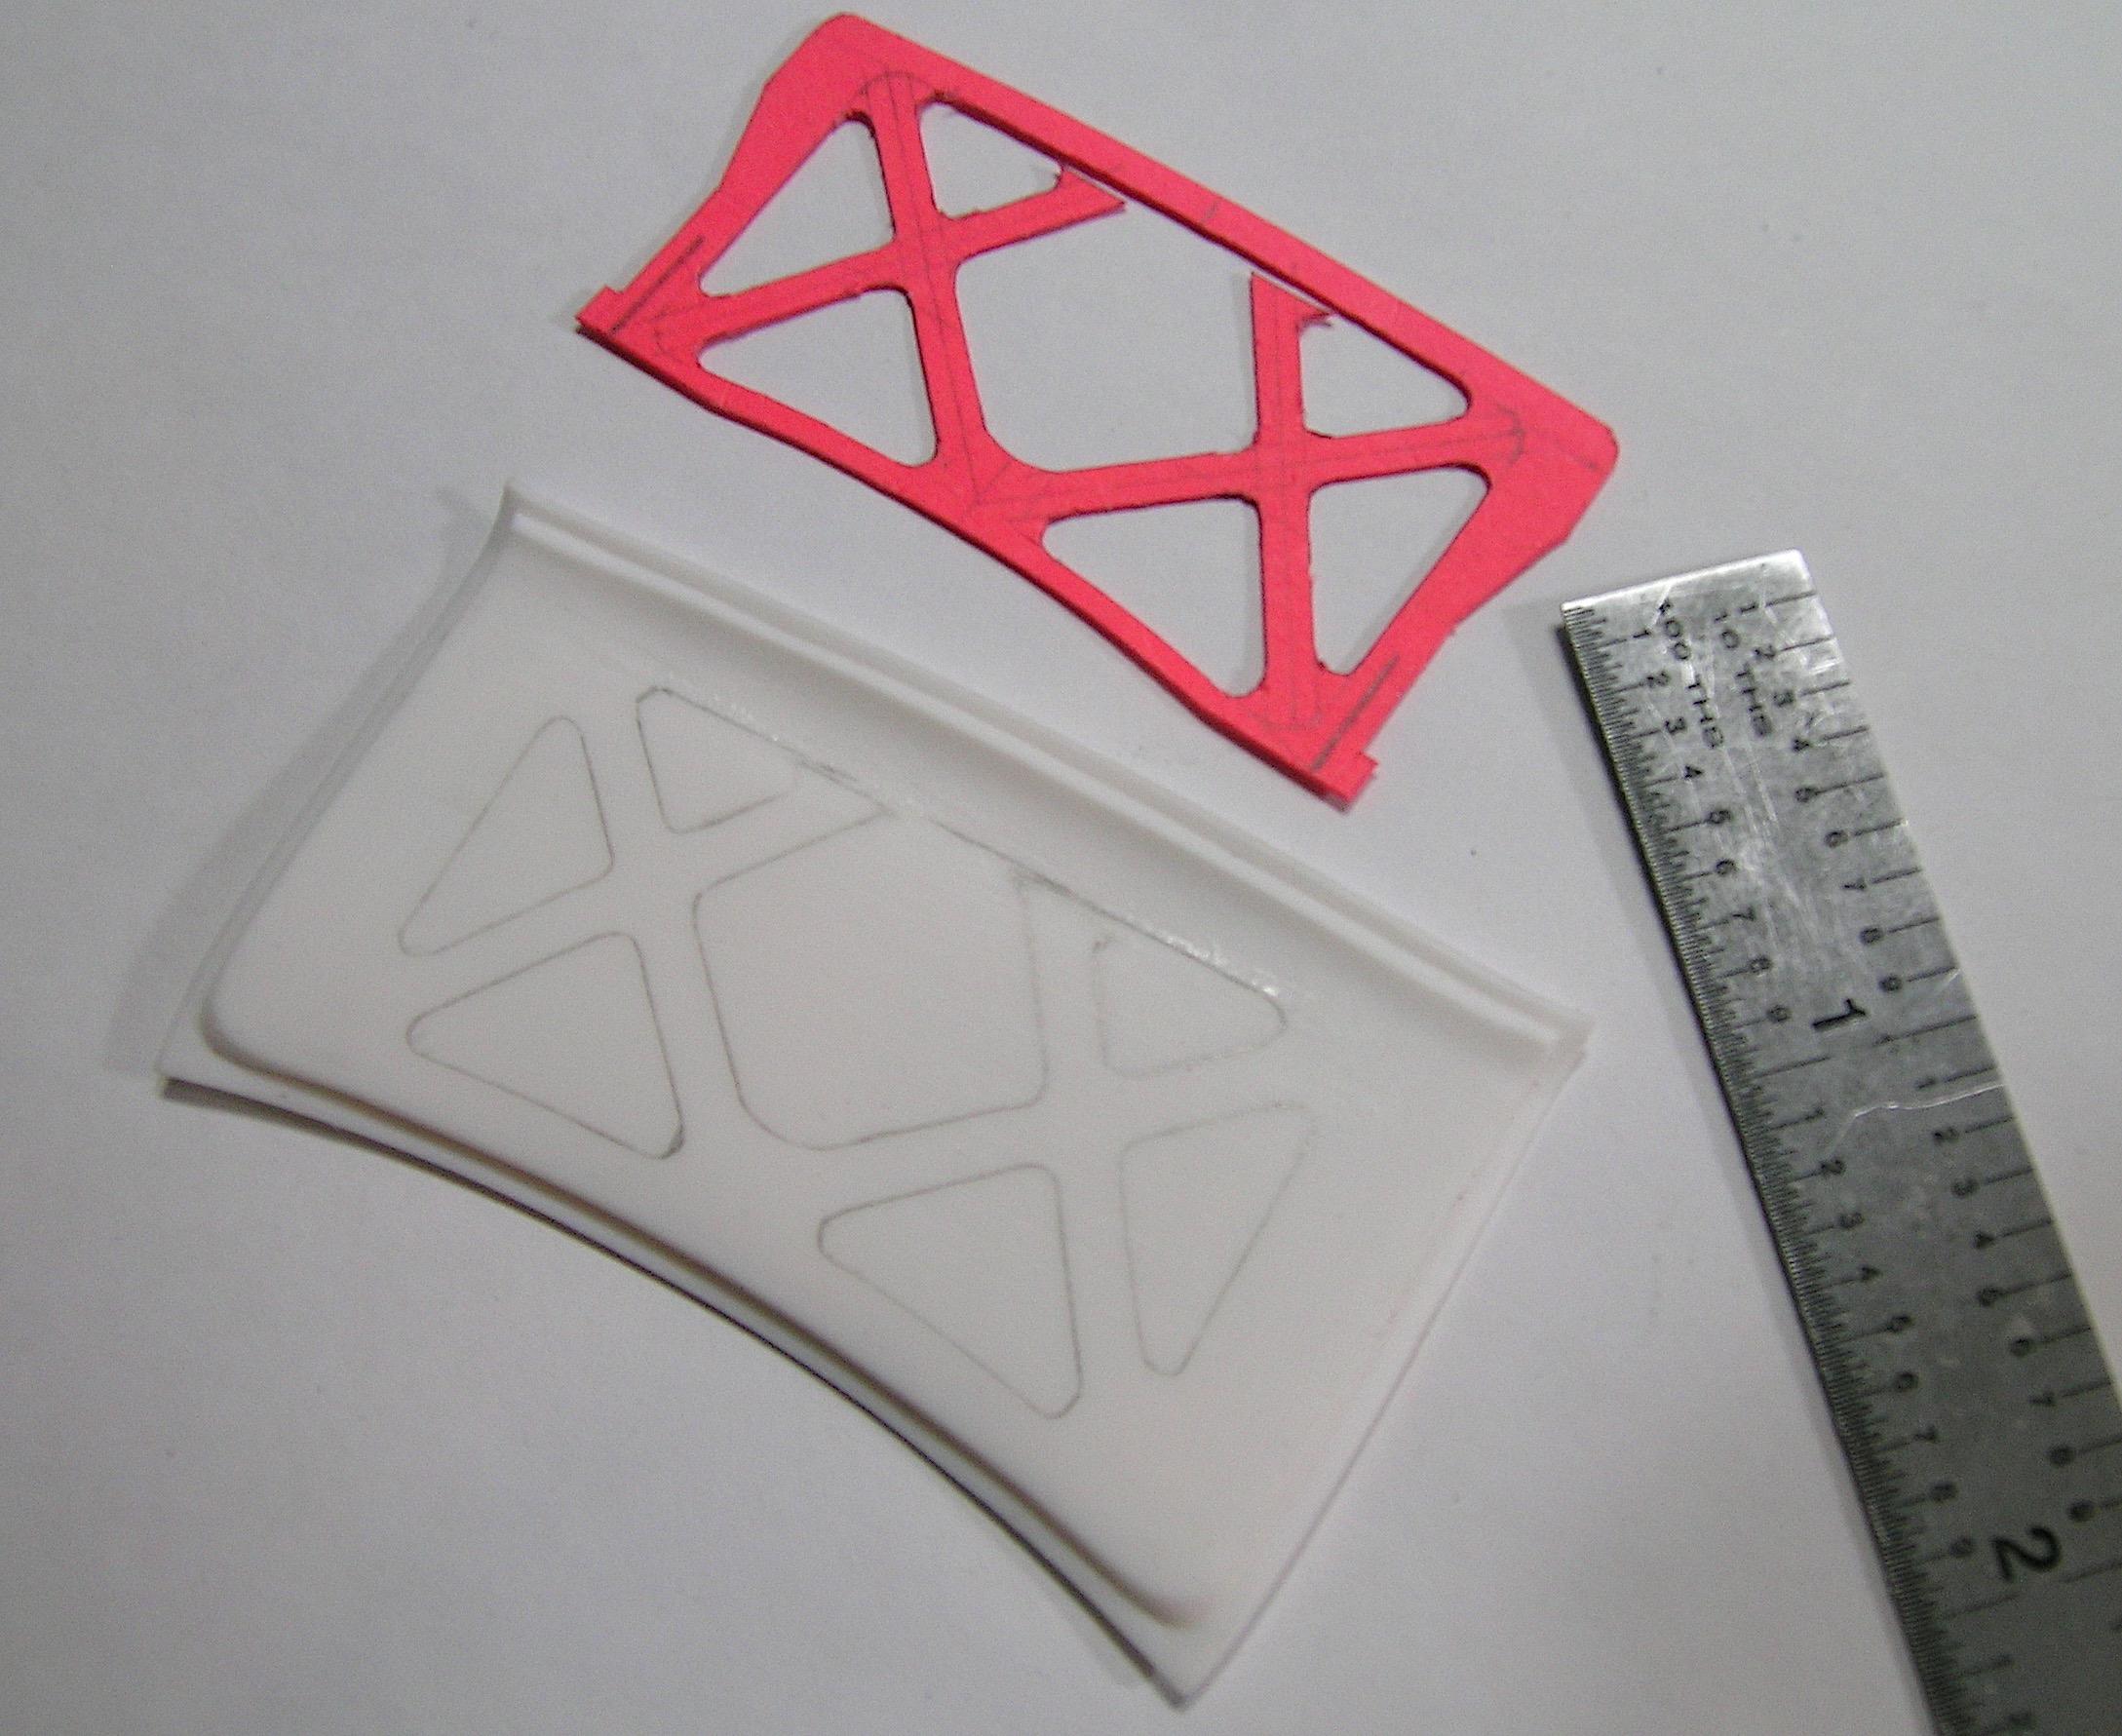
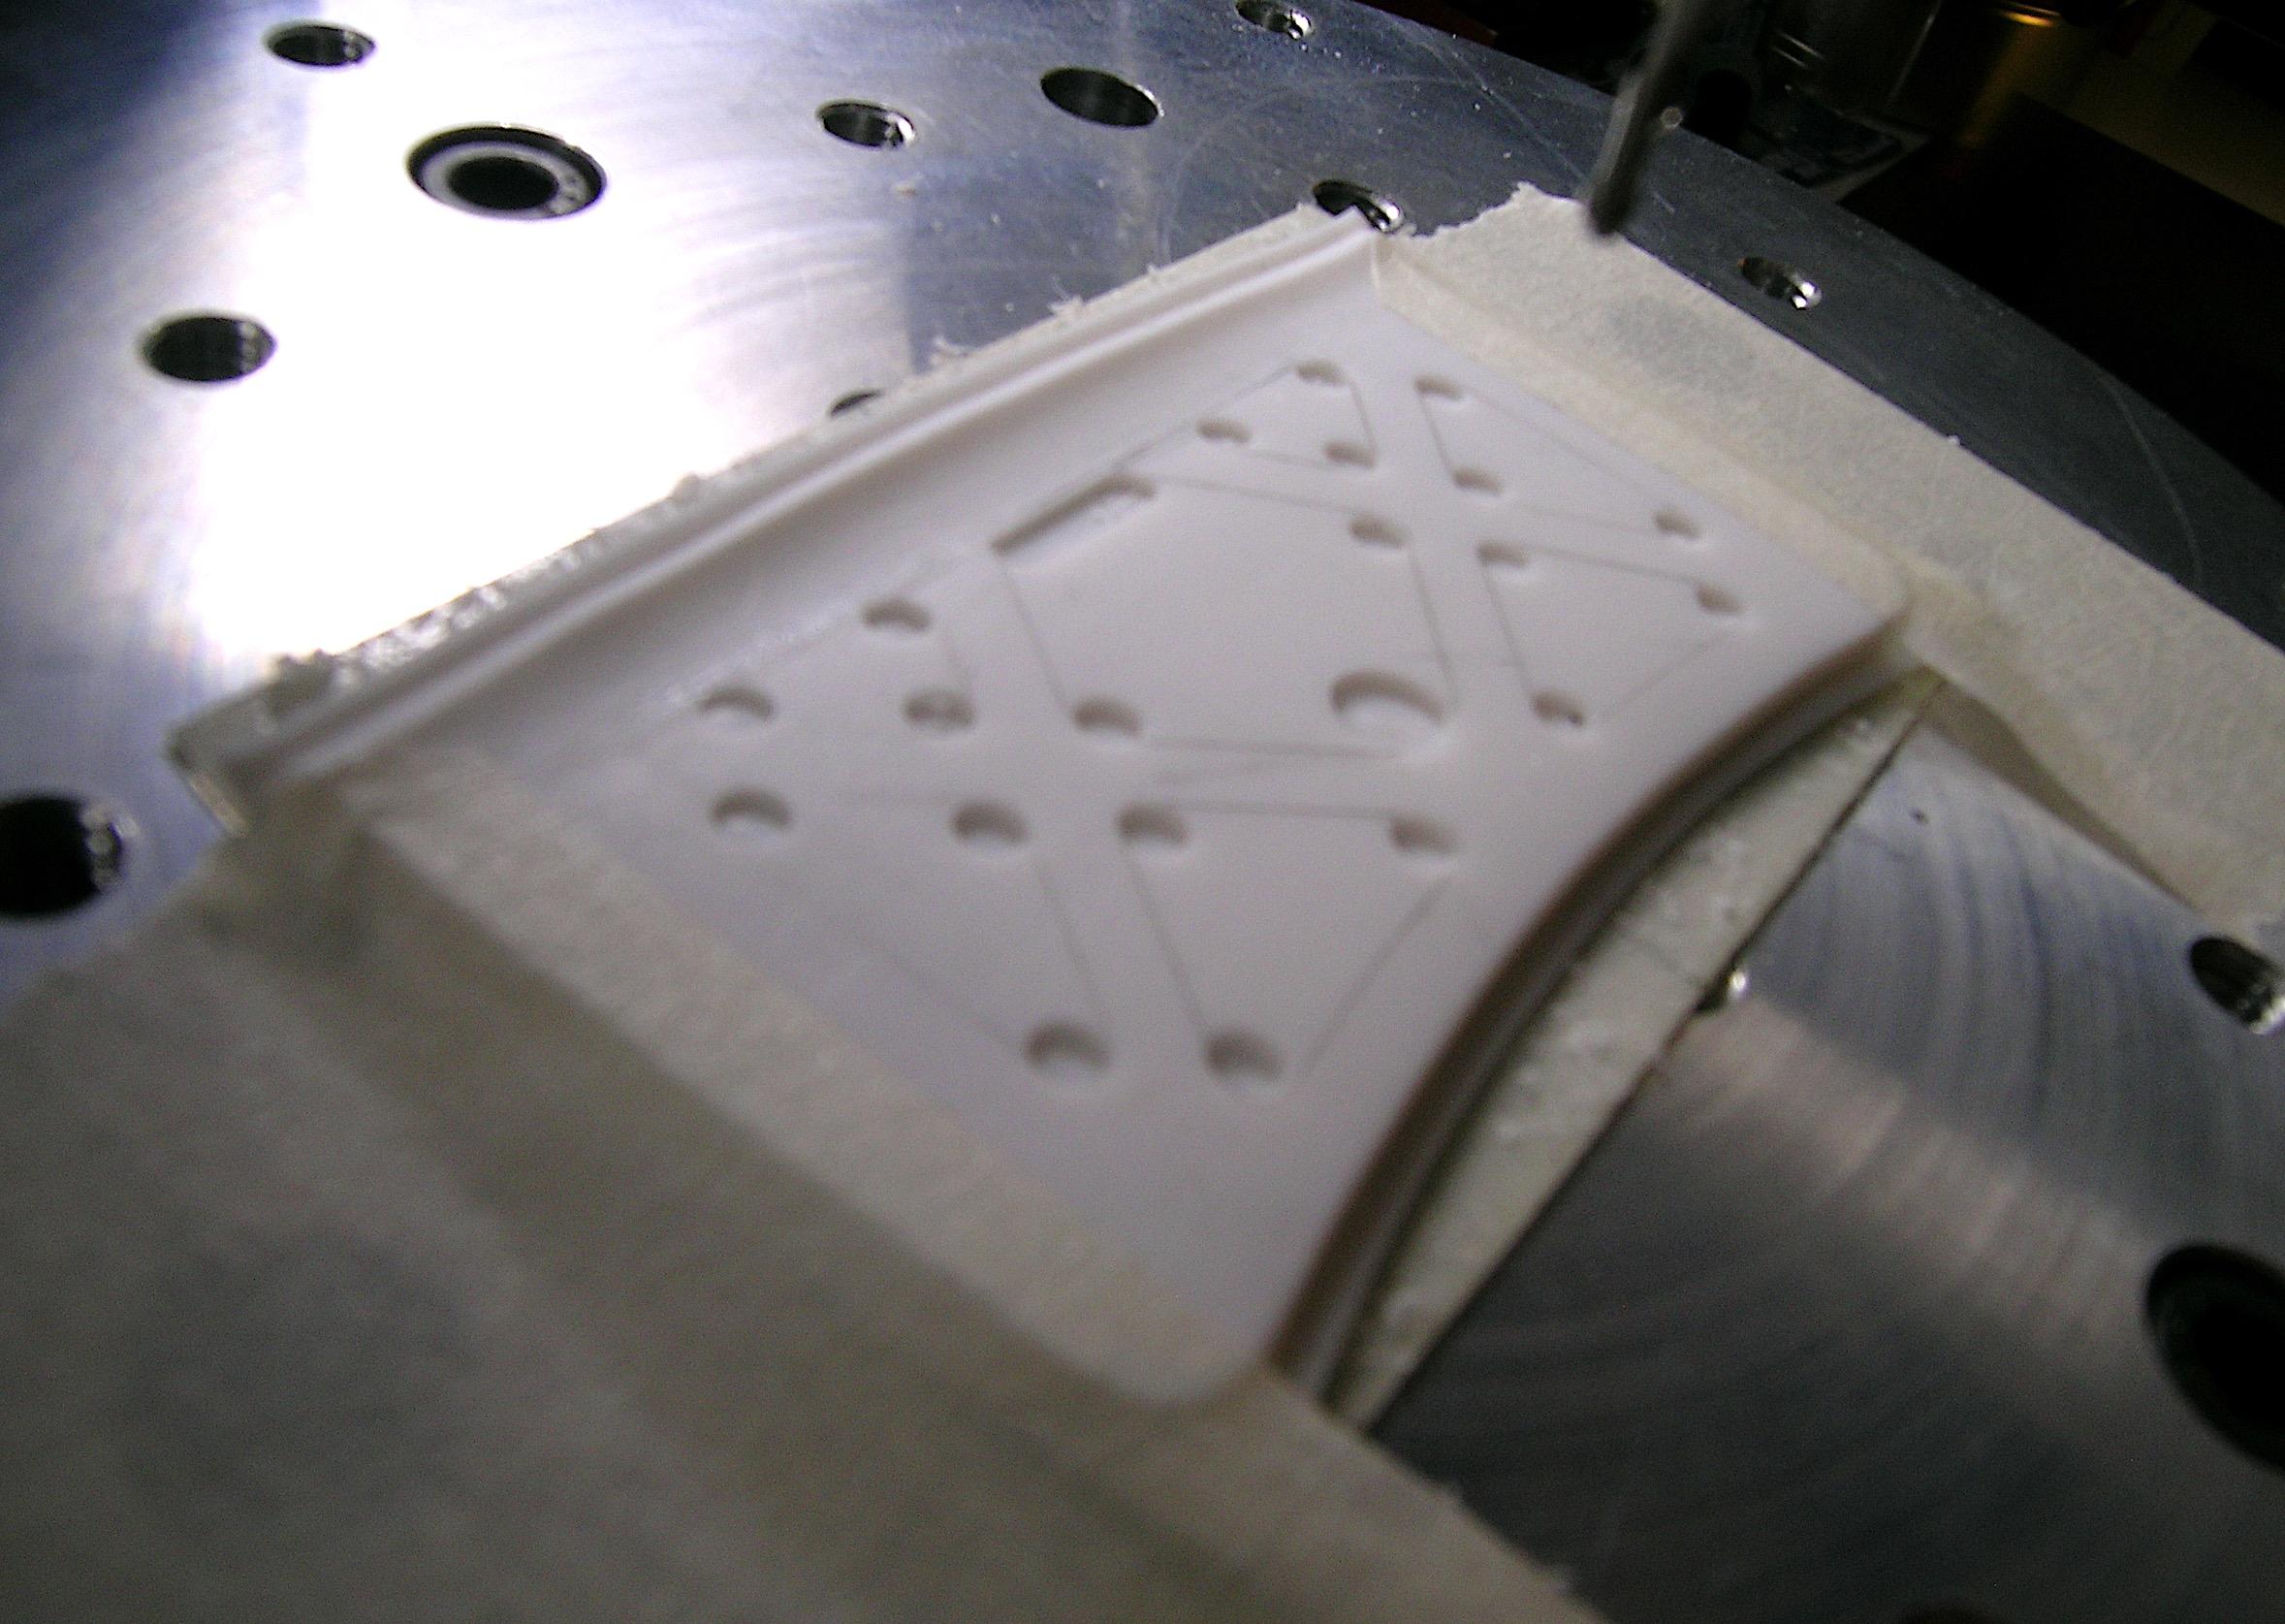
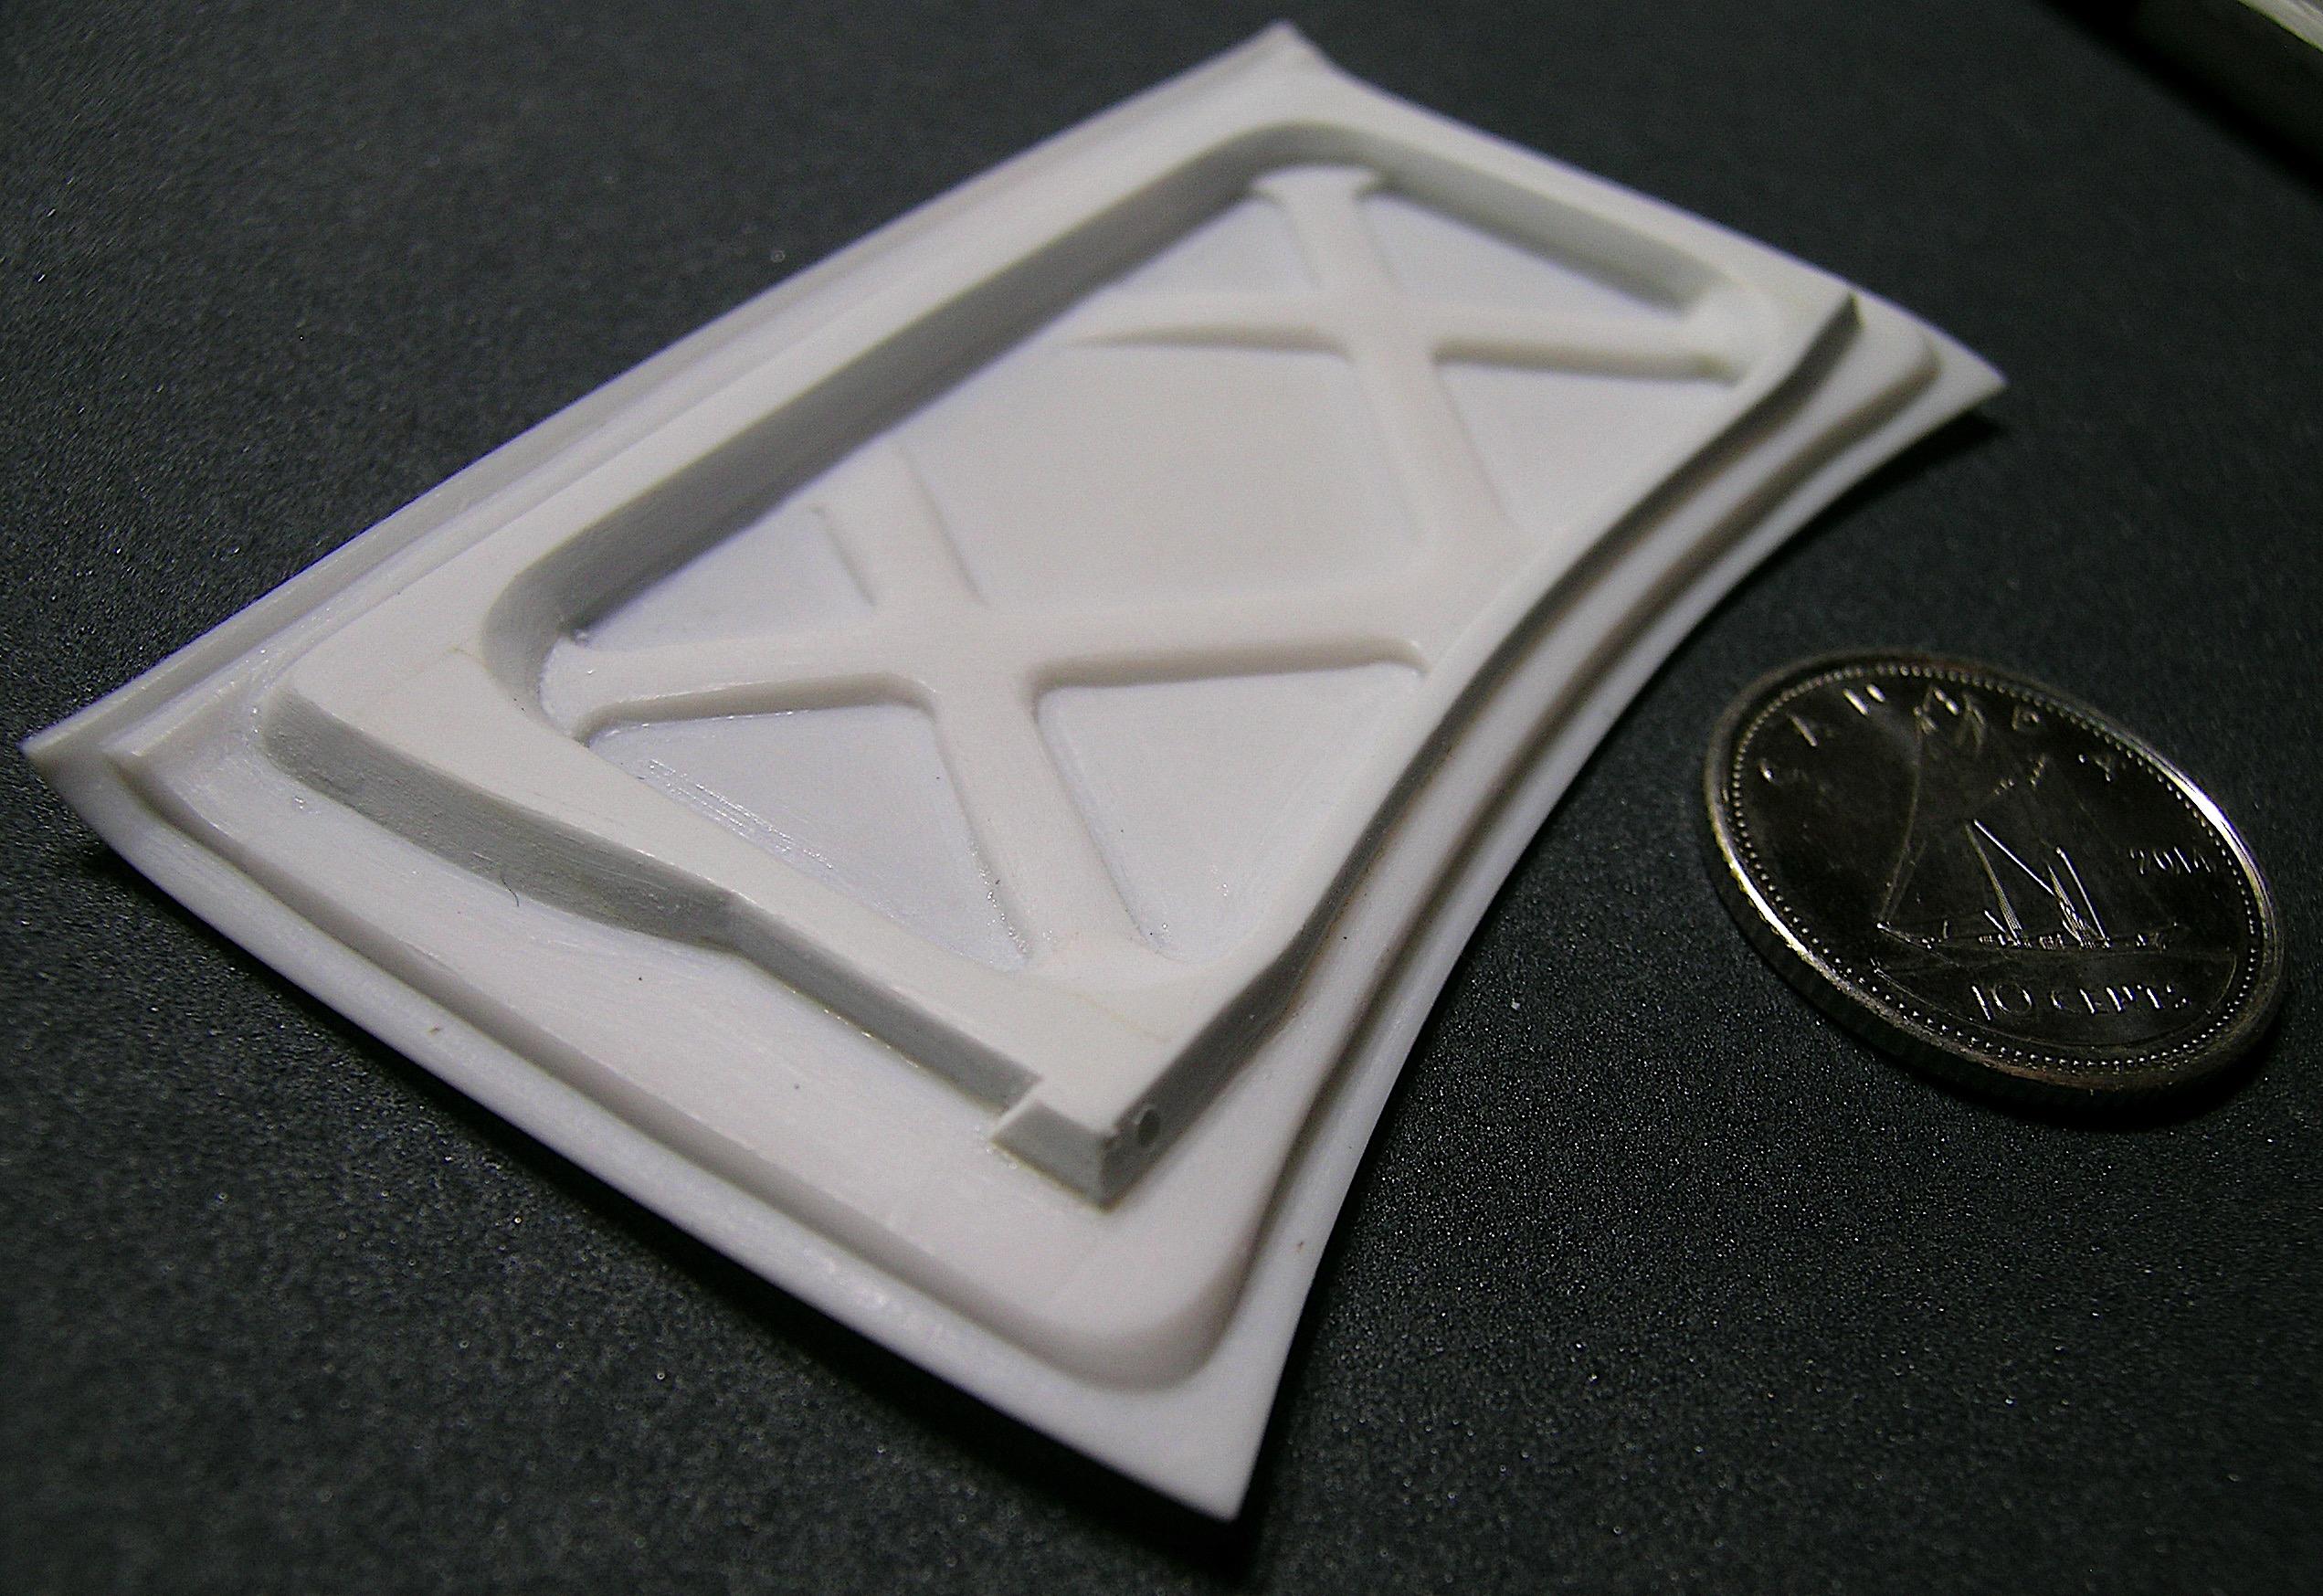
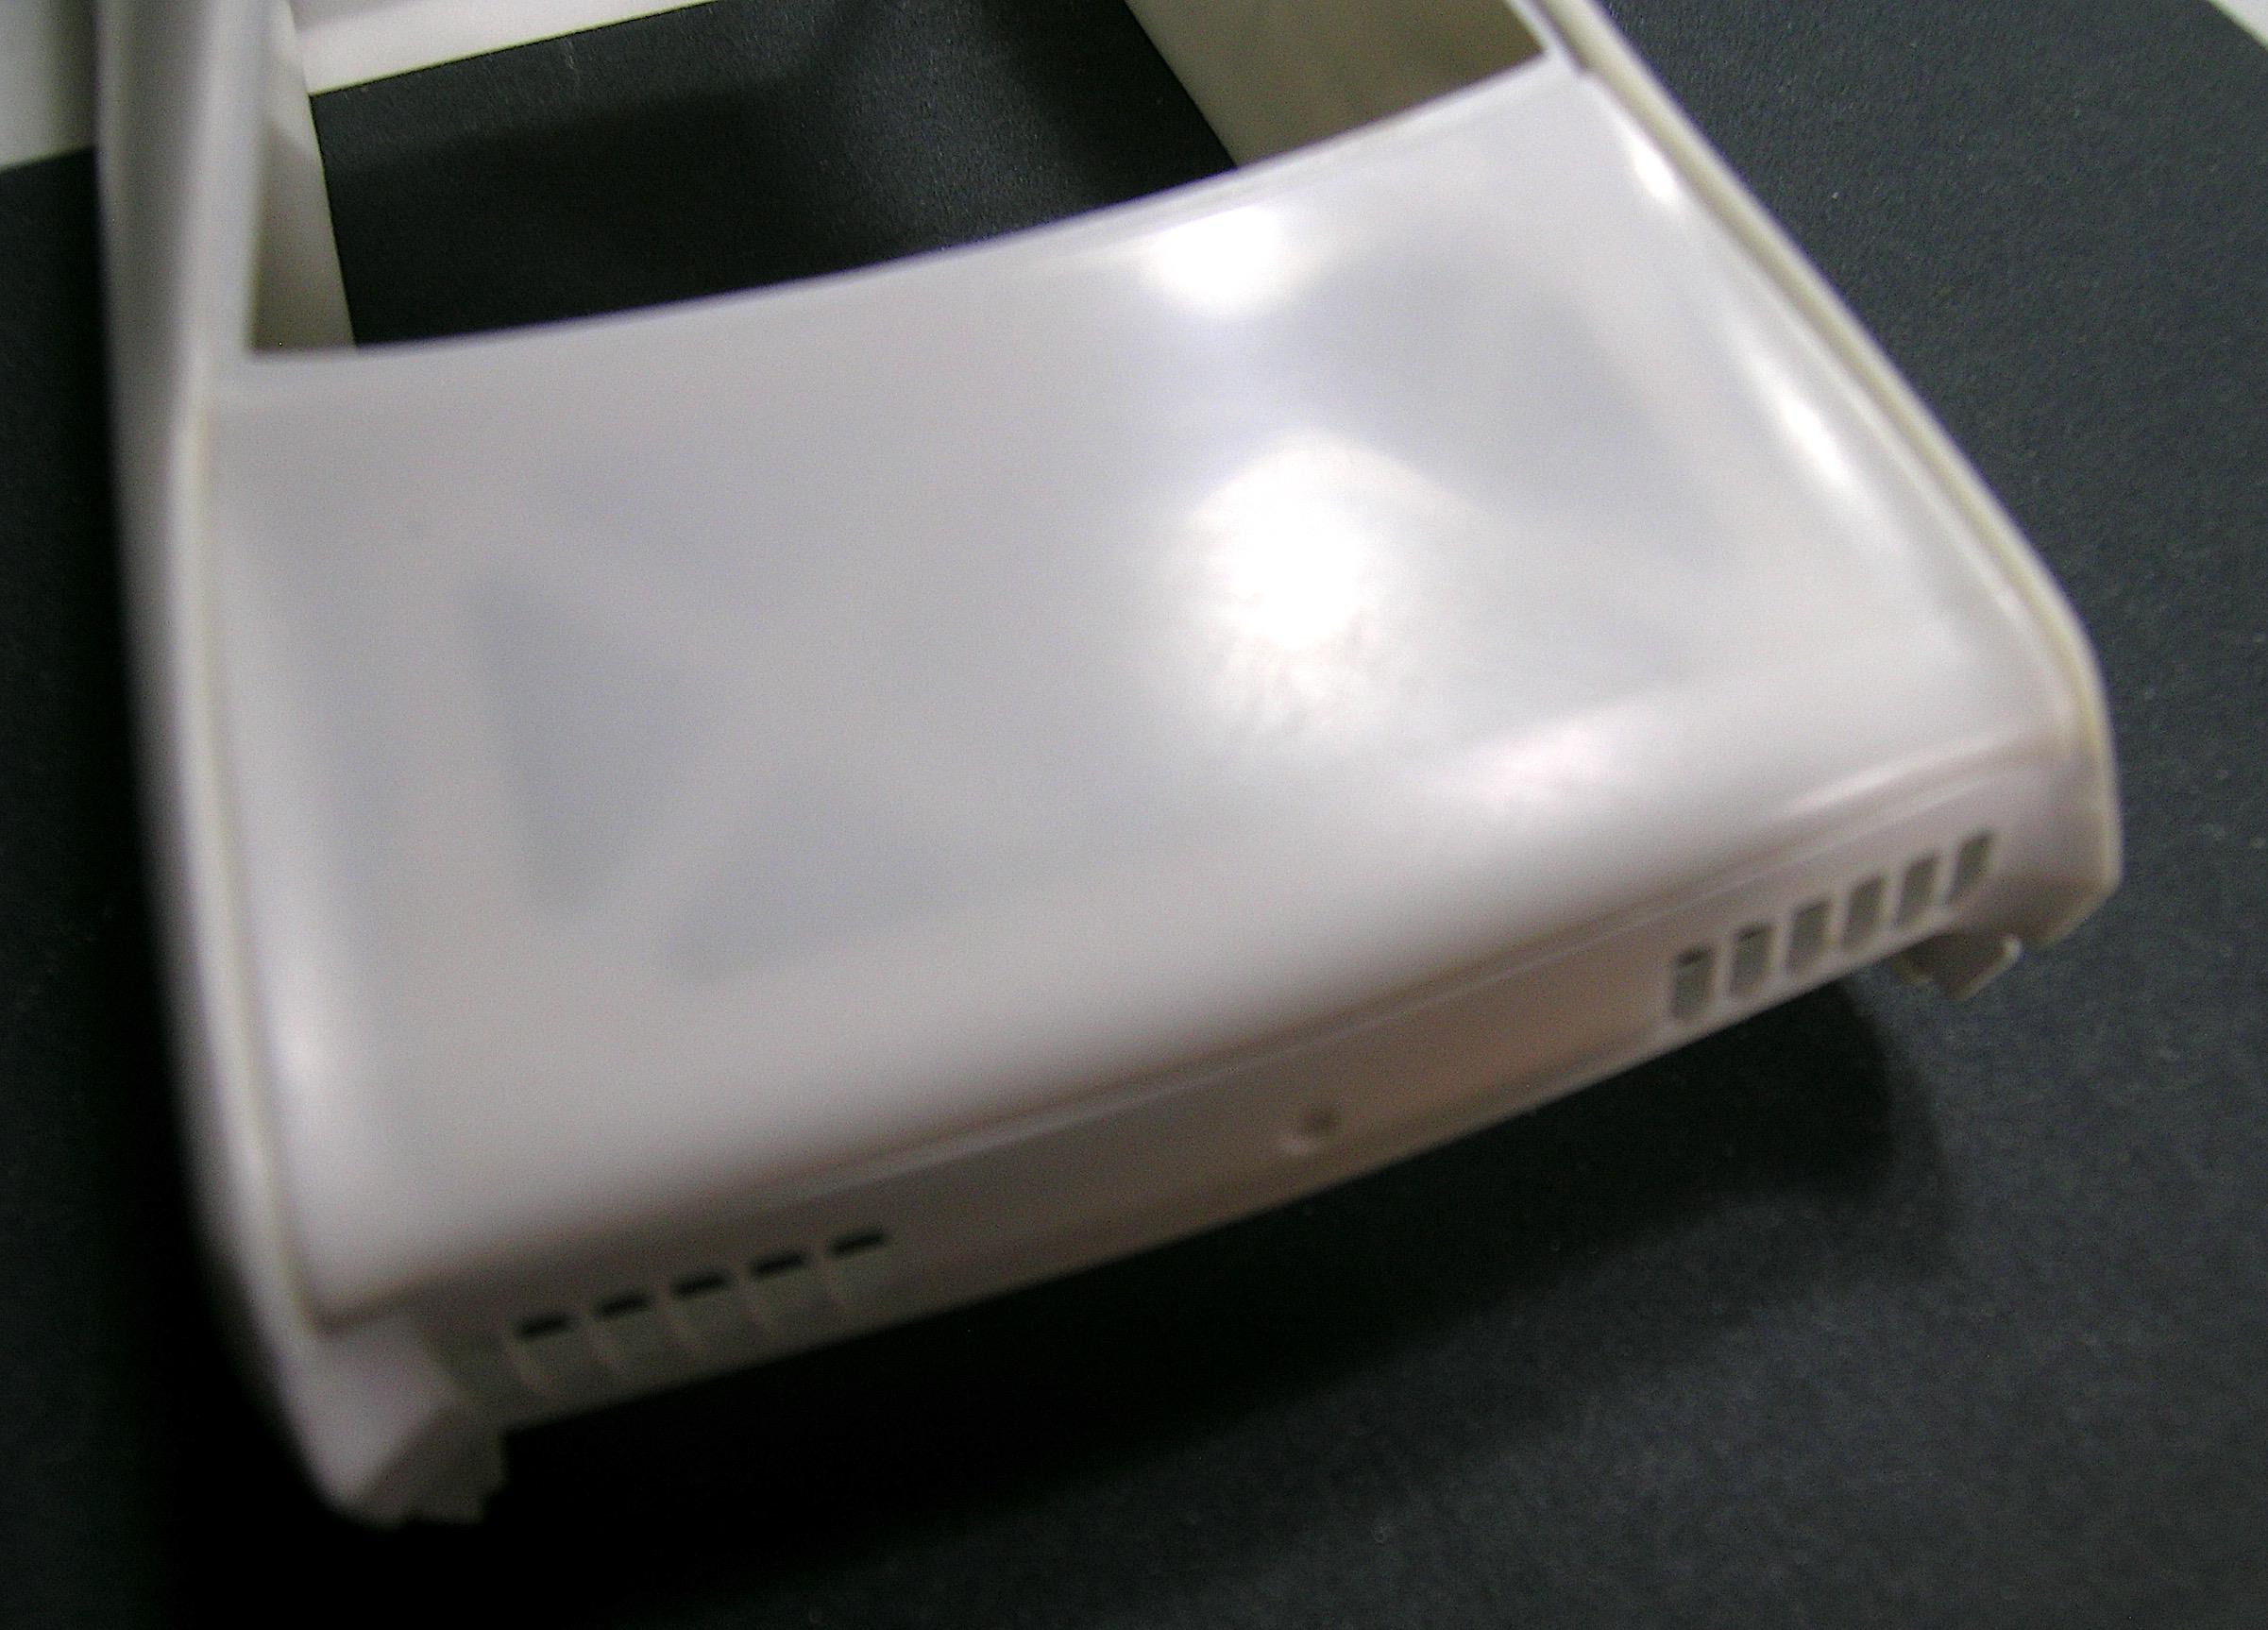
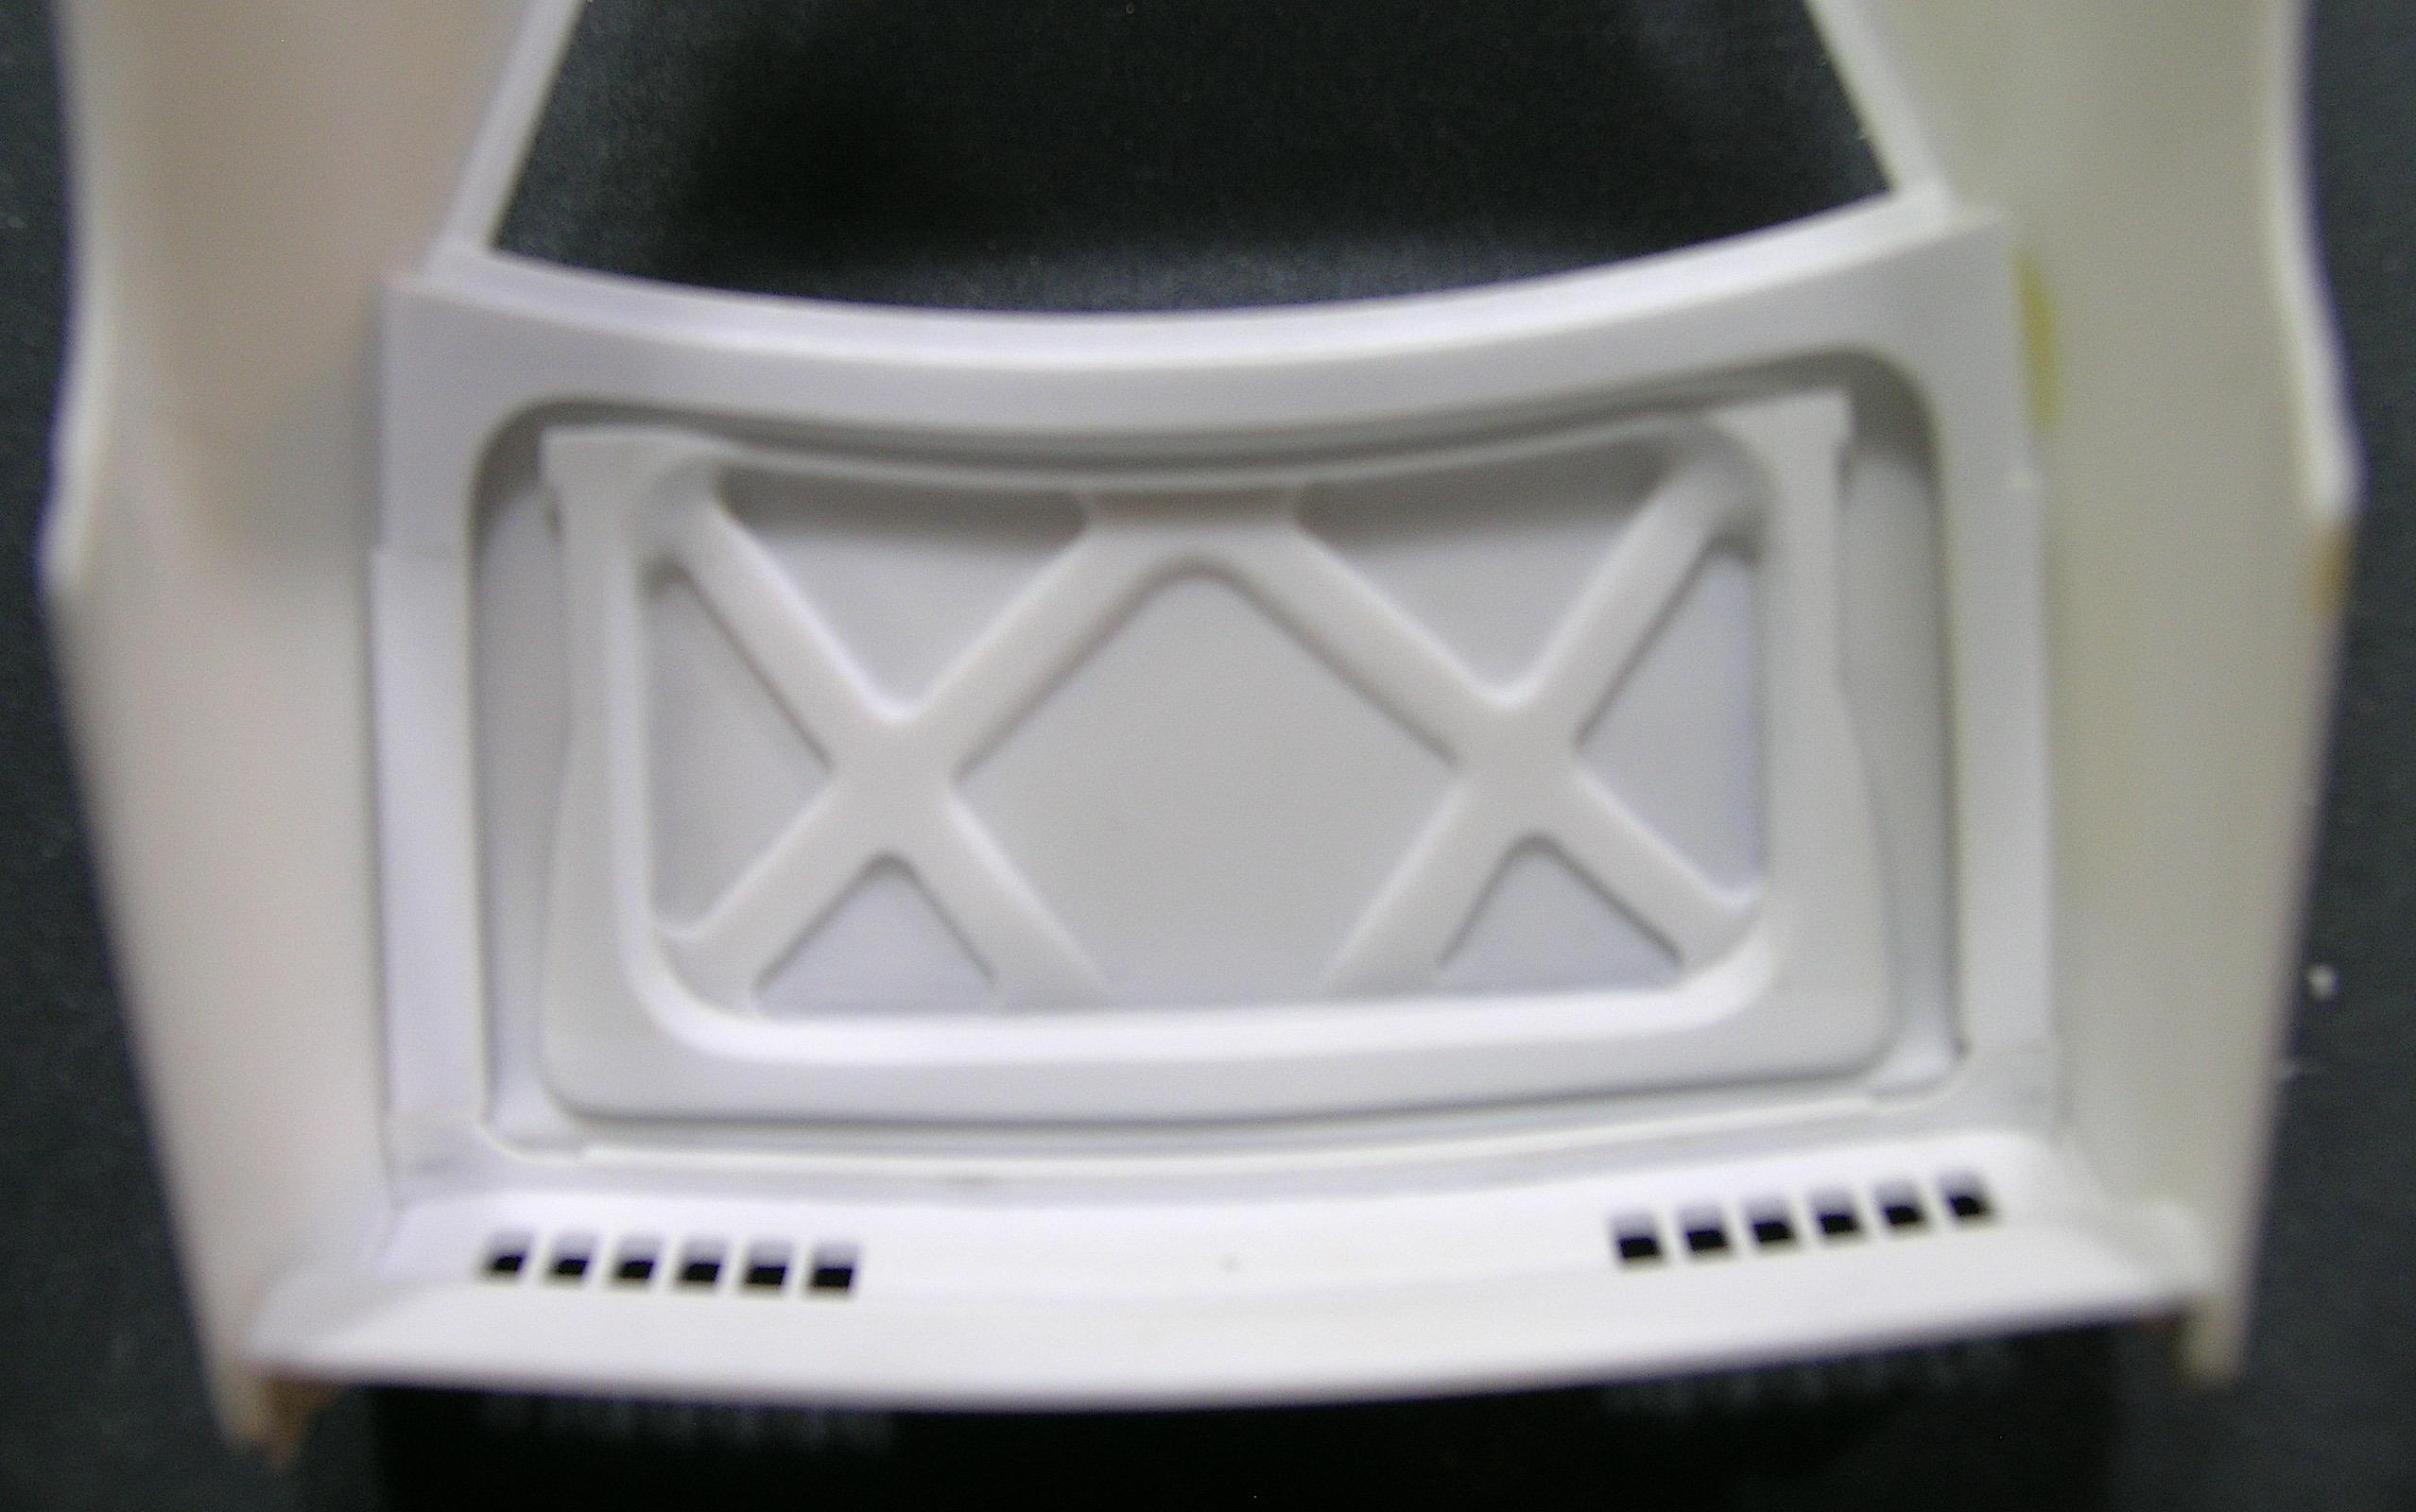
Hello everyone. Time to put a little bit more meat on the bone... Before moving on to the tail lights, I decided to focus on the Demon's trunk lid. This part of the body (including the rear panel) was the most damaged, so everything was removed and thrown in the garbage. I bought a new 71 Duster body on eBay as a donor for this project and put the saw in it without restraint. The rear body of the recent Duster was a little wider than the Demon's, so I had more problems with fitting and sanding than expected, the fabrication took me longer than expected. The Duster trunk lid was also very thick (0.100"), so I decided to etch the reinforcements directly onto the inside of the lid instead of adding the shapes to the part I should have thinned. The rest of the shapes (contour) are Evergreen styrene strips glued with liquid cement and shaped with a small file and sanding sticks. I have provided the entry points for the hinges but I could instead use pins at the four corners as is sometimes the case with drag racing cars. I'll probably make the tail lights before moving on to making the front end, I intend to make all the body parts before moving on to machining the aluminum or brass parts. Francis The donor for a good cause...? I traced the desired shapes on a piece of thin cardboard and used it as a guide to transfer those shapes to the thick panel of the Duster. This is the first time I've done the engraving directly on the plastic part, I started by making the rounded junctions. I glued the piece to a plate mounted on the rotary table, so I could rotate the piece to engrave in a straight line and join the circles. The higher contour is made of Evergreen styrene strips filed and sanded to shape. It took a lot of adjusting and sanding, but it fits pretty well, I think. Sorry for the blurry picture... again... View from inside. Decidedly... sold this morning at a good price, I couldn't help myself, it's a lot of money...
-
I would also add a good dose of talent which you obviously have my friend!!! Coupled with an apparent pleasure in advancing this high caliber project, the pleasure also becomes ours in seeing your techniques in action. There is way too much to comment on, but I like what I see. ?
-
’72 Dodge Demon Drag Racer 1/25 scale
AmericanMuscleFan replied to AmericanMuscleFan's topic in WIP: Drag Racing Models
Hi Steve! Thanks for joining me on my new adventure, my friend. Yes, I decided to go with the Bluenose coin for this project but I think I'll try to find an older silver minted coin as this one is very shiny and the details are finer than the American version. The use of the coin only serves to give a reference of size but it is sometimes difficult to make the focus when it produces reflections. I am not yet at full speed on this project and I have yet to finalize the direction it will take but I hope to be able to produce updates on a weekly basis when I have more time available. Francis -
This is fantastic Ian! I really like this kind of build and you have done some great work on the frame and cage so far. ?
-
Glad to see you back on this build Marcos, you've made good progress so far, it smells like Street Outlaws! ?
-
Very good source of information Daniel, this project is going in the right direction! ?
-
This is great Ian, I love this kind of build so much, the brass frame is on a very good start! ?