The Creative Explorer
-
Posts
1,990 -
Joined
-
Last visited
Content Type
Profiles
Forums
Events
Gallery
Everything posted by The Creative Explorer
-

Aoshima Mclaren F1 GTR longtail
The Creative Explorer replied to sportandmiah's topic in Car Kit News & Reviews
That is for the first time in a long while a very welcome kit for me, -
1/9 Volkswagen Kübel 'Kubelrod'
The Creative Explorer replied to The Creative Explorer's topic in WIP: Model Cars
Thanks Richard, I am doubting, should I paint the hinges with the paintjob or leave them unfinished? I think they should go with the paintjob, just because it makes more sense since it is a showrod and not so much a ratrod. Boy, do I make small tiny steps with this project. In the time I can build/finish a 1/24 engine, I can hardly make some modifications to the lock. I am seriously doubting whether I can even finish this project before the end of the year. I think I need a good month to finish up the doors and get it ready for paint. In my quest to find a good way of making the doorhandles, I was browsing through the manual and found them: the original handles! But they were a bit too big and I shortened them a little bit. Using the kit handles, does require me to change the whole doorlock setup again, but I think it is worth it. I made some doorpanels, not yet finished though Added a bracket with adjustment holes for the spring, that will pull the handle back in position From a different angle: -
1/9 Volkswagen Kübel 'Kubelrod'
The Creative Explorer replied to The Creative Explorer's topic in WIP: Model Cars
Ok, so yes, I am still alive, yes, I still am busy, yes, I still model some and yes, I can give you an update finally. In the last couple of weeks, I've been working on the body, I think all the major bodywork is now done, all though I've seen a few areas that might need a little attention. But, since there is going to be a intricate paintjob, some flaws will be camouflaged and I can get away with it. Just don't tell anybody! Since 2 weeks, I shifted from the body to the doors, they have to be custom made and made them from the original doors, it took me some time to get the right sizes and now I am working on the mechanical bits before I can work on getting it paint ready. I want to use an actual doorcrank, that is operatable. I think I have a setup and now working on getting it to work properly. It is more complicated than I thought, but I find it interesting. It is a new part of modelling for me. This evening, I worked on hinging the doors. I had in mind to hinge them the regular way, with wire. But thought it would look so out of place in this scale and went browsing through my parts. Finally found some small boathinges that look awesome and are perfect for this model. The door taped in place and the hinges layed out for final placement The hinges placed onto the body and secured with screws for a hotrod look. Go suicide! Some rough work on the door latch And in place with the door shut -
Auto Air Colors
The Creative Explorer replied to 17jamato's topic in Model Building Questions and Answers
I use it a lot and never use a blowdryer, carefully building up coats should be enough. The nice thing with Auto air is that when things go wrong, you rinse of the paint to the primer and can start rightaway with a clean sheet Oh, and I always mix it with reducer -
That is exactly why I avoided this topic until I watched the movie
-
1/9 Volkswagen Kübel 'Kubelrod'
The Creative Explorer replied to The Creative Explorer's topic in WIP: Model Cars
I think that used to be a Type 181 or 'thing', build later in the seventies and eighties. To be honest; I can't say I like it, the body is too long, wide and low for a nice hotrod. But it is a unique idea Thanks for sharing -
I watched the movie last week in the cinema and I must admit it is one of the more mature F&F movies, until they came to the last part of the movie at the runway. I believe the scene took about 15 minutes, where approx the take off speed of such beast around 200mph is. That would be approx a runway of 75 miles! I dunno, seems a bit far fetched and how did Helena die? She only fell about 10-12 feet, not really enough to be fatal.
-
Bugatti Royale roadster Esders 1/24 conversion
The Creative Explorer replied to debaronFR's topic in WIP: Model Cars
What I find a huge let down of the Napoleon kit, is the sides of the hood. They need to represent open doors for cooling the engines. I tried on my Napoleon to cut them open and glue them in, but since they are so small and plenty, it is hard to get it nice. So I am now working of making Photo etched sides, with cut outs for the doors. -
1/9 Volkswagen Kübel 'Kubelrod'
The Creative Explorer replied to The Creative Explorer's topic in WIP: Model Cars
Thanks guys, I have been working on and off with the body, it is my main-focus and it is a lame job to do, but it has to be done. I got some templates coming in from the USA for the artwork (I am calling that, since it can not be called a paintjob when finished) and I am down to the last little details for finishing the body. When the body is finished, I need to do the doors and I can start with the artwork soon after. This is how the body looks, shot in a good coat of primer: And after some investigation, I found a couple of problem area's, but was pleasantly suprised by the small amount of them. -
How secure is a forum?
The Creative Explorer replied to edward smith's topic in The Off-Topic Lounge
That is very true, I have a unique name of which there is only one in the world. Not always helpful haha -
How secure is a forum?
The Creative Explorer replied to edward smith's topic in The Off-Topic Lounge
Then you were already in trouble, the IP adress is sent with every e-mail you send out. -
ZERO Paints
The Creative Explorer replied to PARTSMARTY's topic in Model Building Questions and Answers
True, but I rather have plenty for the same price as sufficient. -
ZERO Paints
The Creative Explorer replied to PARTSMARTY's topic in Model Building Questions and Answers
That is a bit biased, the paint you get from Zero comes in bottles you can easily do 2, 3 or even 4 cars out of. Clear is another ballgame, with one set of clear, I can do about 10-15 cars. One bottle is around 6 euro's and one set of clear is about 15 euro's, but not shipped. I think if you add 15 or 20 euro's to shipping, you are around 50 dollars approx, doing at least 4 cars with it, it comes to about 12,50 per car. Which I don't think is bad for quality paint. -
Make sure you buy a back-feeding printer and not a bottomfeeder!!! (not catfish that is ). A bottomfeeder almost folds the paper to route it through the machine, something decal-paper doesn't like. A back-feeder gives the paper less stress on it's fragile coat.
-
Reissued 1/12 Bentley kit, questions answered
The Creative Explorer replied to sjordan2's topic in Car Kit News & Reviews
I was actually meaning the real car itself, such great lines and profile. I do have a serious weakness for late 30's and early 40's cars, especially with the larger body's. Think Bentley, Bugatti, Auburn, Hispano, Packard, Cadillac, you catch my drift But I was finally able to get my hands on the kit after a long time search, I paid 50 euro''s for it, not the latest release, but I don't really care for that, it needs to go together anyway and the latest release is just too spendy for me. -
Foose 1/12 Scale '69 Camaro
The Creative Explorer replied to ewaskew's topic in Car Kit News & Reviews
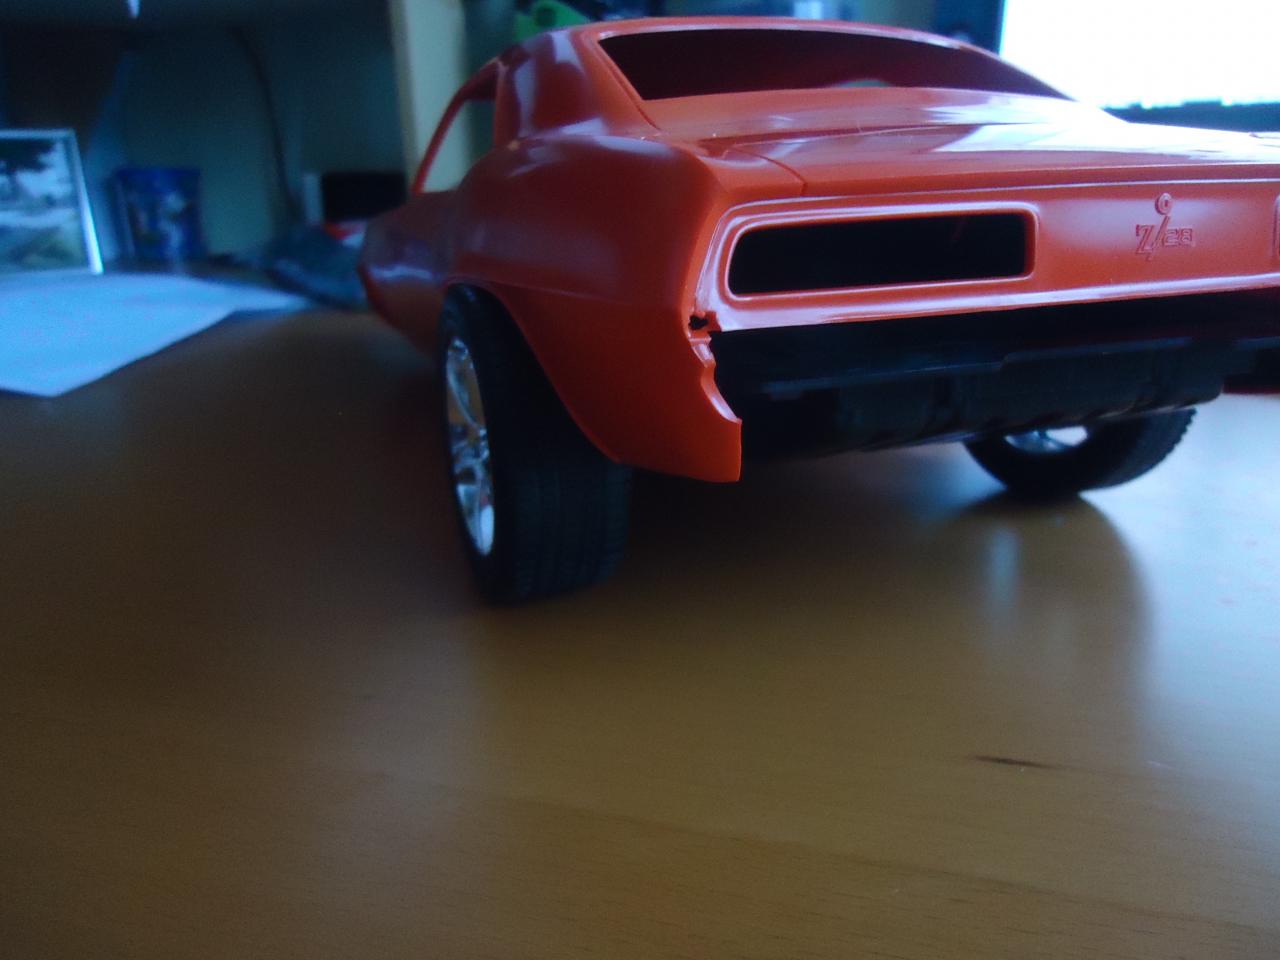
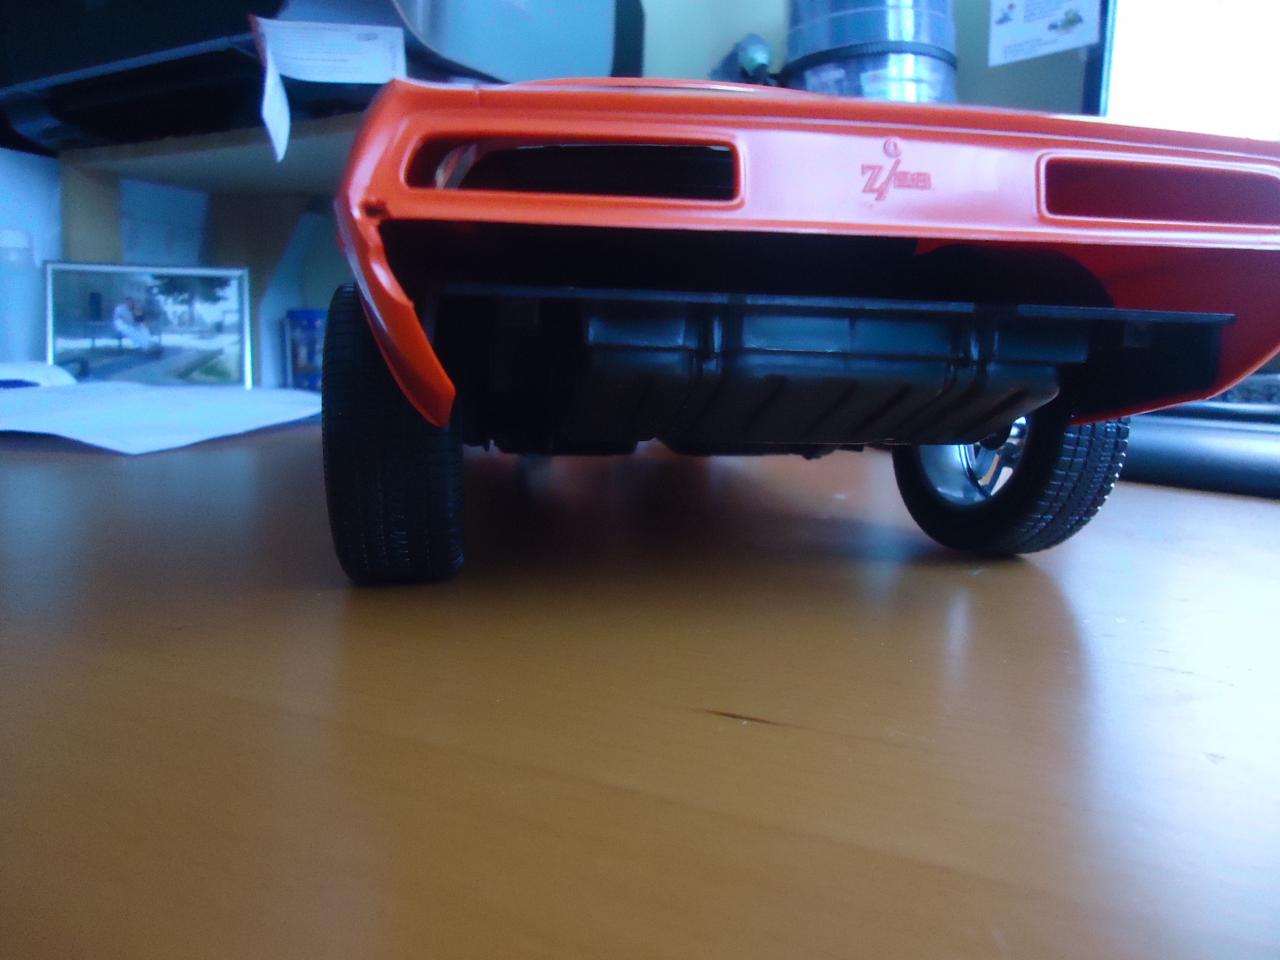
I hope these pictures are clear enough for you Casey. I think the tires look realistically wide enough, not overdone.
-
Foose 1/12 Scale '69 Camaro
The Creative Explorer replied to ewaskew's topic in Car Kit News & Reviews
I need to make dinner at the moment, give me some time and I will post tonight (my tonight, not yours ) some pictures. -
1/25 Revell '90 Mustang LX 5.0 2'n1 Special Edition
The Creative Explorer replied to Casey's topic in Car Kit News & Reviews
Maybe I am weird, but I like the kit body better then the actual car . the little shorter windows make the car look more in balance than with that tall green house. -
Monogram/Revell Big T/Tub/Deuce?
The Creative Explorer replied to CEKPETHO BCE's topic in Car Kit News & Reviews
I do see a lot of parts that were shared with the other Big T kits. Where the older Big T kits were crude with most parts, I see more of a mix here. -
Foose 1/12 Scale '69 Camaro
The Creative Explorer replied to ewaskew's topic in Car Kit News & Reviews
Actually, I am doing that at the moment for my 1/12 Datsun, the F40 wheels are a great base for making an own wheel, you can cut out the 5-star from the inside and have a very nice sleeve left over. -
Foose 1/12 Scale '69 Camaro
The Creative Explorer replied to ewaskew's topic in Car Kit News & Reviews
You mean the 1965 Revell Mustang GT350 in 1/12? I hope not, that would be a disaster for Revell, quite a bad kit and needs a whole lot of work to get it somewhat representable. It is a complete different ballgame then the Camaro. -
Reissued 1/12 Bentley kit, questions answered
The Creative Explorer replied to sjordan2's topic in Car Kit News & Reviews
isn't the Bentley such a beauty? -
How Best To Fix Broken Car Body
The Creative Explorer replied to gwolf's topic in Model Building Questions and Answers
Even though HLJ has a good customer service and probably going to solve this, they can't help if it get's crushed during the mailing process. (if they mail it correctly and with HLJ I have no doubts) It is the customer risk of ordering it online. If you don't want to take that risk, buy it at the LHS. -
Foose 1/12 Scale '69 Camaro
The Creative Explorer replied to ewaskew's topic in Car Kit News & Reviews
And the grille? -
best kit to do general lee
The Creative Explorer replied to CHEVY2MUCH's topic in Model Building Questions and Answers
In the last DOH movie, it got a Hemi, but I would guess it had all kinds of engines in the series cars, not just one specific.