Pierre Rivard
-
Posts
2,579 -
Joined
-
Last visited
Content Type
Profiles
Forums
Events
Gallery
Everything posted by Pierre Rivard
-
Porsche 906-6 from the archives
Pierre Rivard replied to Gramps46's topic in Other Racing: Road Racing, Salt Flat Racers
I love the 906, thanks Gary for taking this one out of the vault for us all to enjoy. I was aware of the LS/Arii kit but not of a Lindberg one. It definitely looks the part. I want to build one but the prices asked on Ebay for these are silly. Fernando has a nice resin kit so that's an option. -
3rd gen Camaro
Pierre Rivard replied to MarkJ's topic in WIP: Other Racing: Road Racing, Land Speed Racers
Nice fab on what must be a very small part. -
Ford vs Ferrari #98 Cobra
Pierre Rivard replied to Phildaupho's topic in Other Racing: Road Racing, Salt Flat Racers
Great build Phil and I love the story that came with it. I too have once put a figurine in the driver seat... and had to amputate the legs above the feet. It's a tight fit but figurines add so much interest when done right, just like your's. -
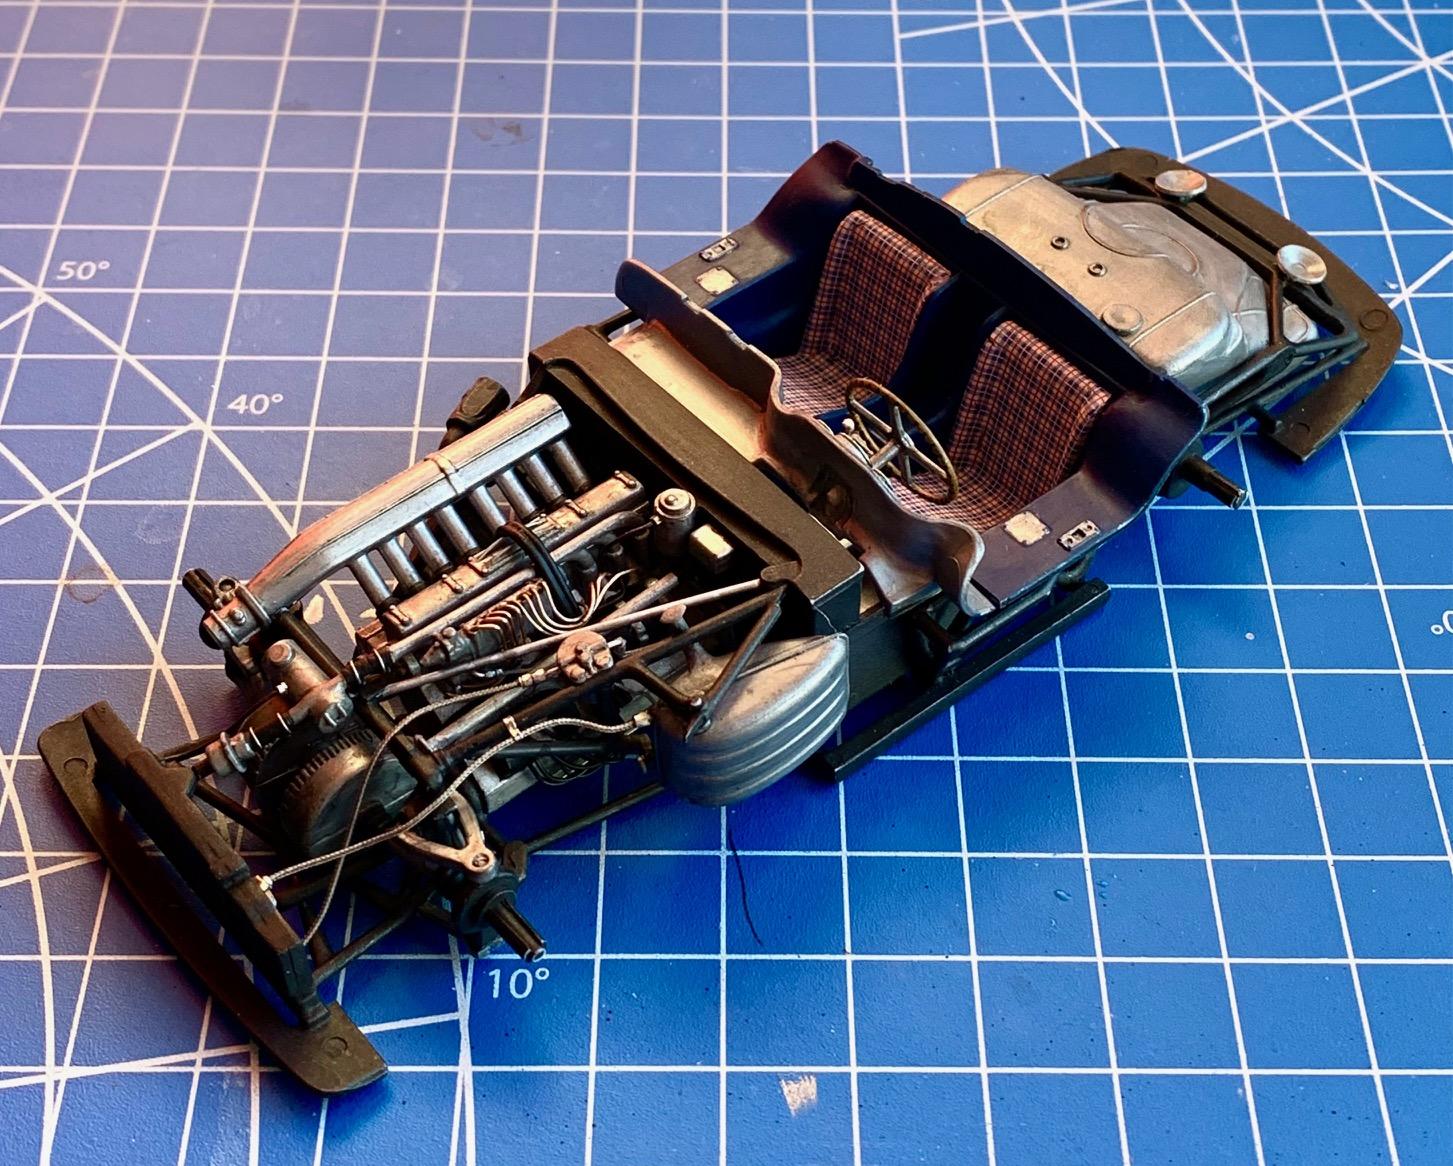
Weathering of the underbody was done to reflect mostly toad dust accumulation. Everything had previously received dark oiled earth washes and I completed the weathering with light ochre yellow pigments. Tomorrow I will be tackling the next phase of the exterior body weathering.

-
I decided to pause weathering and get the body to chassis integration finished. I did not know how much manipulation would be needed and how I could damage weathering effects so better get that out of the way. Good decision...despite countless test fitting during the build this step had to be done multiple times as more interference points popped up. Now these two are bonded for life.
-
Baby steps starting the weathering. First decision was to start with a flat clear (after decals), then oiled earth wash. Step two was to simulate spills from refueling
-
This is going to be a challenging but fun project. I can see many changes coming. Good stuff!
-
1973 Porsche 917/10 Can Am
Pierre Rivard replied to Scale-Master's topic in WIP: Other Racing: Road Racing, Land Speed Racers
Looks really good with the added structure and turbos. All the rest that was molded in one piece has been wonderfully "cheated" with detail painting and washes. Another 1/43 masterpiece in the making. -
Way cool and creative project. Wonderful example of out of box thinking, and I do like the cow catcher.
-
Ferrari F 2003 GA
Pierre Rivard replied to Chris Smith's topic in WIP: Other Racing: Road Racing, Land Speed Racers
perfect paint Chris. Please post your address so I can ship my bodies... ? -
Thank you Allan. Now on to the last phase of the build. Other than a few exterior trim pieces the big job is race weathering of the body. I'm still thinking about how to take on that task. Any advice will be welcome.
-
The Official EBay Discussion Thread
Pierre Rivard replied to iamsuperdan's topic in General Automotive Talk (Trucks and Cars)
I waited years before taking the plunge into EBay land. It's a learning experience but by being patient and careful there are good opportunities out there. One thing I have noticed is that shipping from EU to Canada is usually cheaper and faster than US to Canada. Doesn't make sense... -
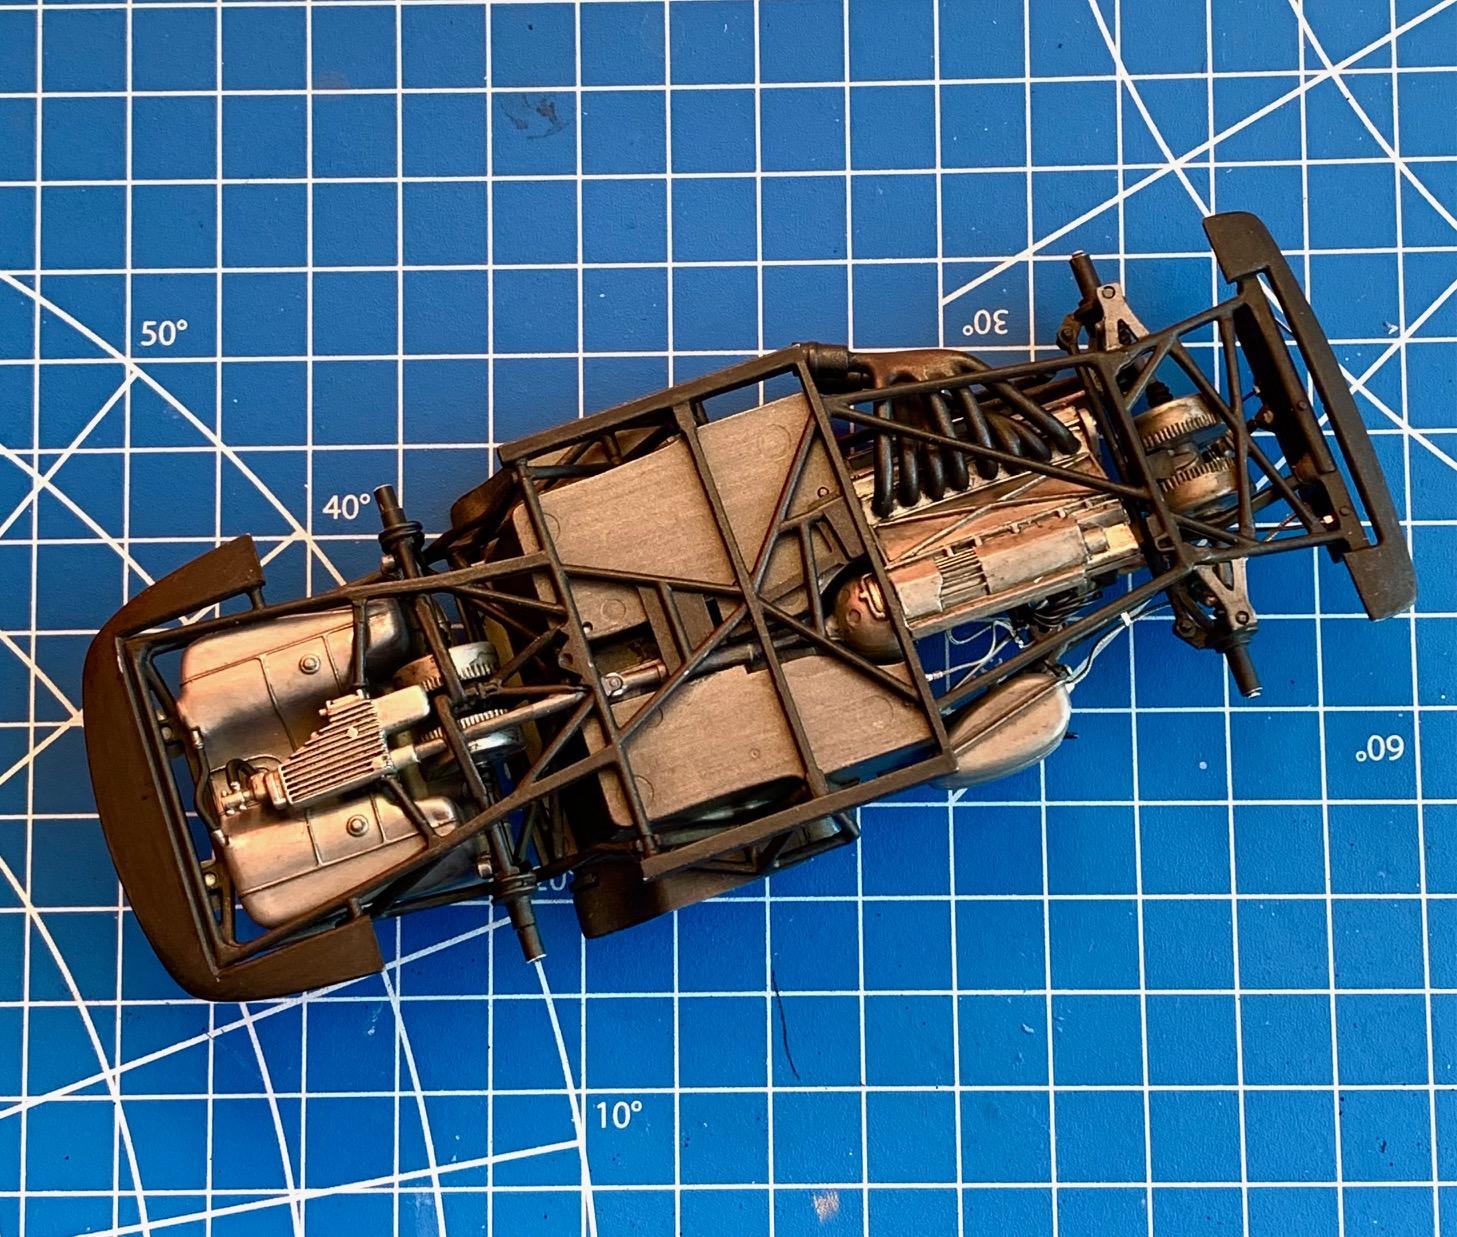
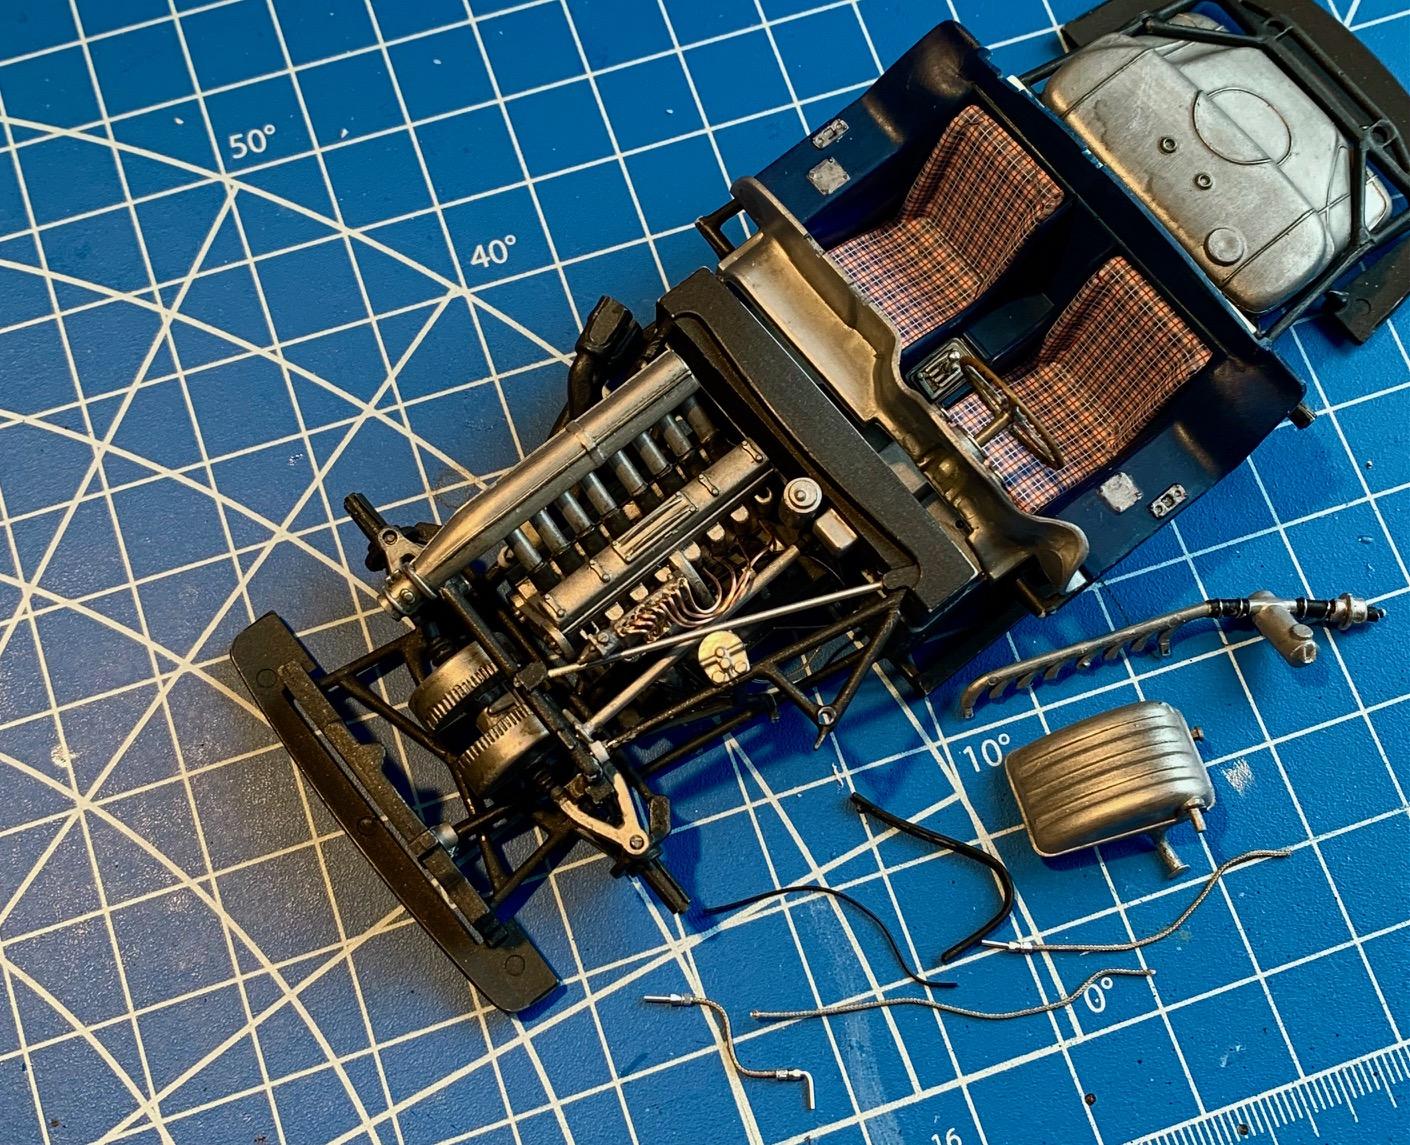
Thank you Mark. Variation of the aluminium shades (by mixing in a touch of black or dark gray) to some of the parts and a liberal use of Vallejo oily earth wash has helped provide more realism to the engine and chassis.
-
We always forget something right. This time it was the drive shaft and everything is glued tight. The way this thing was layered assembled there was no going back. I cut the shaft in 3 pieces, inserted the pieces in and re-assembled in that tight space. Some paint touch ups have to be done after it has dried (see first pic). The chassis and engine compartment are all done. My first attempt at a more elaborate detailing job and pretty happy with it. Some weathering has been incorporated to show a bit of oil and grime. I'll leave the engine compartment as is but I am considering adding some road dust & debris type weathering to the underside. This will be determined at the same time I decide if I go for a race weathered exterior body.
-
Early 50's road/race special
Pierre Rivard replied to Dave B's topic in WIP: Other Racing: Road Racing, Land Speed Racers
It's fun to see this kind of free flow creative project. You always come up with unique cars to model and this one definitely "fits the mold" -
One of them still has a label. The smaller rolls came as a lot and a bit thicker gauge (0.016") than the larger roll (0.013").
-
1:16 Gunze Sangyo 1937 Rolls-Royce Phantom III Sports Saloon
Pierre Rivard replied to Anglia105E's topic in WIP: Model Cars
Those clear parts need some love. If only scratches that can be polished out (I once even removed a wiper molded into glass that way). Coarse to fine then compounds and last a coat of Future. If cracked then go to food container clear plastic. Pretty easy since the glass pieces are flat on this car. -
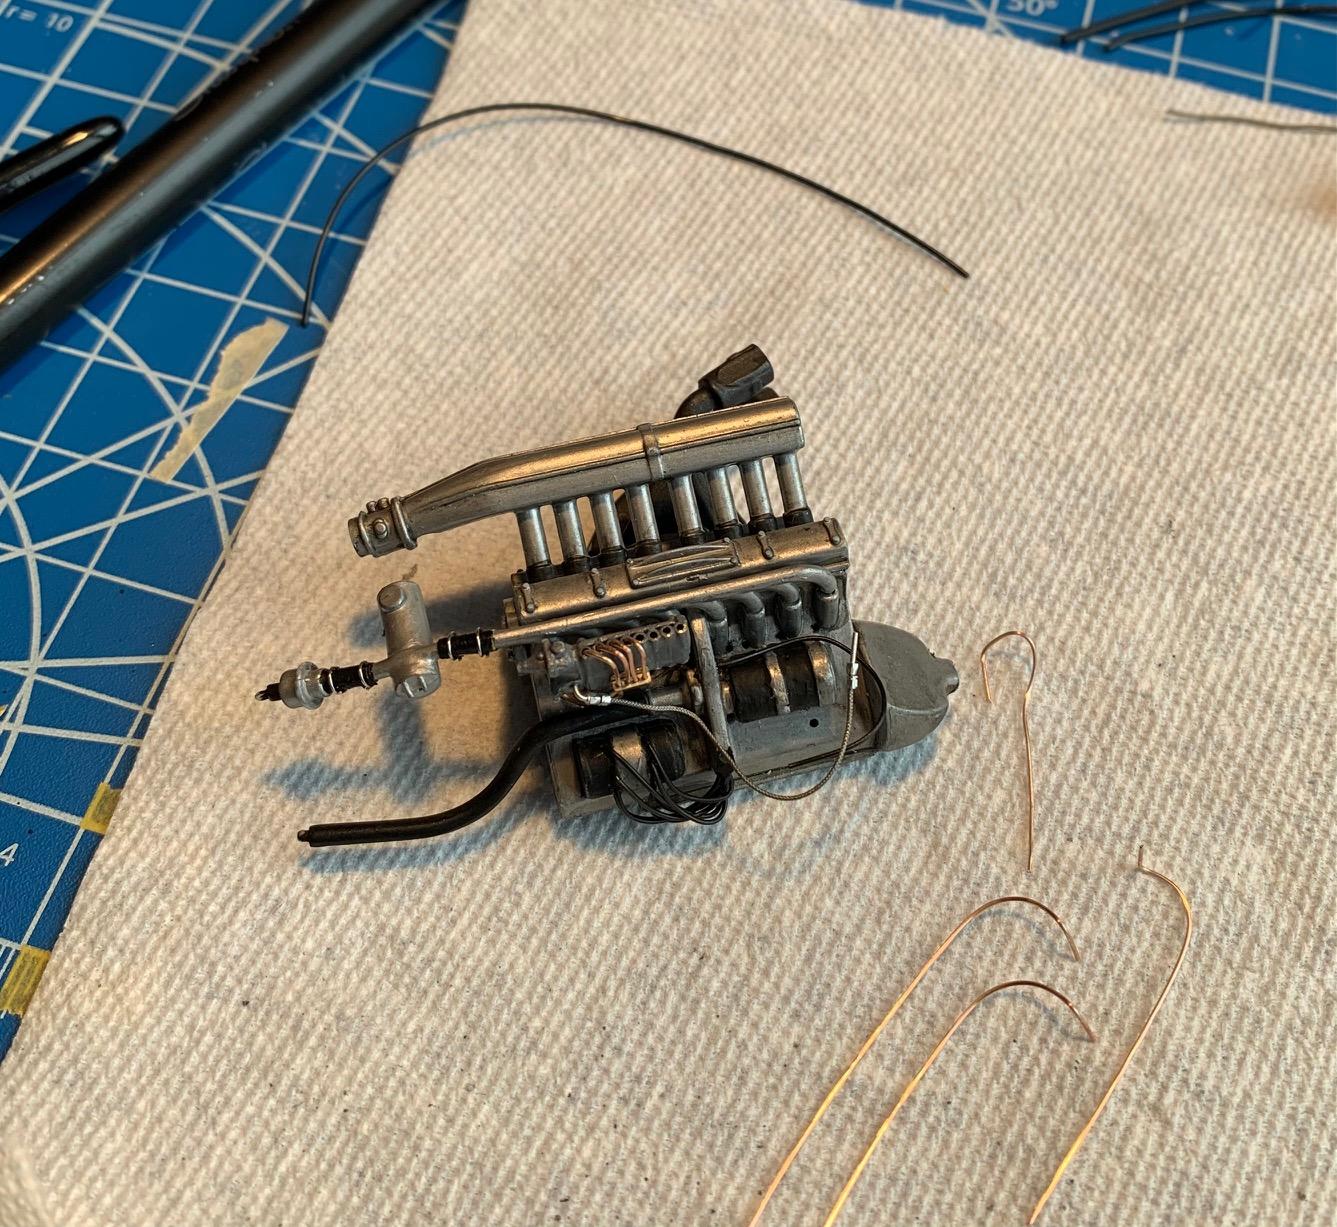
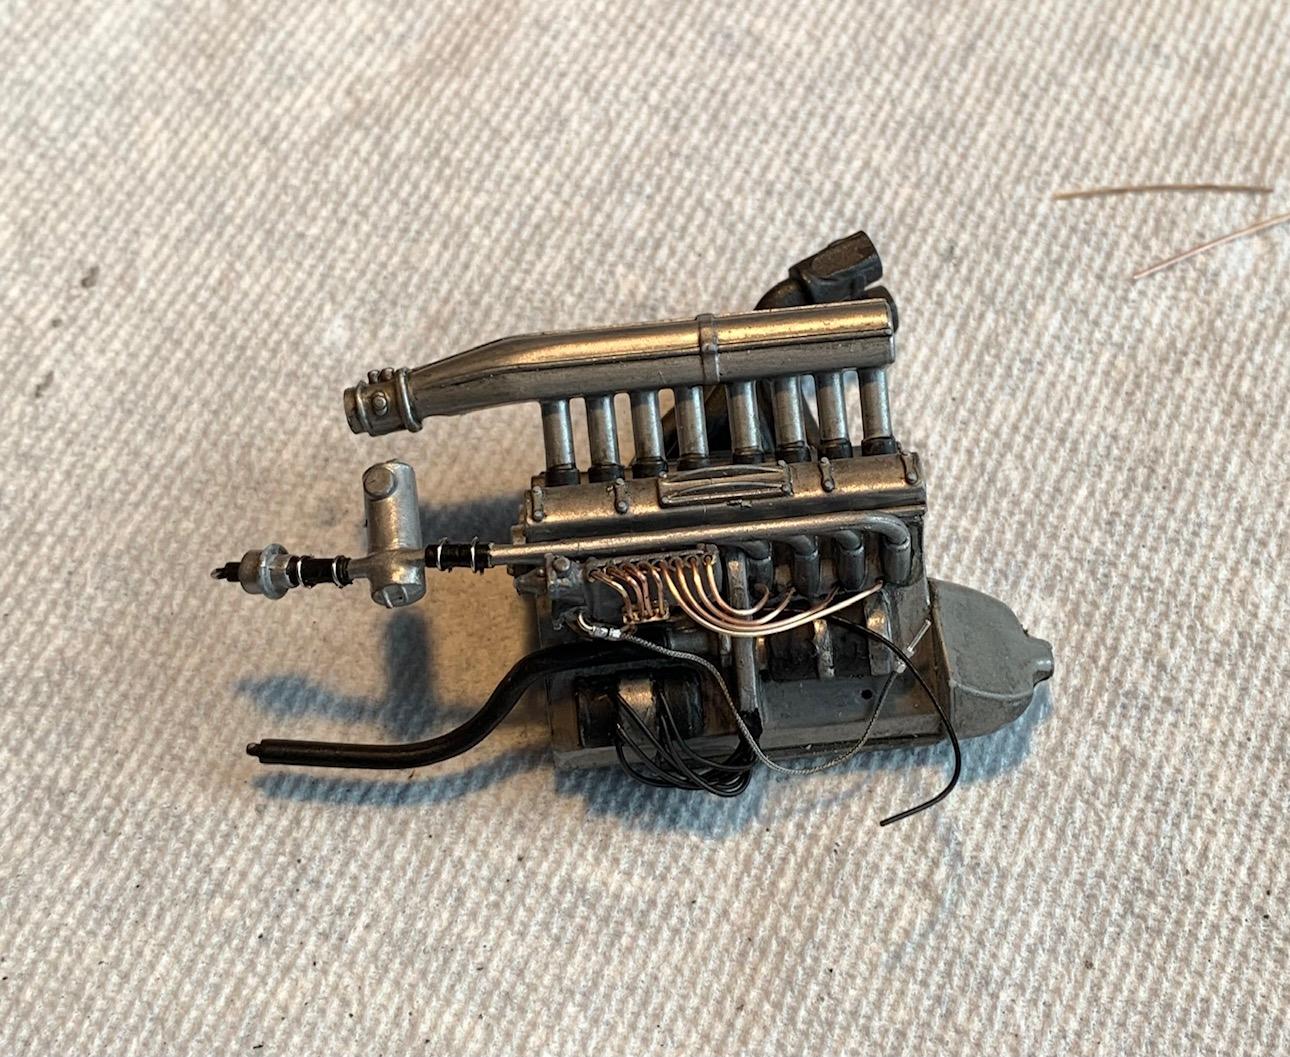
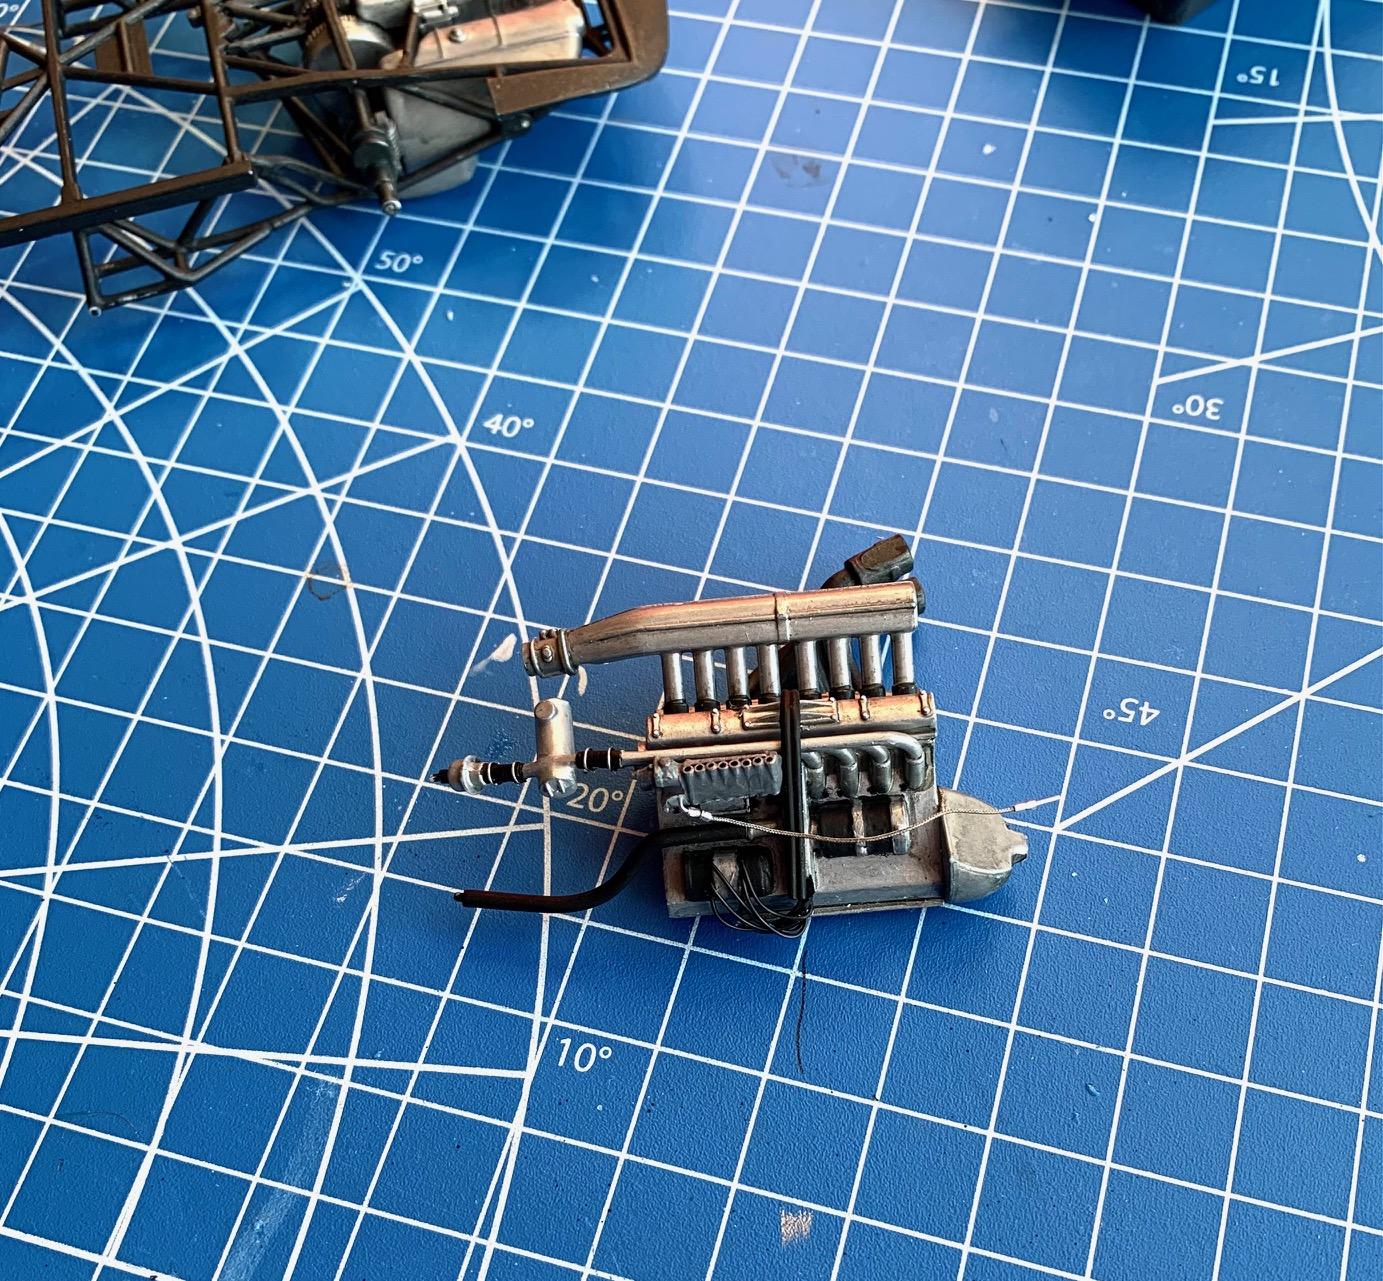
Time to build the fuel manifold & feeds. Manifold is 8 stacked 1,19 mm brass tubes and the fuel feeds are made of 0.4mm wires (from Michael's jewelry section) After the fuel distribution was done I was ready to install the engine into the partially pre assembled engine compartment structure. Planning the layering of components is required as dropping the engine into a fully built front end won't work. So engine install, then steering shaft, top of firewall, then top engine compartment structure. Now I can proceed with adding the oil reservoir and more detailing.
-
3rd gen Camaro
Pierre Rivard replied to MarkJ's topic in WIP: Other Racing: Road Racing, Land Speed Racers
Interesting, I do my gauges in a similar way but I use Micro Krystal Klear for the "glass" and I don't like it much. I have the same epoxy as your's but did not realize it dries clear enough for this. That's good learning. -
Thanks Daniel. I'm attempting a bit of engine detailing here. I don't know how you do that stuff...everything is so small!
-
Thanks Mark. I'm out of my comfort zone with this one so I'm trying to plan my steps a bit more. It's a chassis and engine design like no other I have seen before.
-
Your most difficult kits
Pierre Rivard replied to T-Ray's topic in General Automotive Talk (Trucks and Cars)
Accurate (?) Miniature Grand Sport. It was intense. I have another one to build but have not yet found the courage to take it on.
-
1965 Ford GT40 Roadster
Pierre Rivard replied to Gramps46's topic in WIP: Other Racing: Road Racing, Land Speed Racers
That's interesting, I've had similar issues twice. Does the vinyl just comes as a sheet and you cut circles in. Curious to learn more about this. -
Found A New Source For Grills
Pierre Rivard replied to oldcarfan's topic in Tips, Tricks, and Tutorials
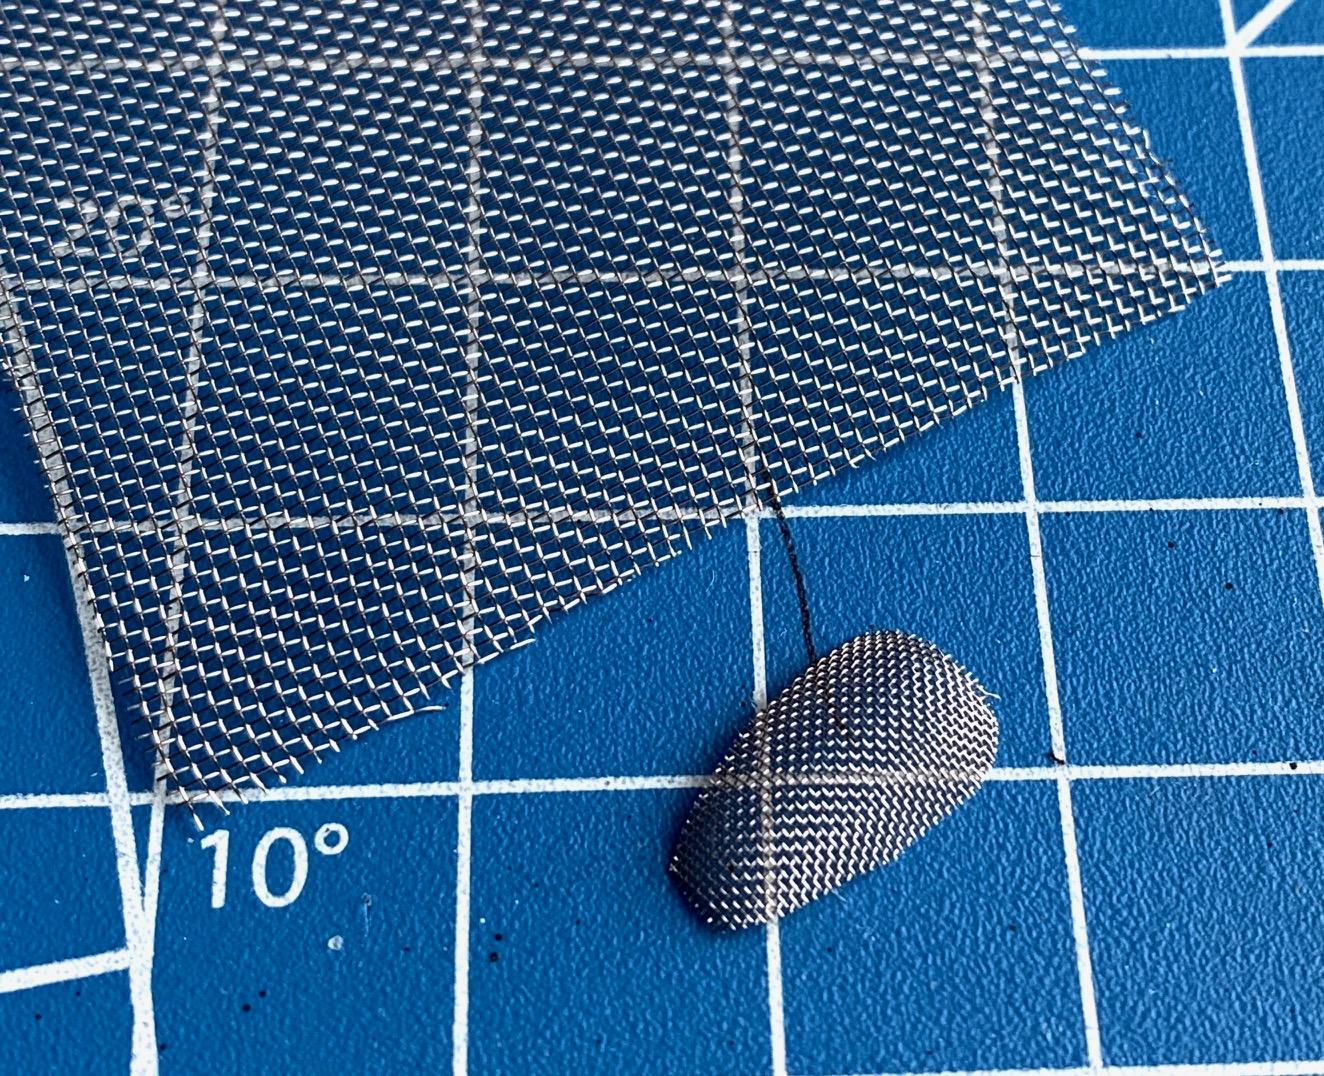
I found stainless steel meshing on Amazon, 2 rolls of 12x45 inches for about $20 (US). It was advertised as 40 mesh but seems more like 20 to me. The small piece at the front I made from material left from a Fernando Pinto kit and I measured it at 40 mesh per inch. The stuff on Amazon is also offered in "80" and "120" mesh, so I think I'll get some of it and be set for life.
-
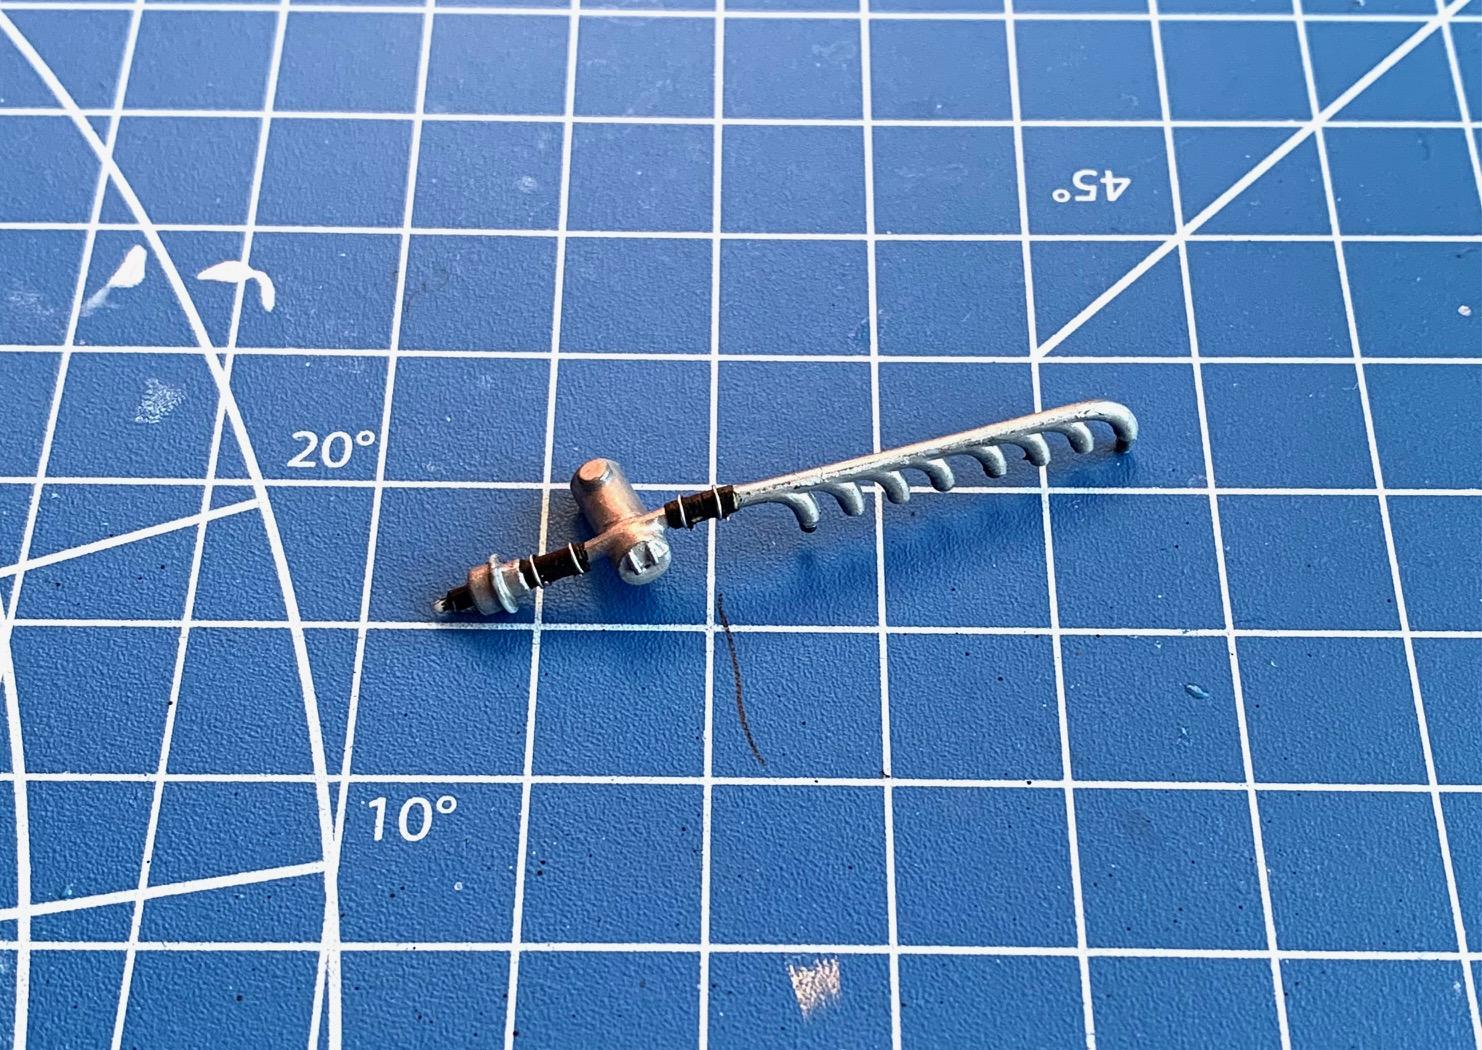
Engine elements pre assembled for test fittings (lots of these needed for this build) have been painted and I am now starting on the slow process of adding some detailing (water, oil and fuel lines). Water feed to rad, I added some tape (painted black) and wrapped wire to simulate hose & clamp elements Fuel distribution unit fabricated using styrene and 1,19mm brass tubes Distributor to collector ignition wires have been added. Not very convincing but it will be mostly hidden low into the engine bay.