papajohn97
-
Posts
700 -
Joined
-
Last visited
Content Type
Profiles
Forums
Events
Gallery
Everything posted by papajohn97
-
Incredible build! How did you do that chassis? If not scratch-built, what kit(s) did you bash it from? I picked up this AMT Merc kit last year at a swap-meet and it comes with a bare-bones one-piece promo chassis if I recall. The chassis frame looks like a ‘60 Starliner but the stamped sheet metal bottom pan looks like a different kit?
-
 Nice to see a white one built, beautifully executed! So many fit issues with this kit but worth the hassle because it’s such a cool legendary iconic race car.
 -
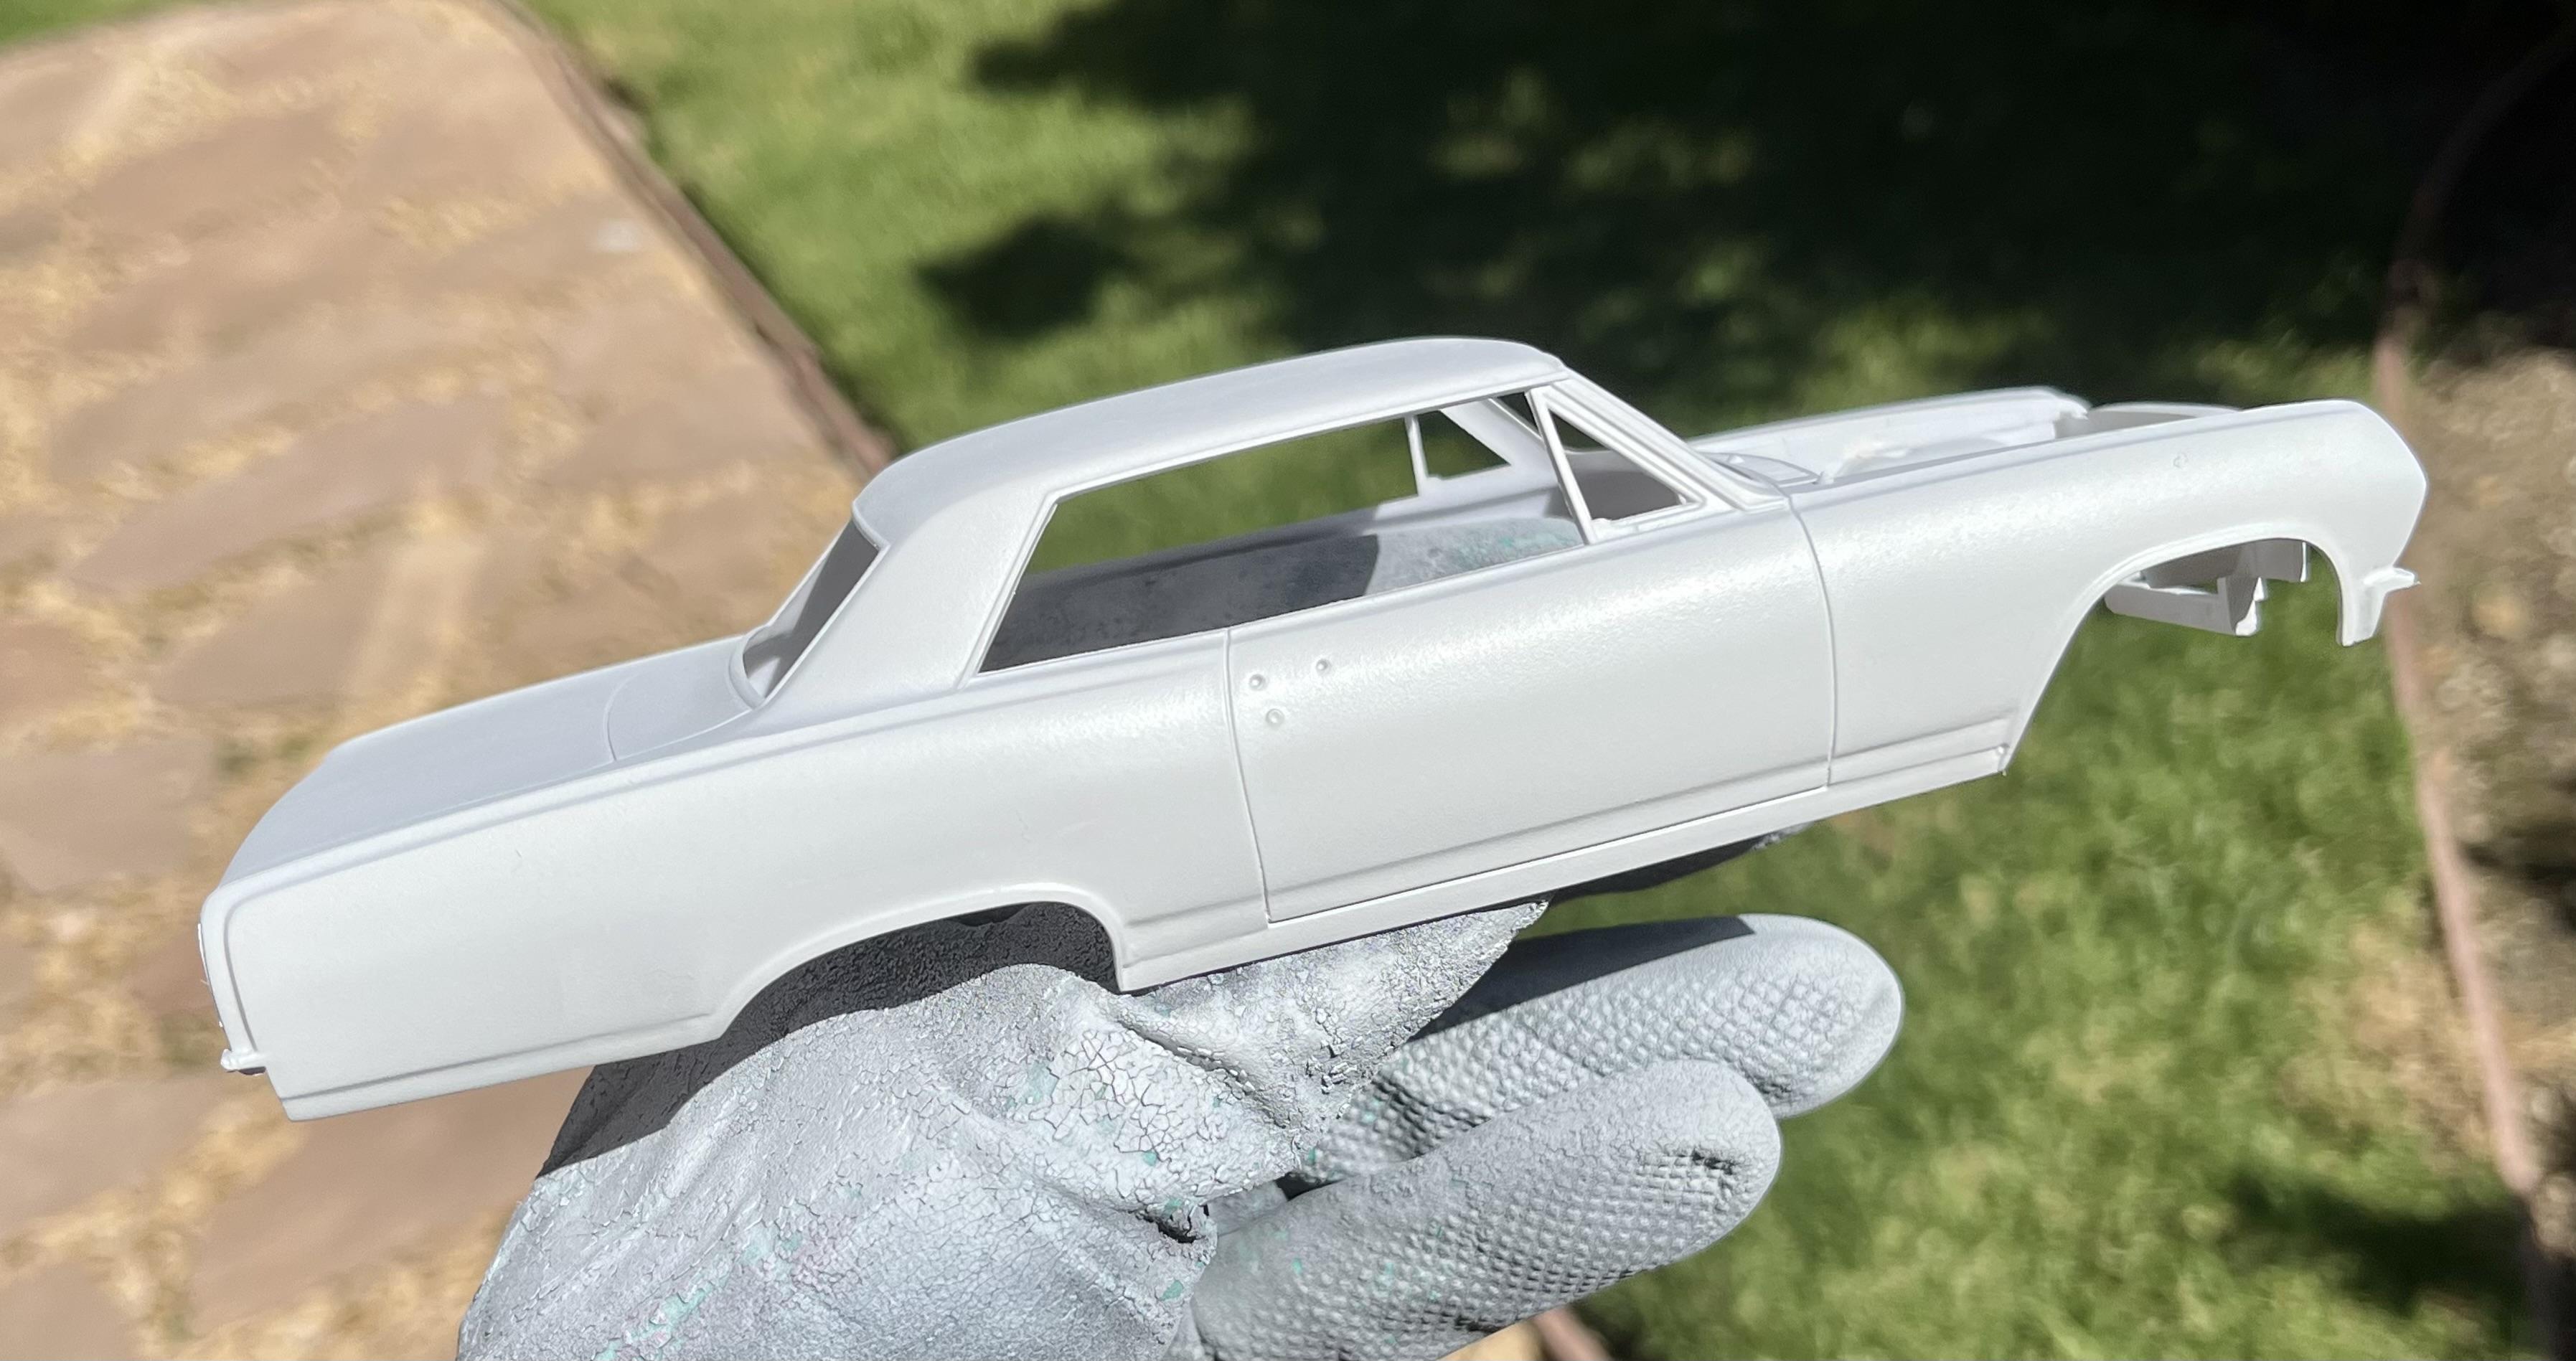
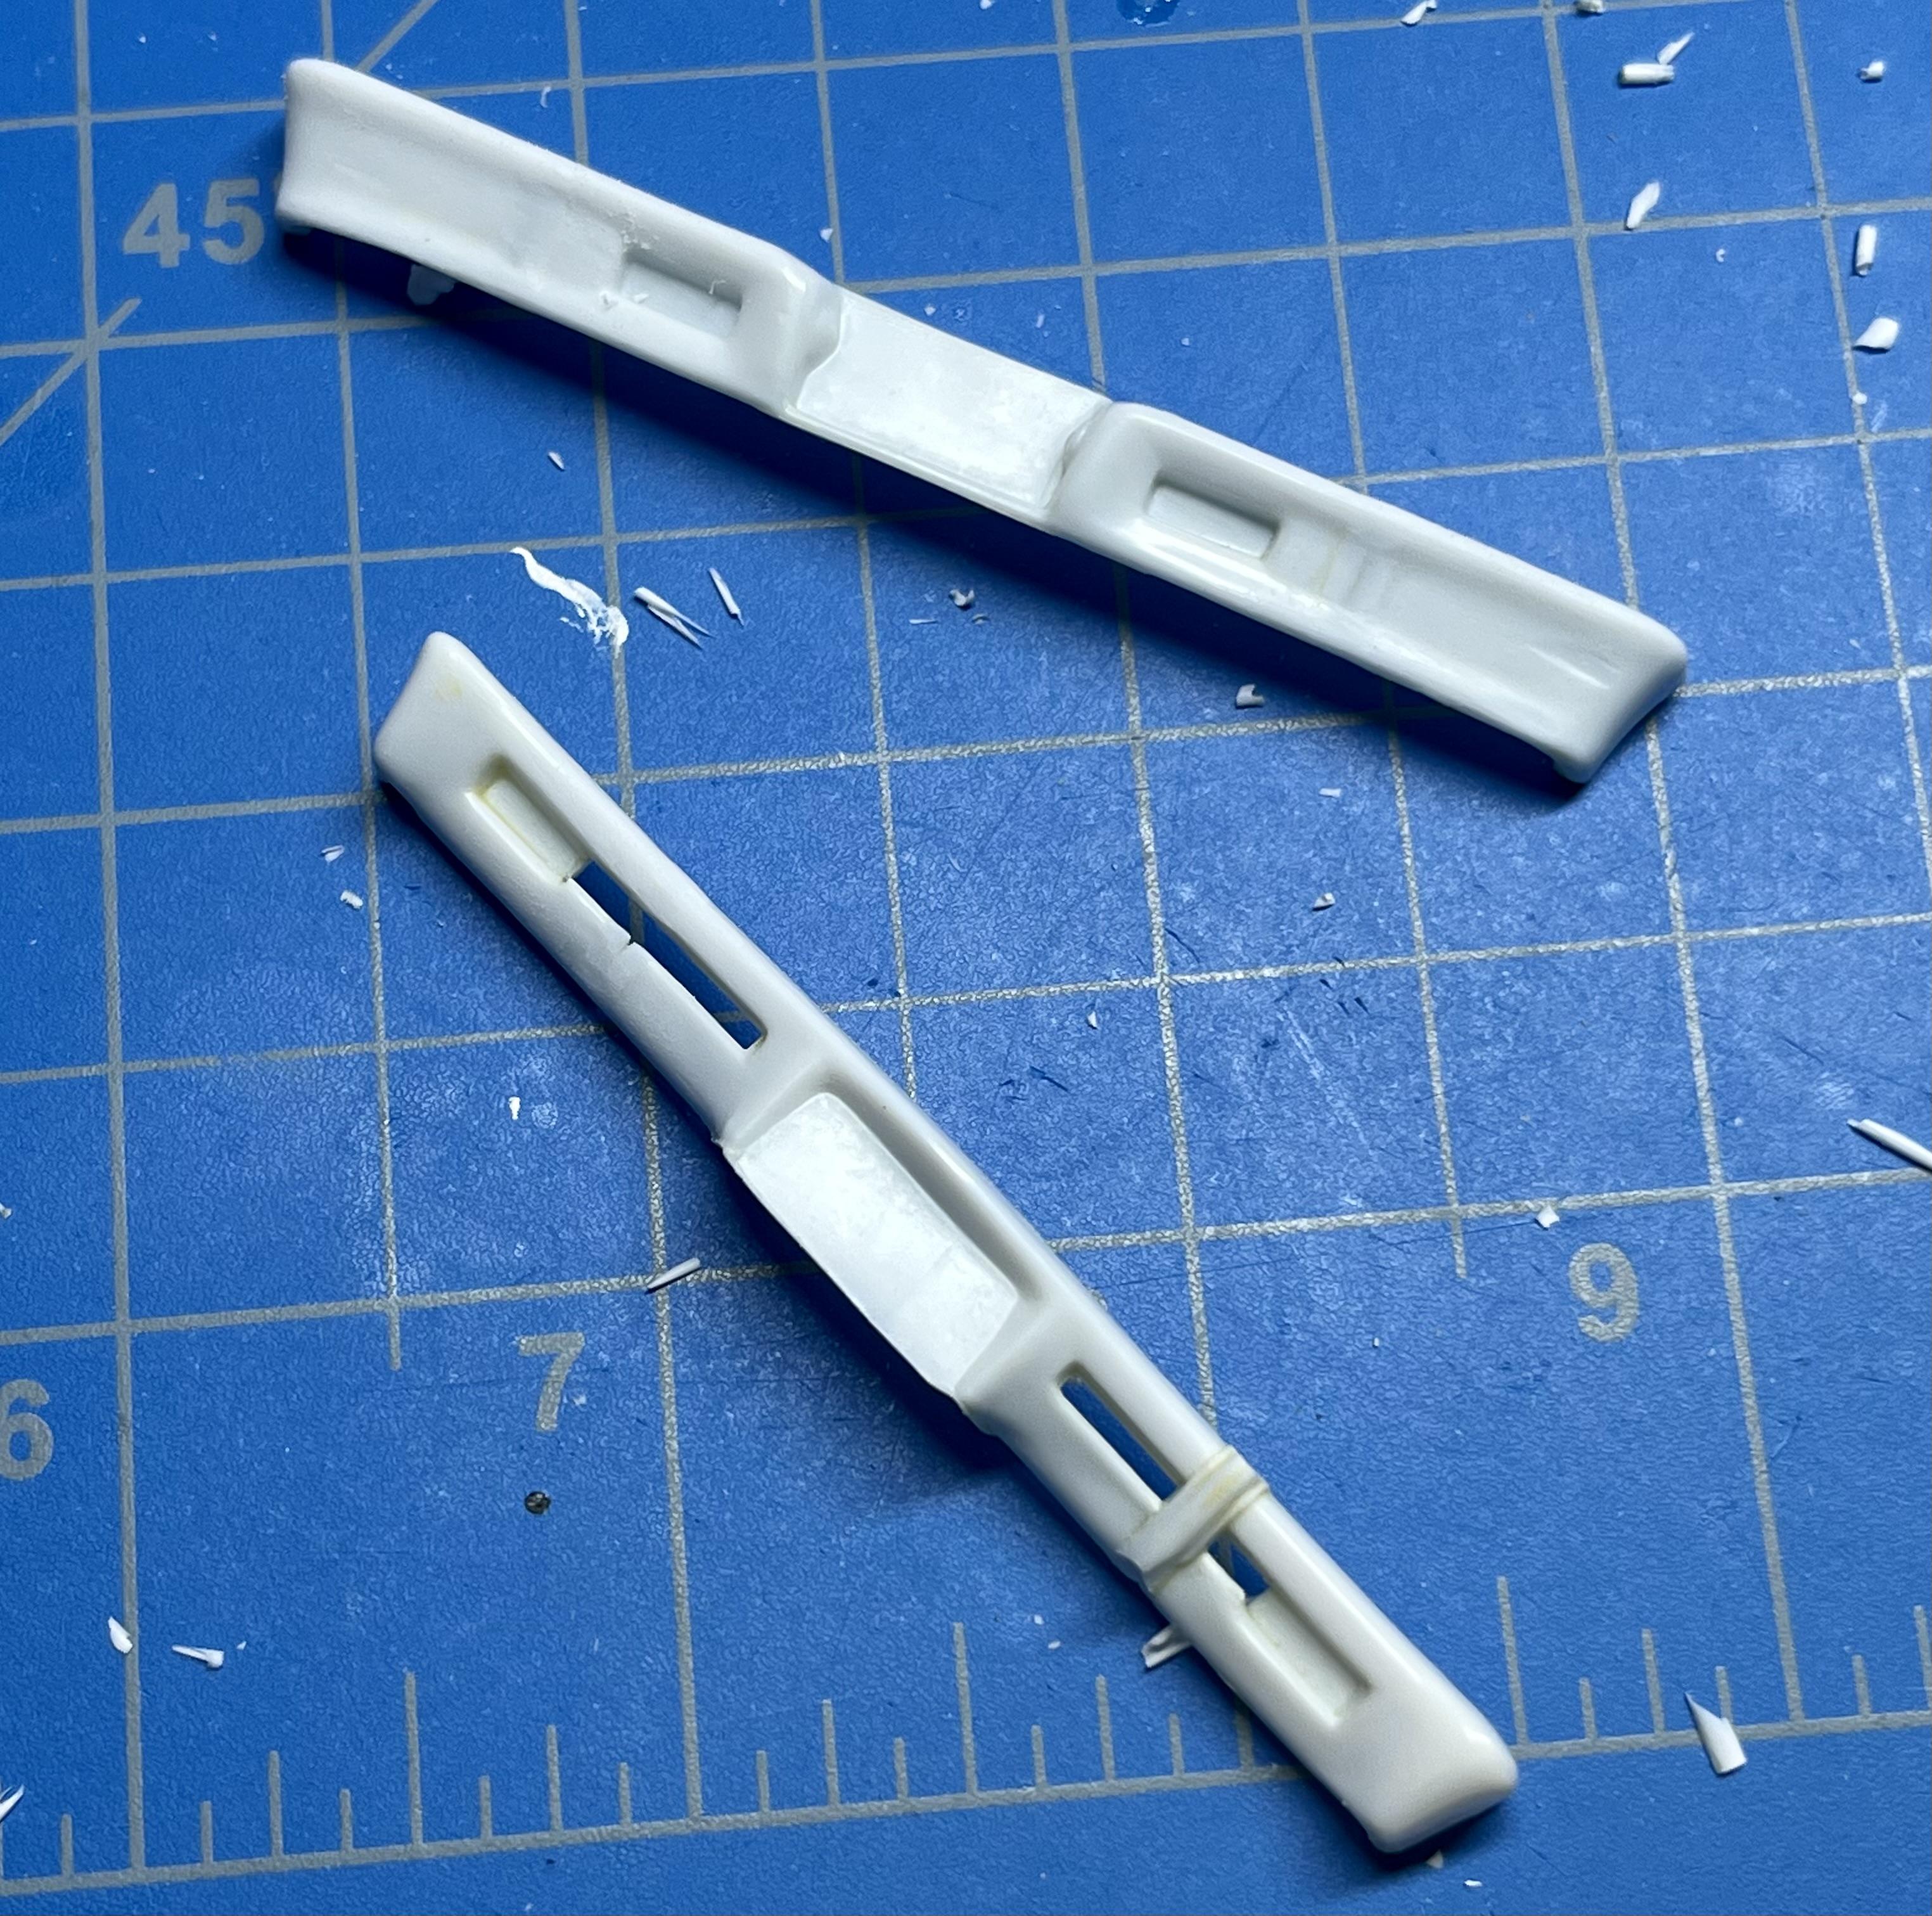
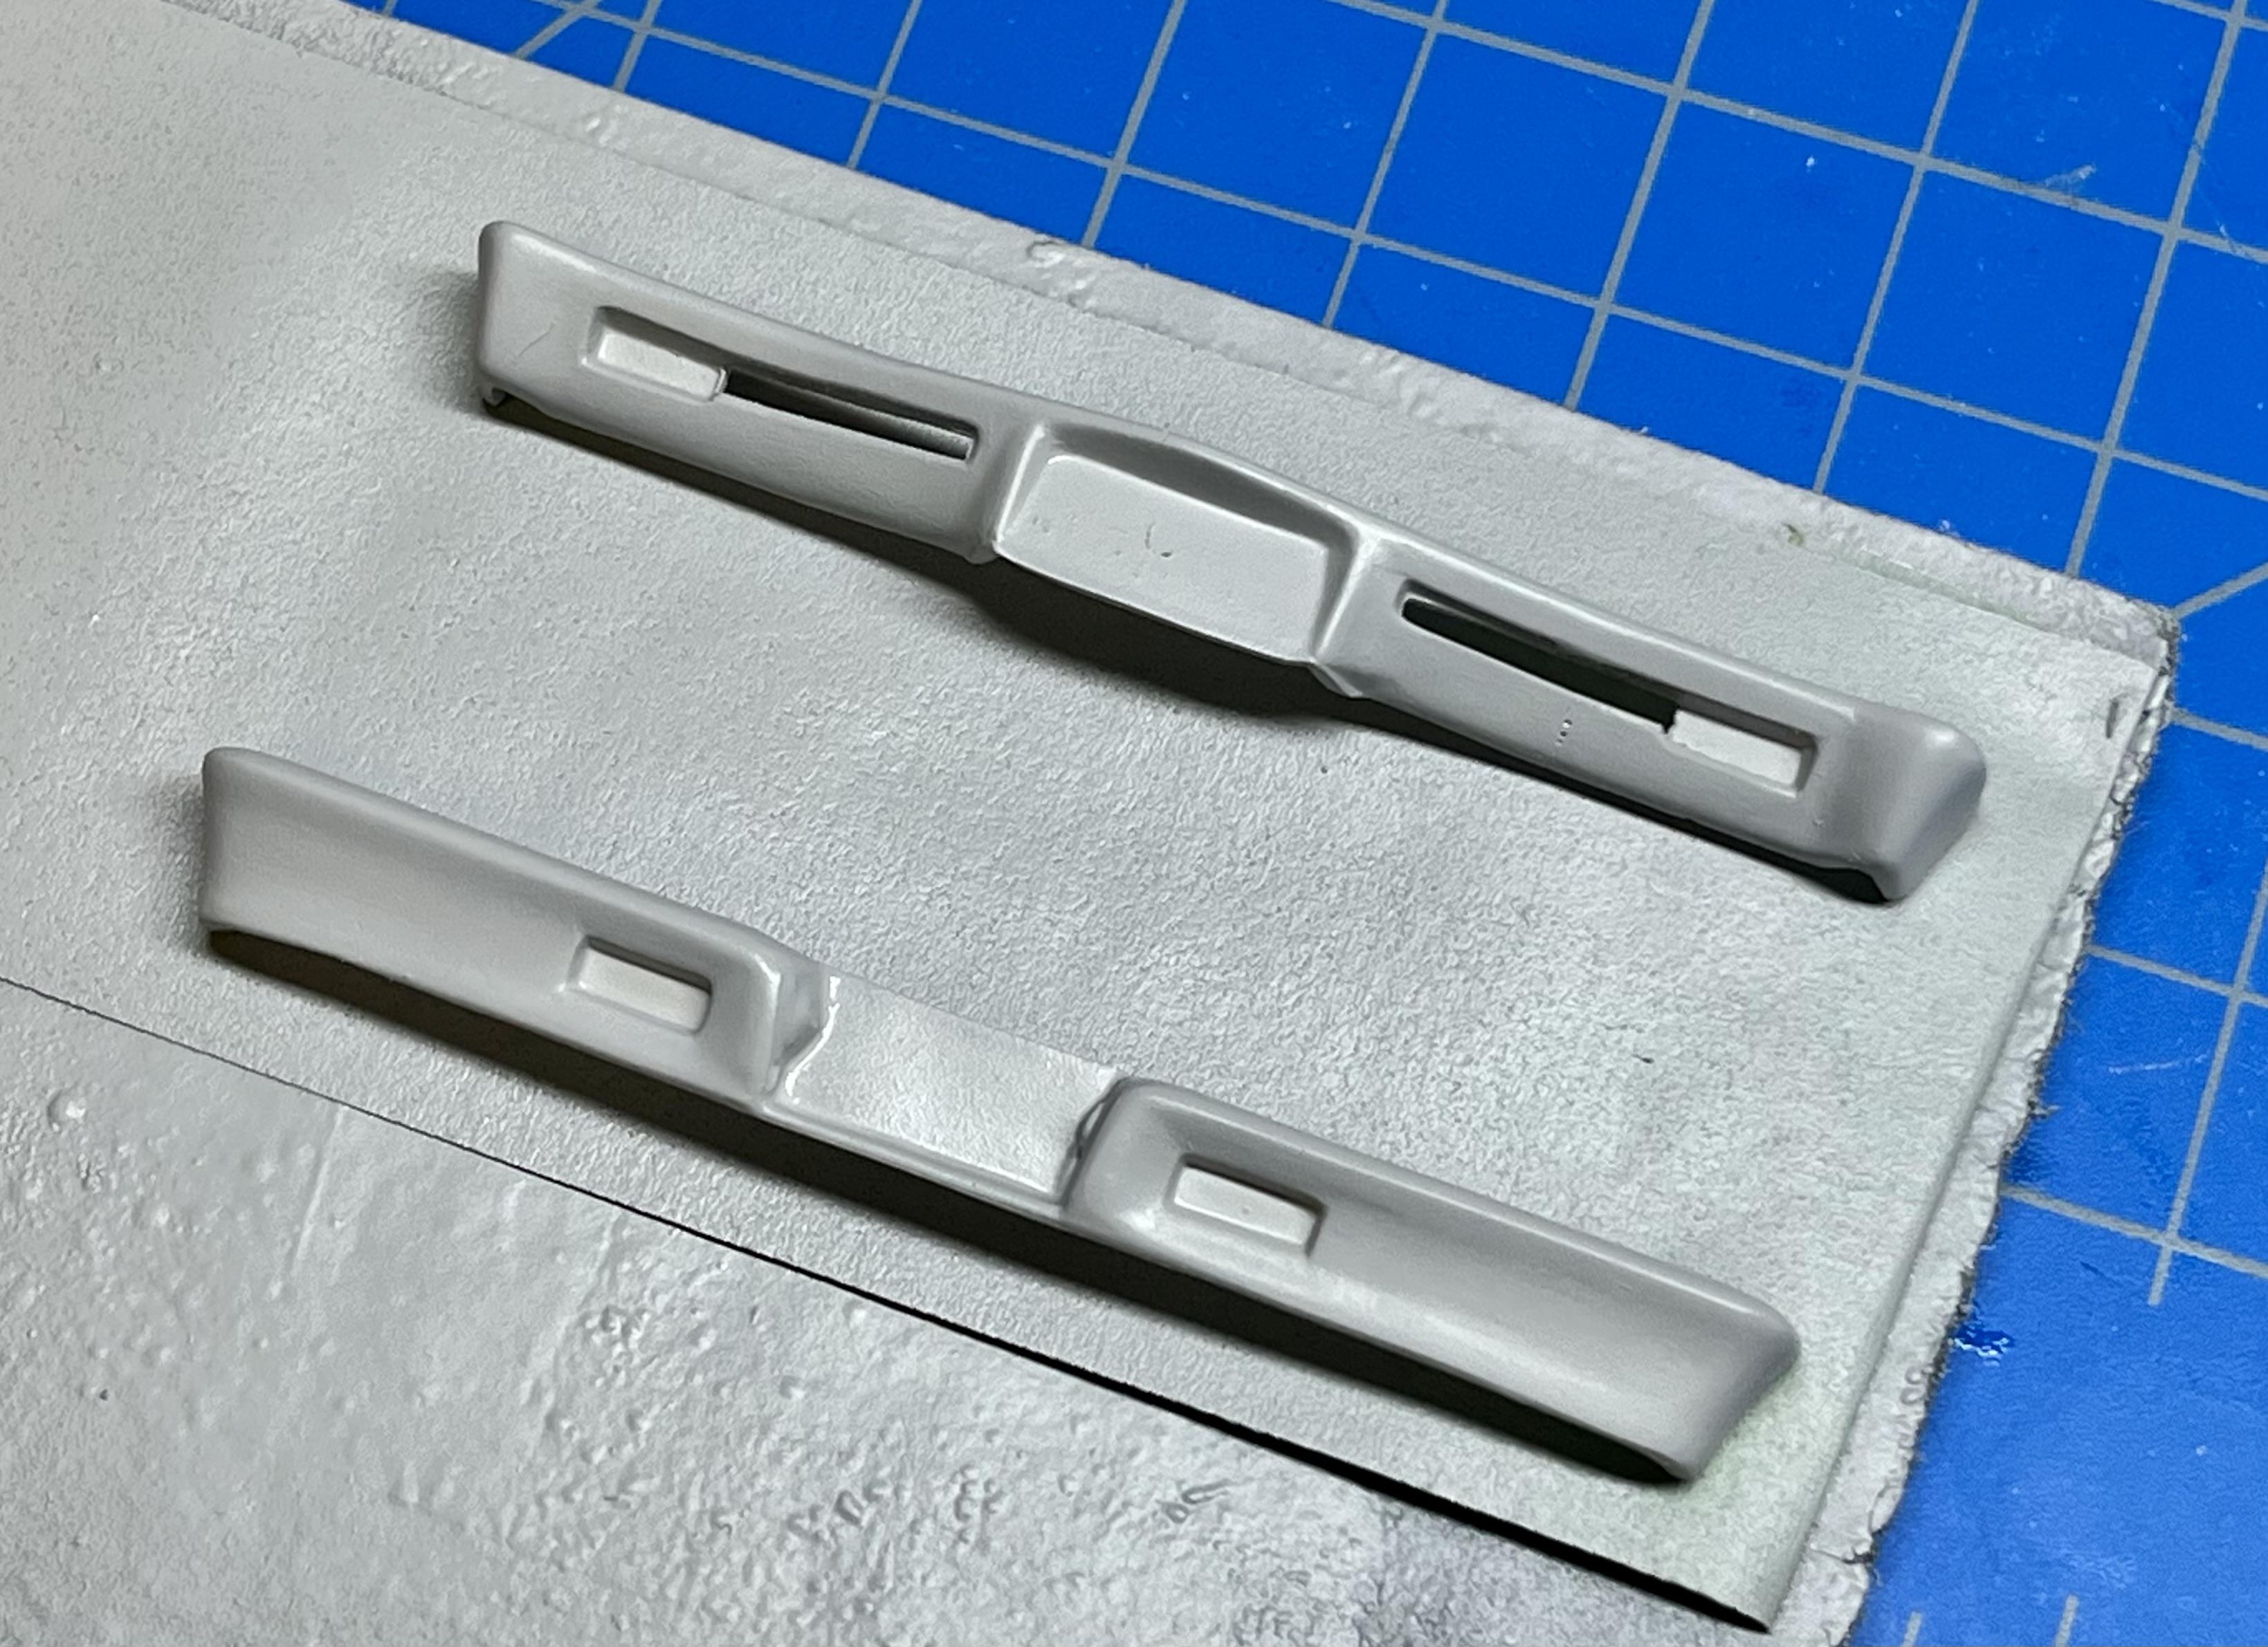
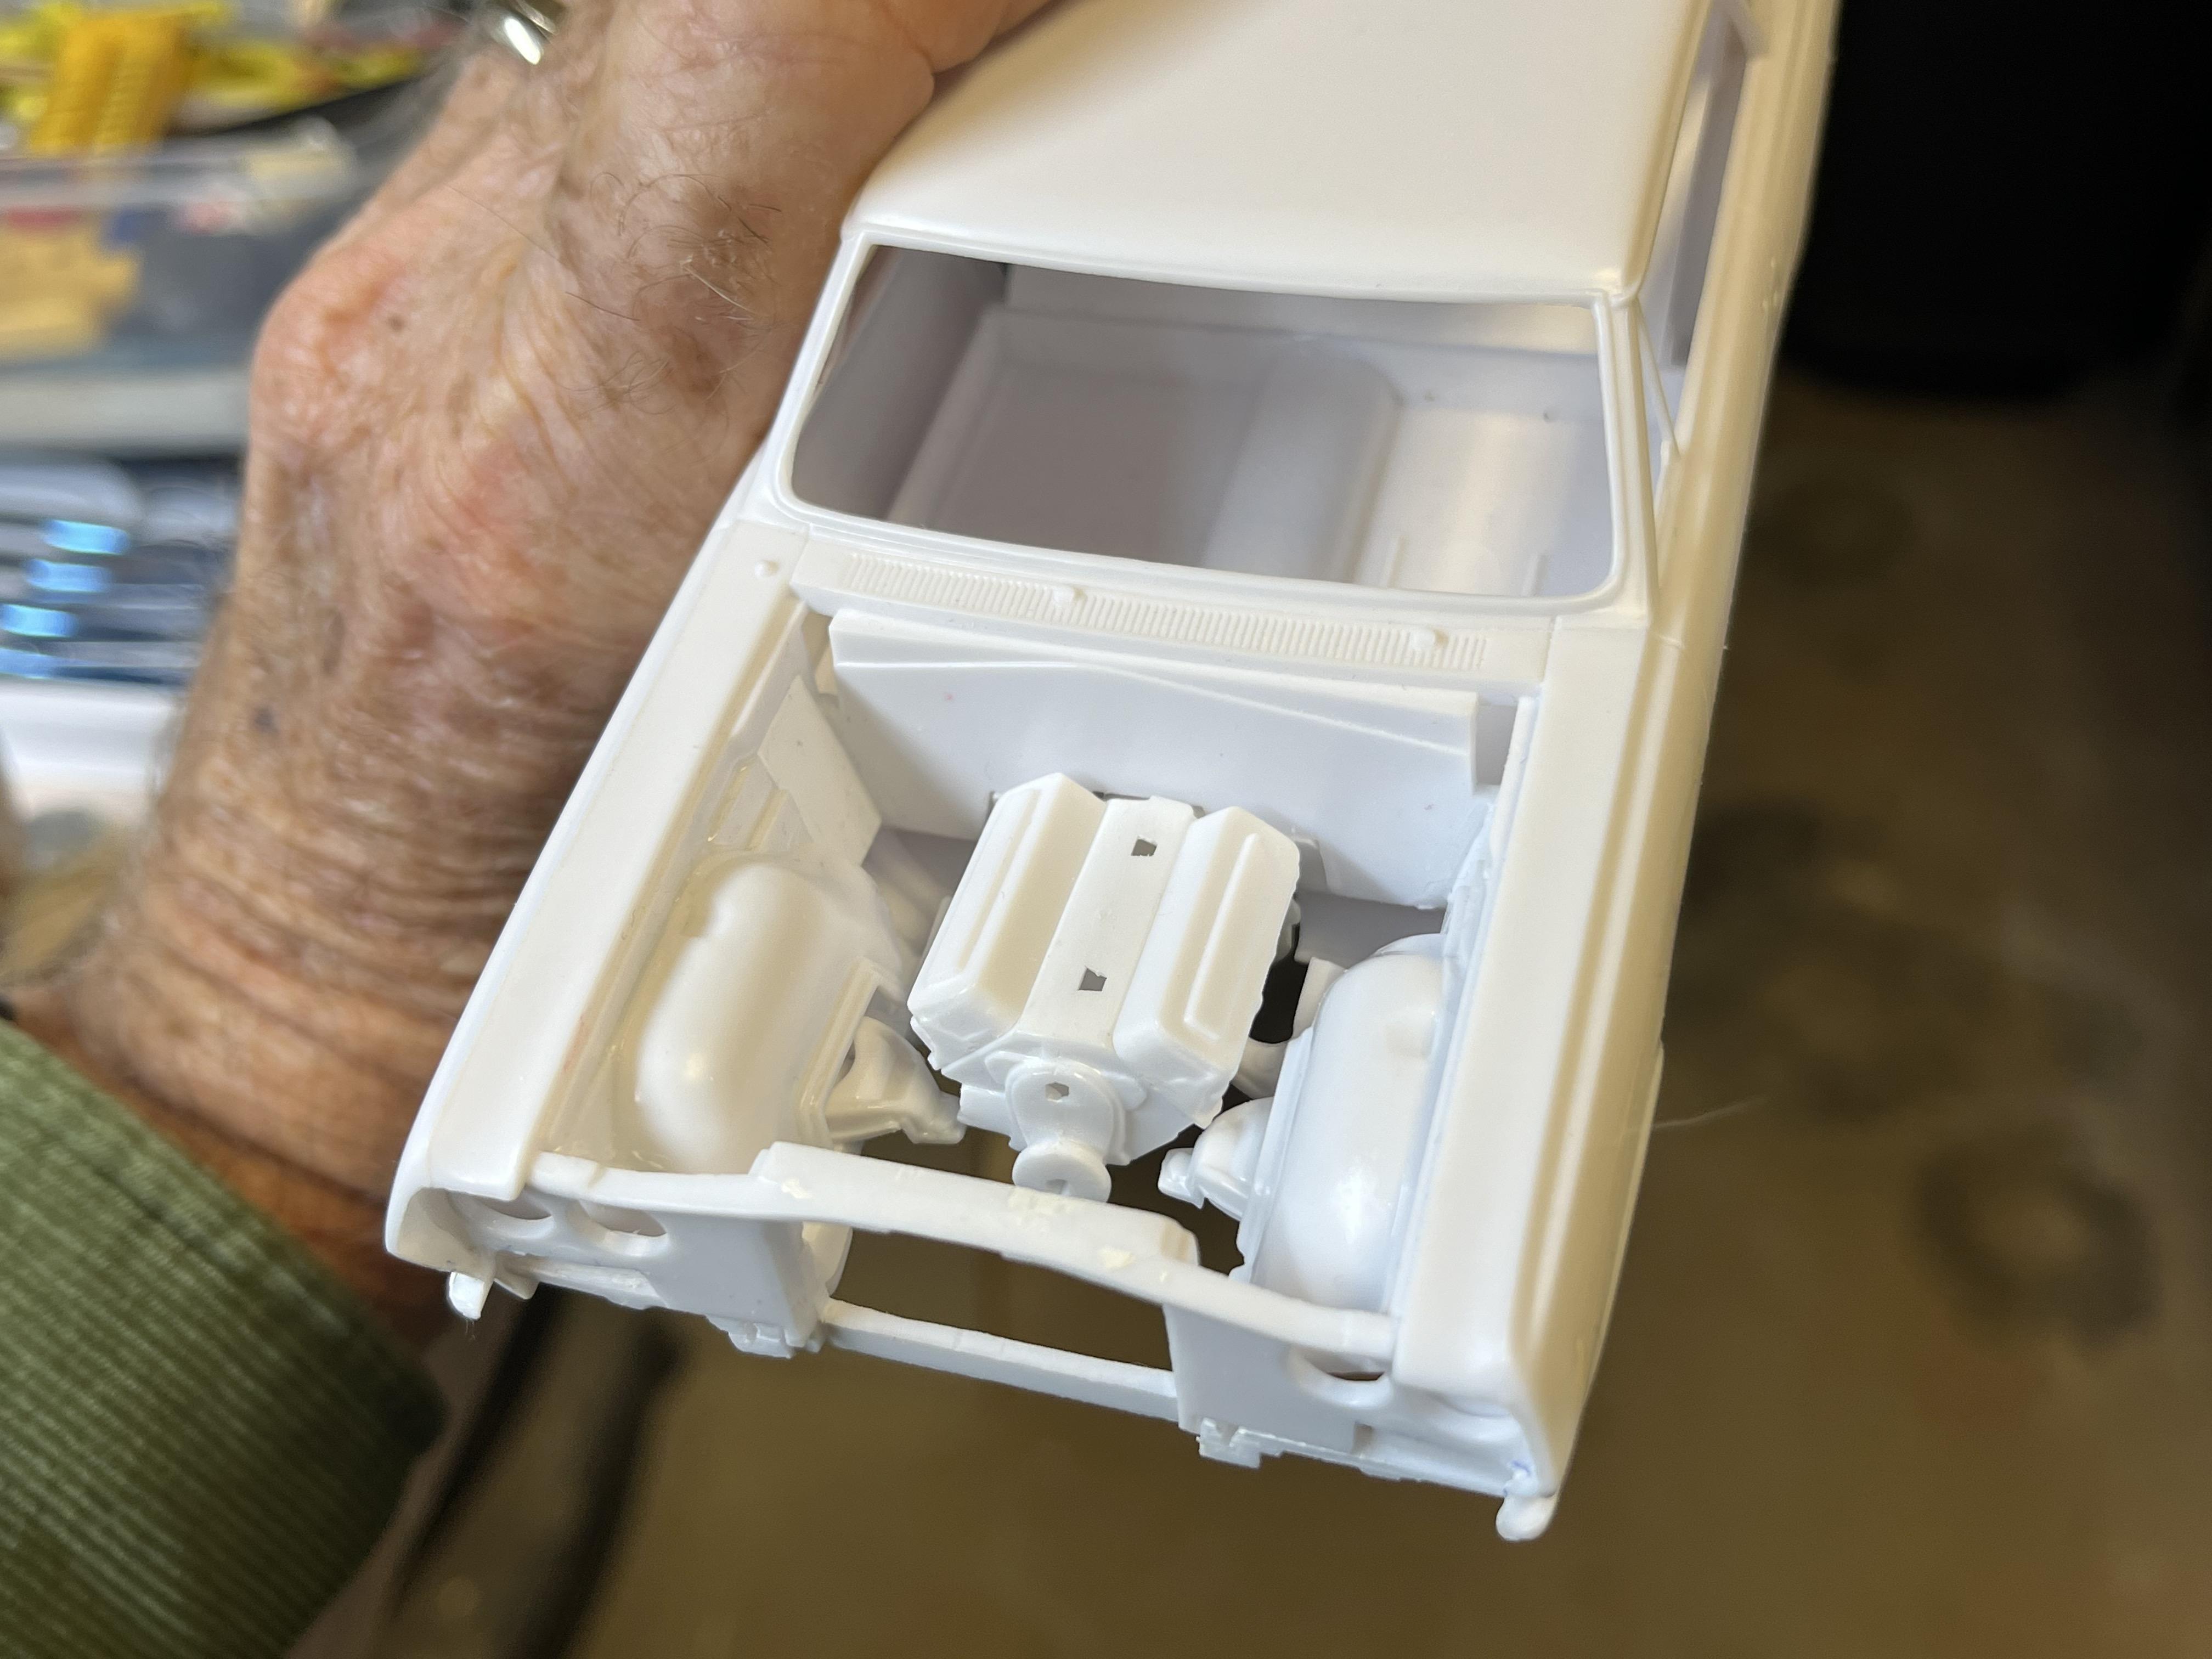
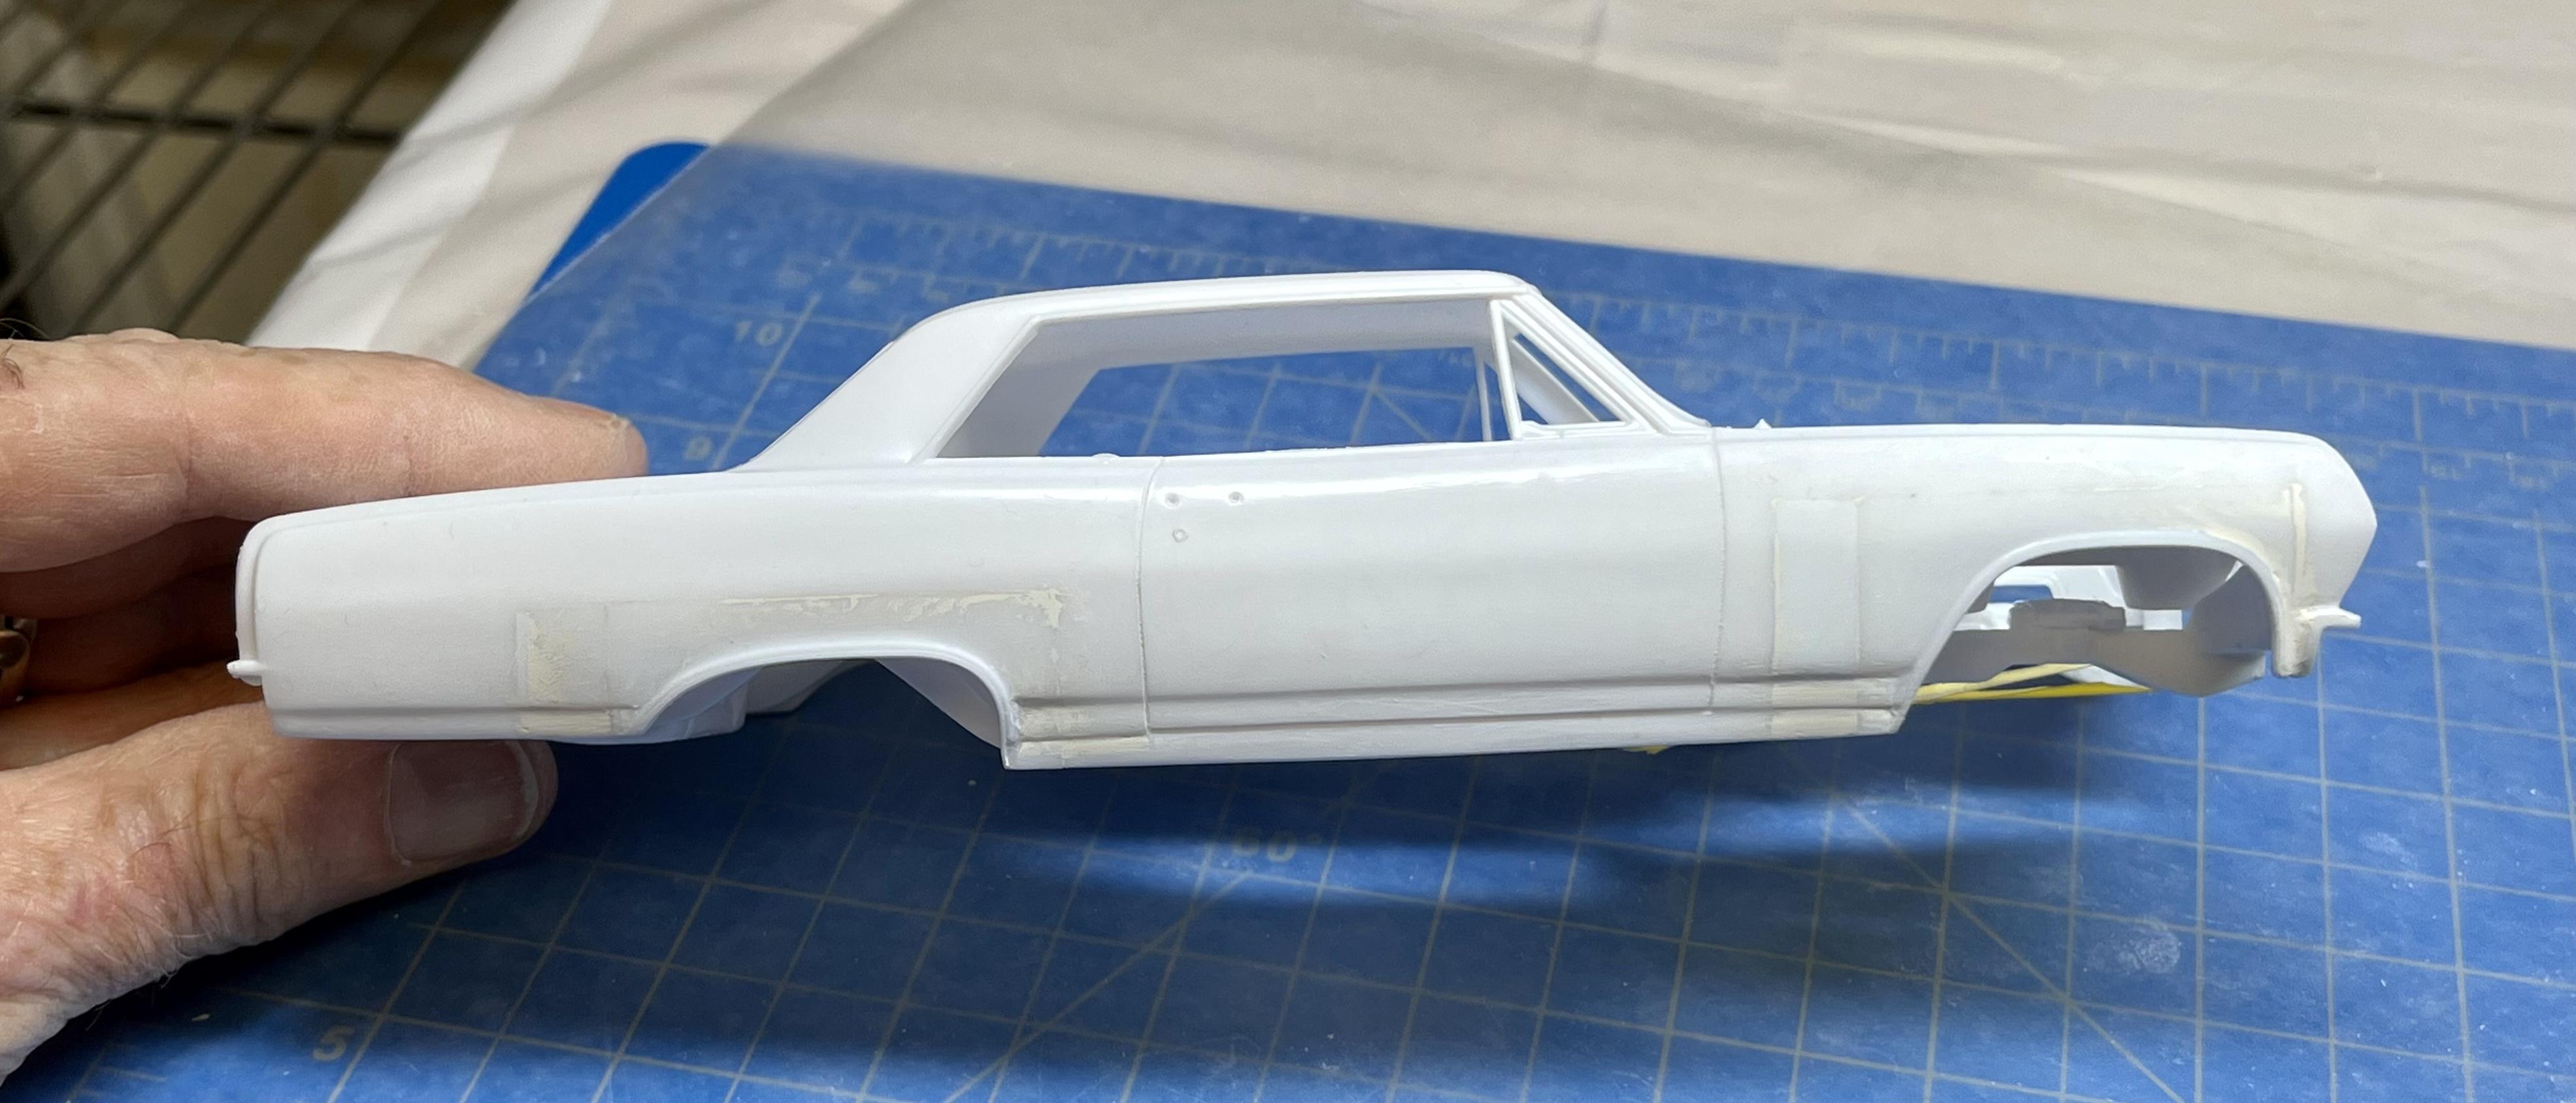
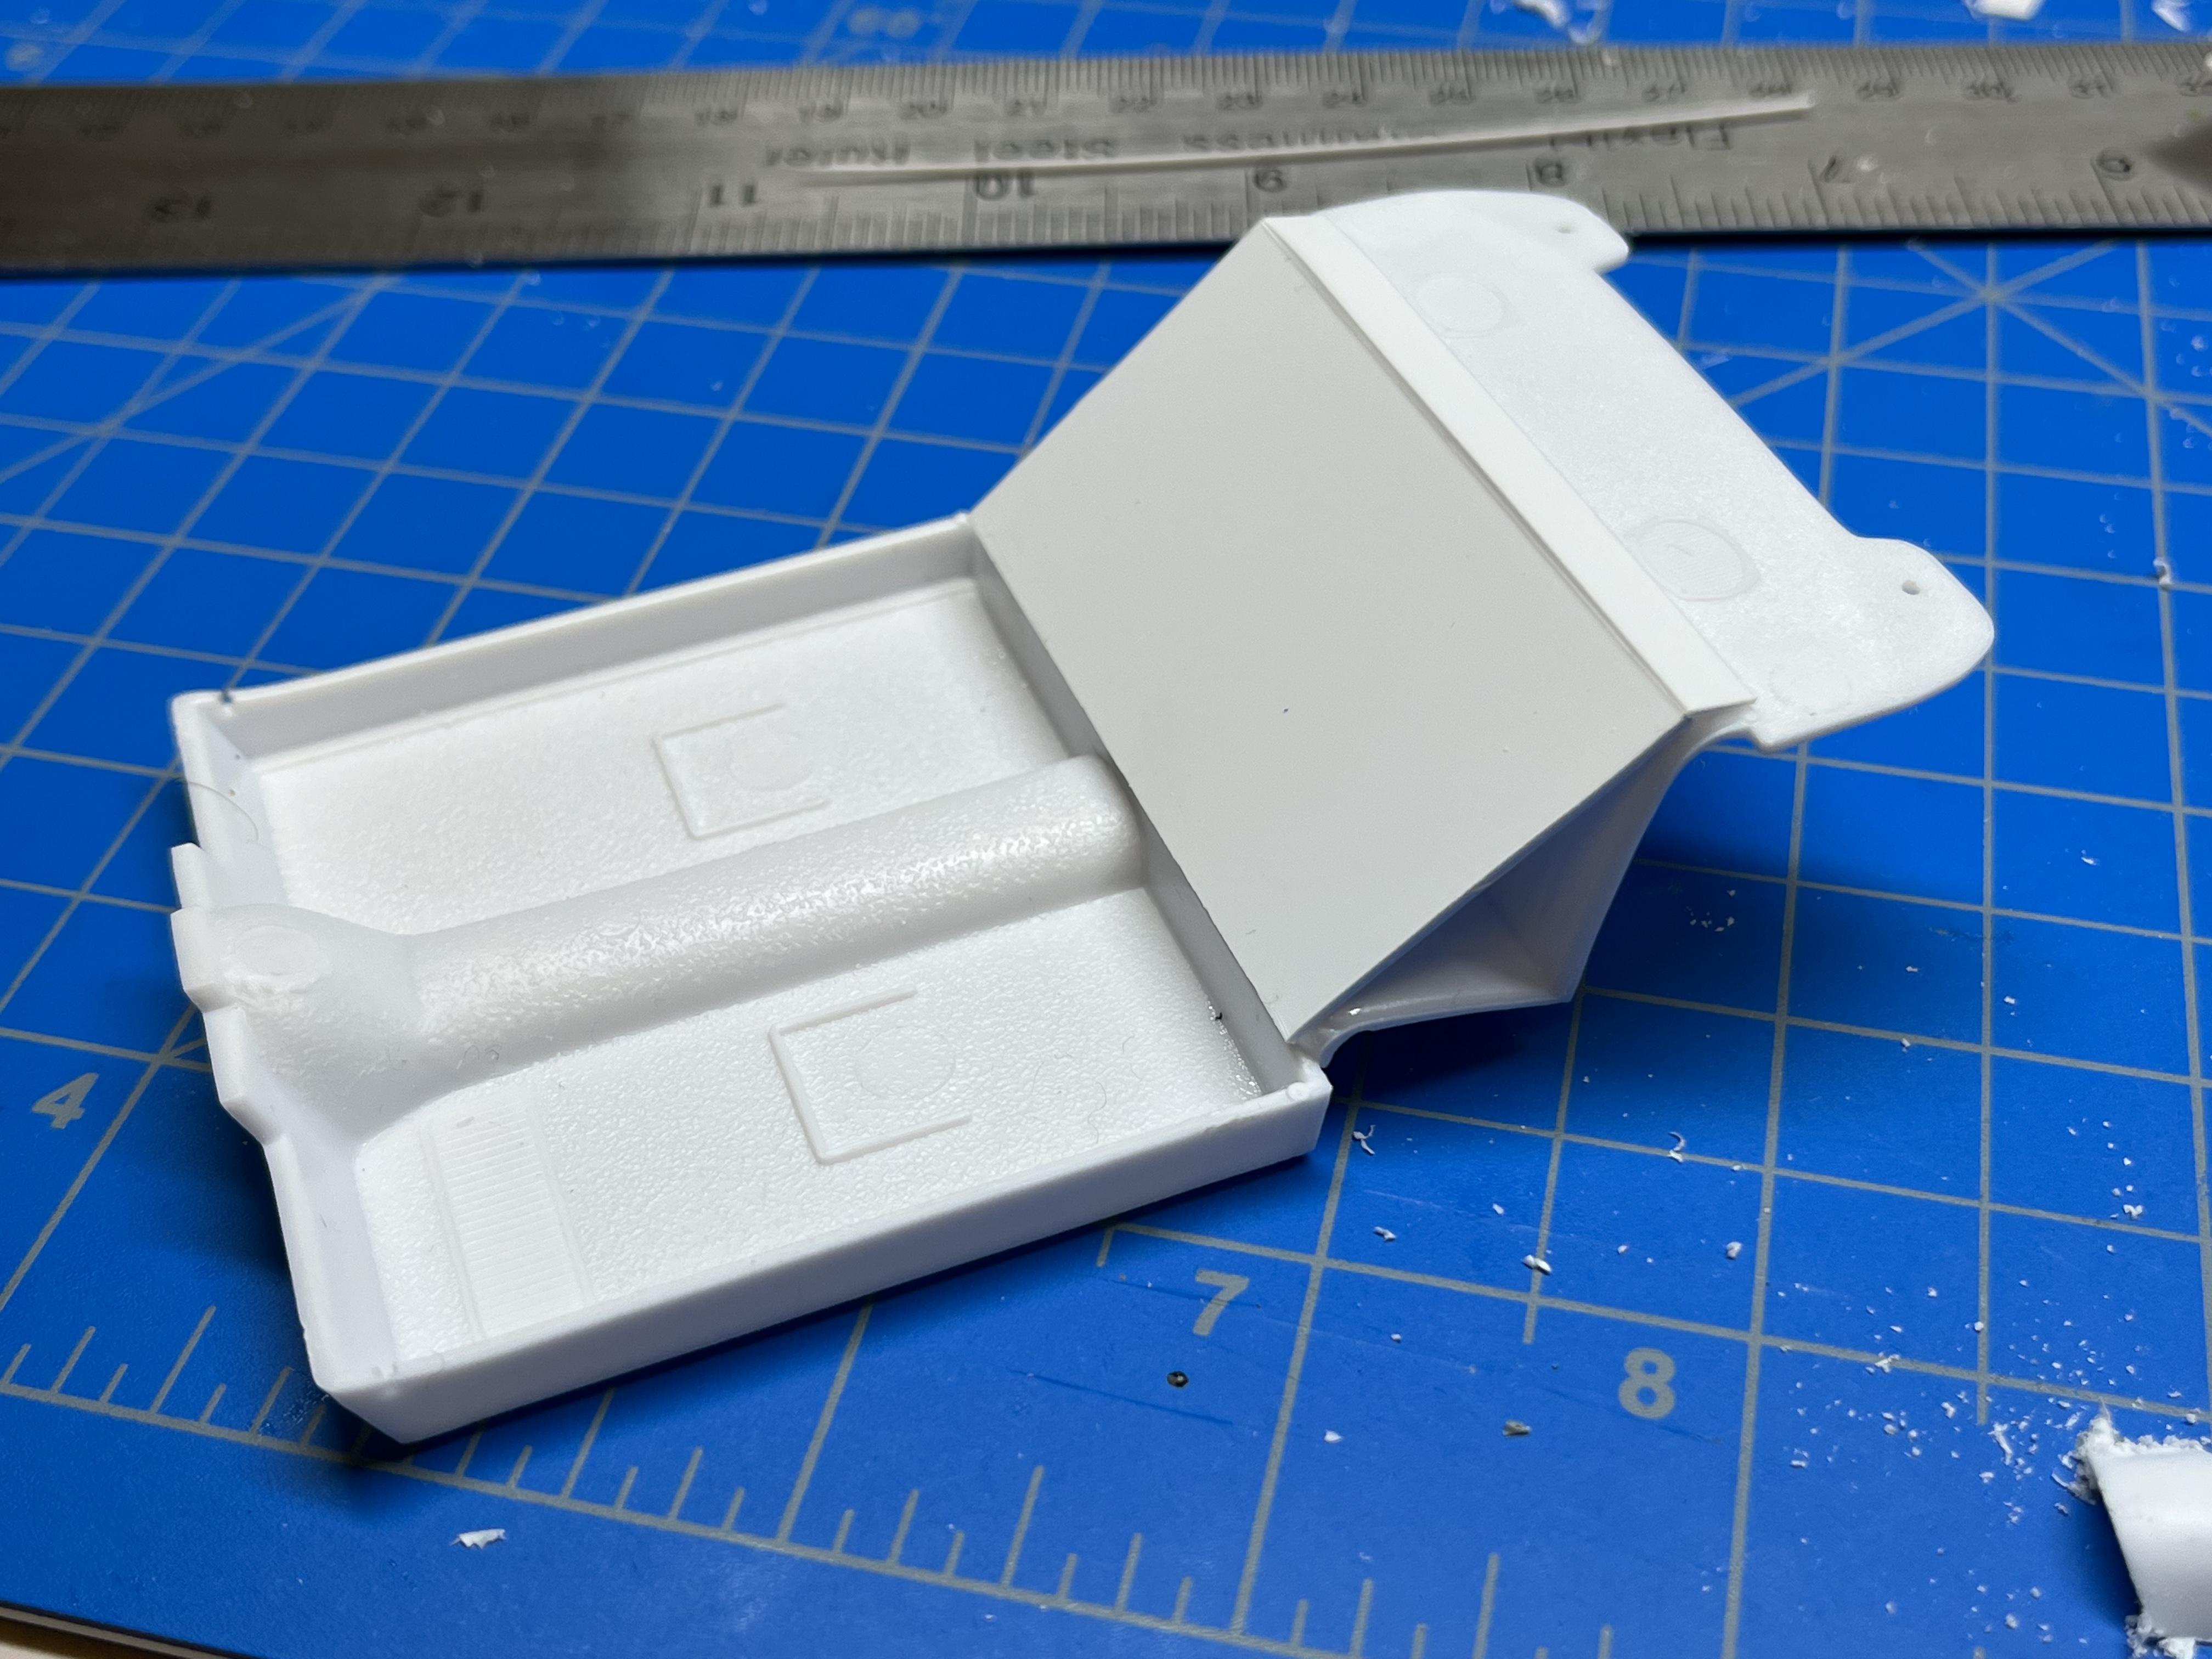
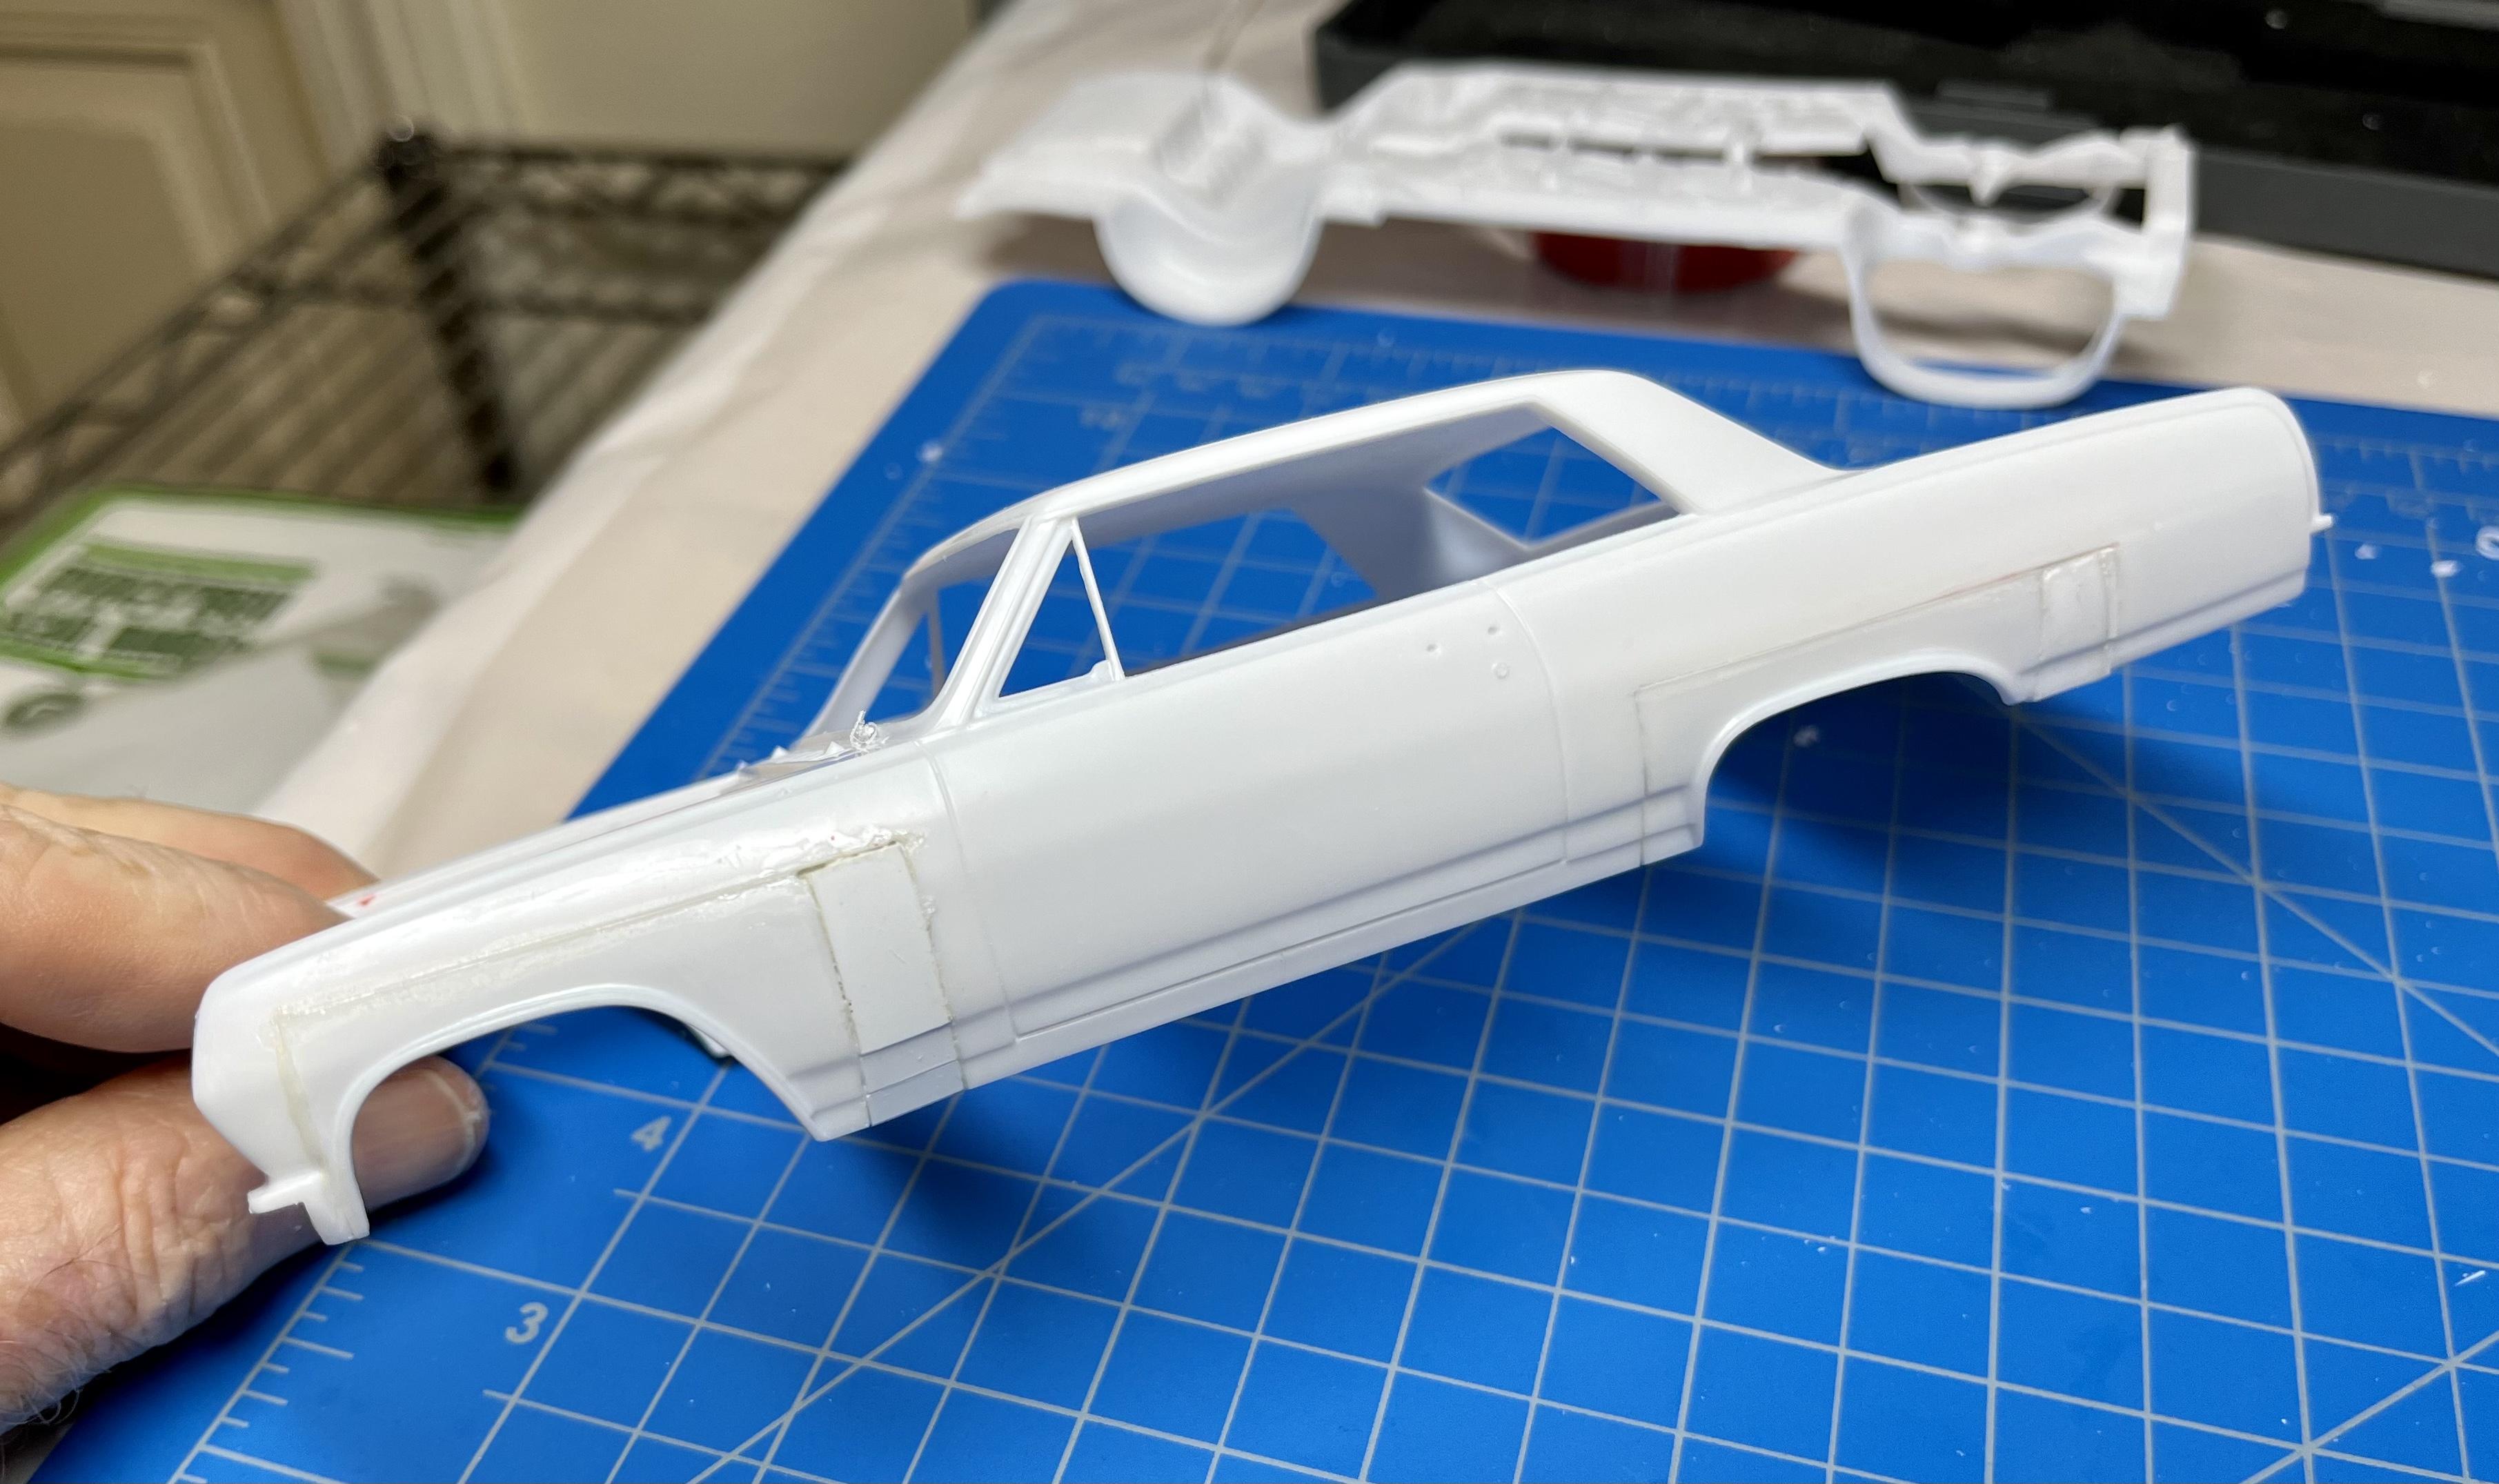
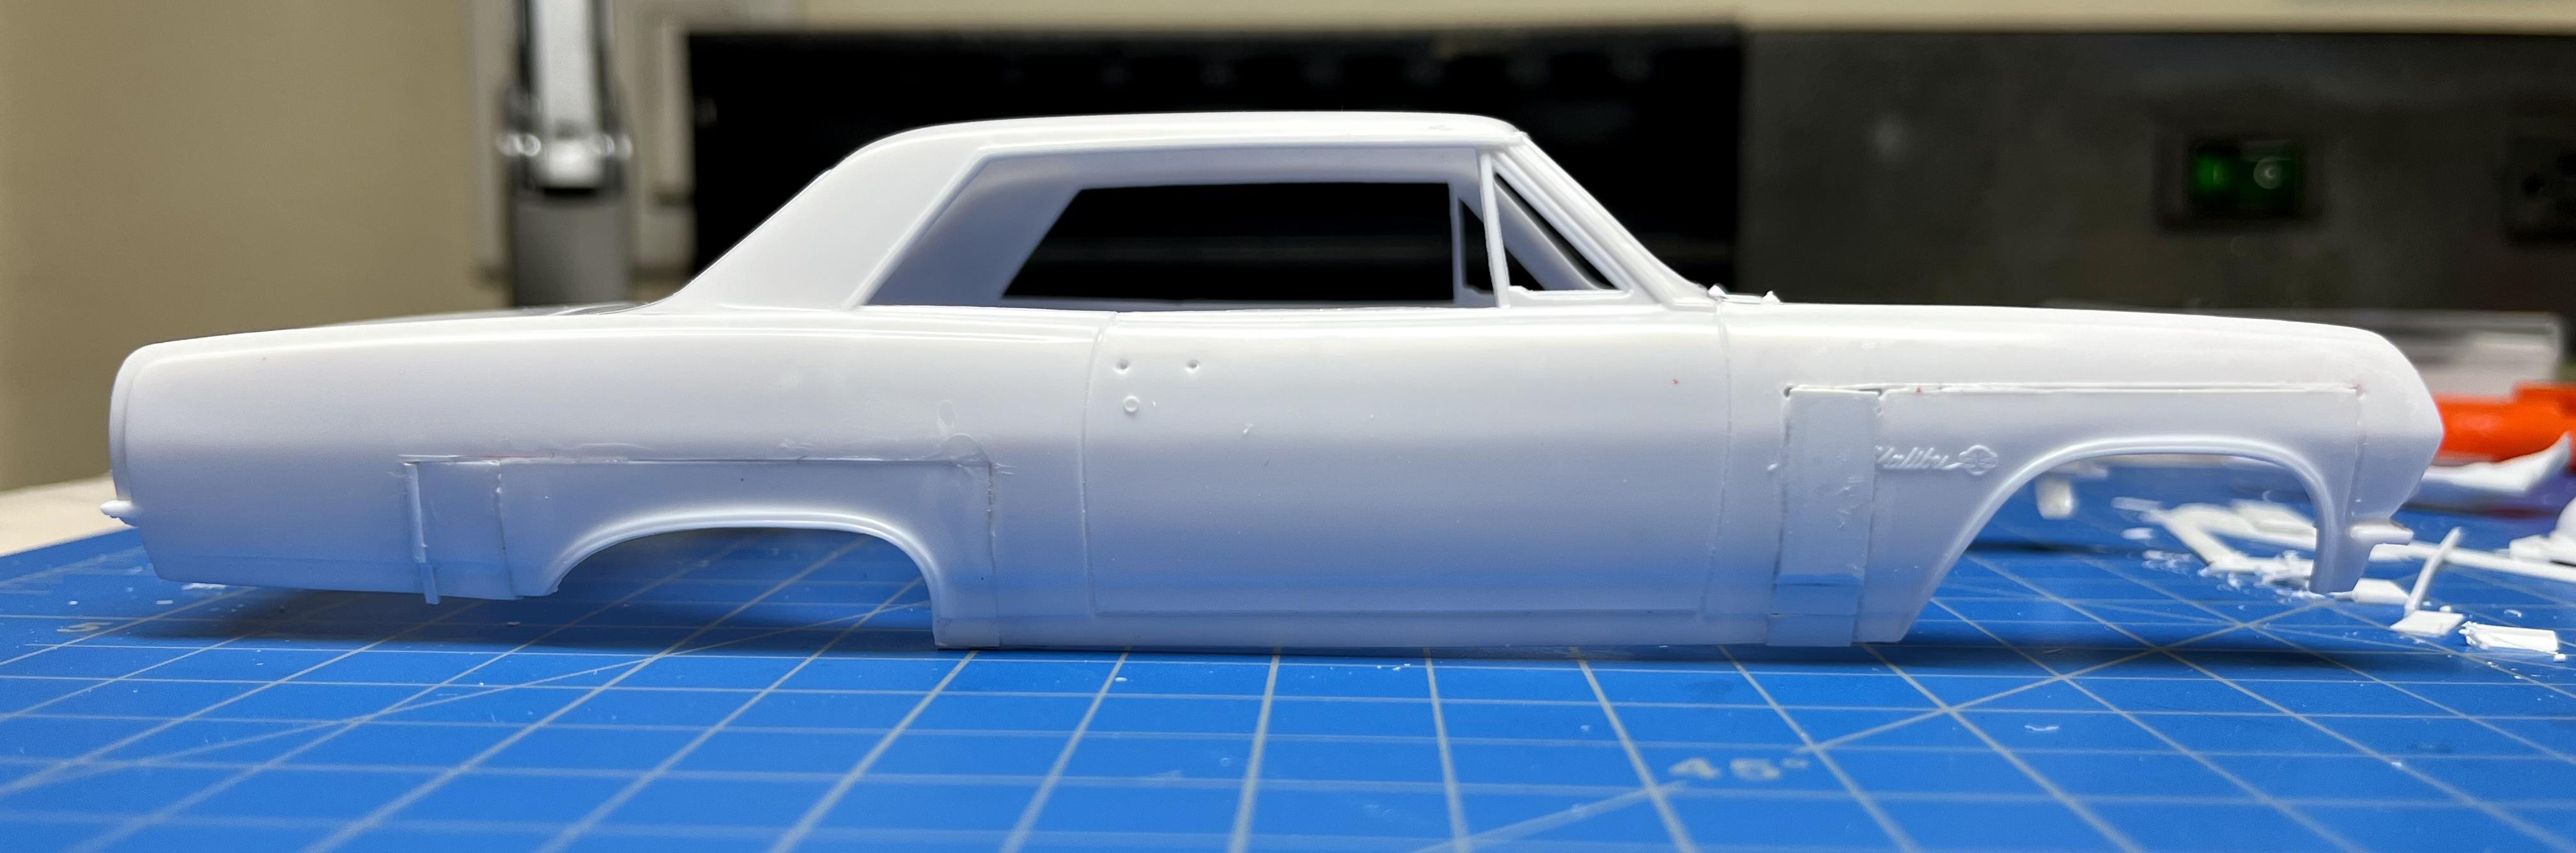
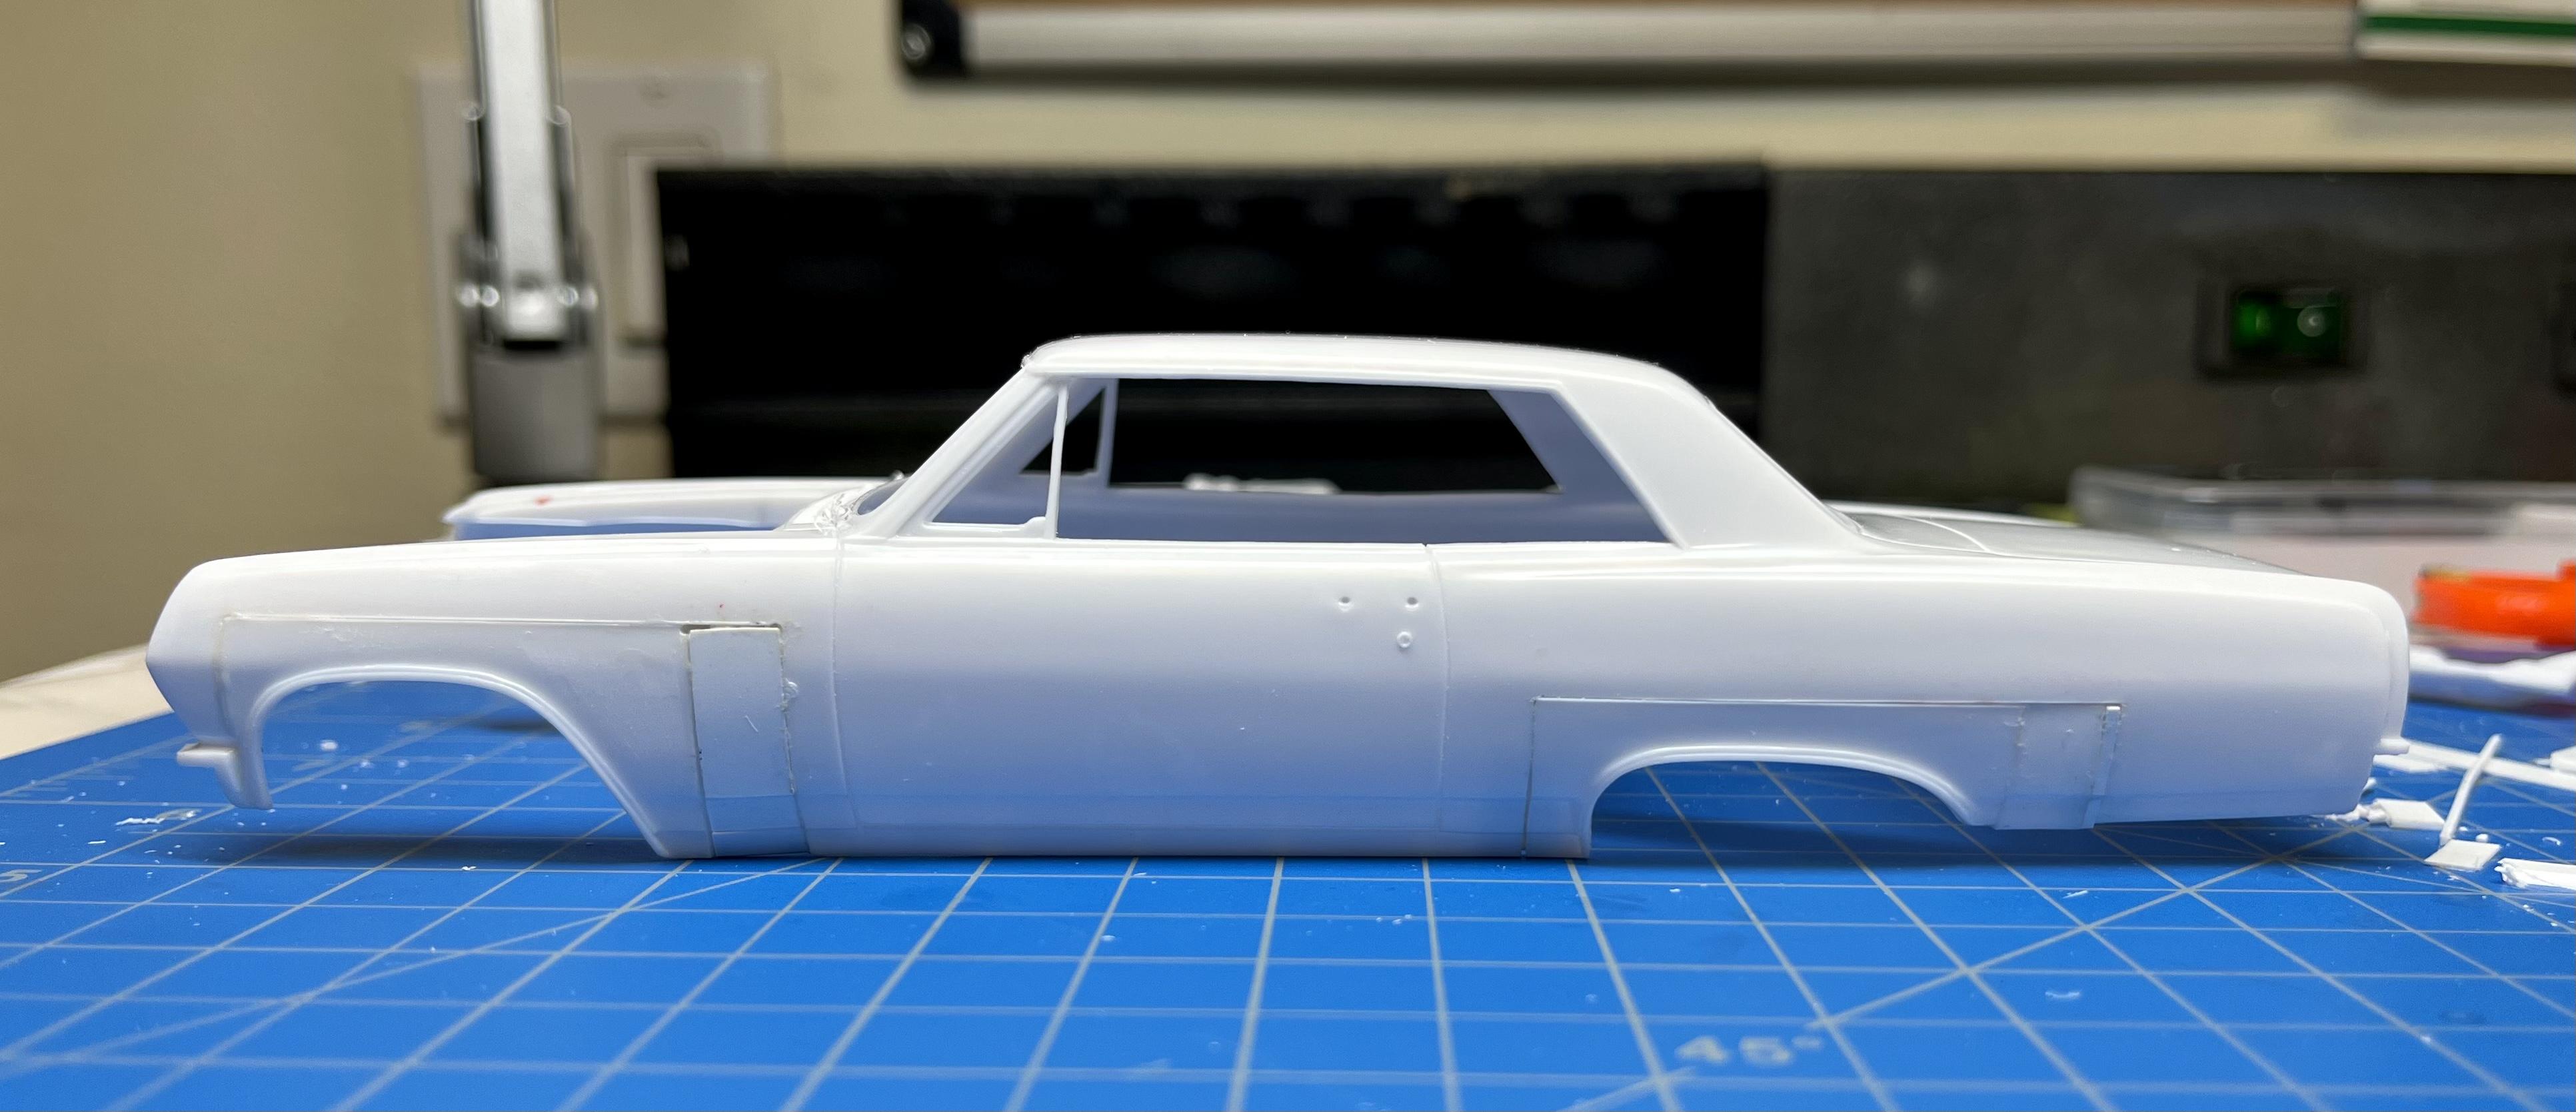
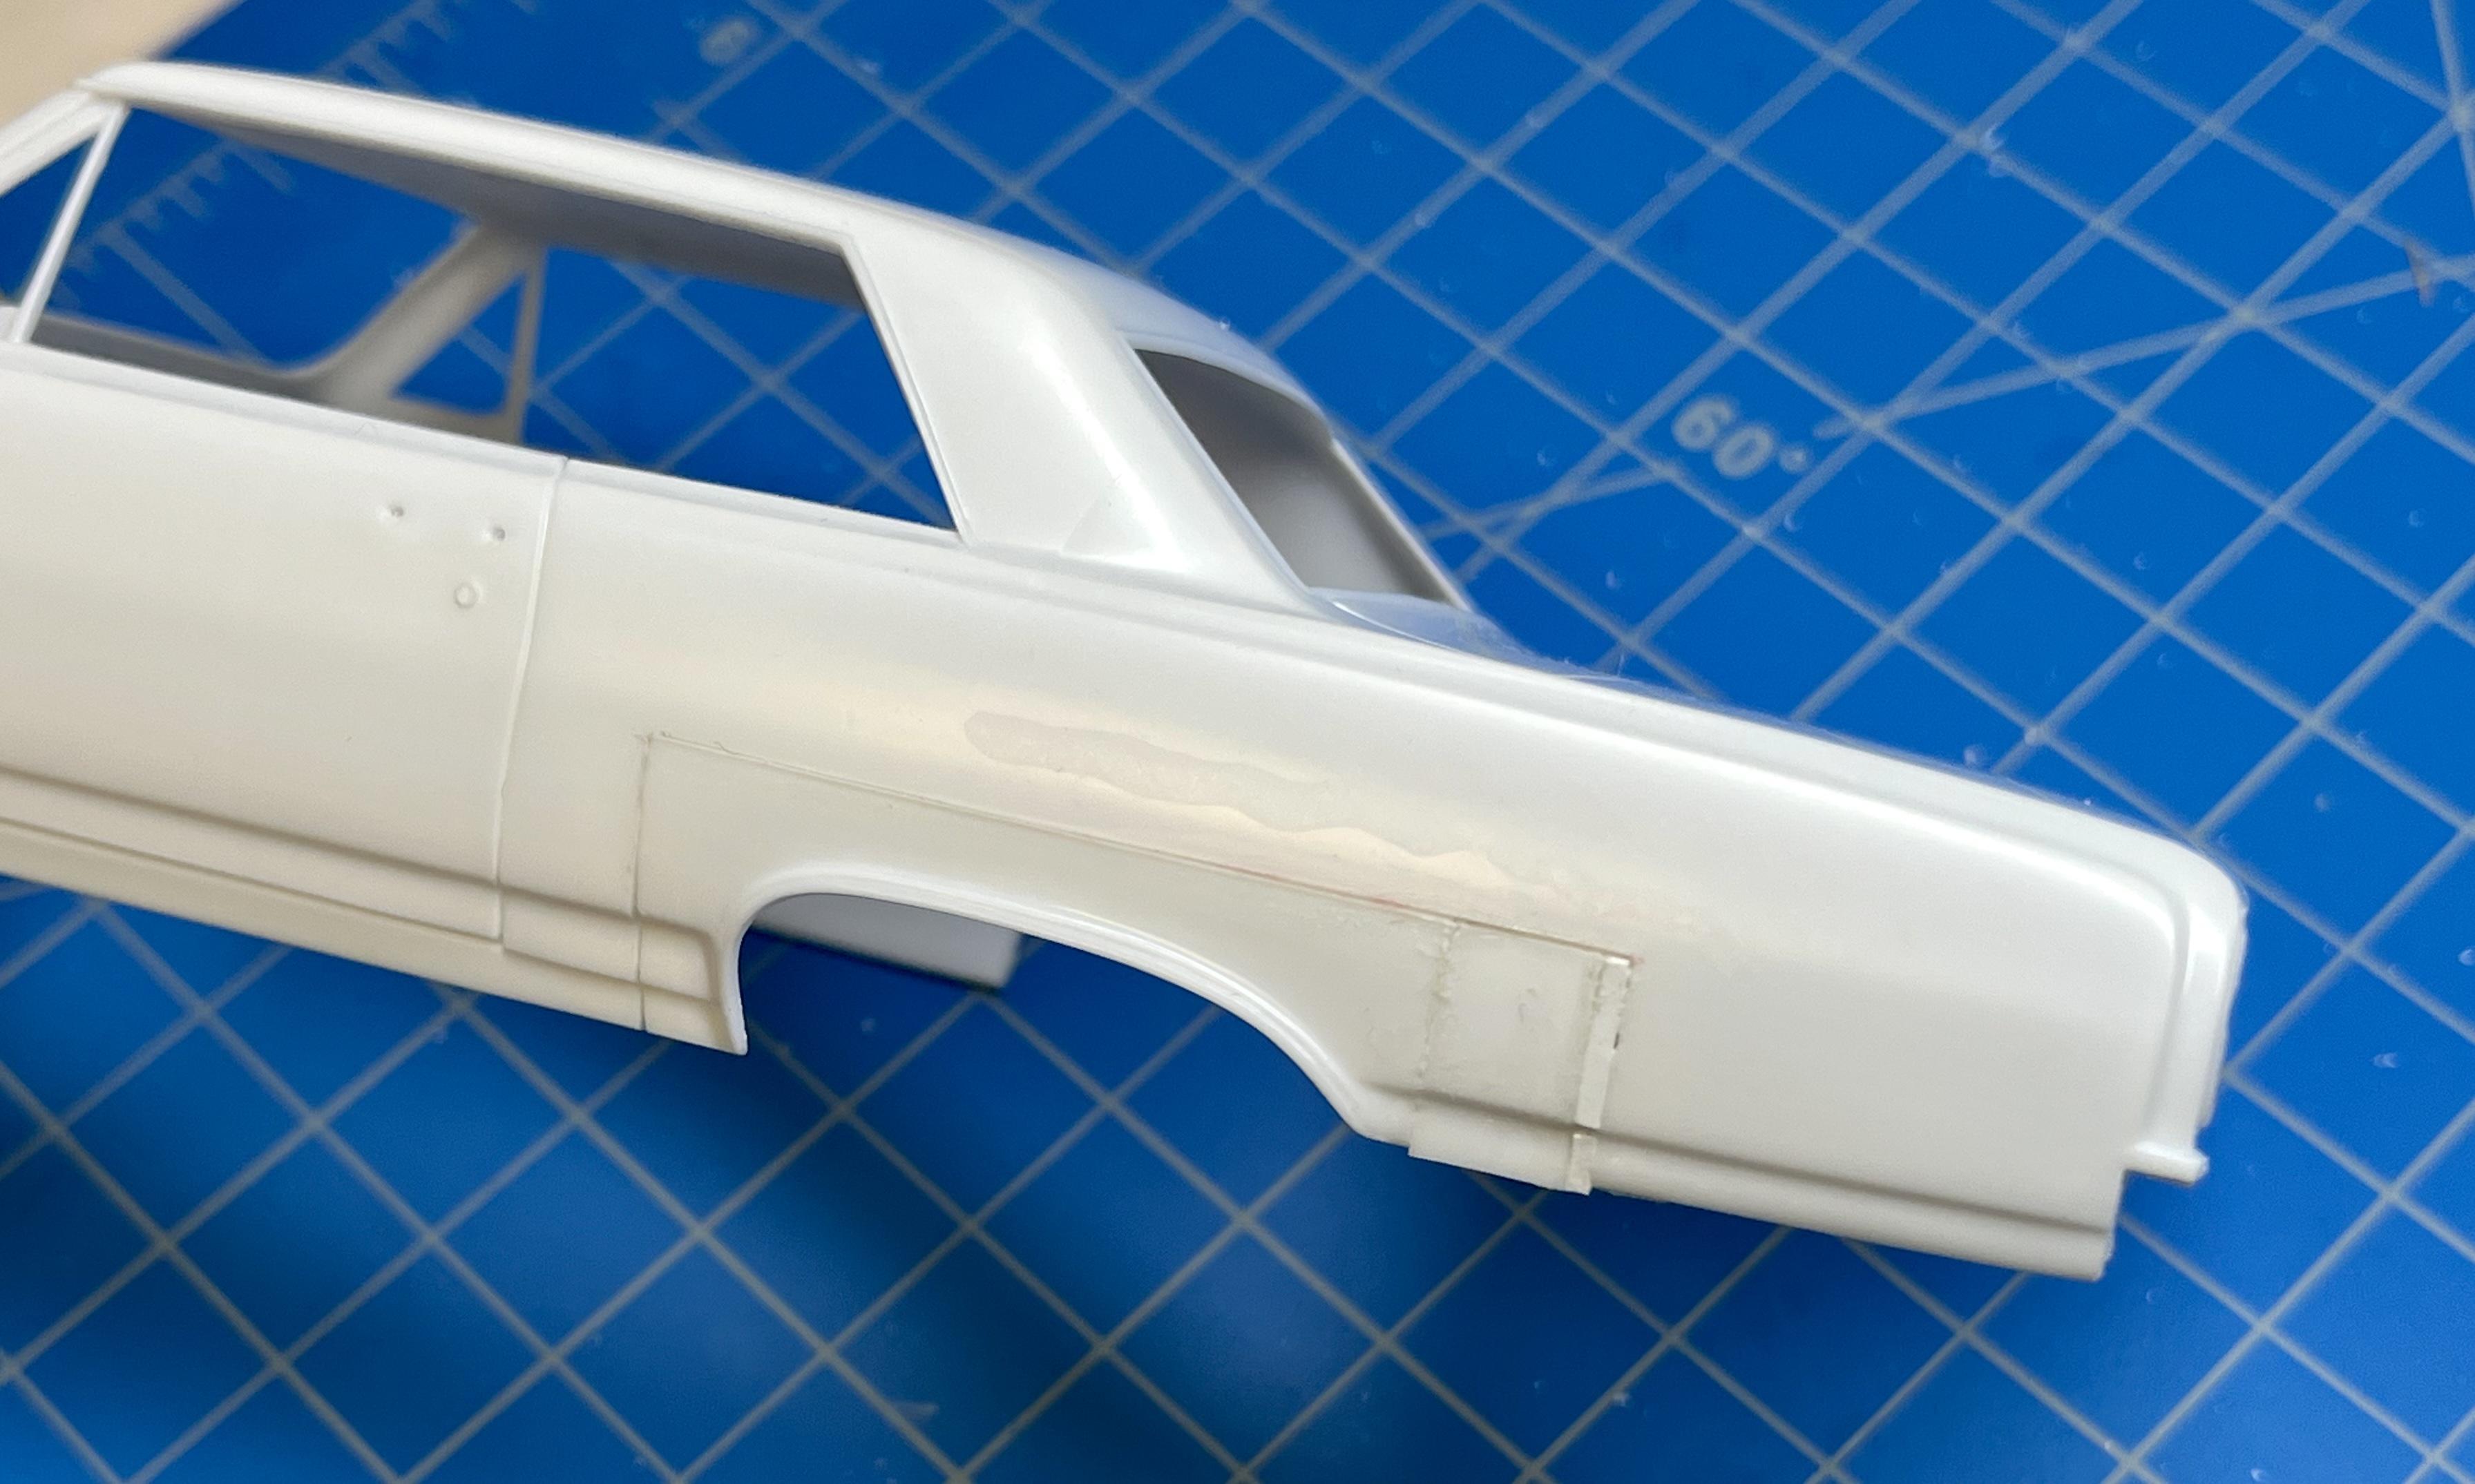
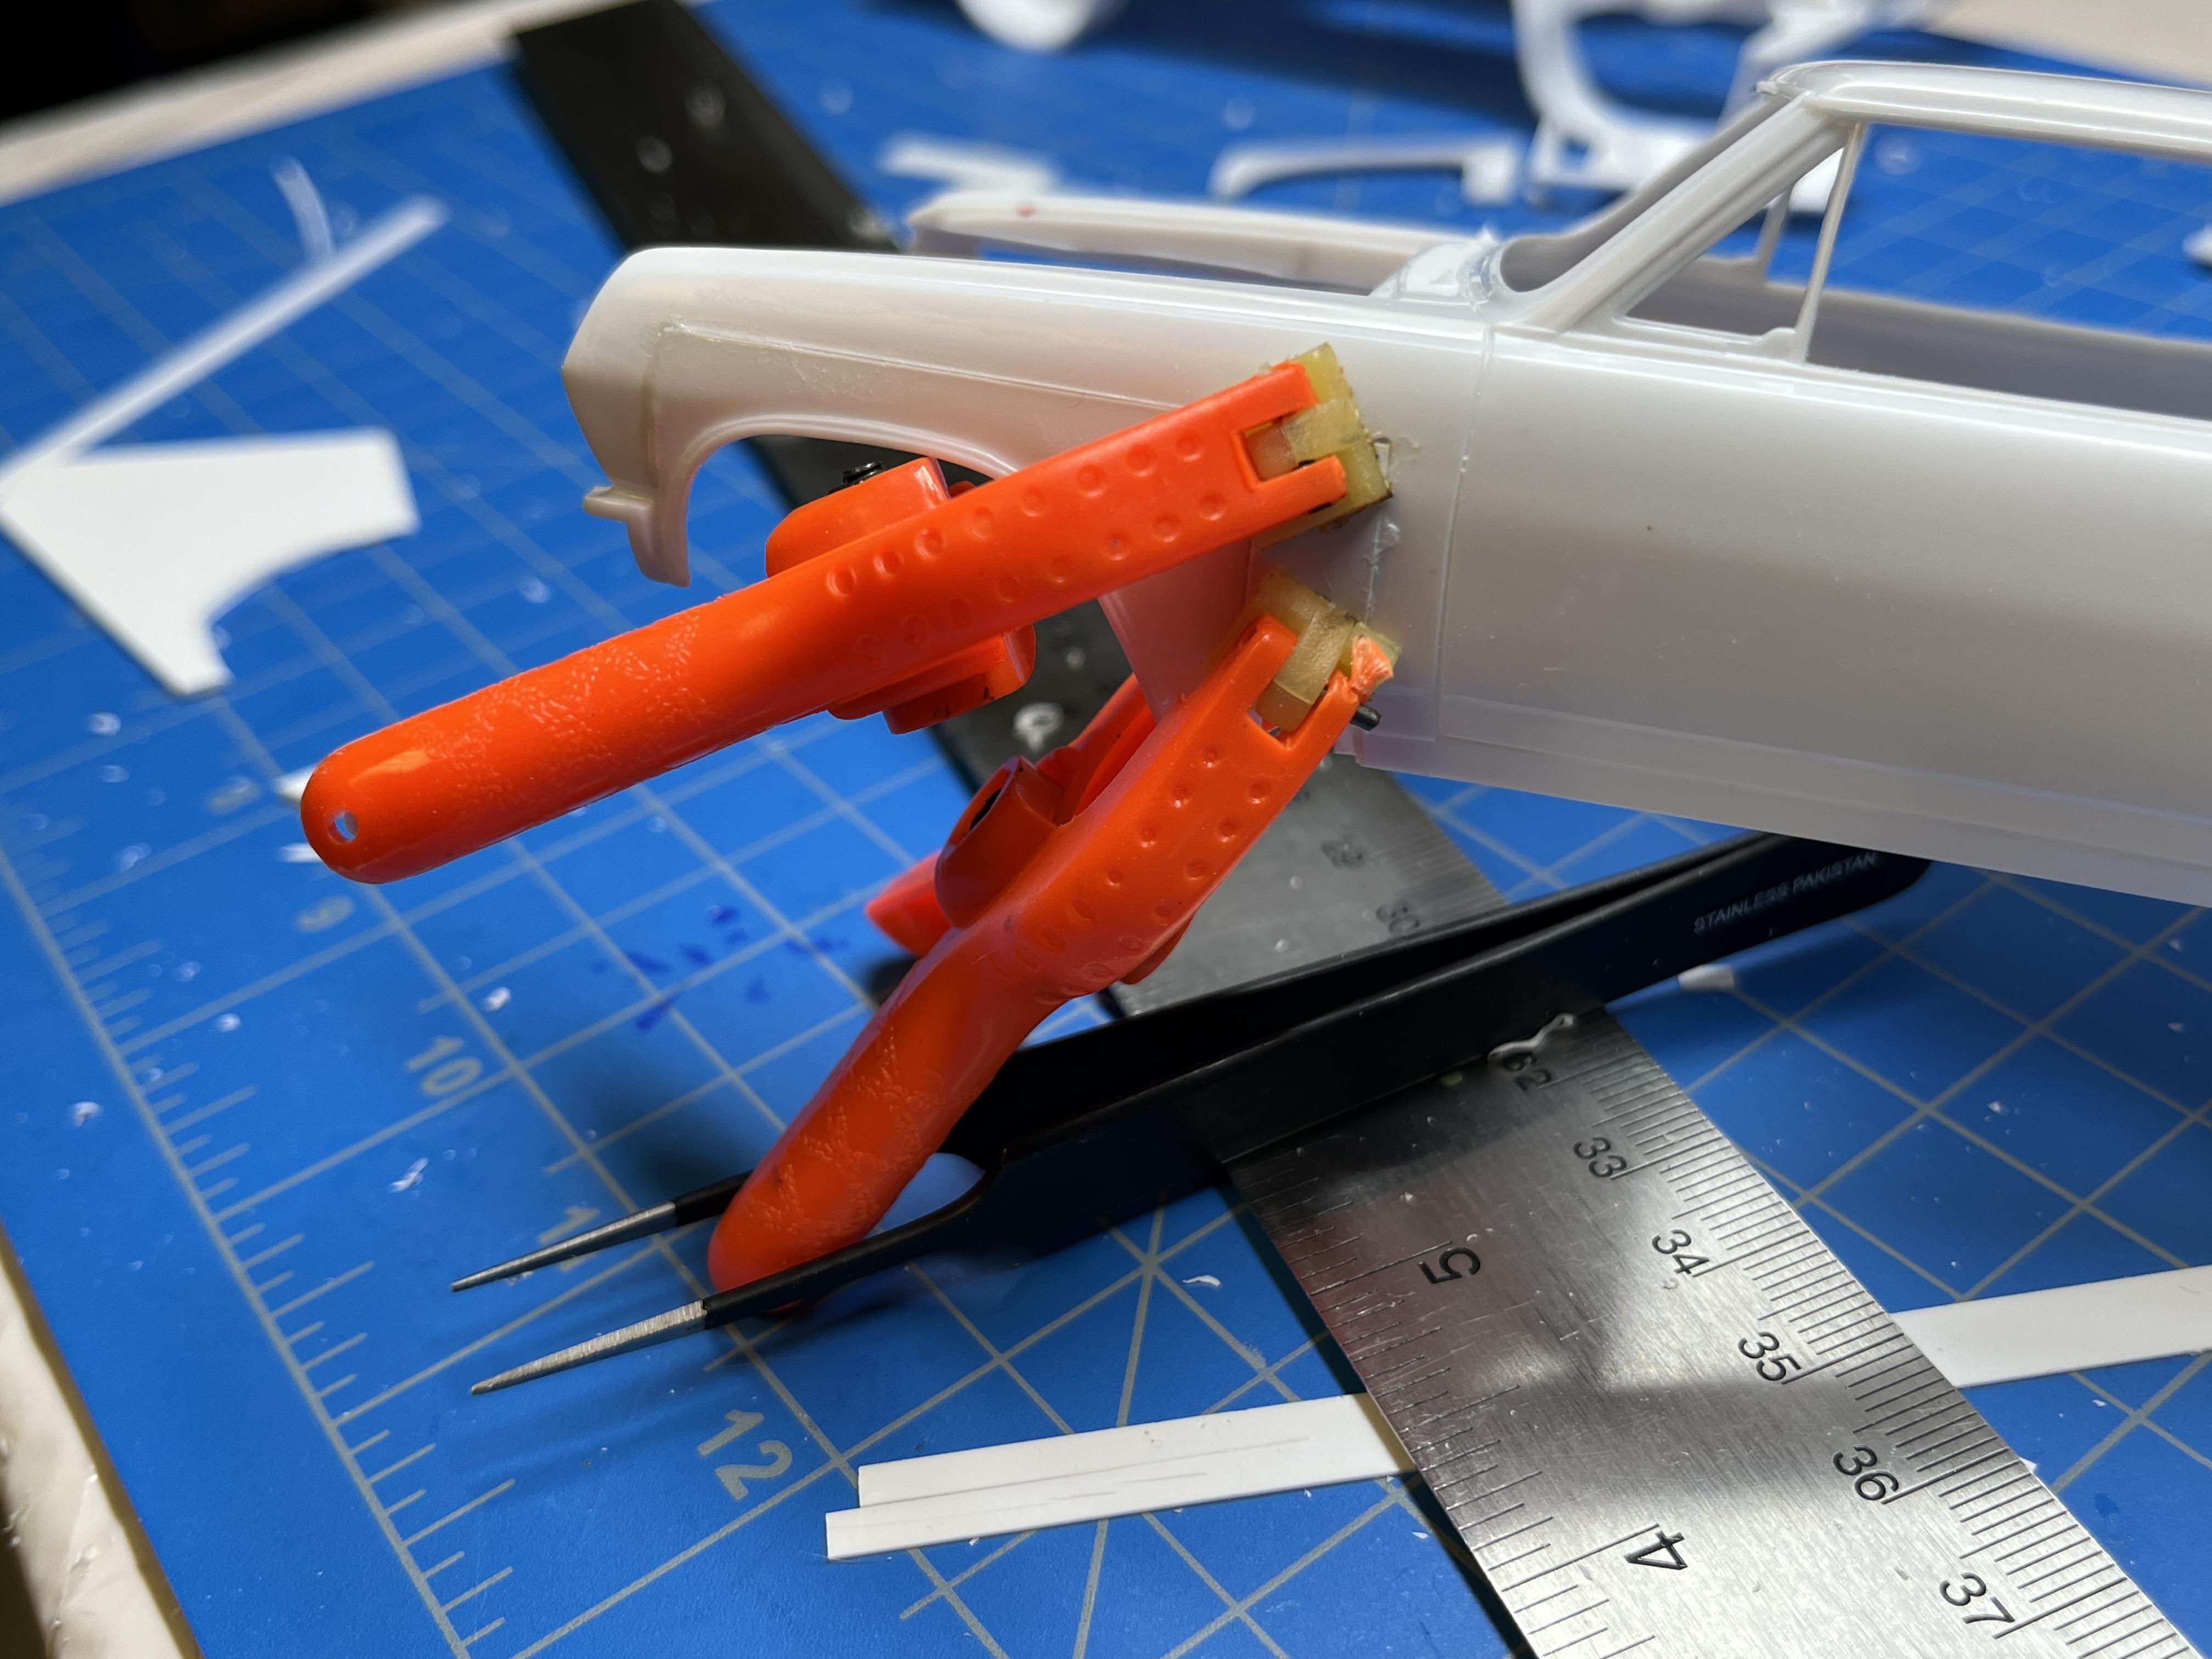
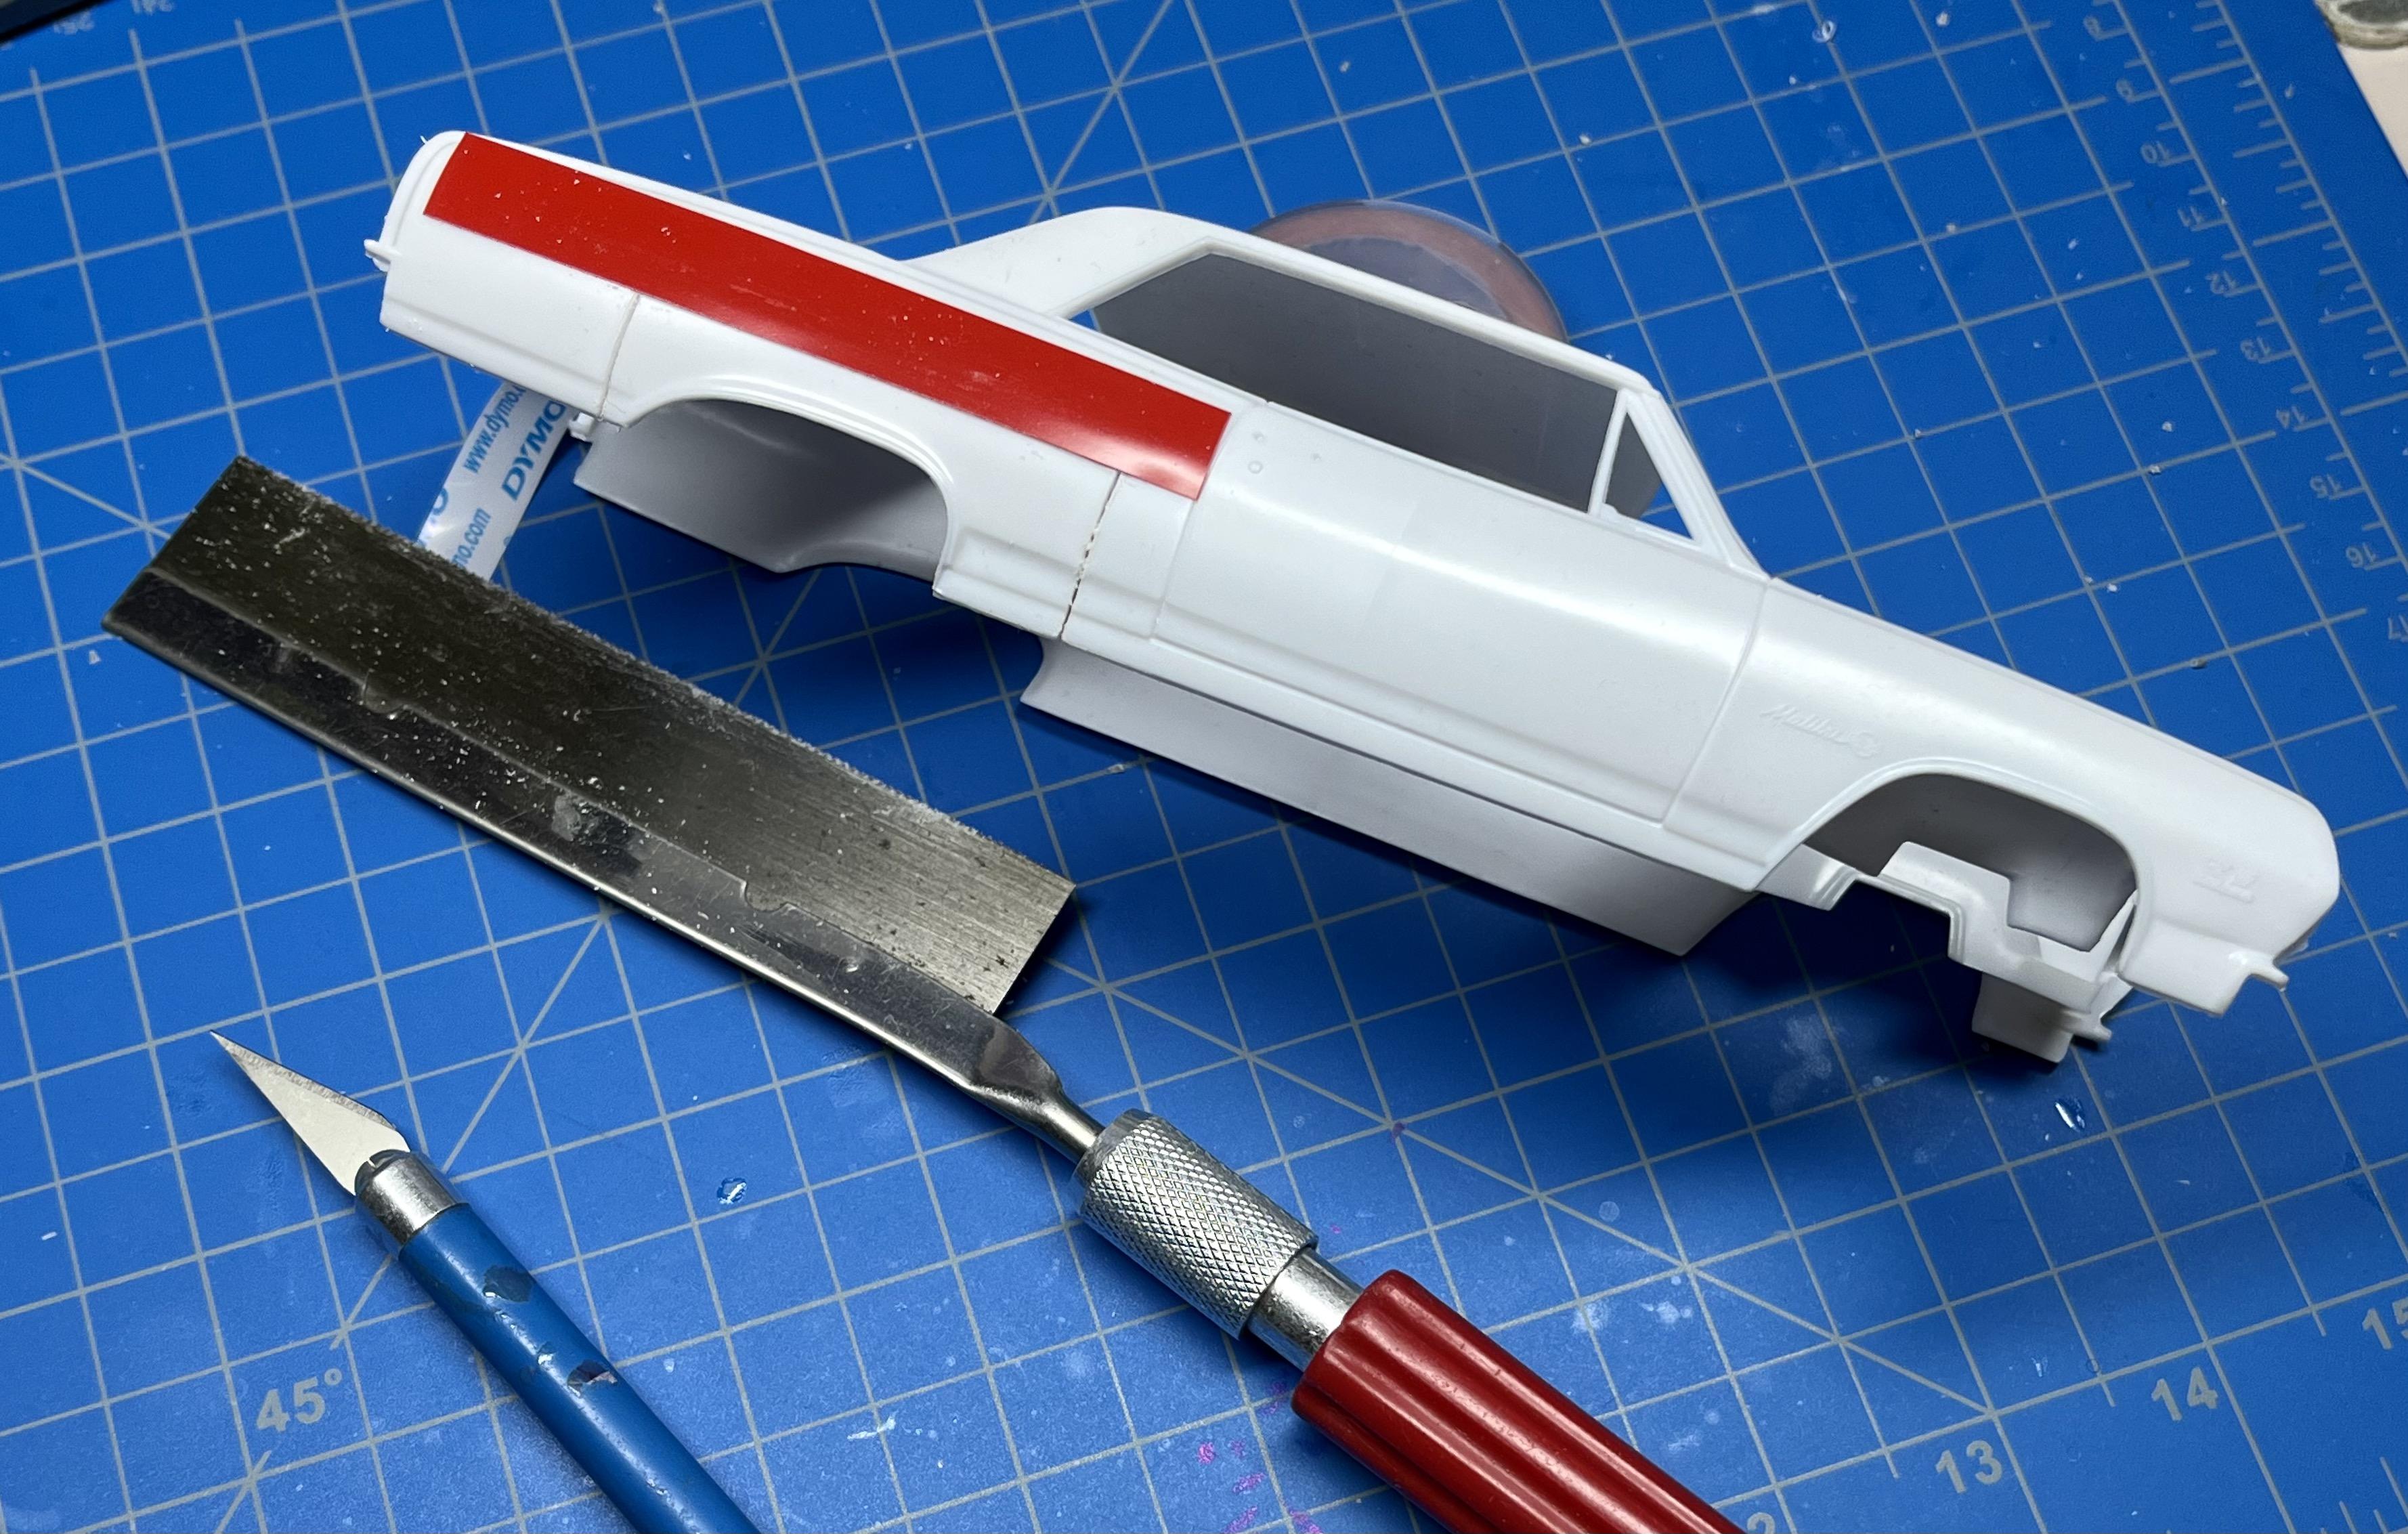
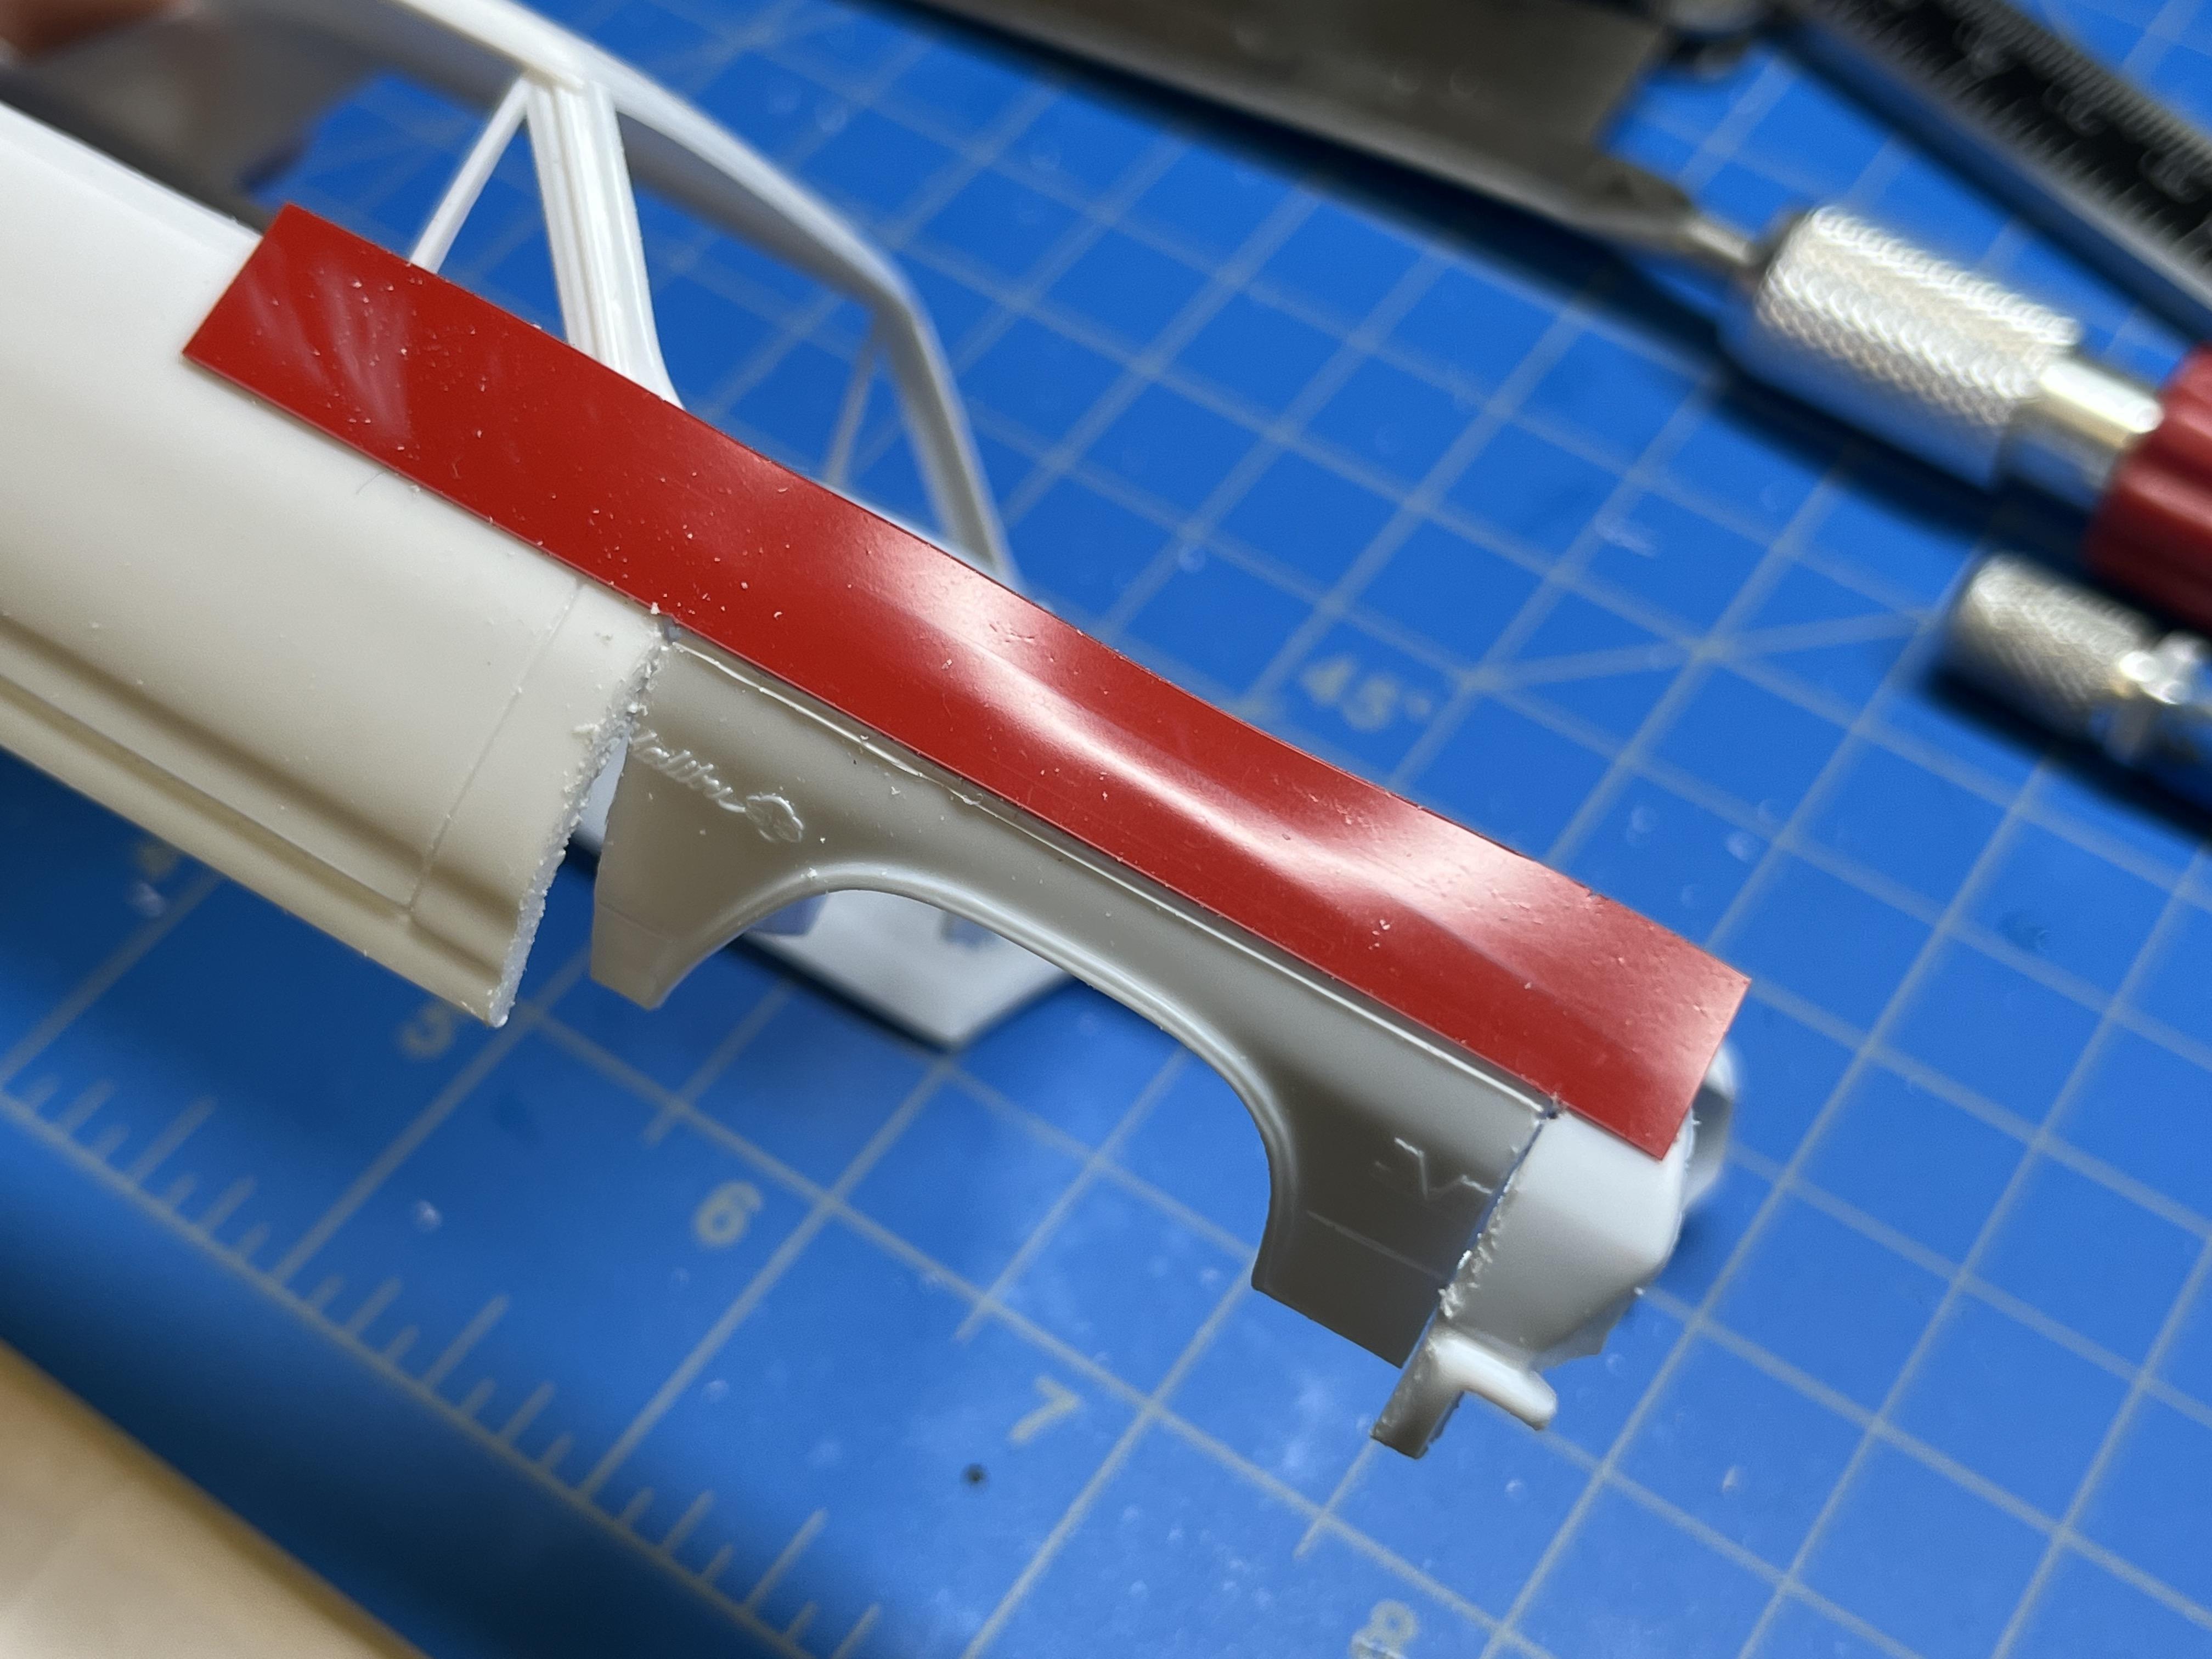
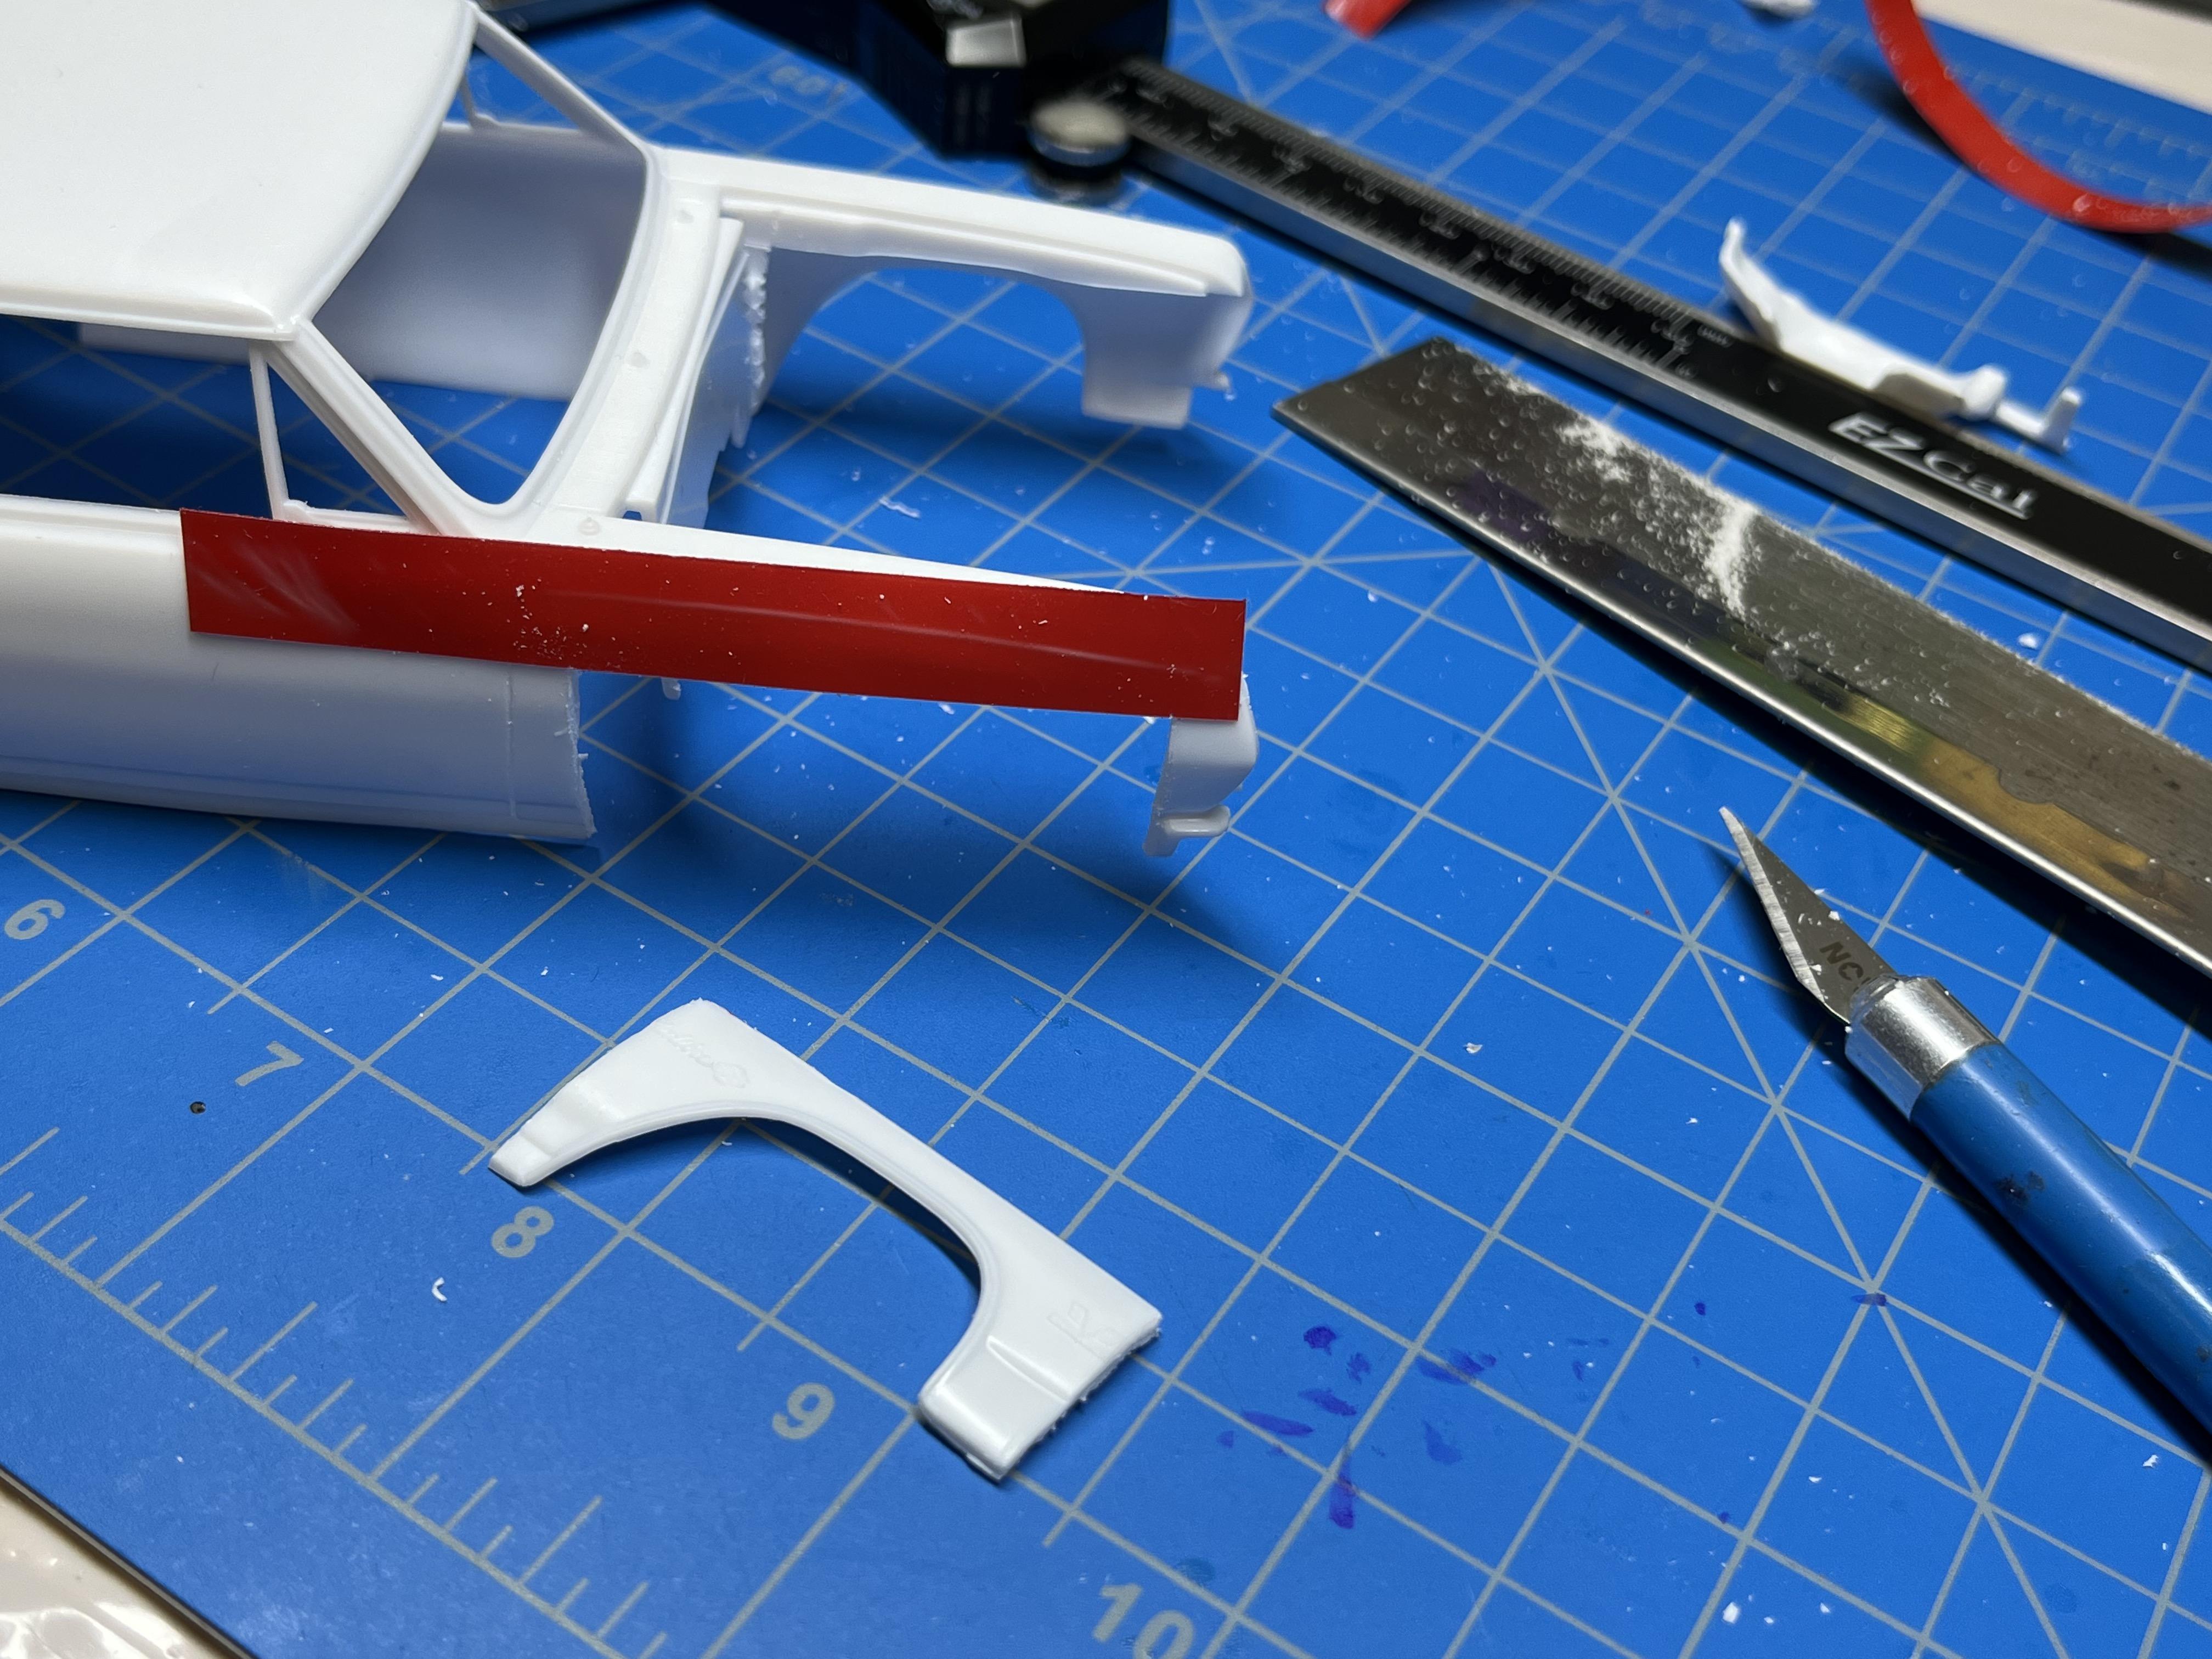
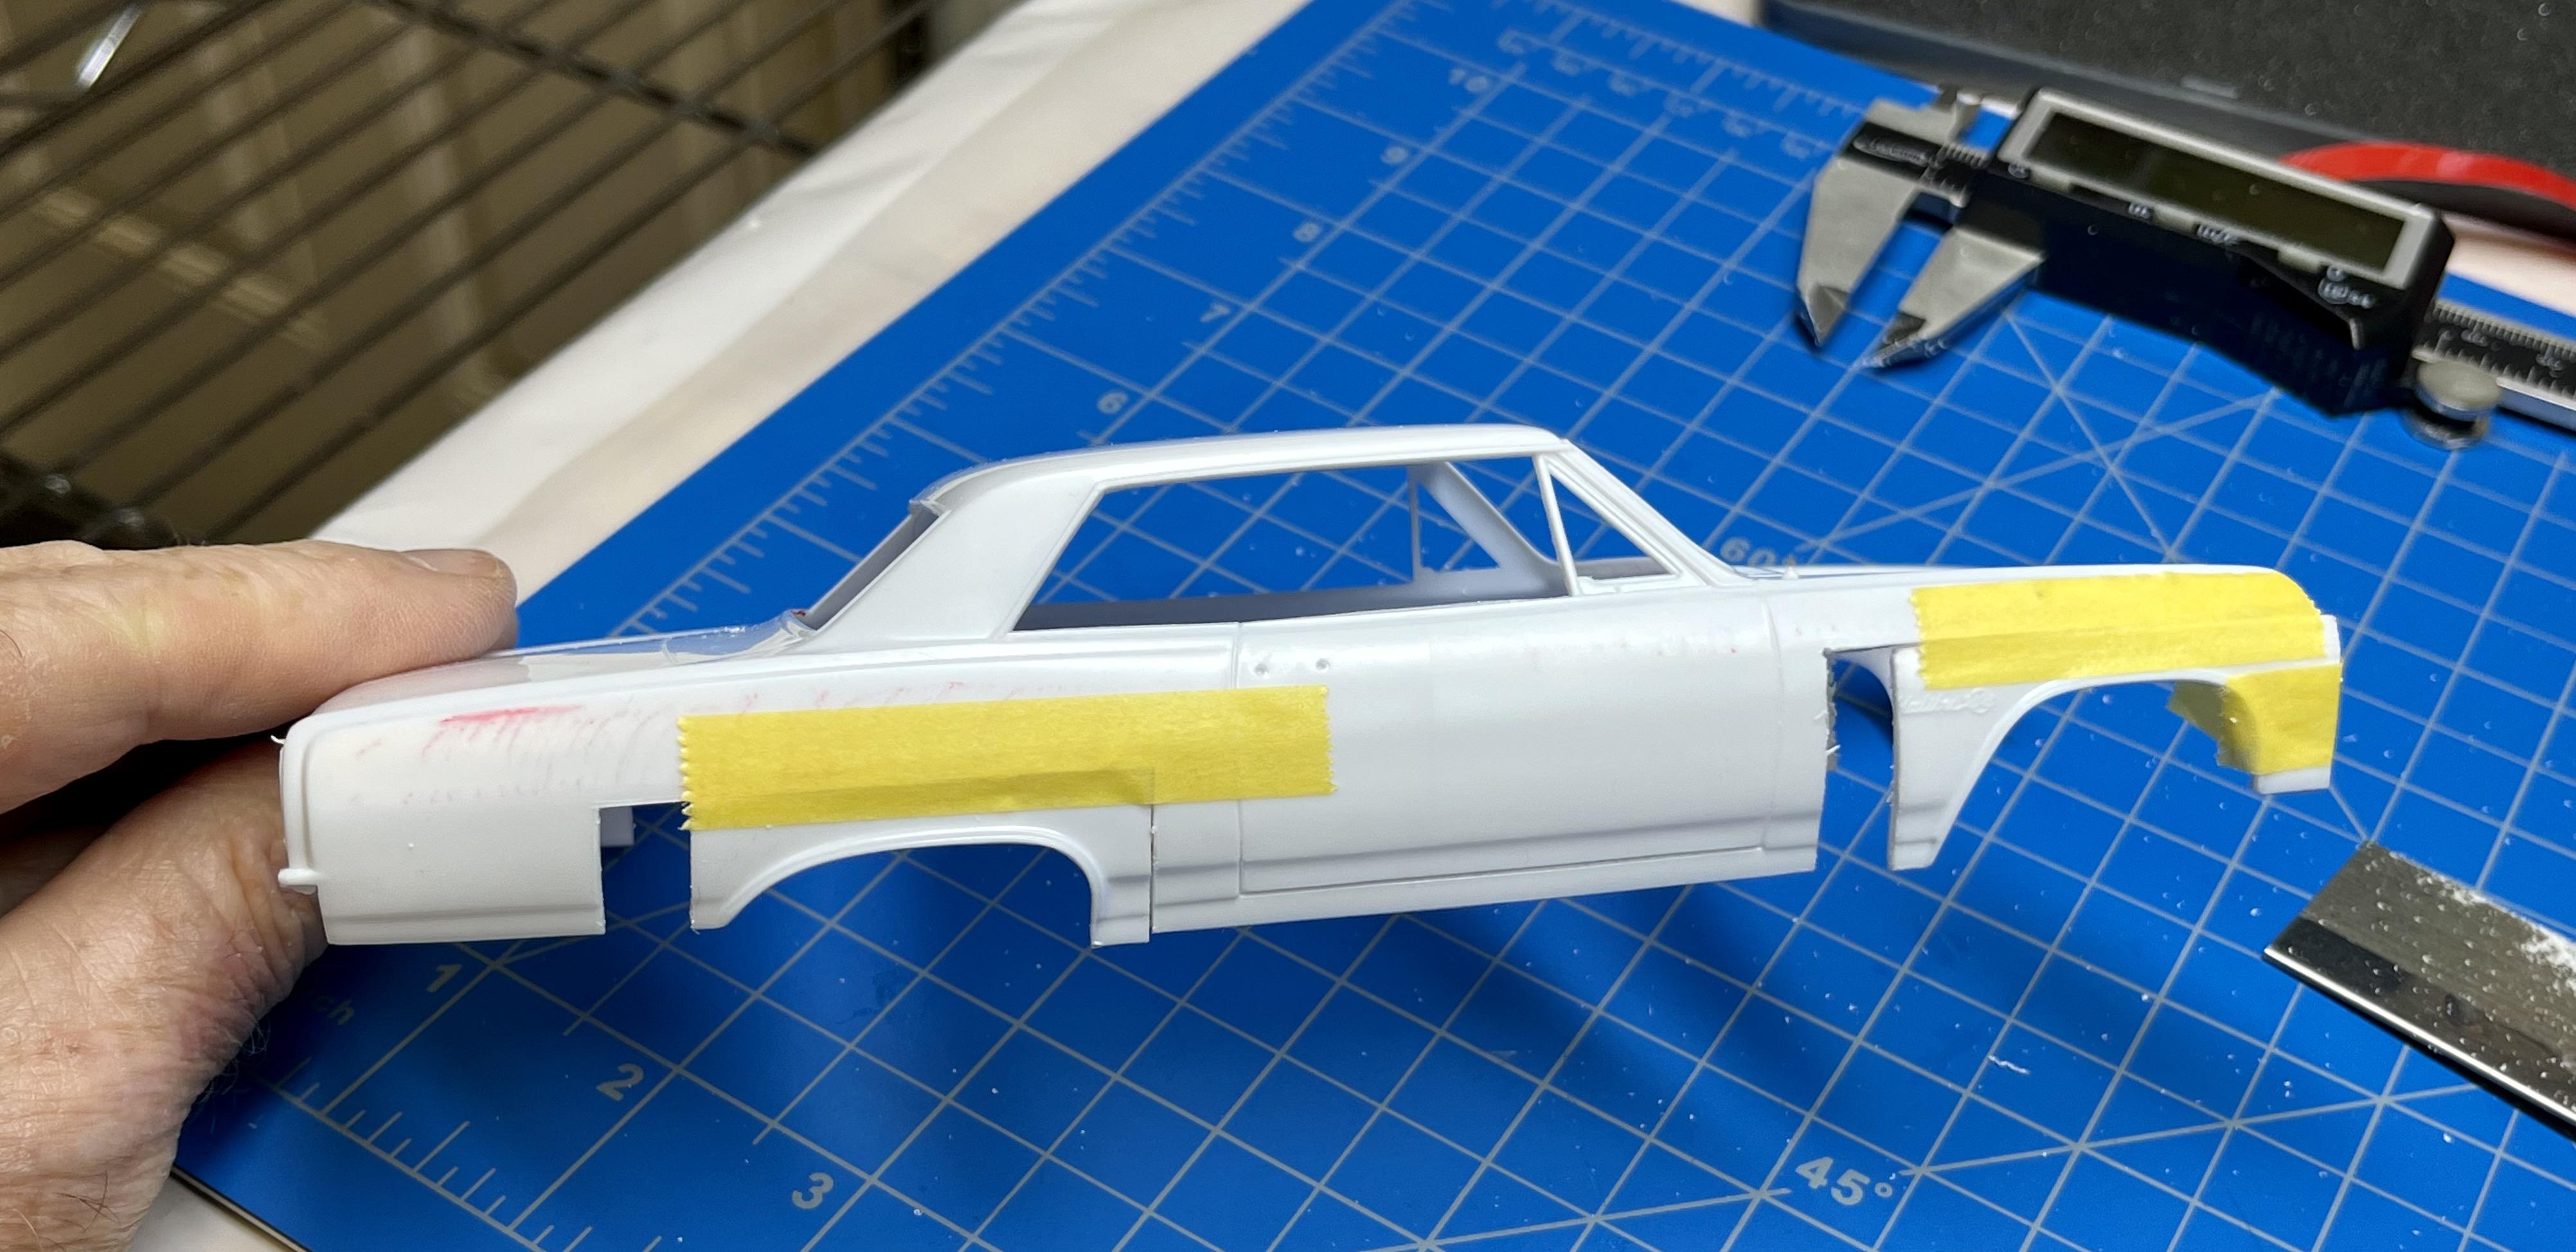
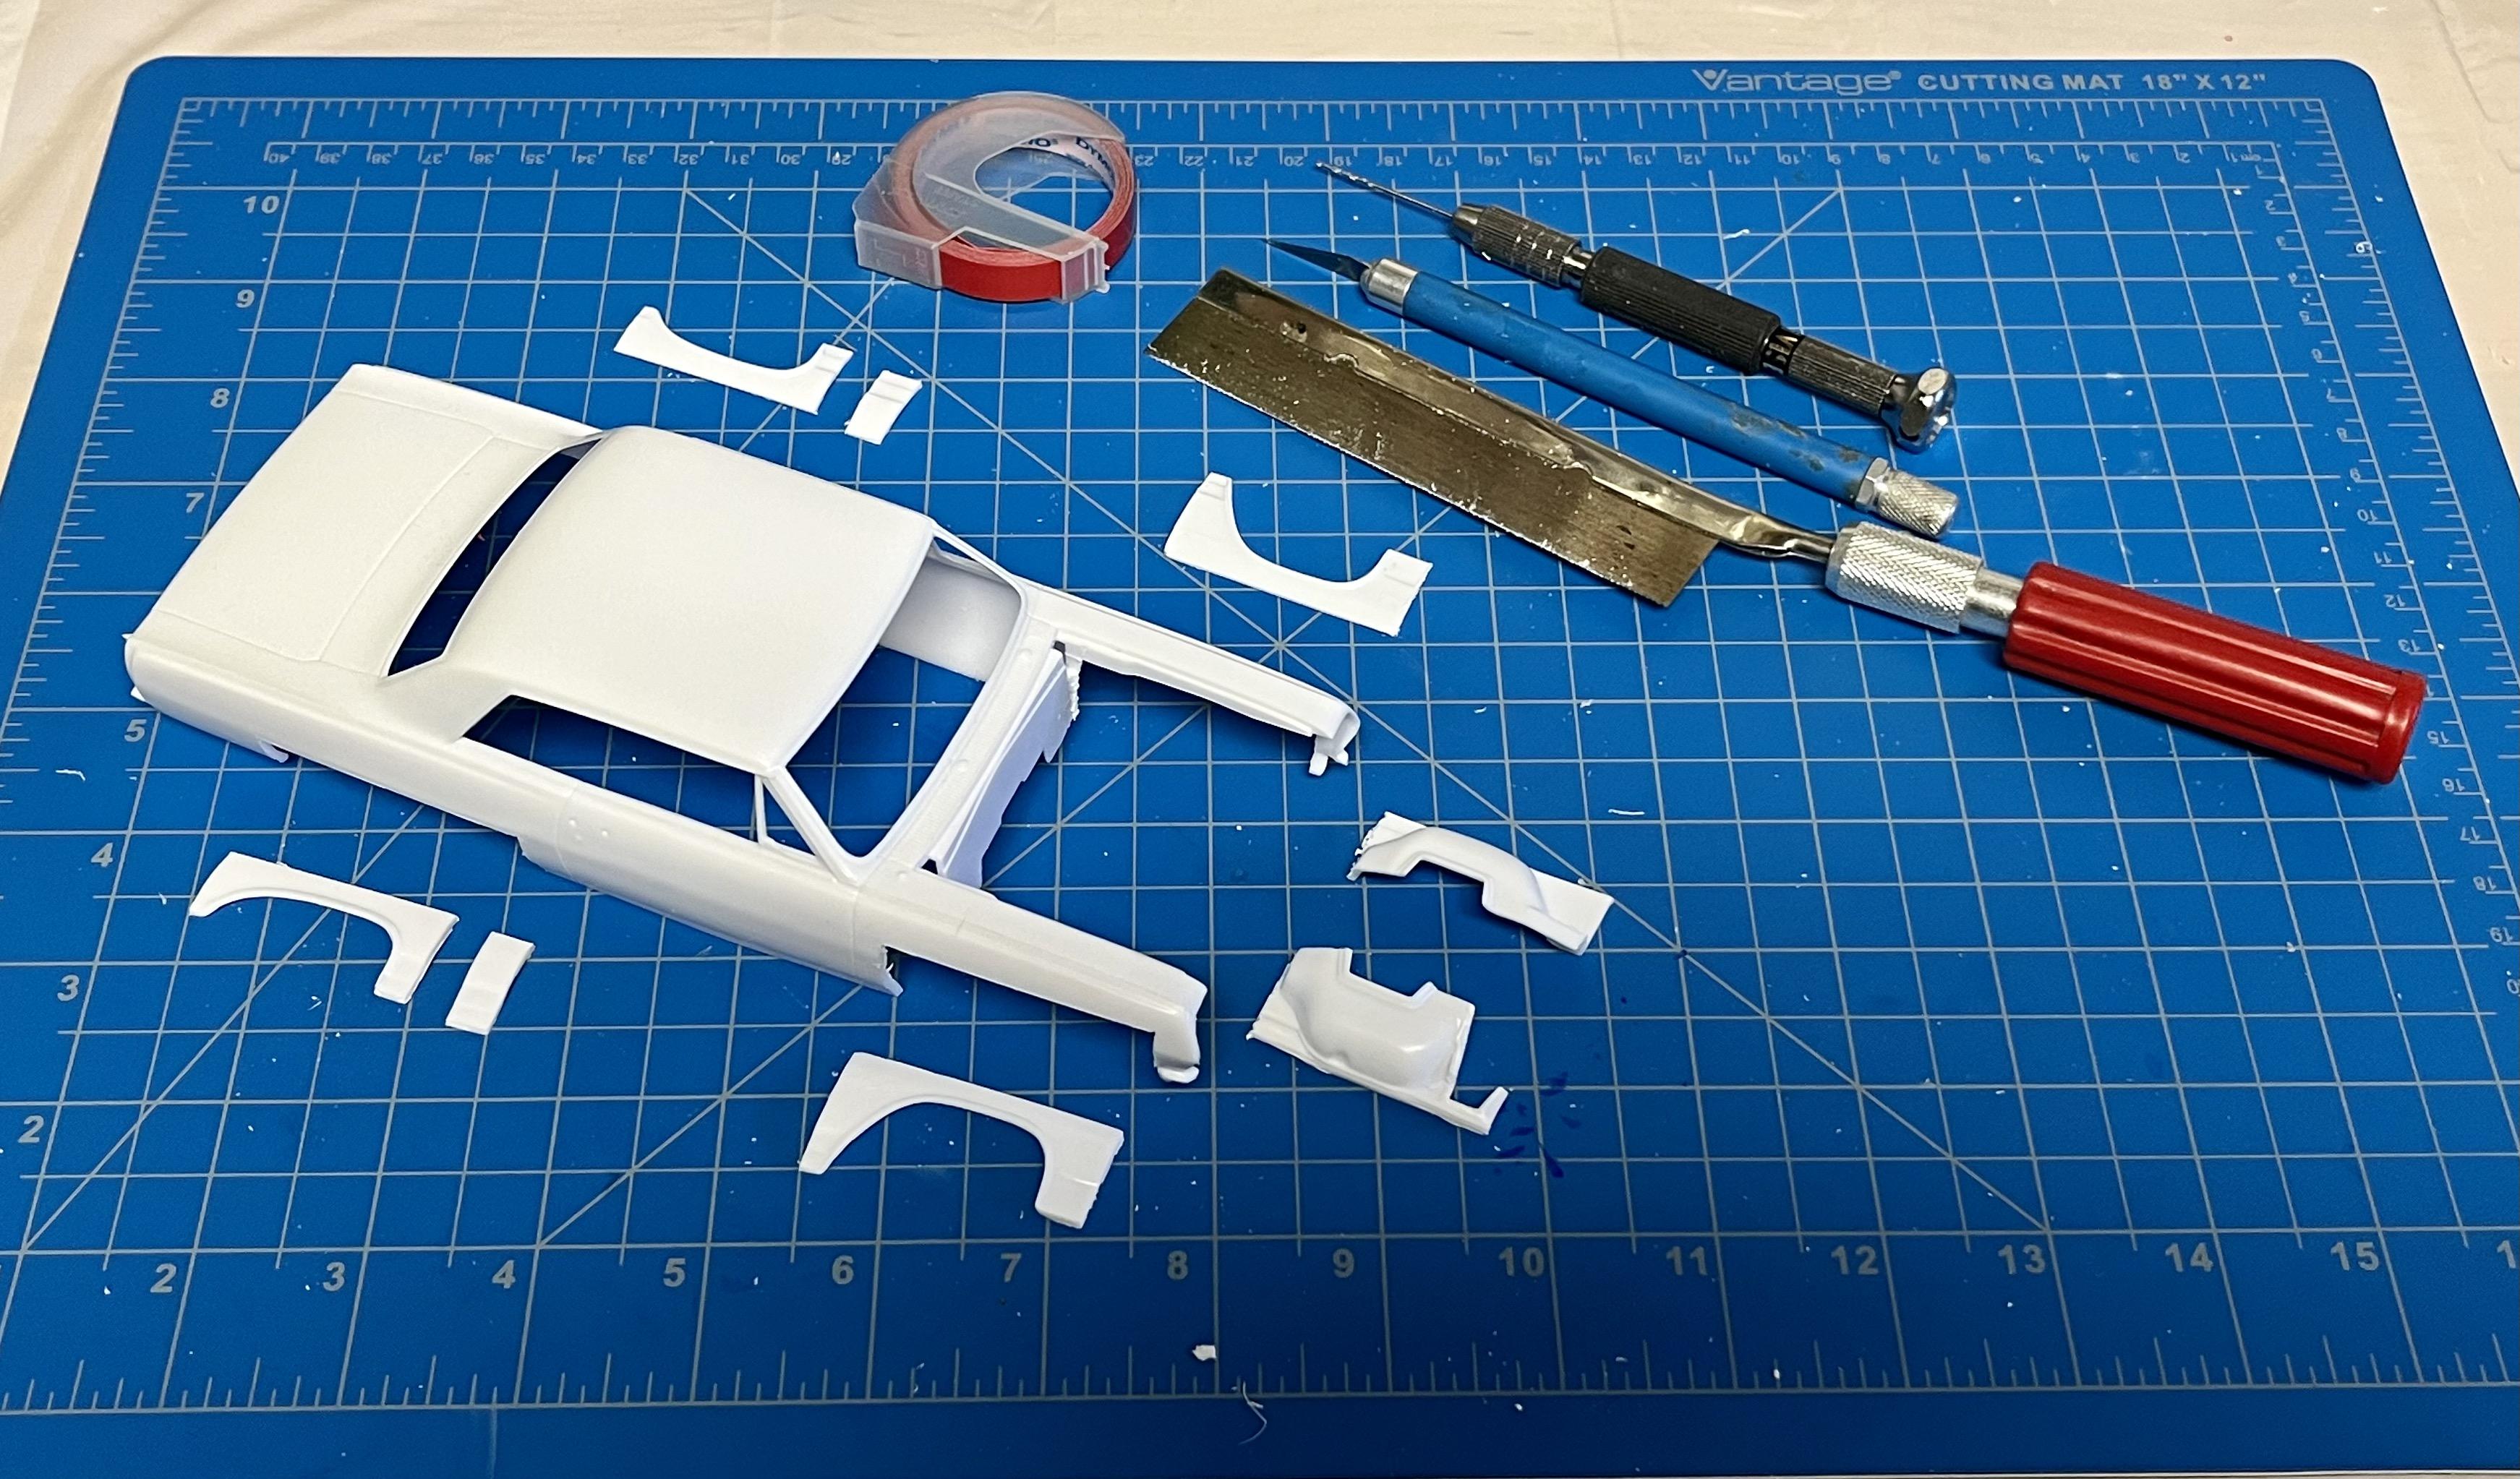
Progress over the last few days: Sanded out to 800 grit and primed the puttied body using Mr. Finishing Surfacer 1500 white primer (nice stuff). It’s not perfect but should pass the “viewing at 18” test and hoping the final red-orange on the lower body + decals will camouflage remaining defects: I added a .28” extension at the rear of the chassis using Evergreen .040” styrene: I then attacked the two bumper guards on both front and rear bumpers (after removing the chrome with oven cleaner) using an X-acto knife and sanding sticks. Not an easy task!: I puttied the damage where I could and then sanded and primed both bumpers: I found a fiberglass type driver’s racing seat in my spare parts box which I hope to include in the interior tub along with a scratch-built roll bar, hydro shifter and column mounted tach. I also think I need to tackle the headers and the modification and dry-fitting of the Hilborn FI and stacks so I can rough-out the cut on the hood before diving into painting of the body and sub assemblies. Going slow on this one but still having fun!

-
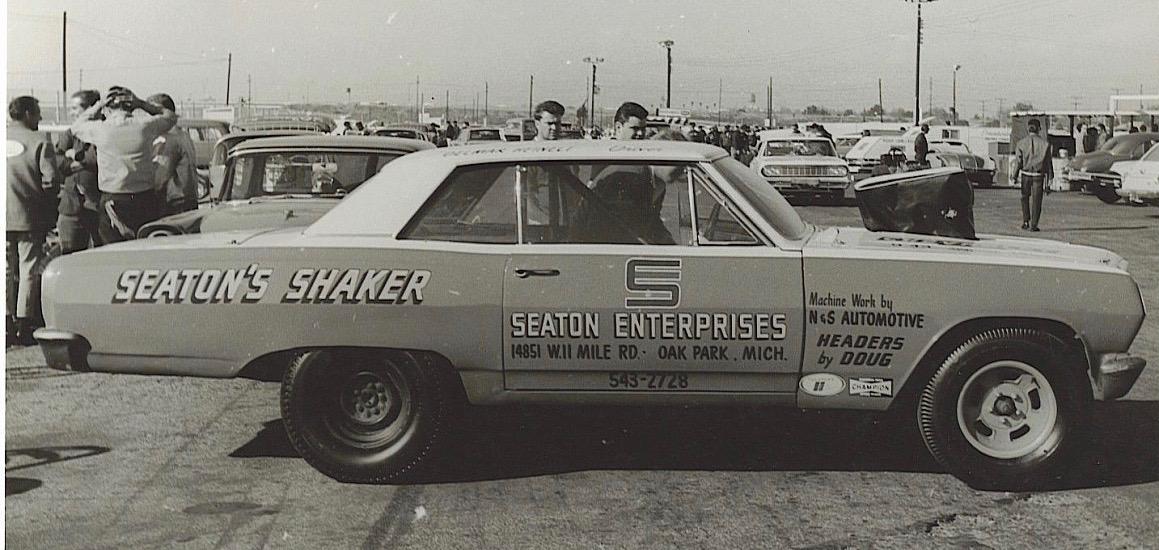
Hi Ian, the Car Craft reference I cited above stated that the transmission used in this car was a Turbo Hydramatic modified by Tom Nell (a GM guy). Other references I’ve seen state that the first TH released by GM was a TH400 offered in ‘64 Caddies.
-
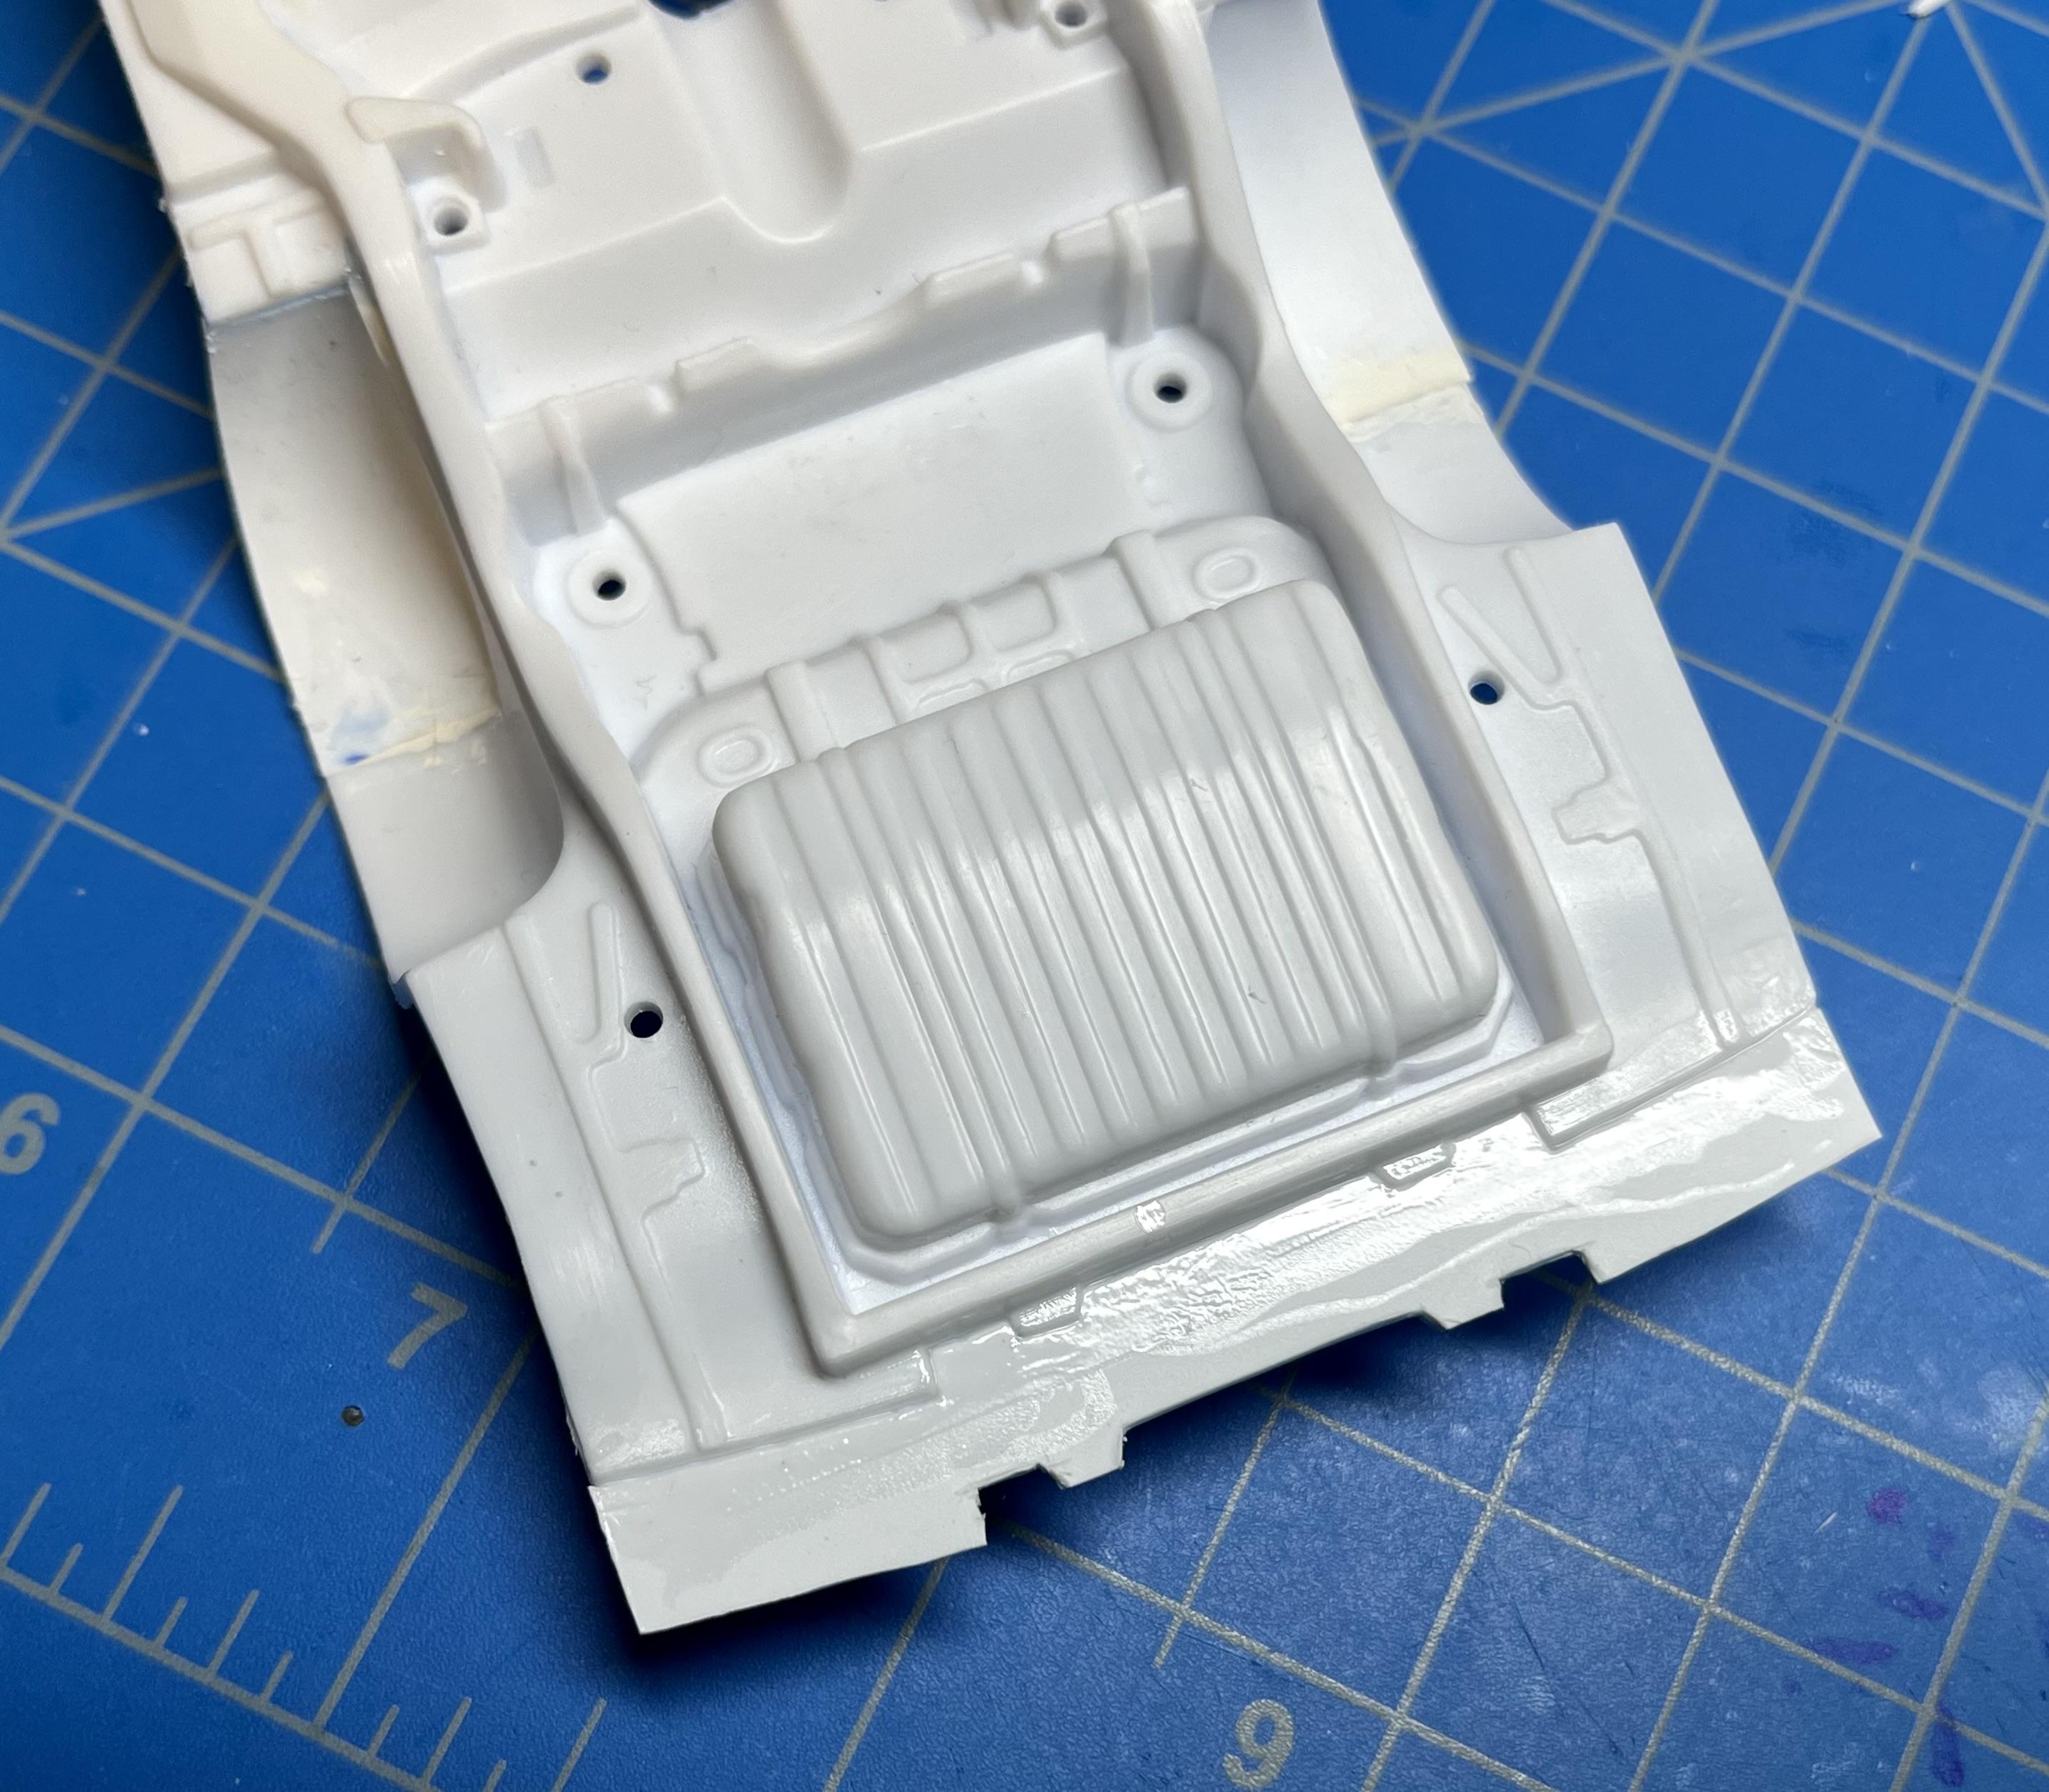
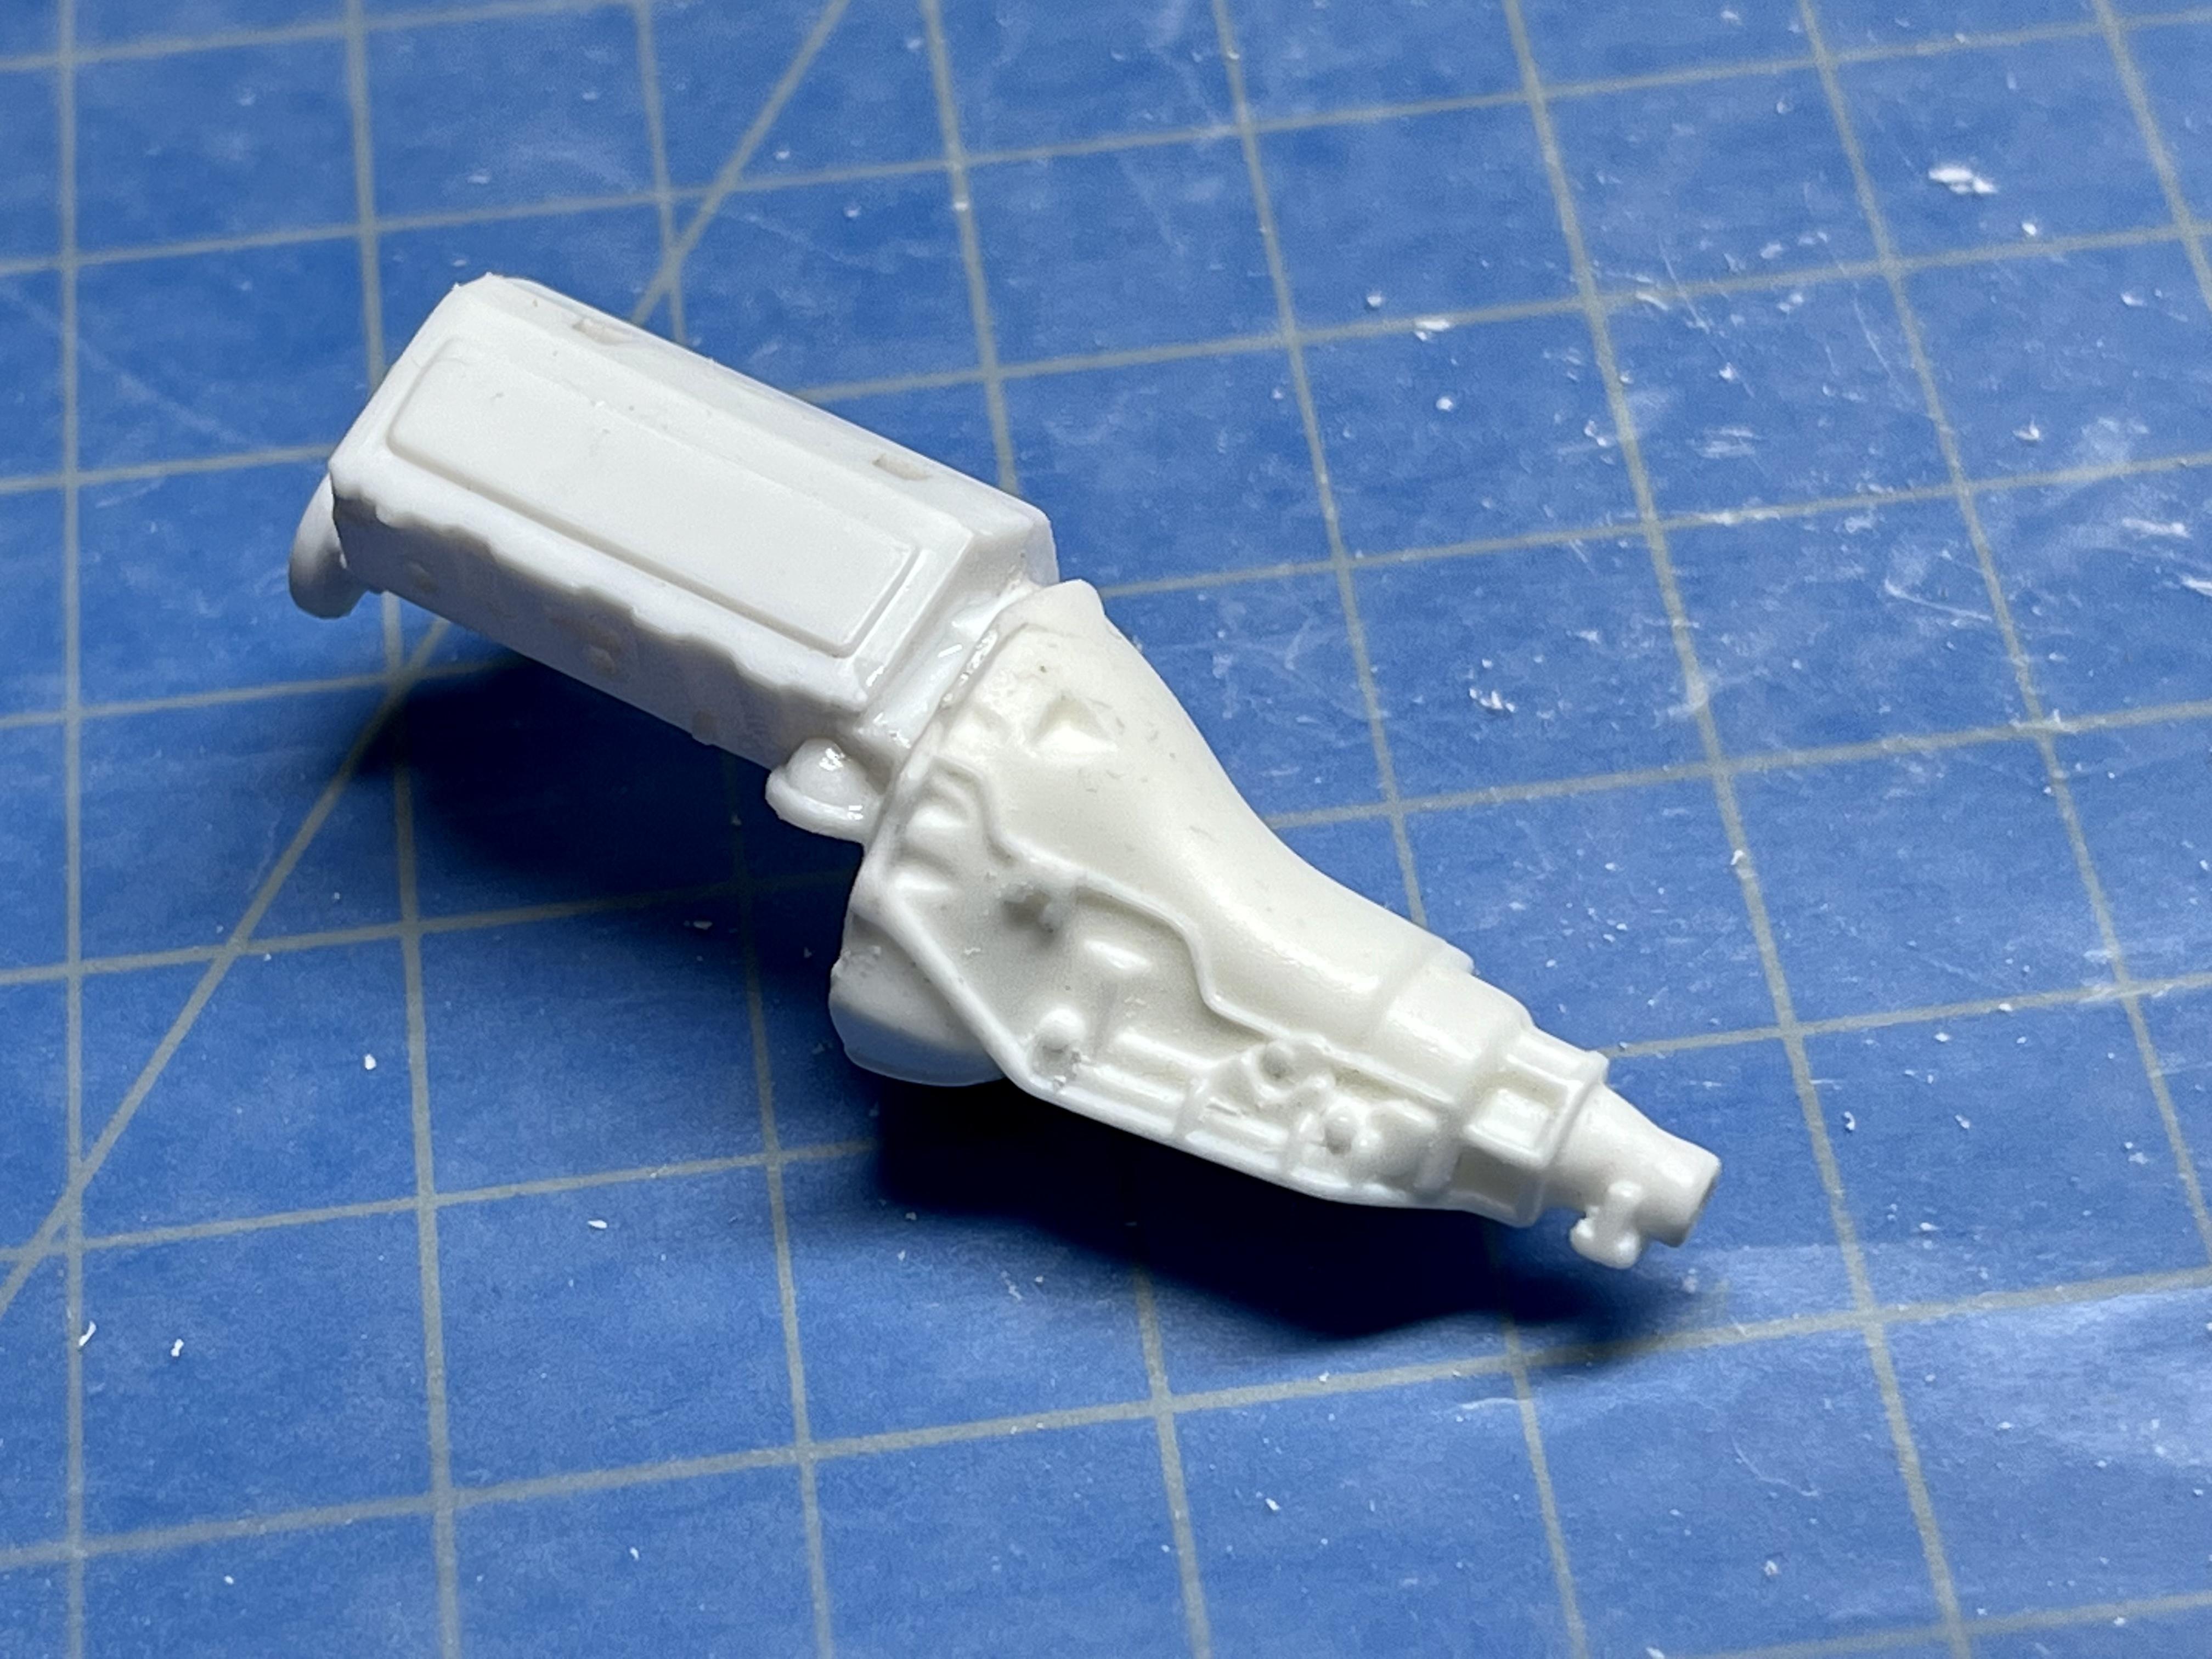
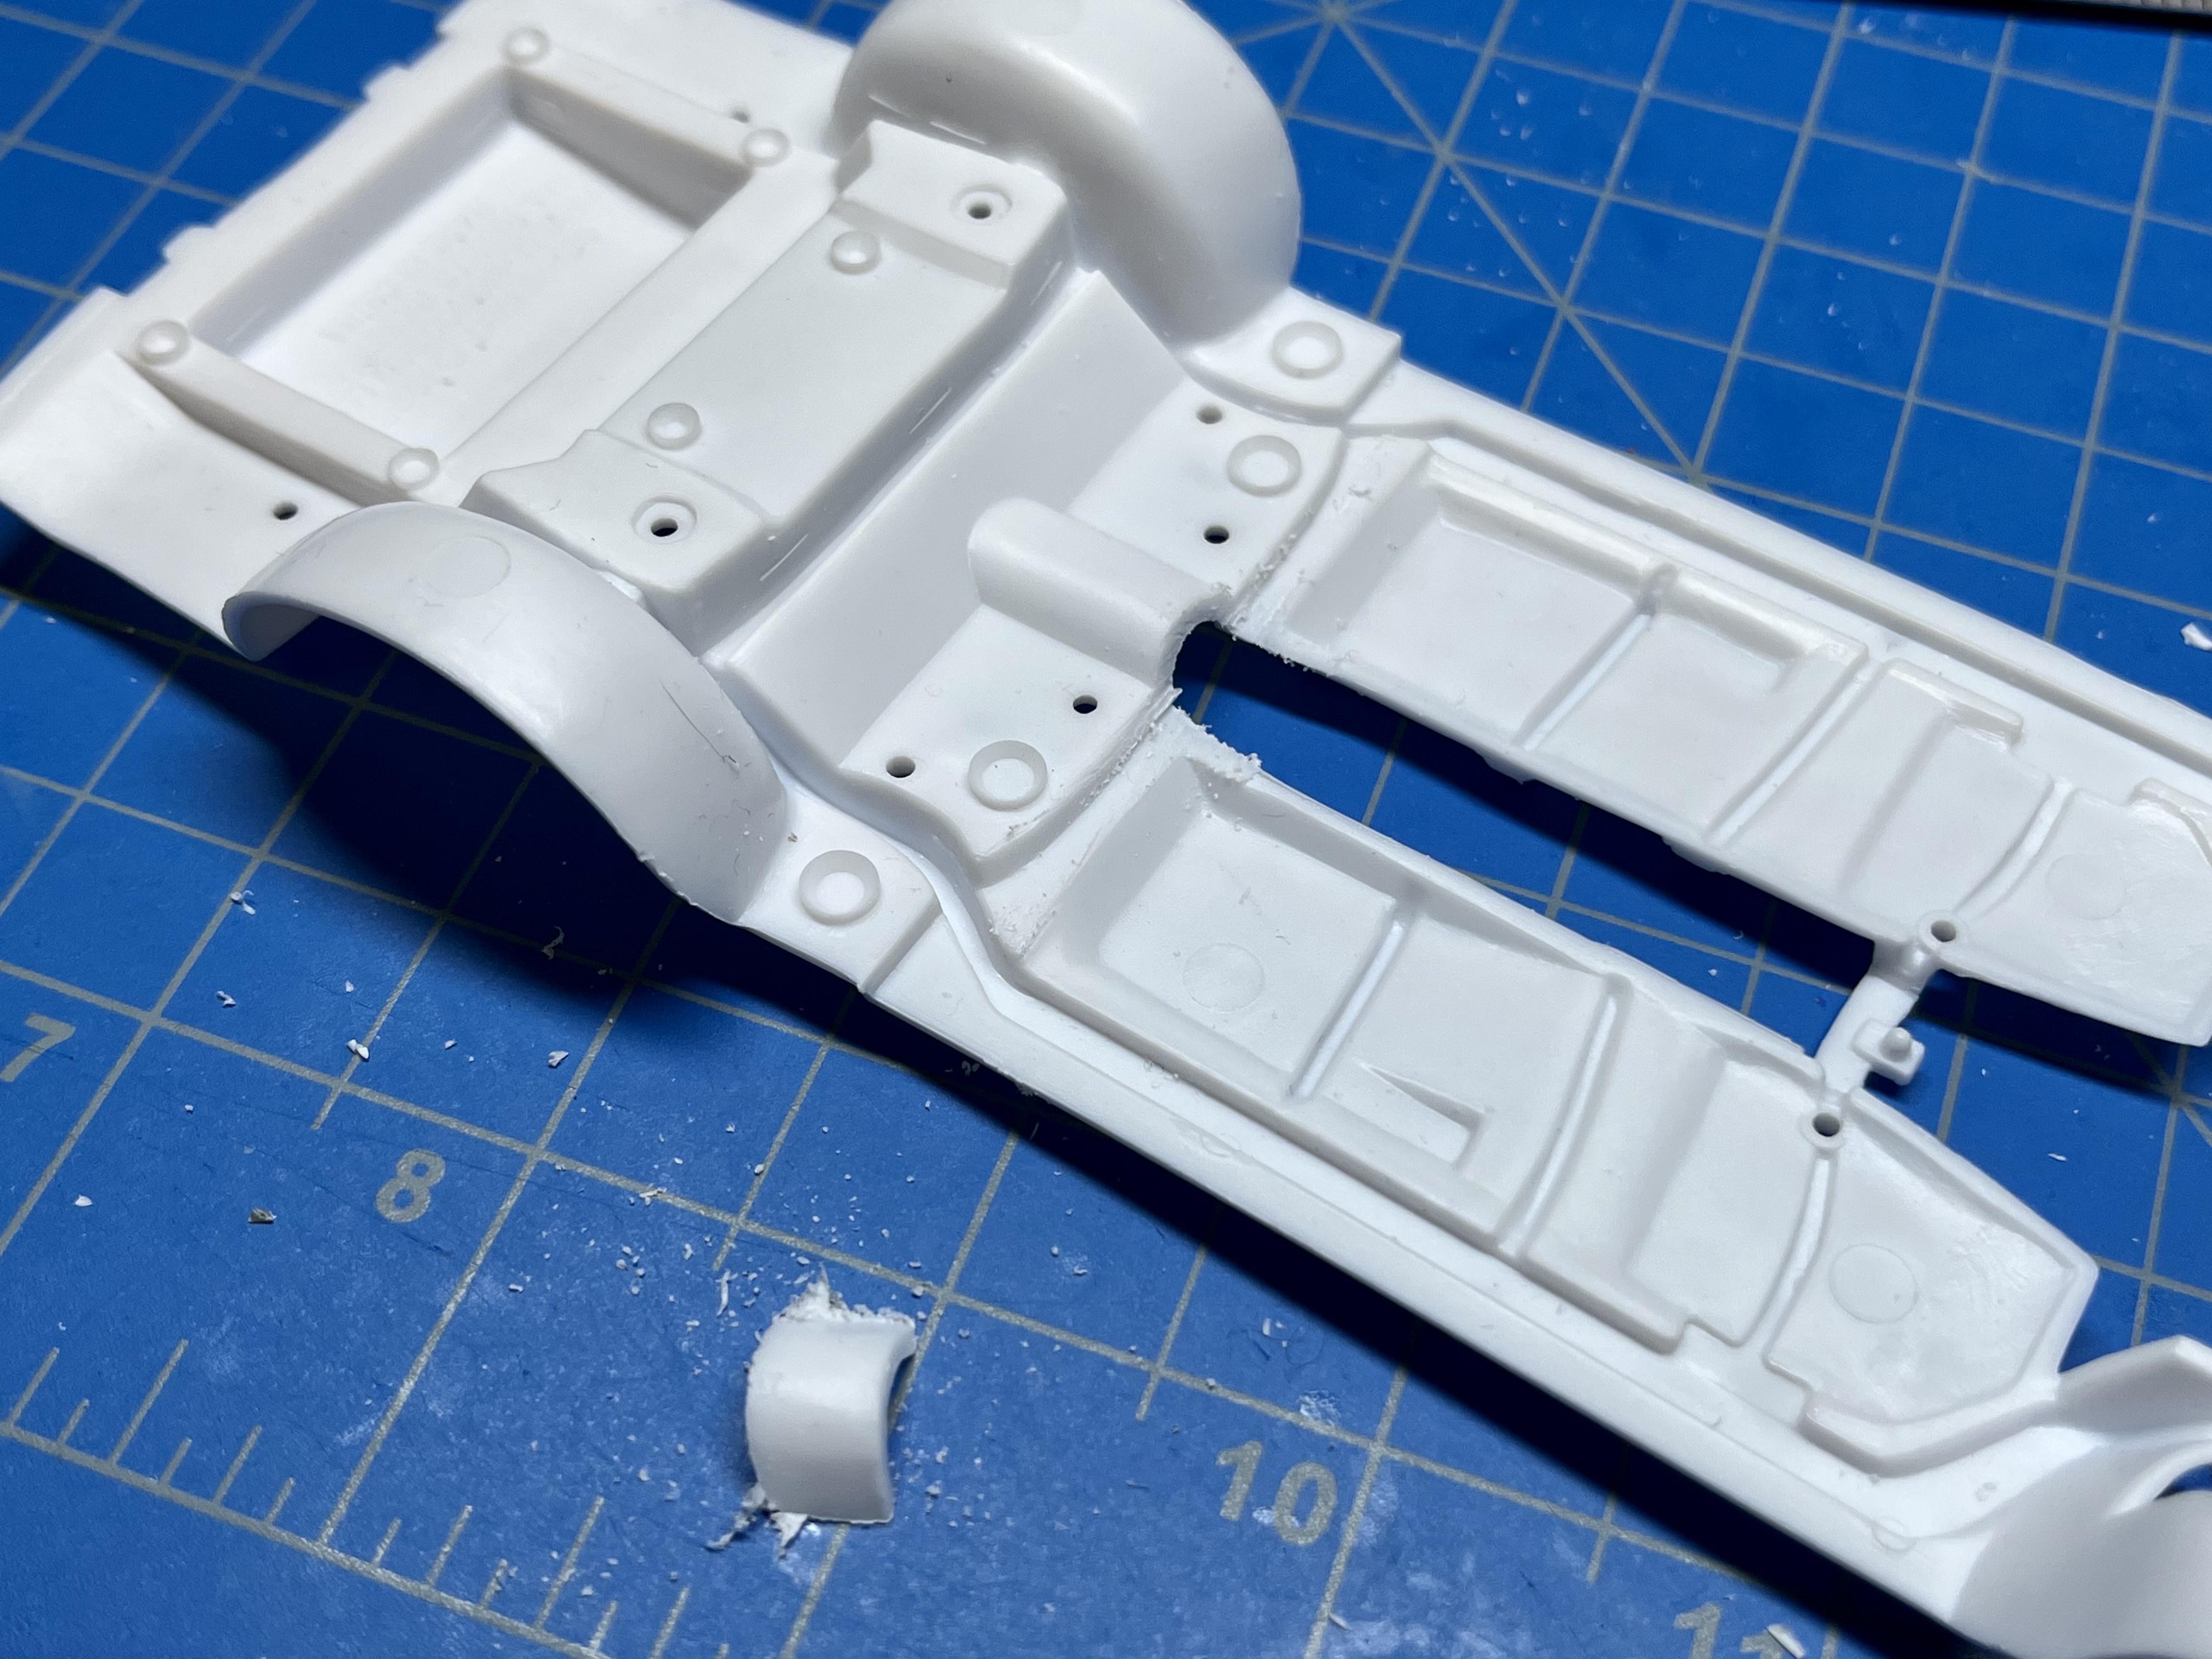
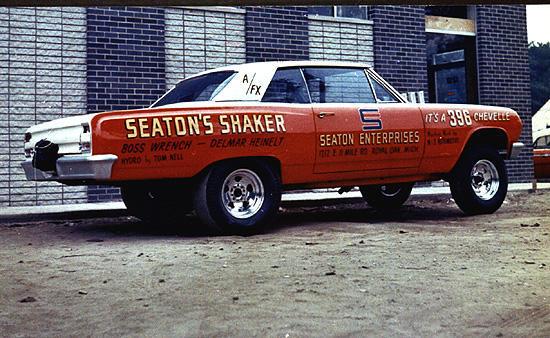
I've made some progress at fitting that big resin TH-400 trans into this chassis: I plan to make my own headers using solder wire, should be fun going around the engine mounts and such: I boxed-in a new transmission tunnel within the interior tub using .020" thick Evergreen styrene to cover up the larger opening I had to make to clear this large resin transmission: And then I fixed the two rear wheel wells on the chassis to allow more room for the larger rear tires: On the subject of reference materials, I splurged on eBay for a rare original copy of Car Craft Magazine Dec 1965 with included an excellent article on this car. I'd love to post the article but don't want too violate any copyright laws so I'll just note the following things I learned and were able to confirm: They described the car as a "match car", not to NHRA A/FX rules I assume, although the photos of the car in the article have "A/FX" on the rear roof column on each side. A three-speed Turbo-Hydromatic transmission was used in this car. They included a floor shifter which allowed manual selection of each of the three speeds or an auto drive option (at 6500 rpm!). No front brakes, no radiator. They included a 5 gal water tank in the trunk with a small electric water pump that allowed them too cool the engine between runs Very little modifications to the stock chassis (positraction and uneven coil springs to counteract the crazy torque). The body was shifted rearwards 7" (maintaining the stock wheel base) and lifted 1" (which I'm probably not going to worry about). They used a full-sized Chevy sedan differential with 4.56 gears, I'll probably just use the stock Chevelle diff. The car/ decals label it a '396' but in actuality, it's a prototype 427 that Seaton was able to get from GM They used a Hilborn FI intended for a Ford 427 and jerry-rigged an adapter manifold. I have a resin BBC Hilborn FI manifold that I think I'll still use but I might add two four hole plates between each of the two lines of four bosses on the resin manifold and the metal velocity stocks too try to mimic the appearance of the actual BBC-to Ford Hilborn FI set-up. A 3 gal Moon fuel tank was mounted in front of the engine. Interior was gutted for racing (fiberglass driver's seat, no passenger or back seat, stock inner side panels but all hardware removed, stock dash and steering wheel with tach mounted on. column, roll bar and five point racing harness). Exhaust headers are individual 2" ID tubing, each 40" long, no collector. Oil pan was 3" deeper (need to add .12") Cheers, John
-
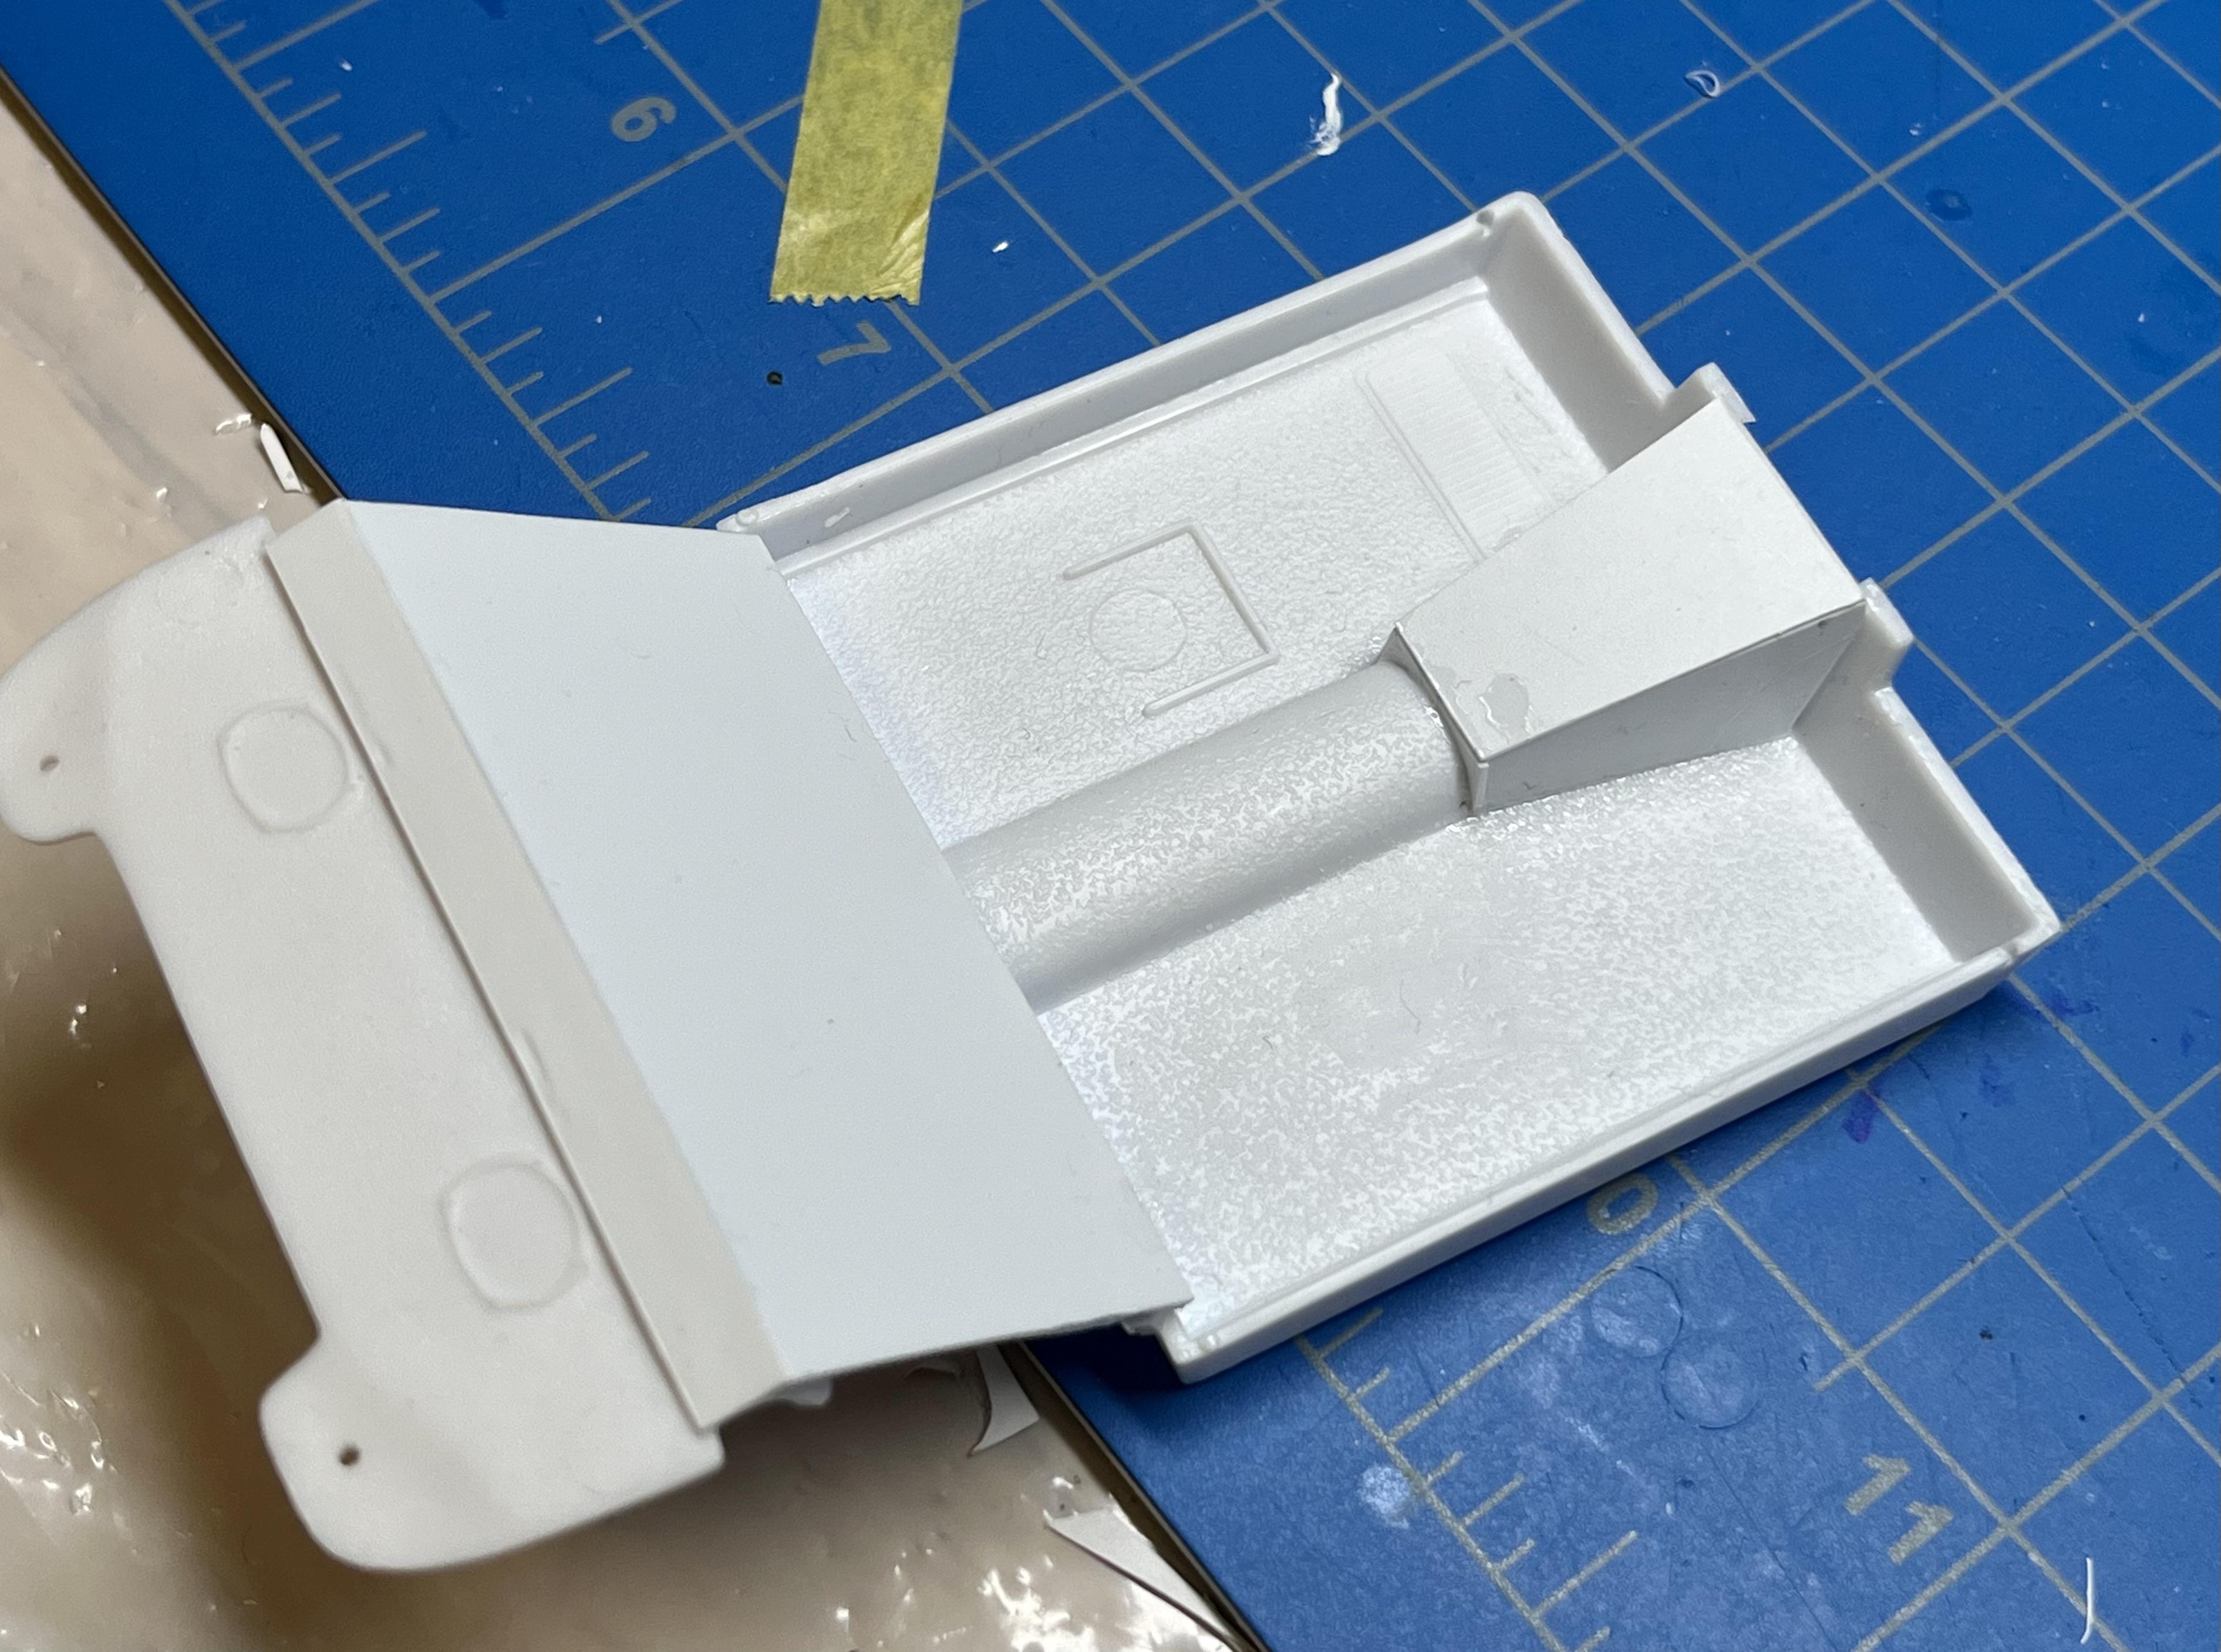
A few minutes left before I knock off for the day, I decided to box in the remaining two gaps between the engine bay wheel wells and the firewall with .040” sheet styrene so that I can prime the body tomorrow to check my putty job:
-
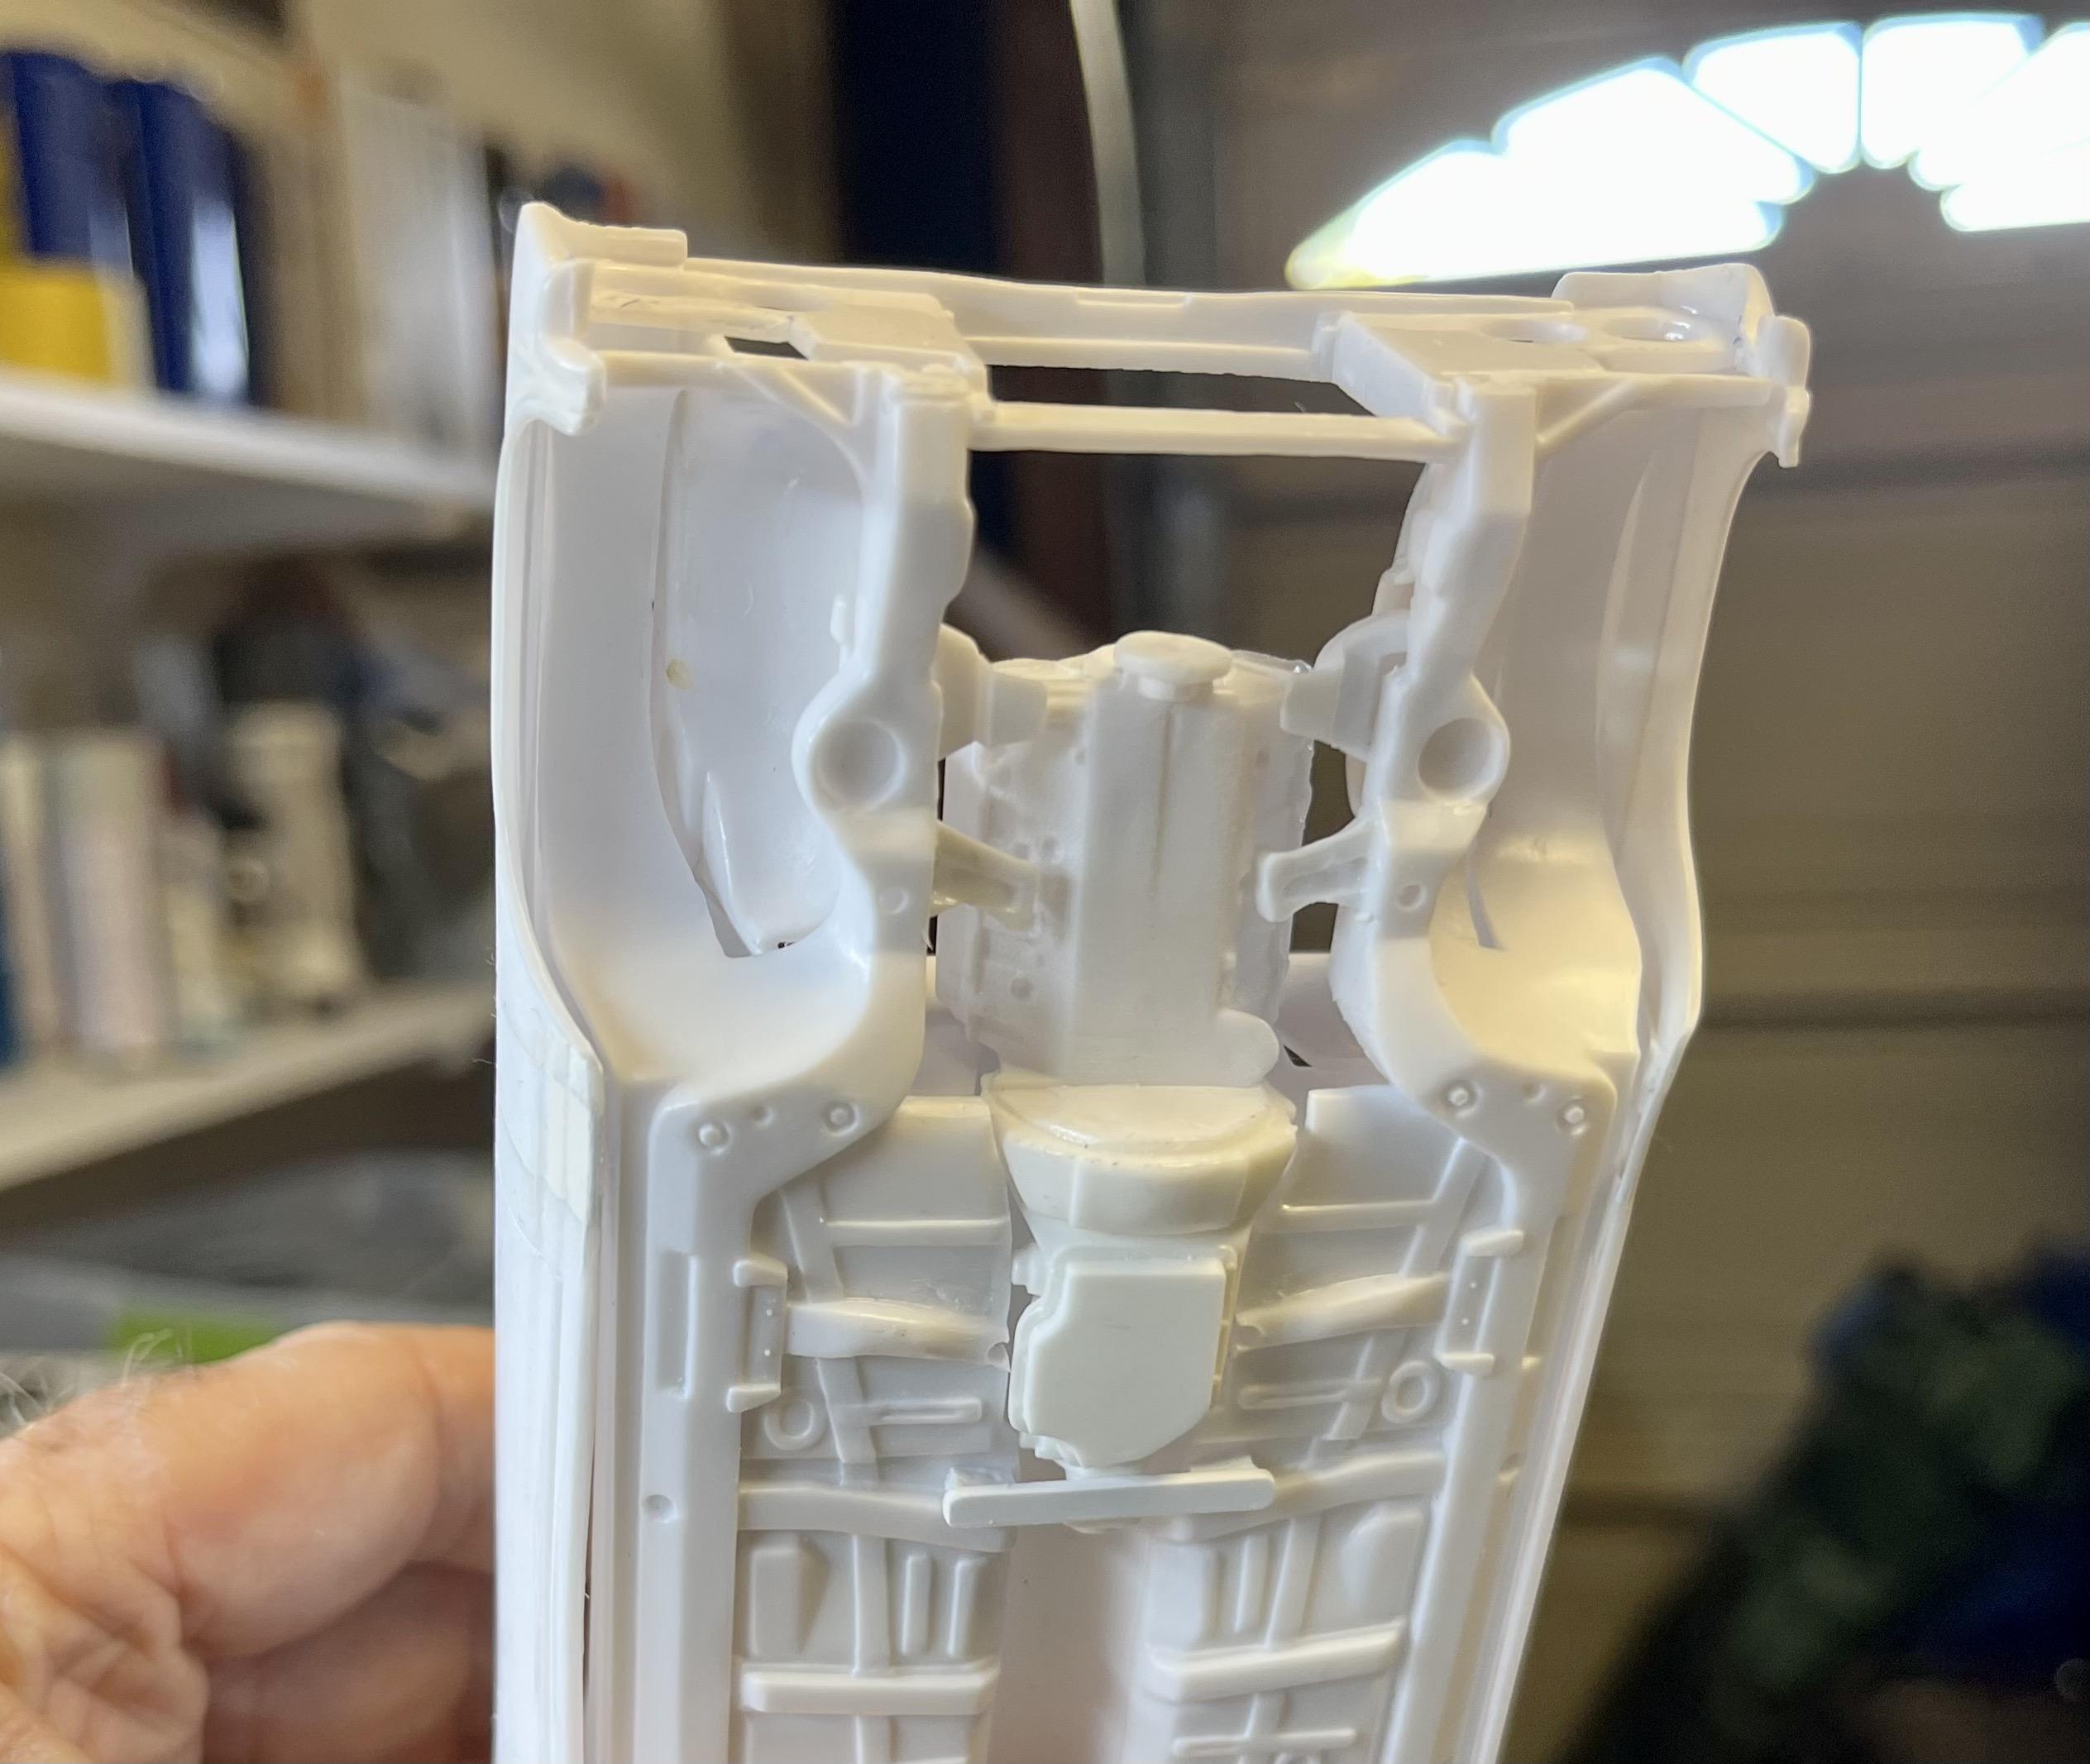
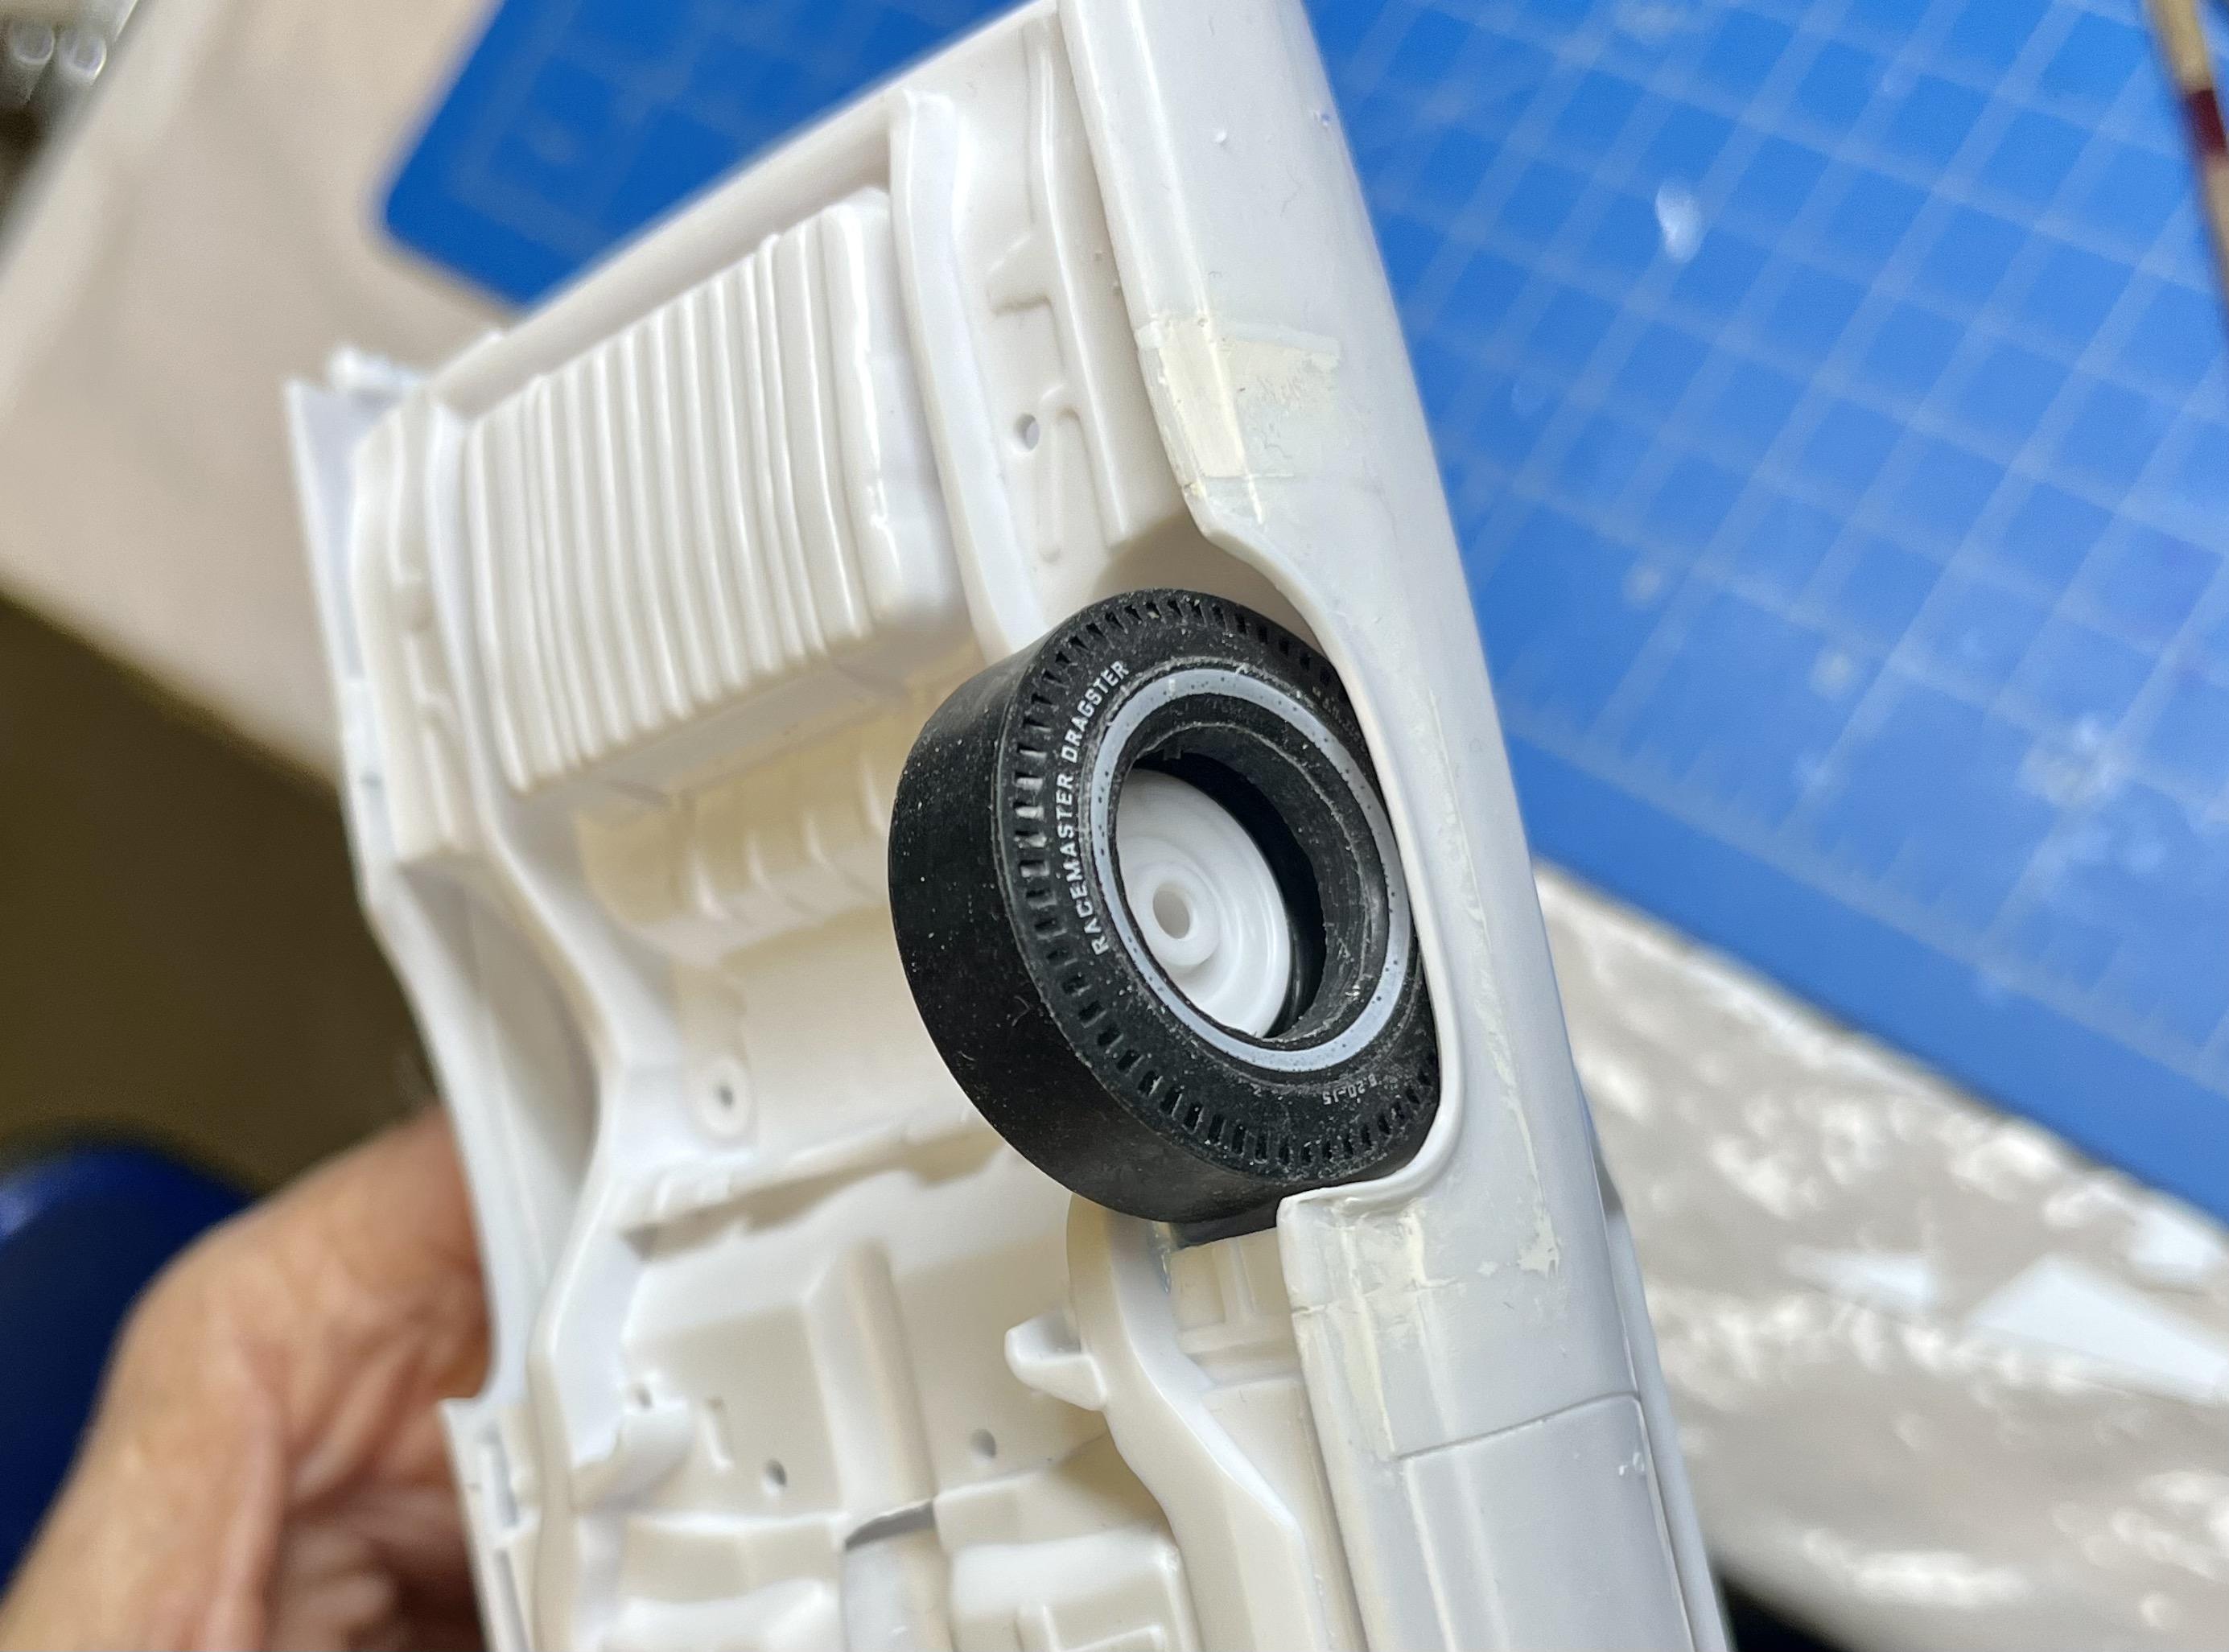
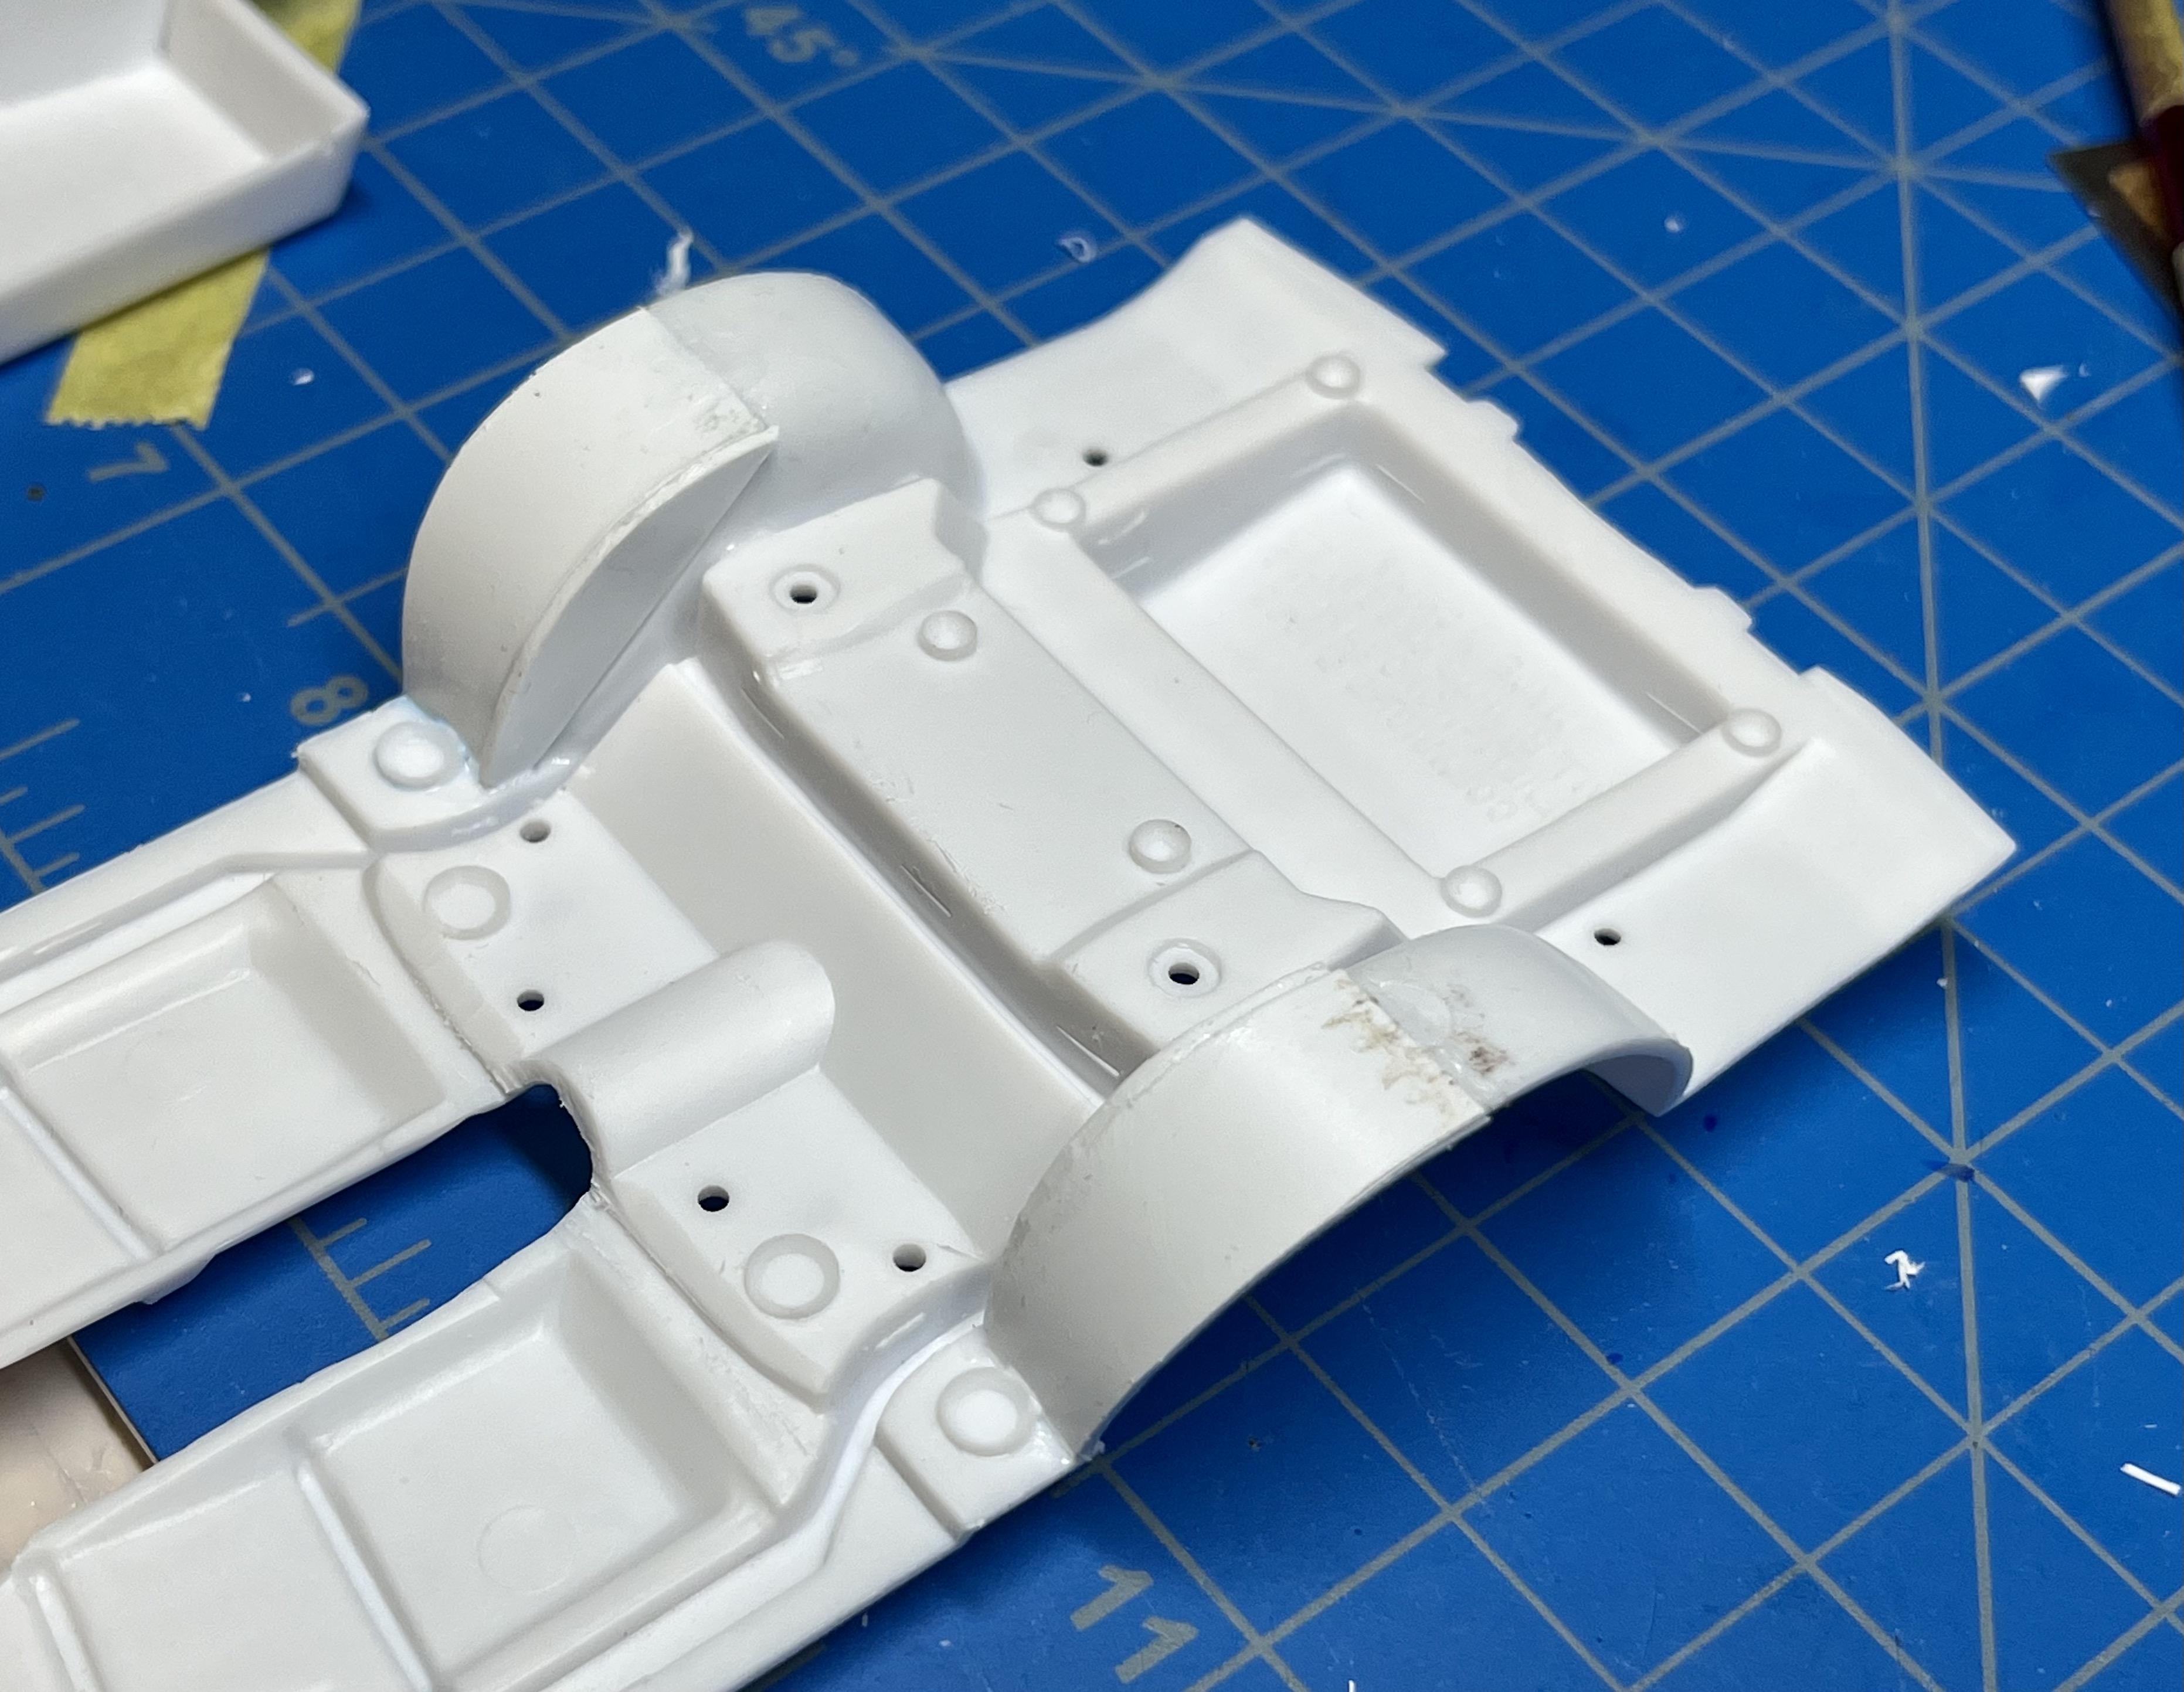
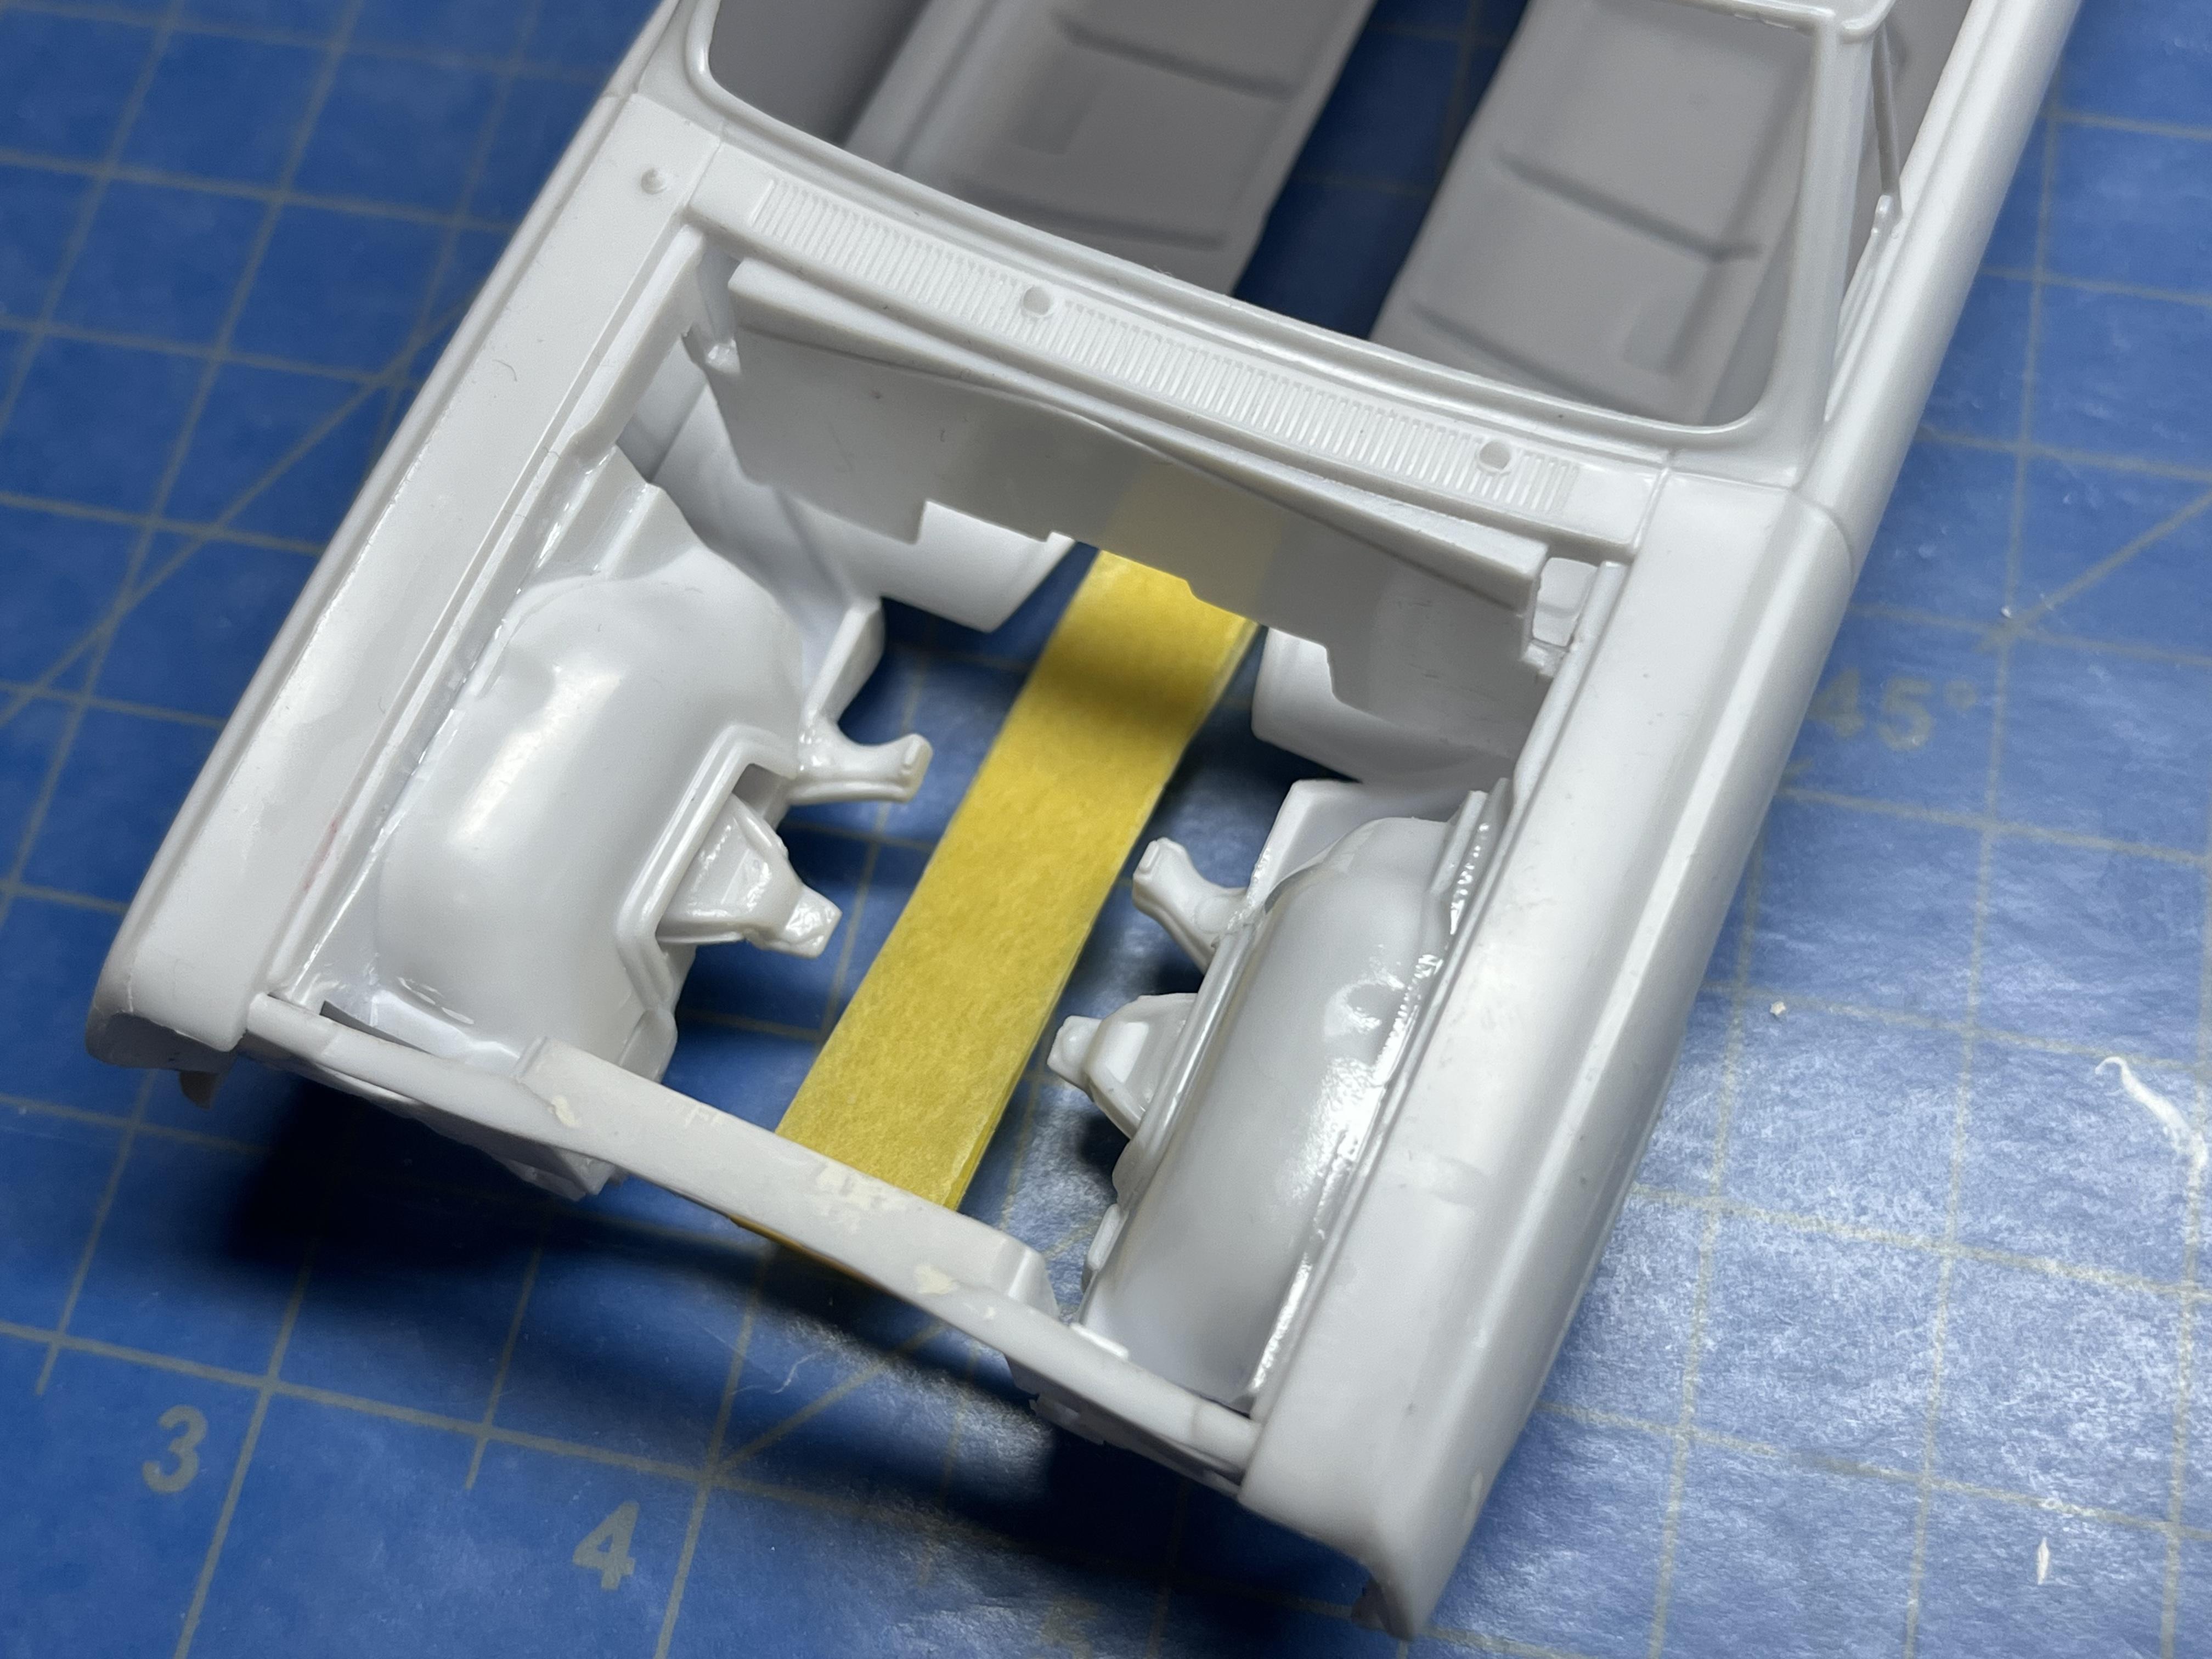
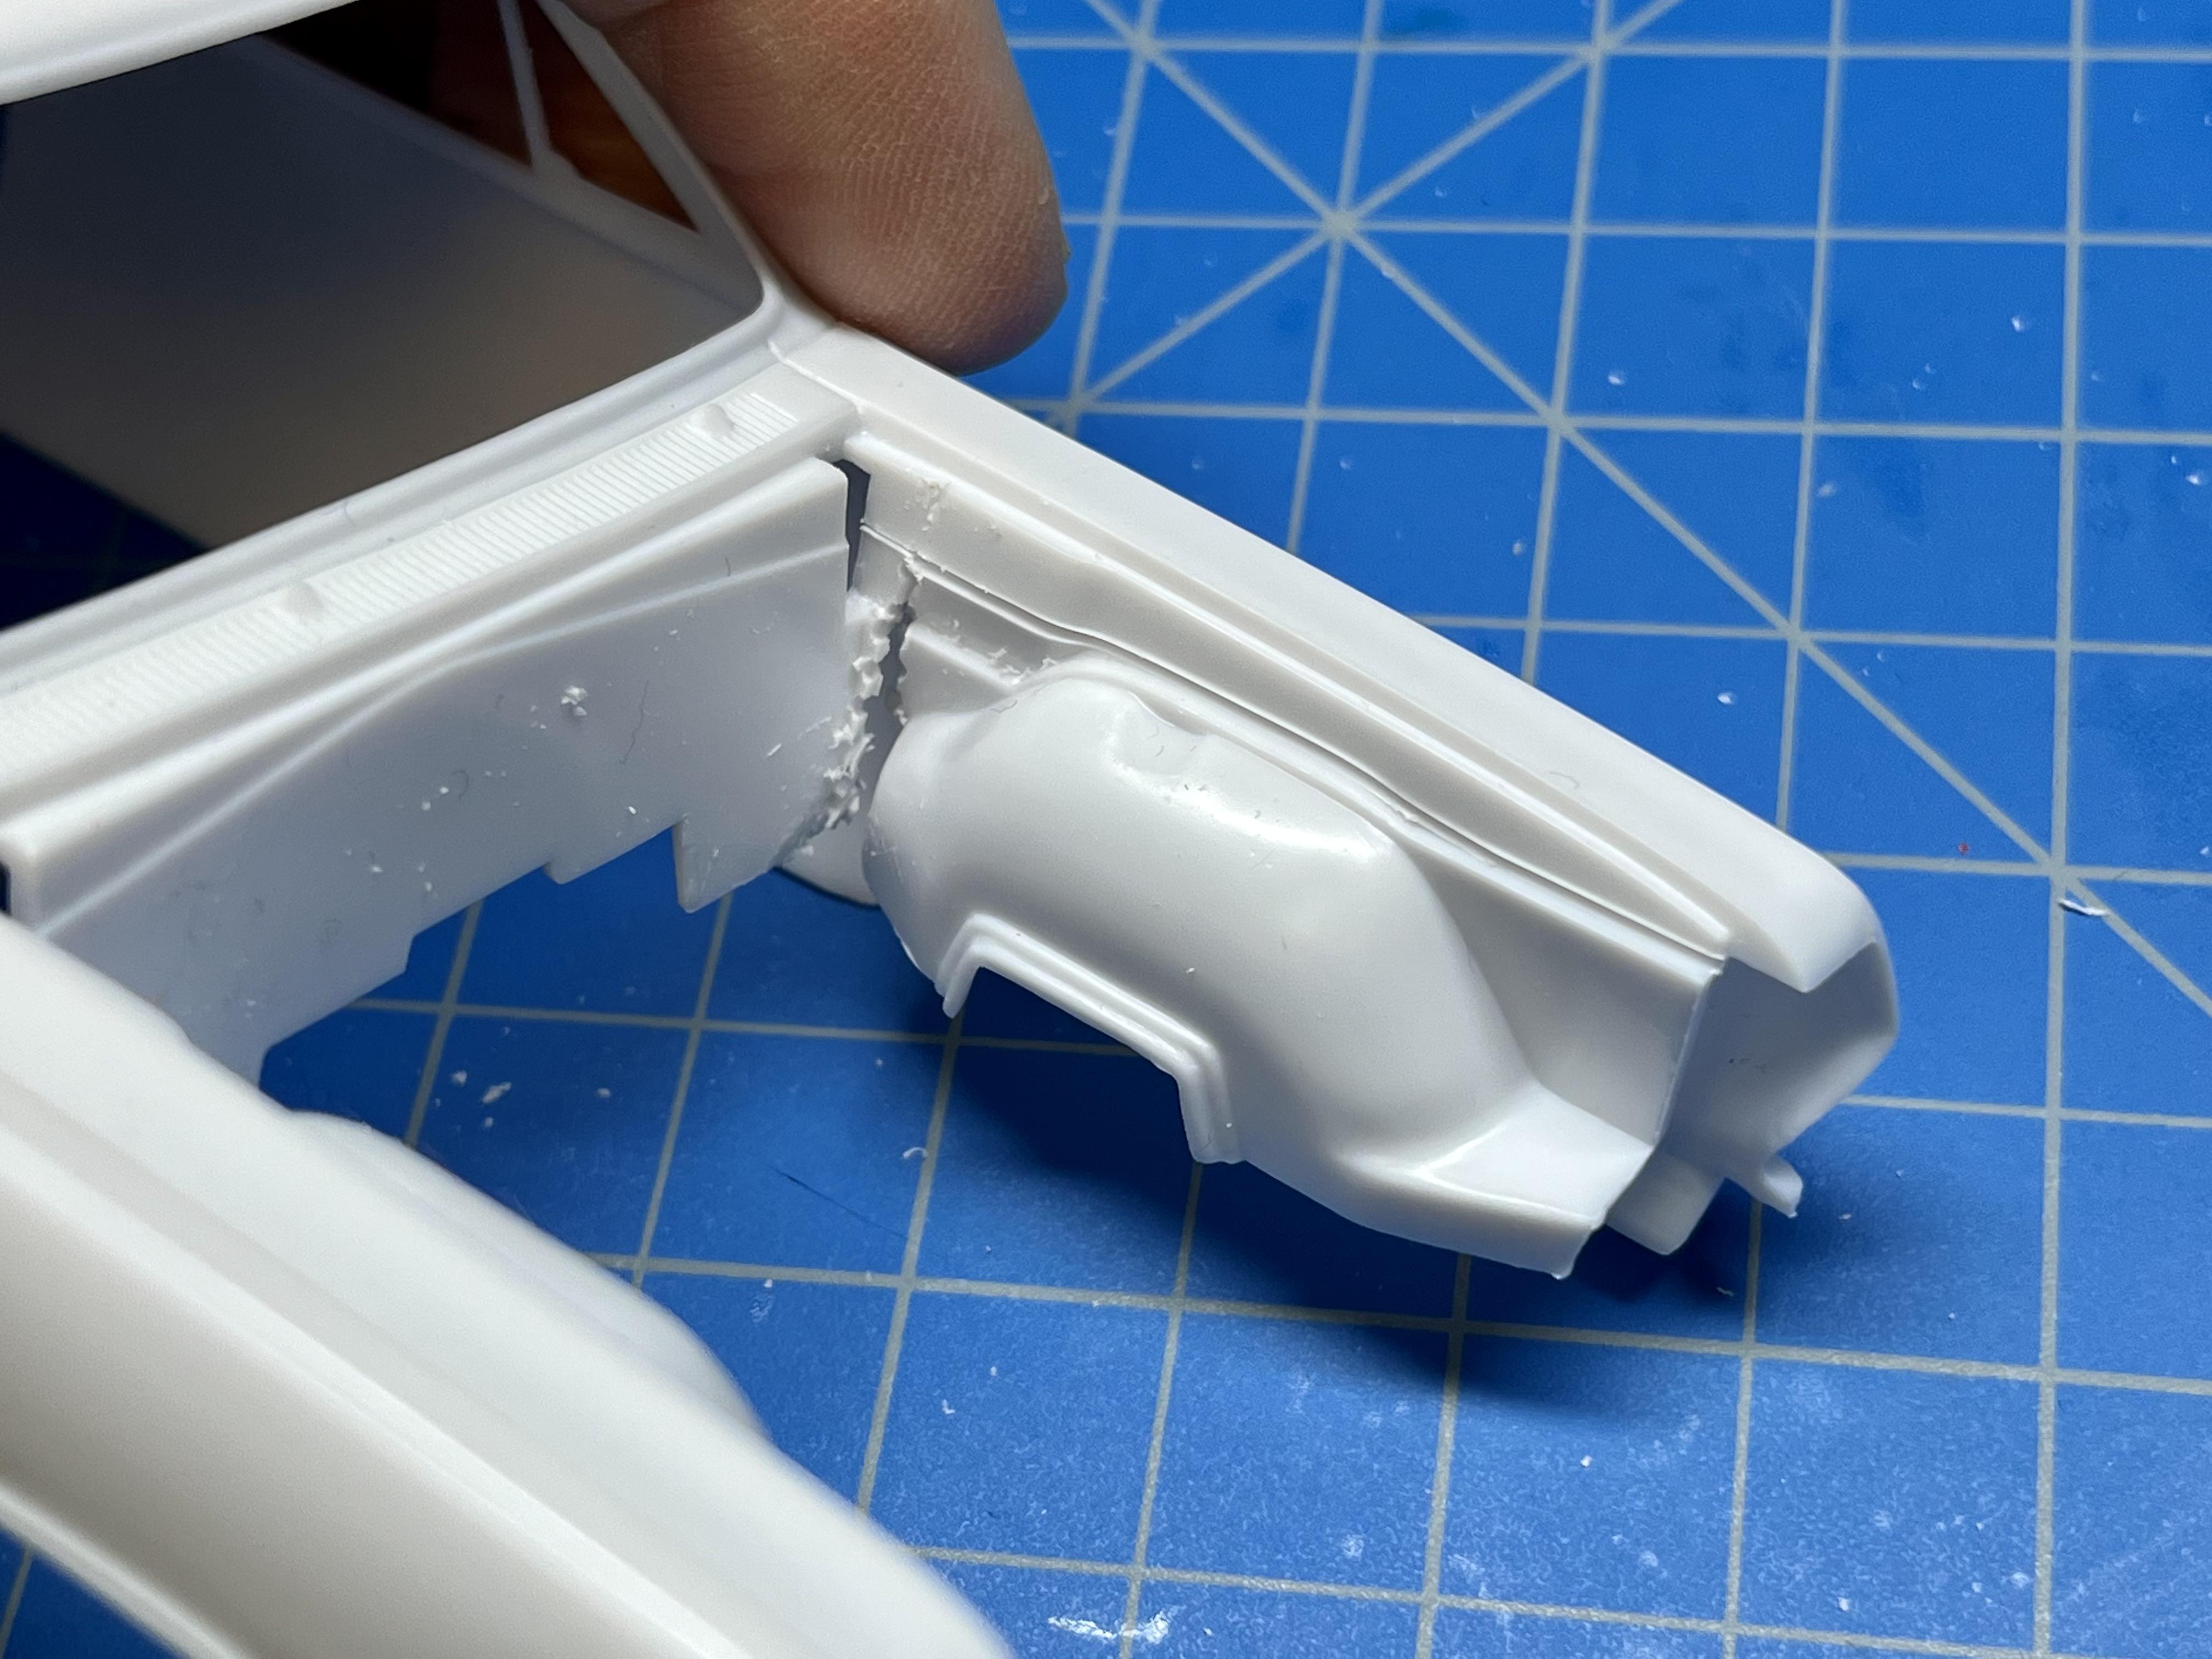
Thanks Ron for the saw name correction! I love my Tamiya razor saws, they must be +12 years old and they still work great! Today’s update: Sanded out the putty patches on all four wheel openings down to 800 grit, will test primer once my engine bay wheel well fixes are done: Bonded the two engine bay wheel wells back into the body and shifted them .28” forward to coincide with the new front wheel openings (still need to add fill-in styrene between these wells and the firewall): Removed the four speed kit transmission and bonded the resin TH-400 automatic into place with CA: This TH-400 automatic is significantly larger than the kit manual transmission so I cut away material around the front of the transmission hump in the interior tub. I’ll box in this opening with sheet styrene, hopefully a larger partial conical piece, once I rough out the final position of the engine in the chassis/ body assembly: In roughly checking the rear slick tire fit in the chassis/ body assembly, it looks like I’m going to need to enlarge the front portion of the two rear wheel wells on the chassis in order to better center the rear wheels in the new openings as well as to clear the chassis with these larger tires. I’m planning on using AMT M&H pie crust slicks on this car, my favorite period slicks and they still appeared to be used on some of the photos of this car, other photos seem to show wider more modern (lower pressure?) slicks. When were M&H pie crust slicks phased out of use in drag racing anyways? ‘65? cheers, John ps - I’m walking my dog one mile each day now so I’m making progress on my medical recovery!
-
“BUILDING THE COVERS “ Vol # 37 THE AWB 1966 NOVA OF DICK HARRELL
papajohn97 replied to M W Elky's topic in Drag Racing
Thank you Mike for taking all these pics and writing up the details, very helpful! I originally bought the new Moebius ‘65 Nova gasser kit with the thought of using it as a basis to build Doug Thorley’s ‘65 AWB “Chevy-2-Much” (I have the Fremont Racing decals) . You’re right, it’s too nice a kit to sacrifice for the front clip. I think I’ll take a look at how Moebius did the front clip and straight axle and copy the aspects of it that I like and can apply to the Harrell ‘66 Nova. I have a bag of resin leaf springs I bought from Speed City awhile back and can probably find a pair that can work. I have yet to get tired of scratch-building these classic 60’s drag cars, they are fun “puzzles” to solve and sure are a lot cheaper then messing with 1:1 vintage drag cars! Much thanks Mike! John -
Thanks Mike. I’ve been incredibly healthy for nearly 70 years and was diagnosed with aggressive prostate cancer in Feb, so I guess I was overdo for something! My doc performed a “robotic assisted laparoscopic prostatectomy” on me on April 3 and I’m recovering pretty well despite the usual side effects. My amazing wife, our family, my dog and my scale modeling hobby have really helped me get through these tough weeks. And my wife says I’m not allowed to die until I finish the +250 unbuilt model kits in the garage so I better get heathy and back to work! Thanks for the clarification on the different appearances of Seaton’s car in the various photos online, makes sense. I plan to build the initial car with the Howard slotted wheels and what looks like an aluminum front bumper. With the weather finally drying out and warming up on the West coast, I’m suddenly wanting to start a bunch of drag car builds (I.e.; my interest in your Harrell Nova ). Thanks, John
-
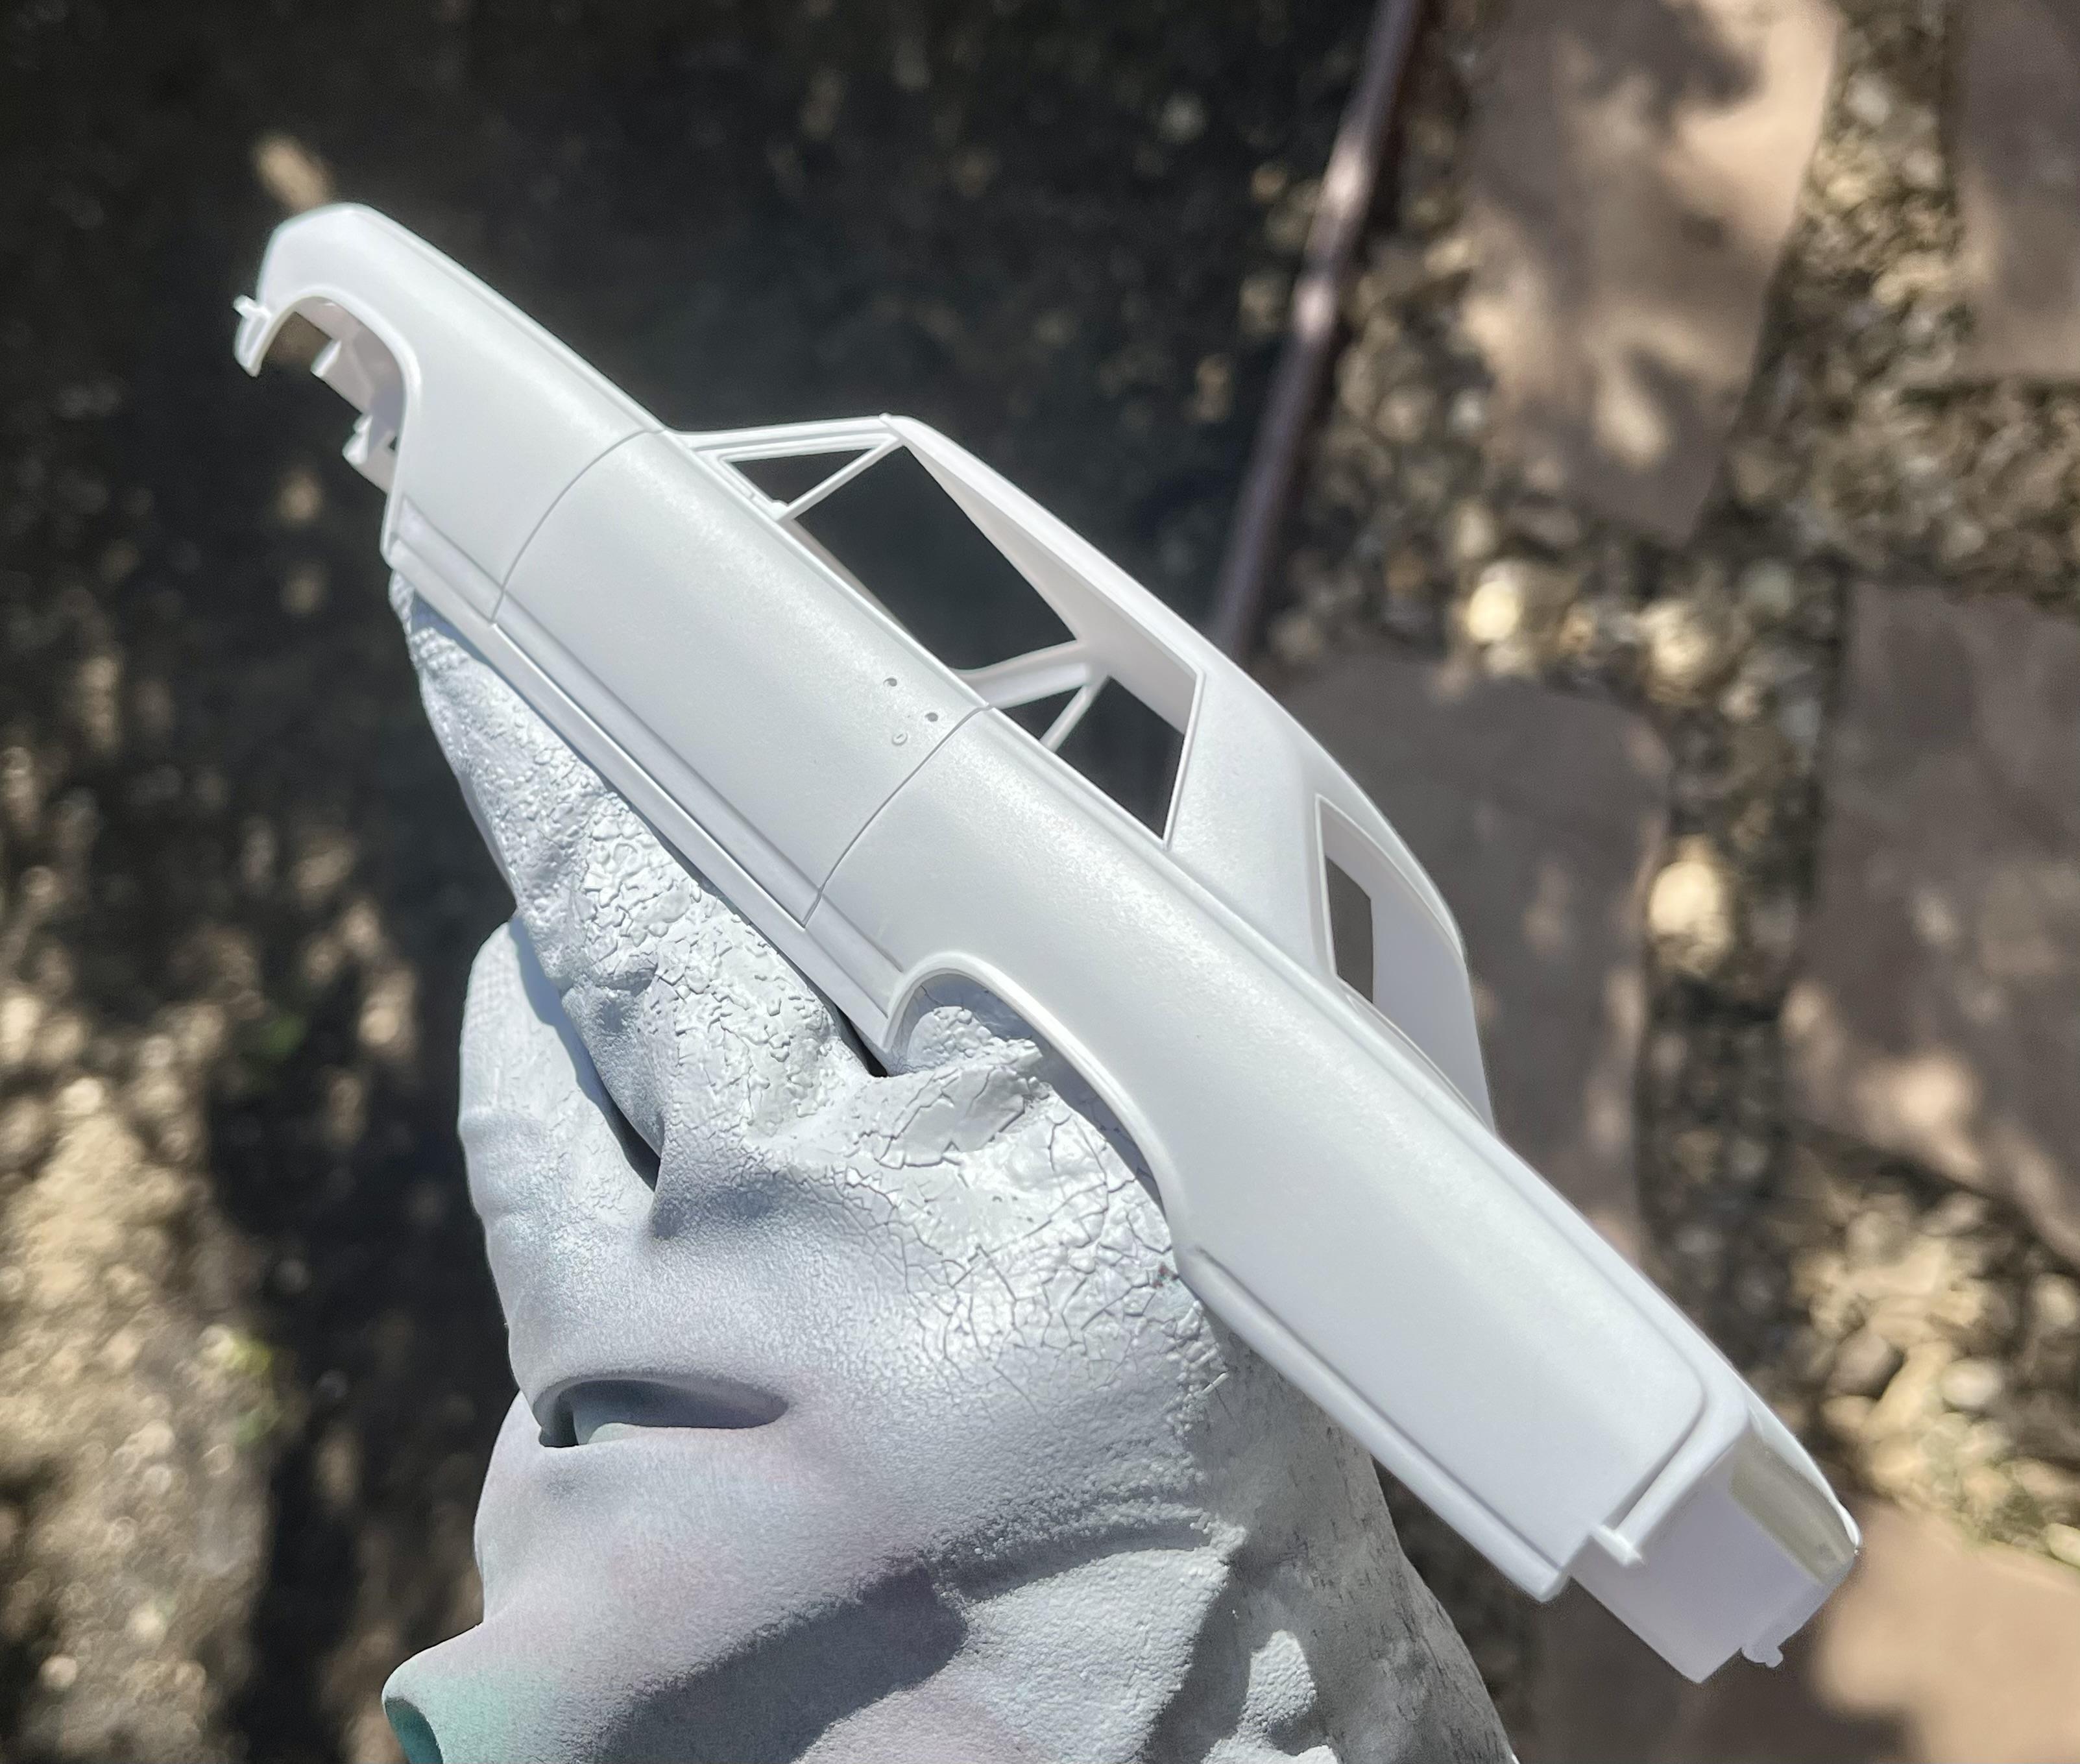
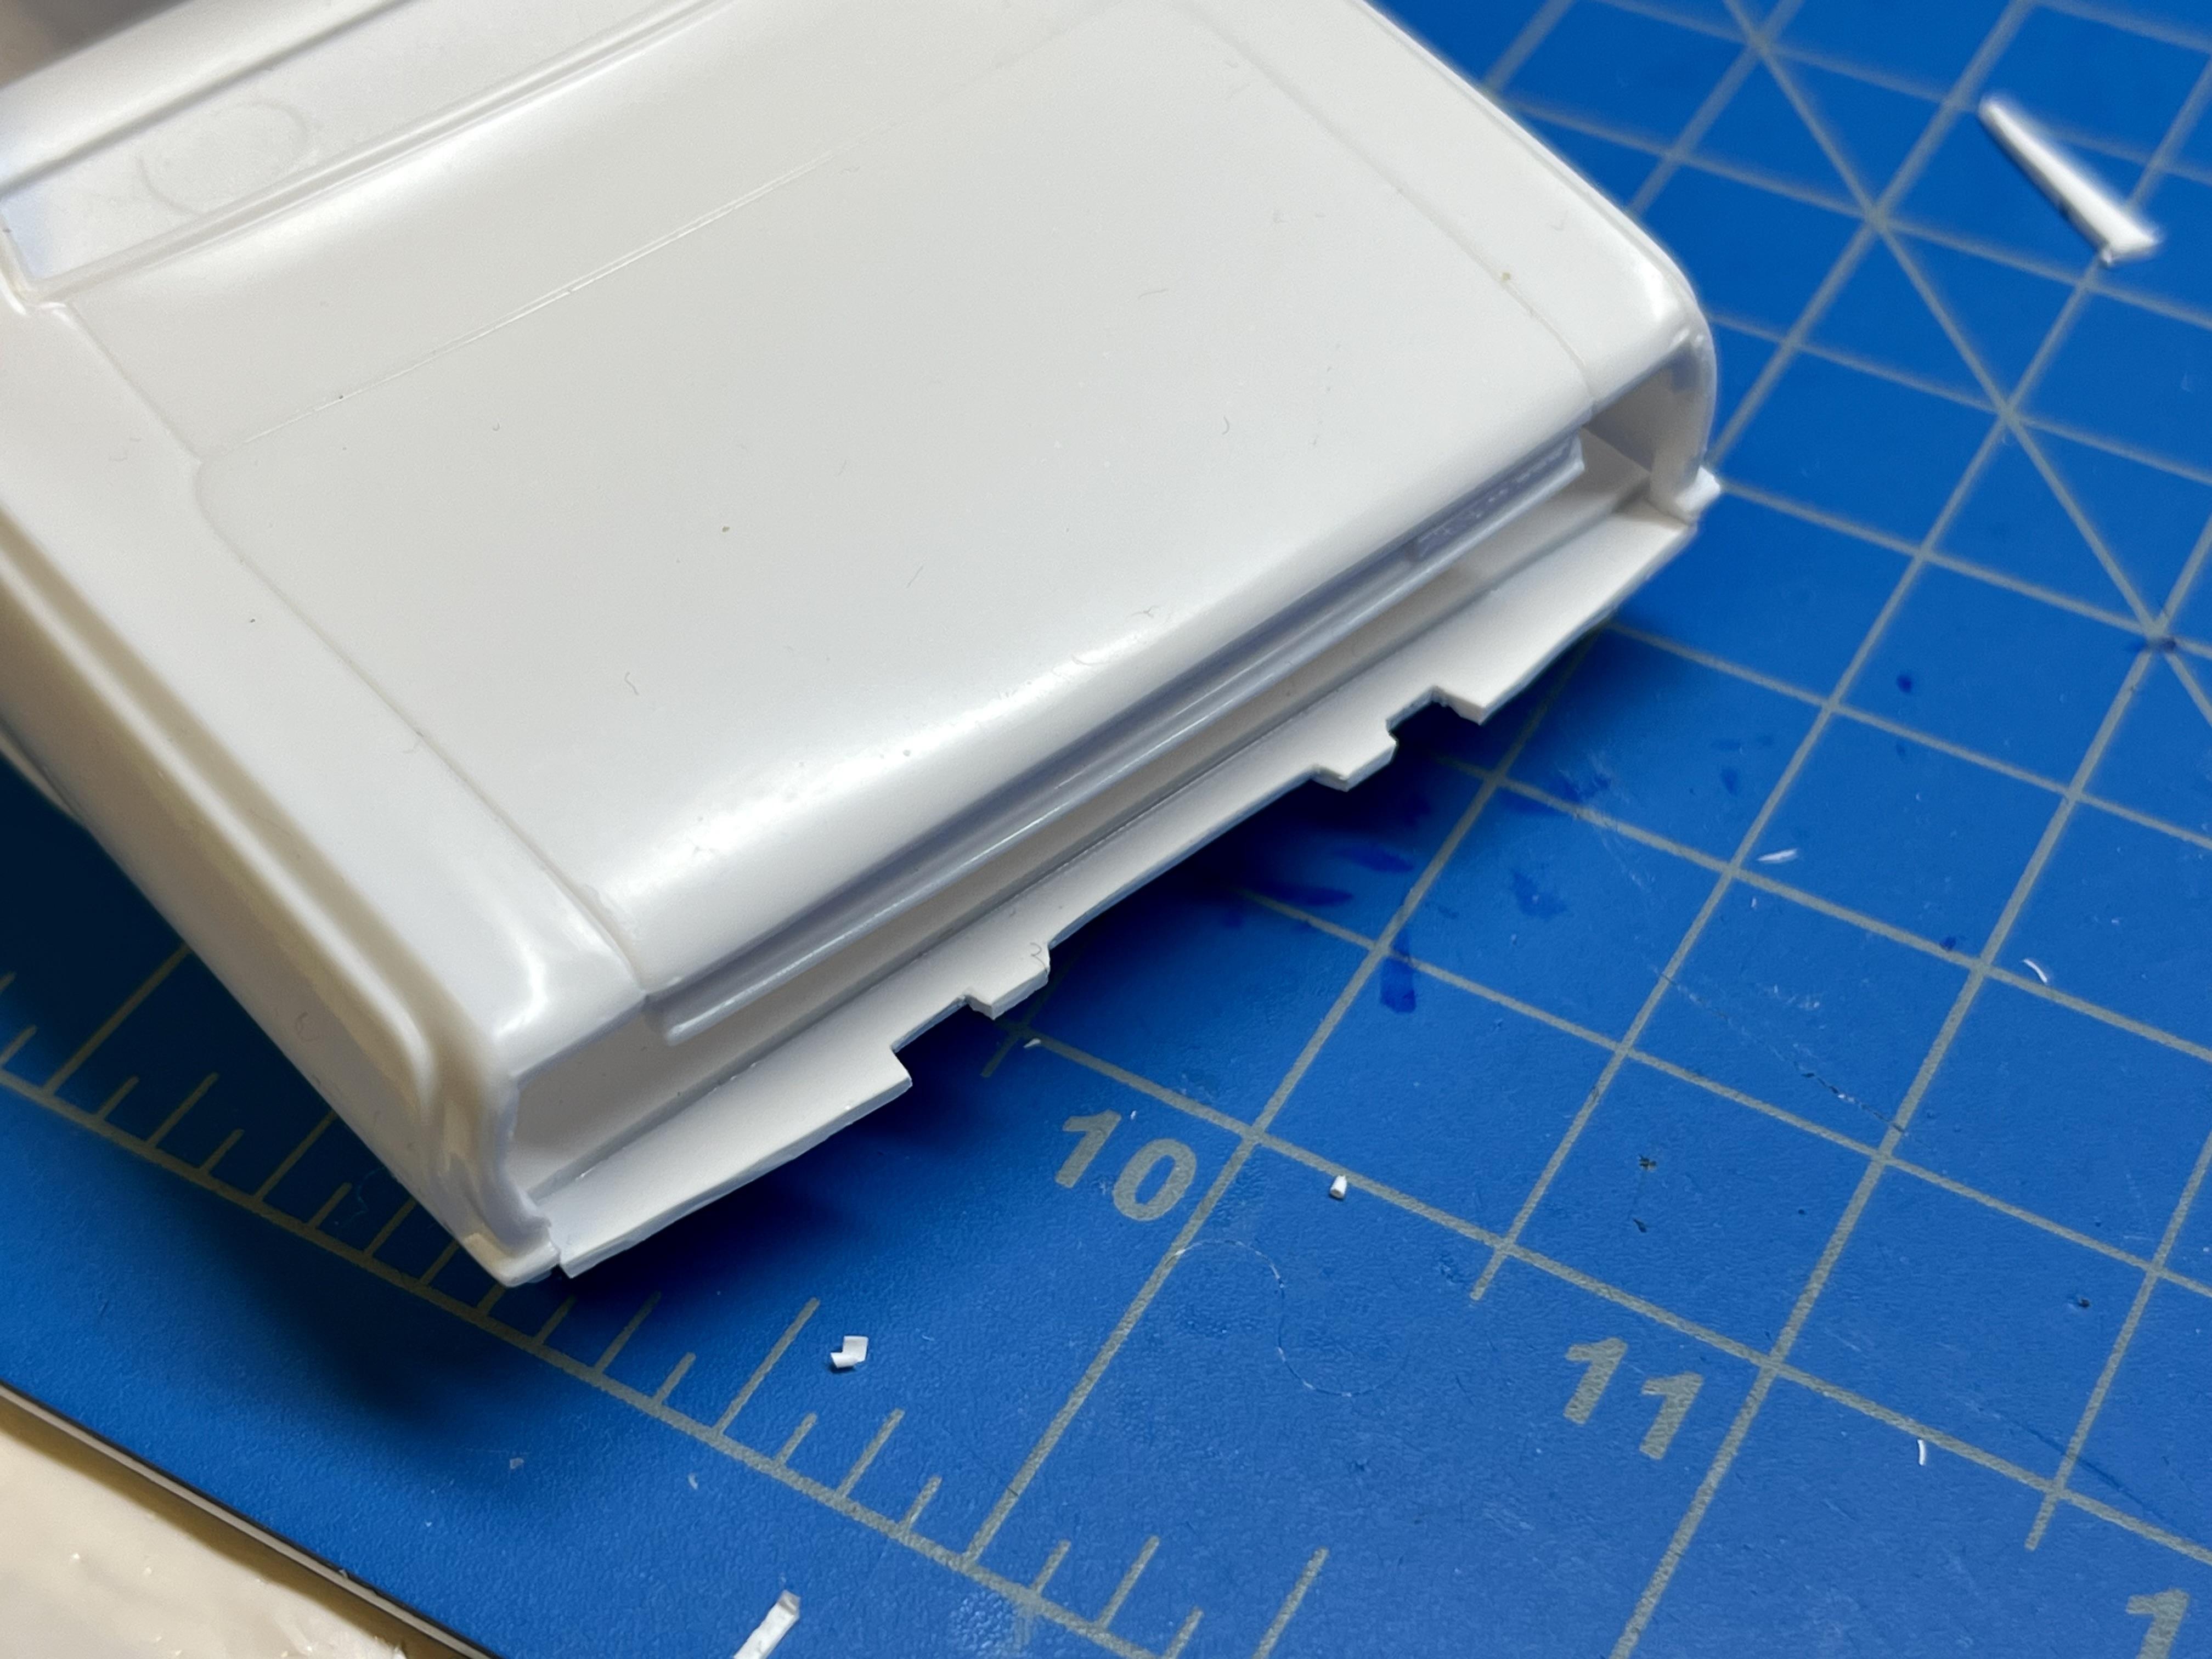
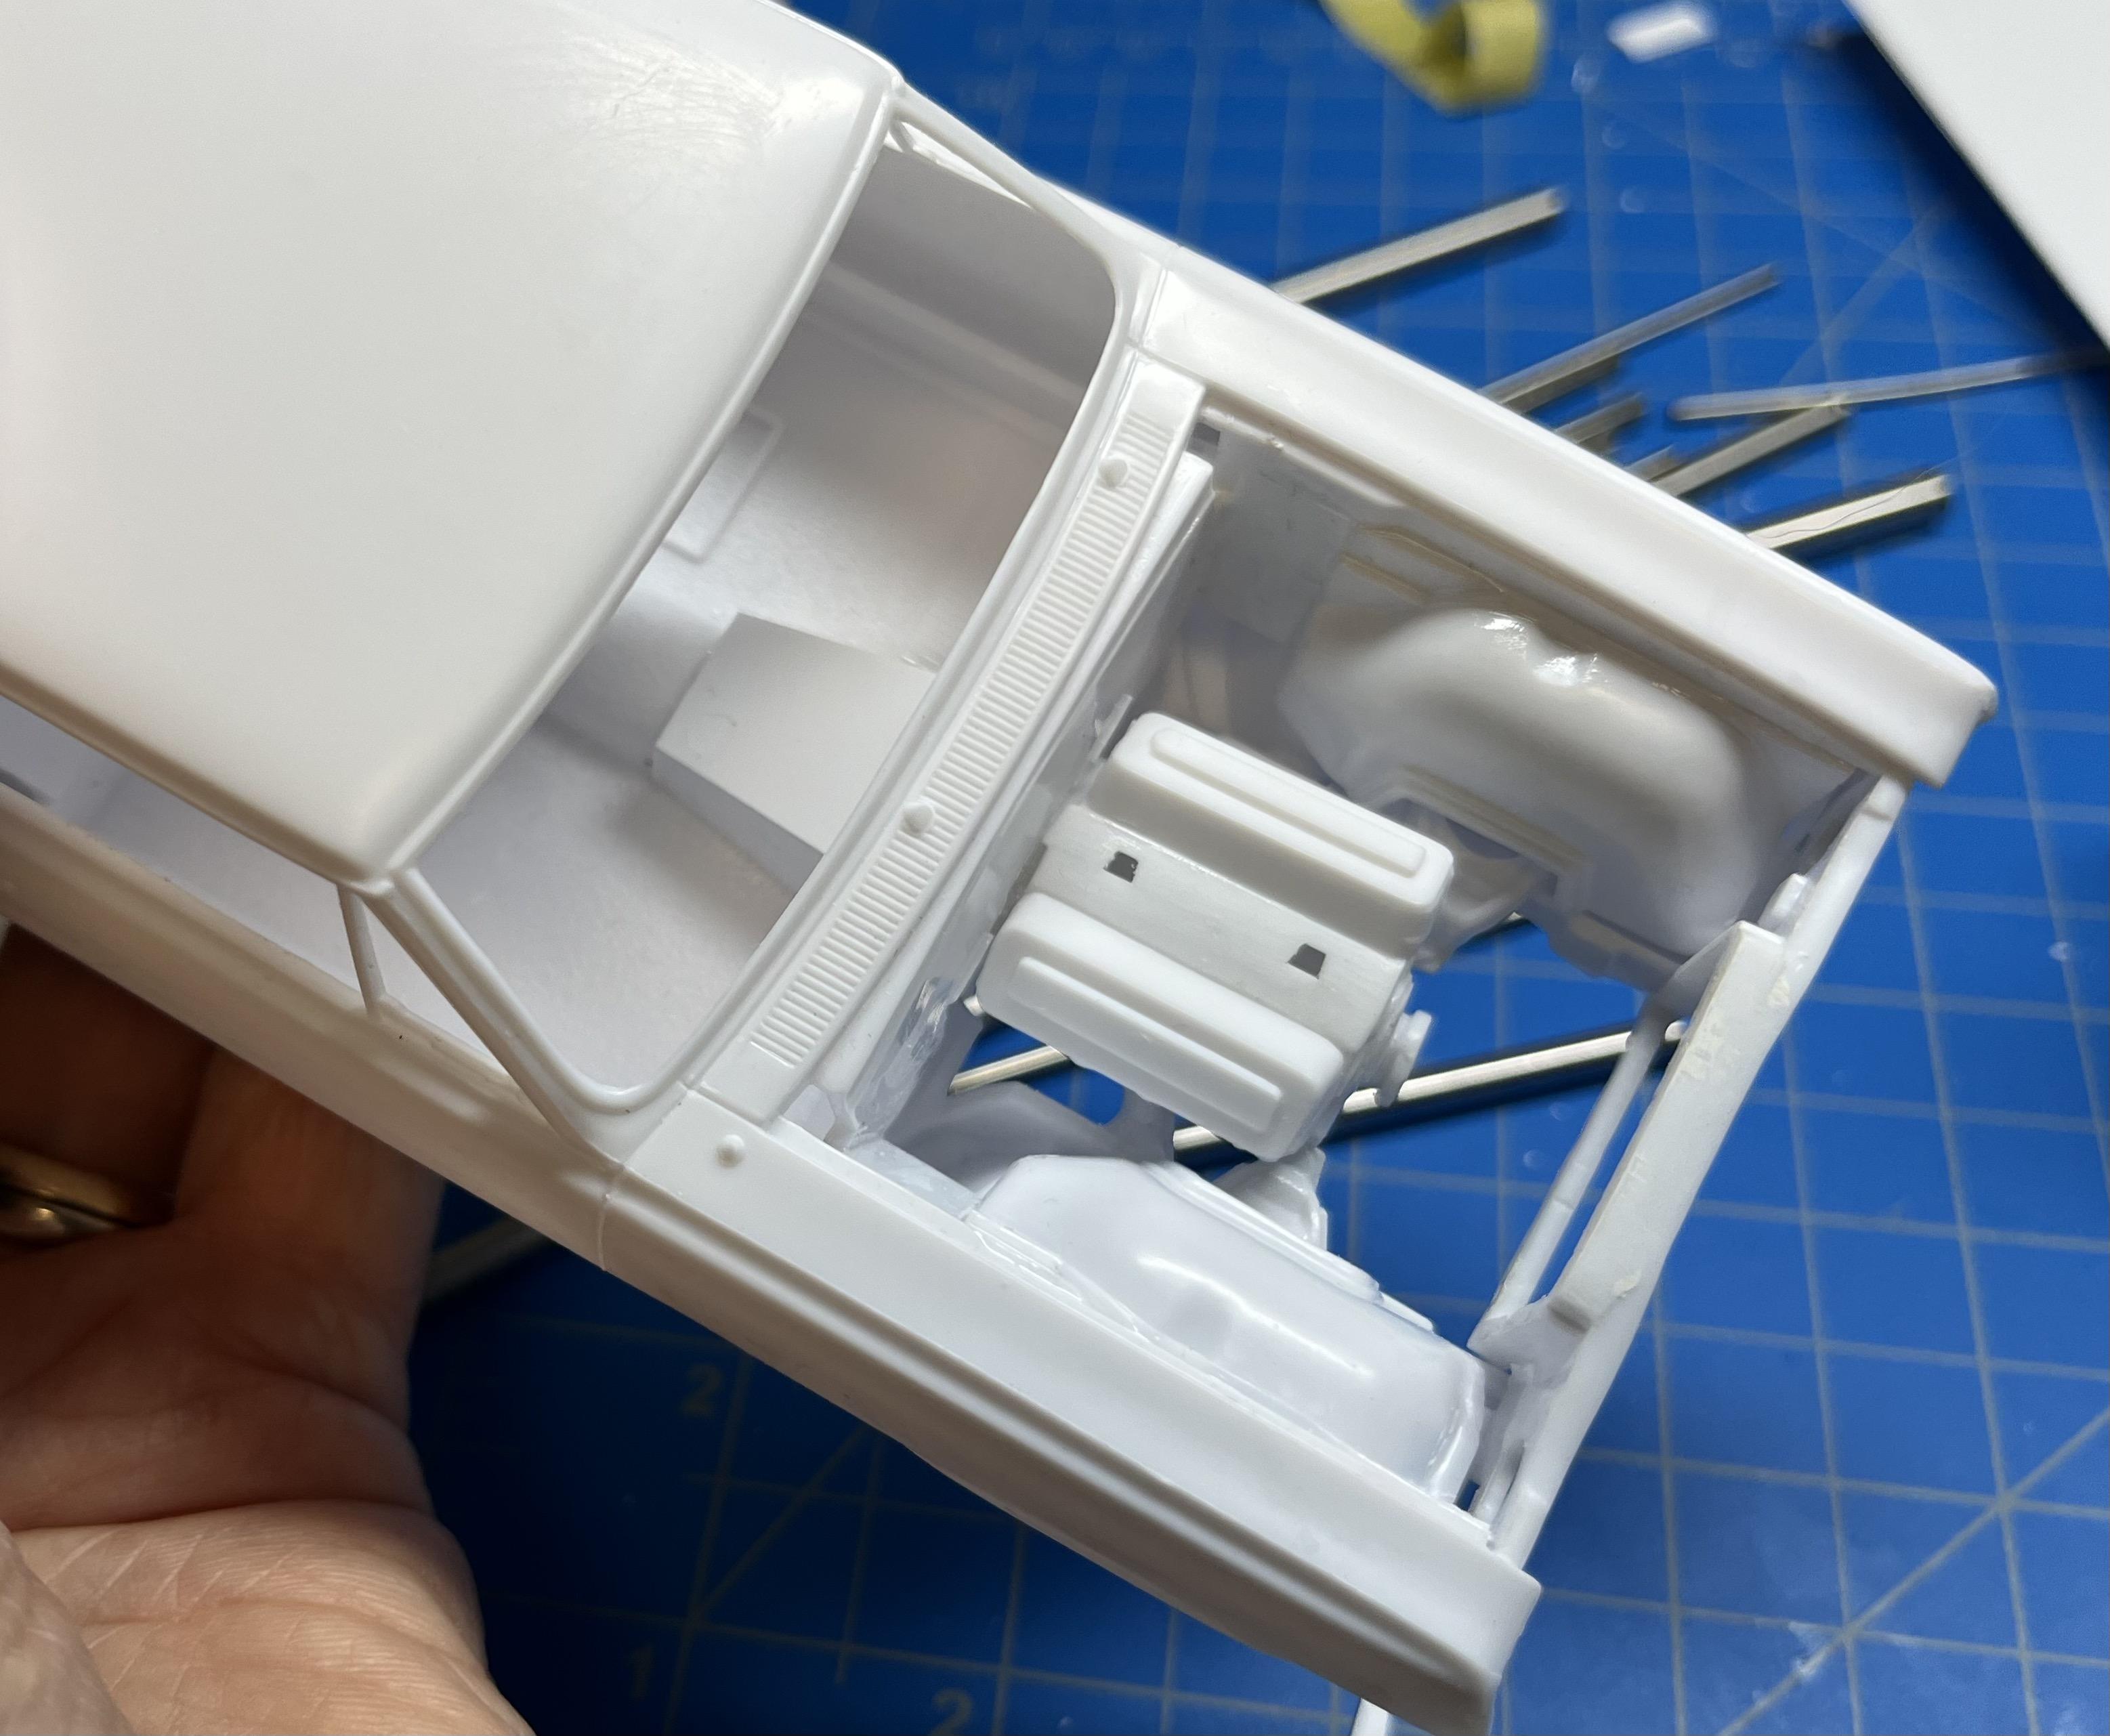
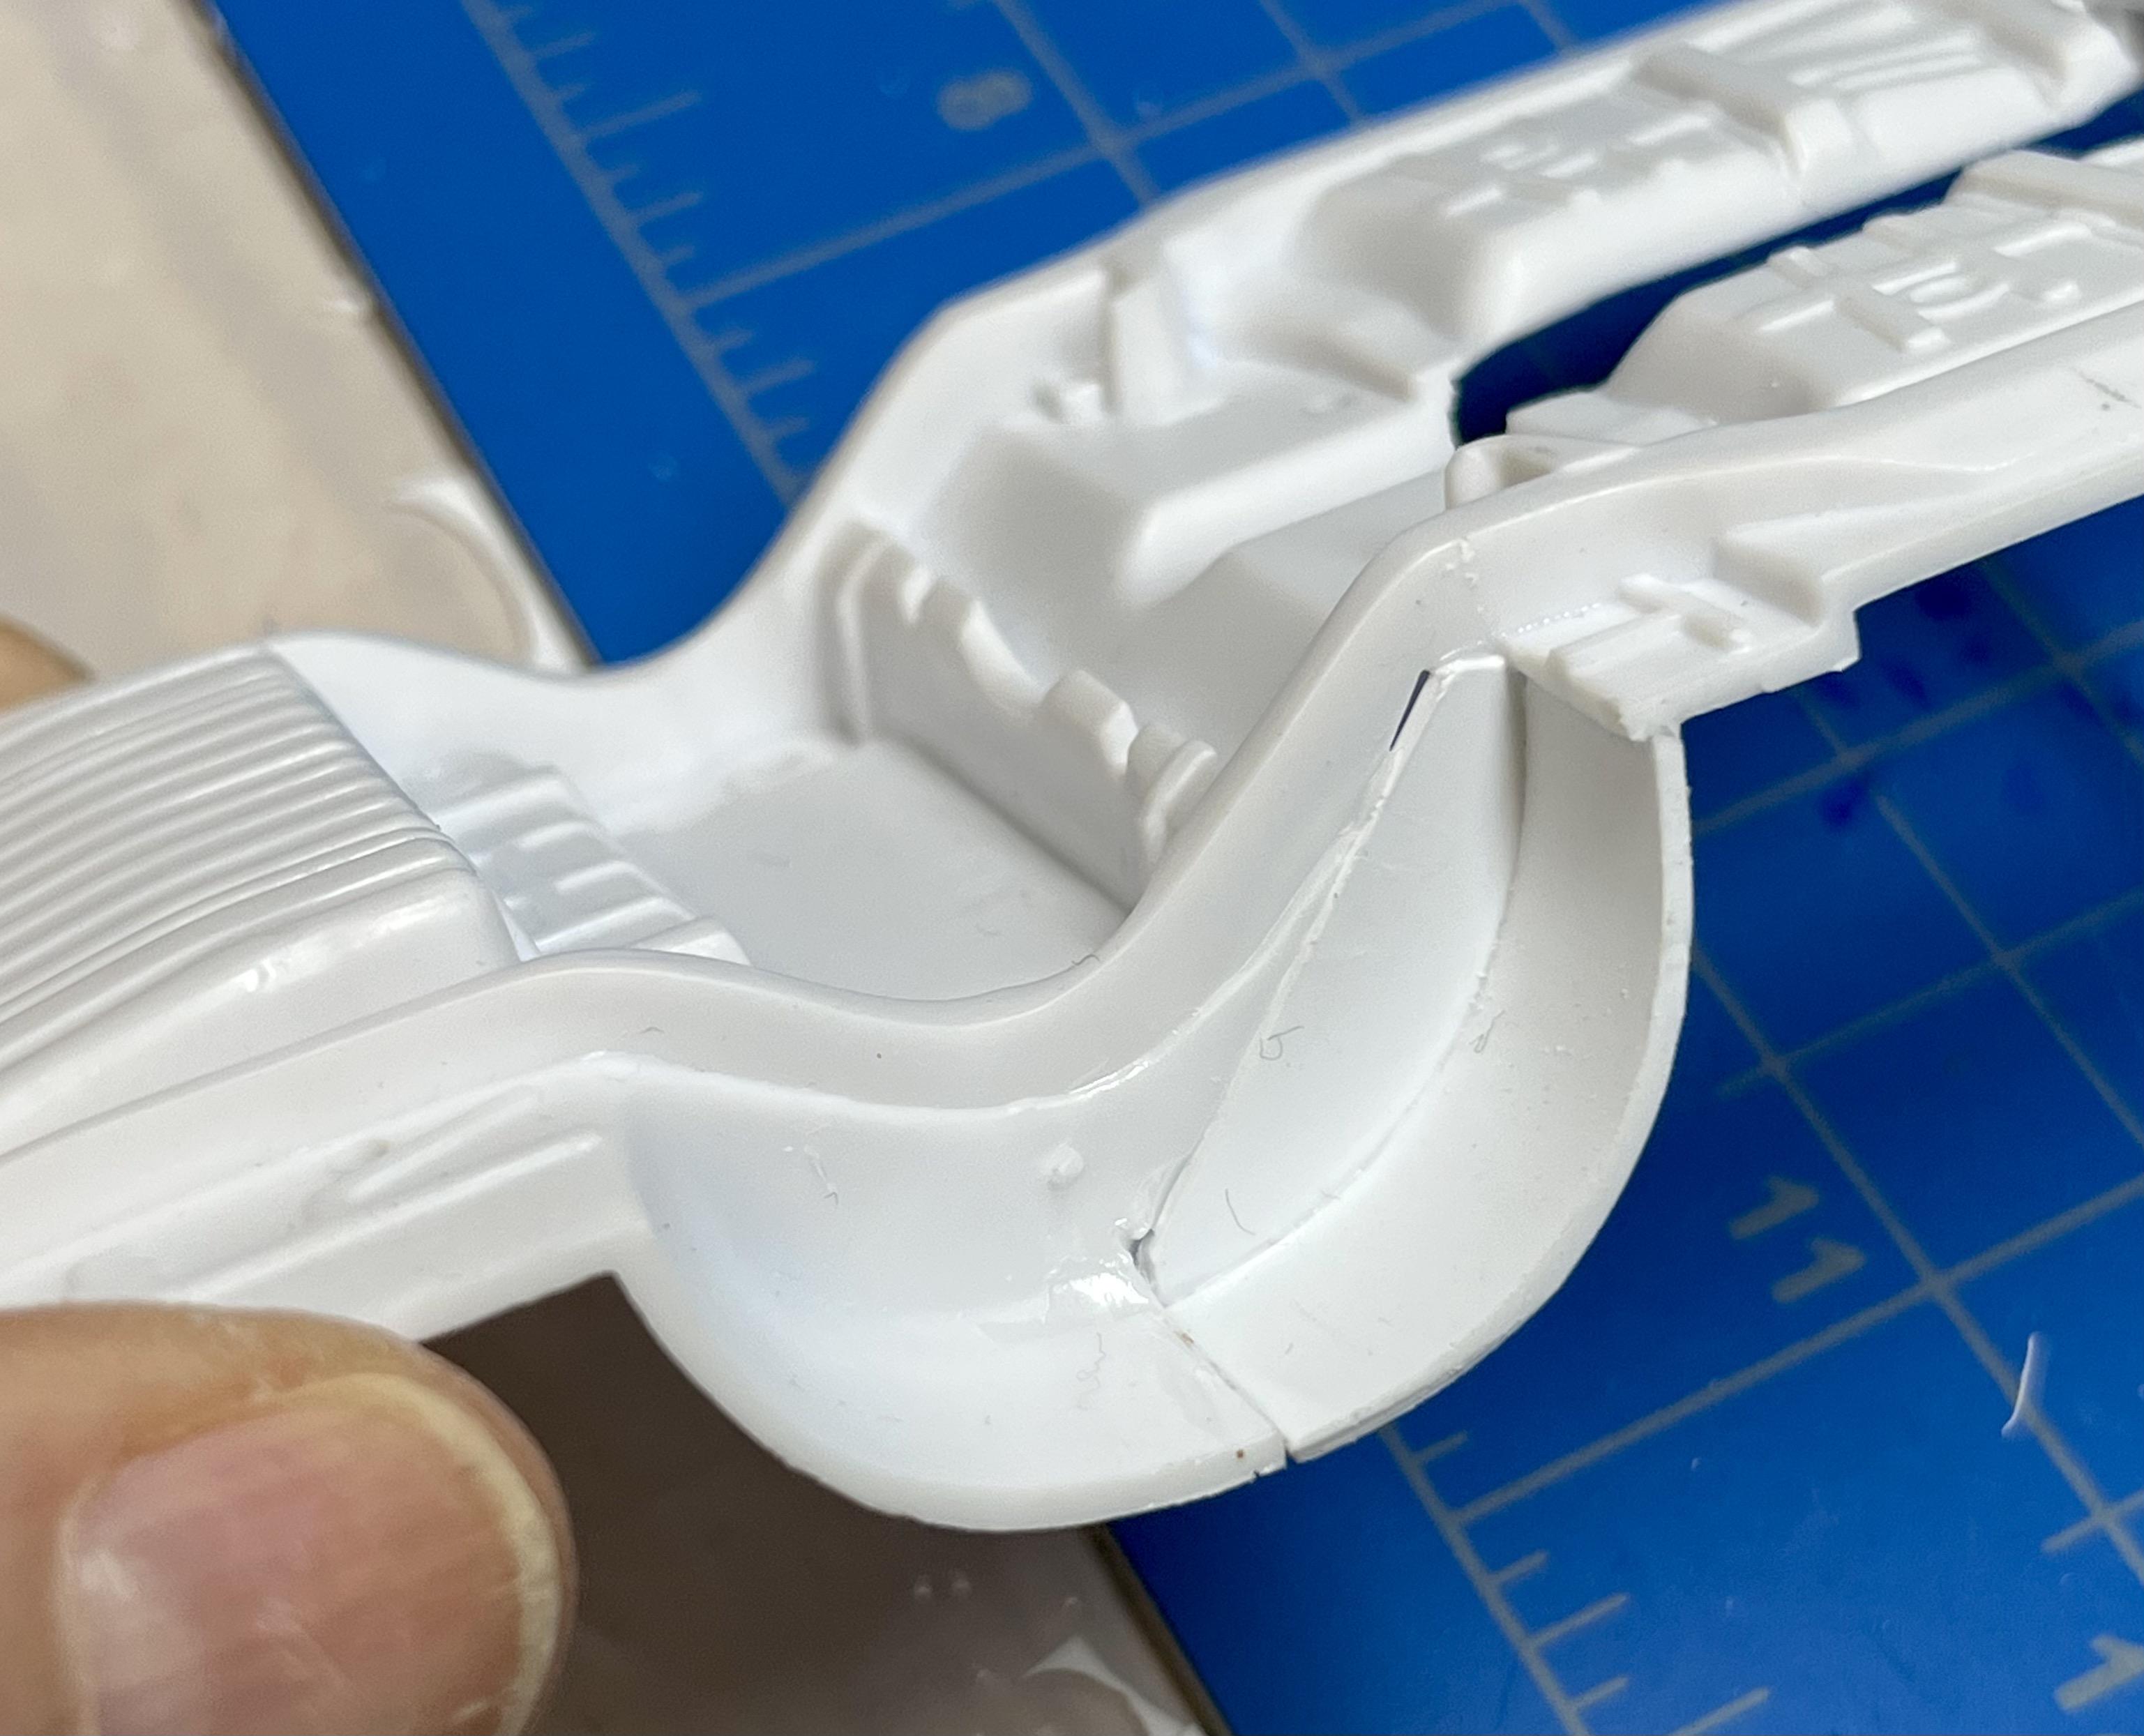
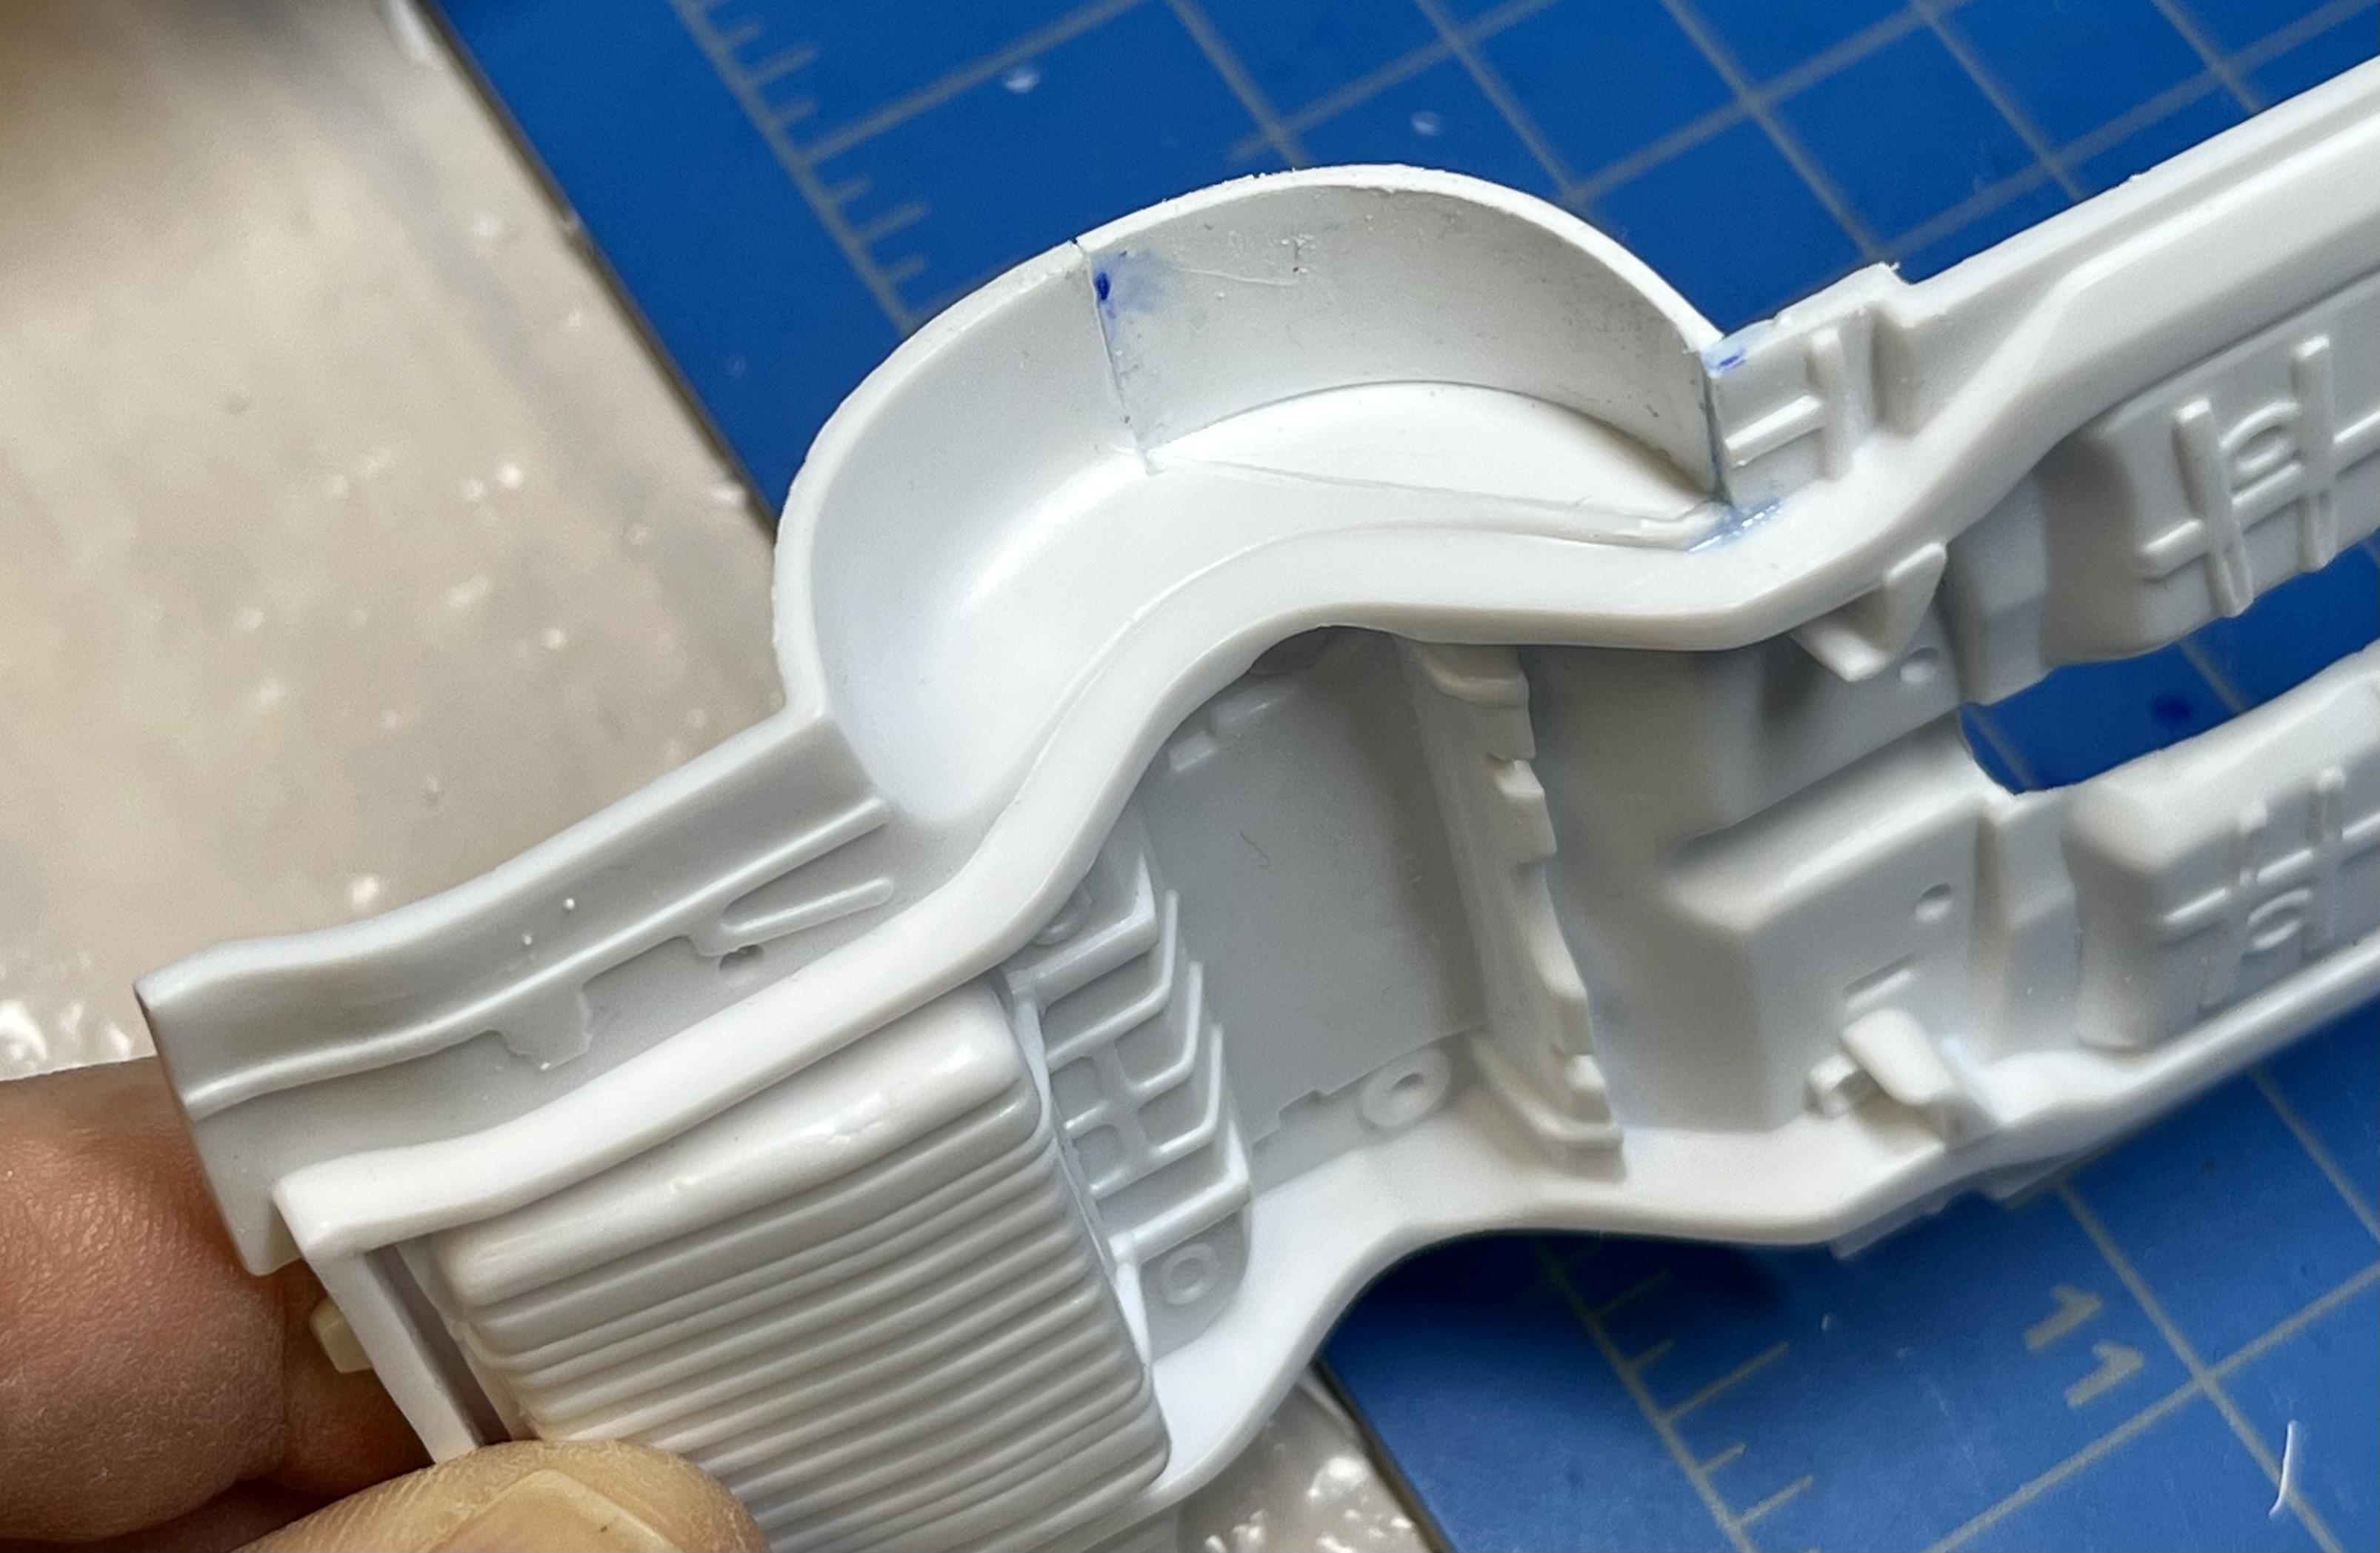
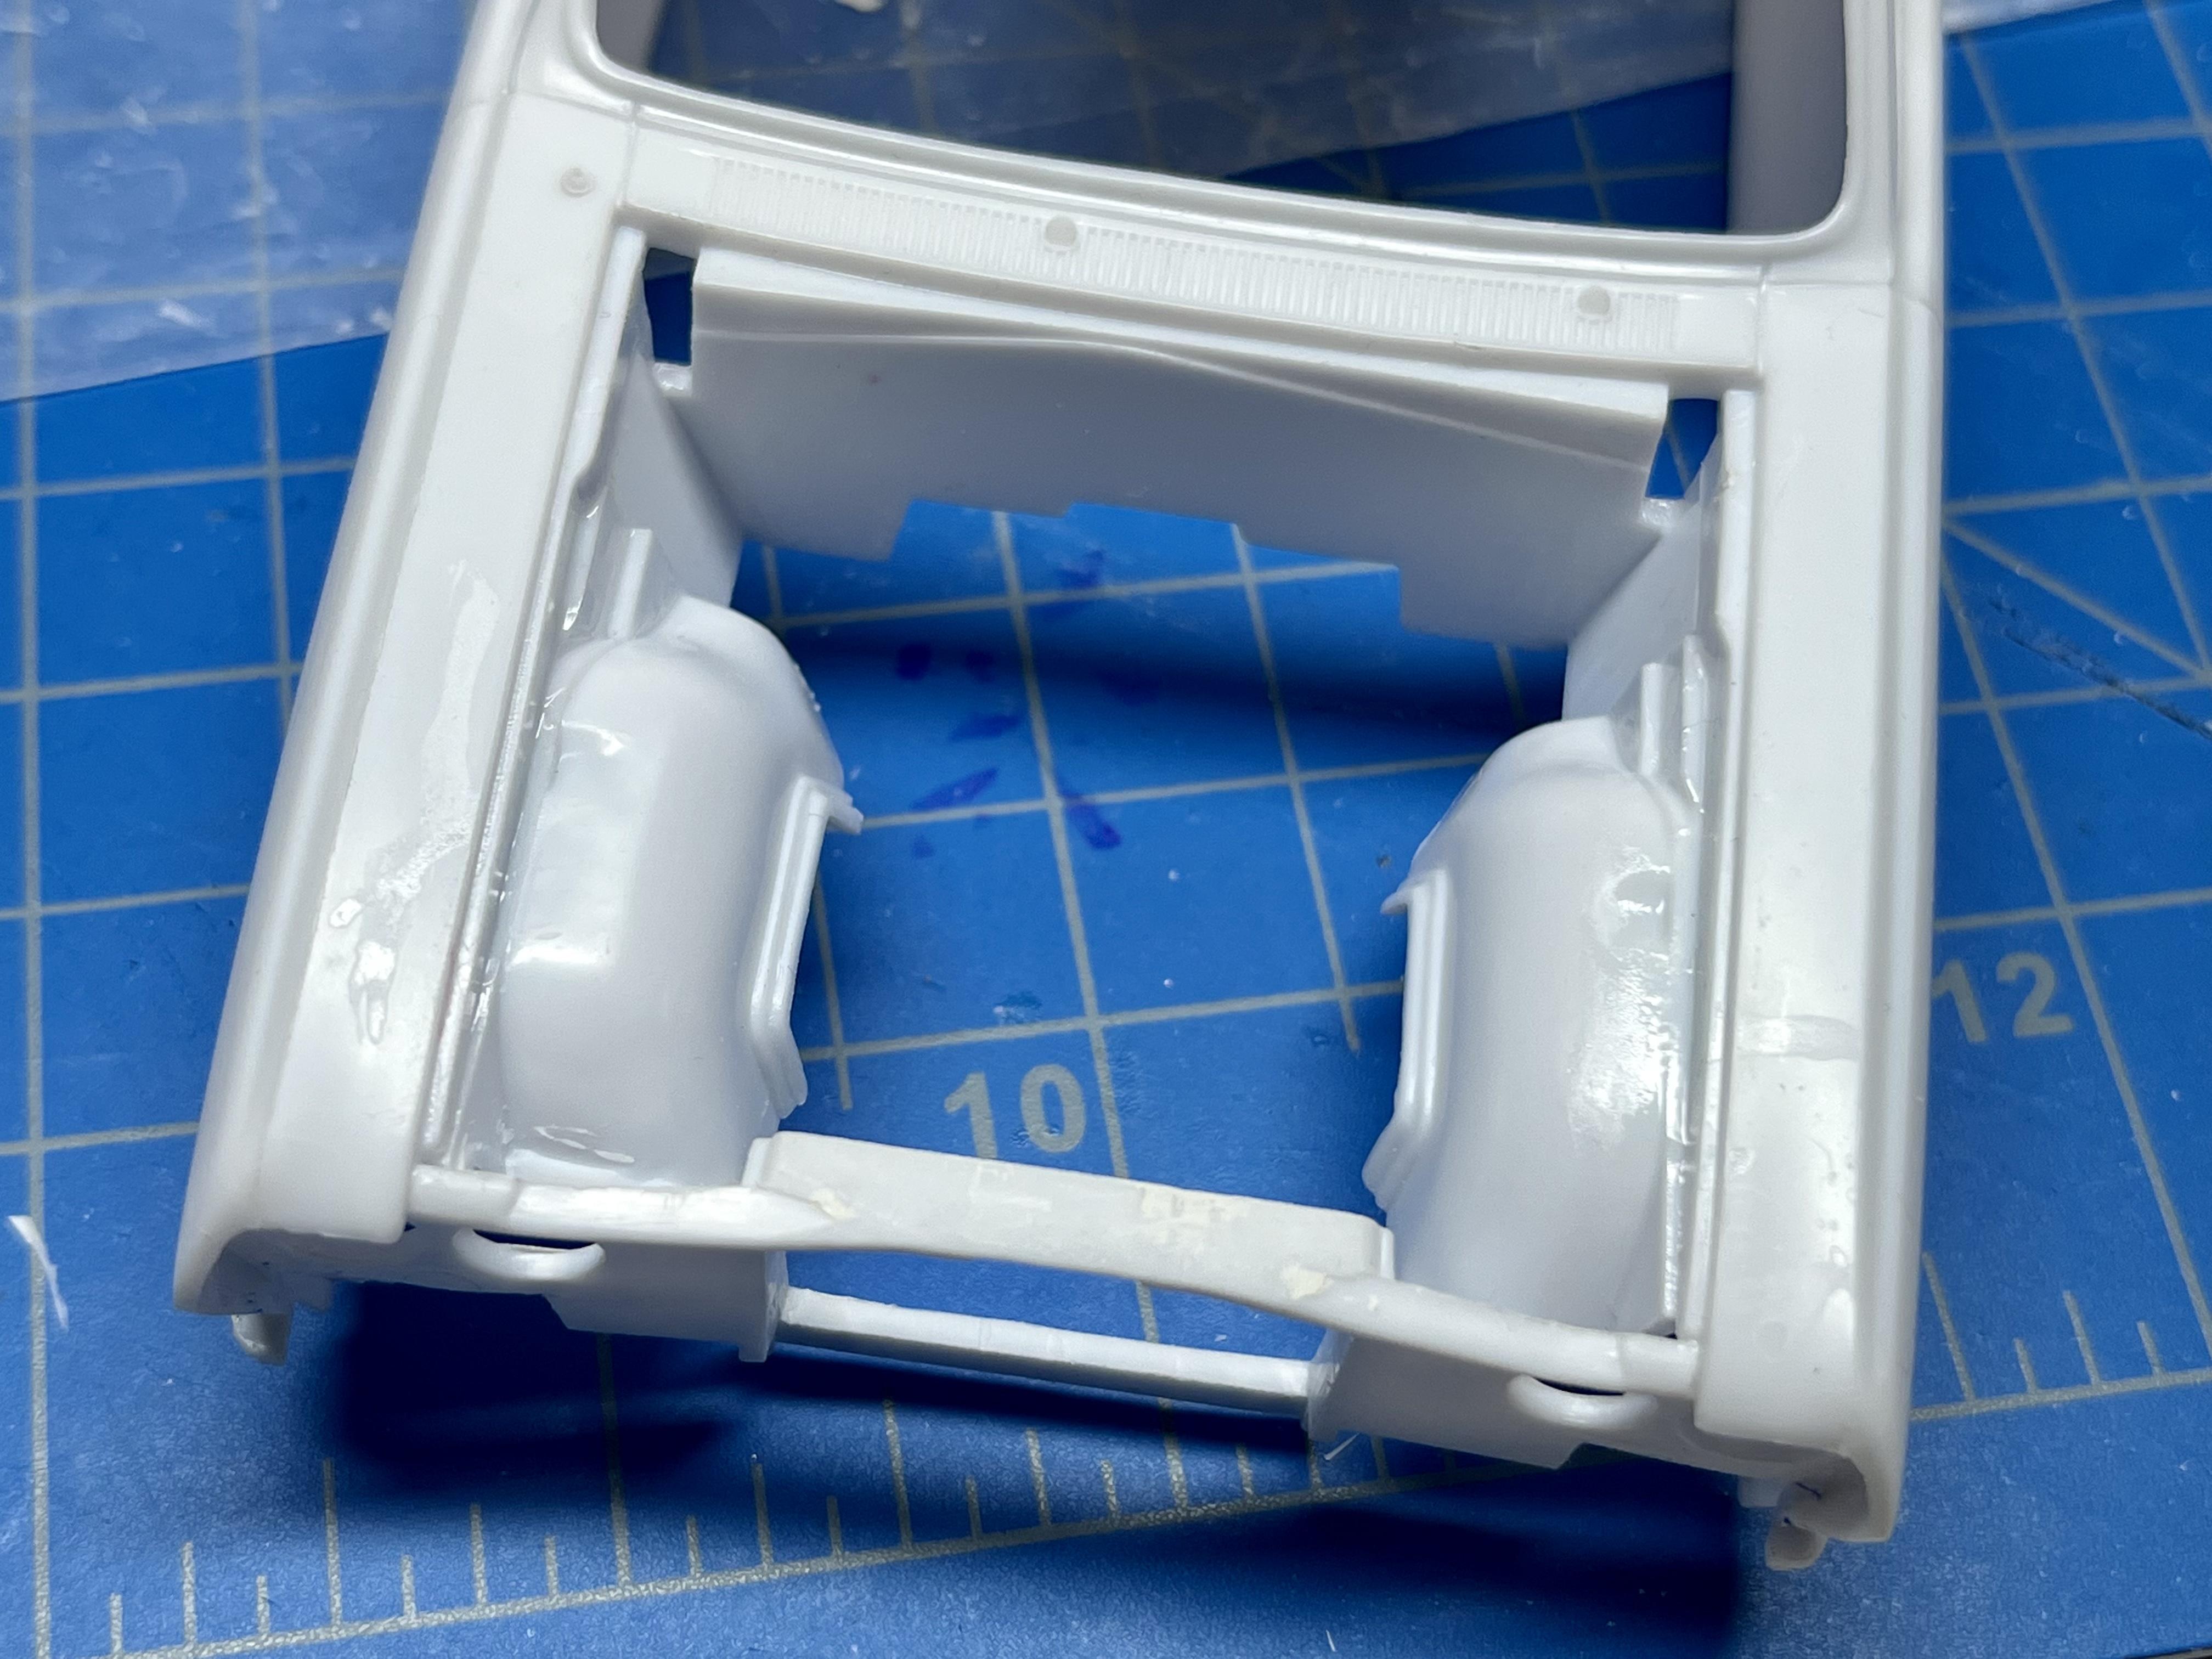
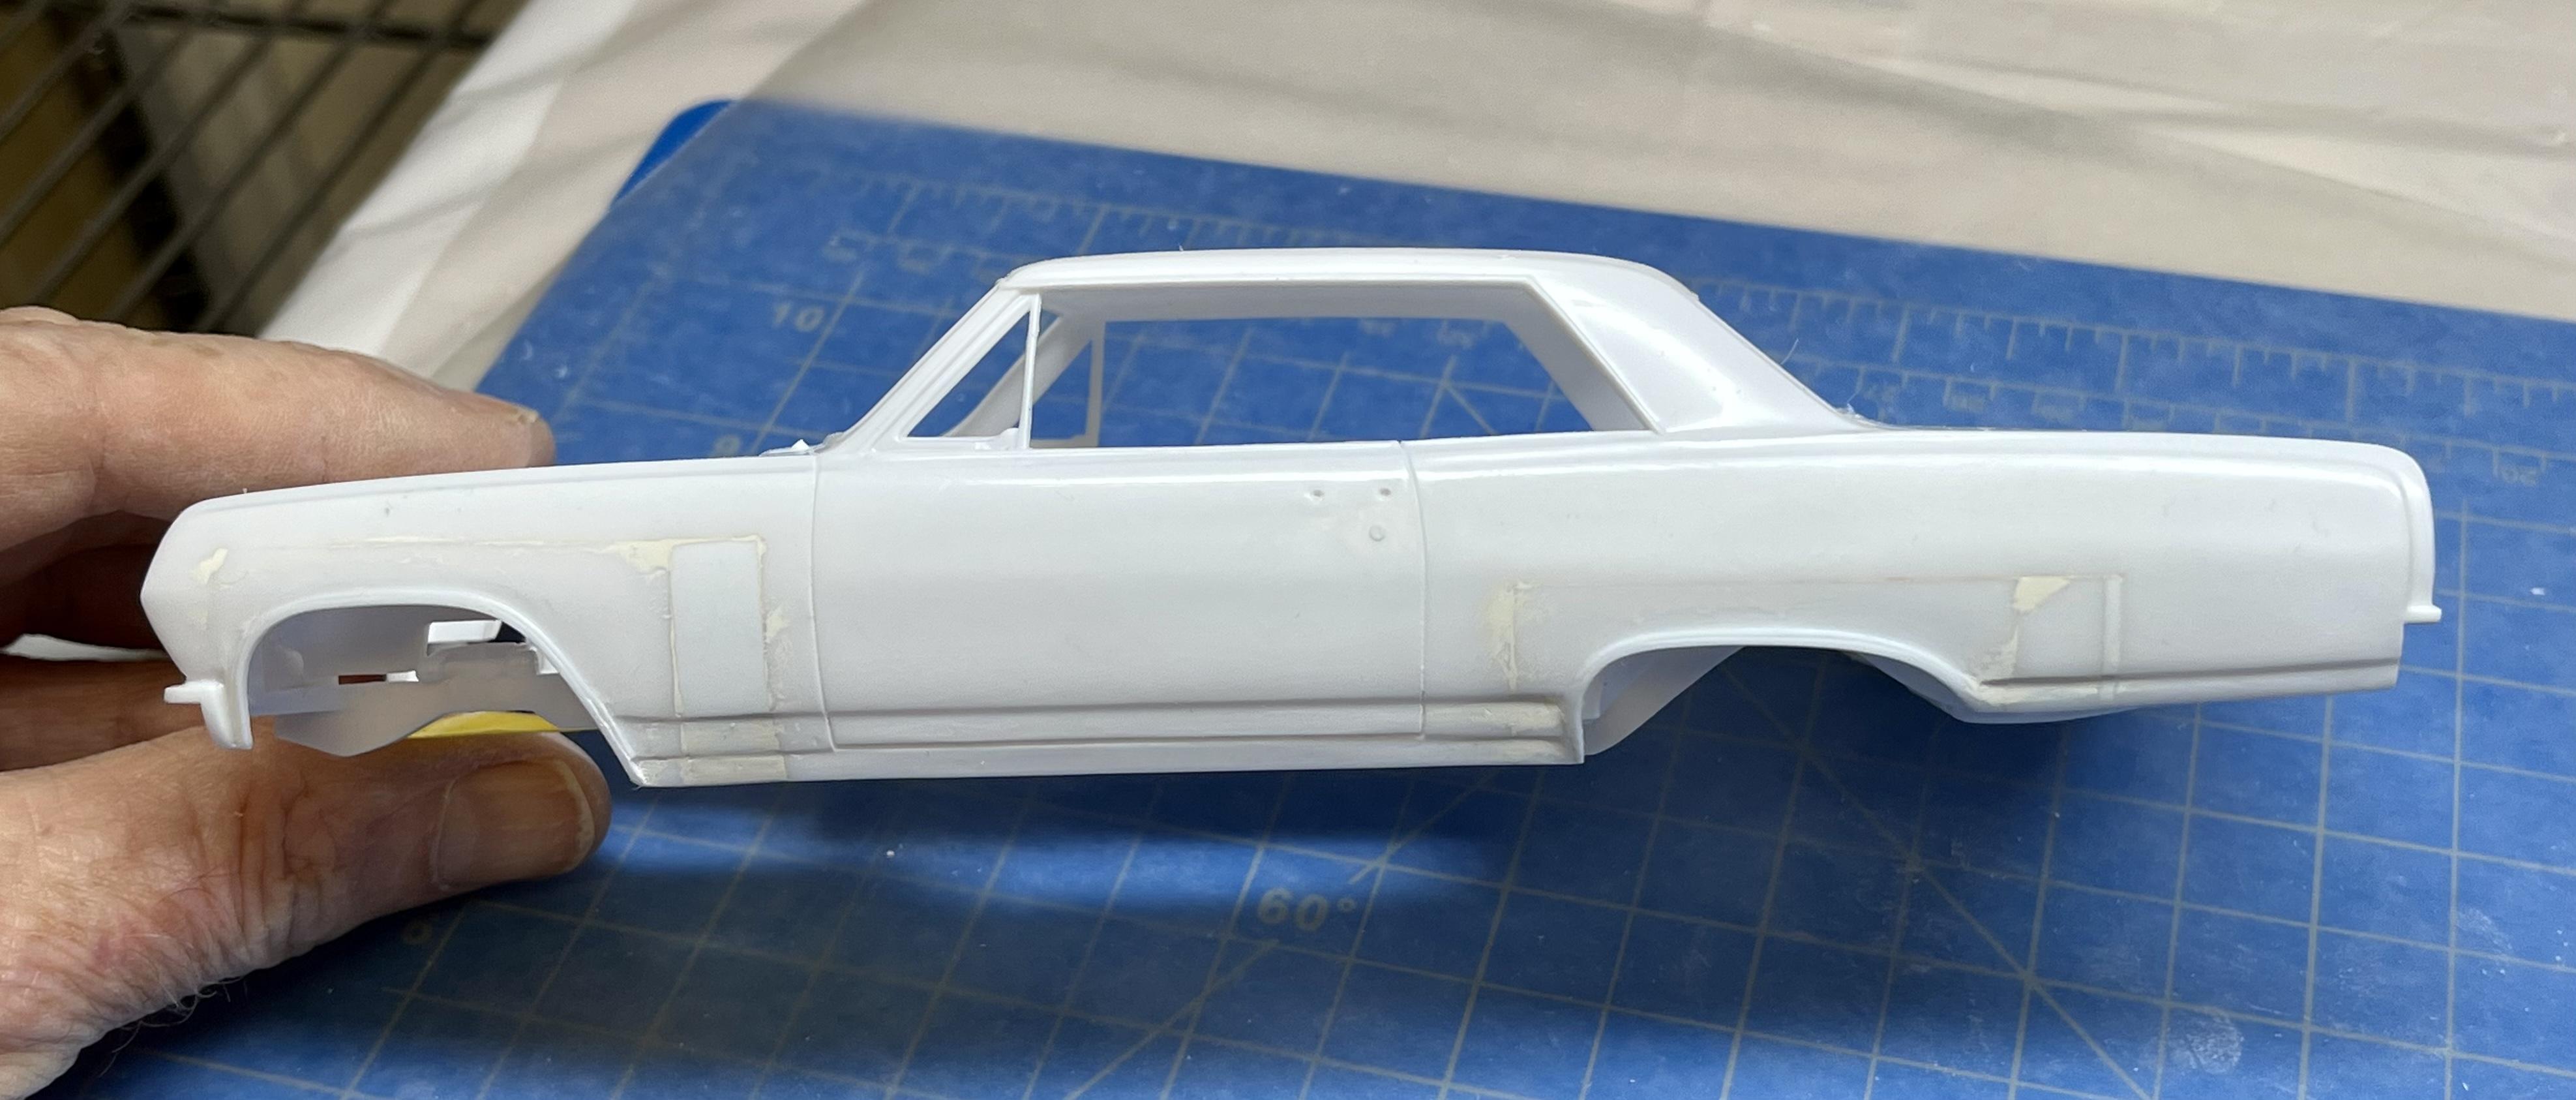
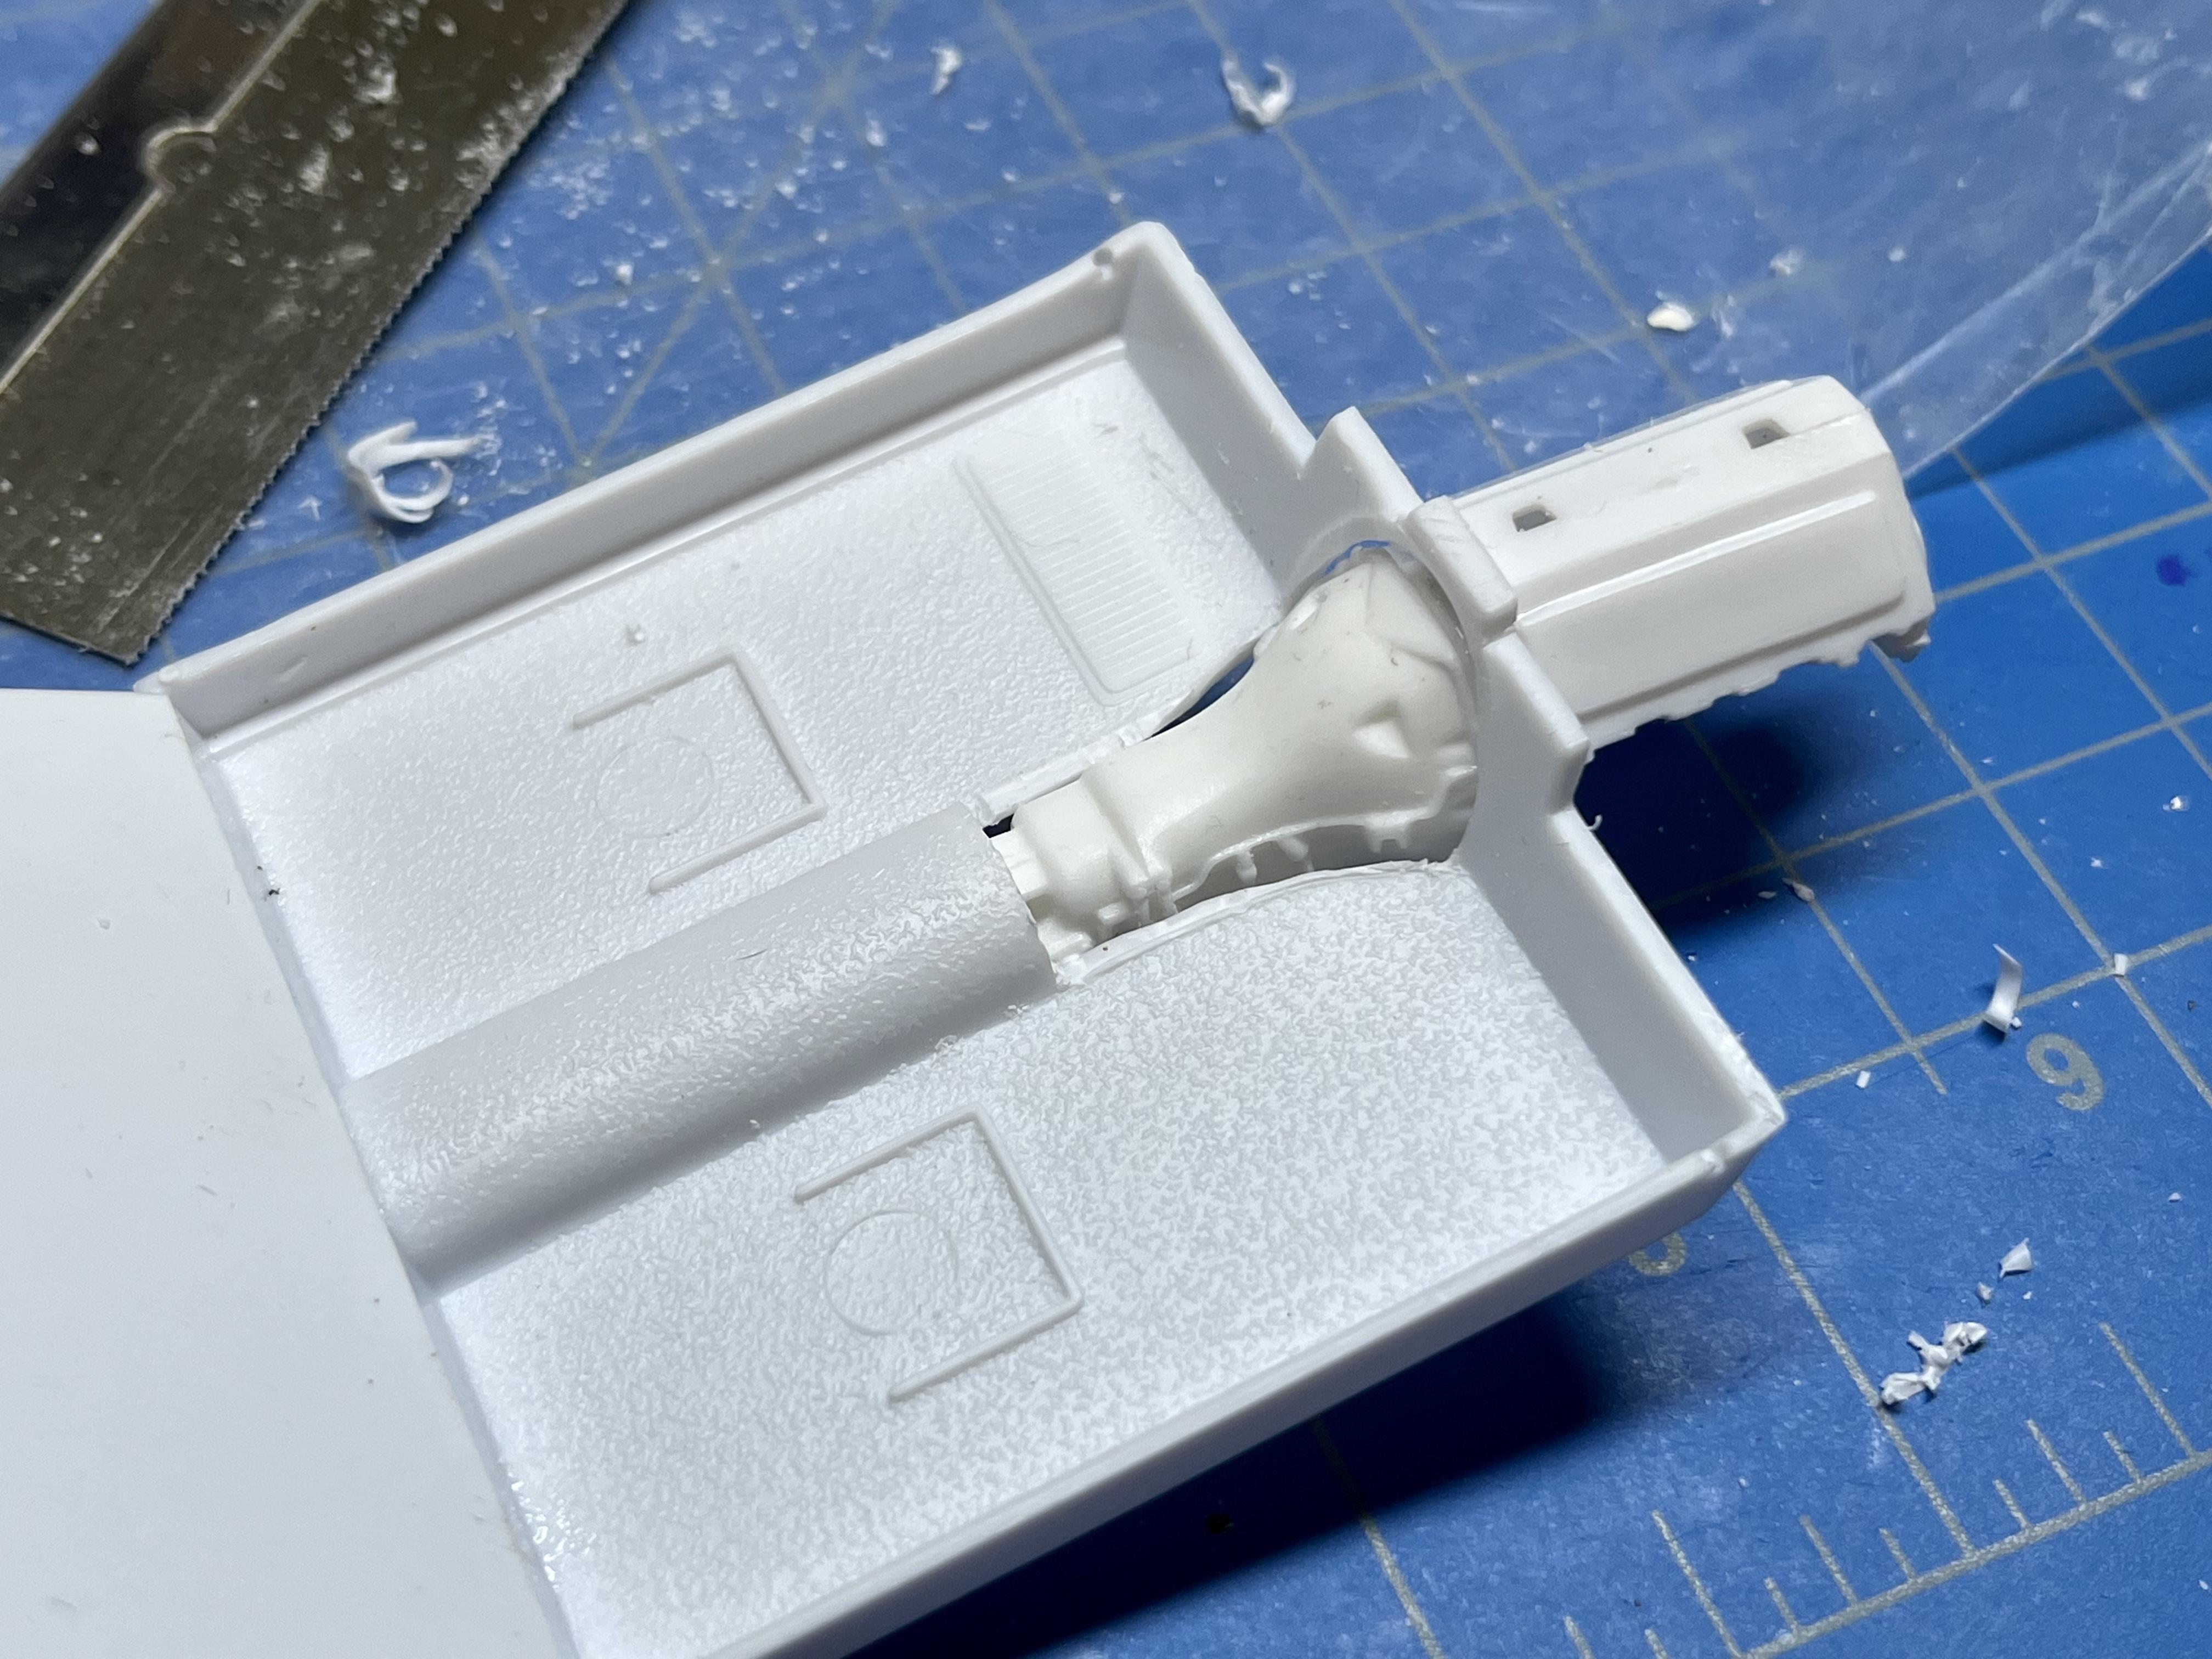
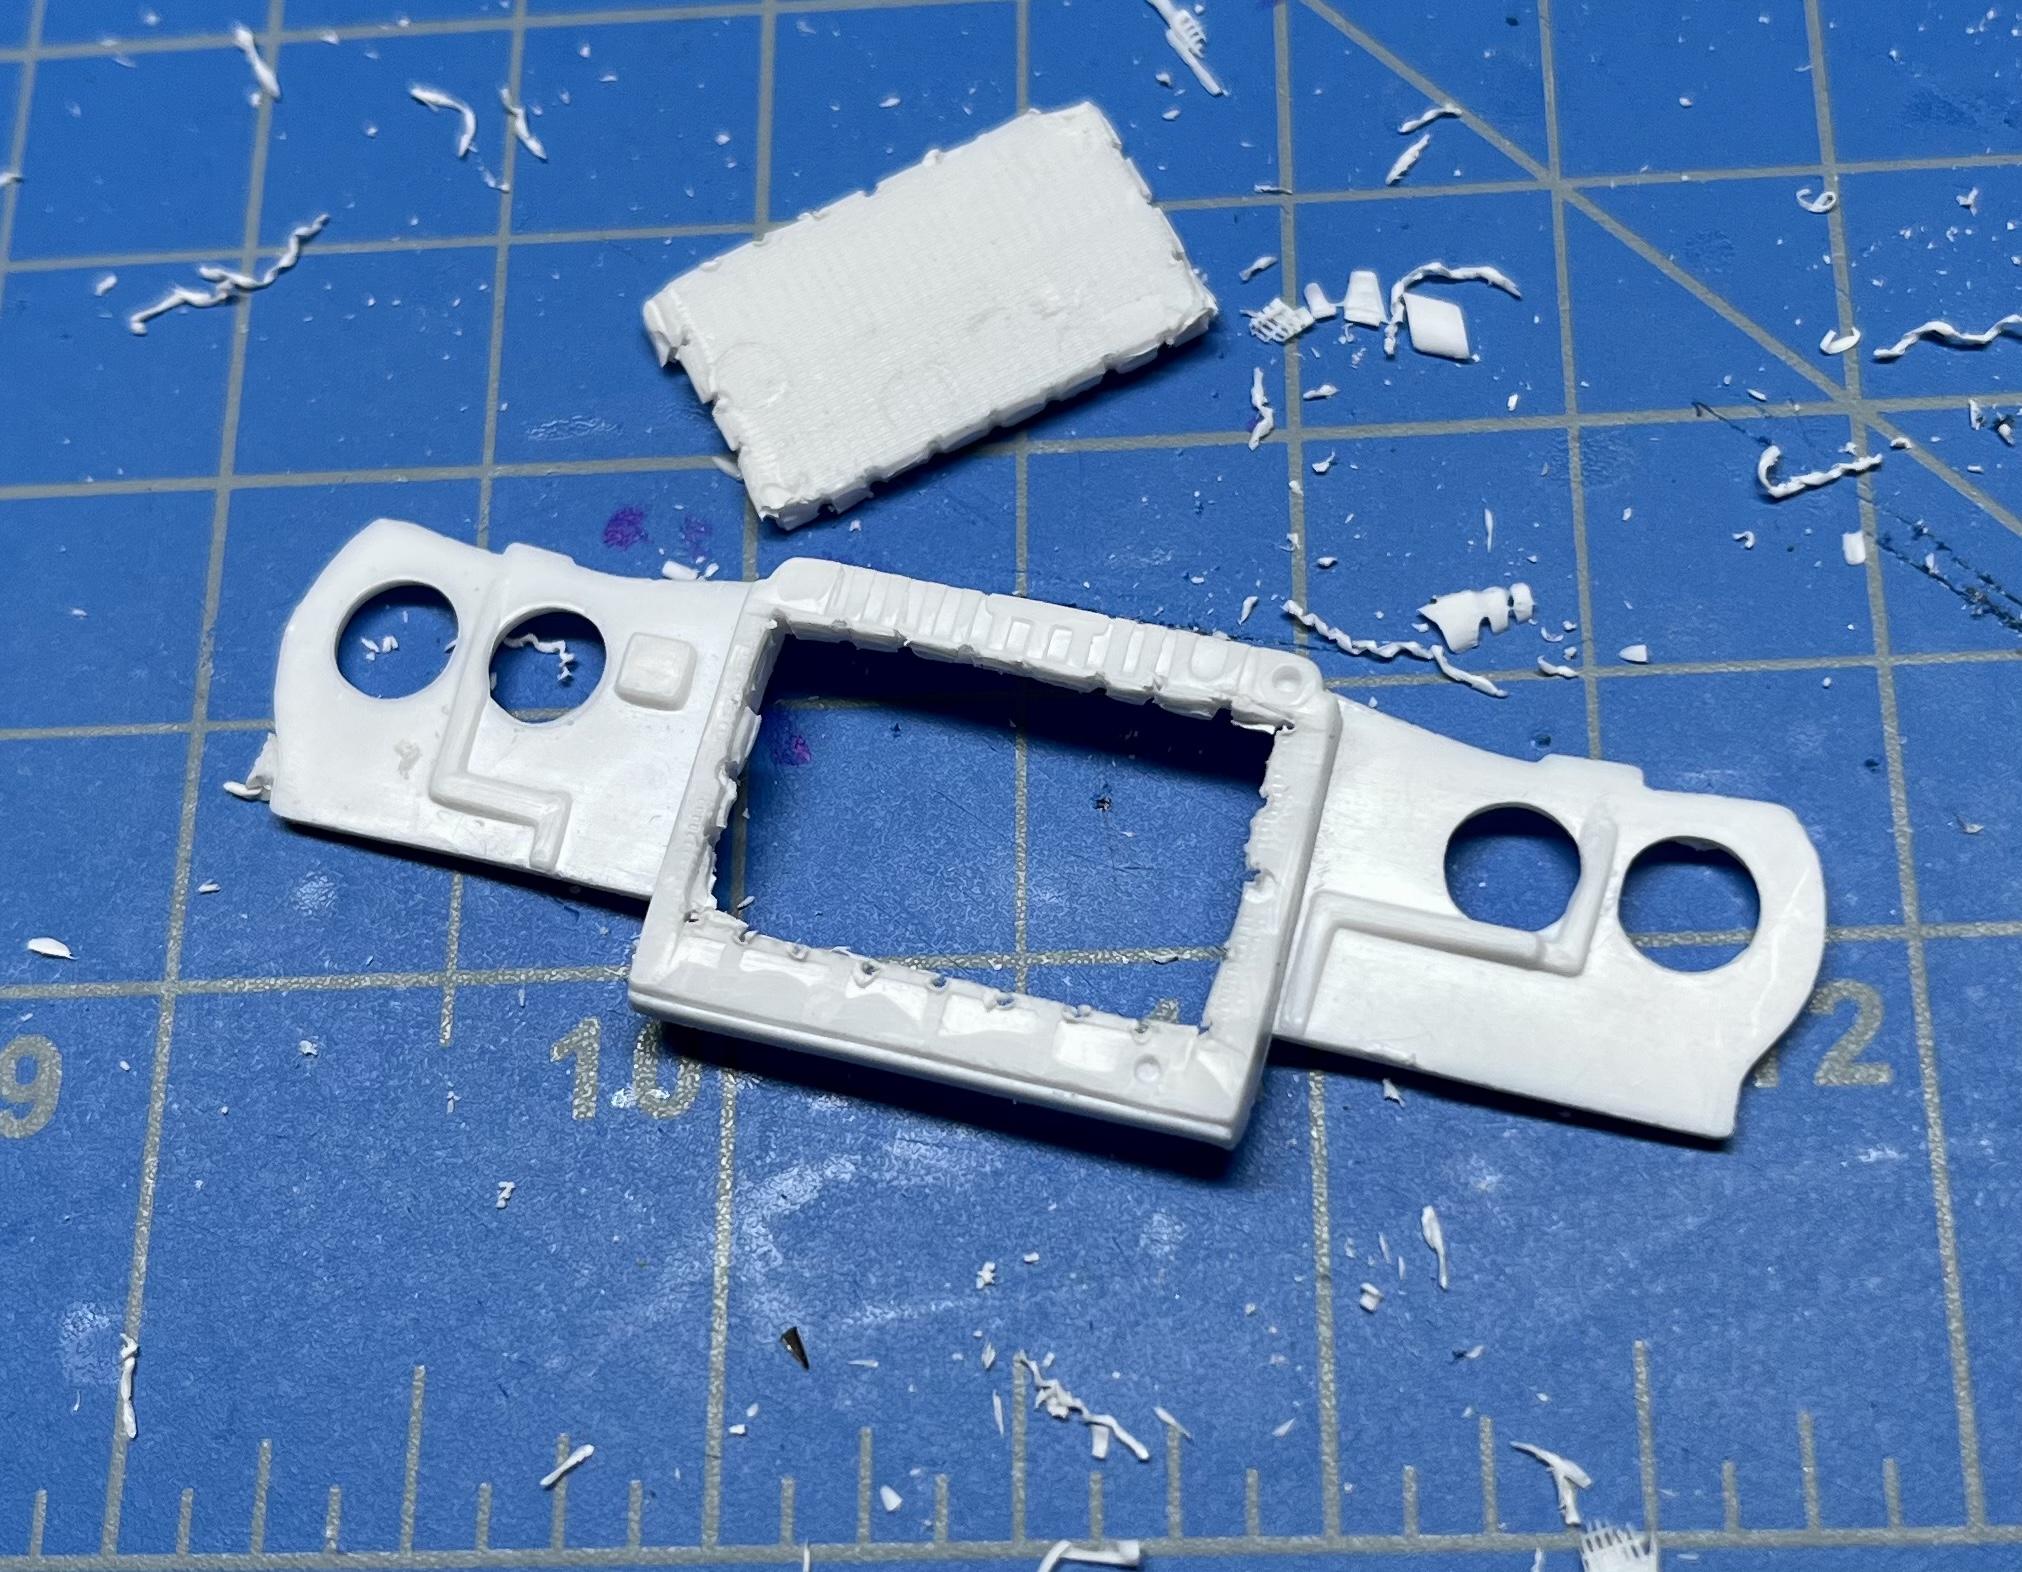
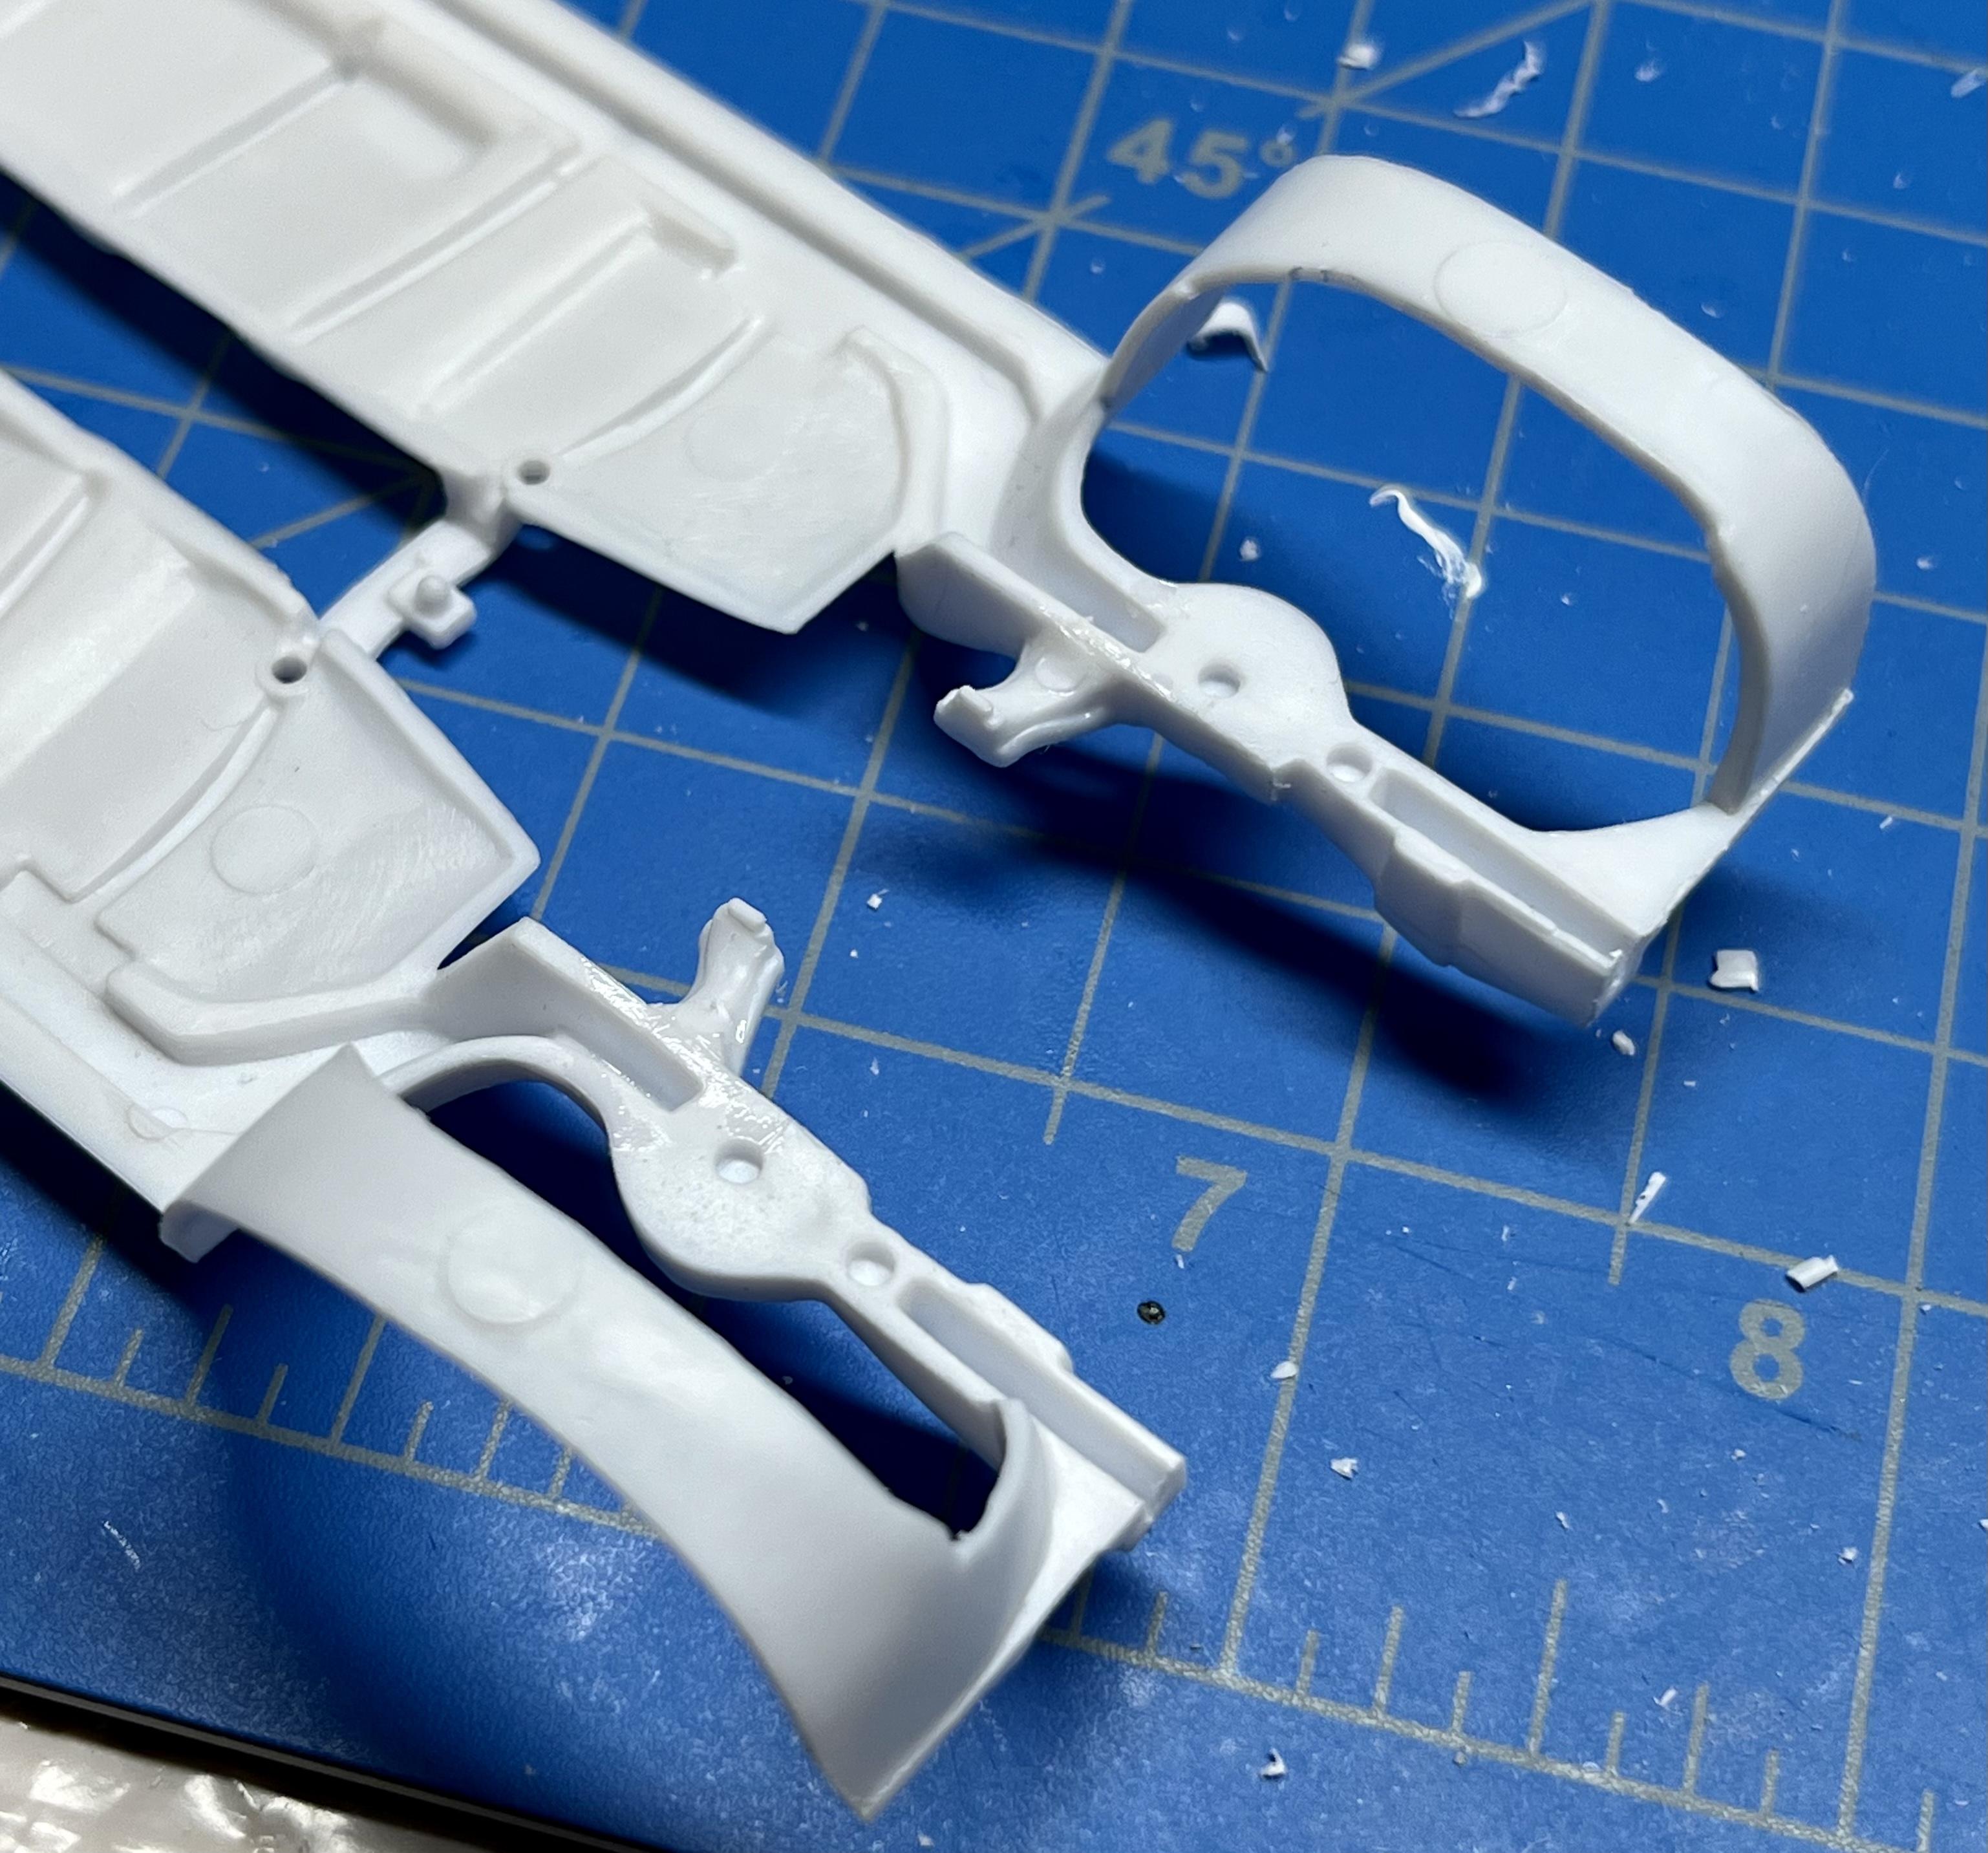
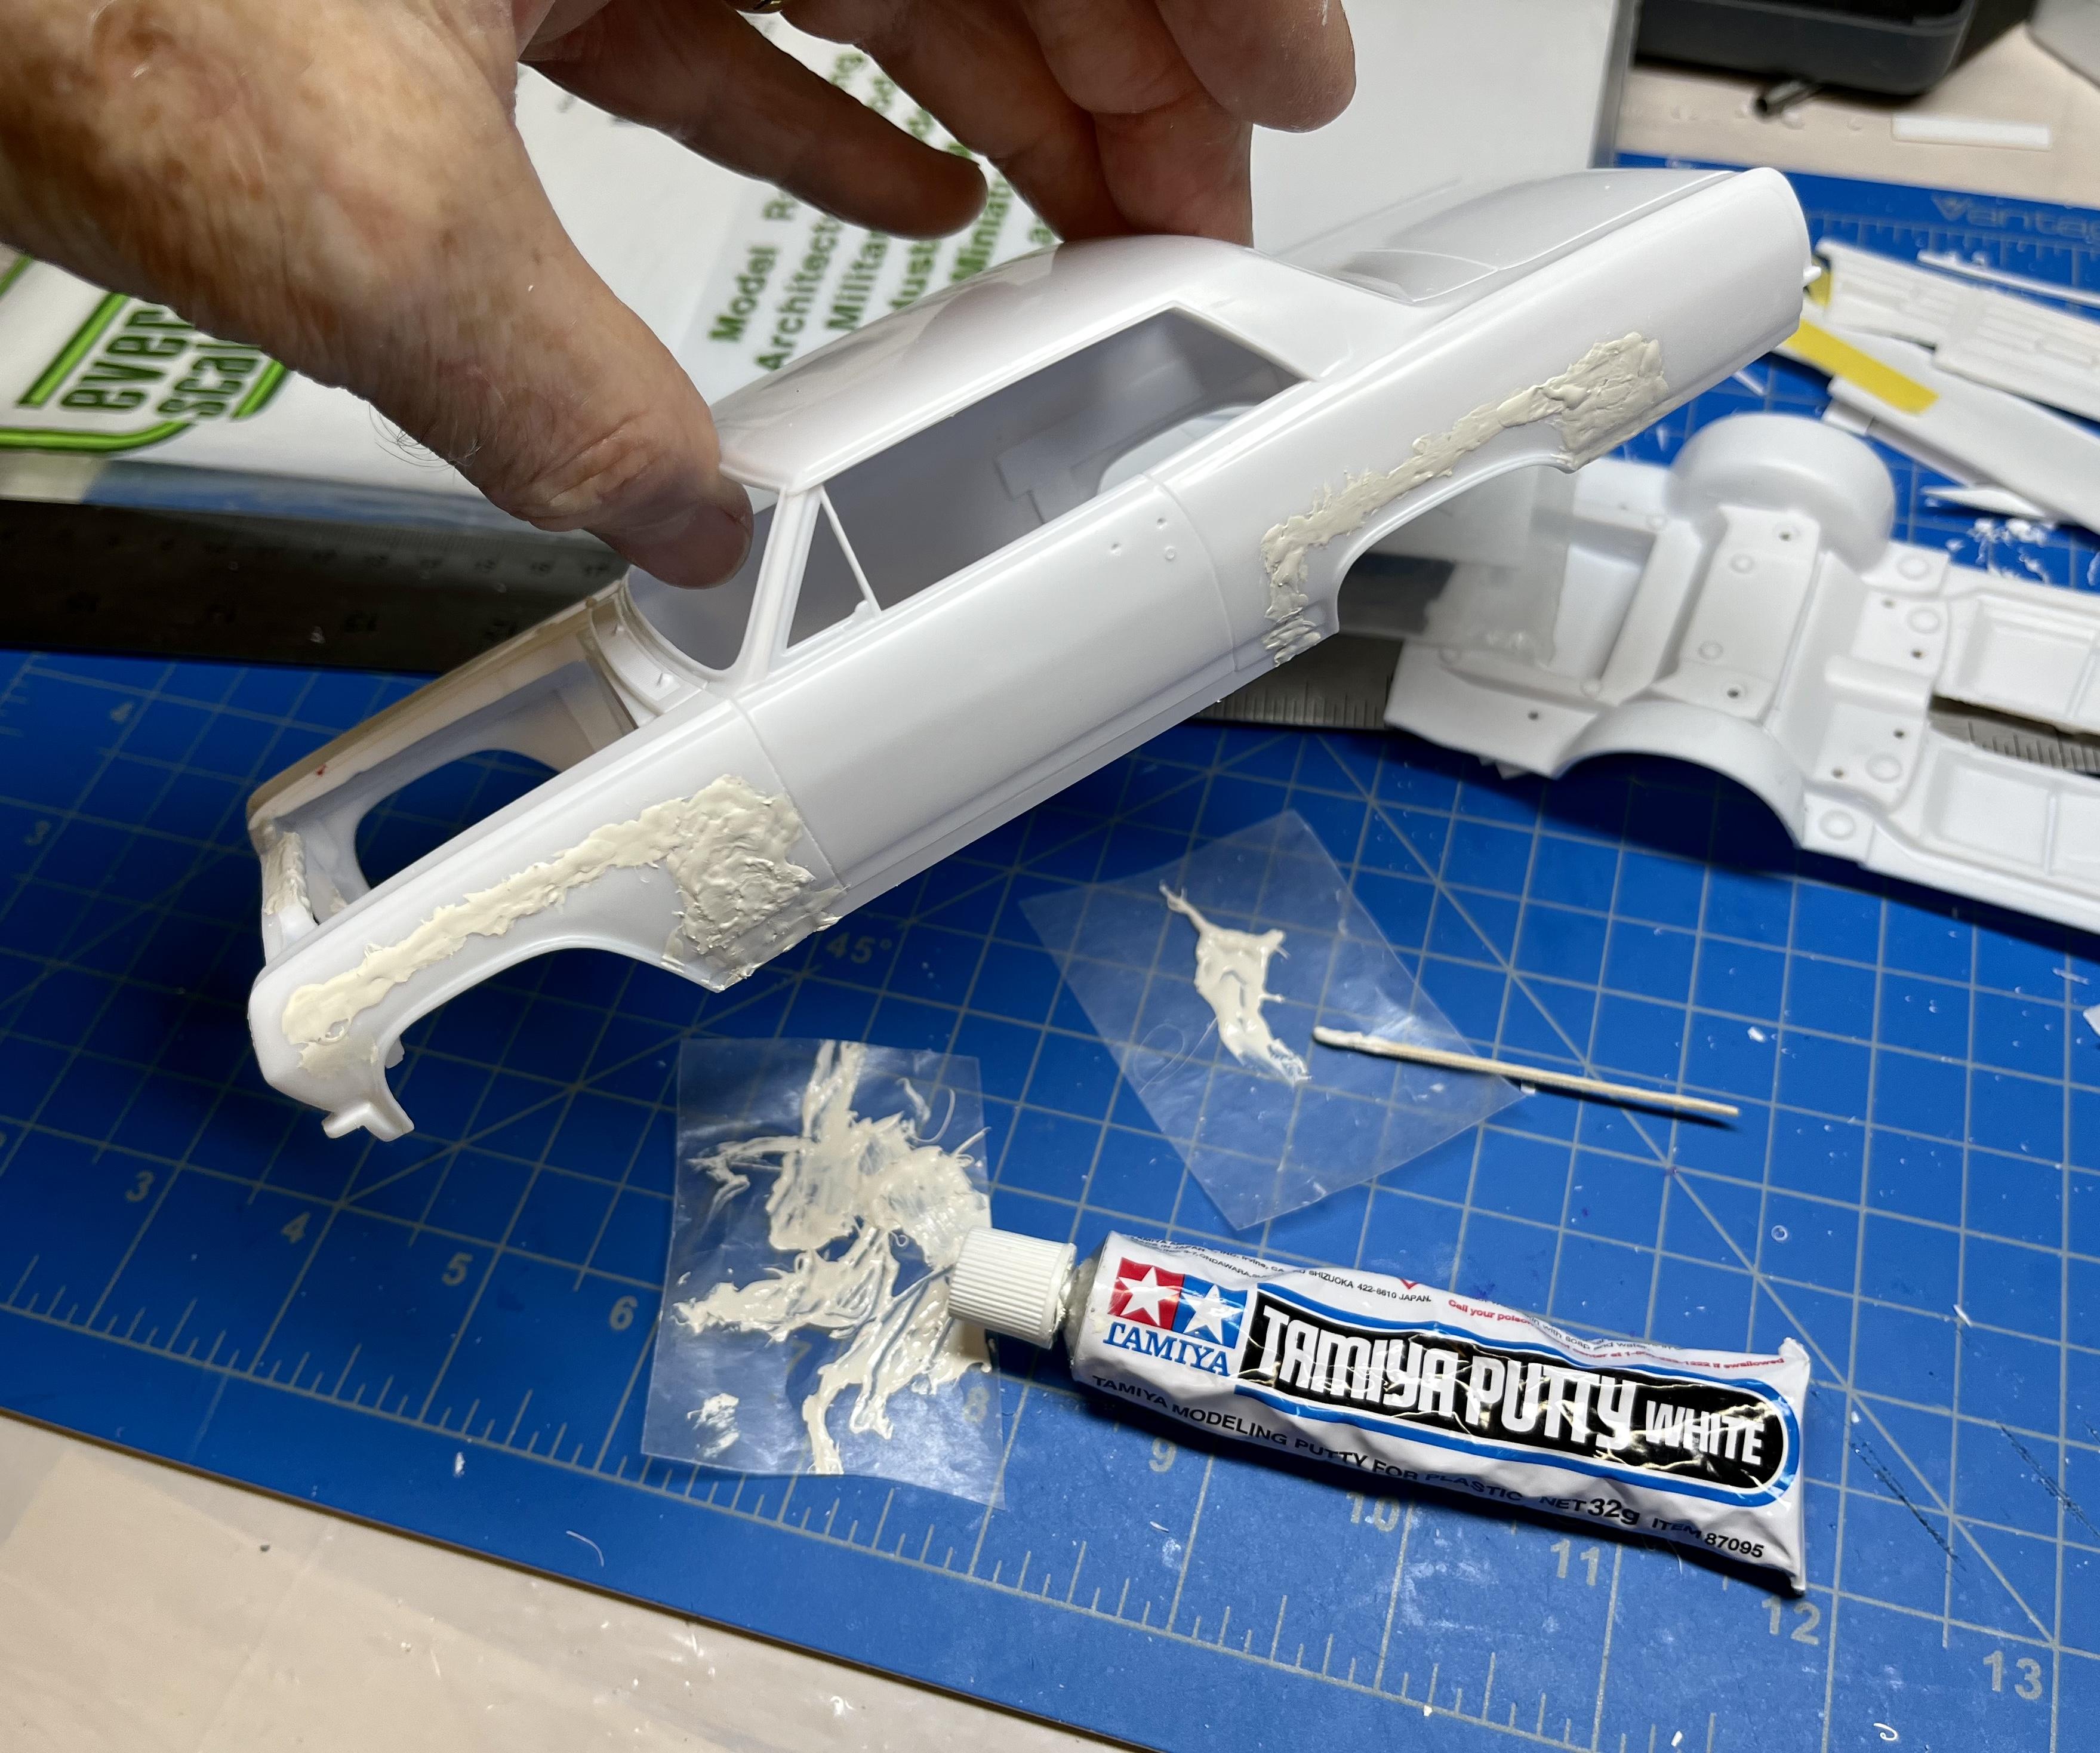
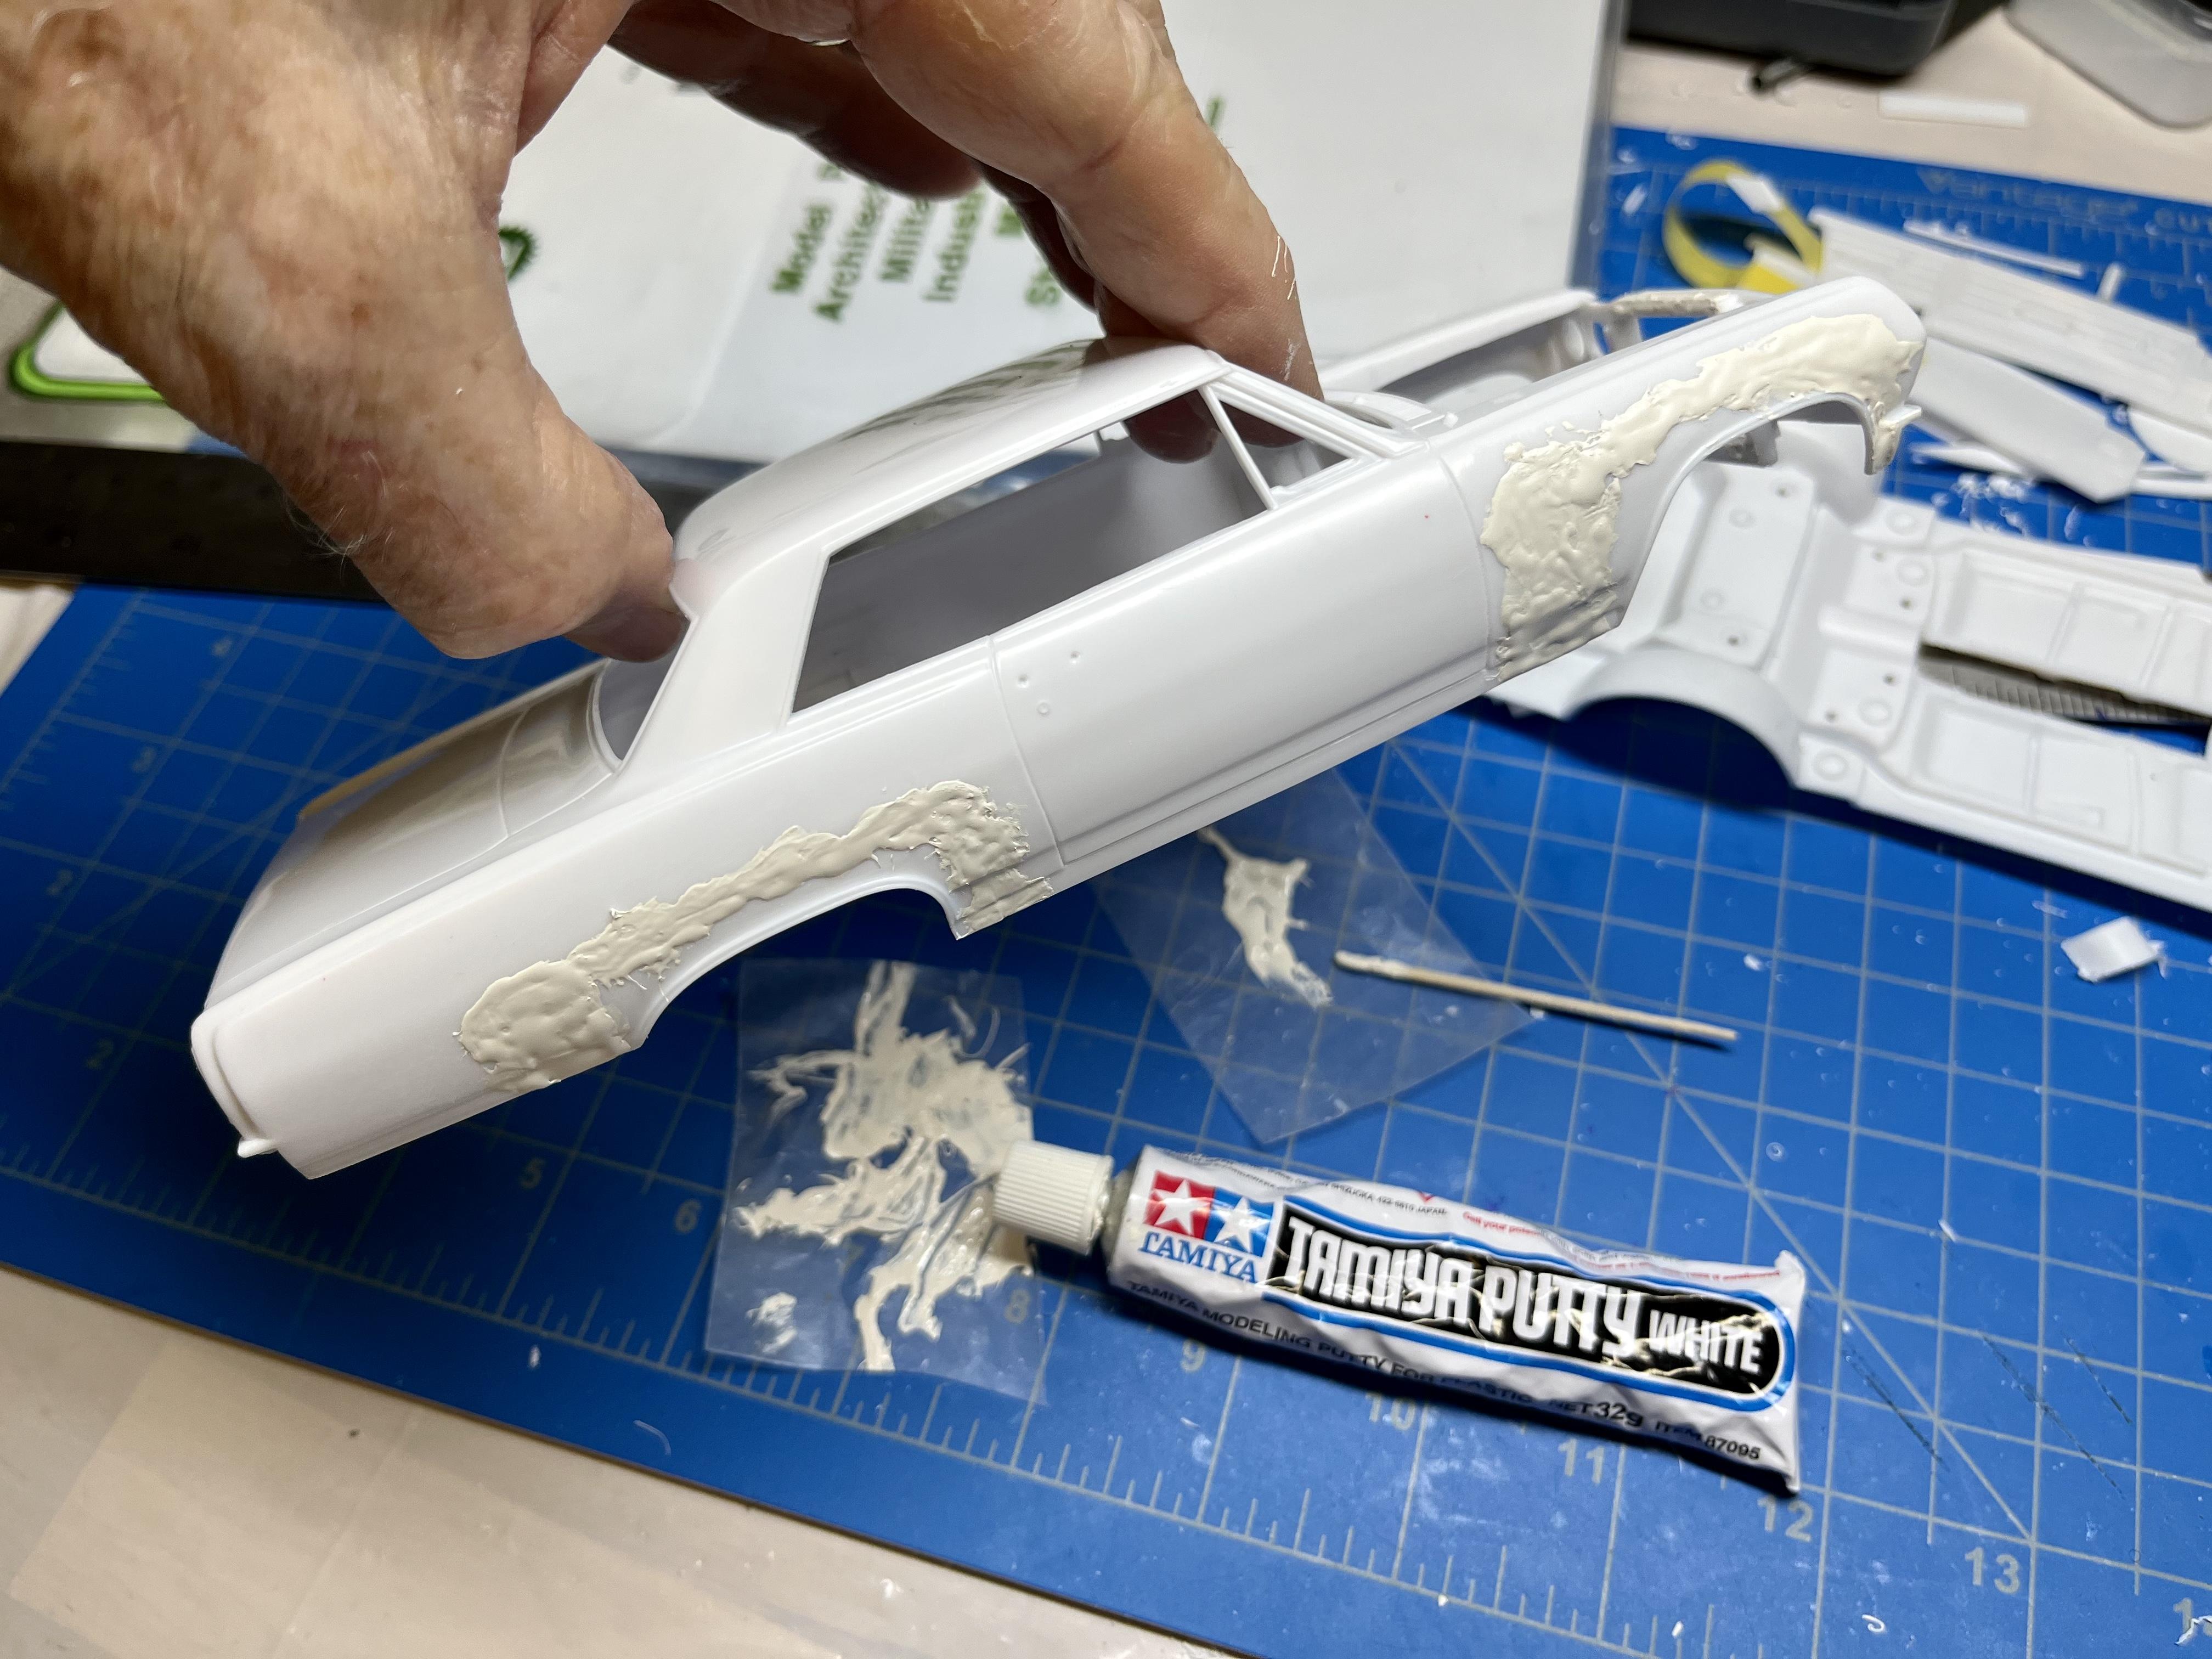
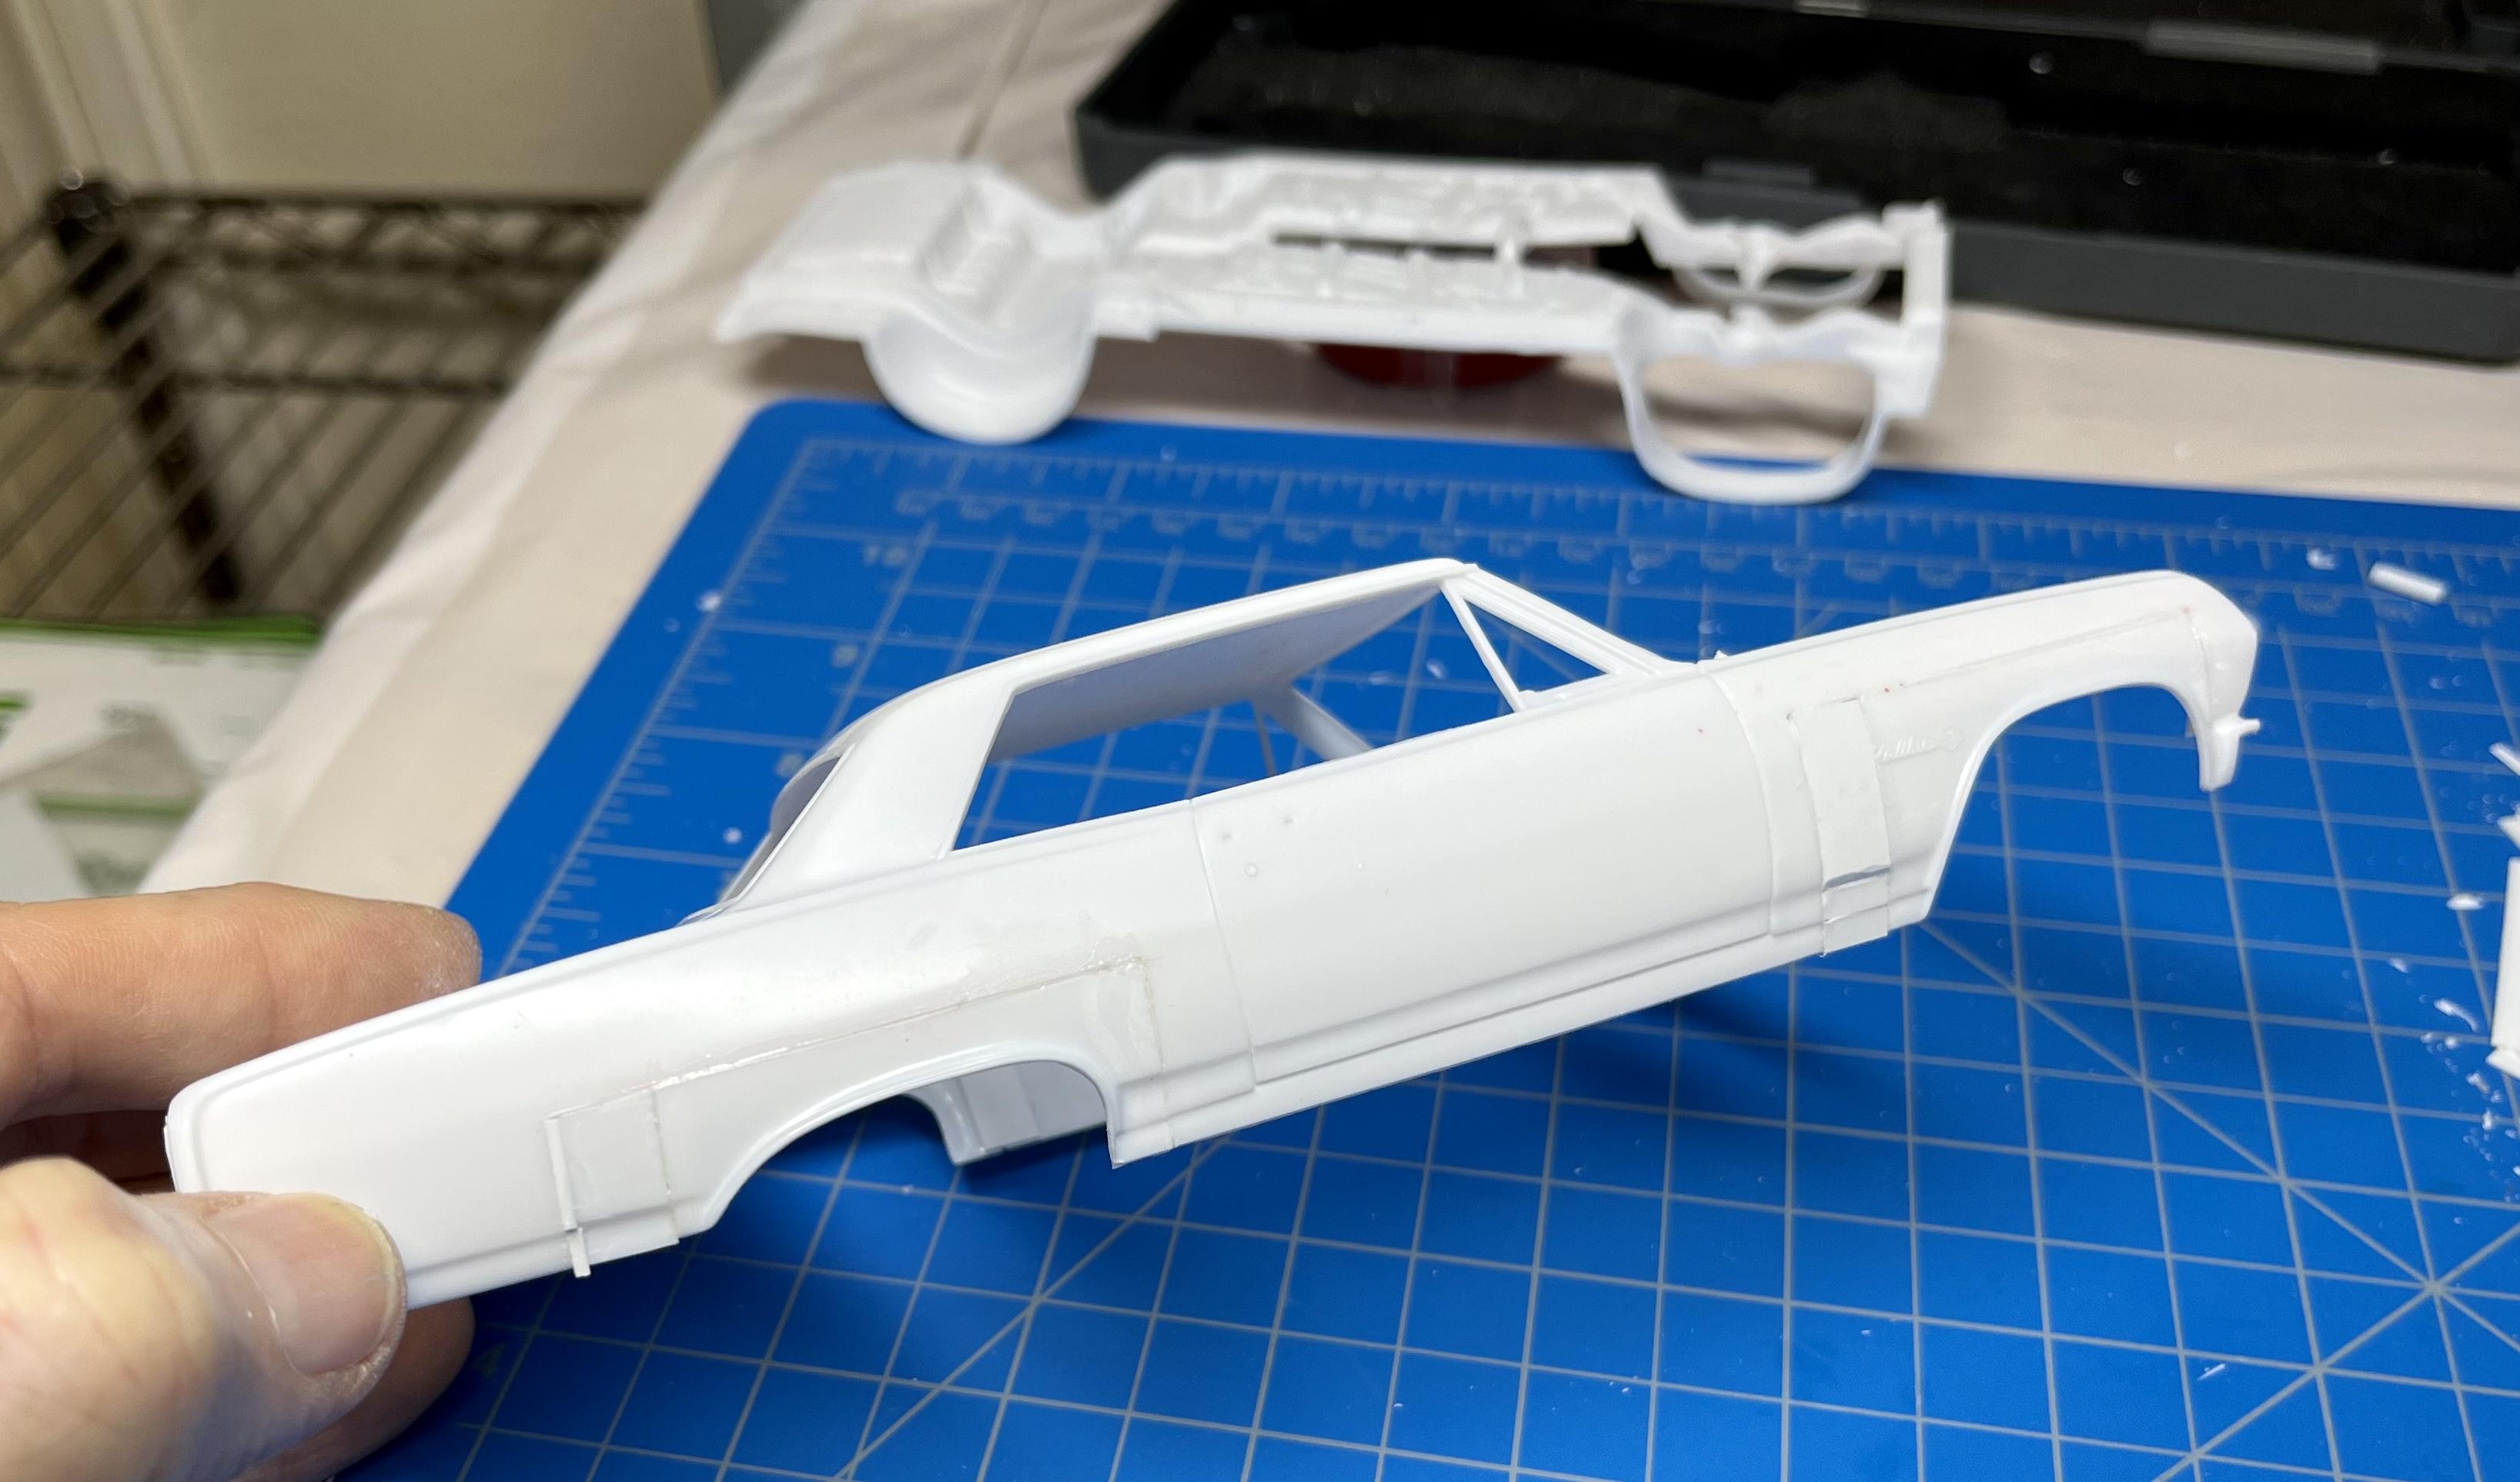
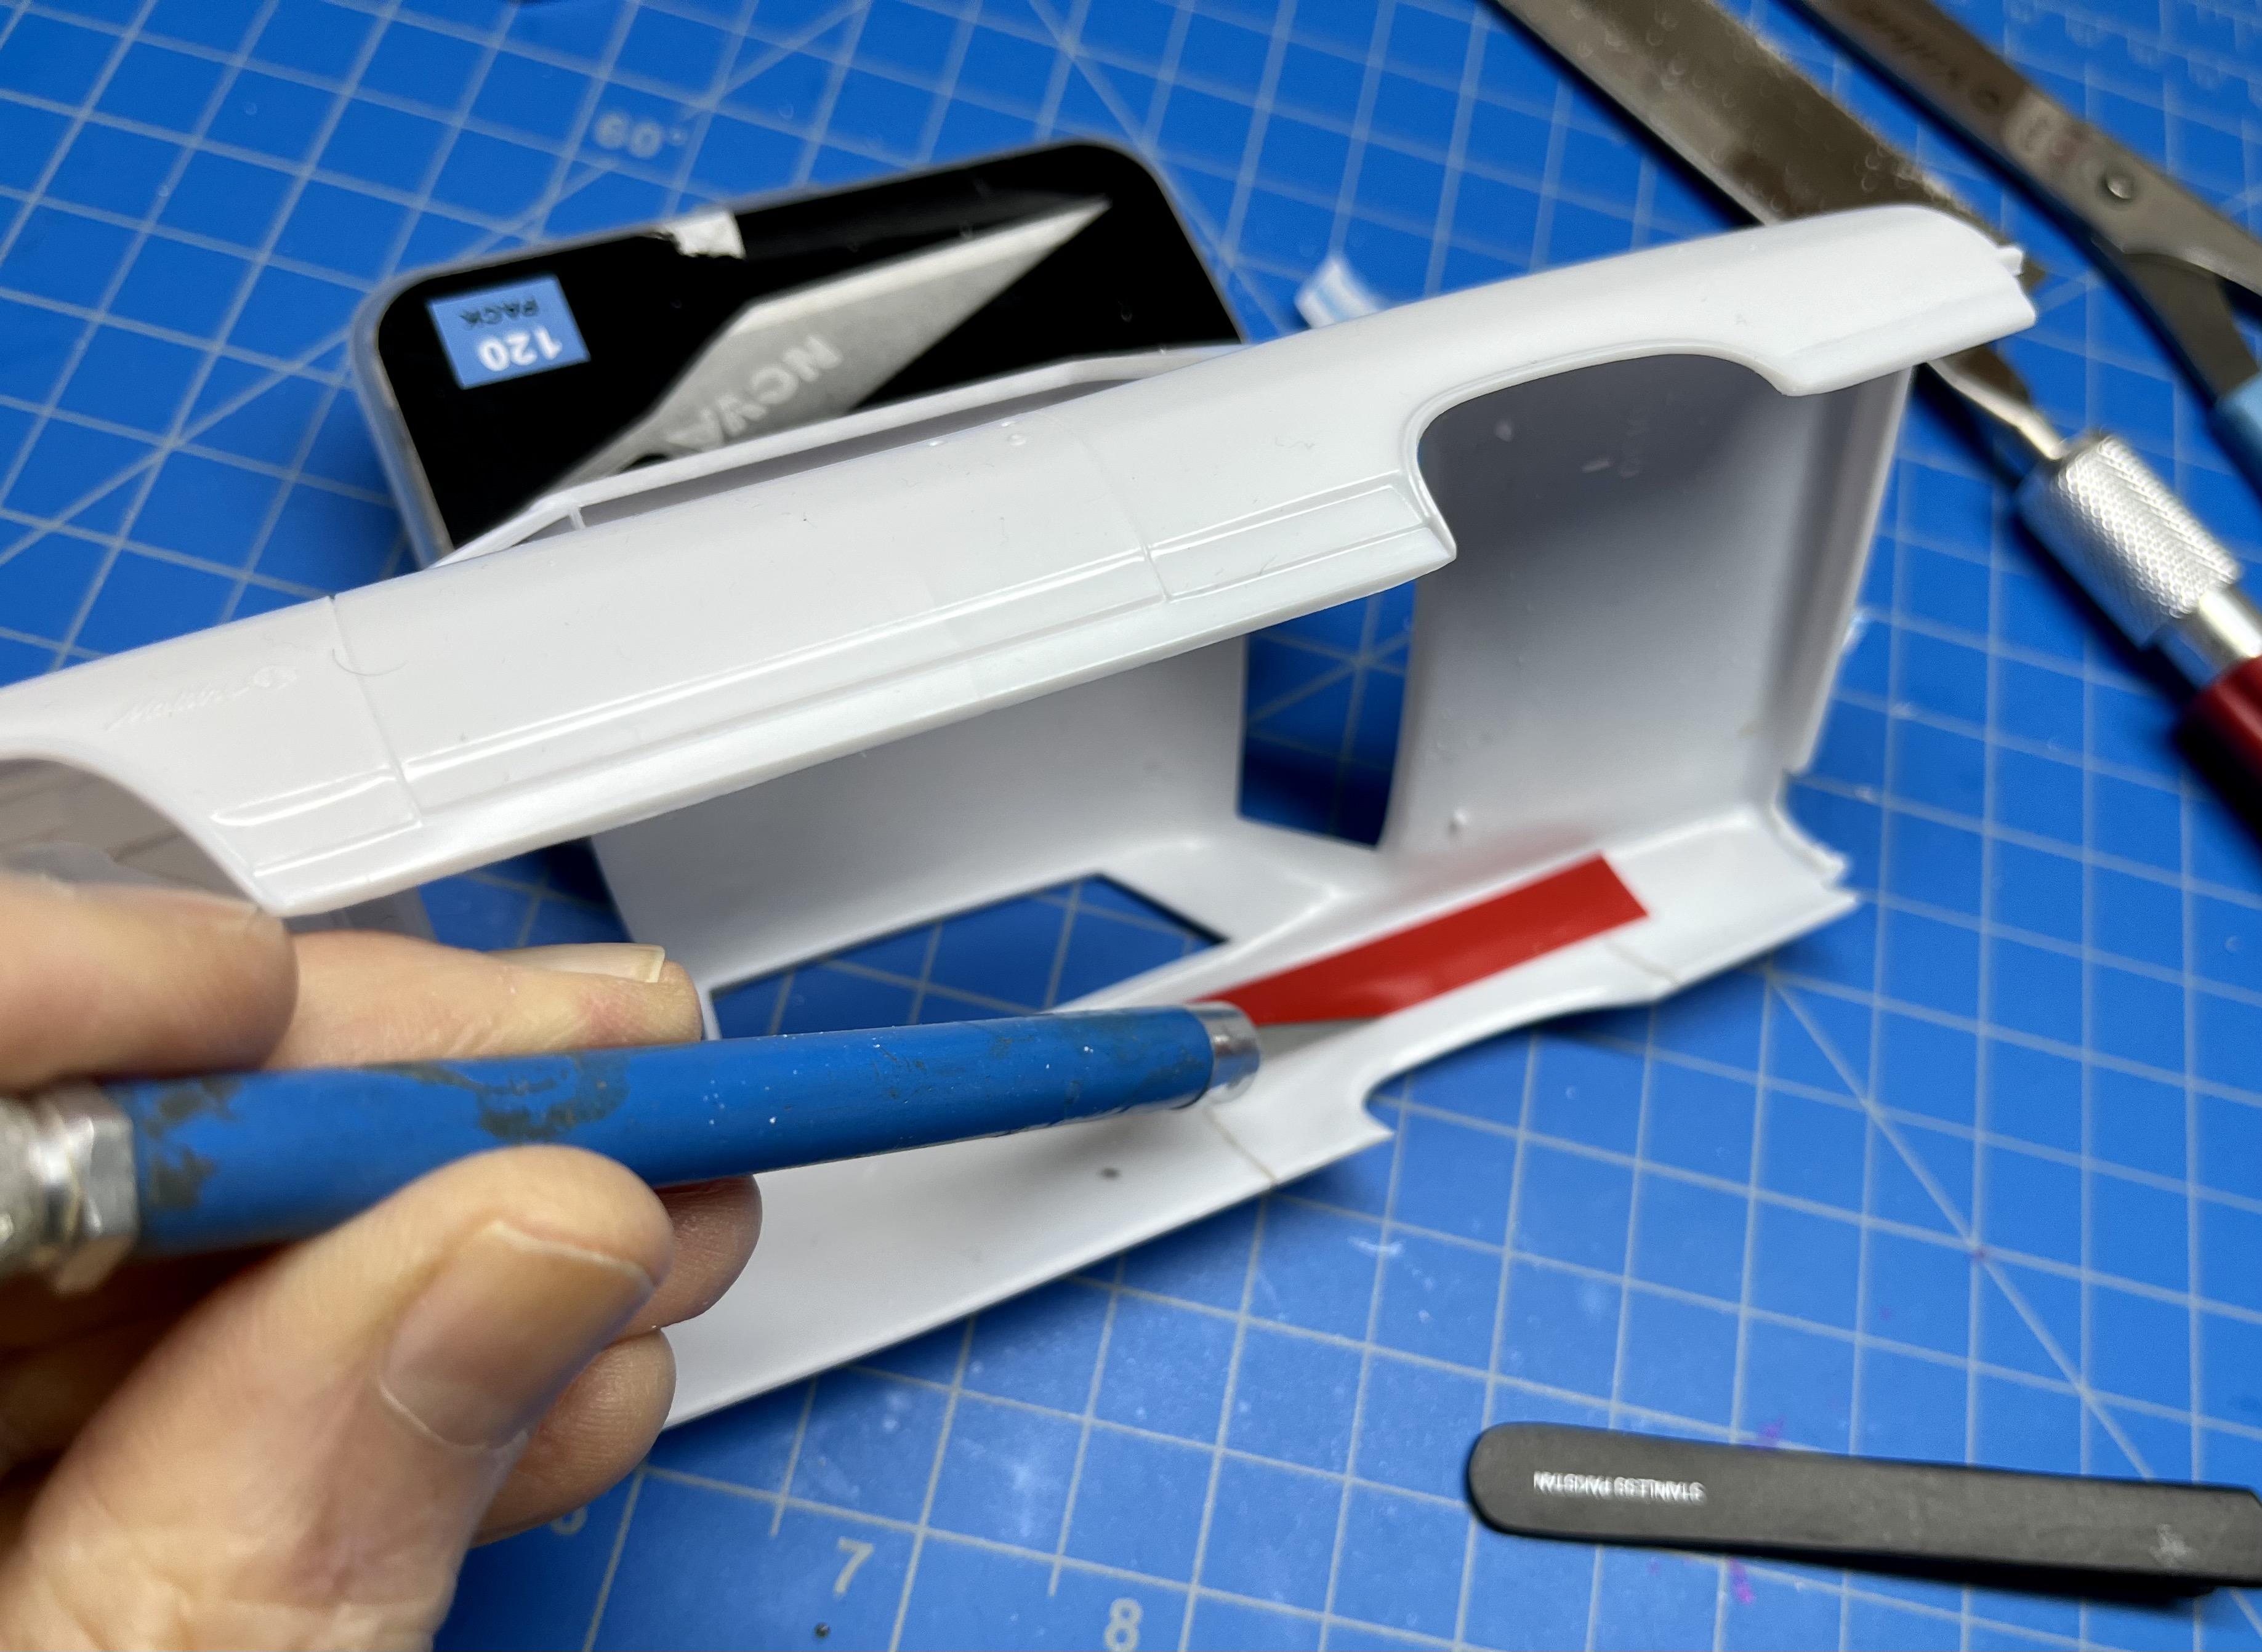
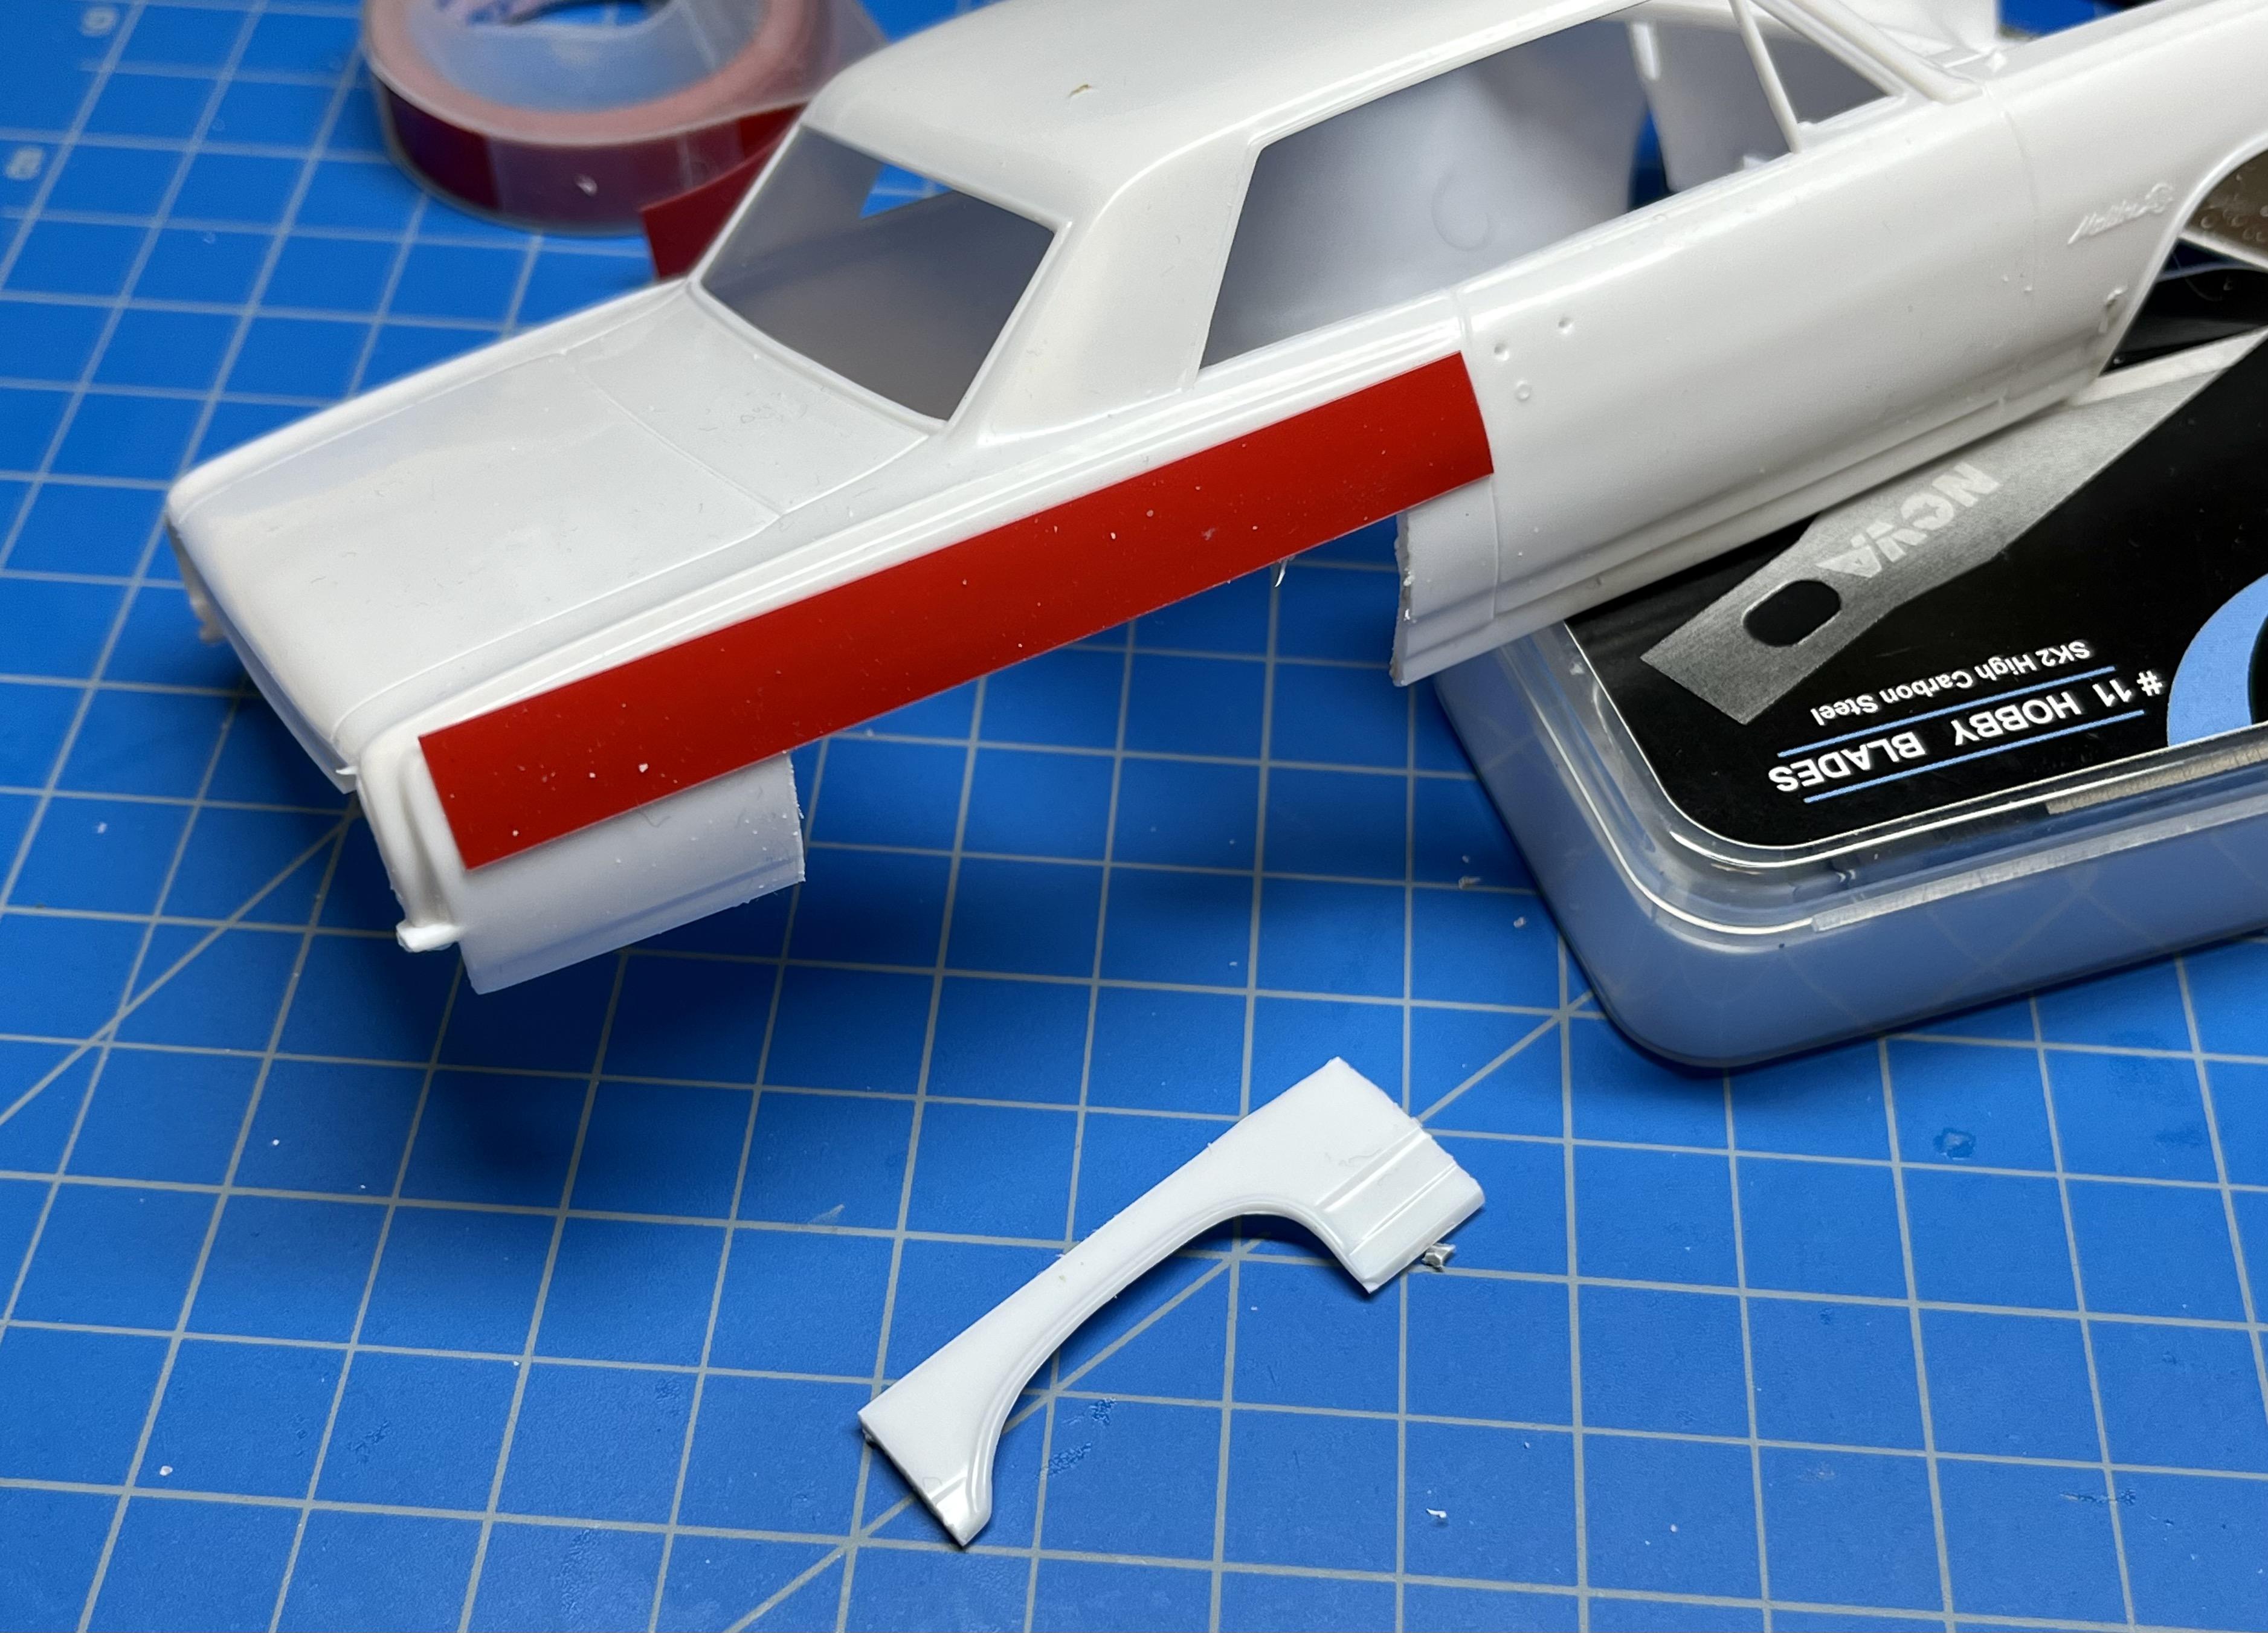
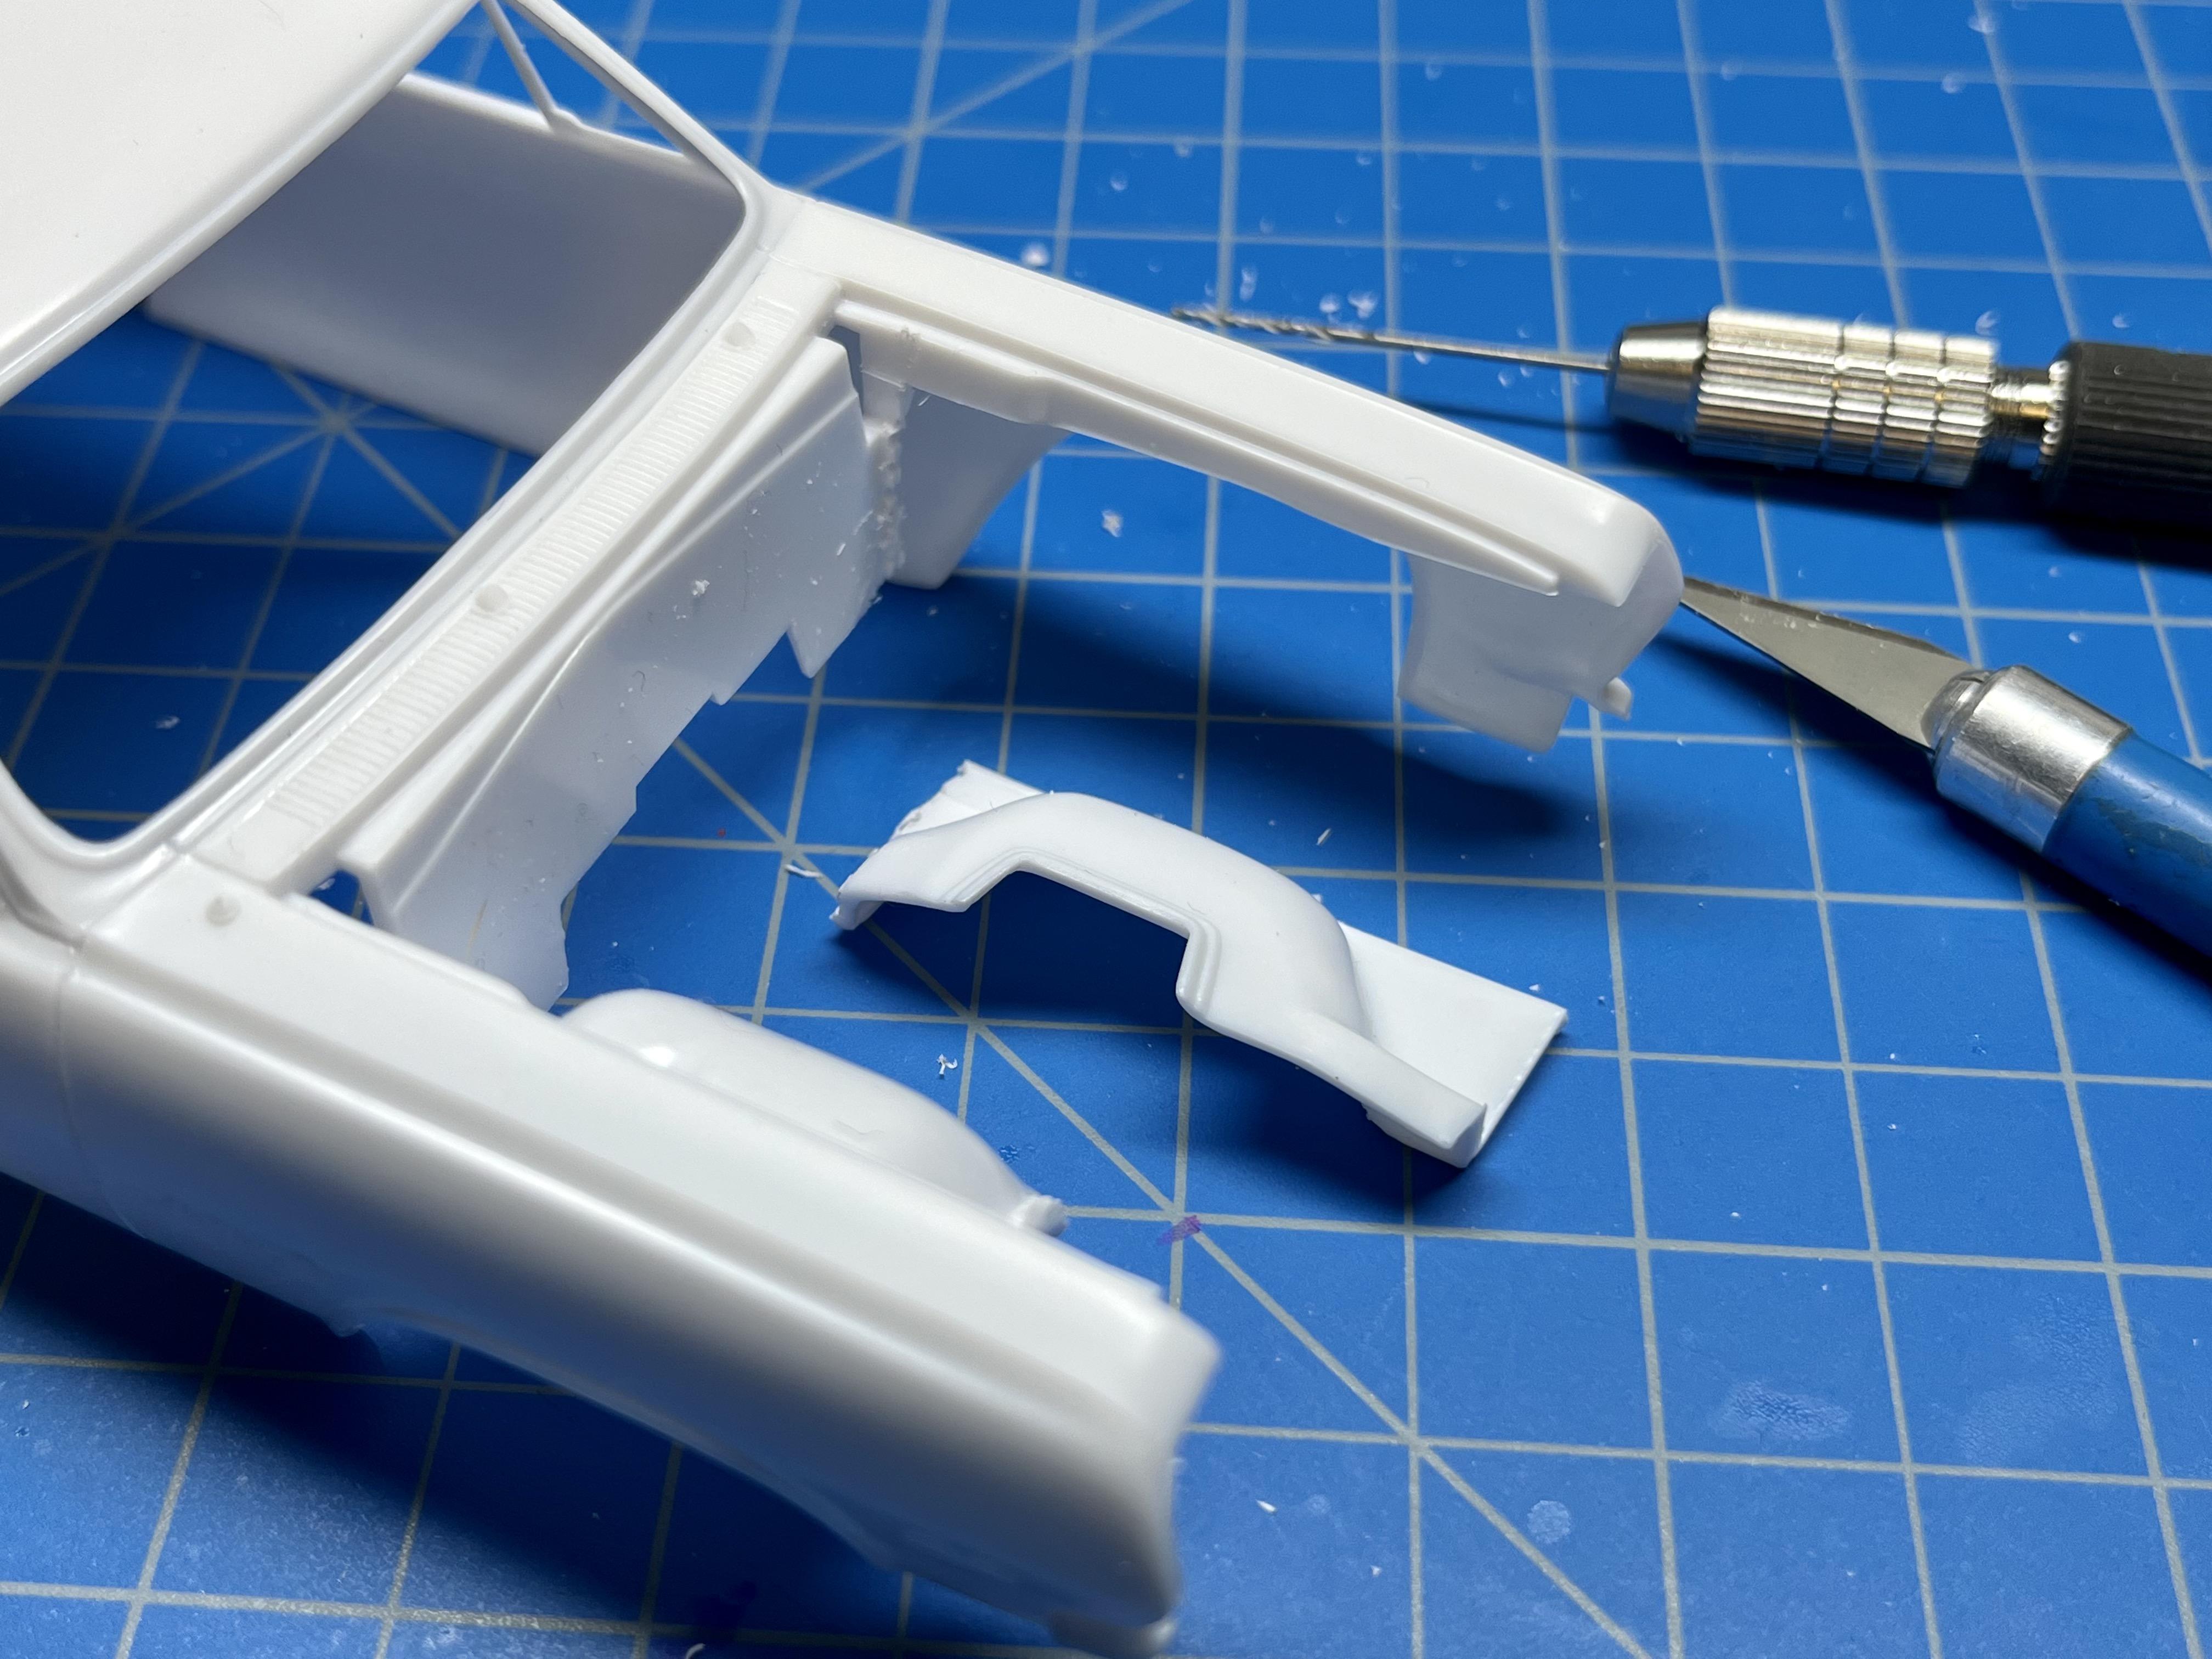
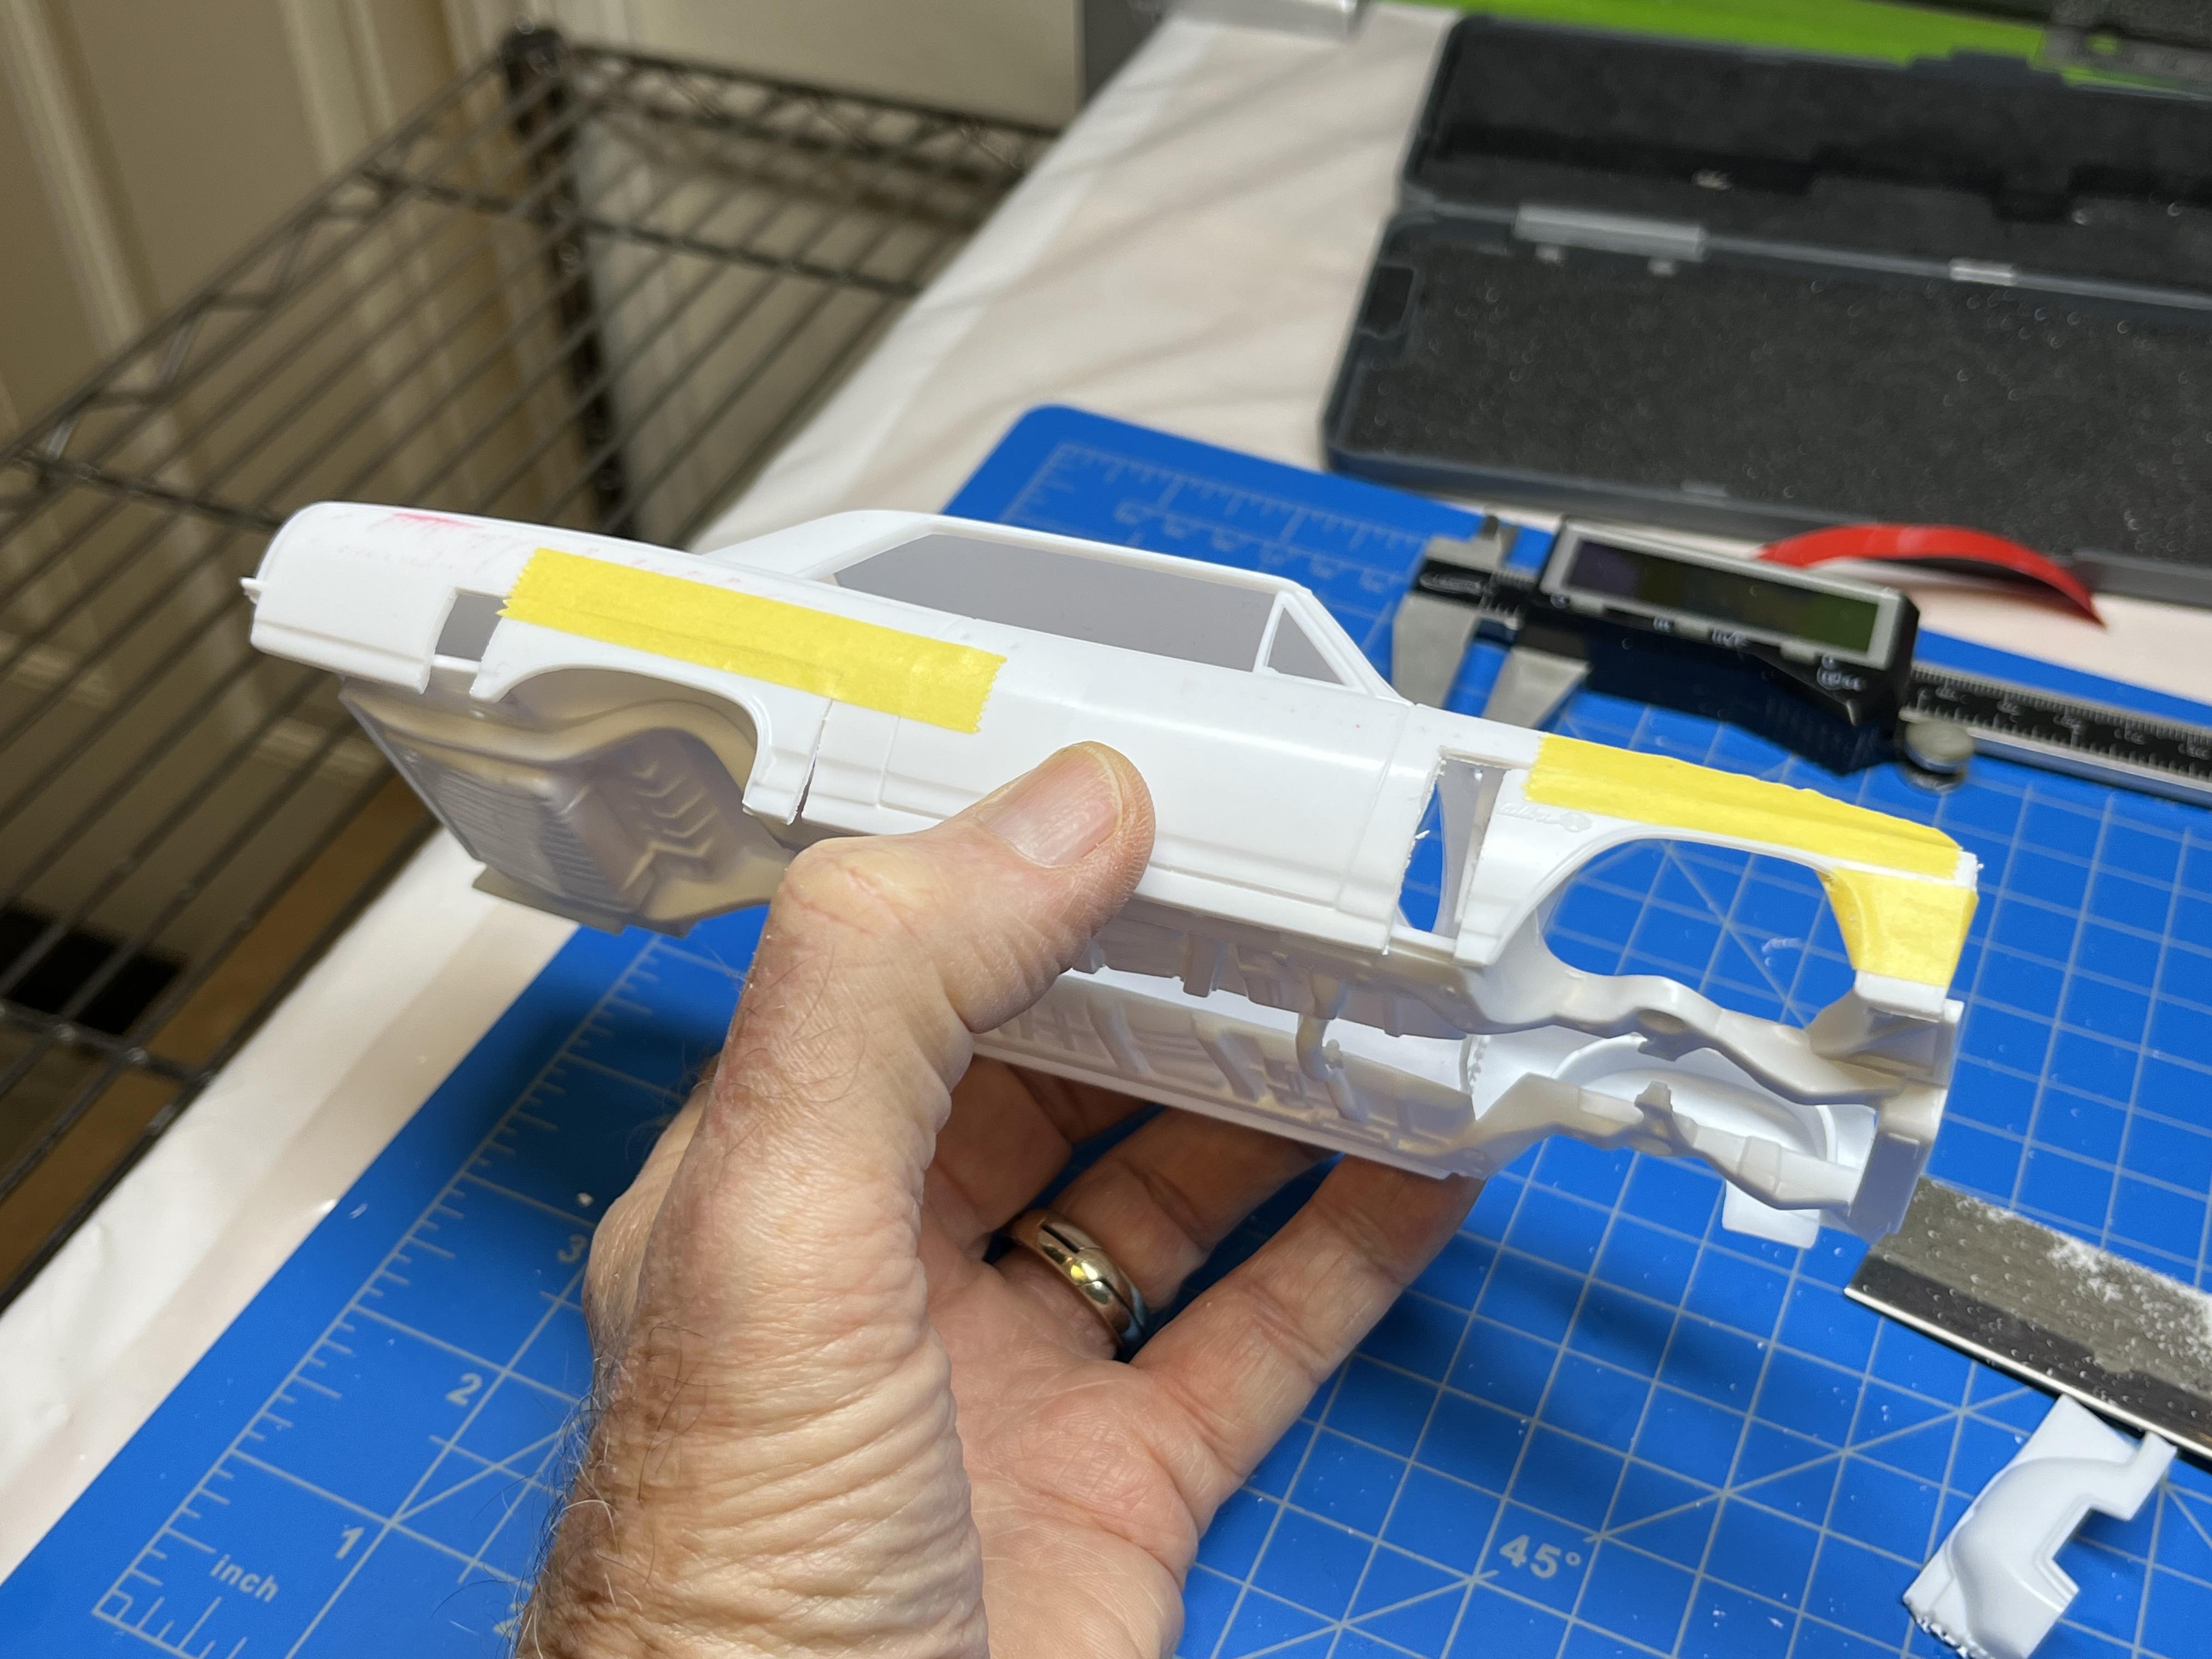
I decided to dissect out the radiator from the front bulkhead and bond the bulkhead to the body, making sure that the chromed headlight/ grill part fully seats and is positioned correctly relative to the front edge of the body: There was no radiator in the actual car and I’ve cleaned up the cut and removed radiator features from this part since the photo was taken. I moved the two engine mounts rear wards by .28” (7” at 1/25): The photo above also shows that I cut .28” off of the front of the chassis to clear the front bumper/ grill/ bulkhead. I also had to cut .28” off the notch that the interior tube bears against to allow the chassis to shift forward by the .28”: I bonded sheet styrene to the rear of the interior tub to replace the back seat. Once this is fully cured, I’ll cut the back and seat portion of the rear seat off from the tub so that the chassis can shift forwards .28” relative to the body + interior tub: And finally, I took a leap of faith and applied Tamiya putty to the four wheel opening repositioning seams: I’ve never been crazy about this Tamiya putty filler and have been using Vallejo acrylic gap/ seam filler on all my planes/ tanks/ ships lately which is easier to work with and excess can be whipped off with IPA. I decided not to use the acrylic putty here because it’s much softer and I was worried that it might react with lacquer based primer and paints. I’m going to give this Tamiya putty a few days to fully cure before attempting to sand this down, hoping I don’t regret this choice of putty….?? I hope to re-position and bond the two inner wheel wells to the body engine bay next and then get going on clean-up and dry-fitting of the chassis/ engine/ interior components. I’ve learned it’s best to solve all the assembly ,and fit issues before even priming any parts.
-
“BUILDING THE COVERS “ Vol # 37 THE AWB 1966 NOVA OF DICK HARRELL
papajohn97 replied to M W Elky's topic in Drag Racing
Hi Mike, I missed this build that you posted a few months back and just ran a-crossed it in searching how others have approached recreating this legendary Dick Harrell/ Bill Thomas injected Nova - very nice job! So how did you do this chassis? Did you cut the front end off of the Nova pro-street chassis and scratch-build the tubular front clip and straight axle/ leaf spring assembly? I’d like to copy your build here (highest form of compliment, right?) using the same ‘66 Nova pro street kit but am also wondering if it’s worth sacrificing a Moebius Gasser Nova kit for the tubular front clip + straight axle assembly? What would you do if you were to build a second one of these? Scratch build the front end or pull parts from the Moebius kit ( still a $25 kit)? BTW, I love all your builds that you so prolifically assemble and post here, you ‘da sixties door slam’in drag car MAN!!!!! John -
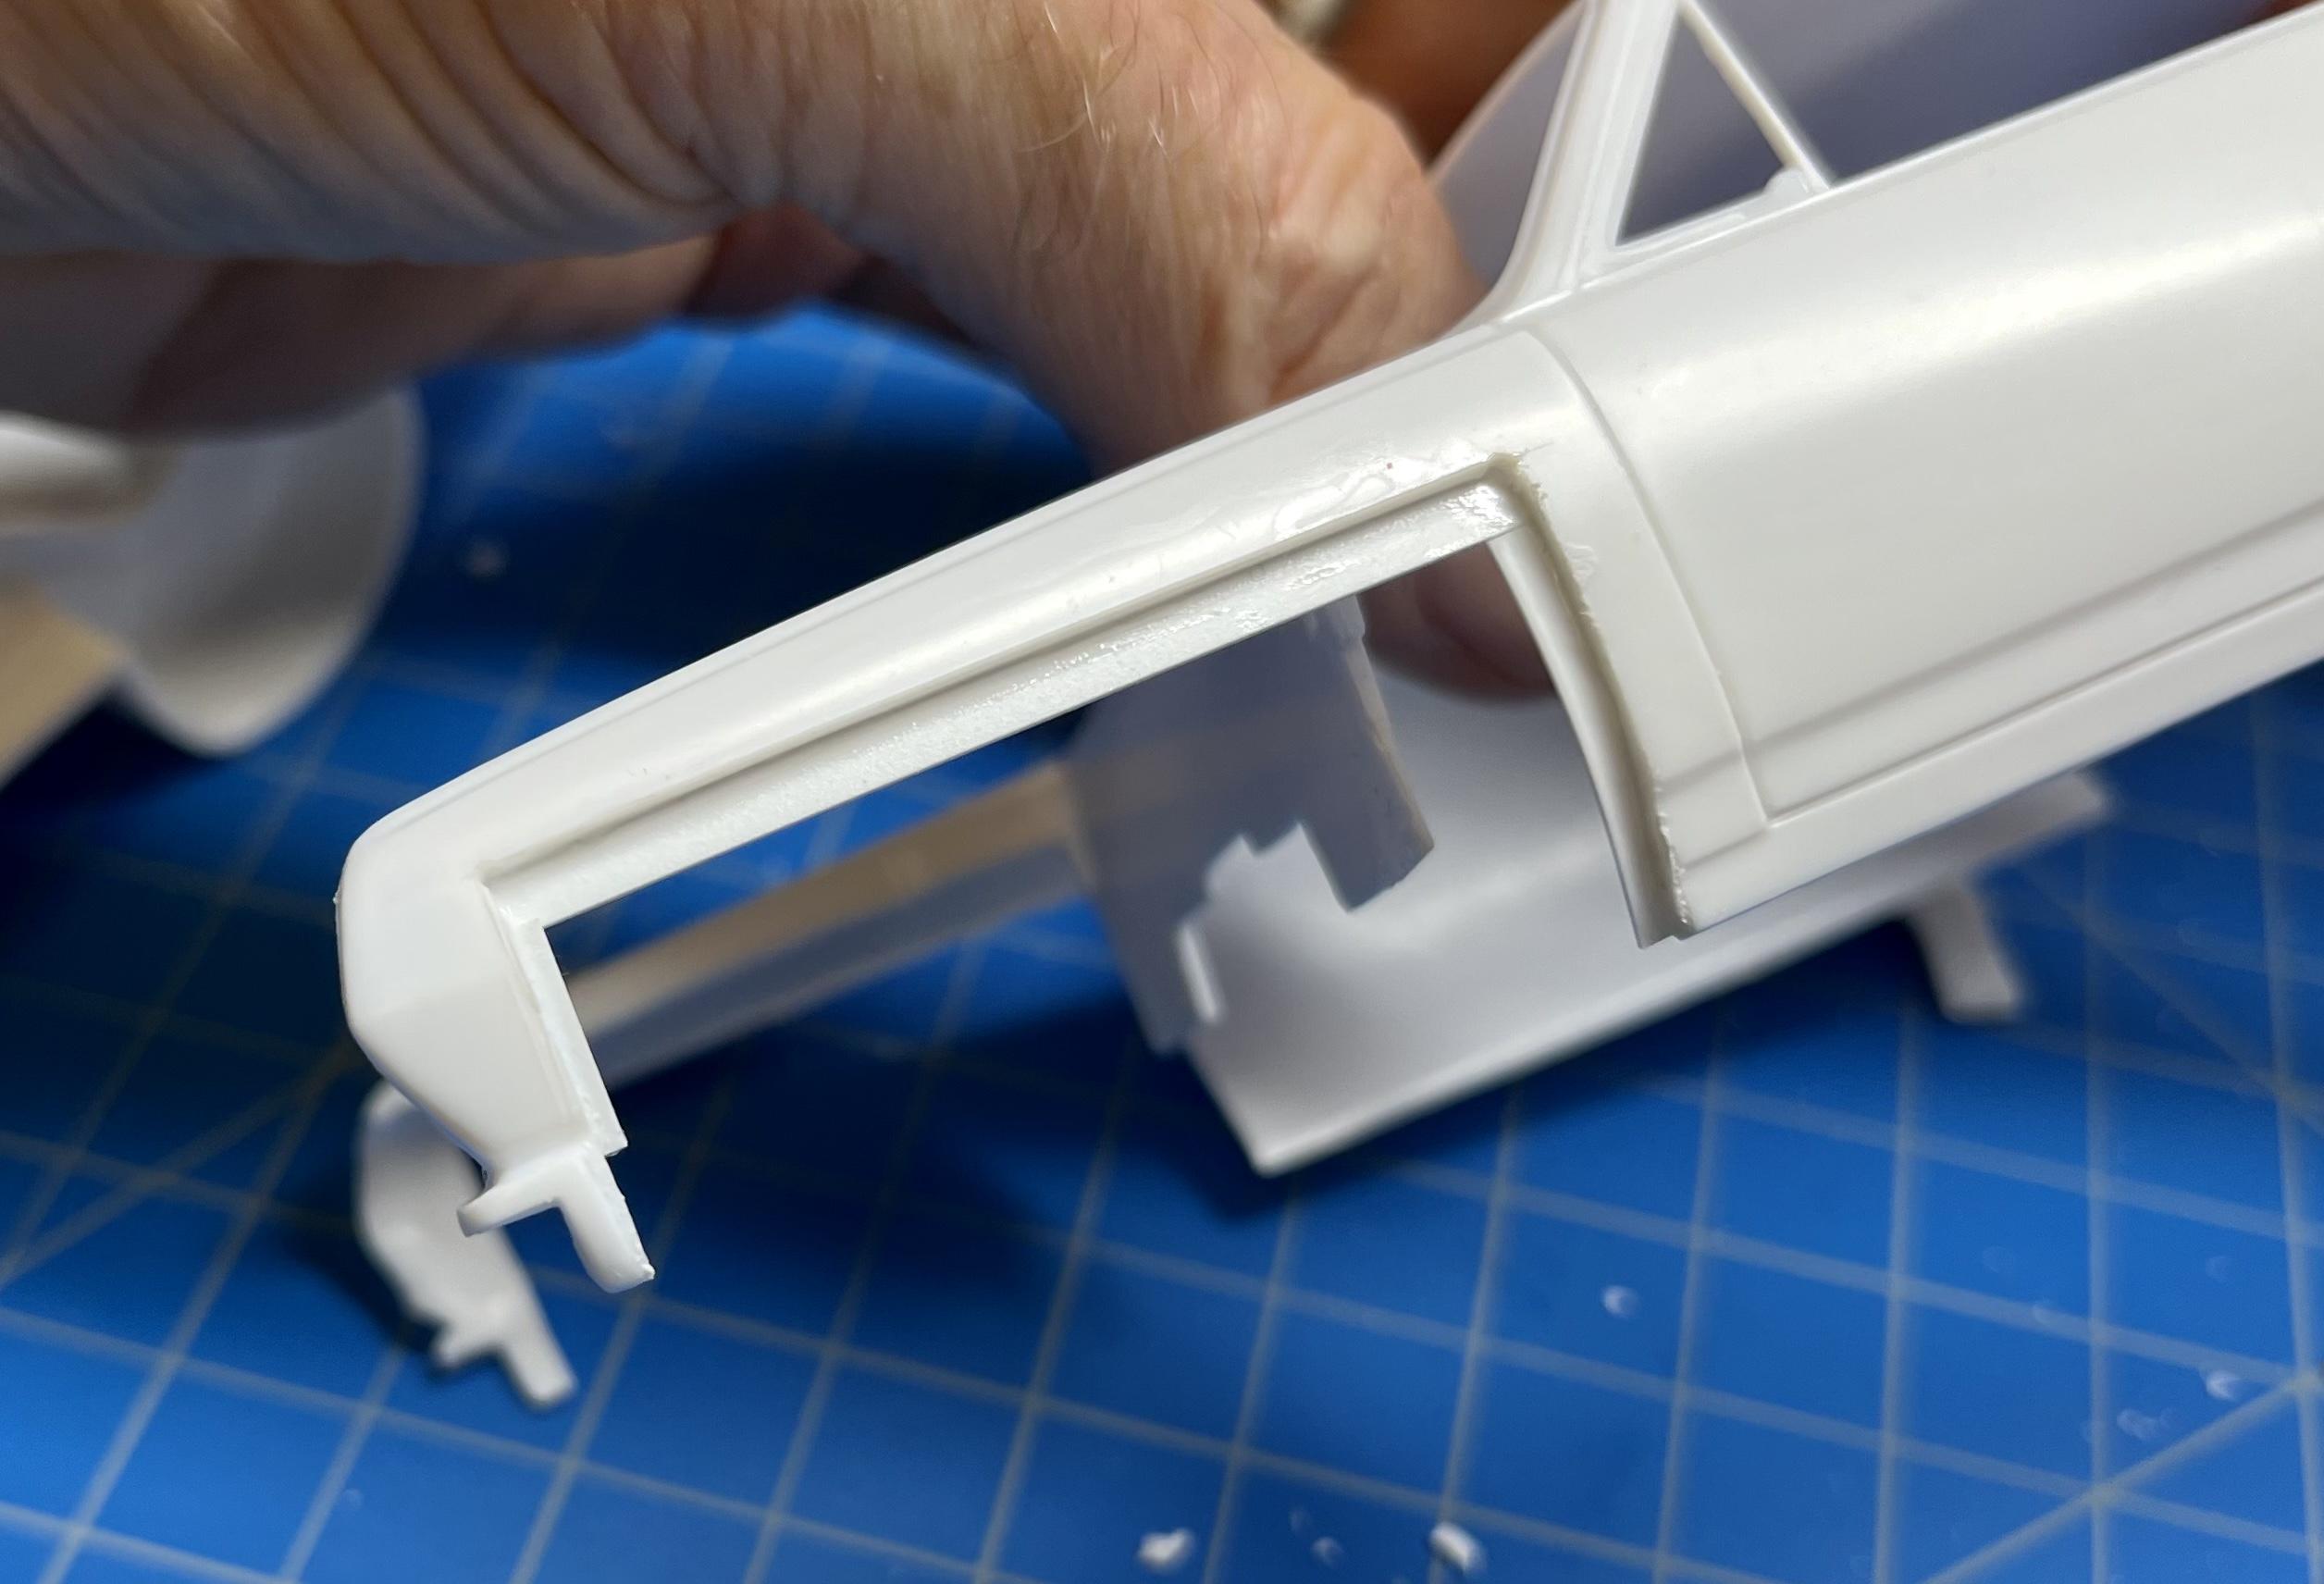
I made progress today on re-installing the four wheel openings on the body for the 7” forward shift. I bonded strips of .015” thick Evergreen styrene inside the body along each square cut-out profile to give the remounted wheel cut-outs and filler styrene something to engage with for bonding other than butt joining everything together: I then bonded each wheel opening back onto the body checking a few distances between the pieces and the front door edges to try to get symmetrical between right and left sides: As tedious as this was to do (about 4 hours work), I’m hoping this method will minimize putty gap filling and sanding….we’ll see! I’m happy with the look of this shift, especially the front wheel wells. It always bugged me that AMT did not adjust the front wheels/ wheel wells on their AWB “funny car” kits such as the Mustang and Chevelle. If this build works out, I’ve got a ‘66 Nova kit which I’d love to try this on to build that cool red Dick Harrell/ Nickey Chevrolet Injected AWB car.
-
Thanks for the transmission feedback Len. Half the fun of doing these parts-bashing vintage drag car builds is the fun of researching and learning new things. I just noticed on some of the period photos of this car and my decal sheet a reference to “Hydro by Tom Nell” - which gave me an additional clue that I overlooked as to what type of automatic transmission was in this car. Unless there were two ‘Tom Nell’s’ involved in mid-60’s drag racing, I believe the Tom Nell painted on Seaton’s car was a Pontiac engineer who was deeply involved in modifying the first GM TH400’s for racing in 1964 - 65 (TH400’s were first available on Caddies and Pontiacs in ‘64 followed by Chevrolet in ‘65): https://www.motortrend.com/features/hppp-1209-pioneers-of-the-pontiac-v8/amp/ This article implies that Tom Nell was helping Arnie Beswick on tuning the TH400 for drag racing during the period of this ‘64-‘65 Seaton’s Shaker. Pete Seaton’s dad was a big shot at GM which may have given Seaton some inside access to back-door GM tech help during this GM race ban period (or Seaton/ Heinelt just connected with Nell at the drag strip?). I have a 1/25 resin B&M Hydro with a Chevy bell housing and could also order a resin 1/25 PowerGlide but based on the “Hydro by Tom Nell” decal, I think I might just stay with the TH400 for this build. I’m a ways from starting the engine/ trans subassembly and am happy to be corrected on this with a better reference or a photo showing what trans was used (maybe they started with a Powerglide in ‘64 and switched over to the TH400 in ‘65?). Much thanks for the feedback!
-
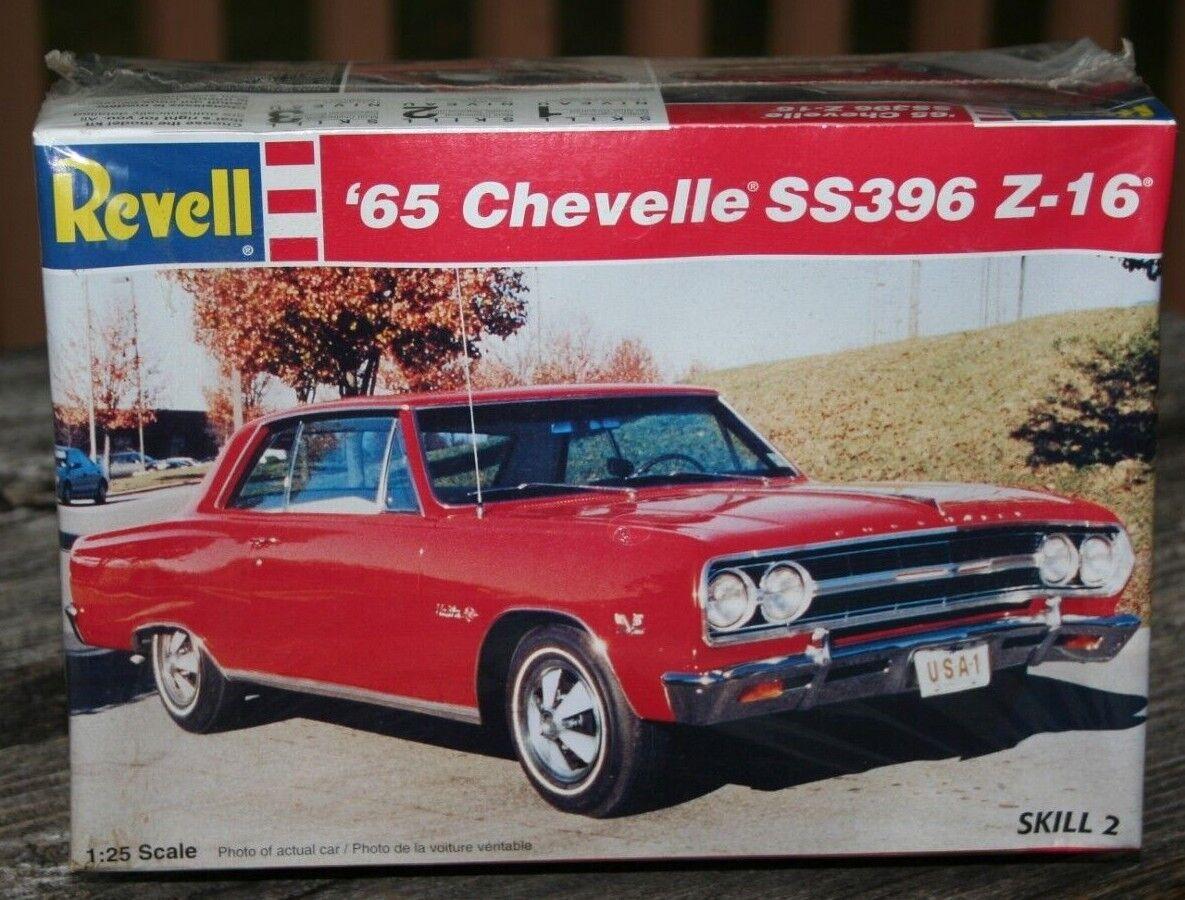
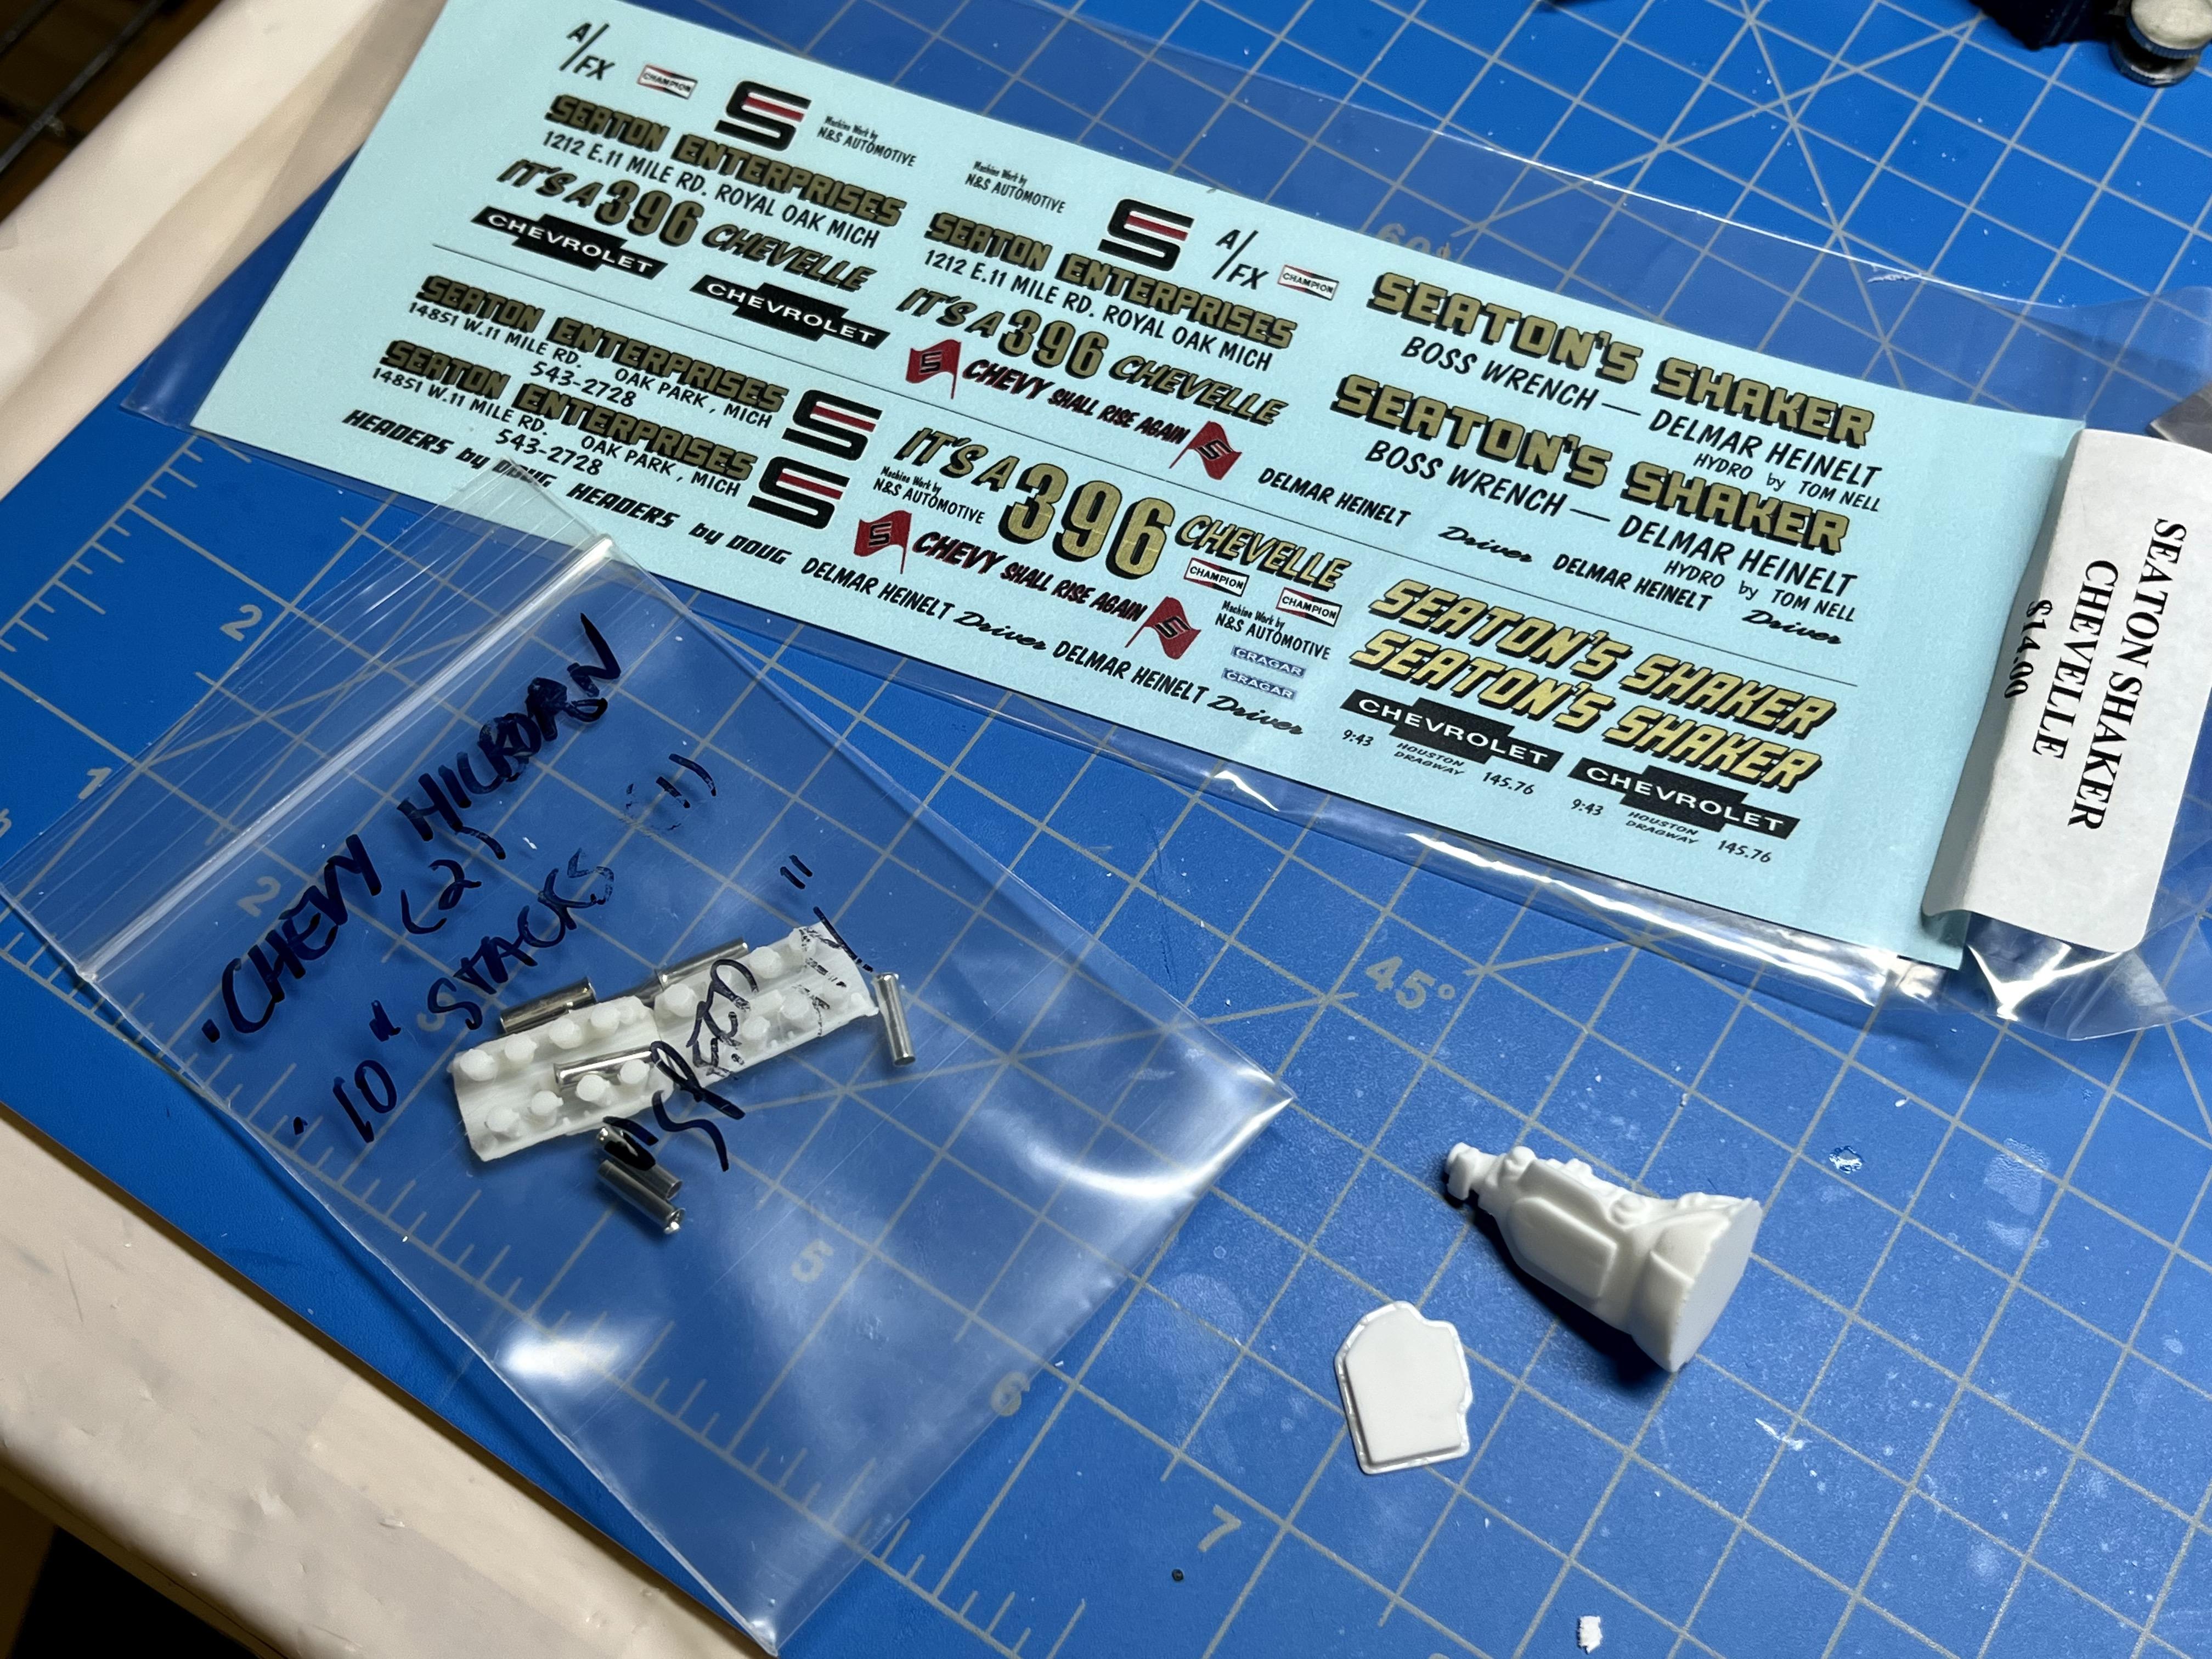
This is a project I’ve been procrastinating on starting for a few years. I had major surgery three weeks ago and am finally feeling good enough to take X-Acto knife in hand and build again (two weeks since the last Vicodin so my wife says I can play with sharp knives, drills, saws and airplane glue again). I am also very happy to be alive and the last thing I fear these days is botching up a model build in WIP public view. I’ve also been inspired by all the wonderful classic super stock drag builds being posted lately by M W Elky and others here and would like to join in on the fun. This is the car I want to recreate and my hope is to accurately shift the body 7” rearward (.28” scale) relative to the chassis while maintaining close to the stock wheelbase. I read this 7” shift while maintaining a stock WB description on the HAMB (it was on the internet so it must be true!) so short of a verifiable reference, I’m going to go with it. Car Craft magazine featured a two page article about this car in their Dec 1965 issue, if anyone has a copy, I would love to know if it supports this 7” body/ chassis shift as well as if there are any photos of the interior or under carriage in the article. I'm starting with this Revell 1/25 kit: I plunged into cutting out the four wheel openings from the body using a jeweler’s saw, X-Acto knife, .030” drill and Dymo tape for a cutting guide. I drilled out each of the two corners to act as a strain relief for bending after each vertical cut is sawed and the horizontal cut scored with the knife against the Dymo tape. I also had to cut each of the two wheel well shapes out of the engine to allow repositioning them forward to correspond with the new front wheel cut out positions. Then I tackled the front wheel well cut-outs: So here’s the final parts cut from the body (I haven't yet removed the .28" section from each of the front fender cut-outs): Here's an eyeball check of the wheel wells shifted forward, hoping it look's close enough to the B&W photo of the actual car above (may to adjust the rear cut-out some?): Here's a view below with the fender cut-outs taped forward and the chassis shifted forward to roughly match. I will have to trim .28" from the front of the chassis and add .28" to the rear. I also plan to shift the engine mounts on the chassis by .28" rearwards so that the engine remains in the stock position relative to the firewall. I purchased Yesteryear decals and a resin Hilborne injection manifold and velocity stacks from Speed City for the 396 BBC supplied in the Revell kit along with a resin automatic (the internet tells me they used a GM Turbo Hydramatic 400 on this car, the Revell kit engine block comes with a manual): I'm hoping to re-install the four wheel cut-outs and engine bay wheel wells onto this body using additional cut and shaped Evergreen sheet styrene as gap fillers and hopefully minimize use of putty. I only have acrylic-based Vallejo putty and Tamiya one-part tube putty at the moment and am wondering if I should resort too one of the two-part epoxy or polyester fillers - suggestions? Looking forward to making progress on this cool chassis-twisting wild ride in the coming days.... Cheers, John
-
I love the dark grey over red, very understated and the overall build quality is excellent, really clean neat workmanship. Your window frames on this one (painted or foiled?) are fabulous. Where did you get the Rudge wheels? They look great and give this gull-wing a racier look than the kit wheel covers. This Tamiya kit is one of the very best auto kits out there, I built one when they were first released and ordered a second to build again because it was such a fun stress-free modeling project. Bravo!
-
One of my favorites as a kid......Big Al Allison powered drag car
papajohn97 replied to V8tiger's topic in Drag Racing
Great job recreating one of the more creative drag machines from my childhood. I recall AMT offered an 1/25 Allison among their boxed accessories when I was a kid (60’s), was it ever re-popped or did you have to pull your engine out of that Model King “Allison Wonderland” T-Bird kit for this build? -
Sweet! A shiny red super stock Dodge! I’d love to see that little old lady from the famous song terrorize Colorado Blvd. (or Grand Ave in Chicago) in this beast. While I applaud their decal subjects and efforts, I’m not a big fan of SMP decal graphic quality (I believe they use course raster graphics vs crisp sharp vector graphics like Slixx) but I must say these decals look great on this old Lindberg kit (which I keep building too!). I have a set of Grand Spaulding decals for a ‘65 AWB A/FX Dodge (the lavender and blue one from Fremont Racing) that I’m looking forward to using on the upcoming Moebius kit when it’s released. Another beautiful classic SS’er Mike! Keep ‘em coming!
-
Two Lotus 49's, 67 Clark, 69 Hill
papajohn97 replied to Rich Chernosky's topic in Other Racing: Road Racing, Salt Flat Racers
Oooh….a gaggle of Lotus 49’s…be still my beating heart! These Ebbro kits take some skill and finesse to pull off with all four wheels touching ground and aligned and body panels and nose fully installed, all of which you’ve mastered. Paint, decals, engine detail, velocity stack screens, everything really well done. Converting the 49(C) kit to a 49 is a brilliant way to avoid the current $$$ kit cost. Looking forward to more pics after you receive and apply the Team Lotus and Gold Leaf decals. Bravo! -
Complex two-tone paint schemes like this are a lot of work (and tape!), yours came out great! Also really like the carbs, linkage, fuel lines + filters. Very nice!
-
Amazing engine detailing, paint and overall build quality. This genre of auto subjects is beyond my time and area of interest but I’m always amazed at the incredible builds and appreciate the talent that you FandF model builders are graced with, fine scale modeling at its best! Paul Walker was killed on the road just outside of my last place of employment. Driving in/ out of work everyday, I remember seeing hundreds (the Mon after the Sat he was killed maybe several thousand?) of young guys in cars like these who showed up and parked near the scene of the terrible accident. It was sad but also touching to see all these “young tough street racing dudes” grieving together. I’m sure PW and all his fans would love your tribute.
- 33 replies
-
- 1
-

-
- mitsubishi
- eclipse
- (and 1 more)
-
Nice job Michele and the TS-60 Pearl green is one of my favorites, particularly for 60’s American cars. I also really liked the Johnny Rivers soundtrack model on turntable video you included, it made me briefly fantasize driving a 1:1 version of your Pearl green Comet down Sunset Blvd on a Sat night in the Summer of ‘64 to see Johnny perform at the Whiskey A-Go-Go. Unfortunately I was only 11 at that time and had to settle for building car models in my bedroom and getting glue and paint on my little kid desk while Johnny sang “Memphis” on my AM transistor radio. Thanks for posting!
-
What a beautiful classy tastefully executed late 50’s/ early 60’s custom. None of the issues that you encountered appear visible to me in your photos. The stock lines and trim on these cars really supported two-tone paint schemes but I think the one color really compliments and differentiates the overall styling from a typical stock ‘56 Ford. The peak look-see view of a small portion of the custom interior makes me want to see more of it. Over-all very cool car, thank you for posting!
-
“THE PLATT BROS. “ SIBLING RIVALRY 1963 Z-11 CHEVY IMPALAS
papajohn97 replied to M W Elky's topic in Drag Racing
Michael, so nice to see you and a few other guys here building and posting all these cool classic super stockers lately! These two Z-11 kit bashed Platt Brother cars are really well done, very realistic recreations and you nailed the period correct lowered rear end/ raised front end stance on both cars. I tried modeling Dave Strickland’s “Old Dependable” Z-11 using this old AMT kit a few years ago and really struggled with it. Revell’s recently tooled ‘62 Impala SS 409 hardtop is so much better a kit, I had fun doing a yellow Dyno Don car I posted recently. I wish Revell would release a new-tooled ‘63 Z-11 Impala with decals for these historic drag cars (or even better yet, a Z-33 “mystery motor” 427 Biscayne). -
This one is absolutely sweet! Amazing how well this came out from this ancient tooled (I assume) Revell Double Car Kit (Bantam Bomber and Scarlett Screamer?) the replacement tires and metallized wheels and other metallic parts look great against that red exterior/ black interior. This reflects my favorite vintage for altered’s before they went a little nuts with the hiked up front ends and towering superchargers (although I like those too ?). This one is my favorite model car of the day, thank you for sacrificing an $$$$ kit and building and posting it for us to enjoy. Did I read on here somewhere that Atlantis has the molds for these Revell double drag car kits and has plans to re-issue them???
-
Wow! Fabulous execution and black over red really suits this classic Ford bubble-top. Fantastic engine bay detailing. The gold name emblems on front fenders and rear deck came out particularly nice, were these done with gold foil or were they masked and dry-brushed?