papajohn97
-
Posts
700 -
Joined
-
Last visited
Content Type
Profiles
Forums
Events
Gallery
Everything posted by papajohn97
-
Beautiful job on the paint and detailing on the bright work trim and front and rear ends. I had a full size one of these in ‘76, the first new car for me after driving $300 beaters thru college, mine was the metallic green with tan interior, the performance was mediocre (like most 70’s cars) but the build quality and reliability was rock solid. It was the first car I could take stress-free road trips in. Also my first car with an FM radio and a 5 spd stick. I still love the downsized Mustang styling of these.
-
Ebbro 1956 Citroën DS19 - 1955 Paris Car Show Edition
papajohn97 replied to ATHU's topic in Model Cars
First one of these I’ve ever seen with gangster white walls - amazing how those WW tires change the appearance of this car - I like it! Also love the weird French styling, especially the weird roof and steering wheel! Beautiful job on the paint, engine and interior detailing. You’ve inspired me to keep my eyes out for one of these Ebbro kits (rare these days?) -
So glad to see the “Michelangelo of car models” has resumed posting masterpieces here! We missed you Mr. Teresi! Your paintwork is unbelievably! Looking forward to seeing outdoor pics of this unique and innovative FC.
-
Hilborn Injection for SOHC Ford
papajohn97 replied to TransAmMike's topic in Model Building Questions and Answers
Scott @ SCR - please count me in for at least two of these cammer Hilborn Fi manifolds if you ever offer them in resin. I have no knowledge of/ experience with the AMT ‘69 Galaxie SOHC but IMO the AMT Mustang funny car engine parts are like cartoon toy parts compared with the Moebius SOHC. I’ve bought two of the Moebius Comet A/FX kits just for the engines. Love that engine! -
Beautifully built and painted! The metallic blue, white trim, steelies+dog dishes + black walls, interior color choices all just period perfect. The Revell kit I assume?
-
We’ll done! Like me, you must also love reading the HAMB forum for modeling ideas!
-
That “marblized/ psychedelic” paint work is amazing! How did you do that? Paint mask? Skillful manual brush splatter? I’m also impressed with your homemade “Rushin’ Hippie” decals, they look “store-bought”! When I first looked at your pics, I just assumed that this car actually existed it’s so appropriate looking for the period. Great job! I think a lot of us modelers here like building these older drag subjects because we all miss those wonderful years of innovation, craftsmanship, creativity, variety. It’s understandable to me why most forms of auto racing (NHRA, NASCAR, Indy, F1) are fading in popularity.
-
Very nice, especially that shade of green metallic with the light green dash and wheels and white upholstery and top, beautiful! I also like the slightly raked stance and that you used the stock steelies and hub caps, both gives this build a very 50’s -60’s “period correct” mild street custom look. I can see this car cruising the streets of LA of my childhood.
-
Nice job Jim, the blacked-out chrome on this titanium/black two-tone looks sweet. I love love love this Revell kit, one of their best, wished I bought more than one when they were still cheap!
-
Another very cool pre-AWB super stocker of a legendary drag racer! I would love to see your entire BTC collection lined up, photographed and posted someday. Where did you find these decals? Old Fred Cady?
-
Thank you Dave for these updates and please pass on thanks to the team doing all the heavy lifting on this. Can’t wait to build a few of these to add to my super stock collection.
-
Great job Jesse on painting/ re-chroming/ foiling this ancient AMT (promo?) kit. This green is perfect for this car/ period and the finish and workmanship is first class. The front and rear grills/ bumpers and wheels/ WWW tires all make your build much more realistic looking. Wish Round 2 could/ would re-issue this kit, it’s so weird it’s cool. Thanks for posting!
-
Another front cover masterpiece! A pink fuelie Hemi AWB early funny! Cool!!!! Love it! As I may have posted before, I really really envy you for your magazine collection! What a great reference library!
-
The 1962 bel air & 63 Z-11 Impala cone Chevrolet’s of Hayden proffit
papajohn97 replied to M W Elky's topic in Drag Racing
Thanks Michael for posting these two builds. I grew up in So. Cal in the 50’s-60’s and Hayden P. was one of many local drag racing legends. These two all-red beauties are a fitting tribute to his very successful 409/ Z-11 racing period. Thanks also for describing all the details to kit-bashing the ‘63 Impala Z-11 using the ‘62 Bel Air chassis, all your efforts really paid off, especially in the period correct front “jacked-up” stance on both cars. You’ve inspired me to build these two in the near future to add to my growing super stock collection. The one criticism I have is not with your build execution but with SMP’s decal graphics. They offer a wonderful selection of early super stock drag subject decals but unfortunately most of them appear to use really large litho rastor graphic files instead of vector graphics like Slixx uses. You can really see the difference if you zoom up and compare the clean sharp decals of the ‘62 Bel Air (Slixx?) with the fuzzy ‘63 Impala (SMP) graphics. Sure hope SMP can eventually address this issue. -
That is a wonderful collection of my favorite drag cars. You can never have too many ‘62 Bel Air 409’s!
-
Beautiful funny, particularly love the chassis with all the linkage and plumbing eye candy. I feel your pain on the “old decals over dark paint” challenges. I’ve been able to minimize this a few times by 1) removing all the decal adhesive from the old decal after wetting and separating it from the paper backing by rubbing it off with a soft paint brush and water and then 2) applying a thin mixture of Micro Set (blue bottle) and white glue between the decal and paint to provide adhesion and fill voids to prevent ghosting. If you use this method, be sure to remove any excess MS-white glue from the decal area before it sets up, otherwise it will leave a un-glossy film.
-
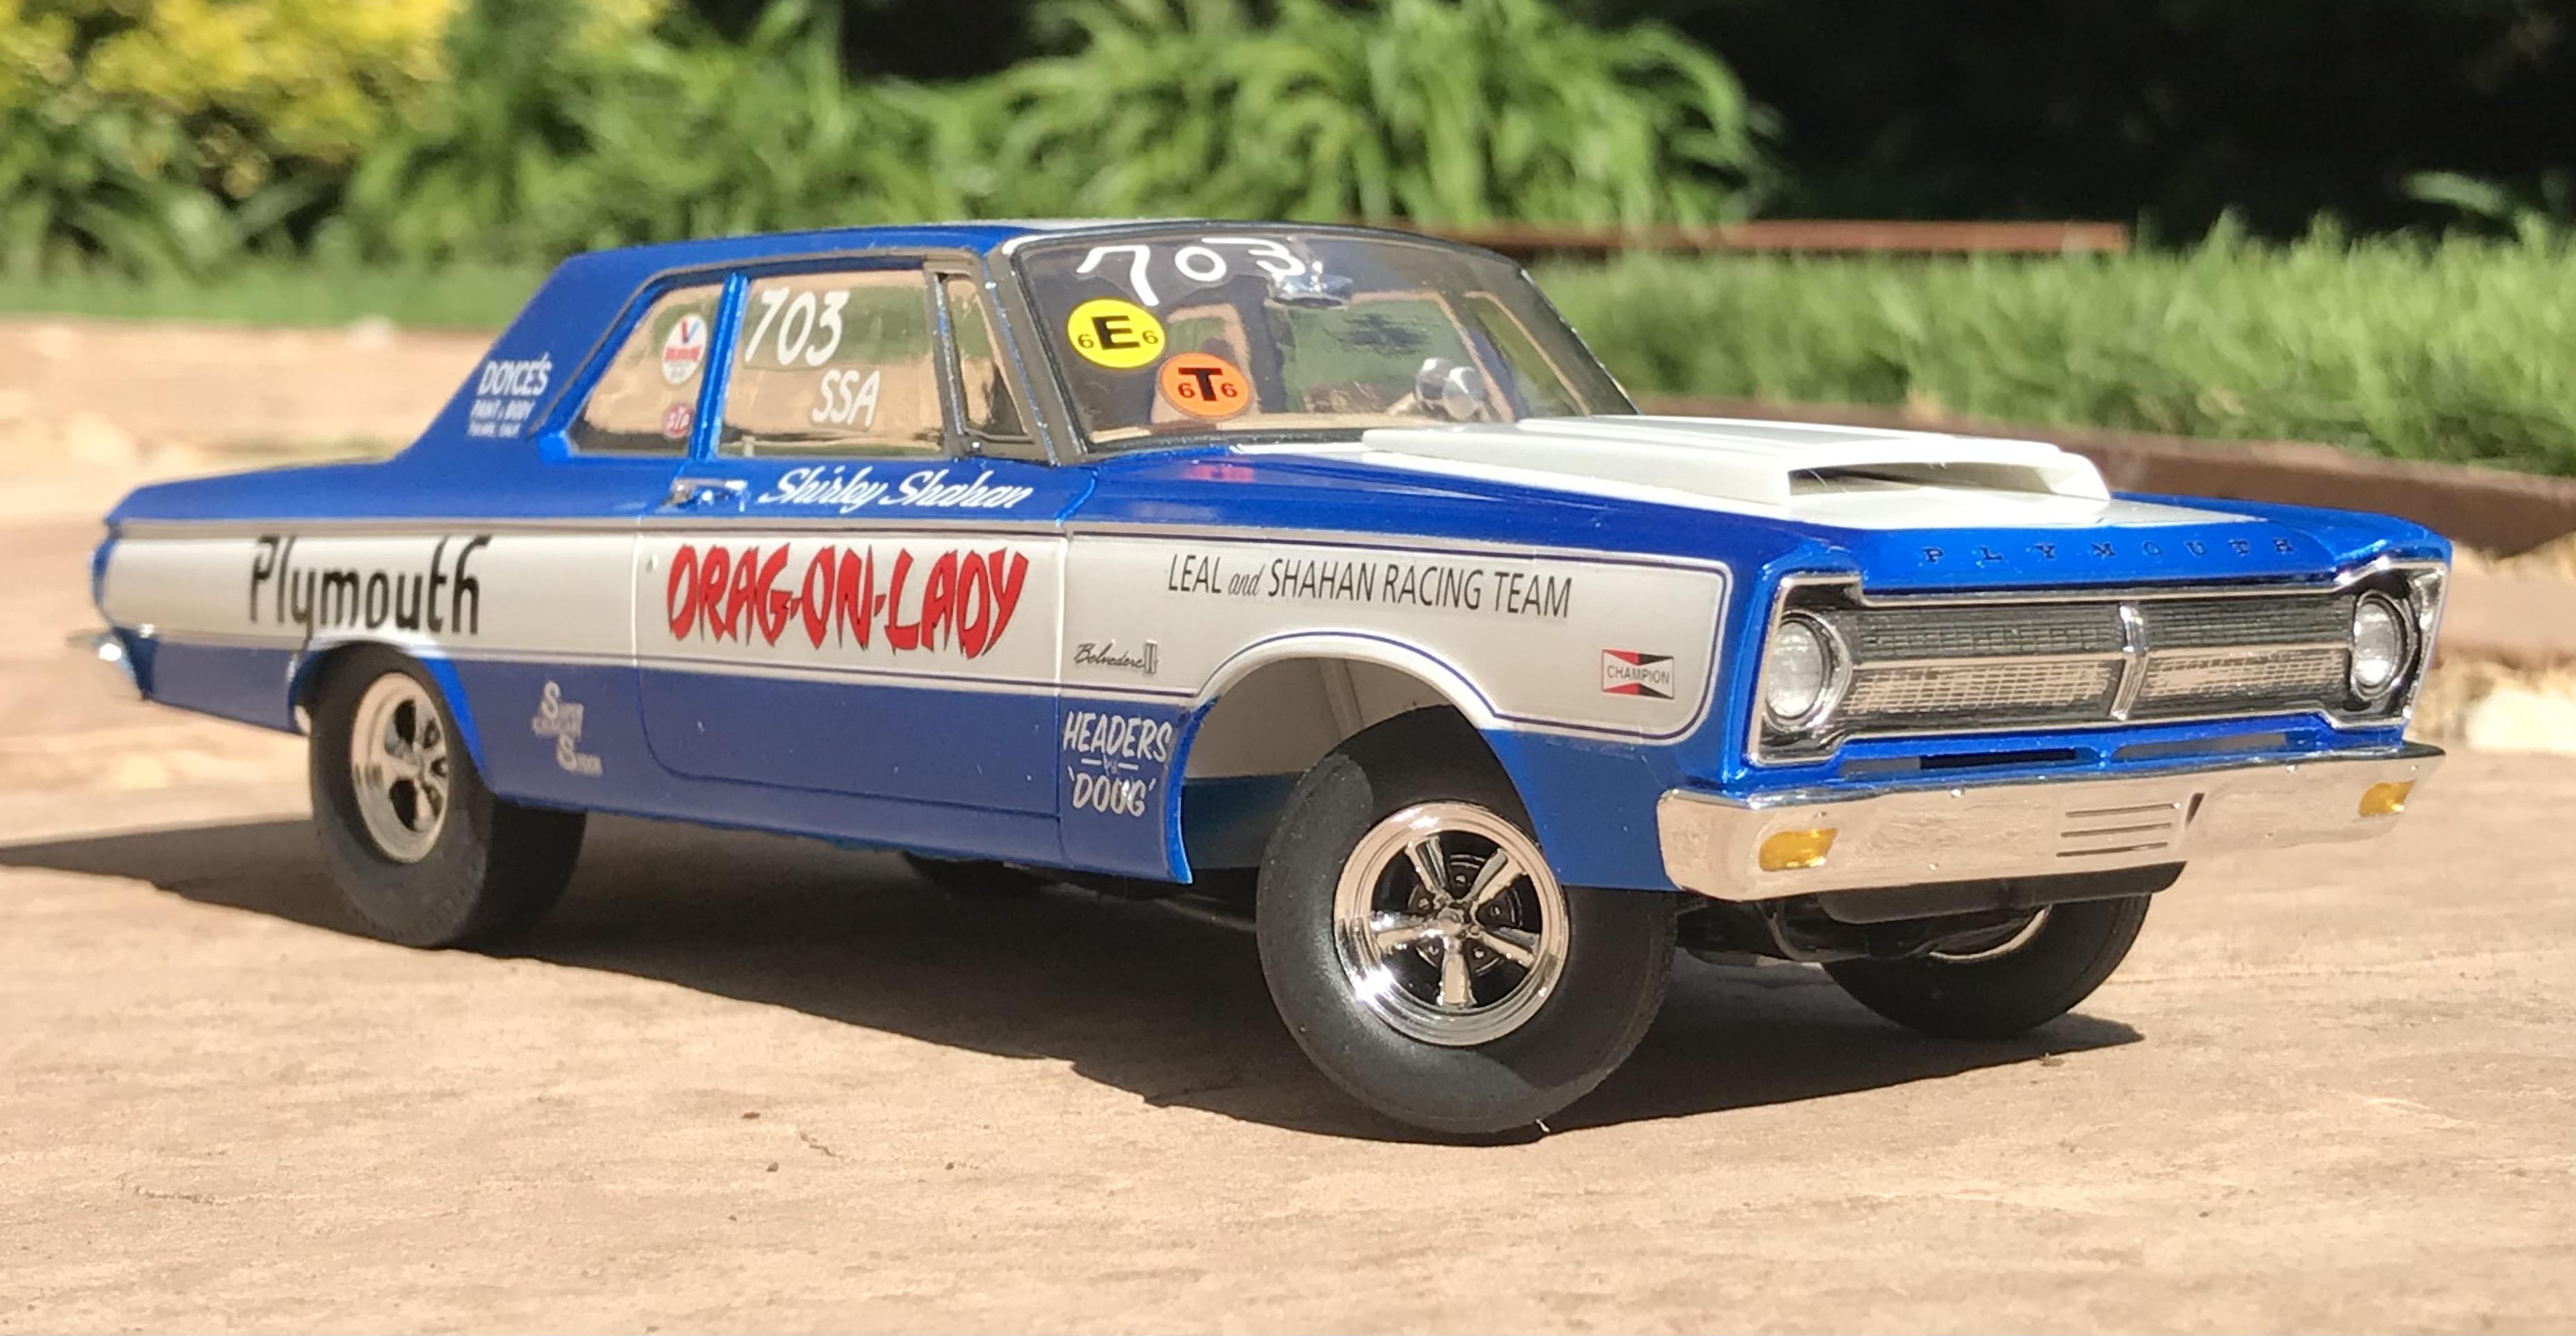
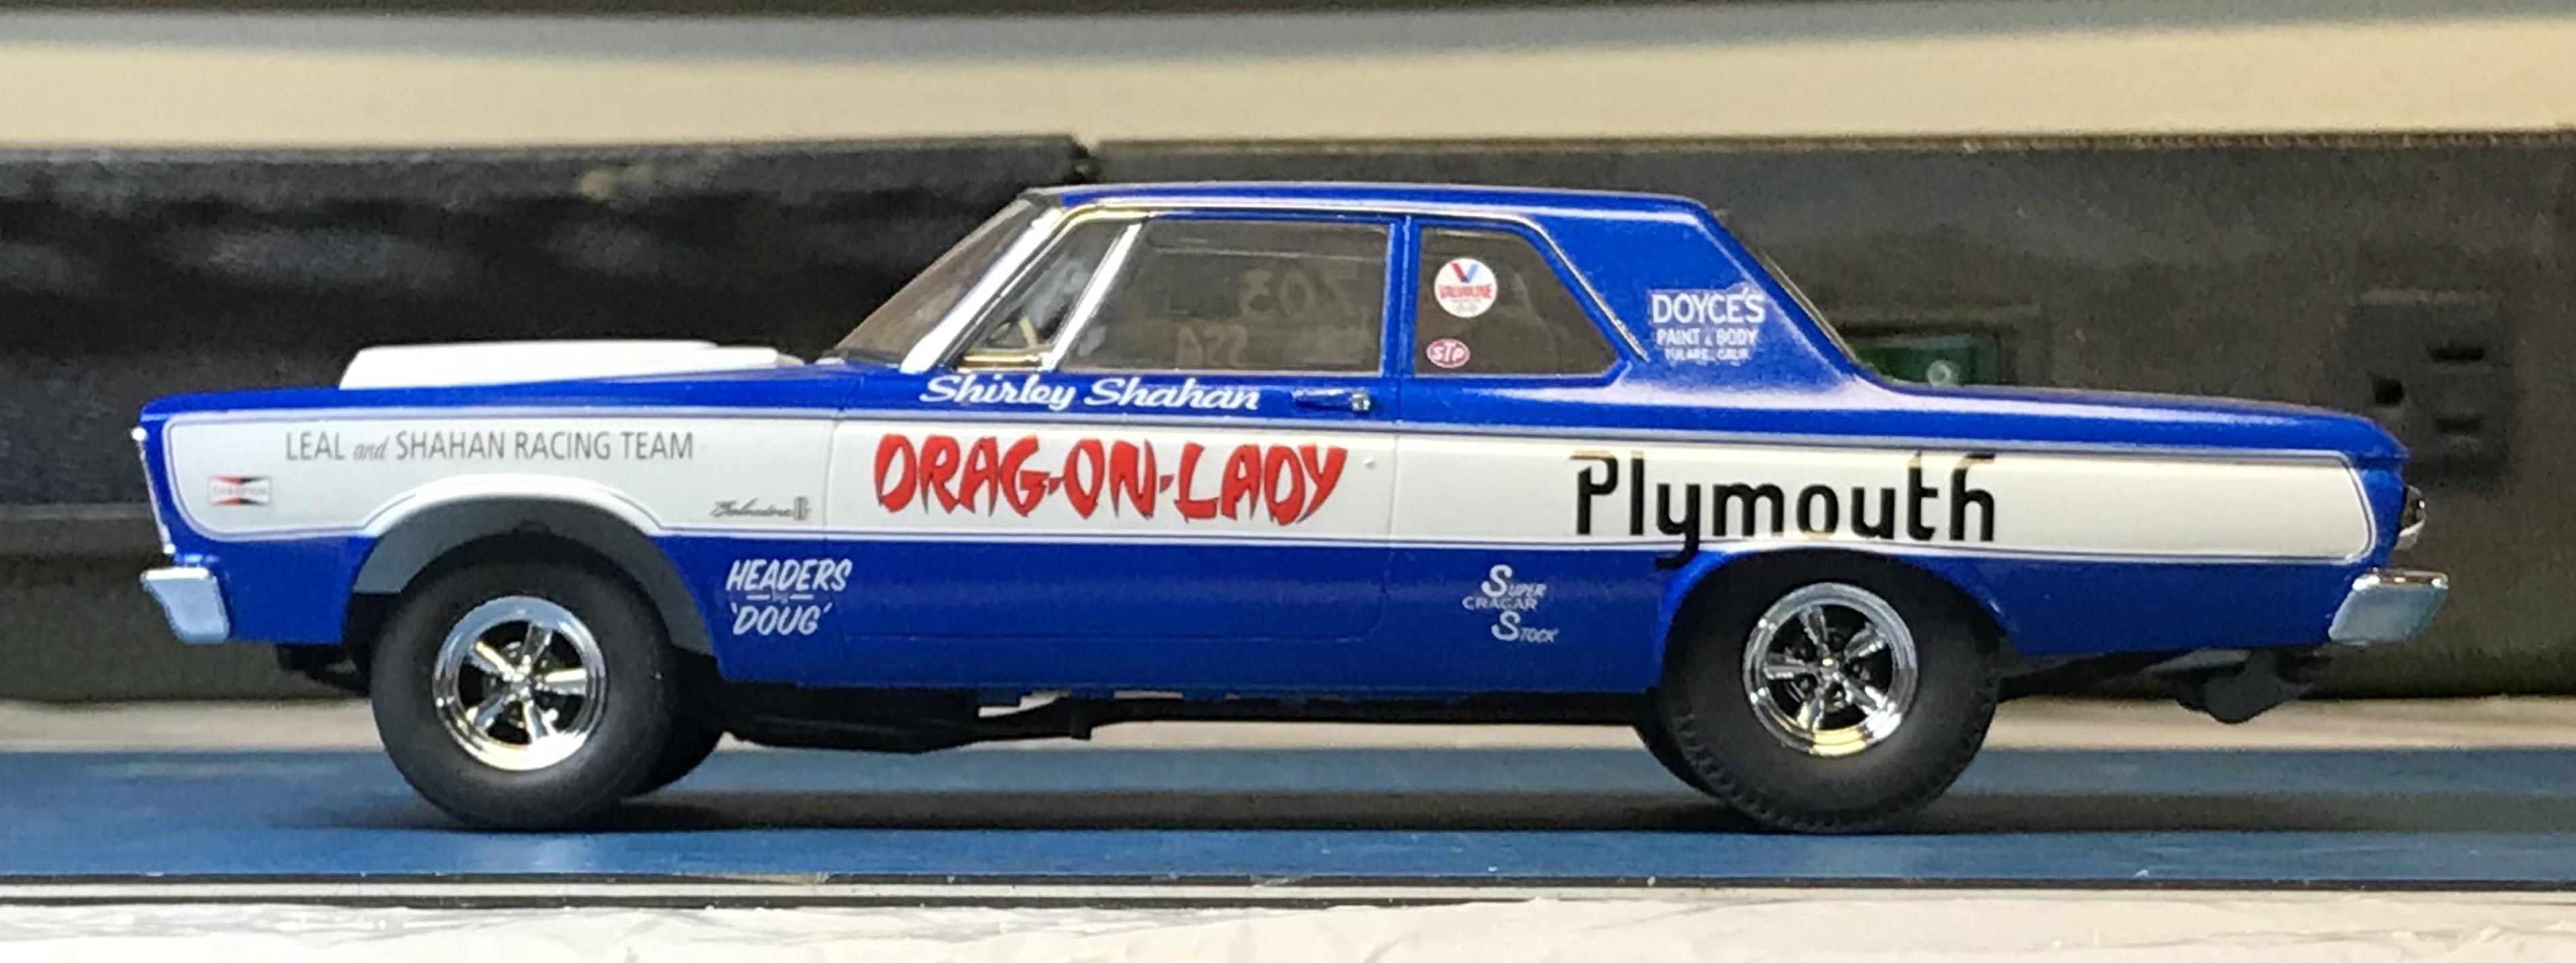
R. Thorne - I left the stock exhaust system (muffler) in place per NHRA rules for S/S in ‘65. I’m not sure when the 1:1 photos were taken (’66?) but in that time a lot of these cars were morphing into match racers/ pre- funnies so it’s likely they removed the stock exhaust. I believe Shirley replaced the dual cards with Hilborne FI sometime in ‘66. MADmodelDOCTER - I used Tamiya acrylic tan (FX-55 deck tan I think), airbrushed on the interior.
-
Thanks guys for the “at-a-boy’s”! Compliments here are very flattering (and encouraging!). I thought the same thing when I first saw the pinstripe decals on the Slixx sheet so I photocopied the decals and used it as a guide when cutting my tape masks. Slixxx prints a thin white boarder on both sides of each pinstripe which really helps maintain an even gap between each stripe and the masked blue edge on the final two-tone painted body. If Slixx had just made the pinstripes a single blue line, I think the final mounted decals on the masked painted body would have looked much sloppier and uneven.
-
-
Cool build Fish! I think you did a great job capturing the "no-frills guy with a day job in the sixties" look on this build. Love the color, love the rear black steelies, love the minimal decals, love the stance. Sweet! I feel your pain on the fractured Moebius door handles, I broke the left one on the '65 Ply I just posted and re-aligning the pieces and re-bonding them together using CA was an exercise in micro jewelry making. It look's ok from 18" away.....
-
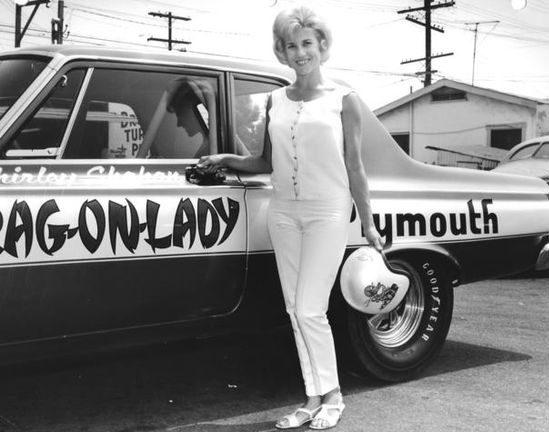
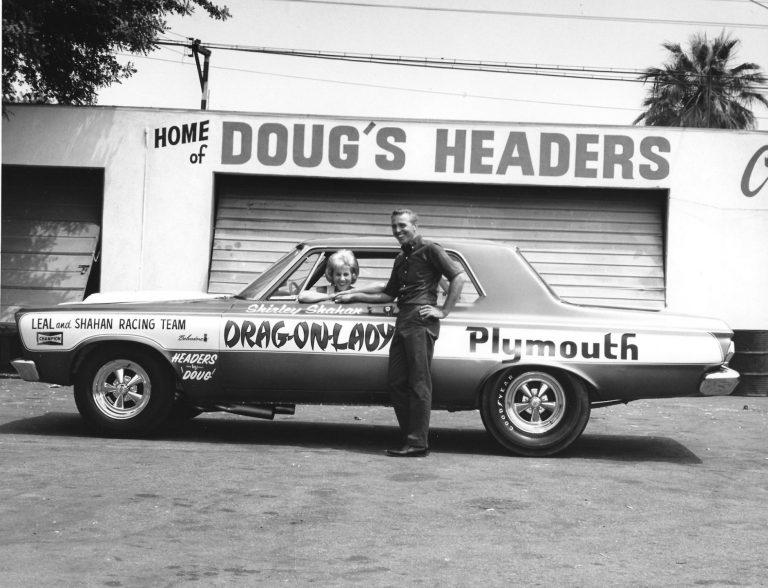
This one is built using the Moebius '65 Plymouth Belvedere A990 Butch Leal "California Flash" kit and a set of Slixx decals. I replaced the 426 engine with stick shift that came with the kit with a Moebius 426 Hemi with a TorqueFlite automatic that came out of the Moebius '65 Belvedere Hemi hardtop kit. I added a Detail Master distributor + plug wires, solder wire fuel lines, seat belts, Fireball Holley 3116 resin carbs and a detail Master tach. I have used the nice machined aluminum Detail Master velocity stacks on previous Hemi S/S builds but they were never period correct so I decided to try making my own scratch-built velocity stacks for this build using styrene sheet and tubing that I think came out a little closer to the original factory stacks (although larger/ taller like the resin carbs!). Exterior paint is Scale Finishes "Tru-Blue" and white base with TS-13 clear coat, everything else Tamiya and a little Alclad metalizer. I was a little apprehensive in attempting to align the Slixx pinstripe decals adjacent to my masking borders but it came out pretty good I think. Shirley Shahan was an amazing super stock driver back in the sixties, shutting all the boys down in the '66 National's and taking home top stock eliminator, all while working at the Gas Company full time and raising three kids. I believe she is still with us (83?), retired and living in the Central Valley of Cal. What a cool woman! Cheers, John

-
Amazing craftsmanship and creativity! Love the front wheel pods and the rear suspension. You really thought through and sweated all the internal details. The only thing missing are Ferrari logo(s)! Bravo!
-
Eagle Gurmey Weslake 1/12 MFH
papajohn97 replied to primabaleron's topic in Other Racing: Road Racing, Salt Flat Racers
Absolutely agree (most beautiful and perfect F1 car ever), probably the one 1/12 MFH model I would consider if $ and my skill limitations were no issue. Fabulous build! -
69 "Jungle Jim" Nova (Fictional build)
papajohn97 replied to Modlbldr's topic in WIP: Drag Racing Models
Soldering a brass chassis from scratch looks like quite a challenge. It reminds me of how we use to build 1/24 slot car chassis from scratch back in the 60’s. You might want to do a search on the web for videos on building soldered brass rod/ piano wire slot car chassis for tips on soldering materials and methods, alignment jigs & fixturing, heat sinks, etc. I saw JJ win the night at OCIR in ‘69 in this car. Last drag race I attended in the 60’s, good old days! Looking forward to seeing how you make this chassis come together. -
Your masking, painting and foiling look fantastic to me. I love this AMT kit, one of their best. 426 Max Wedges Rock!!!!