papajohn97
-
Posts
701 -
Joined
-
Last visited
Content Type
Profiles
Forums
Events
Gallery
Everything posted by papajohn97
-
Chaparral 2D
papajohn97 replied to yellowsportwagon's topic in Other Racing: Road Racing, Salt Flat Racers
Beautiful execution on this old tool (‘60’s?) bare bones kit. Based on color photos of the 1:1 Chaparrals that I’ve seen, you nailed that weird burnt umber color for the inside tub. Wish Fujimi would re-issue this kit, the current EBay prices for remaining unbuilt kits are nuts. I had the 1/24 Cox slot car version of this car (along with the Cheetah) and they are both on my long list of model and 1:1 cars that I wish I still had. Love all of Jim Hall’s race cars, like Gurney he could design and build ‘em as well as race ‘em. -
deleted post
-
Lovely paint and all around clean beautiful build! I’ve had good experiences with Tamiya lacquer rattle cans as well and have gotten my best results with TS-13 clear if I spray it within an hour over the last color coat. How much cure time did you give between your final aluminum coat and first transparent red coat as well as between the final red coat and the first TS-13 coat? Also love the “city scape” backgrounds in your photos, makes it look like a 1:1 car!
-
“Totally bitchin” as we use to say back in the day! Excellent color choices and perfect execution all around. Of what little I can see, the interior looks amazing - do you have any pics of it before final assembly that you could post? Also like others have asked, does the trunk still open or did you glue it closed?
-
Amazing detailing and good looking two-tone paint scheme. Love that front mounted machined aluminum fuel tank!
-
Beautiful build! I love these Fujimi 356 kits, they are not without their challenges but they look so realistic when done. I think they have the most realistic looking wheels of any 1/24 -1/25 model kit ever made. Your roadster really makes the fabulous interior visible (the one coupe I built you can barely see anything inside the dark interior). The omitted bumpers and hub caps makes me remember when these 356’s were affordable “college kid” cars in the 60’s, now one like this one could sell for the price of a new house!!!
-
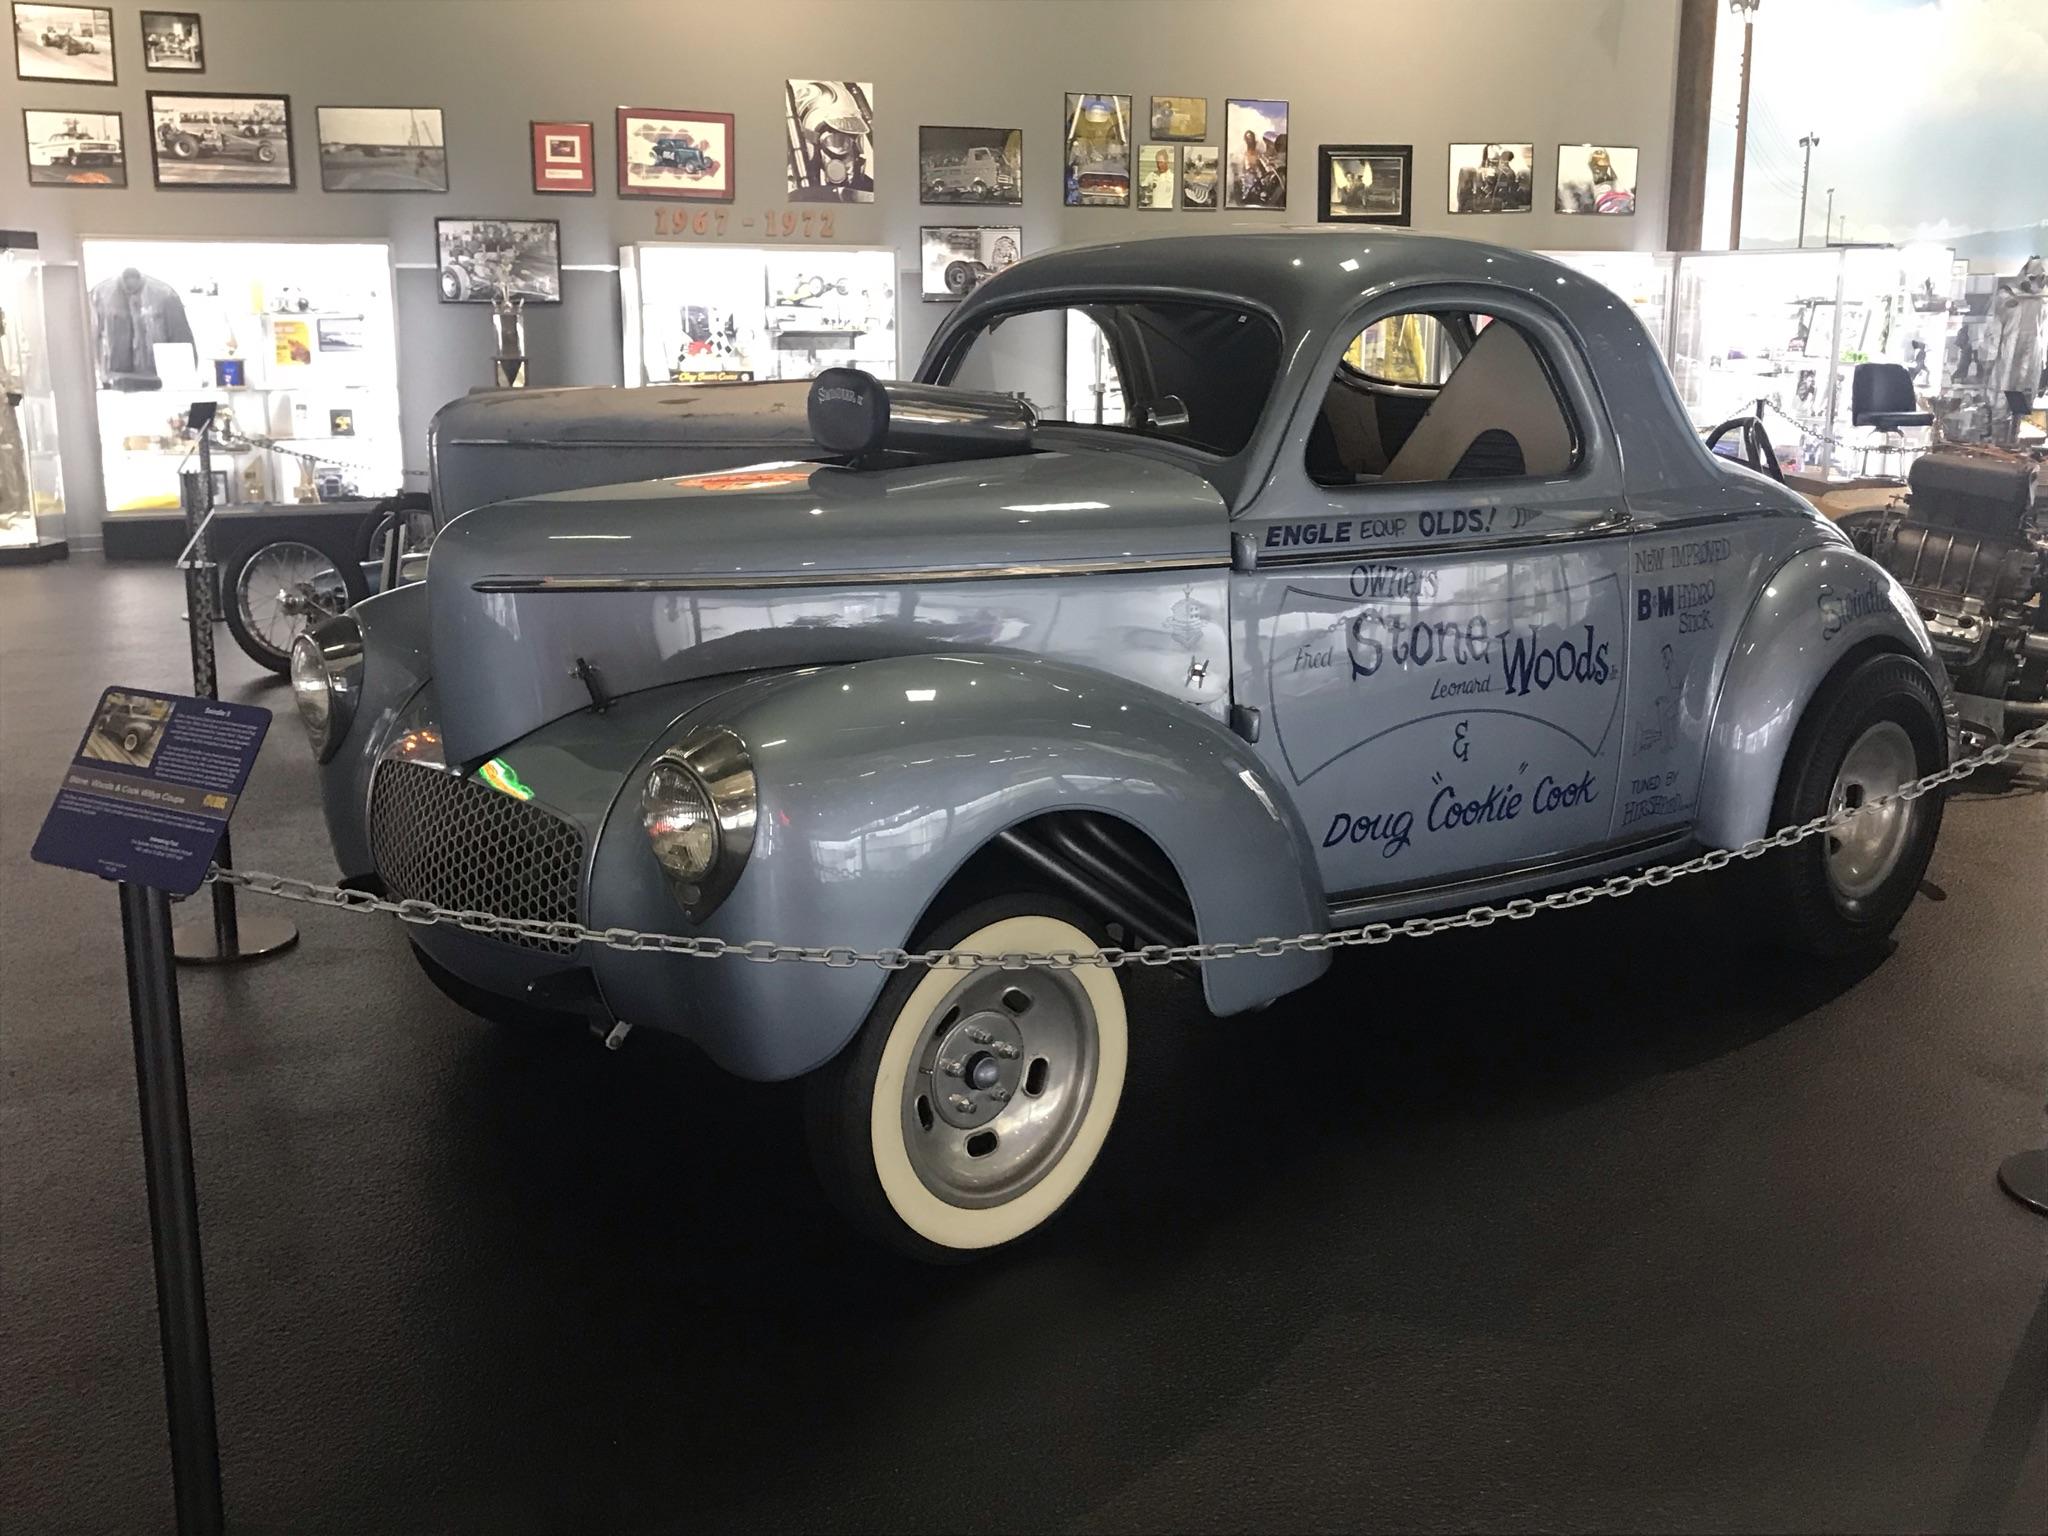
Stone, Woods & Cook Swindler II '41 Willys Gasser
papajohn97 replied to Phildaupho's topic in Drag Racing
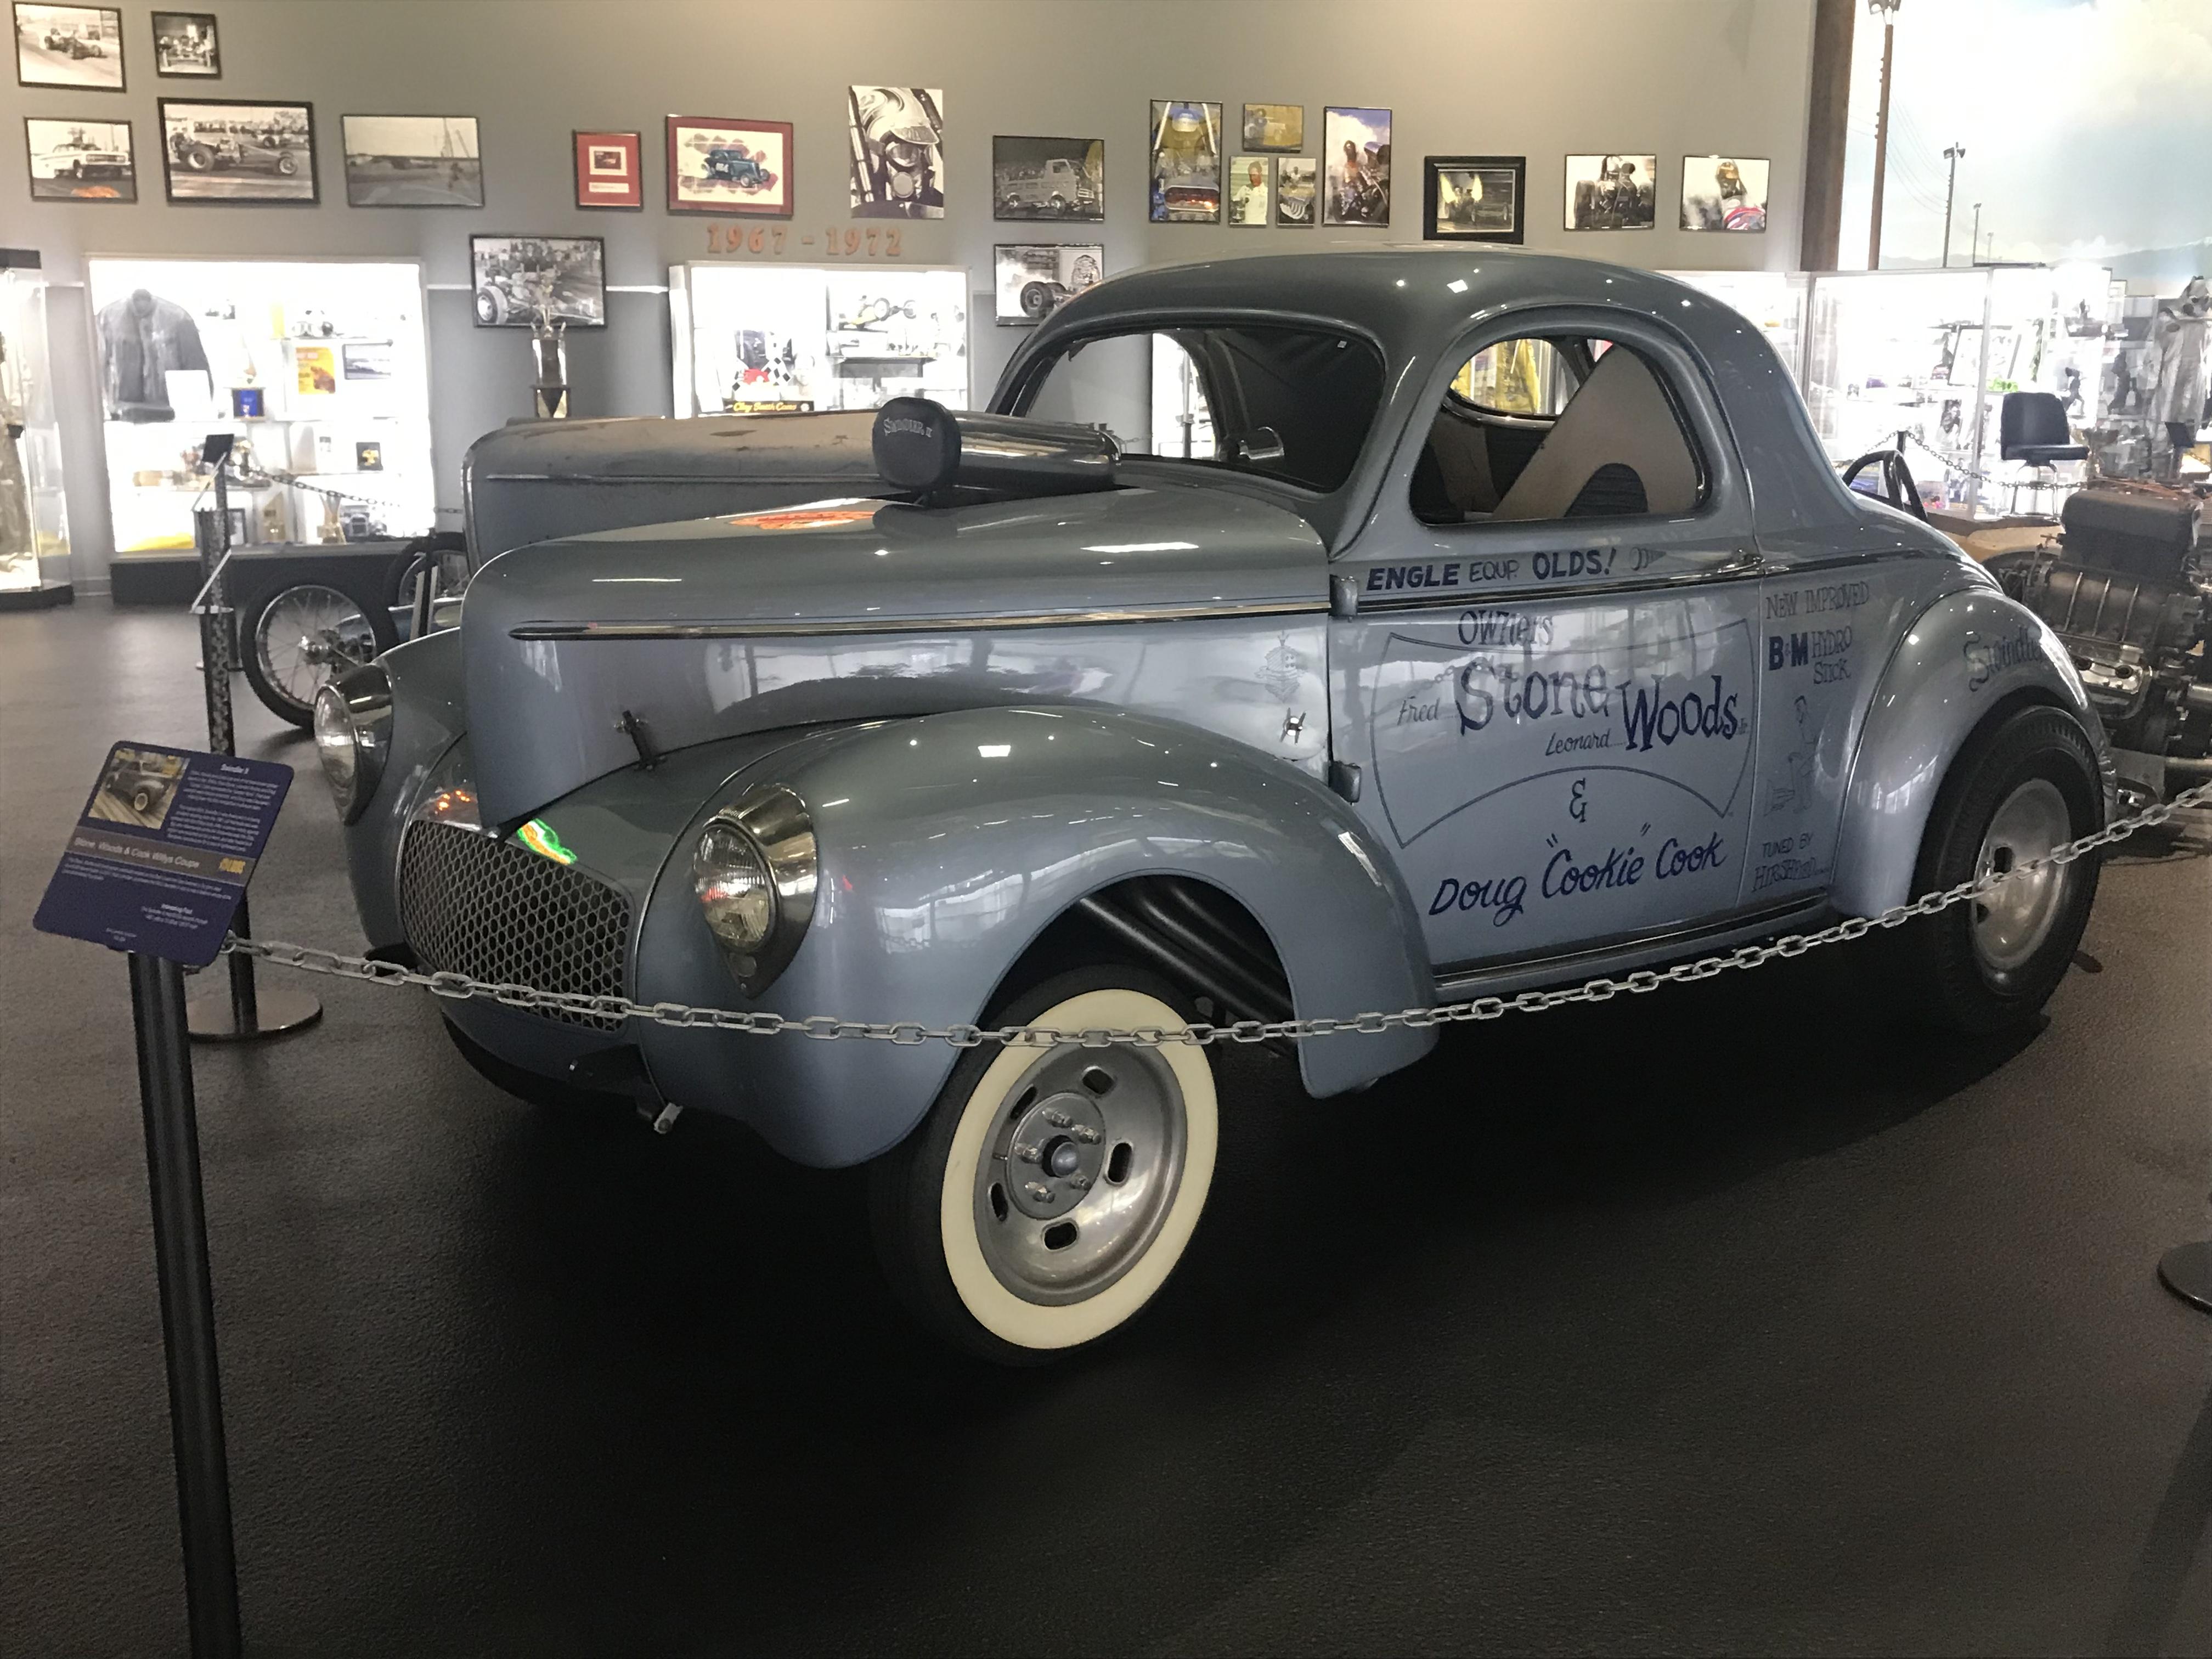
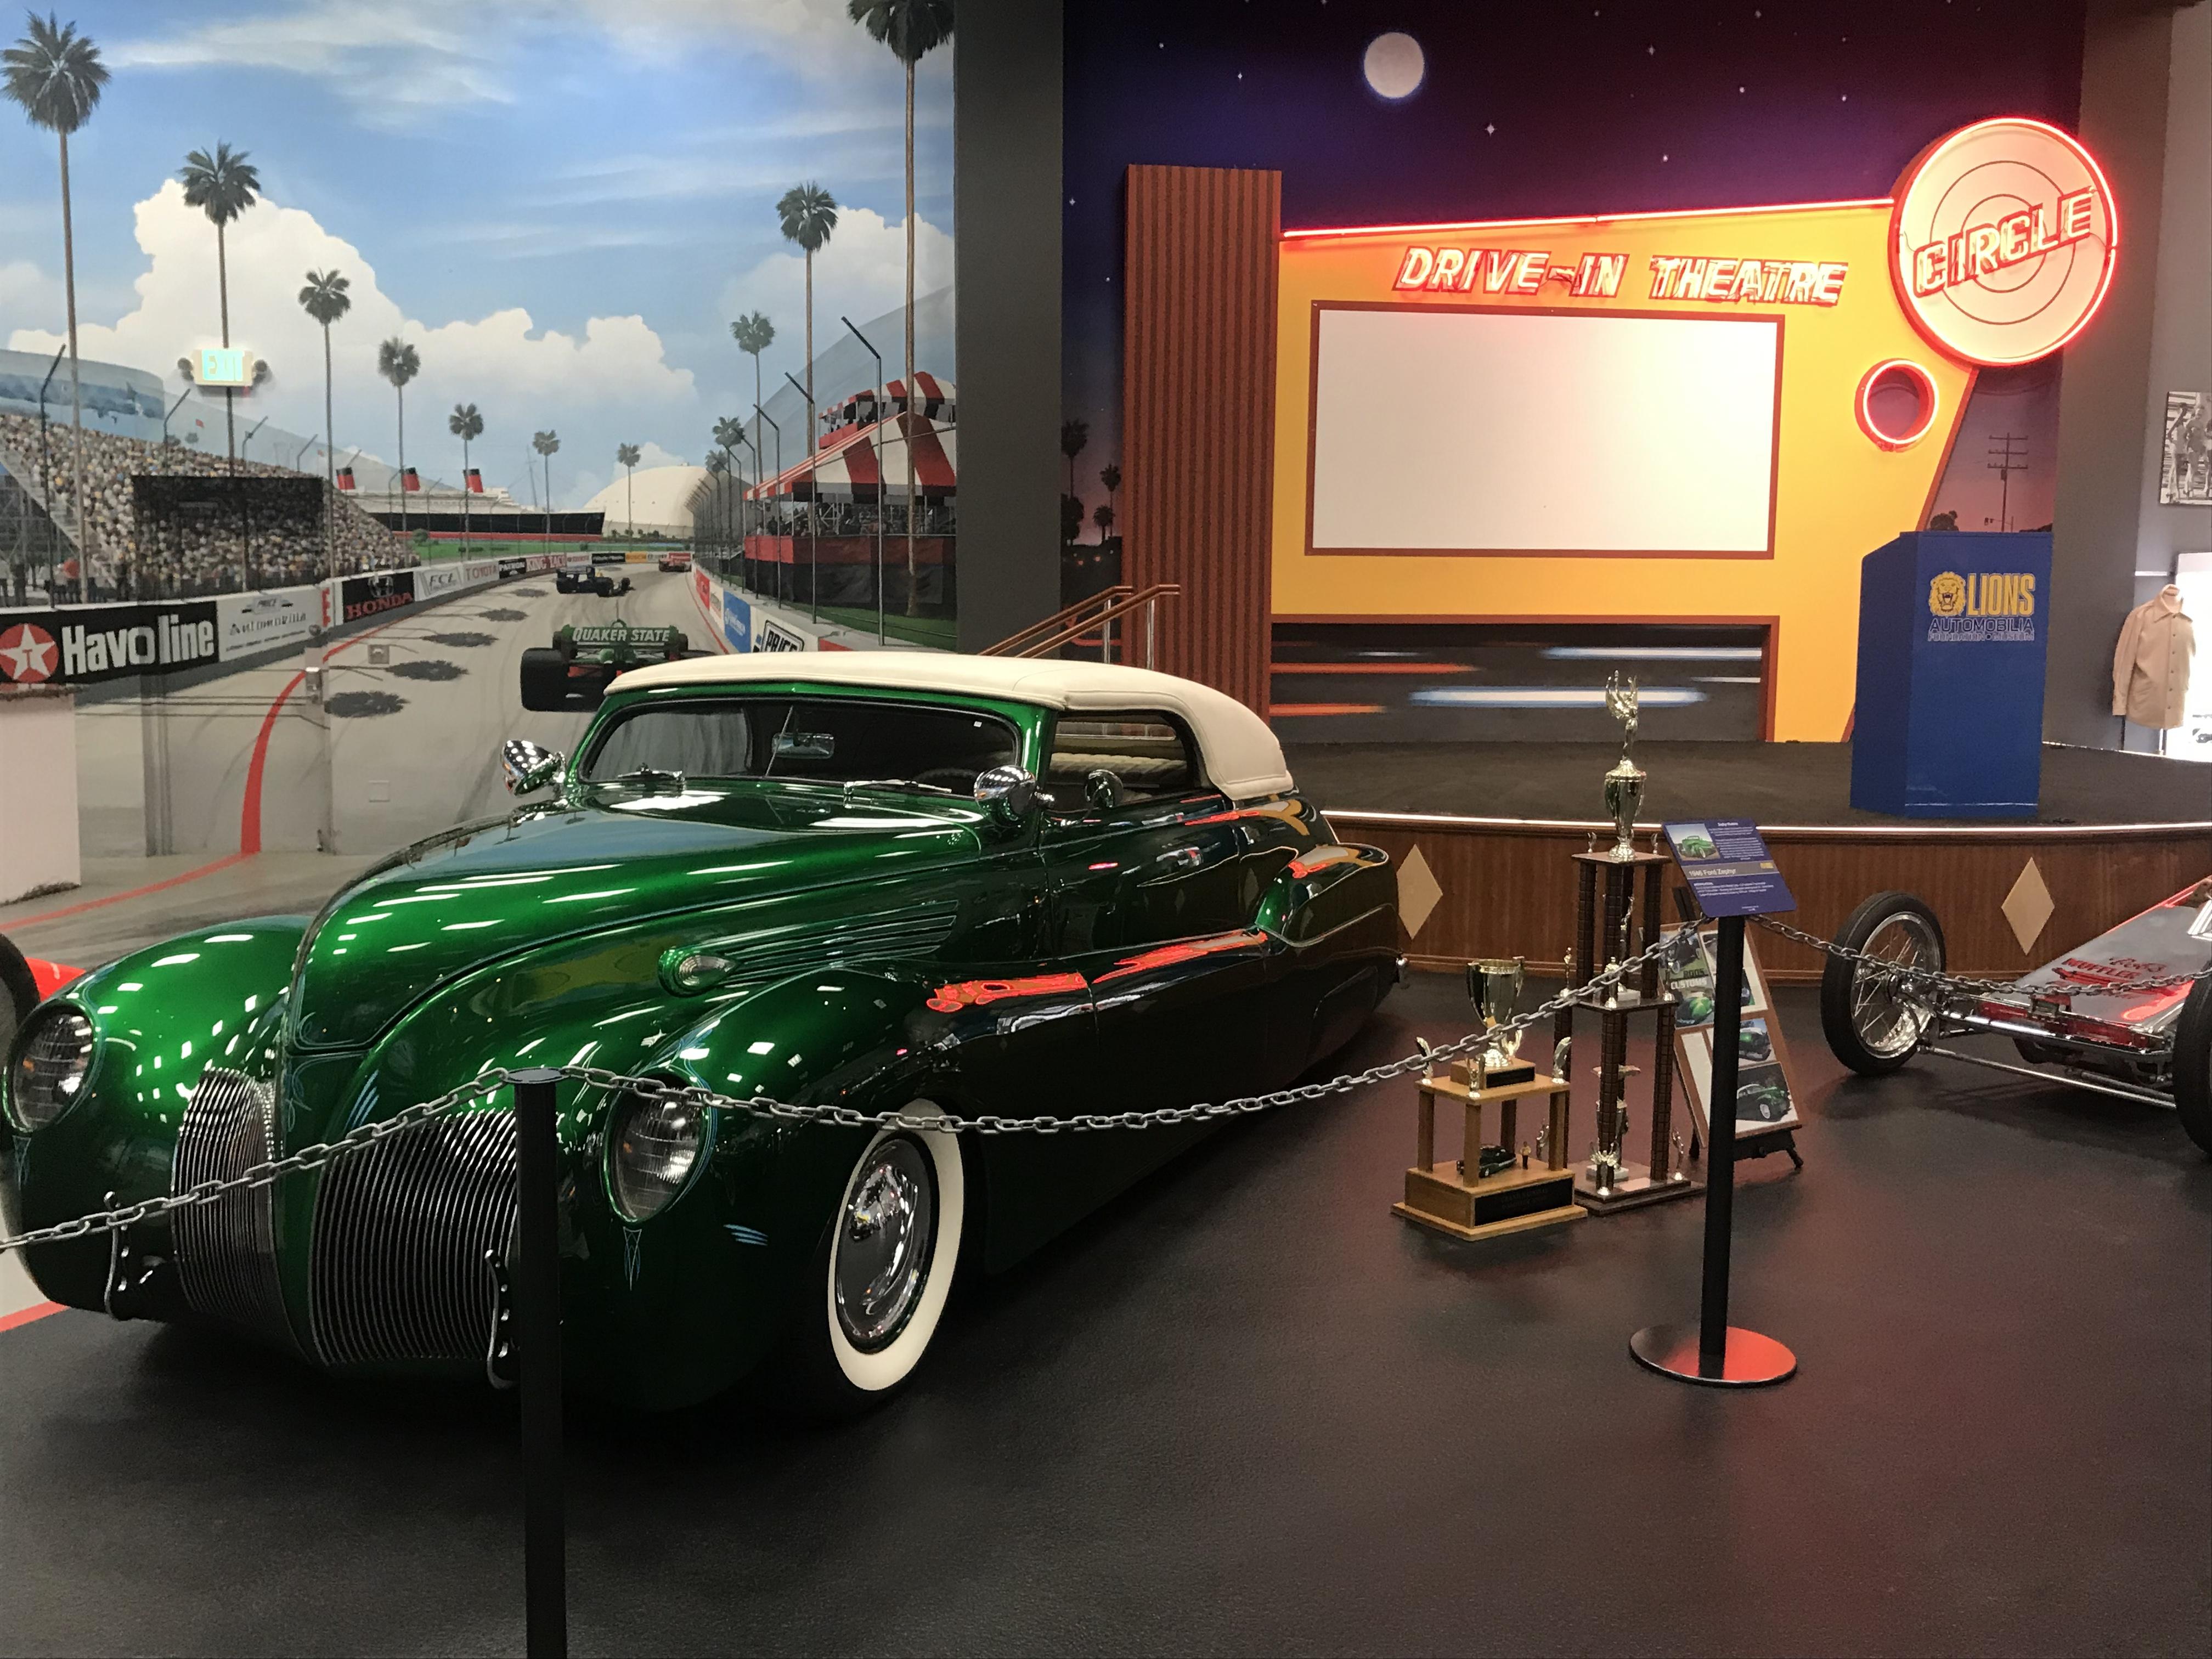
Fabulous job Phil on transforming this spindly old kit into a masterpiece. I have this car on my “to do” list and figured I’d use the newer Revell tooled kit but your build is making me re-think it. Thank you for taking the time to describe all the enhancements you did in such detail. Also, that Tamiya light blue Pearl looks like a perfect match for this early SWC willys. I got to see the restored car at the Price/ Lions museum in Los Angeles last month, an excellent collection of classic drag cars. When I asked the docent what the owner paid for this car, he just shook his head and said “you don’t want to know….it was very very $$$!!!!).
-
Very impressive build Tony! You particularly did a great job on the super big white decals that Moebius provided with this kit, not easy to apply everything so well aligned and bubble-free as you’ve done here. If I assume you first sprayed the entire body with the red first, it’s amazing how well these decals covered the red. I noticed this kit is getting harder to find, if anyone wants to build this excellent ‘65 A990 S/S kit, best to grab one soon before they all disappear and/or become crazy $$$.
-
Thanks for replying Eric. I read somewhere on here that Mobius is working on a Dodge version of their ‘65 Plymouth kits - hope this rumor is true, I would love to build an accurate version of Landy’s AWB Dodge (using the Slixx decal set) without having to resort to resin parts. A ‘65 Dodge AWB could also be built as a Ramchargers, Bud Faubel “Honker”, Dave Stricker car, etc. On the AMT Mustang AWB Funny Car chassis, in case you missed it you can check out how I did my chassis mods on my build of the Dick Brannan “Bronco” match racer using this horrid kit that I posted last June here. Looking forward to enjoying more of your SS builds!
-
Very nice execution Eric on this kit-bashed AWB Falcon. I tried making something acceptable out of the sister kit AMT ‘65 Mustang AWB “funny car” using the toy-like chassis supplied in the kit- what a challenge (= what a mess!!!) I think you did this right by adapting the Trumpeter chassis which looks like it provided a more accurate enclosed engine bay as well as more realistic stance. Look’s like we share the same taste in drag car models (‘60 - ‘66 super stocks). I love the ‘65 Plymouth Bill Jenkins Black Arrow build you posted last month as well as this Falcon. I’ve been trying to pick up a few more of the excellent Moebius Plymouth A990 kits before they all disappear to match up with a few of the also disppearing Slixx decal sets to fill out my SS collection. Hoping to soon build a Black Arrow as well as a Shirley Shahan Drag-On-Lady. Thanks for posting Eric! Show us some more of your builds!
-
Latest Galaxie Chevy Build, 1947 Chevrolet Coupe
papajohn97 replied to modelercarl's topic in Model Cars
Good color choice for this coupe and very nice overall paint and workmanship on all three builds. These coupes are OOP and getting harder to find, nice to see one built. Wish Galaxie would offer more ‘40’s sedans, would love to build a ‘47 Caddie Series 62 fastback. -
JPS Lotus 72E 1973
papajohn97 replied to Rich Chernosky's topic in Other Racing: Road Racing, Salt Flat Racers
Very nice job Rich on this 72e. I particularly like the fuel lines and wiring details you added. I’ve given up applying TS-13 clear coat over any decals, it always seems to cause issues when I spray the final wet coat, even after applying a multitude of thin pre-coats and letting each one dry/fully cure. Ebbro 1/20 F1 kits never seem to go together easily. I recently completed the new Lotus 33 kit and came very close to taking a hammer to it more than once. Whatever build issues you had with this 72e do not appear to be visible on your beautiful finished model. -
Nice restoration! Did you take any “before” pics you can post? I vote for chrome bumpers. I know what you mean about the weather dictating painting activities. Even in So. Cal., I’m trying to get in all my gloss lacquer and clear coat paint jobs before colder temps arrive. Lacquer base coats, acrylics, enamels and even Alclad seem to be ok to spray in my garage workshop even when it chills down to the mid to high 50’s. I agree with others that this early Comet looks really good in black. Wish Round 2 would/ could re-pop this kit.
-
Love bubble tops and this bright blue street machine is a real beauty. Your BMF/Molotow came out really nice. BMF quality has really gone down hill lately and I’m pretty much masking and spraying all the window frames and trim these days. I also have experienced cracking with AMT decals on most their kits, too bad because they look so great out of the box. This ‘61 Impala and the ‘62 Bel Air bubble-top are two of my favorite kits, they go together so trouble-free and look so realistic when done. Nice job!
-
Beautiful job Eric on Grumpy’s only Mopar. These Moebius ‘65 Plymouth’s go together so nicely and with the excellent Slixx decals, it’s possible to do a few variations beyond the Butch Leal car. I wish Moebius offered ‘65 Dodge versions of this and the hardtop Plymouth kit. The fuel lines, filters and ignition wiring you added really makes this kit Hemi come alive. Great job!
-
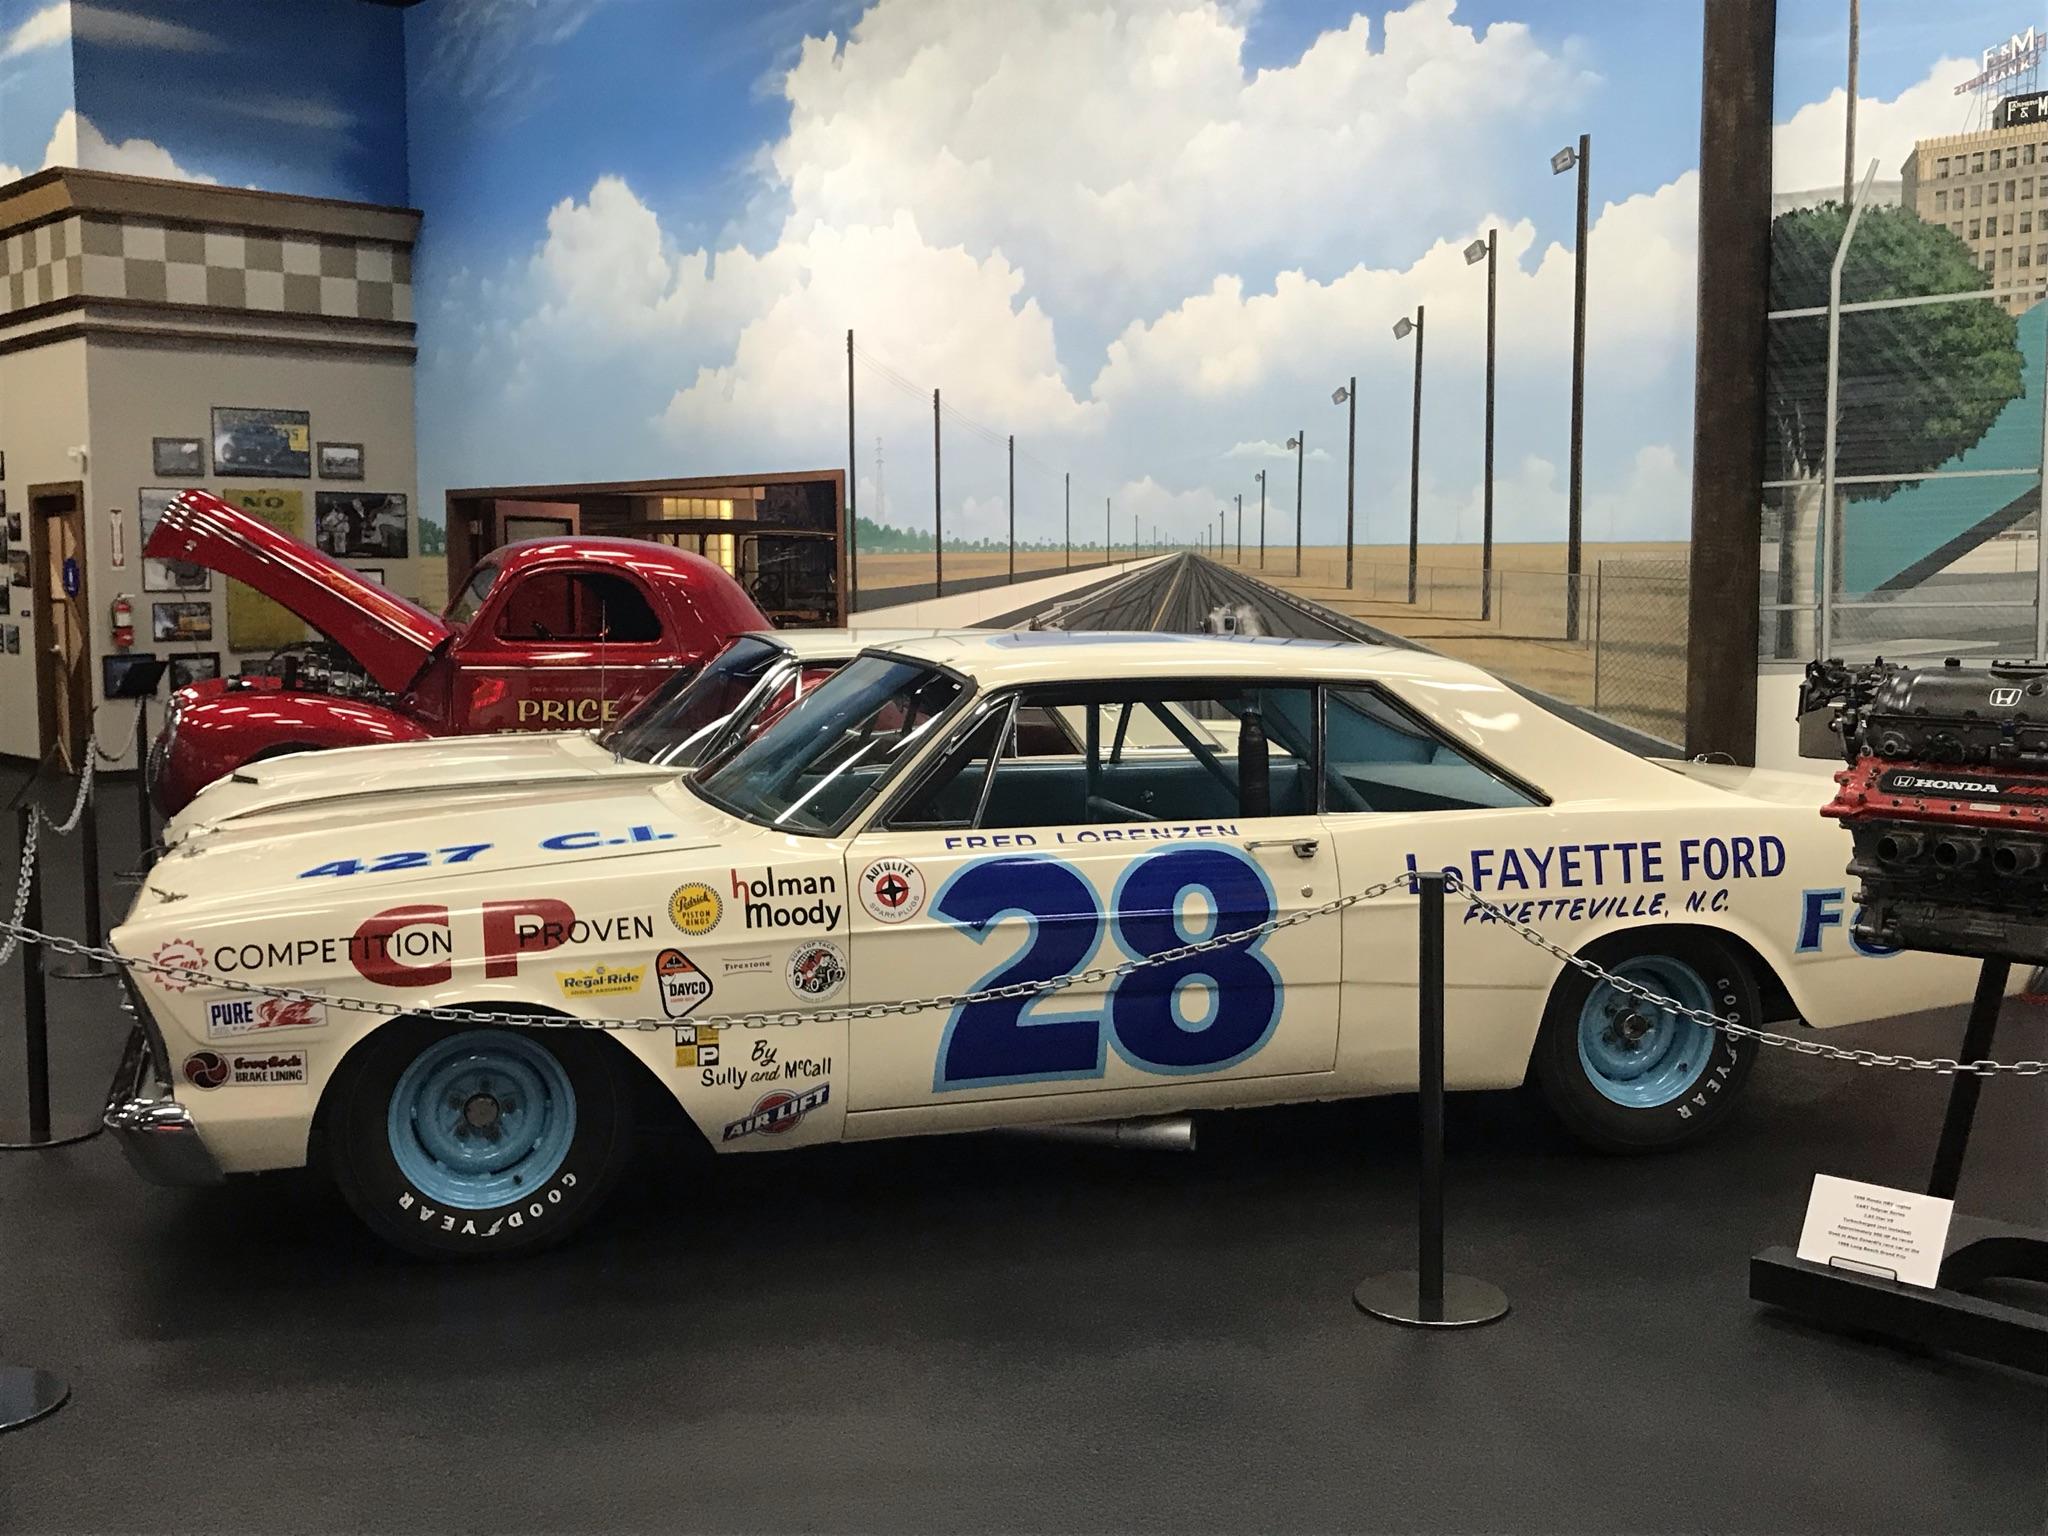
Fred´s Ford in light frost
papajohn97 replied to kjohan's topic in Stock Cars (NASCAR, Super Stock, Late Model, etc.)
Boy that car look’s familiar! Just saw the car below last week at a drag racing museum in LA, I assume this one is the real thing? You did very nice job on your build, particularly the big decals which are never easy to do without damage or bubbles. Makes me want to build a ‘60’s stock car, nice!
-
You did a fabulous job on that dash and interior. I love the tinted visors as well, adds color to this very monochromatic build, but unfortunately I’d still be squinting driving into the sun!
-
Tamiya McLaren M8A
papajohn97 replied to Safire6's topic in Other Racing: Road Racing, Salt Flat Racers
You did an excellent job Steve on this old Tamiya kit. I have the Tamiya 1/18 Lola T-160 kit in my stash that I believe is the same vintage with the battery compartment and your build is inspiring me to take a crack at it. The TS-56 “Brilliant Orange”spray came out spot-on for McLaren Orange. Did you use the original Tamiya decals or Indycals replacements? -
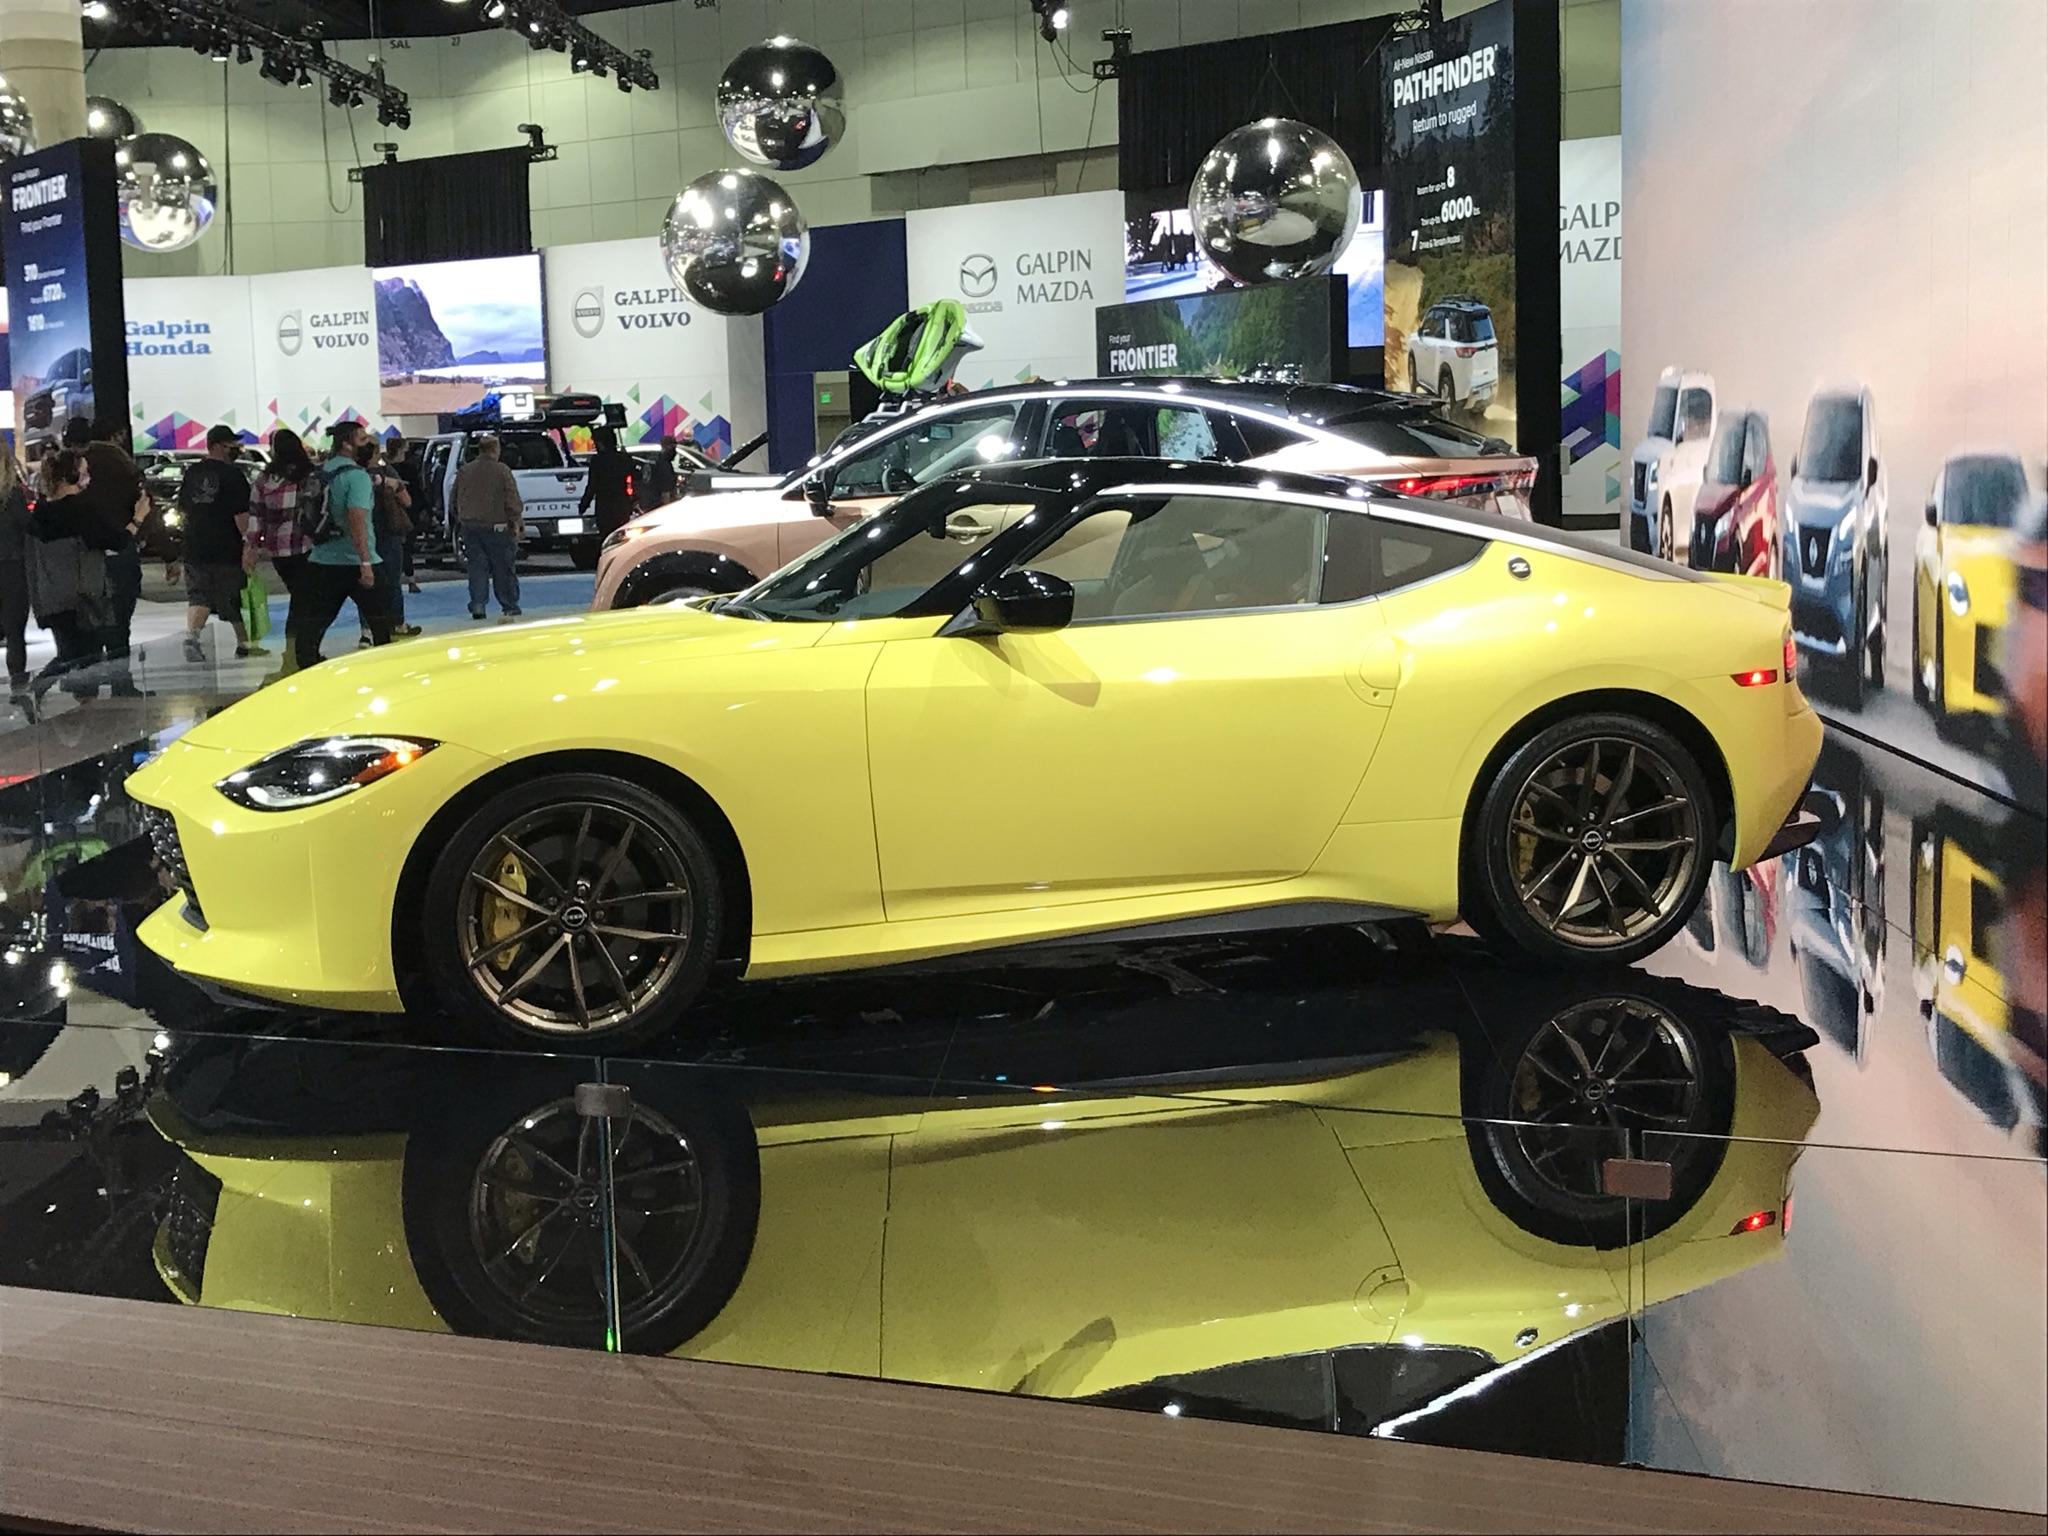
I attended the LA Auto Show yesterday with a very old friend (+50 yrs). We don’t live nearby each other and it’s been a tradition for us and a few other friends who have passed on to “reunion” every year at this show and then share lunch. We last attended the show together in 2018. Impressions: 1. Less than 1/2 the normal big name manufacturer-exhibitors attended. No Cadillac, Buick, Mercedes, Audi, BMW, Honda, Acura, Infiniti, Mazda, Mini, Volvo, Volkswagen….and a few more I’m probably missing. A few of the cars I just listed were on display but it was a local LA car dealer (Galpin) and not the manufacturer. Needless to say, there was alot of empty square footage in both big halls. 2. They had a number of test drive tracks set-up indoors to make use of all the extra space. It appeared that most if not all the test drives were e-vehicles only and patrons were given rides by company drivers (for obvious liability reasons). 2. E-E-E! Big theme this year was electric vehicles nearly everywhere. Many many new e-vehicle manufacturers, too many to list. ICE’s seemed to be the minority / dying product category from a promotion standpoint. 3. Many of the new e-vehicles are huge trucks/SUV/ maxi-van platforms. They all look super $$$ and super heavy. Totally un-appealing to us “old car guys”. I only took a few pics, the new Z looked good in person and unlike the ongoing trend of making sporty cars bigger, it’s a nice compact size: Porsche showed this new spec racer, very nice: This is probably the last auto show I will attend. LA has nearly fully transformed into the scary city from Blade Runner but with many more homeless people and the hassle-factor (traffic, cost to park, crowds) is just not worth it. I think the golden age of automobiles may be coming to a close very soon…..
-
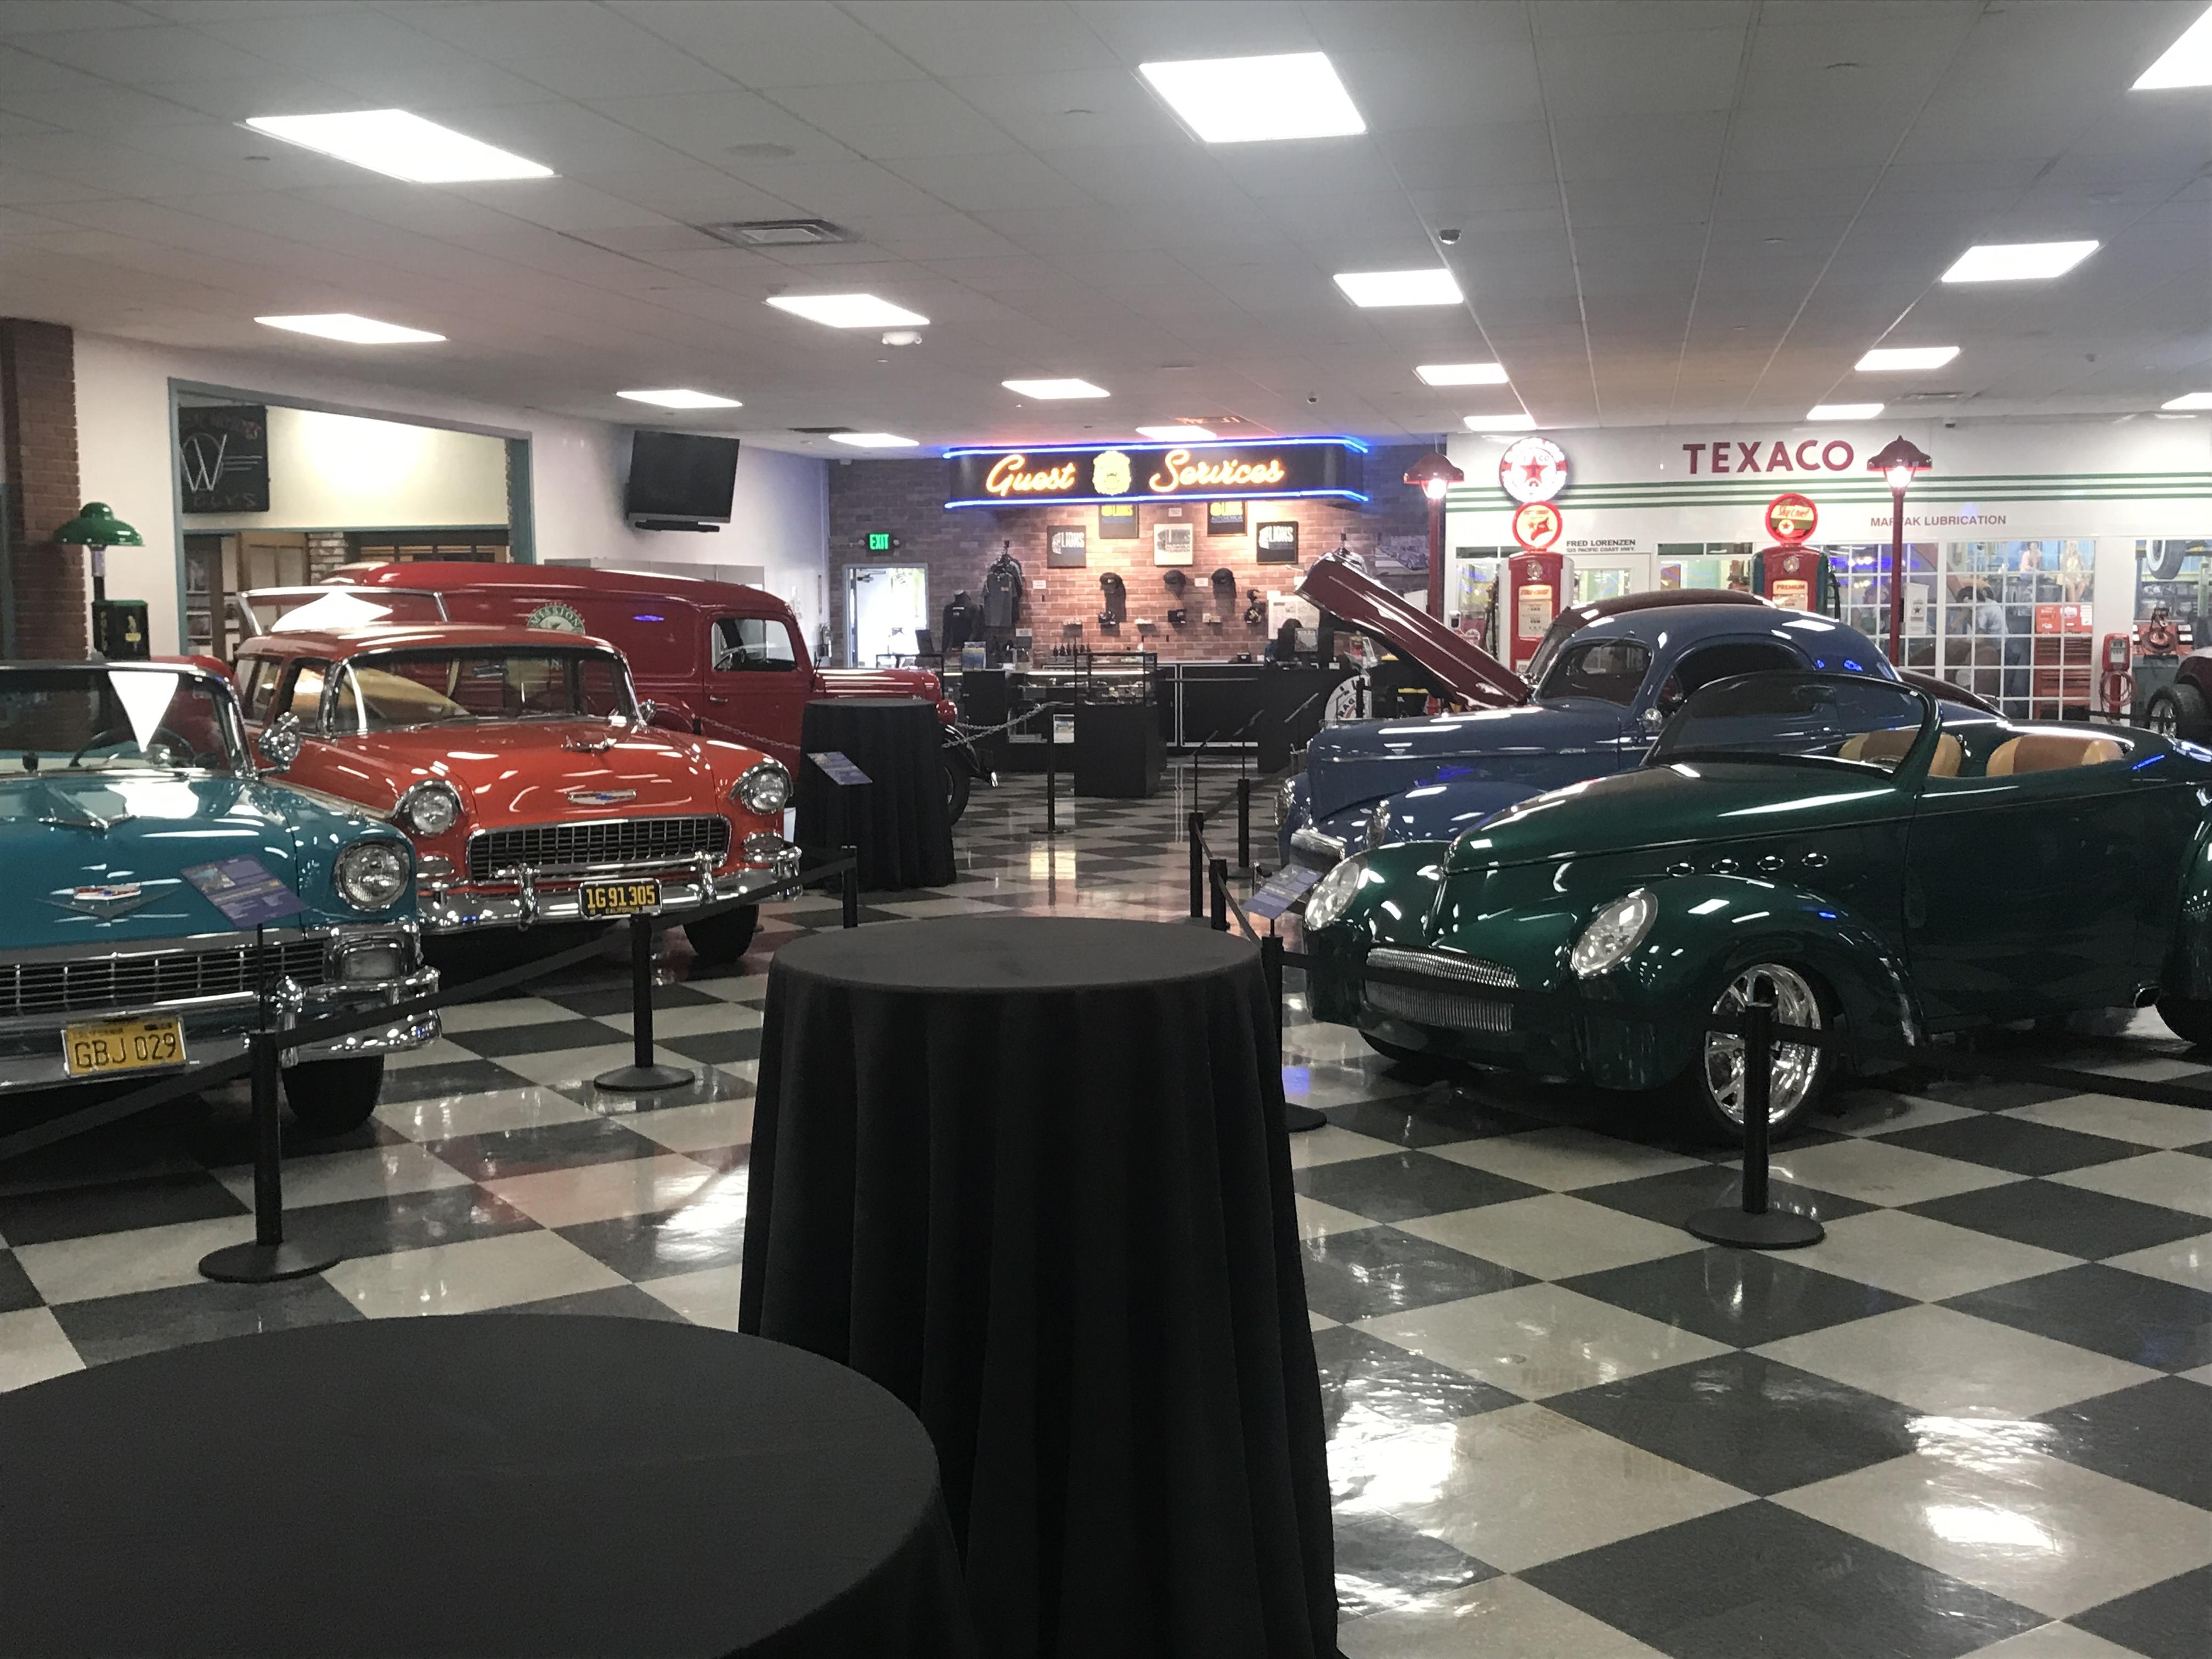
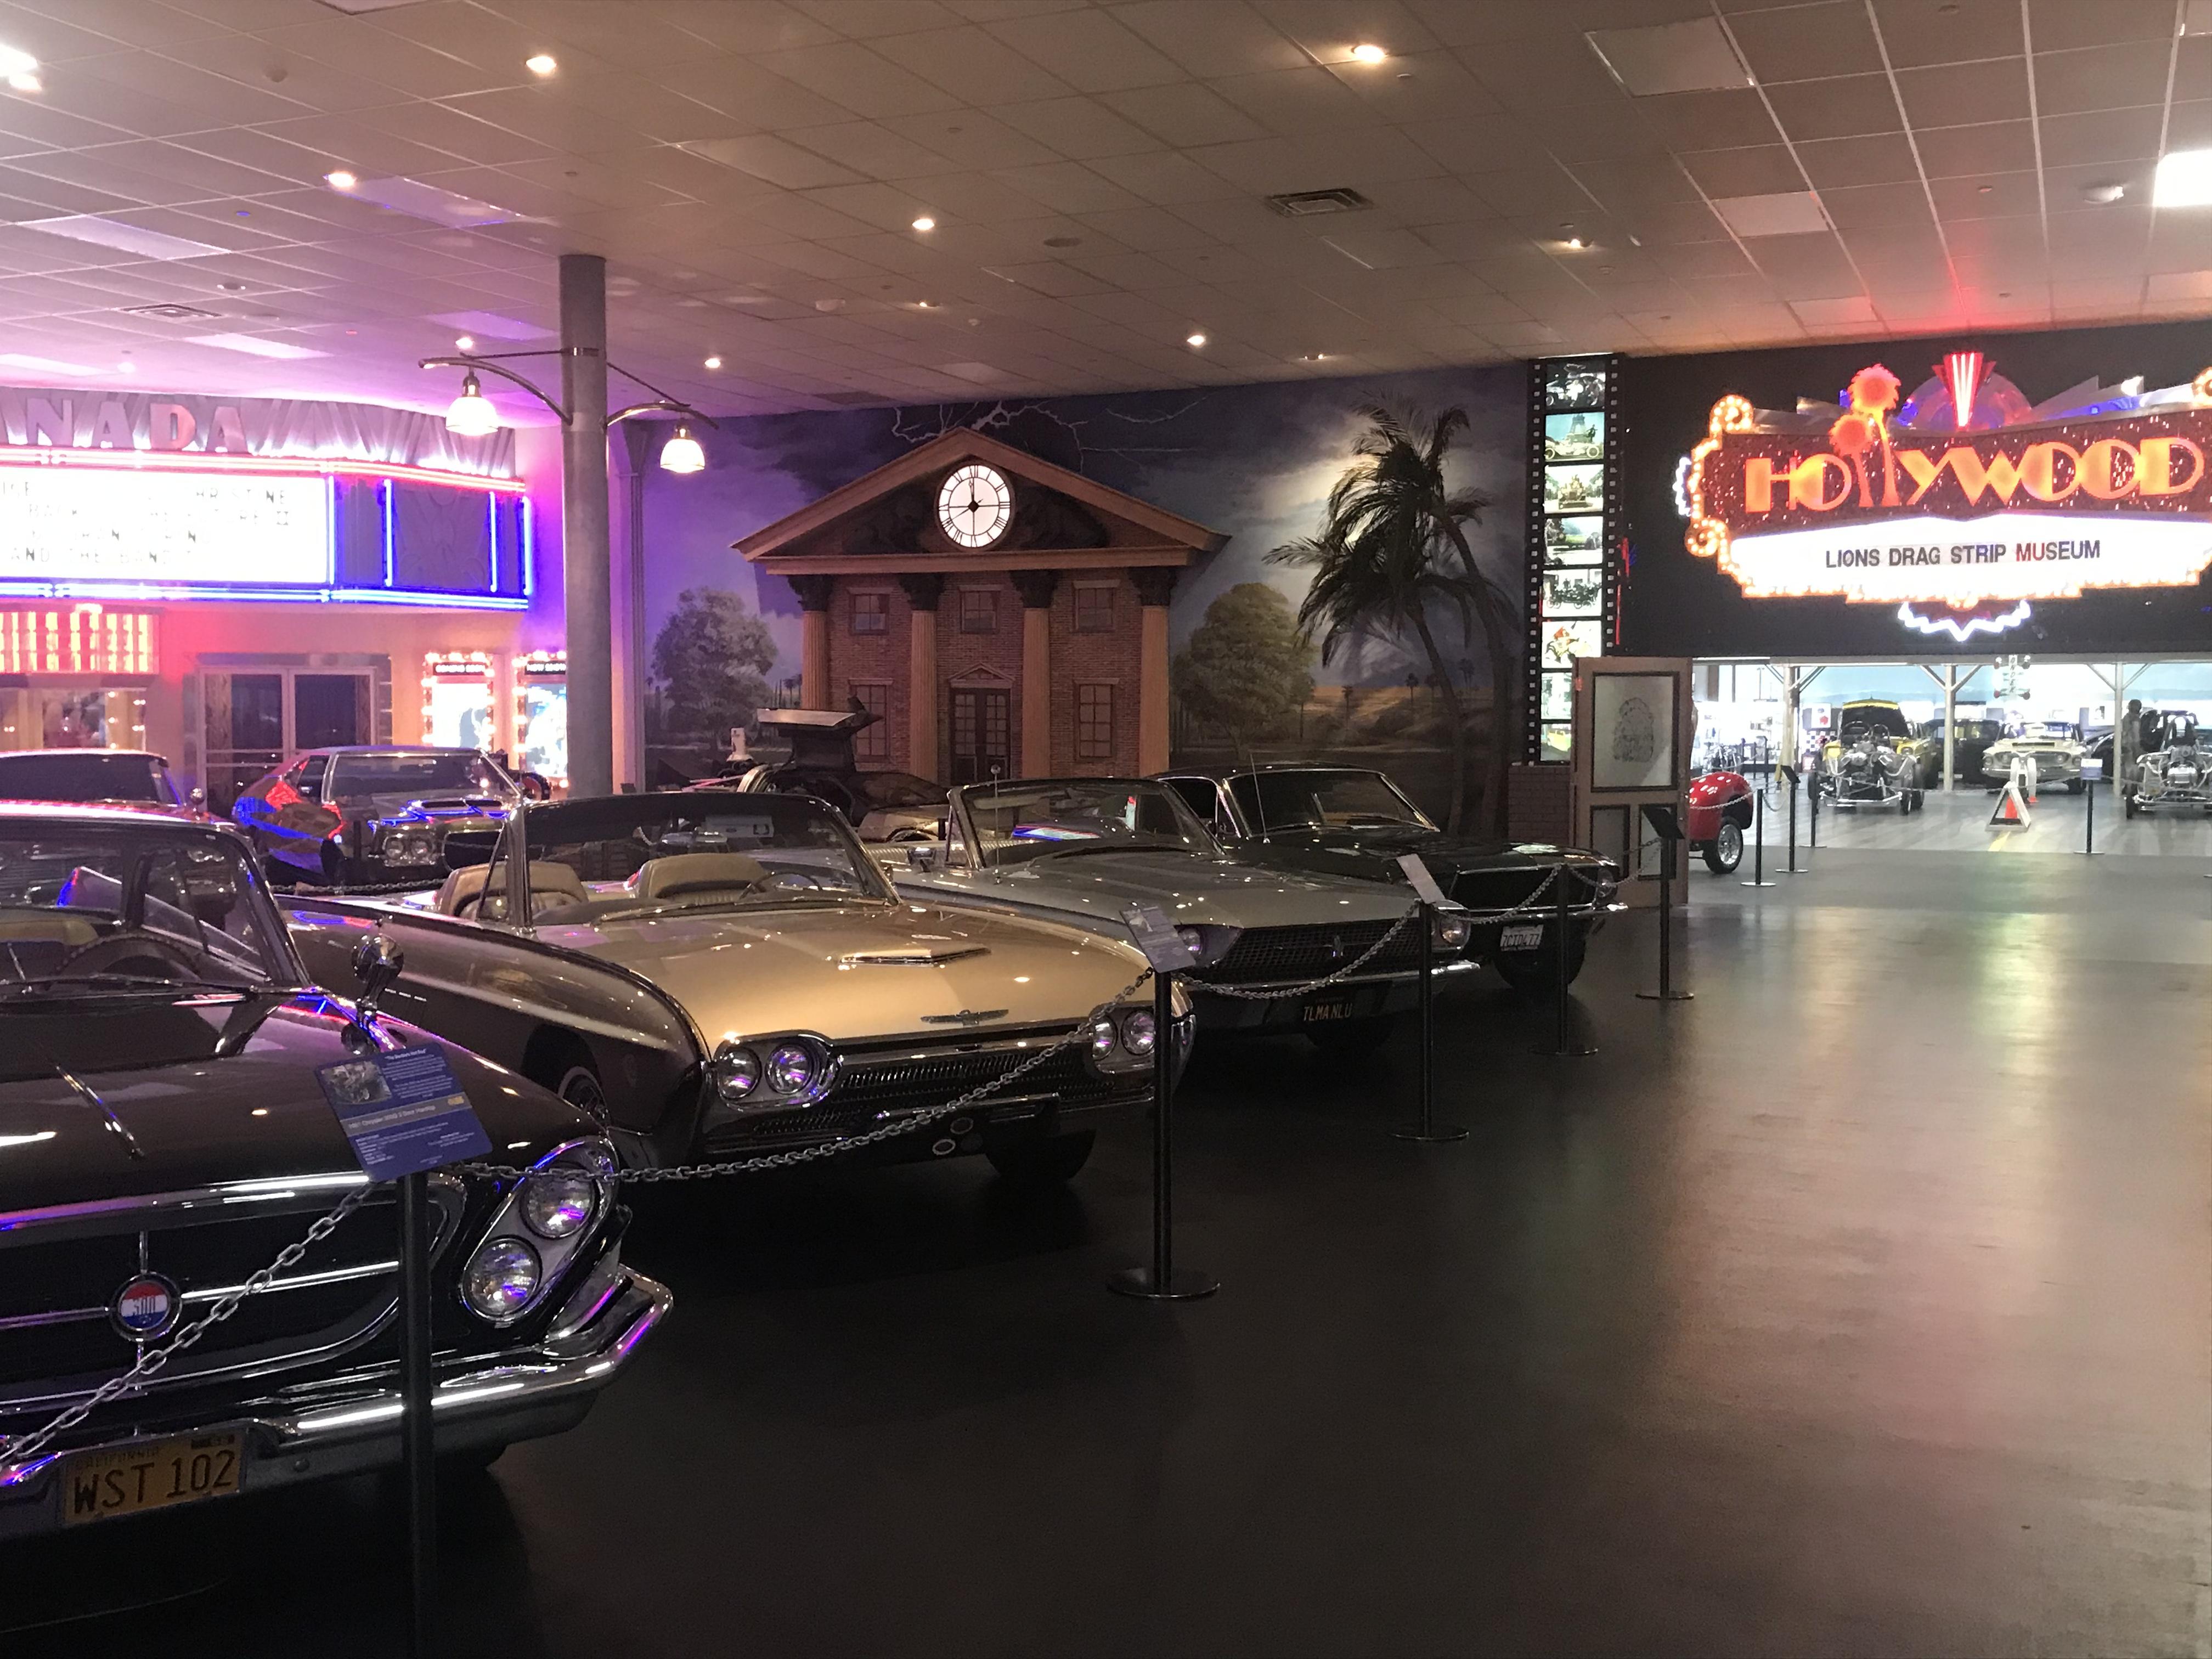
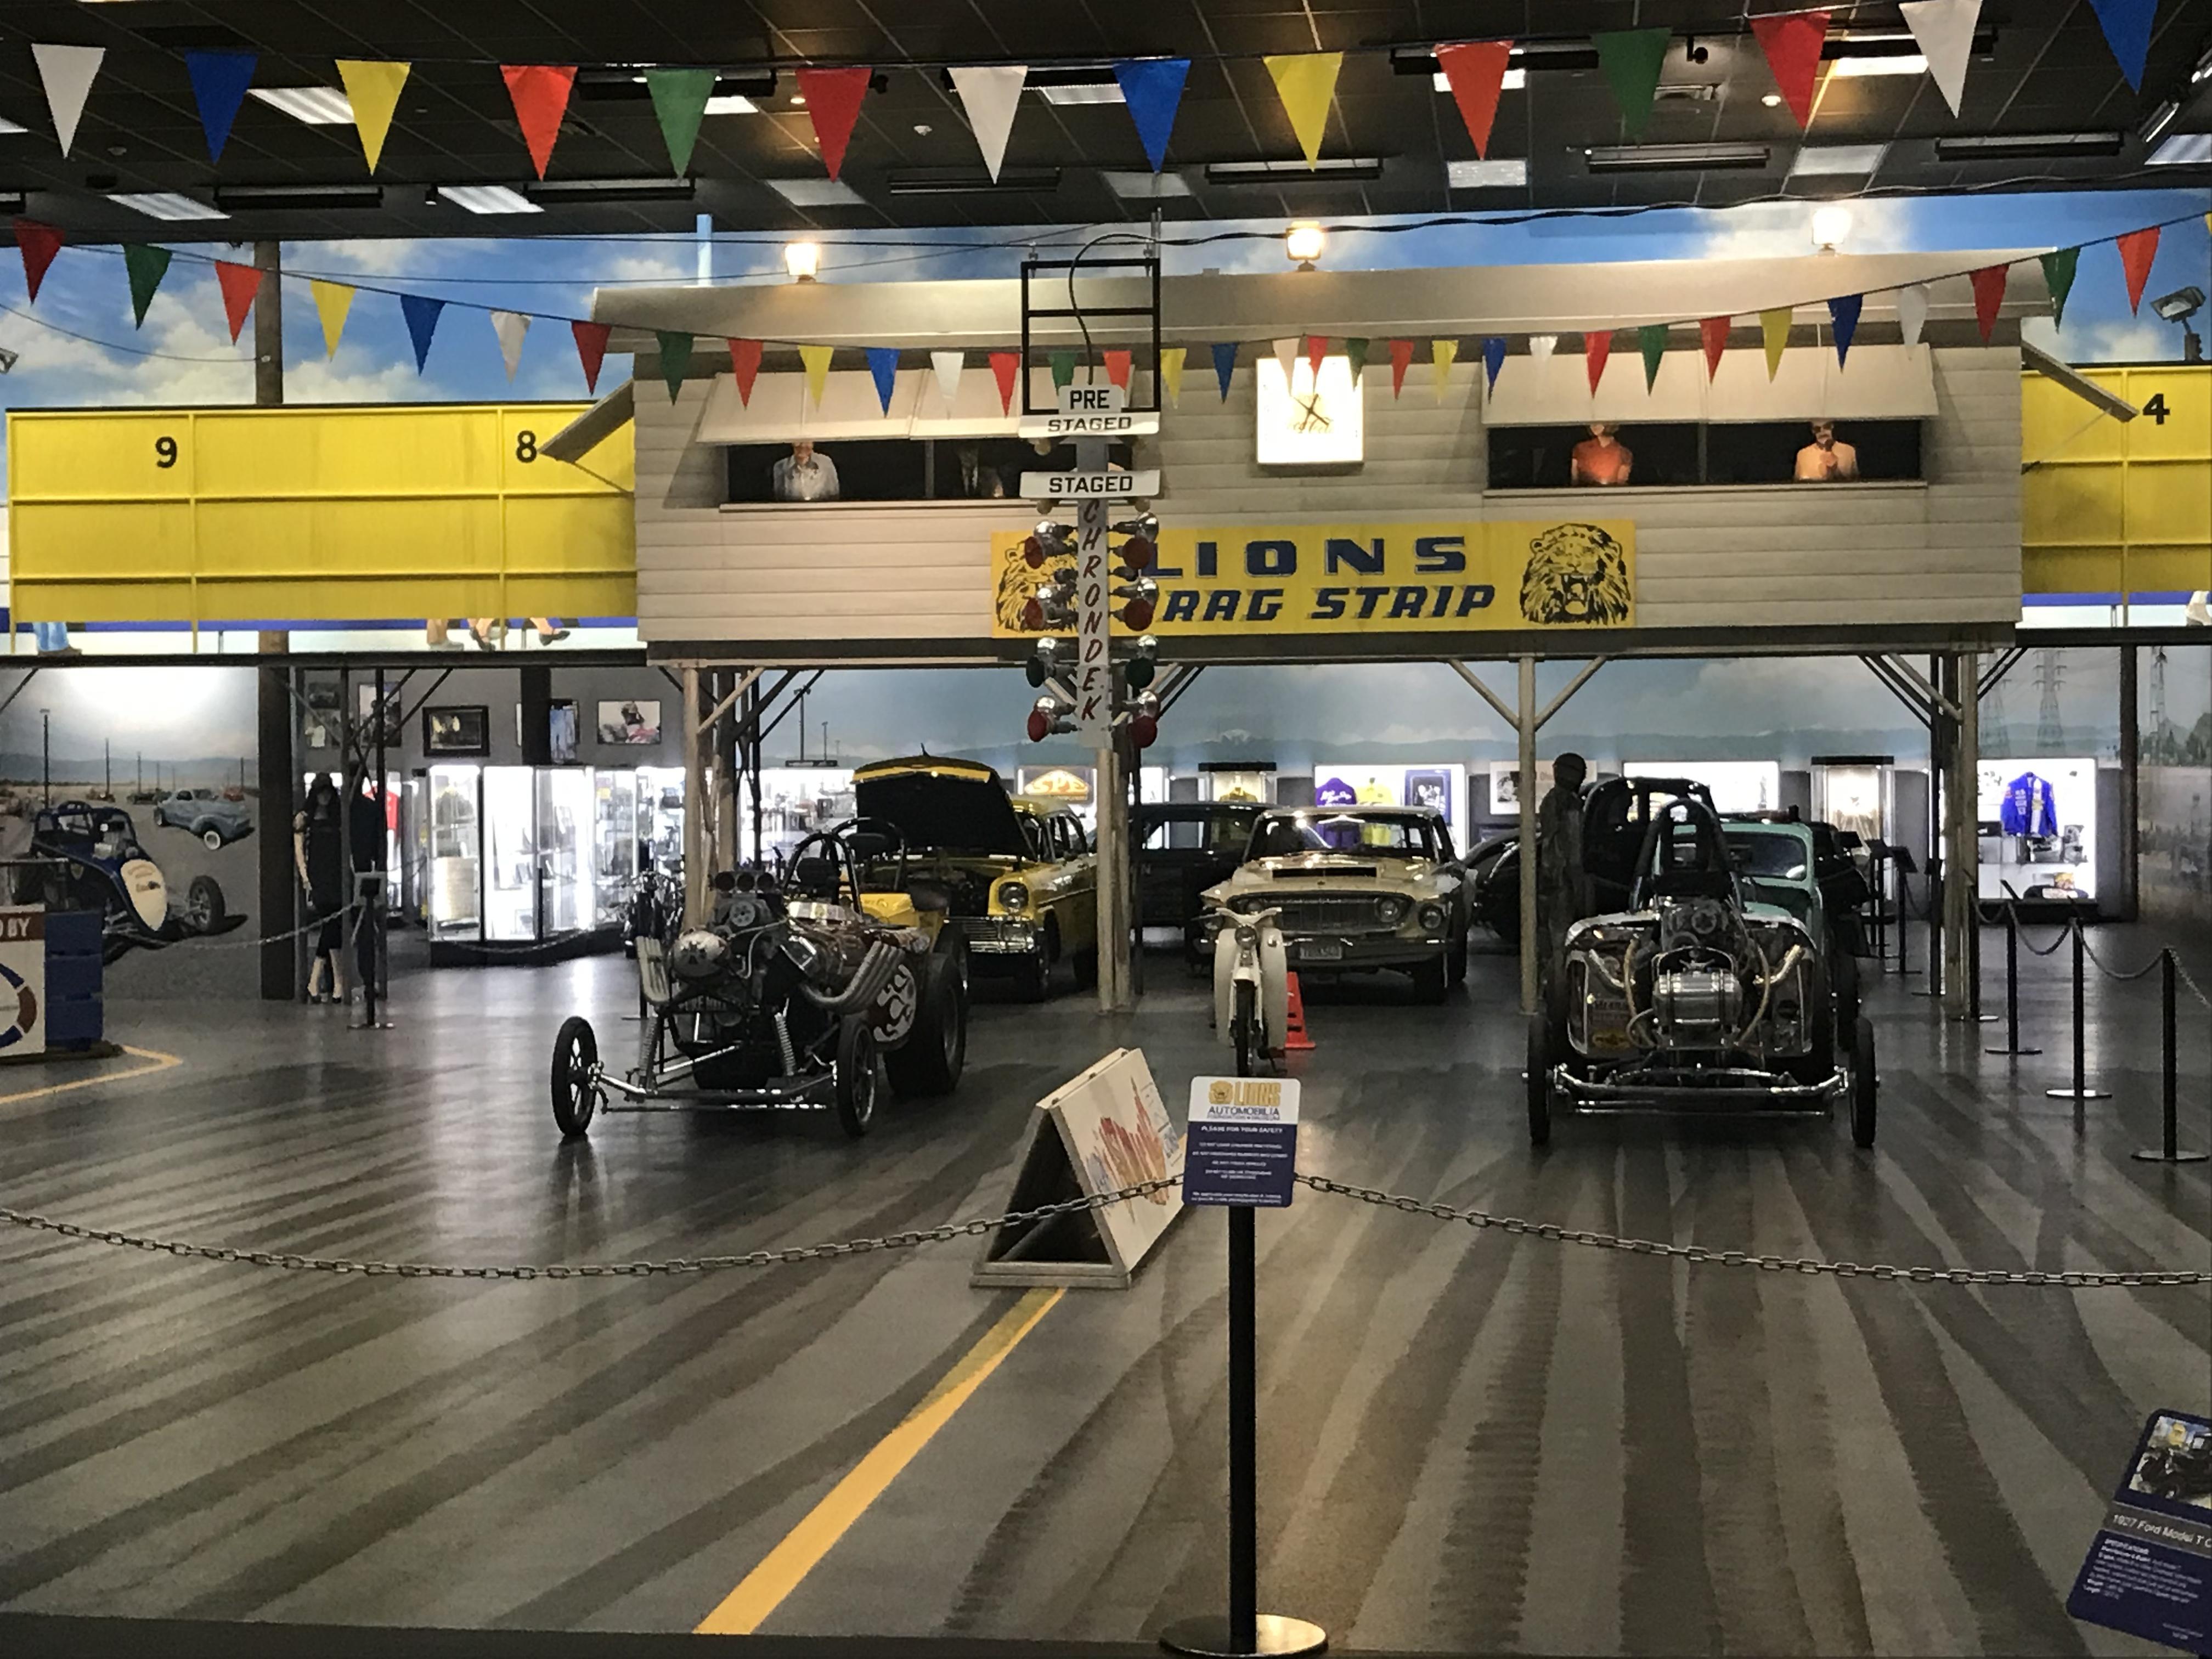
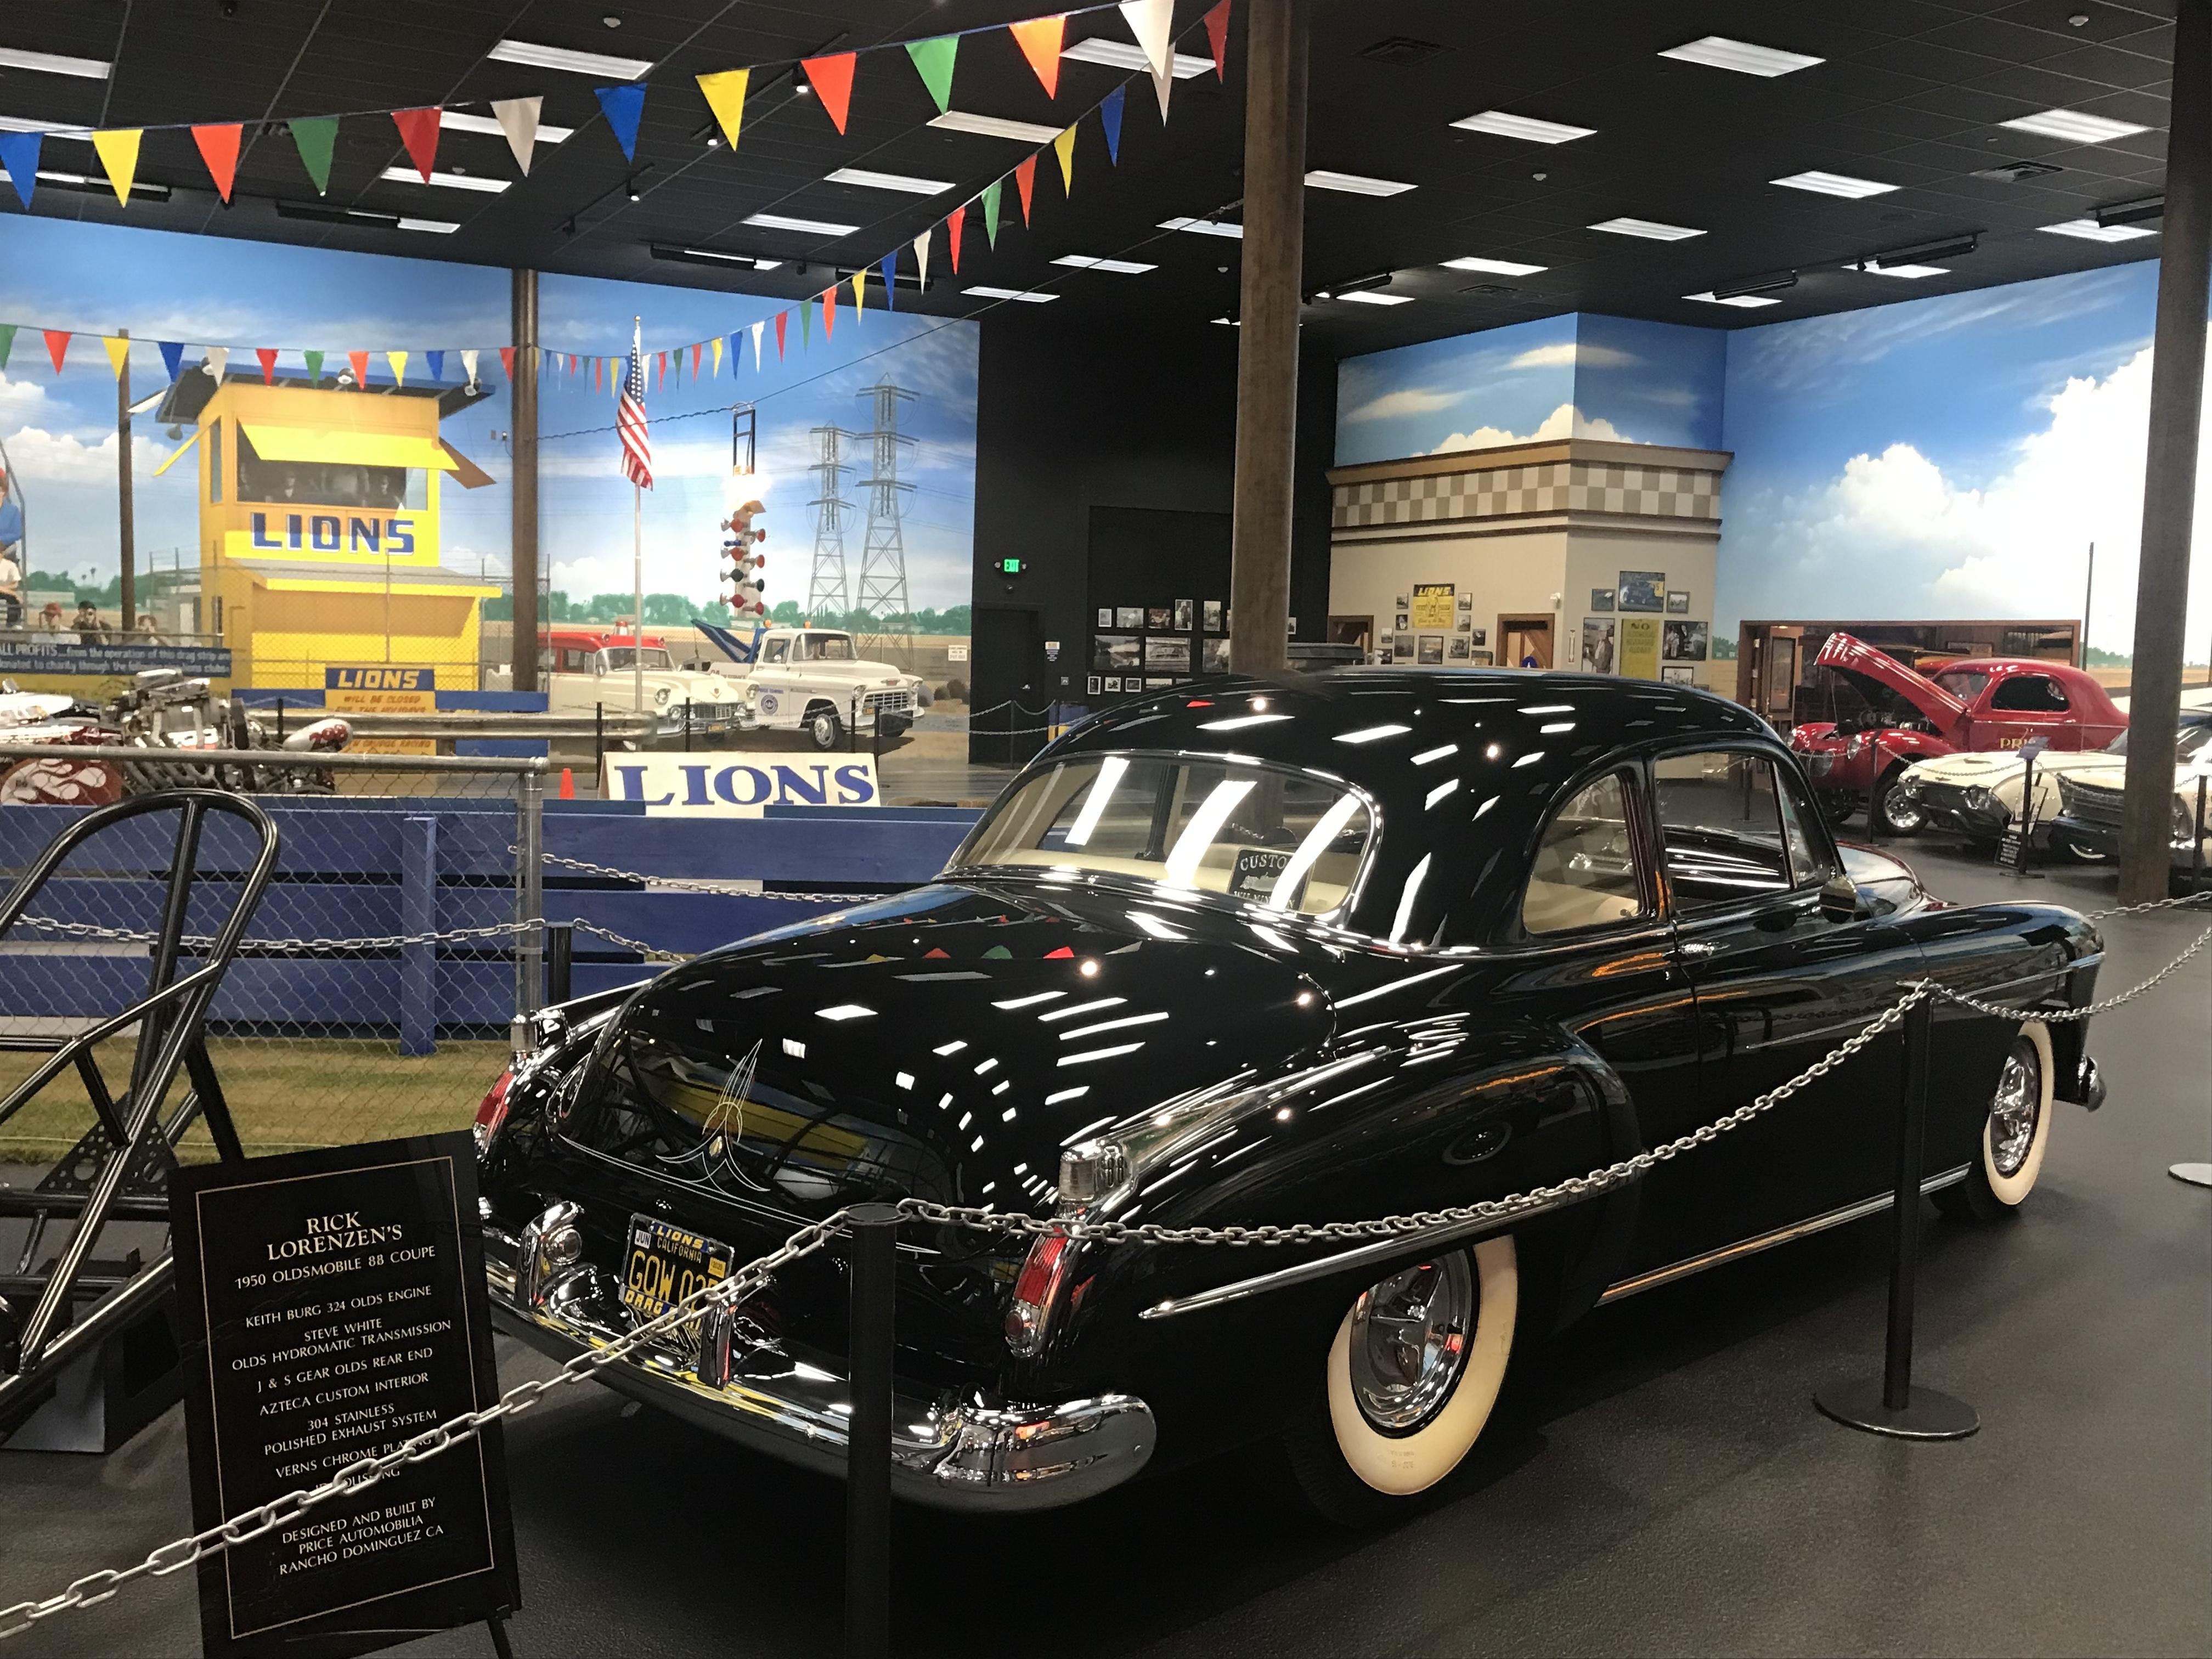
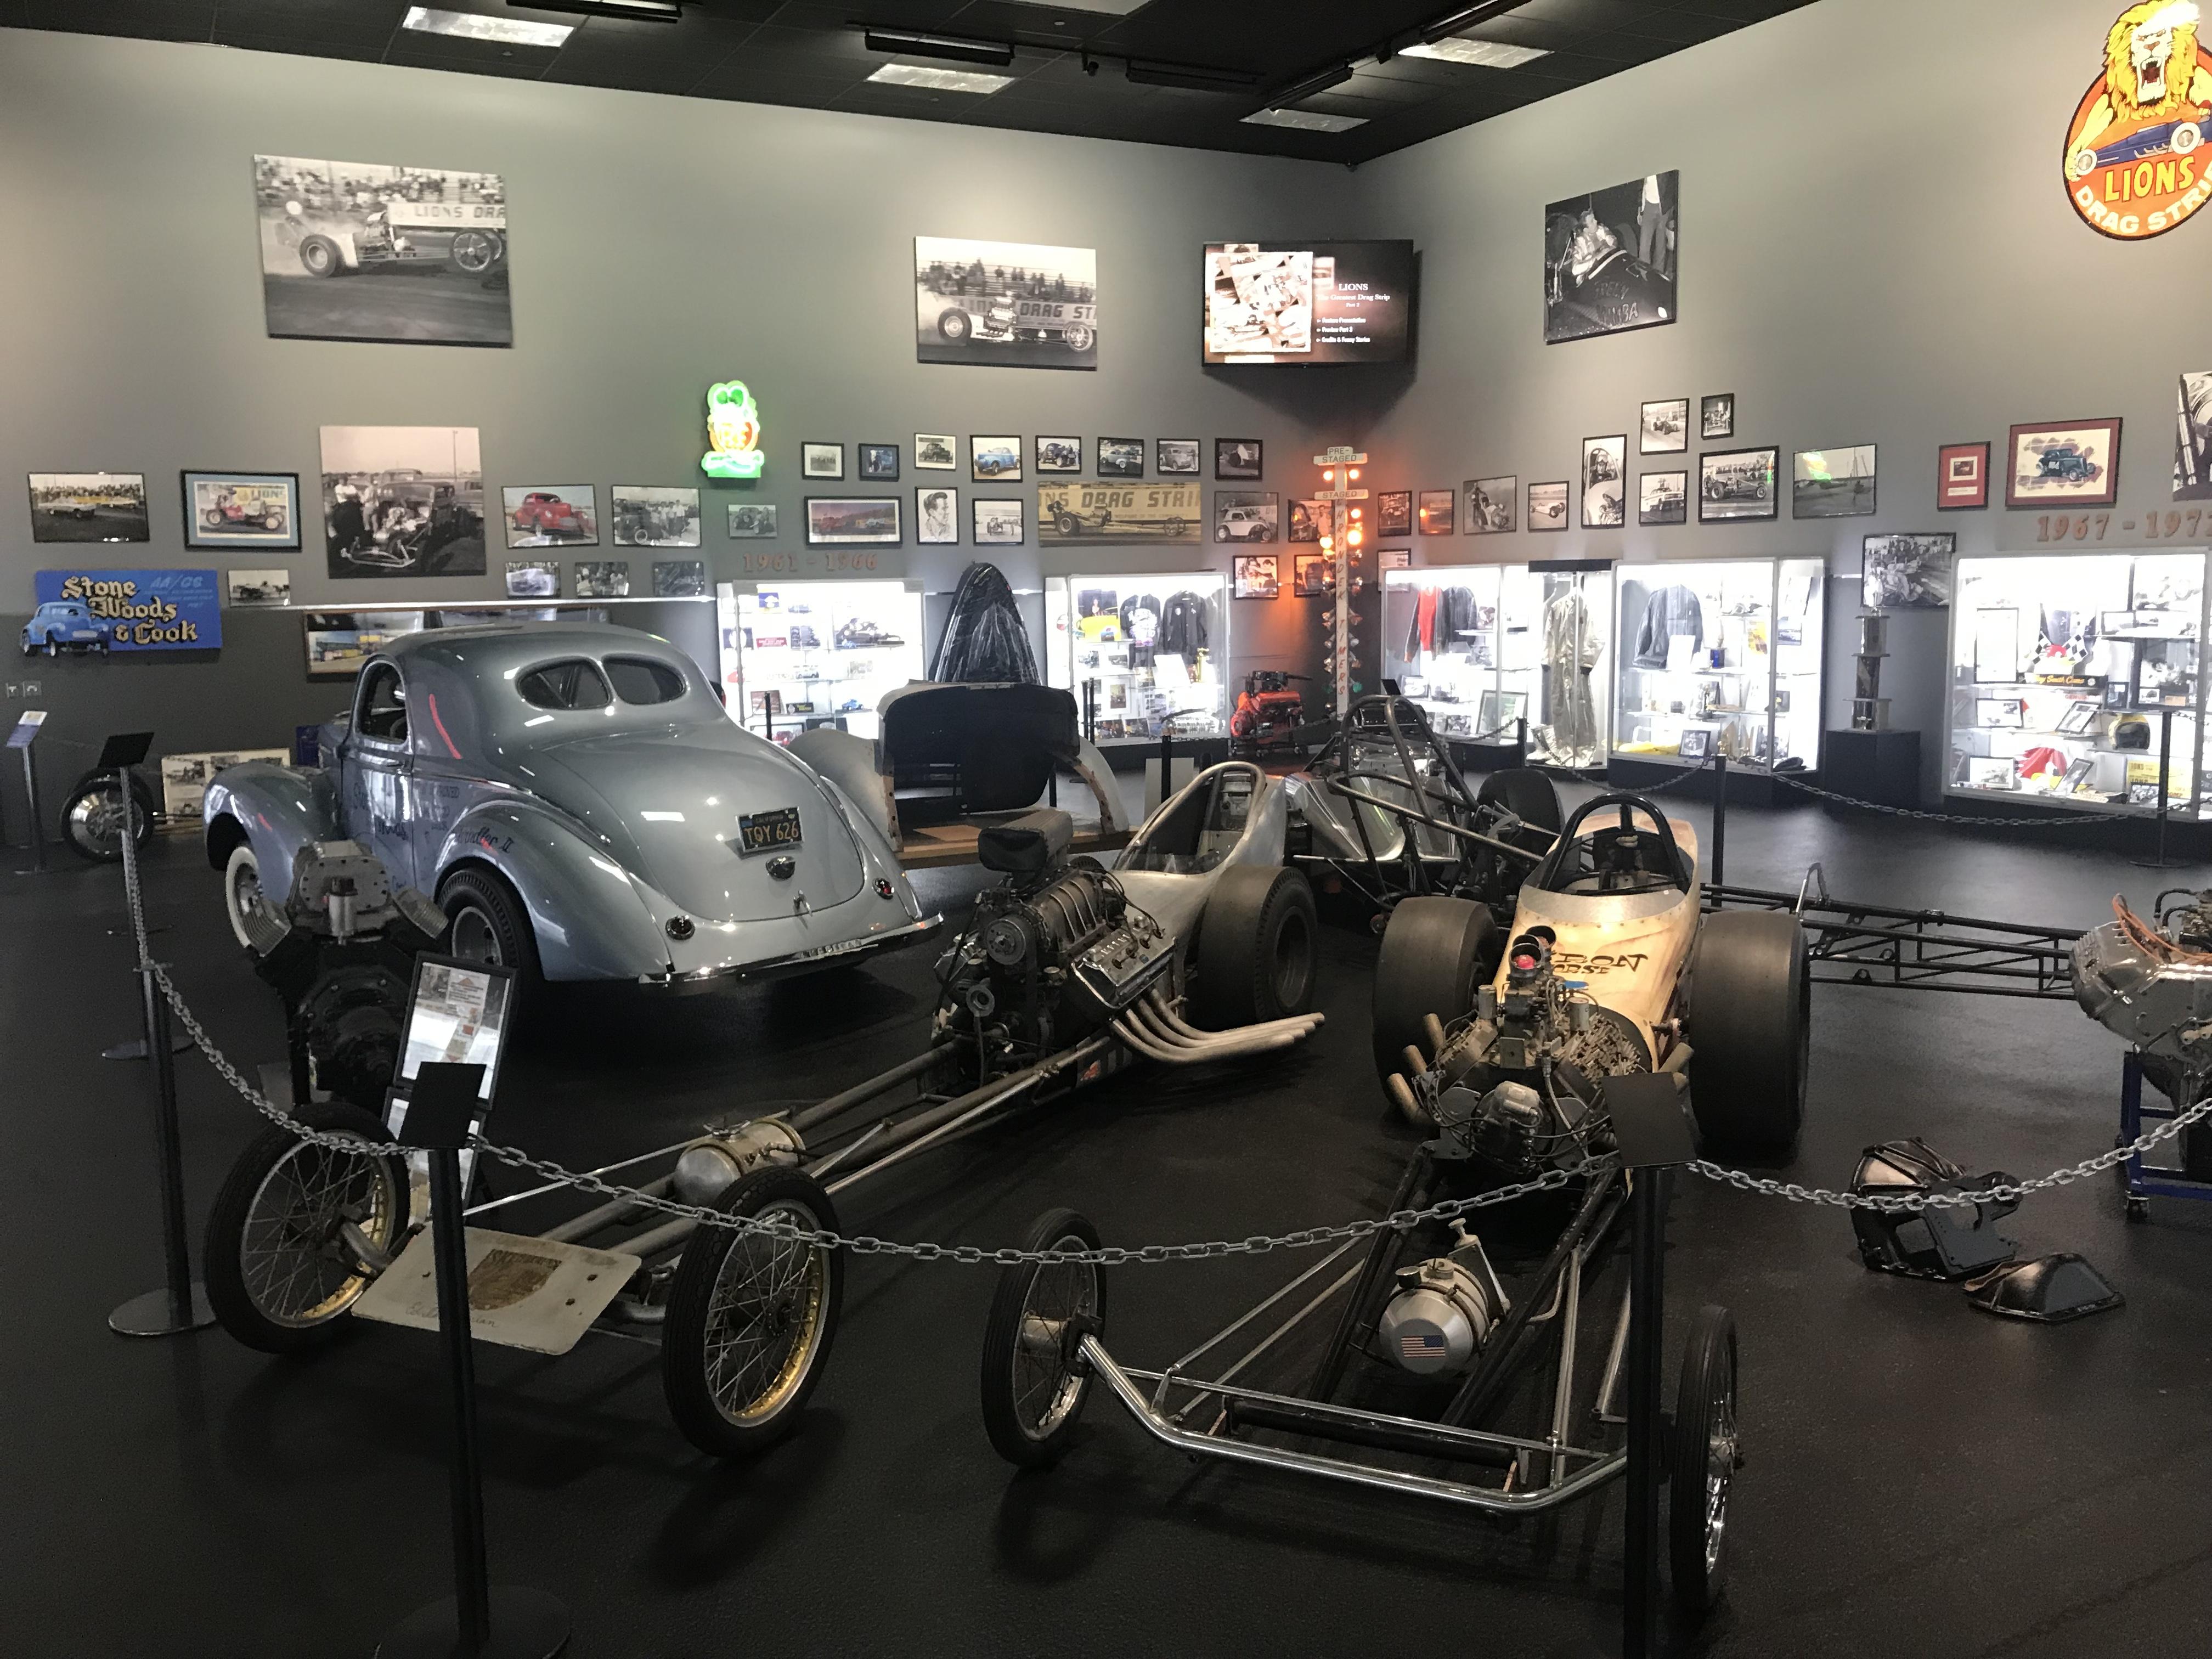
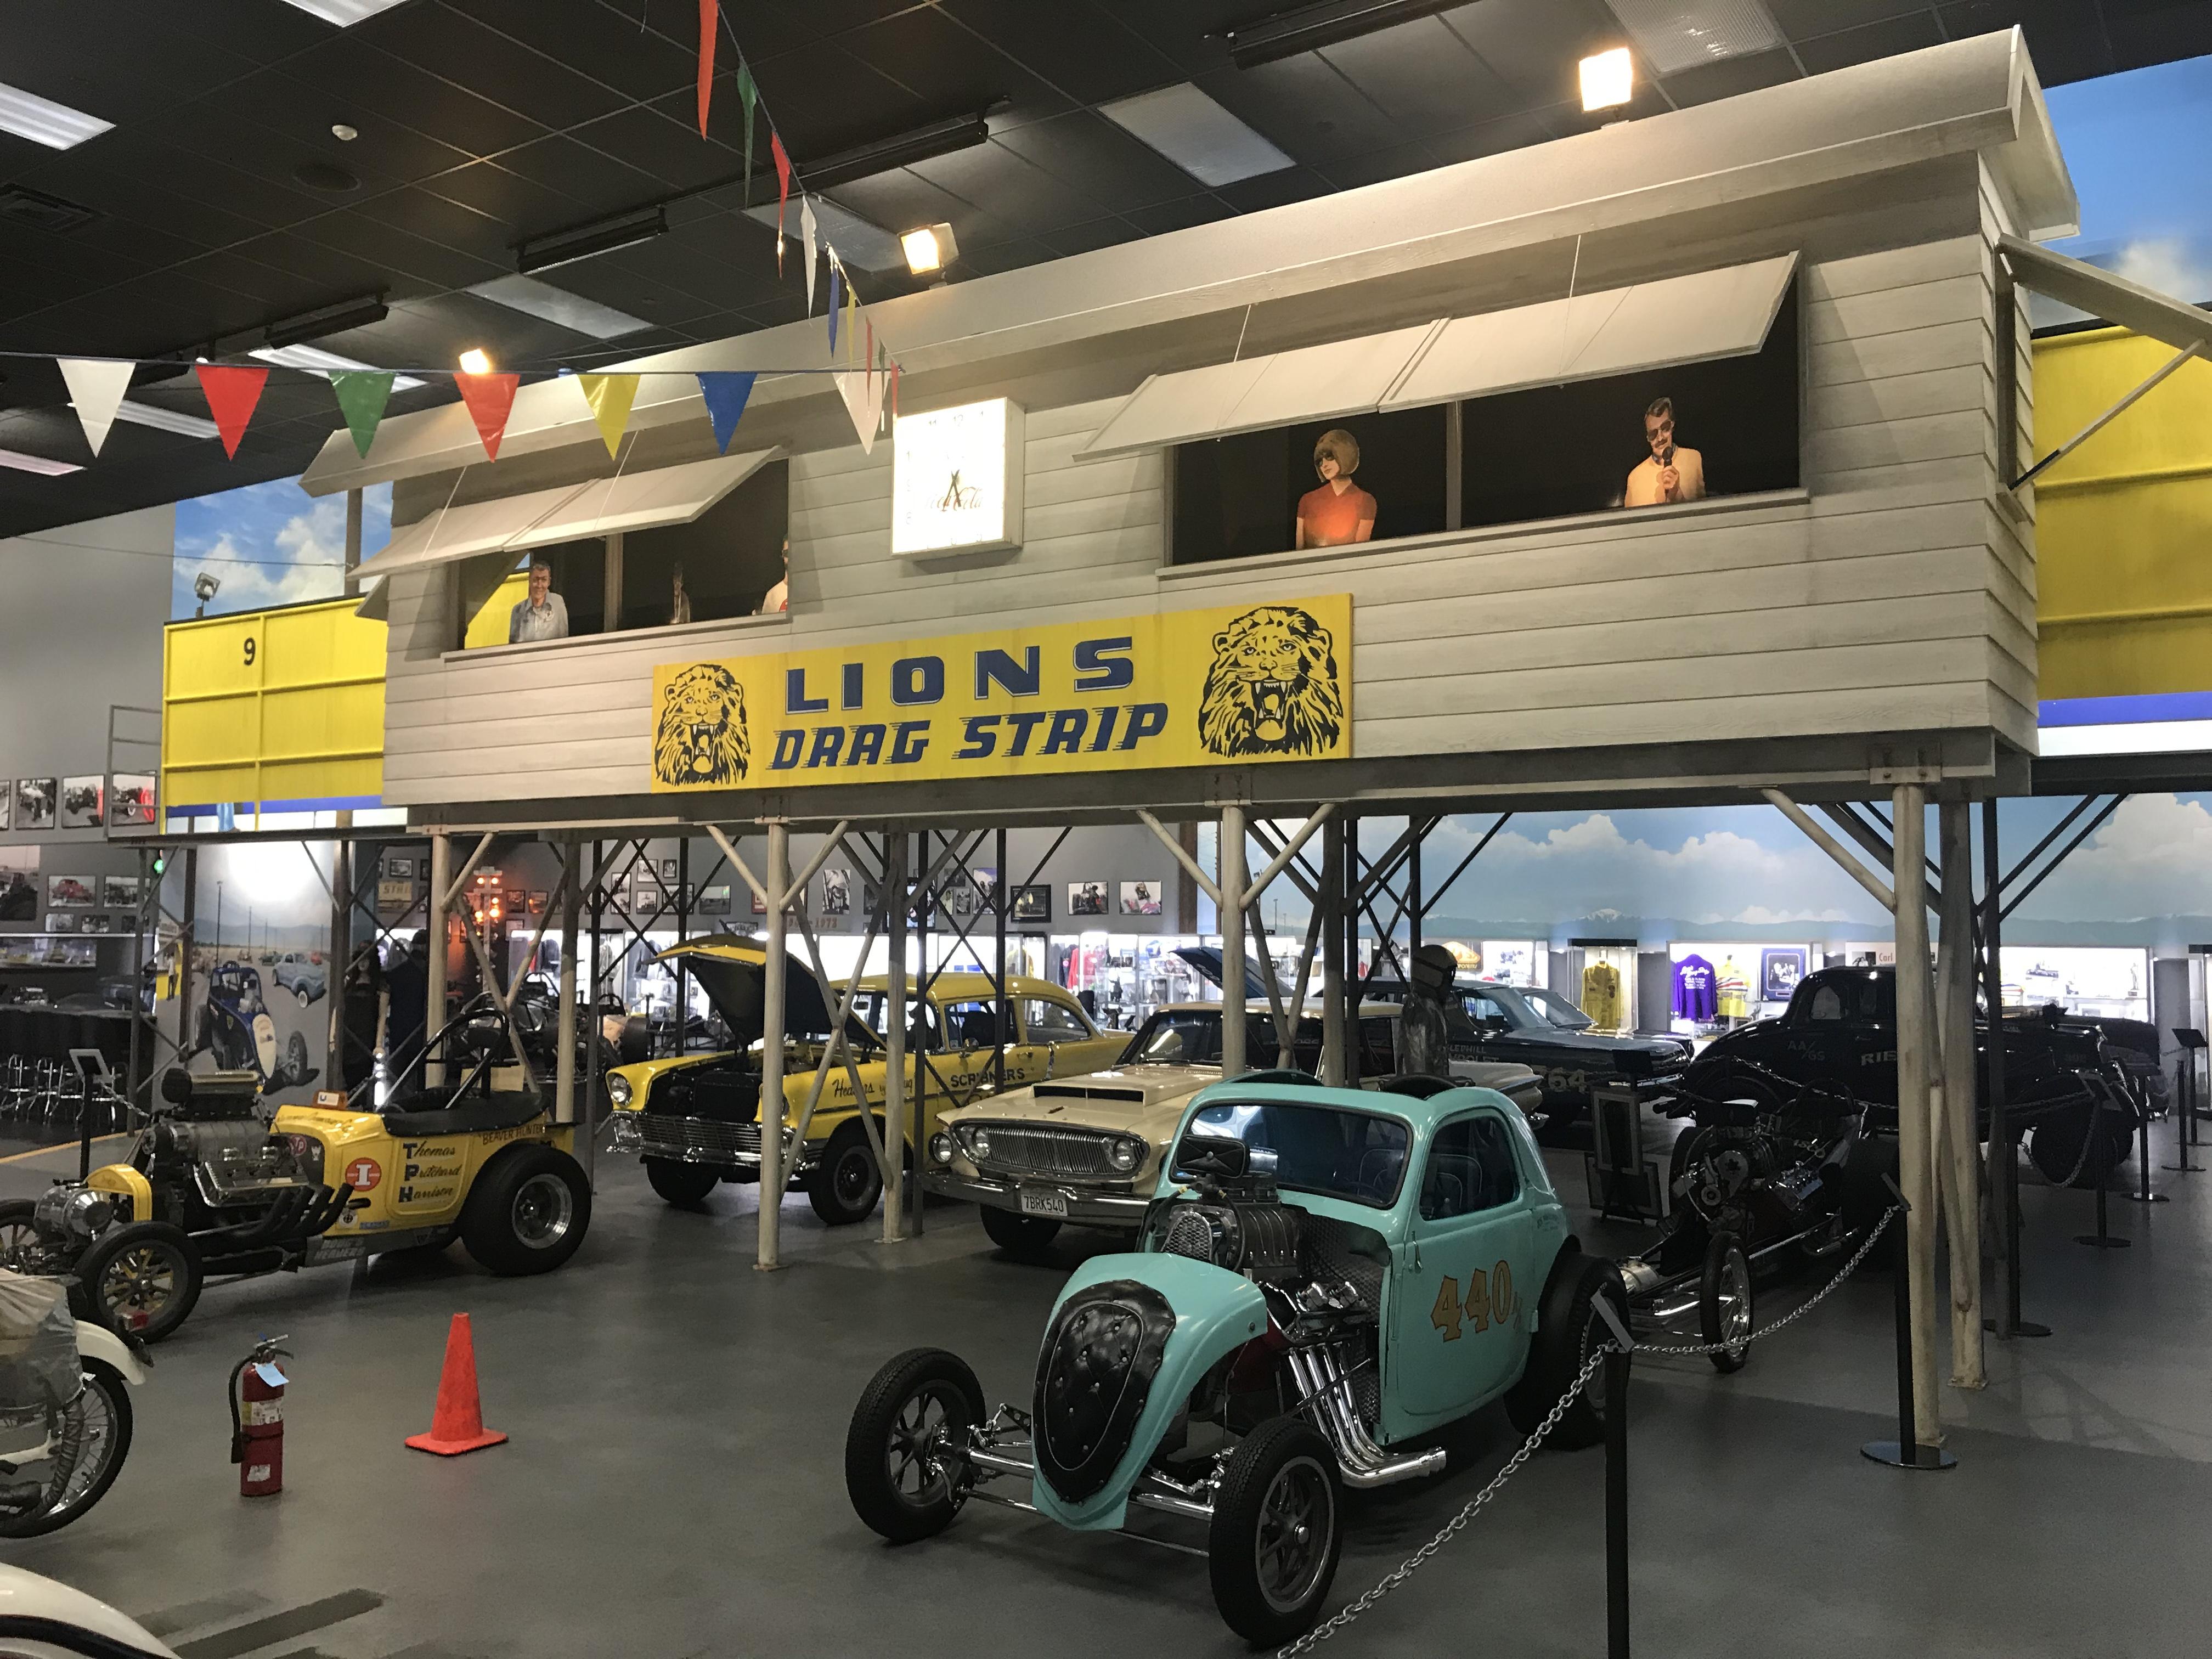
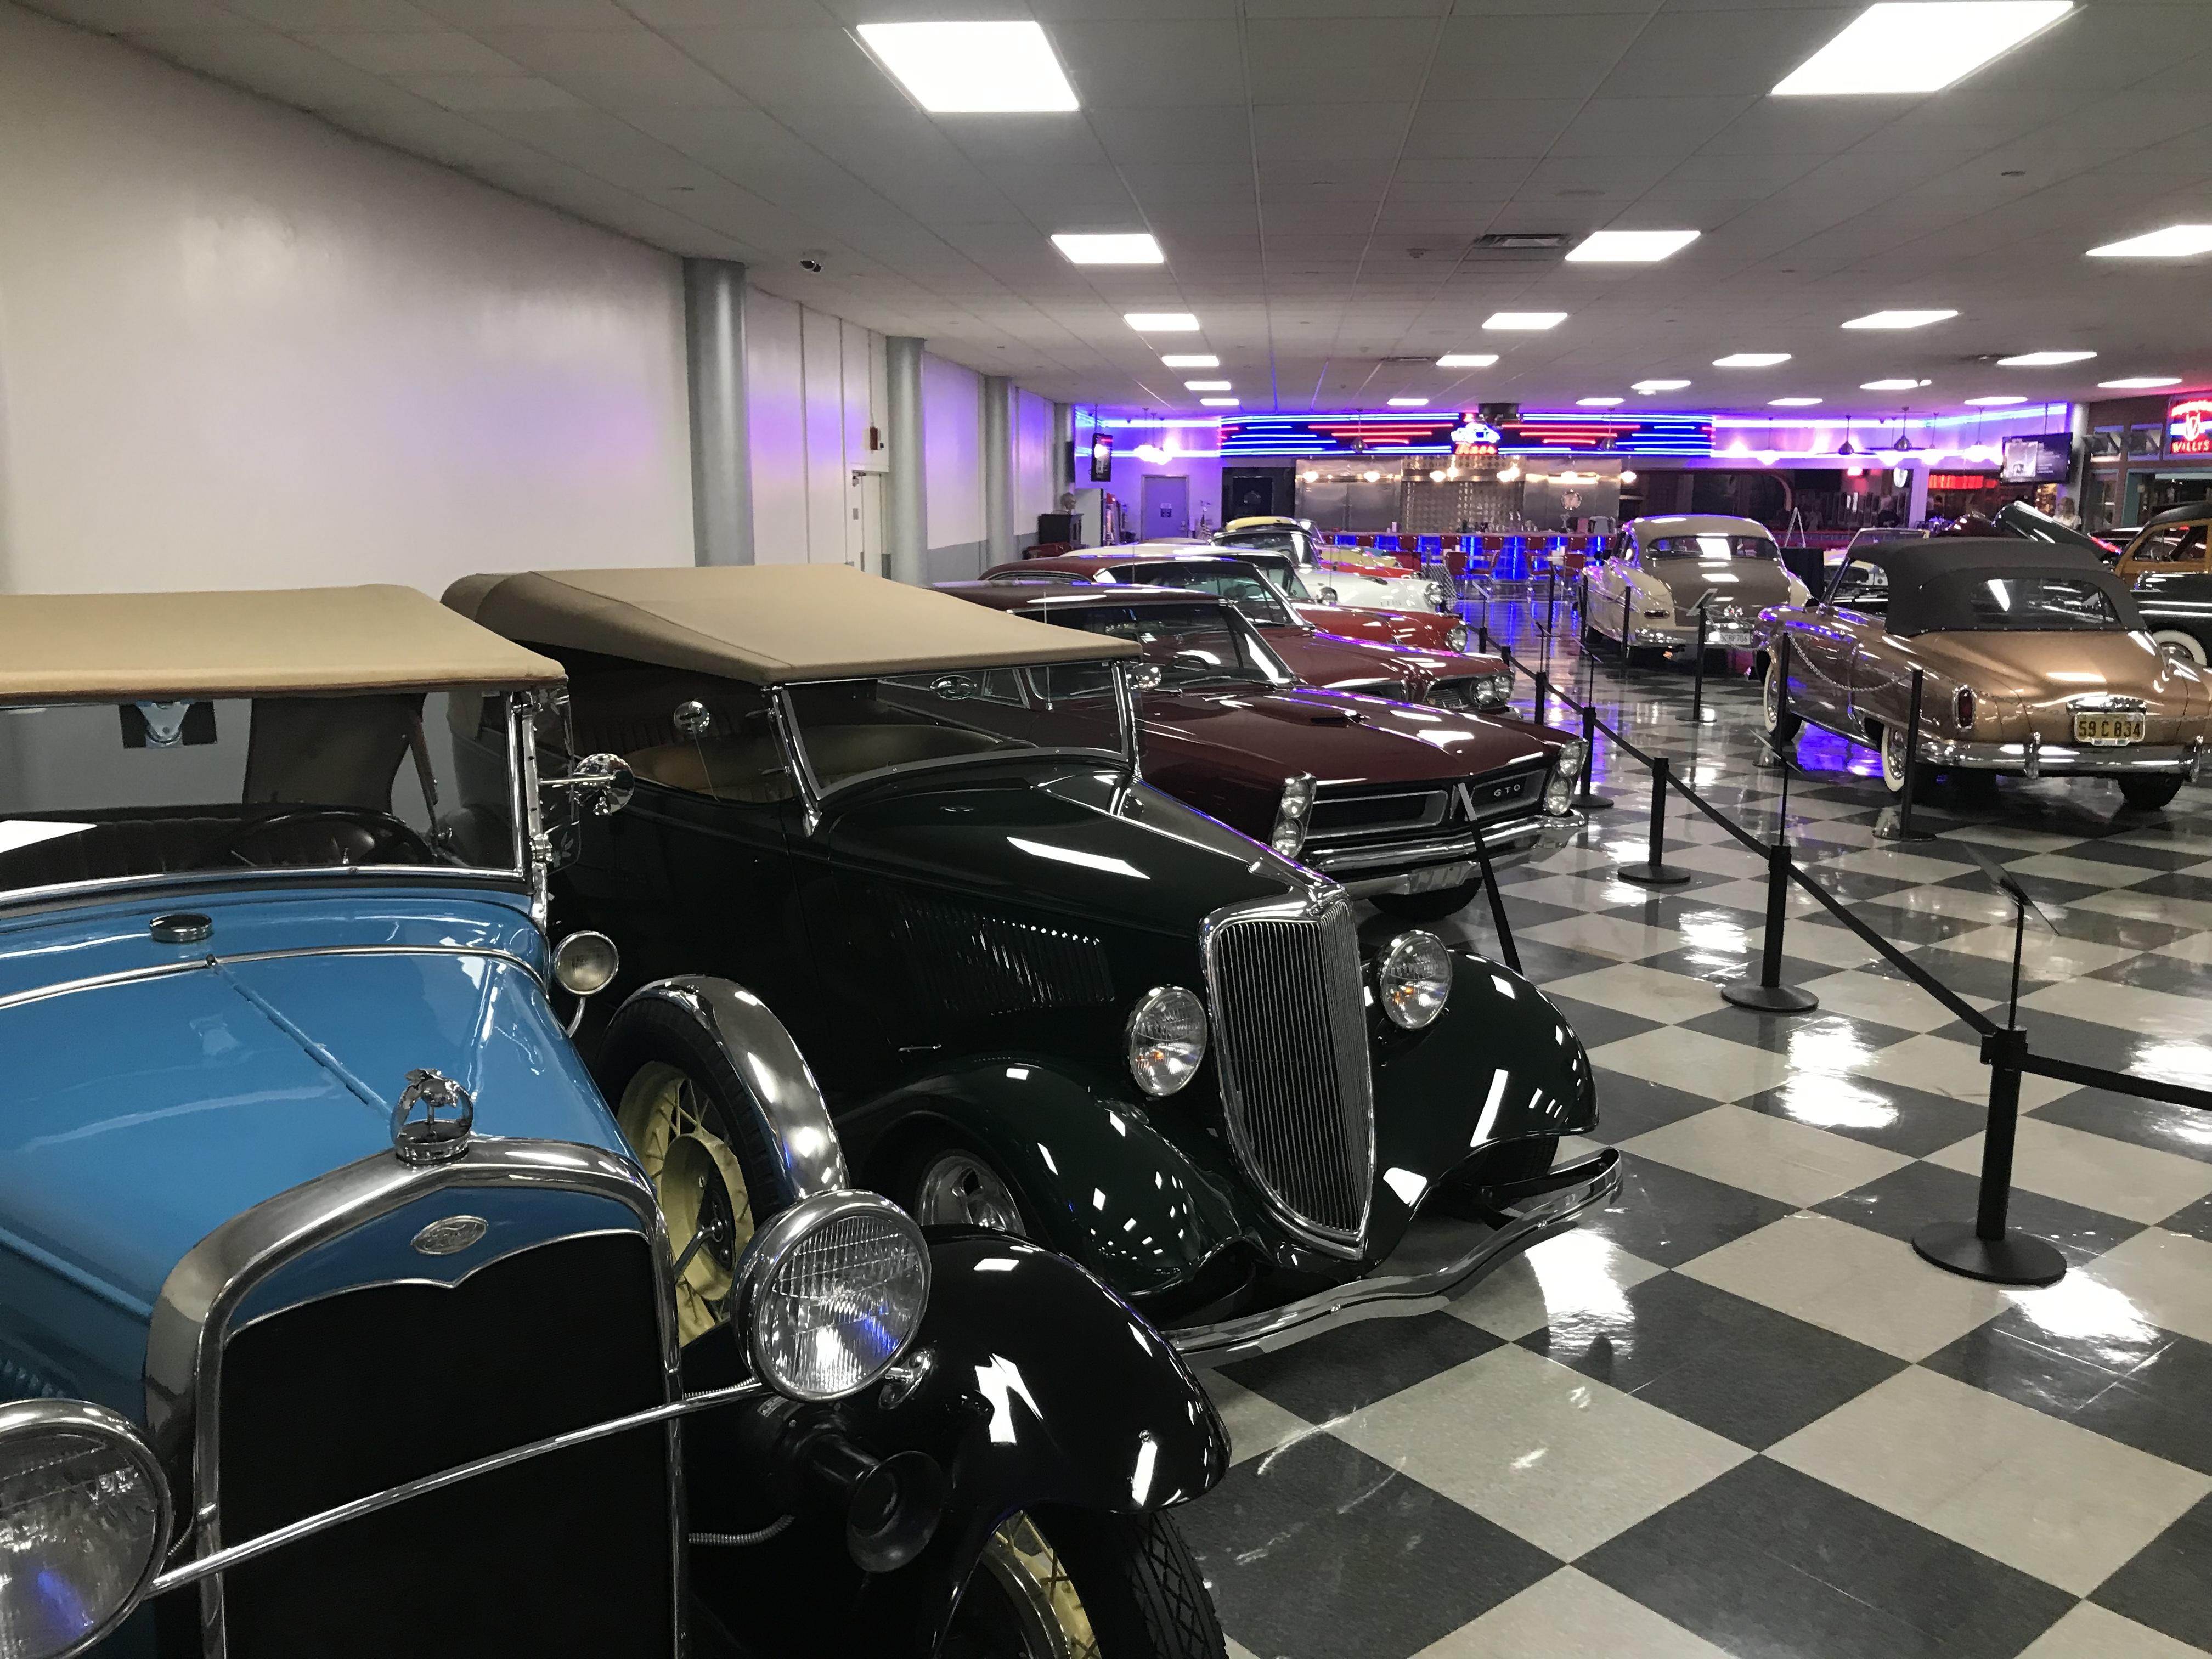
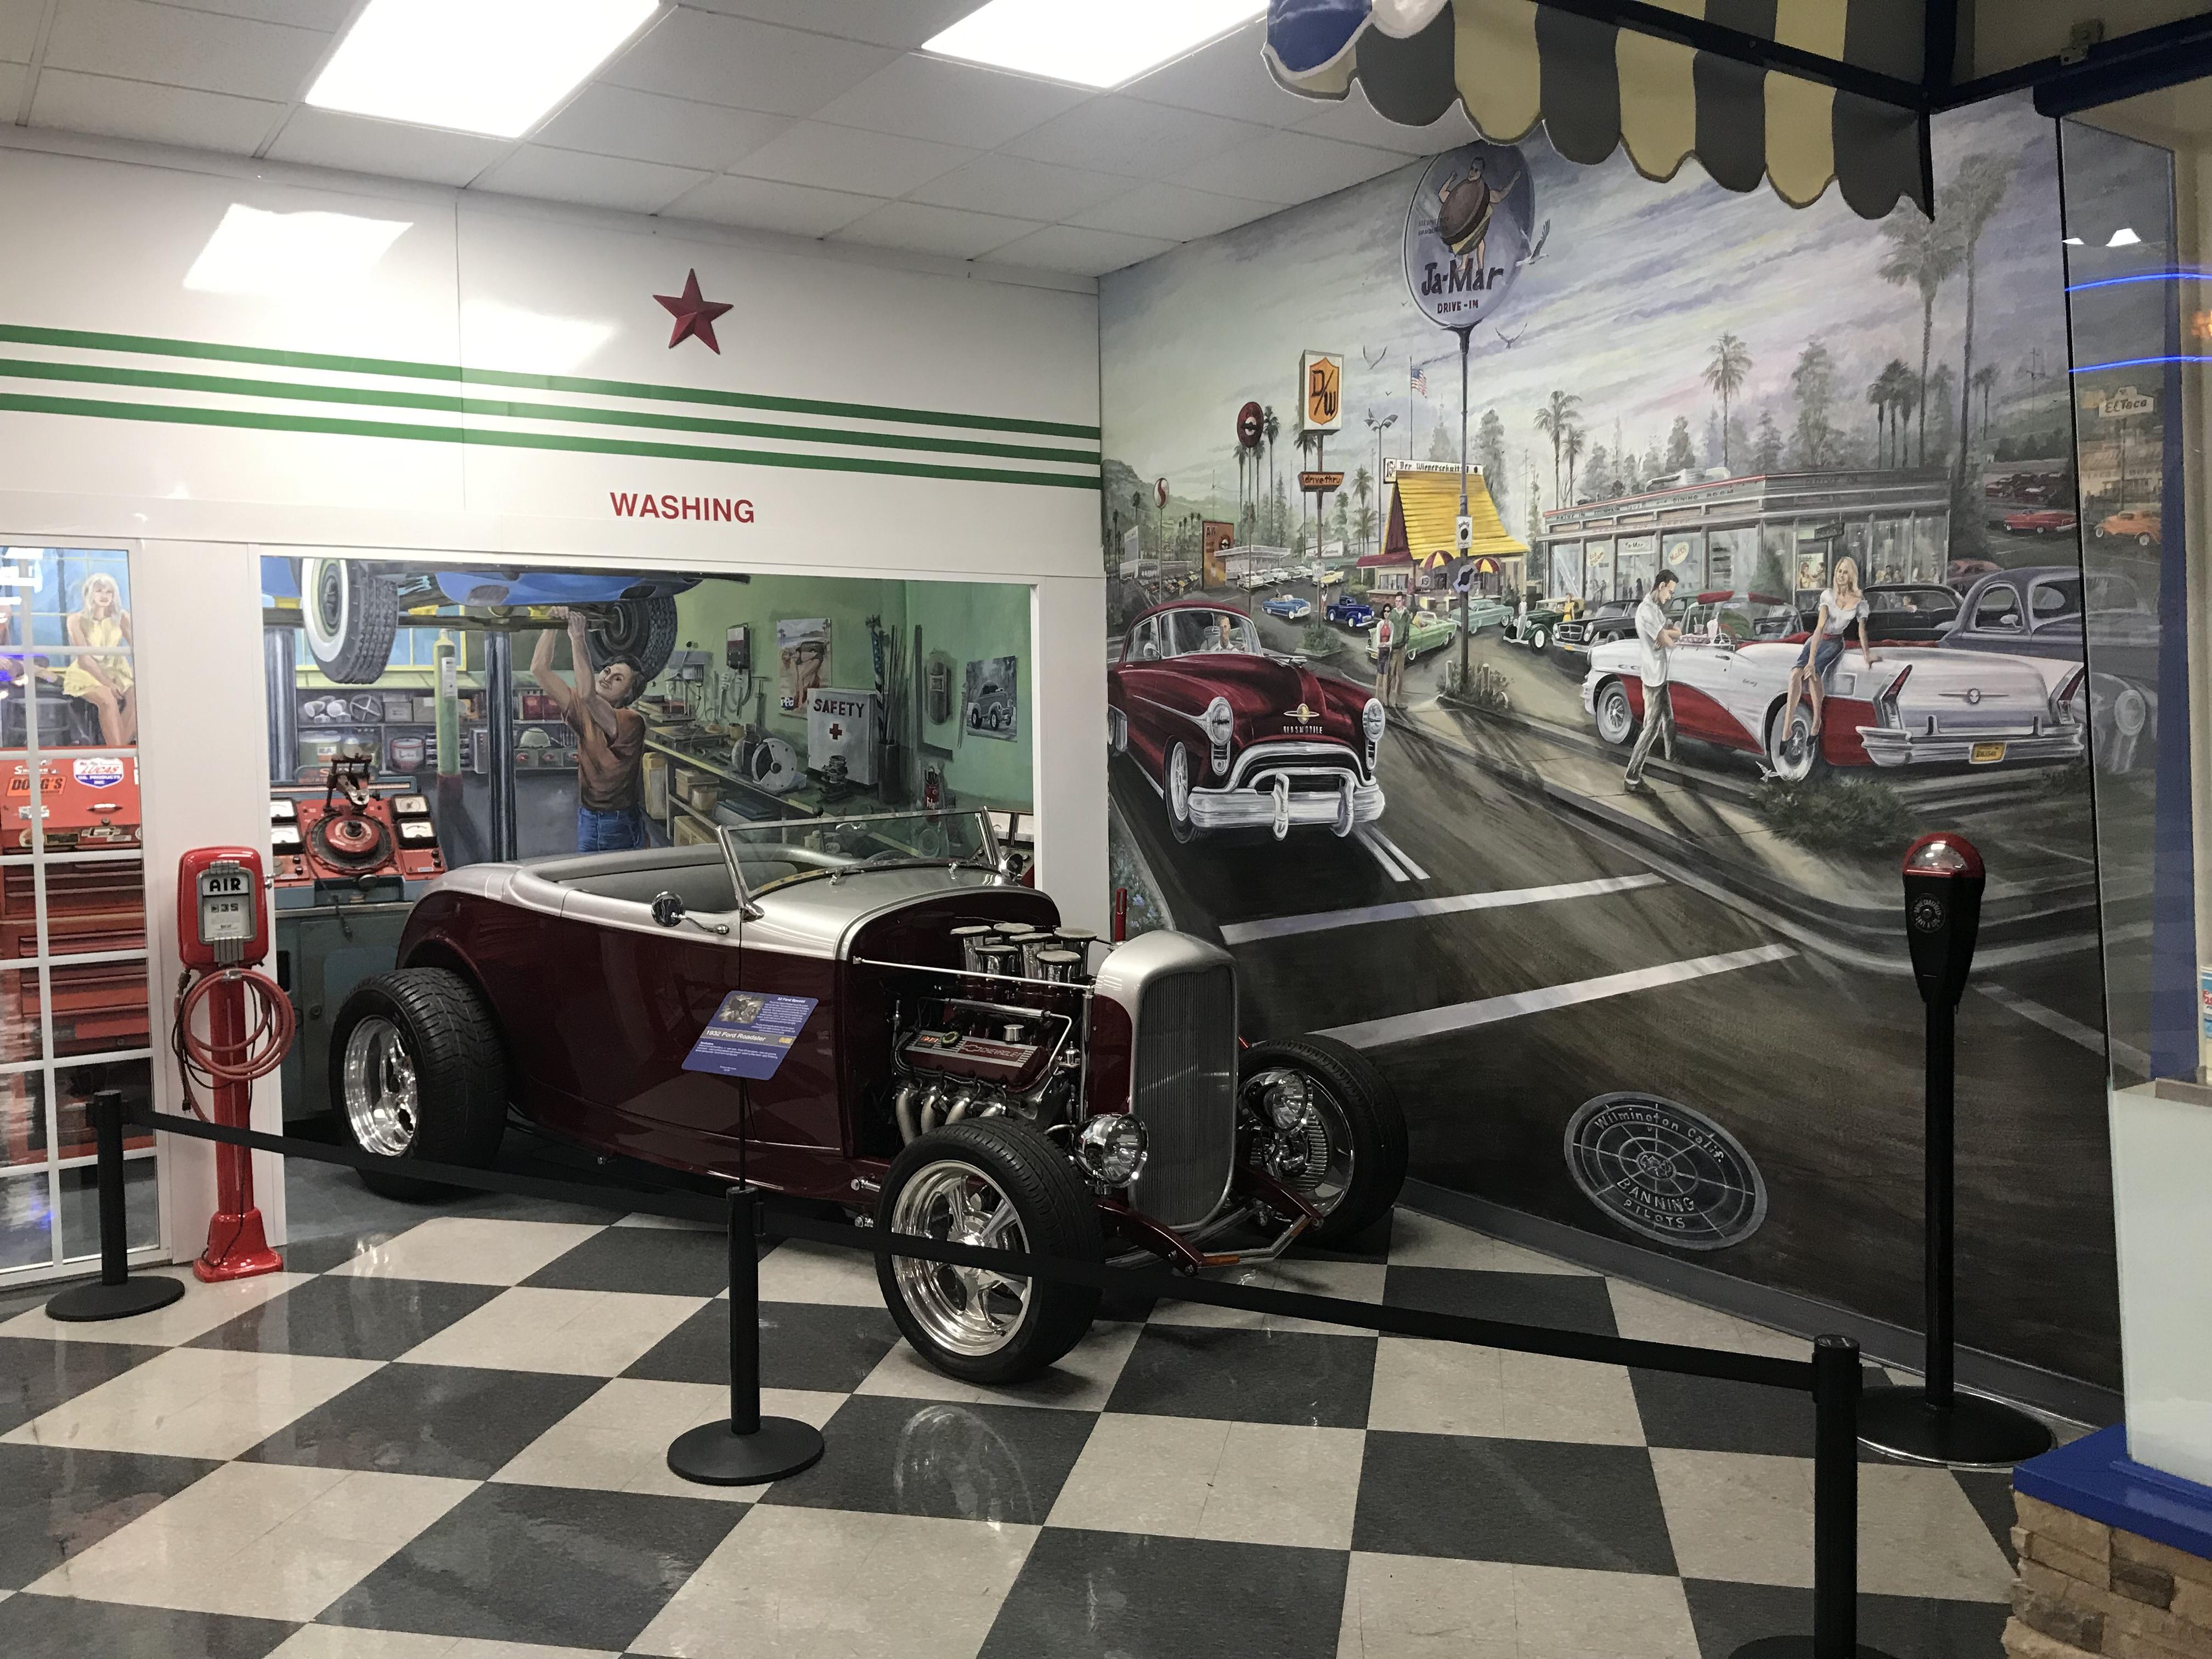
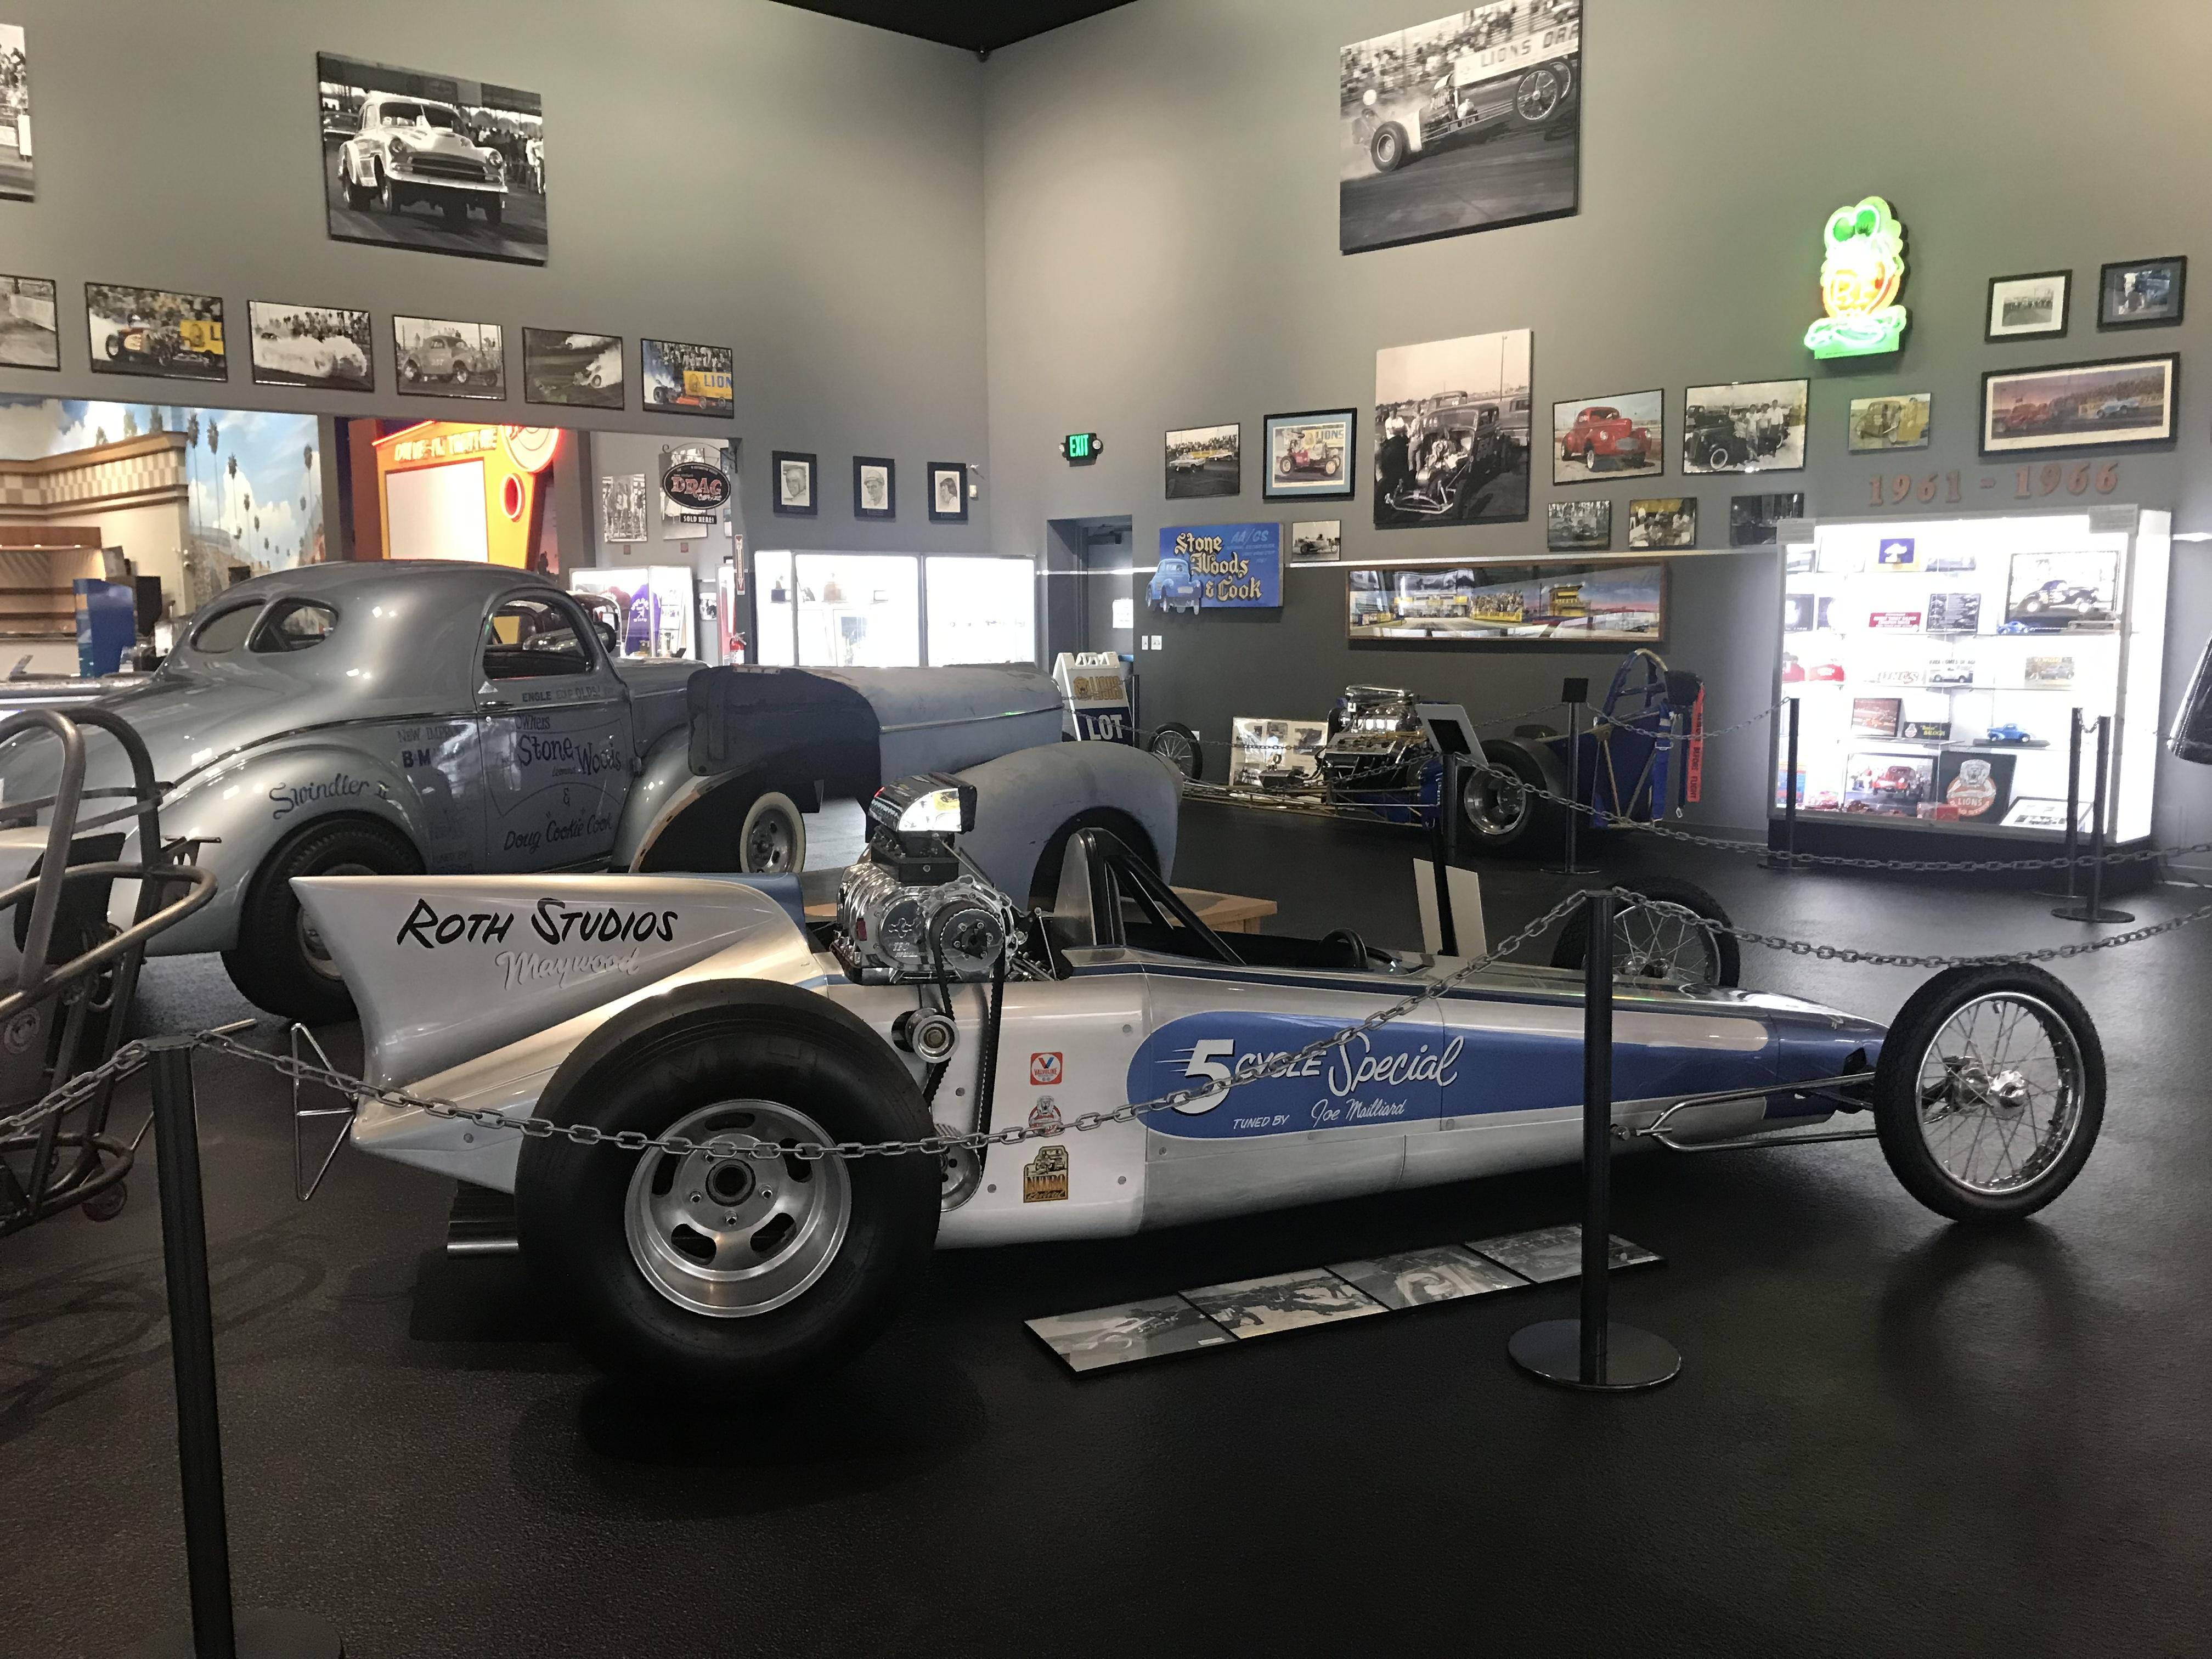
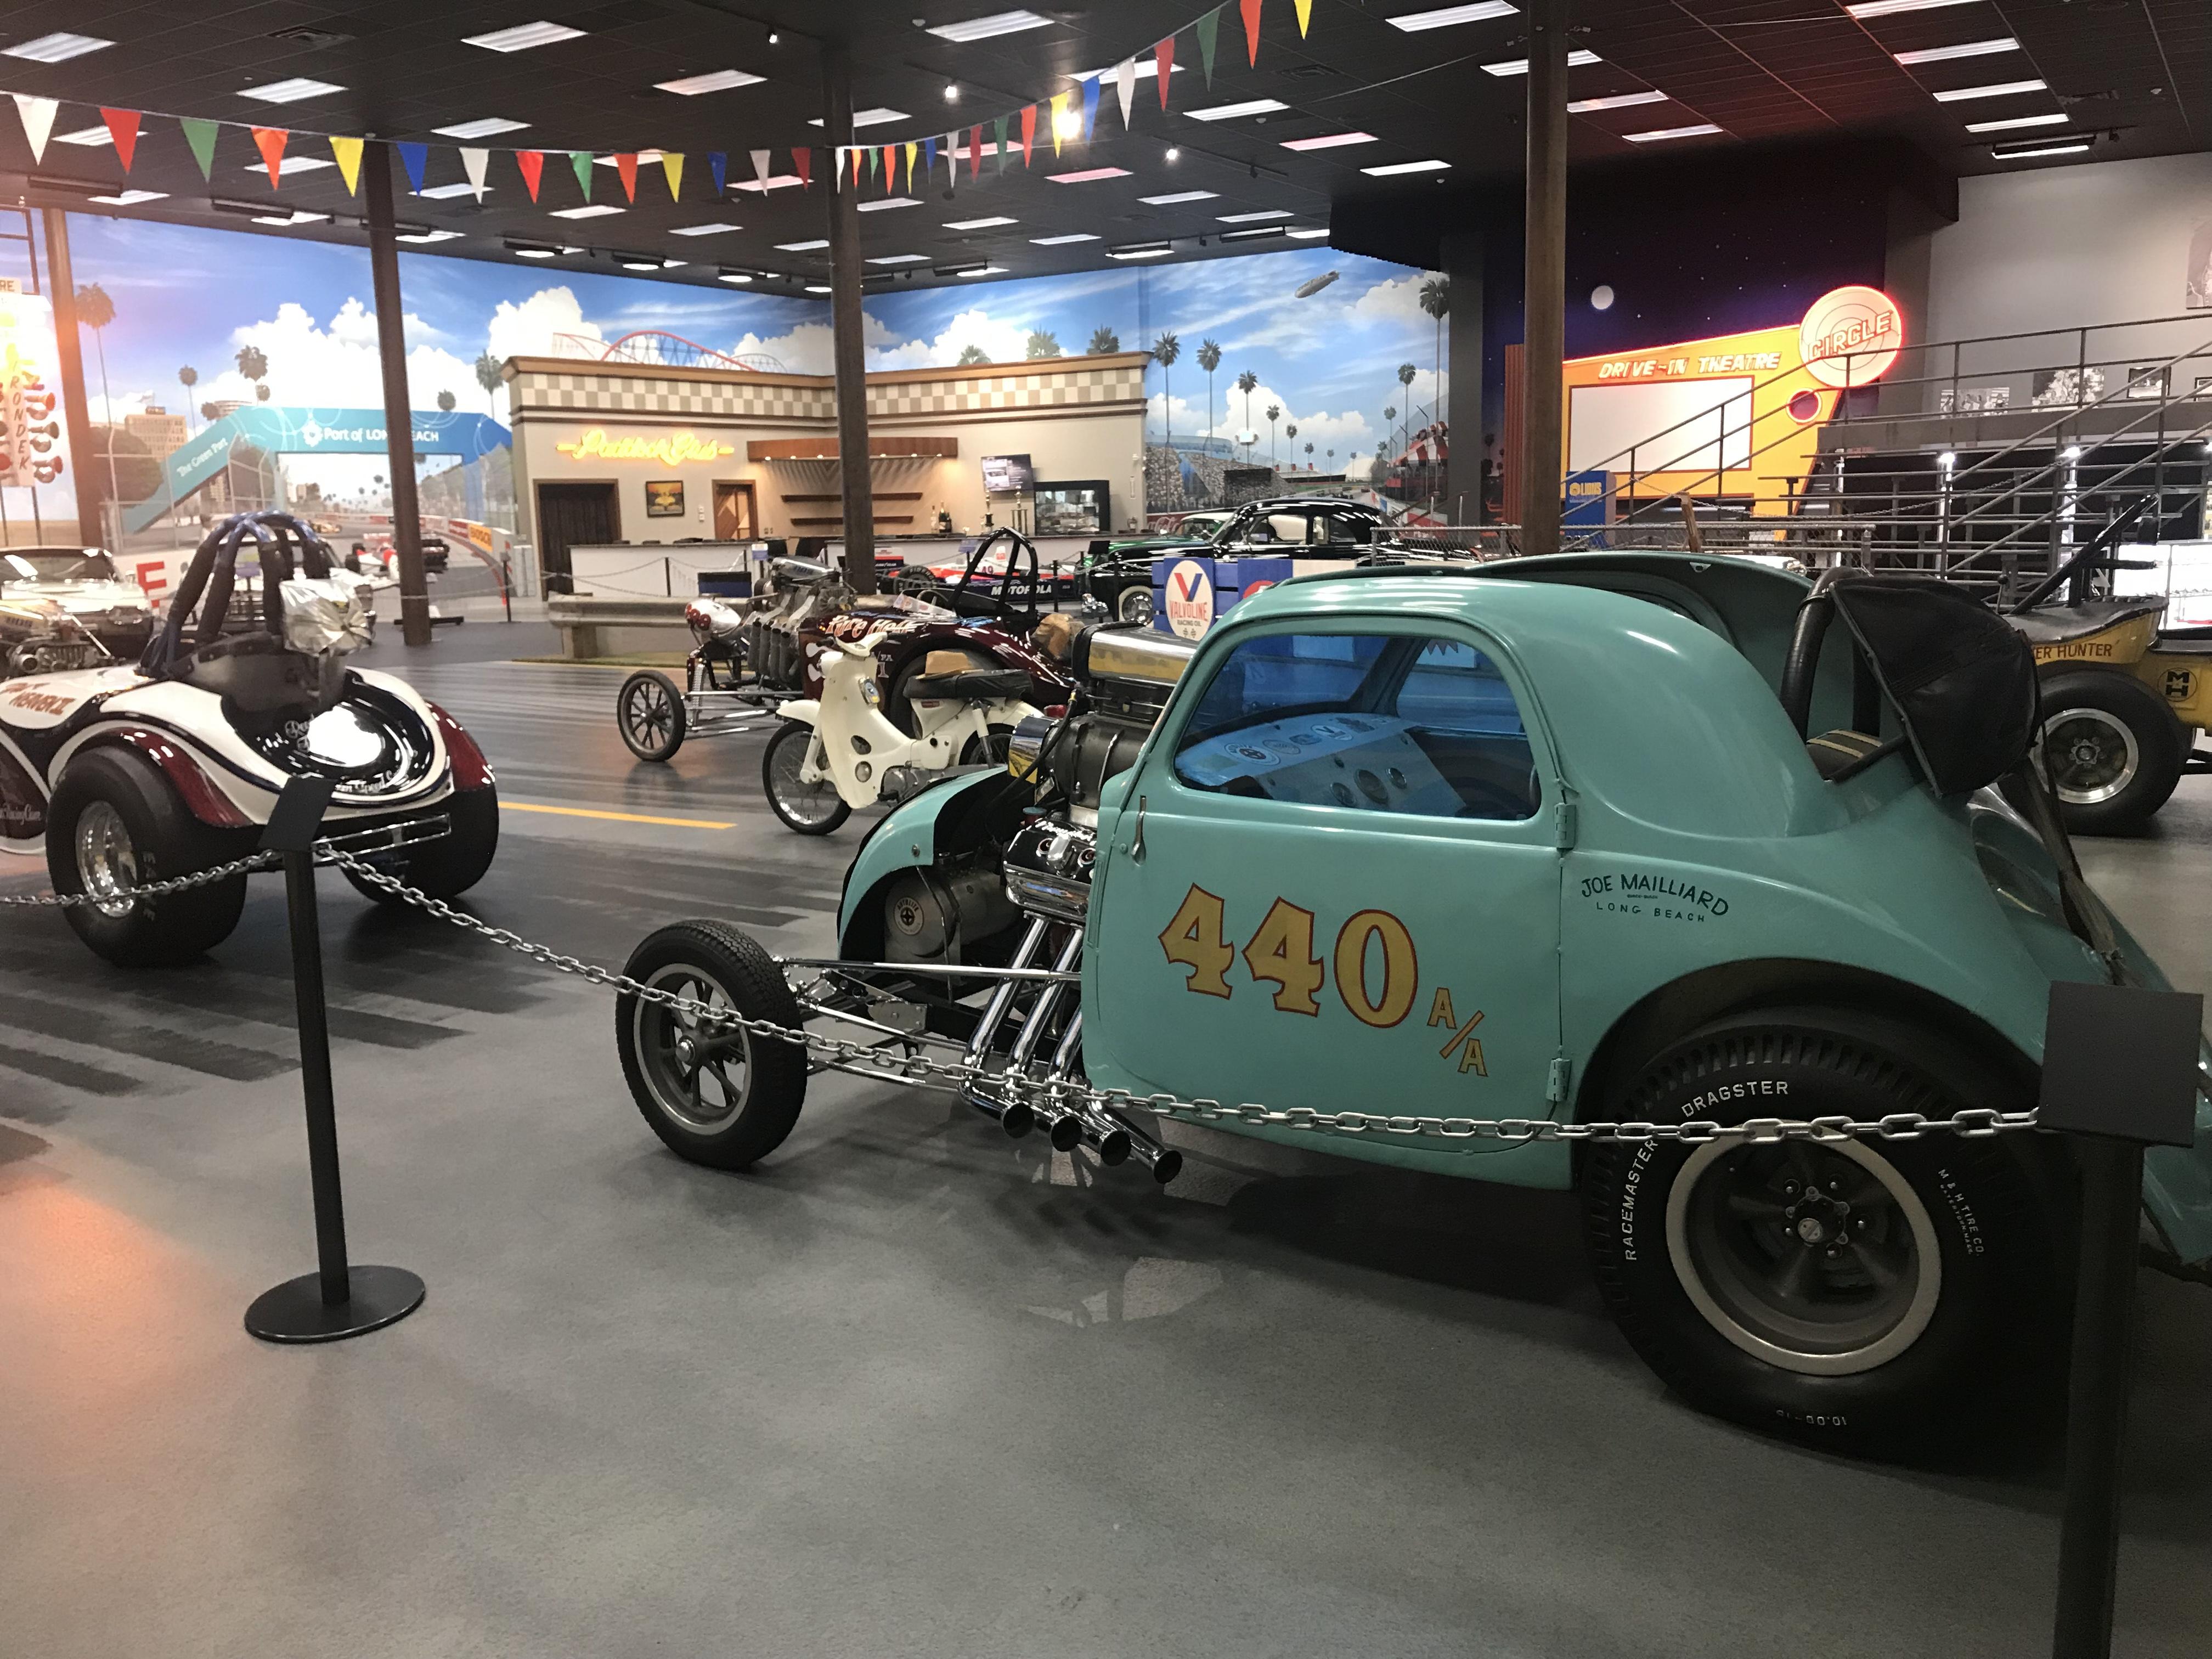
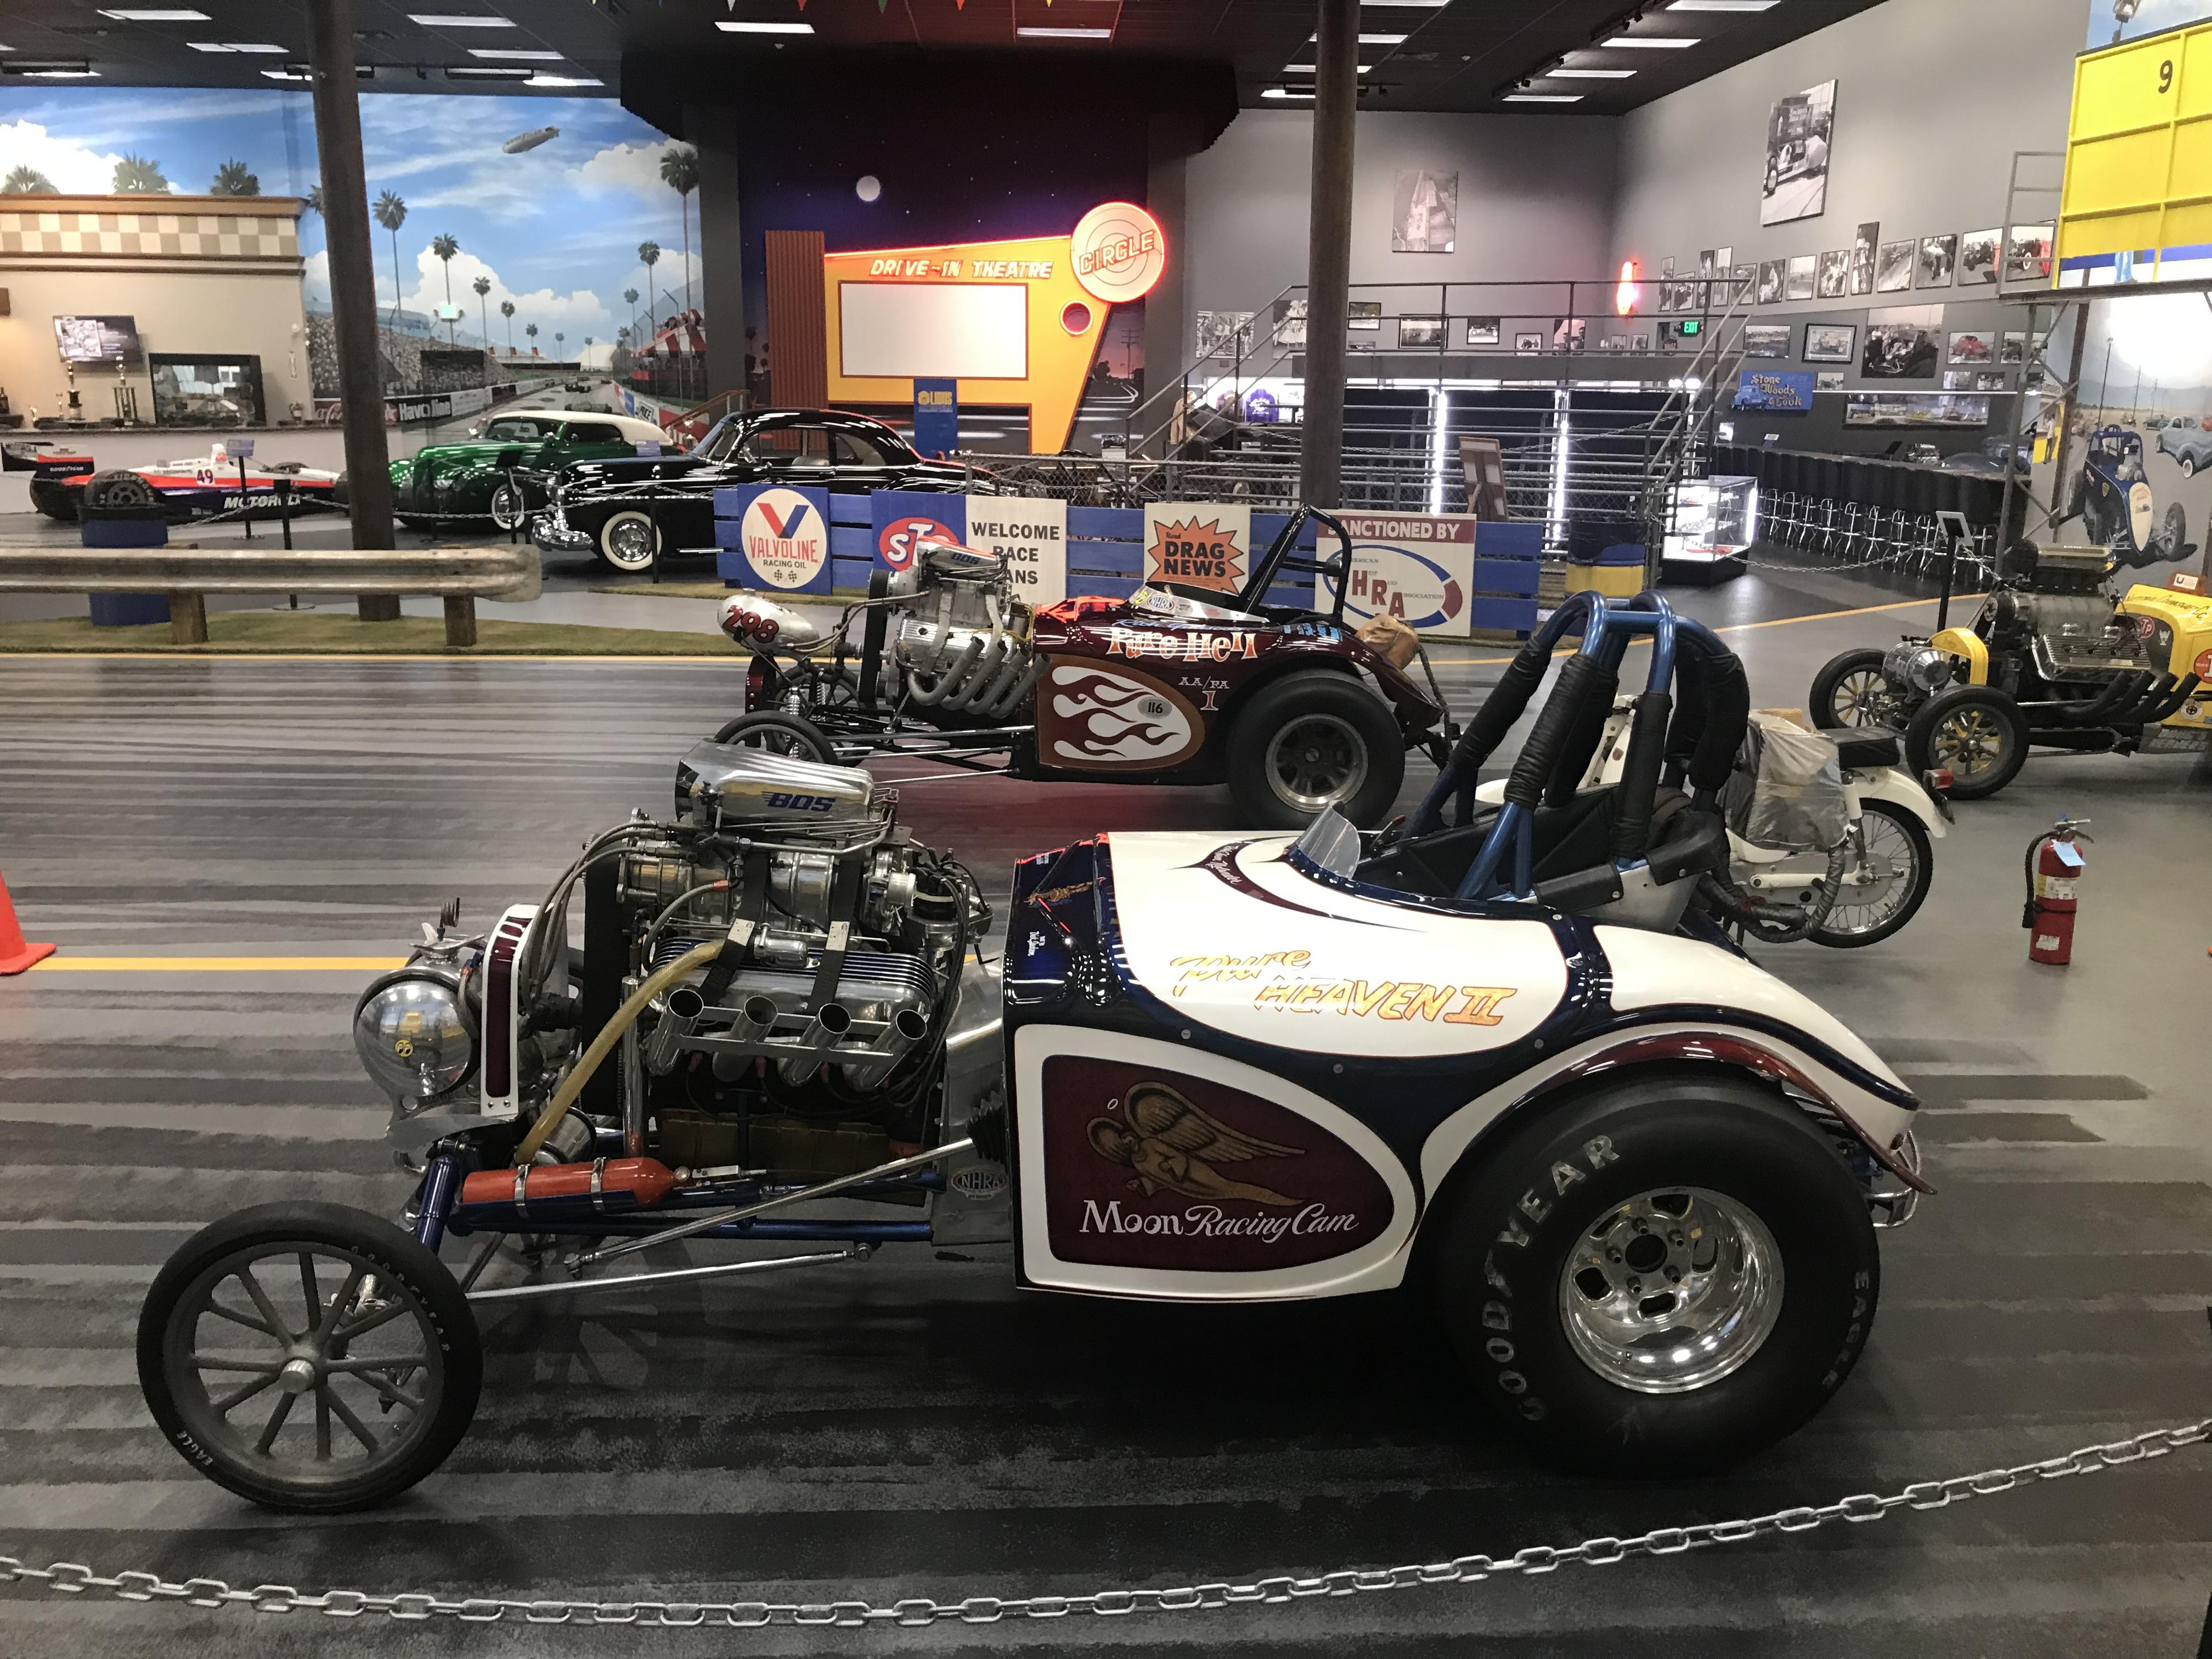
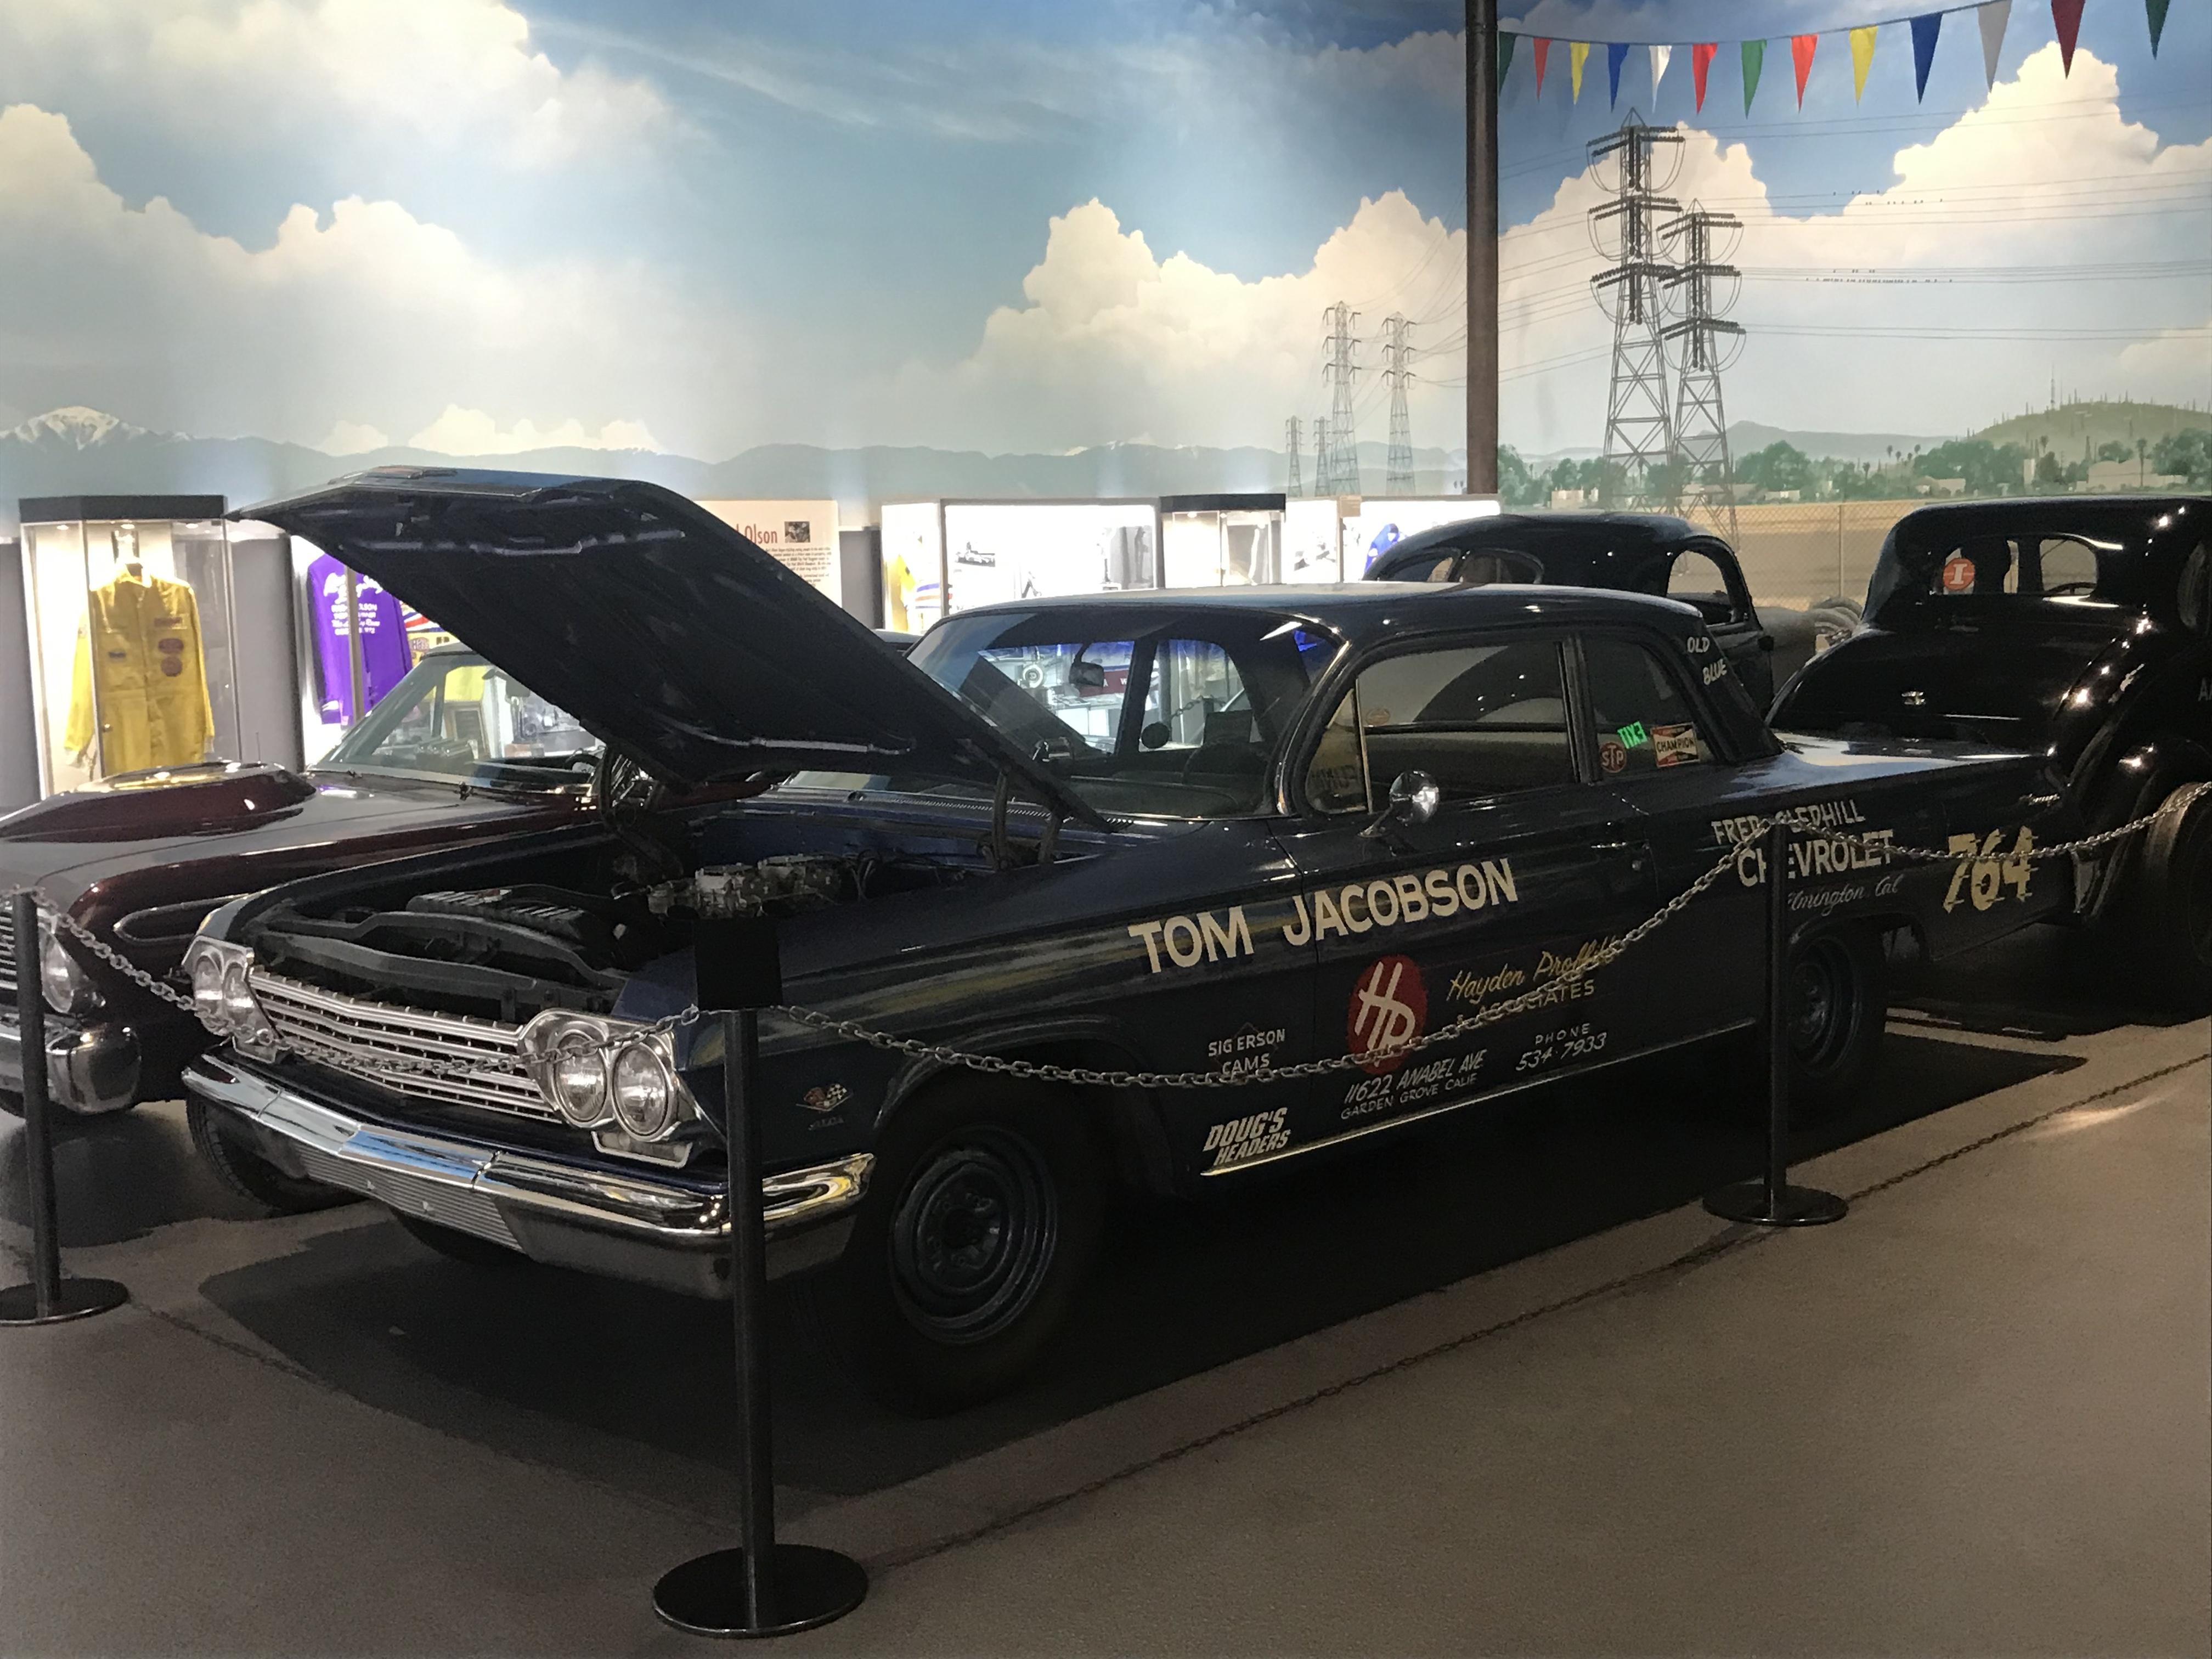
A friend and I enjoyed a brief visit to this car museum in Los Angeles yesterday, amazing place: Lions Automobilia Foundation Museum Its a private collection of drag, custom and street stock cars owned by one family (only a few cars are in loan). Here are pics of just a few of the cars, many more that I didn’t photograph.
-
Very nice build and photographing it in the rain really adds to the realism. You may have started a whole new under glass trend here!
-
Good color for this Riviera. Maybe it’s just my childhood nostalgia but it seems like these 1960’s Bill Mitchell GM design studio years produced some of the most attractive auto stylings of all time. I also must compliment you on the effort you make in your postings, the backgrounds and bases you use in your photos always make your models look so realistic.
-
Impressive kit-bashing job, love the first gen. flipper FC’s that still resemble a stock body. You did a great job on those large red decals and effective fixes on the cracking. Can you post a pic with the body raised?
-
Despite the challenges, your big decals came out beautiful. Also impressed with your braided fuel lines. Nice build!
-
Big thank you Dave to you and your team for this fix - latest body mold shot looks fantastic!!!! A mold mod like this is not trivial, so impressed that you listened to your customers and addressed it. Definitely getting 2-3 of these kits when they are available. Any word yet on what decals will be provided?