papajohn97
-
Posts
701 -
Joined
-
Last visited
Content Type
Profiles
Forums
Events
Gallery
Everything posted by papajohn97
-
Your paint work is absolutely amazing Mr L. You should be painting 1:1 Ferrari’s, you’d make a fortune!
-
I agree with you Eric on this new tool XKE roadster, it approaches Tamiya quality IMO. I believe this is a series 1 3.8 L which was produced from ‘62 -‘64. You did a beautiful job on your build and I particularly like all the correct paint colors and details you included under the hood and in the interior. I just finished a red one for my wife and am tempted to pick up another one to finish in metallic blue for me, it was that much fun to build. Too bad Revell didn’t get the front windshield height right on the coupe version of this new kit (looks like they used the shorter roadster window on the coupe).
-
Beautiful execution on one of Revell’s best 1/25 auto kits. The black steelies are a great choice with the dark blue, gives it a realistic understated early ‘60’s super stocker look. The decals and your application of them are very nice - are they a Fred Cady set?
-
These are some builds I did before the pandemic hit. I’ve been building mostly super stockers since these but I love these “old early days” subjects, gotta build more of these!

-
Love this two-tone scheme with the wide whites. The chrome wheels are very nice as well -did they come in the kit? Sounds like a less-than-perfect kit which you managed to beat into submission- nice job!
-
Really impressed with the transformation you achieved on this one - great job! Too bad you couldn’t “clone” the model you started with to park next to your finished maroon beauty. I must admit, I also love the innocence of the “before” one, like a fine piece of folk art, it’s so bad it’s kinda cool! I feel your pain regarding recent metal foil, I just purchase a fresh new sheet but it’s nowhere as good (in thickness or adhesion) as the old sheet I’ve been nursing for years. Another victim of our supply chain challenges….
-
Very nice job merging the AMT ‘60 Starliner chassis & engine to this old tooled Merc. This car looks good in white & red with the jacked up chassis and teardrop hood. As much as I like the fastback ‘63-64 Ford Galaxies, I think this Maurader has even nicer styling. Beautiful super neat build!
-
Beautiful clean build of an unusual short-lived model from Lexus. I think The styling is pretty nice when compared with more recent Lexus models (ugliest front ends IMO since the Edsel). I’ve seen everything in the streets here in So. CA including Bugatti Veyrons and La Ferrari’s but I have yet to see one of these LFA’s in the flesh, they must be pretty rare. Thanks for sharing!
-
Beautiful job Tom! Love the subject and your fabulous execution. The look of whitewalls on early sixties SS’er’s, so nostalgic for me (as well as for other fellow old geezers). I wouldn’t have even noticed the height of the rear if you hadn’t pointed it out. Under hood detail is also really nice. I experienced your BMF troubles this morning in using a brand new package - it doesn’t stick worth a darn! I had to pull out what little foil I’ve been using for a few years to finish the small job I was doing (Revell’s new XKE roadster). I guess we need to add adhesive to use this newer stuff?
-
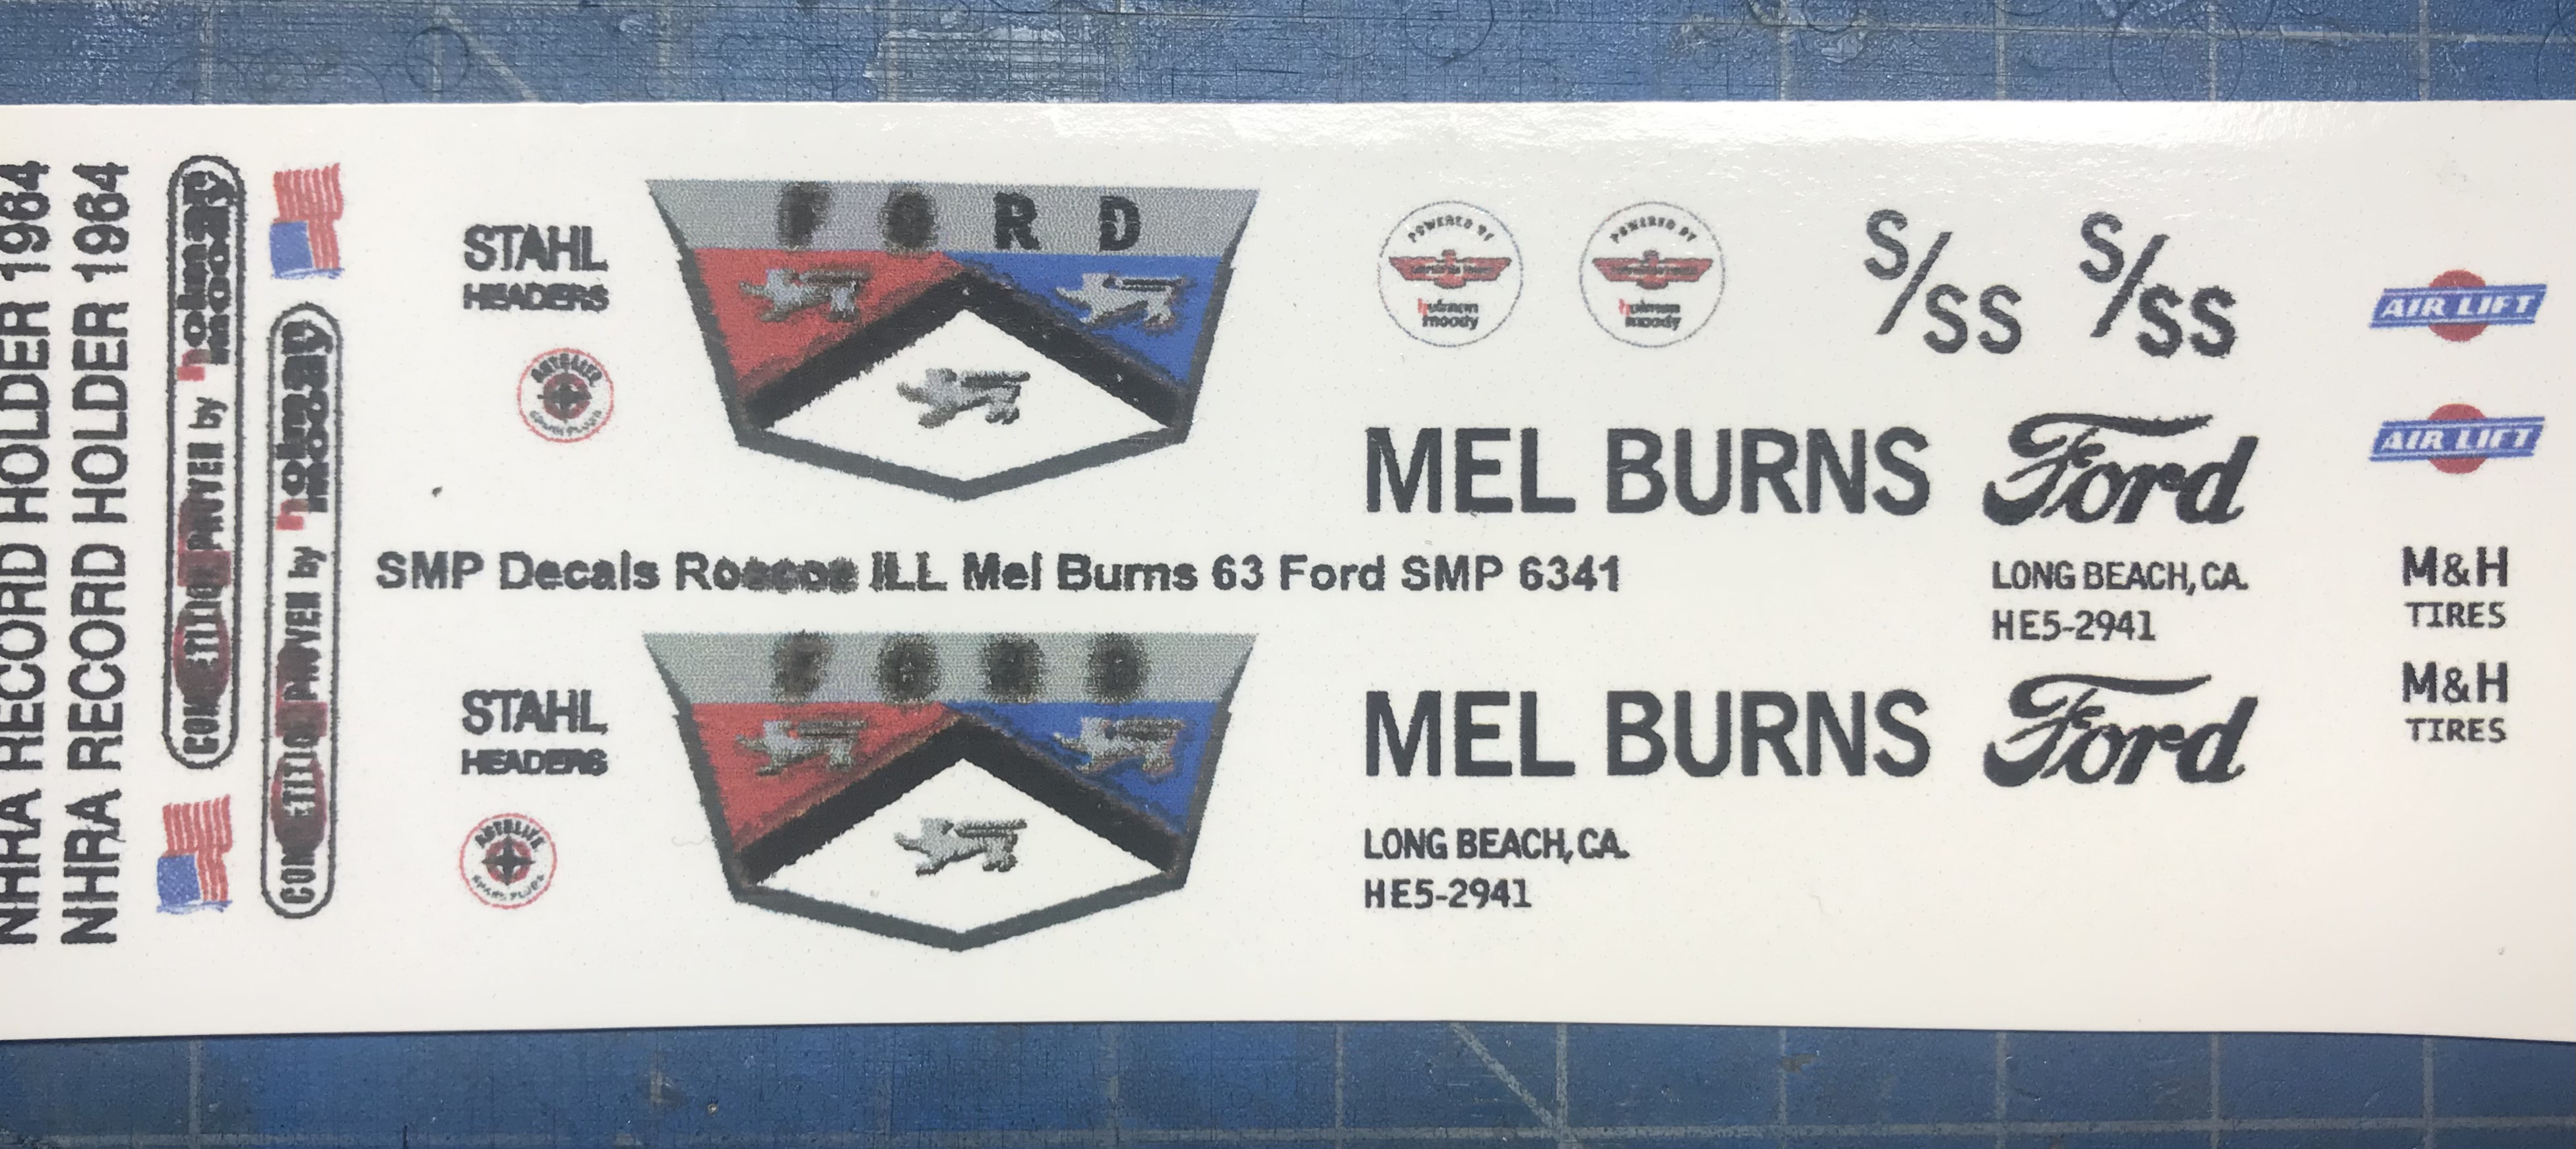
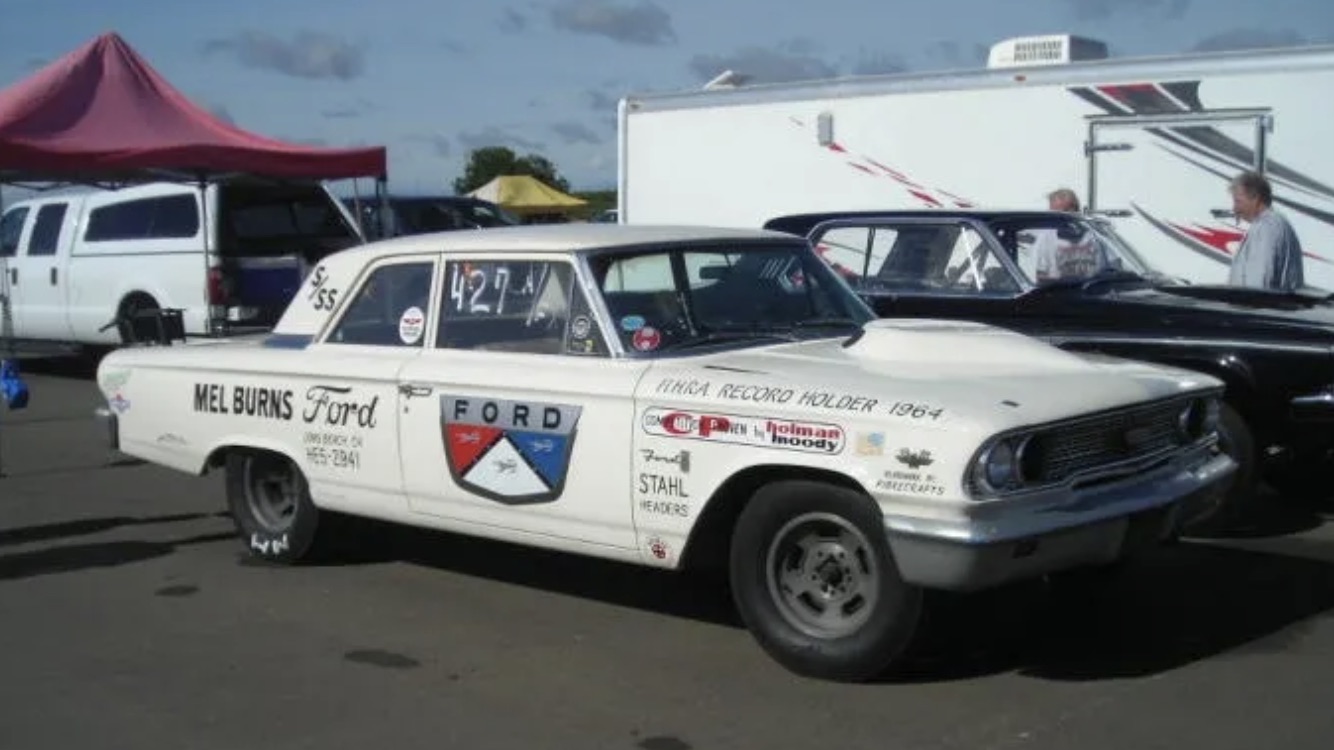
Hey Tom, here’s a photo of the Mel Burns SMP decals I bought earlier this year: As you can see they are nowhere near as nice as yours. I think I was another of one of those suckers who bought my set off a vendor on eBay (teresawulf) and not the SMP website, I suspect they were bootlegged. I’ve learned since that there is a number of folks copying and printing other’s decals (and resin parts) and selling them on eBay. The only pics I have of this car you probably already have:
-
Thank’s guys for the kind comments. Bogger44 - I used Scalefinishes “Dodge Viper Stryker Orange” basecoat along with a white basecoat. Scalefinishes basecoats work great for two-tone paint schemes, I rarely get any bleed thru at the masked edges (I use green Frog tape). I’ve given up trying to use gloss lacquers for two-tones, the solvents in the lacquers just laugh at my masking barriers and bleed right thru!
-
Nice recovery Tom on the body replacement. I love these early sixties SS’ers so you’ve got my attention. I wanted to do a Mel Burns lightweight 62 Galaxie SS (I grew up in Long Beach) but the SMC decals I ordered were really poor quality (they use fuzzy rastor graphic files vs crisp vector graphics?), hoping yours are better. I ended up building the Jerry Alderman sponsored A/FX car because it only needed monochrome dark blue decals which I was able to print at home. It was my first resin body project (also using the excellent AMT Starliner donor kit) and a “learning experience” for me (not sure I’ll go there again unless it’s a really special subject). Looks great so far! - Looking forward to watching your build!
-
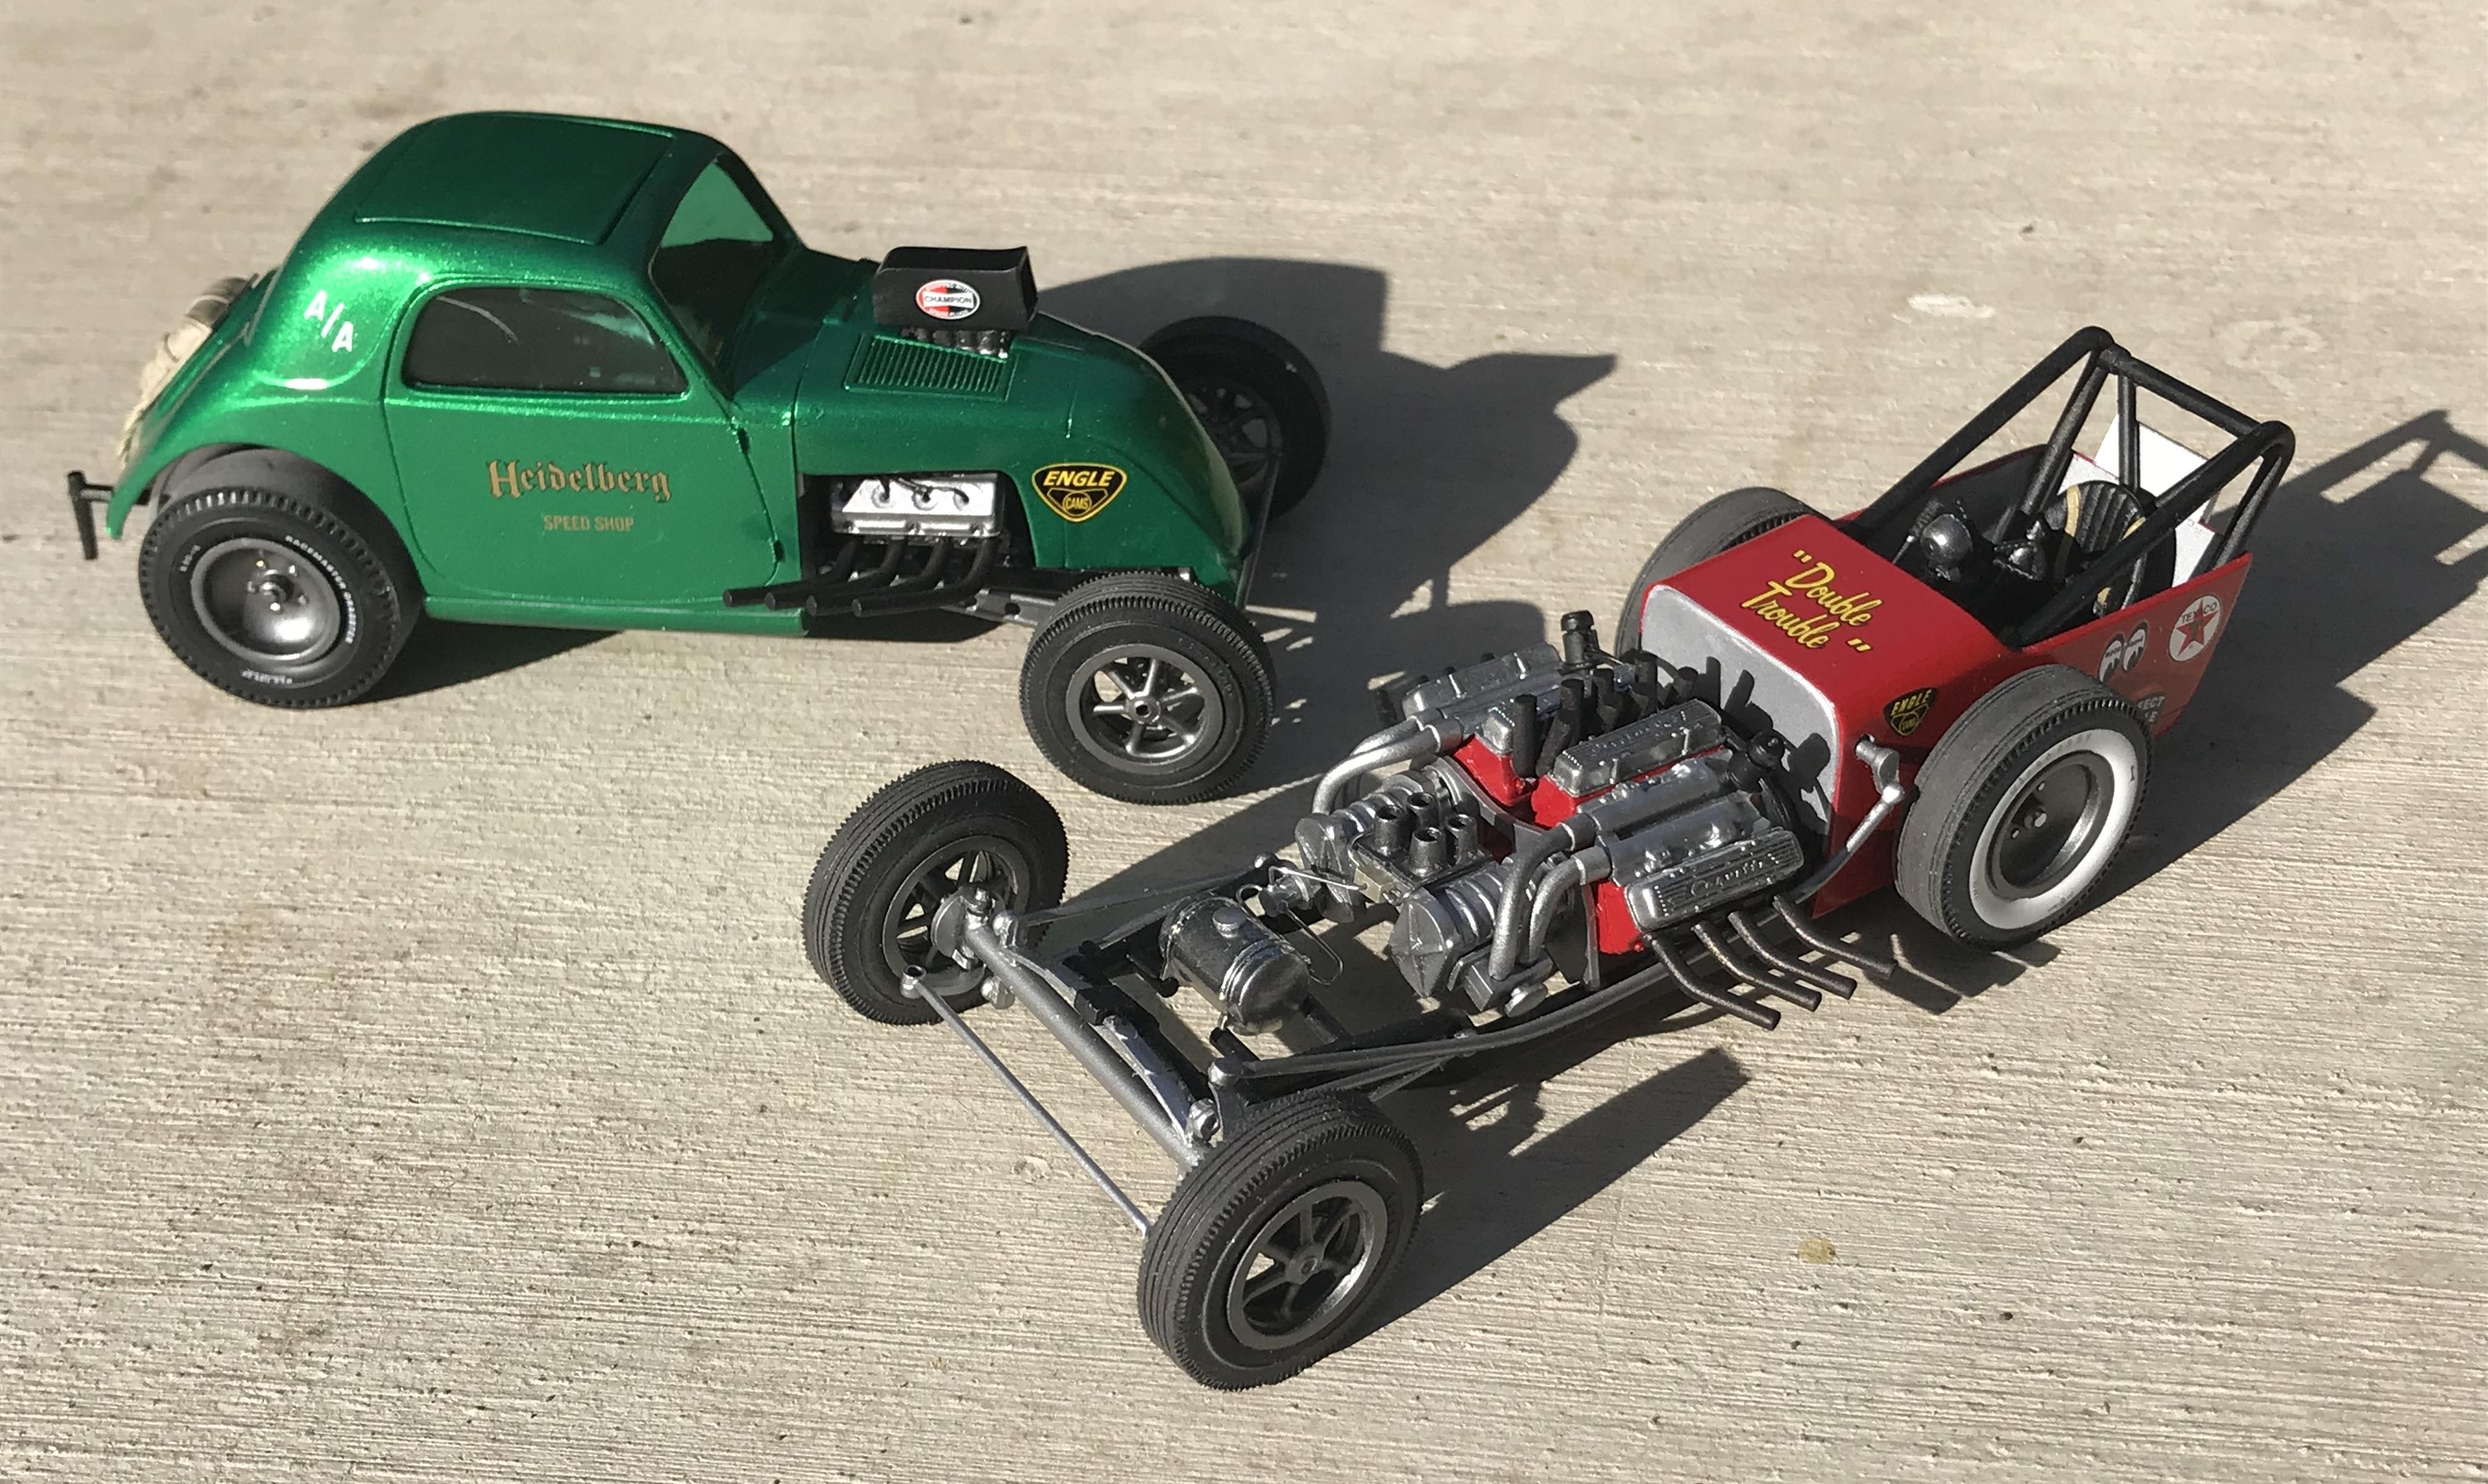
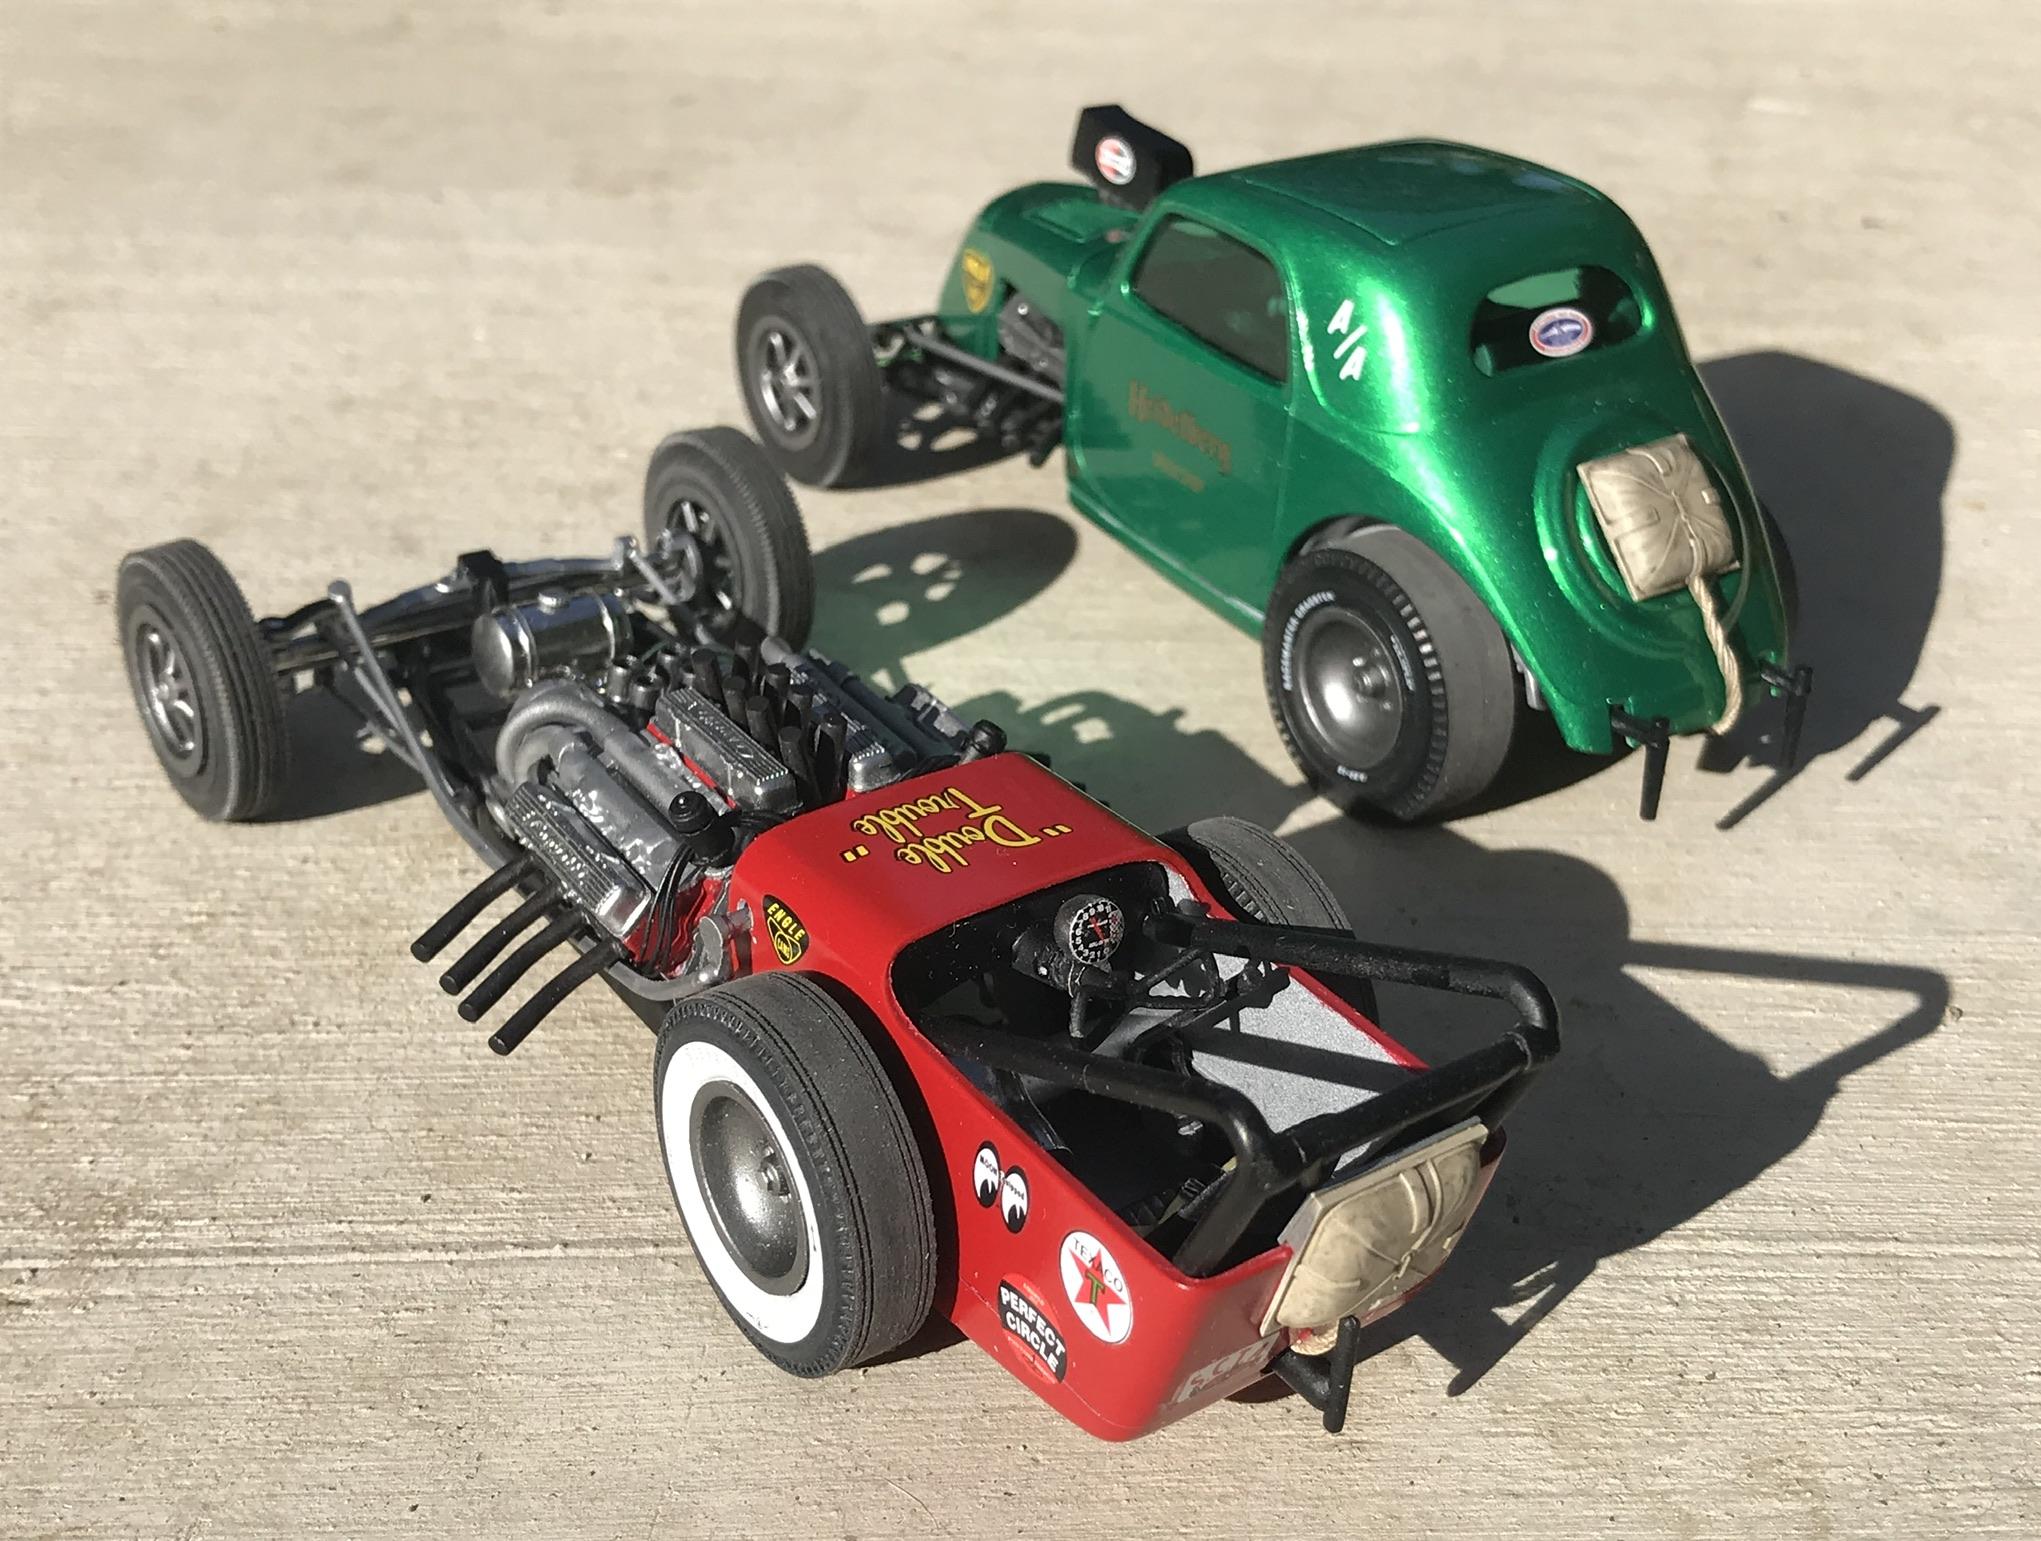
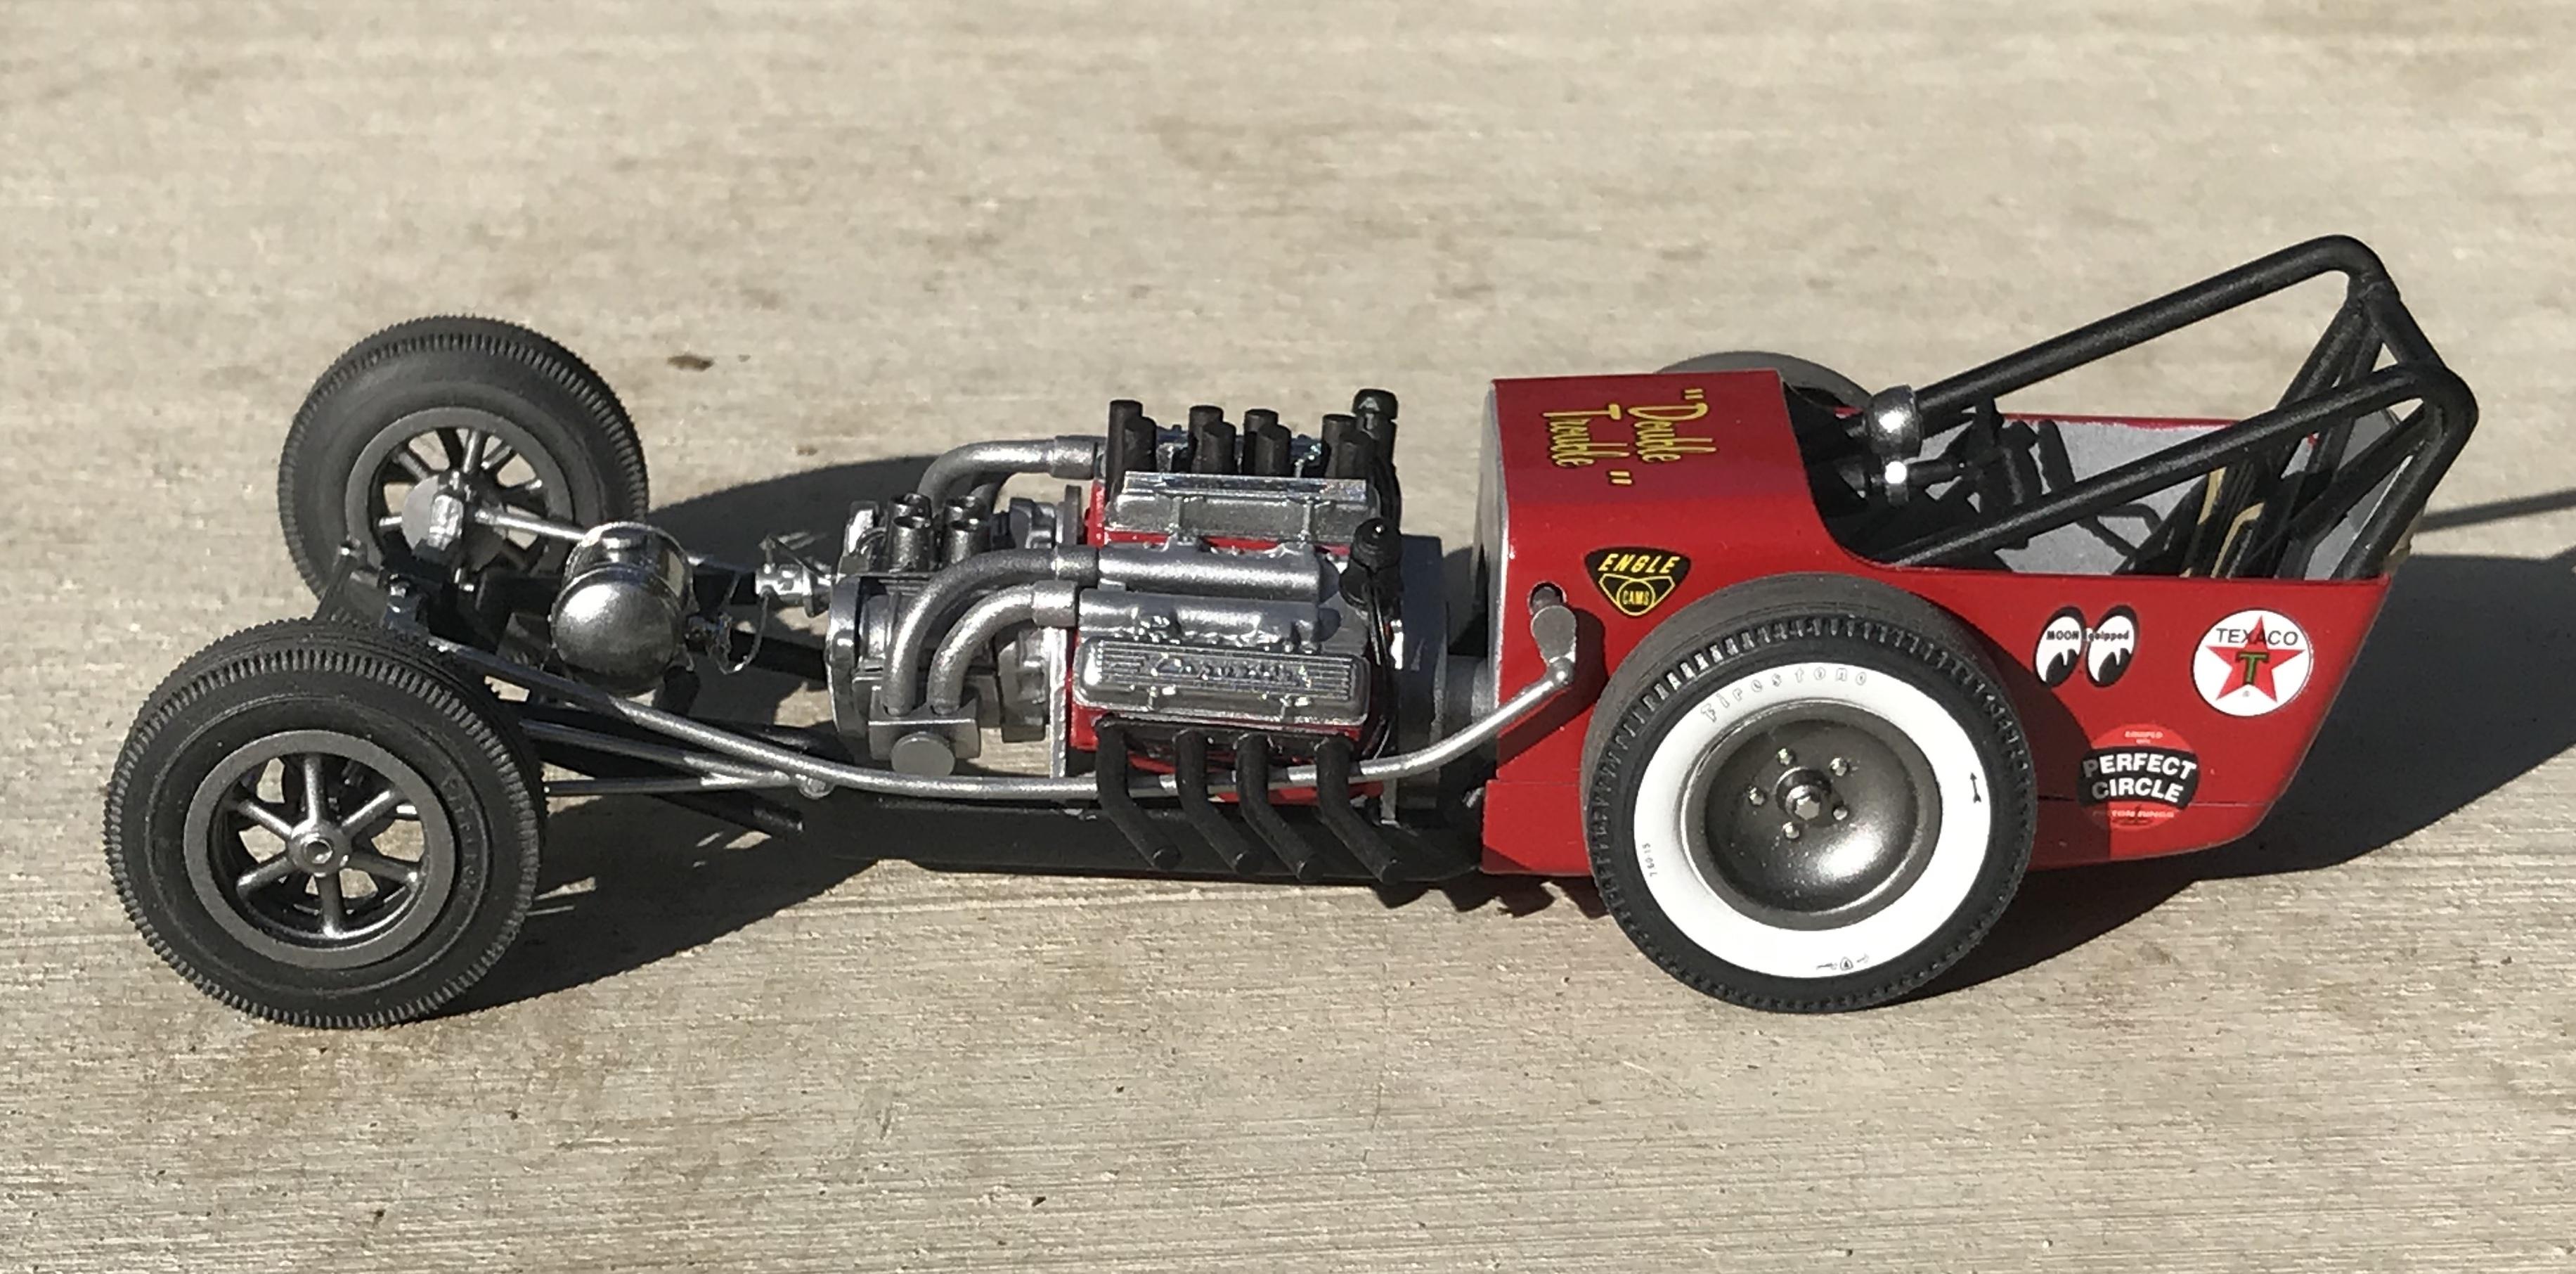
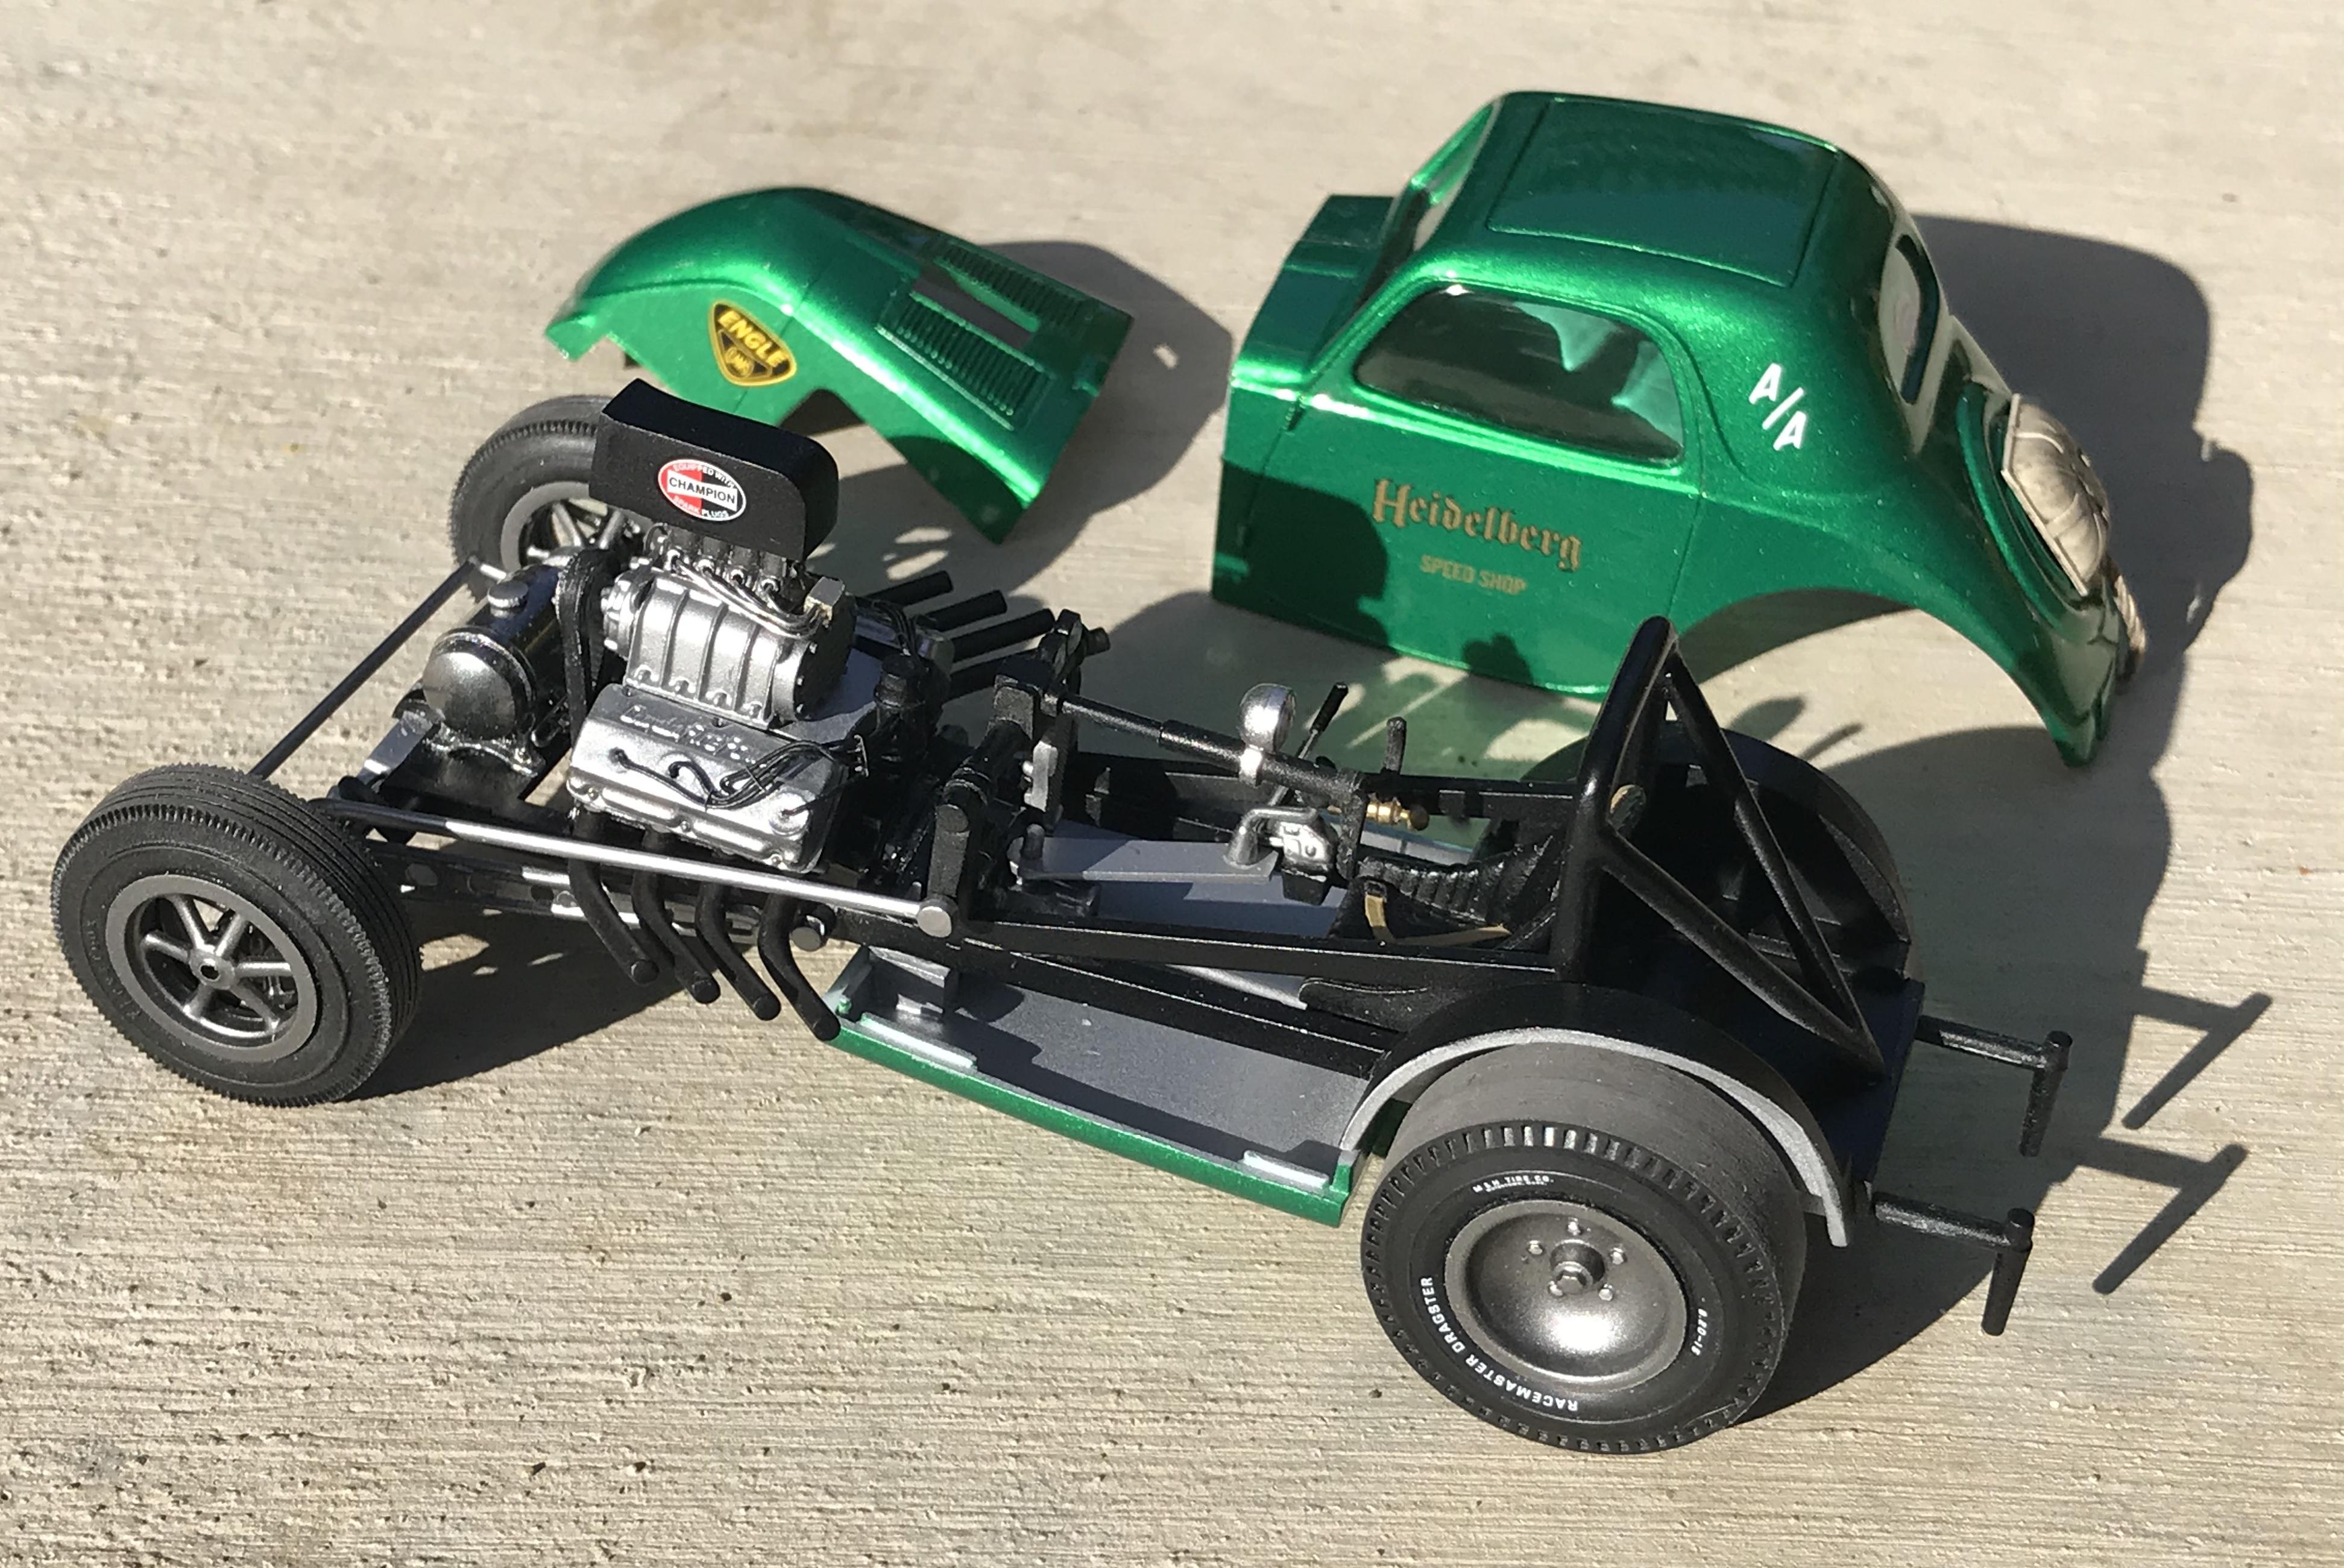
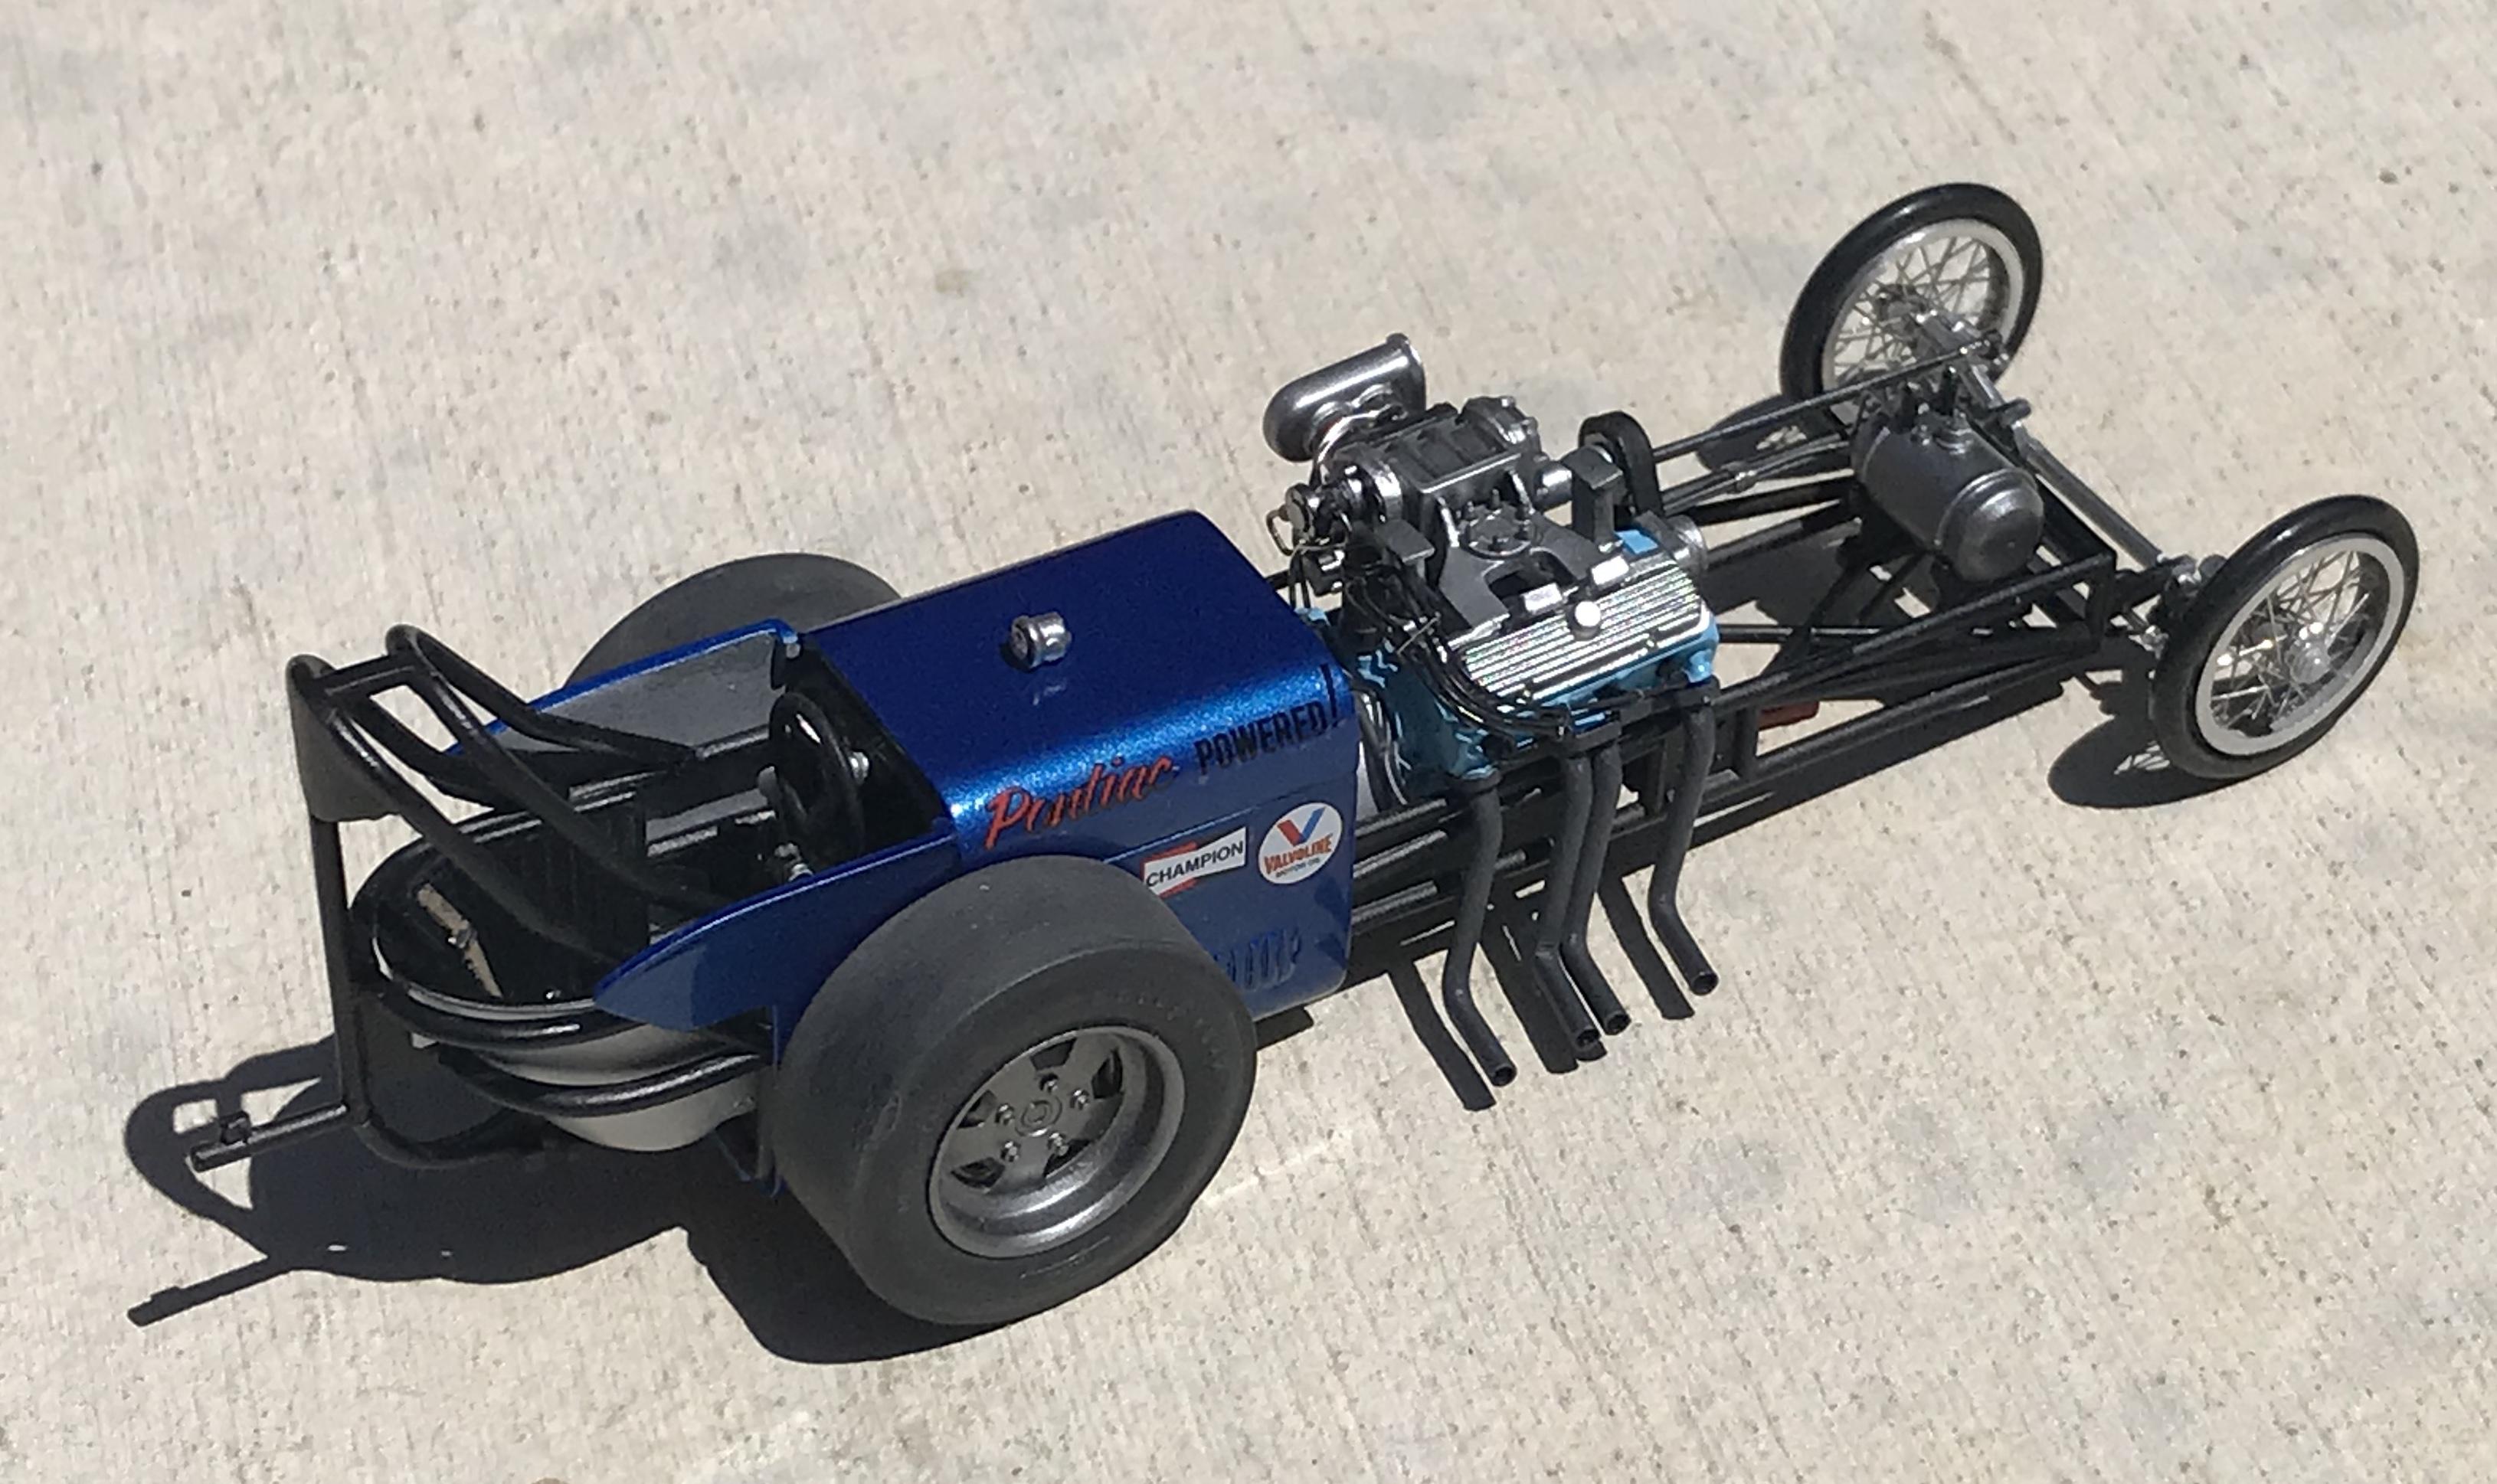
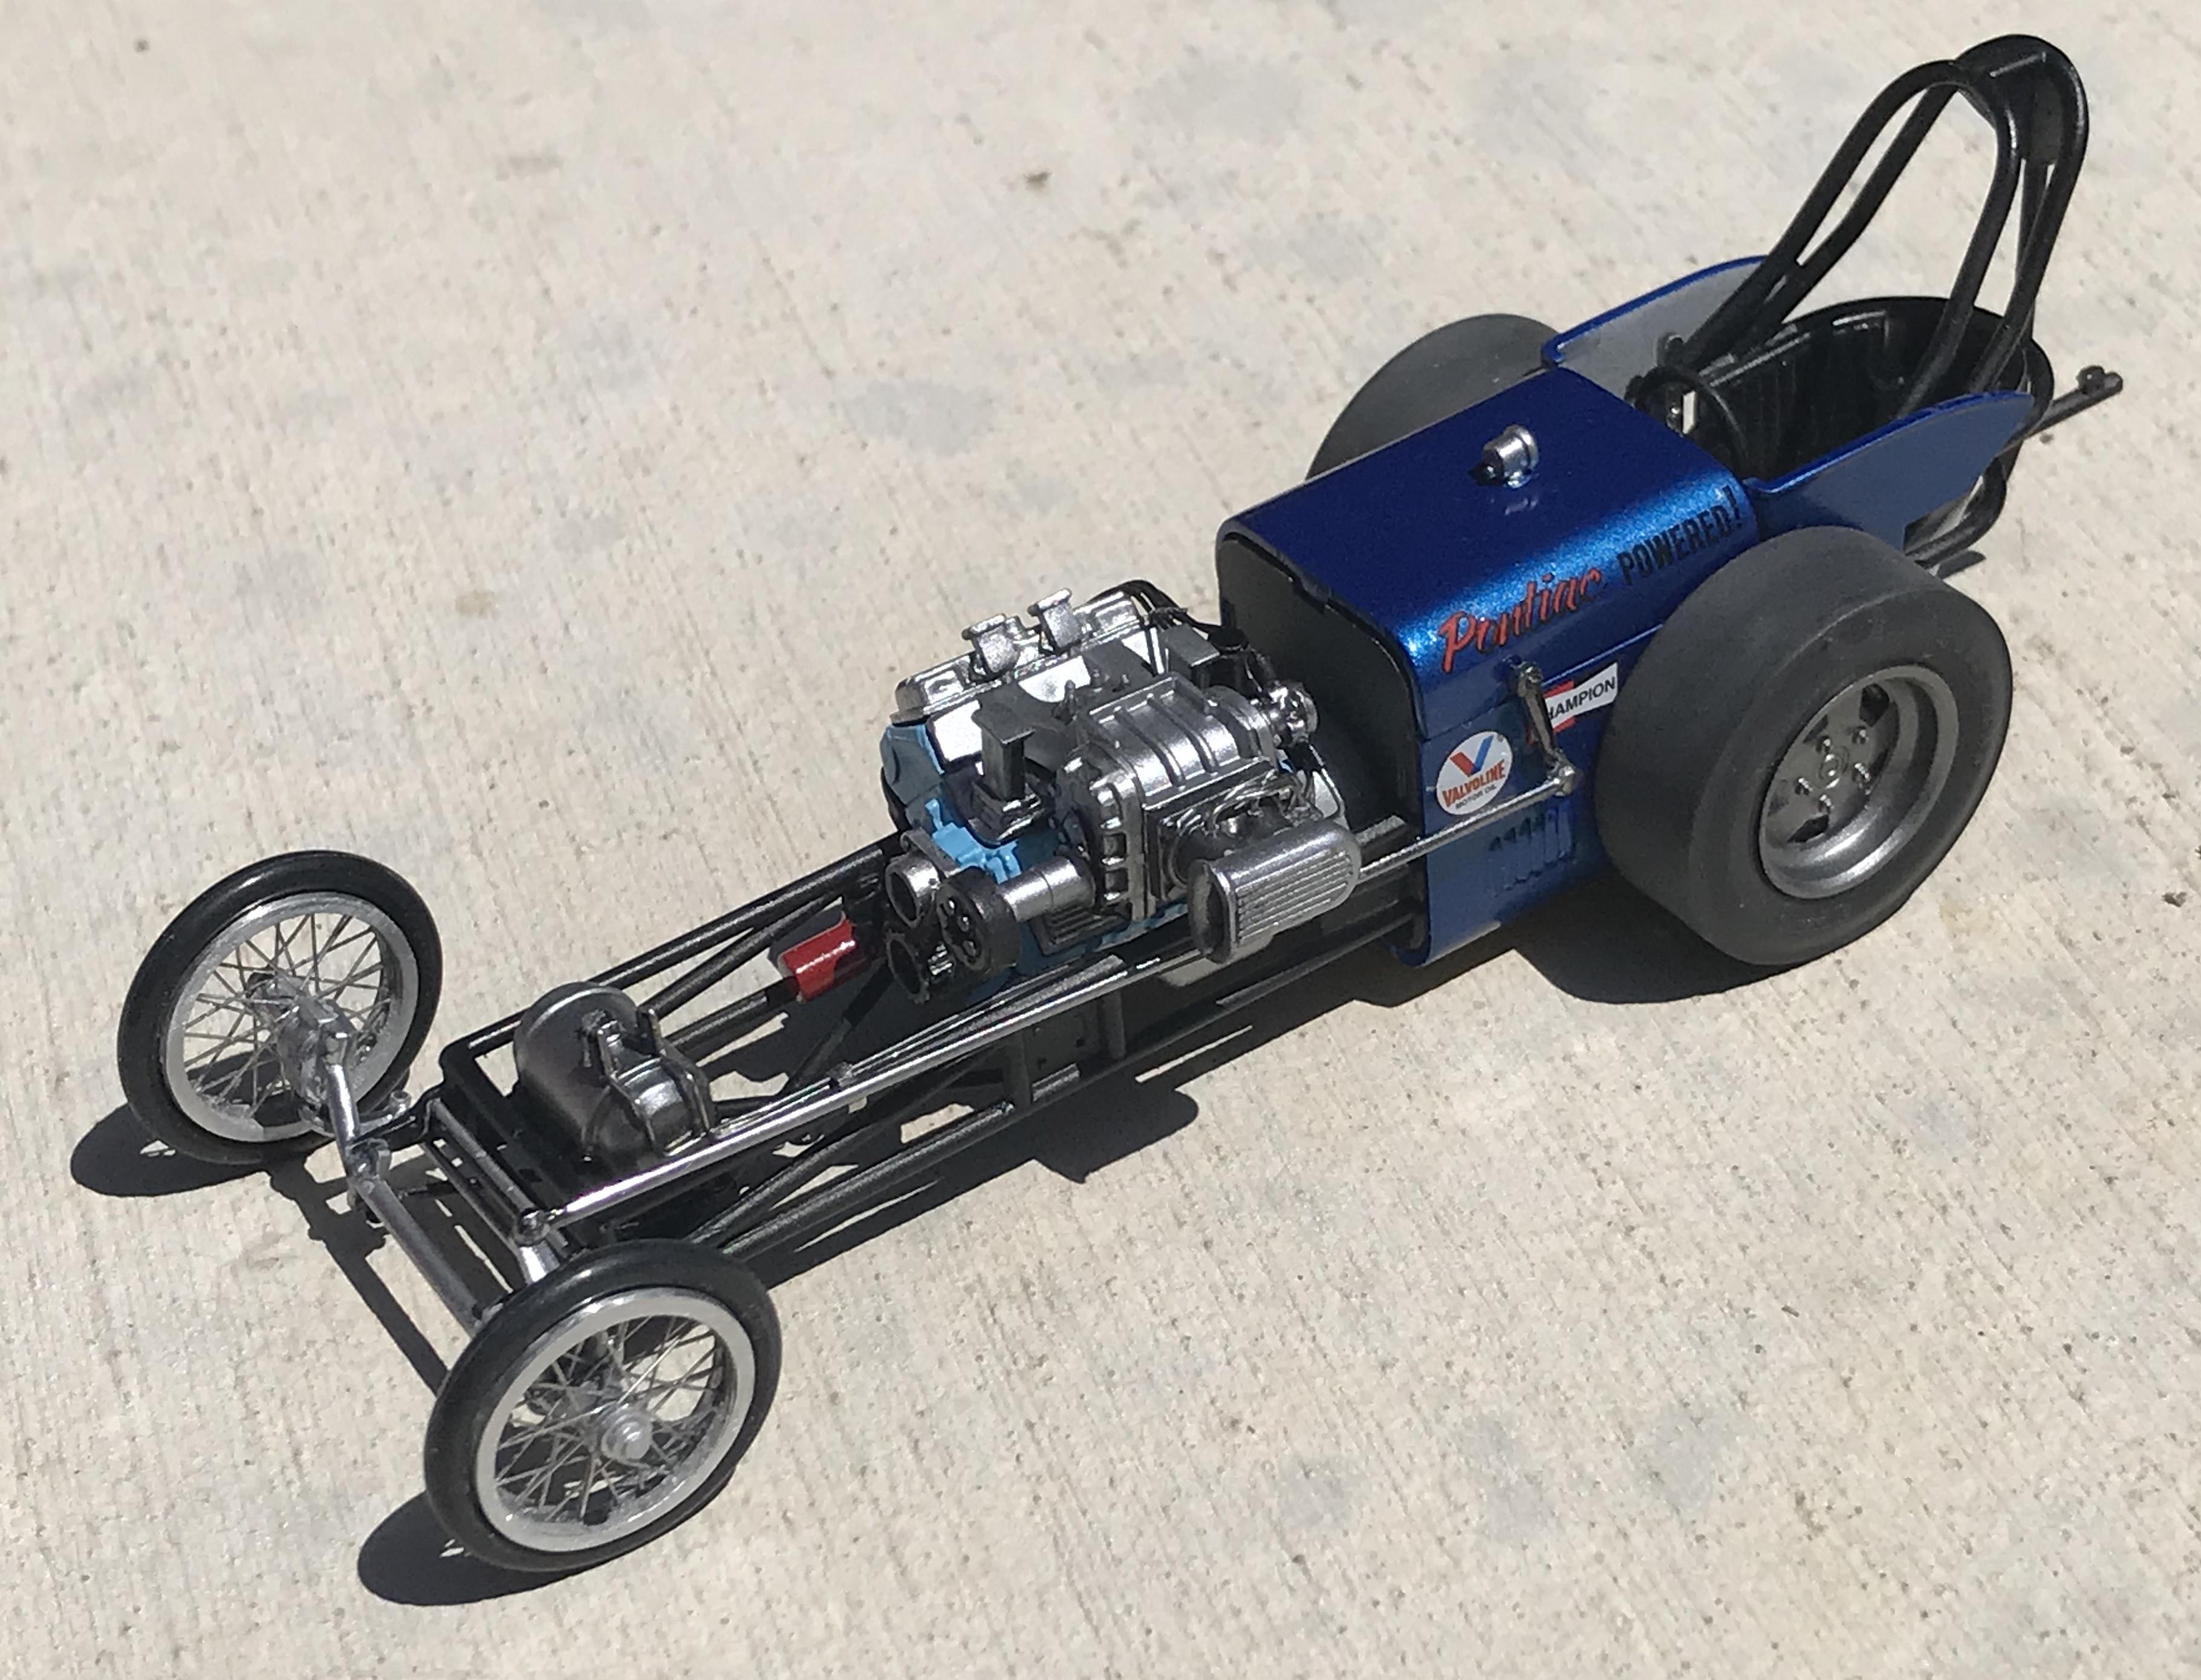
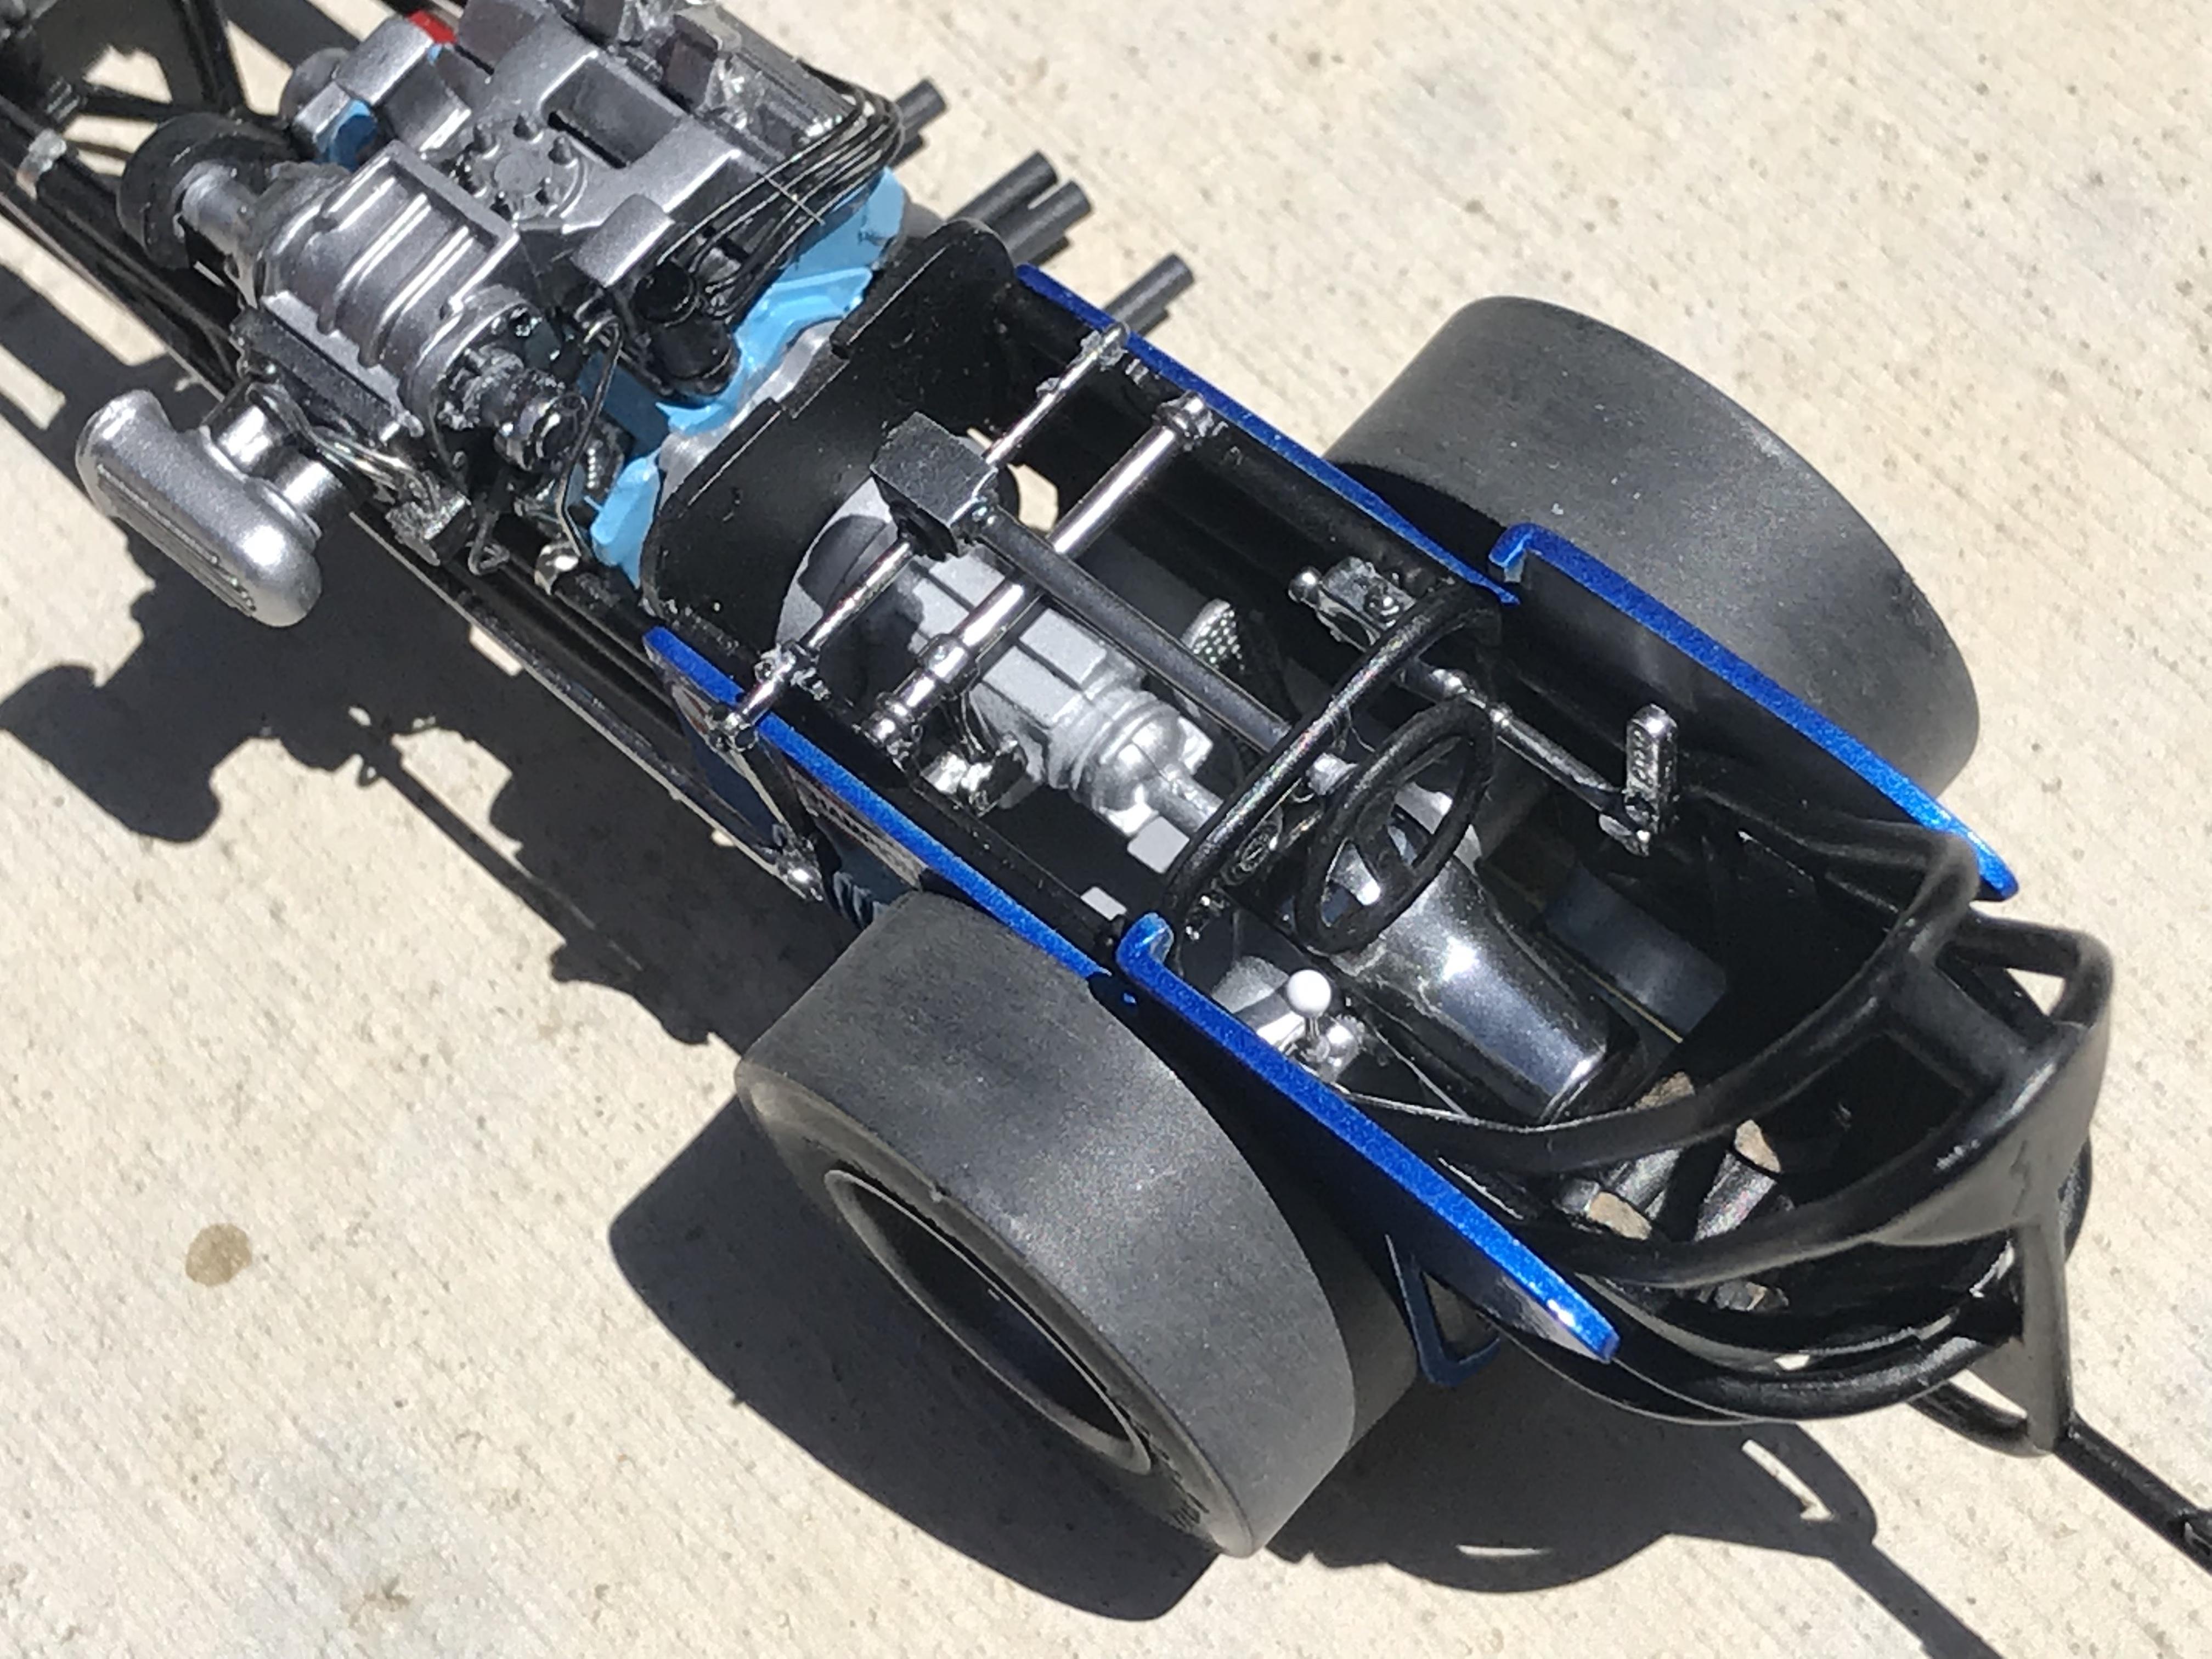
I love it Bob! Love the fact that you incorporated a blown straight six (a 235 Chevy?), a typical late fifties rail made in some dude’s backyard financed by his Mon-Fri job. Those must have been fun (and crazy dangerous) days. We all must have at least one of these extra slingshot dragster frames left over from the double dragster kit, your build is inspiring me to copy you here! Thanks for posting this very cool subject.
-
Nice job Ray on painting and assembling this “diecast kit”, a genre I didn’t know about until I read your post. I like the understated two-tone color scheme and leaving decals off, gives it a sinister intimidating outlaw racer look. Did this Acme kit include those fuel lines and fittings details? (very nice). Would love to see a pic of the left side of the engine and the underside of the chassis. Thanks for sharing!
-
You did a great job Bob recovering from the final assembly troubles, it doesn’t show in your finished product, I can’t even find the crooked decal. And your foil work looks fabulous to me. Job well done! Im jealous of your 1:1 ‘49, you must have guys following you home wanting to know if you want to sell. What a gorgeous ride!
-
Cool altered! Really like the re-styling you did on this drag bug body, sort of a “VW Topolino”. Also like the metal paint and detail work you did on the chassis.
-
Pontiac Bonneville Convertible 1970 in "Aqua Mist Metallic"
papajohn97 replied to Tommy124's topic in Model Cars
Amazing photography of a beautifully built/ painted model. How did you do these photos? Is that a dio behind model or did you photograph the model with an actual building behind it? -
Thanks guys for the kind words. The carbs were airbrushed using Alclad aluminum over gloss black lacquer base and then a very light airbrush spray of Alclad gold (brass) over the aluminum to give it a warm cast aluminum look. These Fireball resin carbs are so much better than anything I’ve ever seen injection molded. If you haven’t used resin parts before, I recommend investing in a good quality razor saw (Excel or similar brand) to cut the resin base off of the bottom of the cast carb. If you leave .02”-.03” of base on the bottom of the carb, you can easily remove it by sanding the base off using 150 - 220 grit sandpaper while gripping the carb (they are not as fragile as they look). After priming and painting the finished carbs, they can then be bonded into the manifold using epoxy or CA adhesive.
-
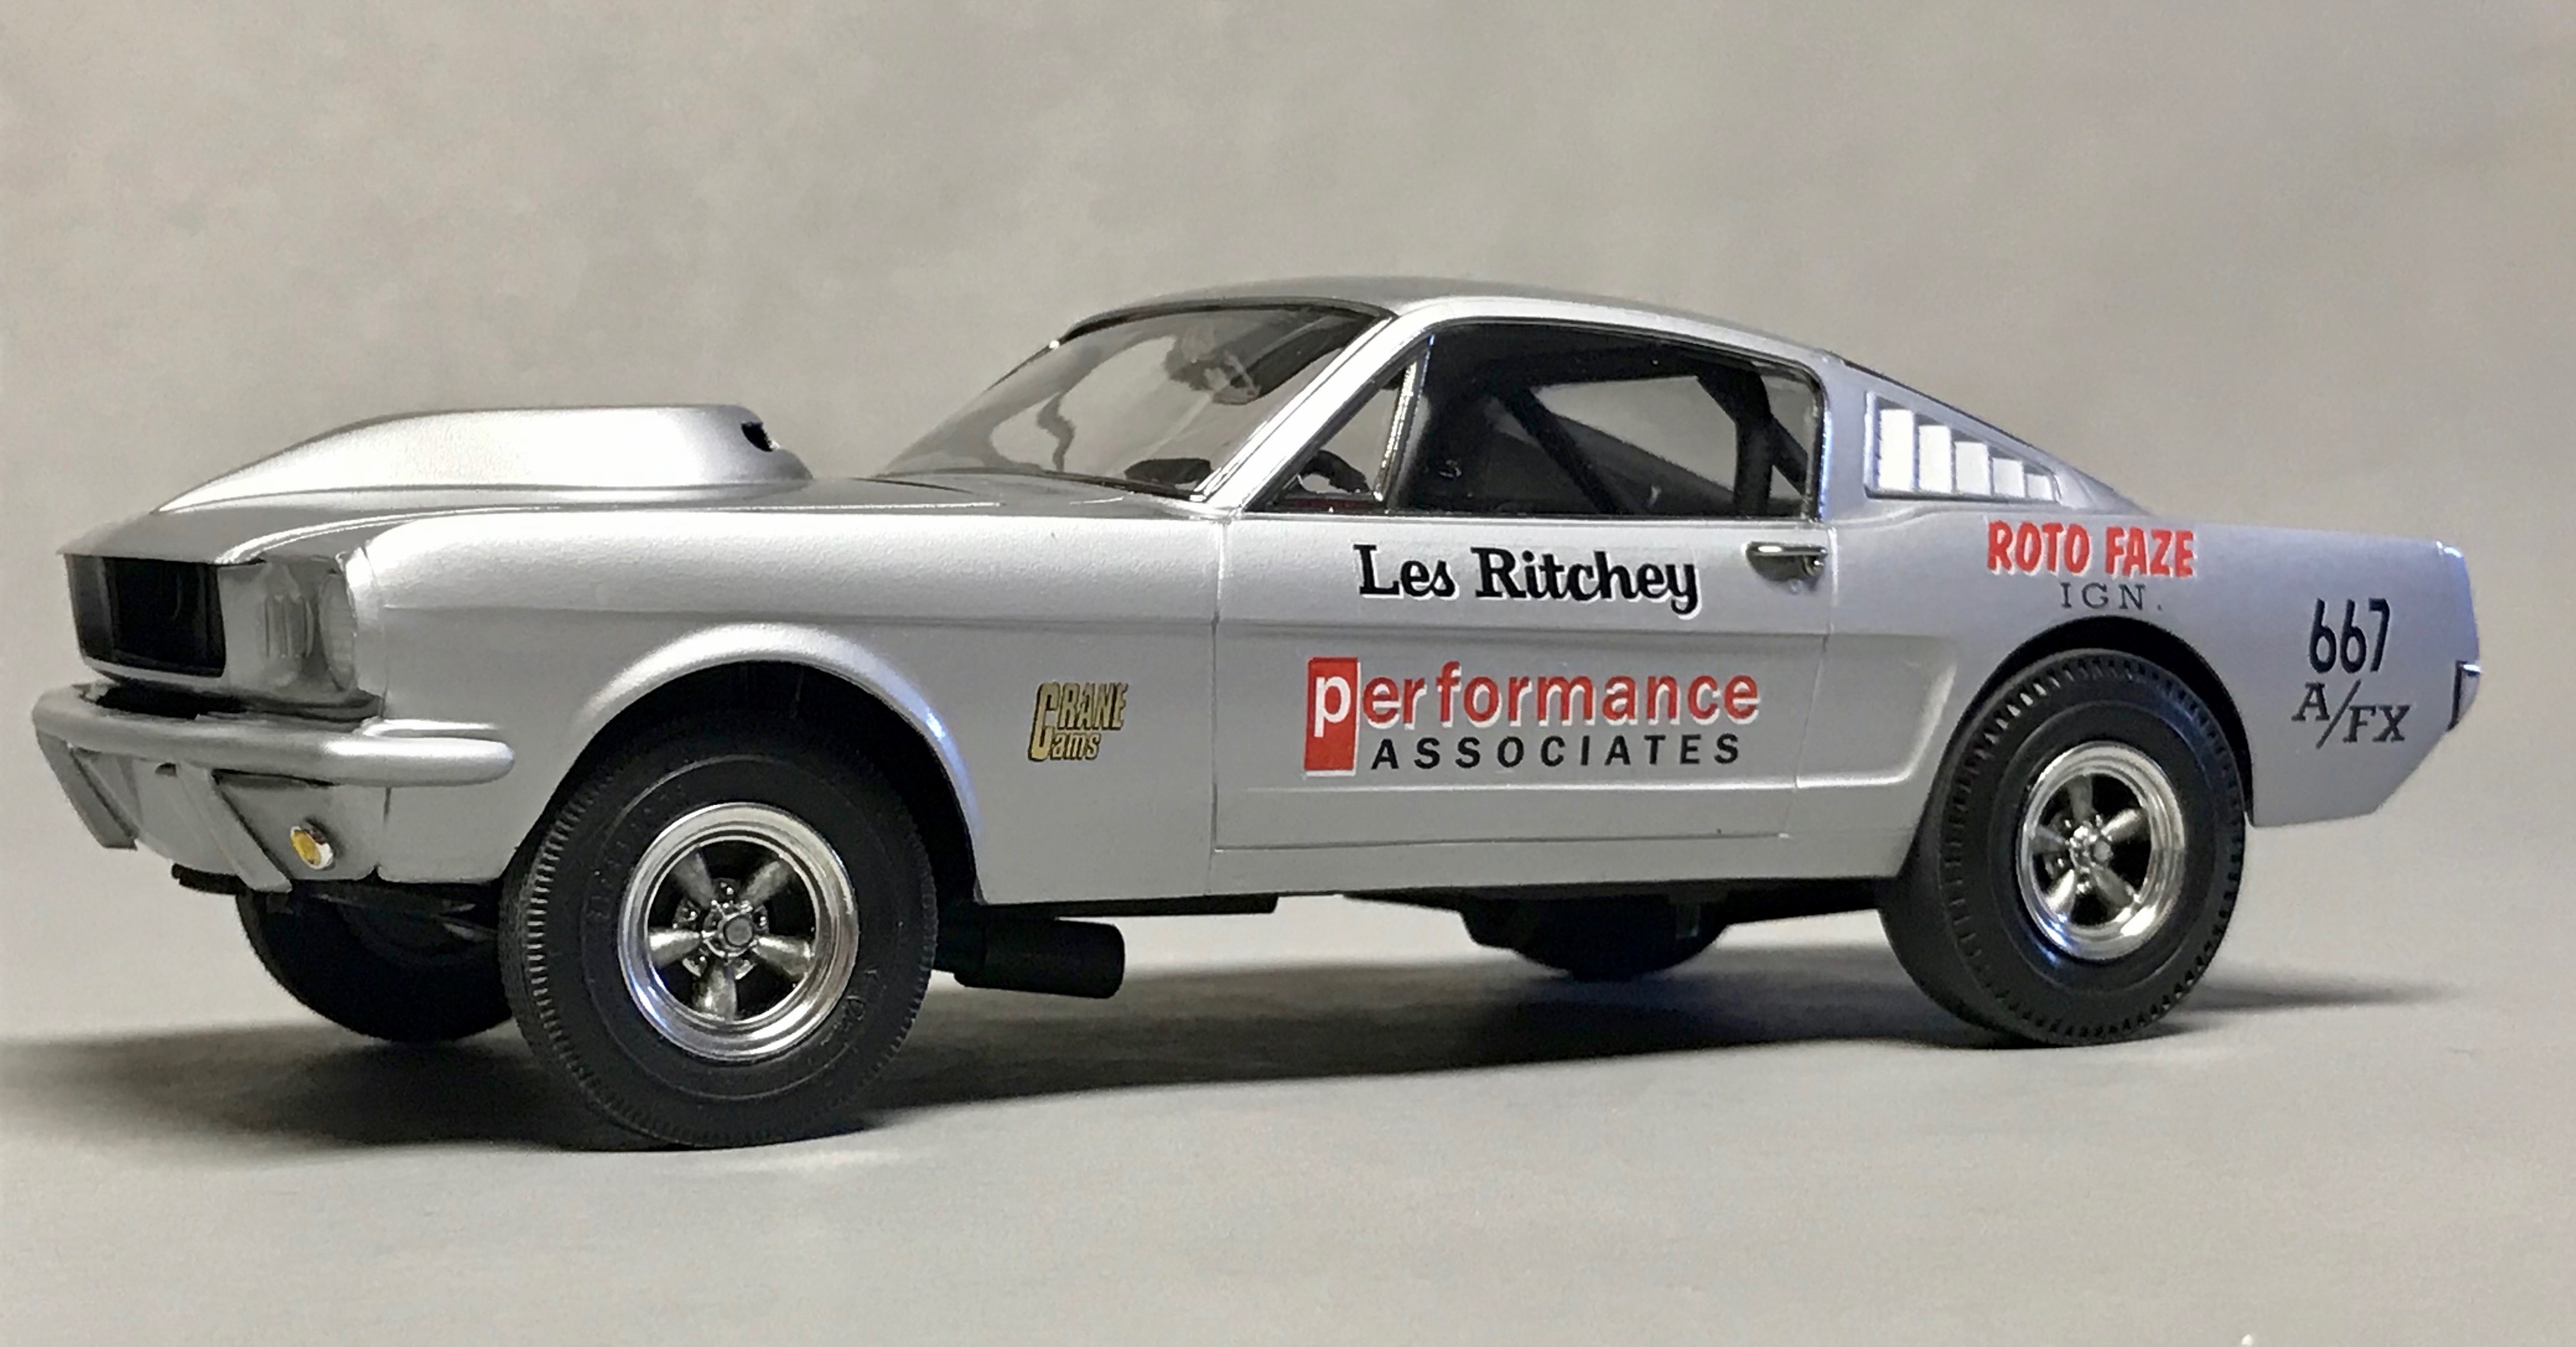
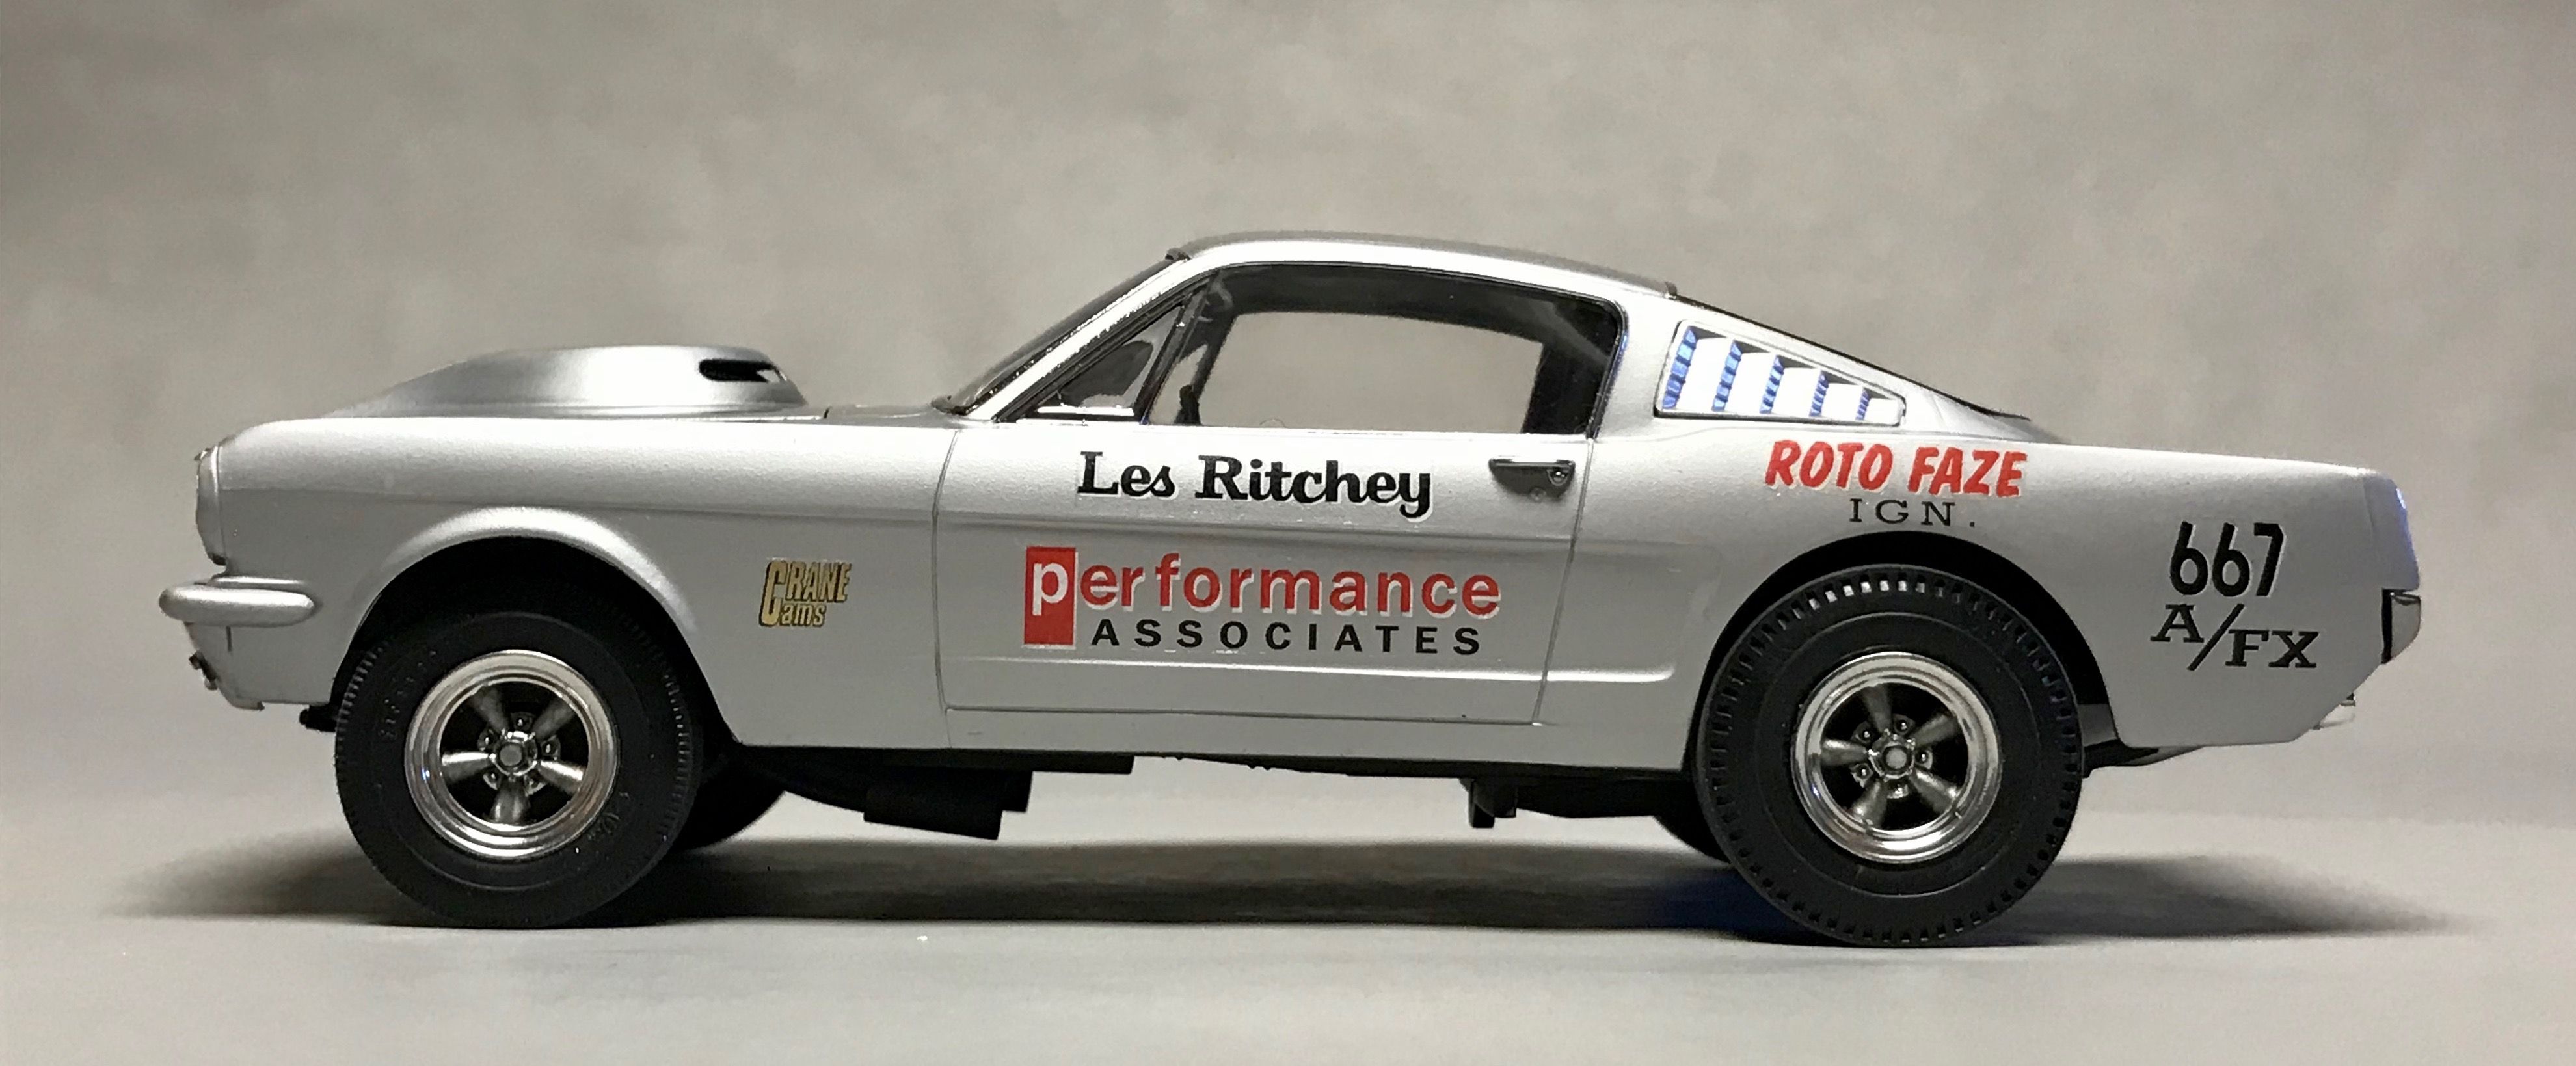
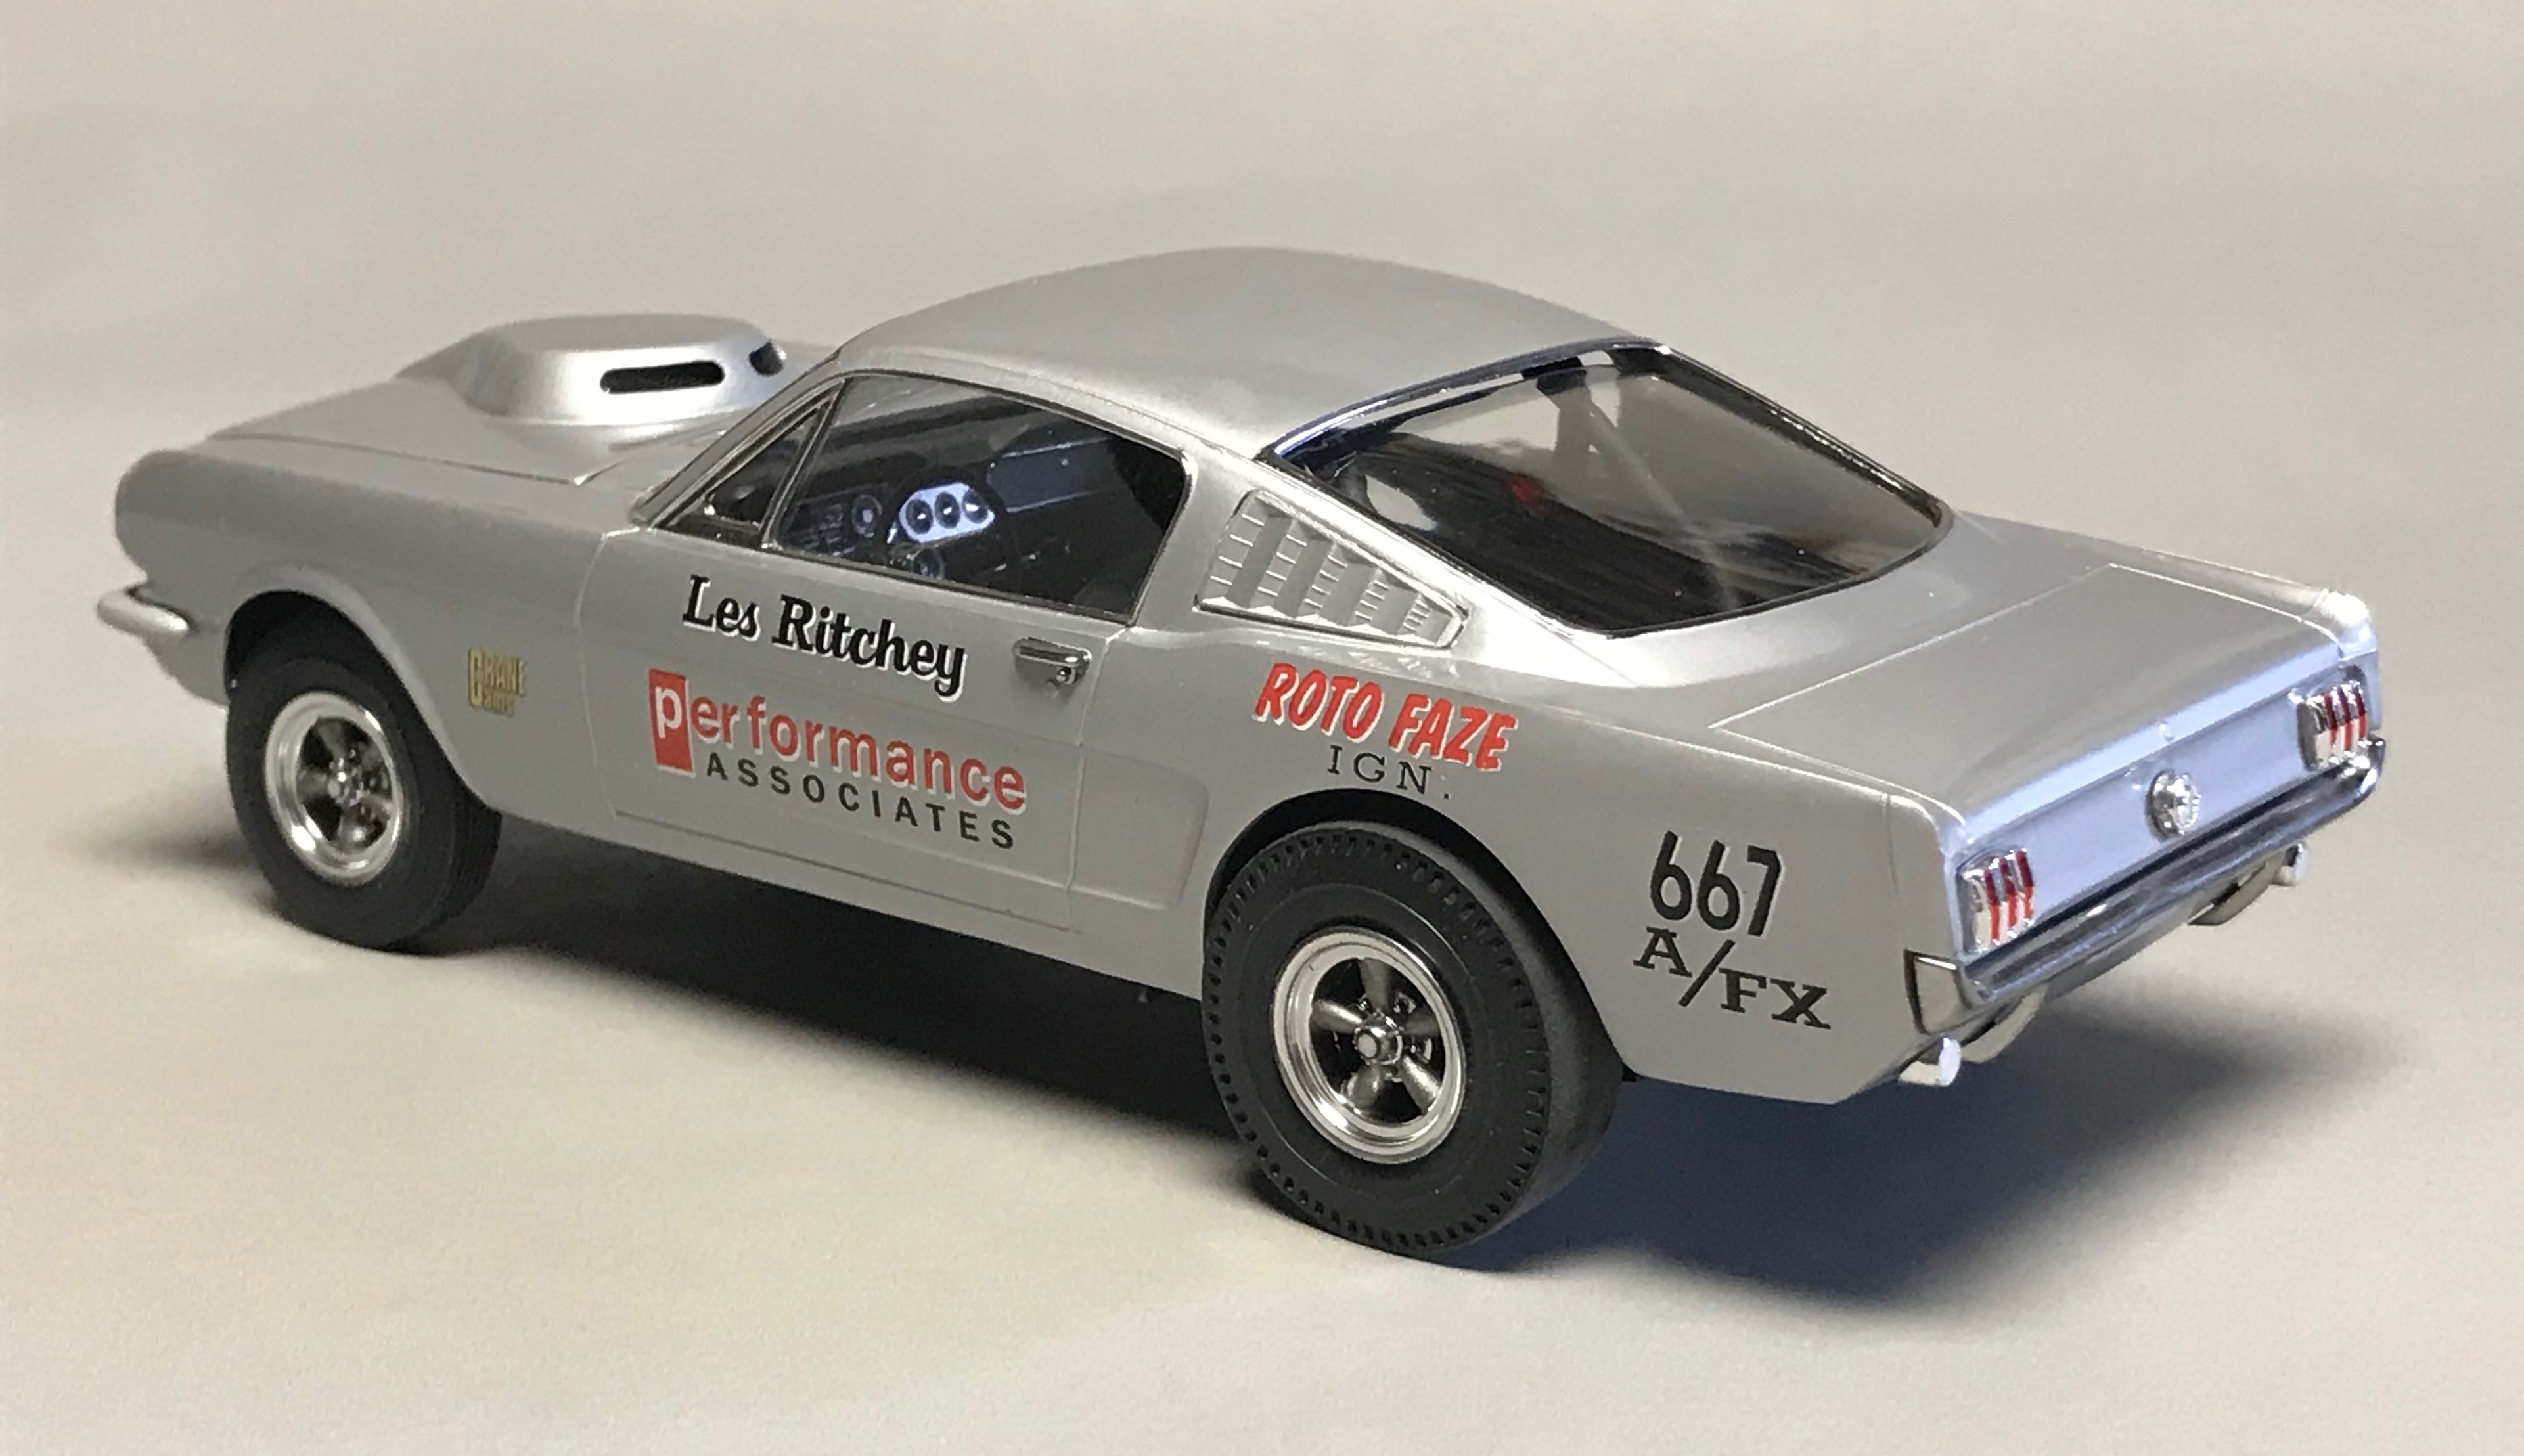
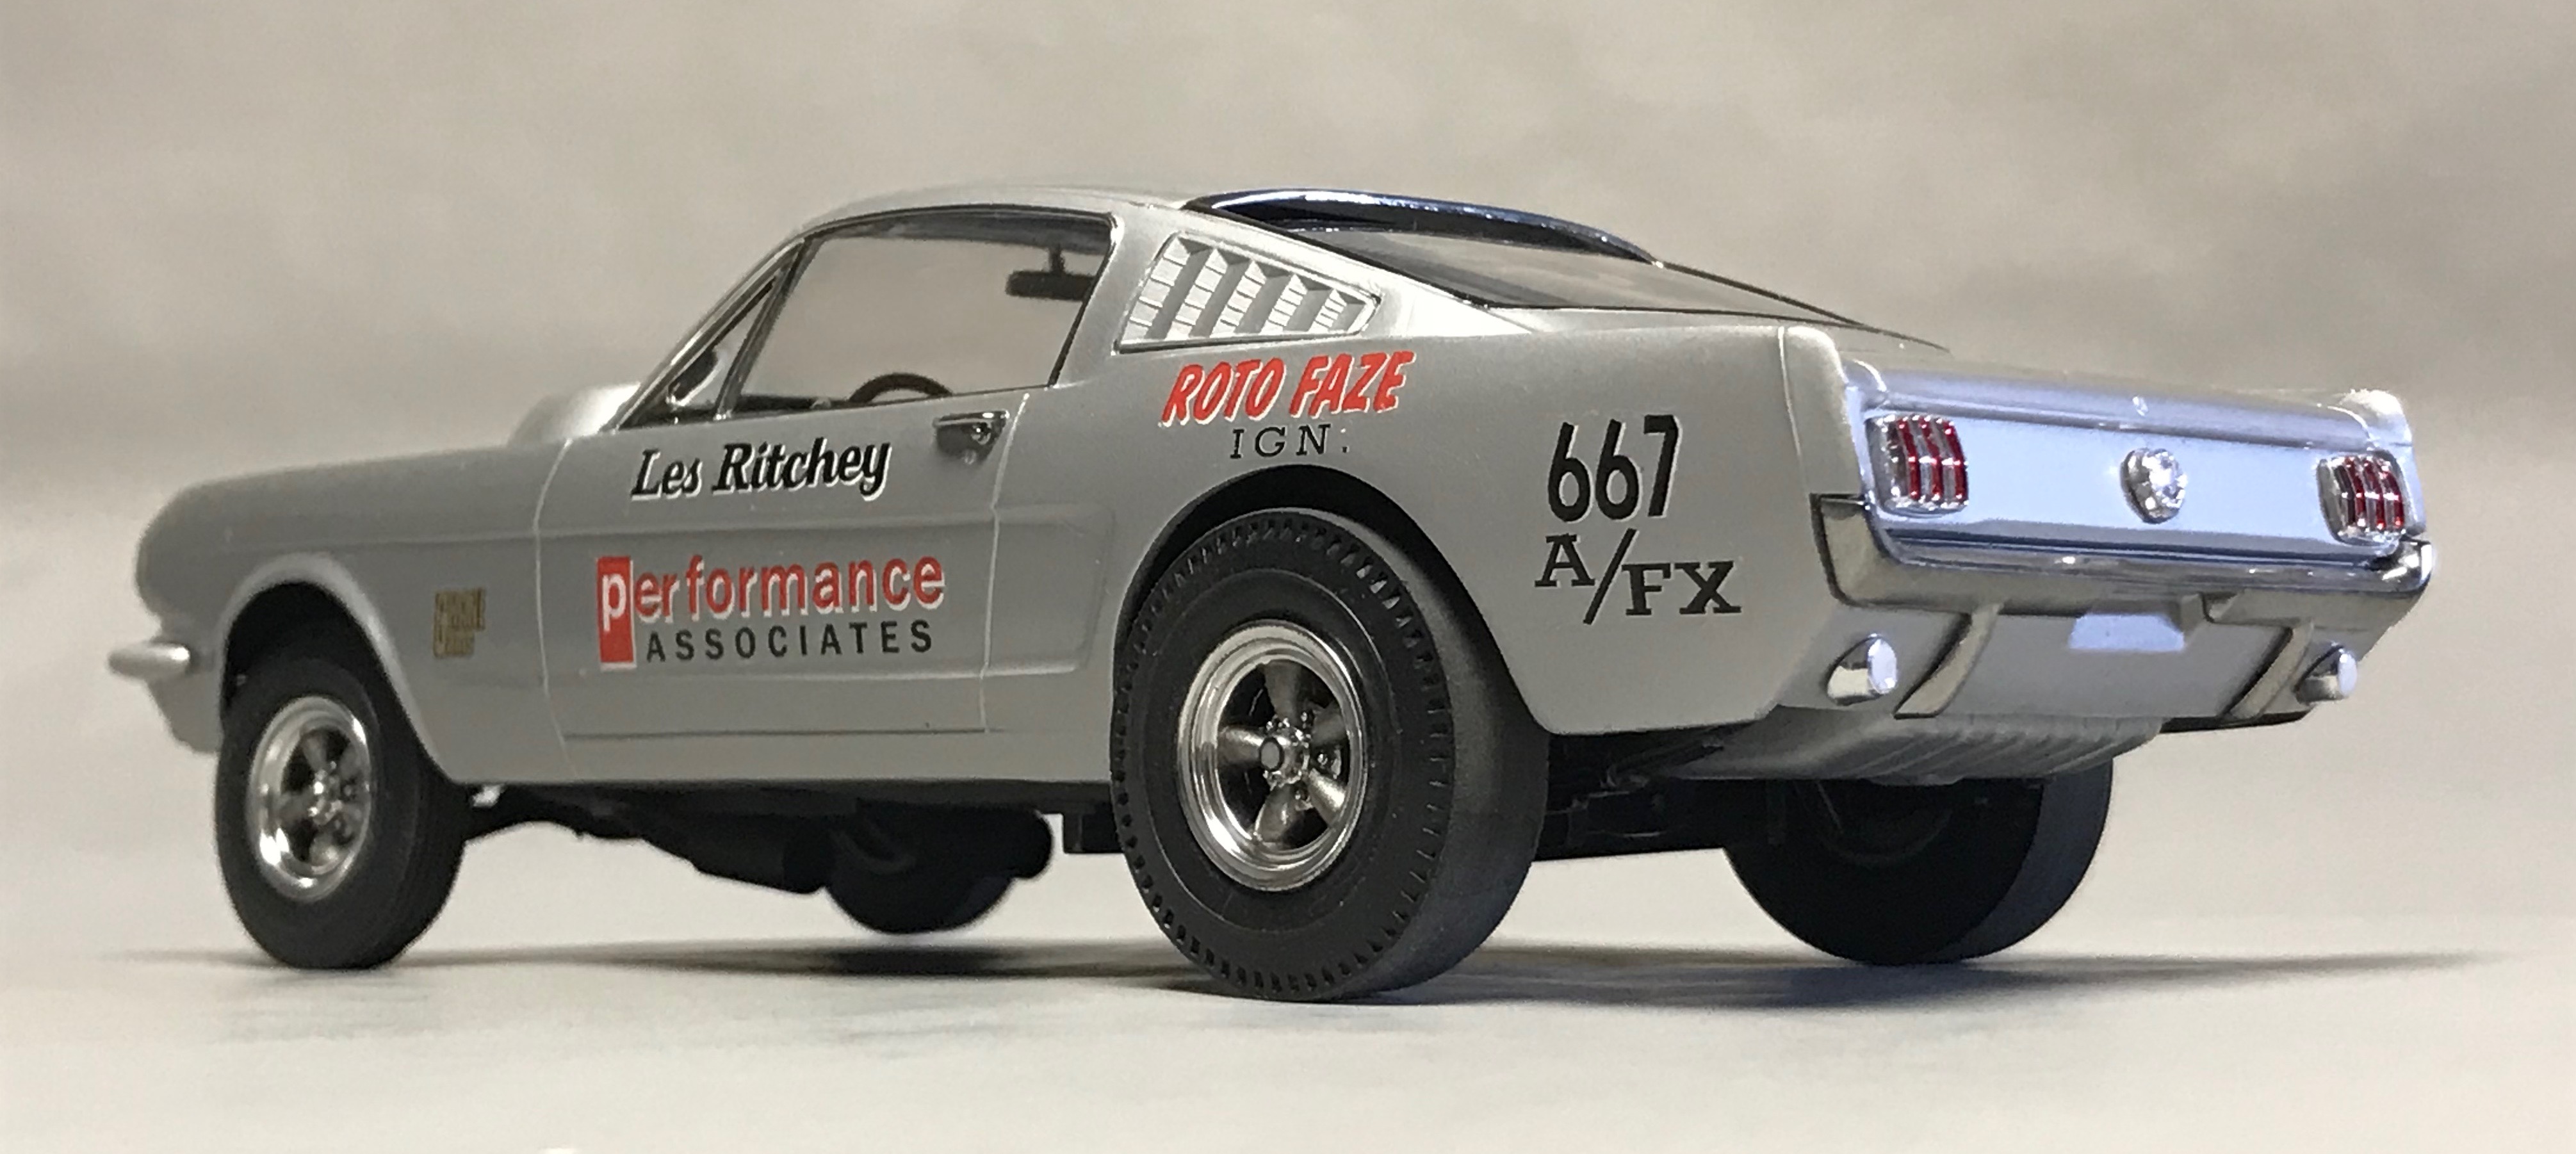
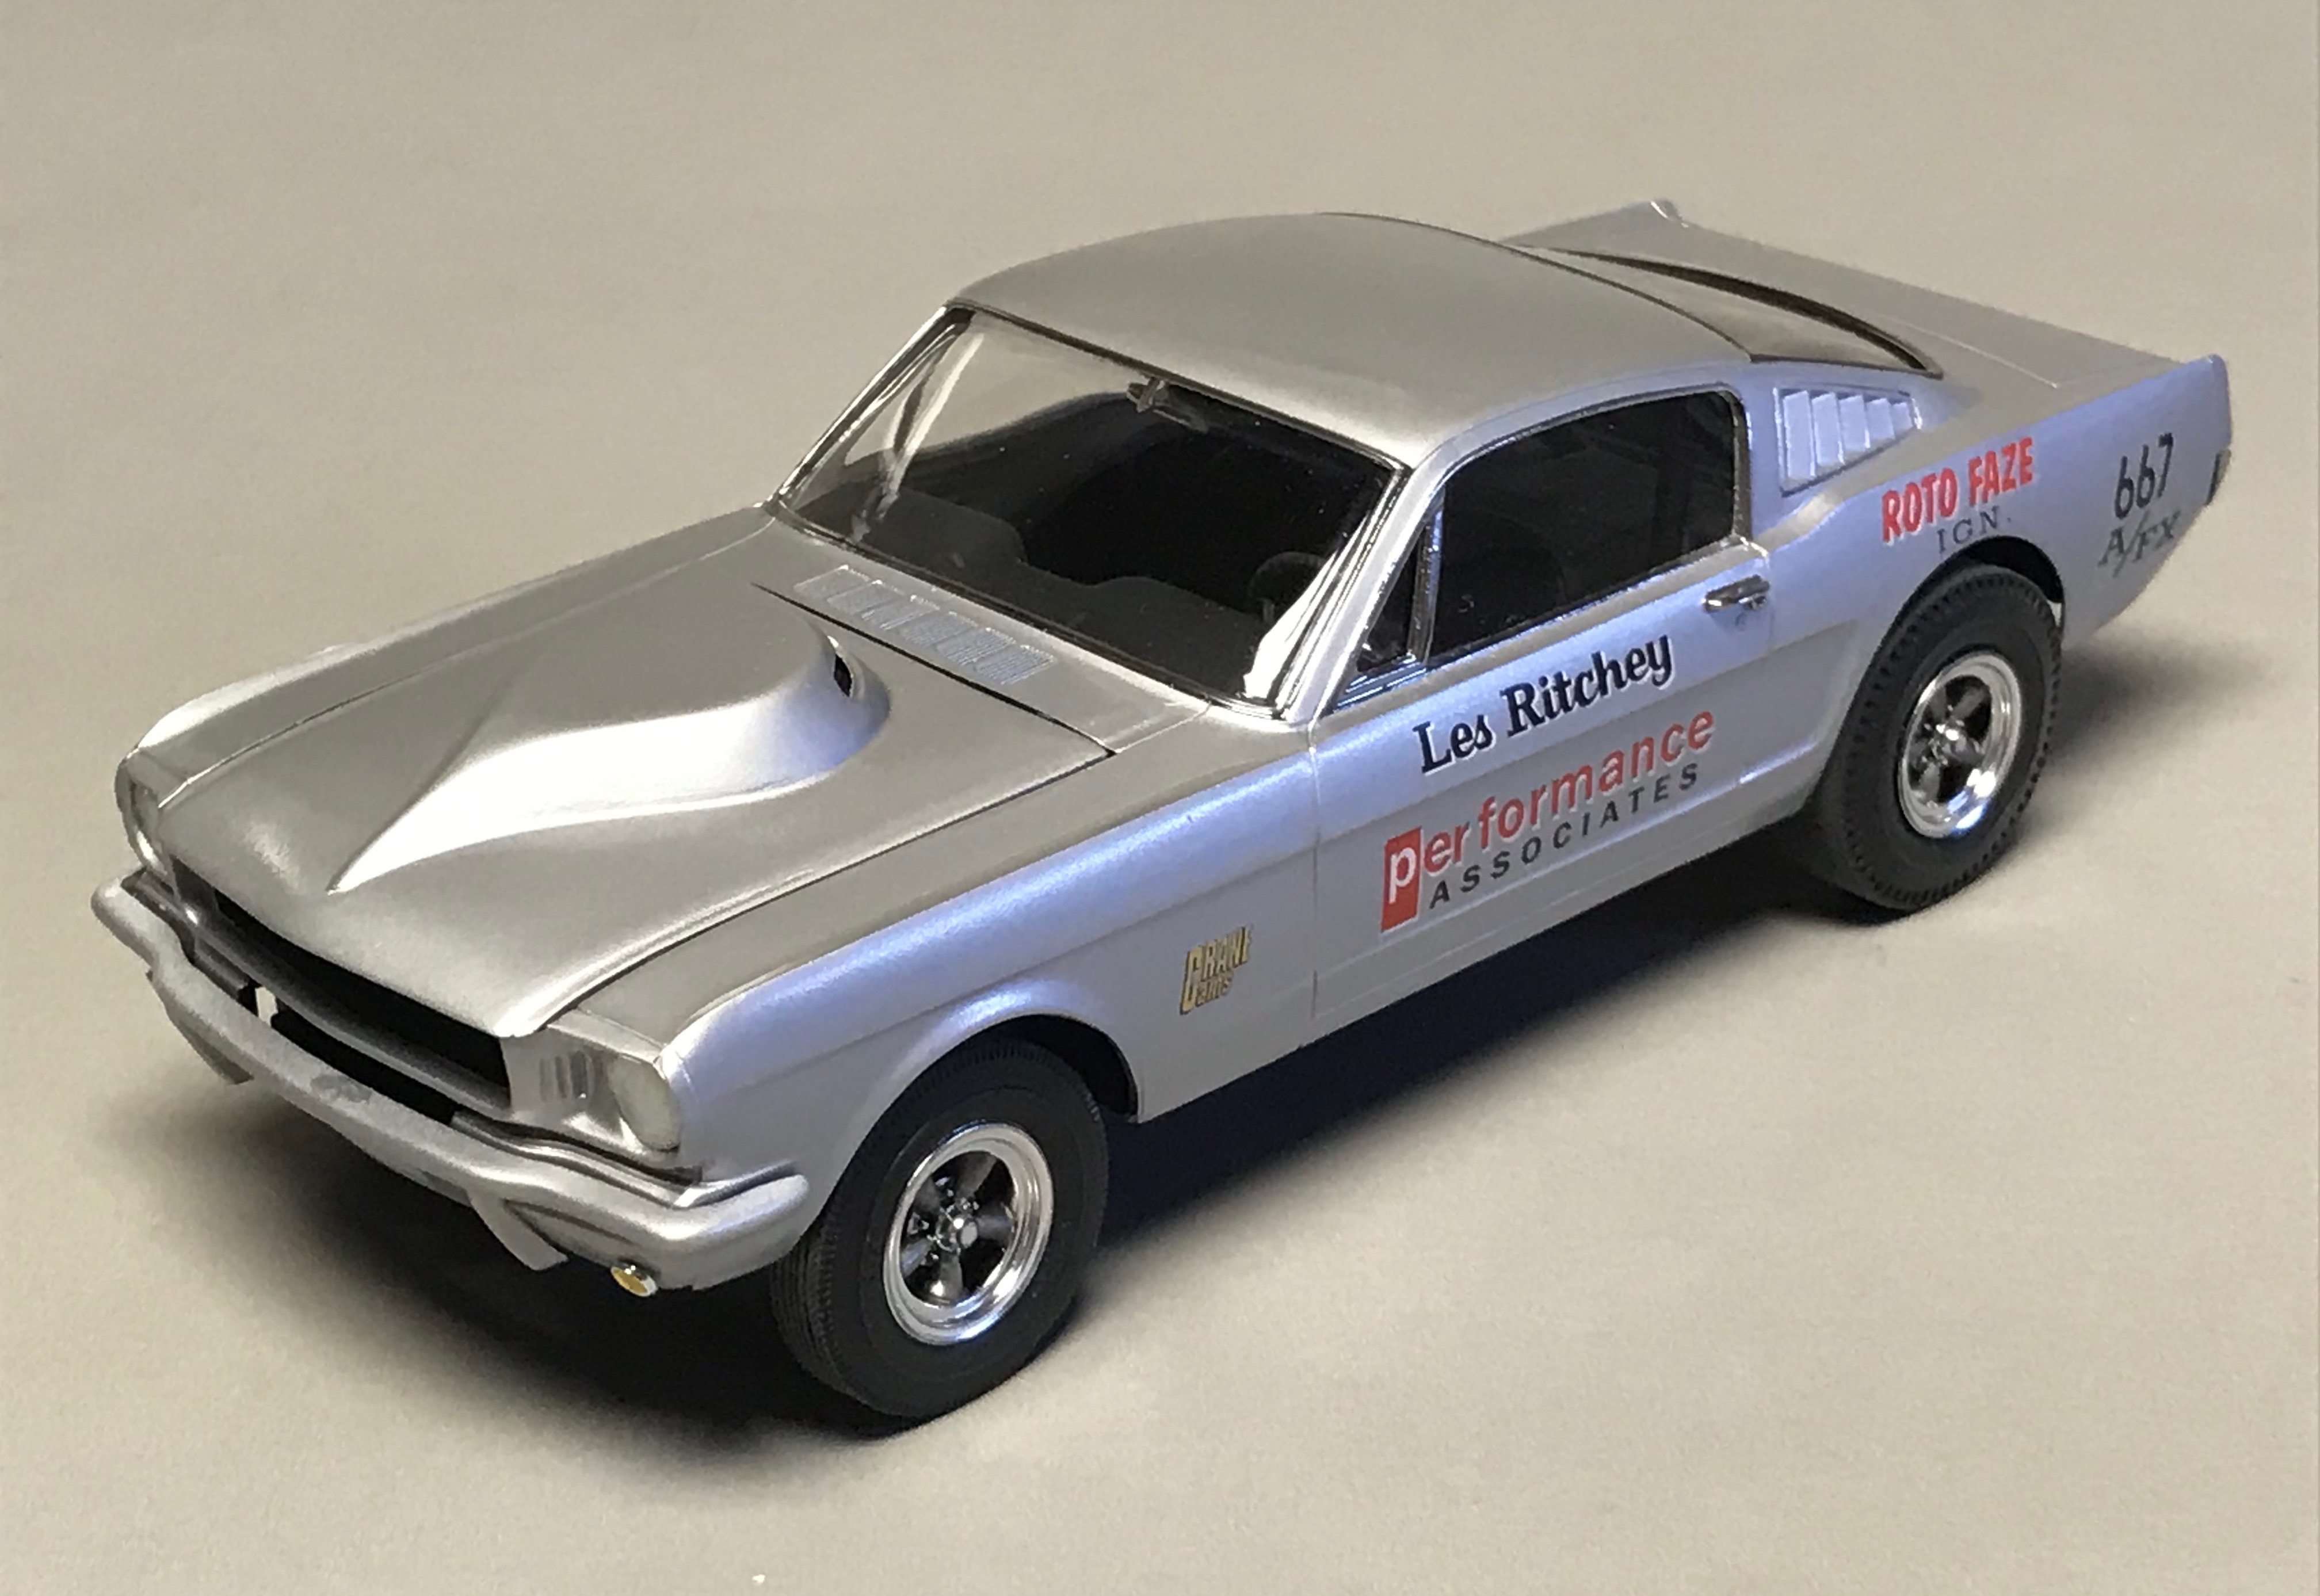
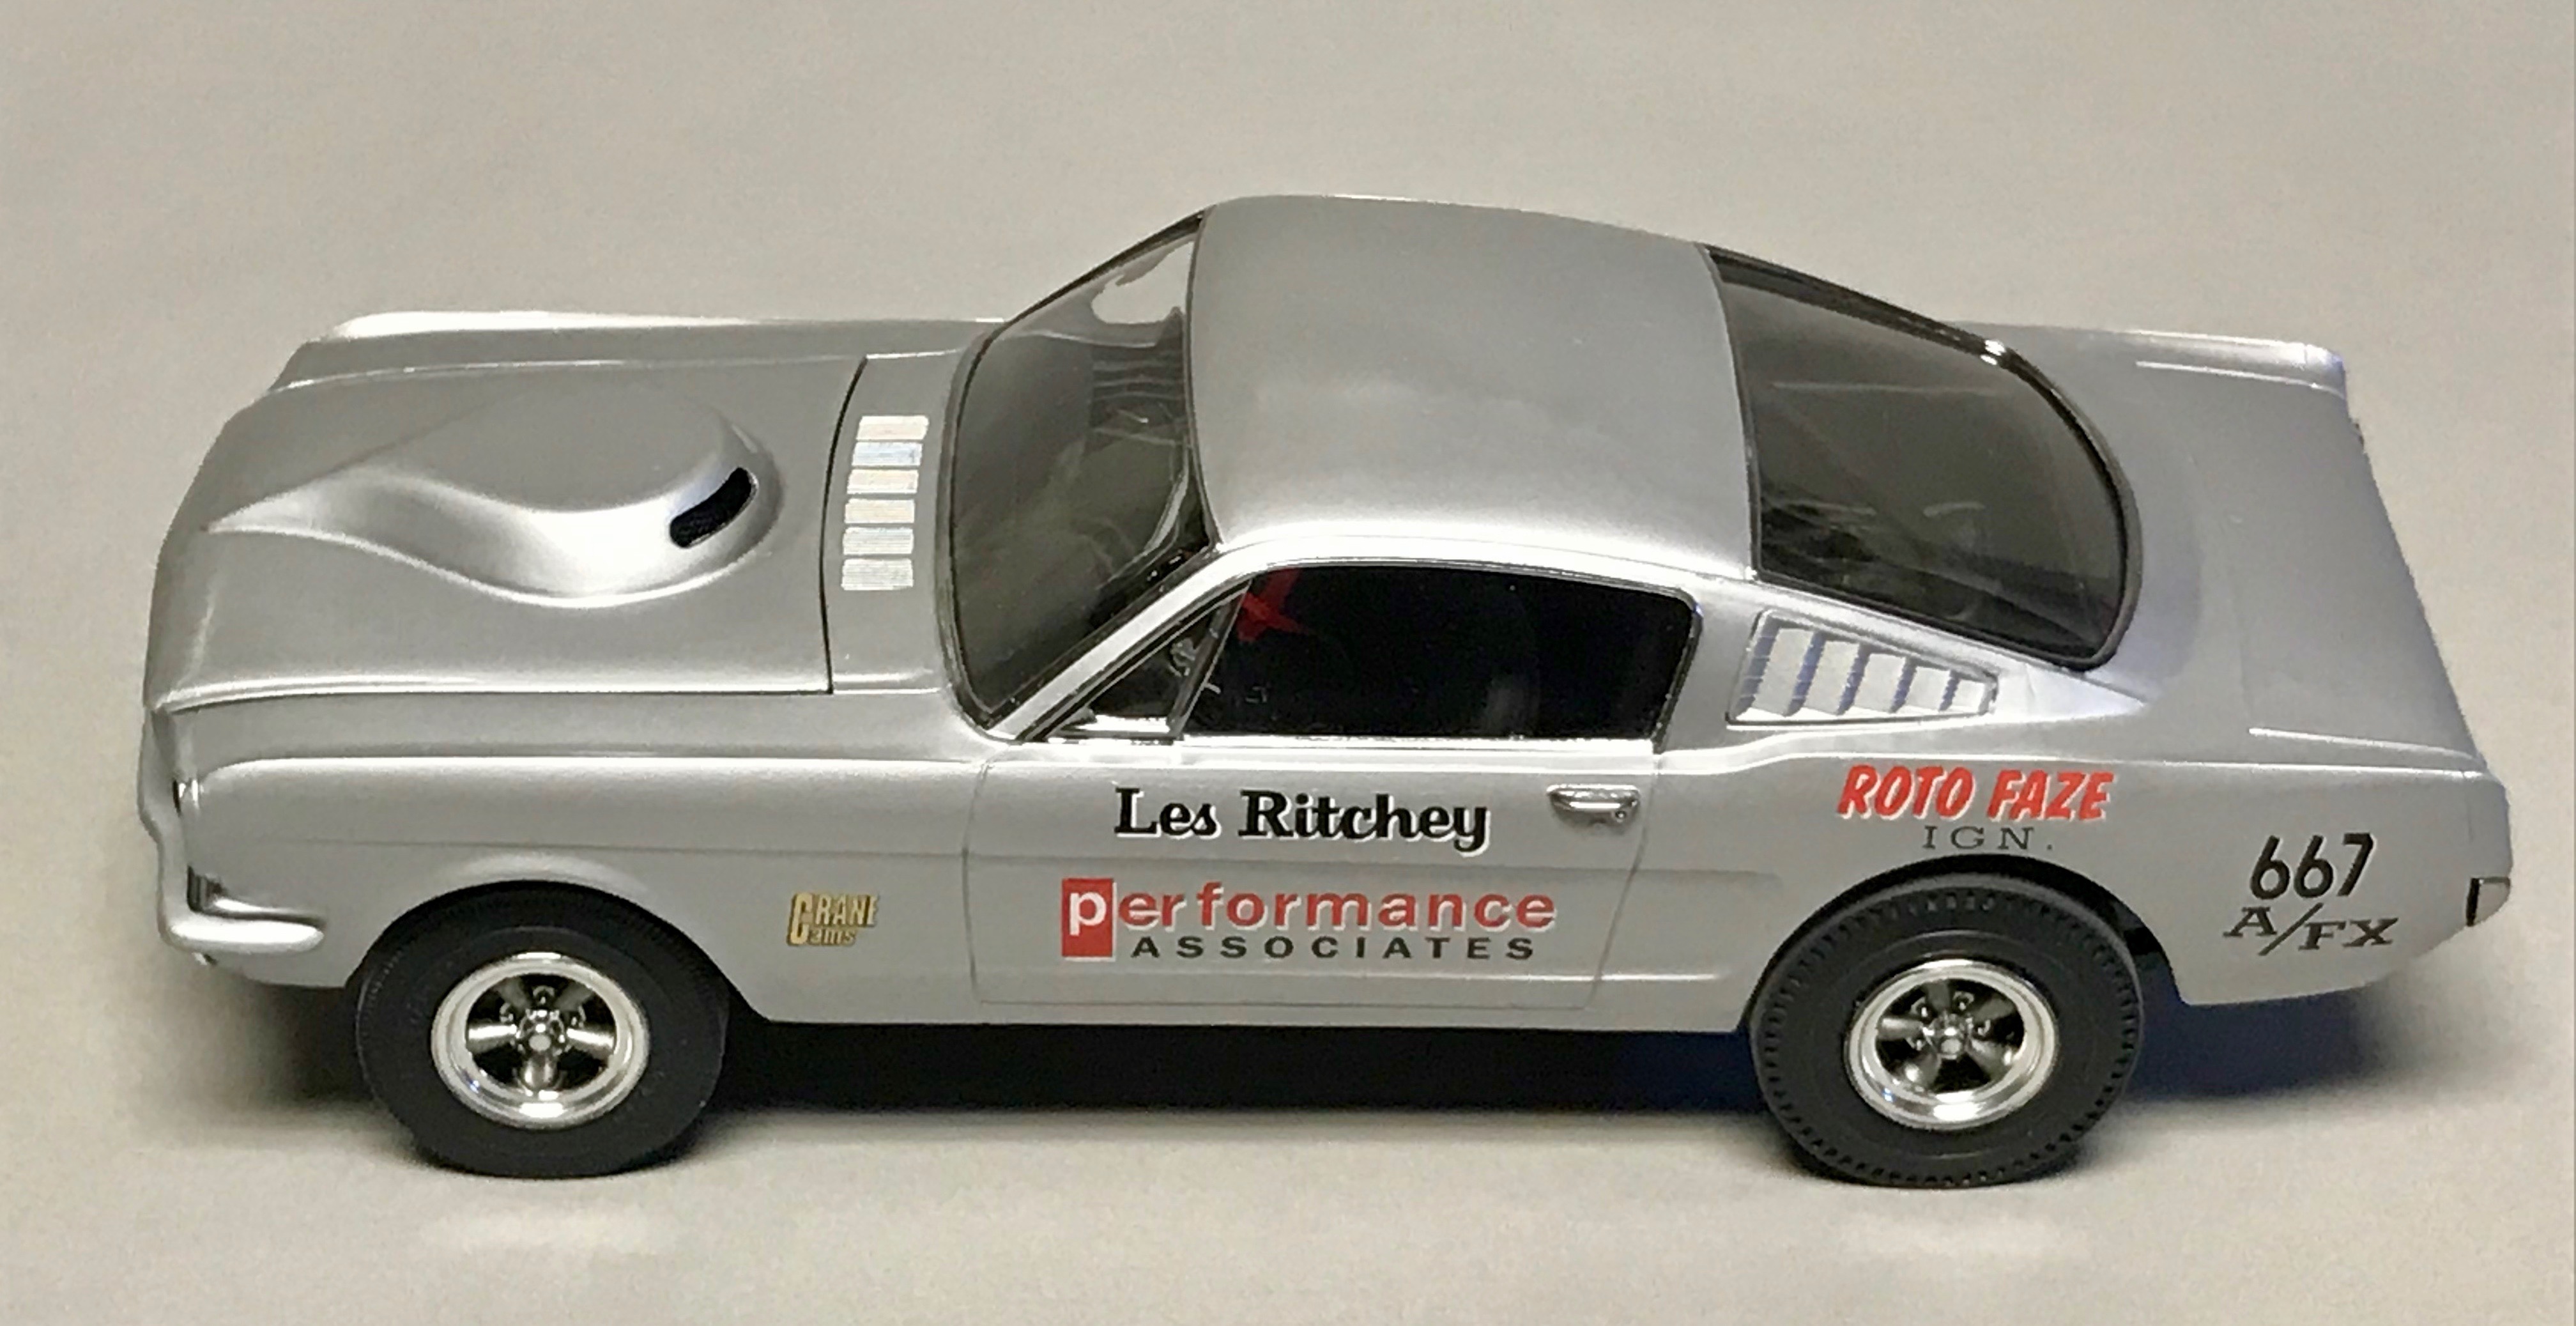
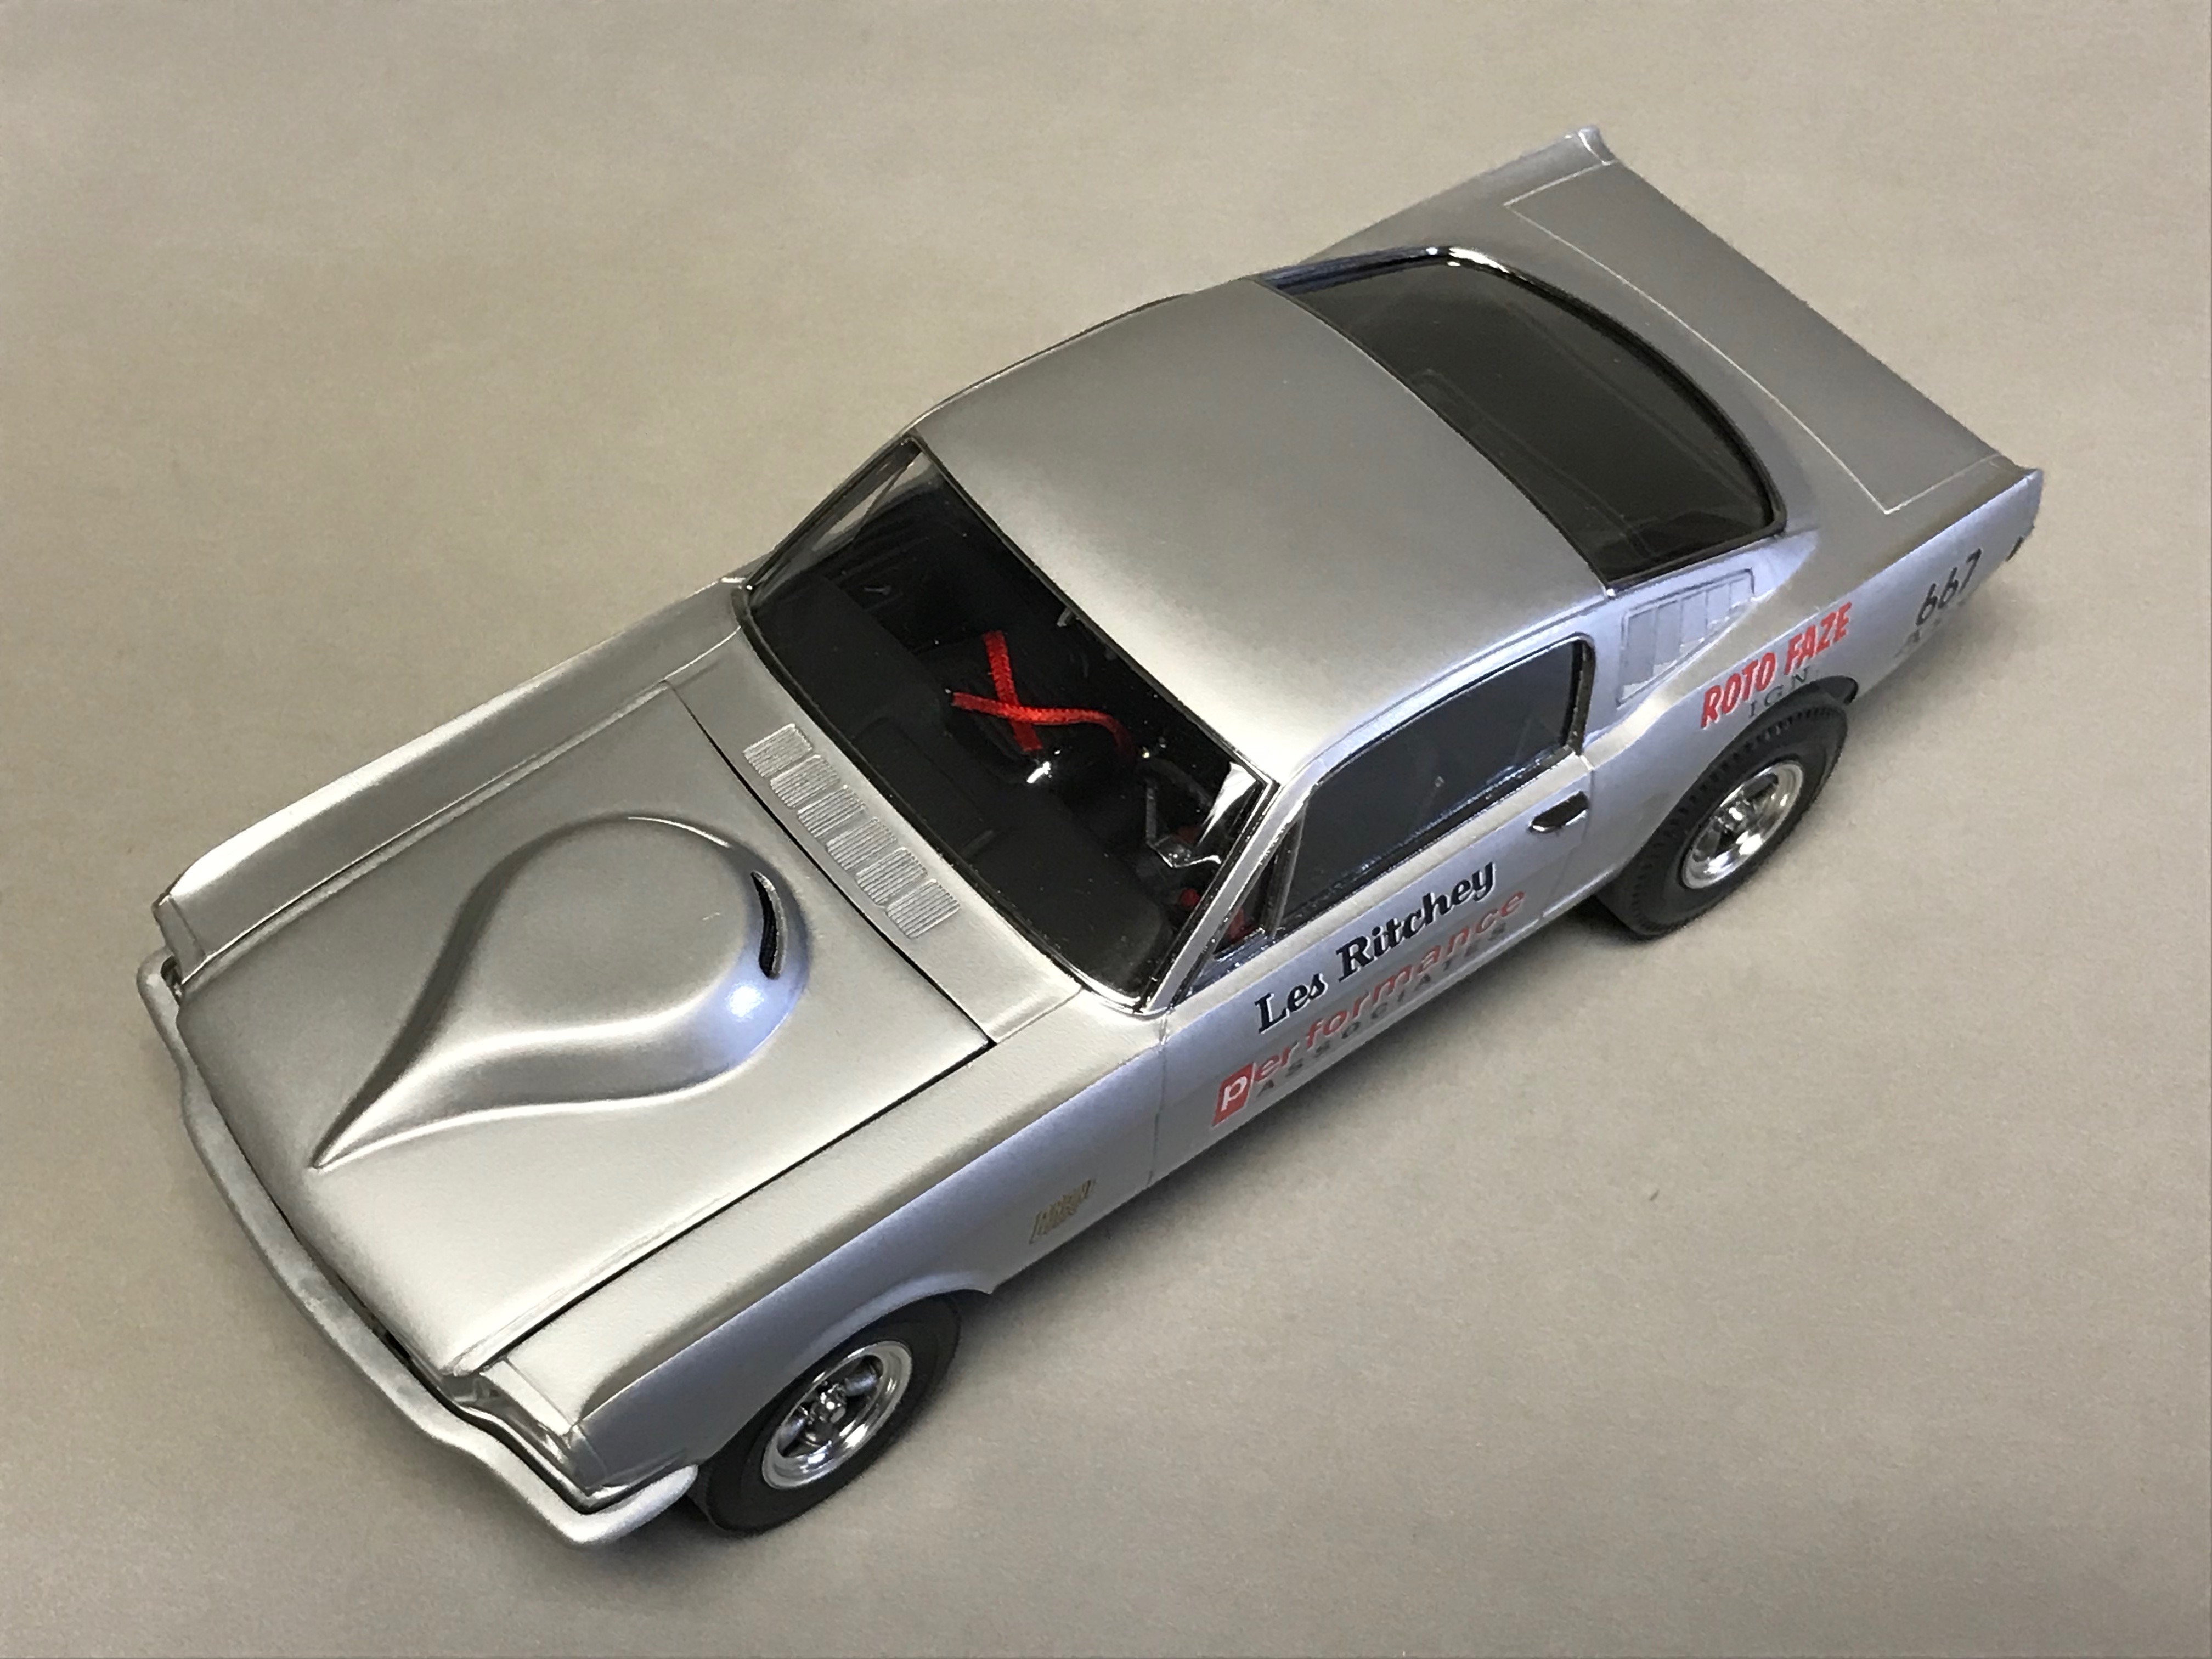
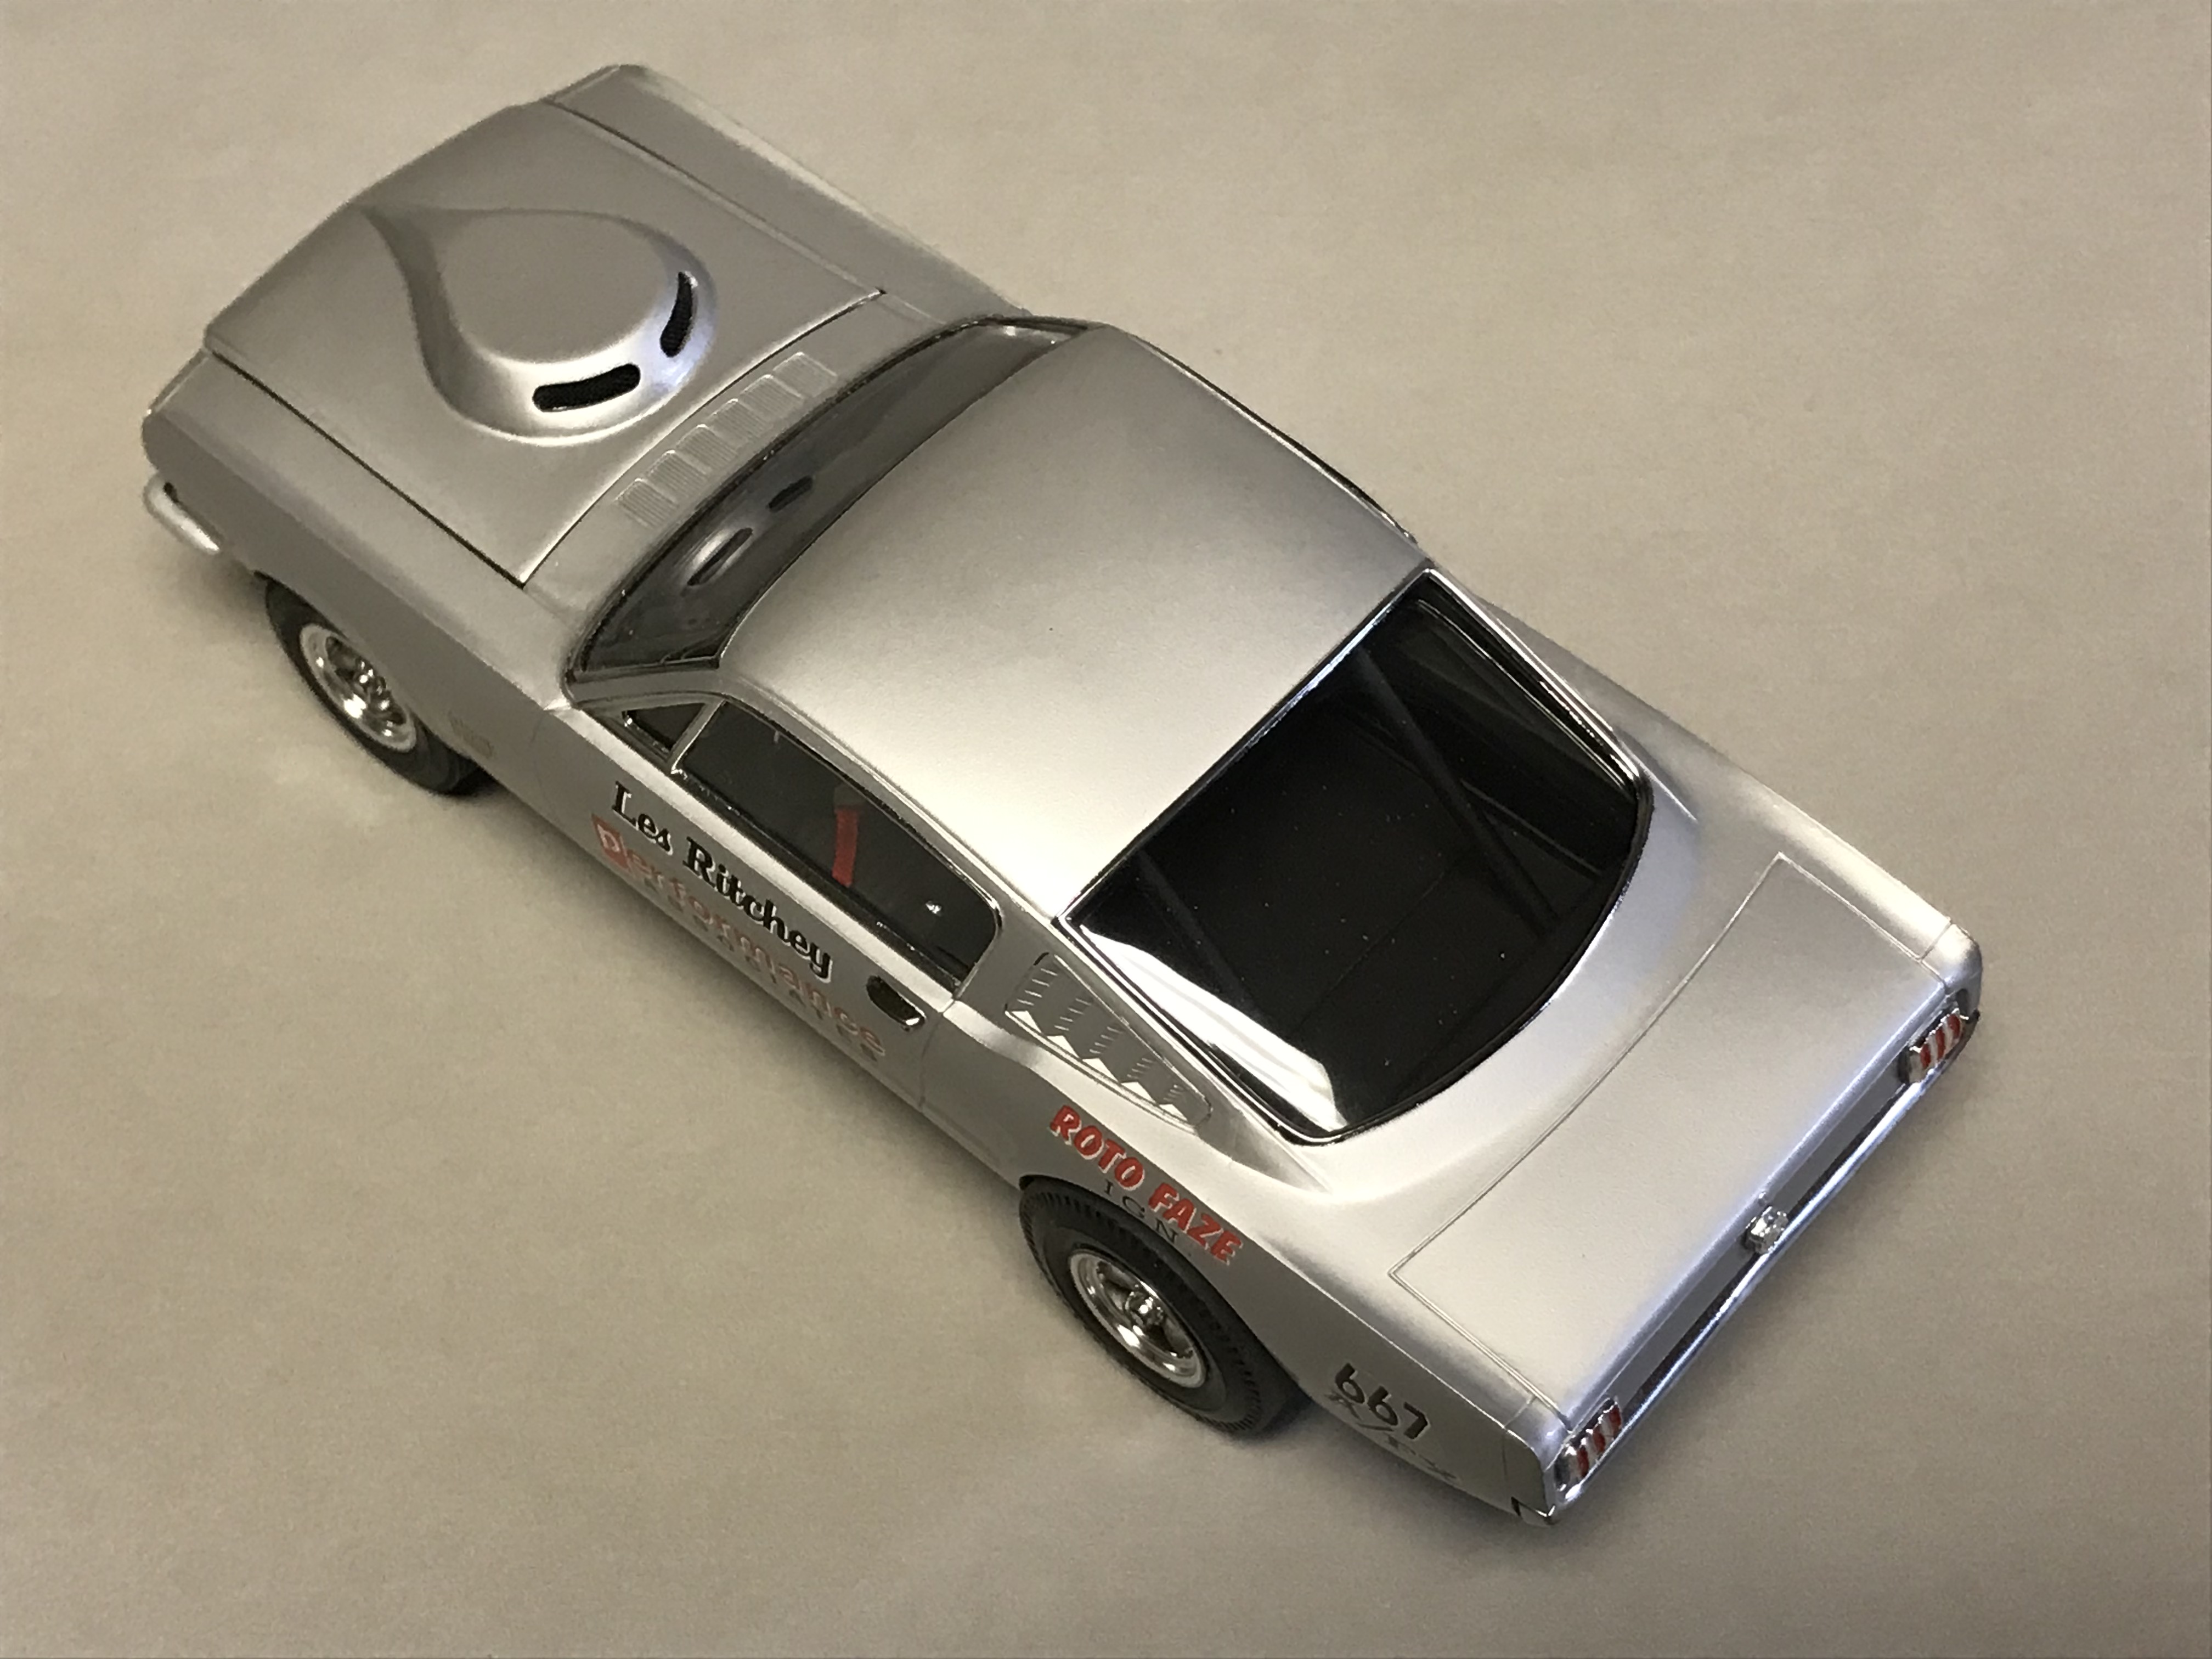
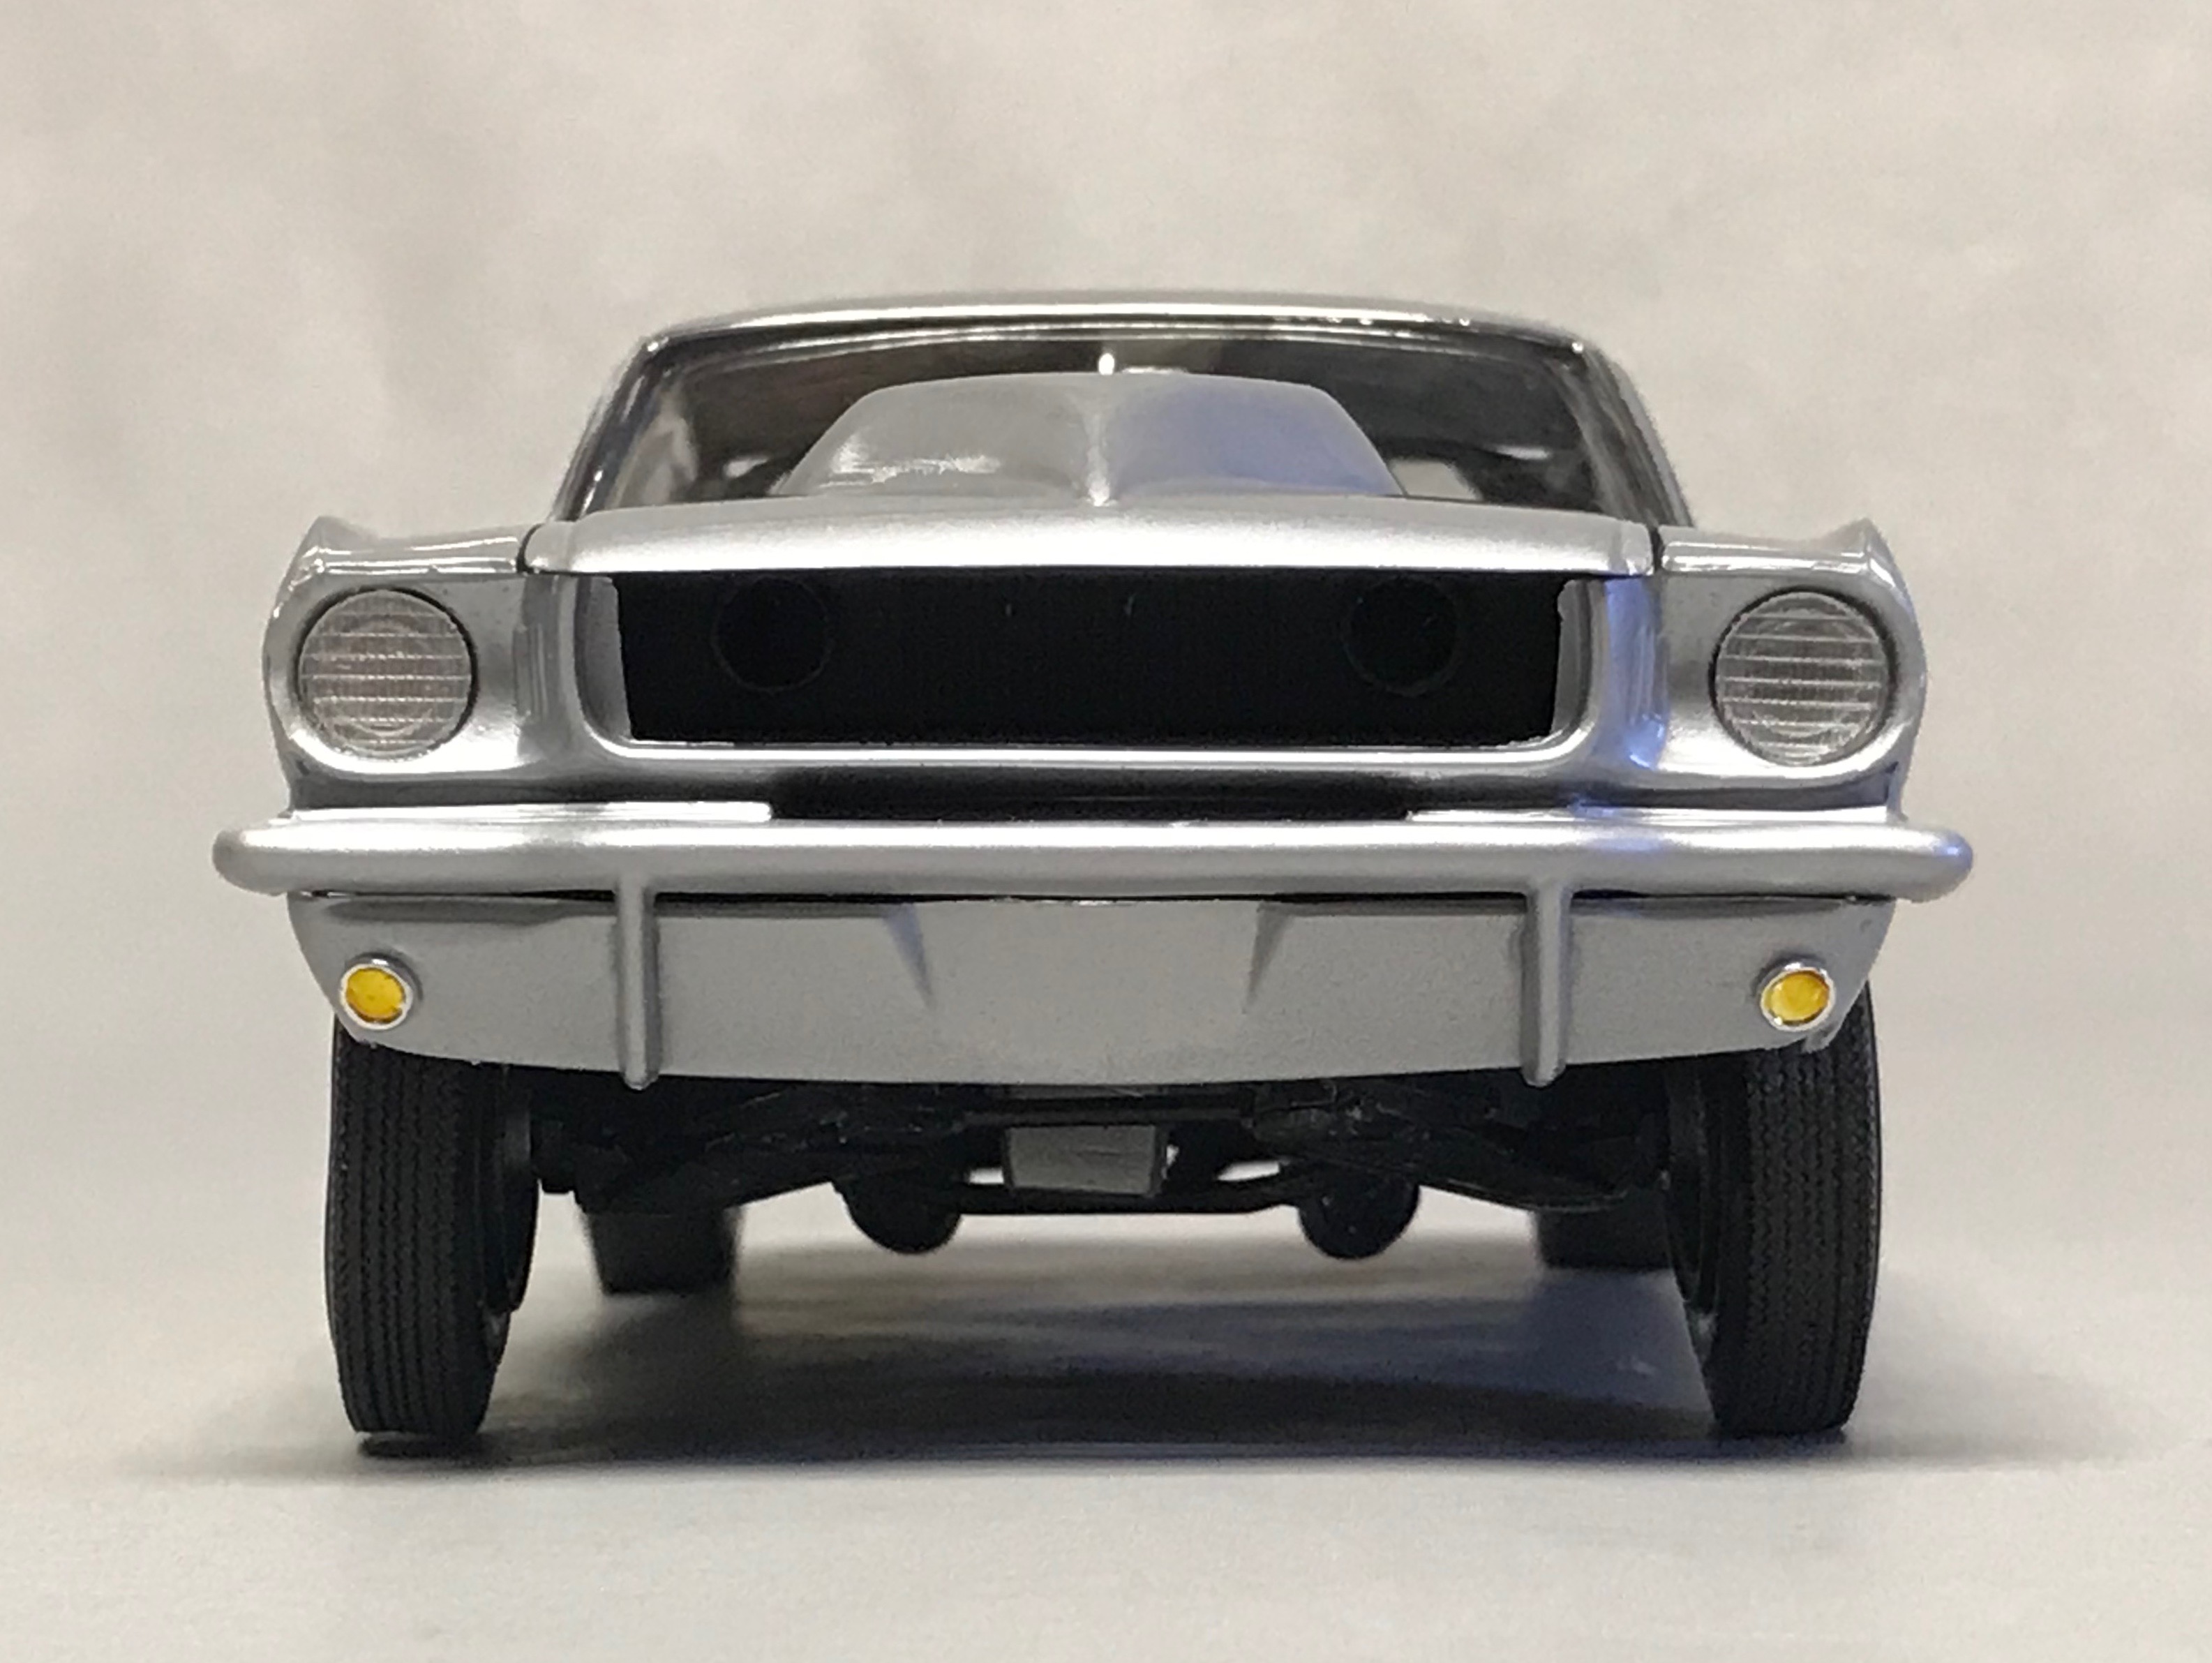
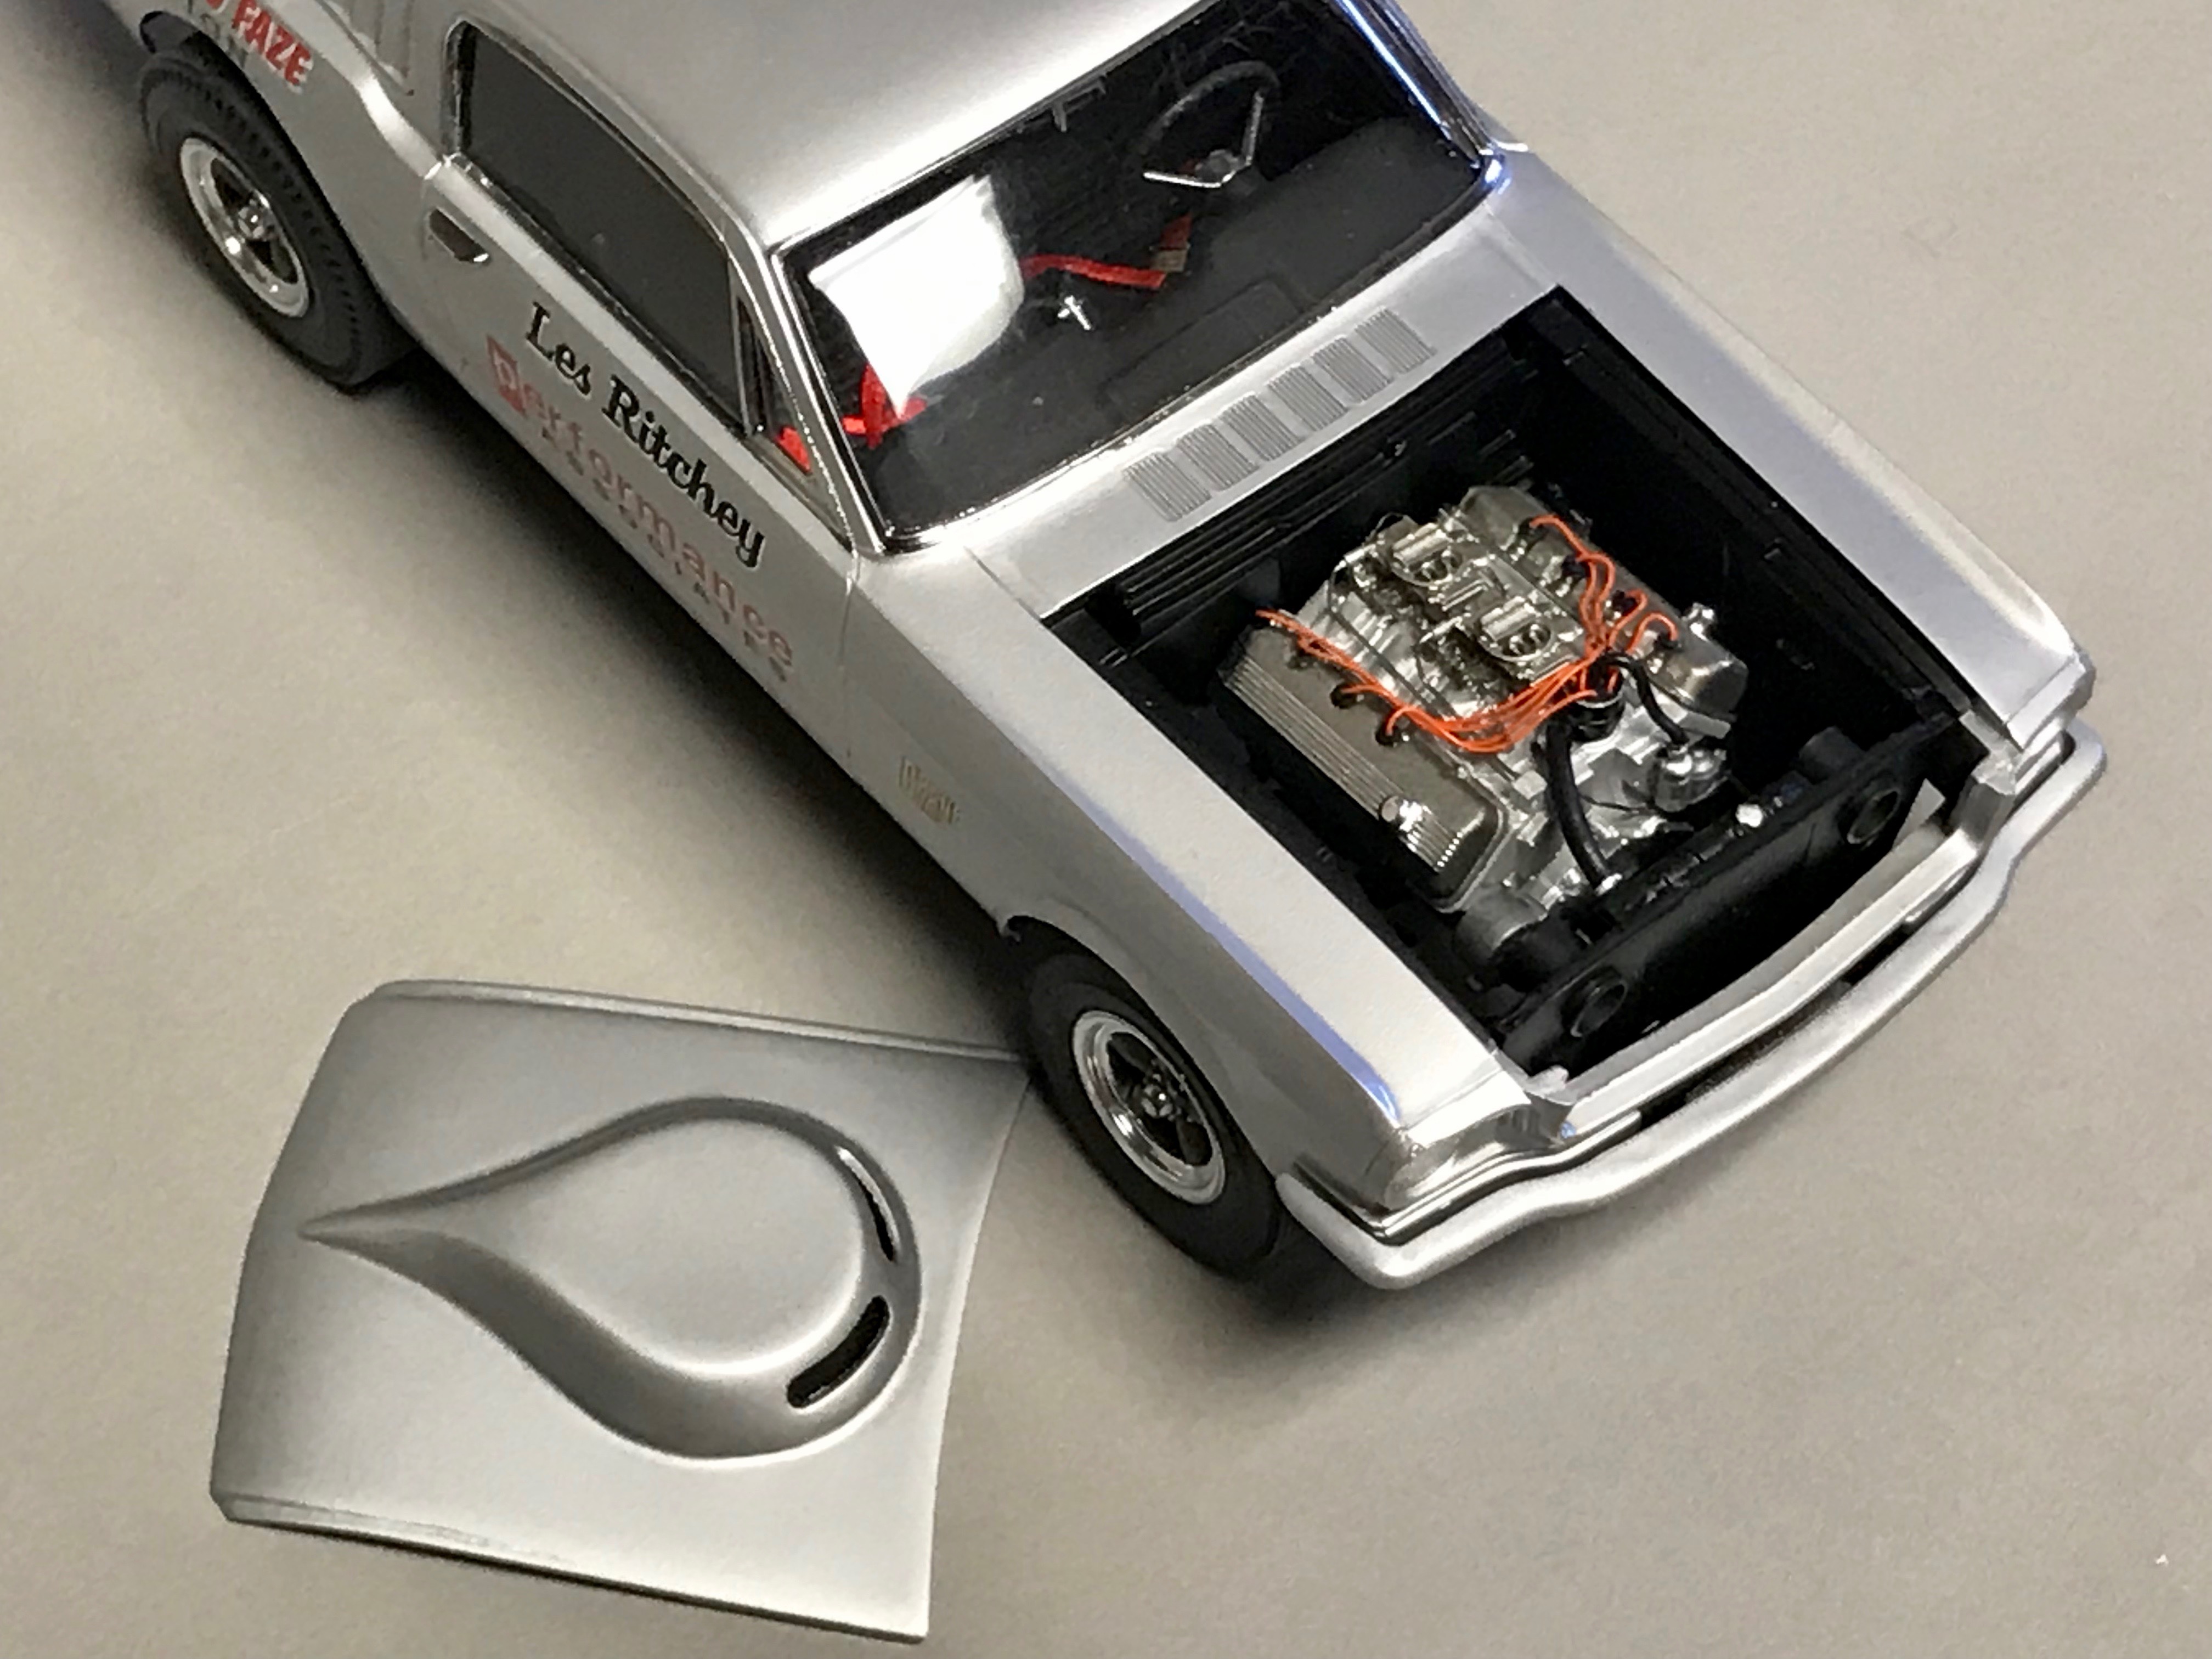
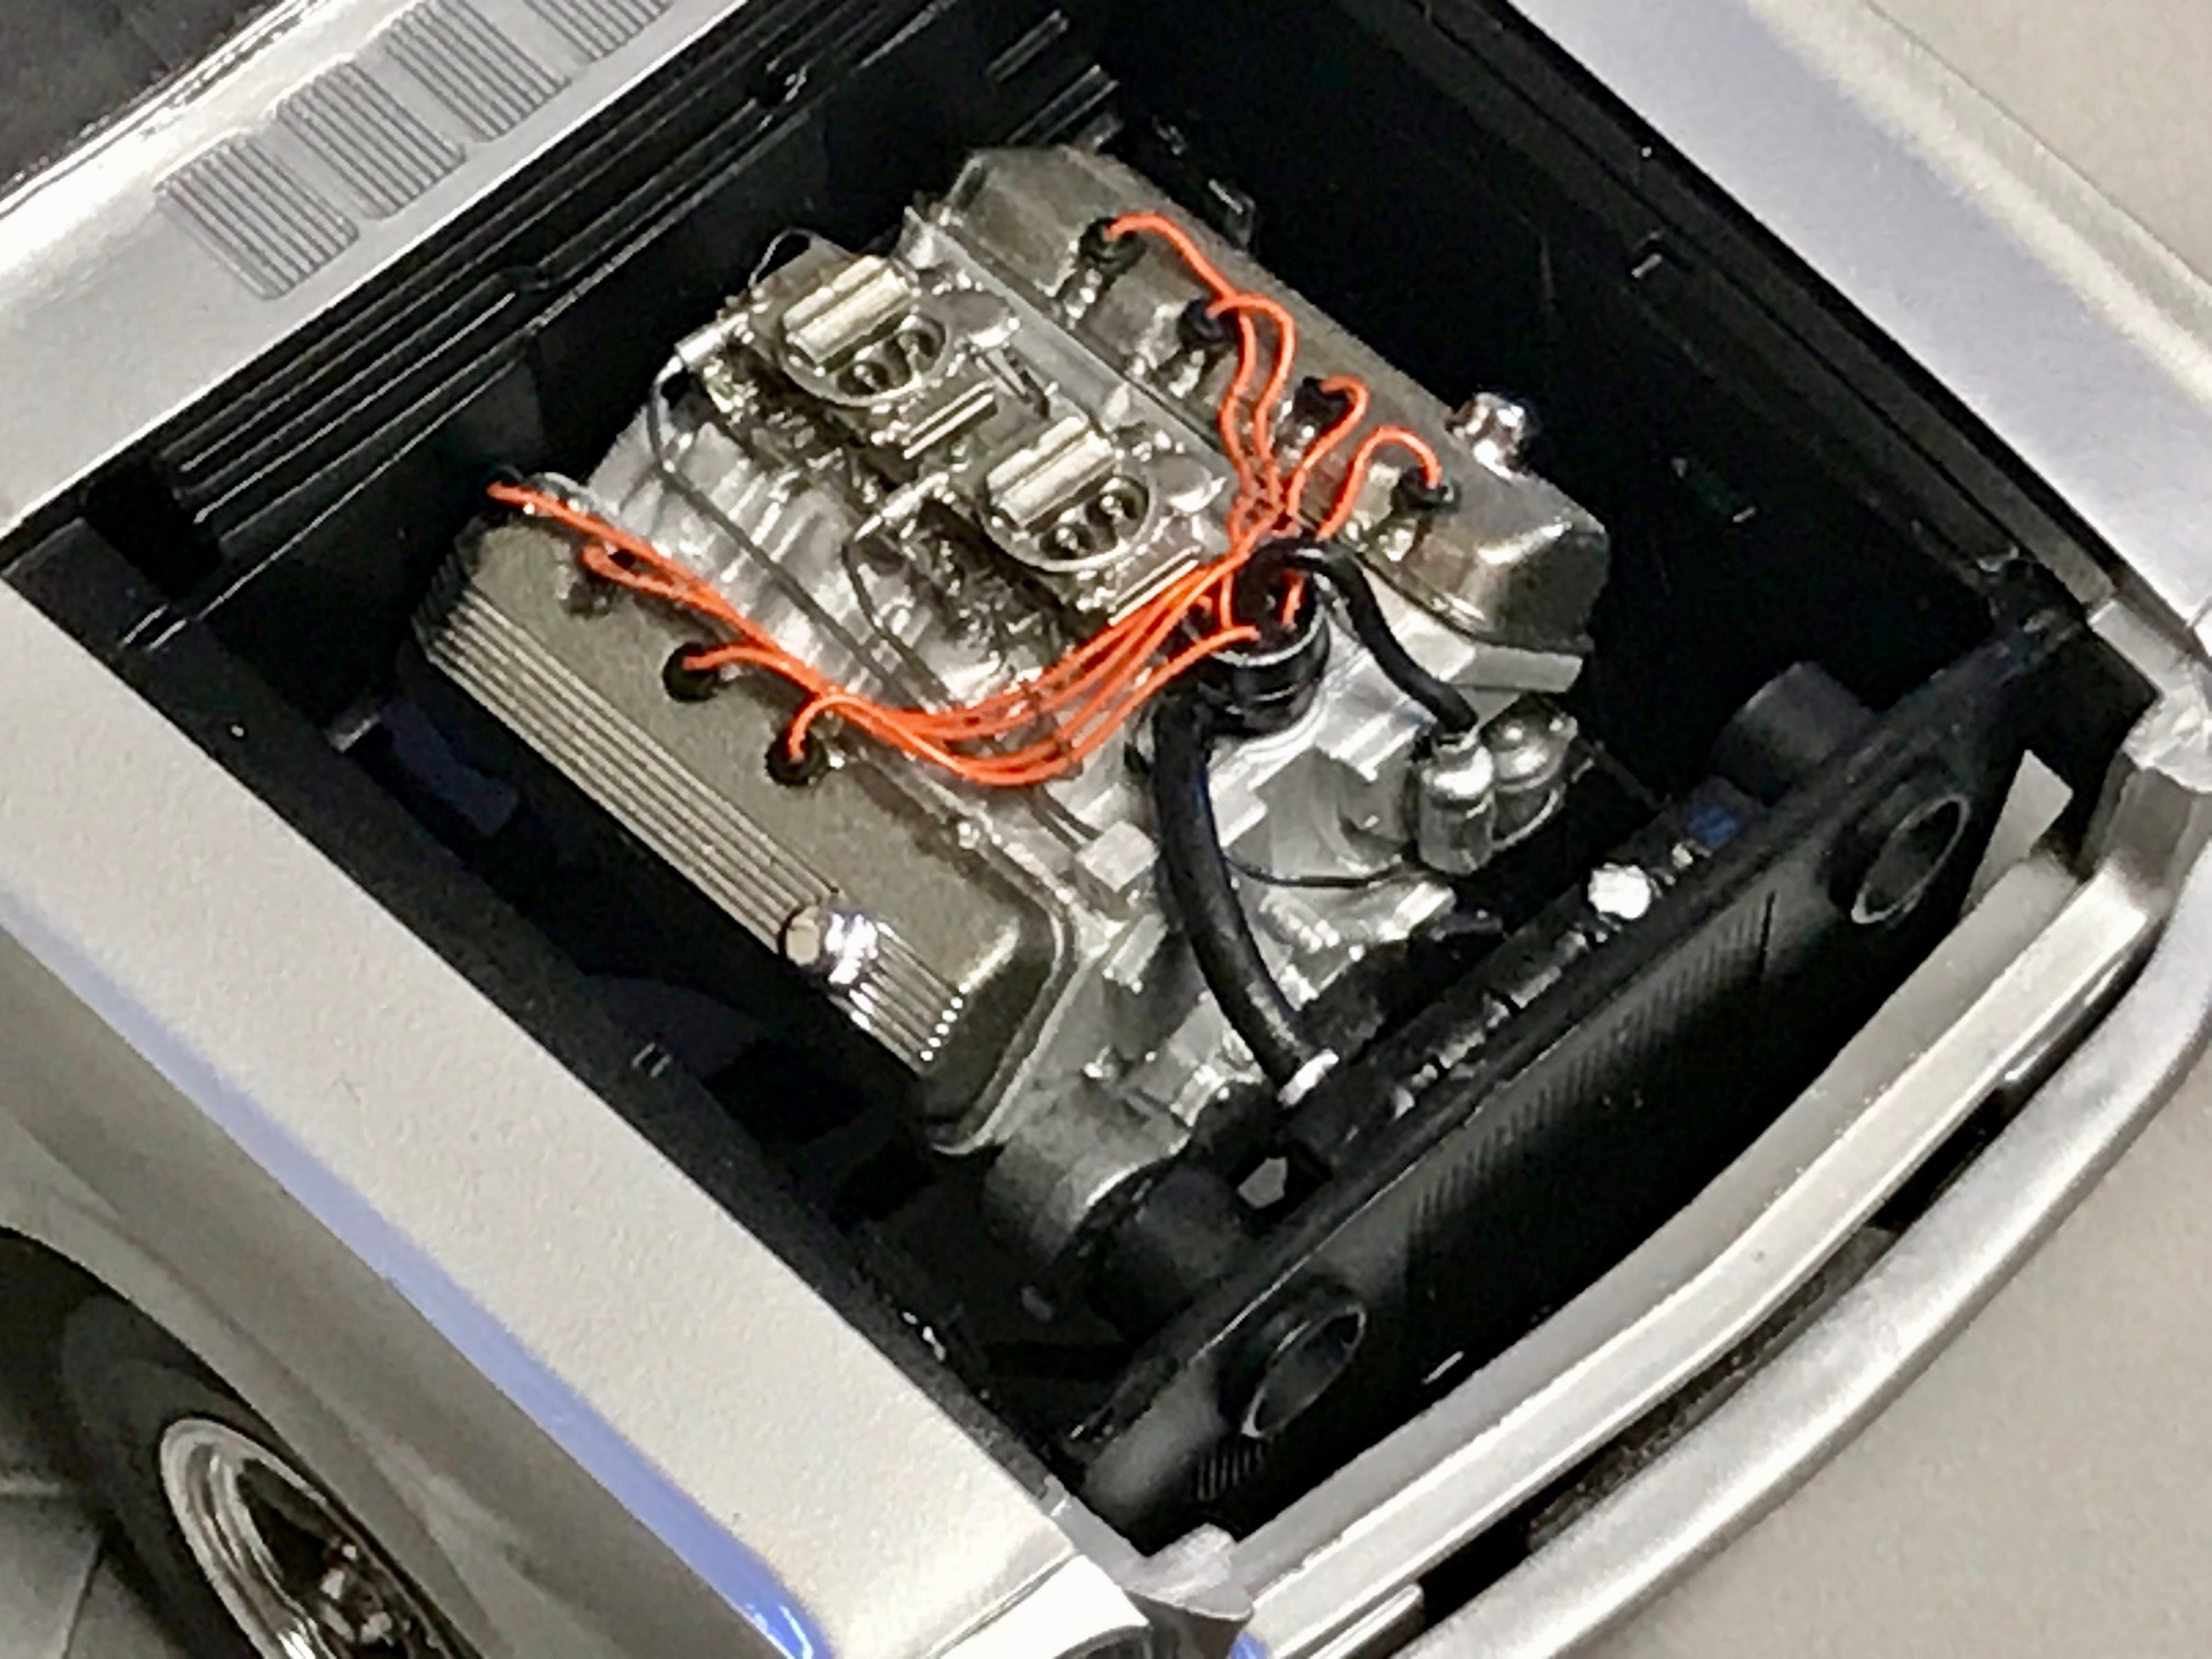
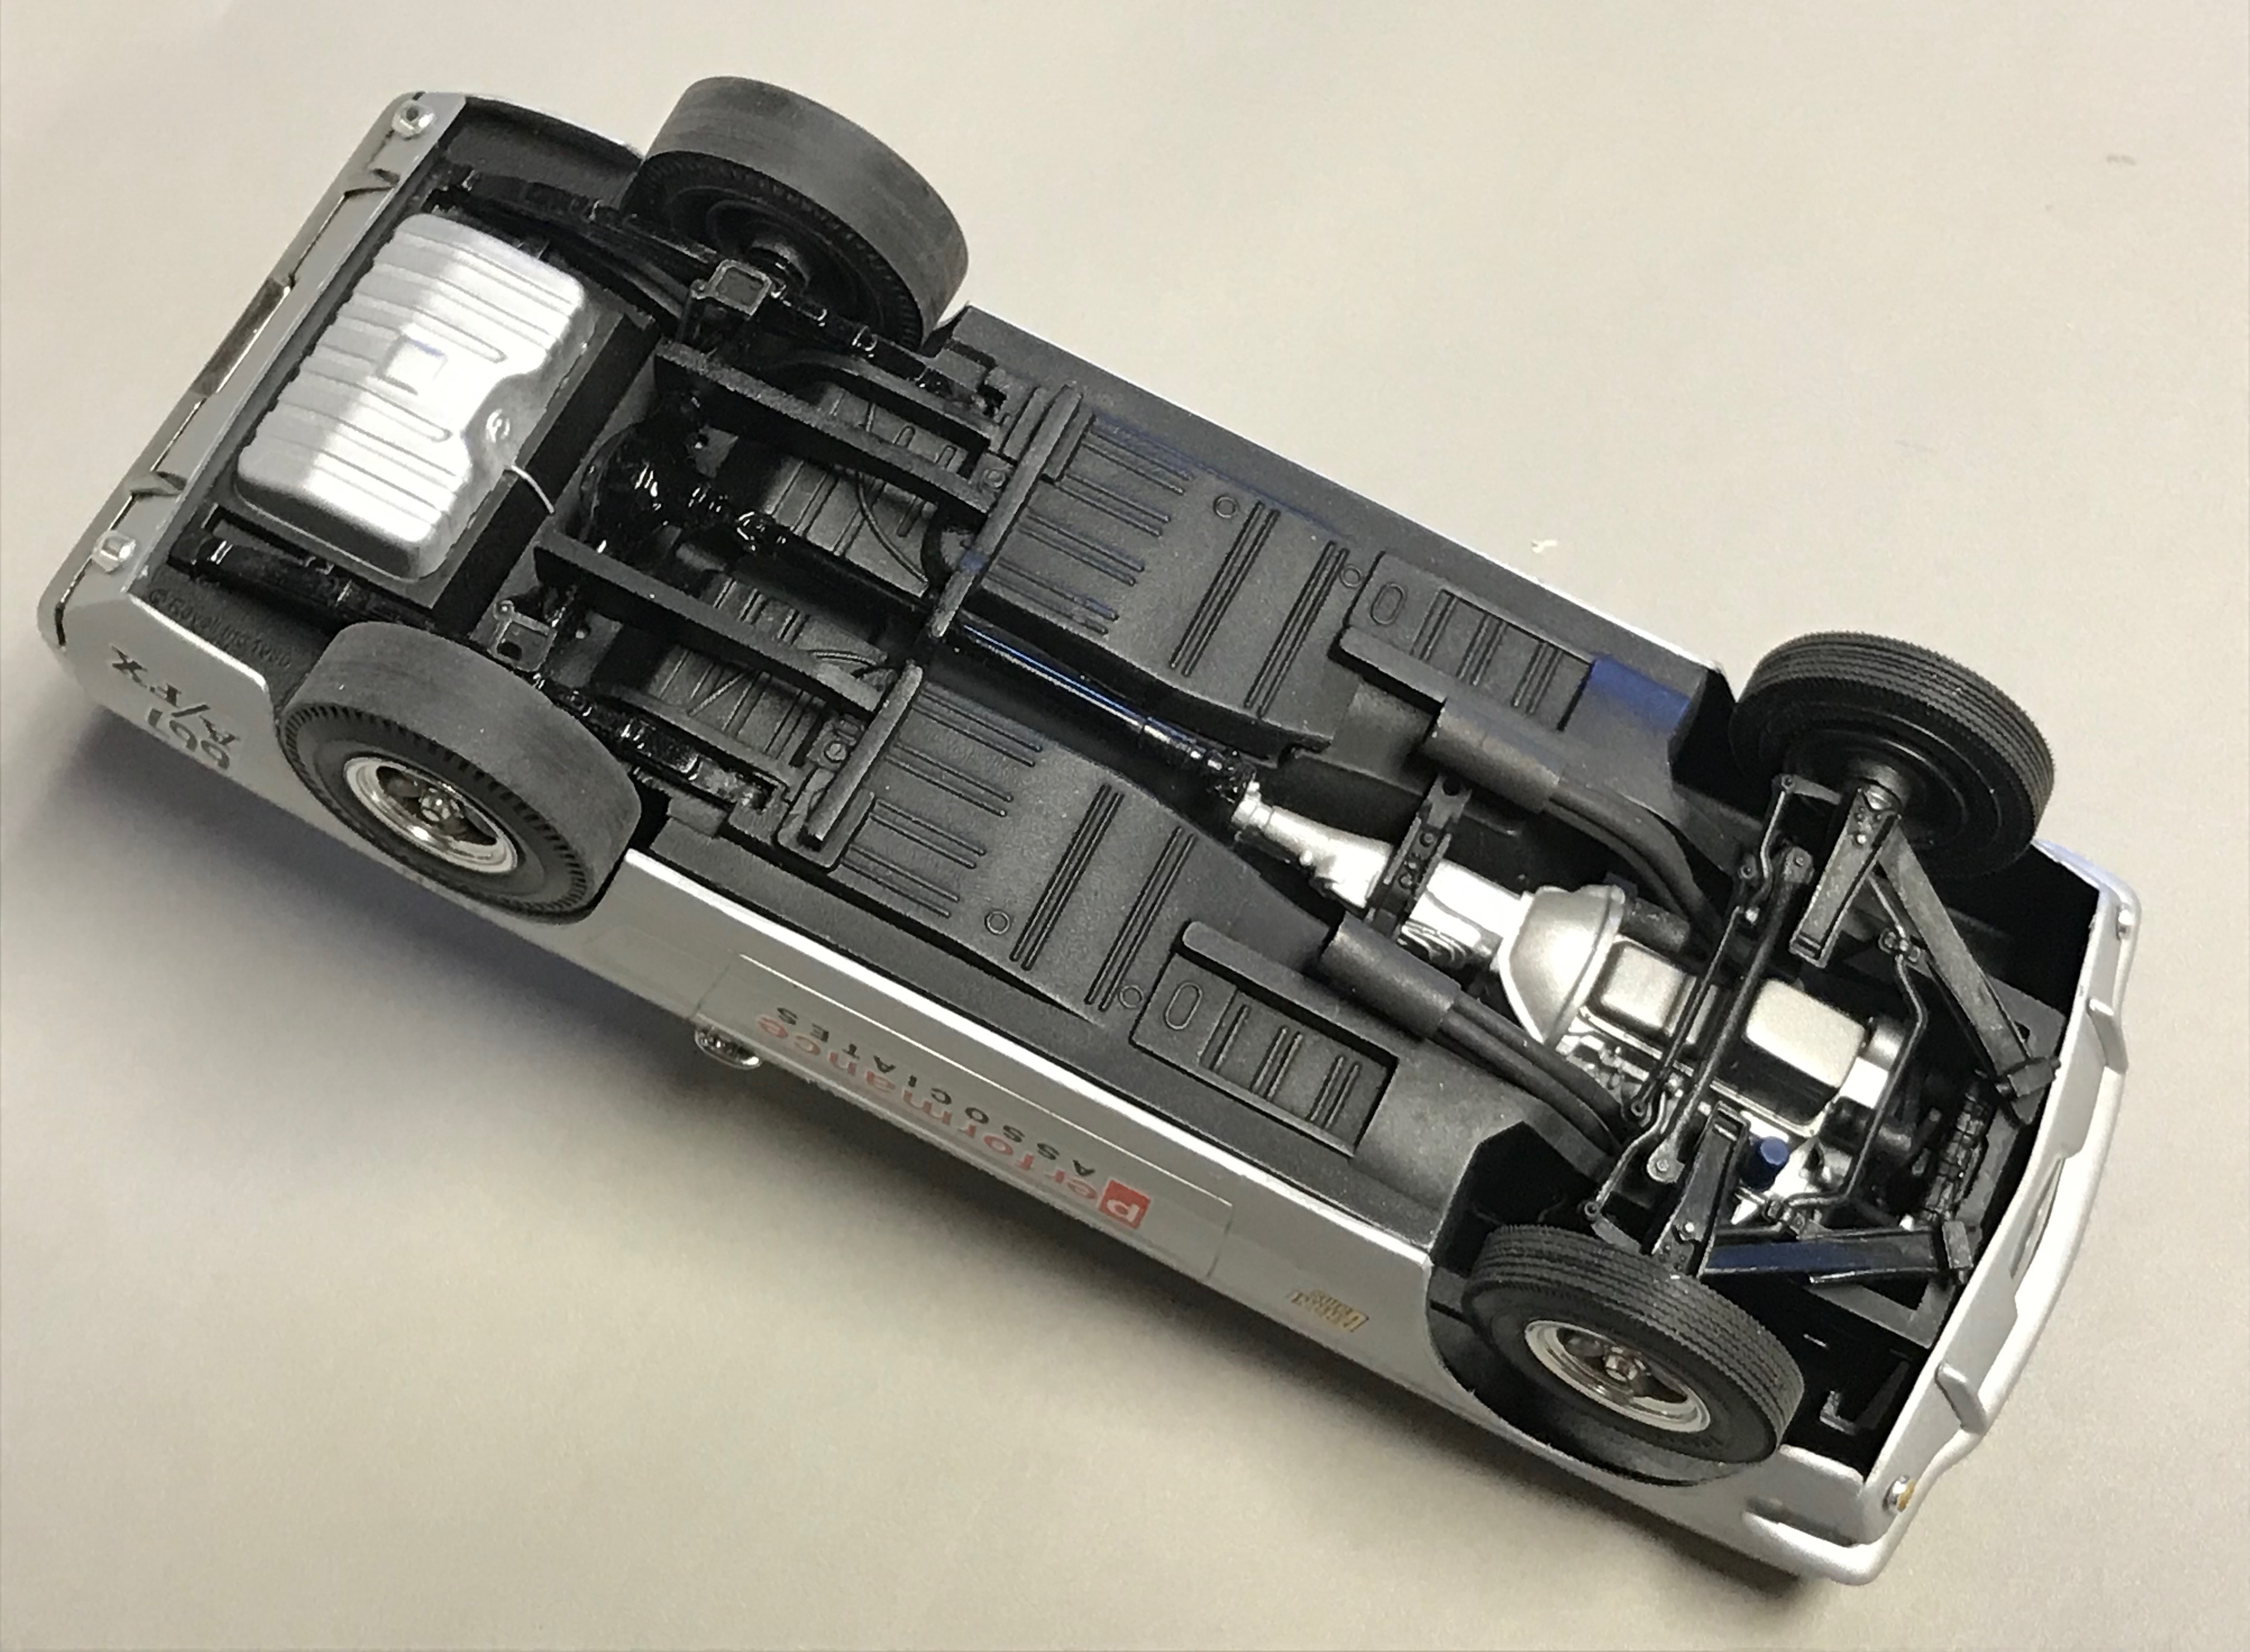
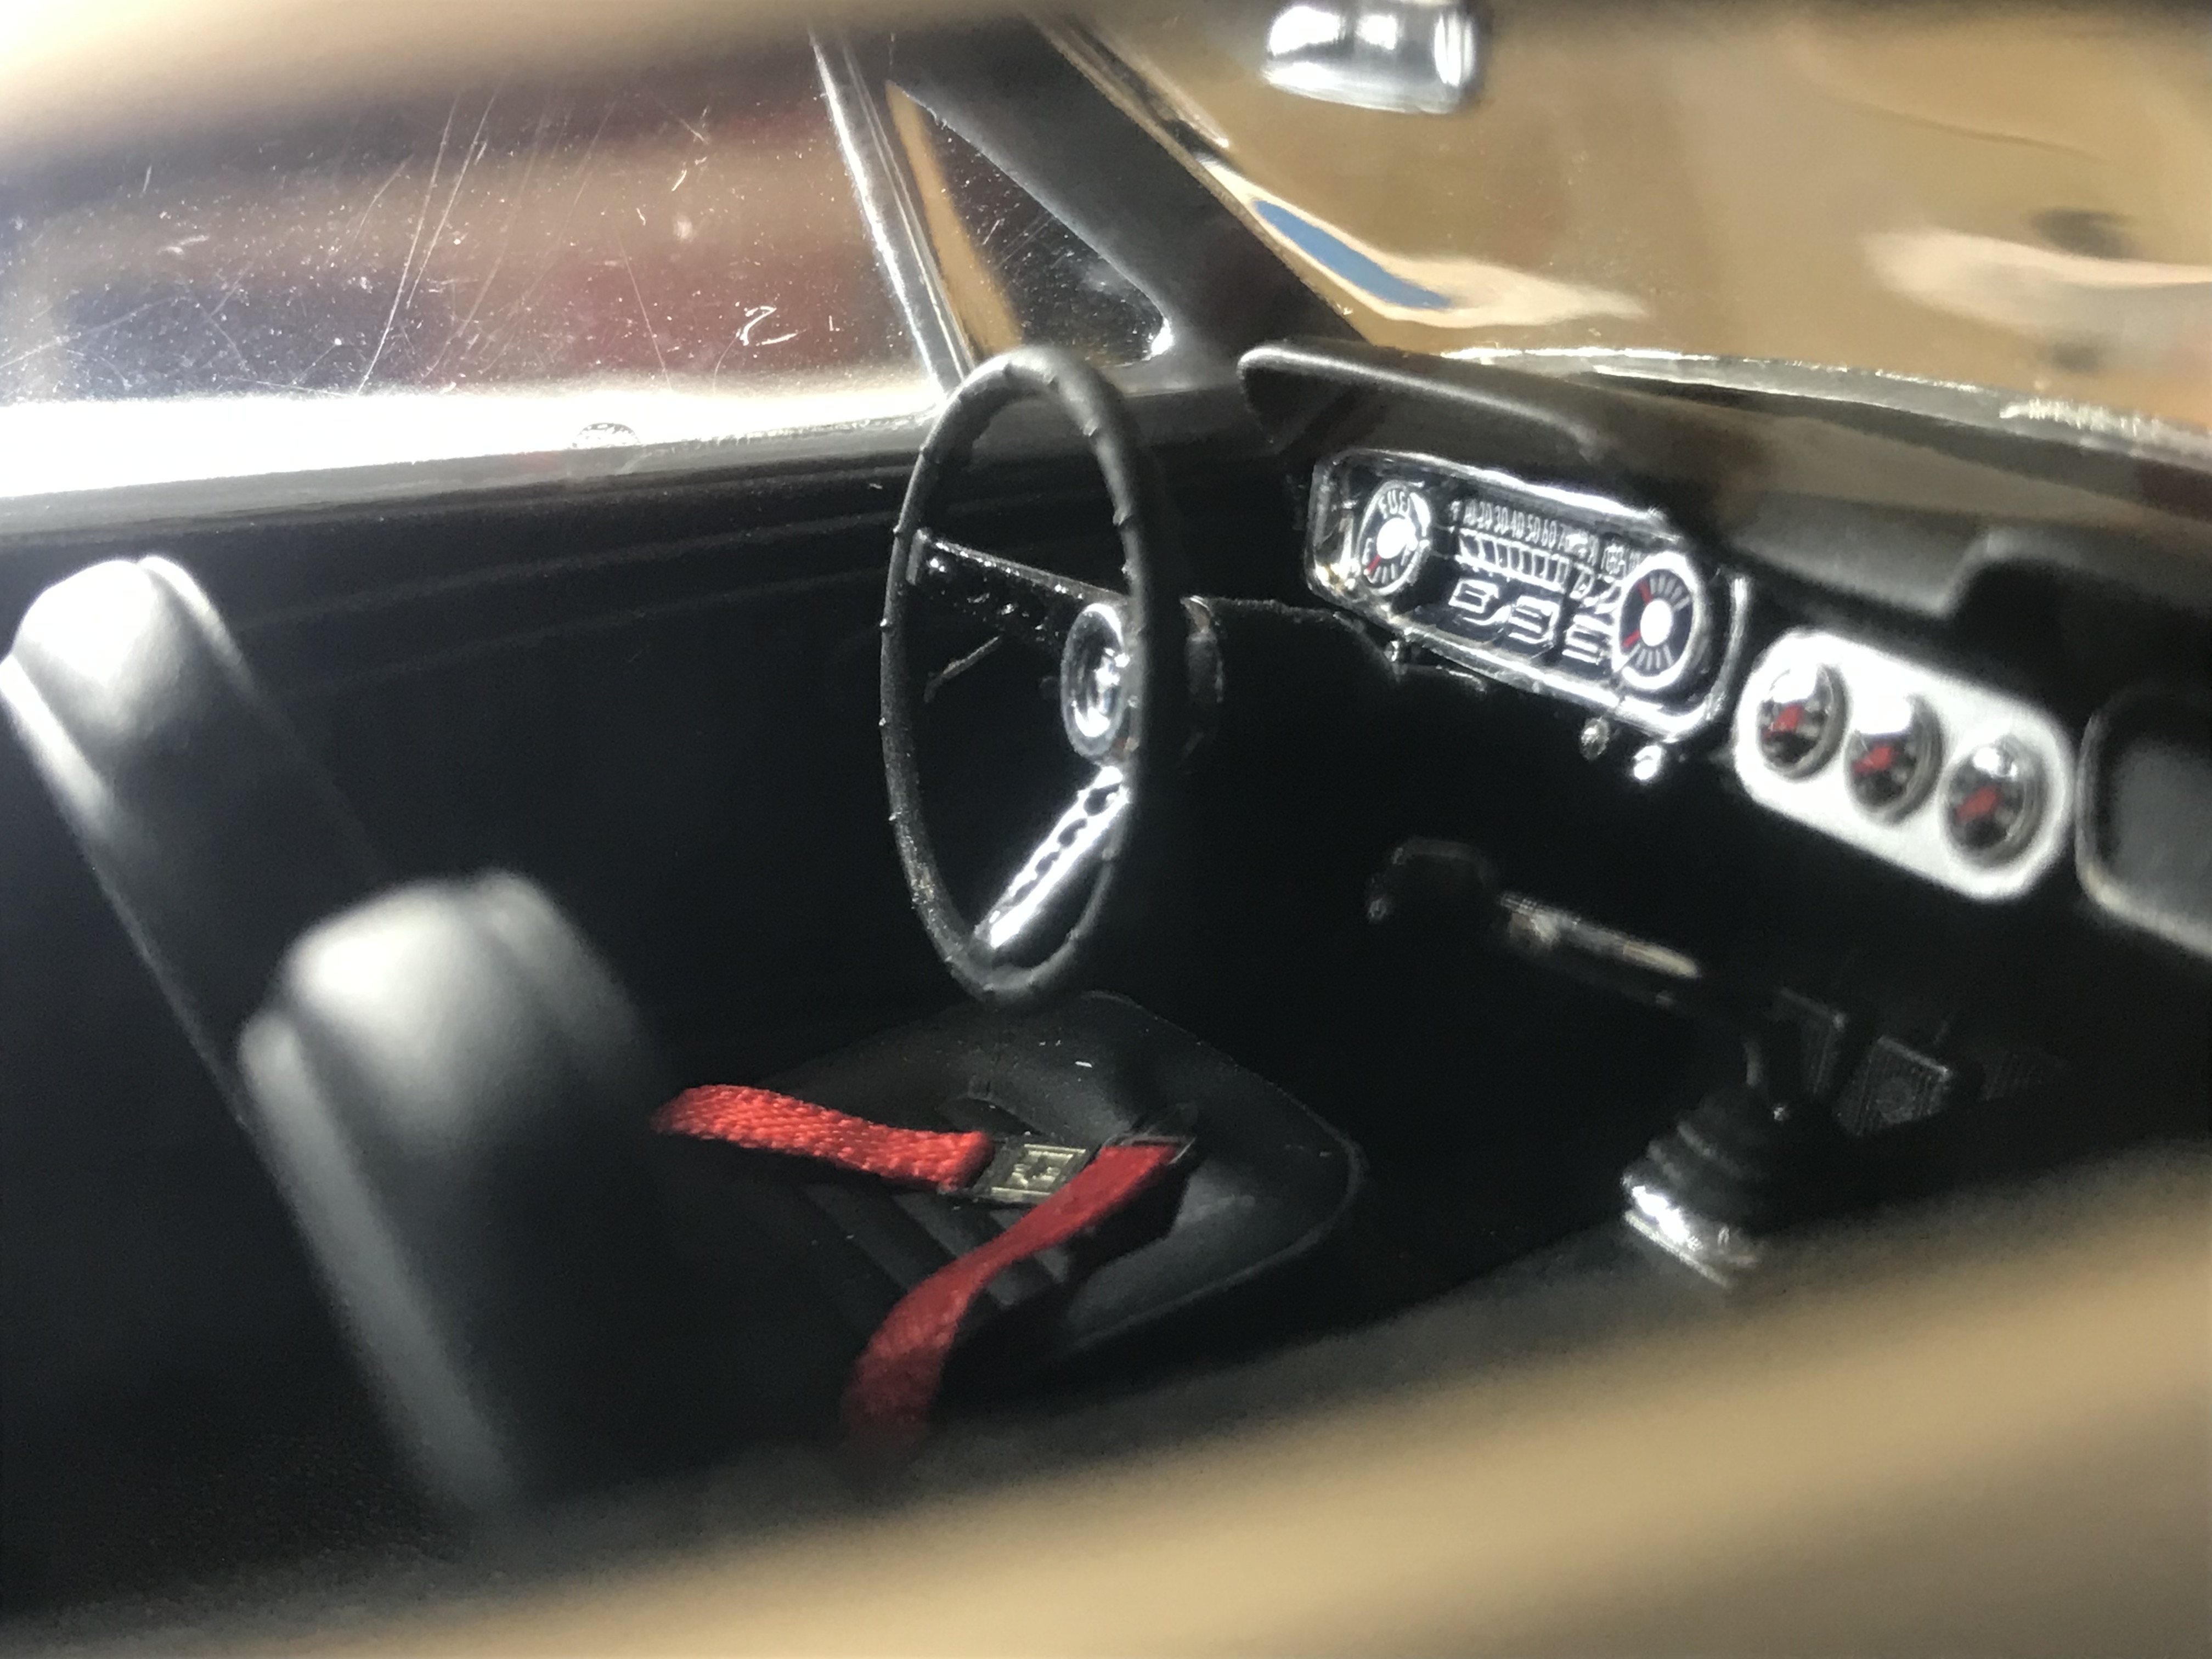
This is one I've been building as a part of a Mustang group build on a British modeling forum, legendary racer/ tuner Les Ritchey's '65/66 Mustang A/FX 427 SOHC screamer. It's based on Revell's 1/24 kit in which I replaced the 289 small block with a 1/25 SOHC 427 from the Moebius '65 Comet A/FX Dyno Don kit. Lot's of mods and scratch-building was required to get this engine to fit as well as to incorporate the weird front torsion/ 1/2 leaf spring suspension that replaced the stock struts and shock towers. Headers were scratch-built using solder and the rear differential/ wheel openings and wheel wells were shifted 1/8" to correspond to the 3 inch wheel base shift that was done by Holman and Moody. Rear traction bars were scratch-built using the Revell '64 Thunderbolt part as a pattern. A roll bar was made using .100" OD styrene rod and our kitchen stovetop. After market parts that I added included Fireball Holley 4160 resin carbs, Detail Master distributor/ plug wires/ looms/ linkage and misc wires and springs. The teardrop hood is a 1/24 replacement for the Revell kit made by Competition Resins. The tires and Torque Thrust mags were taken from an AMT '62 Bel Air kit. The Body was painted using Tamiya Silver Leaf lacquer with TS-13 clear coat, window frames were metallized using Alclad Chrome over gloss black enamel and other paints used were mostly Tamiya acrylics. The key to making this project happen were the fabulous decals that Joe Curtis of Fremont Racing Specialties was kind enough to custom make for me - thank you Joe!!! I'm still toying with the possibility of adding air conduits between the carbs and the radiator bulkhead (similar to the '64 Thunderbolts) but it appears to be a "project within the project" so please don't hold me to it. I've enjoyed building 1/24-1/25 super stock drag car models from the early/ mid sixtes and these A/FX Mustangs have always been somewhat of a "Holy Grail" to me. It's wishful thinking on my part but maybe someday one of the model companies will tool a more accurate version of what I've tried to build here (Revell? Moebius? Meng?). Cheers, John
-
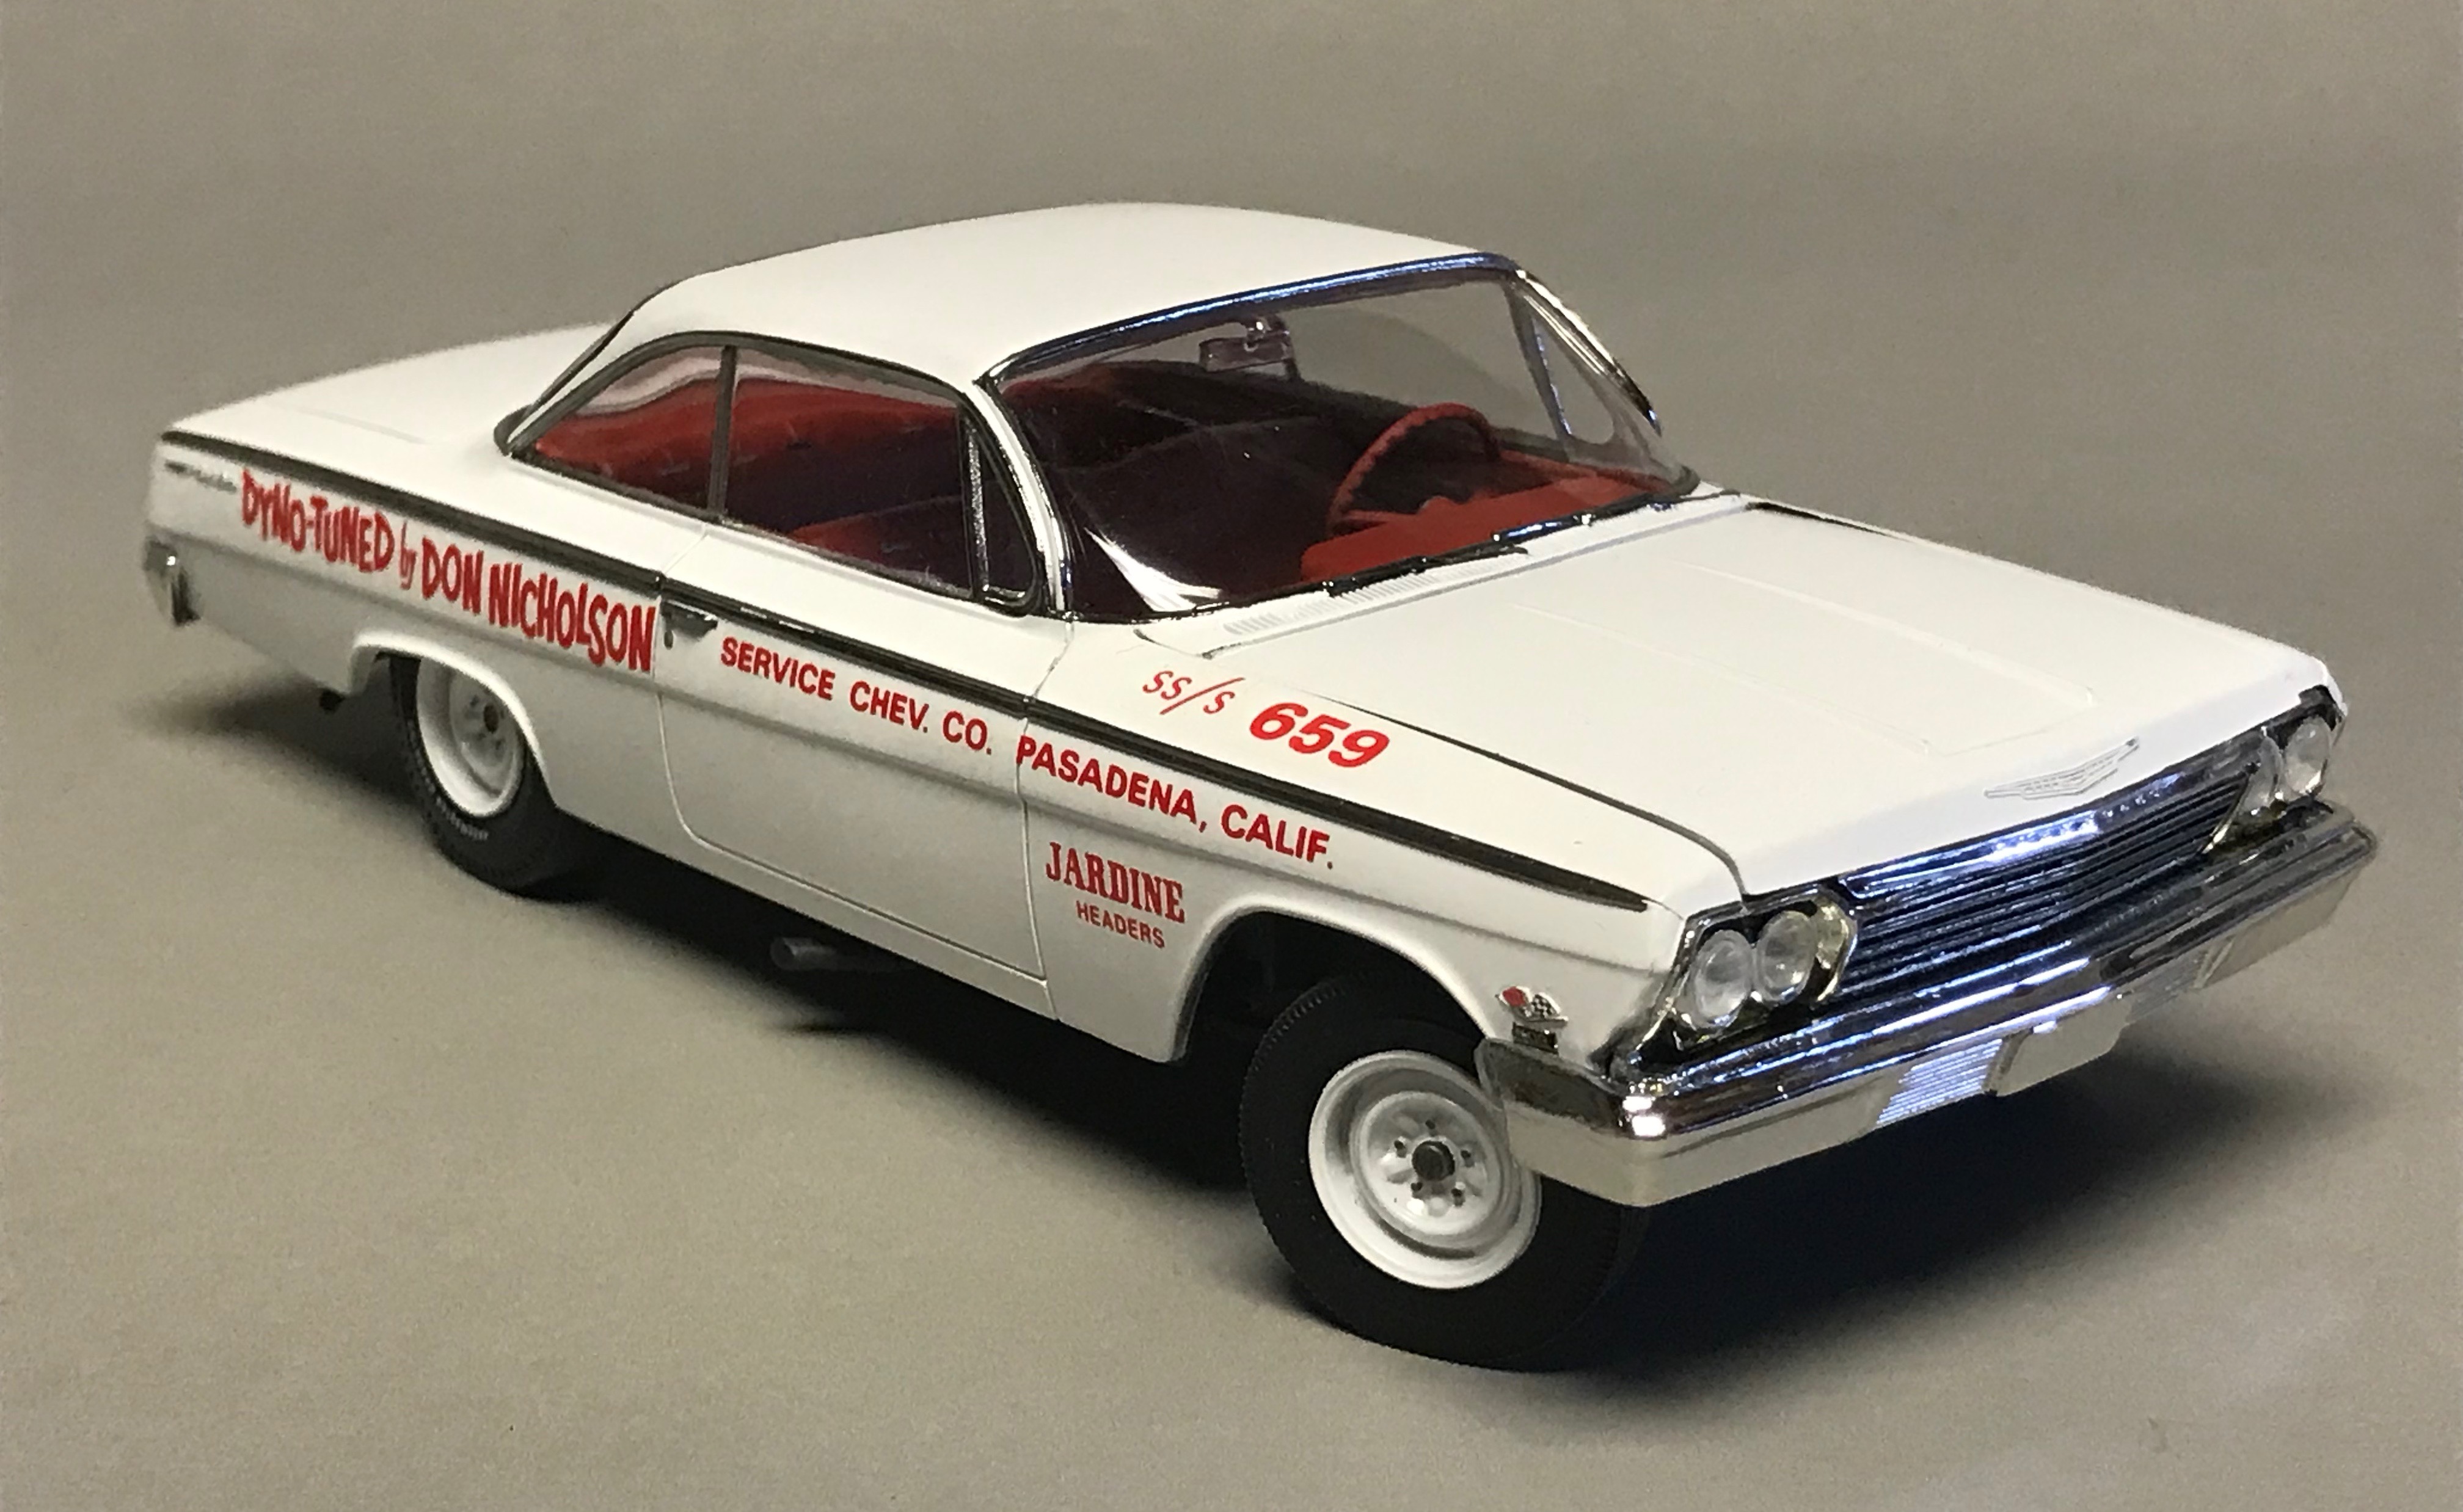
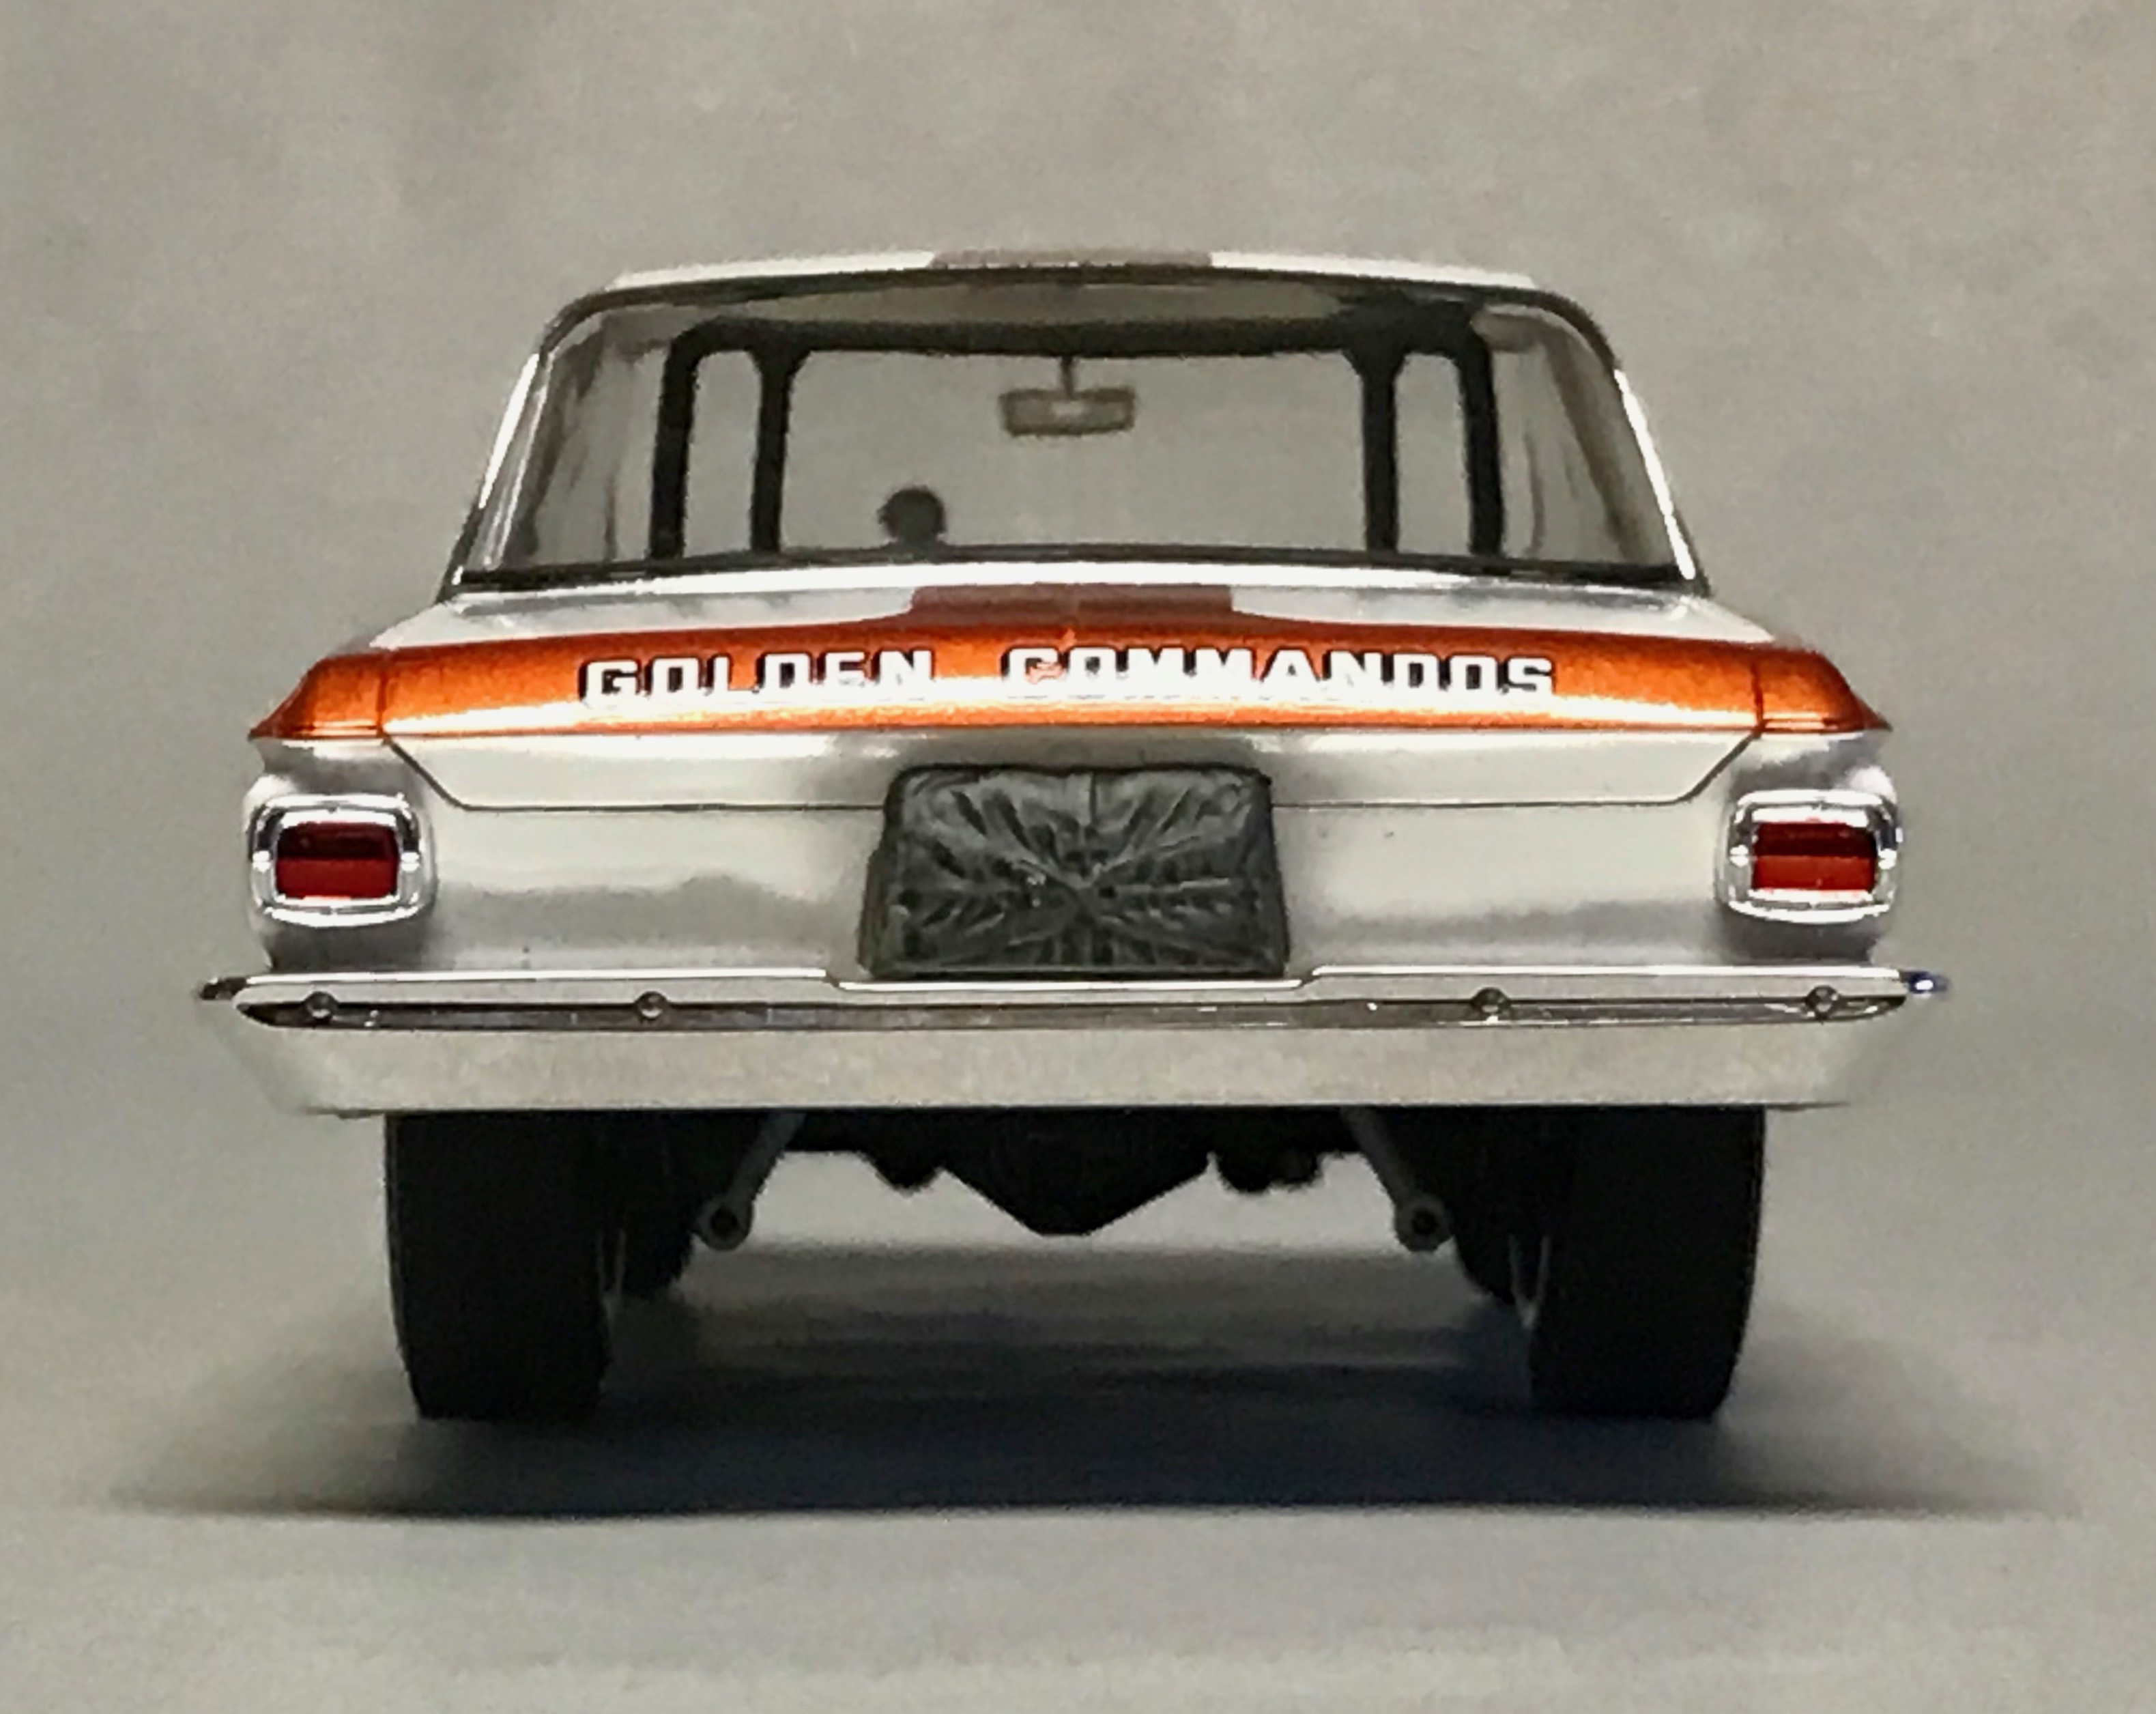
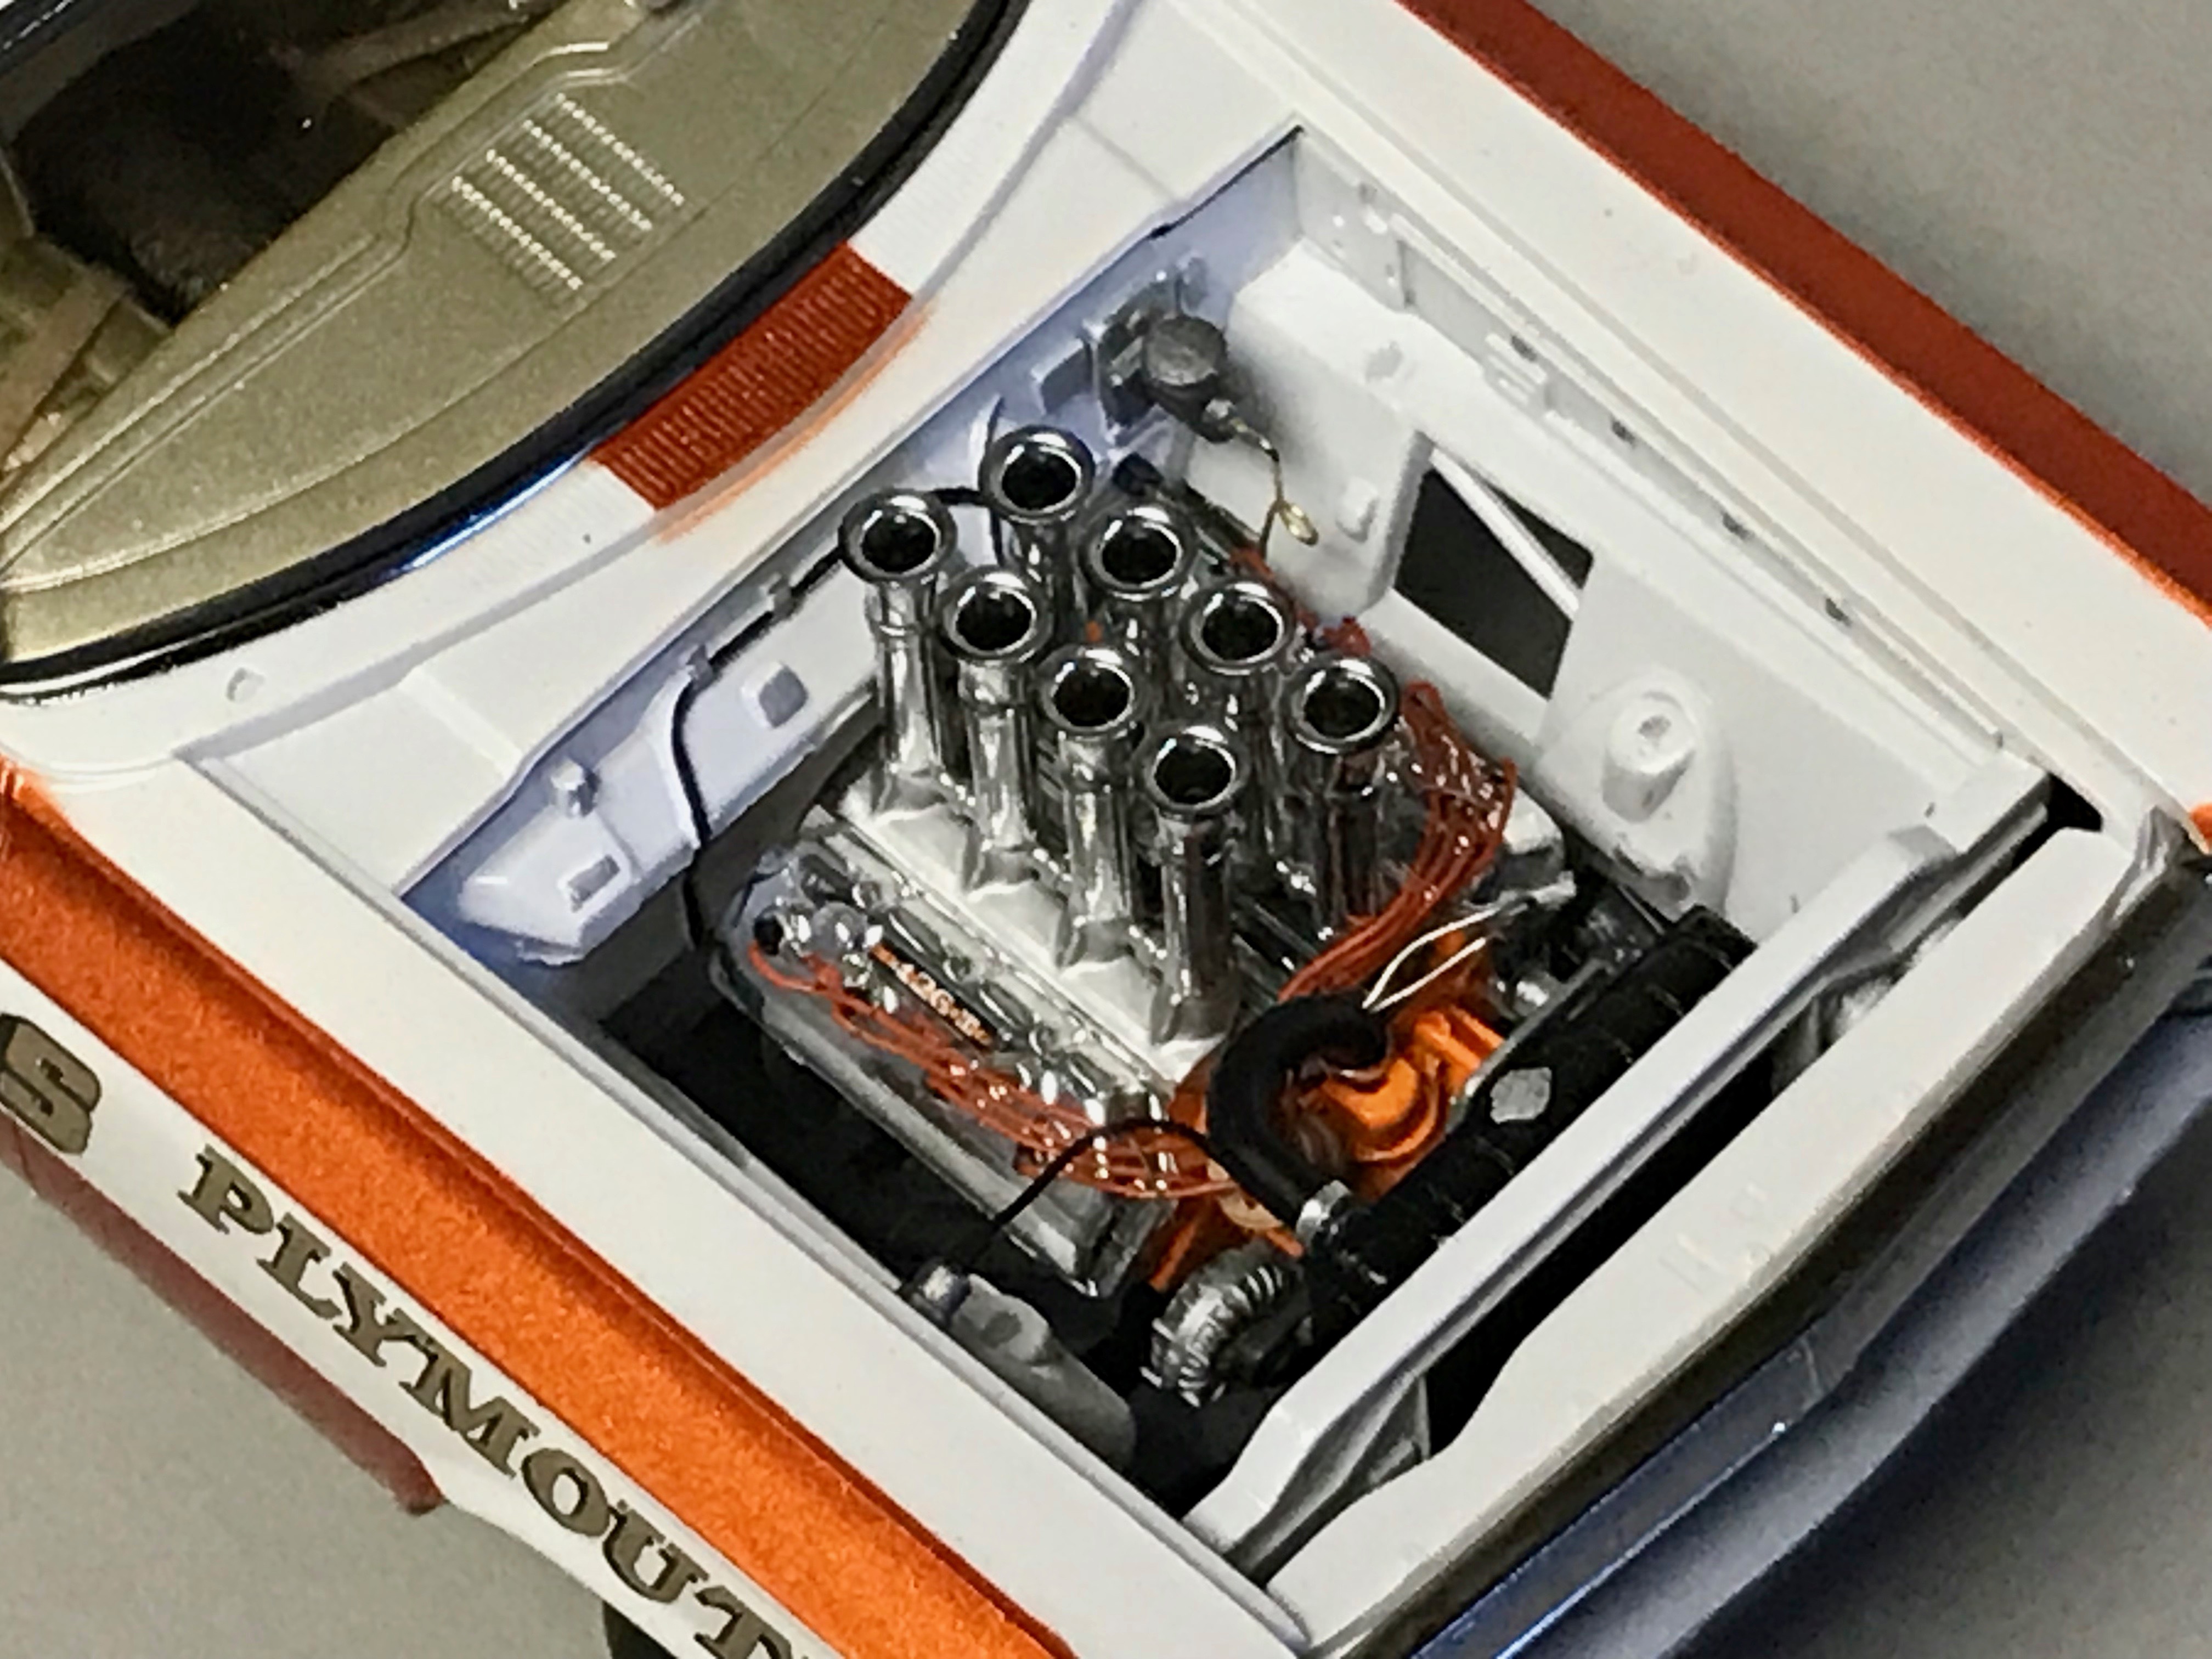
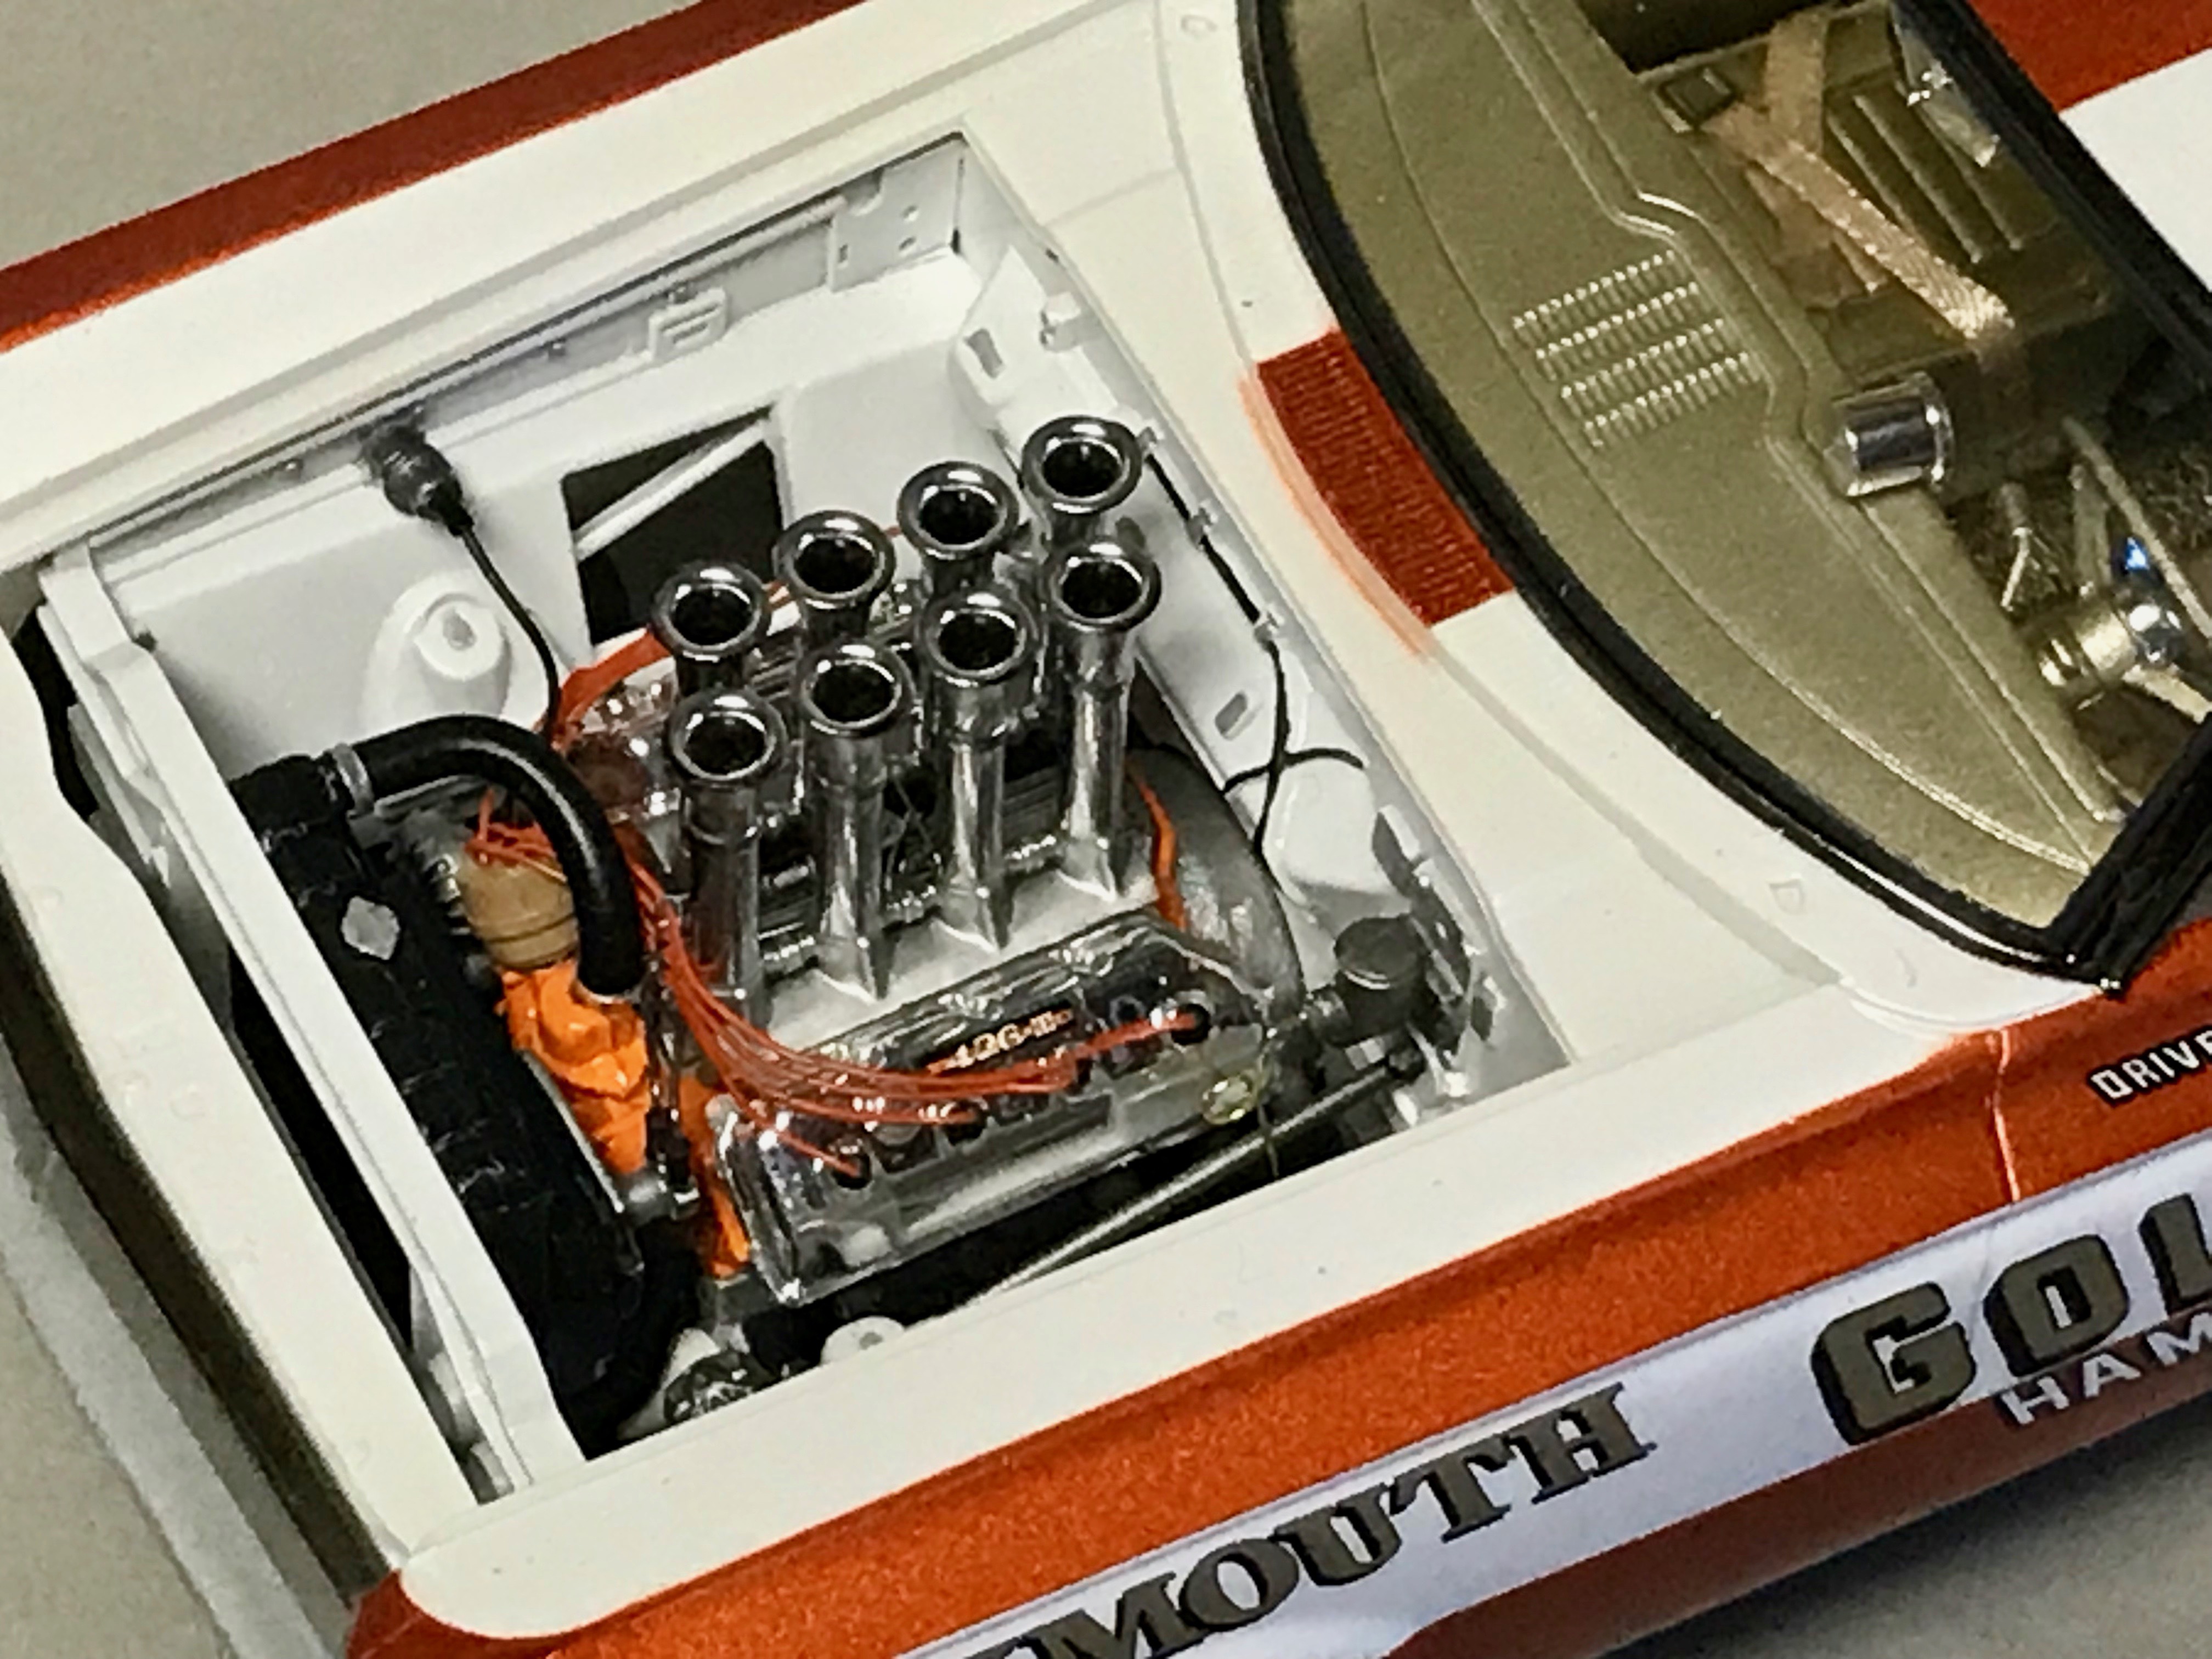
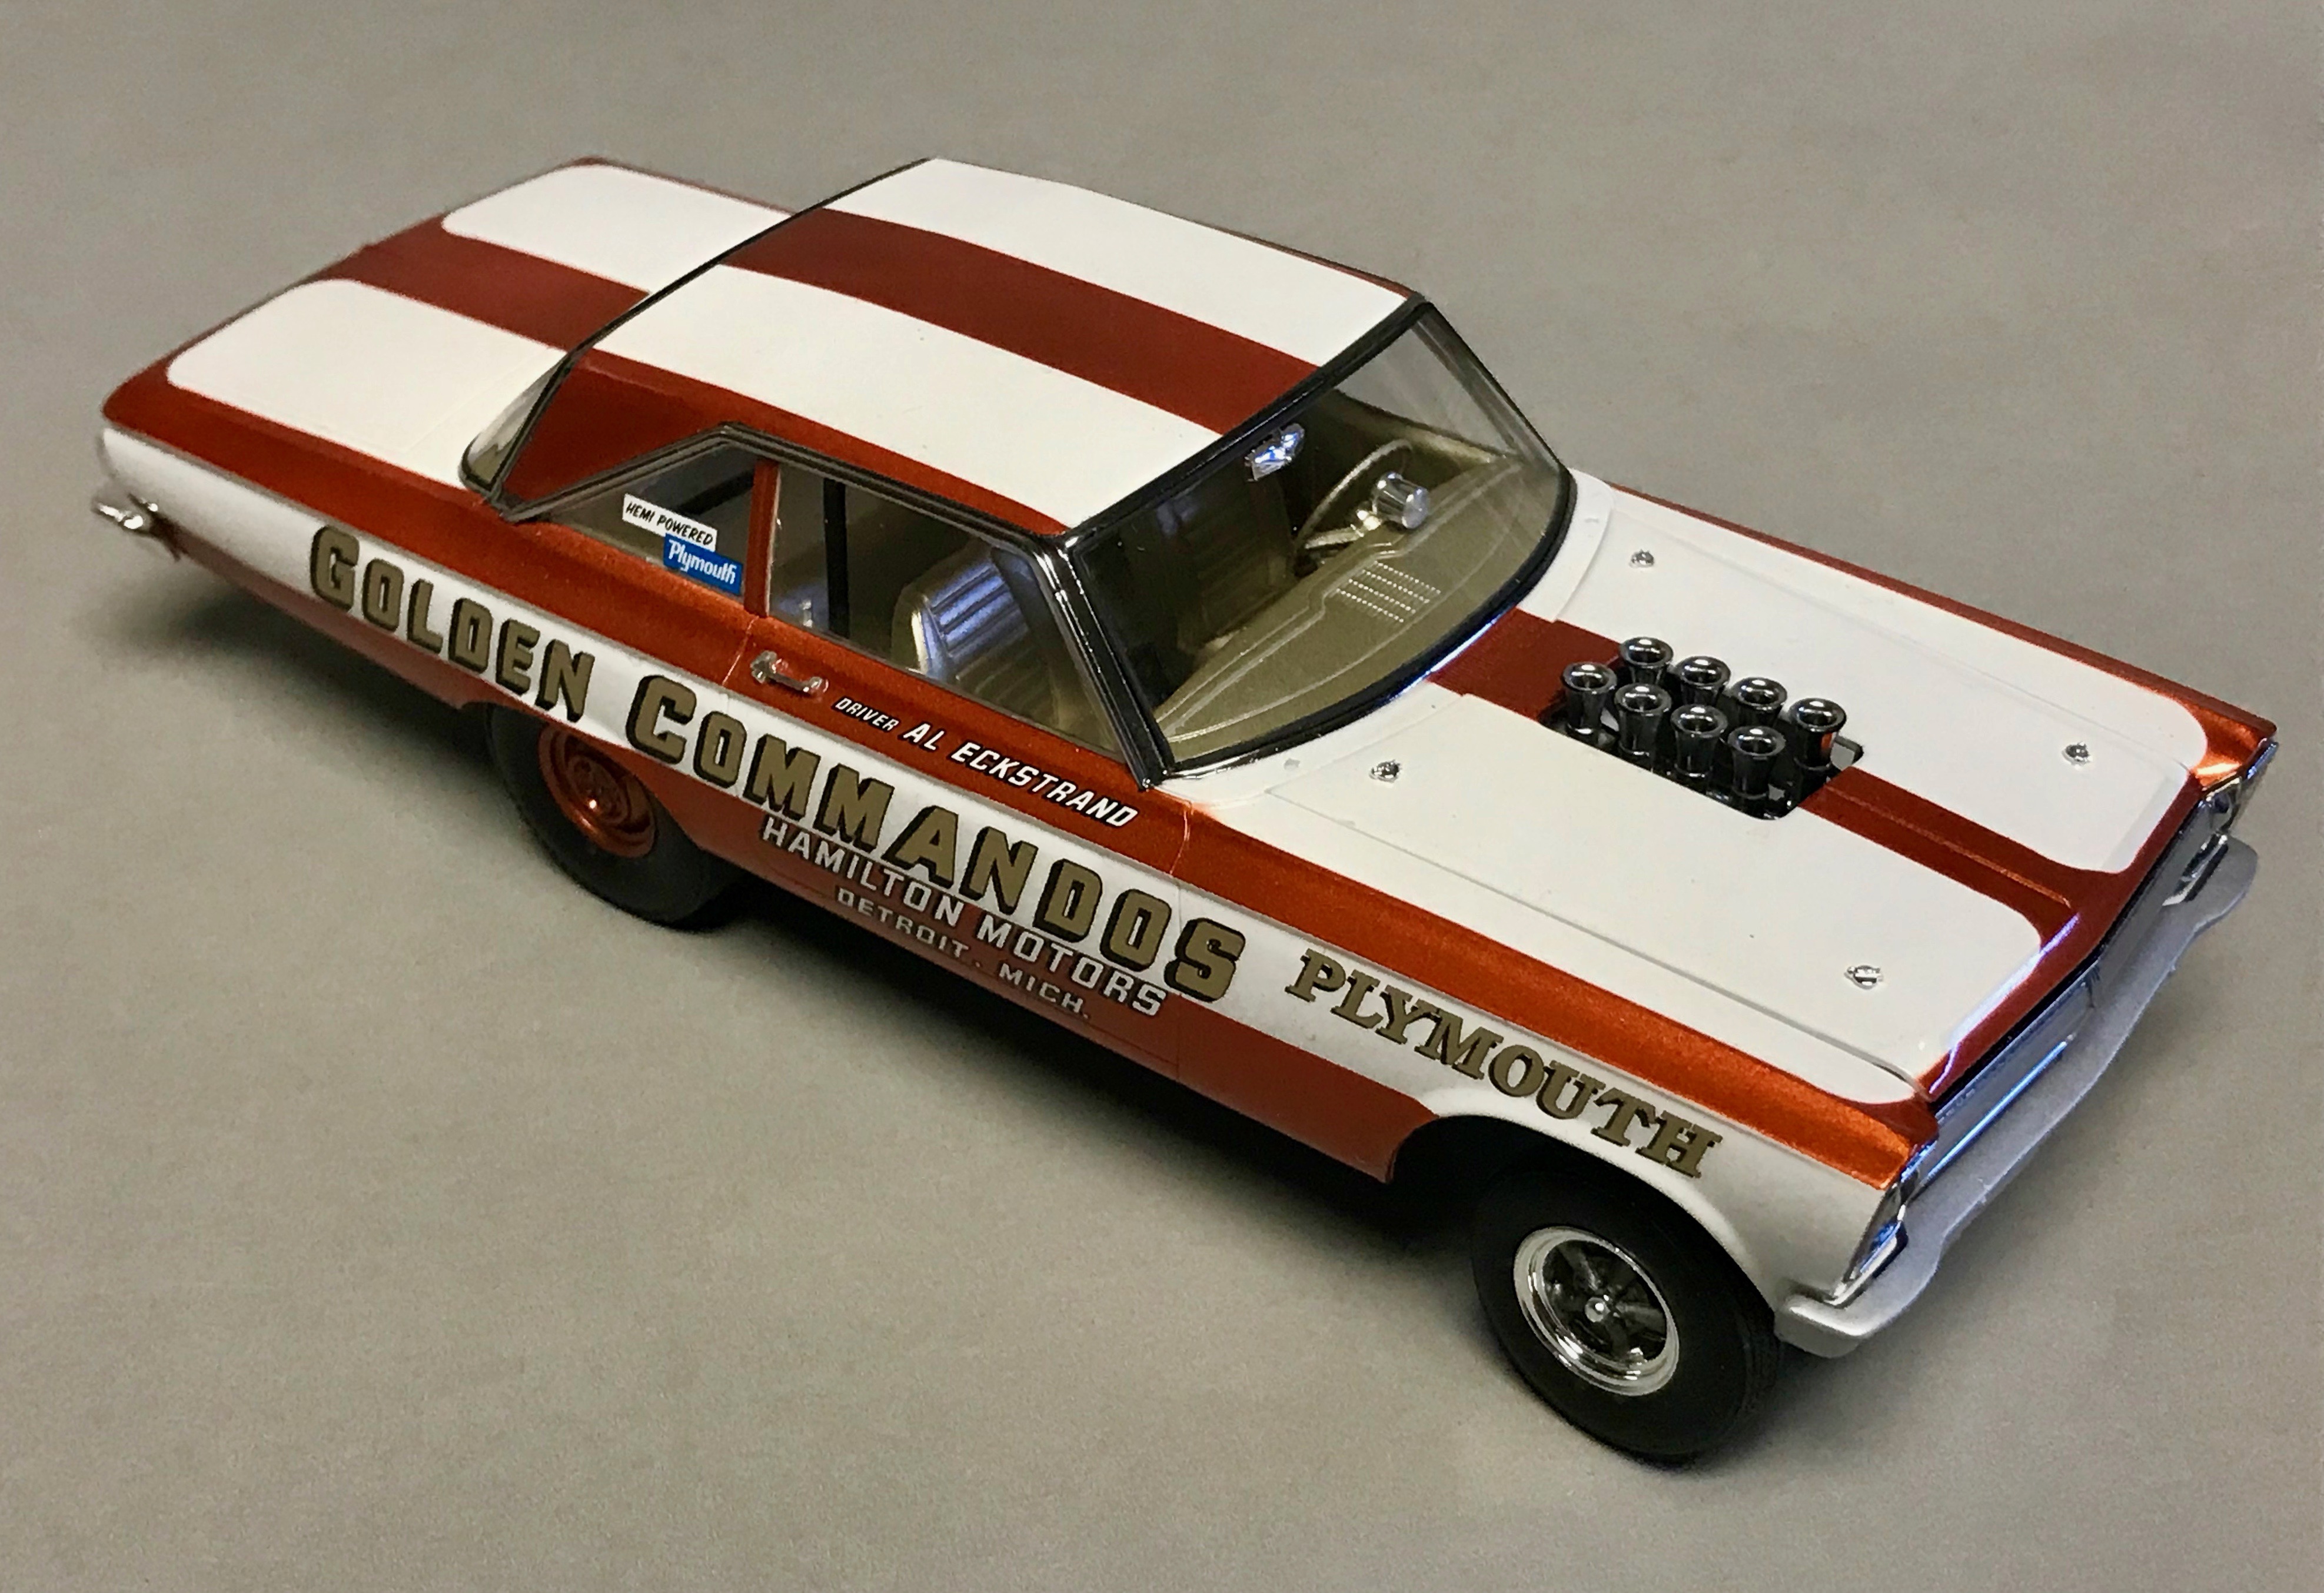
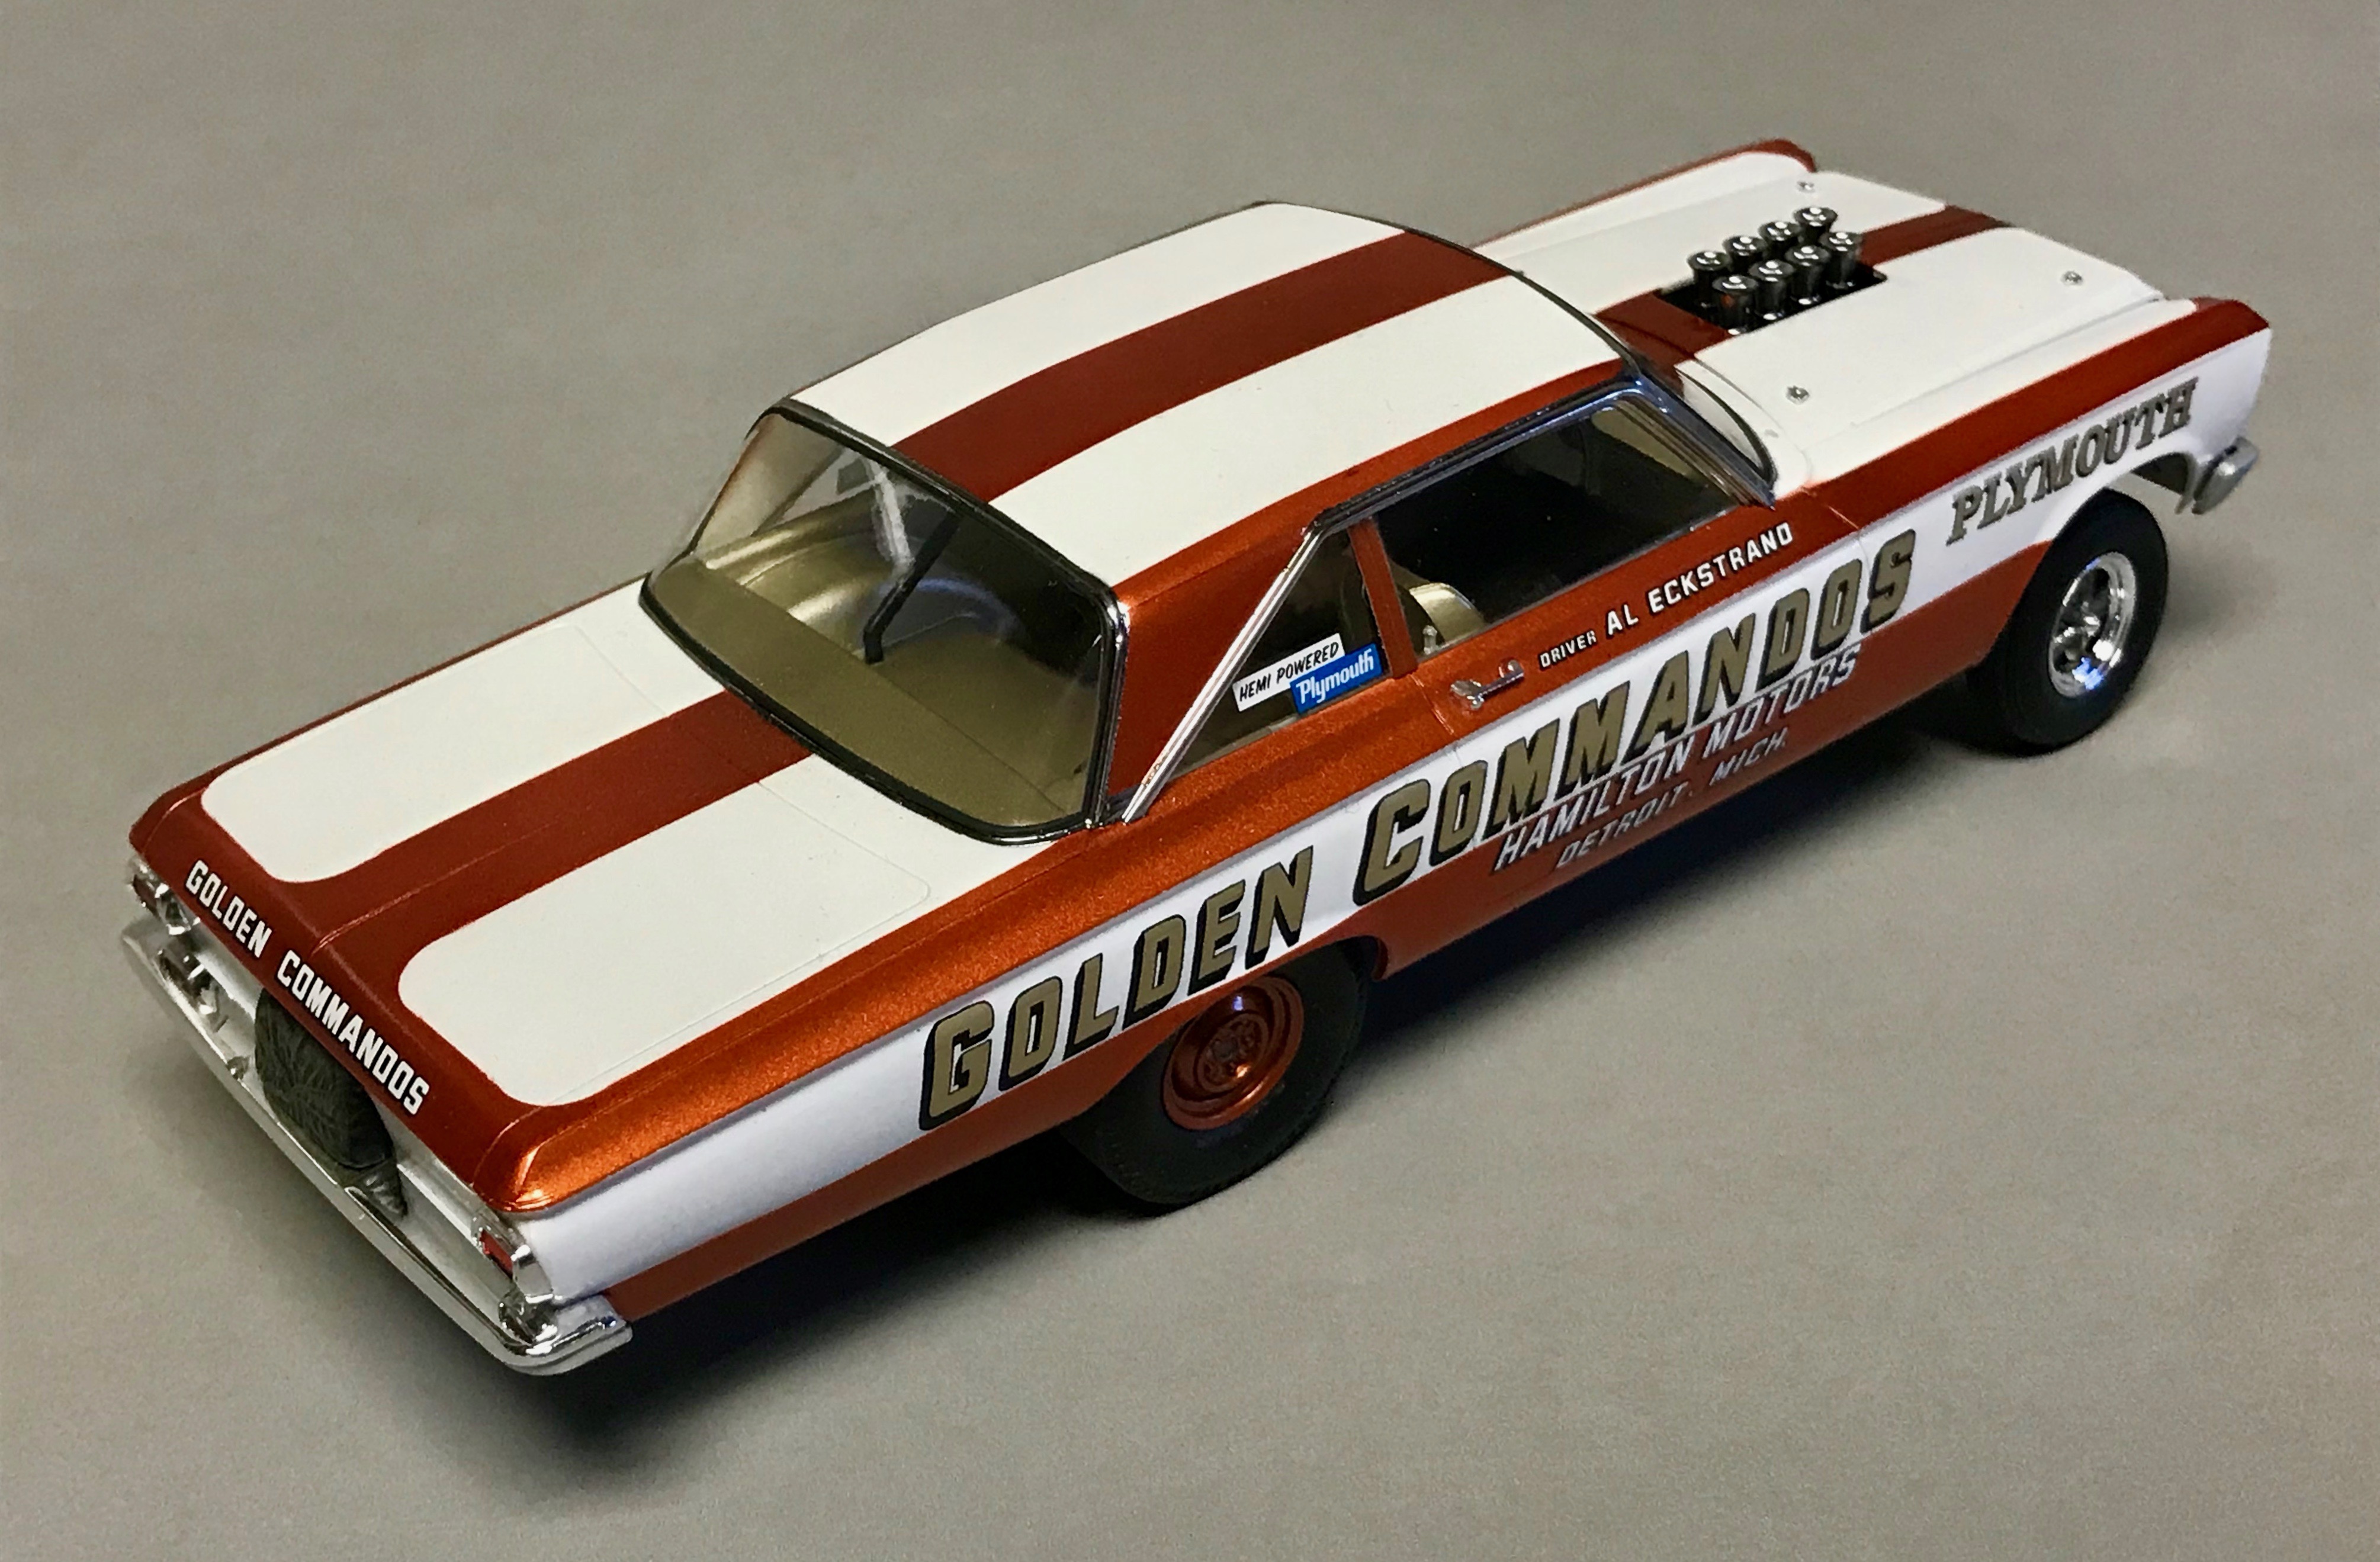
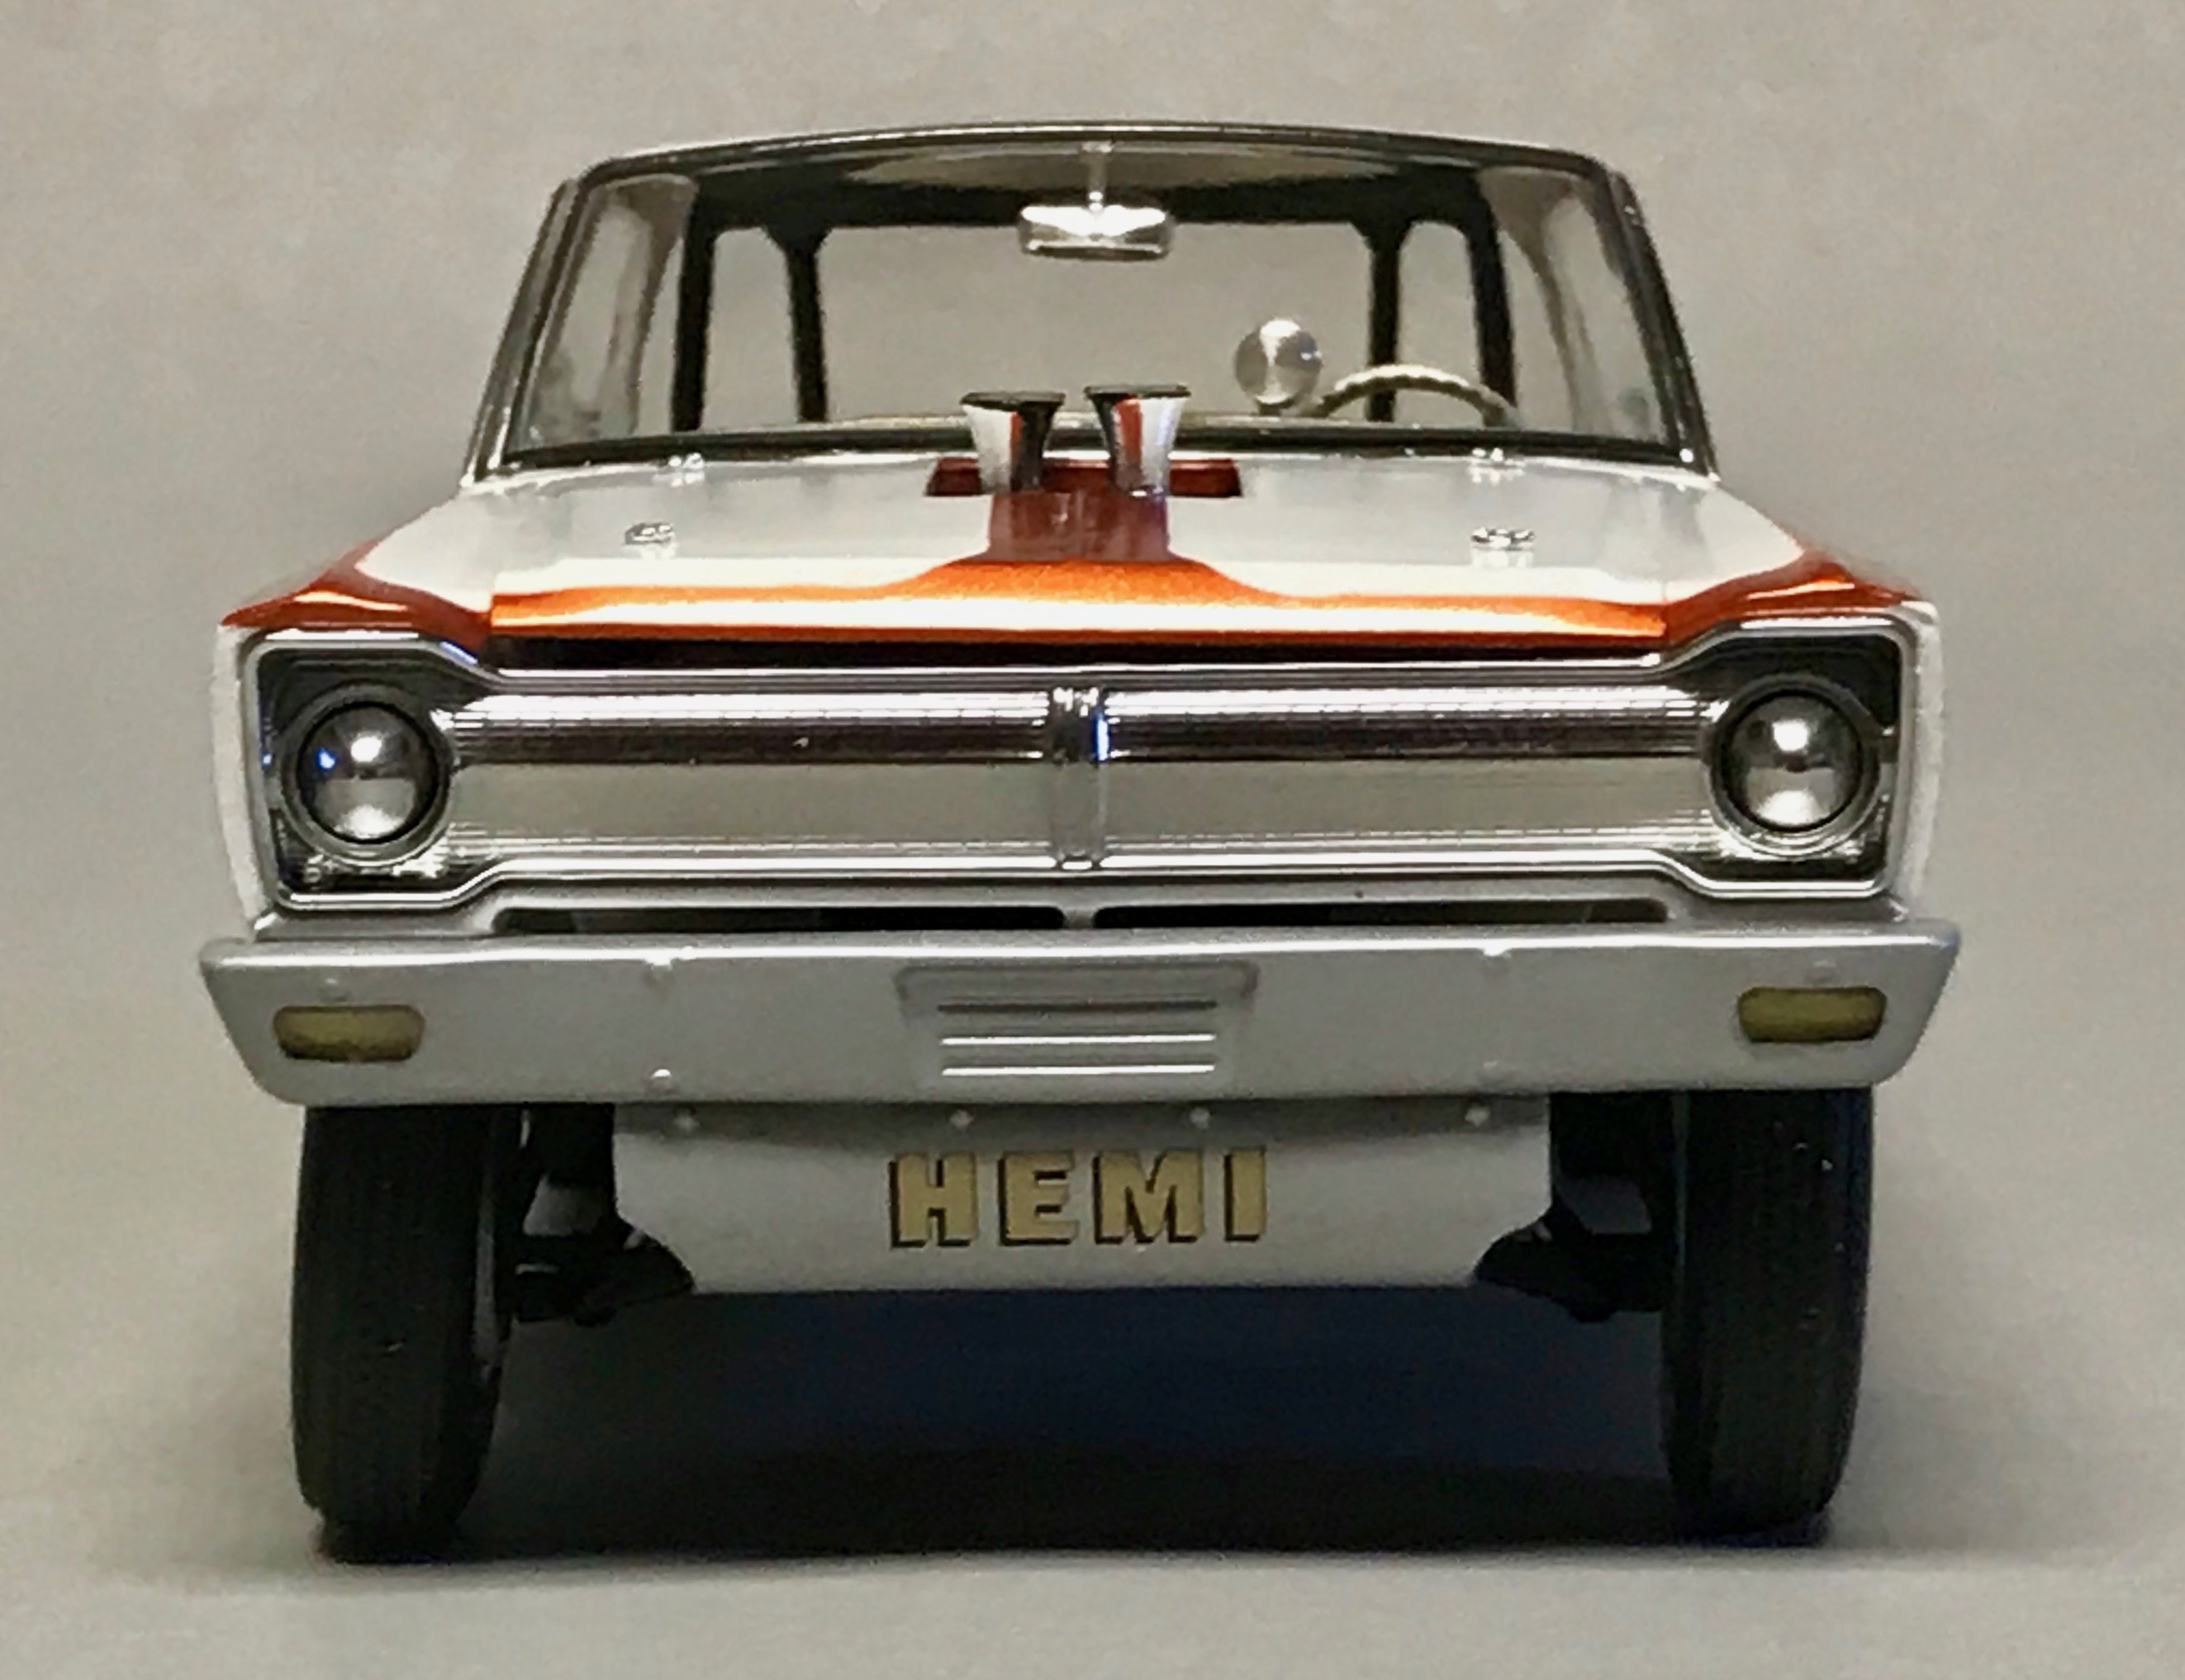
This is my attempt at "Dyno" Don Nicholson's successful 1962 Chevy Bel Air 409 Super Stock drag car built from AMT's 1/25 kit (the "Northwind" edition) and some old Fred Cady decals that I was able to locate (and that still worked great!). Other than a temperamental hood fit this kits assembled very nicely. I used Fireball Resin Carter AFB Carbs and a Detail Master distributor/ plug wire kit otherwise built OOB. I used Keith Marks decals for the various emblems but unfortunately lost the emblem on the front of the hood (no luck finding it after my daily workshop sweep ...). It's been fun building these early/ mid '60's super stockers, this is my 19th done over the last three years. I'd like to complete an even 20 and am thinking of building Dyno's '65 Comet A/FX to round out my collection. Cheers, John
-
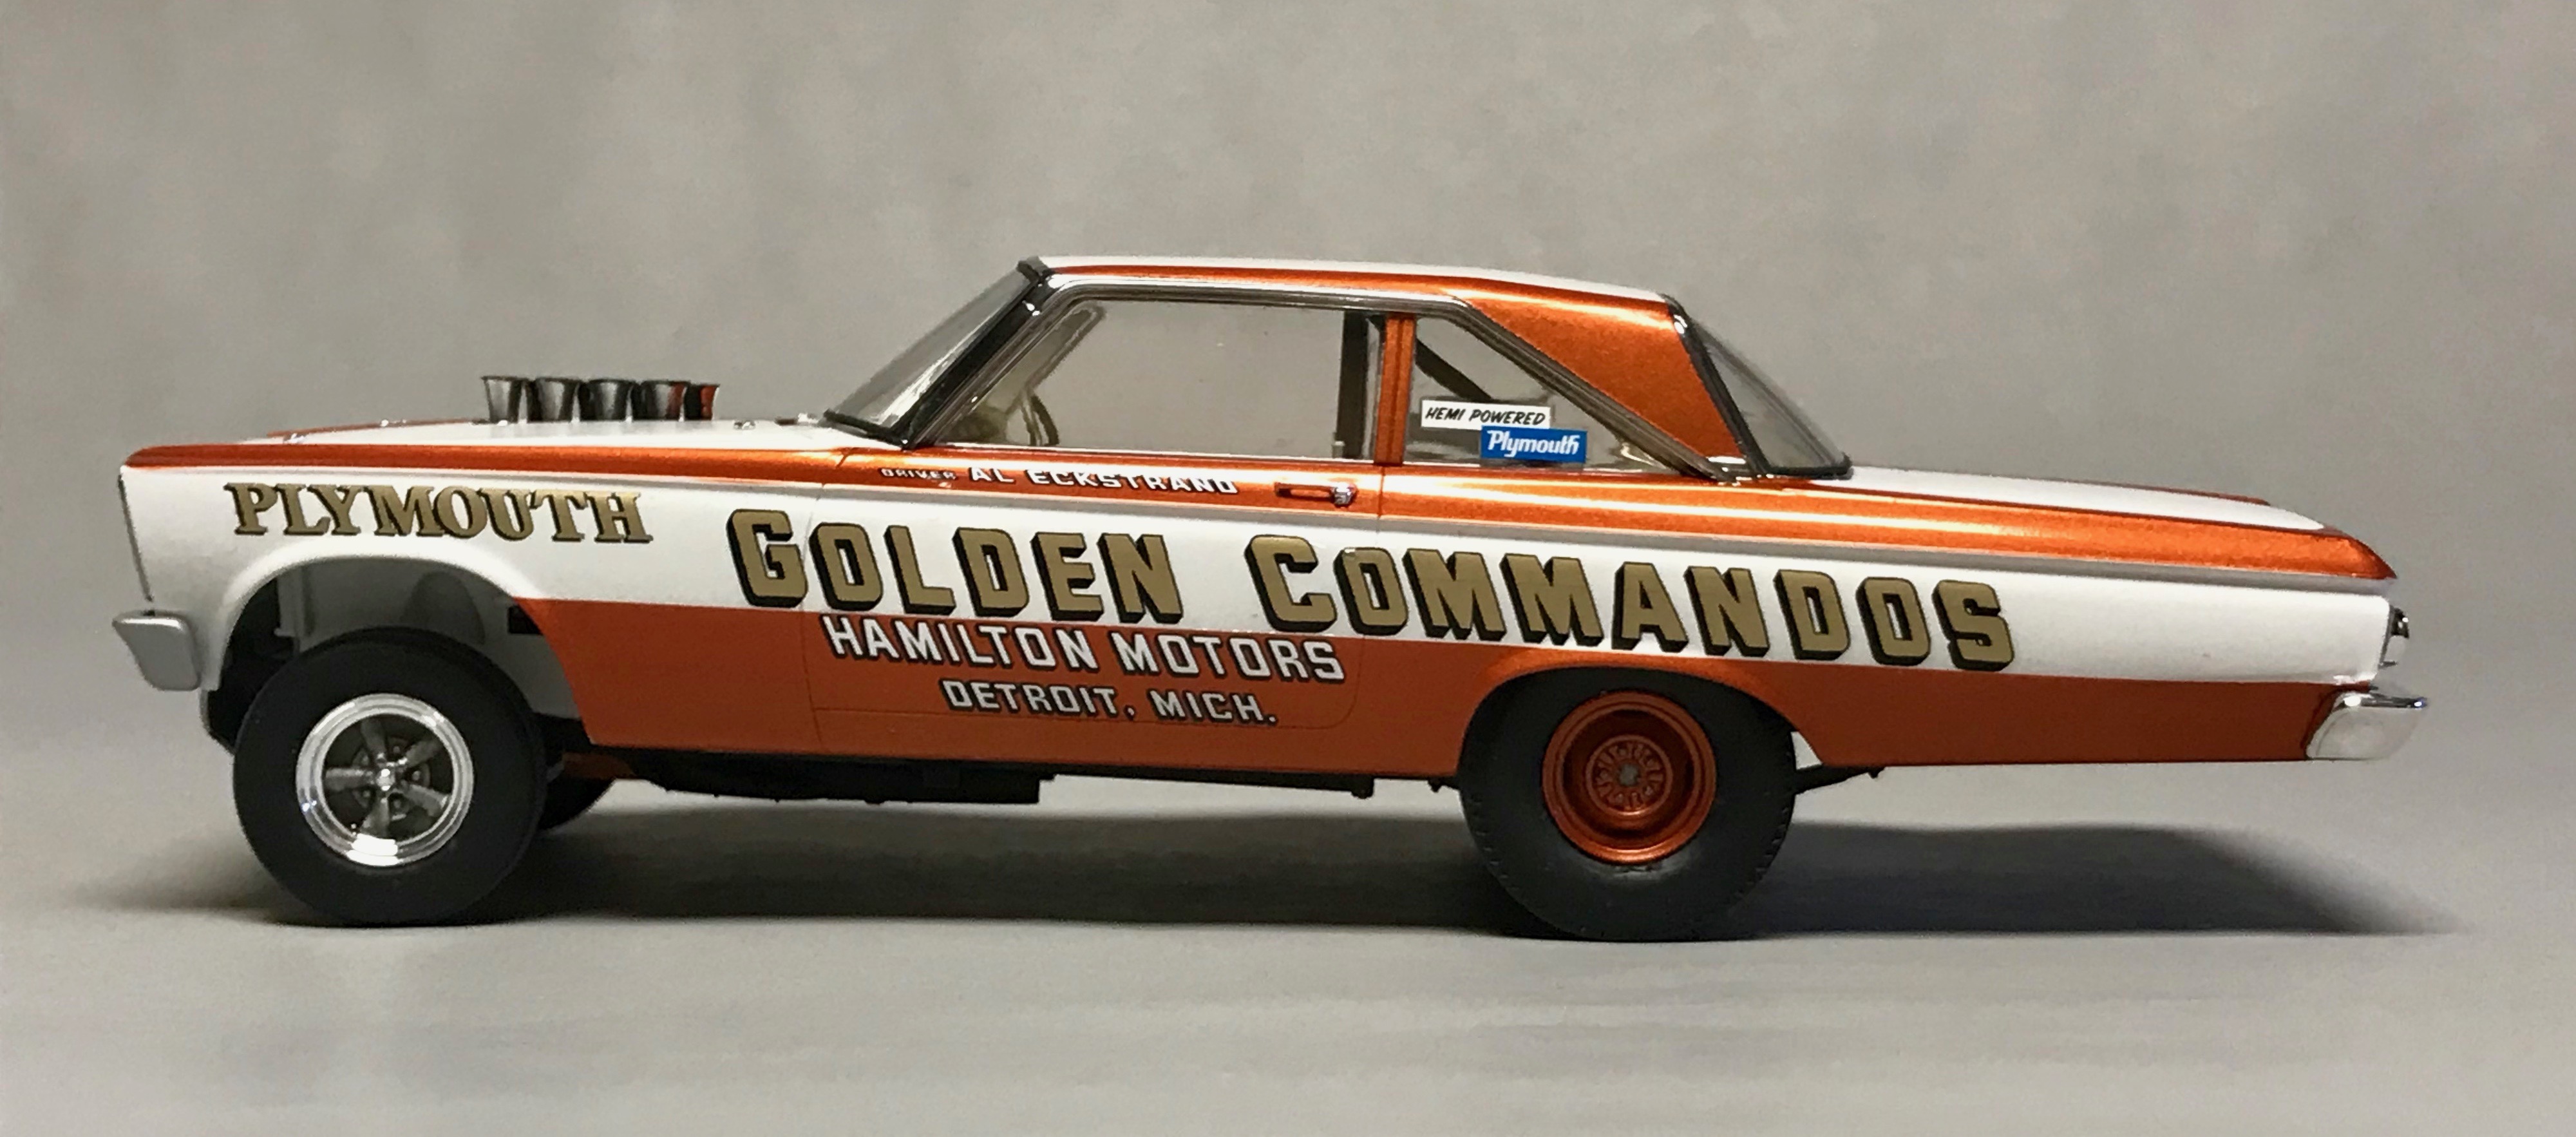
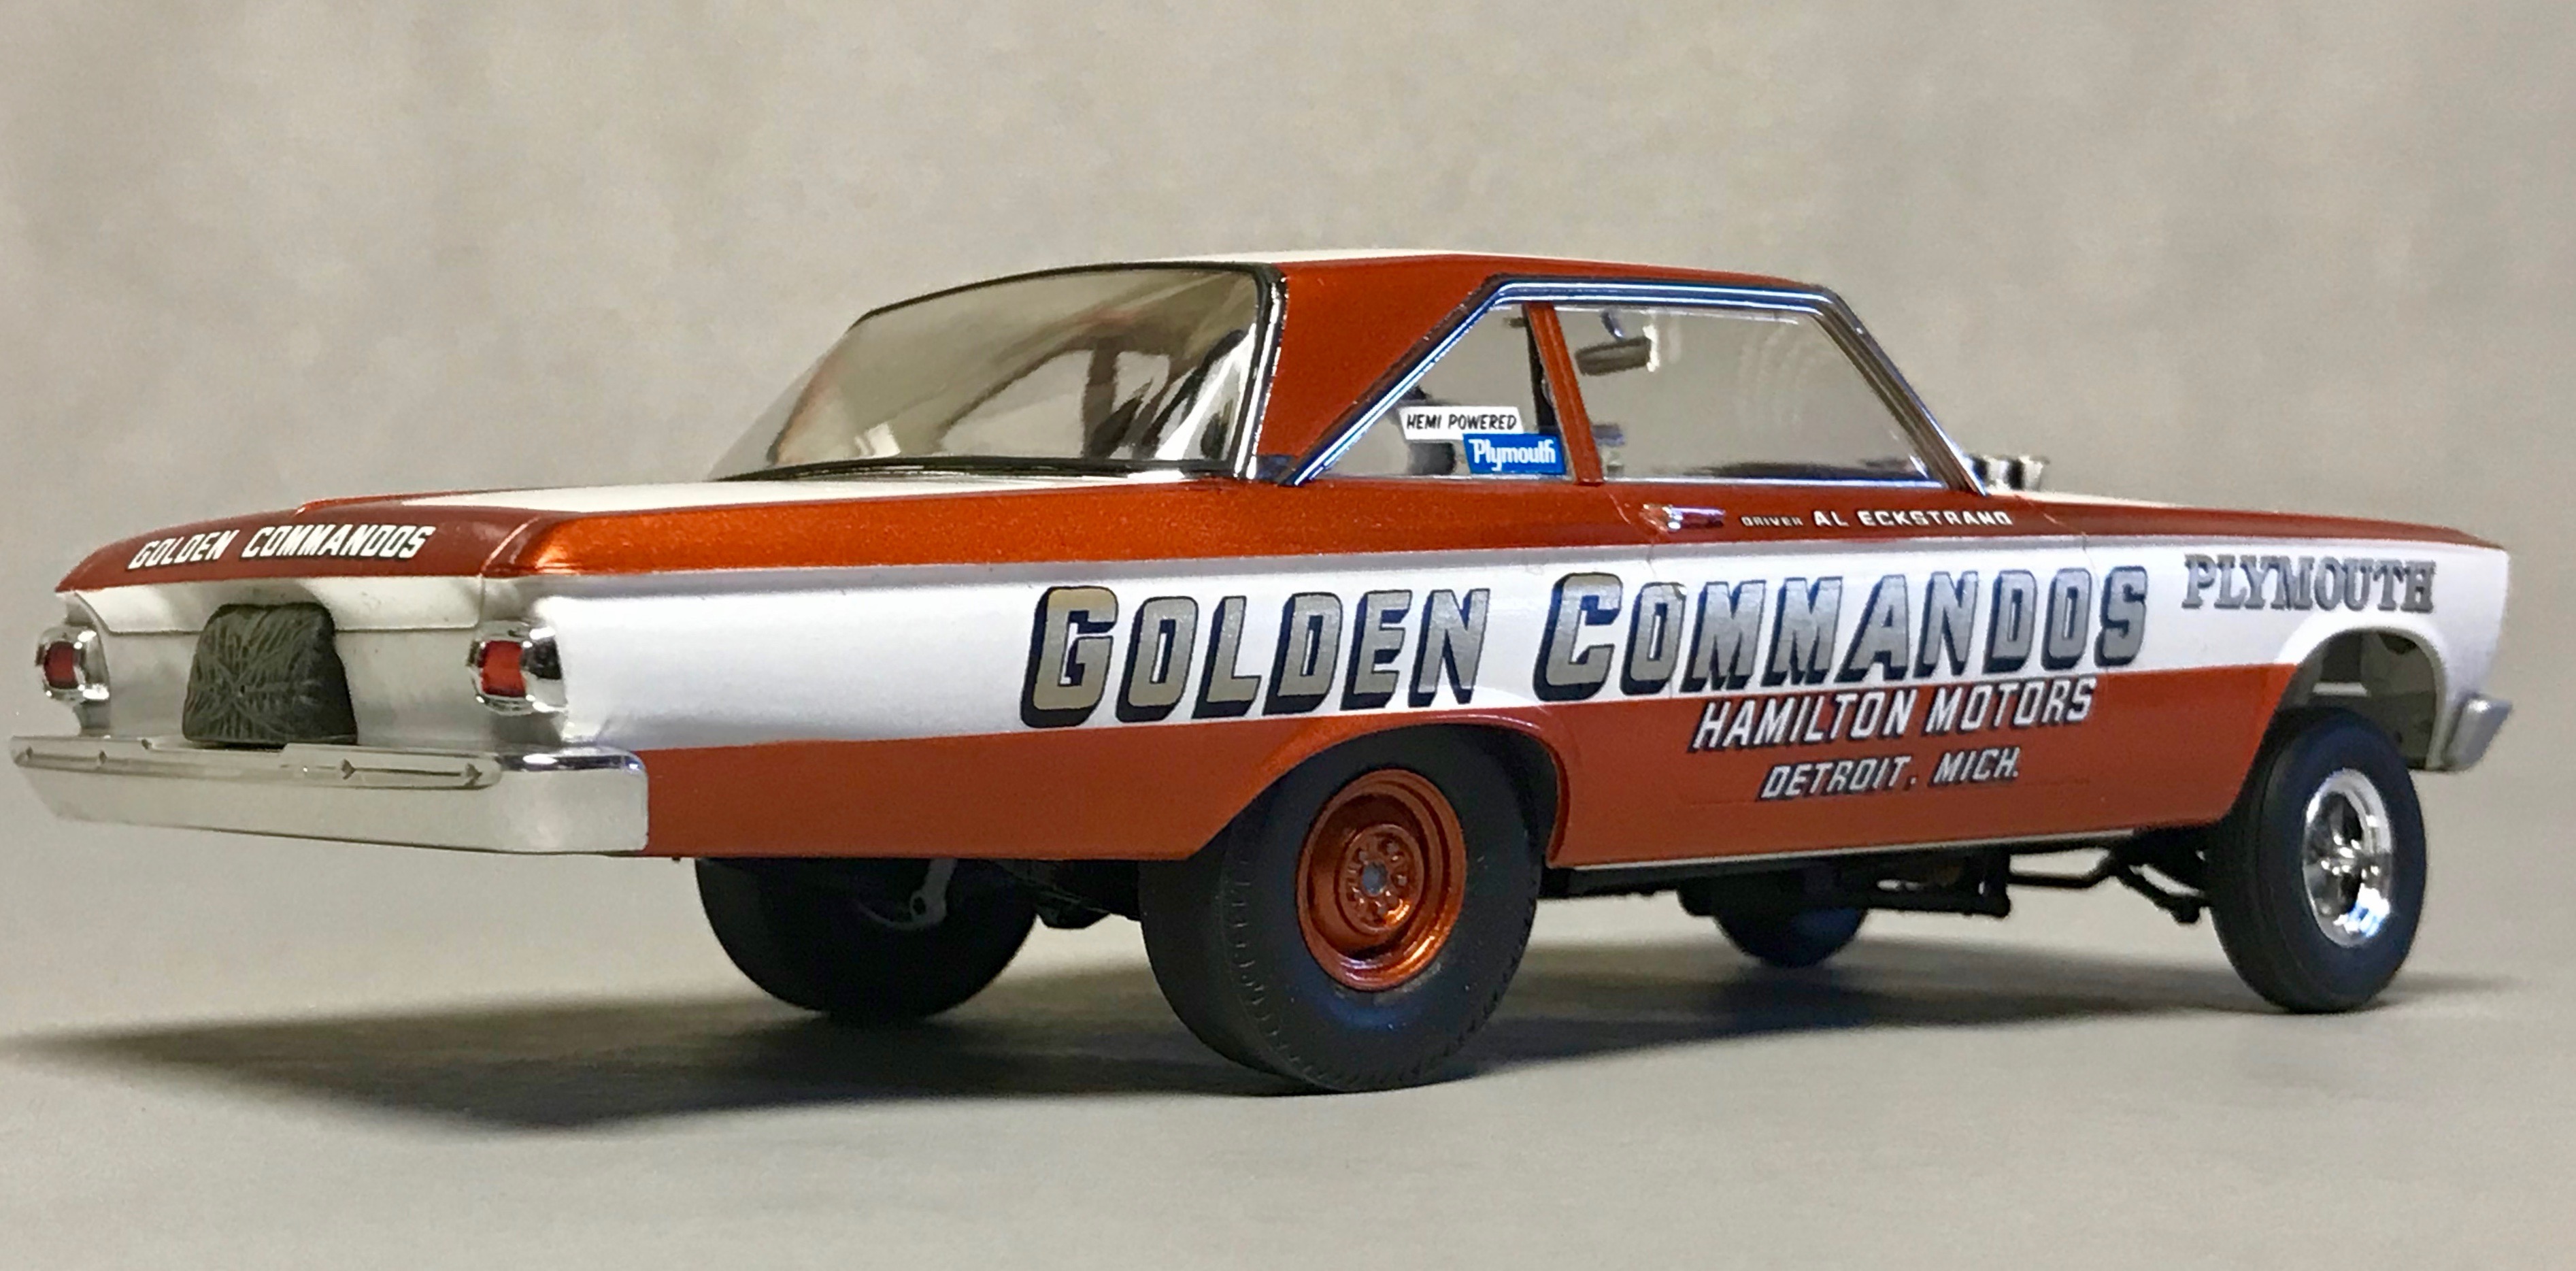
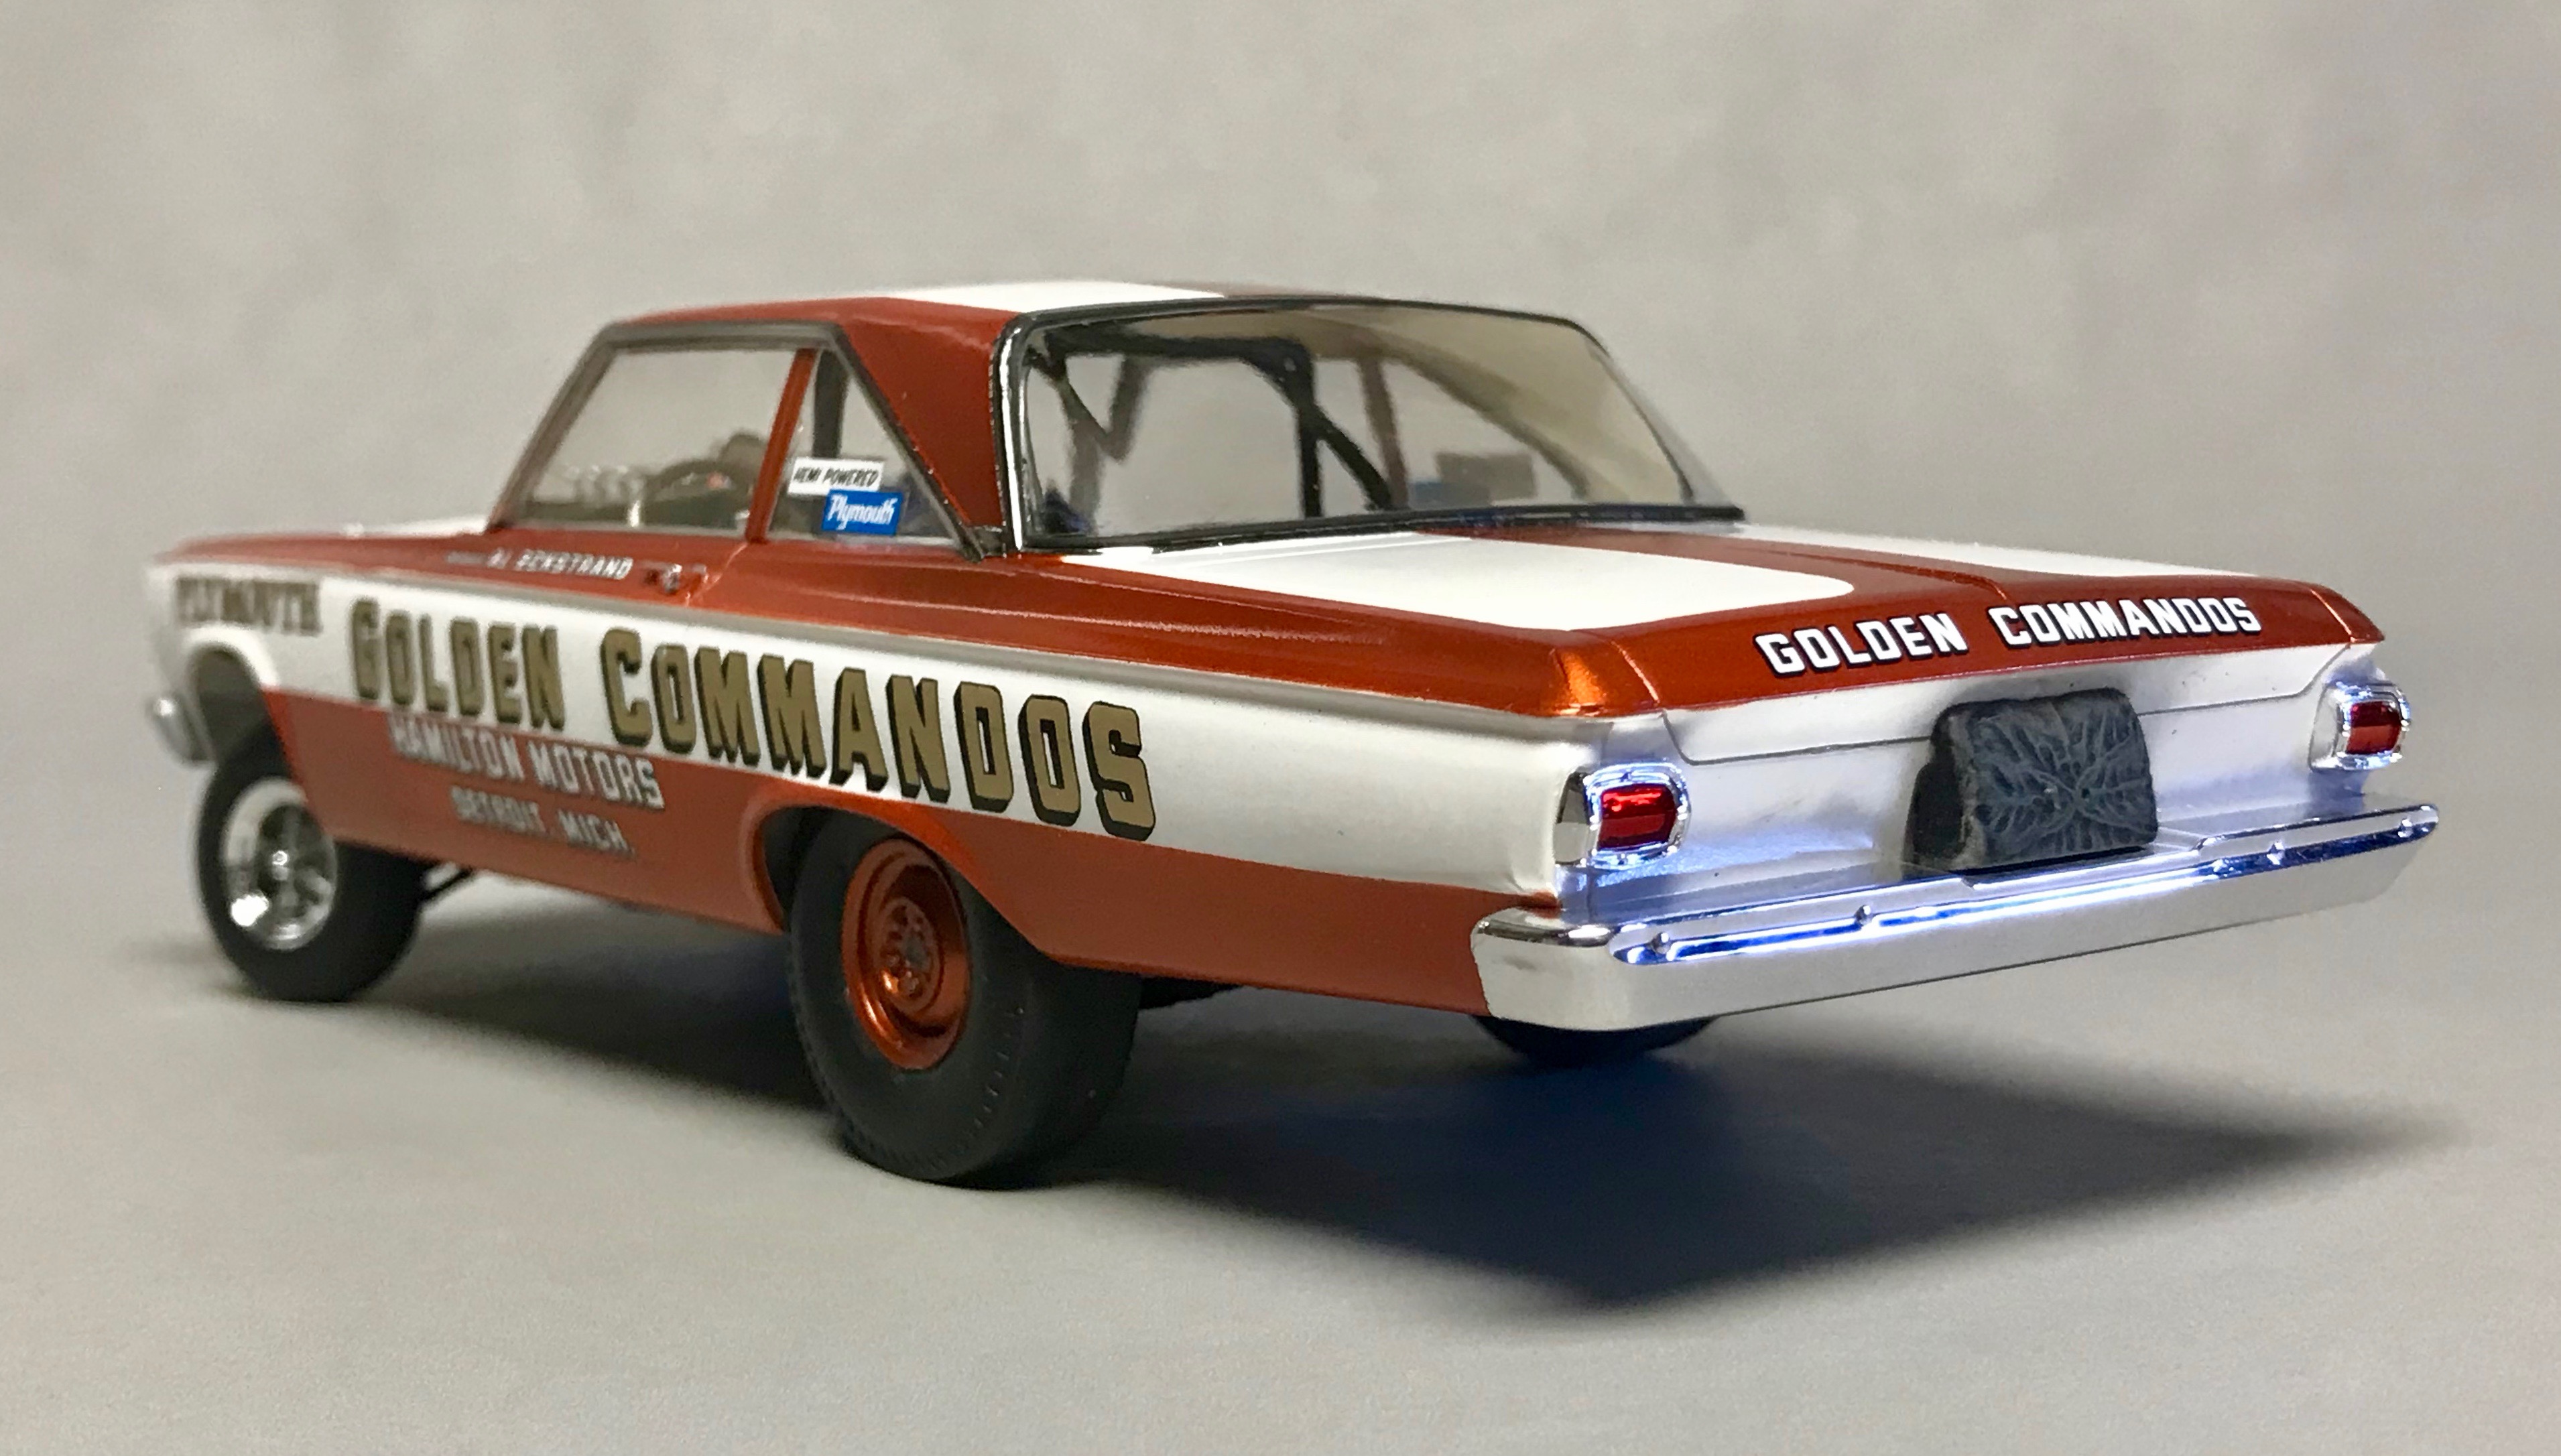
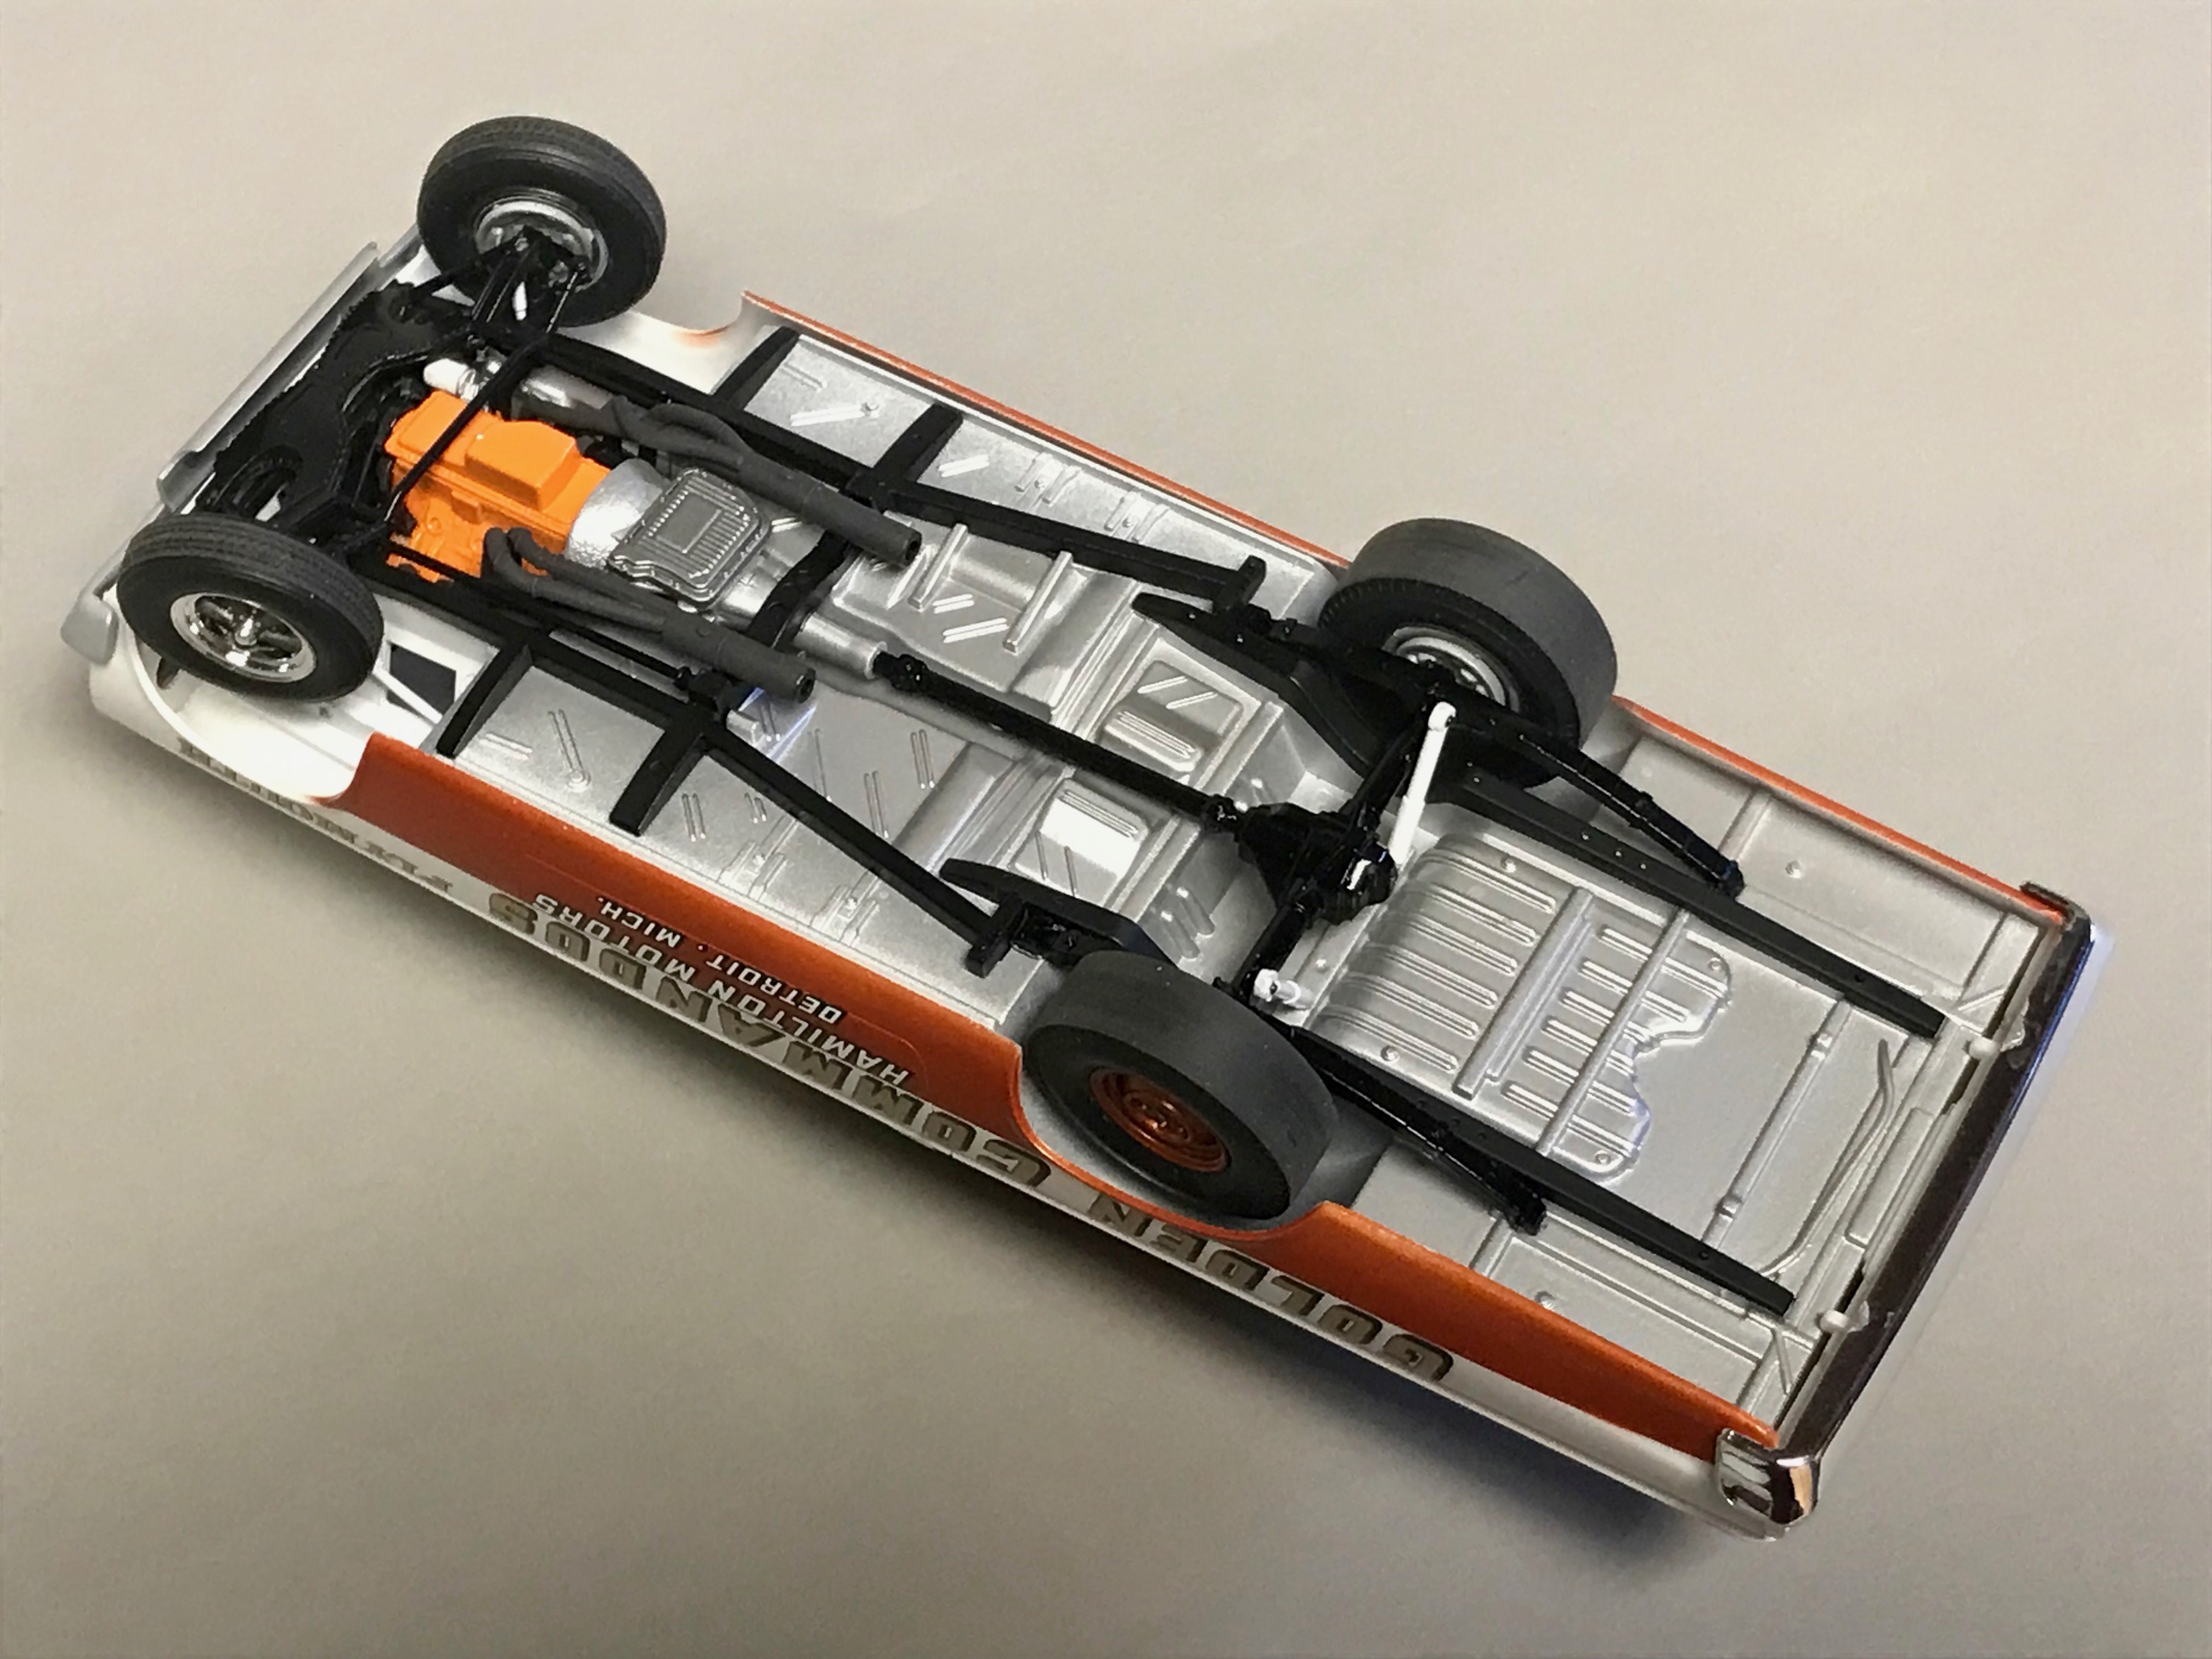
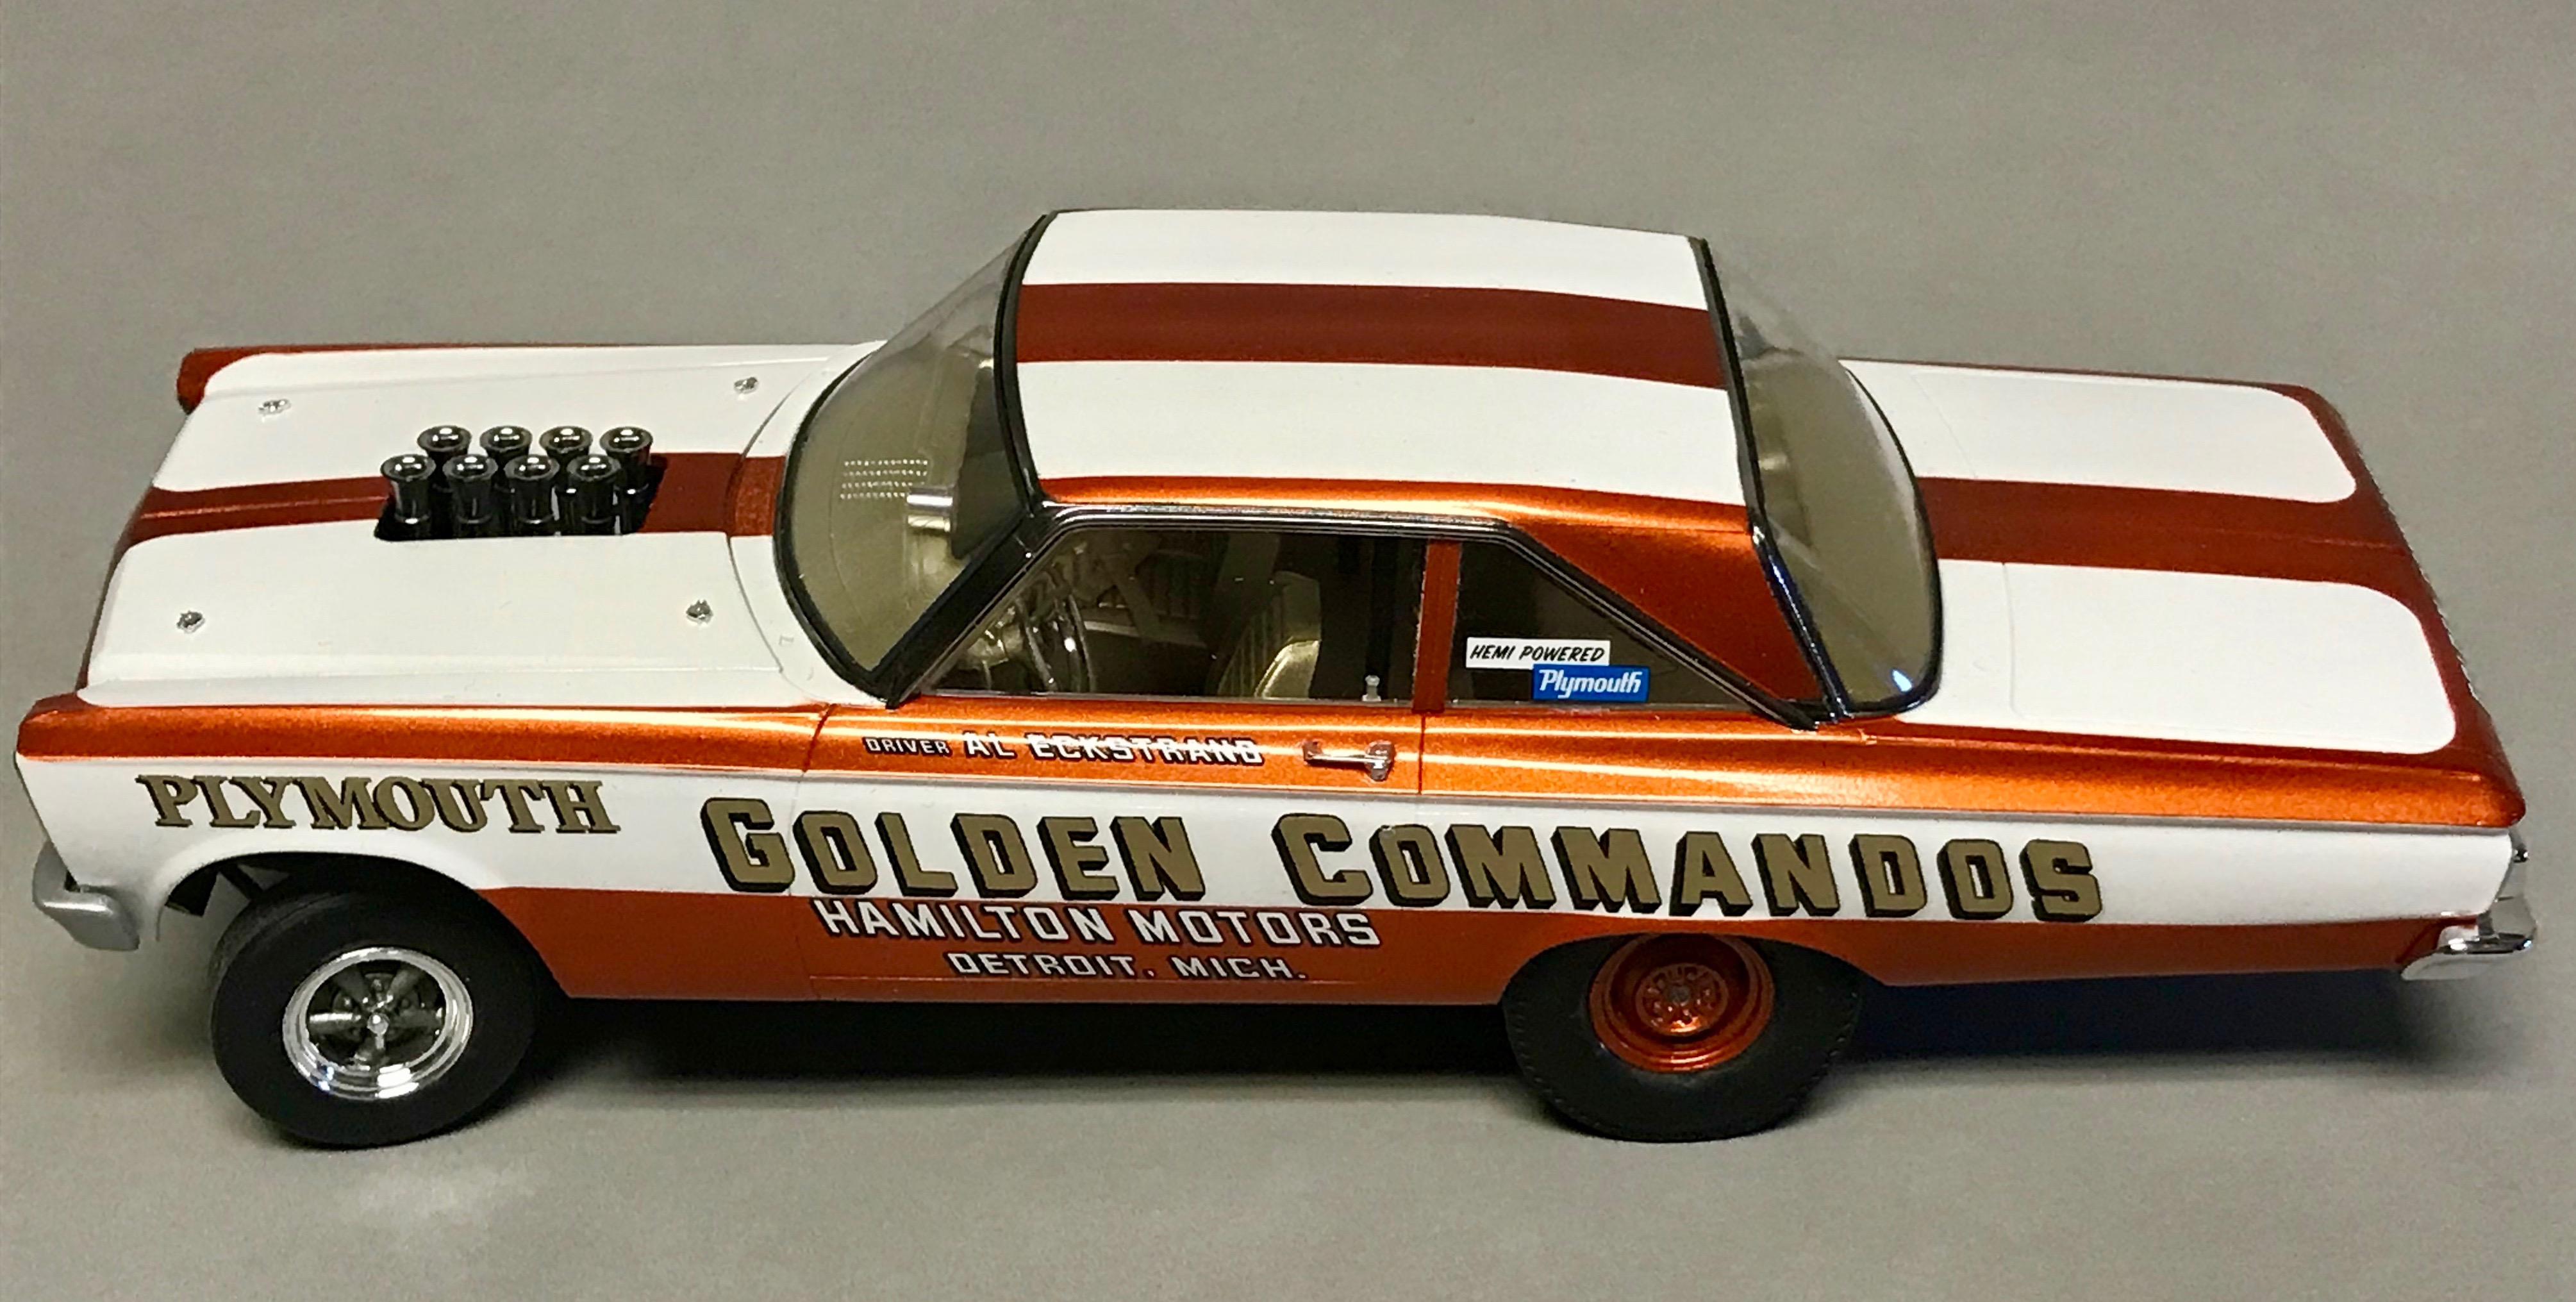
This is the excellent Moebius kit of the '65 Plymouth altered wheel base Hilborn FI A/FX aka "one of those funny looking drag cars". Other than gold decals from Fremont Racing Specialties (the kit decals are tan) and a Detail Master distributor/ plug wires and tach and misc. wires, I built this one OOB. I didn't like the kit supplied chrome plated injector velocity stacks and stripped the chrome with oven cleaner and painted them Alclad Chrome over black gloss lacquer. I painted the front bumper with Tamiya bare metal aluminum and the body paint is airbrushed using Scalefinishes.com base paints with Tamiya TS-13 clear coat. These Moebius '65 Plymouths assemble really nicely. I wish they also made a '65 Dodge AWB that I could put some Dick Landy decals on.
-
That candy red really pops with the indoor lighting. Beautiful build of a legendary drag car. Is this Alclad Candy Apple Red enamel transparent? Would you use it again or recommend it?
-
I’m really impressed with your workmanship on this one, absolutely flawless! How did you do the bright stainless trim work and window frames? If done with metal foil, I’m astounded at how clean and perfect your trimming is on the edges, particularly on the vent-like trim pieces just behind the rear window.
-
Fujimi Ferrari 330 p4
papajohn97 replied to TC's topic in Other Racing: Road Racing, Salt Flat Racers
Loved the Christian Bale line in the Ford v Ferrari movie “If this was a beauty contest, we just lost….” Fabulous execution of a moderately challenging kit. I remember fighting the chassis to body fit on this one as well as the Fujimi GT-40. Nice job on mounting the PE spoilers on the front fenders. I remember wrestling with the decals as well, particularly that circled number one on the rear deck. Love the look of these gold wheels against the red.