Casey
-
Posts
15,091 -
Joined
-
Last visited
Content Type
Profiles
Forums
Events
Gallery
Everything posted by Casey
-

1/43 MPC Dodge A-100 Van & Pickup
Casey replied to Casey's topic in WIP: Model Trucks: Pickups, Vans, SUVs, Light Commercial
Thanks, Darrin. I finally set the chassis/floorpan in position inside the body shell, then added a strip of styrene in between the rear frame rails, and one on the backside of each rocker panel, so now the chassis-to-body position is set: I also added a small block of plastic to which the fuel tank will be glued once it's painted, and I still need to address the front frame rail ends, but this is a small but major step, and will make further test fitting much easier. -
Studebaker Community Build...with a Meet & Greet in South Bend, IN?
Casey replied to Casey's topic in Community Builds
Wayne S. generously sent along a set of the Kurtis Kraft Indy Racer wheels/tires, but unfortunately, they're much too big, so I am sticking with the M/T Challenger 1 tires in the back, and making/casting some smaller diameter tires, based on a cut down Challenger 1 tire, for the front. Wayne also donated the quick change rearend from the Tony Nancy 22 Jr. dragster, so I got that assembled and will deal with the axle tube lengths when I get to that point. I sorted through some of the turbine engine's parts, got rid of a few I won't be using, and added a few odd bits from an old AMT kit which will add some detail to the engine. The exhaust tips were bored out, too: One the front tires and wheels are finalized, I can start to set the final ride height and start building the chassis. -
I finally collected (almost) all the 14" tires I need to go with the 14" steel wheels from the Revell '64 T-Bolt kit...just need to find one more tire, but I may go the mismatched/spare route for #4. I'm using Scenes Unlimited drum brake backing plates with some unknown kit-sourced wheel backs which are very brake drum like, and some resin inner wheel rings: These are easily my favorite kit-sourced 14" steel wheels, and because the circumference is beveled, they really snug down into just about any tire, like so: When is the completion deadline again?
-
Help with leaf springs in 1/16 scale
Casey replied to clavender17's topic in Model Building Questions and Answers
Measure the real leaf spring you're replicating, then buy brass strip or sheet and start cutting and bending each leaf, adding a center bolt to keep them together...or just read this tutorial: http://automodeler.kitmaker.net/modules.php?op=modload&name=Sections&file=index&req=viewarticle&artid=1251 -
Why on Earth did you get me that
Casey replied to lanesteele240's topic in General Automotive Talk (Trucks and Cars)
You will soon be flooded with PMs asking what brand that organizer is, and where they can get one. -
Parts for Barracuda Savage GT?
Casey replied to dimebolt's topic in Car Aftermarket / Resin / 3D Printed
The header and lower front valence/gravel panels would need to be created, too, and add in the hood, nameplate, rear spoiler, grille bars, separate parking lamps (not sure how the MPC parts are molded), sidepipes, and Appliance(?) pseudo-spoke wheels, and you've got yourself more work that it might've seemed. Once you've gone that far, you wouldn't want to just use the MPC chassis, either, so you'd need a Revell '68/'69 Dart kit... -
It might've been PSF Hobbies http://www.psfhobbies.com/ , James. Not sure if these scoops are related to the parts you're looking for or not, but it might be a starting point: http://www.modelcarsmag.com/forums/index.php?showtopic=62664&hl=mustang
-
Let's see your geegaws!
Casey replied to Lunajammer's topic in General Automotive Talk (Trucks and Cars)
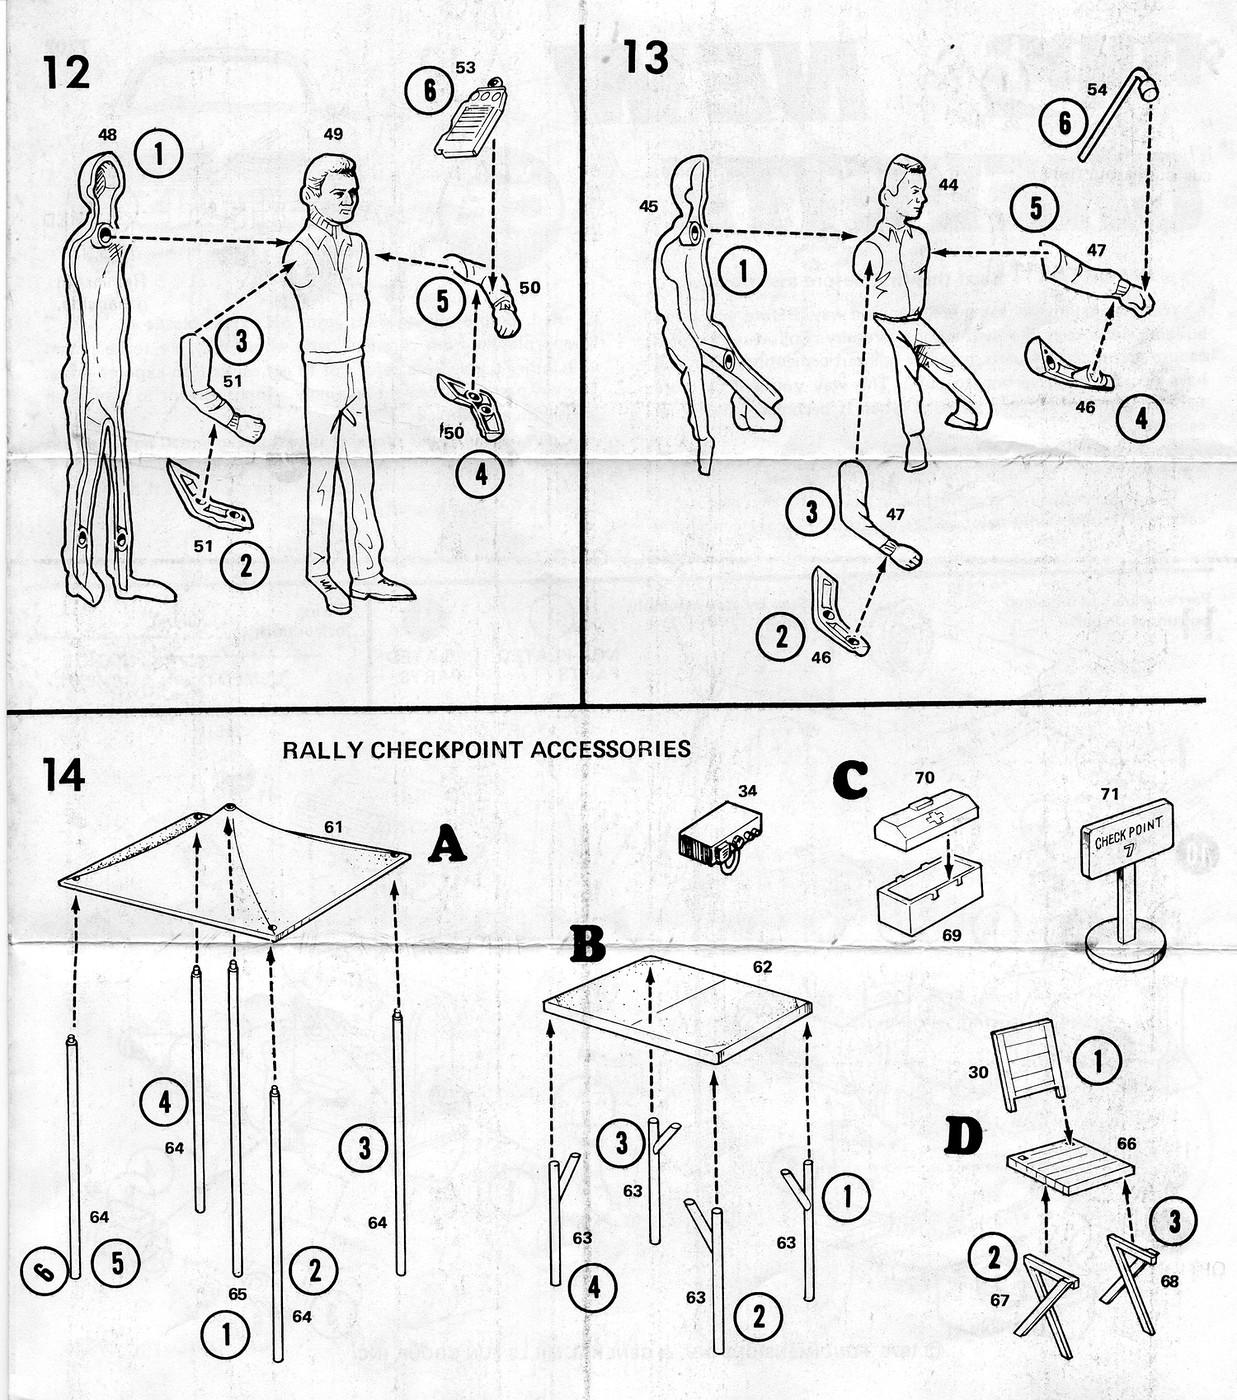
The clipboards are from the MPC '77 Chevette kit, which contained a folding chair and table, tent, tent poles, first aid box (looks like a carry-type tool box), a checkpoint sign, and other things. The AMT '64 Corvette Sport Coupe also contained a clipboard and a few other items:
-
They just updated the forecast. It's gonna be a bit warmer than previously thought:
-
I have seen this Ranger-ish toy, too, and it's not terribly accurate, but if one wanted a starting point for the early, squarish Ranger, this would be the one to find. I'm pretty sure this was discussed here before, and I think either Chuck or Rodney have/had one of the toy Rangers, but maybe it was someone else.
-
Let's see your geegaws!
Casey replied to Lunajammer's topic in General Automotive Talk (Trucks and Cars)
Golf bag and clubs from the AMT '64 Vette?: -
how do i get back to the board?
Casey replied to Tom Kren's topic in General Automotive Talk (Trucks and Cars)
Scroll all the way to the bottom of the main forum page and you should see the Full Version button. -
-
Obscure Kits You Never Knew Were Made...Until Now
Casey replied to Casey's topic in General Automotive Talk (Trucks and Cars)
Those blister-packaged Palmer Cobras look like the Korris Kars packaging, at least as far as I remember. I'm guessing only Erik has seen (and owns) this one? -
Would it straighten out enough once it's attached to the floorpan? I haven't seen any pictures of the kit's contents other than the test shot, but it appears the floorpan piece might be able to help hold the frame in the correct, untwisted position.
-
It's not just you. I noticed the same on my Chevette kit. Maybe the sprue attachment points on MPC kits were a little bit thinner or smaller? I dunno, but I've noticed the same thing, at least compared to Monogram kits, which seem to hold up the best out of the Big Four's kits.
-
What kit has a good Ford 427 SOHC?
Casey replied to Patrick2005's topic in Model Building Questions and Answers
Good reference pic of a Cammer. I like that this one is clean without any excess anything, and the blower belt tensioning pulley and bracket always seem to be left off of scale models...so no more excuse now! -
1971 Datsun PL521
Casey replied to Aeroteto's topic in 1:1 Reference Photos: Auto Shows, Personal vehicles (Cars and Trucks)
I wouldn't mind seeing more pics of the Dodge F-body parked ahead of the Datsun, too. Heck, I'd love to see pics of all Mexican-market specific cars and truck we didn't get across the border. The '90s Dodge Ramcharger, anything from VAM (AMC), not to mention the F-body (Aspen/Volare) Super Bees. -
Maybe it's to differentiate between the Chevy and GMC Astros.
-
The stacked headlights and bezels look great on this car/body style, with all of the existing rounded curves, and getting rid of the stock tail light bezel/rear fender splits(?) is a huge improvement, too. A perfect case of less is more.
-
Marker renderings of traditional Rods and Customs, etc
Casey replied to traditional's topic in Auto Art
Beautiful renderings, Clifford. -
Contact Revell for a replacement. It happens, and they'll send a replacement for free. http://www.revell.com/support/index.html
-
1) '73 Pontiac Astre GT hatchback- great looking car, and the early Pontiac H-body GT hatch just appeals to me: 2) '05 Subaru Legacy GT Wagon - daily diver, all around fantastic car, with plenty of power to test my limits. 3) '78 AMC Gremlin GT- I like AMCs and disco paint schmes: 4) '77 Chevette Sandpiper...4-speed, please. 5) '70 Javelin SST in T/A paint scheme:
-
This is the book, correct?:
-
3D-printed 1/24 scale 15" Vector Wheel
Casey replied to Chief Joseph's topic in Car Aftermarket / Resin / 3D Printed
What Greg said. Just in time for the reissued Monogram GNX kit.