rightrudder
-
Posts
300 -
Joined
-
Last visited
Content Type
Profiles
Forums
Events
Gallery
Everything posted by rightrudder
-
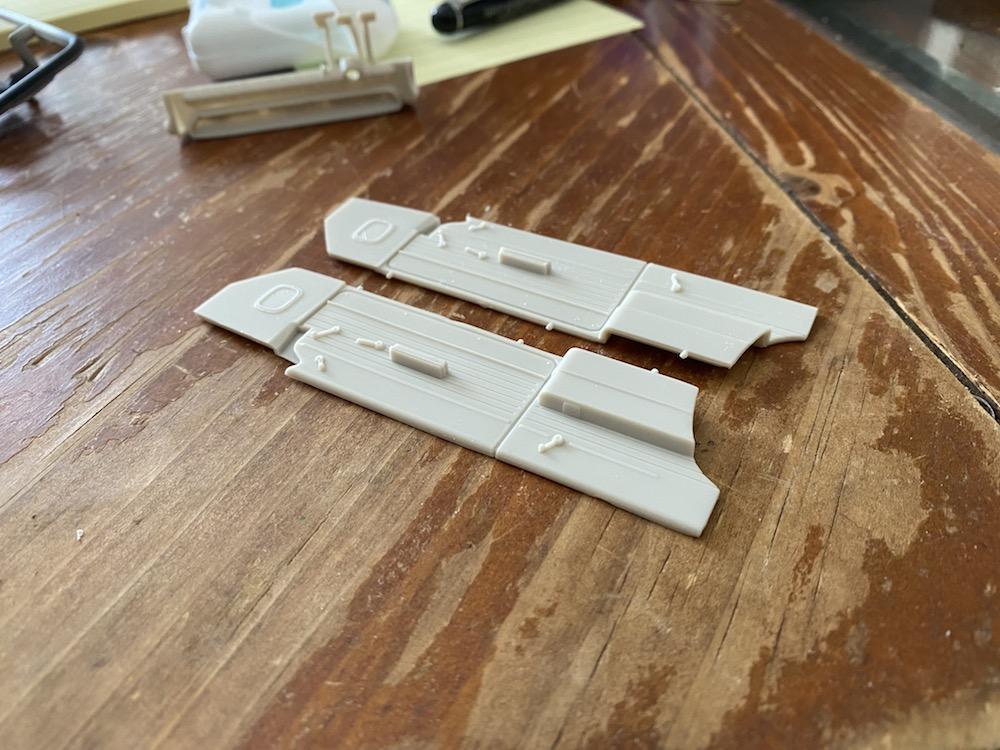
Haha! Maybe it's like the image of Jesus on a piece of toast...could be worth thousands on an eBay auction!! Maybe it's my reflection, but people tell me I look a little like Norm MacDonald. (RIP, Norm) Wow, that sounds tough!! We all have varying degrees of the masochism gene in our DNA strands. Almost ready to start painting interior stuff. Here are the door panels, with the right side pretty flat and the left side a bit of a potato chip. I used my Harbor Freight heat gun to heat the backside and straighten it out pretty successfully, but as many of you know, the delta between enough heat to make a difference and total styrene meltdown is narrow! You can see in the "after" picture that little ripple where the panel meets the floorpan, but with the seat in place it shouldn't be visible. Having a crappy coffee table pays off in model building, as I like nothing better than watching TV, drinking coffee and prepping parts! You can see the dash in the background, and see that I elected to remove the parking brake pedal. It was about the same size as the regular brake pedal (!) and looked like a real monstrosity, so off it went. I love how Moebius went with a three-pedal, manual-trans version of the car. To date, I've owned 21 full-scale cars (only one bought new) and of those, only three have had automatics.

-
Gluing Rearview Mirror on Windshield
rightrudder replied to TransAmMike's topic in Model Building Questions and Answers
Pacer canopy glue works great too. Dries clear, won't fog plastic, and will wipe off if you make a mistake. I let it set up and thicken a little before use. -
Yeah, it was such a space-age styling cue, straight out of an auto show.
-
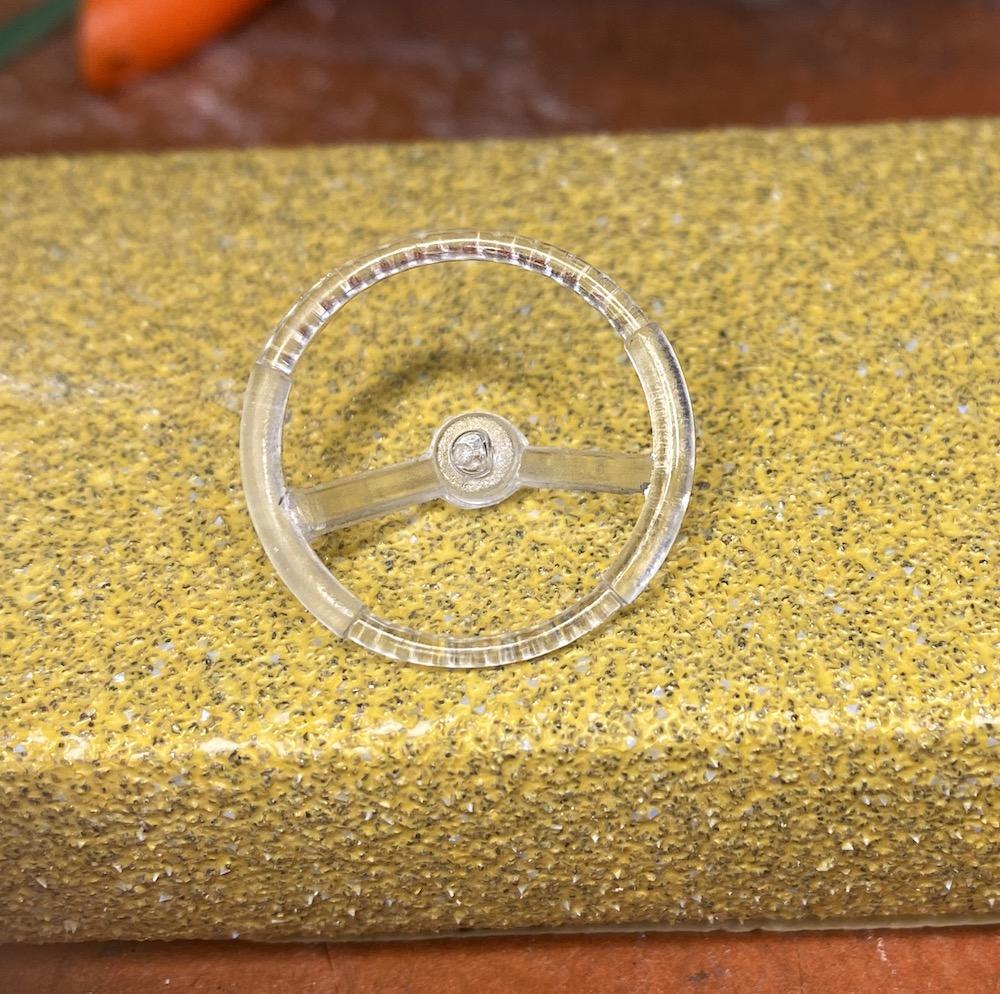
Fiddling around with various parts. It's subtle, but I thinned down the left side of the rim so the wheel wouldn't look quite so chunky and the "step" would be less obvious. I might take just a little more off (and do the right side, of course!).
-
Very clean! Love the 'tude, stance and colors.
-
Aargh! Not So Easy Off, apparently. I hope the bleach works!
-
Thanks! Chassis is underway for a change of pace.
-
Disregard earlier post about shaving those interior floor ribs to mount the front buckets....they're OK as is. I wish the seats would locate more positively, but after fiddling with them, they do sit level. I edited earlier post to remove the error.
-
Cool! Would be fun to make the gullwing doors open.
-
Looks great, perfect for scooting around Tokyo's streets! I wish there was a kit of the Autozam AZ-1, another mid-engine Kei car. Maybe one exists?
-
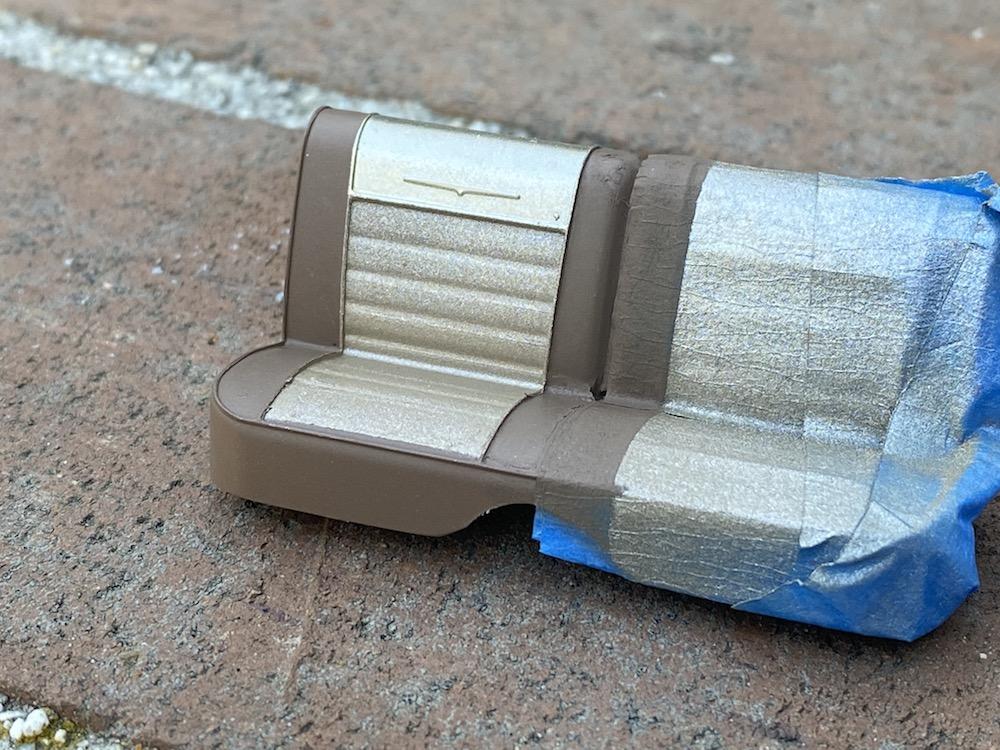
I love that these acrylics dry so fast...you can mask things up quickly! Here's the result of the new test; I really like it! Top pleat is straight Titan Gold; lower center section is 50:50 Titan Gold/Flat Earth; and darker brown is Flat Earth with a little bit of Brown mixed in (maybe 10:1 ratio). To my eye it all has enough contrast, and the gold goes great with the black exterior. I don't think it needs any matte clear, as the gold is not obnoxious.
-
Thanks, David. Yes, I have both those Tamiya colors in bottles and use them a lot. I tried out the top inner pleat in black and didn't like the effect, so the Titanium Silver is certainly in the running...good suggestion! Should have my second crack at the "test seat" done soon. Exterior color is black. I've never done this on a model, but with recent practice on other kits I feel I can get it shiny enough to do the Ventura justice.
-
Thank you, Carl. The more I look at it, the more I like these colors. The flat aluminum will look a lot better when it's evenly airbrushed on, and just a slightly darker brown for the outboard sections will give the contrast I'm looking for. Later today, I think I'll do the other side in final form, with the matte clear, just to get a real sense of it. My dad's '59 Ford Galaxie Skyliner had brown Naugahyde seats, and this makes me think of him.
-
The unused (for me) front bench makes a nice testbed for colors. I did a quickie brush paint to see how it looks. I think the outboard bolsters need to go a shade darker, and I'm not sold on the silver at top, so experimentation continues. Maybe black to match exterior, with gold emblem?
-
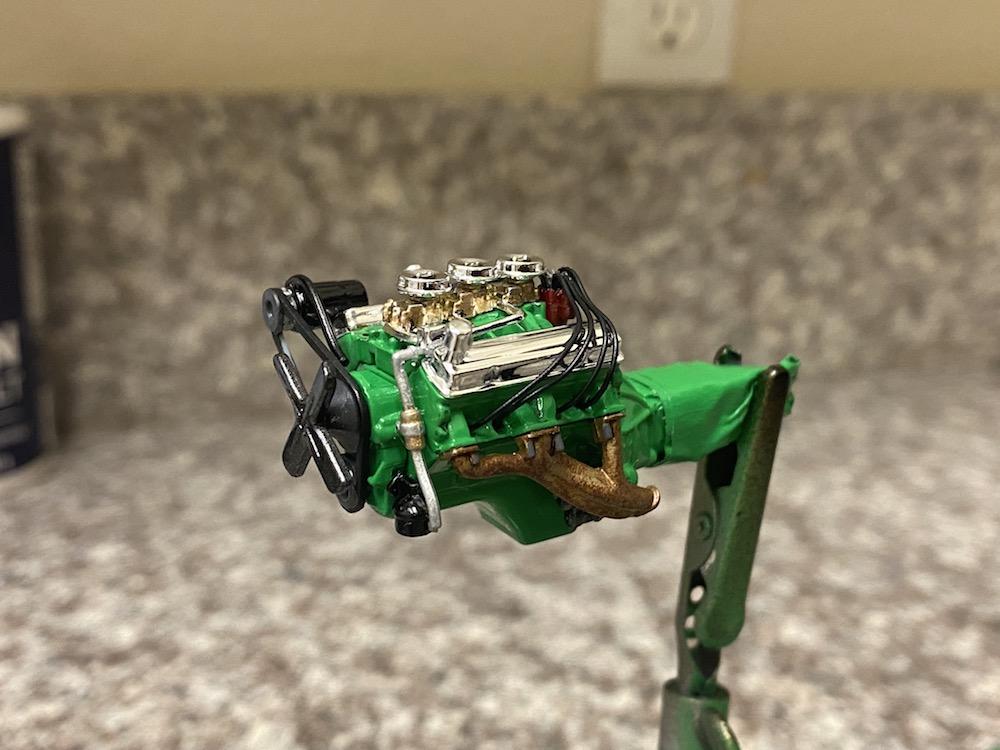
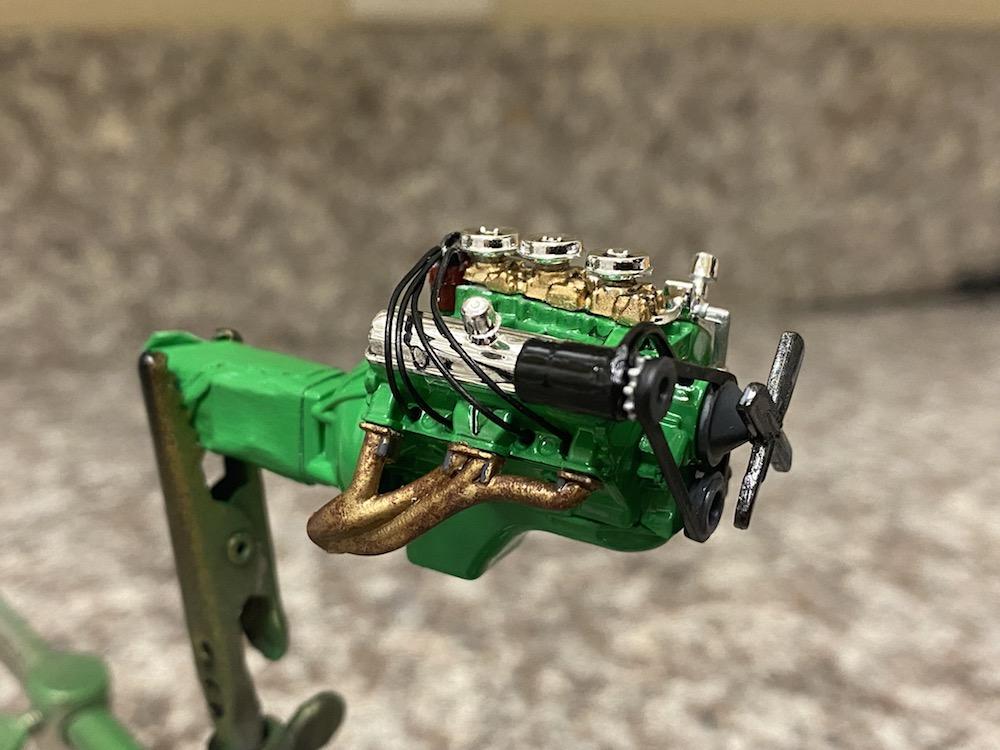
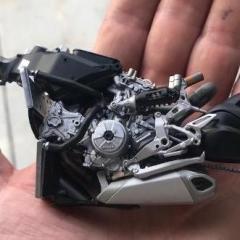
Still have to paint the gearbox (aka the "handle" ?) but the engine's done. I weathered the exhaust a little and put some panel line wash on the intake manifolds and heads. It's not indicated in the instructions, but the three little air cleaners are included for the carbs, although everywhere else it shows the big round air cleaner. The great thing about close-up photos is that I always find areas that I missed or need touching up, like the inside of the fan belt!
-
A fun kit! The door panels and interior in general have a lot of great detail.
-
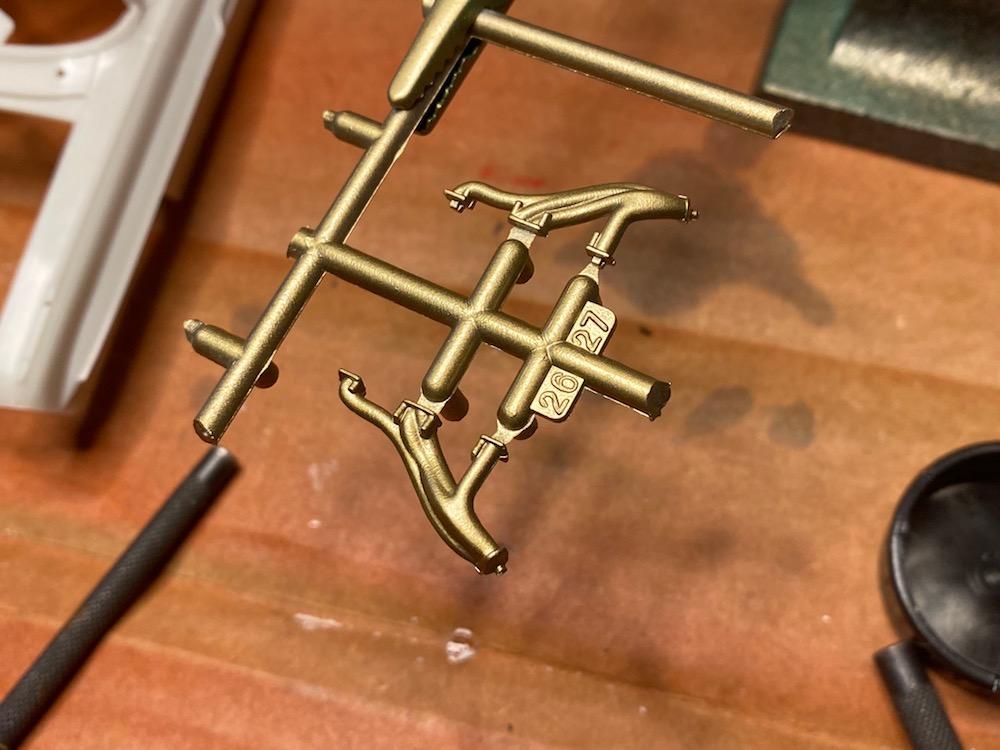
It's the little things... Really crisply molded manifolds. And look how they attach to the sprue, so you're not carving/sanding off the excess in a place where it shows, and it minimizes paint retouching. Also, I like the attachments for the chrome valve covers, at top and bottom. When you look at an engine sitting in the compartment, the forward ends are really prominent, and when you have to touch up here it's far more noticeable.
-
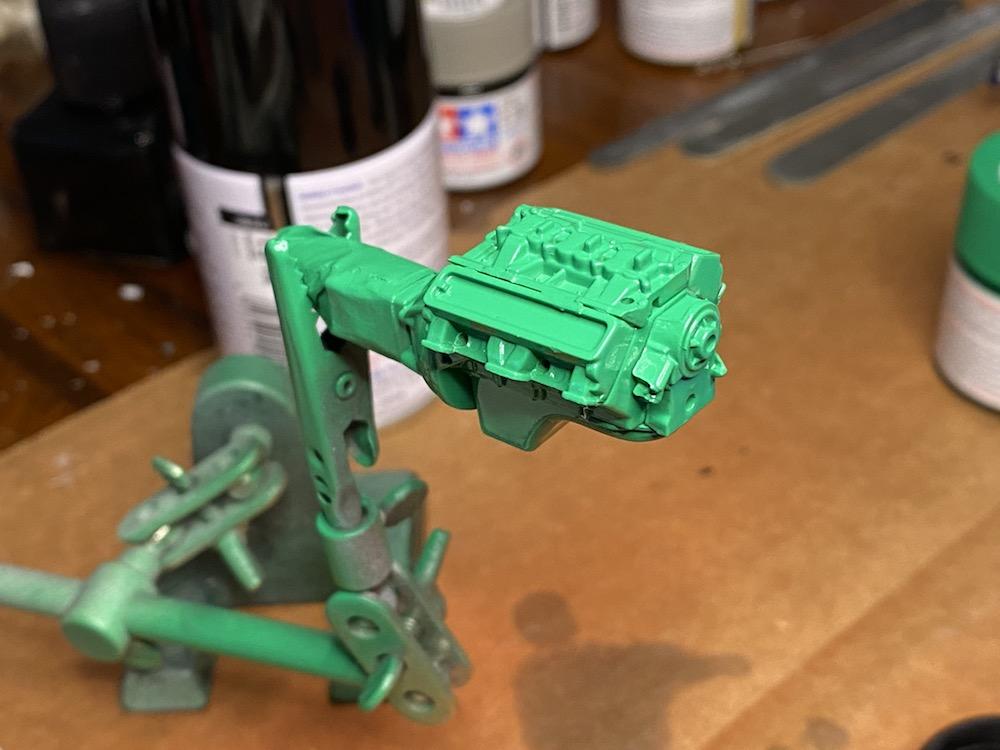
Wonderful comments, guys. It's threads like these that really add to the fun of the build, and all your tips will go a long way toward lowering the frustration level. Bill, you're so right. That guy was the proverbial skunk at the garden party. There's one on every forum! I will definitely check out your Green Hornet today. Christopher, you nailed it...thanks for the pic! I went with "Gumby Green" (Tamiya Park Green) for the engine...I had juuuust enough left in the can from the Impala build. I figure the Chieftains used green paint here, so not completely out of the Pontiac universe. Got the holes drilled for the plug wires. Also fiddling with interior paint colors. Leaning toward the "Black & Tan" look. Here's some test splotches, photo doesn't really do it justice. The colors are straight up Tamiya Flat Earth acrylic, and a 50:50 mix of Flat Earth and Titan Gold. Have to give props to JollySipper for inspiration, when I saw how cool his T-Bird turned out with gold and brown hues. This interior really calls out for a little metallic sparkle, but I'll mute it with some matte clear. Topmost center pleat on seatbacks might be flat silver, but I haven't quite decided. One thing that bugs me on the steering wheel is the too-pronounced difference in rim thickness from the clear to painted sections, so I'll sand that down so it doesn't look so chunky.
-
Monogram Datsun 280Z 'Rolling Restoration'
rightrudder replied to Spottedlaurel's topic in Model Cars
Awesome concept and execution! Sort of Datsun's low rent version of BMW's art cars, to my eye. Bravo!! -
Following this for sure. ? The Duster was a cool sporty car for Everyman. What about yellow? I have to admit I really like the simple look with steelies matching the body color (emu optional!)
-
Bill, I scanned through your thread and it is incredibly helpful. It really got contentious at the end! I like the challenge of trying to improve various pieces, and I don't hold it against the manufacturer if there are shortcomings here and there. Making this stuff right is fun and challenging! I don't know if I have the skills to really correct the wheels like you did, but I have been wanting to get a small lathe or some such for a while, and the challenge of thinning down those flanges may be the impetus for the purchase. I will definitely take plenty of time to make the glass fit, as glass sticking out above the roofline is a flaw that I couldn't stomach in the finished model. I really enjoy the process of gathering reference photos for a particular model, and a pic of a Pontiac 8-lug wheel will be front and center. ?
-
Thanks for the encouragement, guys! Bill, I will read every word in your thread with great interest...thank you for posting that. It's so helpful to see the problems others have encountered and potential solutions.
-
One more photo:
-
Hi guys, Just picked up this kit today at the local hobby emporium. I've never built a Moebius kit, and I have to say I'm impressed so far! Sooo many things are cool about the Ventura. Wonderful wheels with those fluted "turbine" center sections, interesting shapes to the pillars of the bubble top, the way the tops of the twin front grilles curve inward, etc. It's kind of an odd duck from some angles, but I like its quirkiness. Will go black for the exterior and try for as glossy a finish as possible. Stock interior color schemes are way too busy for my taste, so I'll do something similar to factory approach with colors that contrast a little less. And I can't stand the awful powder blue of the engine, so that'll change as well. Purists, avert your eyes!! Parts are molded in a light tan color, and the parts count is higher than typical AMT...for instance, each wheel is comprised of five different parts, including chromed hubcaps and beauty rings. I like this as it's more conducive to adding detail. Frame and chassis tub are separate pieces, and everything locates very positively with slots, tabs and pins. Awesome set of proper wide whitewalls included too. Instruction sheet is more like a folded up poster, printed on heavy stock. Lots of great paint color info on full-size car here, including the Ditzler code numbers. Should be fun! Here's a bunch of stuff that comes in the kit:
-
Thx, Rob! It was fun to build.