dino246gt
-
Posts
2,244 -
Joined
-
Last visited
Content Type
Profiles
Forums
Events
Gallery
Everything posted by dino246gt
-

Moebius Comet... Wild Bubbletop Show Rod- Done! 3-17
dino246gt replied to Impalow's topic in WIP: Model Cars
Wow what a great imagination you have! Love this crazy project, WOW! -
New 3d Printed 32 Deuce Top
dino246gt replied to mnagatani's topic in Car Aftermarket / Resin / 3D Printed
I'll be wanting one of these! -
Tamiya Porsche Carrera GT (updated January 14th)
dino246gt replied to rbarlow1's topic in WIP: Model Cars
Wow, that's looking cool, love that interior! -
1/25 Jeep Gladiator
dino246gt replied to Casey's topic in WIP: Model Trucks: Pickups, Vans, SUVs, Light Commercial
This is a great project, are you doing the early style front grill area as well? Great work so far and I can't wait to see more! -
1:8 Scale Wheels in 3d print
dino246gt replied to mnagatani's topic in Car Aftermarket / Resin / 3D Printed
Tires are needed! Wheels look great, I did get some Halibrand fronts from you and they ARE great! -
I'll be watching with interest, cool project!
-
I ALMOST thought about doing this as a car under restoration, finishing up the interior, front trunk, and adding brake detail (since the rims cover the outside, the kit only has the inside detailed) but after running that by some of my model friends, they pooh poohed that idea. I started the interior, off white with black carpets and dash top and plan to do the body in a very dark blue. I've sort of lost enthusiasm as I got back to 1/25th scale, but I won't give up on this one. Looking EVERYWHERE for a spare wheel and tire to put up front, anyone have one please!!! I've made a temporary "covered spare" from a spray can of the exact same diameter as the front tires. Added a few details to the front firewall too. Ciao!

-
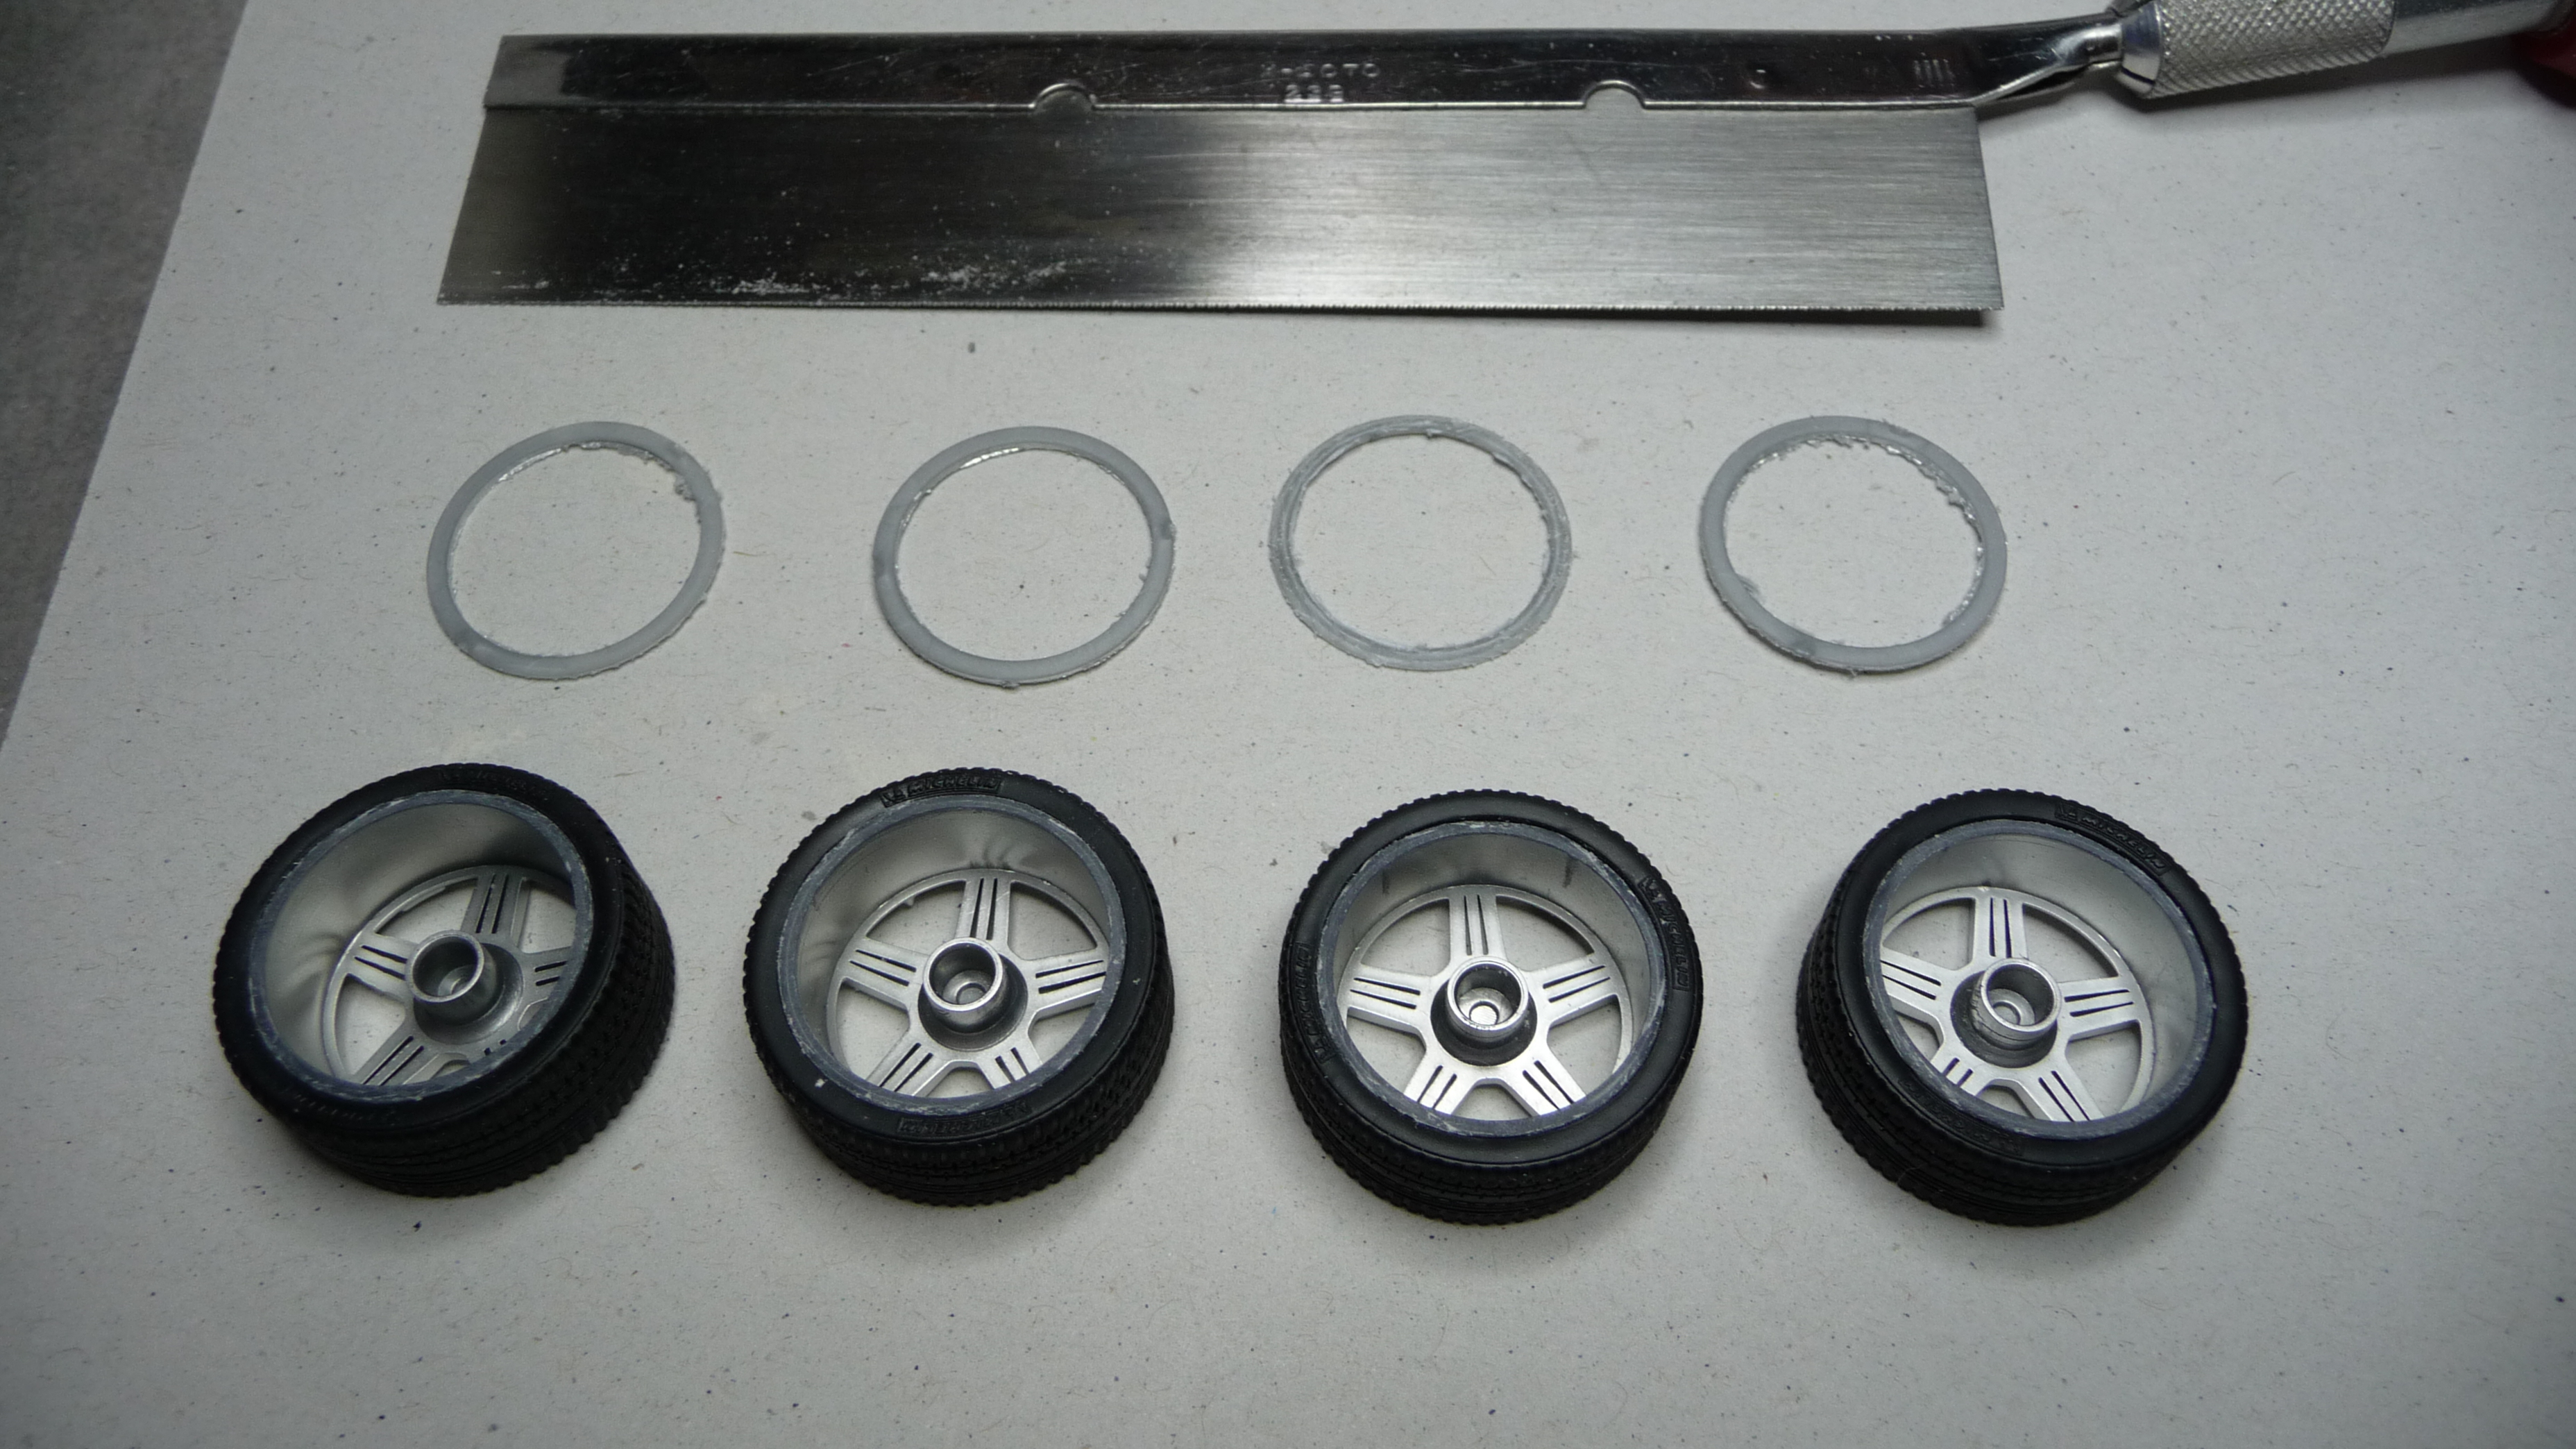
I do the same thing with all those kit's rims, cut the lip off the backs, it works out fine.
-
That cleaned up real nice and your interior is awesome, great details!
-
Wow, this is a great build, so much detail, I love it. Can't wait to see more, looks totally real!
-
Wow, that looks real, those seats are too cool! Nice build, those big kits are something else when done up like this, NICE!!!
-
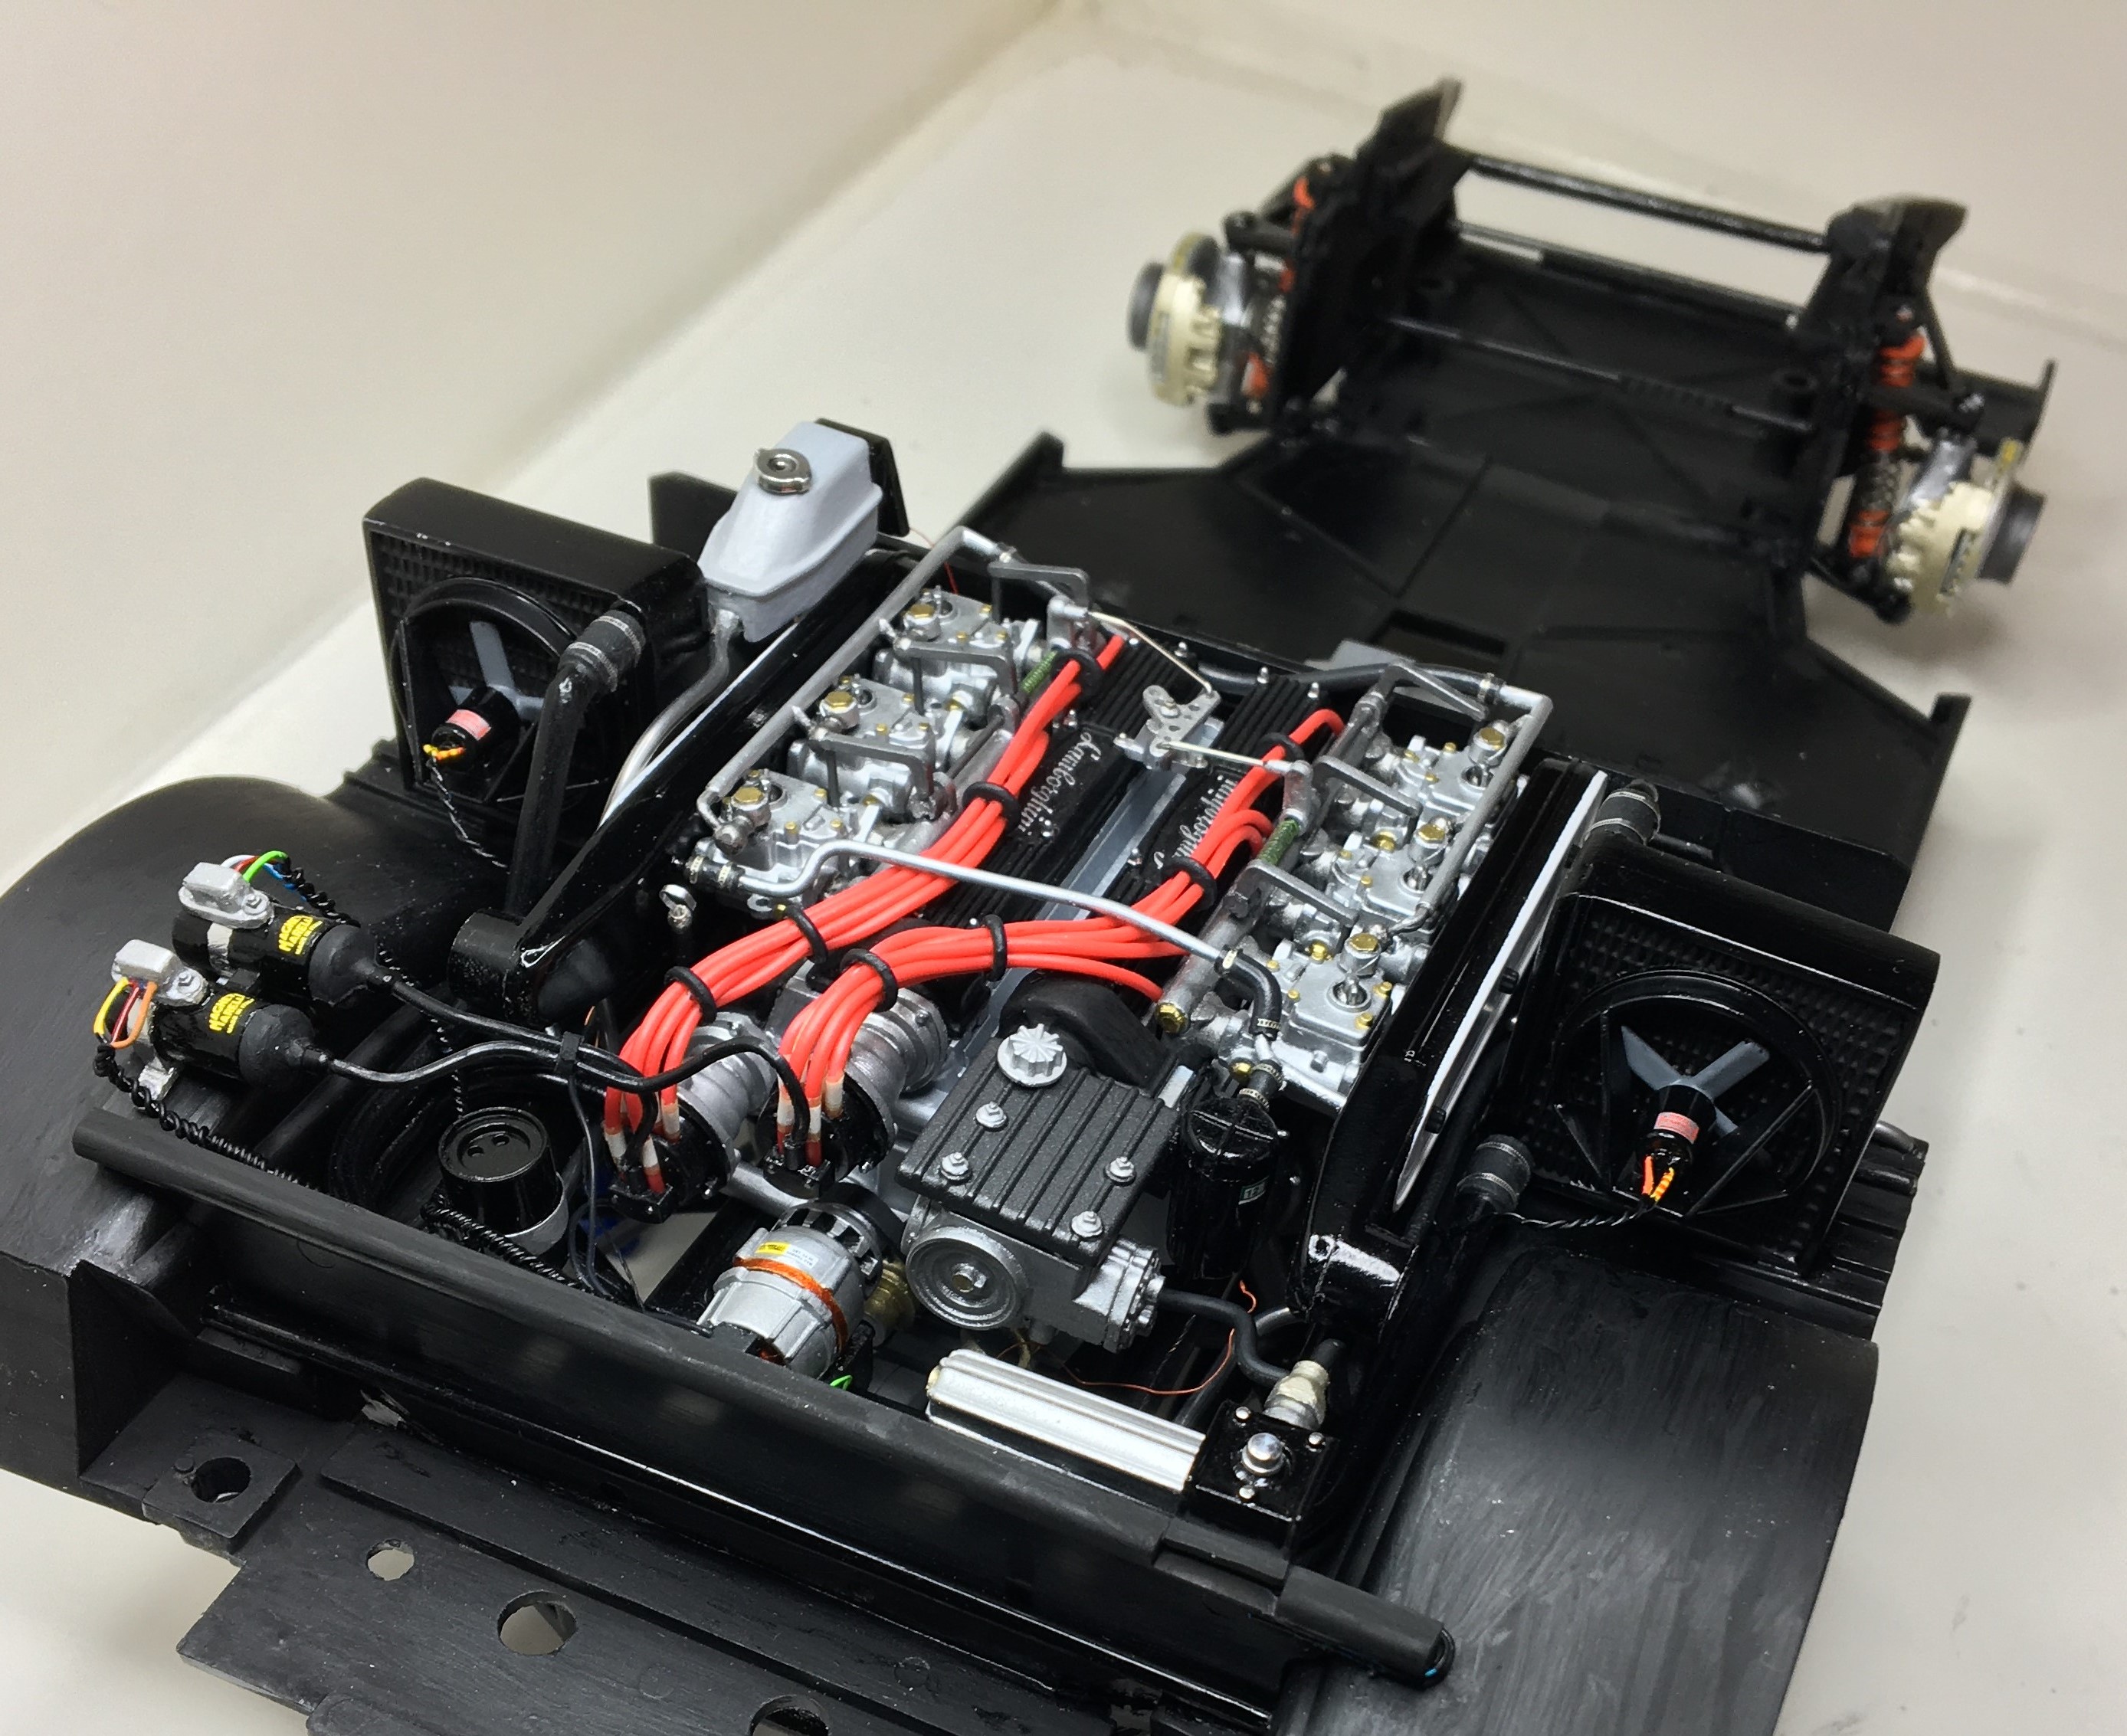
Did the coils, wired the fan motors, made some fittings and hydraulic hoses for the oil pump and mounted all that. Made a dipstick and tube, that's on, so the only things left on the engine are the "dryer hoses" from the air boxes and the throttle cable to the gas pedal. Those are being made but can't be installed until the body is on. That won't be for some time, a long time! For now though, here's the engine!
-
The decal paper is called Experts Choice, by Bare-Metal Foil Co. it's on clear and for laser. I also brushed some Microscale liquid decal film over them before I used them, they worked great and I got real fine resolution for tiny print!
-
Revell Foose '48 Cadillac de-Foosed
dino246gt replied to Perspect Scale Modelworks's topic in WIP: Model Cars
I'm shocked by all the negative comments about Foose, I love the car as a 1:1 but as for building models, I don't want to do someone else's custom, even if it's as gorgeous to me as a Foose's design. I want to put my own spin on it, and what you're doing is so awesome, that roof transplant is what I also intend to do! Too bad we didn't buy those Caddy rear fenders from Modelhaus while they were available! I did manage to get some clear red tail lights so I guess I'll try to scratch the small "fins" for them and graft those onto the rear fenders. LOVE the way yours is looking, got any colors picked out yet? -
Looking good, I love these cars, Falcons and Comets!
-
I've always wondered why they never did that in 1:1, looks so natural, cool keep posting pics of your progress please!
-
That is cool, love the headers!
-
Oh wow, that is so cool! (just don't put sidemounts on it like they did with the Seville in the 80s ha ha)
-
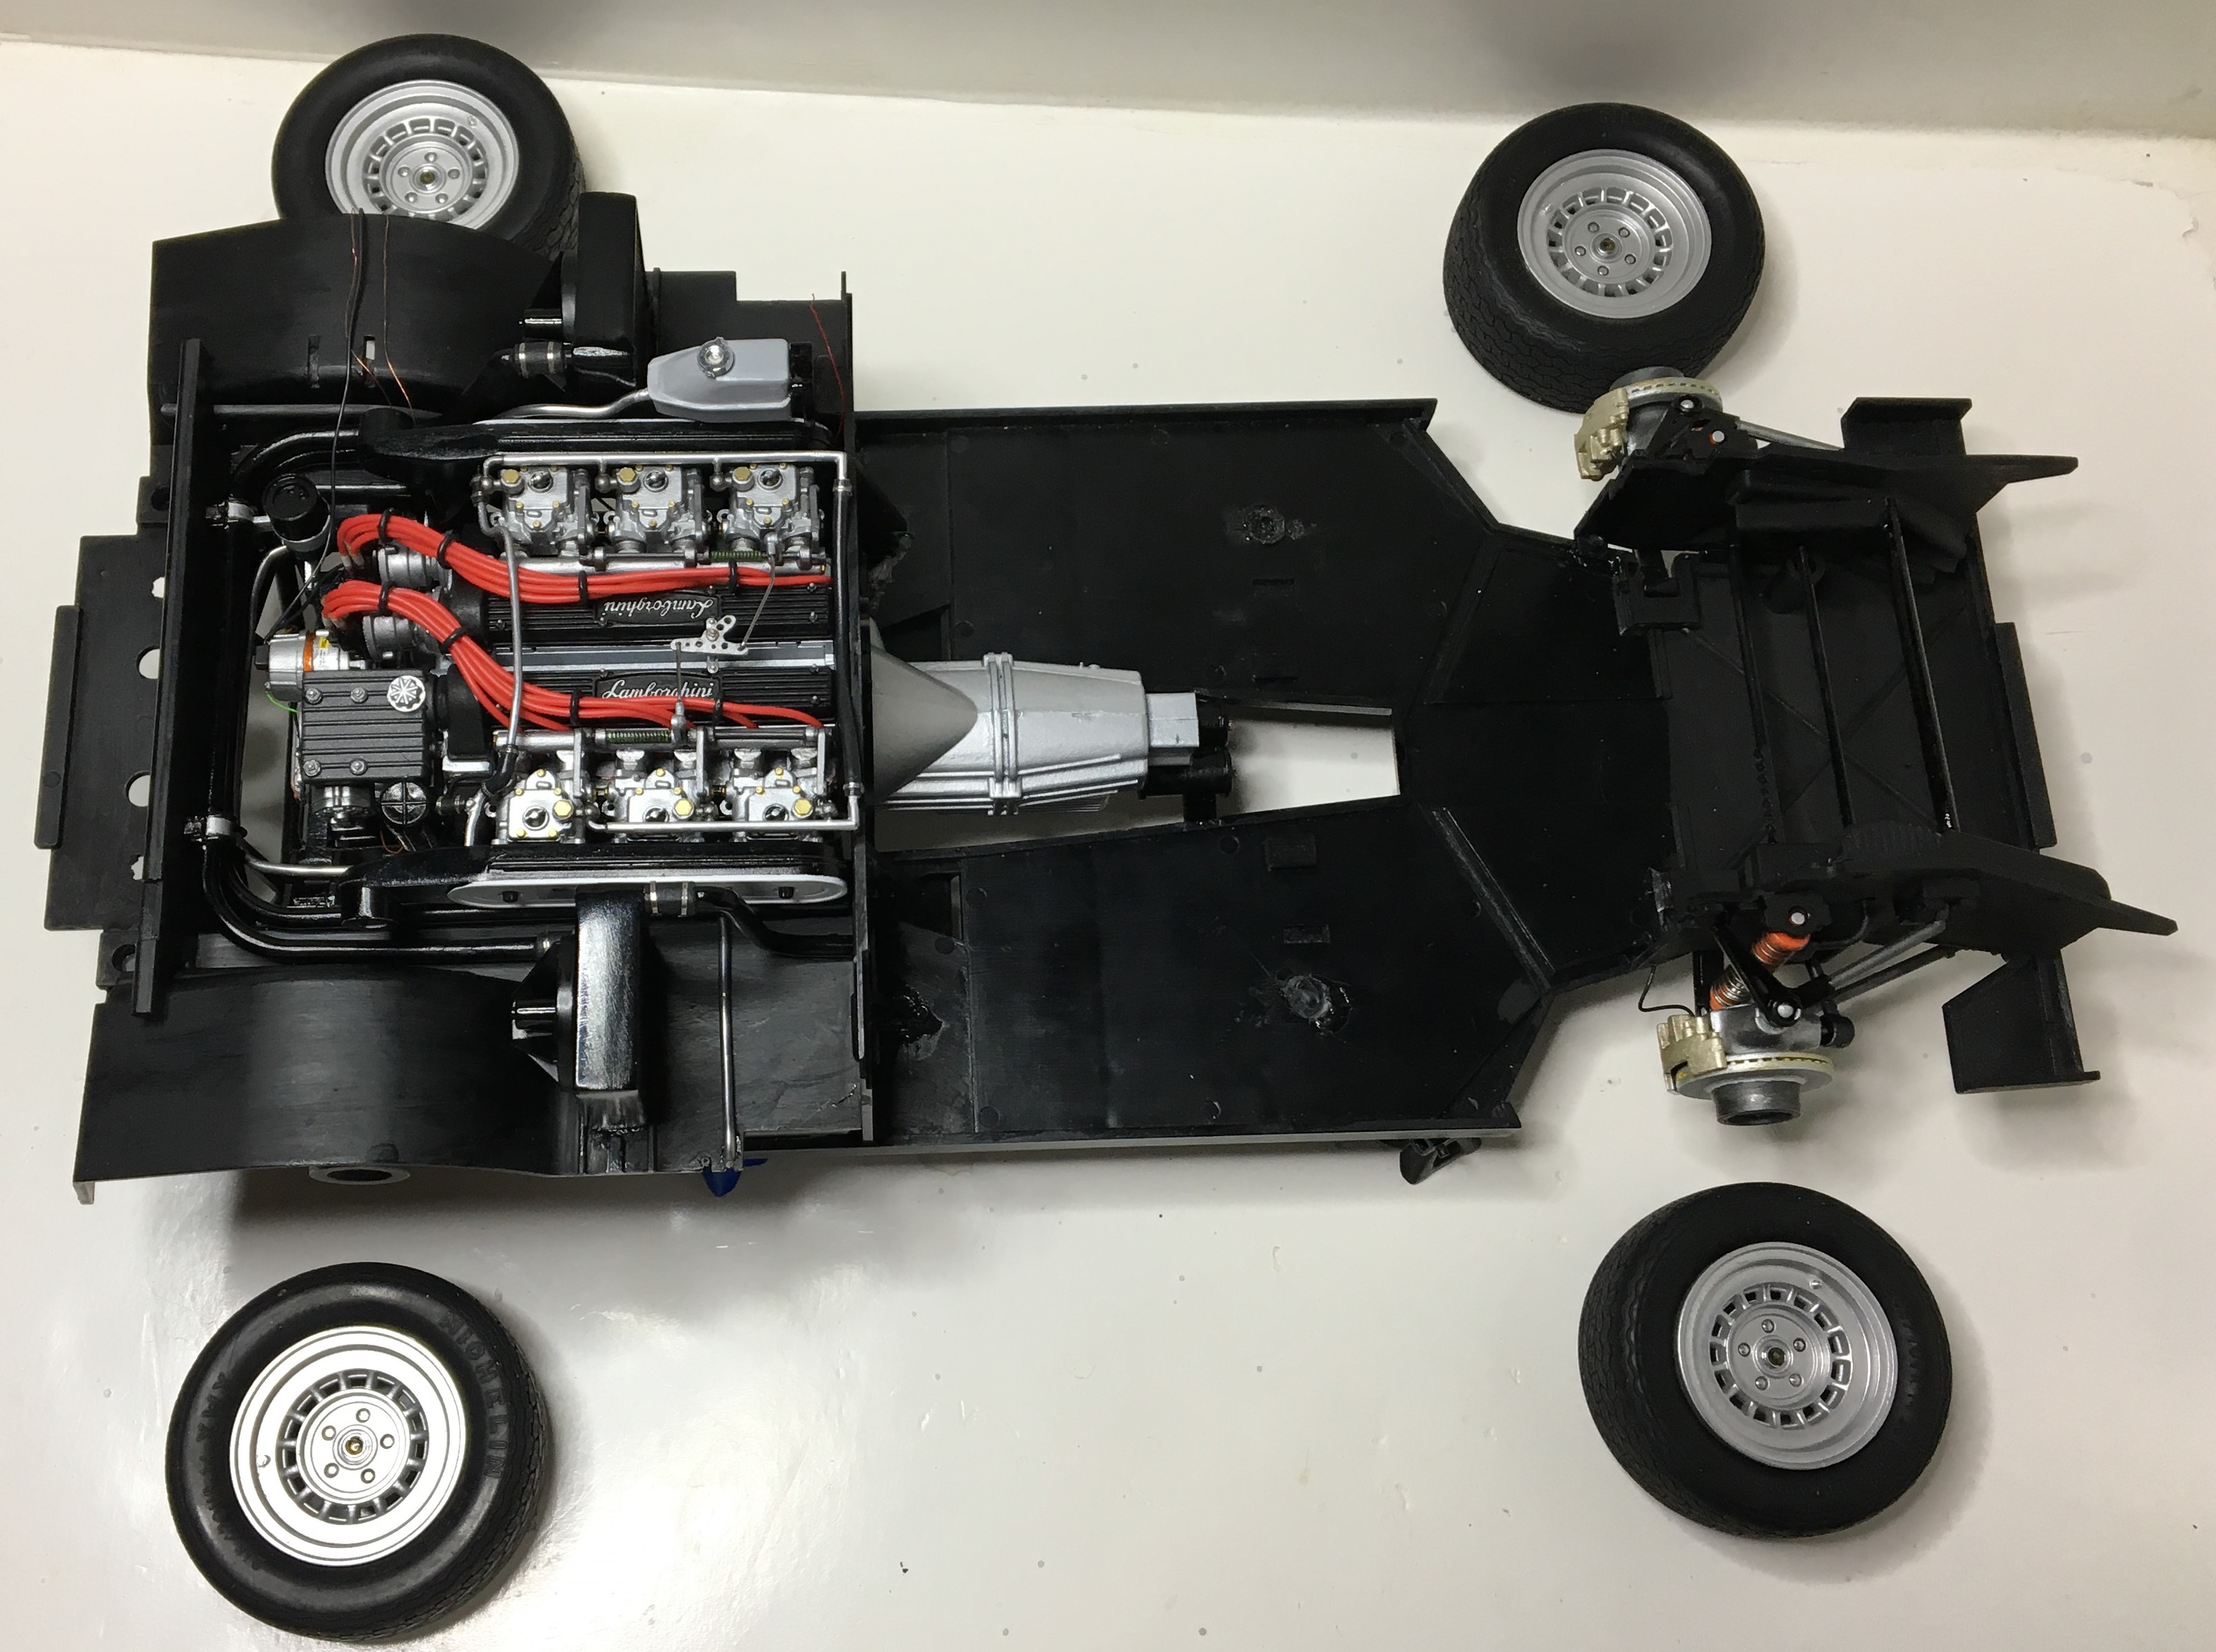
I've managed to install the engine, after getting the suspension put together, still a long way to go, but that only means a lot more fun ahead! Next up, wire the fan motors, add the oil pump and lines, detail up, or scratch build the coils and wiring:
-
Peteski, that will all be under the interior tub, so I didn't bother with smoothing it, maybe I should've, and I still can!.
-
Big scale E100 pickup
dino246gt replied to mnagatani's topic in Truck Aftermarket / Resin / 3D Printed
Wow, I just LOVE the way that looks!! I think 1/25th would be the most sale-able. Love to see it in 1/12th too! BUT sign me up for a 1/25th version!!! -
1/16 Pontiac Firebird's Let's See 'em...
dino246gt replied to bandit1's topic in General Automotive Talk (Trucks and Cars)
Kenny B. that one still looks very cool, like what I'd expect to see out in the storage building! Haven't driven it in years but........................... someday! -
Revell Bronco
dino246gt replied to JTRACING's topic in WIP: Model Trucks: Pickups, Vans, SUVs, Light Commercial
Yeah I love it, looks so real, great weathering and that water bottle is a cool touch! -
I had to make my own decals as this kit didn't provide any, and I searched and searched the internet, there's no decals for it, so I made my own. Something that I've always wanted to do but was a bit leery, however, it's quite simple so now I will be making more! If ANYONE ELSE is building this kit, I've made extras of those air box decals.
-
Did a bit more work on the engine rebuild, well I rebuilt the carbs, yes they were glued with the old tube glue and not sparingly. Plus they were brush painted with Testors bottle enamel! I broke many pieces but that was expected, as I planned to make my own replacement parts, which I've done to the linkages and fuel lines, so far. There's a lot more to go, and that's all to be scratch built, using broken kit parts and internet photos for patterns and references. All of this so far is really only the base since once in that engine bay, only the stuff that isn't made yet will really show, this is all for fun so far and it sure is fun!! Cheers!