
torinobradley
-
Posts
645 -
Joined
-
Last visited
Content Type
Profiles
Forums
Events
Gallery
Everything posted by torinobradley
-
frenched antenna's gseeds how too!
torinobradley replied to gseeds's topic in Tips, Tricks, and Tutorials
Awesome tip! Done this a few times but forgot about it till you mentioned it. I've done this on several builds but use the aluminum tubing for it. I find it a bit easier to work with because it is softer, so I don't tend to file or sand away more plastic than metal. Just my thoughts. BTW, I have also used this type of process for frenching lights, custom scoops & vents, and exhaust cutouts. -
has anyone ever done this
torinobradley replied to rdgracer71's topic in Model Building Questions and Answers
There are small, table-top plastic injection molders available but they use a press type mechanism to create the injection part of the process. Also, because of pressure needed, RTV molds may not stand up to the casting process. Here's a link to em. http://www.injectionmolder.net/ Other than this type of mechanism, I don't think you'd have much success due to viscosity issues. -
I like where this is going. I have a '70s Ford truckster started and a '53 body slated to become one as well. The '70s has been narrowed, channeled, sectioned and the hood along with it. Are you going to hack of most of the bed and put a fuel tank back there? Got any pics of the nose? Here was my start, if your interested: http://www.modelcarsmag.com/forums/index.php?showtopic=21900&st=0&p=197211&hl=truckster&fromsearch=1&#entry197211
-
1/24 scale Lug nuts and lugs
torinobradley replied to Romell R's topic in General Automotive Talk (Trucks and Cars)
Also, you can look for Grant Line and Tichy Train Group plastic nuts and bolts in the train section of a well stocked hobby store. Look at them carefully. Along with normal hex bolts, there are square ones and both types with washers. You can also file/sand off the end of the bolt sticking above the nut and make it the bolt head. I like these because they are about $3 for 40-50 or so, already have a bolt sticking out of the nut and also have a shaft that makes them easier to install. -
Hobby shops in San Diego
torinobradley replied to my80malibu's topic in General Automotive Talk (Trucks and Cars)
I was over there a couple of weeks ago and got to go to Discount Hobby Warehouse. Small selection of auto. Geared mostly for RC, both plane and cars. Prices are fair for what they do have tho... -
Need Ideas for Broken Windows
torinobradley replied to revshag's topic in Tips, Tricks, and Tutorials
Everything about that VW is spot on and awesome. Where's the tutorial for that?!?!? That one blows me away. It's funny when you think about it. What takes the least amount of effort on the 1:1 (basically, leave it alone and ta-da, weathered) takes the most work on the little guys... -
How to make a custom grill
torinobradley replied to Darin Bastedo's topic in Tips, Tricks, and Tutorials
Awesome! Thanks to you, I now know how I am going to do my Grand Sport grill after I modify the opening. The photoetched one wasn't right and was way too thin. With just some simple mods, you can make almost any grill (or vent) you want with this method. By alternating thin and thick pieces, you can modify the spacing between the bars as well. Thanks!!! -
WATCH YOUR BUILDS
torinobradley replied to evilone's topic in General Automotive Talk (Trucks and Cars)
This is part of the conversation with a police officer I had a few years ago when someone stole my trucks radio: Officer: "Did you see them (lowlife jerk that took my radio)?" Me: "Do you see a body?" The officer laughed and said he thinks the same way... I haven't had any models go missing since I was in my early teens but I have had other items taken like the usual cameras, phones, media, etc... Though I did loose a ceramic sculpture a few years ago. Kinda flattering when I think about it. Out of the hundreds of completed projects from the class, they chose one of mine and one other to take. Still upsets me though. I try to keep a close eye on my models at the show and with that, it's hard to concentrate on shopping and chatting with old and new friends. Let's face it, even though most of us modelers have a high level of integrity and huge sense of right and wrong, there are those around us that don't share our ethics. Some of us are more violent and hands on than others when dealing with them but hey, sometimes that's what is needed... Don't we all have a bit of pent-up aggression to let out on some bad apple??? -
1976 Broadspeed Jaguar XJC-12 Racing coupe
torinobradley replied to Plasticfanatic's topic in WIP: Model Cars
You might want to see if there's a resin caster out there that wants to throw a few dollars your way for the honor of casting such a unique car. Might be worth the research if you can get a few greenbacks and some extra parts out of the deal. -
I thought I was the only one going through broken window motors and pool issues... Though now I am dealing with an AC issue in the family van. I hope that's not what's next in your part of the woods. I'm with them. Just wait till it's all together so you don't have to worry about shipping things twice. I just wanted to go on record saying "THANKS" for what your doing in spite of all your obsticles!
-
Look up Steve Strope's Hammer from Pure Vision Designs. It's the one at the end of Tokyo Drift. http://www.purevisiondesign.com/rides_otr_hammer.asp It's a '70 Roadrunner but has some great ideas.
-
The one in the Petrified Forest was set there for picture ops at a little parking area referencing Route 66. The others were on what I assumed was private property. There was a lot of glass and debris around them. There was a couple on the way back via I10 but the ladyfolk of the trip were already done with the whole road trip thing and would have thrown a huge fit if I would have stopped. Honestly, they probably would have left my picture happy tail there... The two on the way back were a '55-'57 Ford and a '30s Chevy Coupe The Ford was upside down so I don't know if it was a convertable or crushed hardtop.
-
Came across these while doing a family road trip through Arizona and thought some of you might like them. Enjoy! These were taken in a field outside Meteor Crater: My favorite of the batch Others from the lot: This one was in the Petrified Forest National Park: The only car I recognize is the '41 Plymouth upside down and I'm not 100% on that one... I would have taken many, many more pictures but the wife was already honking the horn to get on with the trip.
-
Hobvby Lobby Observations
torinobradley replied to Bruce Poage's topic in General Automotive Talk (Trucks and Cars)
After reading this thread, I printed out a 40% off coupon and headed over. Ended up getting three kits for less than $20 for all three, a mini belt hand sander and a bottle of accelerator, which was the only thing I could use the 40% coupon on... Some of the tools are on sale as well, so make sure you check them out as well. -
1/25 chains
torinobradley replied to toplessfury's topic in WIP: Model Trucks: Big Rigs and Heavy Equipment
Also look in the trains section of your local well-stocked hobby store. They have them there as well. -
what was your first kitbash?
torinobradley replied to Corvette.Jeff's topic in General Automotive Talk (Trucks and Cars)
I have no pictures but whatever you imagine will probably look better than mine... I took a pinto body sans rear window and glued in a big v8 deisel motor, backwards, to the rear hatch window frame and put skinny tires on the front and mud tires on the back... Yea, that long ago and yea, it was that ugly. It was brush painted in yellow, motor in white plastic and no frame or suspension... No pictures (think: mercy killing via fireworks) -
My baby has come home!
torinobradley replied to torinobradley's topic in General Automotive Talk (Trucks and Cars)
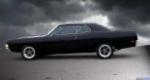
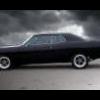
Thanks everyone for you encouraging words! I'm pretty stoked about the whole deal and am spending the next week or three cleaning her up and figuring out what to do first. The current plan is to get her back on the road so I can drive the old "bucket of bolts" around a bit and enjoy the shaking, rattling and rolling you can only get in an old car. I have a trans, brakes, a popped freeze plug (in south Texas, if you can believe it) and a few suspension pieces to deal with and maybe finding a dash pad as this one caved and then it's cruise time. An AOD is on the drawing board considering the issues I'm having with the C4 and gears... I just have to find the right one. The wheels are the standard wagon wheels that were white. I painted them black and put trim rings on em. I wanted black wheels and at the time (14 years ago) they didn't offer any. I was going for a stock car look. I guess you could say I was ahead of the black wheel craze...lol OH, my icon picture isn't my car, it's one I found on the web when I joined the forum but it is a formal like mine, though it is a '69. In case anyone was wondering... The engine in her now is a '67 Mustang 289 with the 200hp cam swapped out for my .478 Isky, 289 performer Edelbrock and a Holley 4010 600 double pumper. Also has headers and a dual vacuum advance distributor (it advances and retards the timing!). That motor, with the .389s in the rear make the car jump like a scalded cat... It will eat a 5.0 till his gears and aerodynamics pass me up... Of course, it hasn't passed a car for a few years...lol Maybe in a year or two after that, the car will be stripped to bare metal and all issues will be addressed. That's when the 390/428 will go into the car. I read there's even an addapter to put a T5 on the back of one of those so may go that route if it will handle the torque/hp. All that and I'm moving toward a TBI so the engine will be computer optimized. Jairus did a '68 fastback rendering that I like and will try to use some of the concepts from, though I am pretty rooted in the red color. I do like the black wheels so will probably go with a set of those in 18" or so. I knew the day you pulled that '68 GT from the pink and it has been on my list to purchase ever since. I already have your '69 Formal and am looking forward to getting and building that '68. When we pulled up with the car on the tow truck, my son was running around the neighborhood telling all his friends. It was pretty cool to see him that excited! Sorry for the long post but I guess I'm pretty excited as well... -
This weekend, my baby returned from her storage at the in-laws. Wife hates her (in her defense, she hates all old cars) but my son was sooooooo amped (he's 9) and can't wait till I'm dropping him off to school in it... She needs a lot of work and tlc but I'm willing to commit to the relationship...lol It's a 1968 Ford Torino GT Formal Hardtop. Originally a 390 4 speed car (original owner kept those) but right now has a 289 C4 in it. Also have a 390 that will eventually sit under the hood, though it will be punched and stroked to 420-something... Sorry about the attached pic, it's from the phone... BigT.bmp
-
Check this site out. http://www.sciplus.com/category.cfm/subsection/18 See if they have what your looking for.
-
Odd question about a detail
torinobradley replied to sjordan2's topic in General Automotive Talk (Trucks and Cars)
Don't forget inspection stickers, registration stickers, rear window defogers, shift patterns, tire pressure and inside door info (on kits with opening doors), guage pannel labels (Lights, Ign, Wipers), steering column stalk labels, steering wheel labels (cruise control), etc... Okay, maybe we've stepped over the "super detailing" line here but hey, it's fun to think about... -
Die-cast custom rims/tires question.
torinobradley replied to whale392's topic in General Automotive Talk (Trucks and Cars)
You might want to check out any local flea market/barter days/whatever weekend selling type gathering there is. They always have a few tables full of die casts down here. I've even found some vendors with just wheel sets containing four wheels, tires and brakes with 2 axles. Might be worth a look. -
Archer Fine Transfers louvers
torinobradley replied to Bernard Kron's topic in Tips, Tricks, and Tutorials
Just last week I sent an e-mail to Archer about making 1/24/25th scale louvers and the response I got was they can't make tapered objects. But these look pretty good considering! I was going to try them out and now, seeing what you've done, will most likely spring for a set. They make a variaty of goodies adaptable to us car guys. They make rivets, welds, louvers as well as casting letters and numbers, stenciled decals, tatoos, flags, templates and lots of other stuff. I would advise you super-detailers to check them out. I have several of their products in my stash and plan on getting more! -
I use either white elmers glue (because it doesn't stick to plastic), tape or something called easy tack used for hanging posters and such. You can get it in the office supply area. It's a sticky putty. Real custom cars are mocked up before they are painted to test for fit and stance. It's the only way to make sure your DeSoto Firedome fits in the back of your '34 Ford when mated up to the GT40 transaxle...
-
1/24 & 1/25 Scratchbuild engine stands?
torinobradley replied to bigmikevee's topic in Tips, Tricks, and Tutorials
Sounds like your talking about a work stand as opposed to a engine dolly. The dolly is usually a small square item about the same size as the motor with four casters on it and a couple of solid mounts that mount to the motor mount points of the engine (usually). The work stand hold the motor up, usually by the bellhousing mounts and have a rotating head so you can access all parts of the motor when building it. These hold the motor at a height so you can work on them when your standing. There is also various types of motor display stands in some of the kits like the AMT '57 Chevy. They don't tend to mount the motor realistically but look nice. Do some research on real ones, grab some plastic angle stock or square stock, or even sprues and go to town. I built one out of sprue and scrap plastic with casters made of can aluminum and plastic wheels cut from, yup, you guessed it, more plastic sprues... Even put a little tray on it and had a rotating head. Good luck and show pictures. -
Research, research and more research. There are so many little tidbits of knowledge for every different car out there that it's relatively impossible to get every detail down to the last nut, bolt and clip. Learn from others, learn from the real car, make notes, create a folder on your pc and put everything in it. In researching my Grand Sport, I researched manuals, books, magazines and parts houses to get all the info I needed. I am ending up changing every part in the kit, if not just rebuilding them from scratch. One major word of advice, don't assume the kit is correct. Kits are made with mold design and limitations, as well as ease of assembly in mind so lots of liberties have to be taken. The colors provided by the instructions should be a general idea but always research the real thing to ensure the colors are correct. Bottom line, get as much information as you possibly can on the subject your modeling and above all else, make sure your still building models for enjoyment. After all, you should be using your hobby to escape stress... Who cares, after all, if that darn header bolt is supposed to be 1/2 scale inch further forward???