randyc
-
Posts
2,961 -
Joined
-
Last visited
Content Type
Profiles
Forums
Events
Gallery
Everything posted by randyc
-
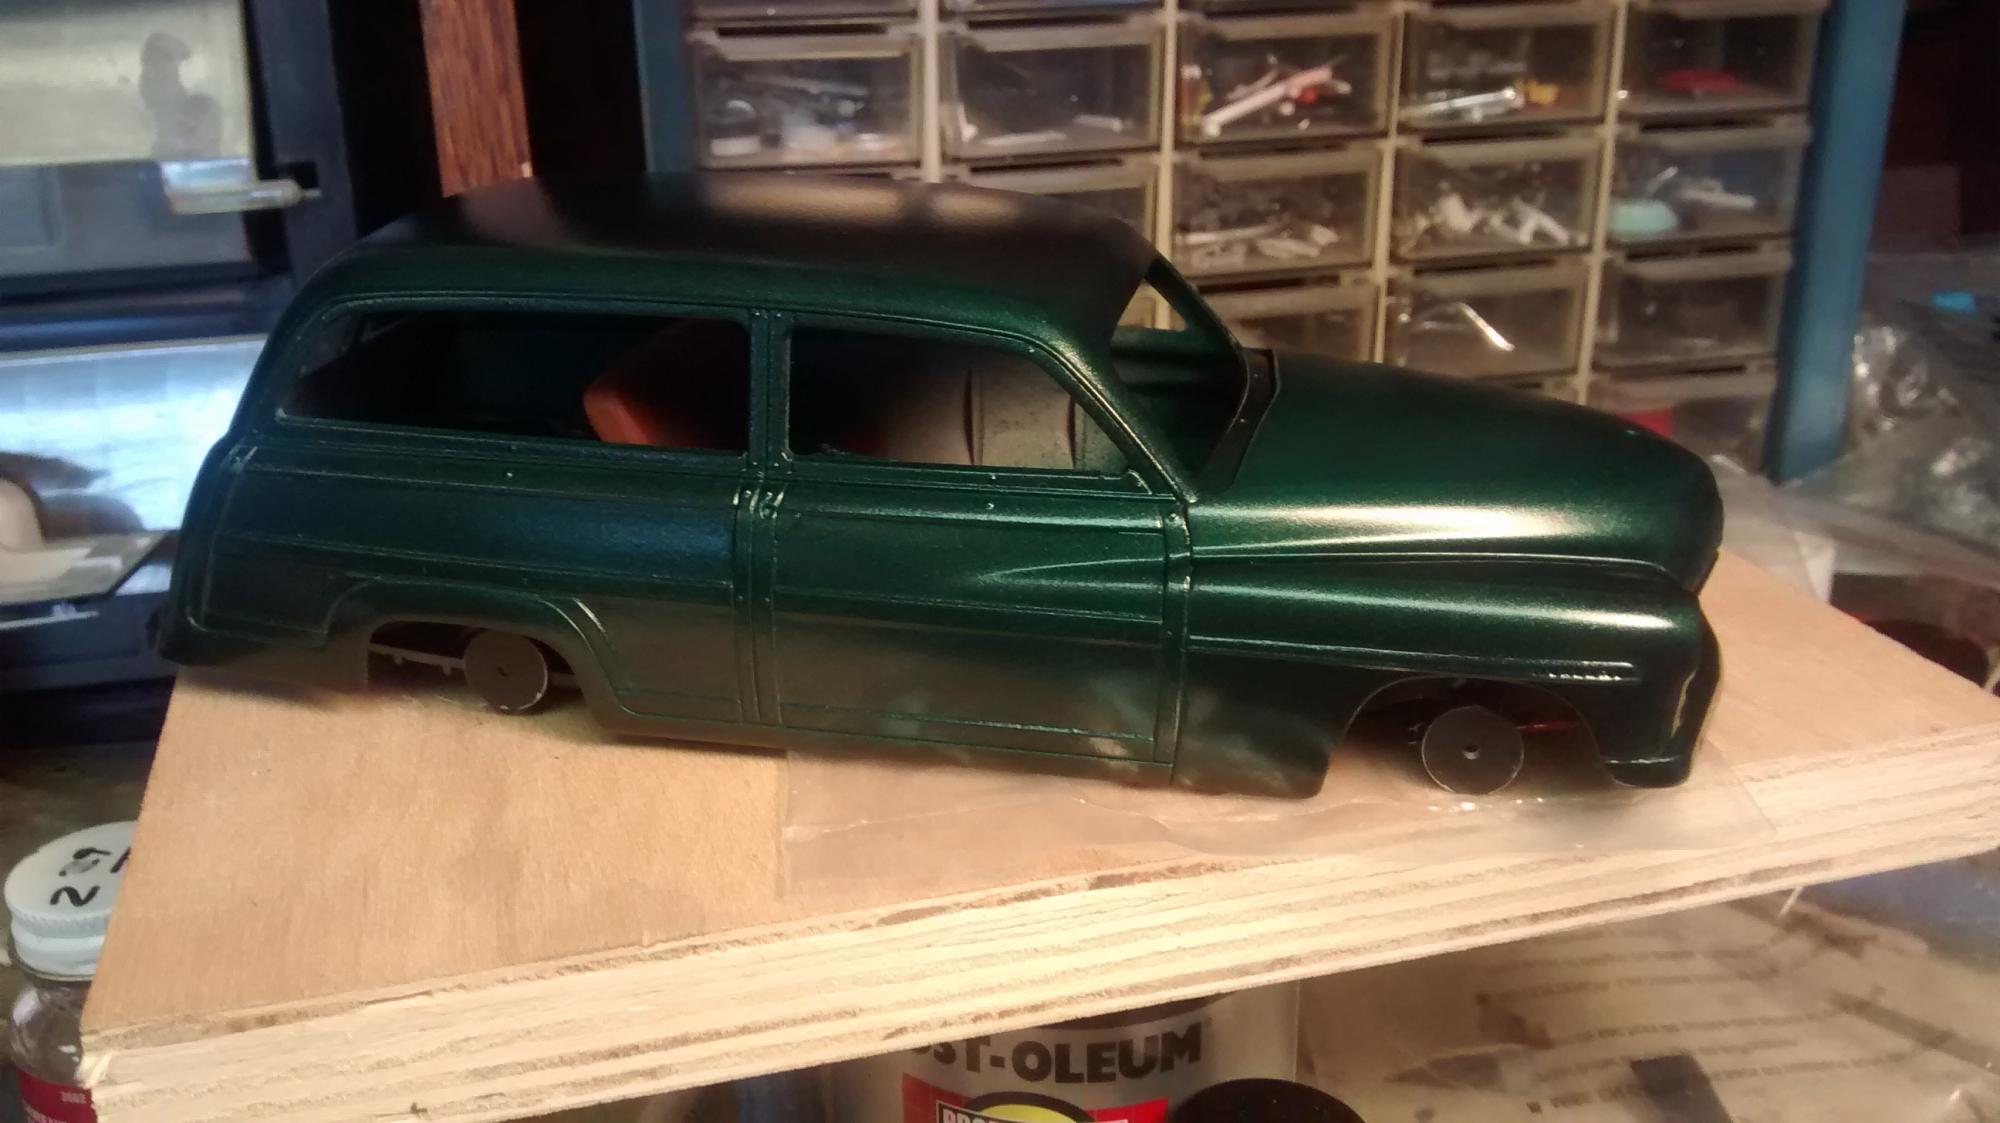
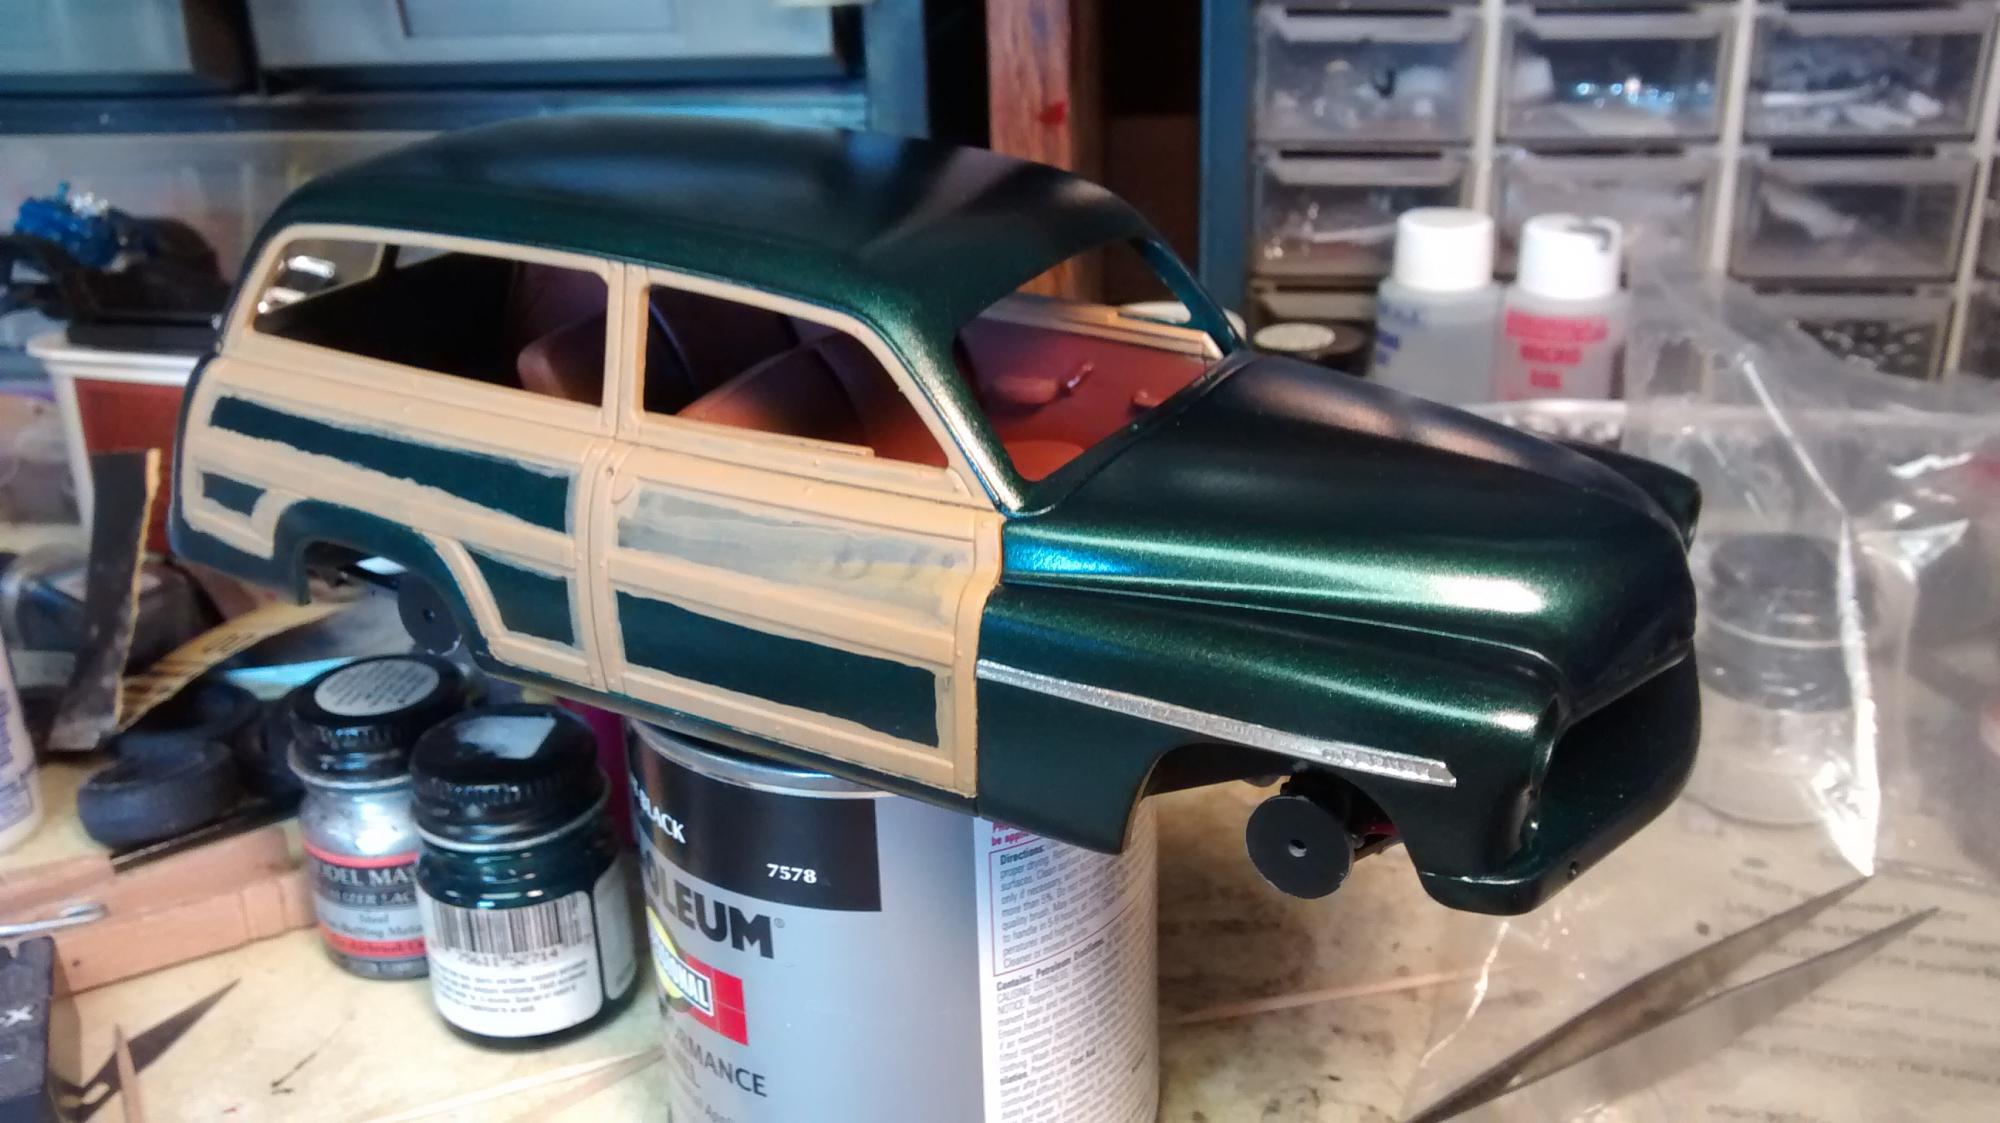
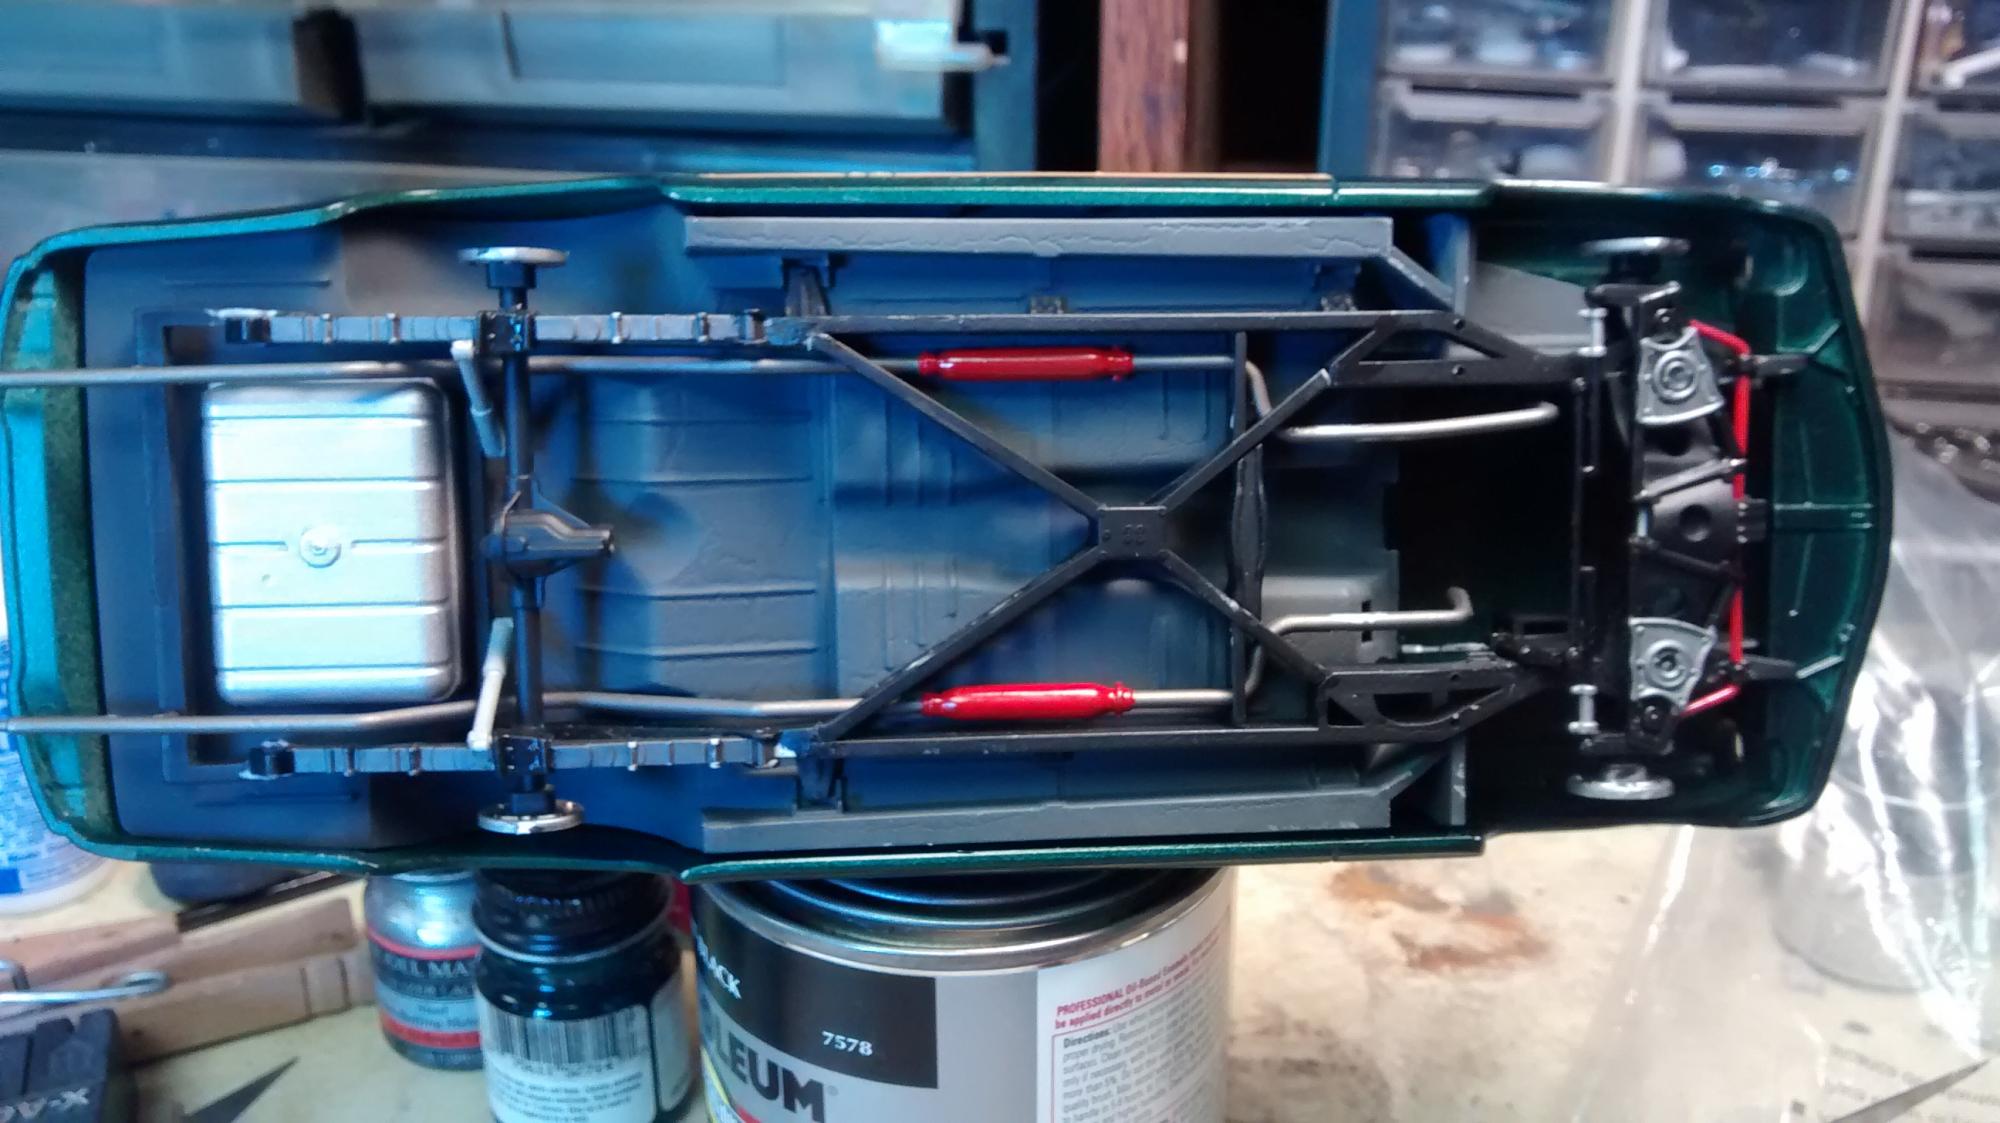
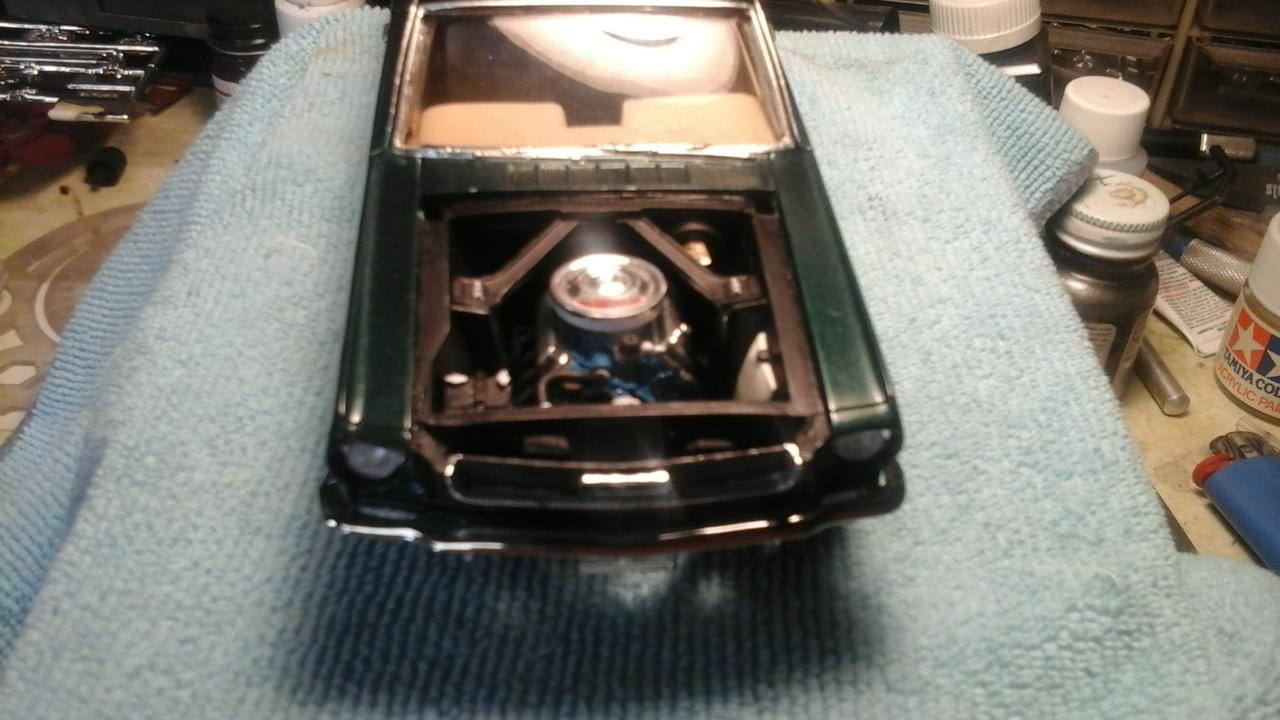
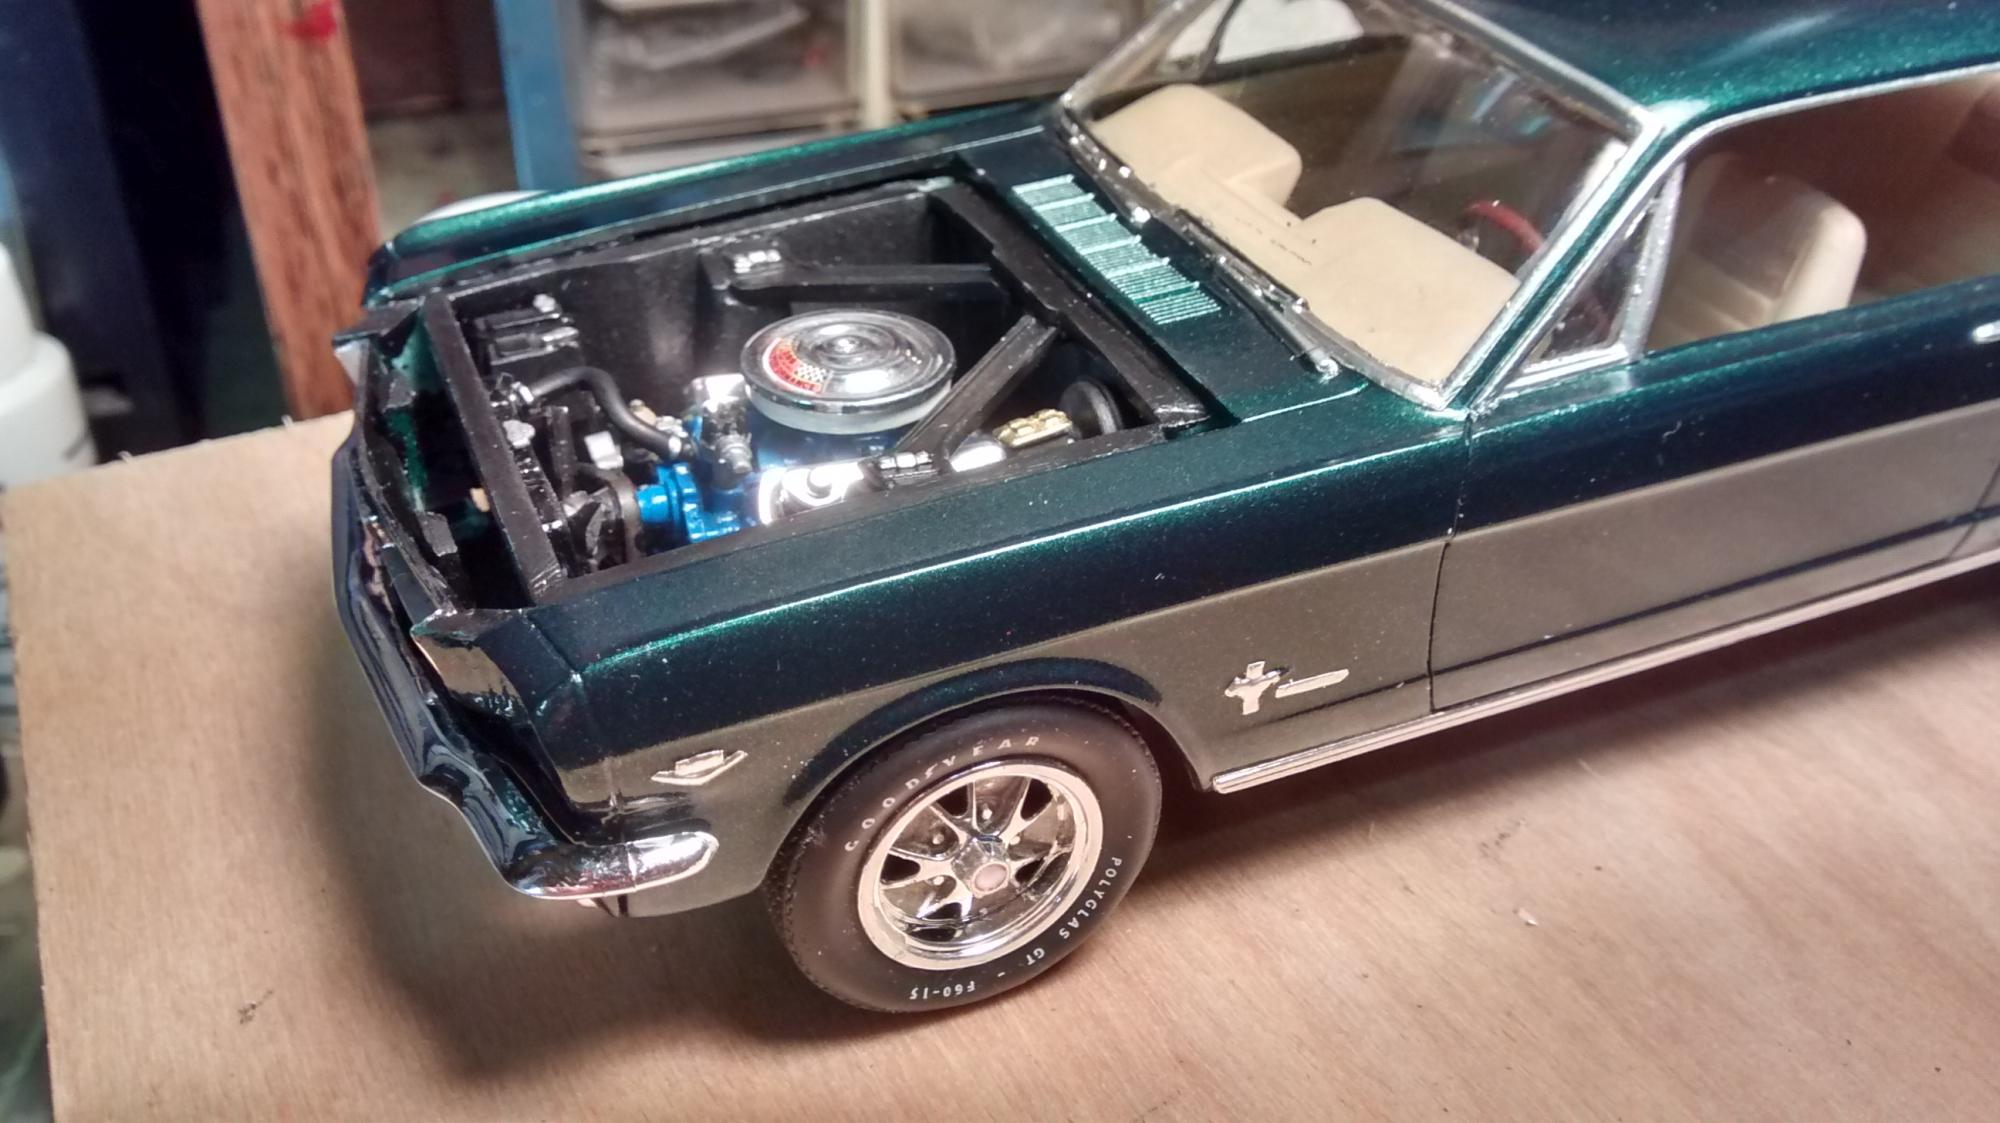
I started this one right after it came out. However, I was living 3.5 hours from "home" during the week and didn't have access to my bench or airbrush, etc. Had a toolbox with suipplies and some bottle paints. So I started it a while back. Got to thinking about it and dug it out last weekend. Looked it over, made a decision to paint with what I have on hand. Forest green met. Original intention was to sand thru the paint to make it appear older, but it came out ok, so going to leave it and move along. Make it ok, but not show car kind of build. Hot rod built at home. As I would build it. This is also my first real work with MM acrylics. I have used Flat black acrylic in the past, but bought some acrylic wood color for the framing. Pretty good stuff. Dries smooth, not so clumpy as enamels can be. Will over coat the light wood with some yellow clear to give it an aged shellac look. Mot sure of wheels yet or anything past what you see here. I can decide all that later. Randyc

-
Last top I chopped, I did so with NO fillers. On Revell 30 Fords or something. Where it was a pretty straight roof. Was very carefull and filed everything to fit. Glued and reglued, til glue would push out of the seam, almost like a weld. Then cleaned up a llittle. But left obvious cues of the chop. So it looked kinda rat rod like. Anyway, I'm not sure I would use Solder. Instead would probably try to moto tool the groove with a ball cutter and glue AND CA a section of sprue into the joint - all plastic? I've read the articles. Just haven't had much luck. But the solder may work. IDK. Looking forward to seeing more.
-
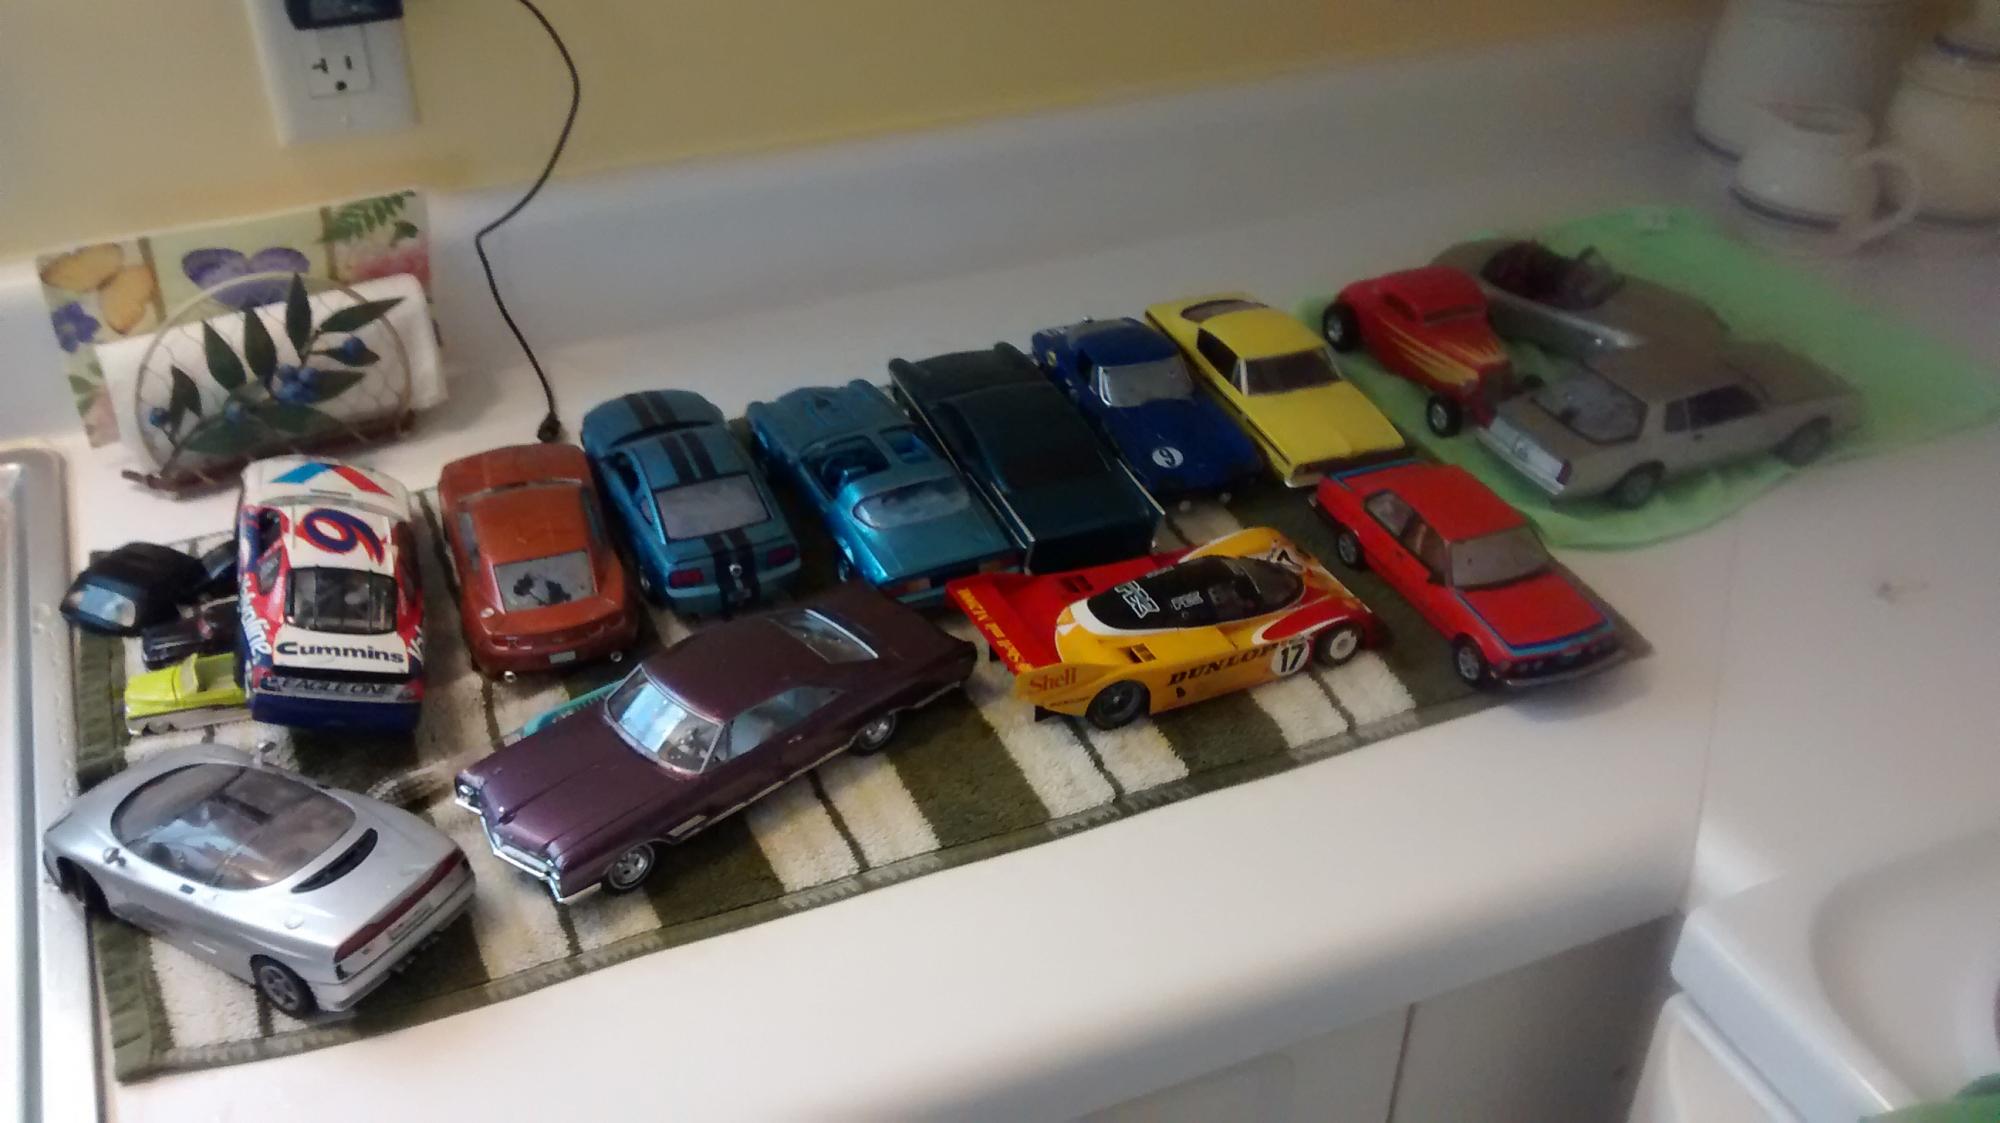
Recently retrieved my collection from the ex. She packed them for me - that's good and bad - she didn't take as much time and a few things were broken but I didn't have to pack them. Here are some that weren't in cases and were in despearate need of a wash. This isn't really Under Glass, but shows that I build a lot of different things... going to have to get rid of some of the builtups soon. I had 6 boxes with 32 cars each ( I think) in them in cases. Plus several more loose like these, and several from previous trips in cases. Not to mention diecasts of all scales and slot cars and track and accessories.. Probably 2500 cars total? Do you gus have any recommendations for ways of selling them off? ebay and craigslist are obvious. Trade them off on here, but that brings in more cars. I'm trying to downsize to fit new house. Randyc
-
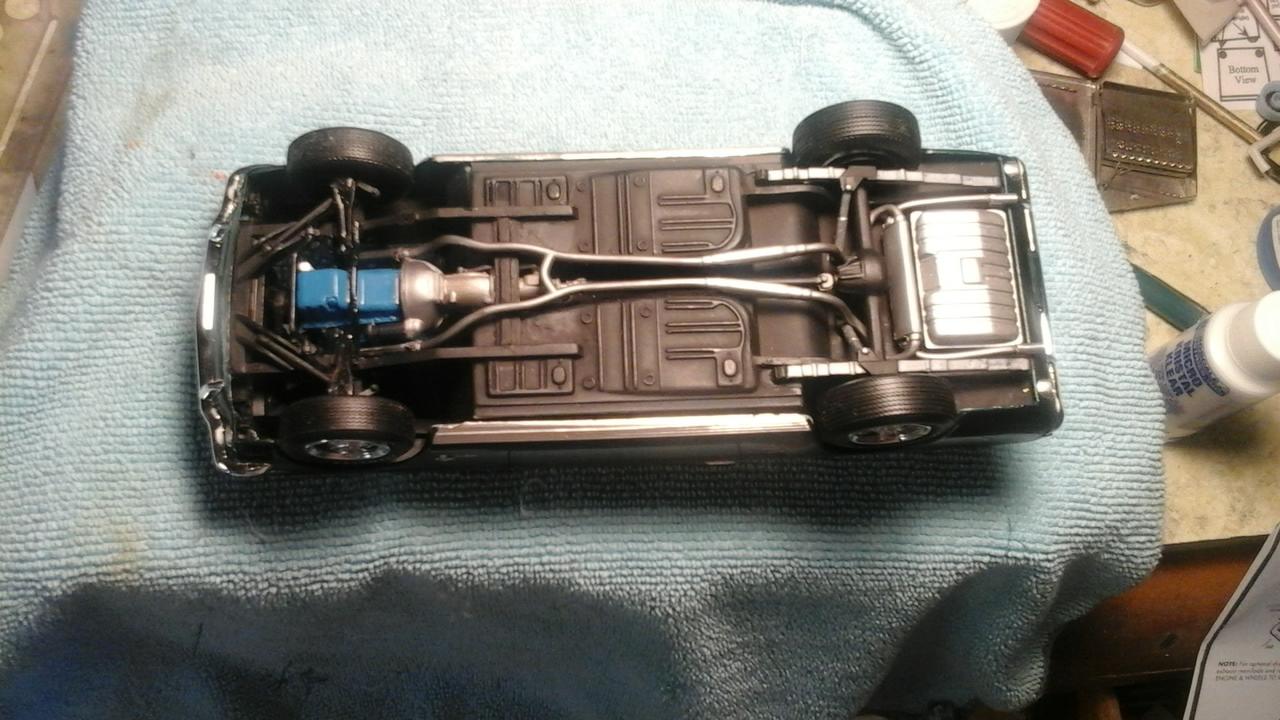
Update: a few more pics. Car is basically done. I think I have the radiator hose left to install, touch up paint, clean it up, and decal the tires. Here's a few pics from last work session on it - didn't have lenses, mirrors...
-
Riddle me this. I've read about sectioning for years in the magazines, but don't know the answer. I also realized years ago, that I am too ham-handed to try to chop or section. I am toorought on the reglued plastic. Anyway. why couldn't you do the vertical cut in a door seam? Would hide the cut better? But then again, it's the smallets cut so I guess it reall doesn't matter. Good luck. I get all sweaty and nervous just looking at your pics. Randyc
-
You have already built it once, so as you said [perfectly, btw], it is magnificent and frustrating all at the same time. I have done the same. The Auto World car and now somewhere I have the red one started. Good luck with it. Go slow. Randyc
-
What happened that you need to go back and prime? My experience is usually that Matte black works fine straight out of the can on the plastic. Did the plastic do something weird? Undercarriages have lots of textured details and take a long time to sand. If it looks okay (matte black is not shiny), leave it as is and keep building. randyc
-
VERY NICE. Those can be tough kits to build. Yours is as nice as any I've seen; better than the 3 I built. Look Great! Randyc
-
I had an uncle that had one of these in silver. I'd definitely like to see a stock version in plastic. Oh the cars of my youth... Randyc
-
I can't remember now, but this or the 74 was the FIRST kit I ever built when it was the annual. These boxes look very familiar to me. I was a lad of 8 or 9 and had seen my uncle's models. I also played with my uncle's models, which didn't sit well with him. I have built other cars for him as an adult to try to repay him. Hope it worked. At any rate, the Vette was my first. No paint and a couple tubes of glue. Some of the parts never dried. They were soft from overuse of Testors orange tube glue. I didn't undertand how this stuff worked back then. The metal springs were awesome. Actually, I don't think I really got them right. But looking back, seems like they would look great under there. I loved the annuals and 3 in 1's. Soo many extra parts for the parts box. Metal axles ruled - build and play. Then tear it apart and rebuild a different way. Or combine a bunch of things to make a new model. If you didn't glue the body and interior to chassis, you could mix & match til you had a new car. From there it kept getting better and better. An d here I am 41 years later, still playing with toy cars. And loving it. Randyc
-
It's tough to drill all 9 holes in a distibutor. Have to use a really small bit of course. I found that filing the nibs off completely or leaving just a bit of them sticking up was the easiest. They need to be flat so the bit doesn't wander. And it is really hard to get them all spaced right. A bit of insulation from a larger wire (phone cable?) will make boots at the distributor and the plugs. Might want to shorten your wires up a little more prototypically as well. And thte distibutor is more or less what you have - it will be straight up from the block on a SBC. You can google different images to see how the wires run, but making them lay right is also part of it. I see models with wires running ni a nice arch, but I have never seen real ignition wiring so stiff it held a perfect arch. The wires tend to sag as they run. And may run behind the exhaust pipes instaed of in front as you have them here. It can go about anyway you want, I guess though. On a real engine, you would not want them touching the hot exhaust as they might melt and short out. Just a thought to keep in mind as you are running the wires. And the 9th wire goes from the center of distributor cap to the coil which is the plastic piece beside the distibutor. Nice work so far. Good luck as you go - this is an excellent kit and was miles beyond anything when it was first released, even with the mirror weirdly molded into the windshield. What was that - 30 years ago? Randyc
-
nice build. Wnet to your site - your rusty flaky paint jobs are most excellent.
-

Fujimi/Testors Mazda RX7 in Titanium Gold over Maroon
randyc replied to JTalmage's topic in Model Cars
Nice. I really wish I would have bought some of them "back when"... -
iF THIS WAS A LOT OF FIRSTS, WE'RE ALL IN TROUBLE WHEN YOU REALLY GETT GOOD AT IT...LOL oops not yelling. Beautiful work. Randyc
-
Nice - love that generation of race cars. Randyc
-
I saw the gray interior as well. But I really wanted that pimpy 80s red. There are tons of pics on the web for reference, so that's a good deal. One thing I missed till too late was there are some details on the back seat interior sides as well. Hard to find pictures of those, but if you;re really going for the detail... I tried to get all I could, just to see how well I could detail paint it all. Look at decal 17 {I think} on the decal sheet - not mentioned in instructions, but it is a card that goes on the shifters when delivered to remind driver of the special shifters... I figured mine would have been driven a little anyway.,.. Seems like there is one more decal too that isn't on the instructions. http://phscollectorcarworld.blogspot.com/2015/03/hot-options-hurst-lightning-rods-1983.html
-
1963 Corvette Grand Sport (update 8/16/16)
randyc replied to RancheroSteve's topic in WIP: Model Cars
Sweet! And a little rich for my current budgetary status... lol plus have to buy another GS base kit, etc. Just making excuses. I'm good - I have the little diecast and 1/32 slotcar. -
Yes. Makes everything fit nicely. Better detail. The 67 was an old build that had some ugliness in the build quality. So I had taken it apart and had it in a ziploc. I just cut it up and used all I could . headlights too. Much nicer than the molded chrome ones. I cleaned up every piece I used from the 67 except the engine.
-
Here's a few more pics for engine and chassis from the 67. Exhaust isn't correct, I know
-
Glad the kit is coming. Thanks for the review. Not wild about defroster lines or the molded in headliner that is incomplete. And the new camaro does not excite me at all. Drove thru the Chevy place and just did not care for the new design. Like someone else said - too hot wheels cartoonish - kinda like they wanted to avoid licensing fees to make a camaro. I know time marches on and they have to change something. But it just doesn't do anything for me. I do hope they sell a ton of them so others will follow. And I really didn't mind the simplified, prepainted Challenger. Easy build that didn't take a full machine shop to build... lol. At this point, my modeling is more focused on the things I want to build and not every new kit that comes out like in the past. My income has not increased with the model prices unfortunately. $100 used to get me a BUNCH of kits, now just 4 or maybe 5. Thanks for the write up - I love these previews. Randyc
-
Dodge Hot wheels 43 Nascar truck
randyc replied to Ben500's topic in WIP: Stock Cars (NASCAR, Super Stock, Late Model, etc.)
Nice. I have 2 of the black Mopar trucks and the #20 Dodge. Did them years ago. One is resin body before the Dodge came out in plastic. Love the Hot Wheels scheme. -
I did this one when it was current. Can't remember which vesion, but the Miller decals for hte quarters didn't havea the RED on it. Had to paint it in. Nice build. Randyc
-
Earnhardt "Wheaties" Monte Carlo
randyc replied to Hawk312's topic in WIP: Stock Cars (NASCAR, Super Stock, Late Model, etc.)
oh yeah - that is some good stuff. I use it for about all my oranges. Bodies and engines. Randyc -
It has arrived
randyc replied to JerseeJerry55's topic in WIP: Stock Cars (NASCAR, Super Stock, Late Model, etc.)
If memory serves, if the decals are matte finish, they may break up on you. Glossy decals don't. If memory serves. Randy -
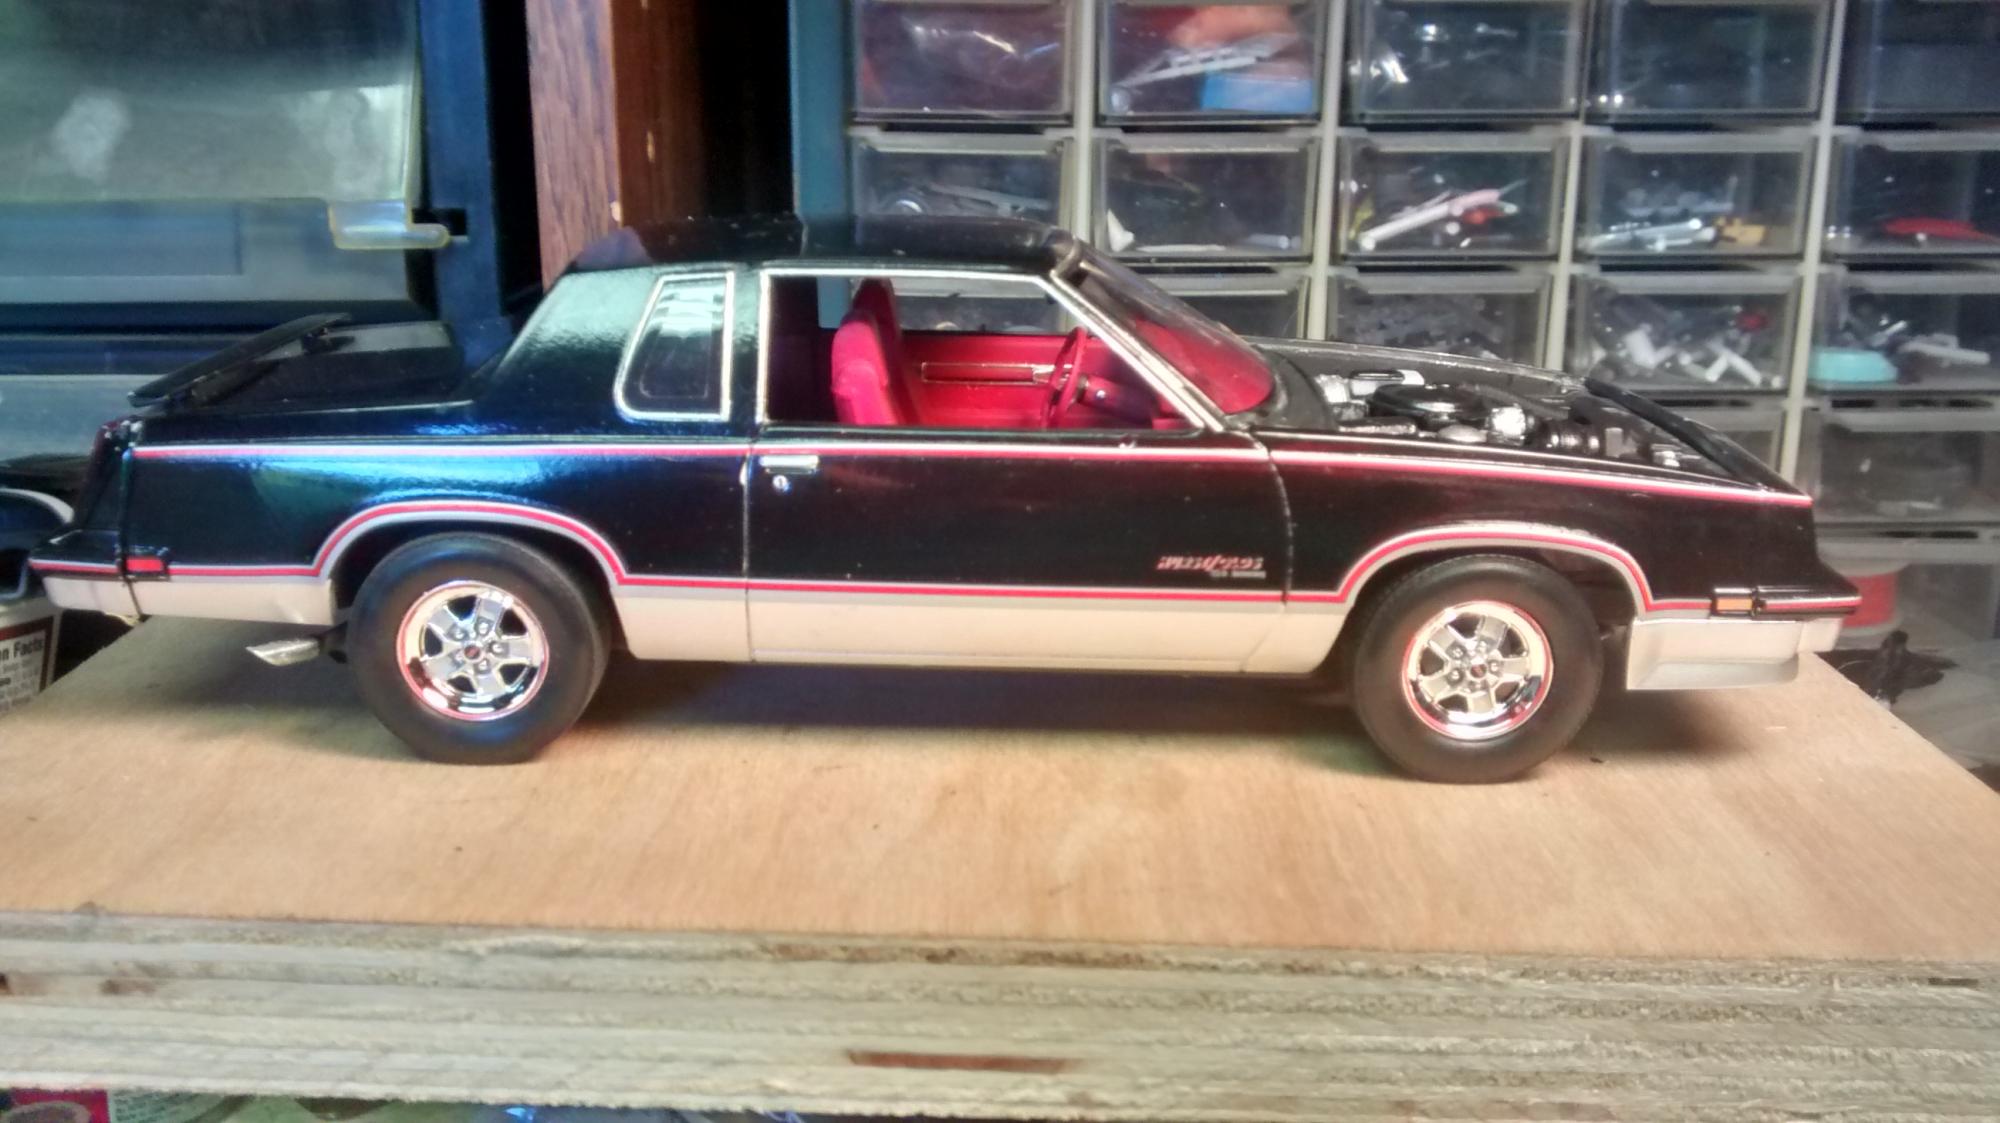
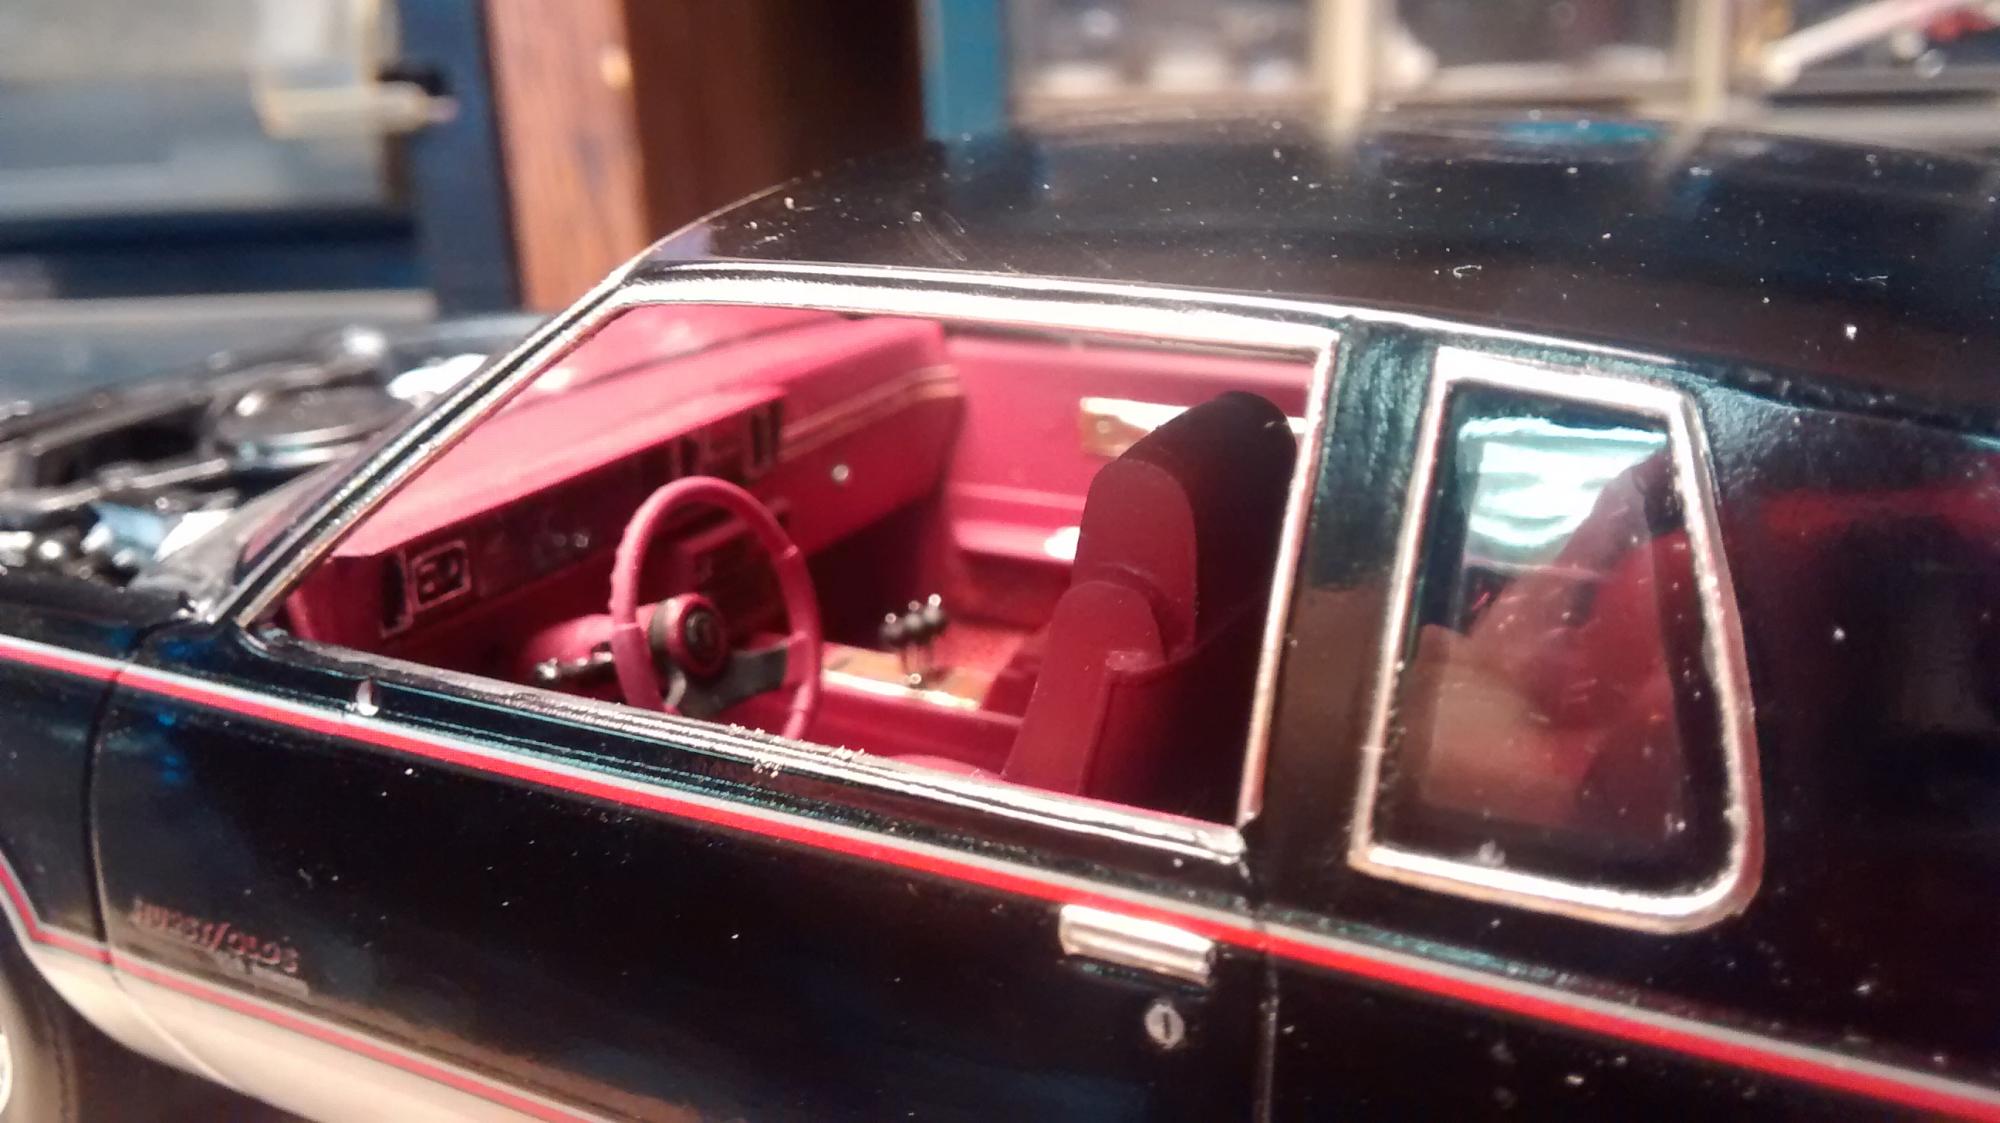
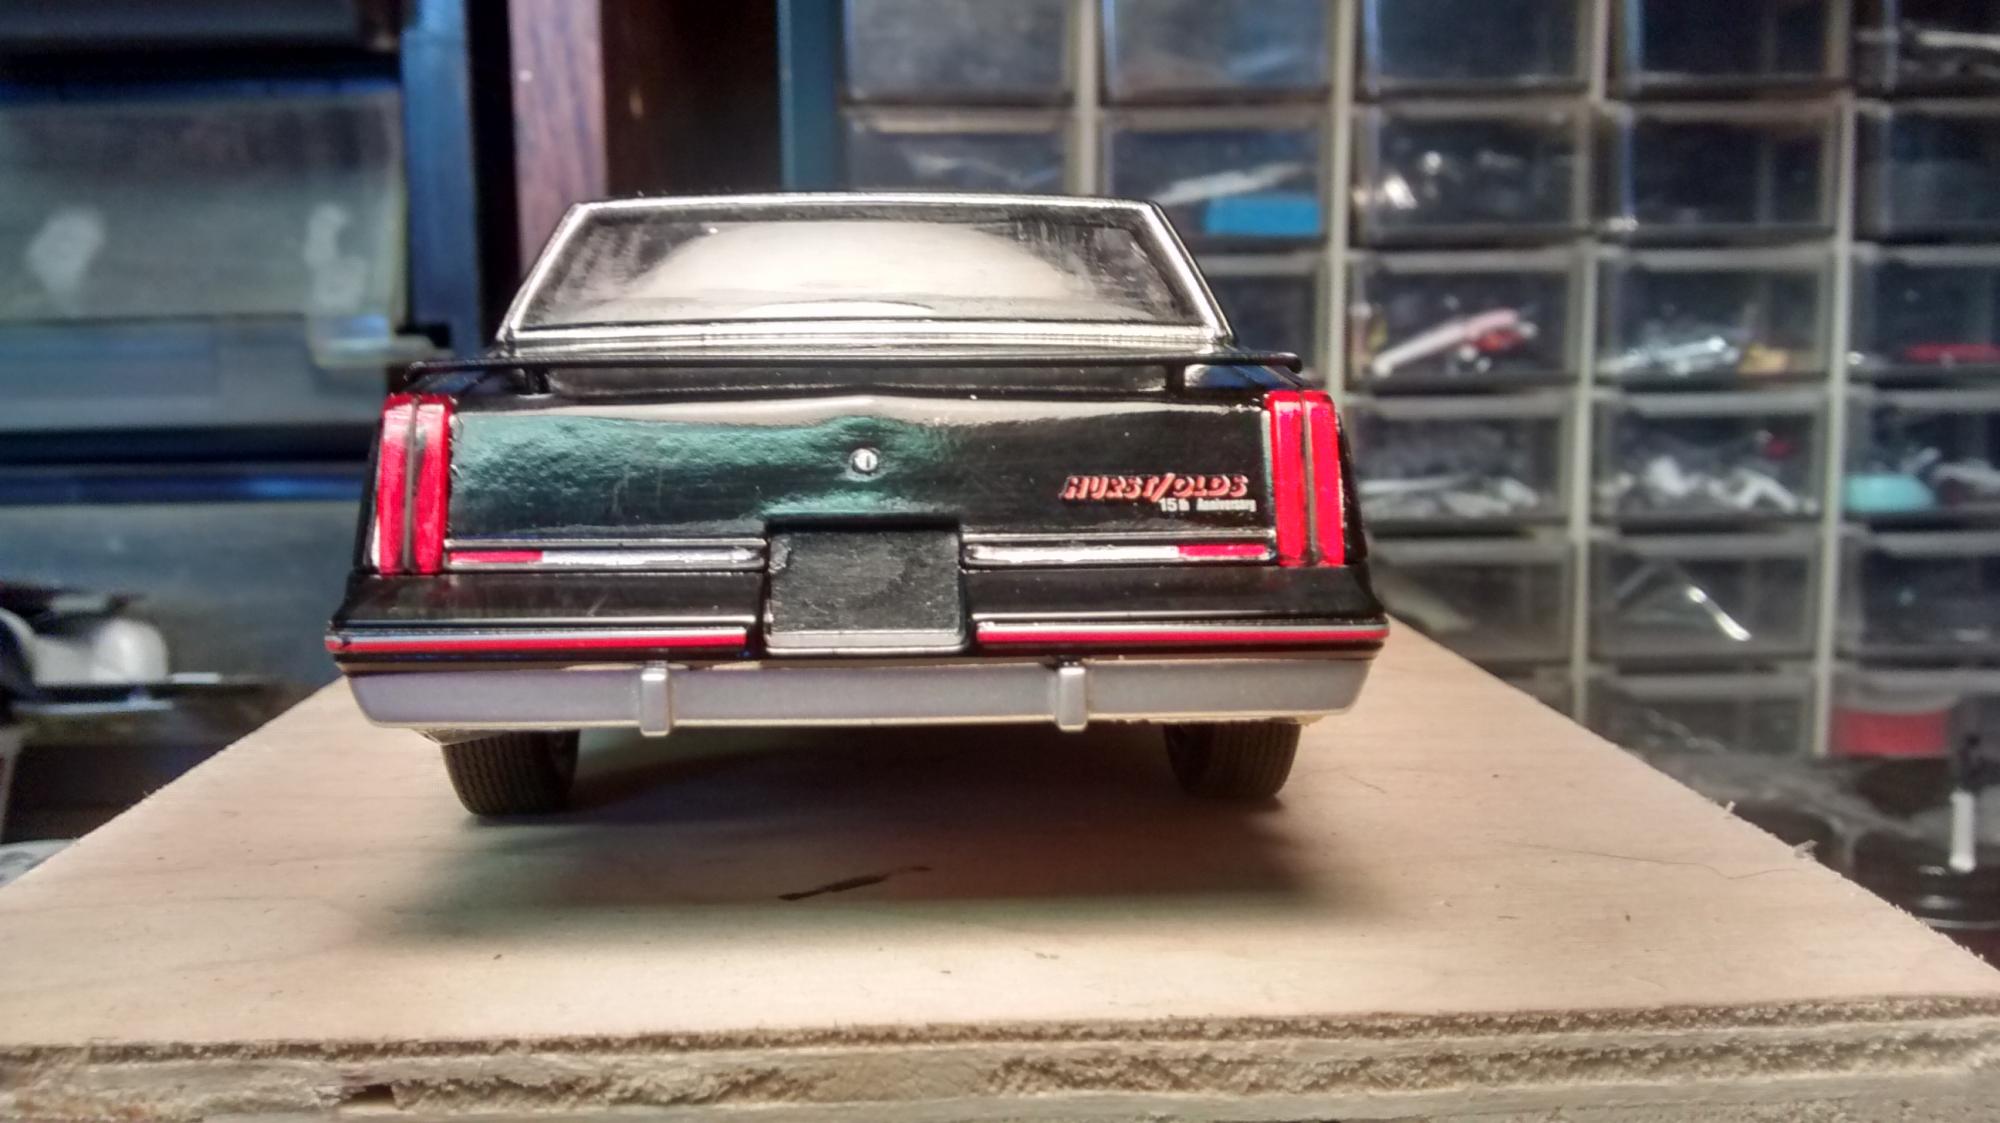
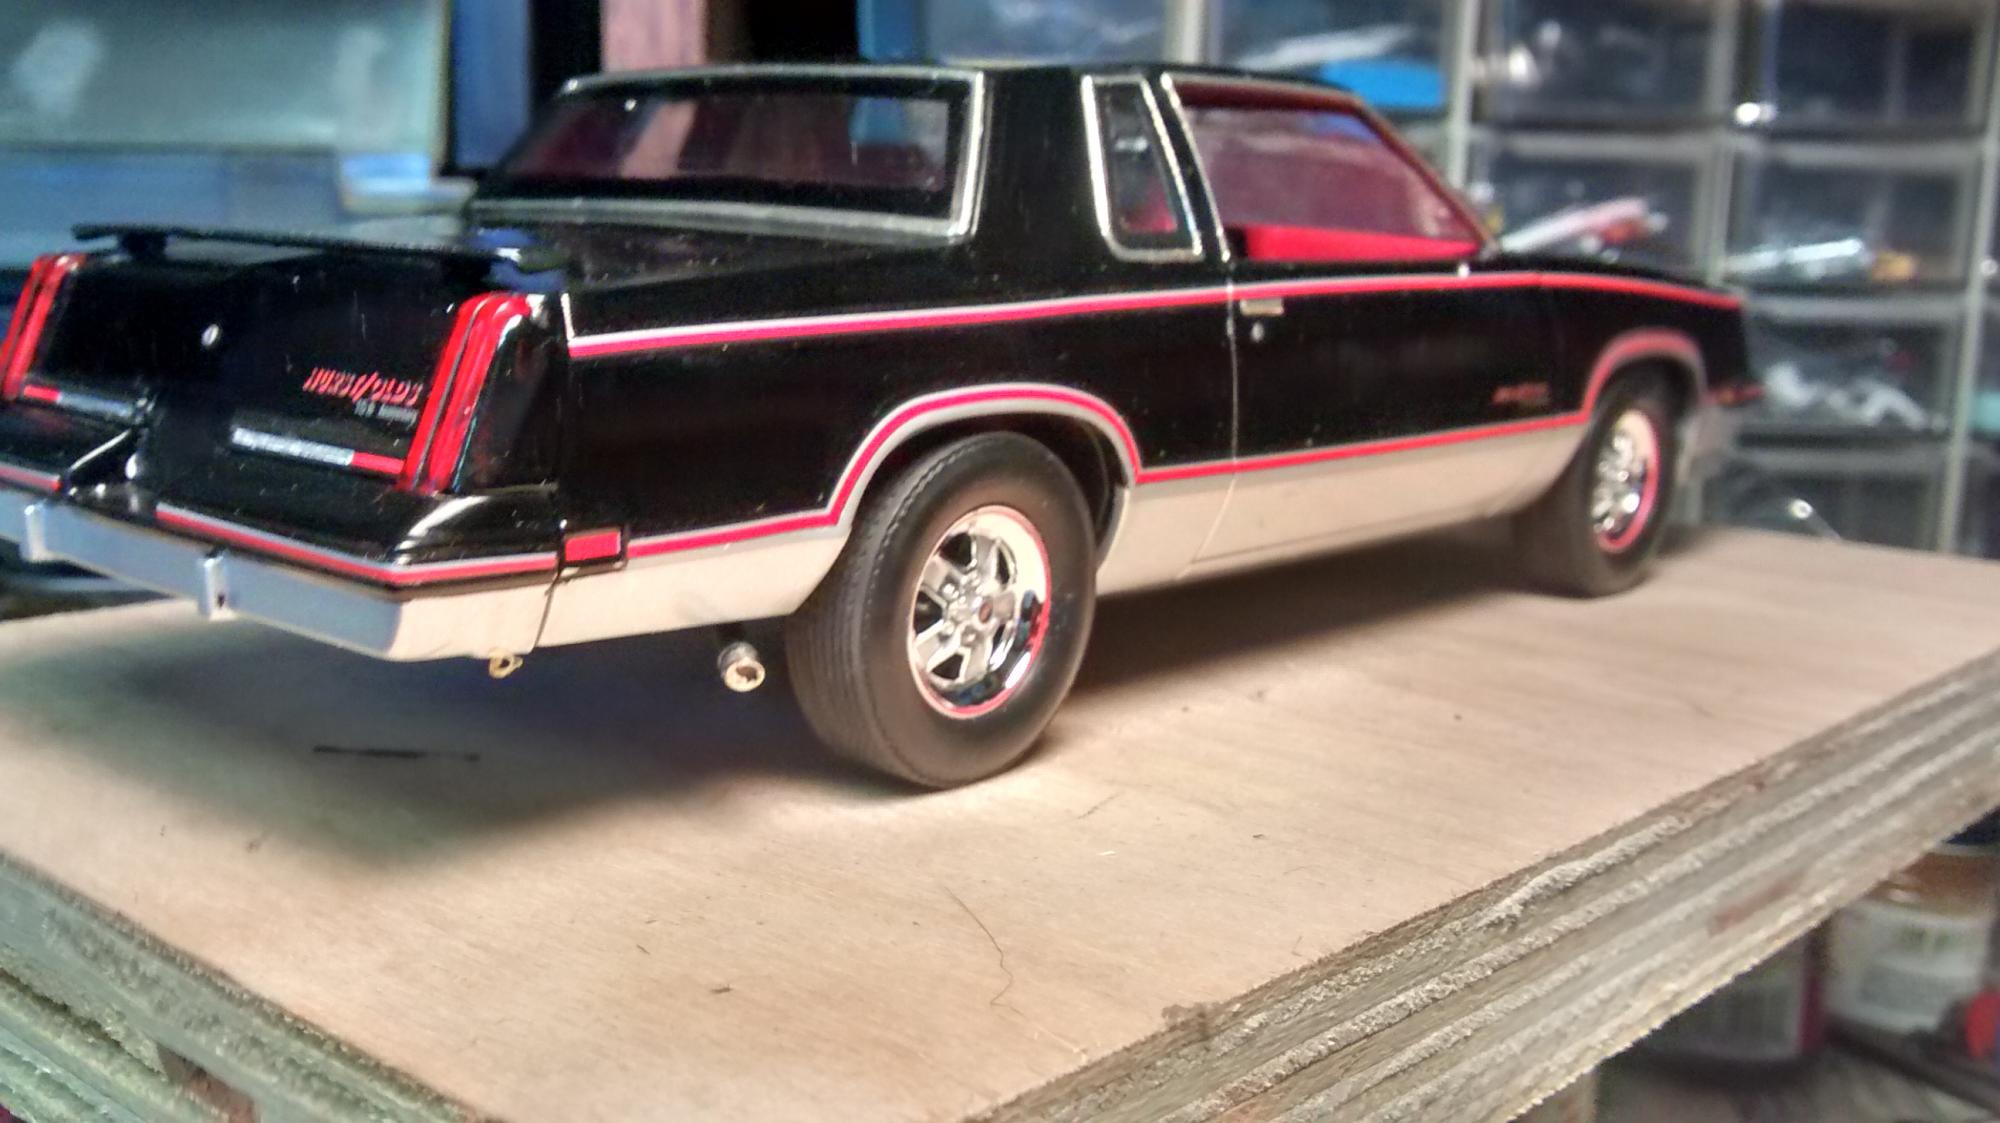
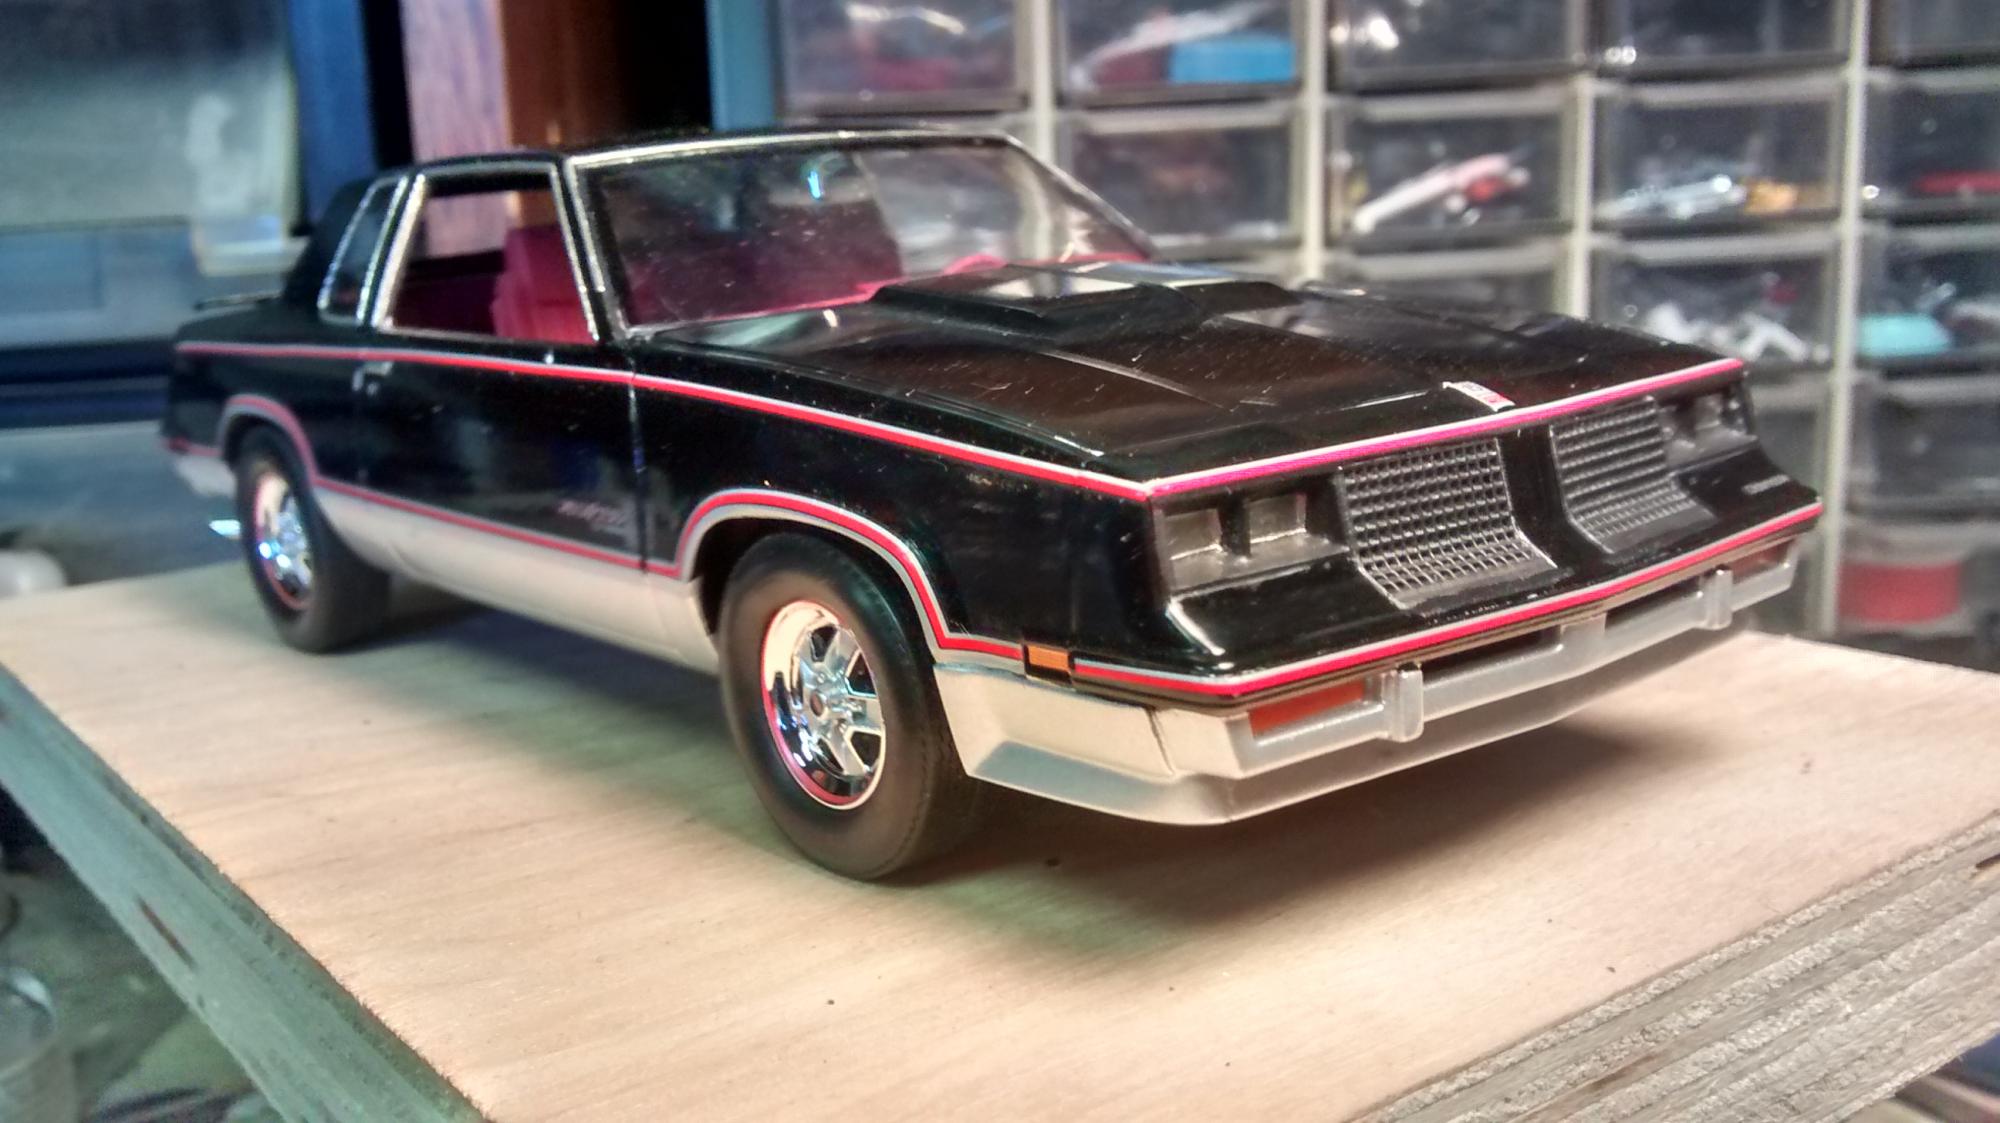
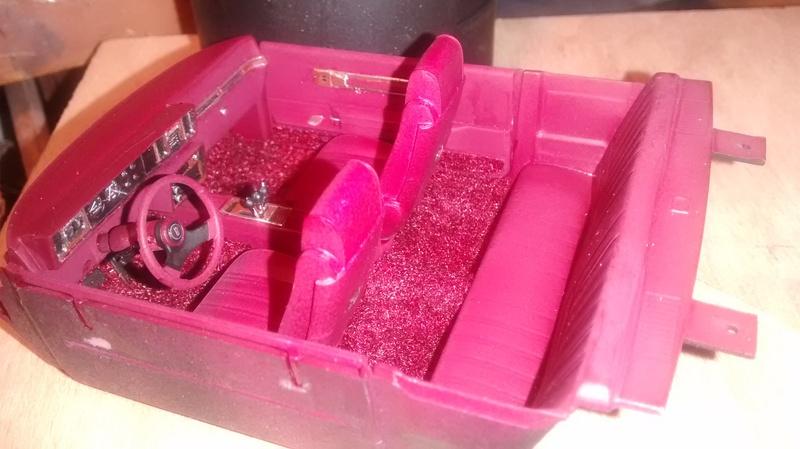
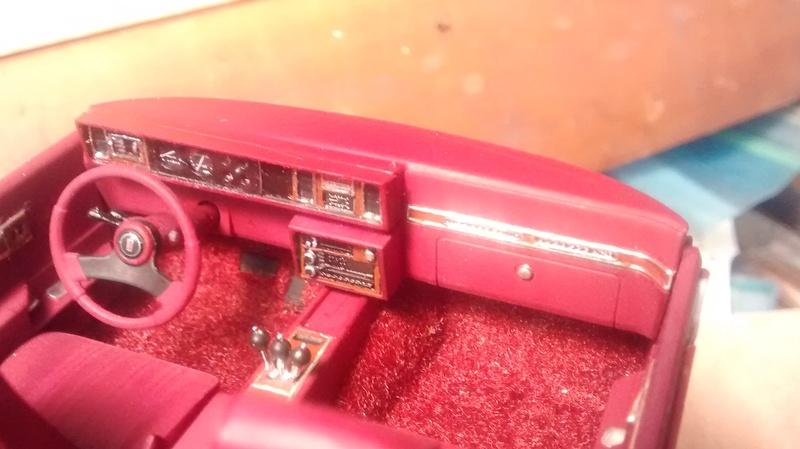
Another Hurst Olds WIP. Interior - this may be my best so far... I've figured out that I have to take my glasses off and hold everything about 6" from my face to get it right. magnifiers or reading glasses mess up the depth perception. I wear readers while working in general, but fine painting has to be up close. The car is basically together - have to do the decals and lenses, I think. I made the lens over the gauges out of some thin plex instead of the slightly distorted kit piece. I did miss the chrome trim around the seat backs. For the wood grain on console, I found I can either paint the brown, then add this strips of foil around the edges or foil the whole piece and paint out to the edge, leaving a thin strip of foil showing. Makes a big difference in the final appearance I think. I painted all the interior parts with spray bomb fabric/vinyl dye from auto zone. The color is darker than it appears in the photos. The seat backs need a lot of filing and sanding to get rid of the seams on the headrest and tops of seat backs. Nice kit all in all - throw back to the 80s Monogram construction sorta. Couple more tips: If you are working on this kit, the windshield or frame needs a slight bit of filing to get it lay in perfectly. I took a few swipes off at the base on the cowl, instead of the windows. the side window edges can also benfit from a touch too, to get them to lay in better. Also use a black marker or paint and paint the edges to make them disappear more. And the real car has the black seal around the windows as well. May as well paint that while you're at it. Most of the pics I found show the grilles to be matte black, as well as the headlight surrounds and the back up strips between the rear bumper and deck lid. I'll post more pics whenever I get more done. Randy