Art Anderson
-
Posts
5,052 -
Joined
-
Last visited
Content Type
Profiles
Forums
Events
Gallery
Everything posted by Art Anderson
-
A cheap polyethylene "turkey baster" works great, as do the "squeeze bulb" droppers from Testors. Art
-
My Pace spray booth has a "squirrel cage" blower, very small one, virtually identical to what is used on modern gas water heaters--whisper quiet, super effective, and the motor is brushless, completely out of the air stream. Art
-
Something to consider here, and seriously so (it was the subject of a very long thread several years ago!) is that any blower or fan that is in the airstream of paint fumes, particularly rattle can or airbrush, NEEDS to be a brushless, spark-proof unit, and if possible, even that outside of the air flow. I dunno if Pace is still in business (they were not at the IPMS show in Indianapolis IN last month, which was where I hooked up with them back in 2010, though), but Granger, the nationwide retailer of HVAC equipment does carry small "squirrel cage" blowers, meant to be mounted OUTSIDE of the air flow they generate (most if not all gas water heaters use the same size unit that my Pace Spraybooth is equipped with. Bear in mind, that while the risk of explosion or fire from flammable spray paint fumes might seem miniscule, I for one consider it an unacceptable risk. In addition, living in an apartment in a subdivided older house, which shares its HVAC system with two other apartments, I am very sensitive about causing any fumes or odors that could upset my neighbors, and in many ways those can upset a spouse or other housemate(s) as well--not to mention the overspray "dust" that is inevitable. Food for thought here? Art
-
MOPAR Engine Paint Colors
Art Anderson replied to afx's topic in Model Building Questions and Answers
Silver, as in "aluminum paint" was used by Chrysler Corporation, from almost their beginnings in the 1920's out to at least the middle 1950's, sometimes with flathead cylinder heads, and later OHV valve covers being a different color. A Google Image Search can be your best friend in stuff like this, BTW. Art -
Micro Balloons questions.
Art Anderson replied to HotRodaSaurus's topic in Model Building Questions and Answers
I still have a one-pint (approximately!) plastic jar of K&B micro-balloons I got from stock in the hobby shop (The Modelmaker) which I ran from 1984-1992 (when I went to full-time resin casting). The stuff works equally well with 5-minute epoxy, and the much more smelly, but stronger polyester (think fiberglas) resin, which I prefer, but nowadays, since I live in an apartment, upstairs in an older house here, with an HVAC system shared with two other apartments--odor can be a problem--so epoxy being much less odiferous, that is what I prefer using. Epoxy with a bit of sticky surface? Food dehydrator to the rescue--been there, done that, got the Tee Shirt--works for me, every time it's tried. Art -
Gluing acrylic rod to resin?
Art Anderson replied to crowe-t's topic in Model Building Questions and Answers
NOT if you get, and use the excellent CA glue accelerator from Bob Smith Models (available in most hobby shop RC departments, as well as online from Bob Smith Models, and Great Planes or Horizon Hobby). The big plus? This stuff has no adverse reaction to raw styrene, nor any sort of paint I've ever used on a model project. Art -
Those are the only scale model "classic" US Royal Master tires, that were ever done by any model car kit mfr (so very popular on show-car customs circa 1961-about 1964). Be aware though, that Revell tooled them more than a bit too large to fit most all 1/25 scale model car kits, save for their own model cars tooled and released in the 1960's (learned that over 50 yrs ago!) Art
-
Another method, if you lack both styrene sprue or rod stock large enough, and lack a lathe, would be to get the appropriate size styrene tubing in Evergreen, cut to length, and either fill with gap-filling CA glue and an accelerator, or blank off the exposed end with say, a strip of .040" evergreen flat strip styrene, then once the glue as set, file and sand to shape--I've used both techniques for shapes and detail parts such as this, decades ago, before I acquired my Sherline late and vertical mill, so I know the concept works. Art
-
Yes, if anything can, water--if it gets into the glue joint, expands irresistibly, as it freezes (8th Grade Science Class, for me at least). Note that could take several tries, but it most generally does work, unless the model in question is a total "glue bomb". Note that water doesn't dissolve (break down as you seem to suggest) but rather it breaks the glue joint apart. Think of this as if water turning to ice becomes a sort of "expanding wedge" rather than a solvent (with virtually every glue we use in model building, any "solvent" that would dissolve all but the so-called "non-toxic" model glues, would dissolve the surrounding plastic) Art
-
Just this past week, I reviewed the CAD files for the corrected roof shapes, and gave my approval to Dave. MANY pics of the trucks he and I took at that "collectible but unrestored cars and pickup trucks" dealer in far-western IL almost 2 yrs ago (the one that had the disastrous fire about this time last year) clearly show the upward "arch" of both windshield and back window, and the much higher, curved "crown" to the roof--it's already in the process of correction--so sit tight. Art
-
Uh, nowadays, it's "go out, find original 1:1 examples, take hundreds, if not thousands of photographs, from every angle possible, most with a "marked" (every other inch blacked out) carpenter's folding rule along with a non-stretchable cloth tailor's measuring tape (or a metal measuring tape, if the subject vehicle is old and perhaps just a bit rusty--believe it or not, old unrestored, but correct and complete vehicles make super reference material--dull paint, with a bit of surface rust here and there, give the best information in photographs!), much of which can be far better than "factory drawings" from decades ago. FWIW, I learned the basics of doing just exactly that, when researching some of my AAM resin-cast models, then "honed" that a bit more when I was working up "Binders" for directing the mockups and tooling for Johnny Lightning Diecasts (1/64, 1/24, and 1/16 scales) and now, with Dave Metzner who is the Product Development Mgr for Moebius Models. As for "original" factory drawings, those would be very hard to use, considering that they are quite large--often were drawn to 1/8 scale or so--some even larger, and with their having details, many of which can be well over the top for any model kit--pretty much useless for scaling down to 1/25th, which is the scale (along with 1/24th) is the scale that virtually all tooling mockups for models of US cars, done by US companies (regardless of what continent they are mastered, tooled and produced), as opposed to 1/10th scale wooden mockups of not only the various parts and components carved from white pine or basswood, tediously by hand, before the days of CAD, and CAM. Once the CAD files are approved--by Dave, with input from a couple other modelers along with myself, then tooling mockups are made--3D printing comes into play here--of every part of each new product, each and every individual piece and part, which the factory does clean up, do such smoothing (3D printing still gives even a slight indication of the "layering" that necessarily will be there), primered in flat grey, then assembled, and sent to Dave--this is where the critical phase really begins: Bear in mind, that the tooling prototypes have to travel nearly half the circumference of Earth, and the carton, regardless of how carefully it's packed (along with stickers announcing that it is FRAGILE) gets beat and battered around--so often there will be "repairs" needed. And the real fun begins (after Dave gets everything fixed that was damaged--usually small detail parts). I get the call to make the 110 mile drive from where I live, to Dave's home, where his full basement is dedicated to Moebius (along with his own model projects). We go over the tooling mockups with an increasingly passionate review--comparing just about every part to the hundreds of reference pics we took, along with further information and pics that can be gleaned from Google Image Searches--and then the discussions really can get deep, even a bit passionate at times. But in the end, we both come to a "meeting of the minds" as to accuracy and more importantly, inaccuracy. Once CAD files of the corrections can be seen and approved, then the "trigger" for tooling gets the action. Given that you could buy a top-end 1:1 luxury car, or even a decent house, for the cost of all of this--a lot of $$ rides on all this process. Once the tooling has been cut, then test shots are forwarded to Dave, and I get a set as well--along with a couple of other modelers, whose names I won't mention here (for their privacy) who also review those parts. Most generally, the only corrections are needed, but once in a while, something major can crop up--which means a bit of a delay. Once the final test shots are approved, then the tooling is polished (even that has gotten forgotten at the factory once or twice) the tooling is hardened, and placed in production. Along the way, box art, and instructions have to be created, and approved--and once so, in a few weeks time afterward--kits start arriving! Long-winded I know, but I believe it is time that this all has been said, laid out. Art Anderson
-
K&S 1/16" brass rod works very well, as the original "steel" wire axles that AMT included are also 1/16" diameter. Art
-
Best '32 Deuce two door kits
Art Anderson replied to Greg Myers's topic in General Automotive Talk (Trucks and Cars)
For it's very accurately done body, I will go with the much newer Revell '32 Tudor sedan--while the Orange Crate does come in a very close second. As for the AMT and MPC '32 Ford kits from the 1960's, great for "nostalgia" but all of them have major inaccuracy problems. Art -
Jo-Han Models
Art Anderson replied to Johnnymac's topic in General Automotive Talk (Trucks and Cars)
It was about 1964 that Aurora Plastics started using a machine-folded and glued plastic wrap on their model kits--done to help slow down what we in retail hobbies called "shop wear", but also was a deterrent to unscrupulous kits from "getting into" model kits on the store shelves, shoplifting the likes of "chrome trees". Within perhaps 2-3 years, every domestic model kit mfr had made that transition (prompted, I am sure, by the then-rise of Big Box stores, such as Kmart. Art -
Yup, formulated for use on automotive soft trim, in particular, those soft bumper covers, which were (and well could still be) made from polyurethane resin. Art
-
Not to mention that burial caskets were nothing like they are today--smaller and lighter a century or more ago. Art
-
Given what appears to have once been a white paintjob, I suspect that is a "child's hearse". A century or more ago, child mortality was way more than it is today, and many funeral homes had a smaller, often white, for transporting a child's coffin. Art
-
What brand of vise do you prefer
Art Anderson replied to STYRENE-SURFER's topic in Model Building Questions and Answers
I've got a small bench-vise that I bought here in my hometown over 50 yrs ago--it works great for many applications--but I also have a swivel Pana-Vise that I like a lot, as well. Art -
'40 Ford Coupe: Lindberg same as AMT ?!?
Art Anderson replied to Intmd8r's topic in Model Building Questions and Answers
Palmer yes, Pyro? Not too likely, given the sheer number of small sailing ship kits they introduced from the late 50's to the late 1960's. Art -
Interesting that this kit is apparently back in production again! In the spring of 1997, I fielded a phone call from the toy/hobby kit buyer from Walmart at my All American Models Resin Shop, to ask me to quote casting up a thousand of the "20 Mule Team Borax wagon and mules". I had to explain to the the person that while the model kit he wanted reproduced had been done in injected molded plastic--without the actual tooling, and certainly no injection molding machine(s) in my shop--that would have to be a massive hand-casting job, in RTV Rubber molds and urethane resin--and the cost to Walmart would necessarily have to be in the range of about $100 per kit. Once the buyer understood, that was the end of the conversation. Art
-
I've been sitting here, smiling away! When I spotted this 2000 V6 long box Dakora on the little used car lot that's just a block up the street from me, stickered at $4400, with stated mileage less than 25K, I looked it over, then sat back, and watched it for about 2 weeks, finally walked, chatted with the dealer (a guy I've know for nearly 50 yrs), made him an offer of $4-grand, took a fairly long test drive, and came home with it. It runs like a scalded dog, iron V6 has more than enough power, starts at the turn of the key. I generally don't drive more than perhaps 3500 miles a year. Looked at the title history (original owner kept it garaged in a small town not far from me, turned out to be a neighbor of a long-time model car buddy--who vouched for the great care given it. It's just now turned the OD past 30K, so I figure I got a great deal on it. Great on the highway too. Art

-
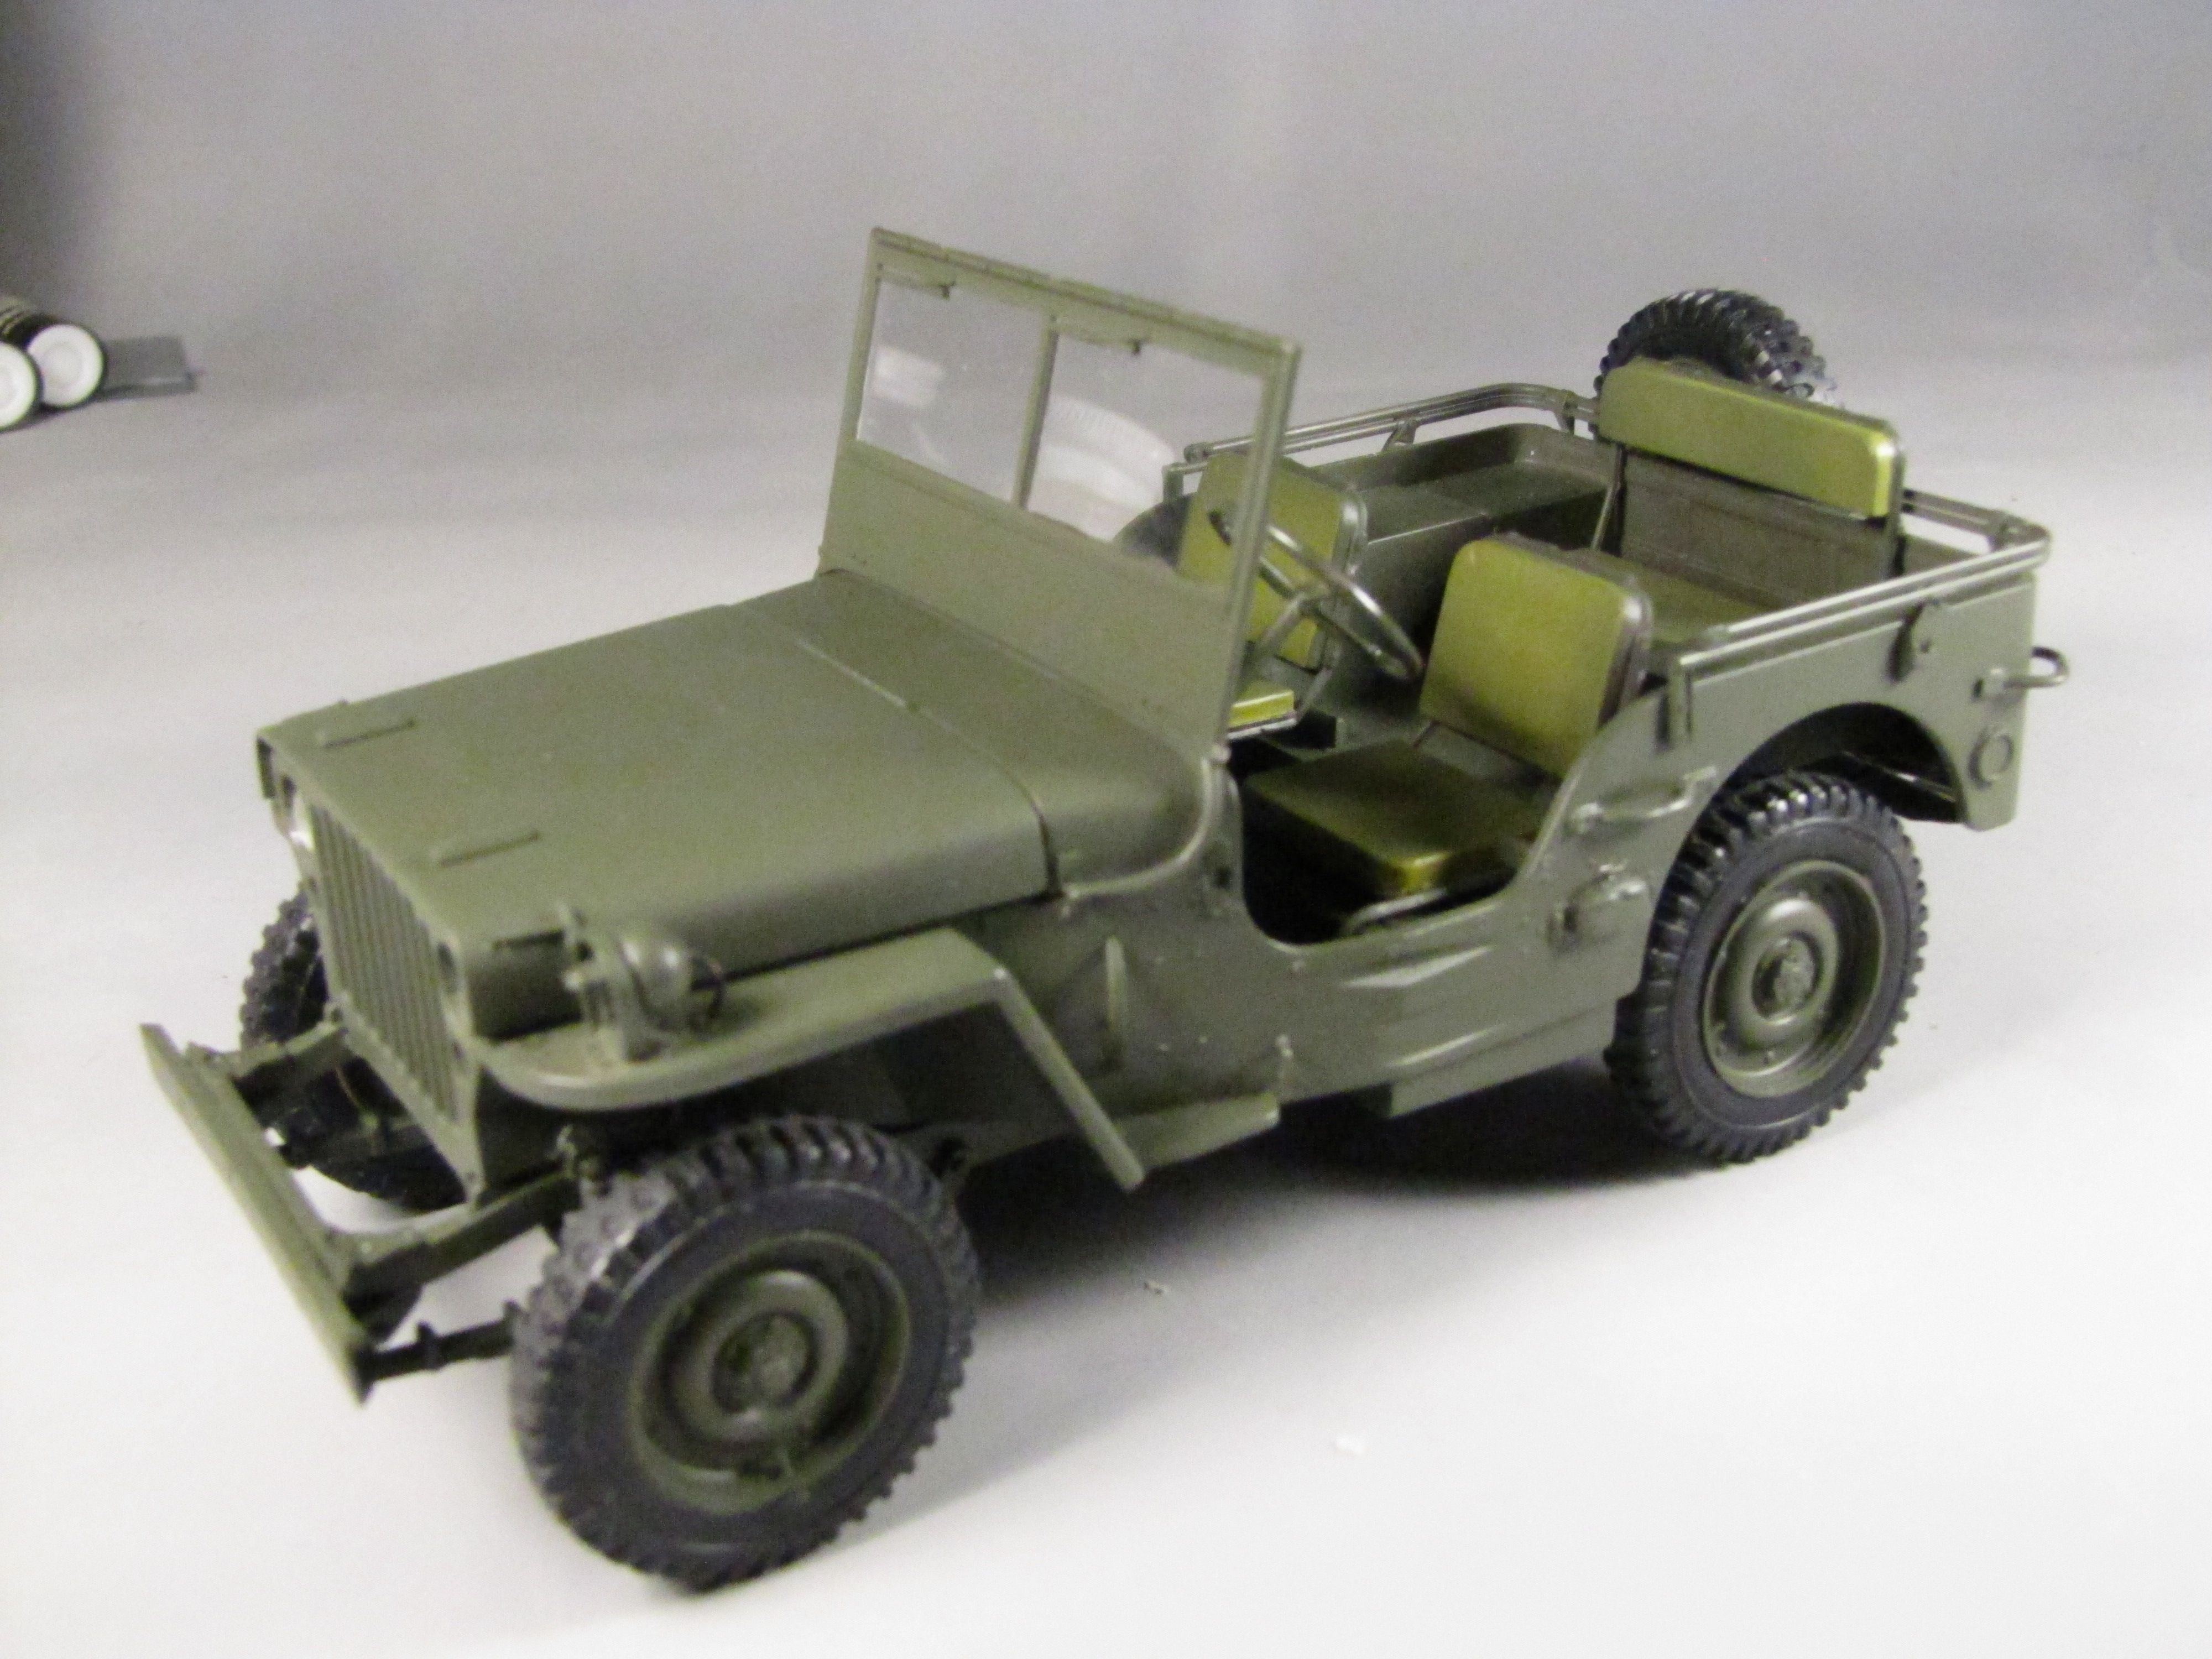
Neither of MPC's Jeeps is a WW-II Jeep: The "Hogan's Heroes" Jeep is actually a CJ-2A, which in early 1951 Willys-Overland produced a military version, the M-38 Jeep. The MPC CJ-5 is a Kaiser-Willys creation, which appeared first in 1954 as the M38A2 Jeep for the US Army. In 1/24 scale there are two WW-II Jeeps, Italeri made/makes a Ford GPW Jeep, Hasegawa makes the Willys MB Jeep (only noticeable difference between the two is in the front chassis crossmember). My Hasegawa Jeep in 24th, which I converted to a Ford GPW:
-
Steve, along with the Flareside Bed (which dated from 1953 with only a couple of detail changes, and ran all the way out to about 1978). Art
-
Charlie, I've been thinking (I know, that's DANGEROUS) but it might be just as quick (for me at least) to set up my Sherline Mill to simply mill down the grousers to a more correct height (?) Art
-
I've seen any number of this vintage Caterpillar D8--and NEVER saw any with even a hint of brightwork, beyond perhaps the starter key! If I have any gripes about this kit it's this: Why in the name of God did AMT's designers decide that a clear sticker with black dots was a good way to portray the grille? Of course, I can mount the radiator unit in my mill, and accurately drill out all the little holes, in scale, and precisely to the pattern on the real thing, but still? Art