Mr. Metallic
-
Posts
2,783 -
Joined
-
Last visited
Content Type
Profiles
Forums
Events
Gallery
Everything posted by Mr. Metallic
-
Revell 32 Ford Center Crossmember
Mr. Metallic replied to Calb56's topic in Model Building Questions and Answers
Rik is still active in the car world, but sadly has left the model car hobby. If you do Facebook and/or Instagram you can find him under his own name and Custom Car Chronicles. Also the Custom Car Chronicles website. His hobby now is doing digital restyling work of traditional custom cars. -
In my opinion, this is the best application possible for the Rat Roaster engine straight out of the box. Those headers always screamed Fad-T to me. And the car you built around it is spot on. Well done.
-
Great stance, cool wheel/tire combo
-
Interesting that they have the Frenzel supercharger as well. Appears as though Okey is trying to diversify, which could be a good thing for all of us.
-
Great color choice on the body. Curious why you painted the side of the air cleaner covers? I could be wrong, but I don't believe these are meant to replicate the open element filter type air cleaners, but the airflow comes up from underneath.
-
I don't think I'd go into panic mode just yet. I got mine from Spotlight Hobbies a couple weeks ago, they must be a preferred Revell dealer (didn't realize that was still a thing since Blitz took over). But they are just starting to hit most retailers right now. My LHS got them last week (picked up two more)
-
Curious how QC is supposed to catch this when it appears to happen after it leaves the factory?
-
11 of 15 the 32 ford body styles “oh let’s call it 12”
Mr. Metallic replied to Bullybeef's topic in Model Cars
Ambitious project. Tired of 32's yet. I've been building them for 25 years now and still not tired. -
1932 Ford 3 window coupe, traditional hot rod
Mr. Metallic replied to Bullybeef's topic in Model Cars
Nice job parts swapping and great stance. -
Great color combo. Nice cruiser.
-
The stance, wheel/tire combo and flattie really make this one. Nice job.
-
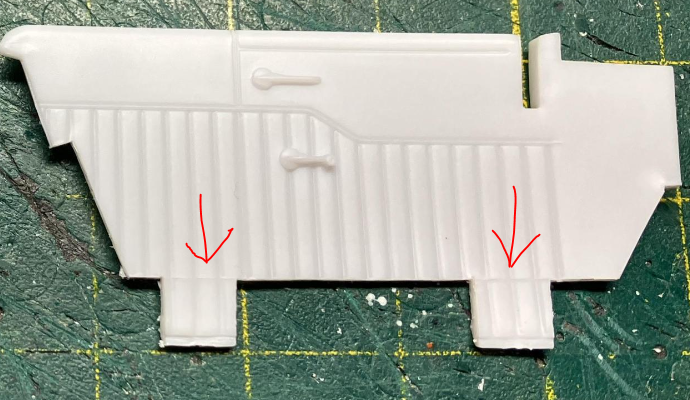
You're off to a good start. The proportion of the chop looks right on! Nice job sectioning the interior too. Retaining the portion of the side panels as a tab on the bottom is a smart move, one that I have used as well. Critical for keeping the side panels in the right spot.

-
I did just that on my current build featured in the On the Bench section by gently sanding the underside of the stanchions and making slight indentations in the cowl to give the windshield a home. About 5 minutes of work
-
I think what @Bernard Kron is getting at is if they were going to do a new tool of a 32 Roadster that making a miniature version of the Big Deuce would be a boon for traditional hot rod builders as far as parts content, not necessarily to build a Little Deuce itself. Even the original Little Deuce kit was not an exact copy of the Big Deuce when it could still be built that way straight out of the box. Different wheels, no quick change and a bunch of other small details (mostly made in the name of simplification I'm sure) Incidentally, I did make my own version of a 1/25 Big Deuce (not a Little deuce) a few months ago, which sticks much more closely to what was available in the BD
-
At Walmart (at least one store)
Mr. Metallic replied to Classicgas's topic in General Automotive Talk (Trucks and Cars)
Yeah, except people in Rockland County consider anything north of them "upstate NY", so there are no hard and fast rules -
That chop is sick! Just curious why you didn't chop it digitally before printing?
-
Marc is correct. Here's my personal thoughts (and of course, these are not hard and fast rules, anything can be done no matter the coast) East- sectioning and channeling West- chopping East- near level stance West- raked stance with rear higher
-
Be still my heart. That's awesome. Looks like I'll be adding that to my ebay wish list.
-
At Walmart (at least one store)
Mr. Metallic replied to Classicgas's topic in General Automotive Talk (Trucks and Cars)
Looks like mostly the same stock as last years displays (with a couple additions) -
There was a pretty in depth conversation here about the 34 kits, including the Monogram kit. I seem to recall in the various conversations I've seen here and on TRaK that the Monogram 3 window actually scales out pretty well to 1/24. I think@Ace-Garageguyeven did some real world measuring? edit- found the thread
-
My two local stores never saw the recent clearance that others had. The ones others said were marked down are still full price at my stores. There are quite a few empty spots though, but they are labelled for upcoming "new" kits, so that's a good sign after what seems like nearly the same stock the last 18 months.
-
No Witty Name Revell 32 Roadster (update 11/9)
Mr. Metallic replied to Mr. Metallic's topic in WIP: Model Cars
Suspension update Since I'm using the I beam axle from the Revell A kits, I may as well use the suspension arms from that kit. The nice part is that to accommodate both highboy and channeled versions in that kit, there are 2 sets of front arms included, that leaves a second set of arms to modify for use on the back and so everything matches. To get the front set to fit the 32 frame I sanded down both sides of the mounting bracket. Then I drill a hole through where the 1:1 bolt would attach the arm to that bracket. Once that is done and I test the pin fitment I remove the pin and then, using a very small saw, sever the mounting bracket from the arm. I have done this mod several times now, and find that a photoetch blade removes the smallest kerf. Those blades come in handy for so many other things, so if you don't have one in your arsenal I would definitely invest in one. Clean up your cuts, glue the pin to the hole in the arm and then after the glue is dry slip your bracket on the pin. Now you're ready to mount the bracket permanently to the frame. Put the arm in position on the axle and then use a clamp to hold it in place. Now swing the arm up into it's proposed final location so you can see where you need to glue the bracket. I usually wait to trim the pins until final assembly, but you can do it anytime now that we have the bracket mounted. The rear is even less involved, but if you want to do the same mods to the brackets you can. I am using the molded in brackets intended for the shocks on the rear axle as my brackets for the arms. As you can see the rear spring is now pinned to a location in the faux crossmember I made earlier. This is a huge aid for repeatable mockups and a secure final assembly. Take the arms and sand off the pin that would have attached to the front axle and sand flush. Then drill a hole and insert a pin in the very center of the arm, and drill a corresponding hole in the center of the bracket on the rear axle. Sand the backside of the mounting flange on the other end of the arm, and then it's ready for mockup. I may add some small bits of plastic to either side of the brackets on the rear axle to make it look more realistic. I need to figure out a shock setup as well. -
Vapor Pearl the 32 Ford roadster “10/21/22 under glass”
Mr. Metallic replied to Bullybeef's topic in WIP: Model Cars
Replicas and Miniatures of Md does a beautiful setup just like that for those that are looking. -
No Witty Name Revell 32 Roadster (update 11/9)
Mr. Metallic replied to Mr. Metallic's topic in WIP: Model Cars
Engine mods While the kit supplied Weiland supercharger is really well done, it is not early 60's appropriate. Fortunately a readily available replacement can be found in the Revell Model A kits (the ones with the SBC, not the Nailhead) I was able to drop the blower intake right on the block from the 32 kit (as it should since they're both SBC's). I adapted the separate front cover from the A kit to fit over the molded in version in the 32. While mocking up the engine in the frame I noted that the blower belt gets really close to the front crossmember, so I shortened the snout on the blowers front cover about 1 scale inch, and sanded off the raised area on the backside of the bottom blower pulley so everything moves towards the engine to create clearance. I also removed the molded in oil pan from the 32 kit and replaced it with the separate item from the A kit. At this point you're probably thinking, why didn't I just transplant the entire SBC from the A kit. Well, that is certainly an option, but I hate messing around with motor mounts, so using the SBC from the 32 allowed the engine to still drop in. As you can see I also grabbed a manual trans from the parts box, because "real hot rods have three pedals" -
No Witty Name Revell 32 Roadster (update 11/9)
Mr. Metallic replied to Mr. Metallic's topic in WIP: Model Cars
First thing I needed to address was the rear height. For the initial mockup I simply flipped the axle over so the airbags were hanging down out of the way. Well apparently when I snapped the above pic the flanges for the shocks were still holding the frame artificially up in the air. Once I got into properly modifying the rear everything settled down where it belongs. See new mockup below For those of you wanting to keep things simple you can find a different way to go to backdate the rear suspension, or simply keep the airbags. Totally your call. I decided to steal the transverse buggy style spring from a Revell 30 Ford touring, and pinned it to the axle. Then I created a faux crossmember around the spring by adding a piece of .080 x .080 Evergreen strip between the frame rails. This has an added benefit of covering up the mounting holes for the kit airbags and shocks. Here's a quick summary of the minor mods I made to some of the front wheel components. To get the drum style brake to fit in the wheel without widening the track I had to remove the wheel boss from the wheel back. I also sanded off the outer edge to fit the narrower AMT tire. To get the cycle fender to fit the tire I had to remove the molded on brake disk, while retaining a portion of it to act as the bracket. I then thinned down the front side to help the bracket snug up tight against the tire. Lastly I sanded off the raised portion on the back of the Revell A sourced brake backing plate to allow it to set in the wheel assembly. If you do this take care not to sand too far because you could sand through (note how thin the plastic is in the finished piece) And now, the final stance with everything in it's true position with no supports underneath. Right where I want it. I also dug out the sweet chopped convertible top mastered by Dennis Lacy and offered by Drag City Casting. I did get some of the mods made to the engine (which will be shared later). It's sitting crooked because there is no trans crossmember yet.