Mr. Metallic
Members-
Posts
2,781 -
Joined
-
Last visited
Content Type
Profiles
Forums
Events
Gallery
Everything posted by Mr. Metallic
-
There have been quite a few builders here mentioning their "duvall" frames have varying degrees of warpage. I experienced this one one of the two kits I've purchased. Is this what you're talking about @Bearcat ? If so, reach out to Revell customer service for a replacement. I made mine work by drilling and pinning it to the cowl, but that operation is tricky on a fragile part, and depending on the amount of warpage may not fix the problem.
-
Revell (New Tool) 32 Ford Roadster - complete!
Mr. Metallic replied to SpikeSchumacher's topic in Model Cars
Very clean build. Nicely done. -
Very nicely done. Great stance, and the wheel covers are the cherry on top. I especially dig the Lincoln bumpers
-
AMT-Ertl 1956 T-Bird Street Freak/From the Vault #7
Mr. Metallic replied to tim boyd's topic in Model Cars
Another stunner time. The paint job is eye catching. I have a similar build based on the AMT 56 planned, minus the kit y-block of course. As a side note, I think the OneCoat paints survived the culling by Rustoleum. I still find them on store shelves including Hobby Lobby. They even released a new color I had never seen (turquoise). I just can't believe it's old stock that hasn't been exhausted in the 2 years since Rustoleum turned off the Model Master spigot. -
Renwal Peirce Arrow Concept by Virgli Exner
Mr. Metallic replied to Scott Colmer's topic in Model Cars
I've been following along intently in the mag as you've built this one up. Thanks for taking us along for the ride. -
Very slick and smooth chop. Gie it a great side profile. Nice color combo too.
-
Surf's Up! Monogram Early Iron Woody Wagon 1965 Style
Mr. Metallic replied to Dave Darby's topic in Model Cars
This is freaking rad. Glad to see you finally bring this one across the finish line. The thing about these molded in color Monogram hot rods is that most people don't realize they're not paint, but polished plastic. And you sneaking in the 32 ford grille is just the little subversive touch that i love that makes people scratch their heads. Freaking rad! -
I like the wheels you've found, but the box art wheels have been in nearly every version of that cool. I've never had that 80's version with the billet wheels, so I'm guessing they didn't include the 5 spokes in that version? Surely someone should have a set floating around up north there? I have several, but my understanding is shipping across the border is $$$
-
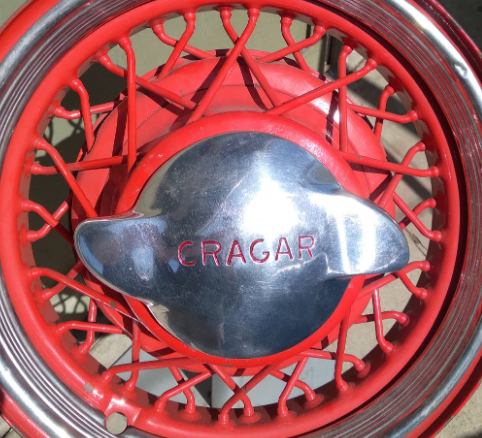
I have officially started gathering parts! What I'm looking for right now is the 2 blade knockoffs. The ones I've found closest to what I have in my mind are from the Revell Jaguar XK (the 60's tool). Although the ones from the brand new tool from a couple years ago would work as well, but the likelyhood of someone having thos floating around their parts/spares box is pretty minimal. The look I'm after is like this (doesn't need to say Cragar). I figured there would have been something in the old AMT/Monogram/MPC 30's classic car kits, but so far nothing. Closest I can find so far are the Jag knockoffs.
-
Odds & Ends you'd Like to See
Mr. Metallic replied to Calb56's topic in Car Aftermarket / Resin / 3D Printed
I don't think Rep+Min offered one, but I'm pretty sure The Parts Box out of Australia still does. And there's a 3d one floating around ebay too. -
Rustoleum paints are terrible.
Mr. Metallic replied to James Maynard's topic in General Automotive Talk (Trucks and Cars)
The size of the flake seems to vary quite a bit from lot to lot. Best thing to do is a test spray first. -
You know I'm in on this one. That is in my top 5 favorite box art examples. Great wheel and tire choice too. As far as engine, you can of course go flattie. Keeping it blue oval beyond that may get tricky because the Y block is a longer engine (especially with the stock water pump/fan setup) so may be a tough fit in the engine bay without some serious surgery. But you could go with a 289 with some cool speed equipment which would put it solidly in the mid 60's. Lots of options ahead.
-
AMT The Green Hornet Black Beauty Kit
Mr. Metallic replied to martinfan5's topic in Car Kit News & Reviews
Well, since Steve just noted that he held the 3D mockup in his hands I'd say at least 6 months if not longer. -
Replicas and miniatures of Md make some very nice ones.
-
Thanks for the photo reference. Now I feel better. I wonder why they call out Model A wheels specifically. I get the wooden T wheels, but what is so different about the A wheels that they are not allowed? Anyway, I'm not ready to jump in with both feet yet, but I'm formulating a plan. Plus, i work better on a tight deadline ? I ordered these 2 months ago, but they just landed on my bench so I thought I'd ask. And you ain't kidding, their stuff is not cheap, but I bought them during the Black Friday sale, so I saved a little ?
-
Possibly formulating a plan. I just got these, they are called out as 1932 Ford wheels. So, am I within the rules to use these? they're not Model A, but I'm unsure why they are against wire wheels at all. I know they aren't the best for drag applications because they can't take the torque, but in the late 40's/early 50's (which is where I may be headed with my build) they were probably still ok?
-
Man those blue lines are nice. I may have missed it, but can you purchase those blue line fronts in a parts pack or were they in any other kit yet? I'd love to have a pair to go with a set of the blue line slicks I have. No offense, but I don't have much use for the rest of the new Monkeemobile kit to buy one just to steal the front tires. But now I'm sure someone will just tell me to make my own with a gel pen.
-
I would leave the splash shields on. Gives it a more dual purpose (street/strip) feel, which is what would have mostly been running on the beaches back in the day. Drive to the beach, strip off the headlights and fenders and maybe remove the windshield, then go racing. I believe the reason the splash guard remain on dual purpose racers is that they are very time consuming to remove at the event since the attachment points are buried under the body
-
Jealous. The grille you show in the pic with the wheels and tires is from the original issue of the Monogram 34 Ford 6 in 1. More of a custom grille, it is still ultra cool. Wish I had one.
-
I see that you took care of the issue in true hot rodder fashion and just removed the fenders. It's looking great. Just an FYI for you and anyone else, the bodies in this kit drop on the AMT 29 Ford roadster fender unit. The helpful thing here is that that kit has a separate frame rather than being molded to the fender unit like this kit. Thanks @Dave Darby for sharing that tip awhile back. Haven't used it myself yet, but thought others in this thread might like to know it too.


