Mr. Metallic
-
Posts
2,783 -
Joined
-
Last visited
Content Type
Profiles
Forums
Events
Gallery
Everything posted by Mr. Metallic
-
Jealous. The grille you show in the pic with the wheels and tires is from the original issue of the Monogram 34 Ford 6 in 1. More of a custom grille, it is still ultra cool. Wish I had one.

-
I see that you took care of the issue in true hot rodder fashion and just removed the fenders. It's looking great. Just an FYI for you and anyone else, the bodies in this kit drop on the AMT 29 Ford roadster fender unit. The helpful thing here is that that kit has a separate frame rather than being molded to the fender unit like this kit. Thanks @Dave Darby for sharing that tip awhile back. Haven't used it myself yet, but thought others in this thread might like to know it too.
-
No Witty Name Revell 32 Roadster (update 11/9)
Mr. Metallic replied to Mr. Metallic's topic in WIP: Model Cars
Thank you. I've lost my motivation the last few weeks for anything model related.. Between the holidays, working on the house and just general lack of motivation everything on my bench is gathering dust. The phaeton is essentially ready to go but Ed wants me to try to master a chopped uptop for it and the first attempt ended up in the trash. I have parts for a second attempt, just need to sit down and do it. Stay tuned. -
Dang, I have a thing for anything worked on by the A Bros, was hoping to build the concept car. Oh well, thanks for your efforts bringing this kit to market though.
-
No Witty Name Revell 32 Roadster (update 11/9)
Mr. Metallic replied to Mr. Metallic's topic in WIP: Model Cars
? https://trakinscale.proboards.com/thread/19828/apologies-dennis-ed-updated-2022 -
Man, this has that sweet late 80's flavor. Takes me back to wandering around the fairgrounds with my dad back then, and leafing through all his then current Hot Rod and Popular Hot Rodding mags.Thanks for taking us along for the ride as you built this one up.
-
Yes, what Dave said. This is such a cool build, it would be a shame to watch the wheels/tires slowly disintegrate. Those wheels are such a signature part of this build, you should try to save them. Anyway, thanks for sharing.
-
x2. Very well done.
-
Nice clean build, augmenting the basic items the kit gives you to heighten the accuracy. Well done.
-
Rescued and rebuilt Monogram Little T survivor
Mr. Metallic replied to JTalmage's topic in Model Cars
With the parts 98% there, it deserved to be put back together, faded chrome and all. It looks great. -
Alright Dave, I may have missed it, but what are you up to with the windshield. there's definitely two different ones floating around your bench
-
1964 Econoline
Mr. Metallic replied to Tcoat's topic in WIP: Model Trucks: Pickups, Vans, SUVs, Light Commercial
That's what i was afraid was going to happen when I saw that you were painting the floor and chassis without having the body in your hands. Hopefully you wont have to perform too many mods since the work you have done so far looks good. -
Thank you for your thoughts on the newer Revell tire decals Chuck. I always avoided them because i assumed they would just be more of a headache than painting. But your examples above look great.
-
Maybe @Bernard Kron could update the title of this thread? Just a thought
-
Color me intrigued, especially if we eventually get different body styles (30 or 31 roadster, 30 closed cab pickup) I keep wanting to type that the choice of 1/24 is unfortunate for the hot rod world (and I get the reasoning behind the global scale of 1/24 being chosen) but then I remember all the 60's Monogram hot rods were all 1/24 as well. (30 Phaeton, 34 coupe/roadster, 30 Coupe/cabriolet, Little T, Little Deuce, Woody Wagon, Blue Beetle)
-
Super clean build of a very tough kit. Nicely done.
-
Well, I don't venture into the Community Builds area very often, so this thread was a pleasant surprise. Just read through the whole thing, good to see the usual suspects participating, and also a bunch of builders I don't normally associate with hot rodding. But everyone who has shared so far is definitely on the right track. I would love to participate, but I don't want to commit yet. By bench is 9 projects deep right now, so let me see how the next couple months goes before I jump in. That said, I'm already formulating build ideas in my head. But I will definitely be following along through the "race"
-
Glad this one got a bump because it's a sight to behold. I'm sure many of us have the thought to build one of these with our modern skill sets. You have set the bar very high. Well done.
-
Late to the party, but this is sweeet! Great color, great stance, and excellent wheel/tire choice. But my favorite part is the precision fitment of the hood around the exhaust. A tricky endeavor for sure
-
Top notch builds from your bench as always. Your build style is so clean, a level i strive to reach someday. Between your 65 build and Steve Milberry's, I no longer feel a need to build my own if I can even get my hand on the parts. That's not a bad thing, I can just take pleasure in looking at yours and spend my efforts on something else. And the VW bus mini dio is sweet. Thanks for sharing
-
Being a big Testarossa fan as a kid in the 80's with a poster on my wall I was intrigued by this car and I built the Monogram version when it was new. Not my best build, as there were some fit issues, but I also painted it silver like you planned to. Then I was introduced to Tamiya kits and found one of these on clearance. Still have it in my stash as one of those "someday" builds. Yours is looking very good. Great color choice. Plans for the interior color? Tan?
-
Glad to know the Rep +Min Duvall fits the new body. I applaud Revell for the new parts they added to this kit and will buy more. But the R+M piece really captures the laid back swoopiness of the Duvall unit so much better. Looking forward to seeing your build progress.
-
Hobby Lobby does carry some of the Atlantis ships and aircraft, but for some reason they haven't carried any of the automotive stuff. ?
-
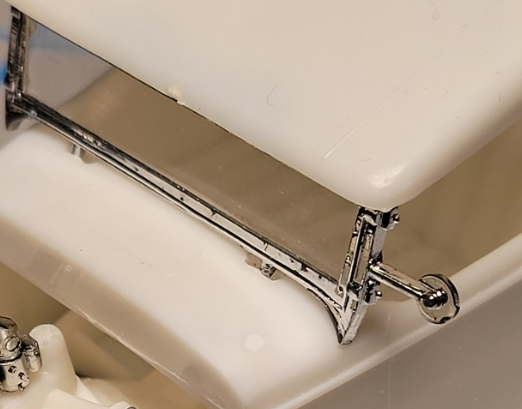
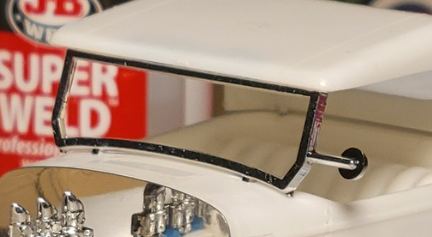
I guess I never posted these pics before the holidays. I was hoping to get some bench time between the holidays on my time off but it didn't work out that way. Anyway, here is where this one stands right now. I cut out a bit of the bed floor to allow the bed to sit down where I want it. The rear crossmember is now permanently in place. And here she is mocked up on all 4's for the first time. With the stance locked in I can start finessing other aspects. You can now see the successfully bobbed rear fenders as well. And I grafted in the cowl from the new roadster so I can use the Duvall windshield. Out of the 2 of those new kits I've bought one windshield was perfect, and the other was warped. If you buy one open it up right away and if you have a warped one get your request in to Revell, they are aware of the issue. I'm going to make mine work by pinning it to the body. Fingers crossed during final assembly. Here you can see the new motor mounts I scratched up from evergreen C channel and tubing. Don't mind the gap between the block and the intake, that's me not making sure everything is where it belongs before I snapped the pic. Flatheads can get lost in a 32 engine bay, especially with fenders, so I want the engine sitting up high. The new motor mounts necessitated small notches in the lower edge of the fender so it sits flush on the frame. And now you can see the effect of mounting the engine higher up.
-
No Witty Name Revell 32 Roadster (update 11/9)
Mr. Metallic replied to Mr. Metallic's topic in WIP: Model Cars
If that's the case then I must not have any copies of Dennis top. I swear I bought some from you but I can't find them anywhere Tim, this one got shuffled a few inches deeper on my bench when I started working on the 32 phaeton conversion for Ed, and I couldn't help myself and started the shorty 32 RPU when I got some sweet new parts from Texas 3D Customs as well. I was hoping to spend my holiday time off work at the bench but ended up doing stuff to the house instead. My bench is seriously 8 projects deep right now, surprised i still have any room to work.