Alan Barton
-
Posts
2,113 -
Joined
-
Last visited
Content Type
Profiles
Forums
Events
Gallery
Everything posted by Alan Barton
-
Nice truck for sure, but those lowered headlights - wow - they are Ubercool! So here I am with a million projects on the bench going Hmmm, I gotta a bunch of Revell roadster pickup parts, maybe I could just do a quickie - NO NO NO Noooooooo..... Here we go again! Cheers Alan
-
Easily the best build I have ever seen of this kit. Extra points for doing such a good job of matching your photography angles with the original photos - that is never as easy as it sounds! Cheers Alan.
-
What an outstanding restoration! I love the little dudes standing guard. I've always wondered what one of these would look like with a conventional pointy nose? Such a cool design, especially the cab. Cheers Alan
-
That 29A pickup does it for me - simply stunning! Cheers Alan
-
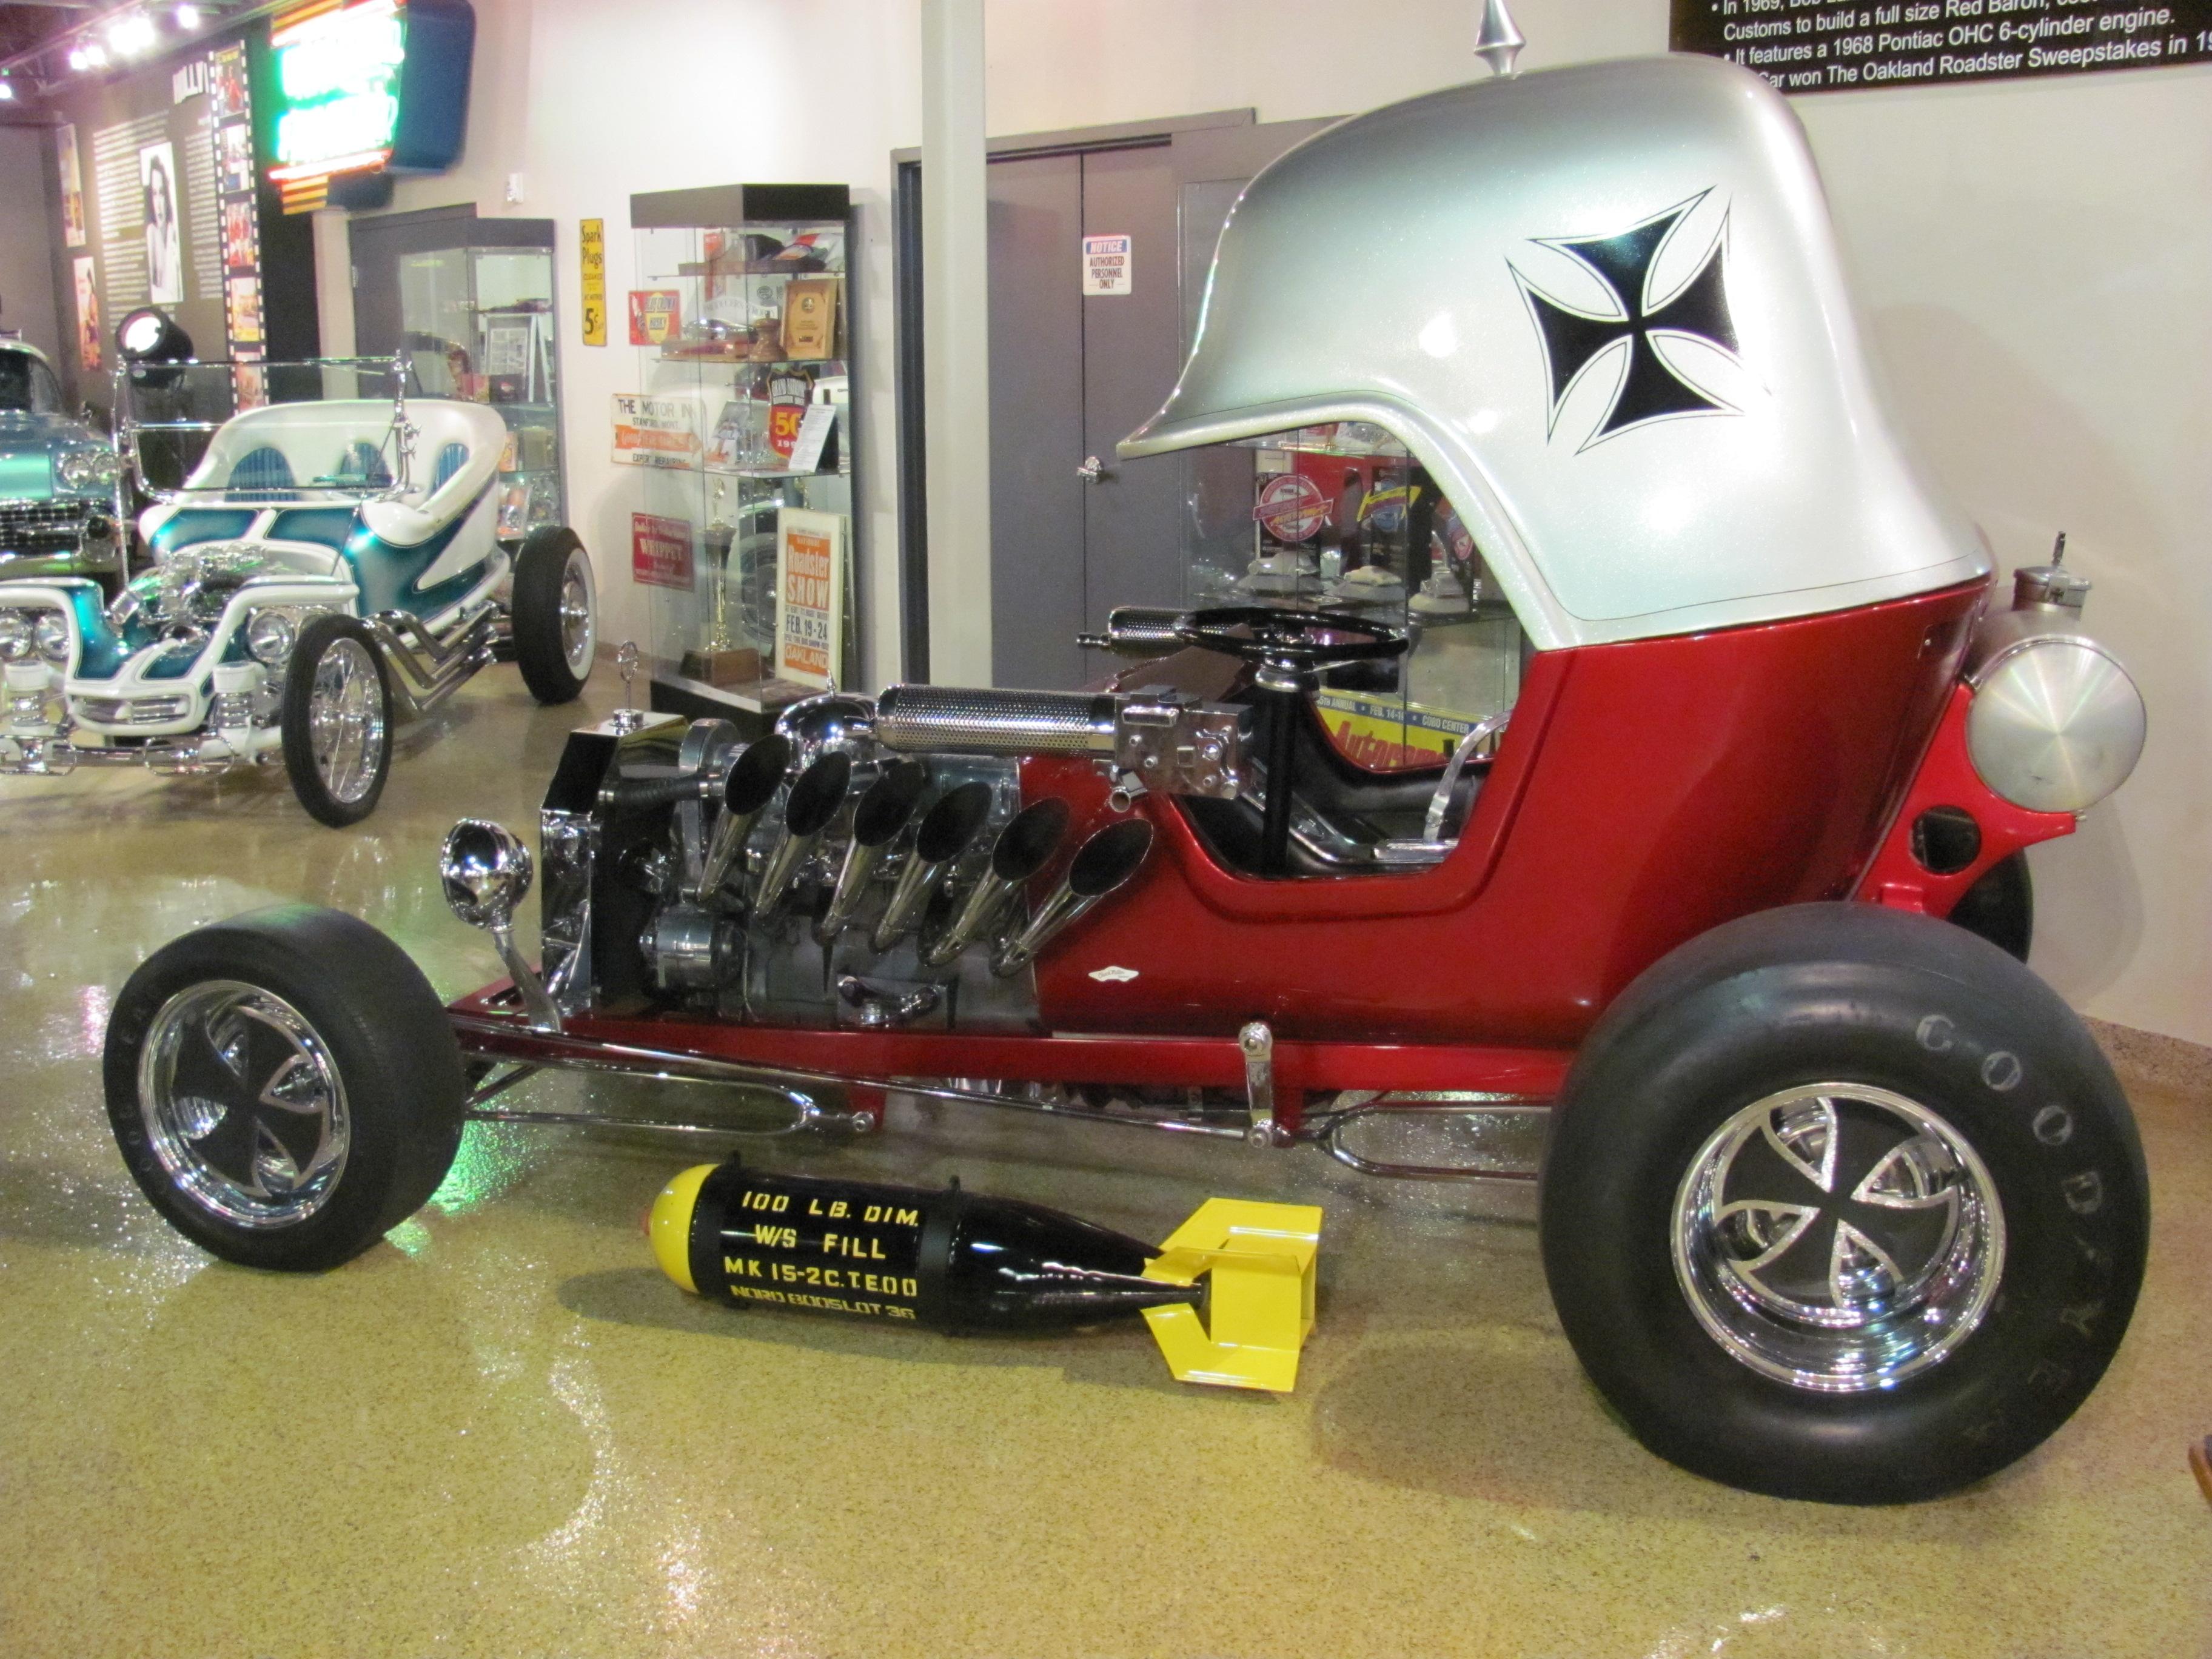
One of the best I've ever seen! I love the effect of the Green Stuff chrome. It looks very similar to the finish on the real car in the American Museum of Speed in Lincoln Nebraska. I took these photos when I visited there in 2017. I currently have one of these on my bench and will try to replicate the real car - that was a replica of the model! I have the Pontiac six cylinder engine but may have to fatten it up a bit. The biggest challenge will be recreating the headers on the left hand side - right now I have no idea how I'm going to do this! I did find the helmet on an old Matchbox car - a cartoonish VW with a German pilot! Thanks for the inspiration! Cheers Alan

-
That looks like a box art build! What a beautiful finish! Great to see the old Tom Daniels kits are still popular. I did mine in white with fogged blue edges - I didn't like the connotations of yellow ice! Cheers Alan
-
Absolutely beautiful work but even on a full size computer screen I am struggling to see the detail you have achieved. Any chance of a slightly bigger photo of the finished job? I have one of these kits in the pile and would be interested in tackling the conversion you have shown here. Cheers Alan
-
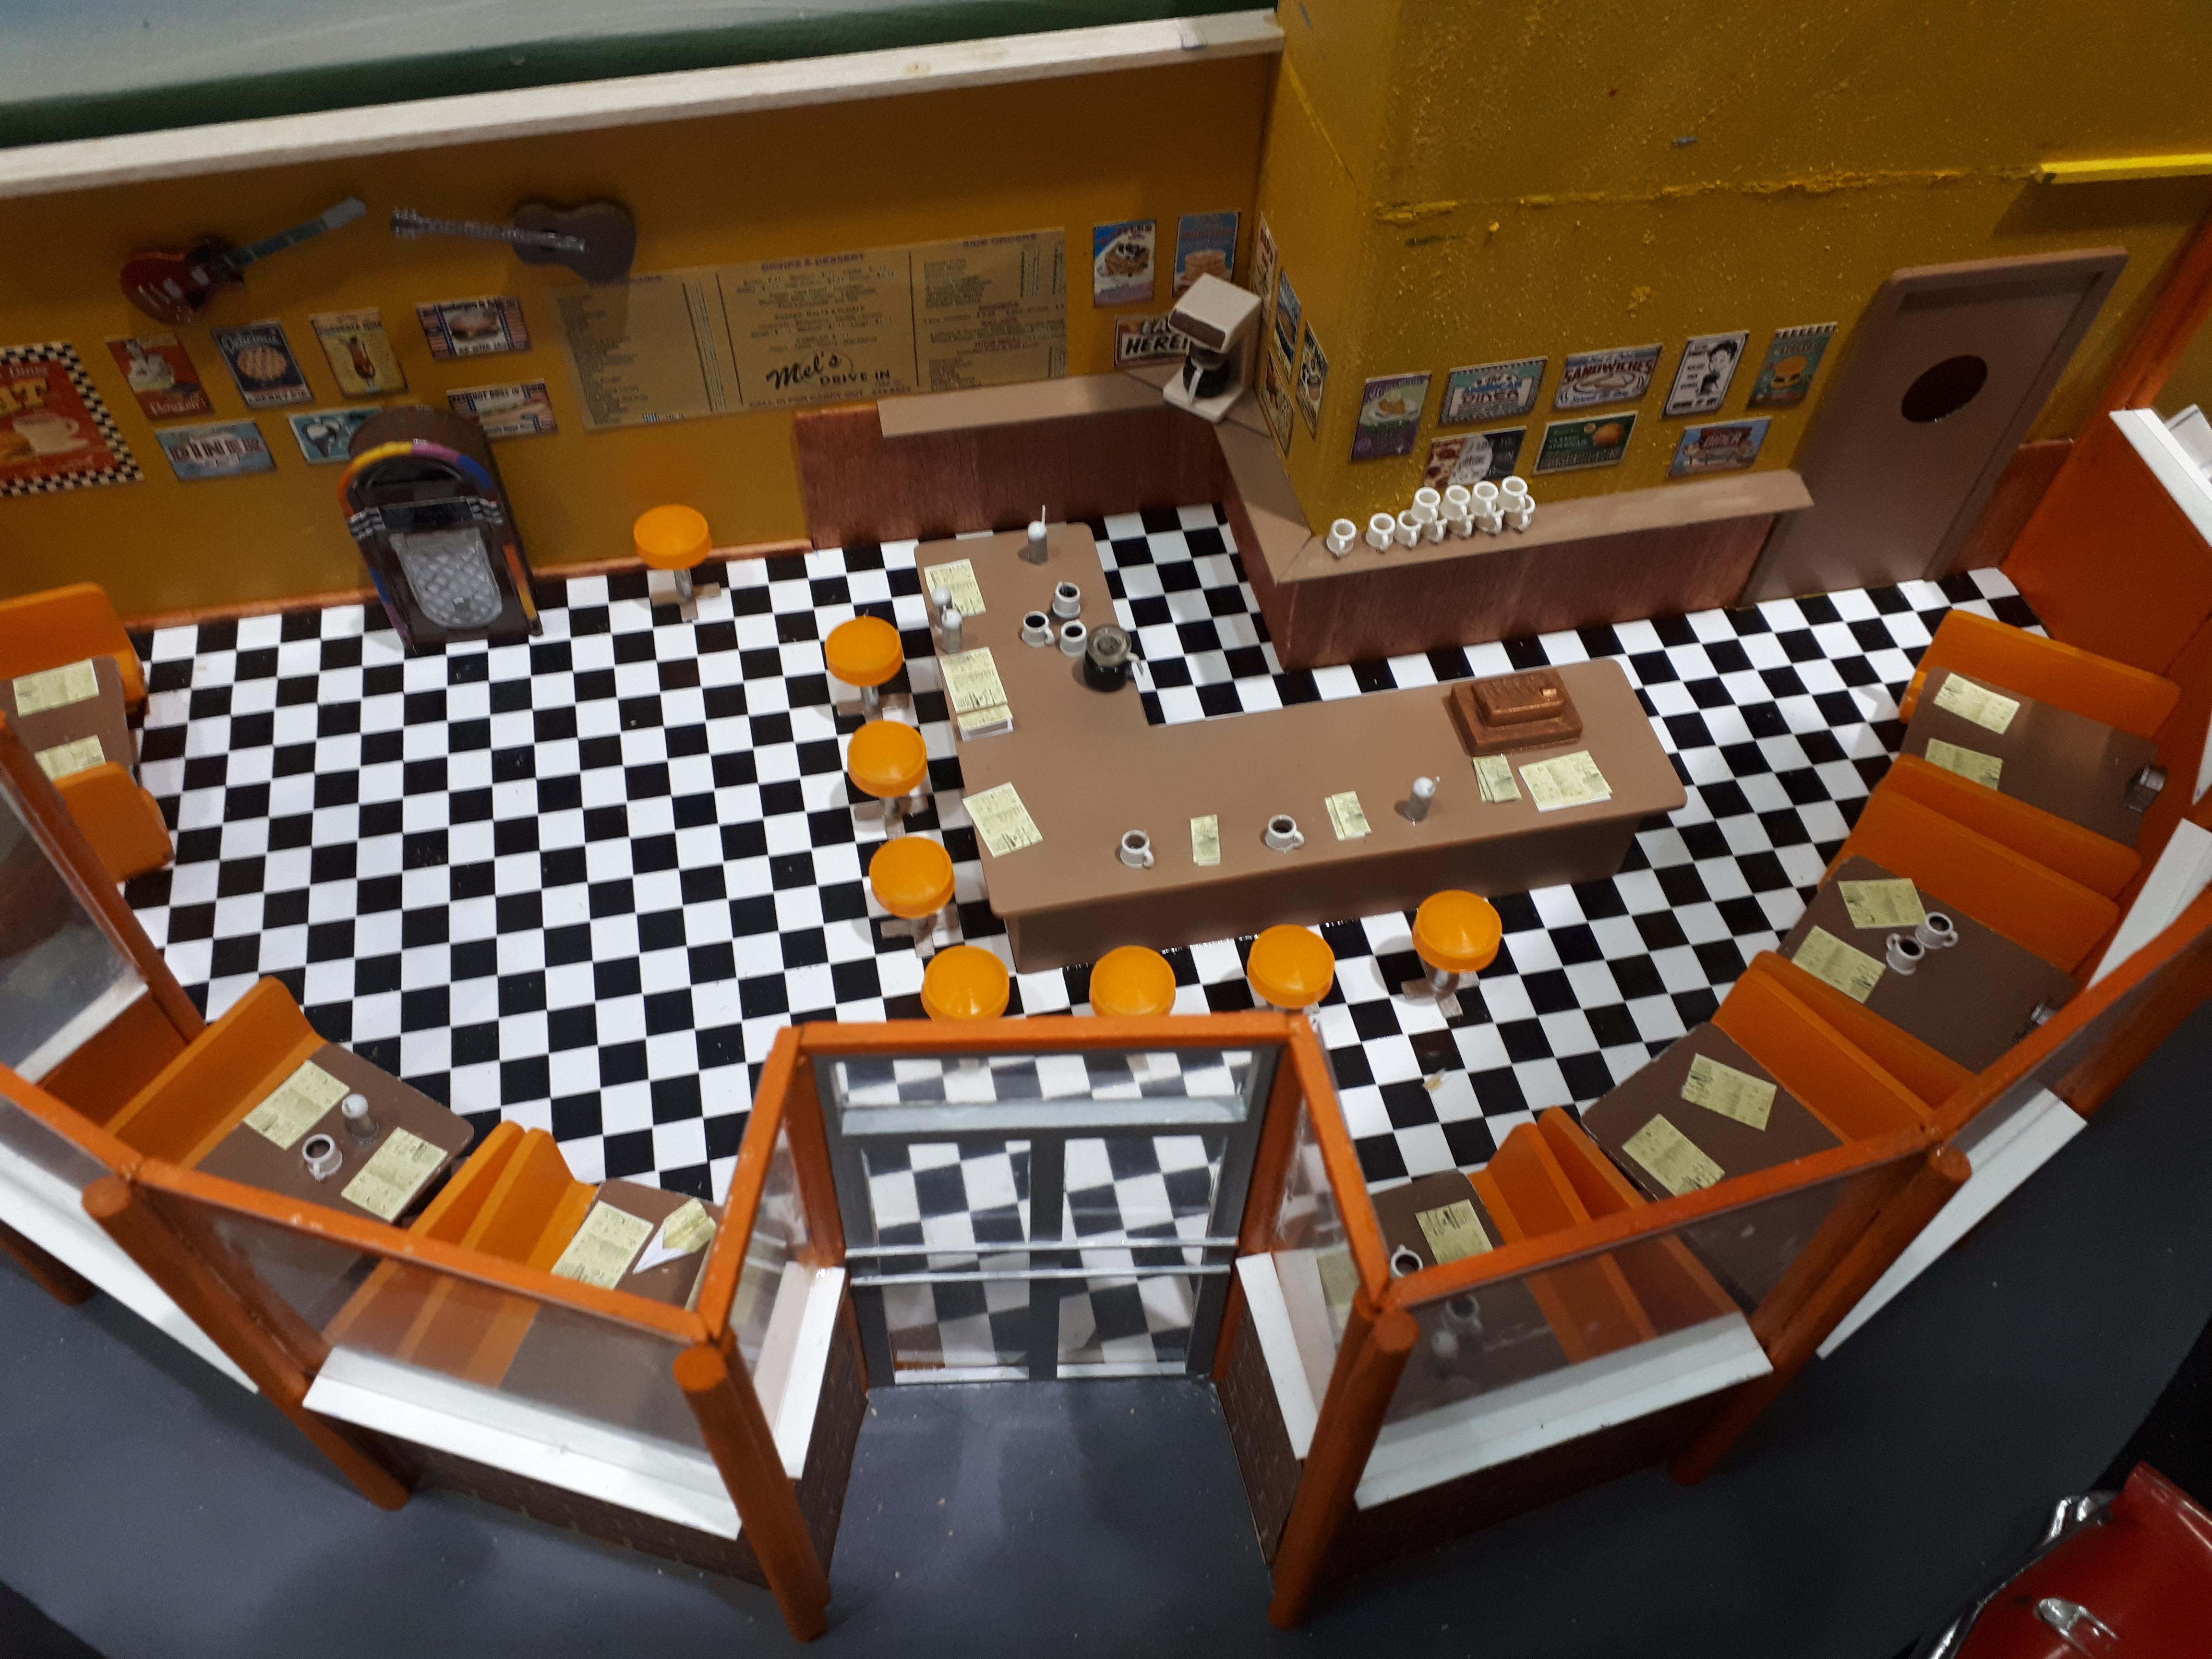
Thank you everyone! We had a lot of fun putting it together. It may not have all the fine surface detailing that many dioramas have in this forum, simply because we reuse the boards every year for a new project, but I think the overall effect is successful. Greg you're right! That red Monogram T-bird is mine and I simply polished the red plastic. In the months leading up to the show we had a register that was e-mailed to all our club members to ensure that we had all the significant cars. We did pretty good - hope you noticed the red VW, black 36 coupe and blue 2CV - but somehow the white T-Bird slipped through the cracks and we didn't notice until the show was set-up. And no-one had one in their stash! Next time! Cheers Alan
-
This is soooo nice. I am pretty sure this is the nicest Lincoln wagon conversion I have ever seen! Your back-story is perfect to explain its existence. I have one of these kits waiting in line at the moment. My plan was to do it as a nostalgic Top Fuel tow and push car, with slicks on the roof rack rather than surfboards. Could you help me out with any tips regarding how you blended the roof into the body? It looks a lot more natural, smooth and flowing than many I have seen before. The diorama is something else! The neatest of the electrical installation , the accuracy of the door detailing, this is very special. Congratulations also for the quality of your photos - they really do the model justice. Cheers Alan
-
Boy, that Mako brings back memories! It is what I WANTED to build as a thirteen year old but ,alas, the body was twisted and I never did manage to get it together. Years later I stuck a funnycar chassis under it and twisted the body even more and displayed it crashed into ma wall. You have really done the model justice and the paint job is amazing. My thirteen year old heart loves it! Cheers Alan
-
A REALLY rear engine Corvair - unsafe at any depth!
Alan Barton replied to mr moto's topic in Model Cars
So cool- who would have thought that the blunt frontend of a Corvair could work as a boat - genius! We are definitely on the same page regarding boat names - my 57 Chevy boat is called the Bel- Aqua! This is a truly beautiful boat and deserves to go here - it has become the marina of Model Cars Forum and gives speedboat enthusiasts the chance to see dozens of different builds in one place. Cheers Alan -
Add me to the list of people wondering how I missed this! For me, the second shot is killer. The fact that every single detail of the hot rod is completely parallel to every other component gives a whole new meaning to the word "stance". This Tudor has stance from front to back, top to bottom. Better still, in 1-1 scale you could actually sit inside it and drive it, further than the length of a fairground. And the green - couldn't think of a better colour for the car. The rod run in your display cabinets must be looking pretty cool these days! Cheers Alan
-
Clifford, I often wonder if you were a jeweller in a former life? The precision and cleanliness of your builds are an inspiration to us all. Thank you for sharing this sensational hot rod with us all - it is eye candy at its finest! Cheers Alan
-
Thanks Kit, and congrats on correct usage of "Mate!" to address an Aussie - someone taught you well! Dennis - a huge THANK YOU for kicking this whole thing off! If you remember, early in your build thread, I stated that I had far too many projects to complete as it was. Alas, I am weak and couldn't resist the opportunity to play with you guys. Imagine how cool all these builds would look lined up side by side on the same table! Tim, you are the zen-master of having fun with model cars - I simply followed your lead! And to every single person who has commented on my model, thank you so much. It means a lot to have the international modelling community acknowledge your efforts. It is not a perfect model by far ( can you believe the dust in some of those shots?) but having the eyes of the world on you makes you strive that bit harder to achieve a good result. I definitely learnt a few new tricks on this one. Thank you all. Cheers Alan
-
Ya shamed me into it! I finished it last night and the model is now posted in Light Commercial Under Glass. Cheers Alan
-
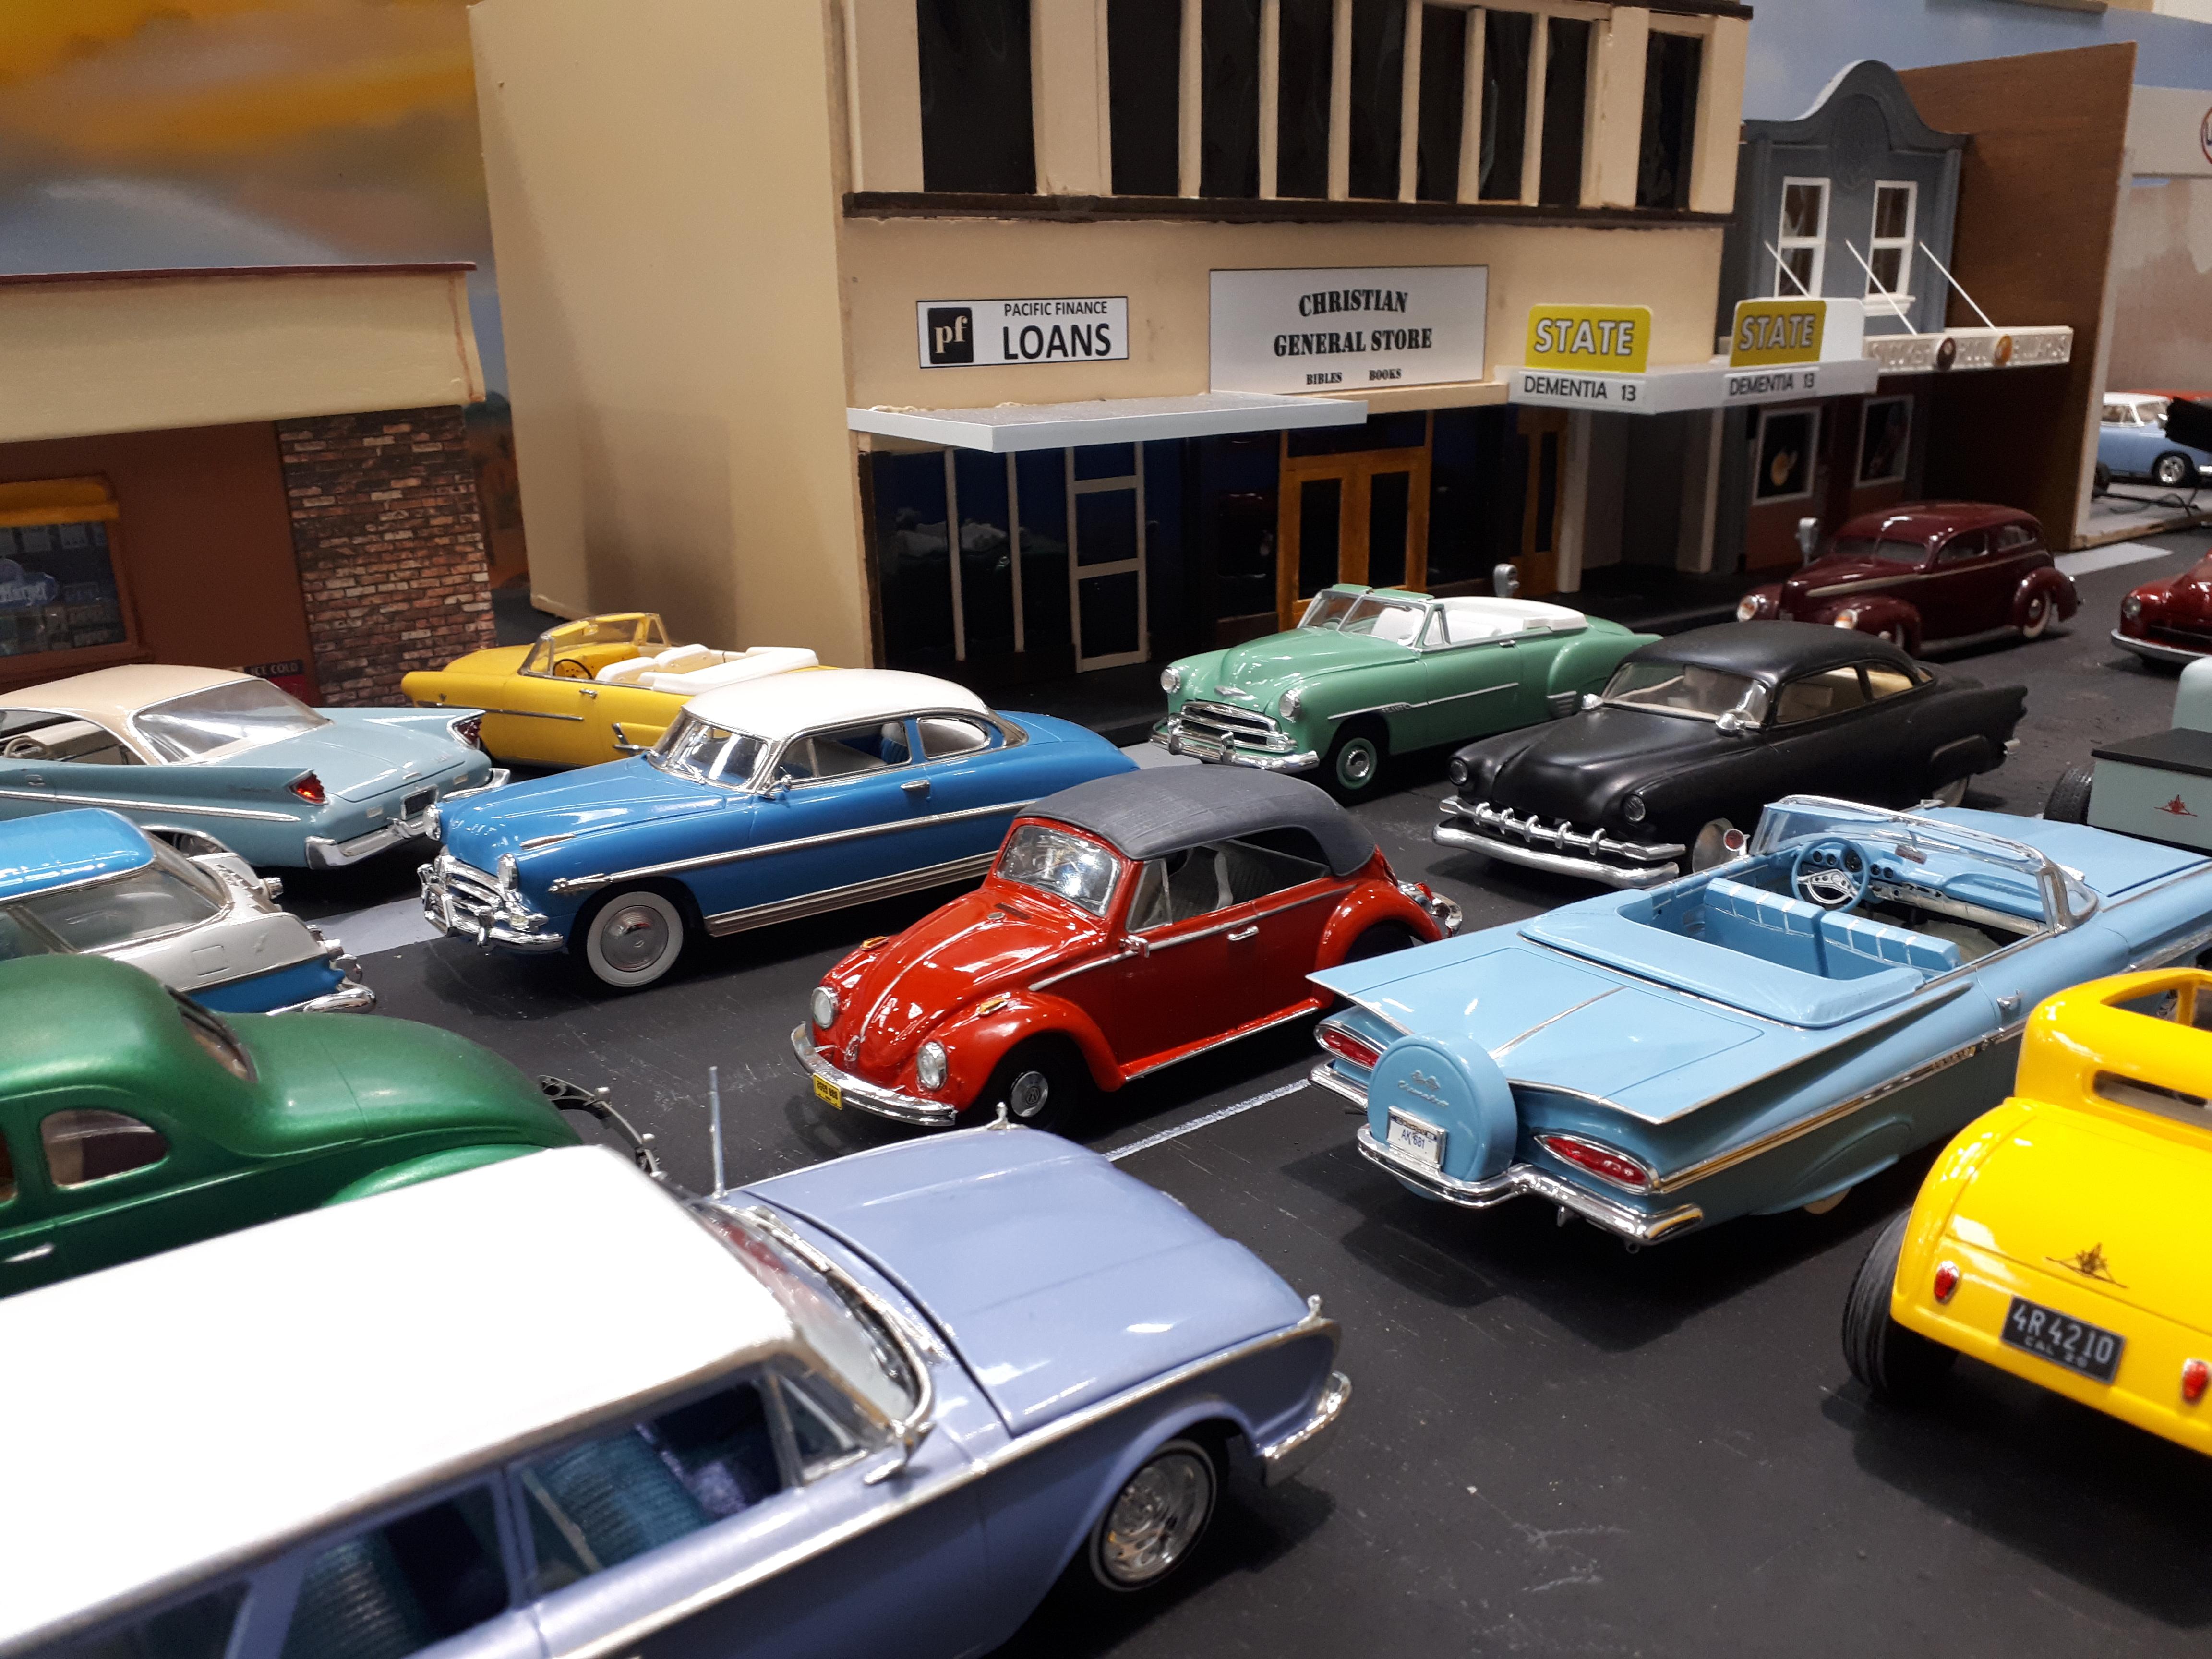
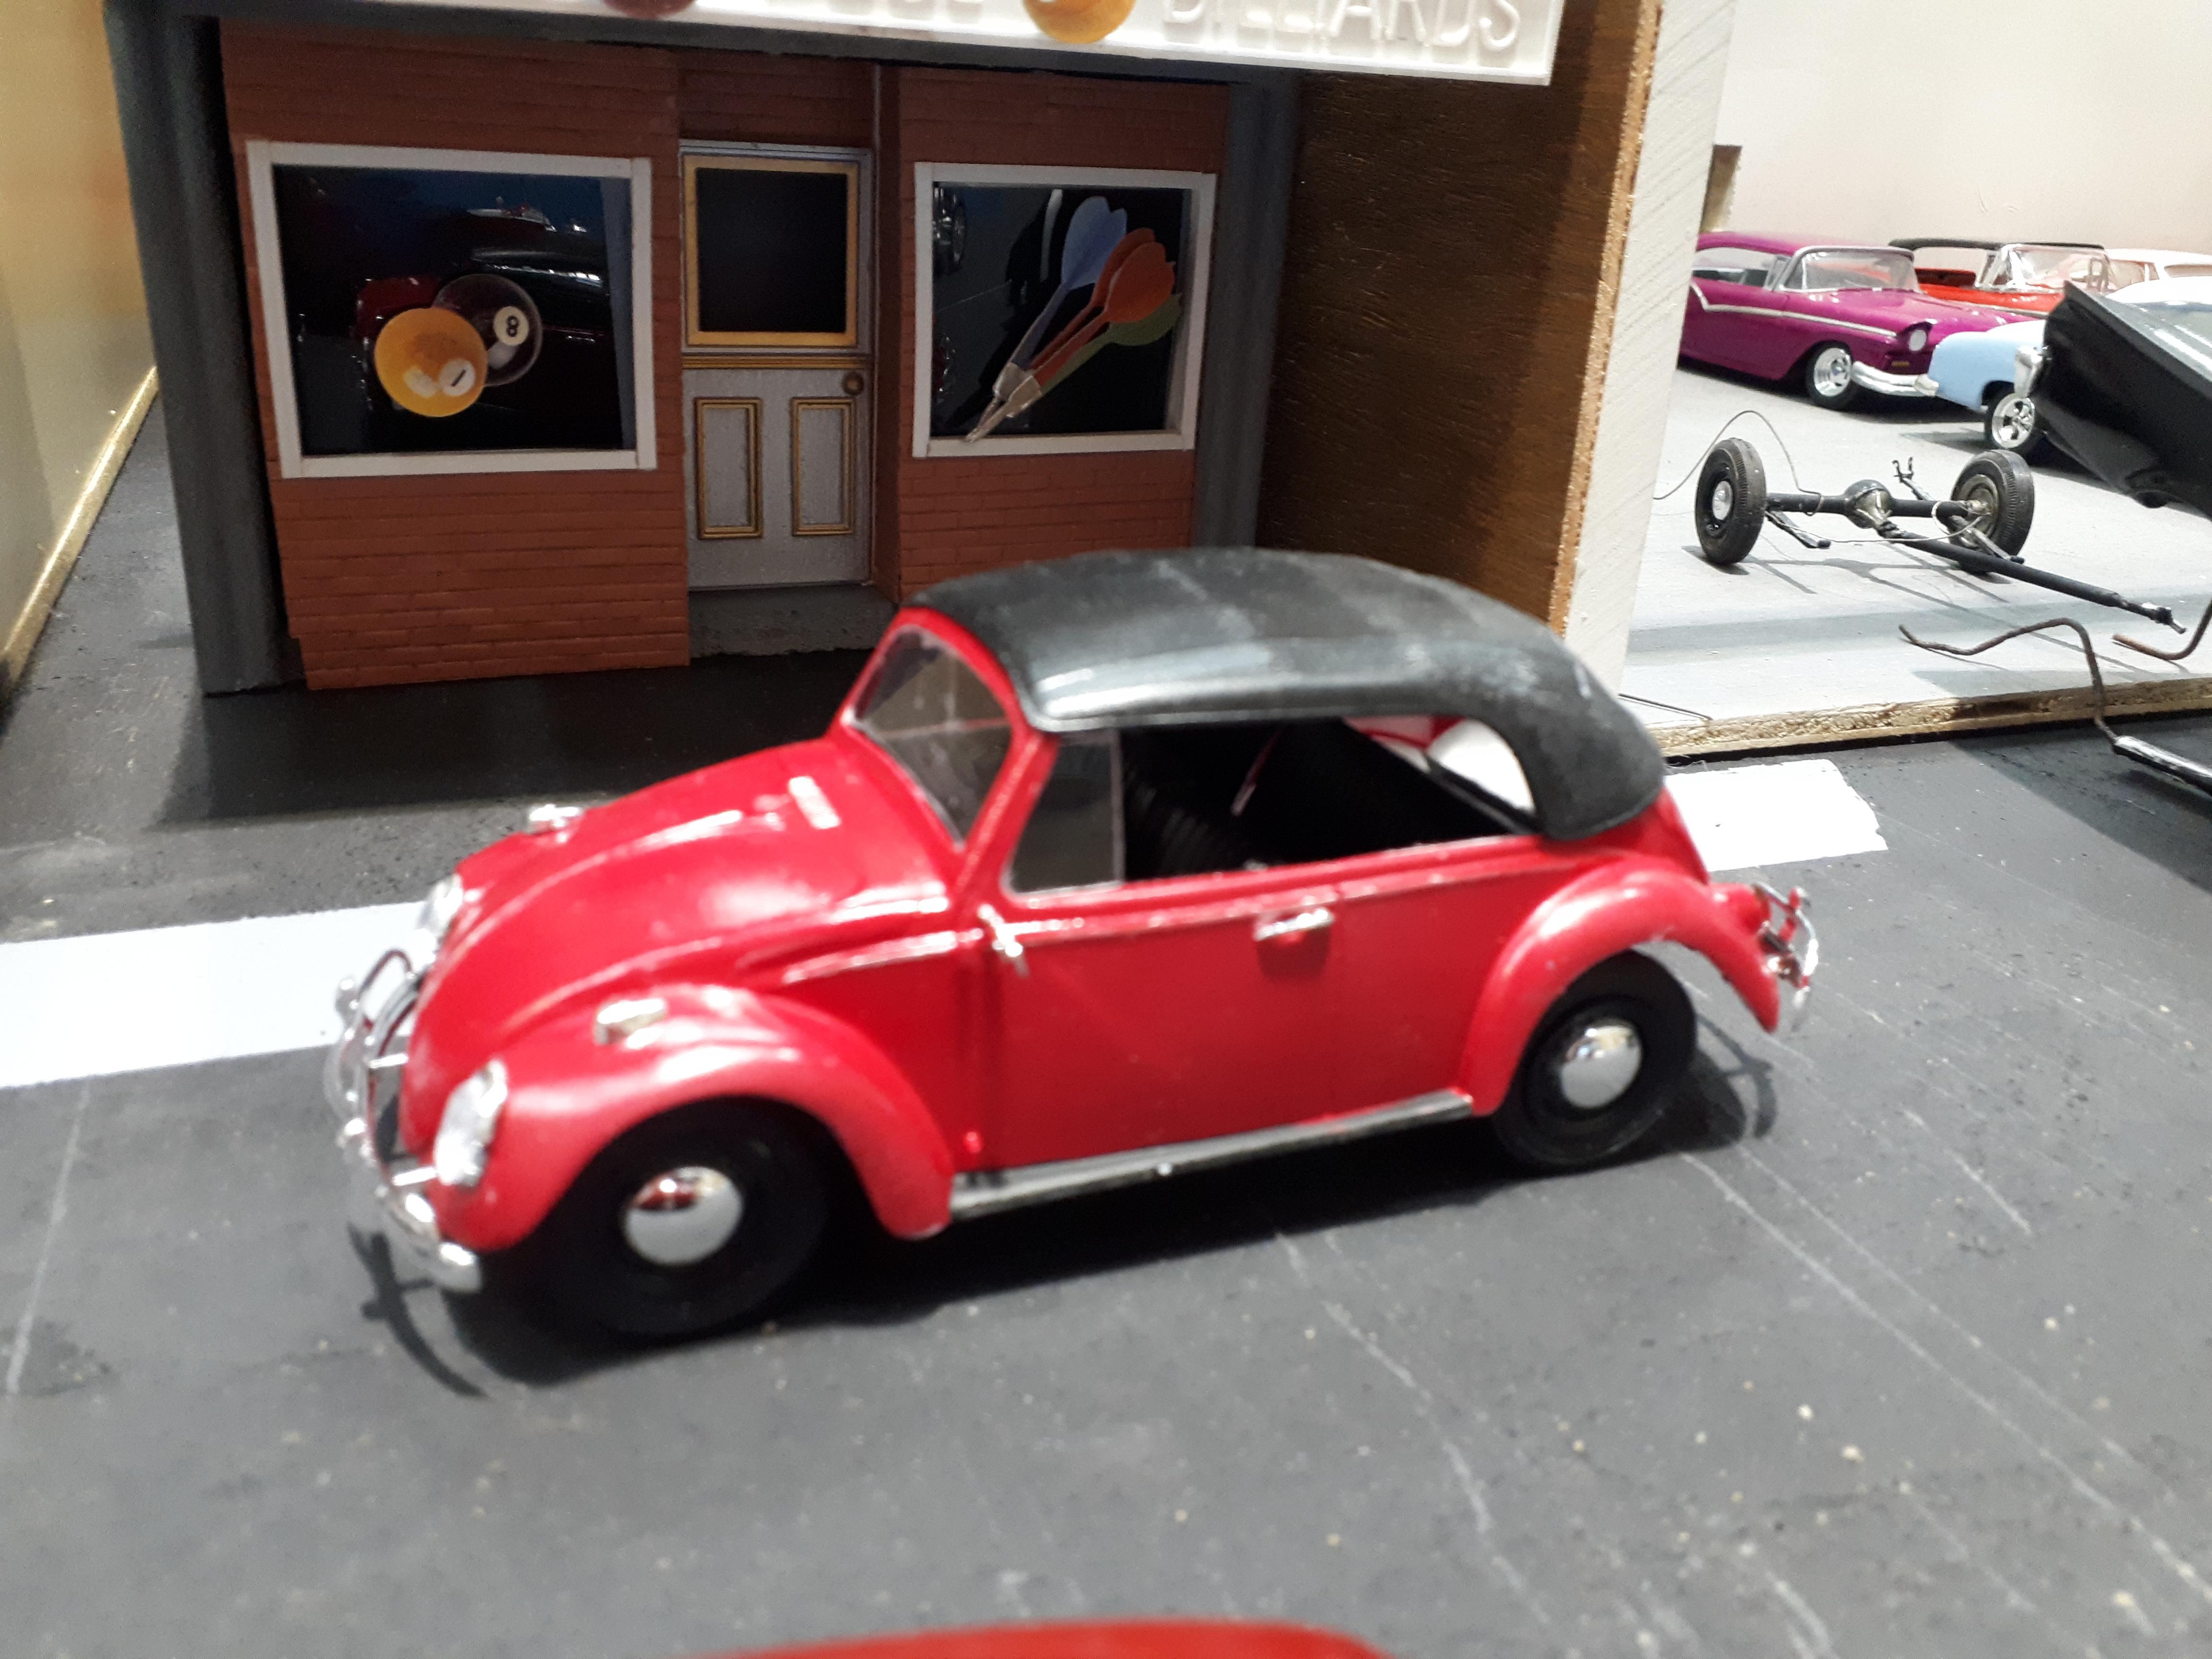
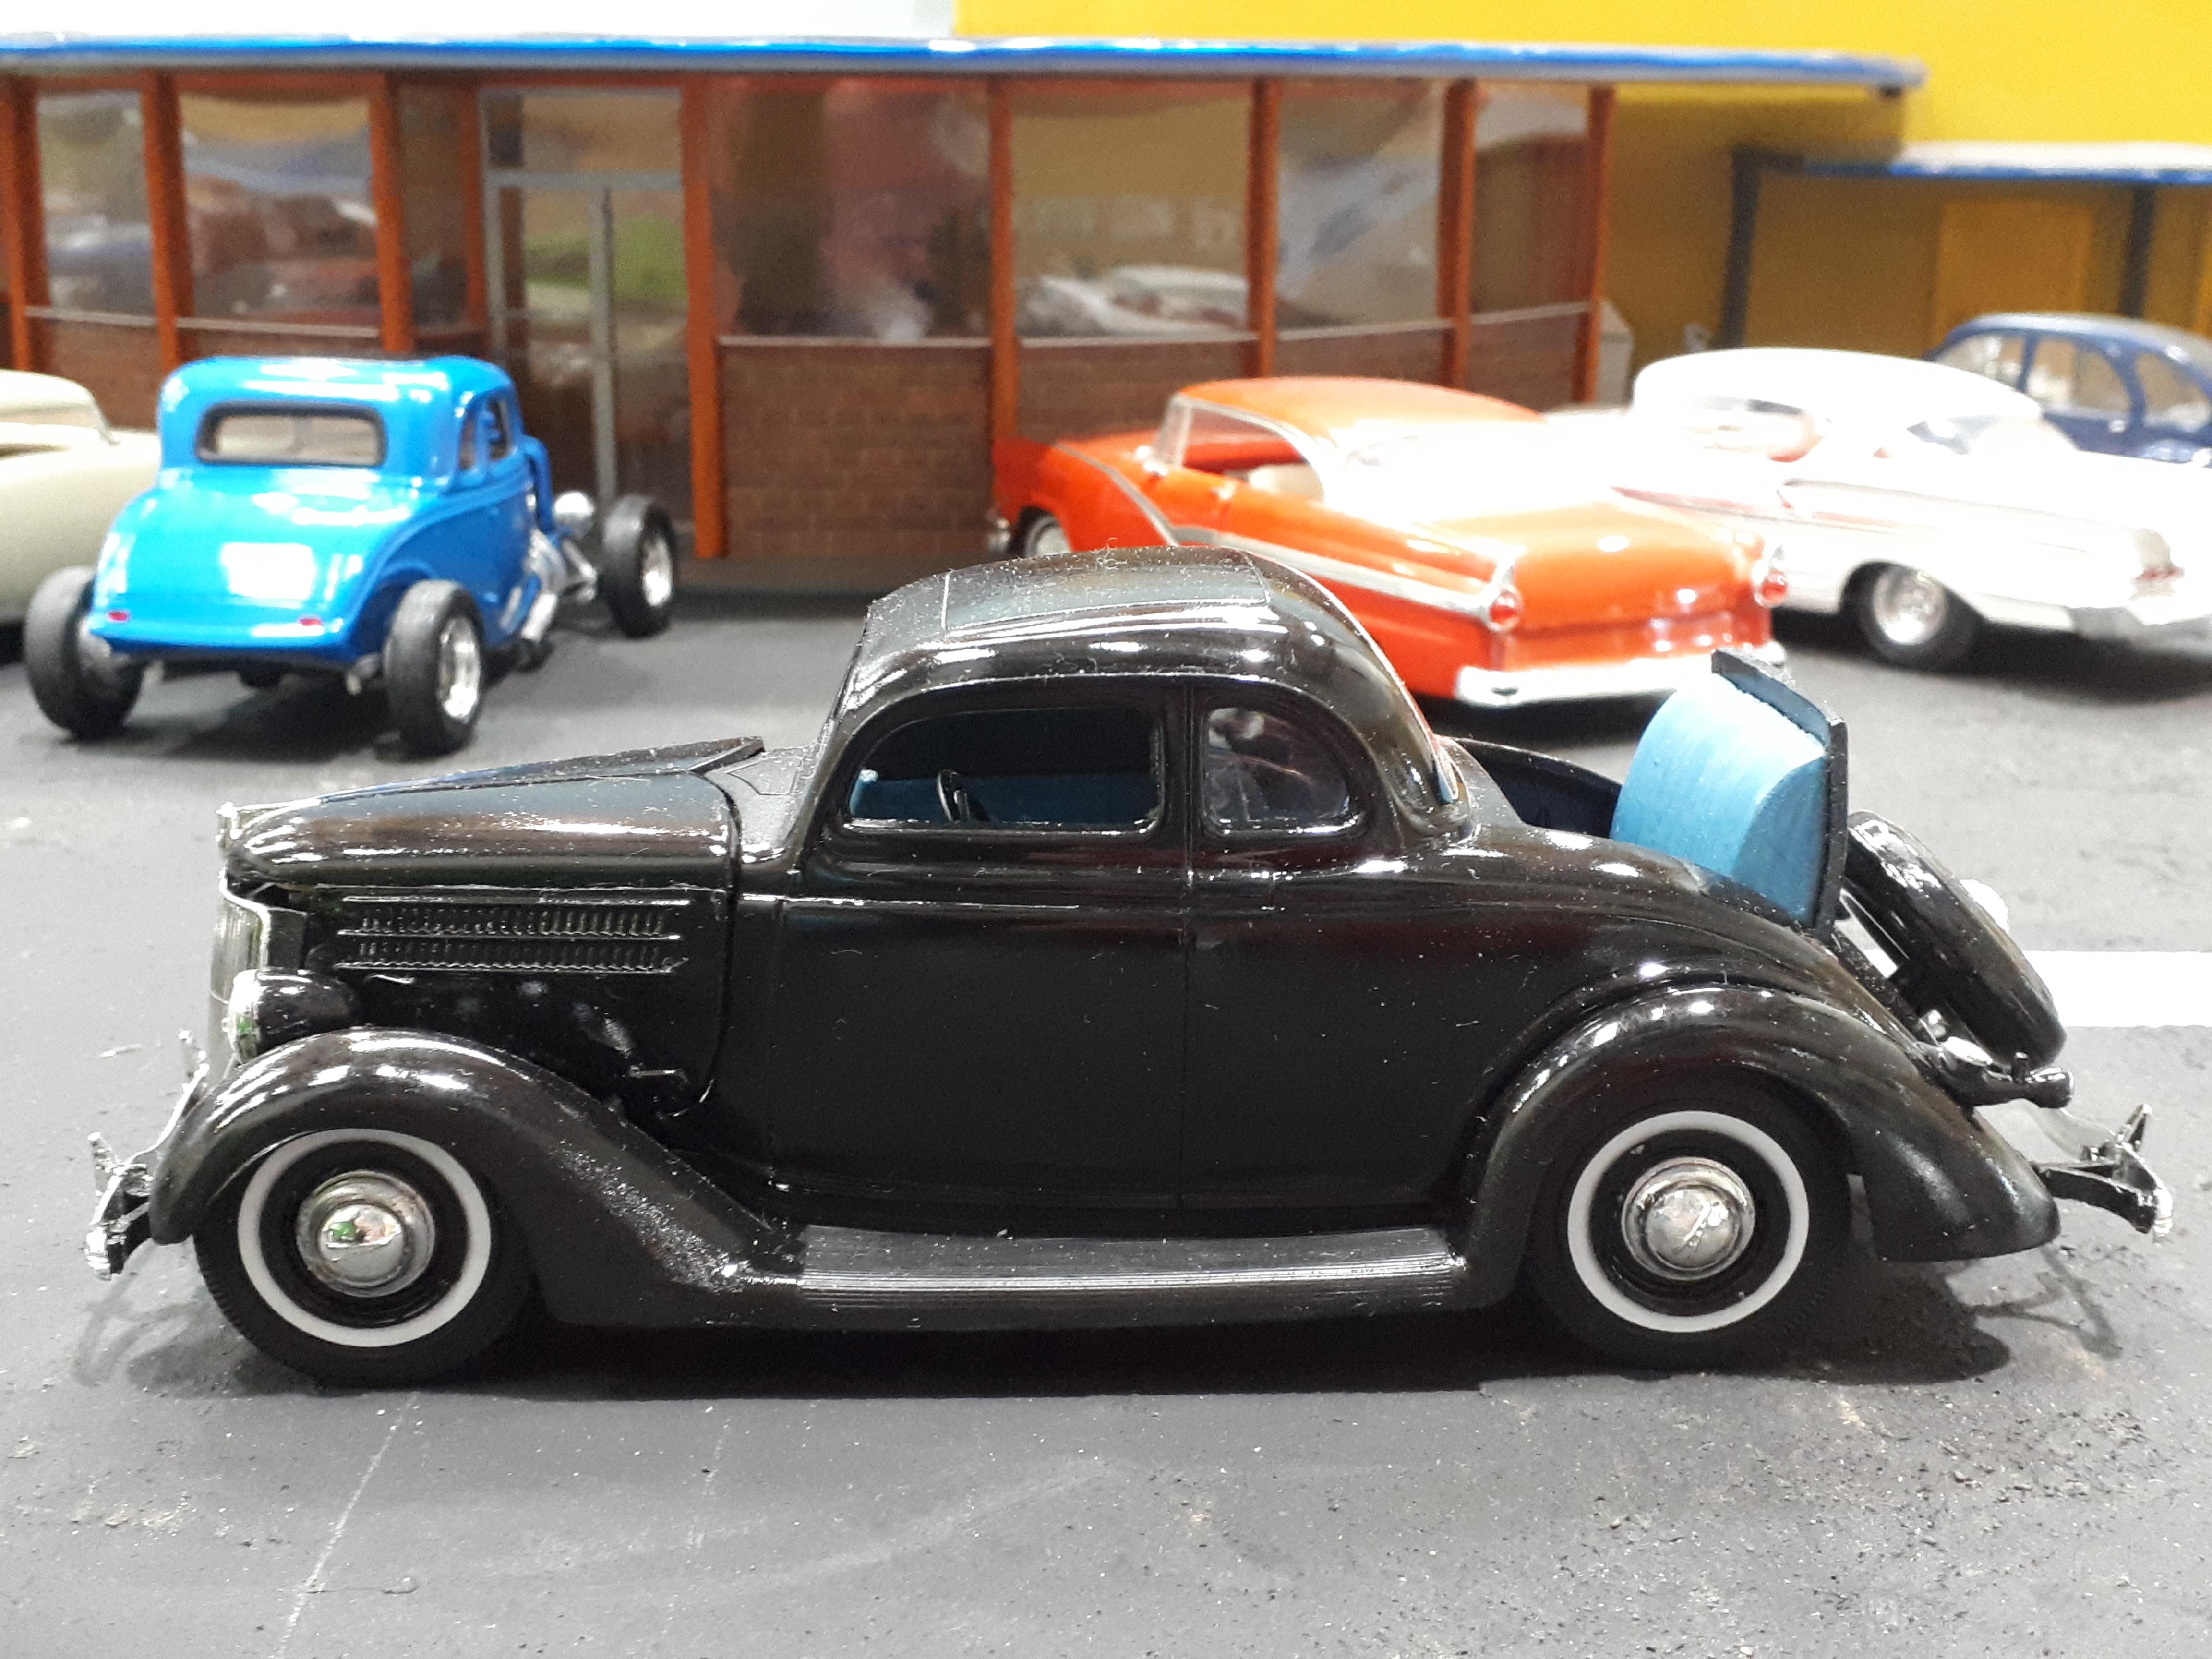
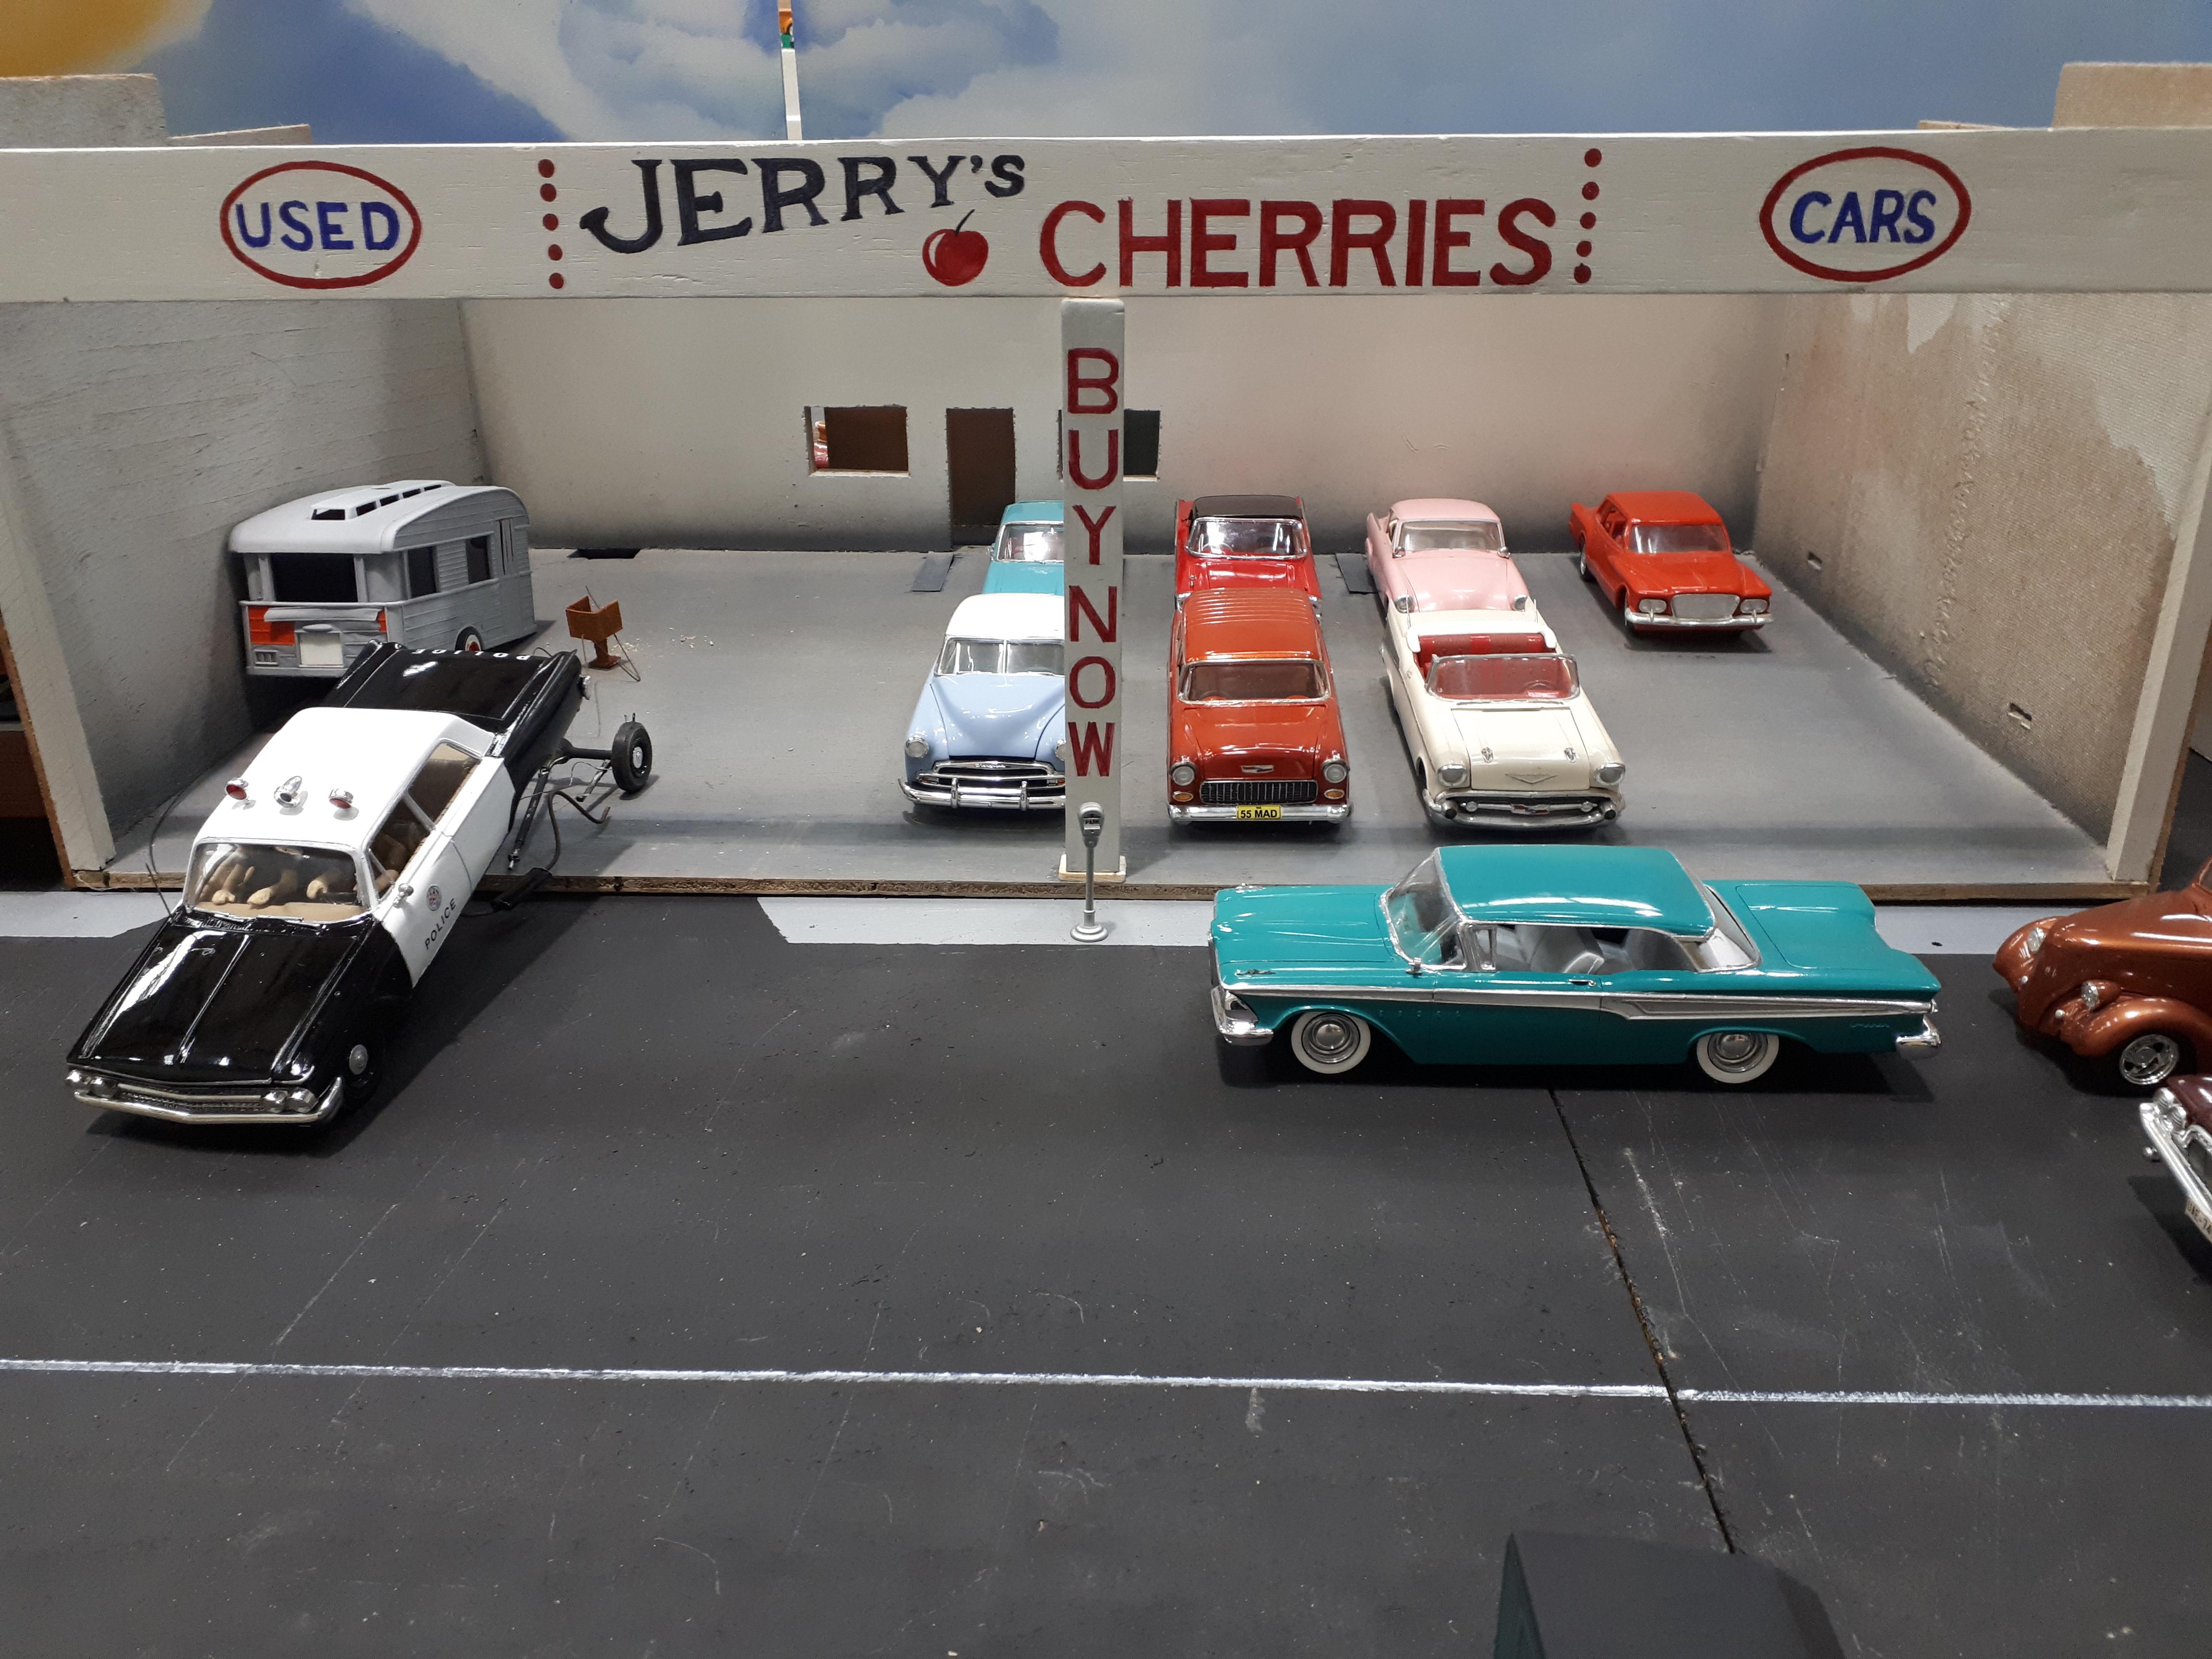
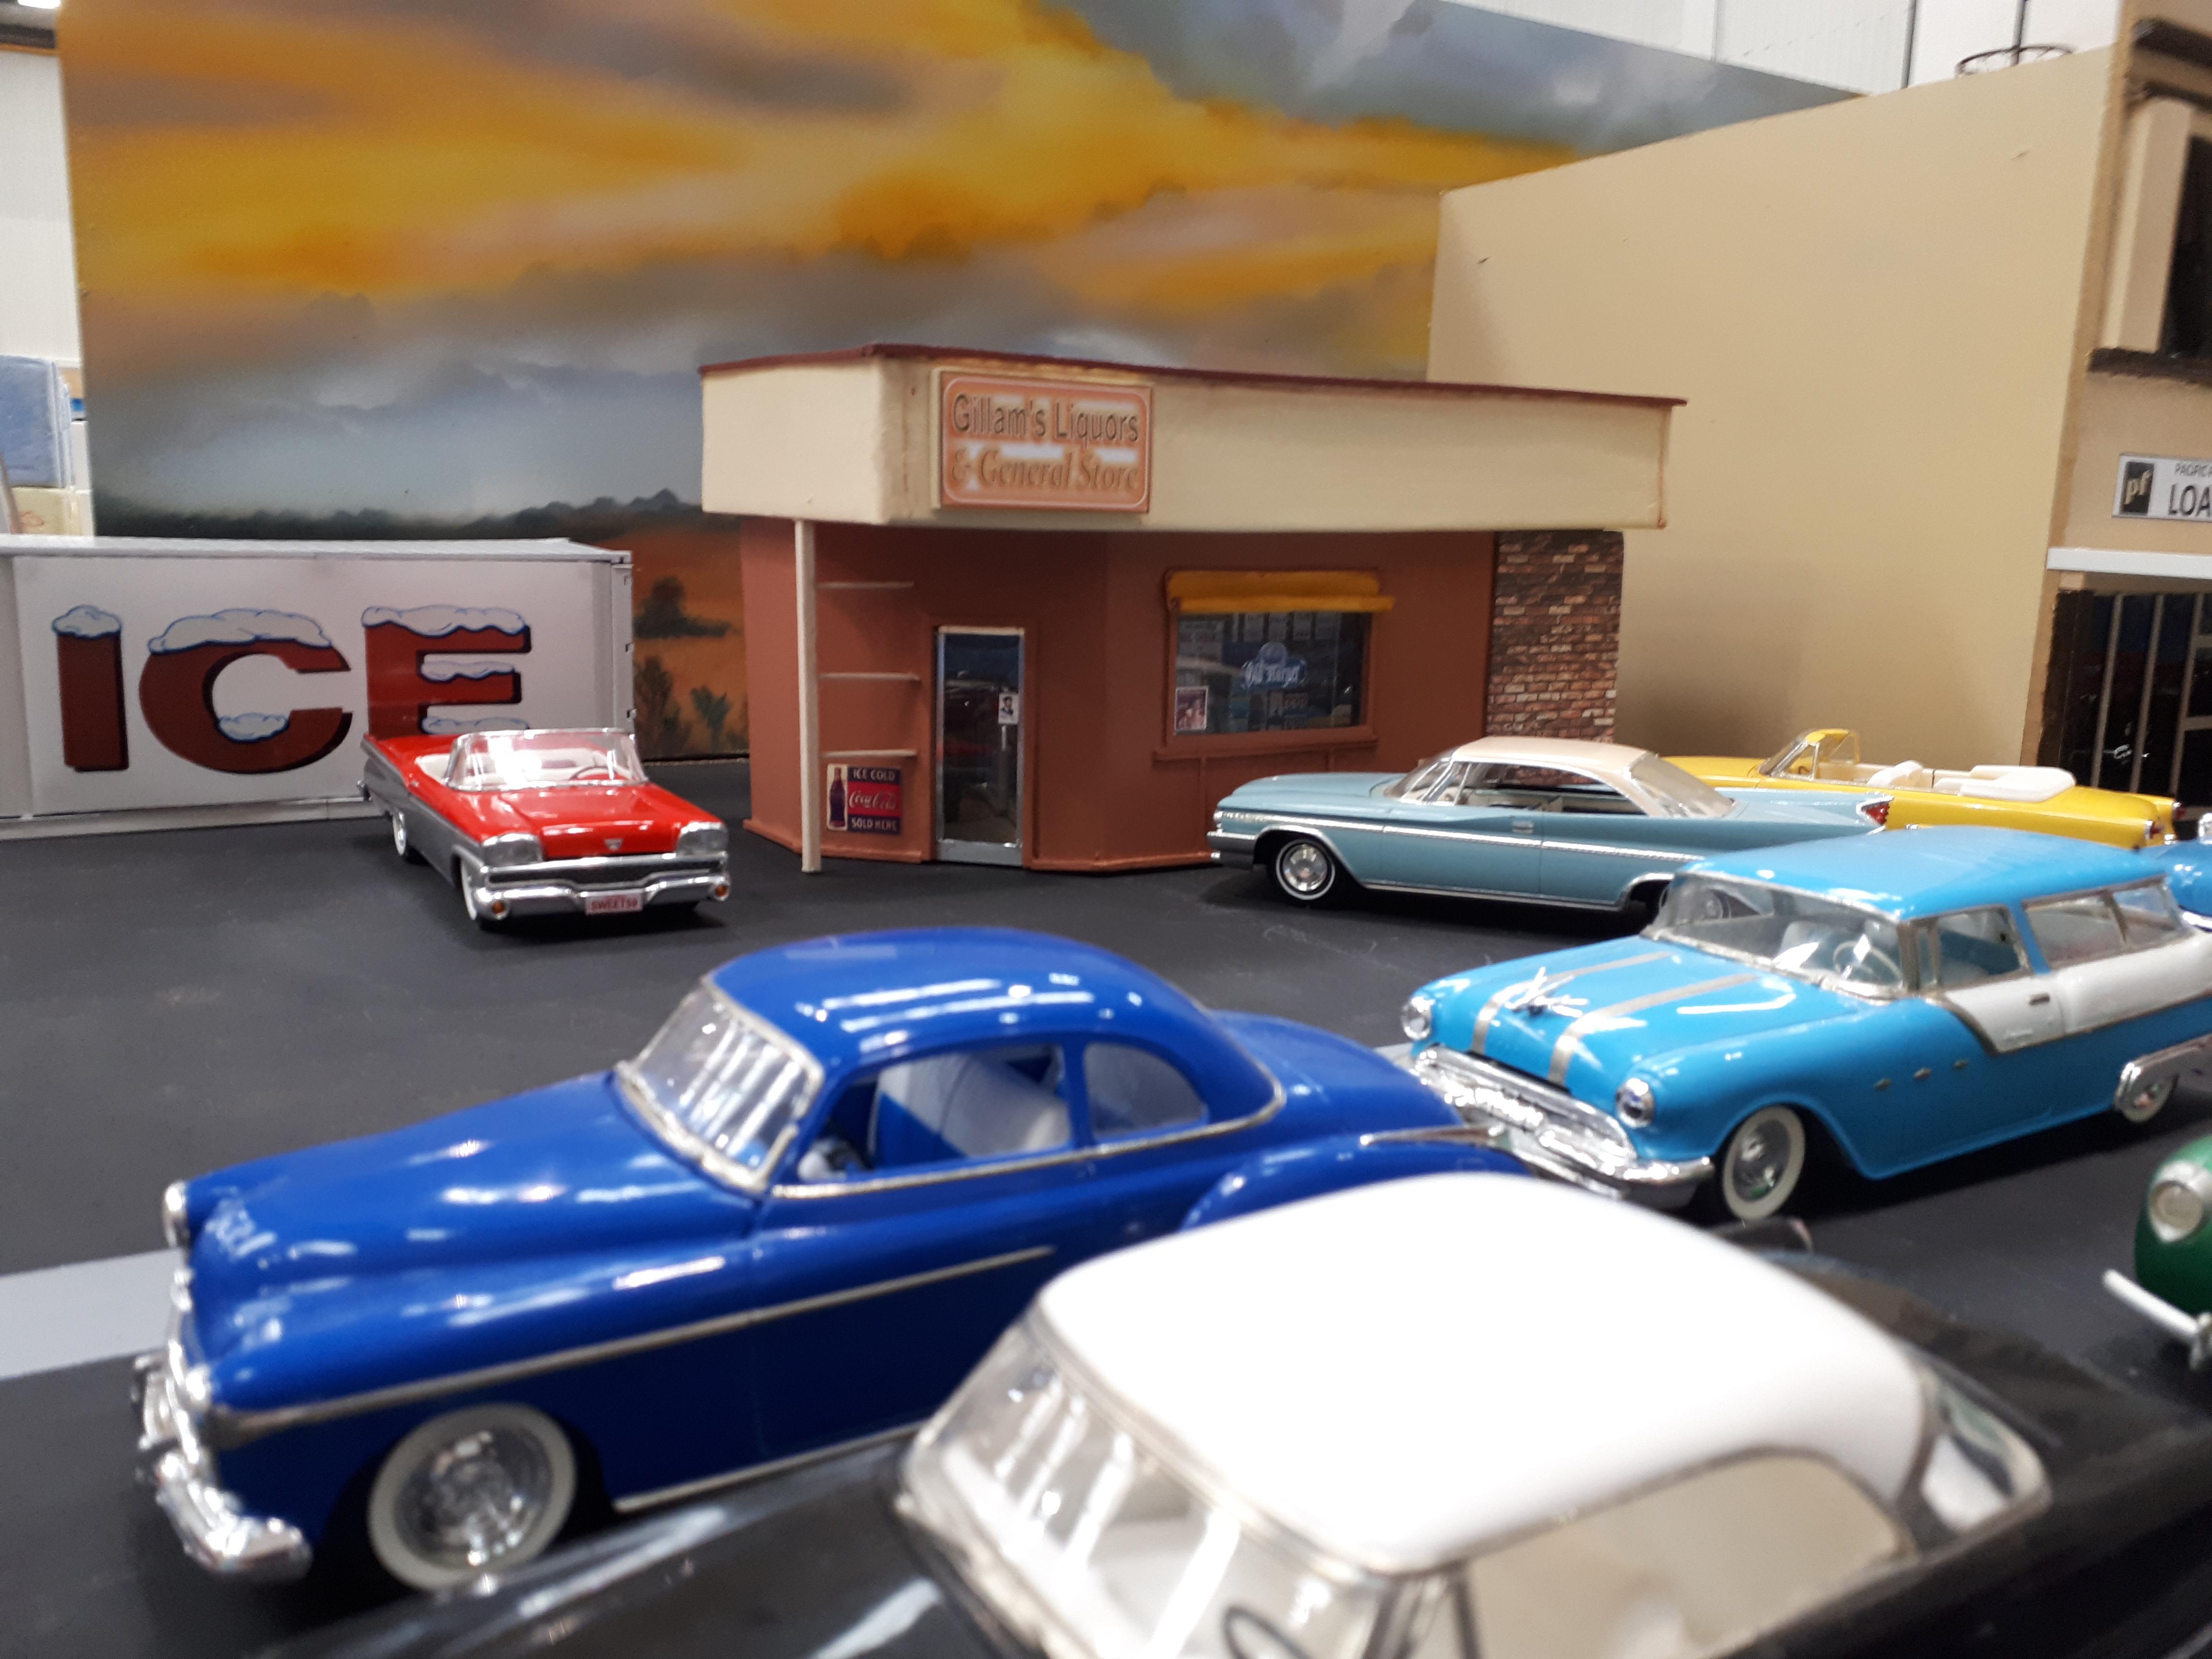
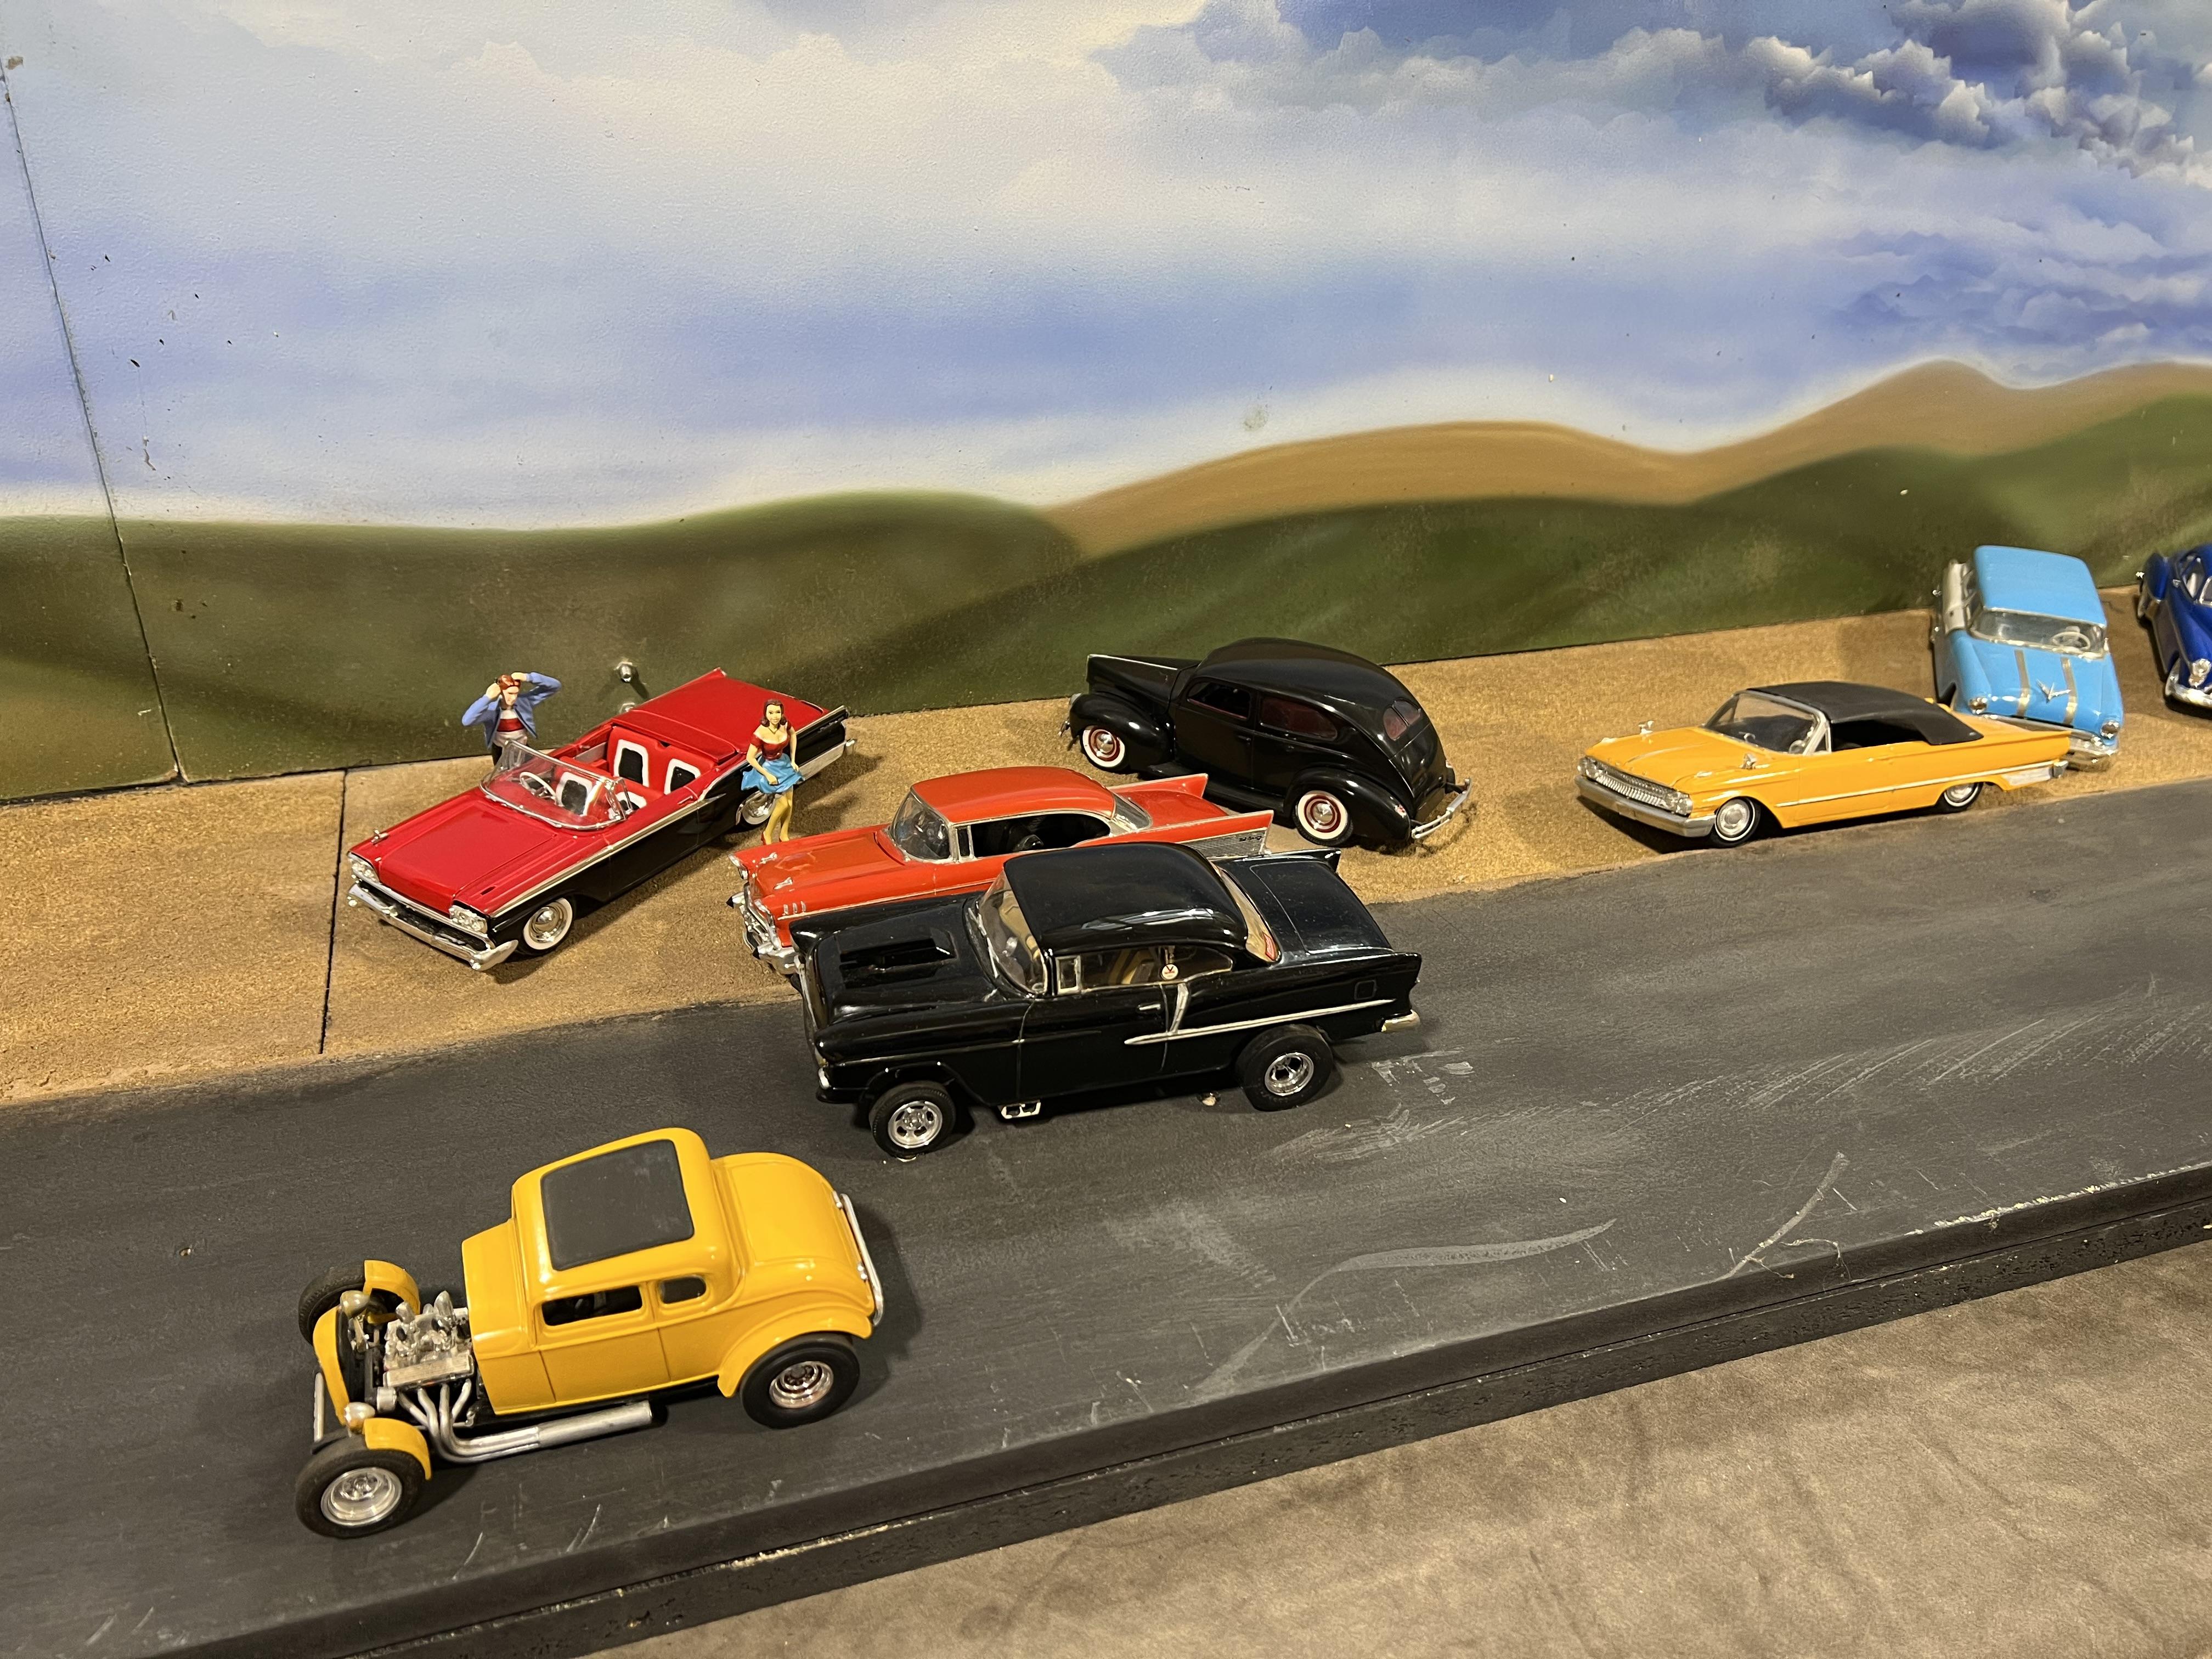
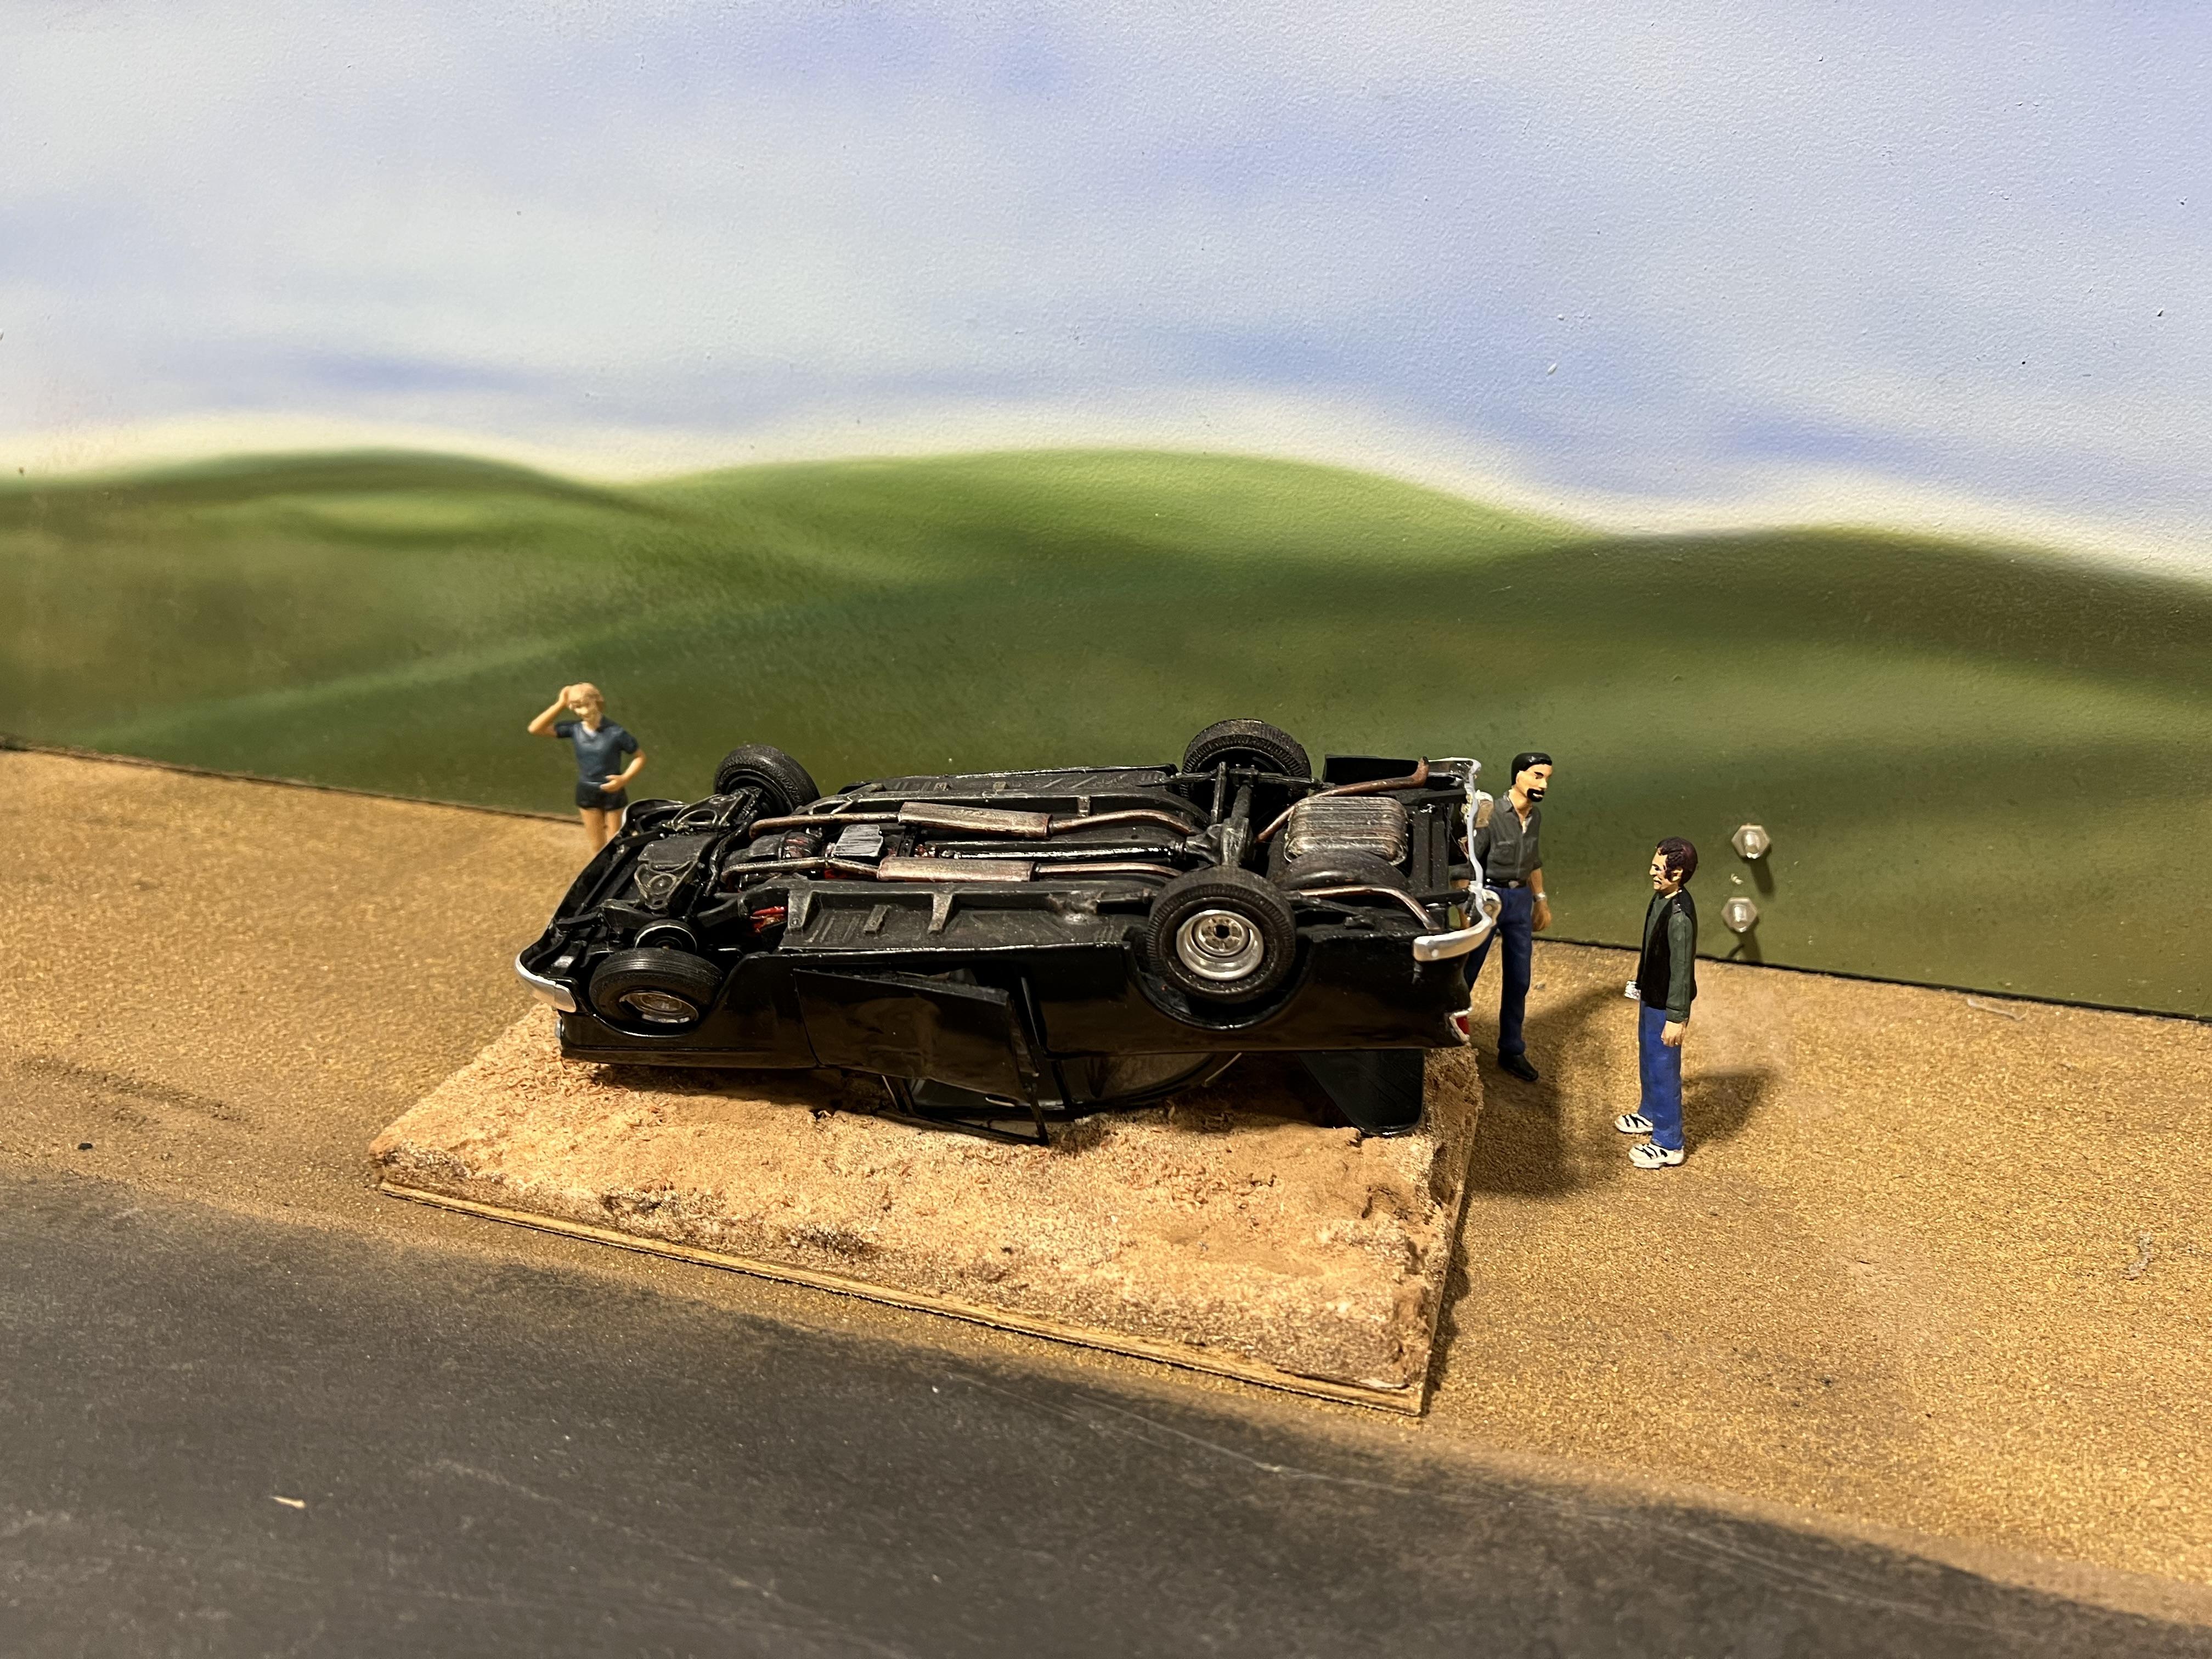
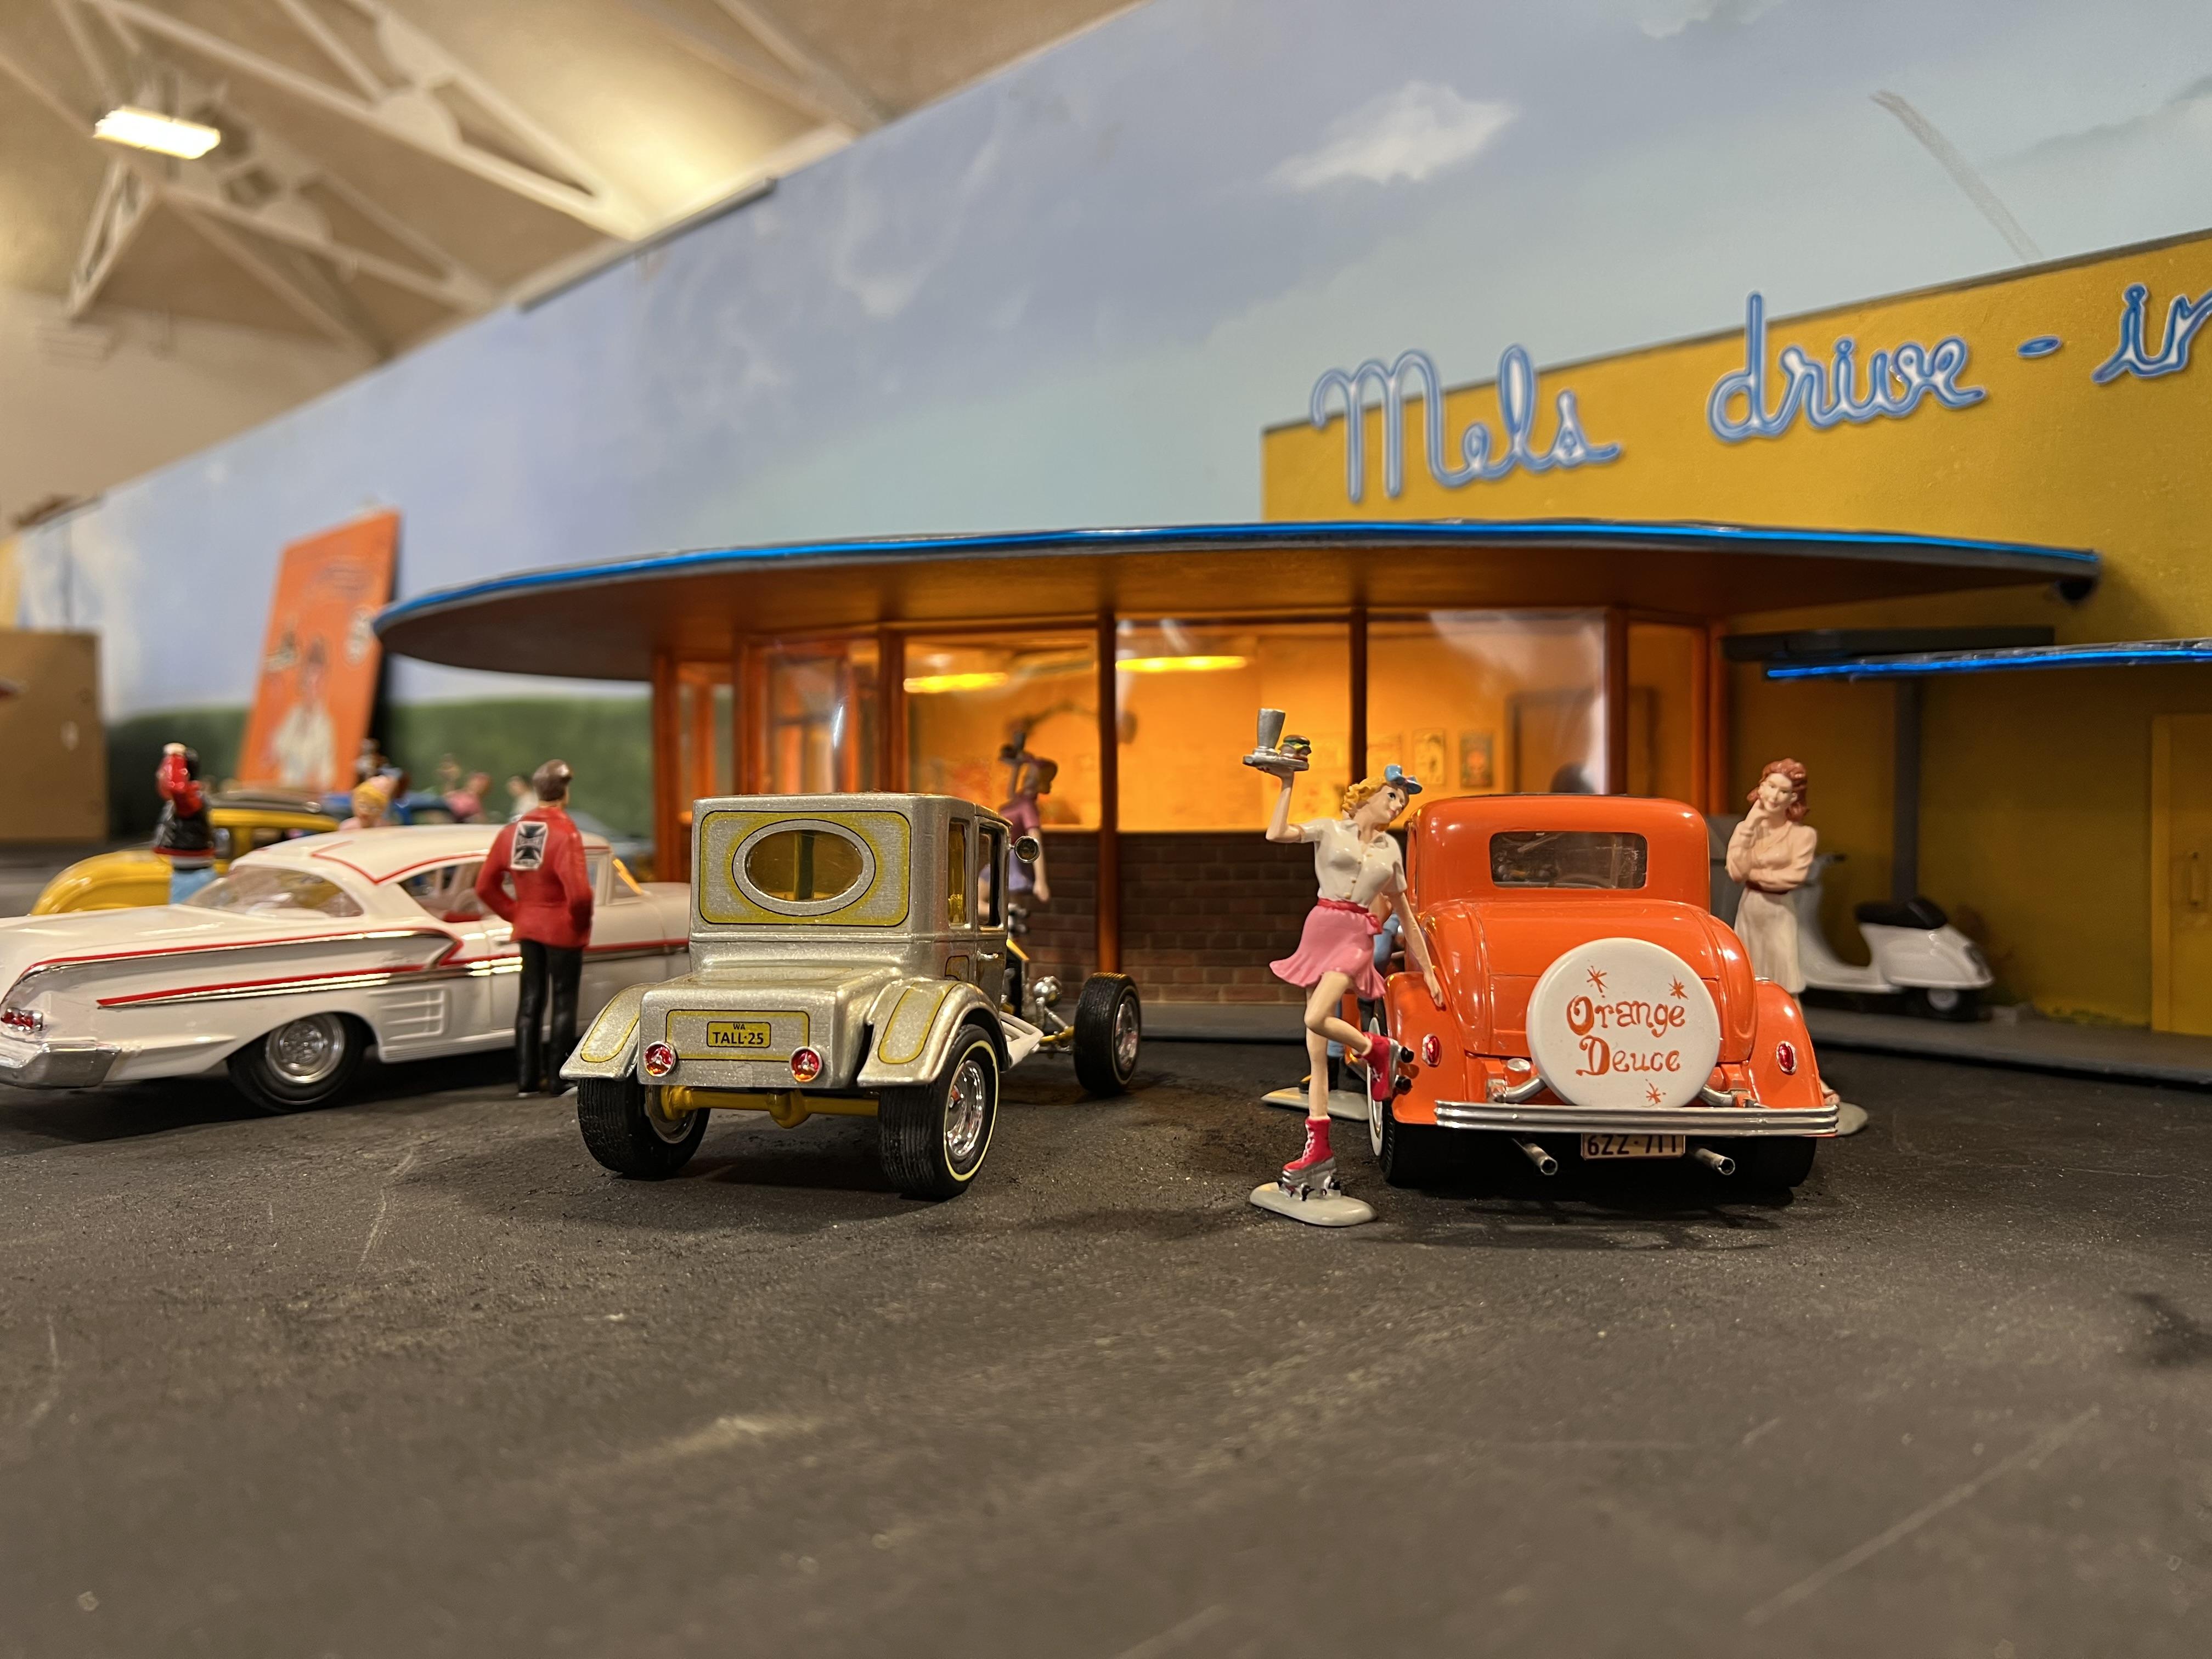
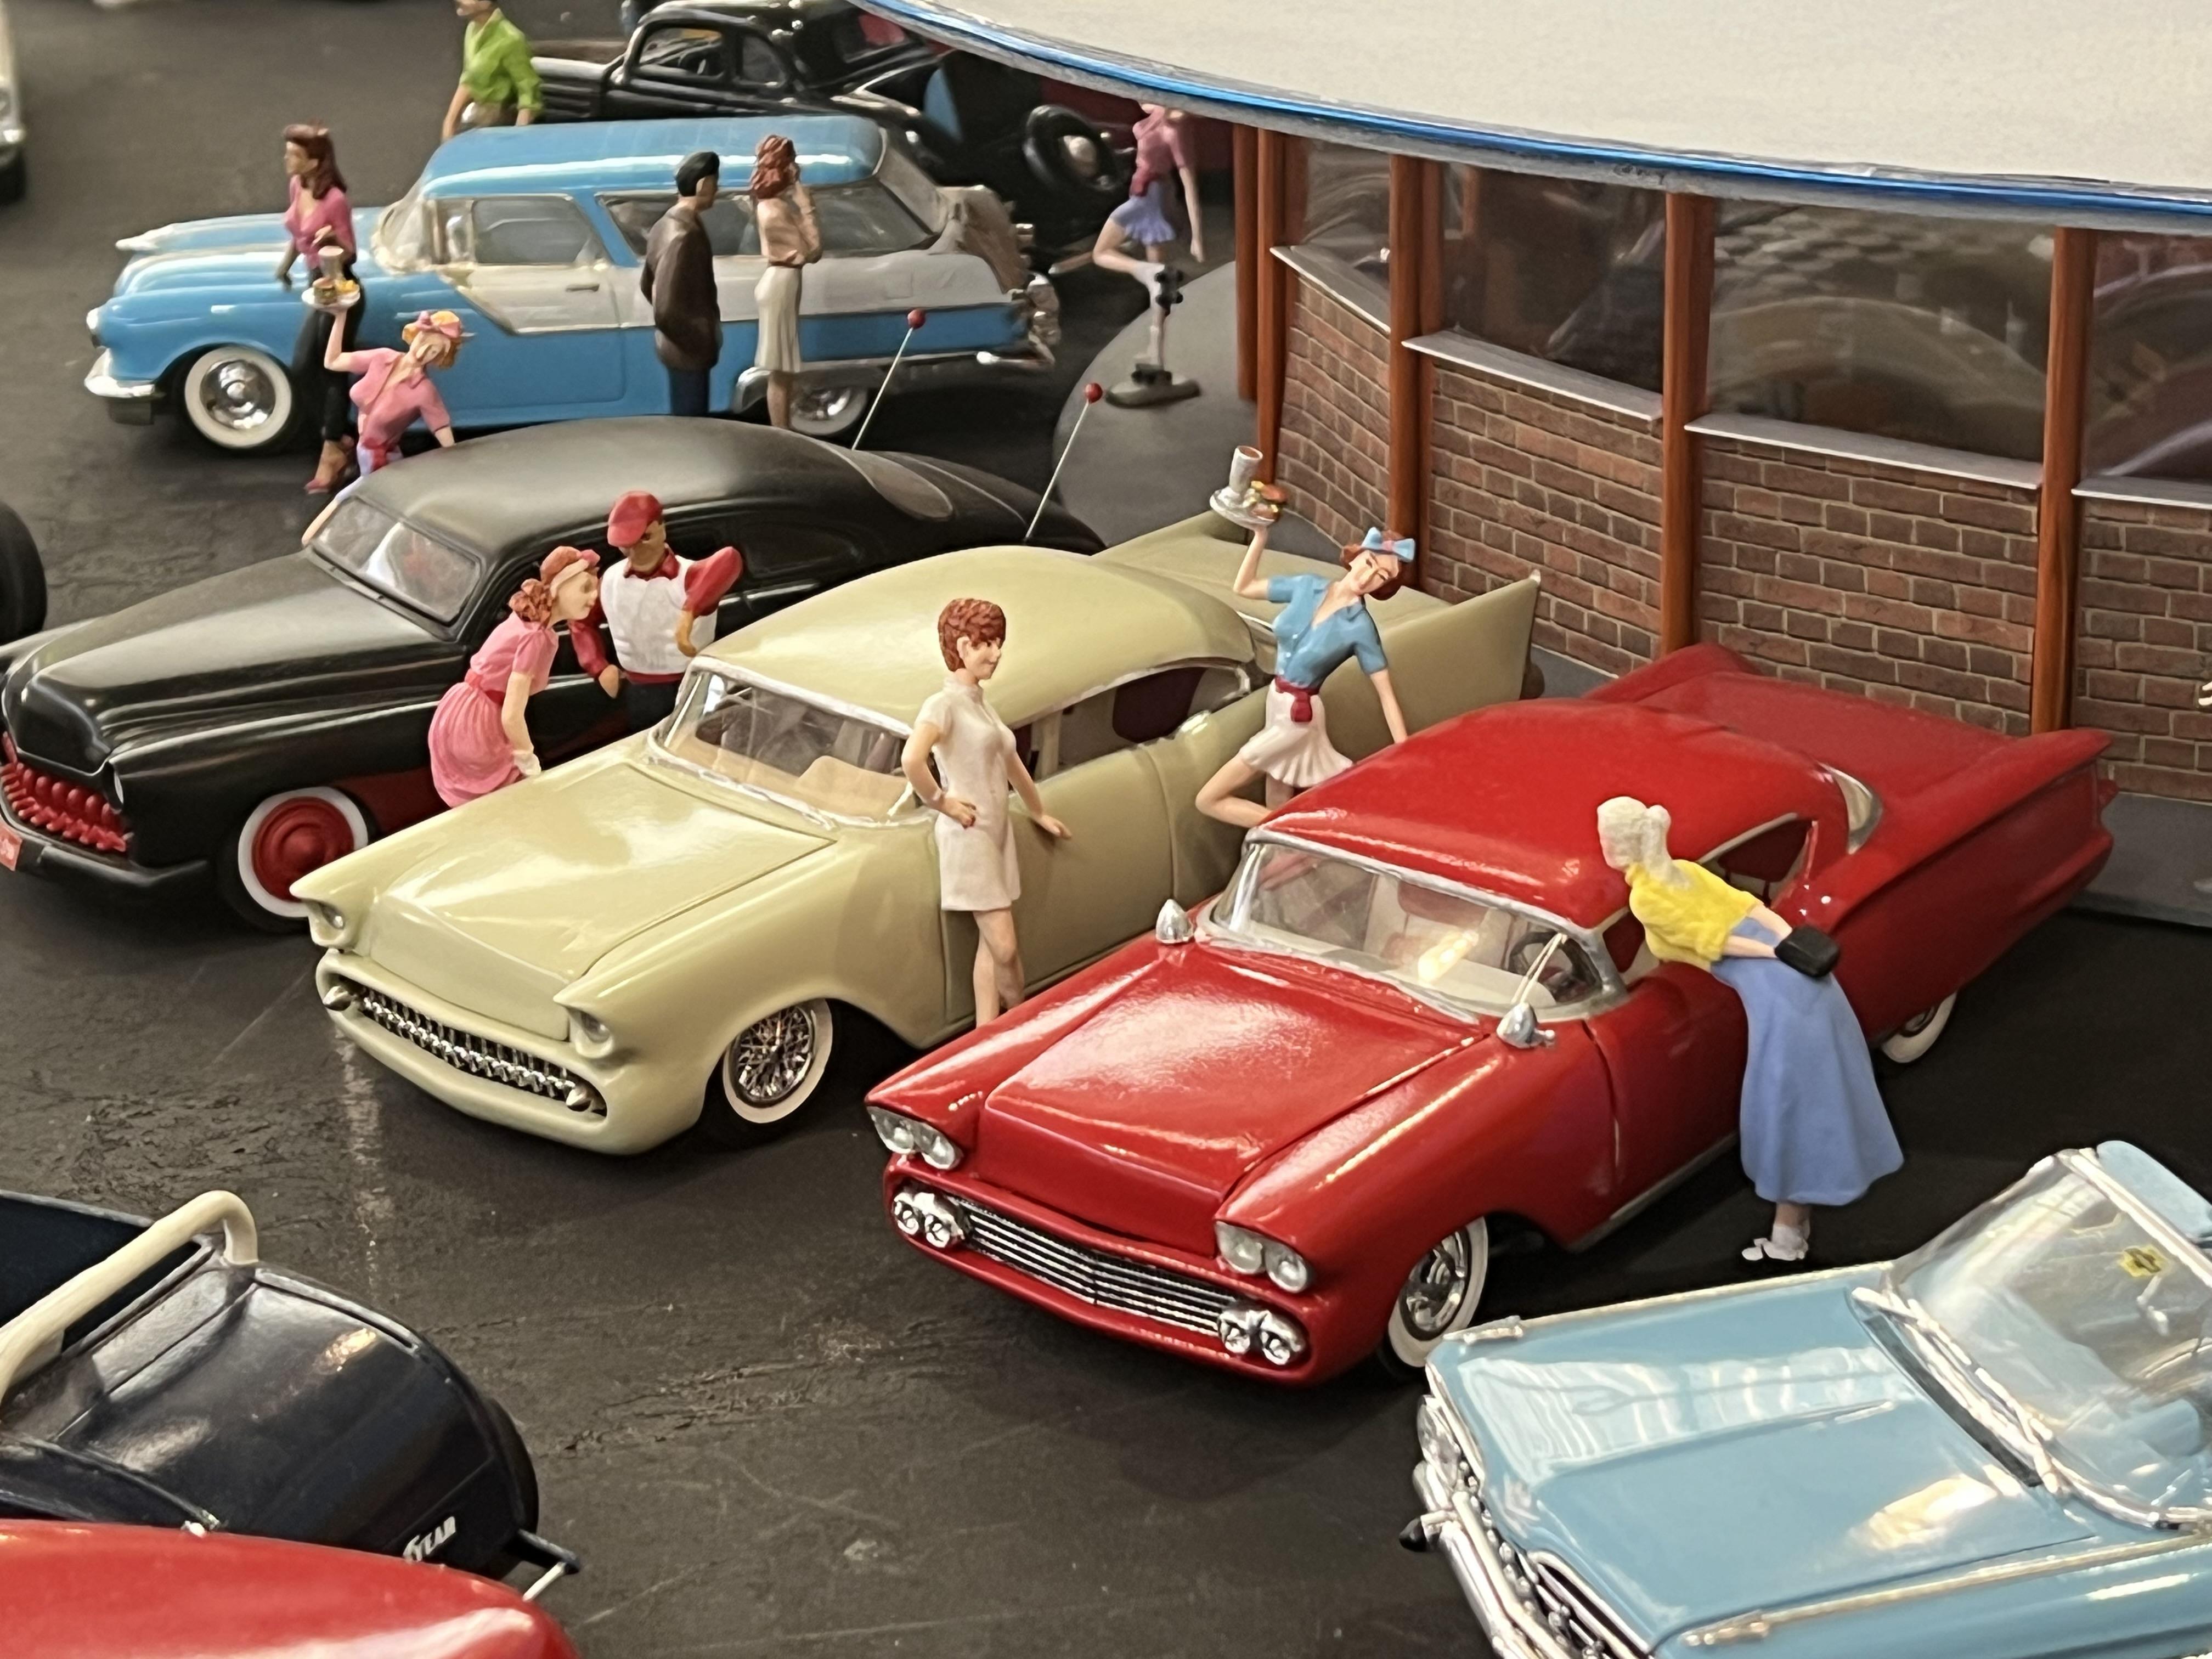
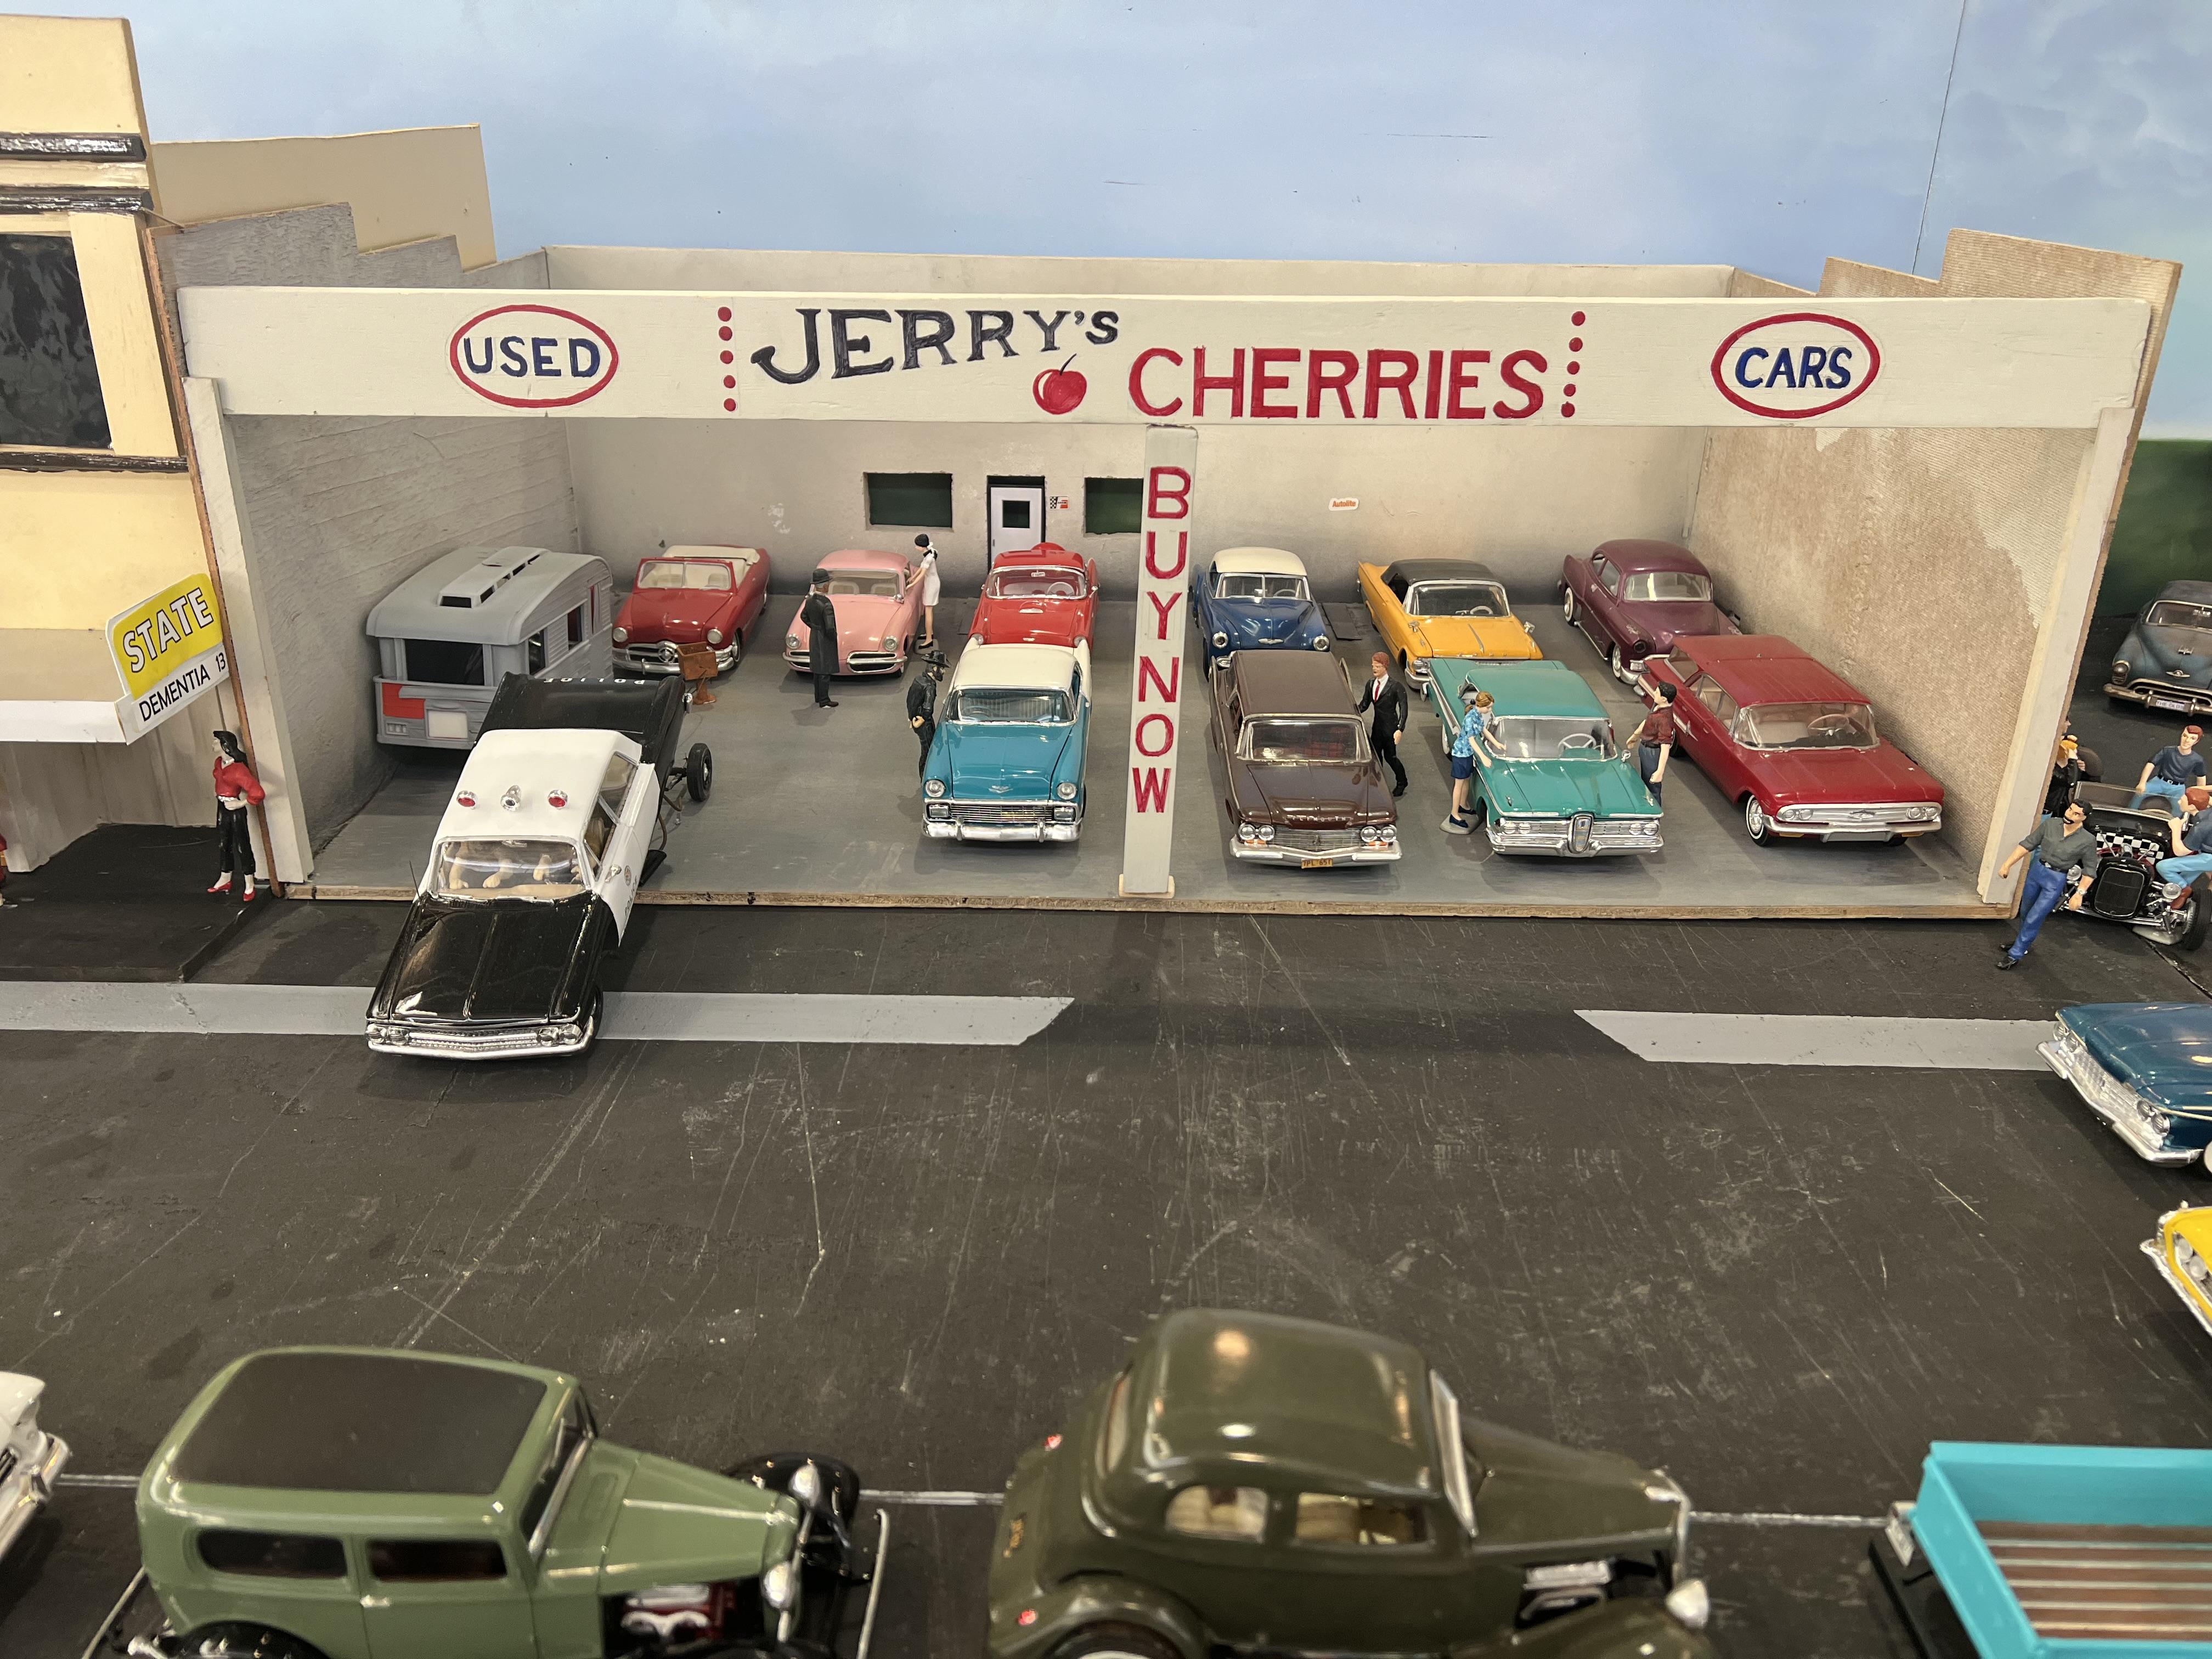
Here in Perth our very active model club produces one giant diorama each year. We get together at a member's home to construct and paint the baseboards and then individuals produce the cars and buildings necessary to complete the scene. We endeavour to do at least three shows a year - we debut at our own Model Car Spectacular, then WASMEX, which is an IPMS style show of all genres of building and the W.A. Hot Rod and Street Machine Spectacular. This schedule had been interrupted somewhat by COVID but we just finished our final showing for our American Graffiti diorama. I will include photos here of each of the three displays - you will see that it changed a bit from venue to venue. If you are as big a fan of the movie as I am, I am sure you will recognise many of the cars and the scenes. Cheers Alan
- 28 replies
-
- 12
-

-
You do cold better than any modeller I have ever seen. This is awe inspiring. Cheers Alan
-
This must be the most appropriately weathered and patinaed model I have ever seen. Like someone else said, the bed is a diorama in itself. Very worthy of its award! Cheers Alan
-
I wouldn't call myself a pickup guy but this is razor sharp and reminds me of all the hopped up trucks I have seen in my travels to the USA. Great work as always Tim! Cheers Alan
-
What a beautiful truck! I found an overlooked can of hardware enamel in my paint store today and wondered on what model I might use it . It is so close to the colour of yours that I think the decision has been made. Cheers Alan
-
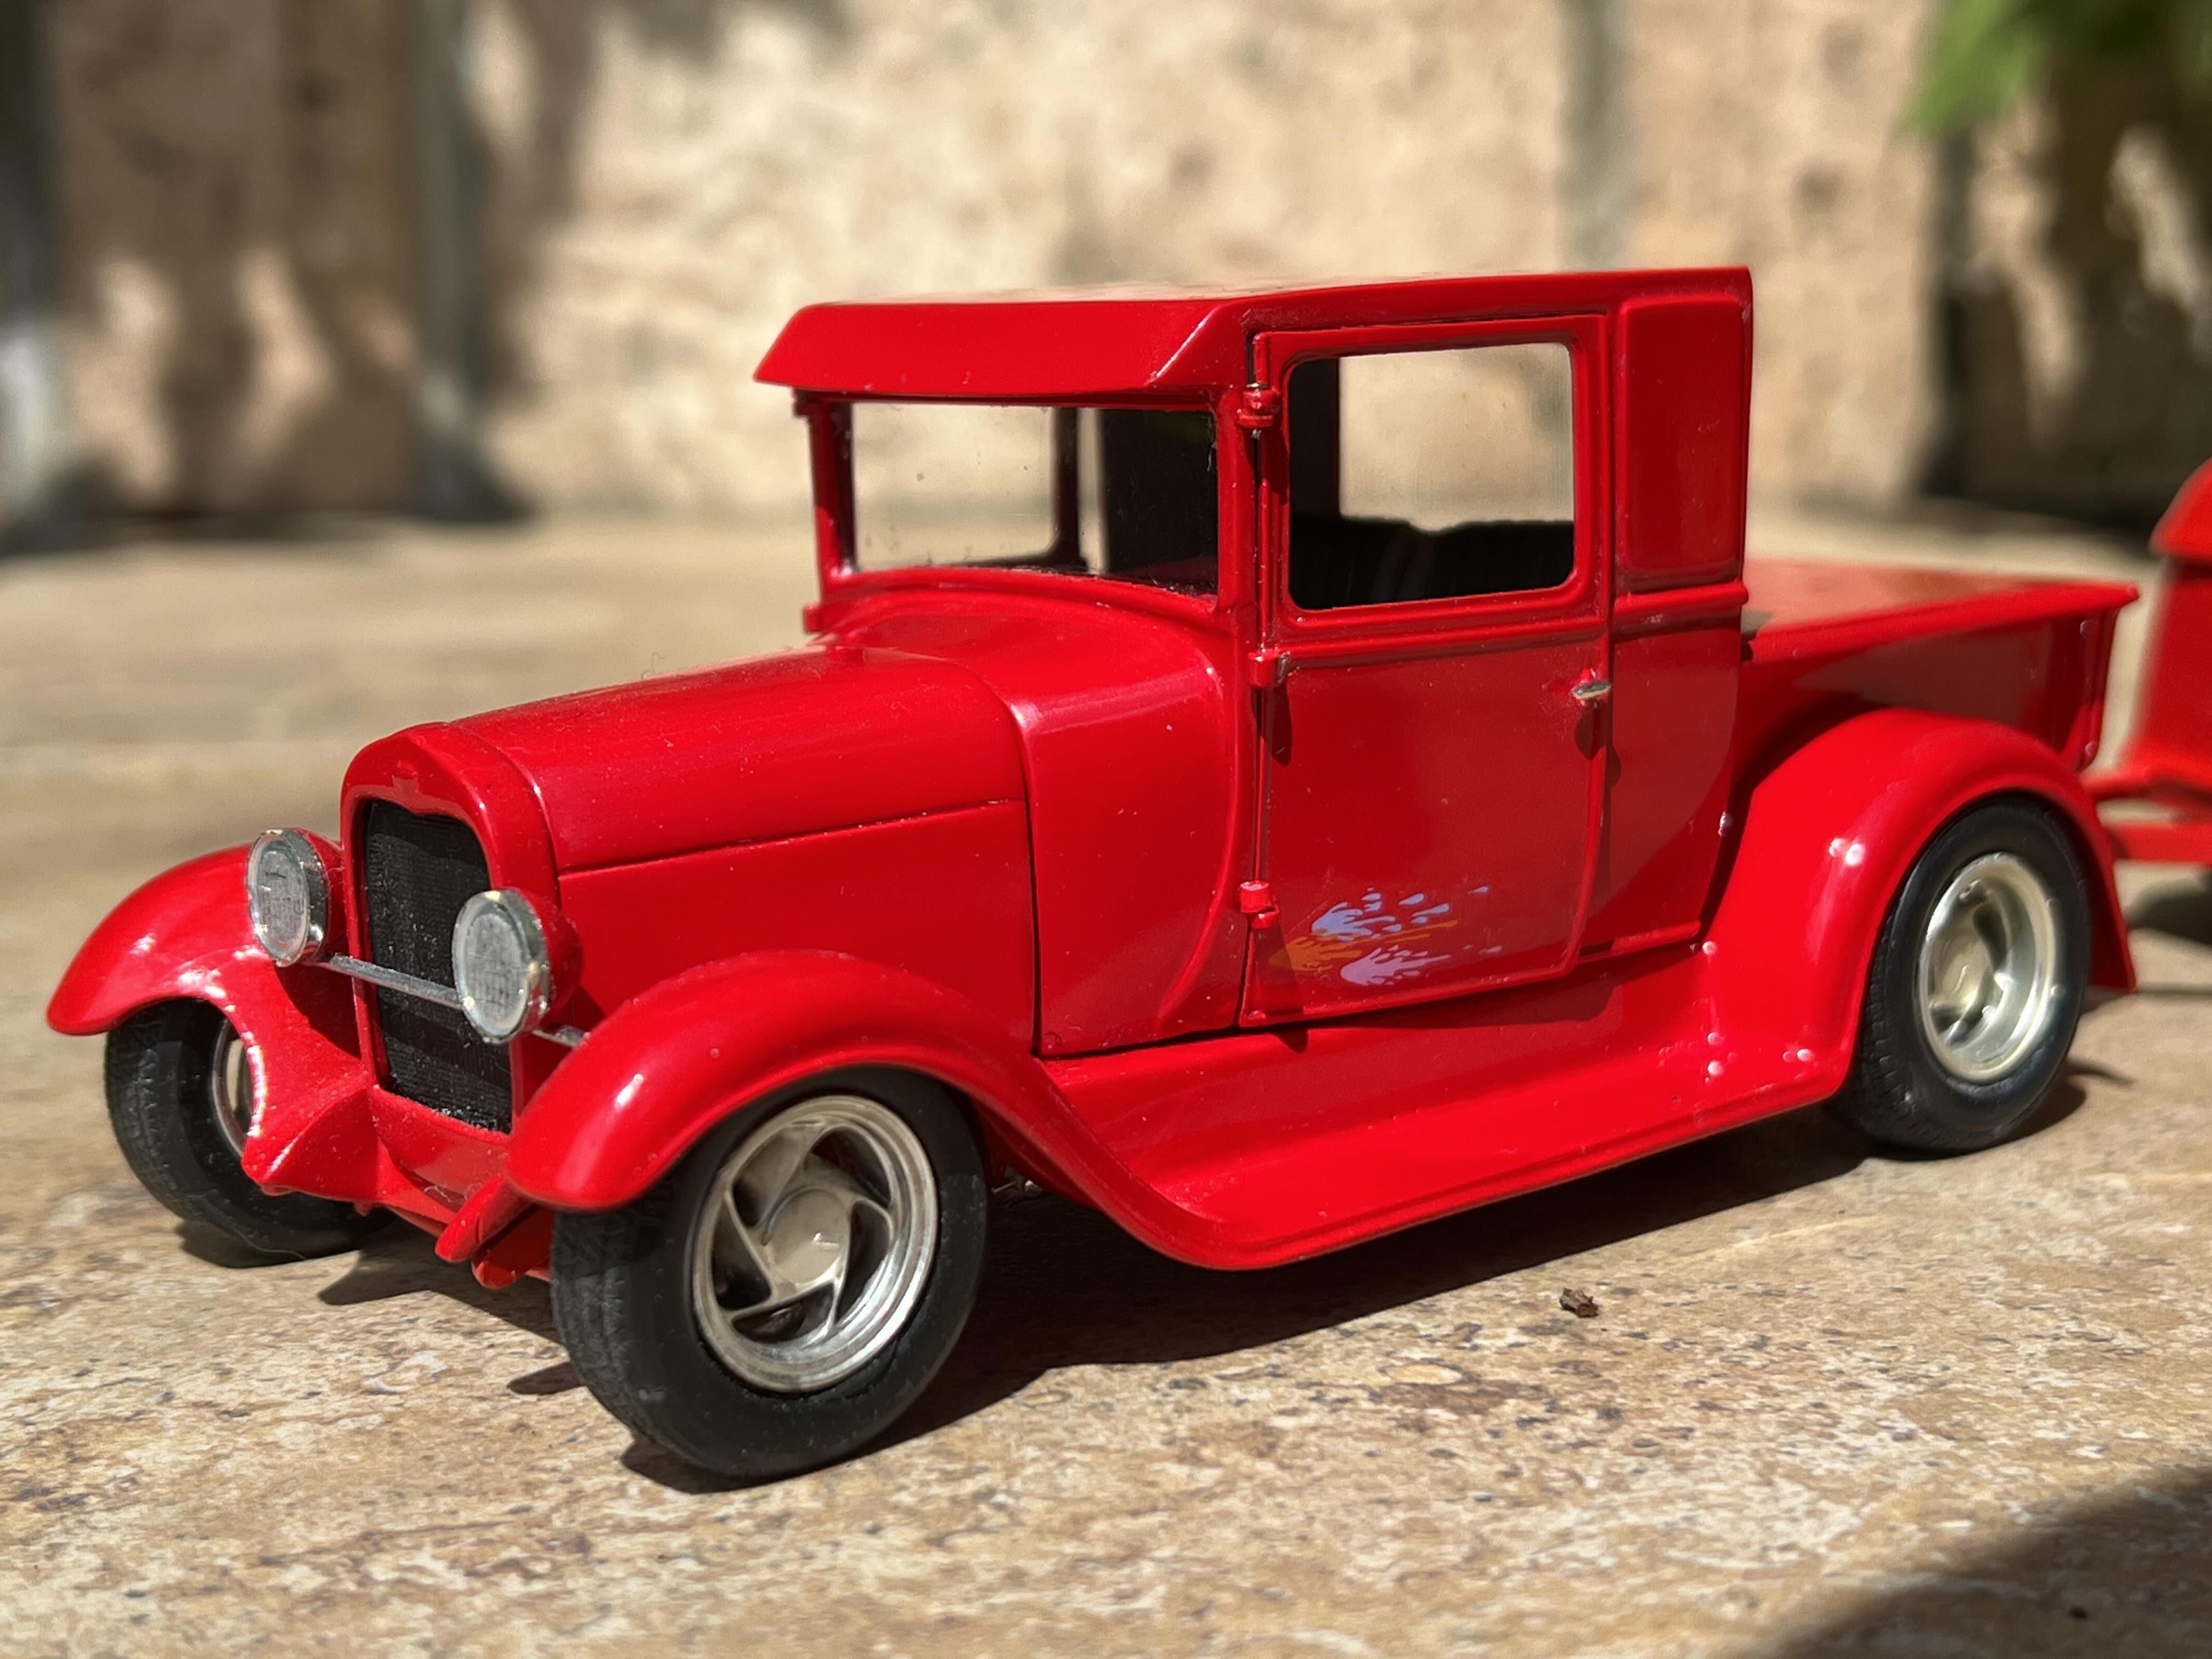
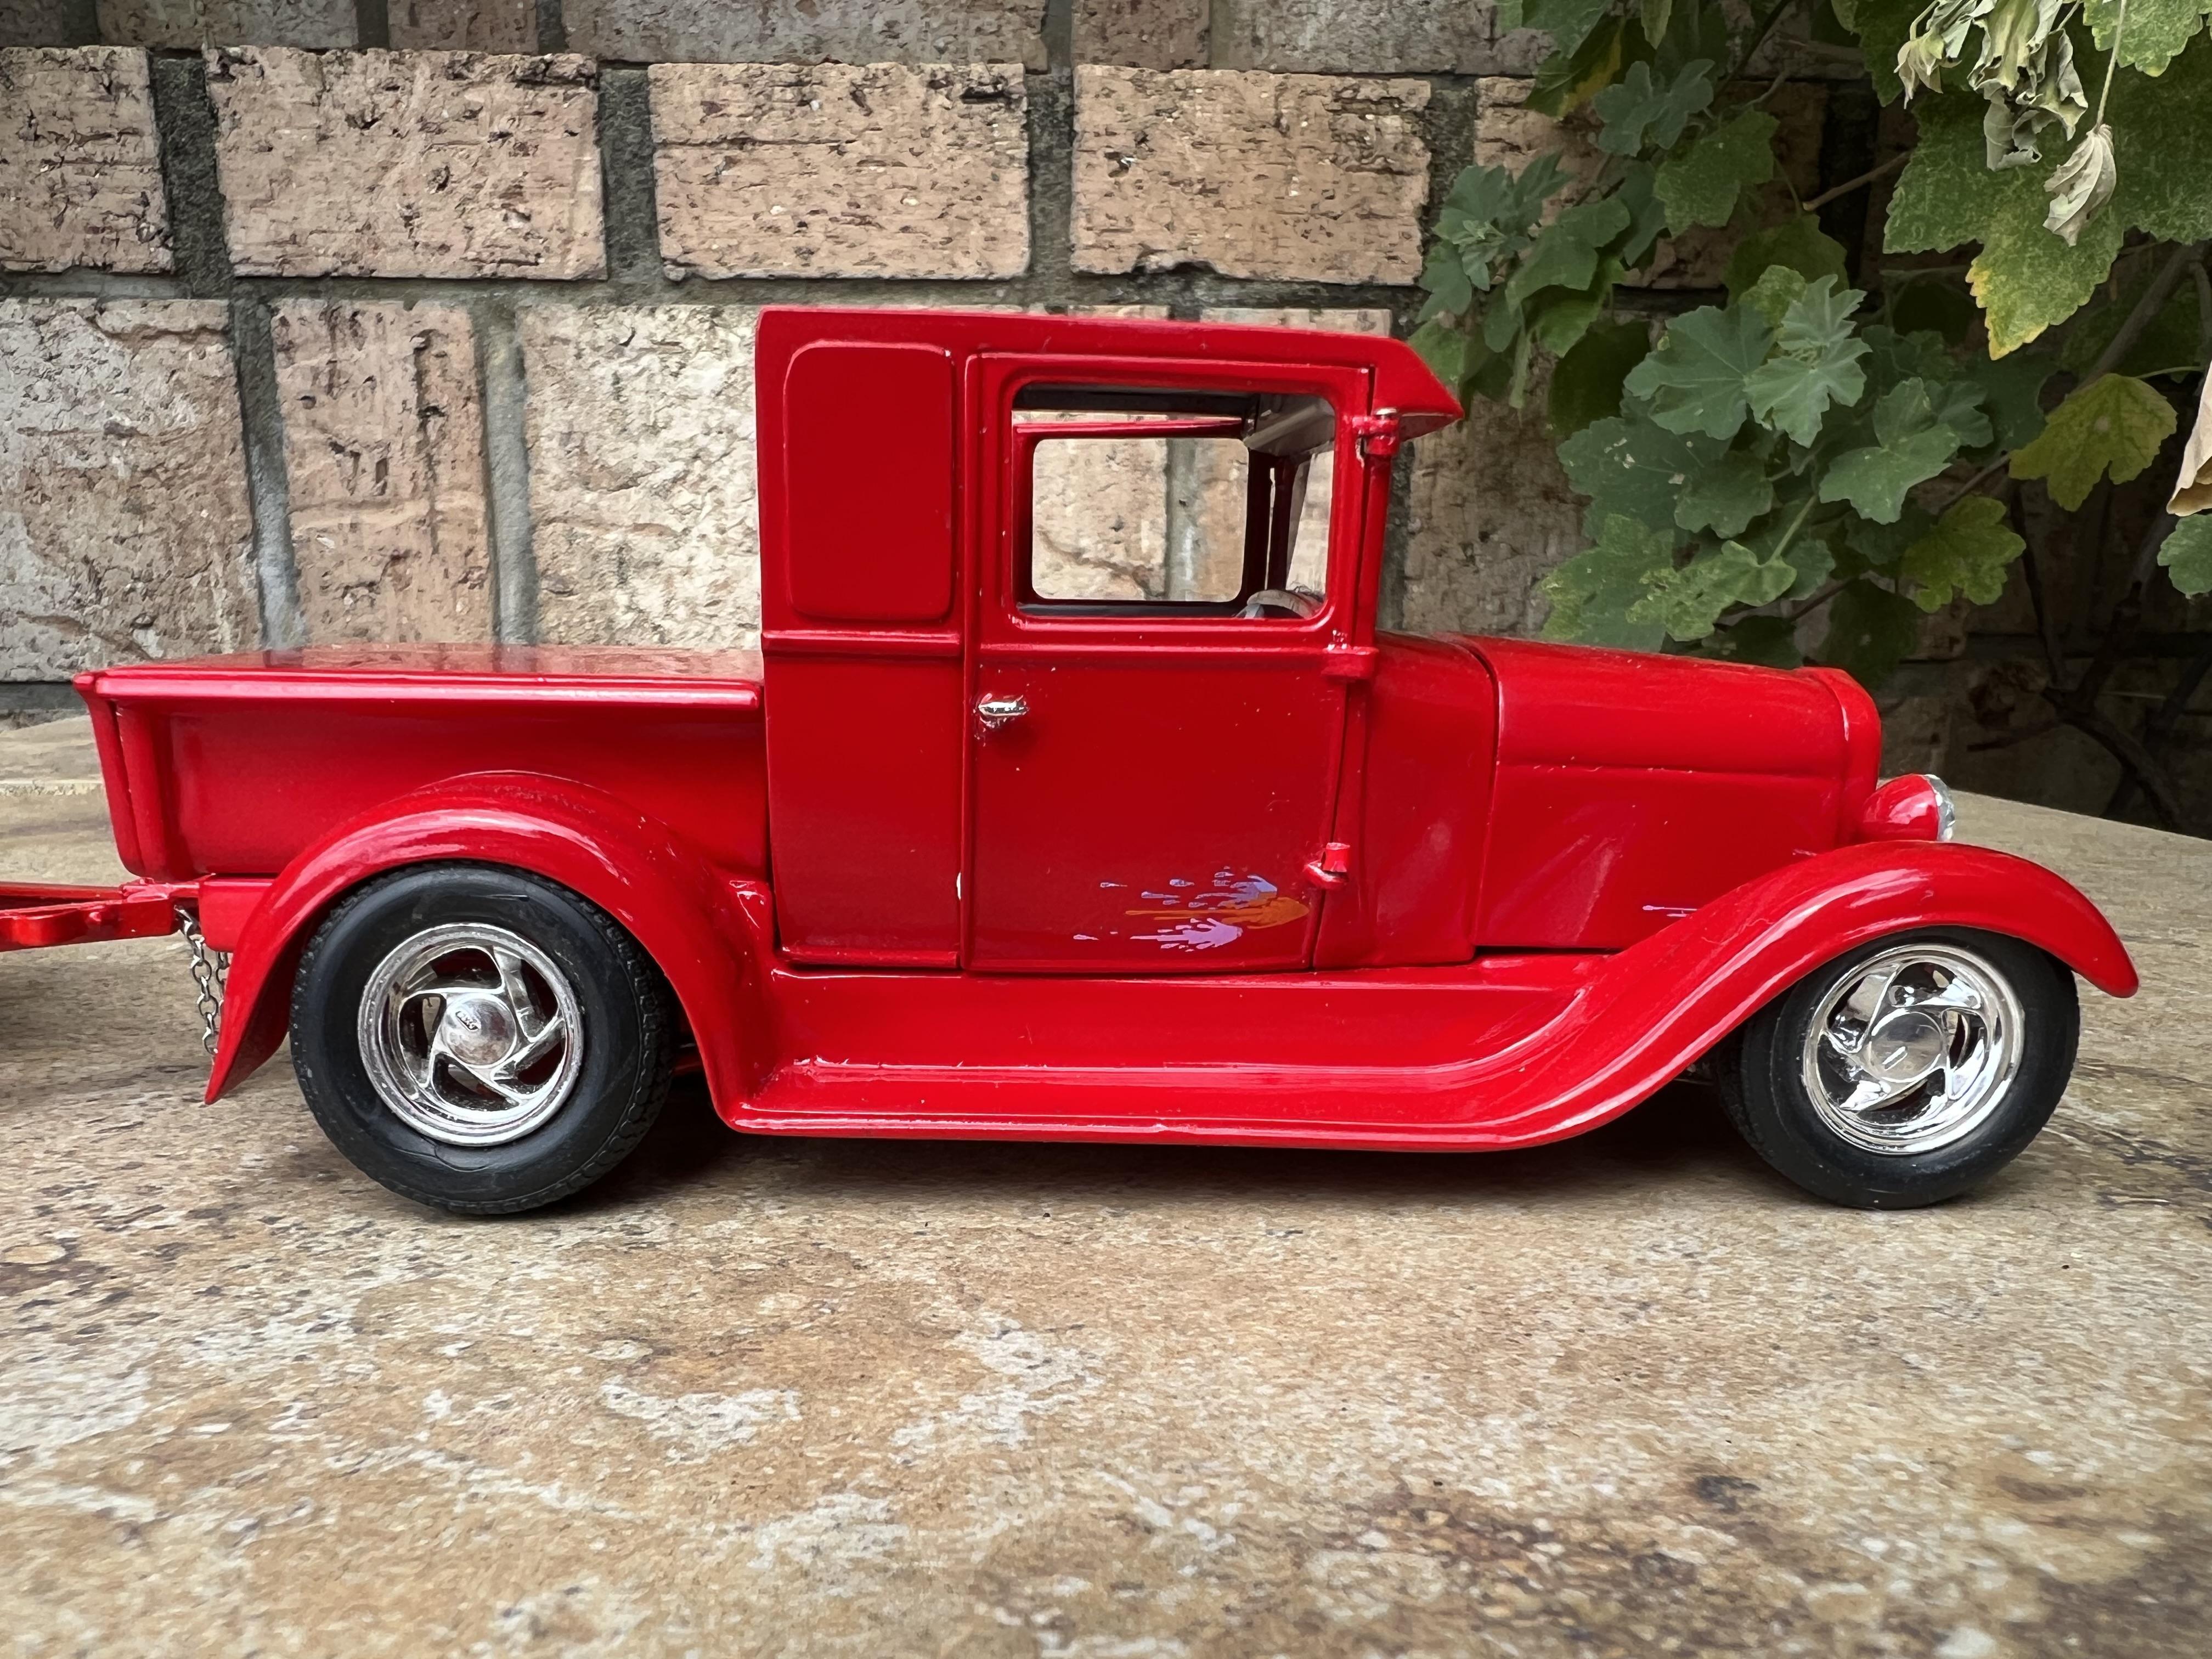
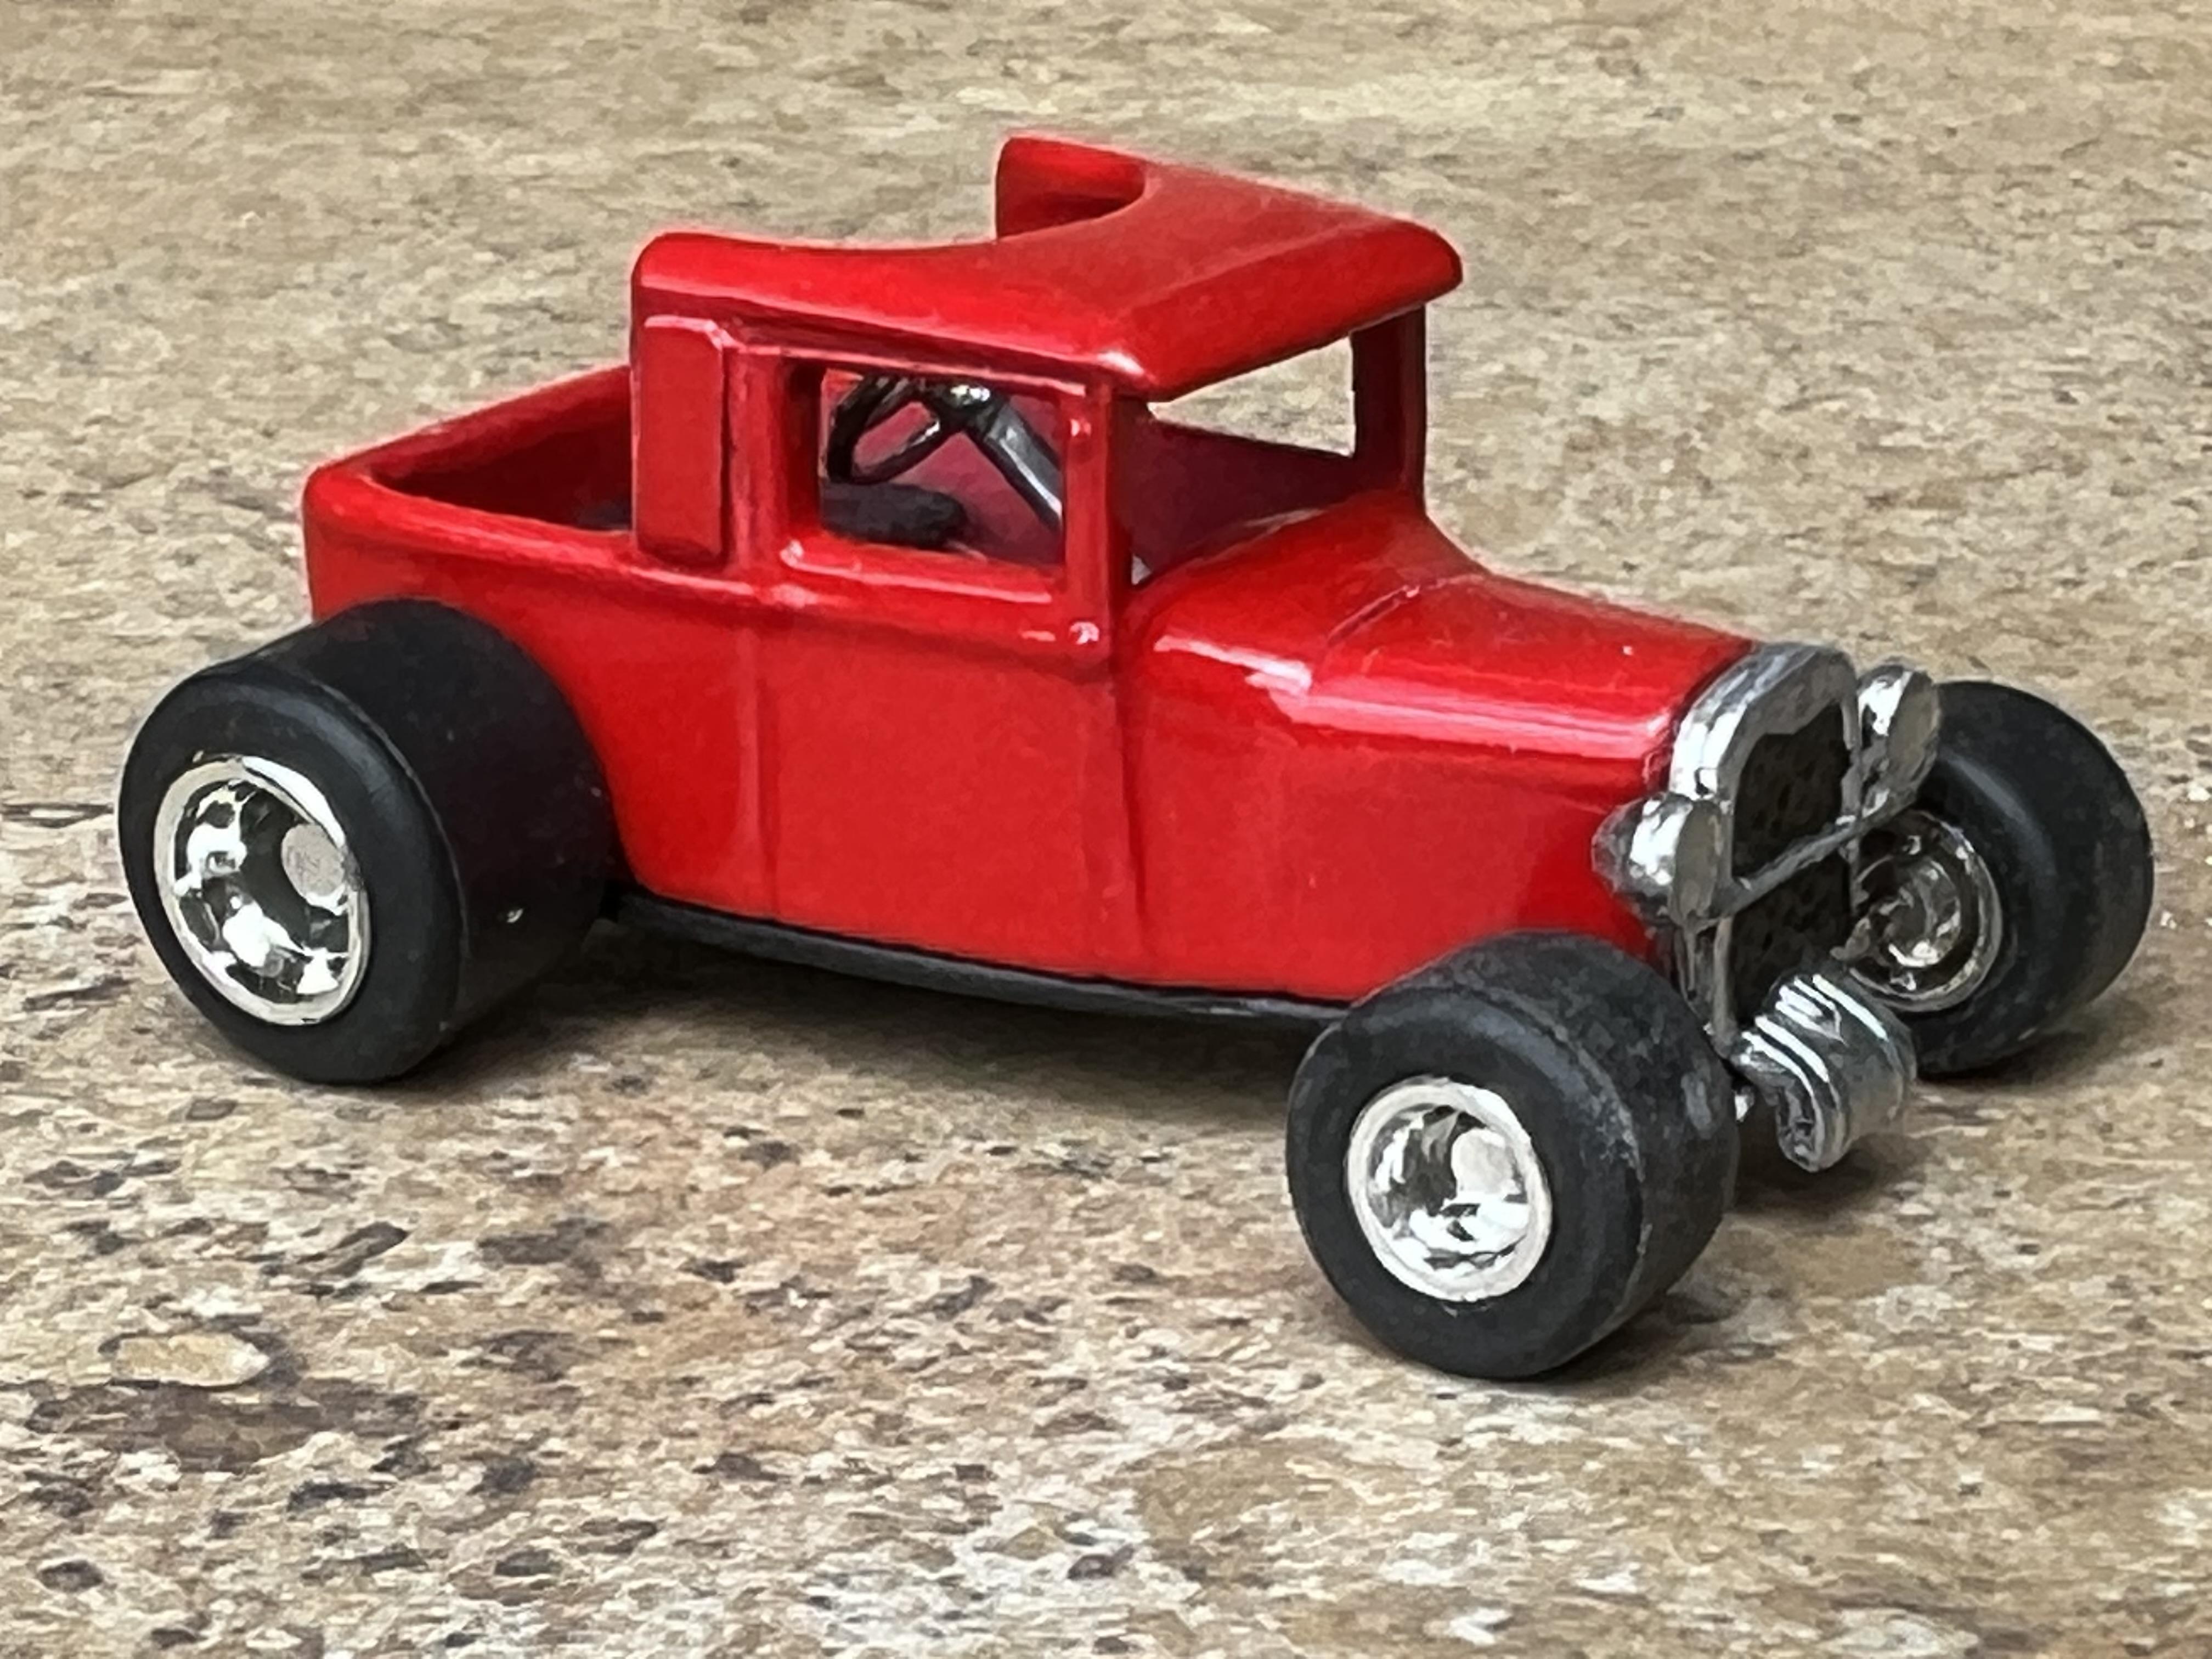
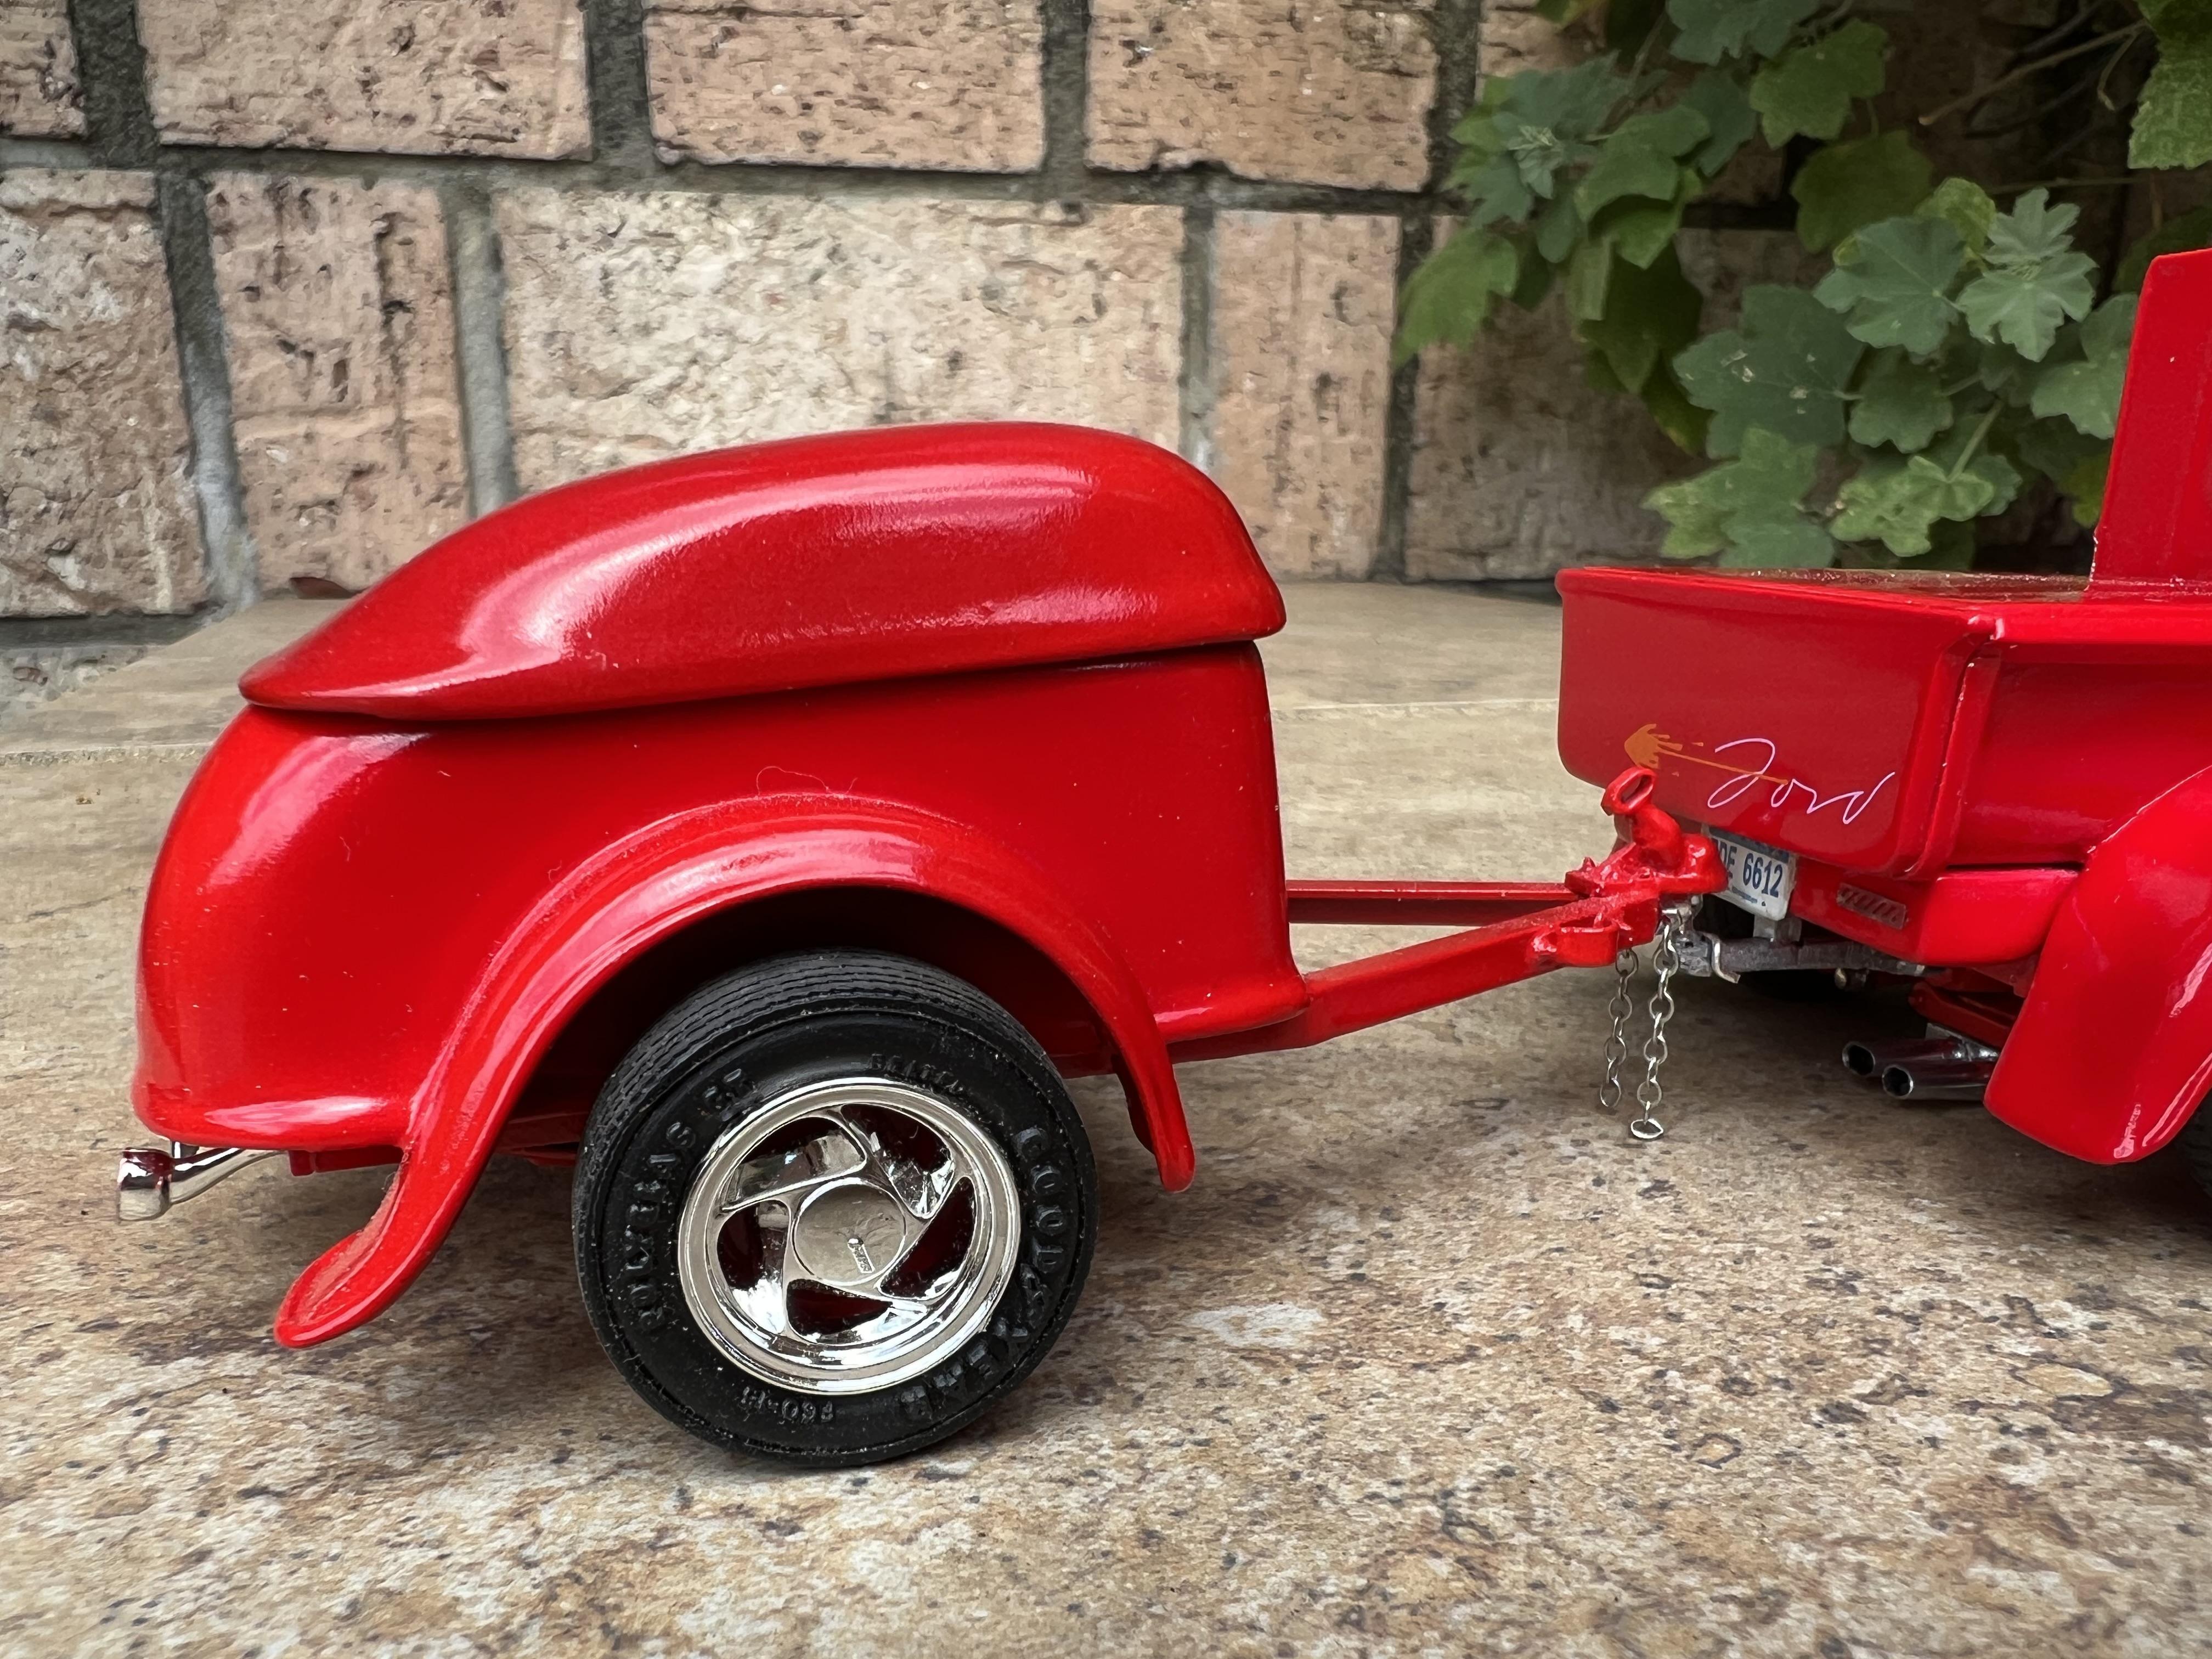
I finally got myself organised last night and built the towbar to allow me to complete my submission to the Tim Boyd Tribute build challenge. It was a great privilege to mix it with skilled modellers from all over the world and to pay homage to the man who re-ignited my passion for model building when I wrote to Tim via Street Rodder Magazine in 1981. Thank you Dennis for kicking this challenge off and thank you Tim for your inspiration and friendship over the years. The recipe goes like this. Model A Closed Cab Pickup. Body - two Revell 29 Model A closed cab pickups. Fenders - Bandai Blue Beetle knockoff Hood - AMT Model A roadster with scratch-built sides Pickup bed - Monogram Street T trailer with scratch-built tonneau and tailgate Fuel tank - scratch-built Chassis - Heavily modified (and ex- glue-bombed) Monogram Blue Beetle Front axle and four bars - modified Revell 32 Ford Super Bell tube. Rear end - heavily modified Buttera Jag IRS Engine - Revell ASA Thunderbird with Monogram sprintcar injection Exhaust Cut-down 53 F100 hemi headers, modified ZZTop mufflers and solder tailpipes Seats, door panels and overhead console - Revell Buttera series Model T Tudor Wheels - AMT 33 Tudor Street Rod Tyres - Monogram Michelin TRX fronts, Goodyear Steel radials rear. Paint - Tamiya Bright red over Tamiya pink Primer with Tamiya clear - applied with spray cans and then polished out. Mullins Redcap trailer Scratch-built Vacform using a wooden mould that I drew and carved to specifications from a mid seventies Rod Action magazine. Operating hinged lid Axle, A frame and tow hitch scratchbuilt from Evergreen. Kiddie car - cut down Hot Wheels 1/64th diecast "AOK" Model A delivery with wheels and tyres from a pullback toy. Floor and seat from Evergreen. The stunning figure on the running board is from Masterbox of Ukraine. Very expensive over here but worth every cent. It has been beautifully handpainted by my wife whose skills in this area far outshine my own. I hope you all enjoy my phone booth pickup. Cheers Alan
- 27 replies
-
- 11
-
-

-
I do remember this one Tim. I was very impressed and wanted to build one like it but had no chance of finding one out here. Then, one day, a friend and I were looking at the classifieds in SAE and someone was advertising some bodies for sale. They were a 29 Ford Tudor, a 32 Chevy Delivery and a 63 Ford Fairlane. Dave owned a real 63 Fairlane, I had a real Model A and also wanted the Chev delivery - it was almost too good to be true! We couldn't believe our luck - these were holy grails to us and we sent our money off to the USA as quick as we could. And that was how we both came to learn about resin bodies. These things looked like someone had melted honeycomb over the stove and tipped it into a Plasticene mould! The Chev body was OK but peppered with microscopic air bubbles. The Fairlane was an abomination that I can't adequately describe here. And the Tudor is still languishing in a box somewhere. After a dozen coats of primer and much sanding I did manage to build a half decent version of the delivery. So I thank you, again, for the inspiration. Your build is as impressive and relevant today as when you build it. Cheers Alan P.S. Just for giggles, here's what the Tudor looks like!
-
I've finished the truck and finished the trailer and the kiddy car BUT still need to build a towbar to link them up! Cheers Alan
-
Behind you and the bench
Alan Barton replied to KC FitiWerks's topic in General Automotive Talk (Trucks and Cars)
I swing around to look at this all the time! Please note I do not collect kits - these are all to be built and the stash would have diminished somewhat if only I didn't a) keep buying more and b) building models from parts instead of from a box with only one kit in it! I have set an all time personal best this year by completing 46 models but alas, probably only five or so were from a new box so the display cabinets in the other room are full to exploding but the stash doesn't seem to have changed much! For example, my AMT Model A Roadster box has six bodies fitted to inside - I could build five cars and still not lose a box from the stash! Cheers 'Alan
-
Reissued kits
Alan Barton replied to slantasaurus's topic in General Automotive Talk (Trucks and Cars)
Here you go Steve! This is the phone booth from the Touch Tone Terror. I assembled it a few years ago but unfortunately the kit was already opened and missing a few pieces. This explains why the doors are not fitted and there is no phone in the booth. It was a bit vague to assemble but not impossible, obviously. Biggest challenge, for me at least, was masking without scratching any of the glass. It looks very similar to Australian aluminium phone booths that my Dad used to install around Perth. From a diorama point of view, it is a handy item to have. I think if someone did some measuring they would find the phone booth from the MPC Phone Booth T is way too big as it was designed to hold a caricature of Stroker McGurk. I had this kit as a teenager but not anymore but I remember it was huge! Cheers Alan