Alan Barton
-
Posts
2,113 -
Joined
-
Last visited
Content Type
Profiles
Forums
Events
Gallery
Everything posted by Alan Barton
-
Nice work Gustavo! I had planned the same conversion and already had the wheel arches filled and the strip of Evergreen added around the waistline, just like yours. That was as far as I got so your finished product is certainly a great inspiration to get mine finished! Cheers Alan
-
Pleased to say that my issue 213 arrived here in Perth Western Australia on the 23rd of May, less than a month after it was posted in the USA. That is a massive improvement on the five plus months it took for Issue 2010 to arrive hear. Since last year, I received issue 209, 211, 212, 210 and 213!!! who knows what the postal pixies are up to?!?!?
-
Next up will be a Monza, and this model will be a replica of the "Super Chook" Kentucky Fired Chicken car. For the Americans in the audience, Aussies call a chicken, a chook. If you are going to KFC, you are going to get some chook for dinner. Thus, the name of the car. It was driven quite successfully by Leo Gommers at Claremont Speedway and later by Colin Knox. The original version had very protruding cylindrical flares but later received an IMSA style body kit - this is the version I am going to build. Like the Corvette above, the Monzas were popular at speedways across the country, especially after Gene Welch brought a four car team out from the USA for a summer tour down under. We never saw Monzas in our showrooms and I doubt whether very many ever made their way to the country as road cars - I cant recall ever seeing one in the wild. Many years ago after following Tim Boyd's advice in Street Rodder Magazine , I bought the MPC Monza to get what he believed to be the best detailed small block available at the time in 1/25th scale. It is still waiting in a box with a special project! As I researched cars for the display in October, I realised that the Monza body was languishing untouched in another box, and it came with IMSA flares so it was time to start another project. It might seem a little crazy but I am keen to get all bodywork and paint completed on these projects as early as possible so that I can use the remaining time to complete the somewhat easier chassis work. As with all such projects it is never as easy as it first looks. The fibreglass Monza bodies for the speedway had fairly vertical sides while the kit had a lot of roll-under to the rocker panels. Plus, the body kit did not quite match the contours visible in my one reference photo so there was a fair bit of trimming to do to get things close ( plus just a smidge of putty!) I tack glued the body kit in place and then worked out what bits needed to be removed to get things right. I then used a woodworking tool called a marking gauge to scribe part way through the inside of the body at the waste line so that I could gently bend the lower body panels outwards to get things looking correct. I have since applied a responsible amount of body filler and we have some serious sanding ahead of us! Cheers Alan

-
Next up is one I am really excited about. I had never owned one of the MPC Super Stocker series of models so was pleased to hear that the GTO had been re-issued. I had good intentions of buying one but decided to wait as a friend of mine along with our wives were planning to attend the Adelaide Toy Fair in South Australia last June. You can imagine my surprise when the second table I walked up to had not one but two Dick Trickle Mustang kits, complete but bagged, not boxed, on his stall for $50 a piece. If you are thinking that is a bit spendy, consider that the GTO currently on the local hobby shop shelves would have set me back upwards of $65Aus so in any language the Mustangs were a bargain. I love dirt trackers and Dave loves Mustangs so they both came home with us. Every state in Australia had a two or three competitors in Mustangs in the seventies and when you consider how rare ( then ) they were on our streets, they were a big deal to see on a speedway. I have been very impressed with this kit although I did find the rear end assembly a bit fiddly. The weird bit is the fact that the Mustang body has had its sills removed and as a result the bottom of the rollcage hangs out in the breeze - probably something to do with the fact that these were essentially a GM style frame. Two strips of styrene sheet rectified that problem. I also cut the top bars of the cage for now - this lets the rollcage sit higher in the body and will save a lot of work later. As it was the top bar that should have aligned with the window opening ( where you would normally rest your elbow) was a good 3mm lower than it should be. The other problem, if you can call it that, is that the car has a big block Chevy engine. I have no qualms about swapping out the engine for a Ford but I love those over the top headers so I have elected to paint the Chevy engine blue, add some Ford rocker covers and front mounted distributor, and fake it! The neat thing is, apart from the flares and a change of rolling stock, this will nearly be a box stock kit. Once again I used aluminium wire and thin plastic to create the flairs. Like the Torana, this one is going to have a little twist in tis final livery but I will reveal all as it nears completion. Cheers Alan
-
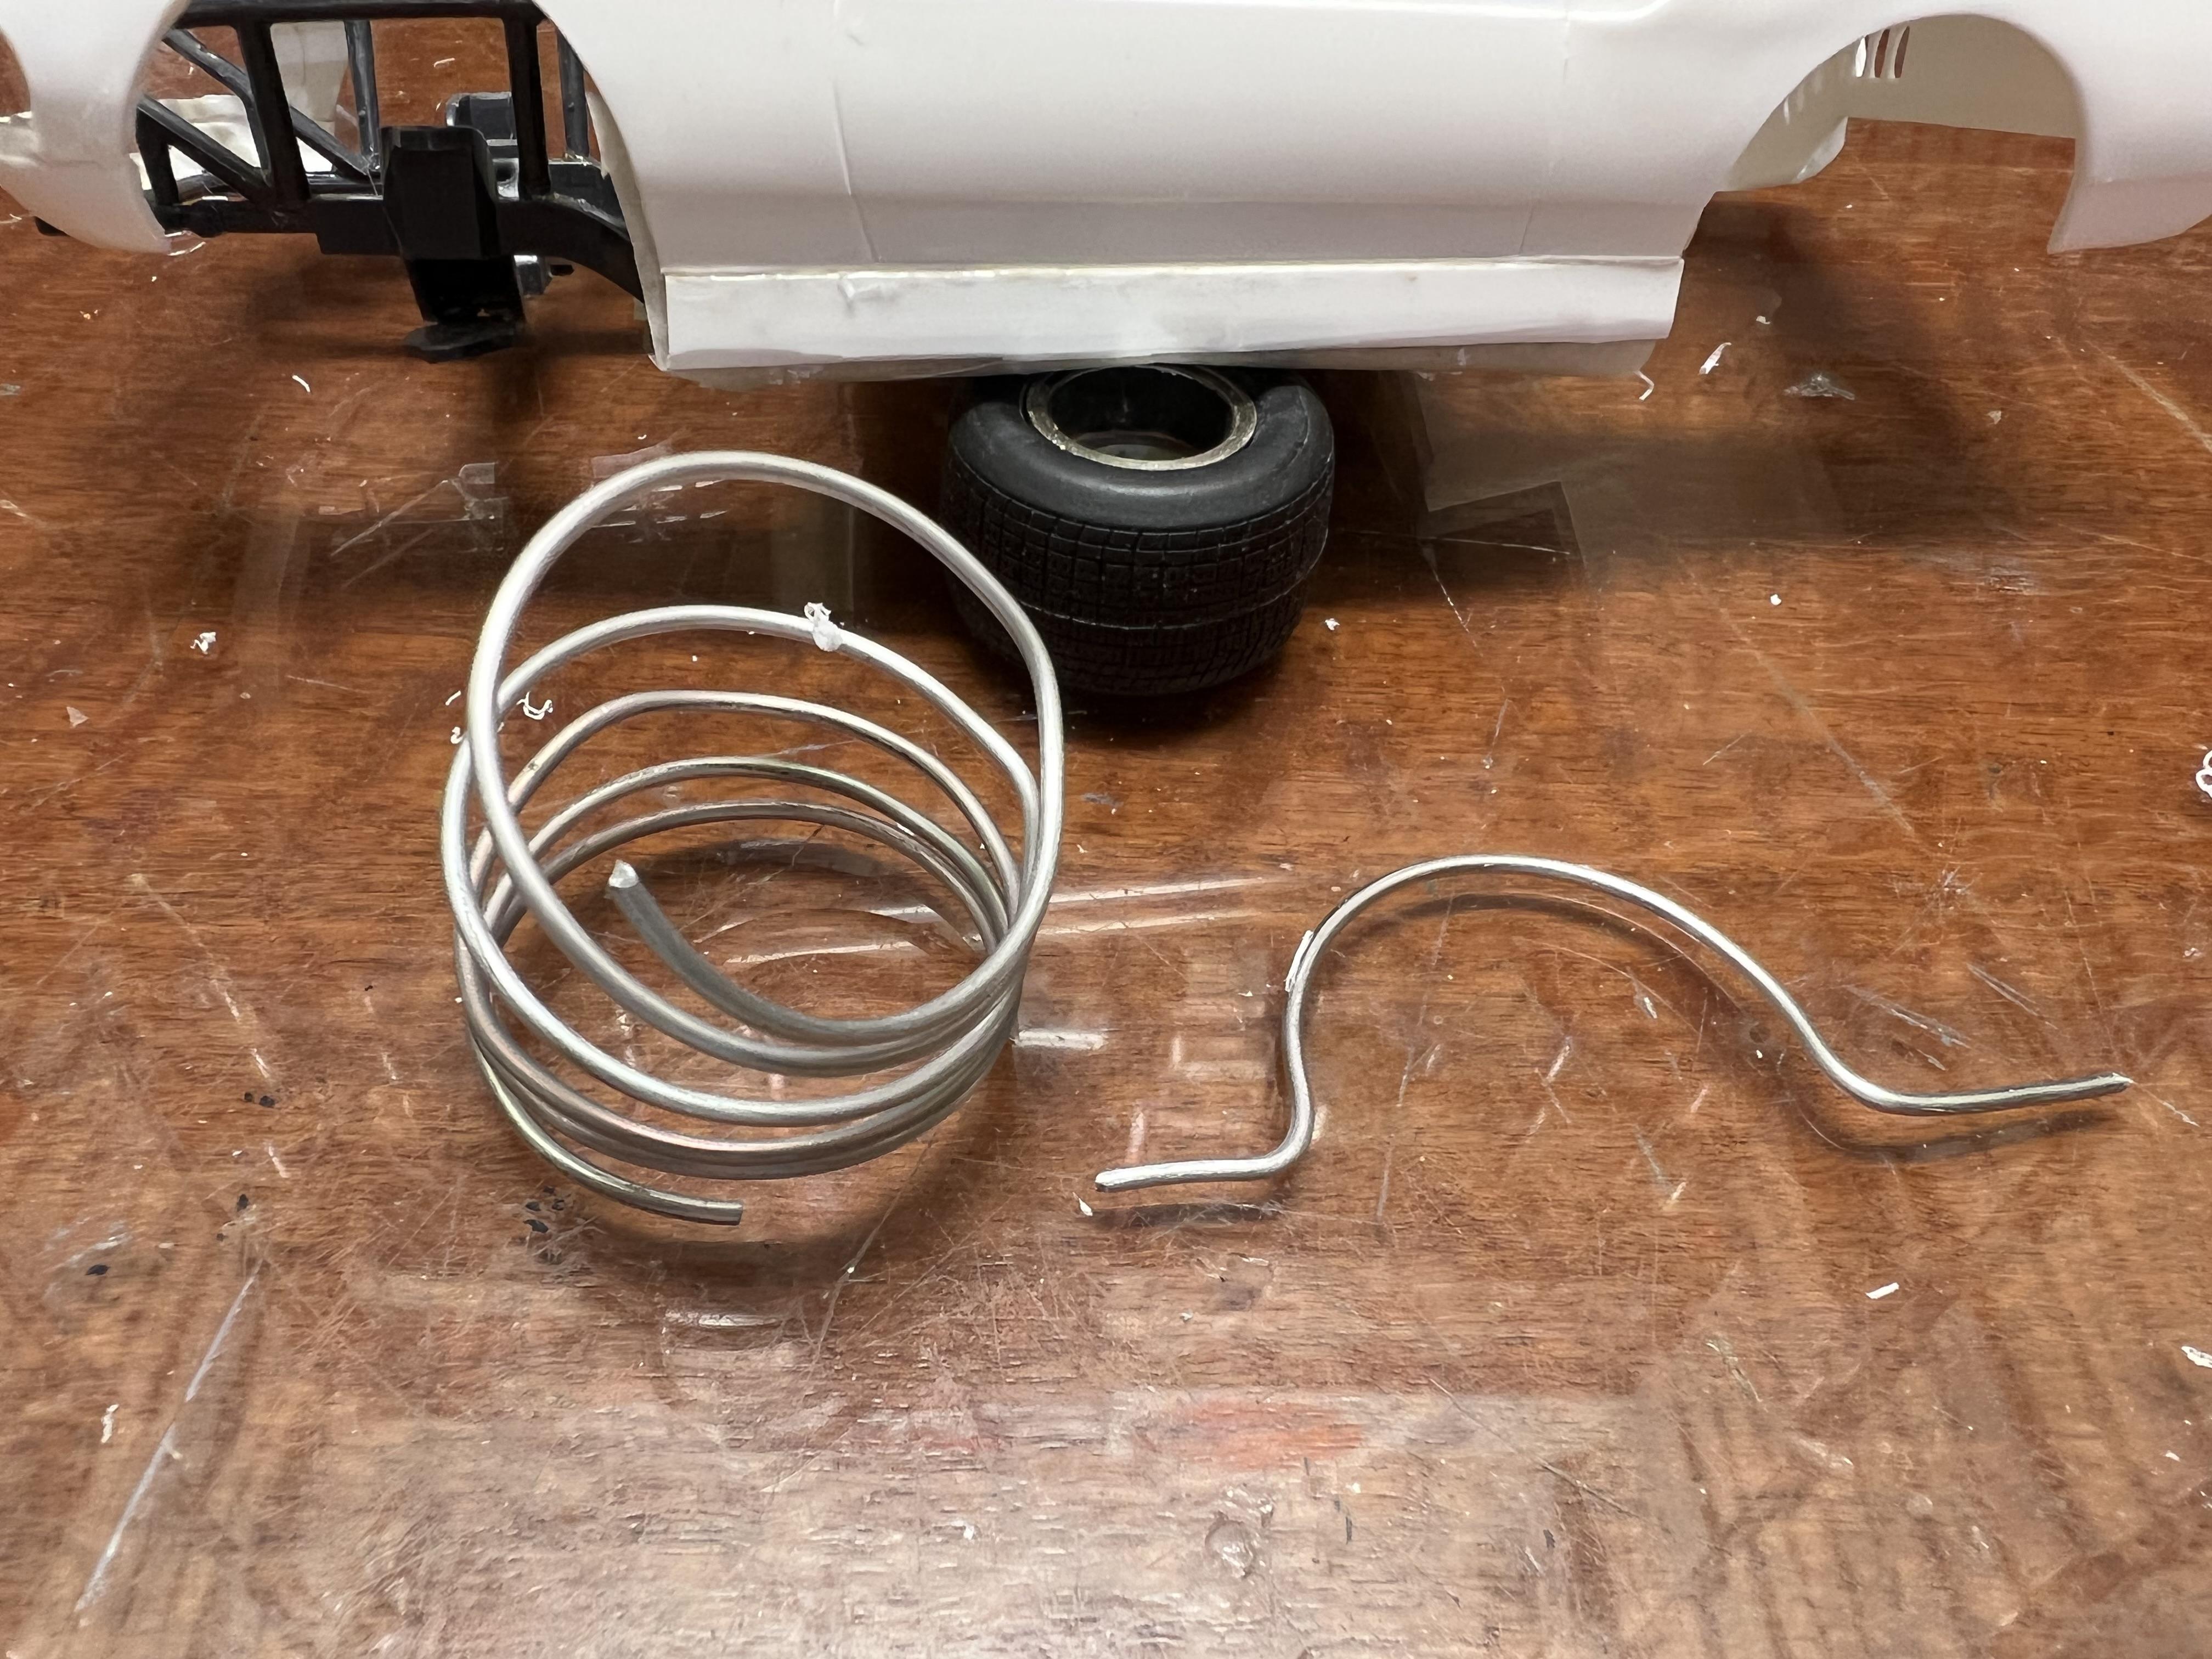
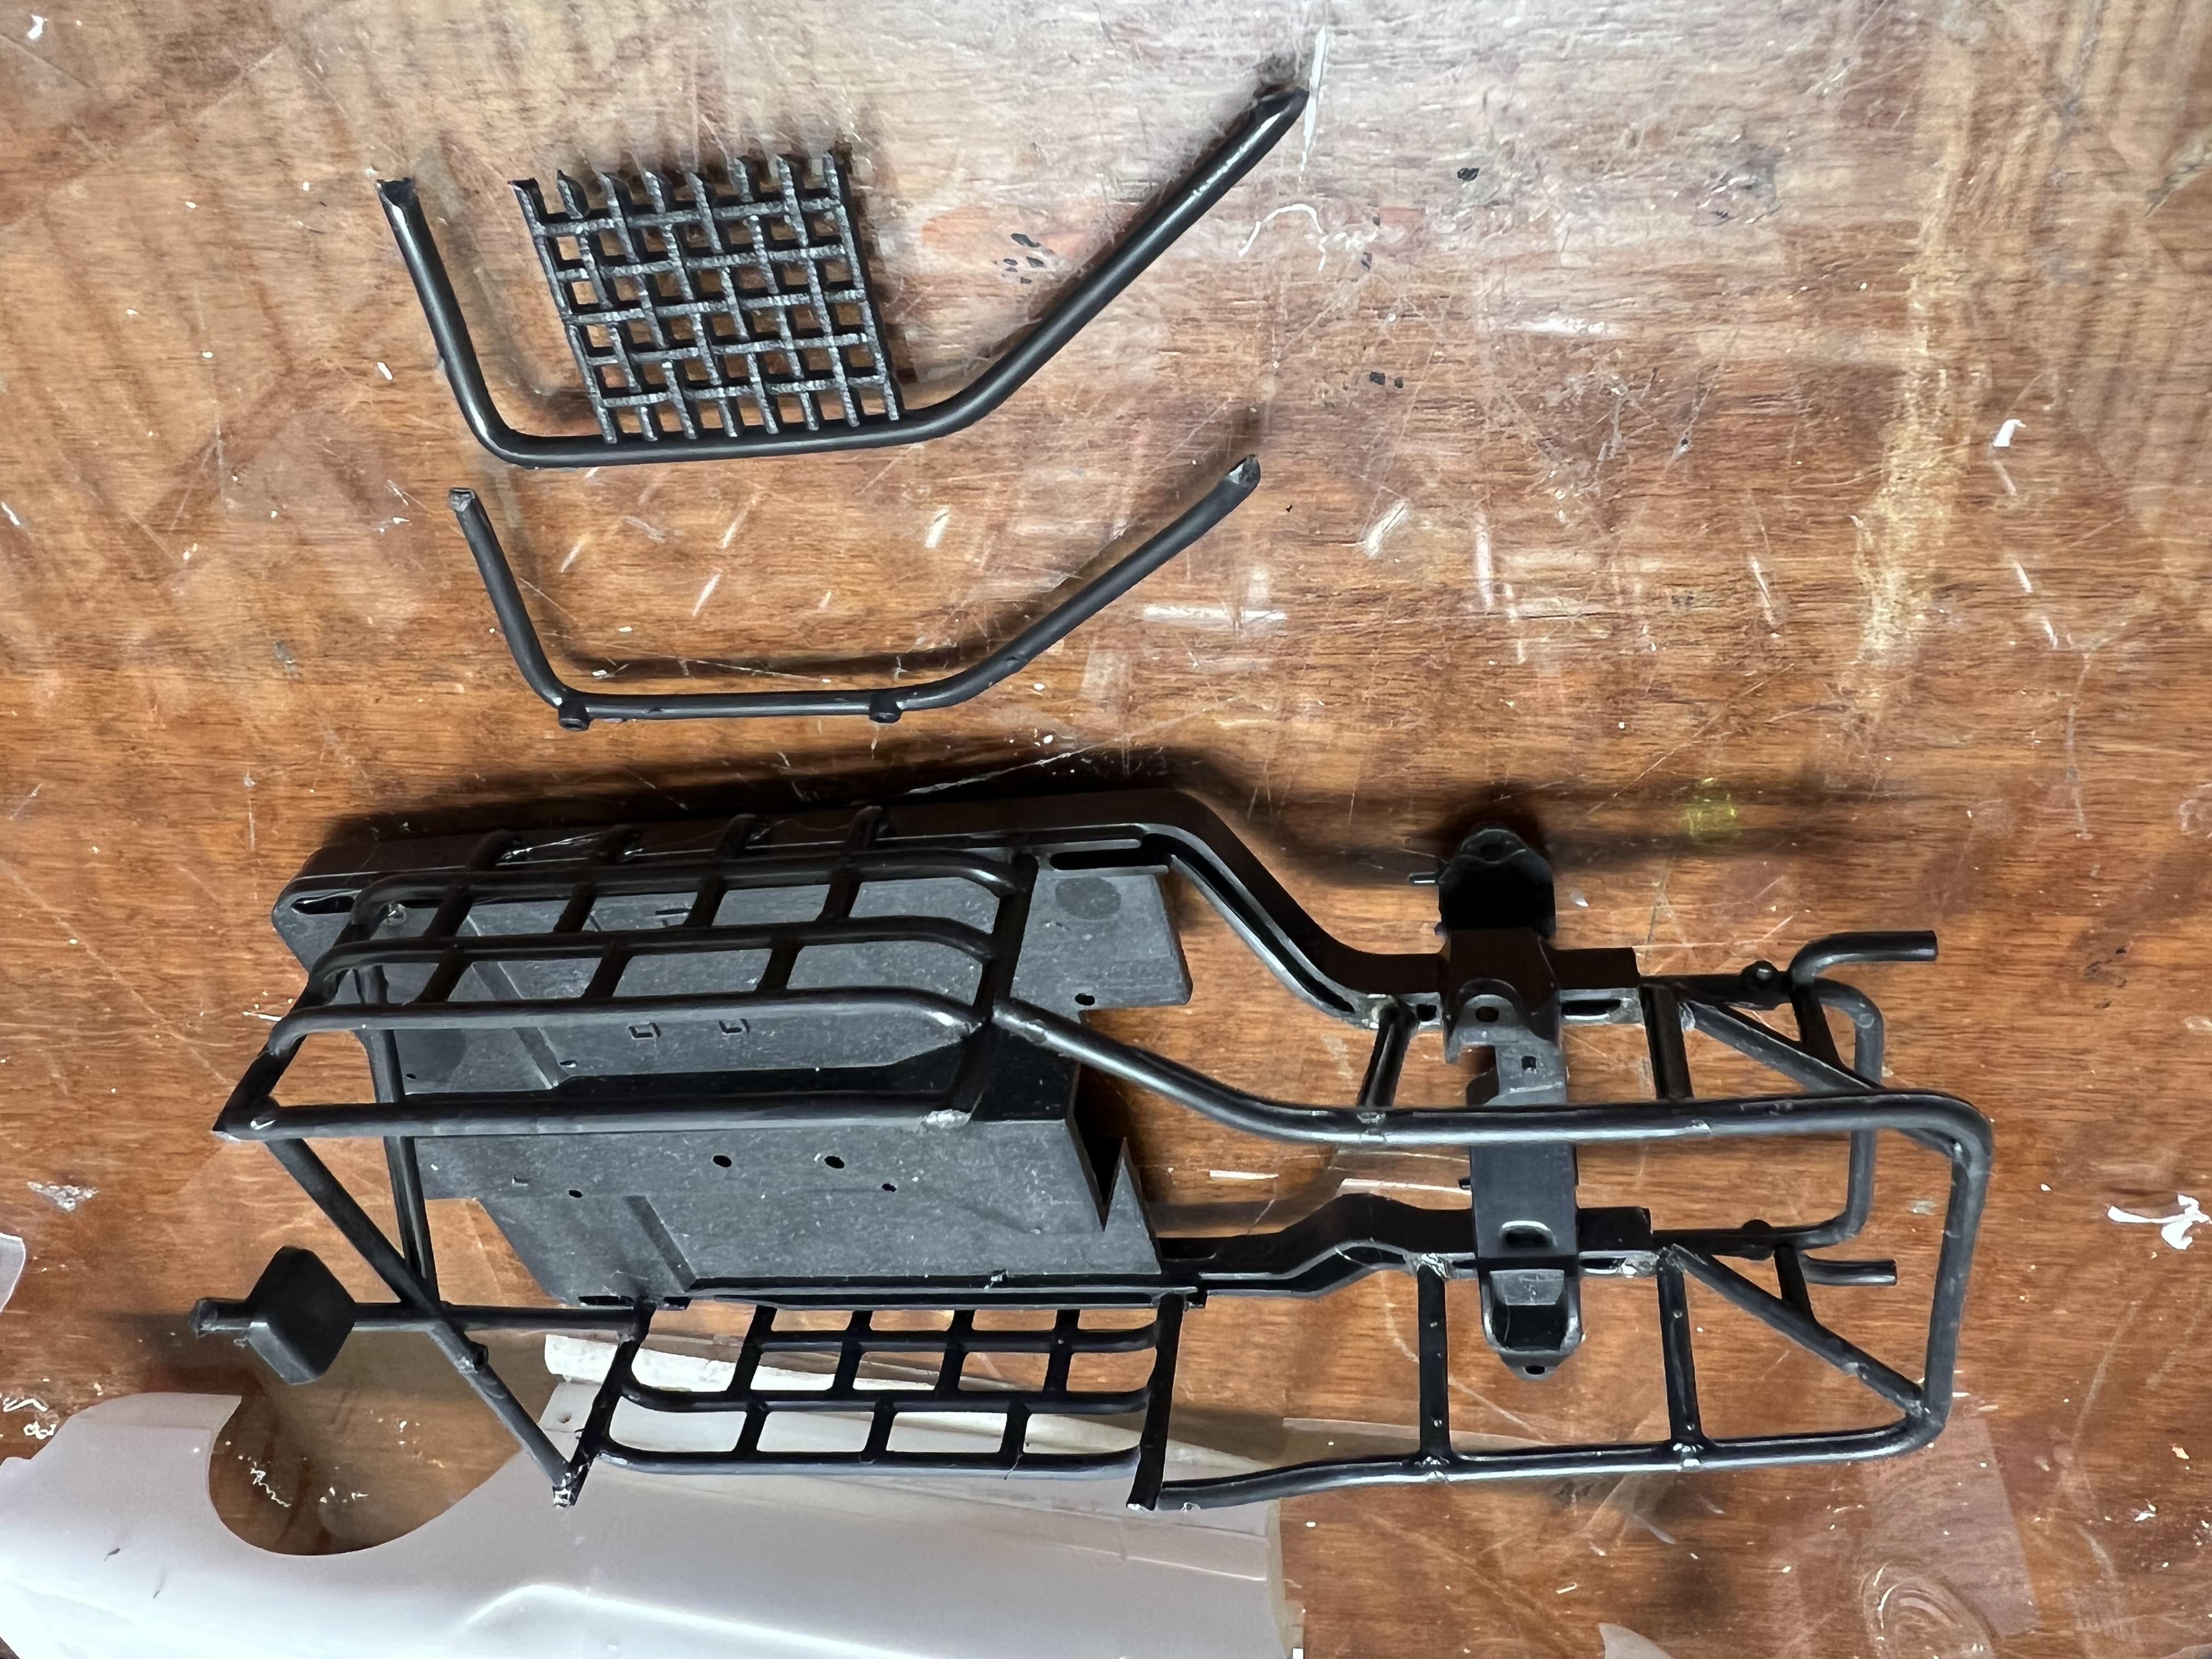
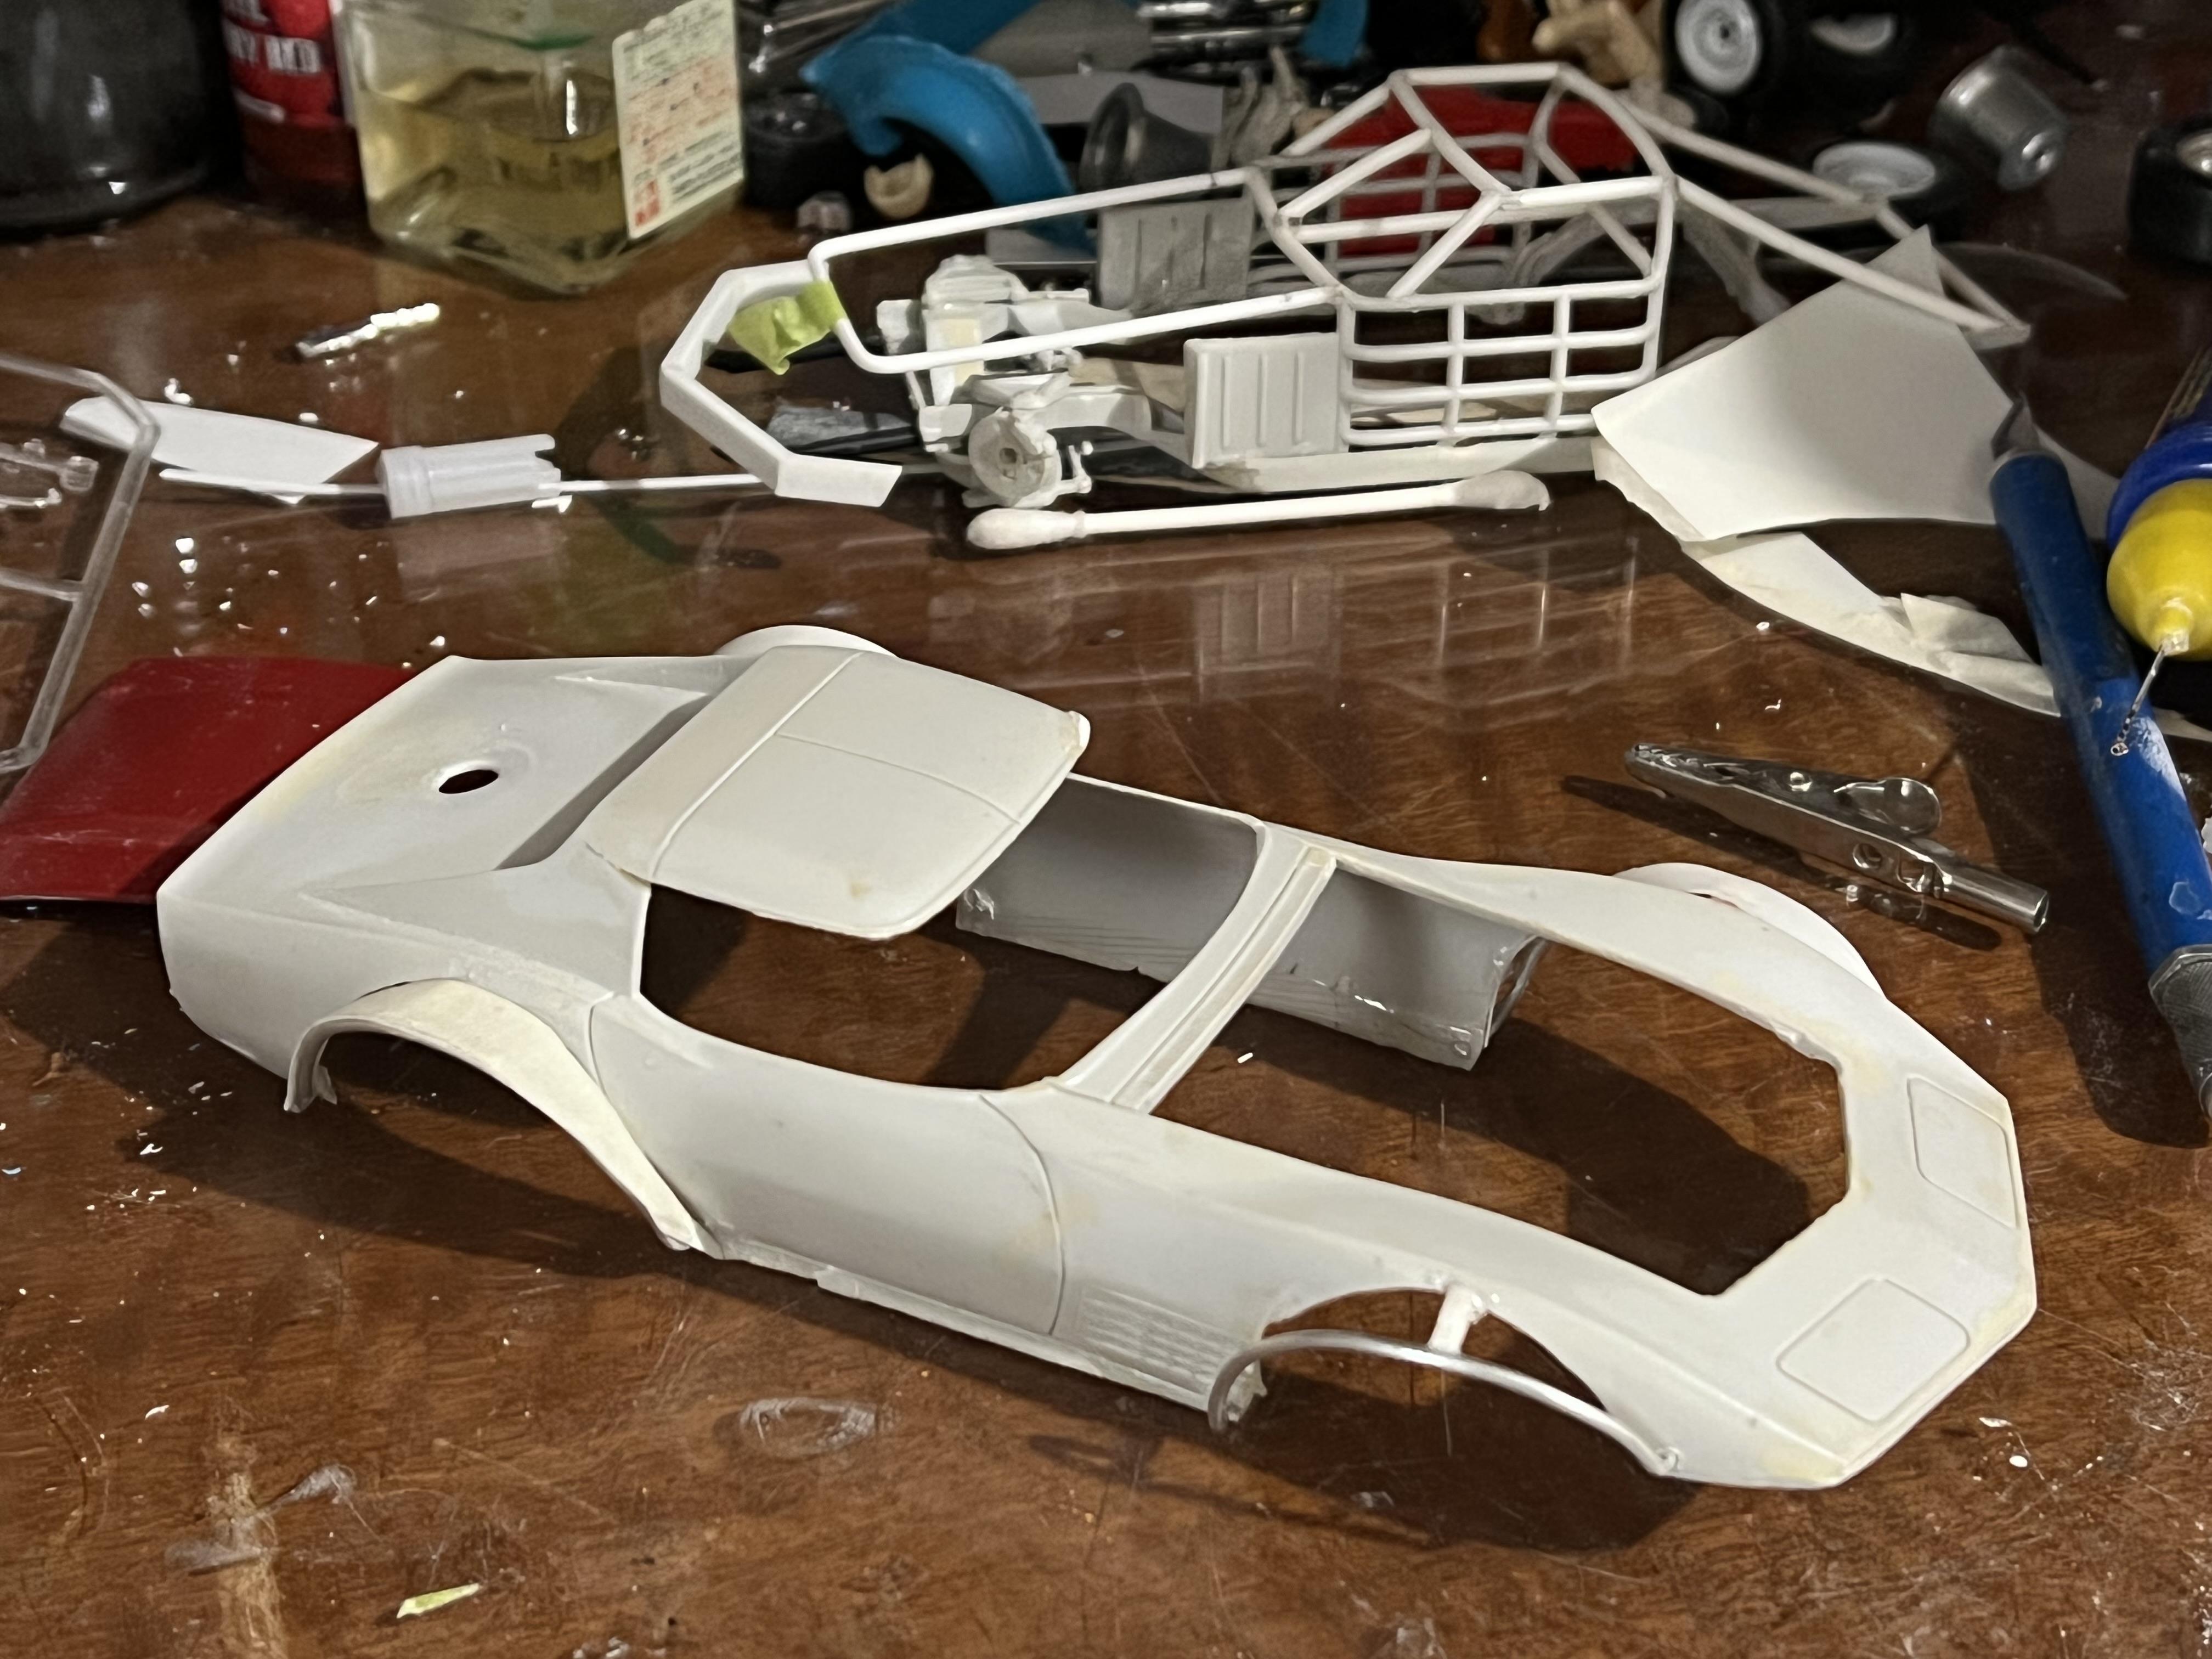
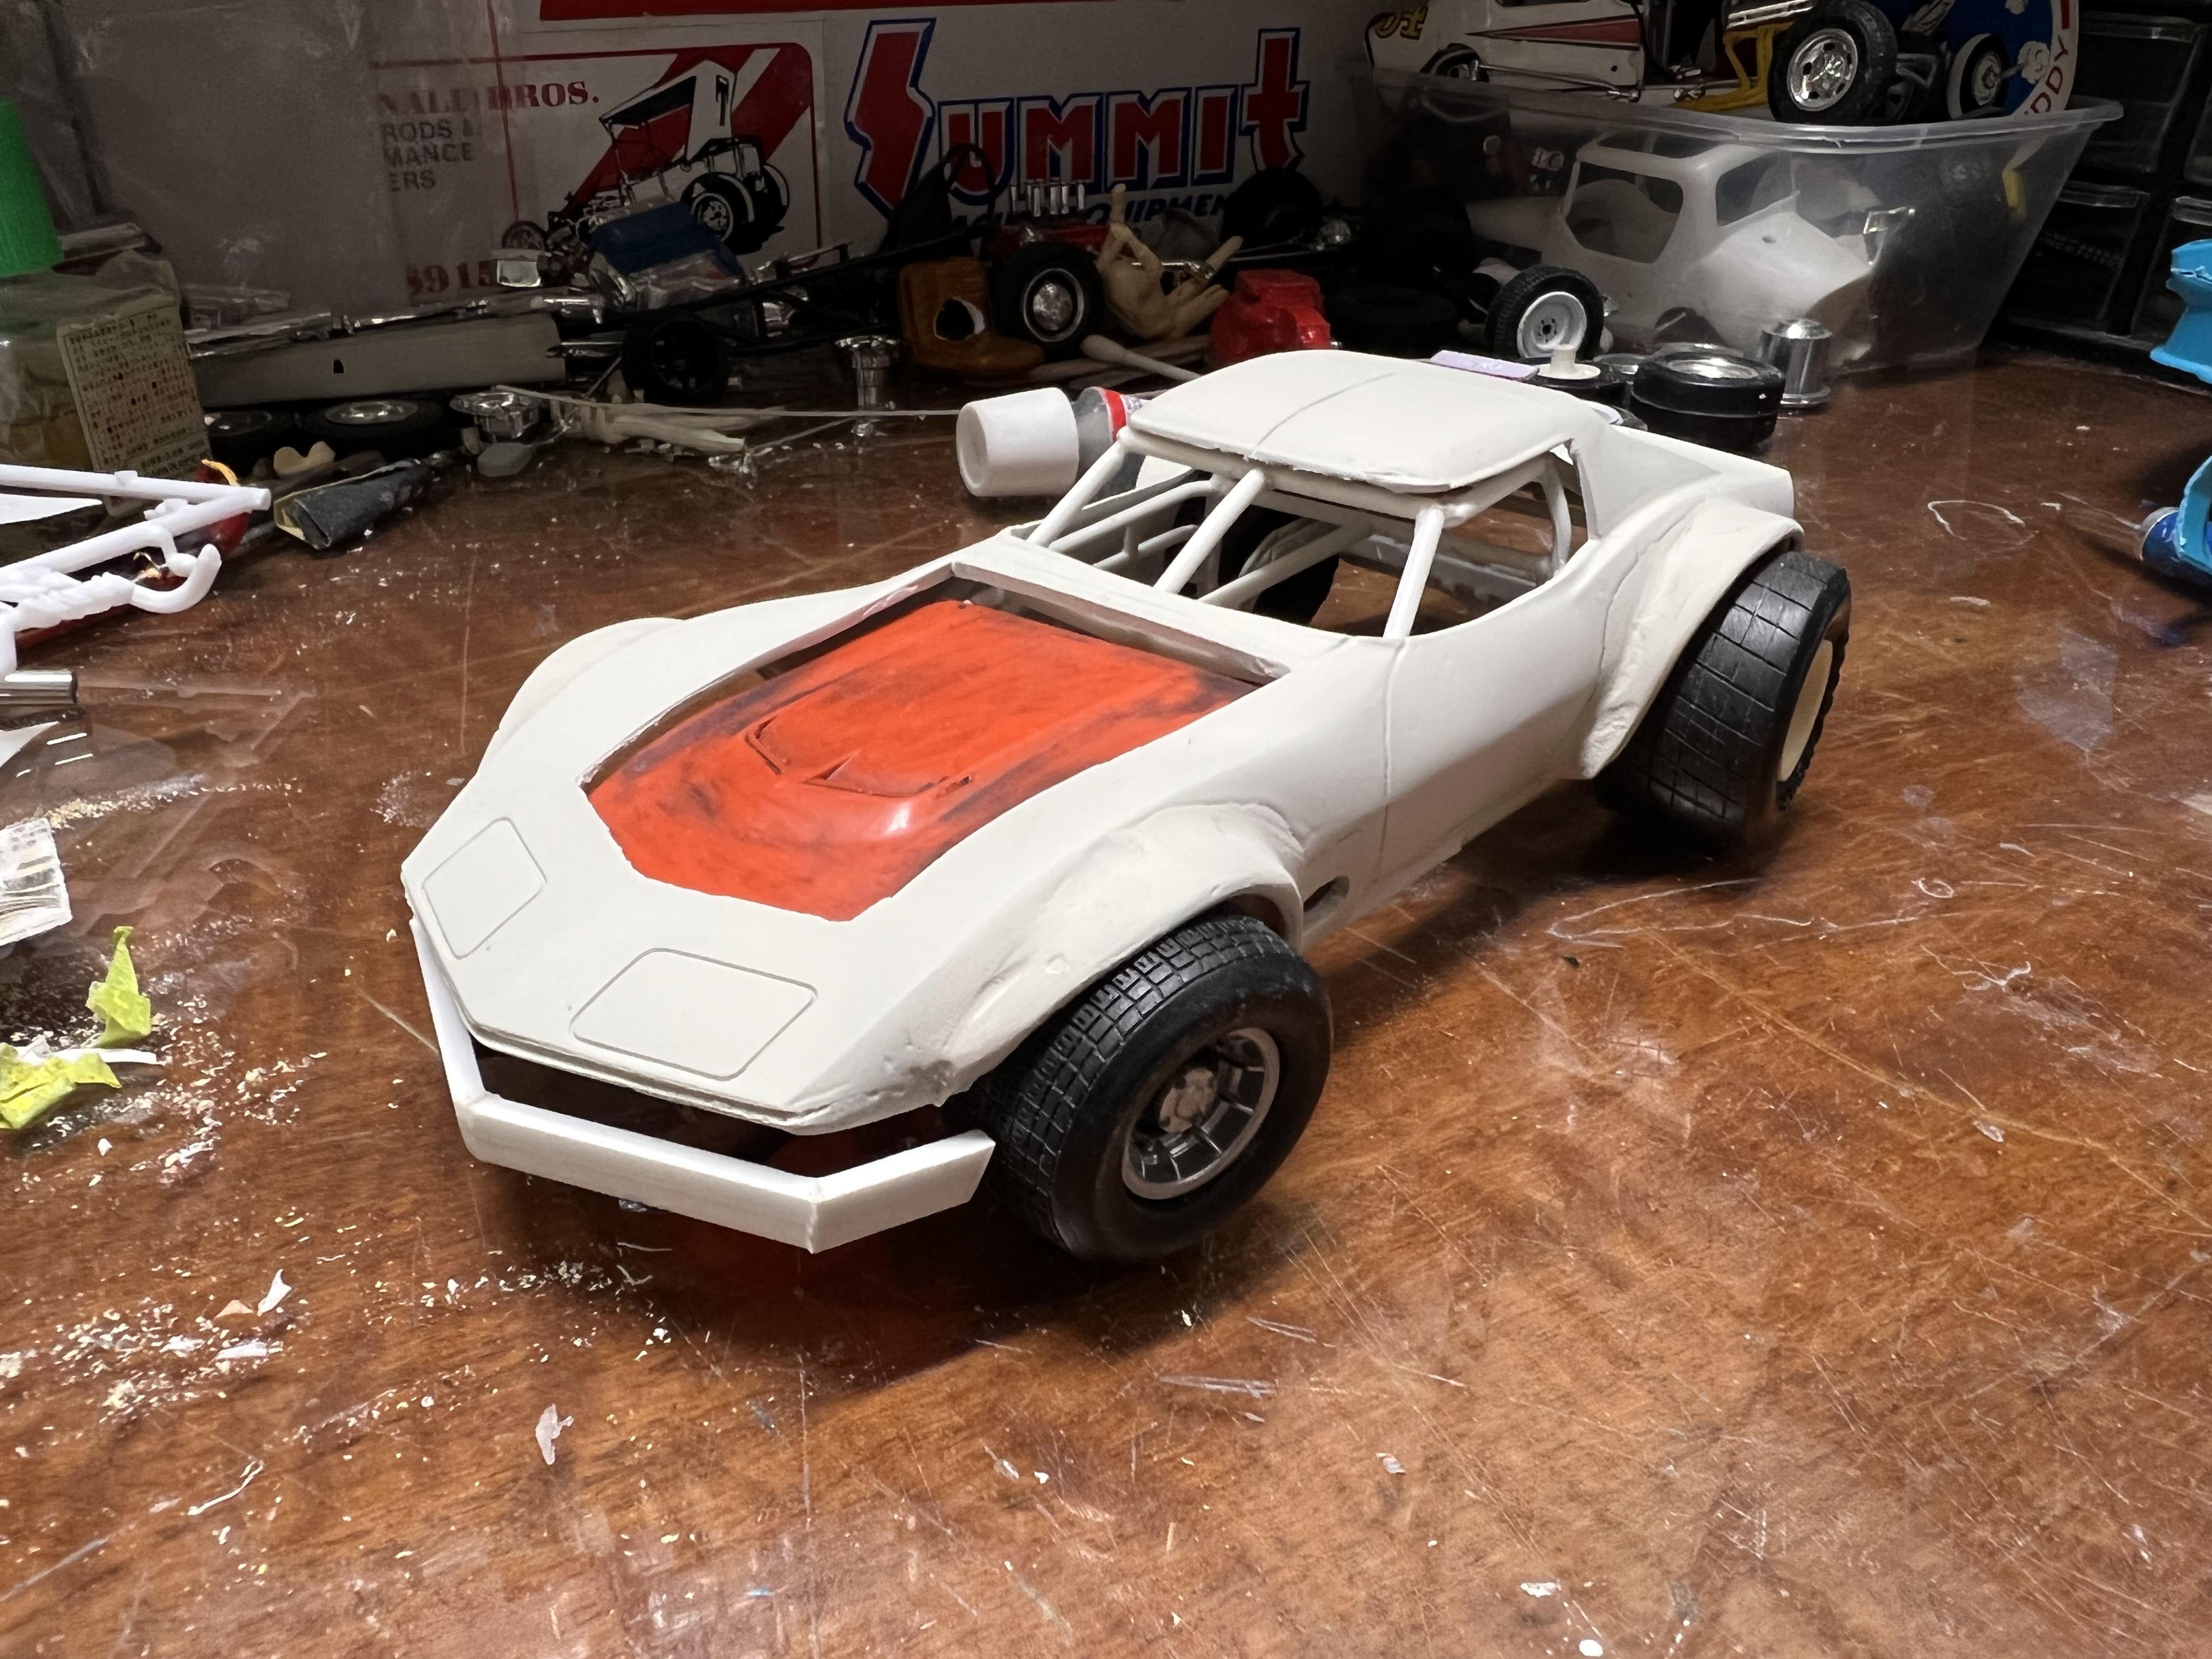
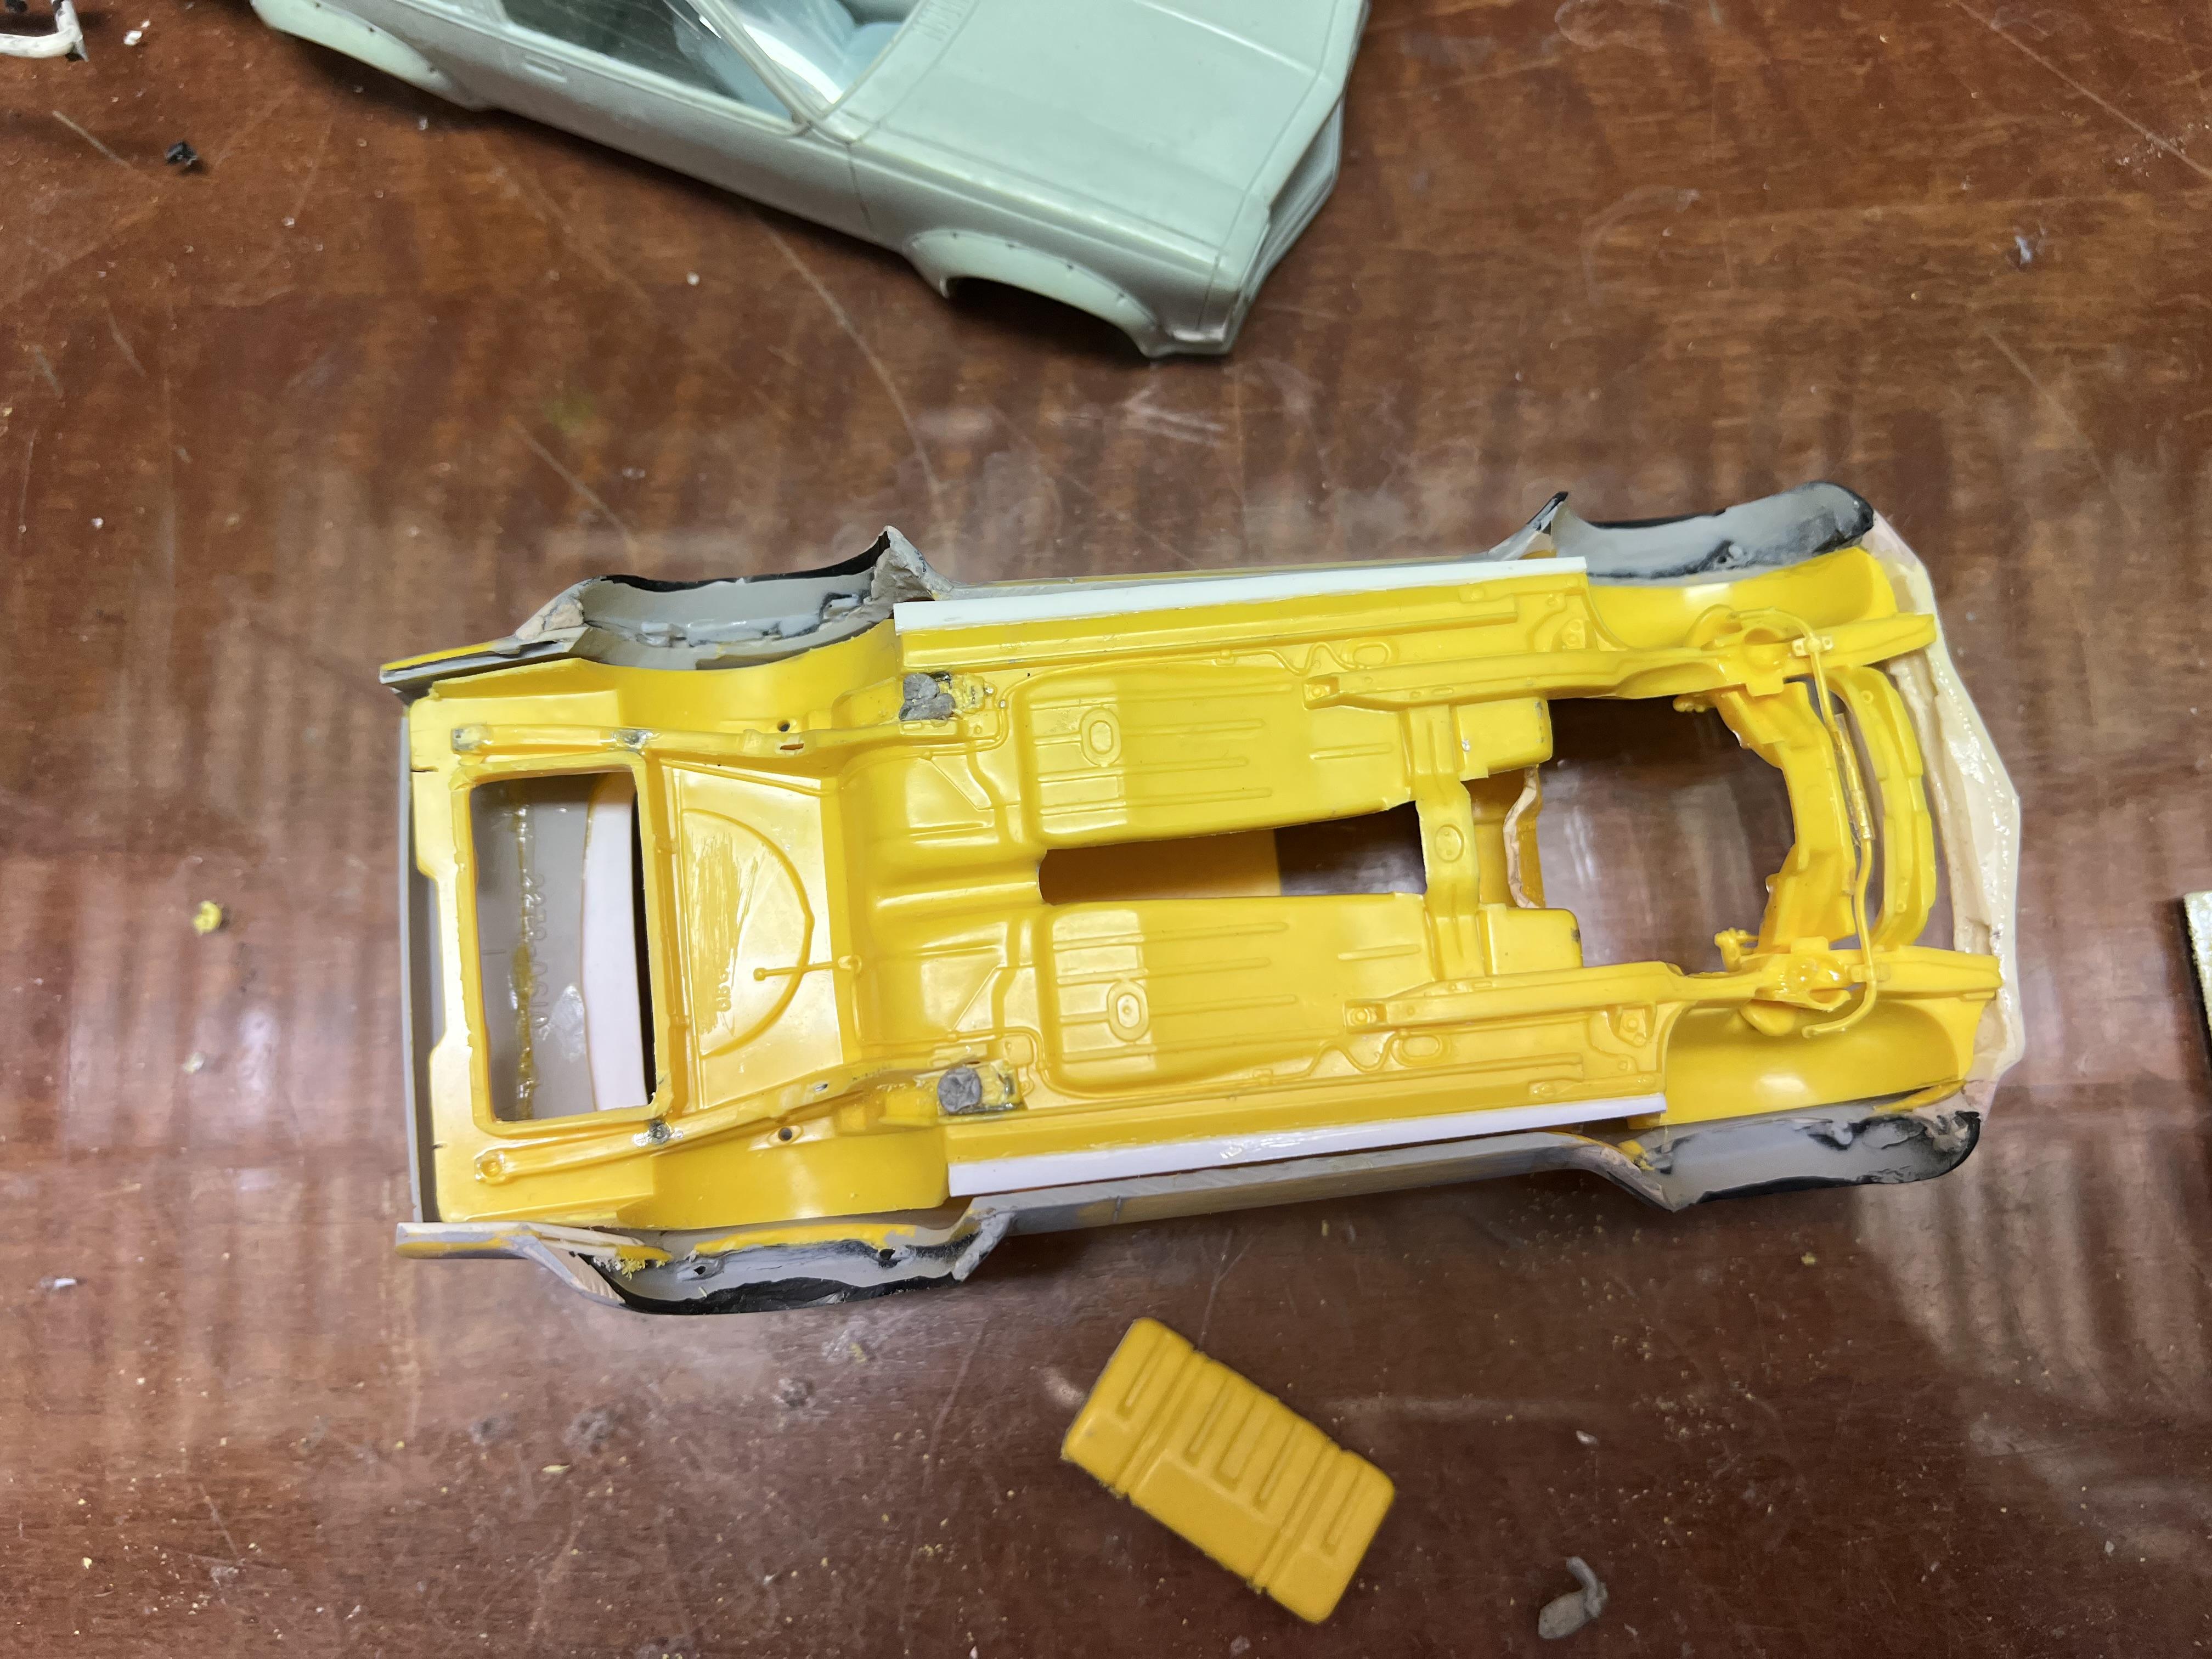
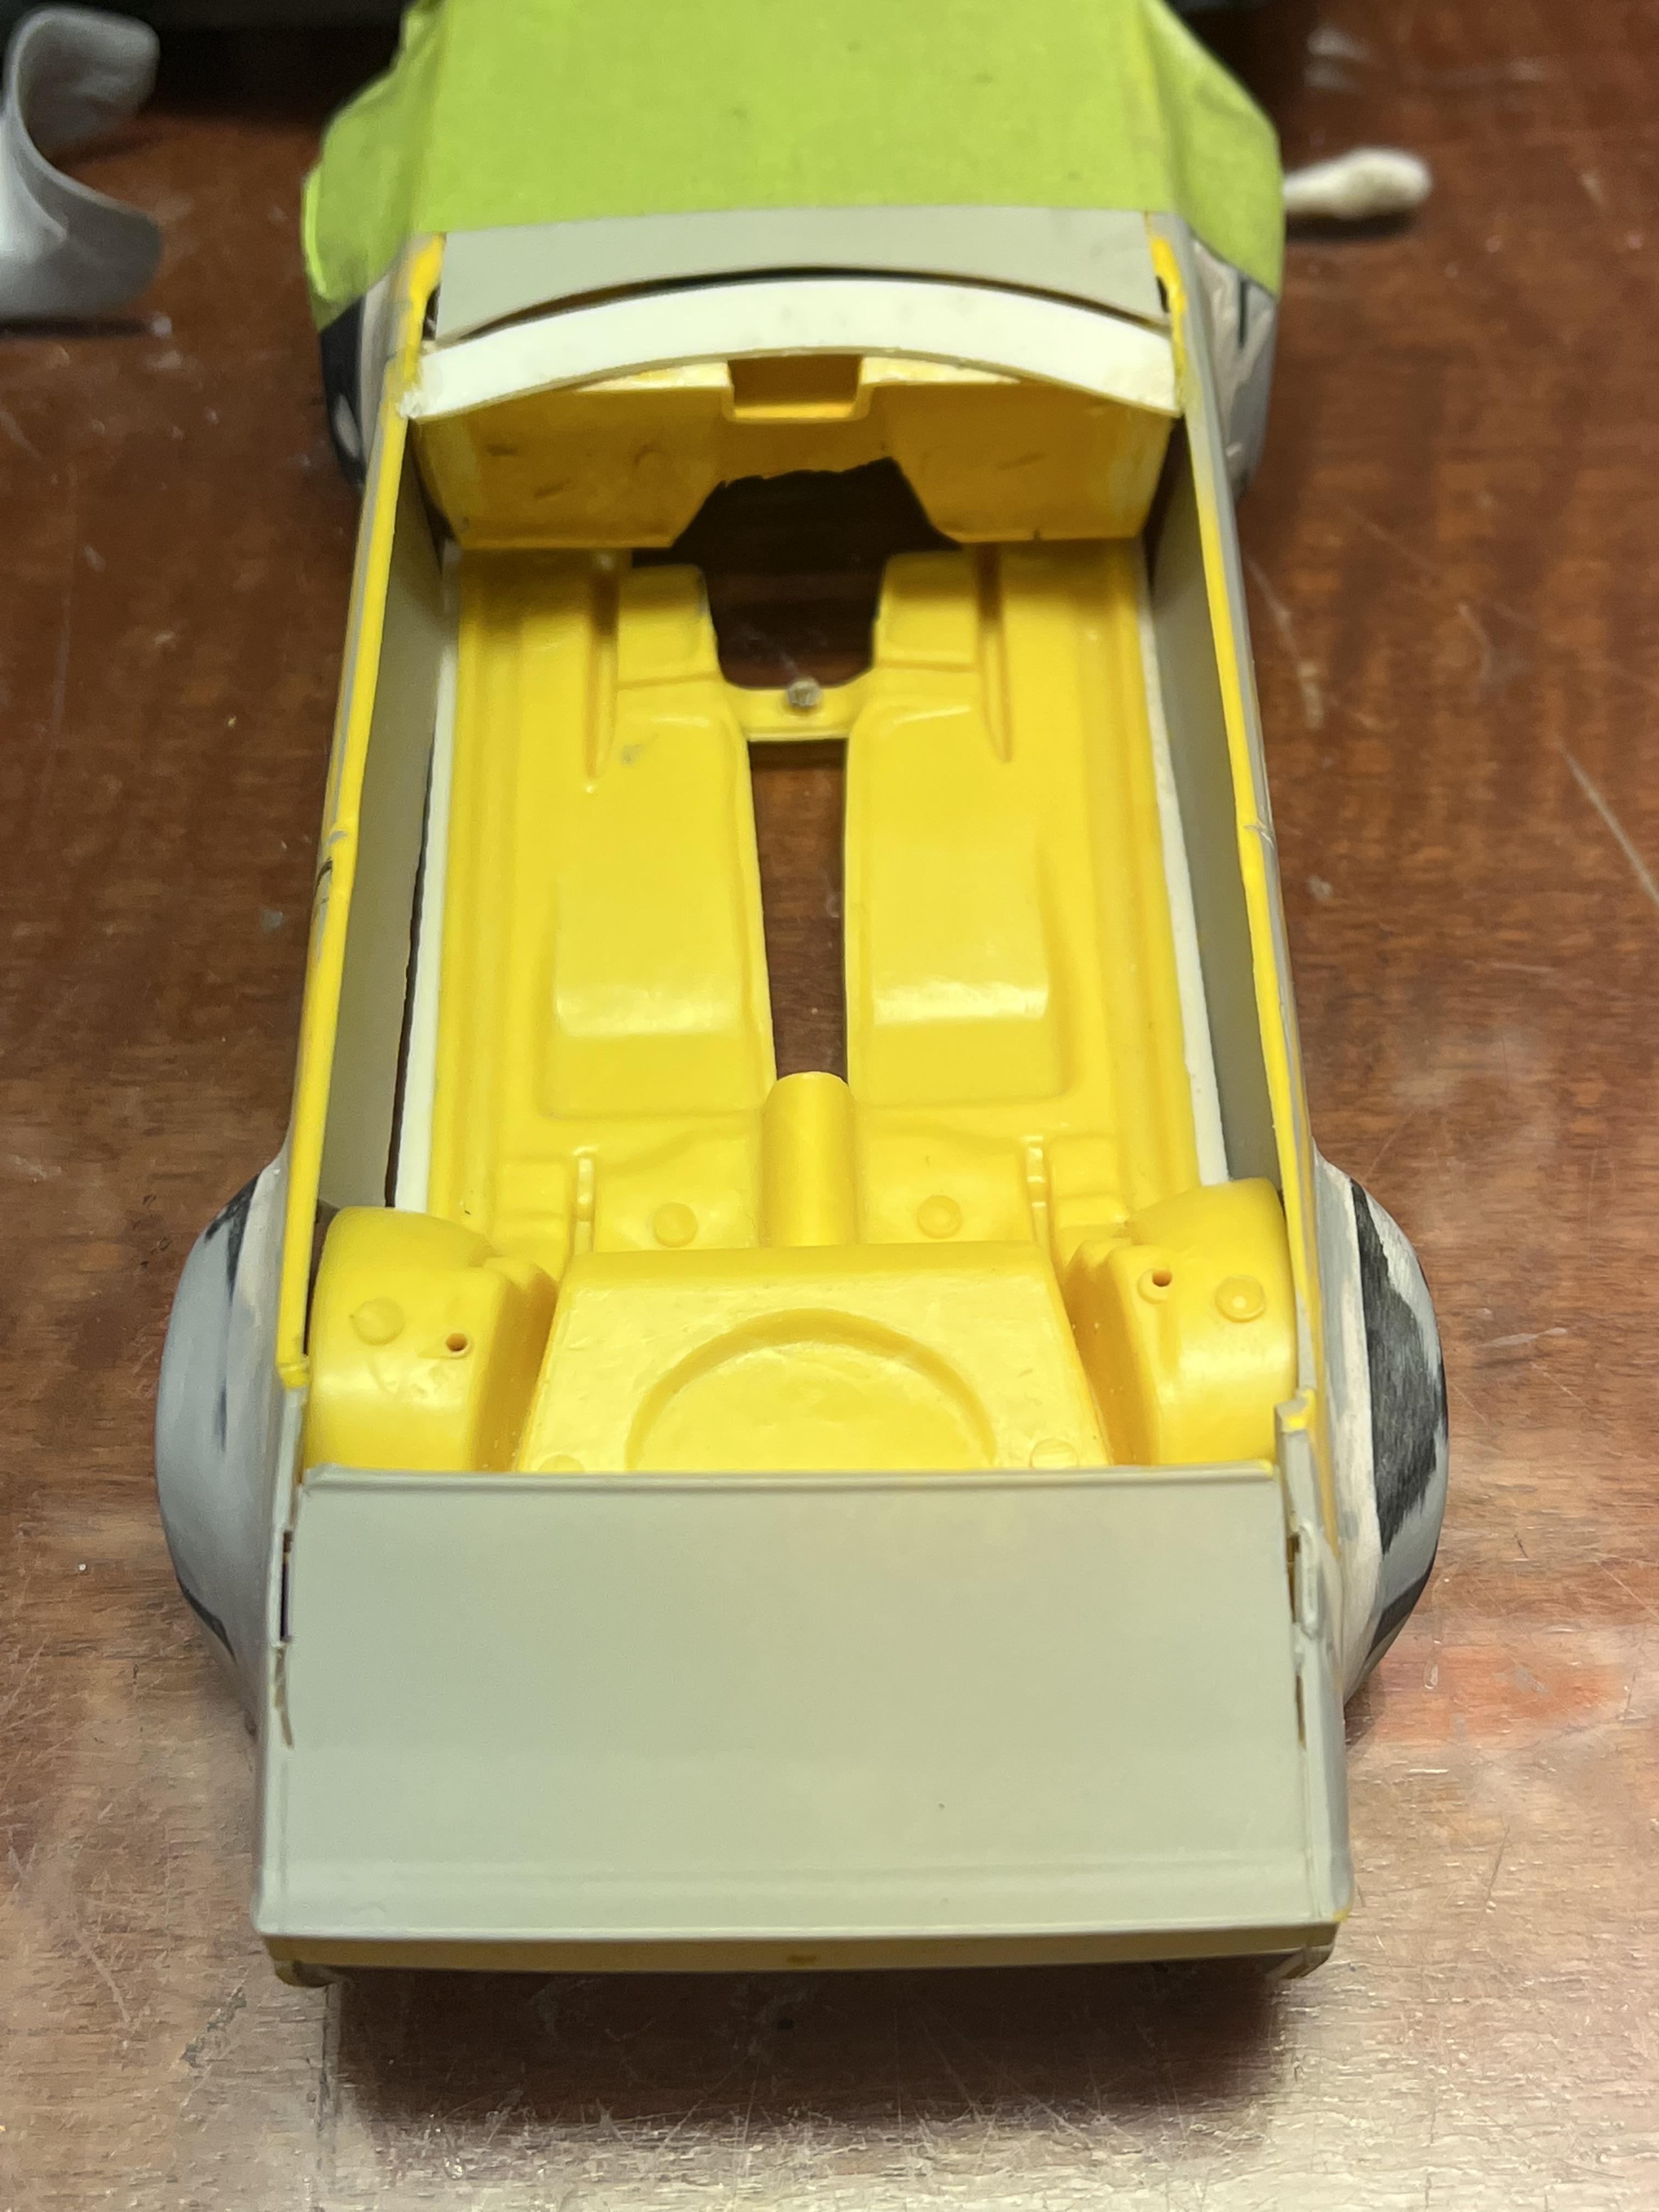
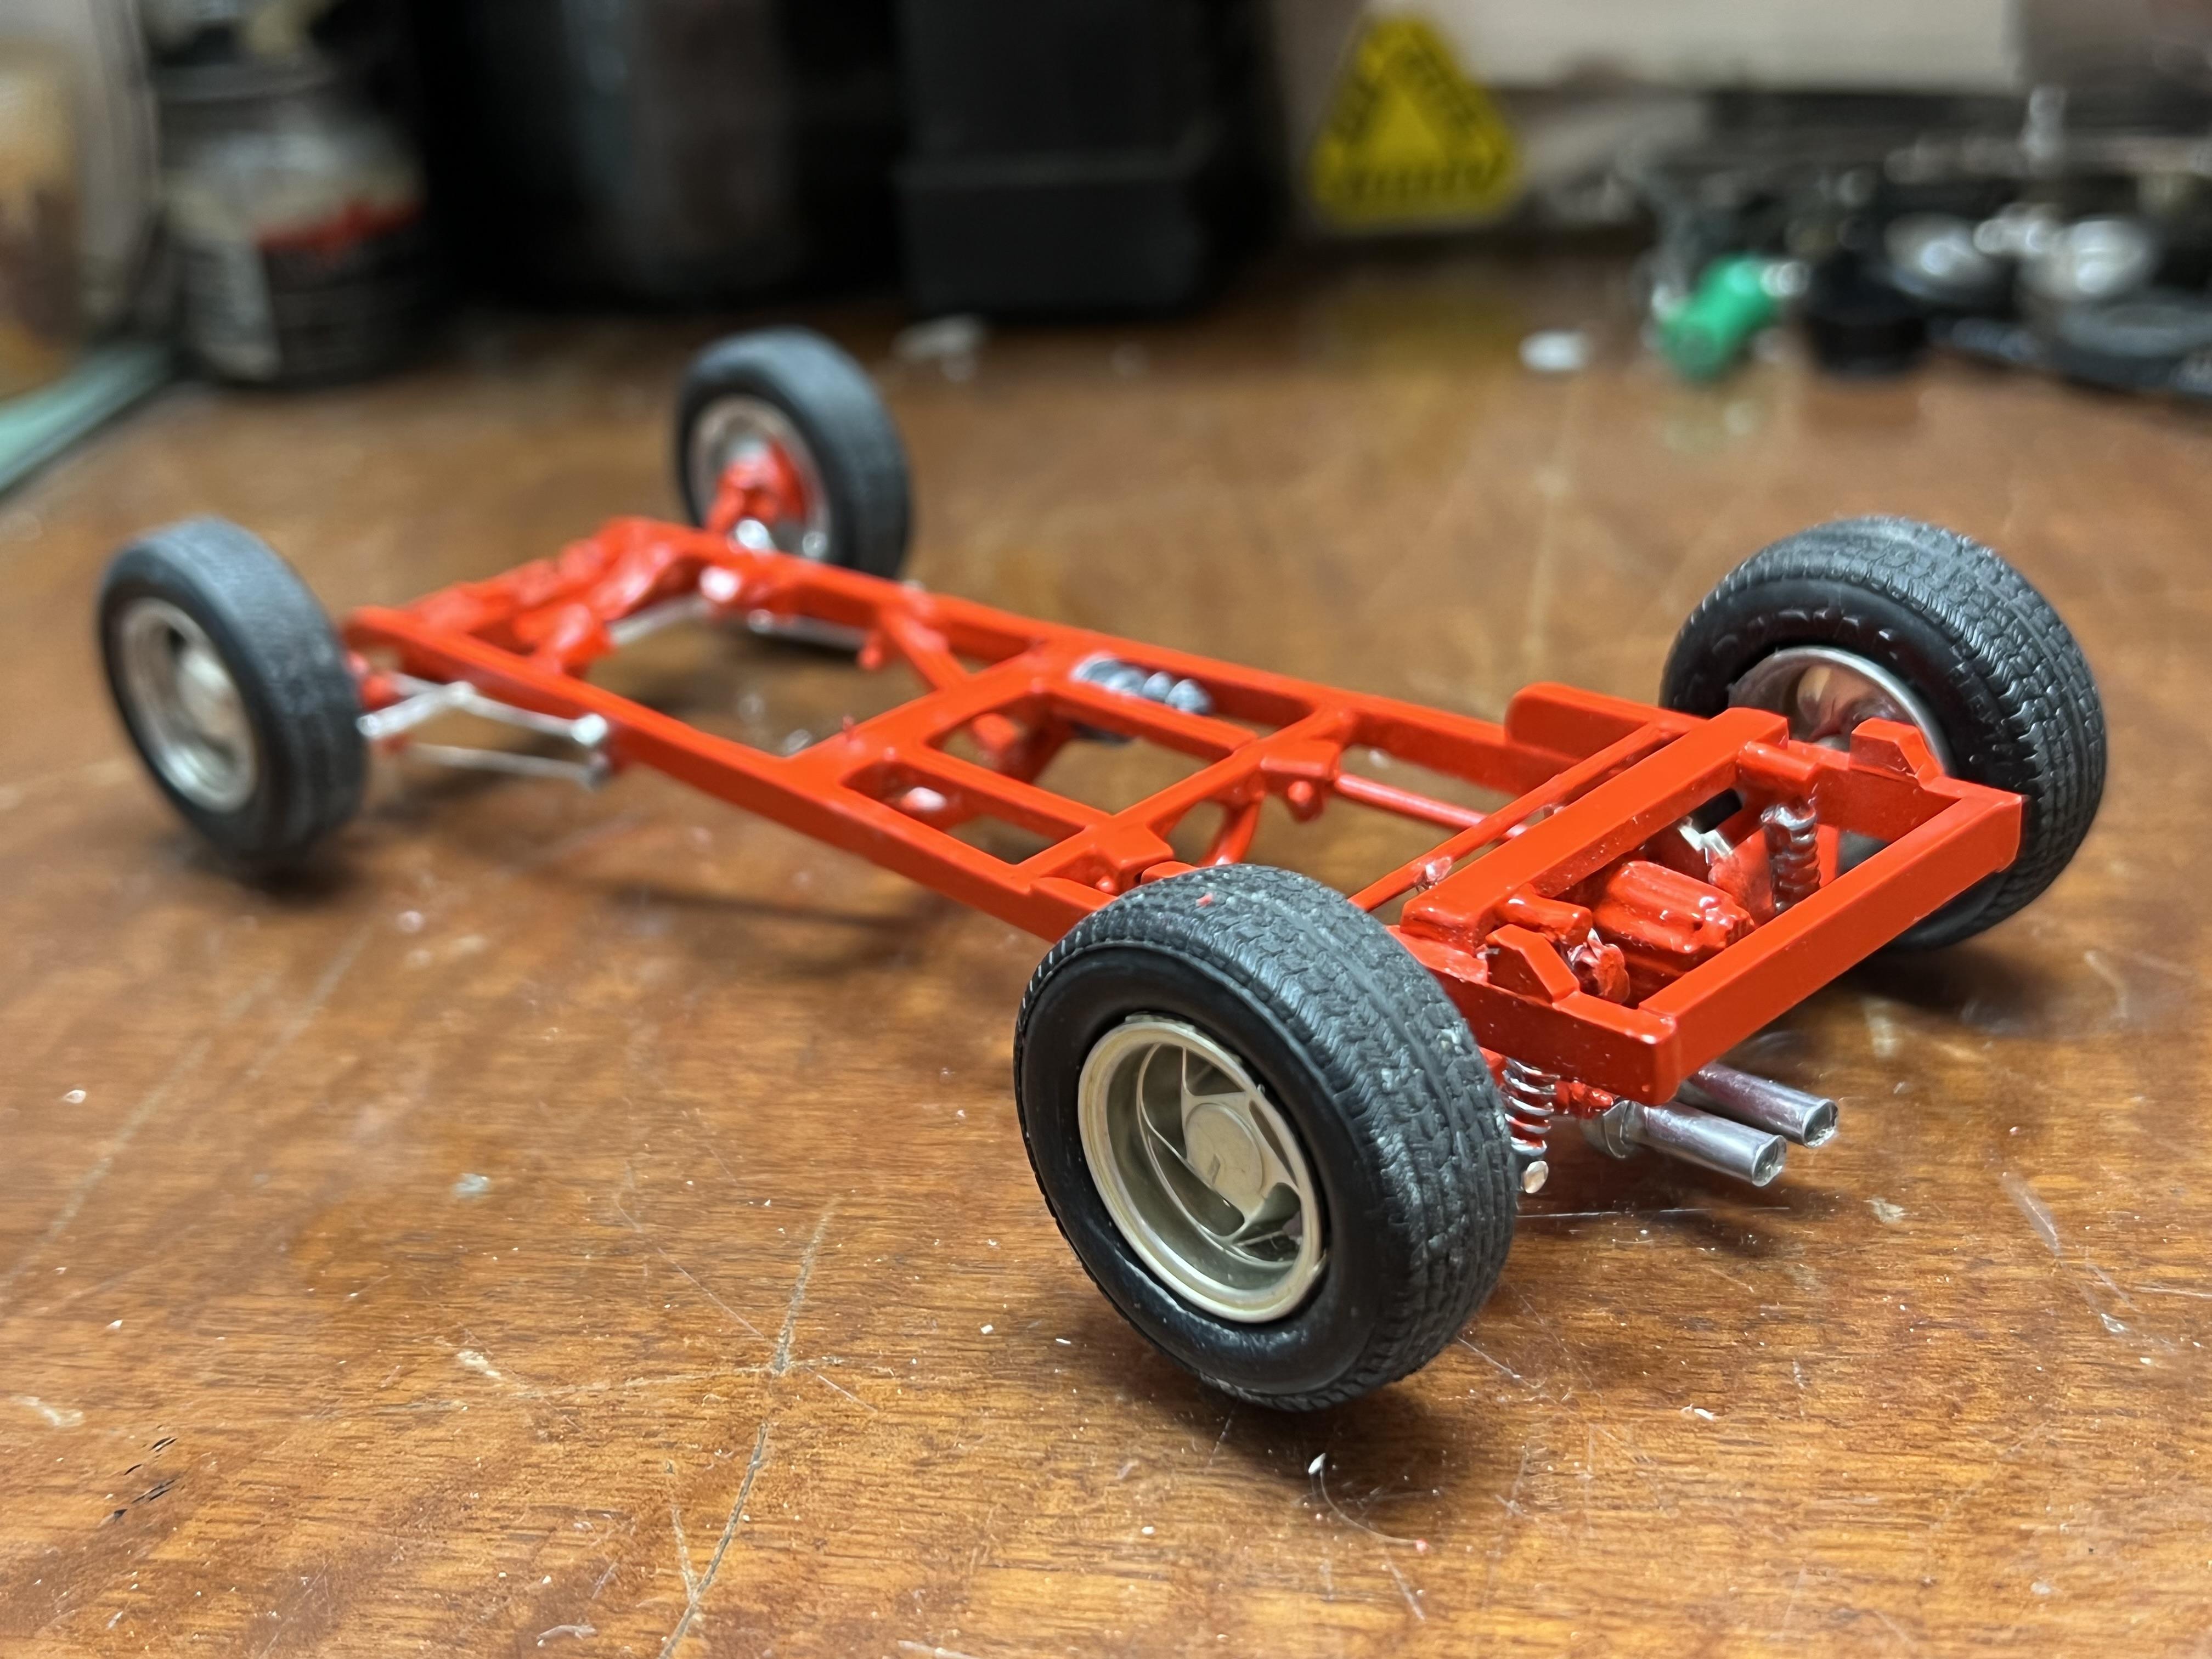
So while I wait to receive the decals, I have started on several other cars. I will continue to show multiple cars on this one thread but will give them separate posts Under Glass when they are completed. In the eighties, Corvette bodied Super Sedans were very popular right across Australia. I am stating with a glue bombed AMT Corvette - about a 71 I think, maybe earlier. Windscreen pillars have been removed along with the front bumper and roll pan. These cars were among the first to use a fully fabricated tube chassis in Oz but some lo-bucks teams would use the GM style perimeter frame from an HQ-HZ Holden one ton utility. These frames have a passing resemblance to, of all things, a Corvette frame so in the interests of simplicity I completely removed the floor and IRS mounting points of the AMT Corvette frame and began building my roll cage on top of that platform. Initially I also lowered the front edge of the roof down a smidge but on reflection it looked odd so I lifted it back to stock. I also made some wide flares for this car although if I was modelling a car from a few years later these would not have been present - it would have just had radiused wheel arches instead. Aussie speedway cars starting losing their flares around 1981 if I recall correctly but I like them so included them in this build. I wrapped some aluminium craft wire around a wooden dowel - this gives a smooth curve. I then cut off appropriate lengths of the curve and bent the ends in at 90 degrees - these were then inserted though holes drilled in the body and superglue was applied. I adjust the angle of the flares to suit the tyres and then glue small strips of plastic between the wire and the body to establish this distance. Finally, I cut and fit small strips of thin styrene sheet to fill the gaps. Eventually a skim coat of bog blends everything in. In the photo you can see the rear flare filled in while I am still establishing the front one. You can also see the beginning of the frame in the background. In the second mockup photo the frame has dropped away from the body - that fabricated bumper will be snug to the body eventually. Cheers Alan
-
It's been a while but time for an update. I got the white and red paint on the Torrie, plus the black sill panels. A friend in our model club is very talented in creating decals so he is doing them for me - I will explain the significance of those decals when I get them applied to the car. For the Aussies viewing now, -think MDHT! Narrowing the flares made a huge difference and another friend has just 3D printed a set of wide and wider rims for me. These are an Australian wheel known as an Aunger Hot Wire. Similar yet different to an Appliance wire mag or a European BBS wheel, they were very popular on street machines as well as racecars and up until now, there was only one rare source for them and they needed a lot of work, especially in regards to width. They are the ones you can see in this photo but it will have the #D printed ones next time I post a picture. These will be the finishing touch on the model. Cheers Alan
-
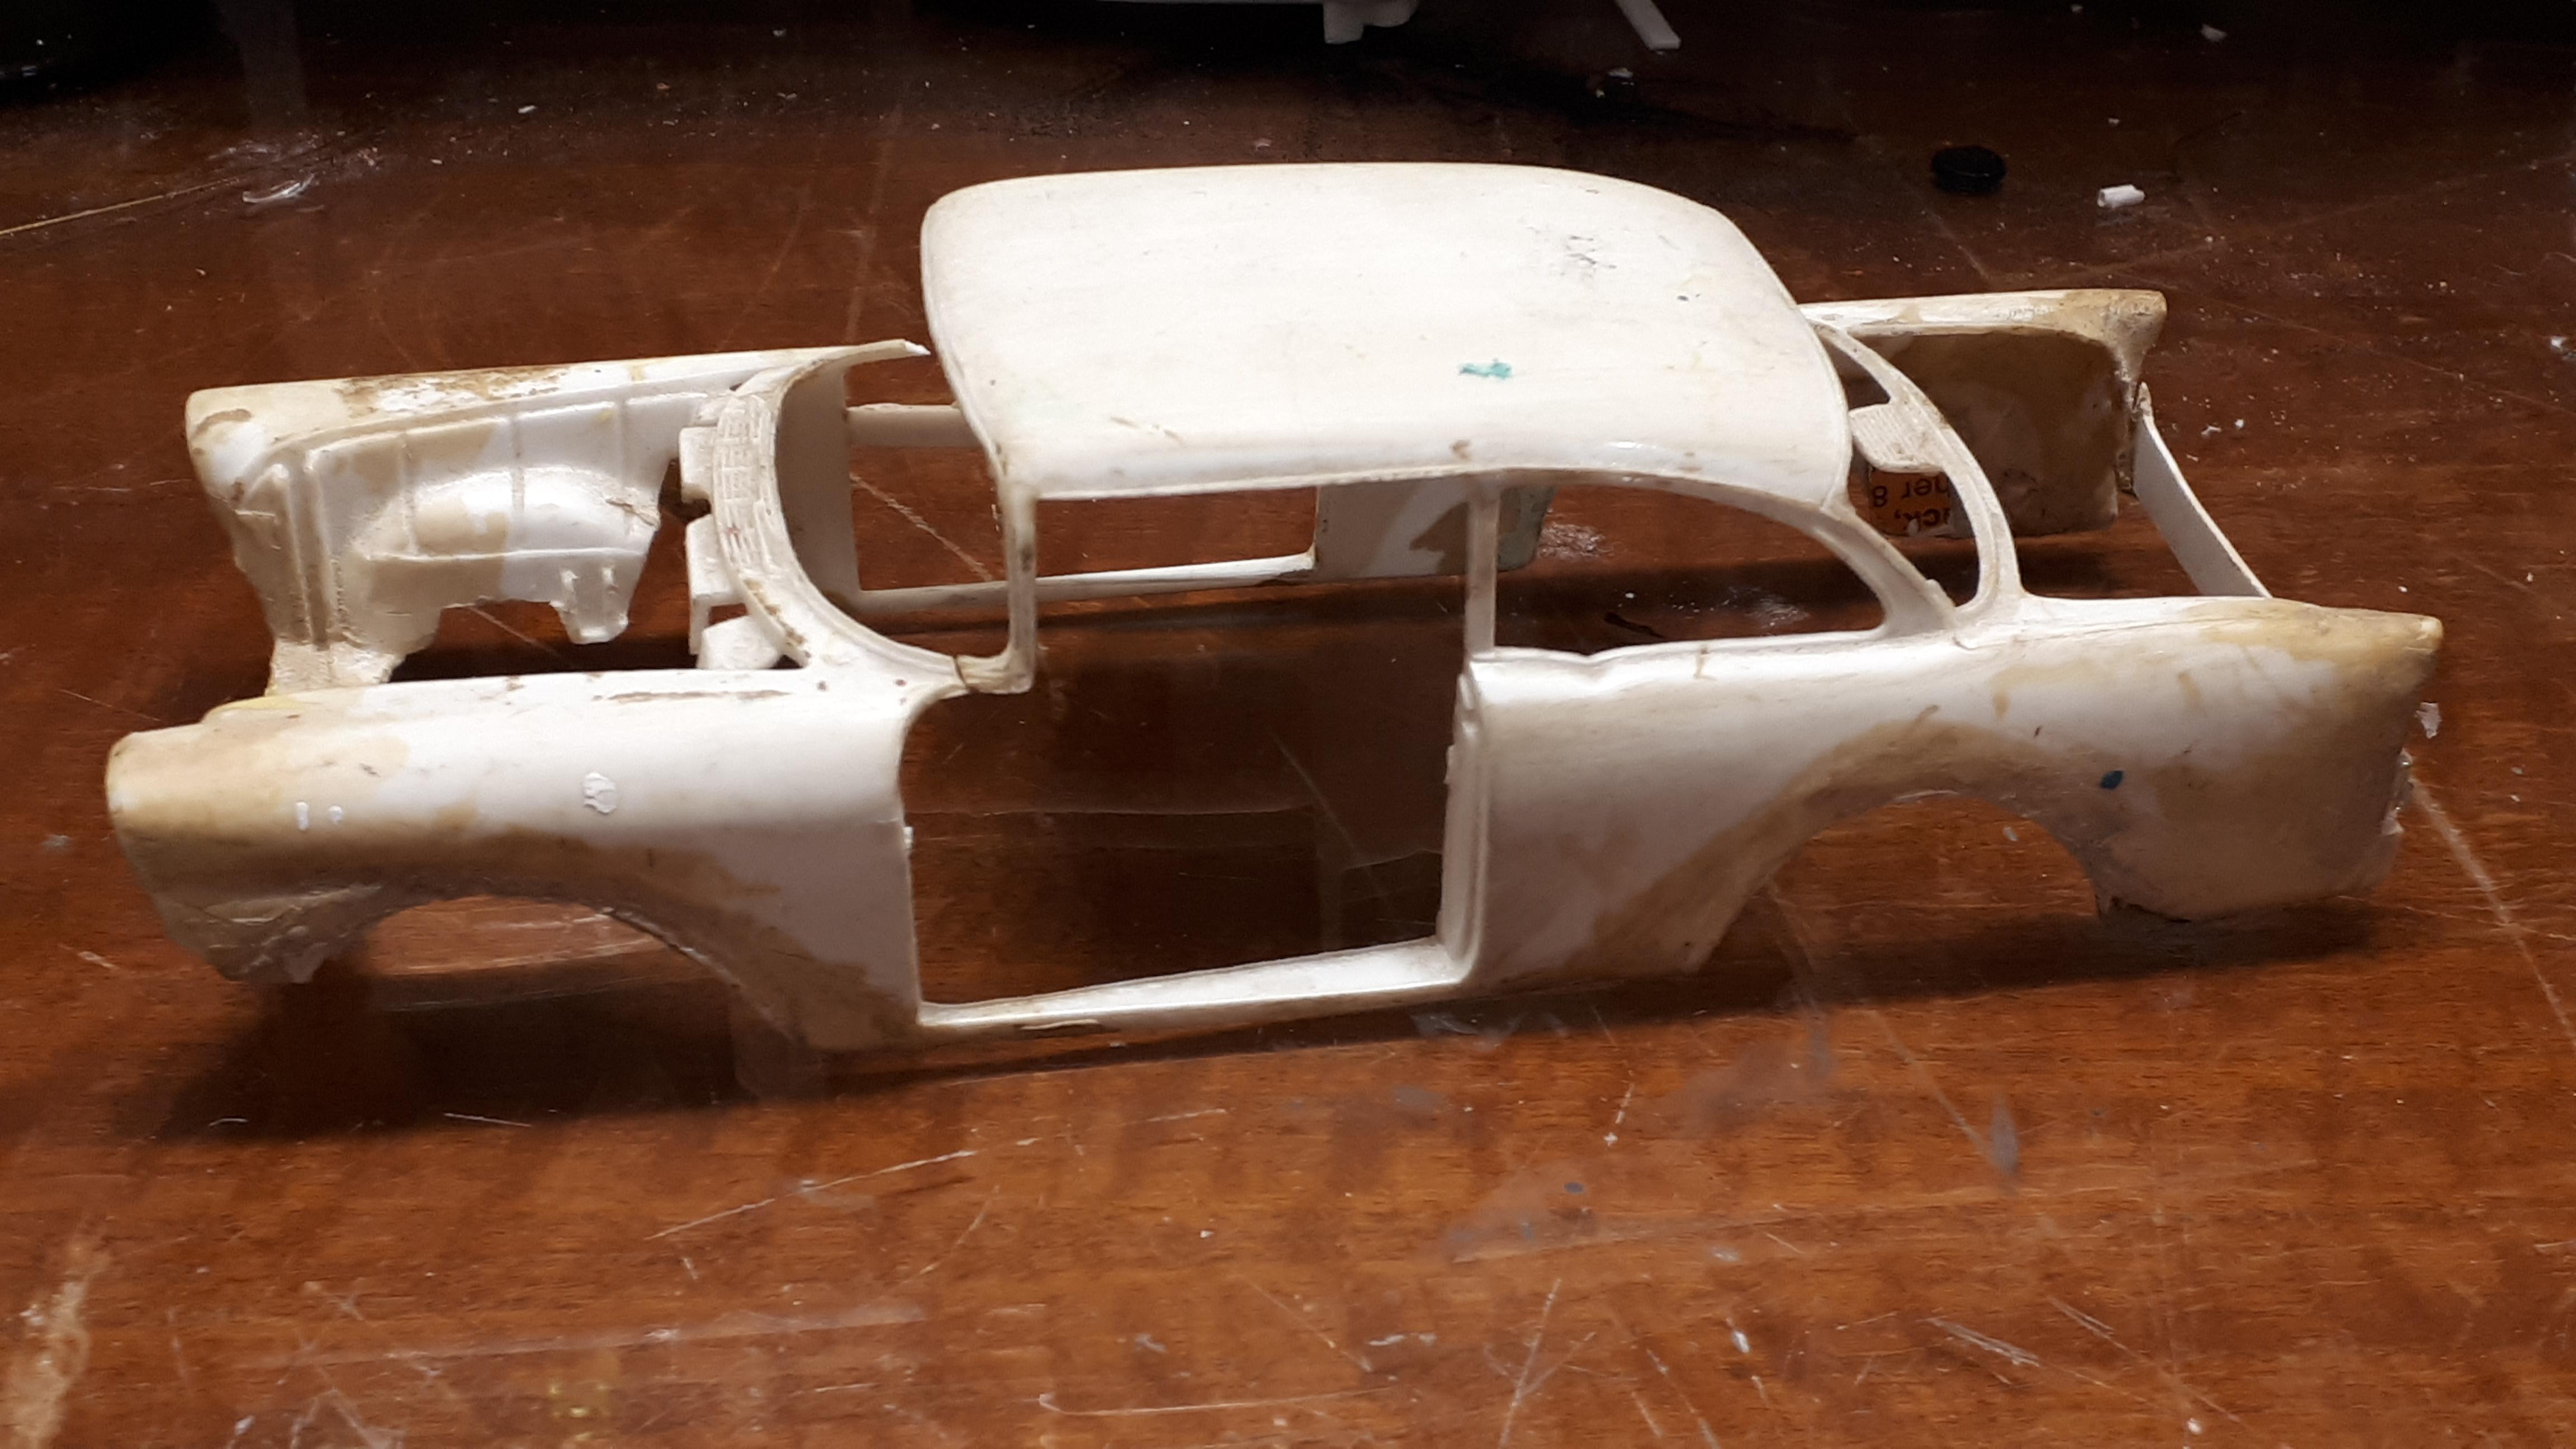
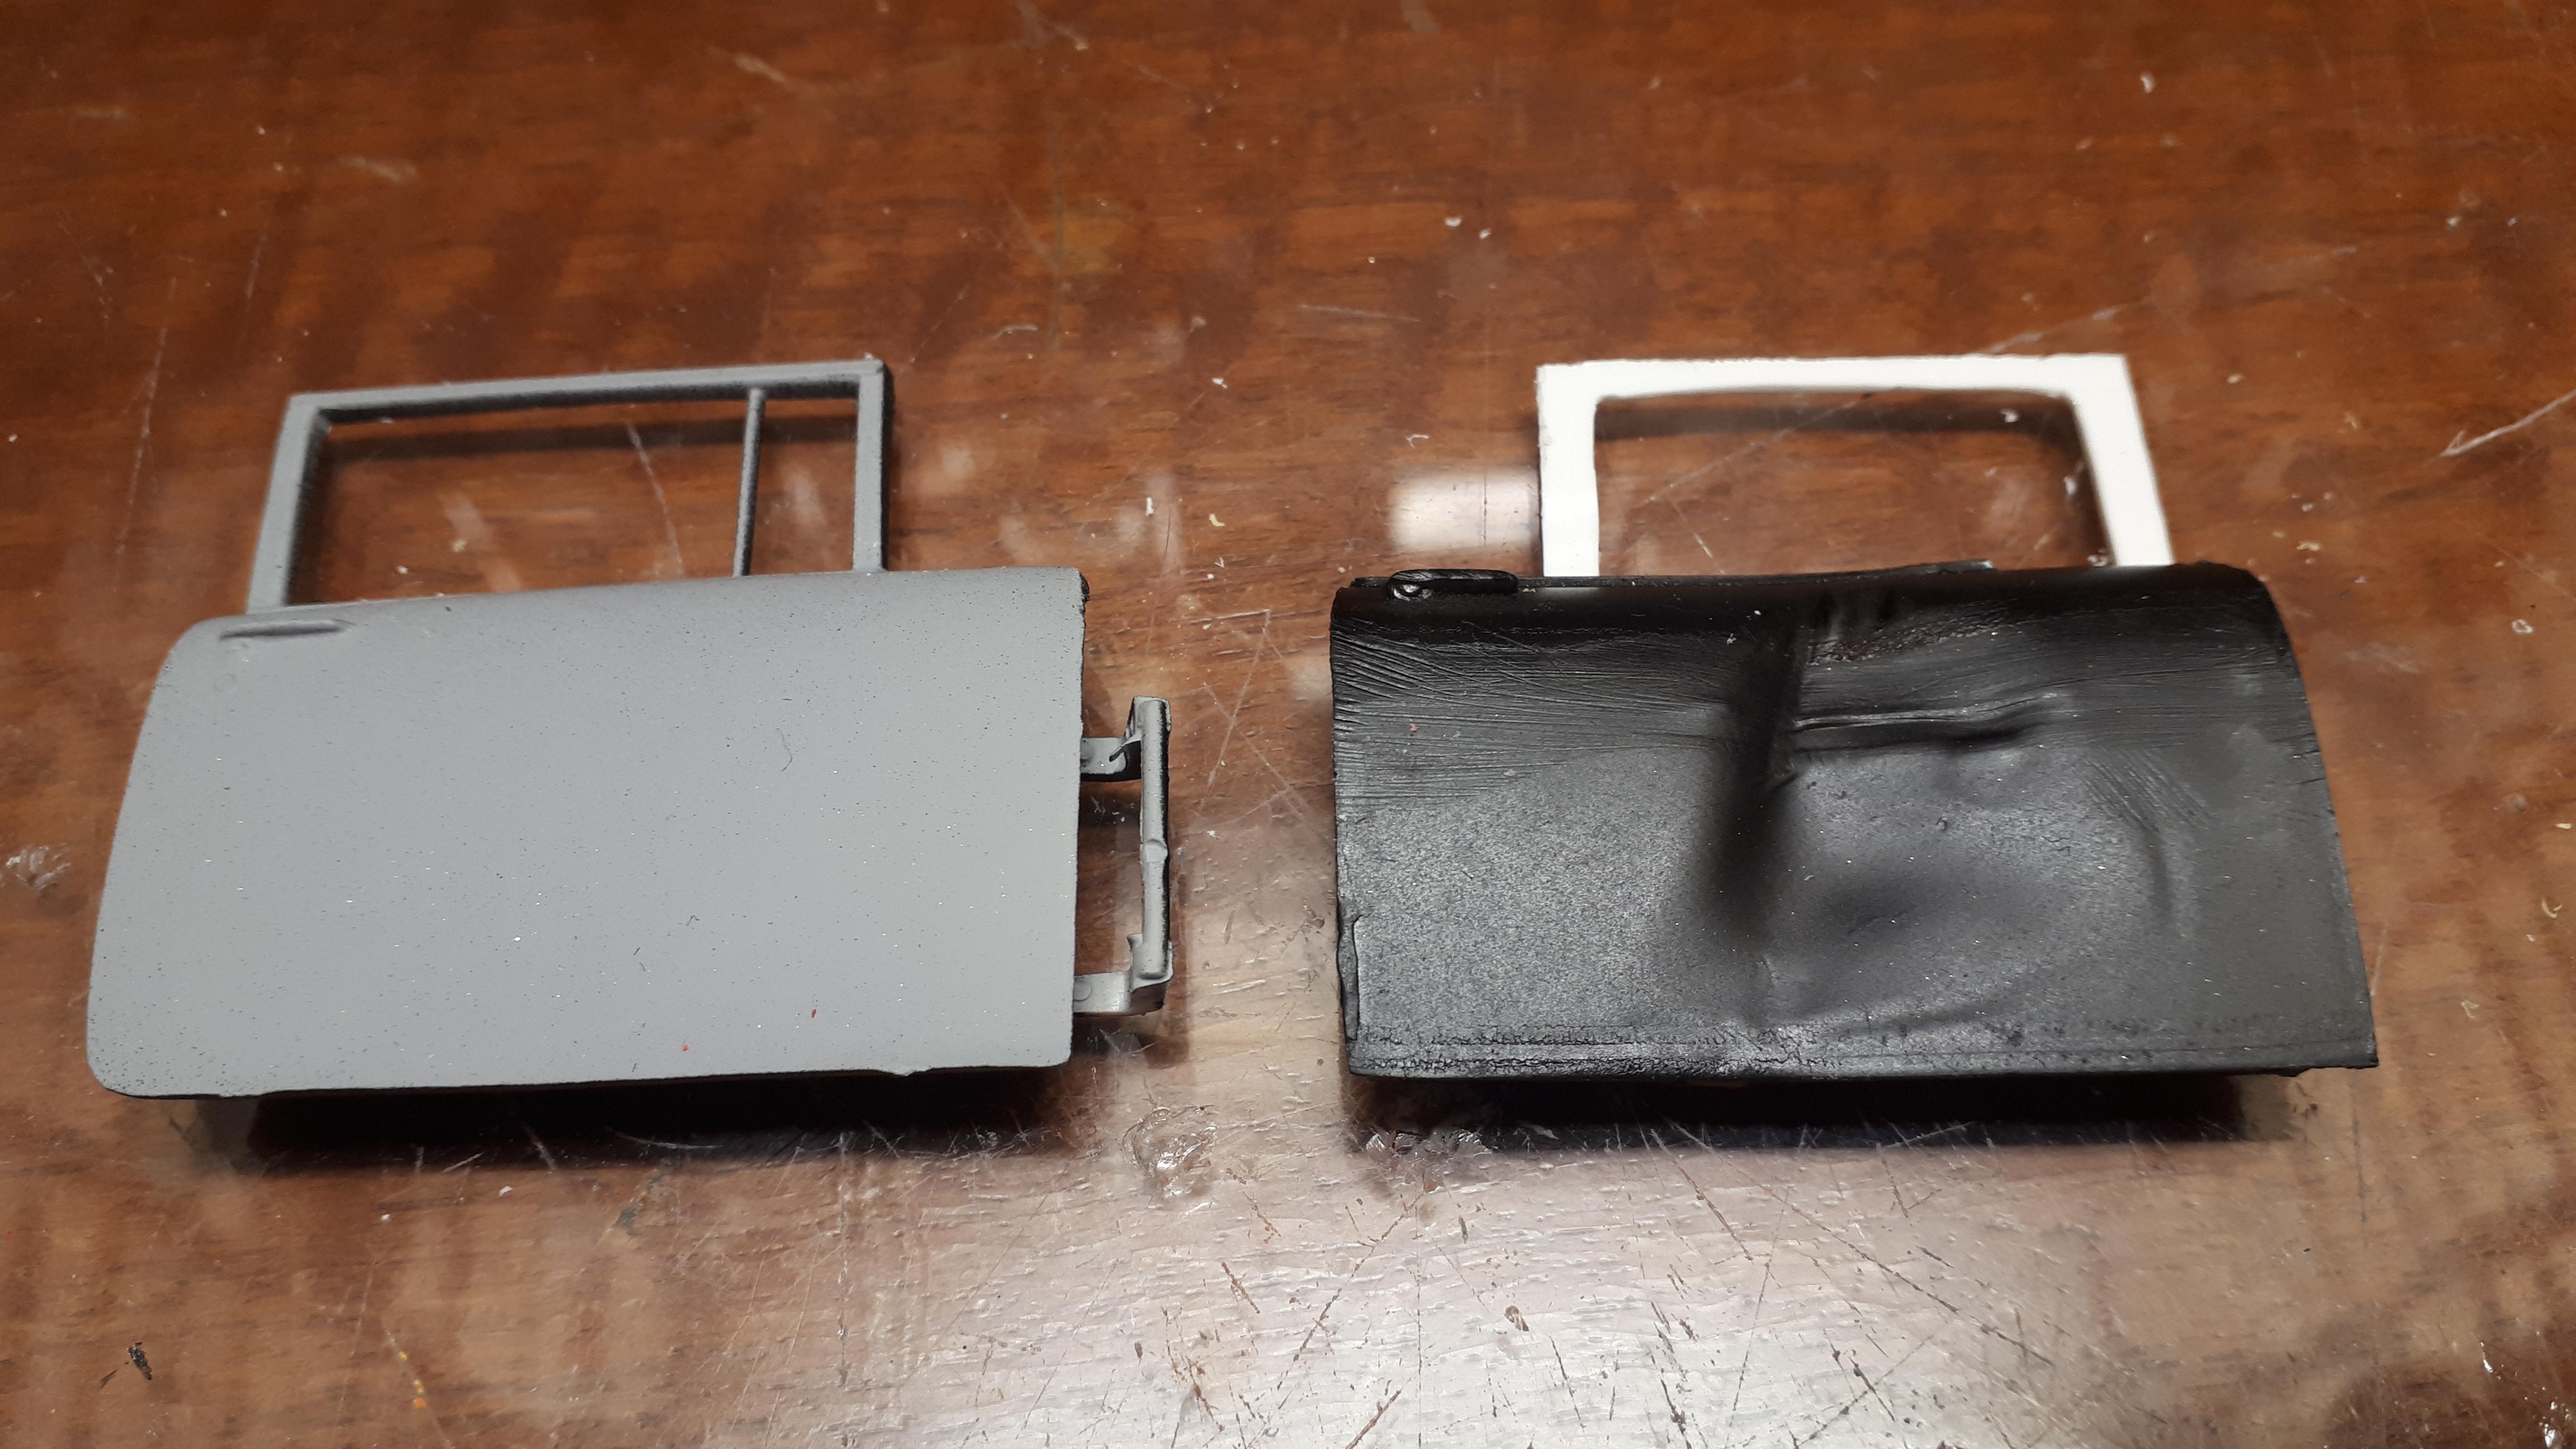
I mentioned our club's American Graffiti diorama when I posted my 61 Galaxie police car from the famous "ripped out rear-end" scene. At the same time I was also building a '55 Chevy for the rollover scene. It took a lot of freeze framing to get all the research information I needed. Compounding this is the fact that there are three separate cars in the scene. The drag race with Milner's coupe starts off with the movie "star car". The car rolling over is a second car simply bodgied up for its short moment of infamy and the final car is actually a 55 hardtop with pieces of painted timber wedged in place to look like a sedan. It obviously is not the car that is seen rolling over because the front fender, especially the right hand one, is still intact with a working headlight, after supposedly completing a heavy roll over starting on the right hand corner of its nose! I chose to build the thirds car but as if it was a true sedan, not a hardtop. I started with a very sad Revell '56 Chevy post sedan that my brother attempted to convert into an Australian Holden about 50 years ago. The conversion was clearly beyond our combined teenaged skill set and it has languished in a box ever since. It had broken A pillars but amazingly the door sills had never snapped and the chassis and steering was still intact. You can still see the orange diff and fuel tank that would have been very "on trend" in the early seventies! The highly detailed nature of these early Revell kits suited the bill perfectly for this model, as it needed to have opening panels and would be perpetually displayed upside down. I call it my "Doesn't Matter" model because, being displayed upside down and having suffered a rollover, I could overlook flaws that would normally stick out like a sore thumb. Briefly, I cut the ravaged 56 front clip off just in front of the cowl vent and the door hinge mounts, to preserve these details. I then carefully removed the front clip from an abandoned AMT 55 hardtop that I acquired somewhere and joined the two sections. The hood scoop is from a Monogram Early Iron series 40 Ford pickup with the details sanded off. I had an odd scrap of a rear 55 taillight section that I grafted into the LH side and used putty to modify the damaged rh side 56 quarter into a 55. The engine came from the parts box and as the rollover car was a Powerglide, I fabbed up a simple plastic tranny pan to glue straight onto the "four speed"- doesn't matter!. One door is shown damaged in the movie but the doors on the 56 were perfect and I couldn't bring myself to damage one so modified a rough Revell 57 Nomad door instead. The chromies are tatty ones from my parts box that don't even match but, hey, "doesn't matter"- they got damaged in the rollover! I also glued thin plastic around the windshield opening to simulate the flange that the rubber grips onto - I do this a lot on my speedway cars as well as it subtly hints at the body being a real steel car. The final paint was very cheap hardware store black enamel '-"doesn't matter" - which actually looks a lot better in real life than in the photos. Being a movie car I didn't want it too nice anyway. Rather than use heat to damage the rolled over roof, I made a simple base out of packing foam with a depression in it to accommodate the original roof - who knows, I might want to restore the car one day! The car has been displayed twice now and will have its final outing in December at our annual hot rod show. It looks the part and best of all, was made almost entirely of otherwise unloved parts. Definitely a case where the whole is greater than the sum of the parts! Cheers Alan
-
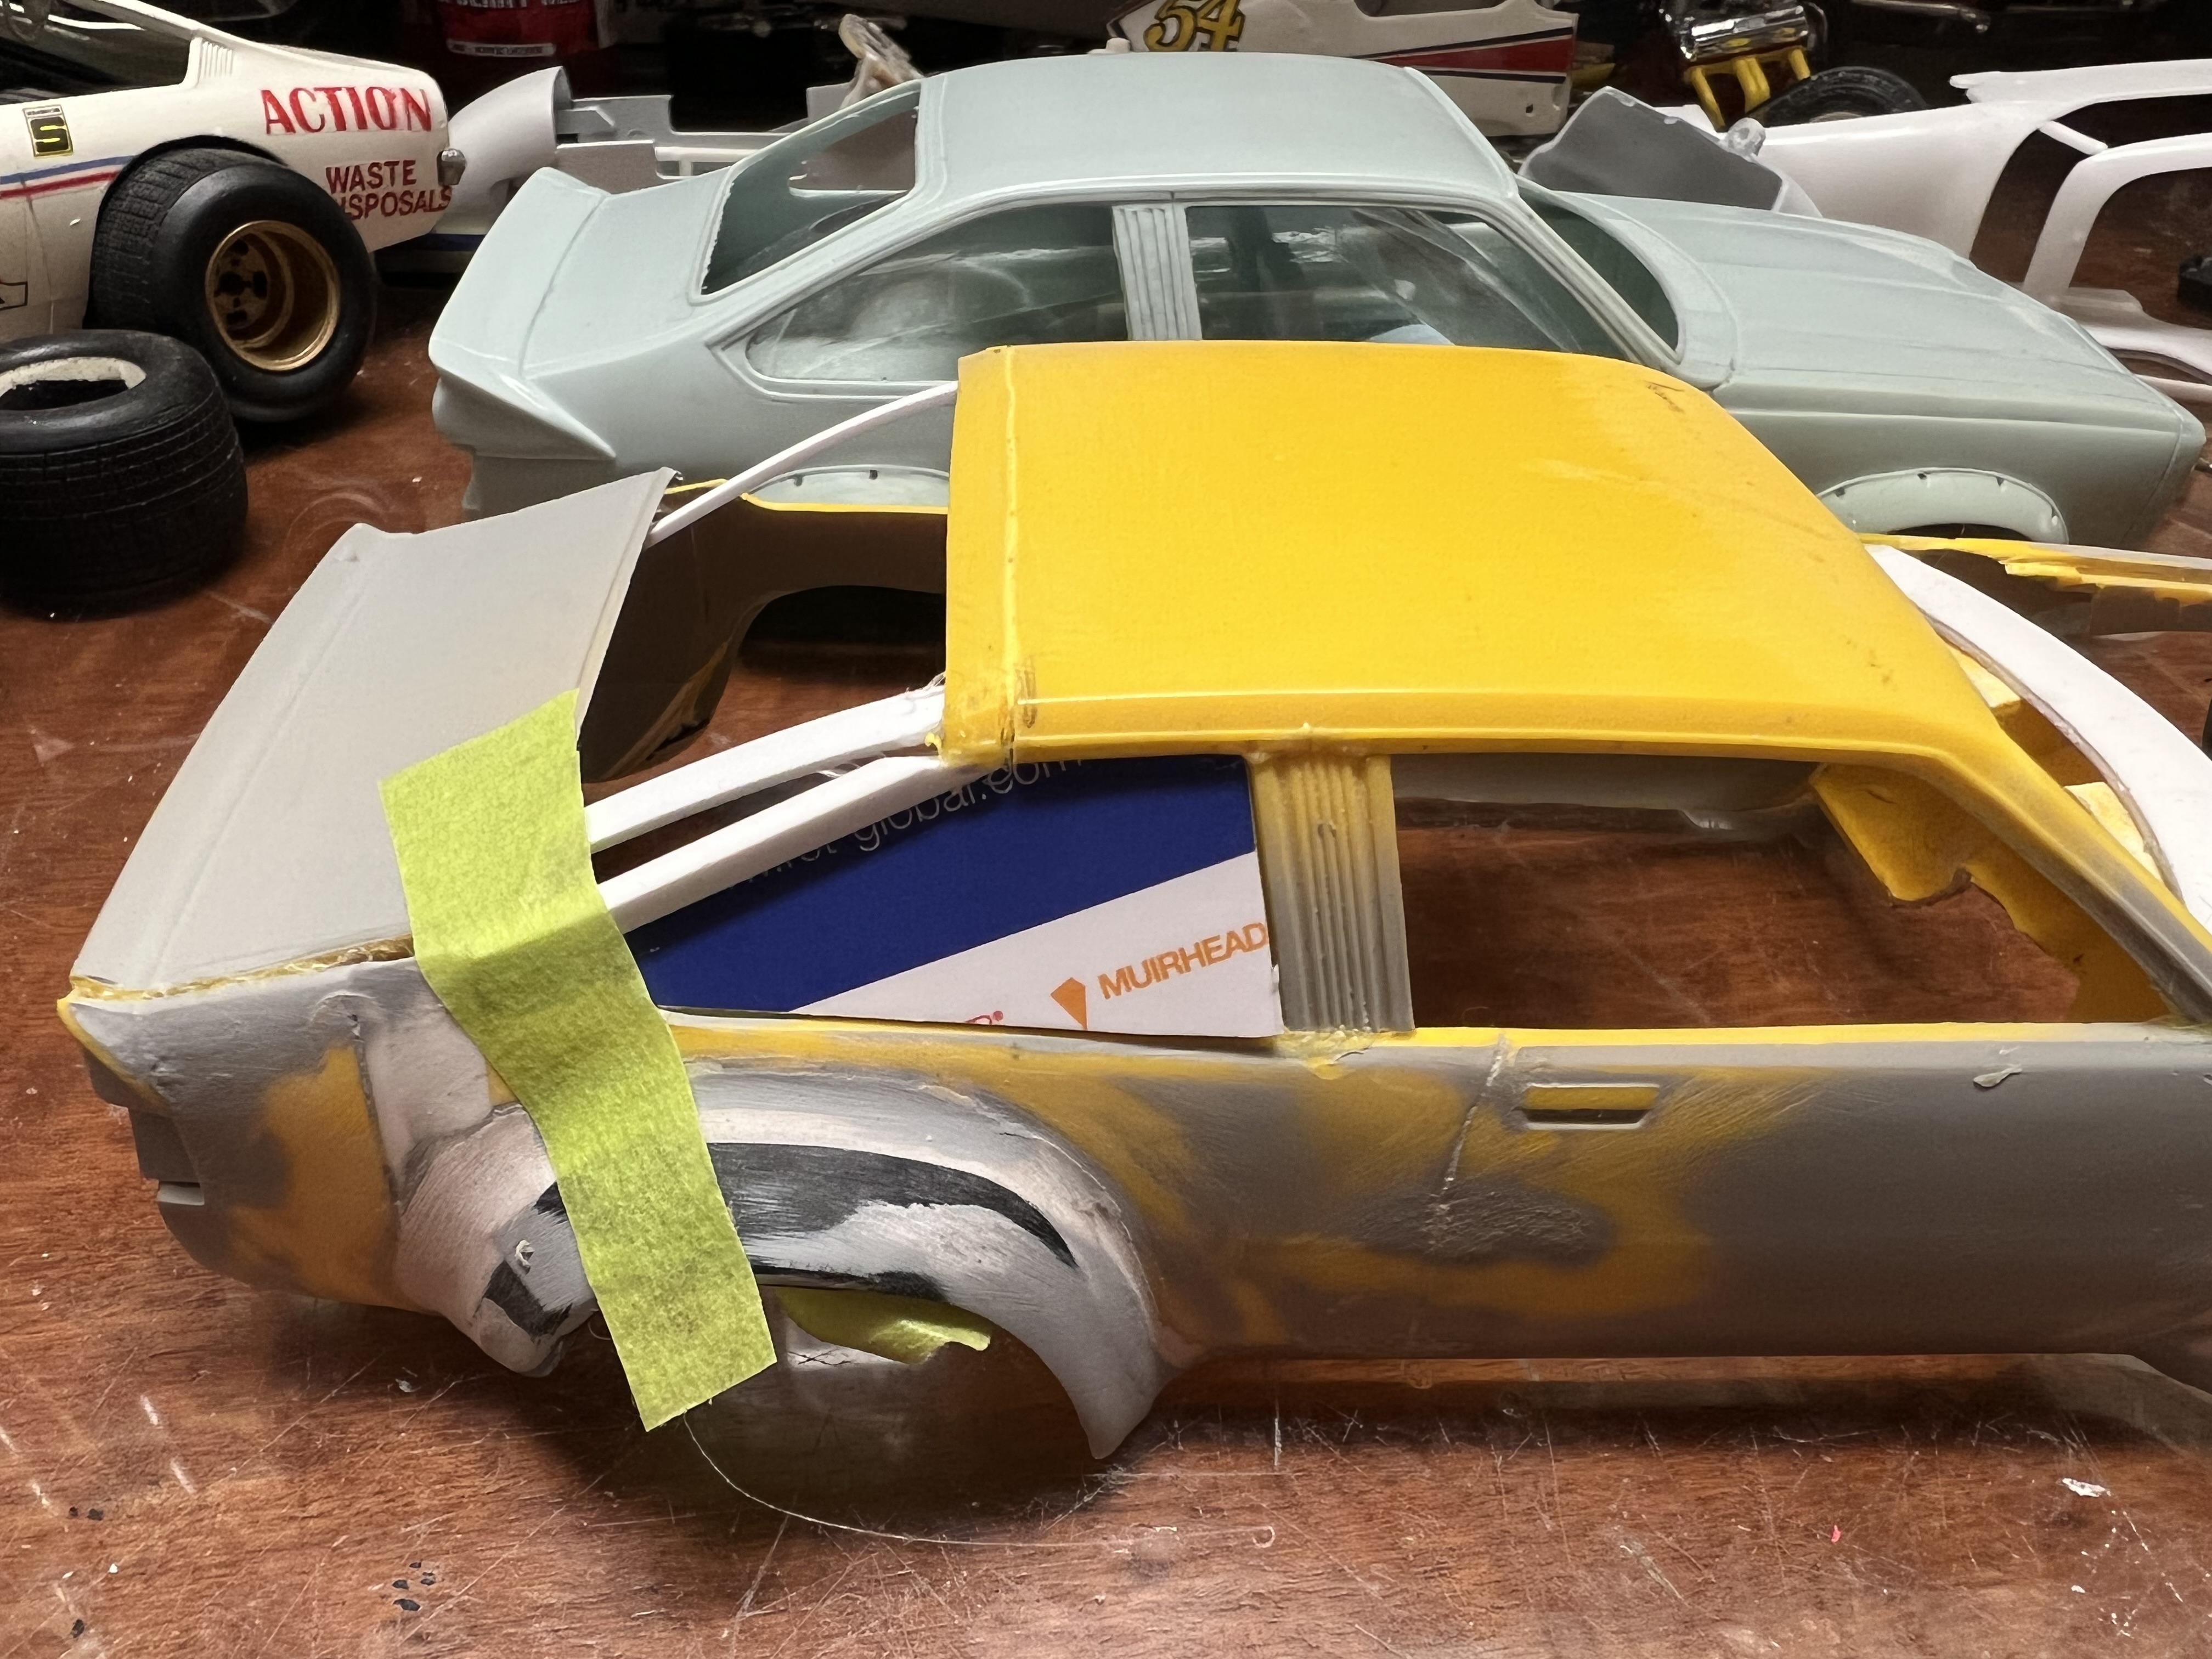
Had a busy weekend but made some more progress on the Torana. Thanks to everyone who has viewed and commented so far - it is greatly appreciated. It turned out that the Citation hood scoop was a little larger but a little flatter than the A9X scoop but otherwise the same shape. I cut it out of the hood instead of off the hood and then glued it to the grey plastic hood from earlier. When it had dried solid I carved out the plastic underneath to allow clearance for the eventual stack injection. I found what I think is a Camaro chassis (Copyright Revell 1990) which was near perfect fit into the revised Citation body. I trimmed a little front he front and from the wheel arches and then added a pair of styrene strips to the side of the floor. Easy peasy. The Torana has a four link coil sprung rear axle so I grafted in one from a Monogram Chevelle. I also removed the stock fuel tank as per the regulations of the time. I found some front and rear bumpers in my parts box, both Japanese I suspect, and with less than a half hour's work they fitted up fine. Here she is ready for primer and then finally the first mockup in one colour. I am REALLY happy with how it looks but there is still a fair bit of finessing to do before she gets her first coat of white. One thing that is very obvious now is that the front flares in particular are too wide. Luckily, if I take a few mm off the outside edges, it will also open up the arches and give me better clearance on the tyres - win, win! Cheers Alan
-
Claude, your annual trip to the salt is always worth waiting for! This creation, apart from being totally stunning, takes your level of creativity to new heights! I will have a salt racer myself to post shortly but it pales in comparison to this one! Cheers Alan
-
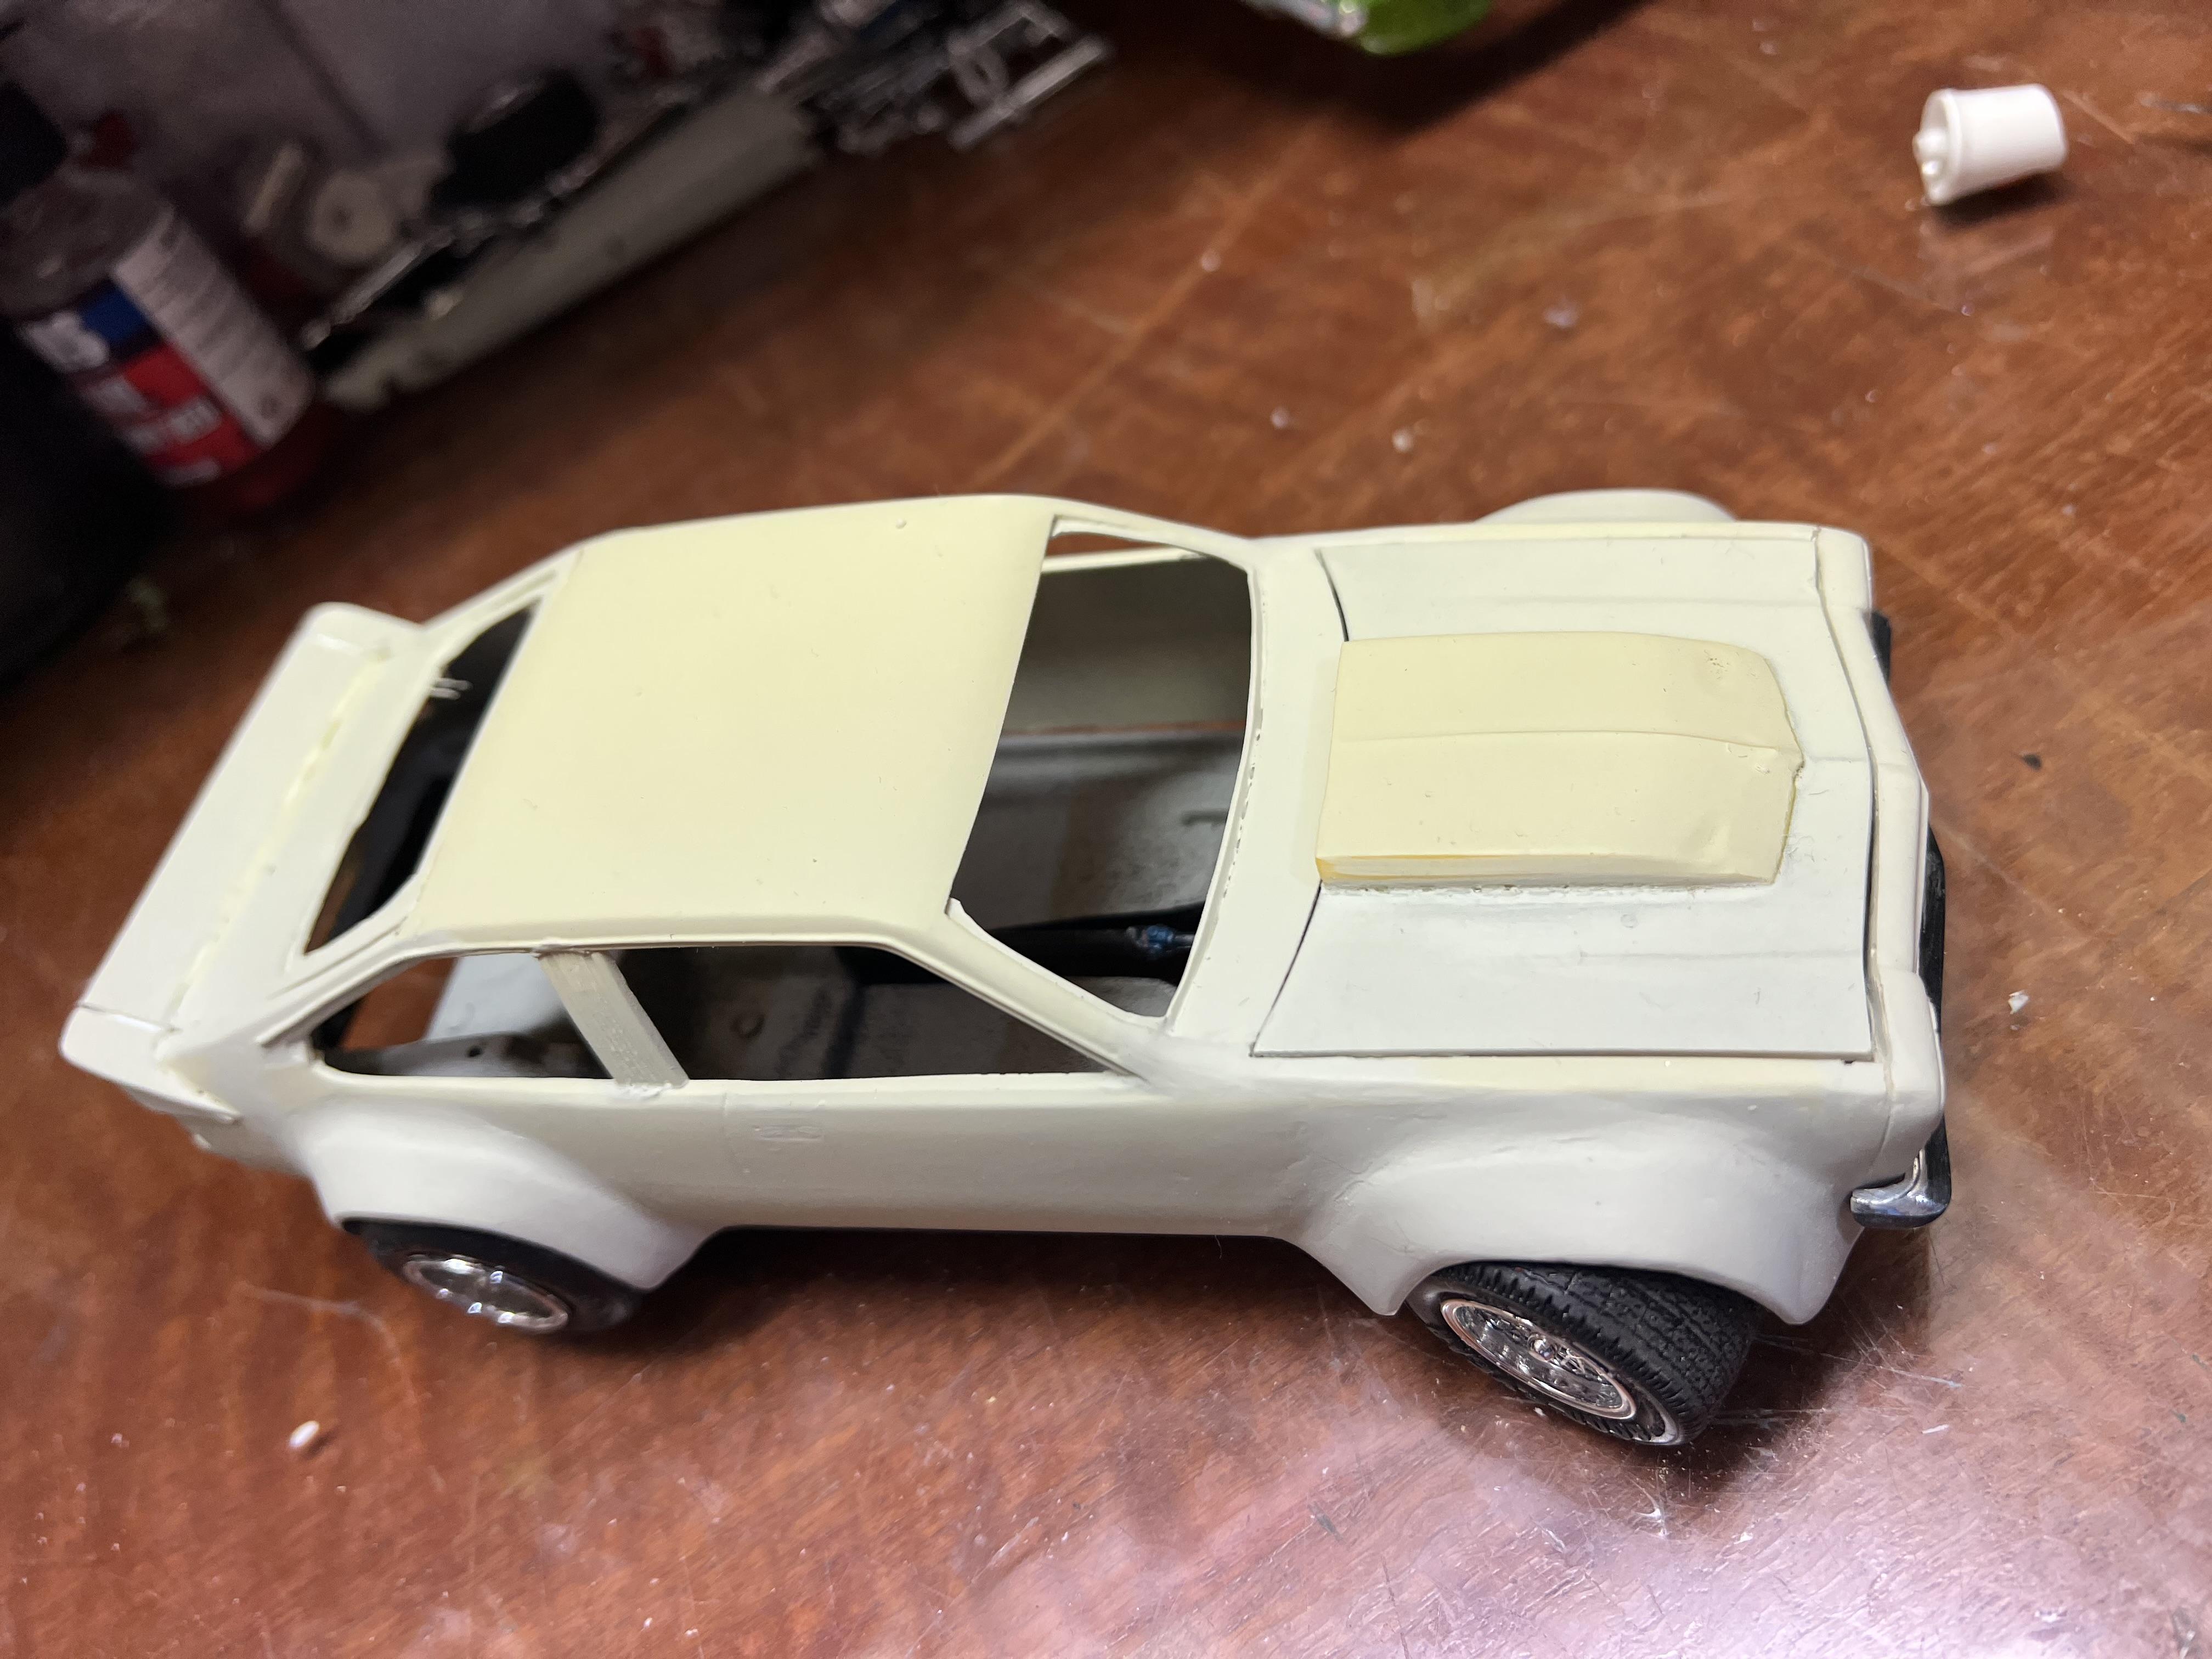
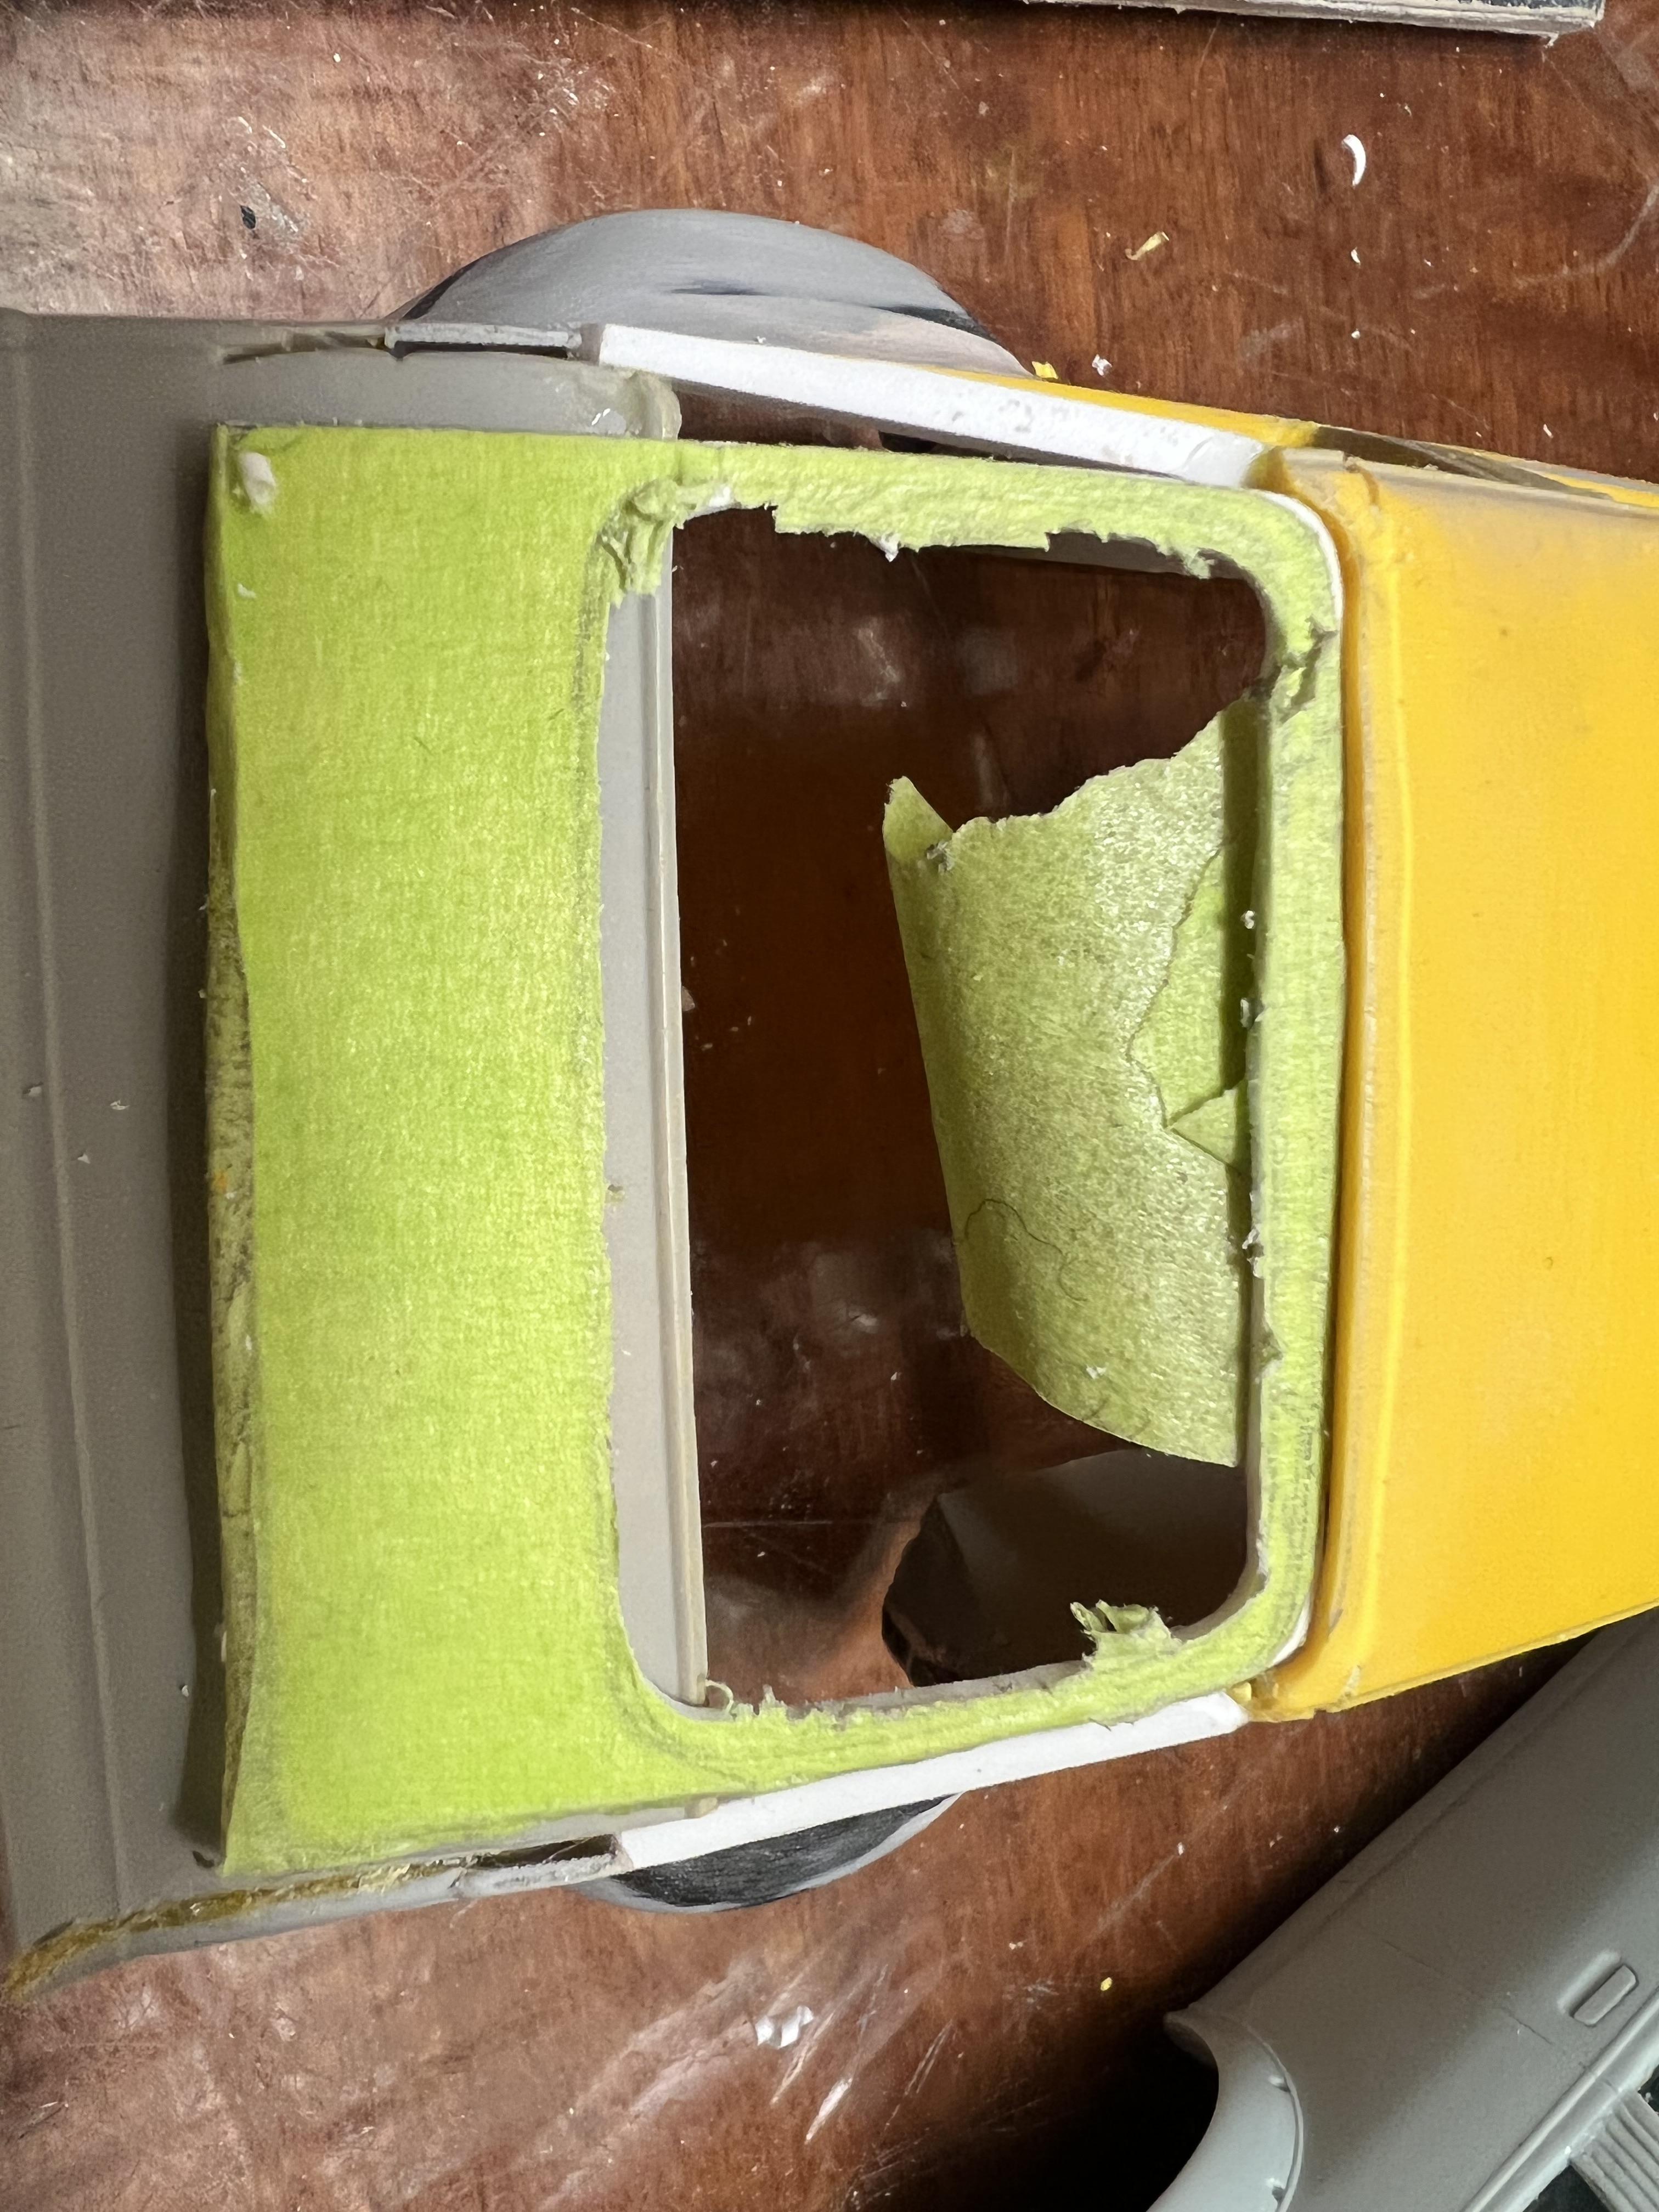
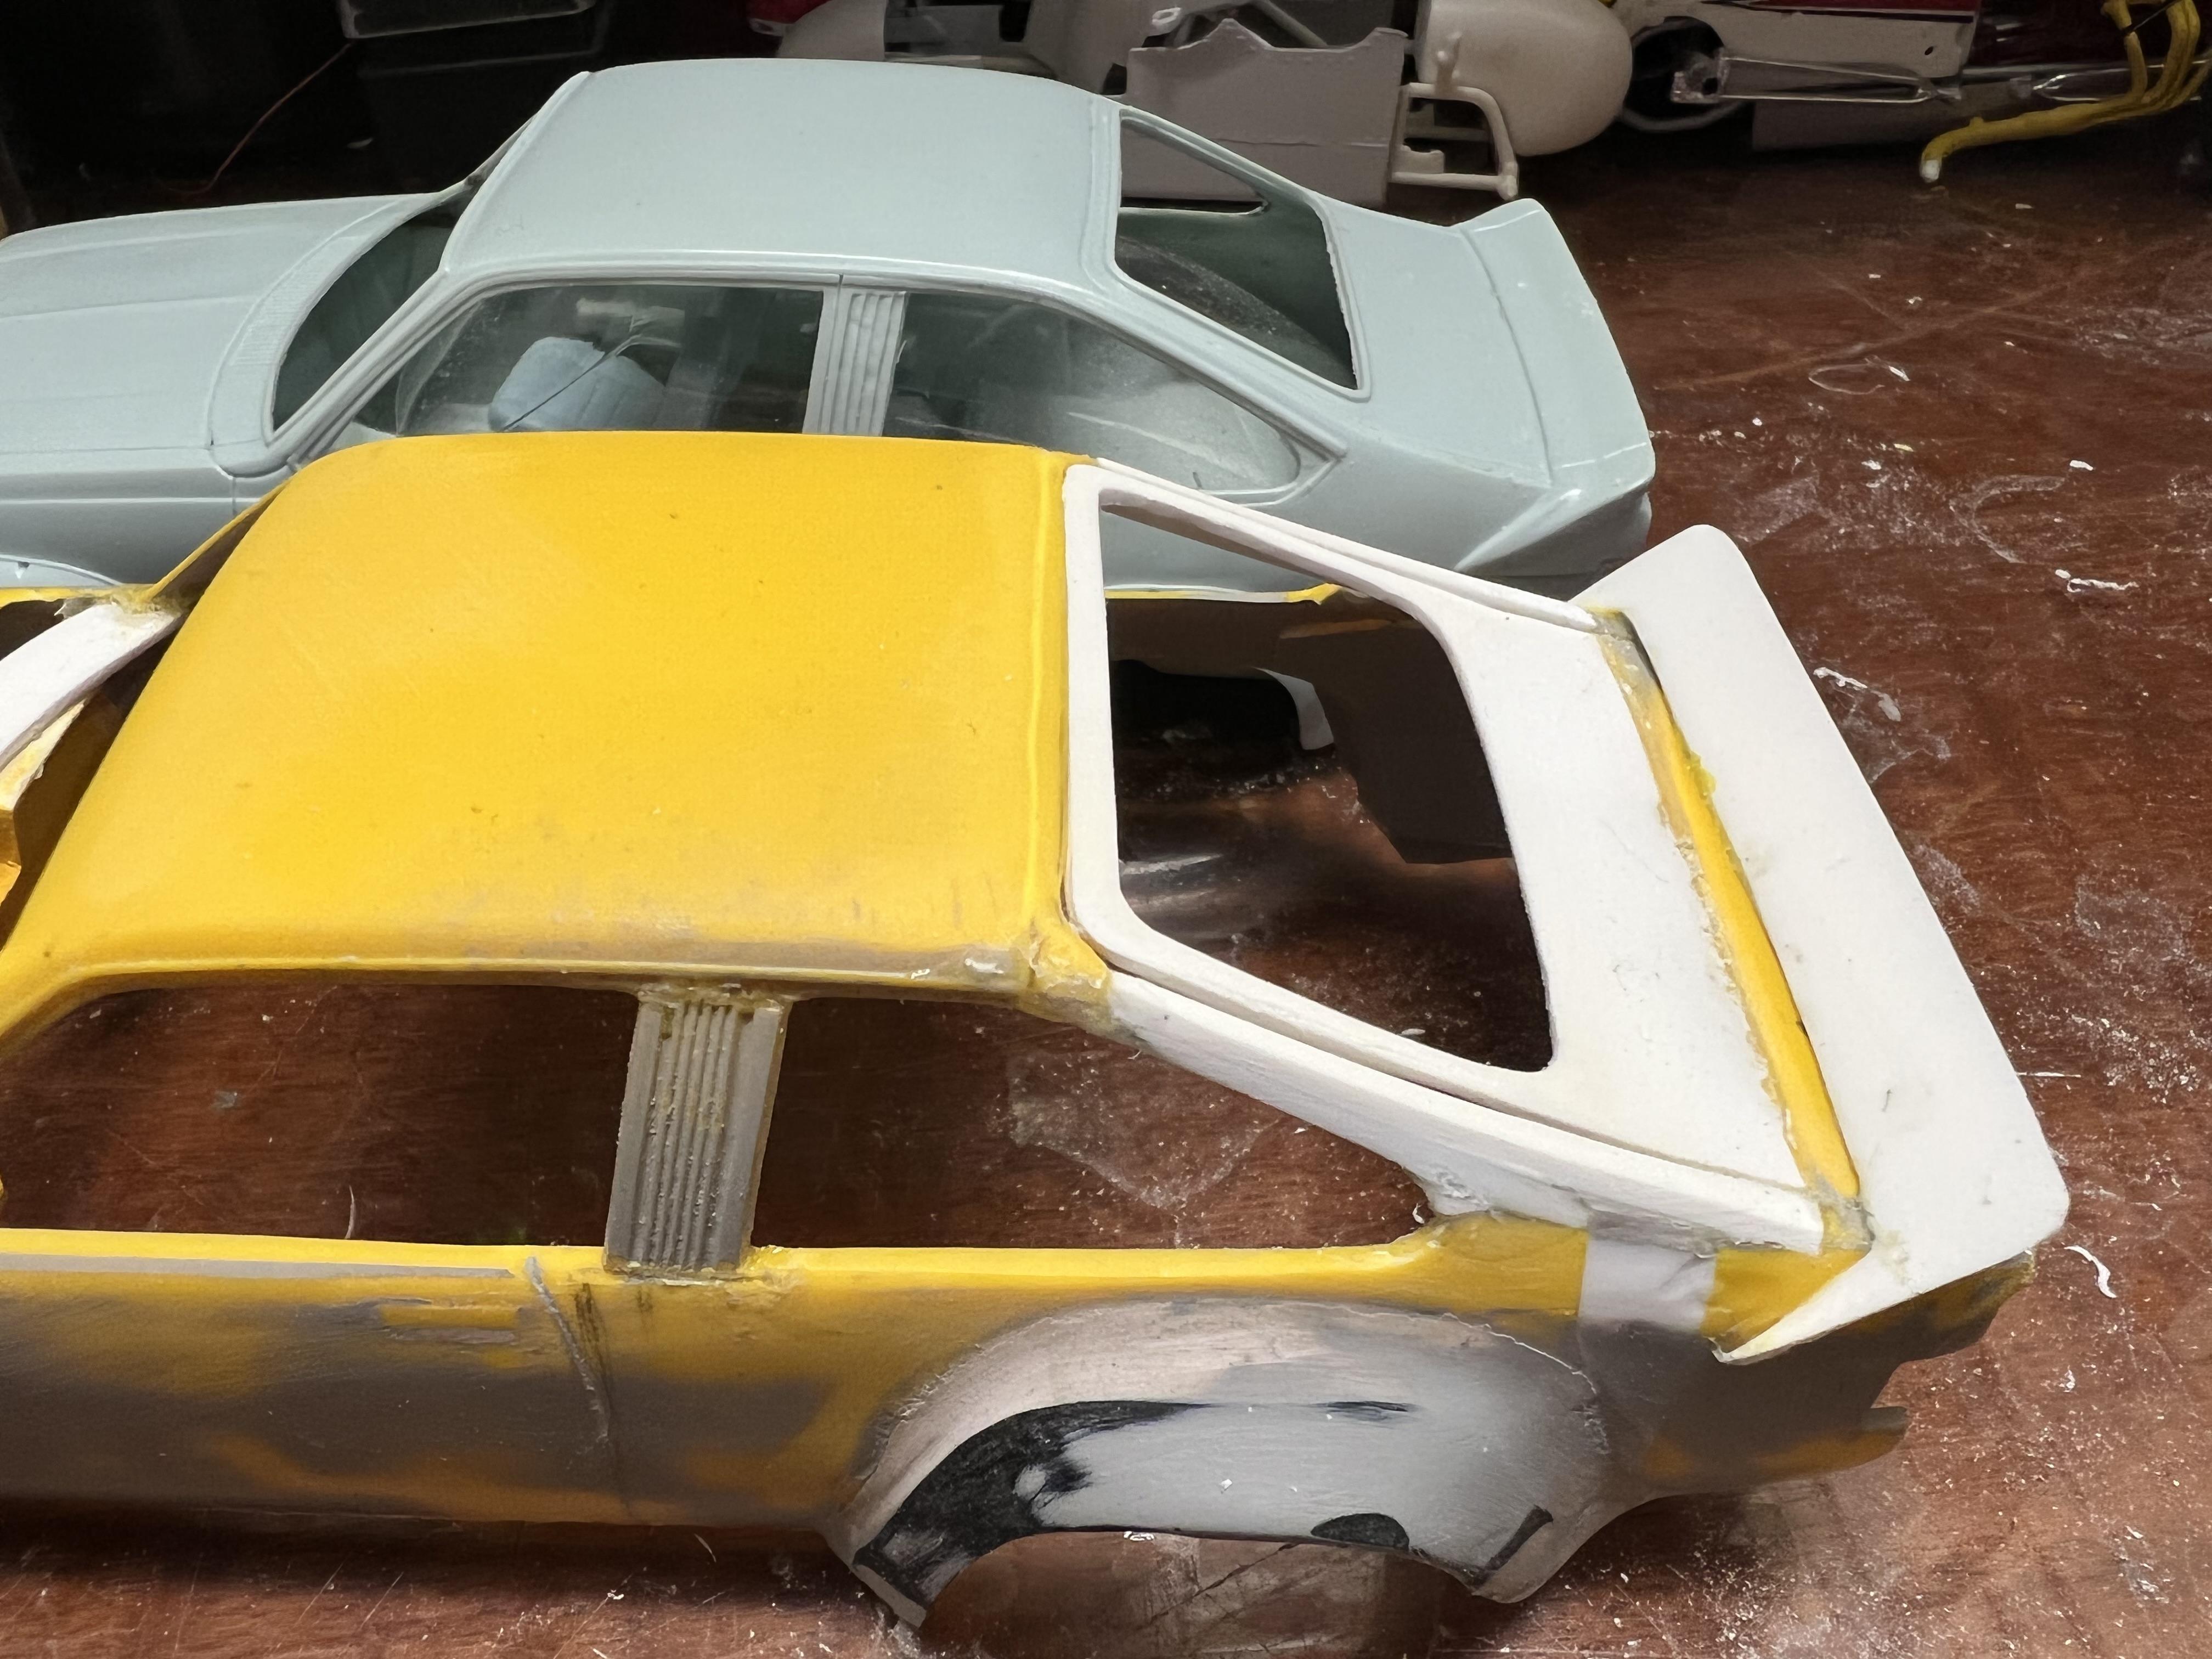
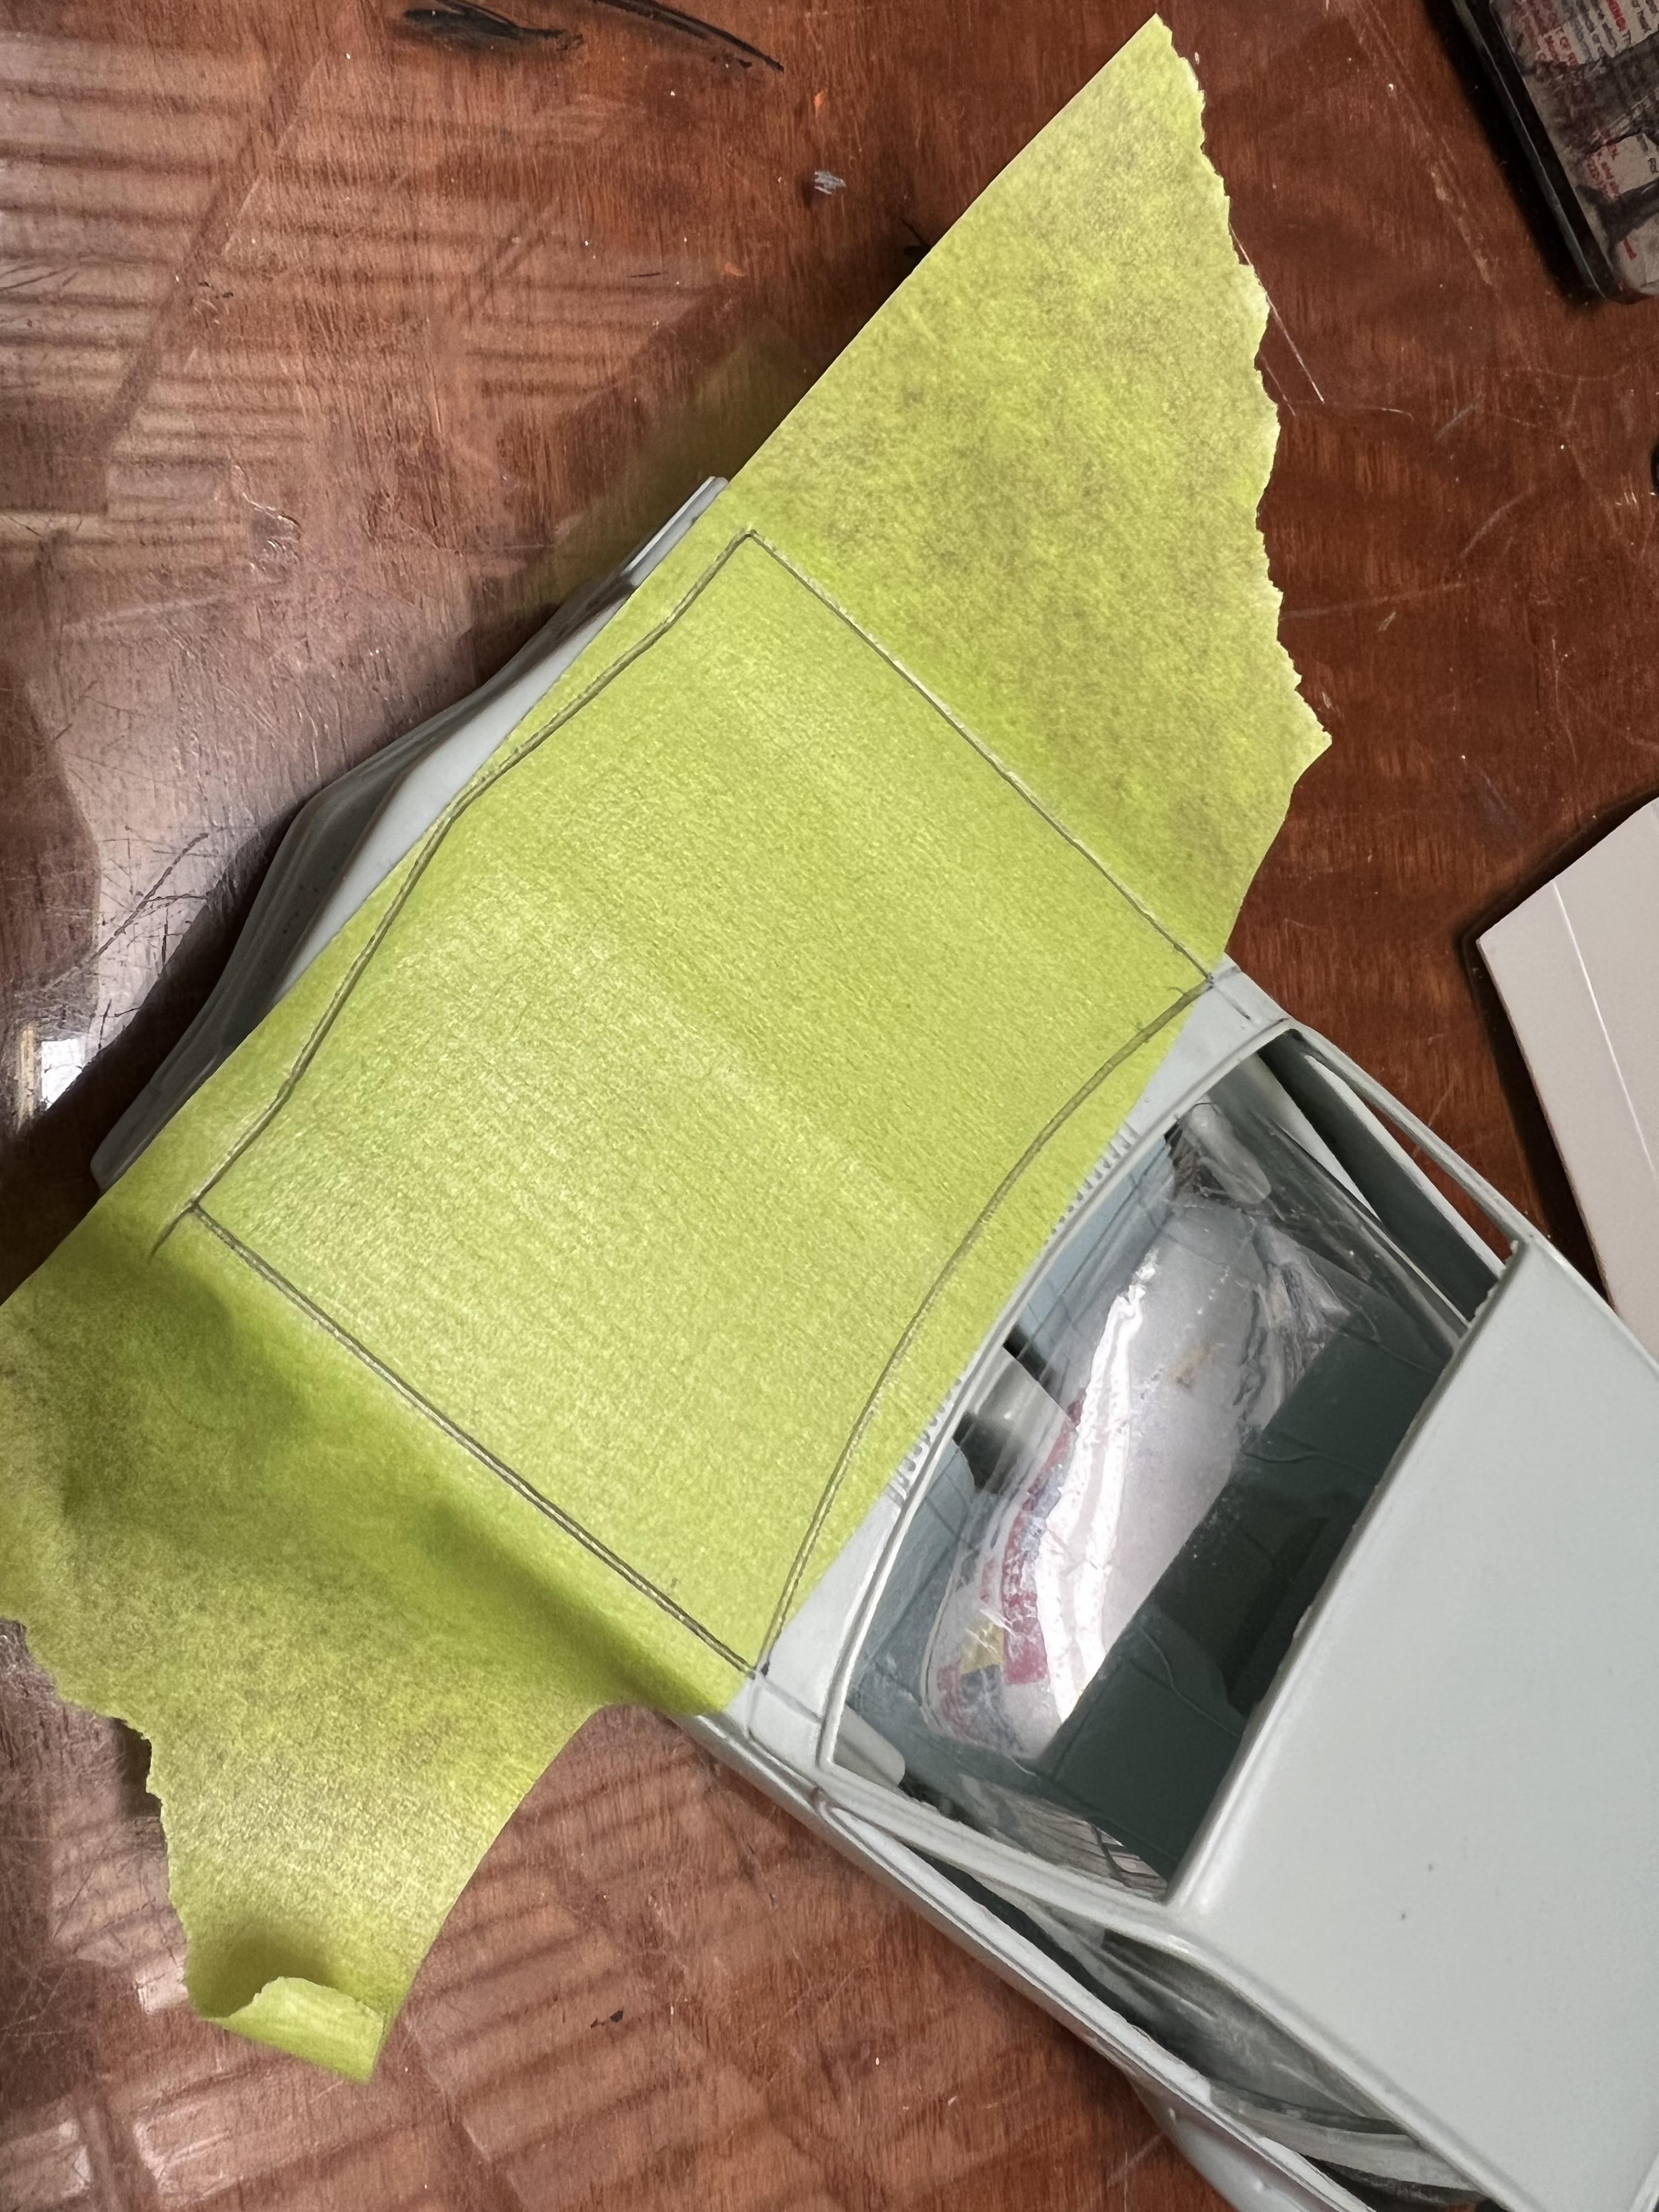
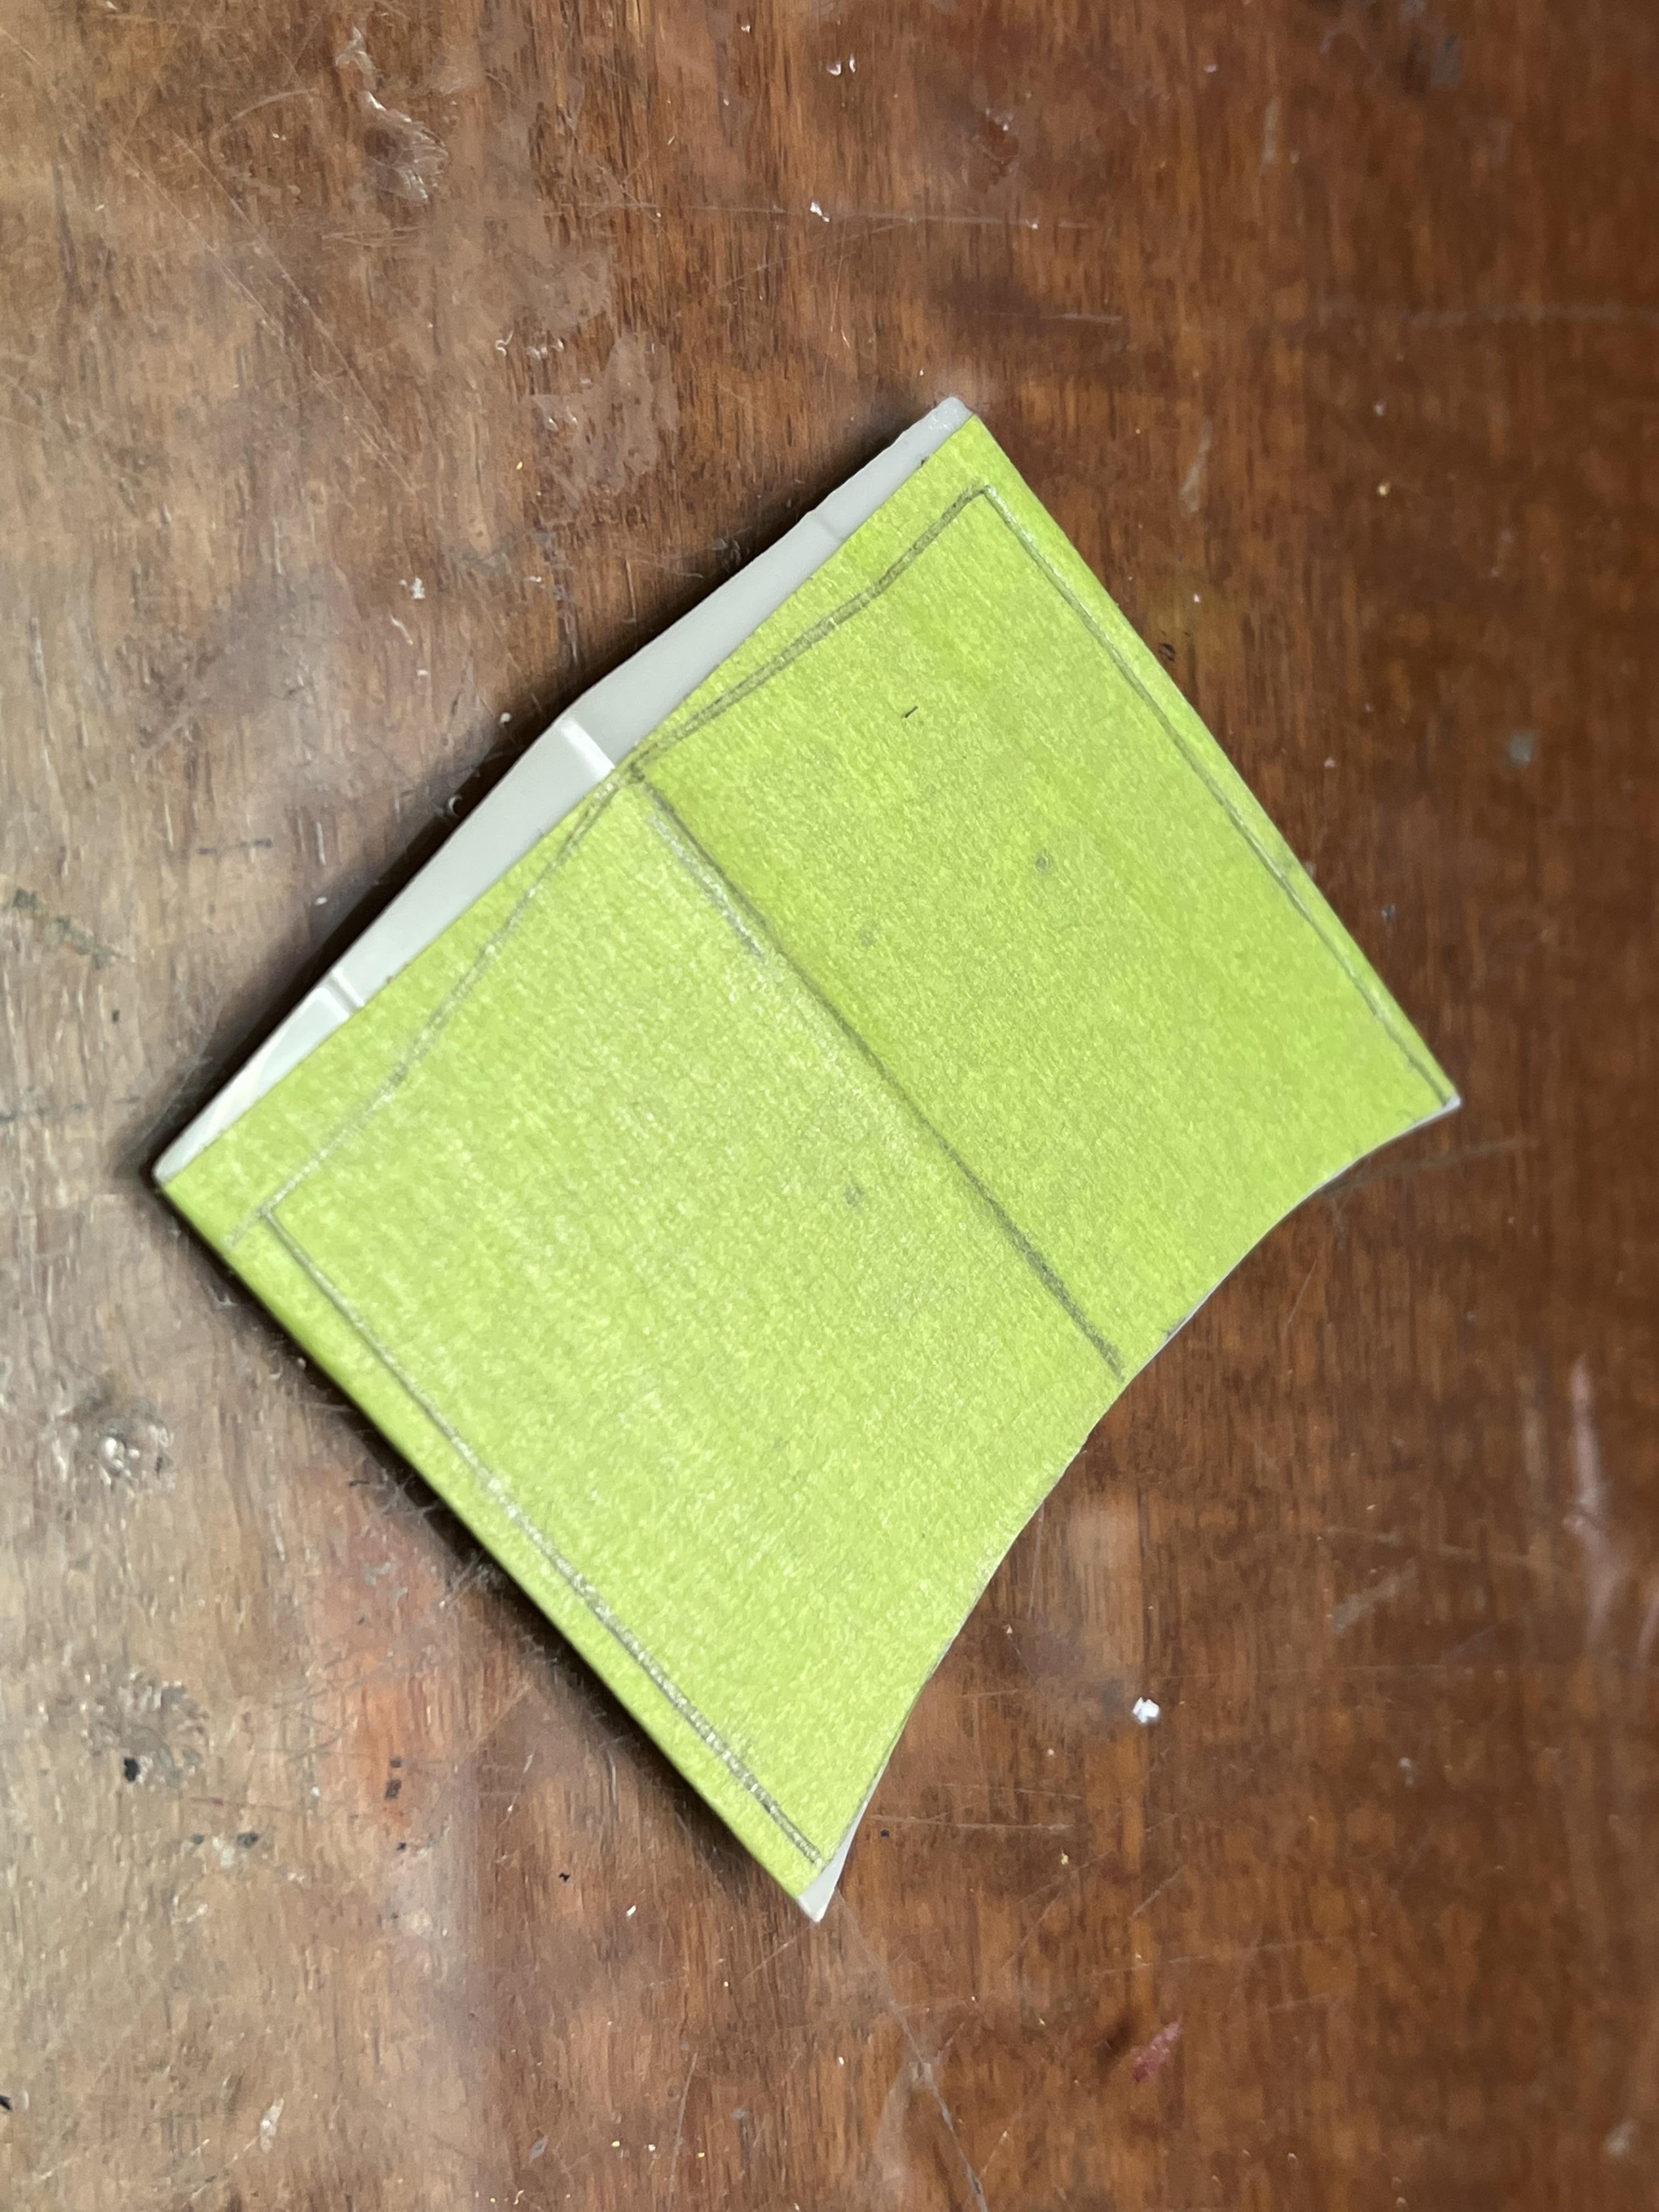
Thanks Trevor! Got a lot of work done last night and tonight so have some more photos of the hatch area coming together. I started off by making a tape pattern off the original kit and transferring it to a piece of flat styrene. I then glued strips of Evergreen to bridge the gap between the roof and the trunk. I used my previous cardboard templates and this ensured that I was achieving the correct proportions before I committed to gluing the hatch in place. I then drilled five holes in the window area of the hatch and used scissors and a sharp X -acto to cut out the window opening. I filed the trailing edge to a taper to assist with blending it in with the Citation trunk lid. Two small taps of plastic were glued under the top of the hatch opening to give the top edge of the hatch something to glue to. I carved away a heap of excess plastic from the old trunk lid as well - just in case! I glued the new hatch in place and left it to dry overnight. In the morning I realised that the profile was too high so I sliced around the edge of the white plastic and dropped the whole sandwich down flush - worked a treat. I then cut and glued strips of plastic either side of the hatch to start forming up this area of the body. One big advantage doing to this way is that I automatically create deep panel lines. I am rubbish when it comes to scribing panel lines so this was a bonus! This was all superglued up convincingly and allowed to dry. Following some sanding to get the C pillars and quarter panels blended in, I used a cardboard template to duplicate the A9X rear spoiler in styrene and glued it to the body. It will need a lot more work tomorrow but for now, I am very happy with what I see - I got me a Torana! Cheers Alan
-
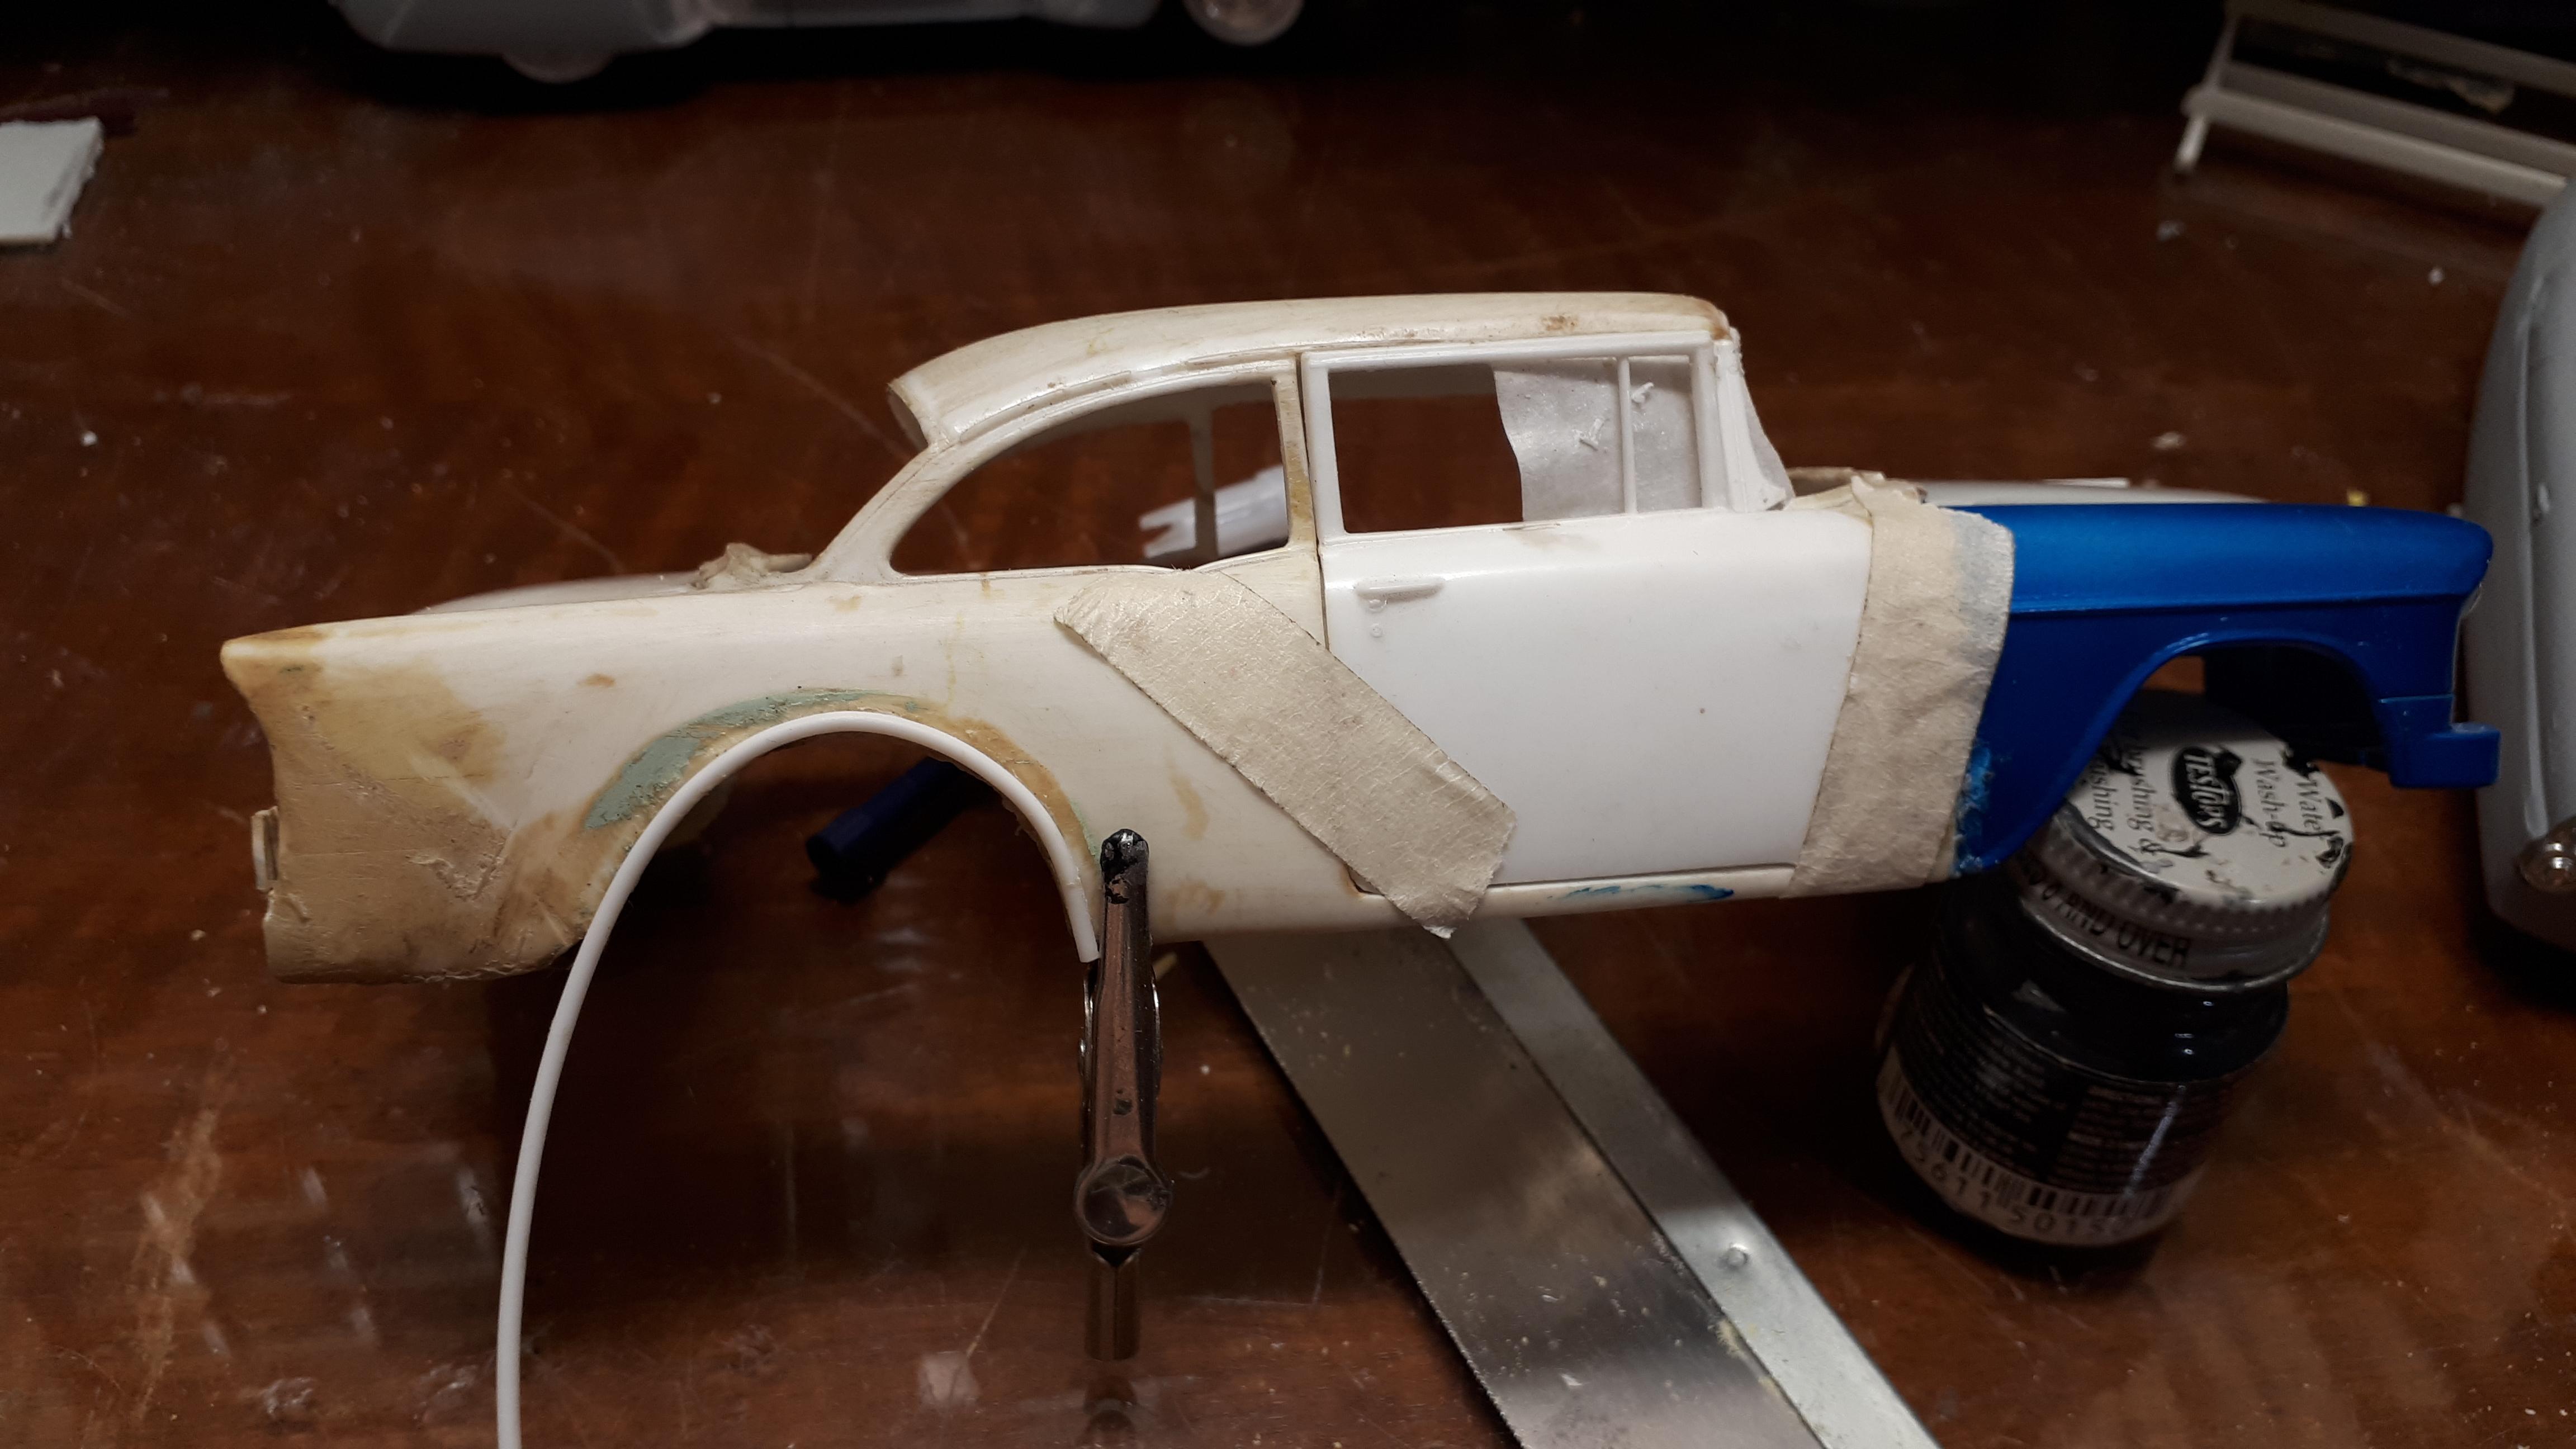
Great to see some Aussies following along! And a Canadian - we are really going international here! Of course, being a speedway car, "near enough" accuracy is more than good enough but from the way I have progressed so far, it wouldn't be impossible to do a showroom stock conversion, it would just take a lot more time. Thanks Richard, it is always interesting to hear about the inside of the toy and model industry. I have been very distracted by other modelling projects lately but got some work done on the Torana last week. To join the copy of the resin Torana front clip onto the Citation fenders I had to remove the cowl /plenum chamber area first to allow the front fenders to be pulled inwards as the Torana is about 3mm narrower. This meant that the roof had to be removed as well. Always scary when only a bit of plastic at the rear is holding it all together. I added some hidden pins to strengthen up the joint. Anyhow, it all worked fine and I added some more bog to blend in the front clip to the front flares. Of course, having narrowed the front I now needed to narrow the rear as the car would be tapered otherwise. I cheated by simply cutting down the already partly cut trunk line on the right hand side and removing 3mm, A fussy modeller would have removed 1.5mm from each side but for this car it really didn't matter and one cut is stronger to re-join that two! Next we needed a hood. I found a grey plastic AMT hood of unknown origin in the parts box that was close enough. I took a masking tape pattern off the Cavalier Torana hood and cut it out before applying it to the AMT hood. I then cut and filed the hood until it was a neat fit. While I was at it, I cut a strip of flat styrene for the new cowl section. This is purely structural at this stage - I will shape it later. I also glued another parts box refugee firewall in place to stiffen things up. The Citation roof has a lot of similarities to the Torana design but annoyingly just enough differences that I couldn't use it as is. The grooved B pillars had to be slanted forward slightly more and the rake on the A pillars had to be adjusted as well. I used cardboard templates taken off the Cavalier Torana to check I was travelling in the right direction! I also filed off the windshield mouldings at the front and will replace this with a glass flange later. The next step will be to construct the rear hatchback section. Once that is done we are ready for final bog and primer! Thanks for watching Cheers Alan
-
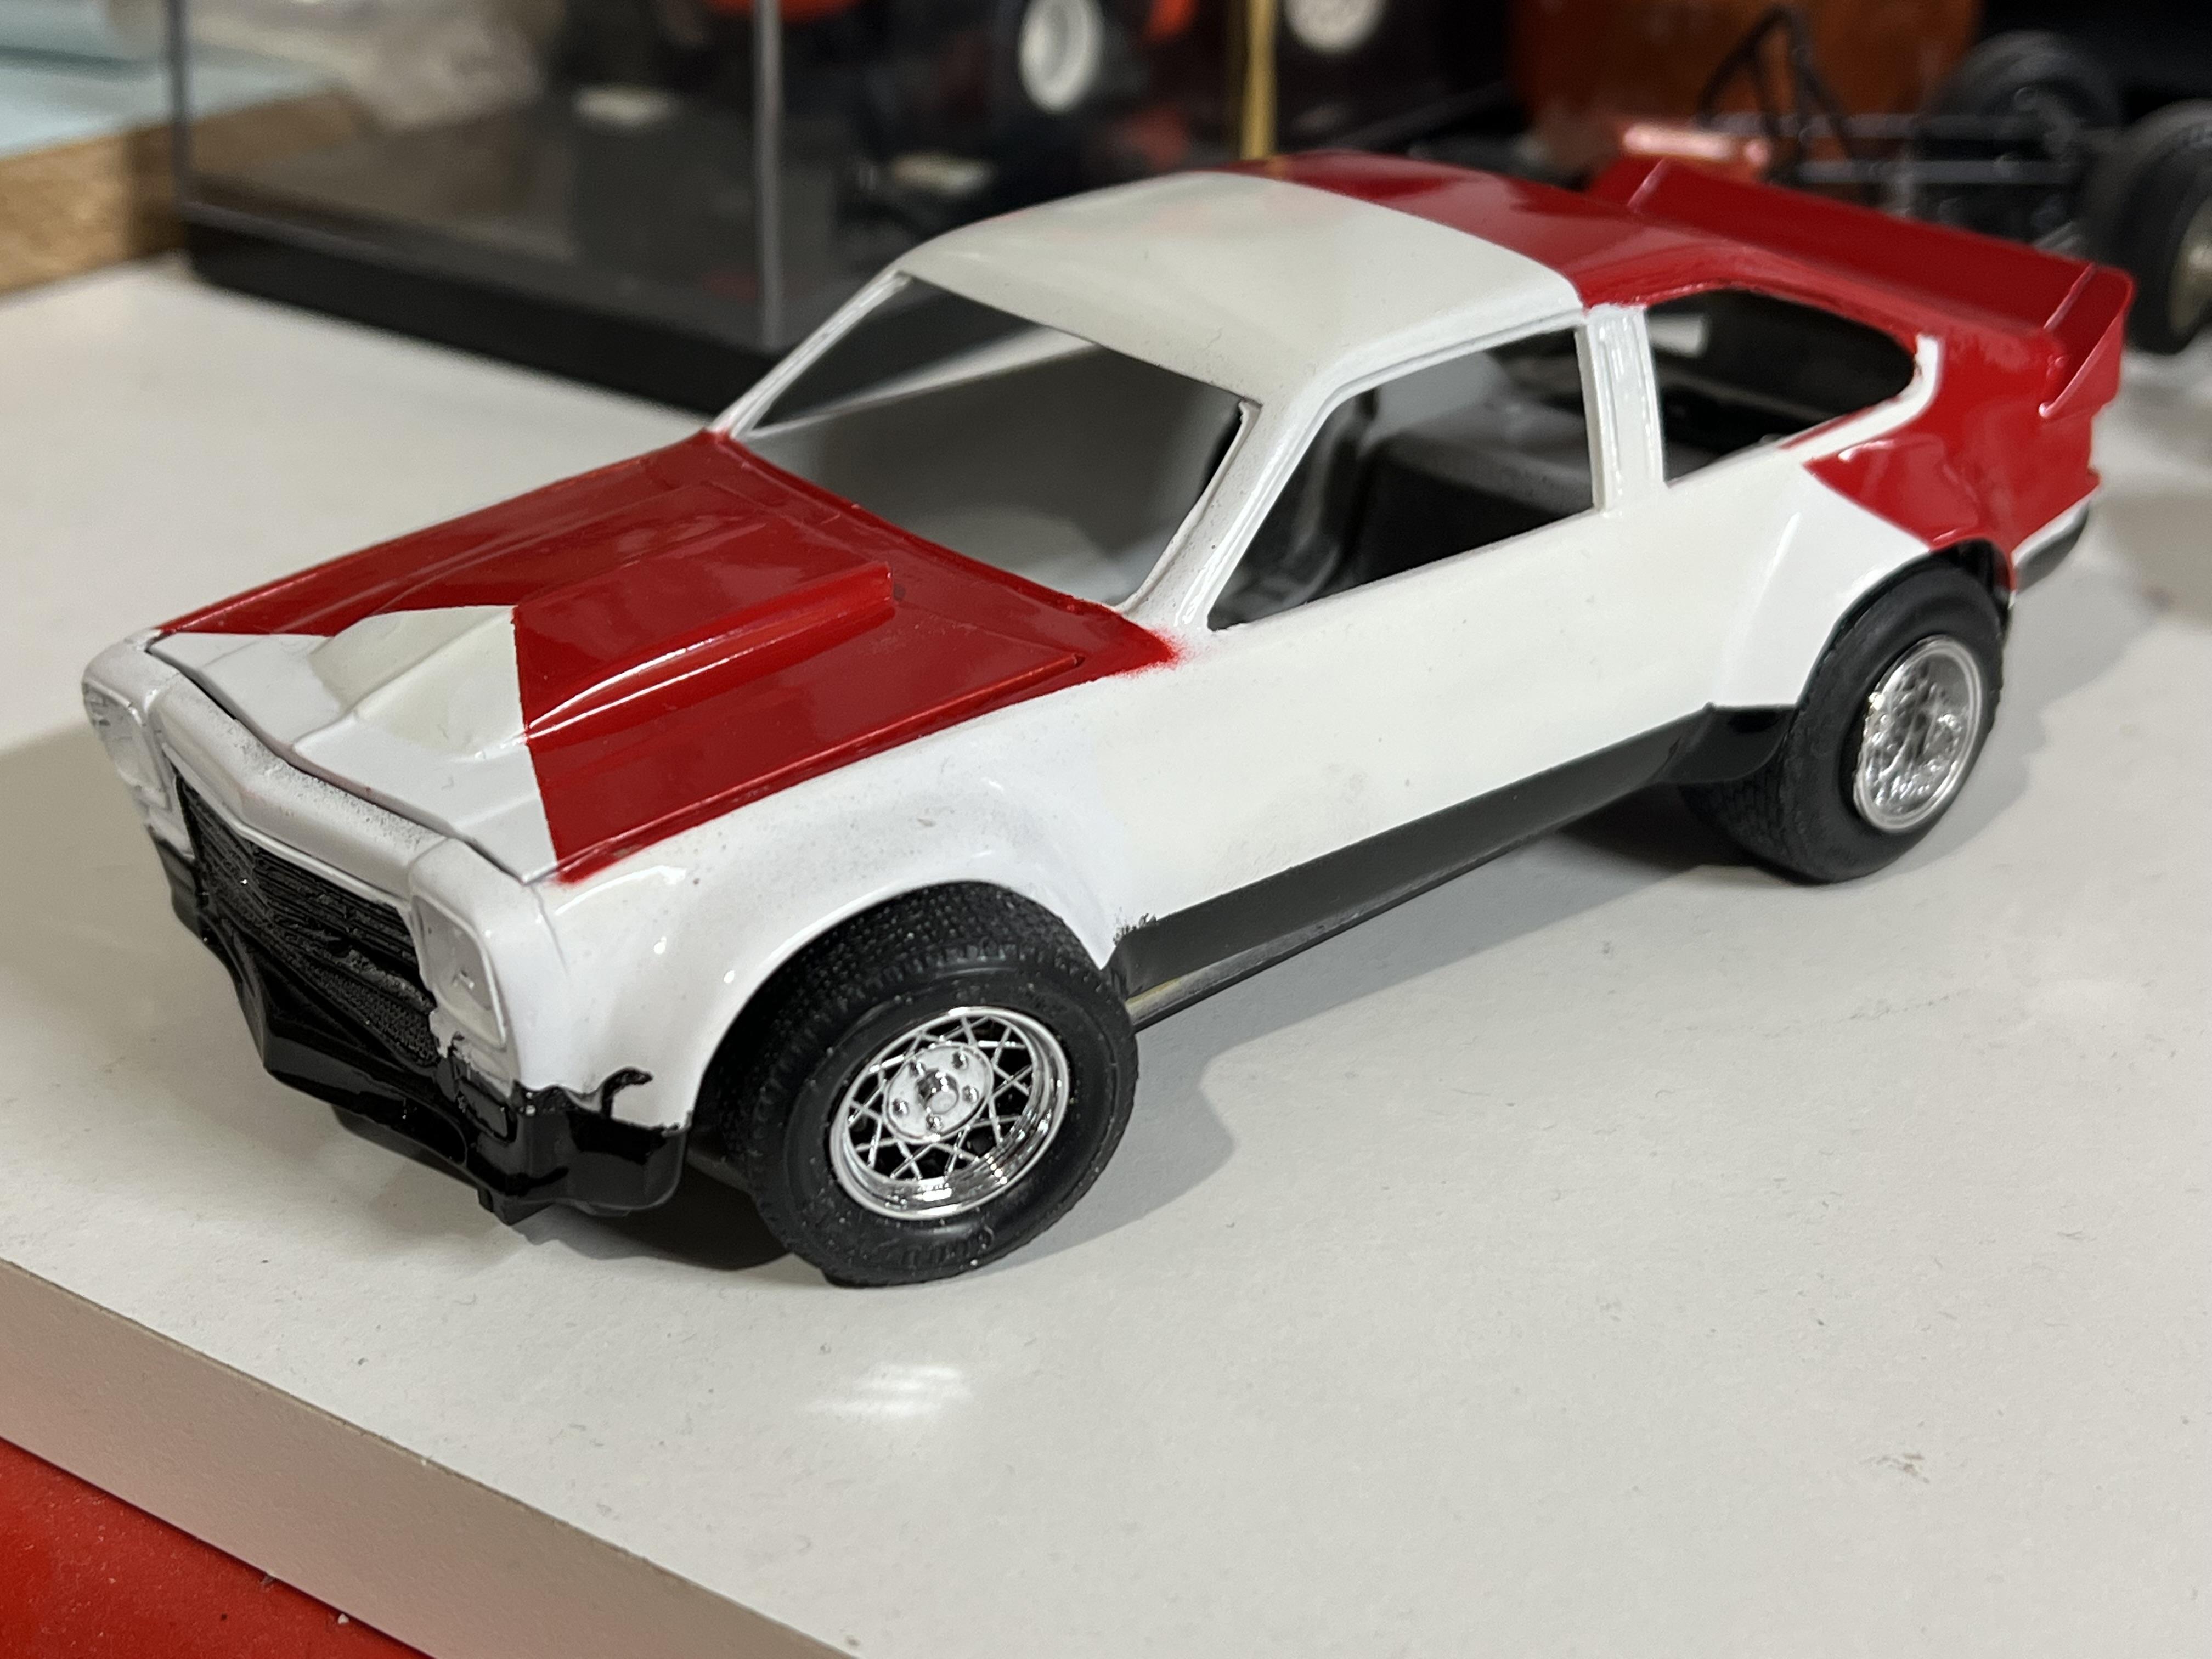
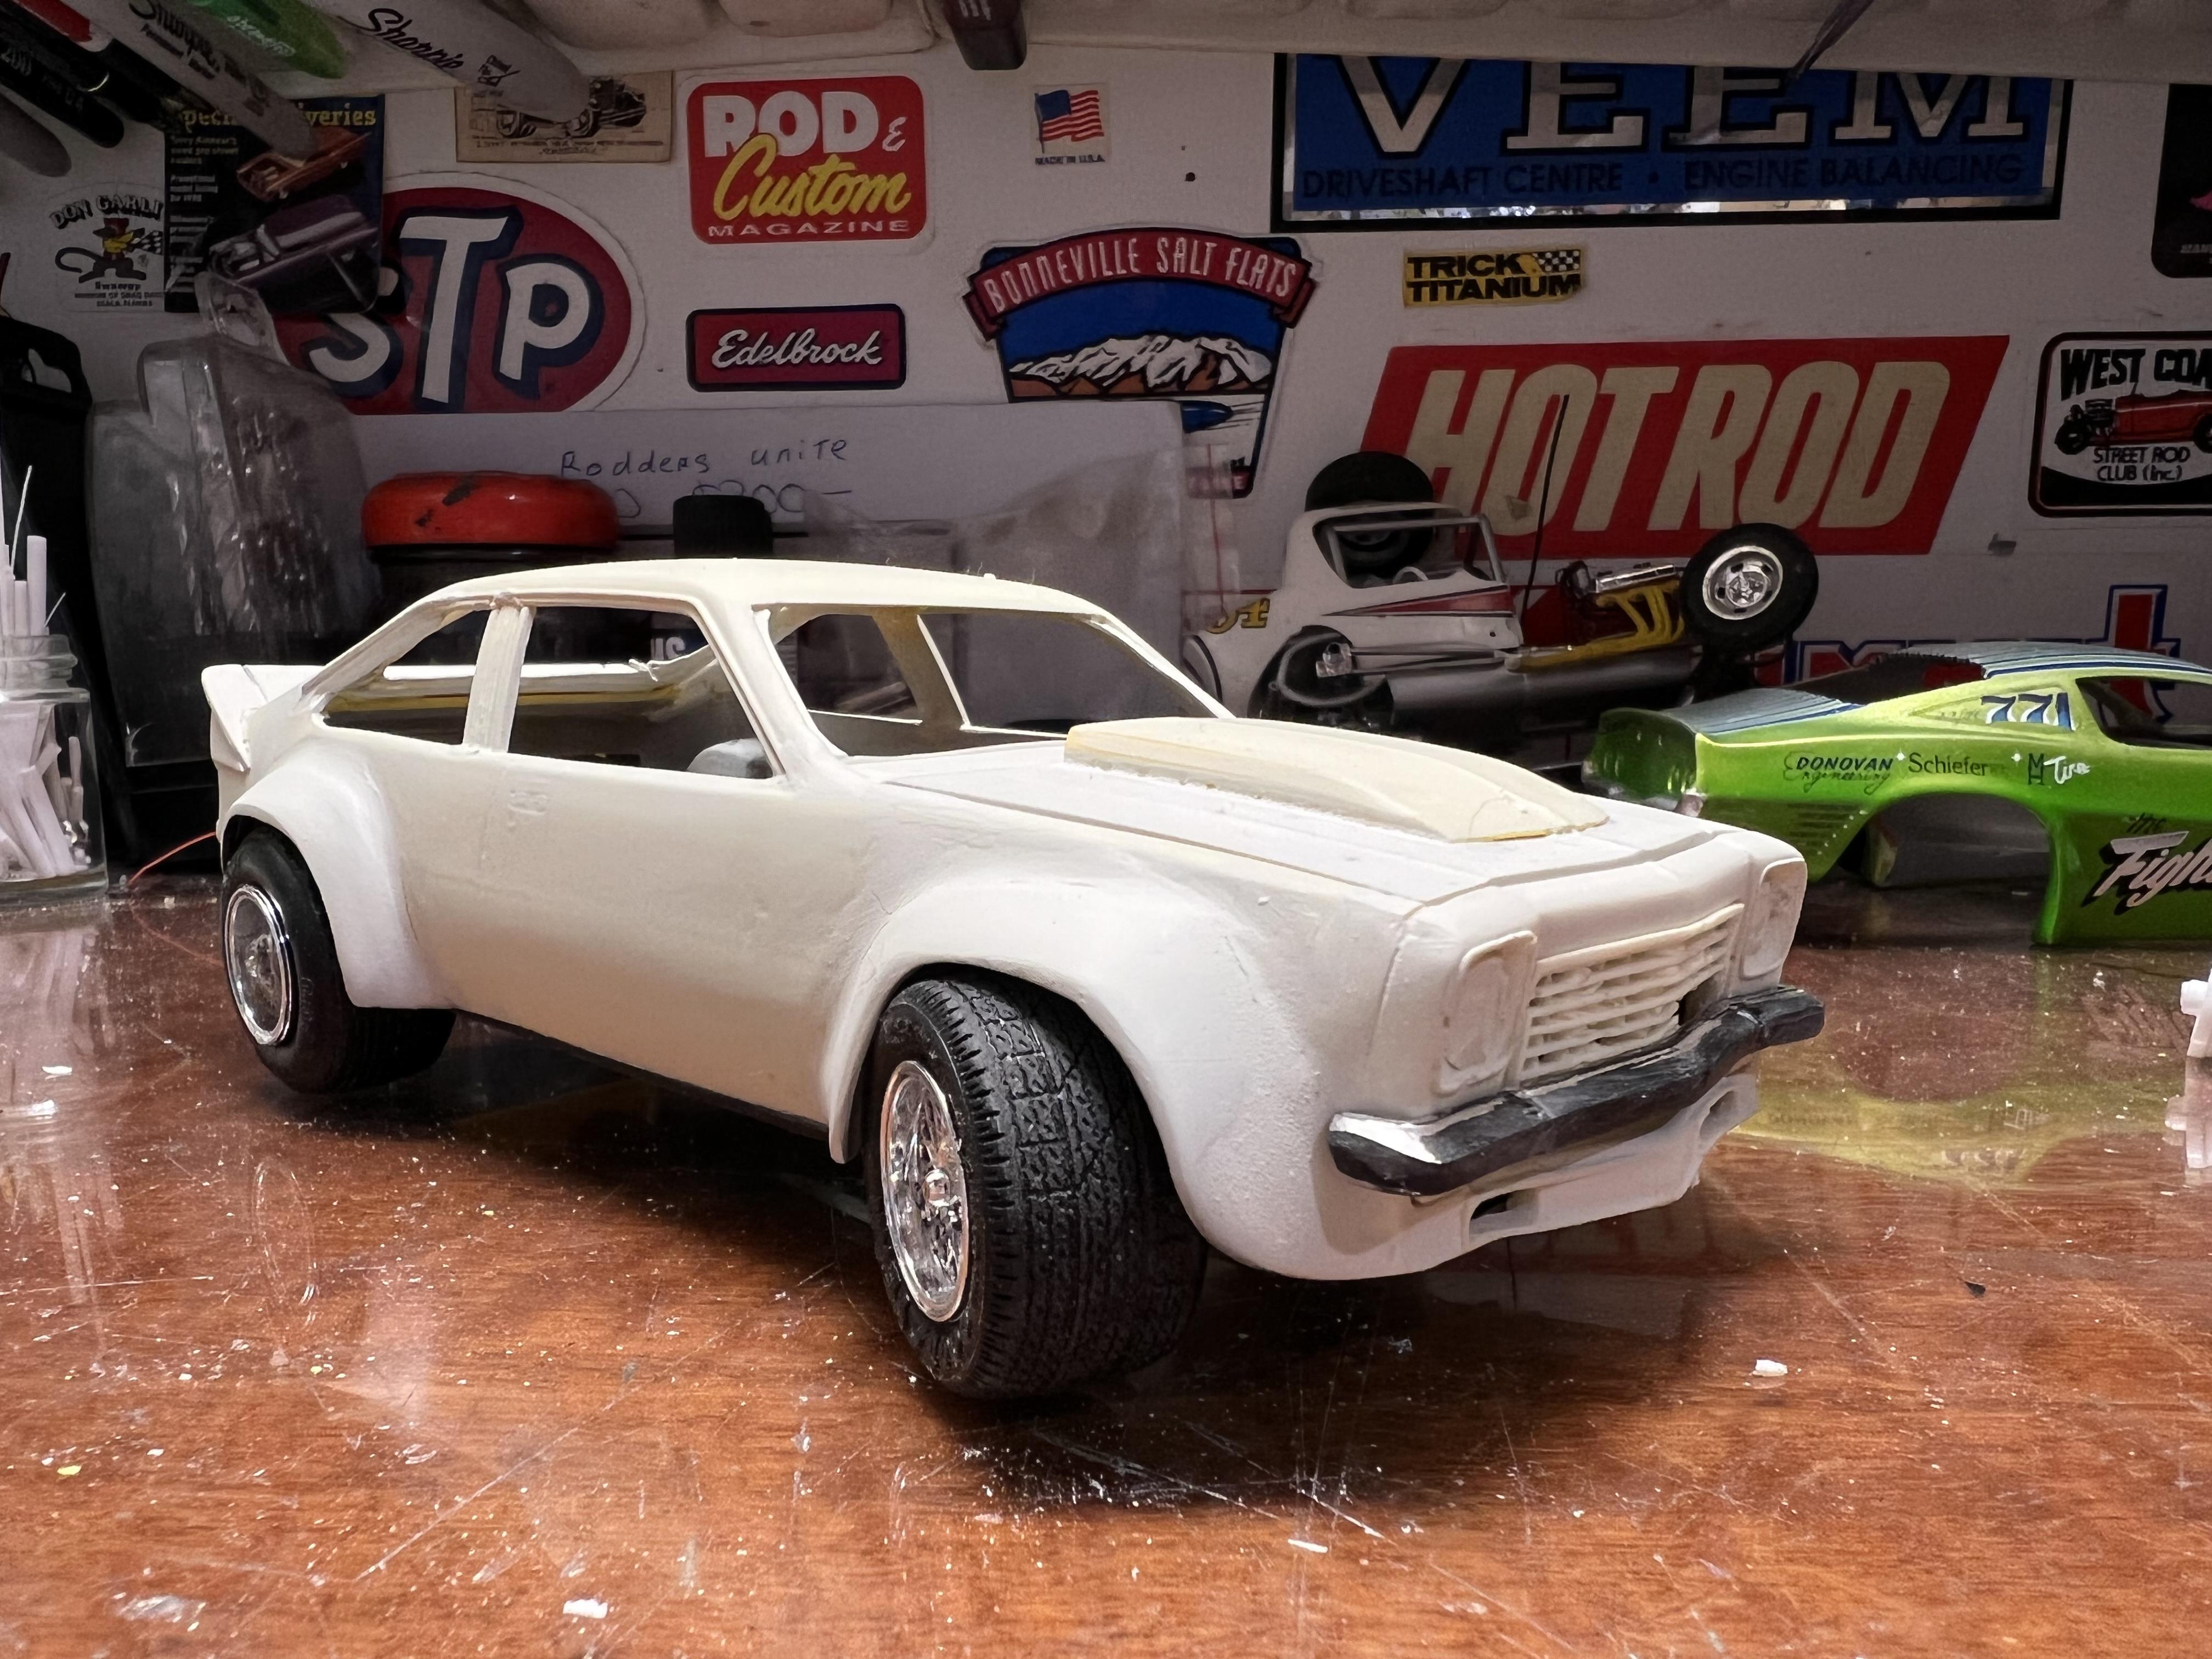
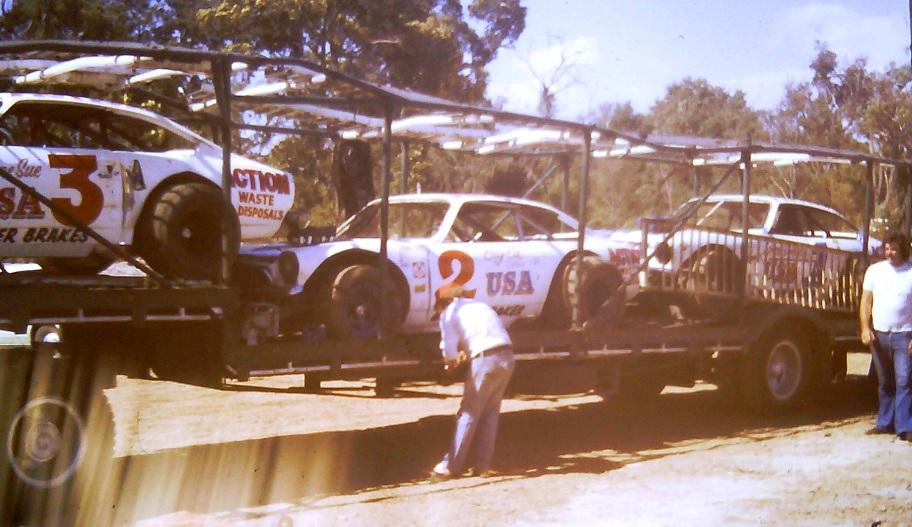
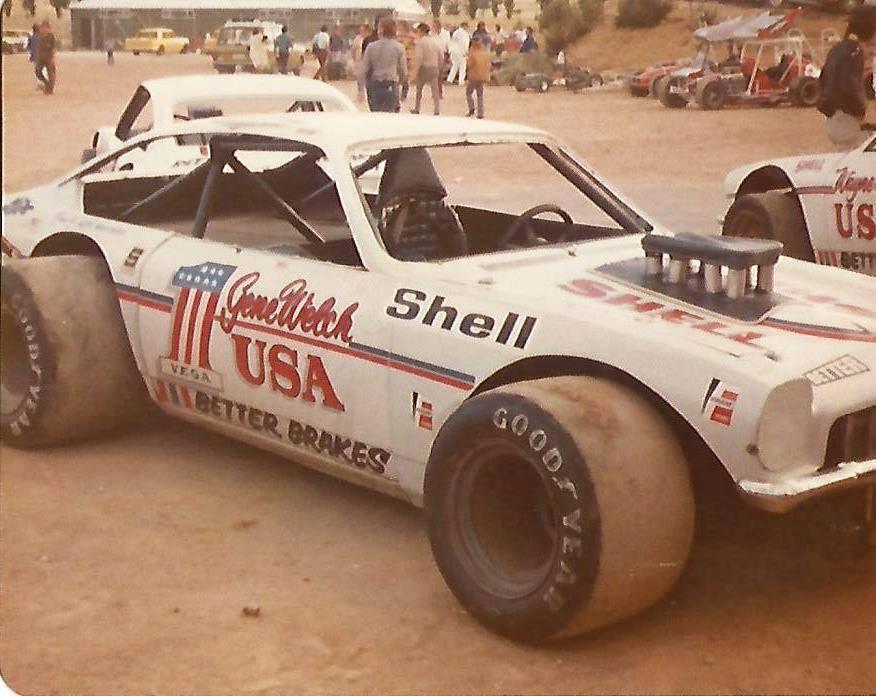
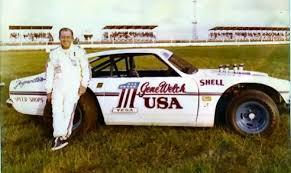
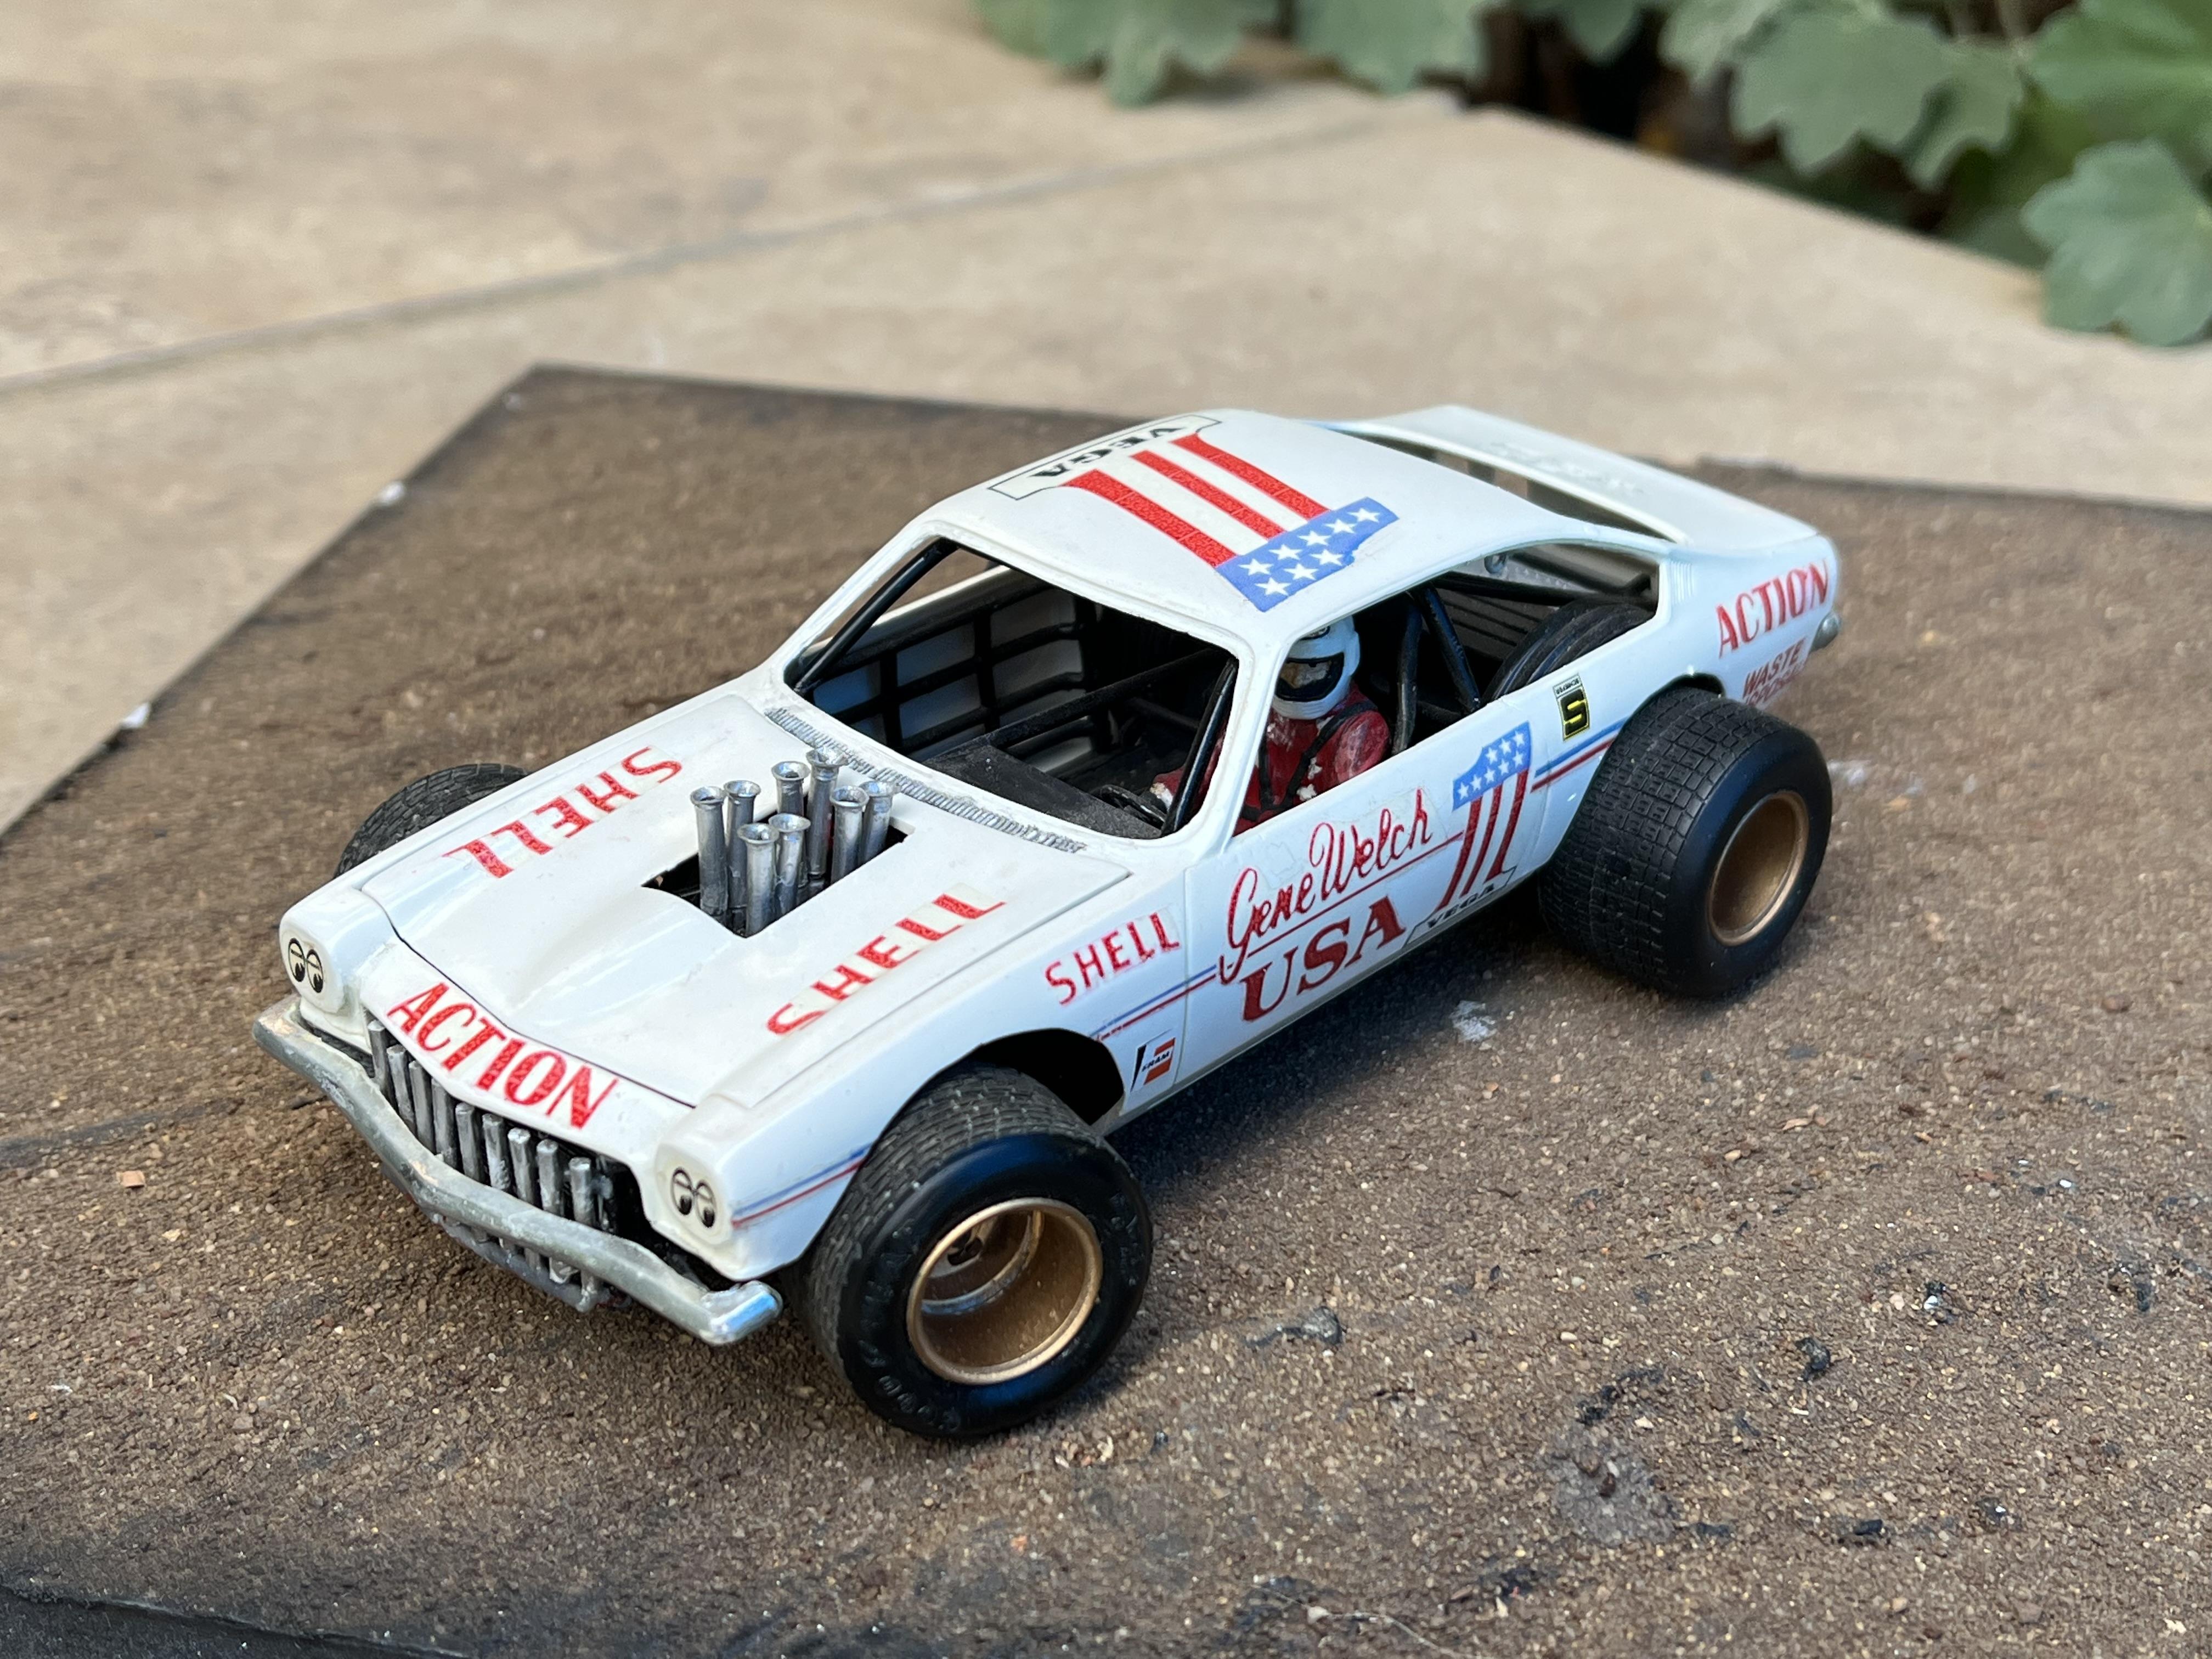
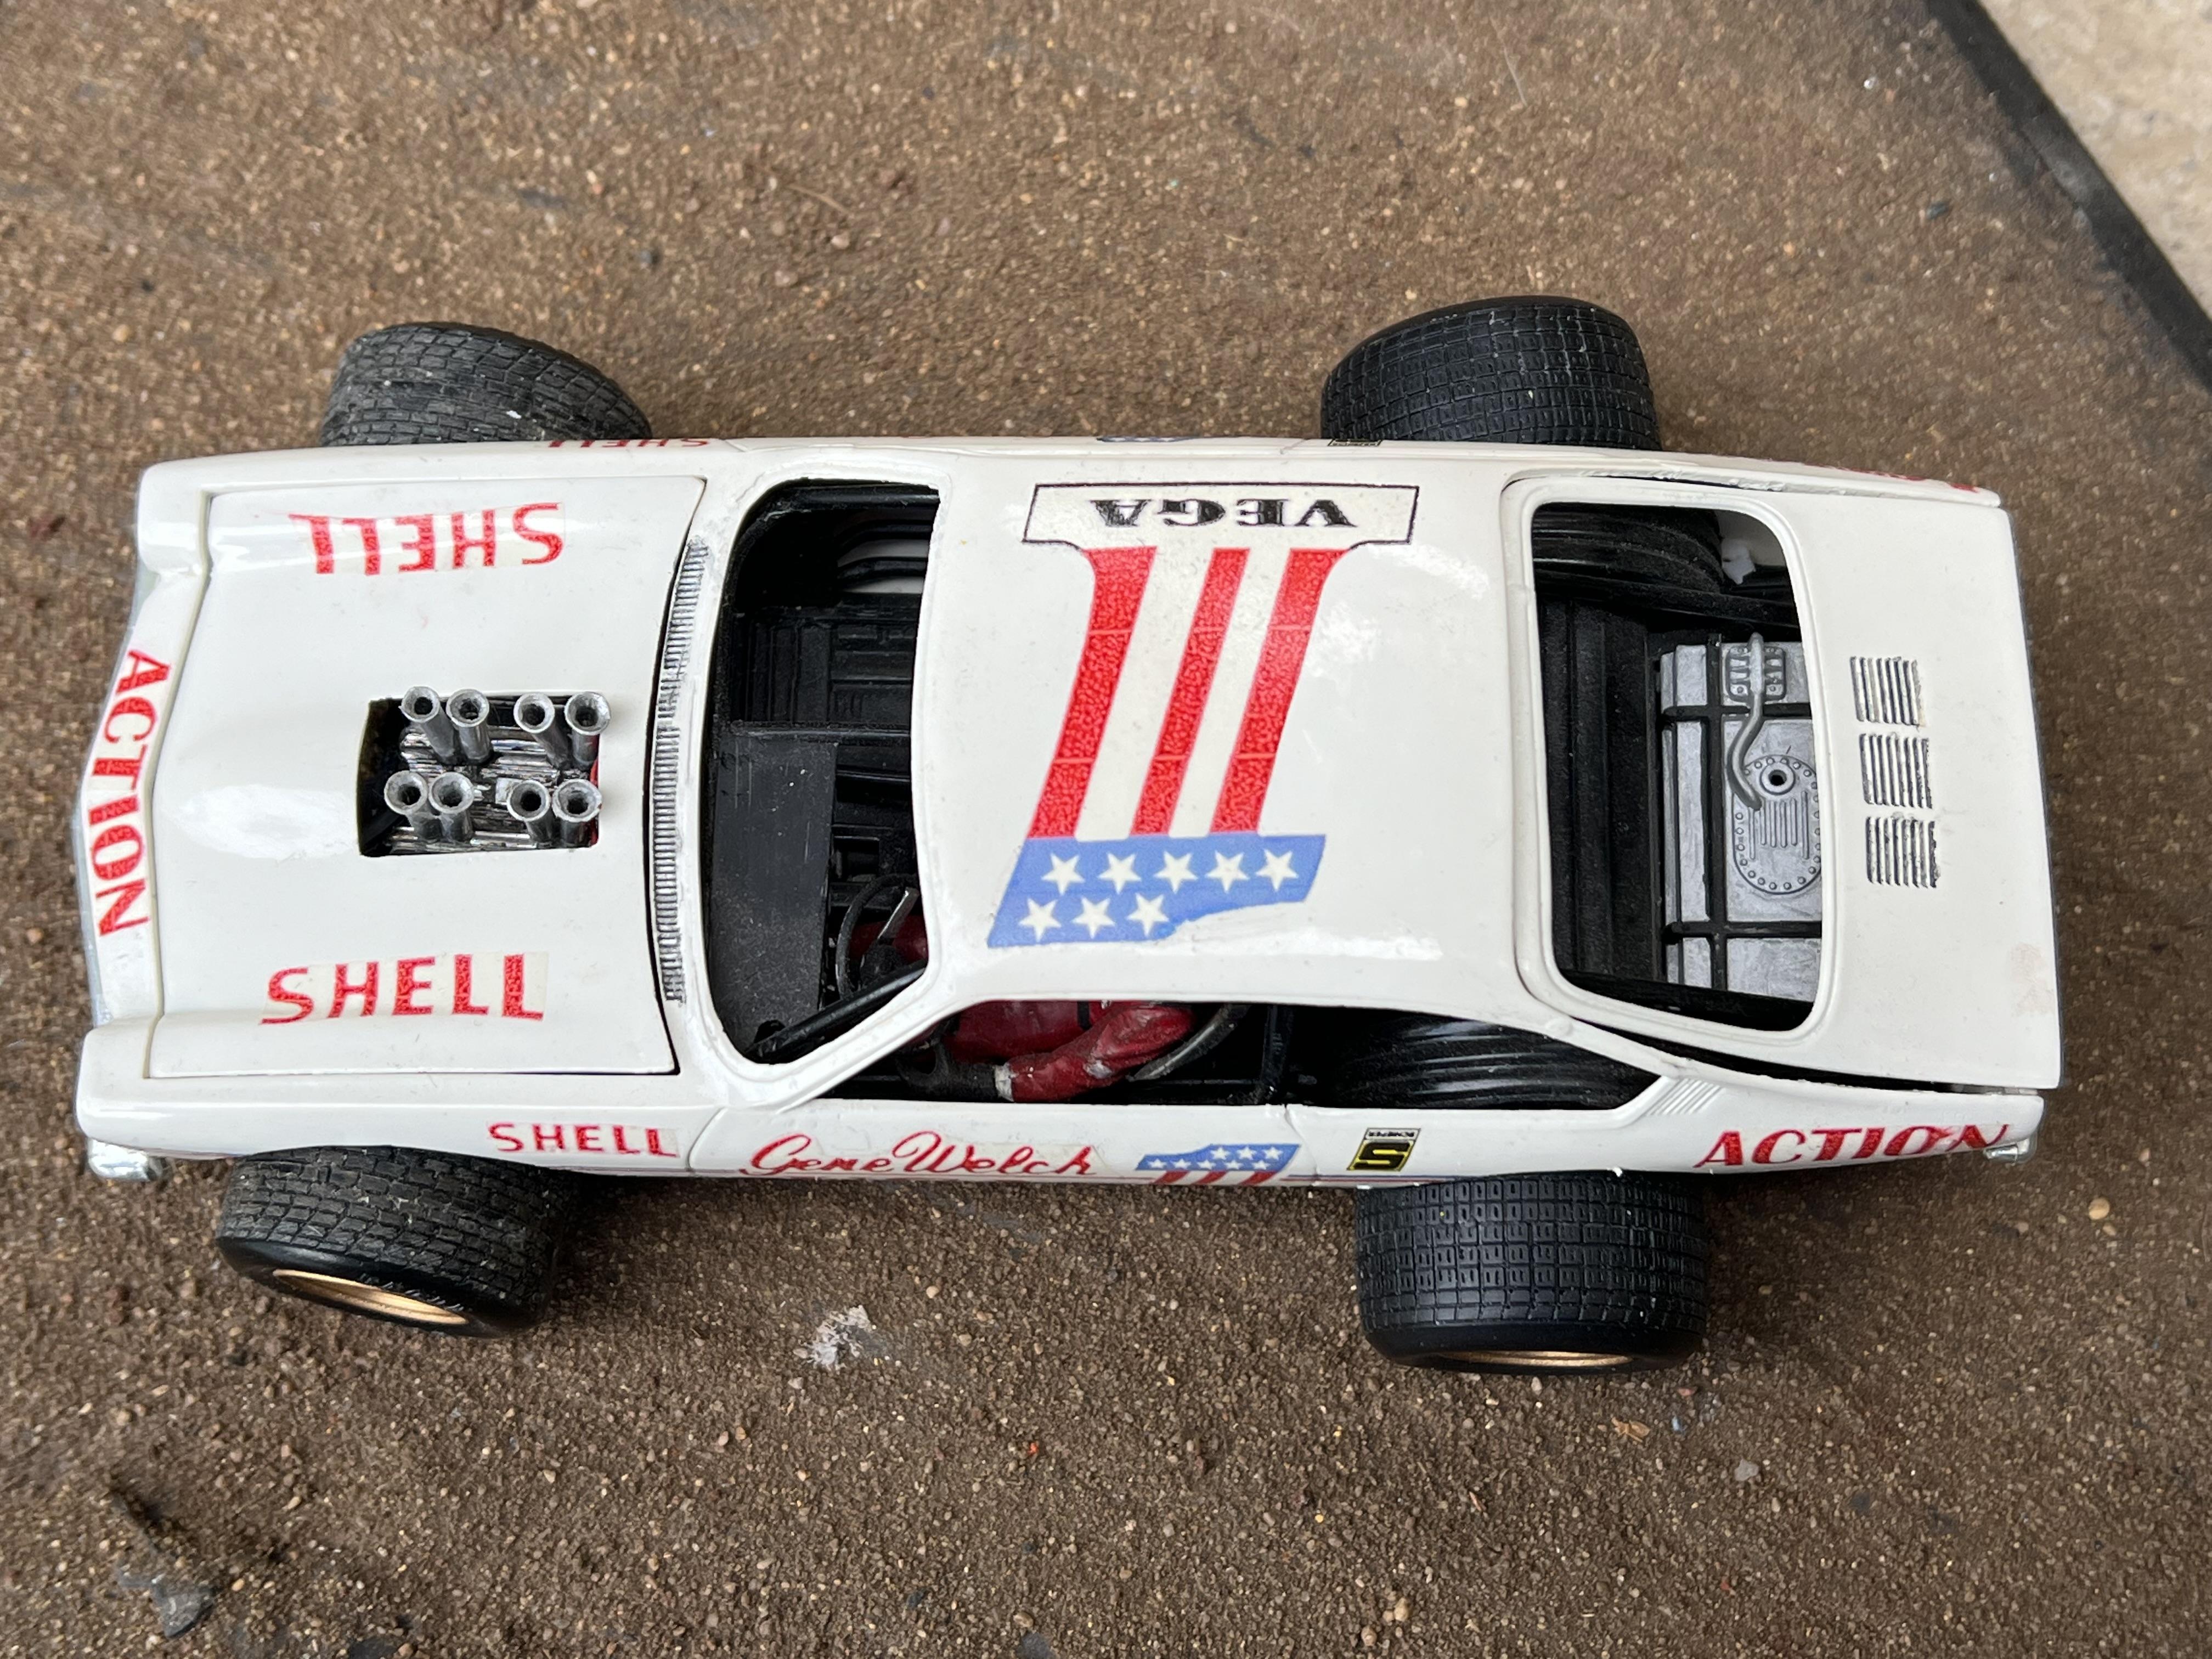
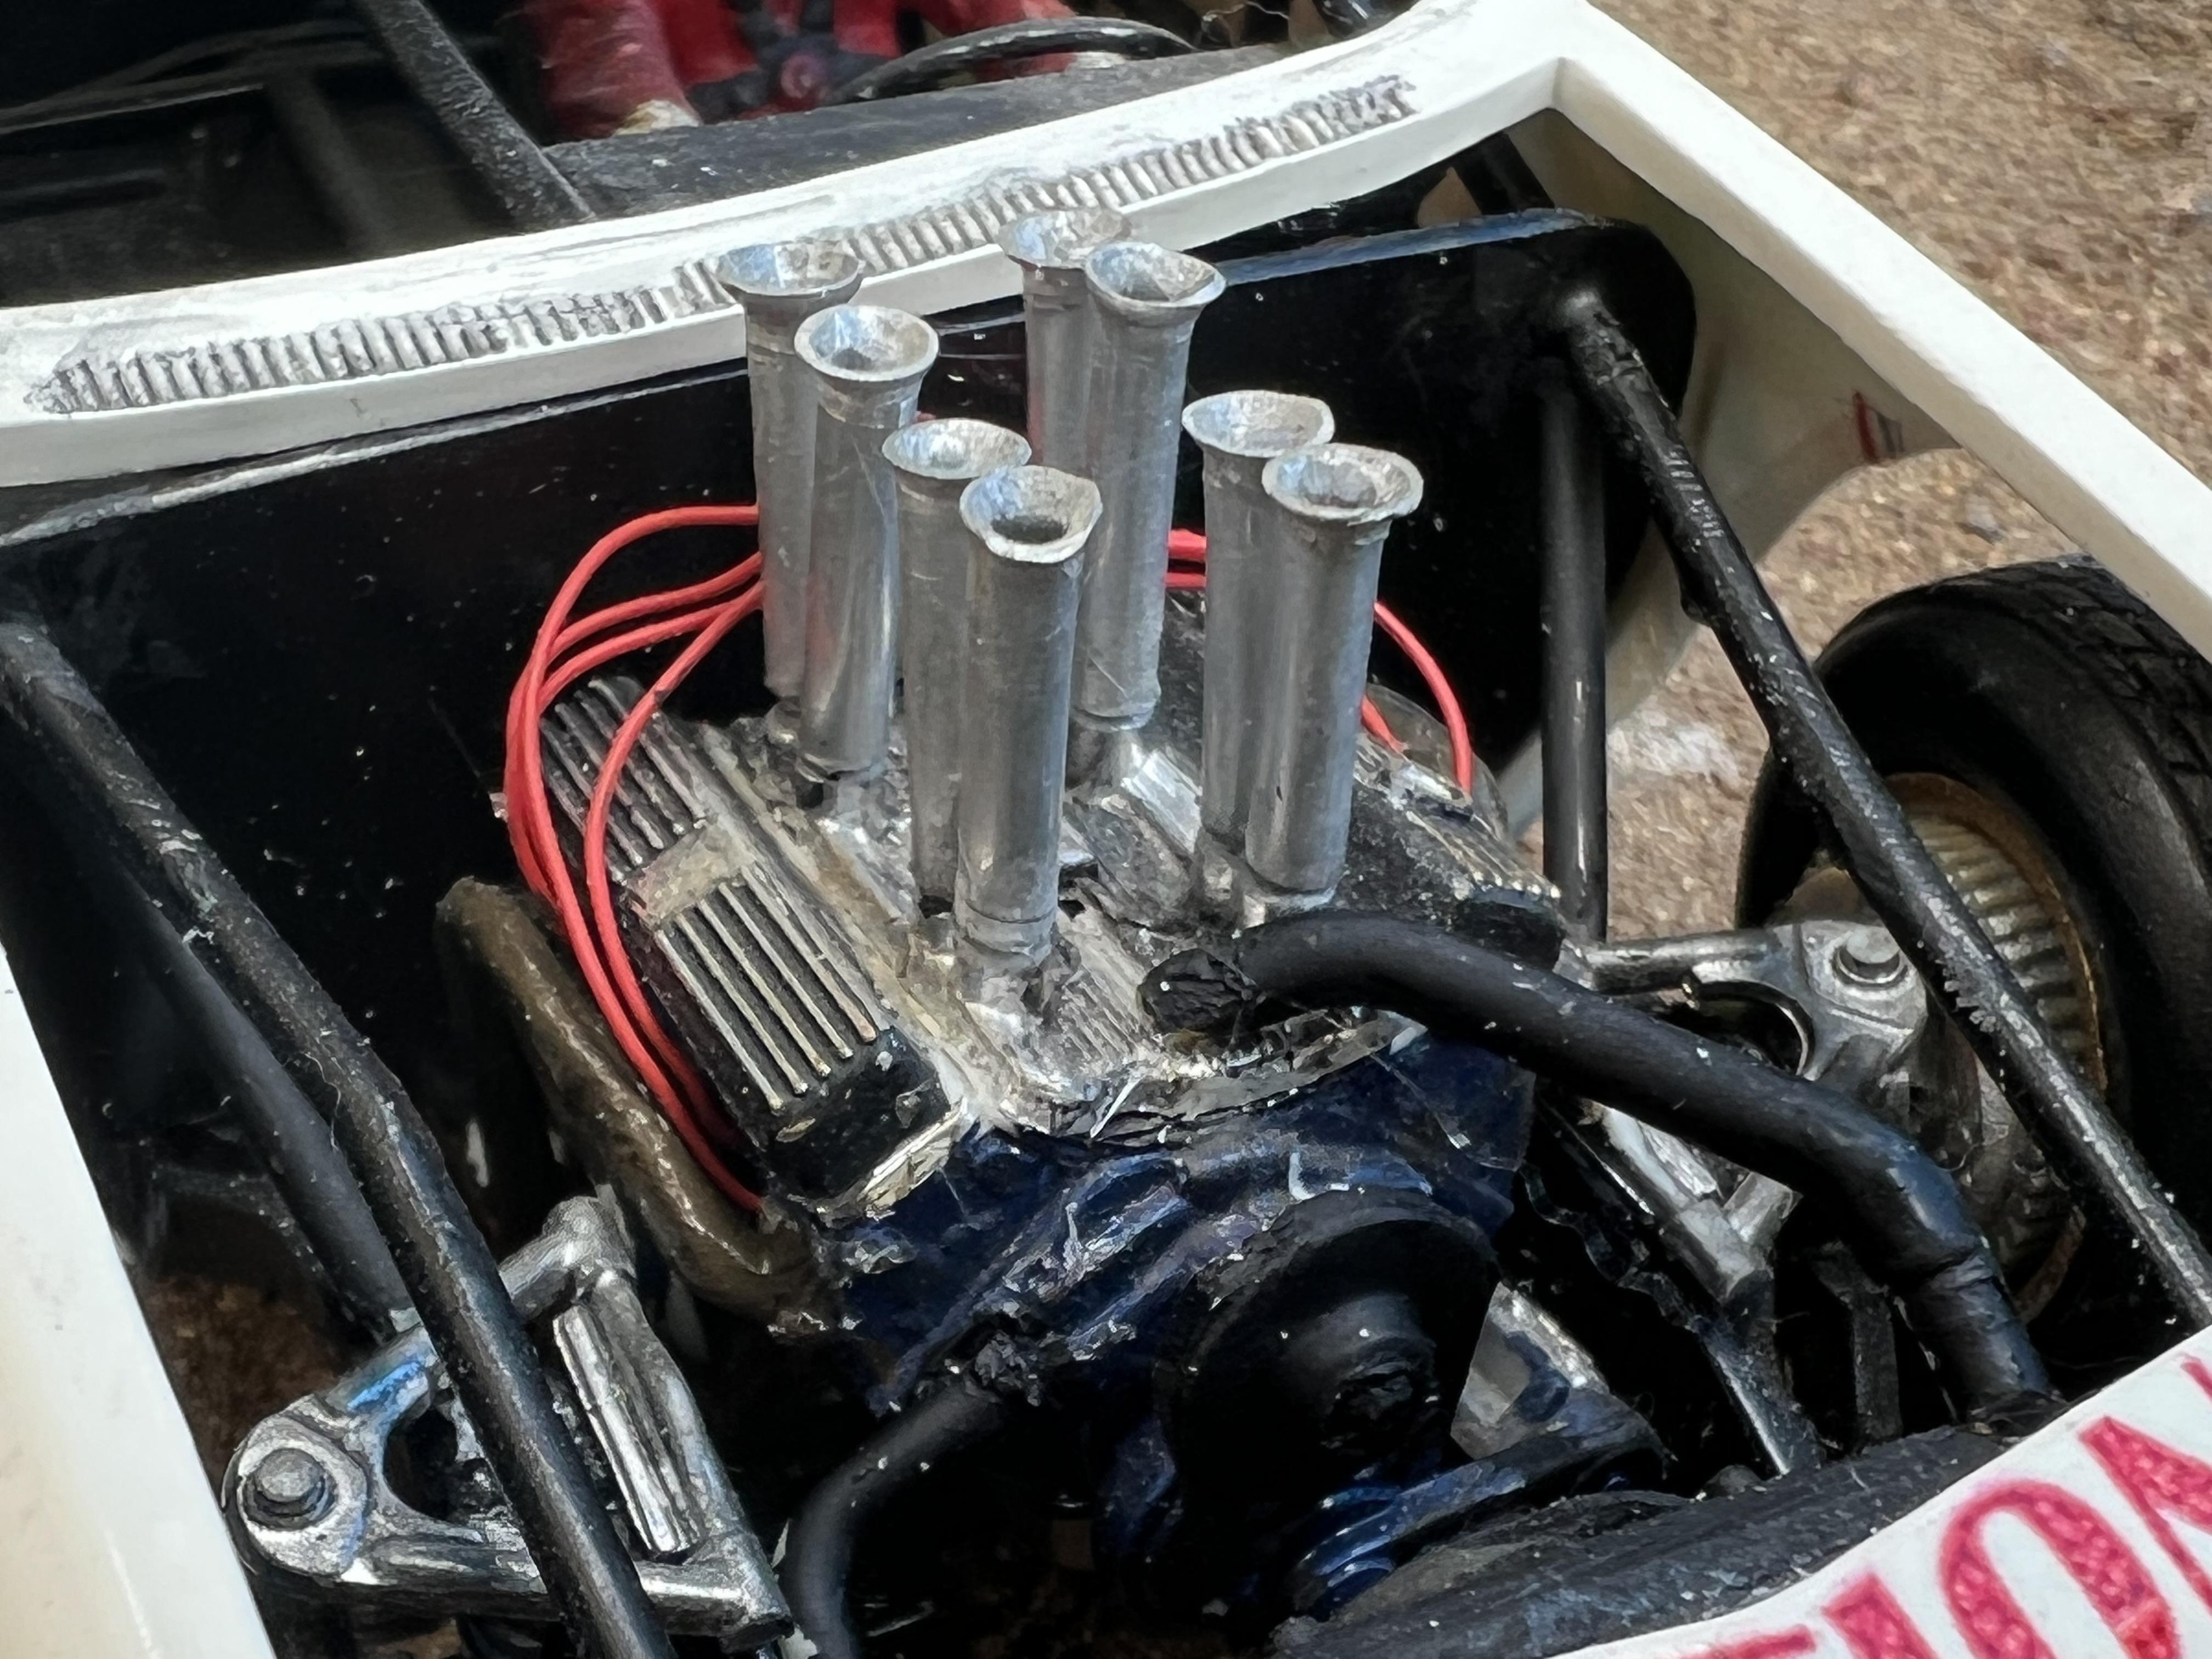
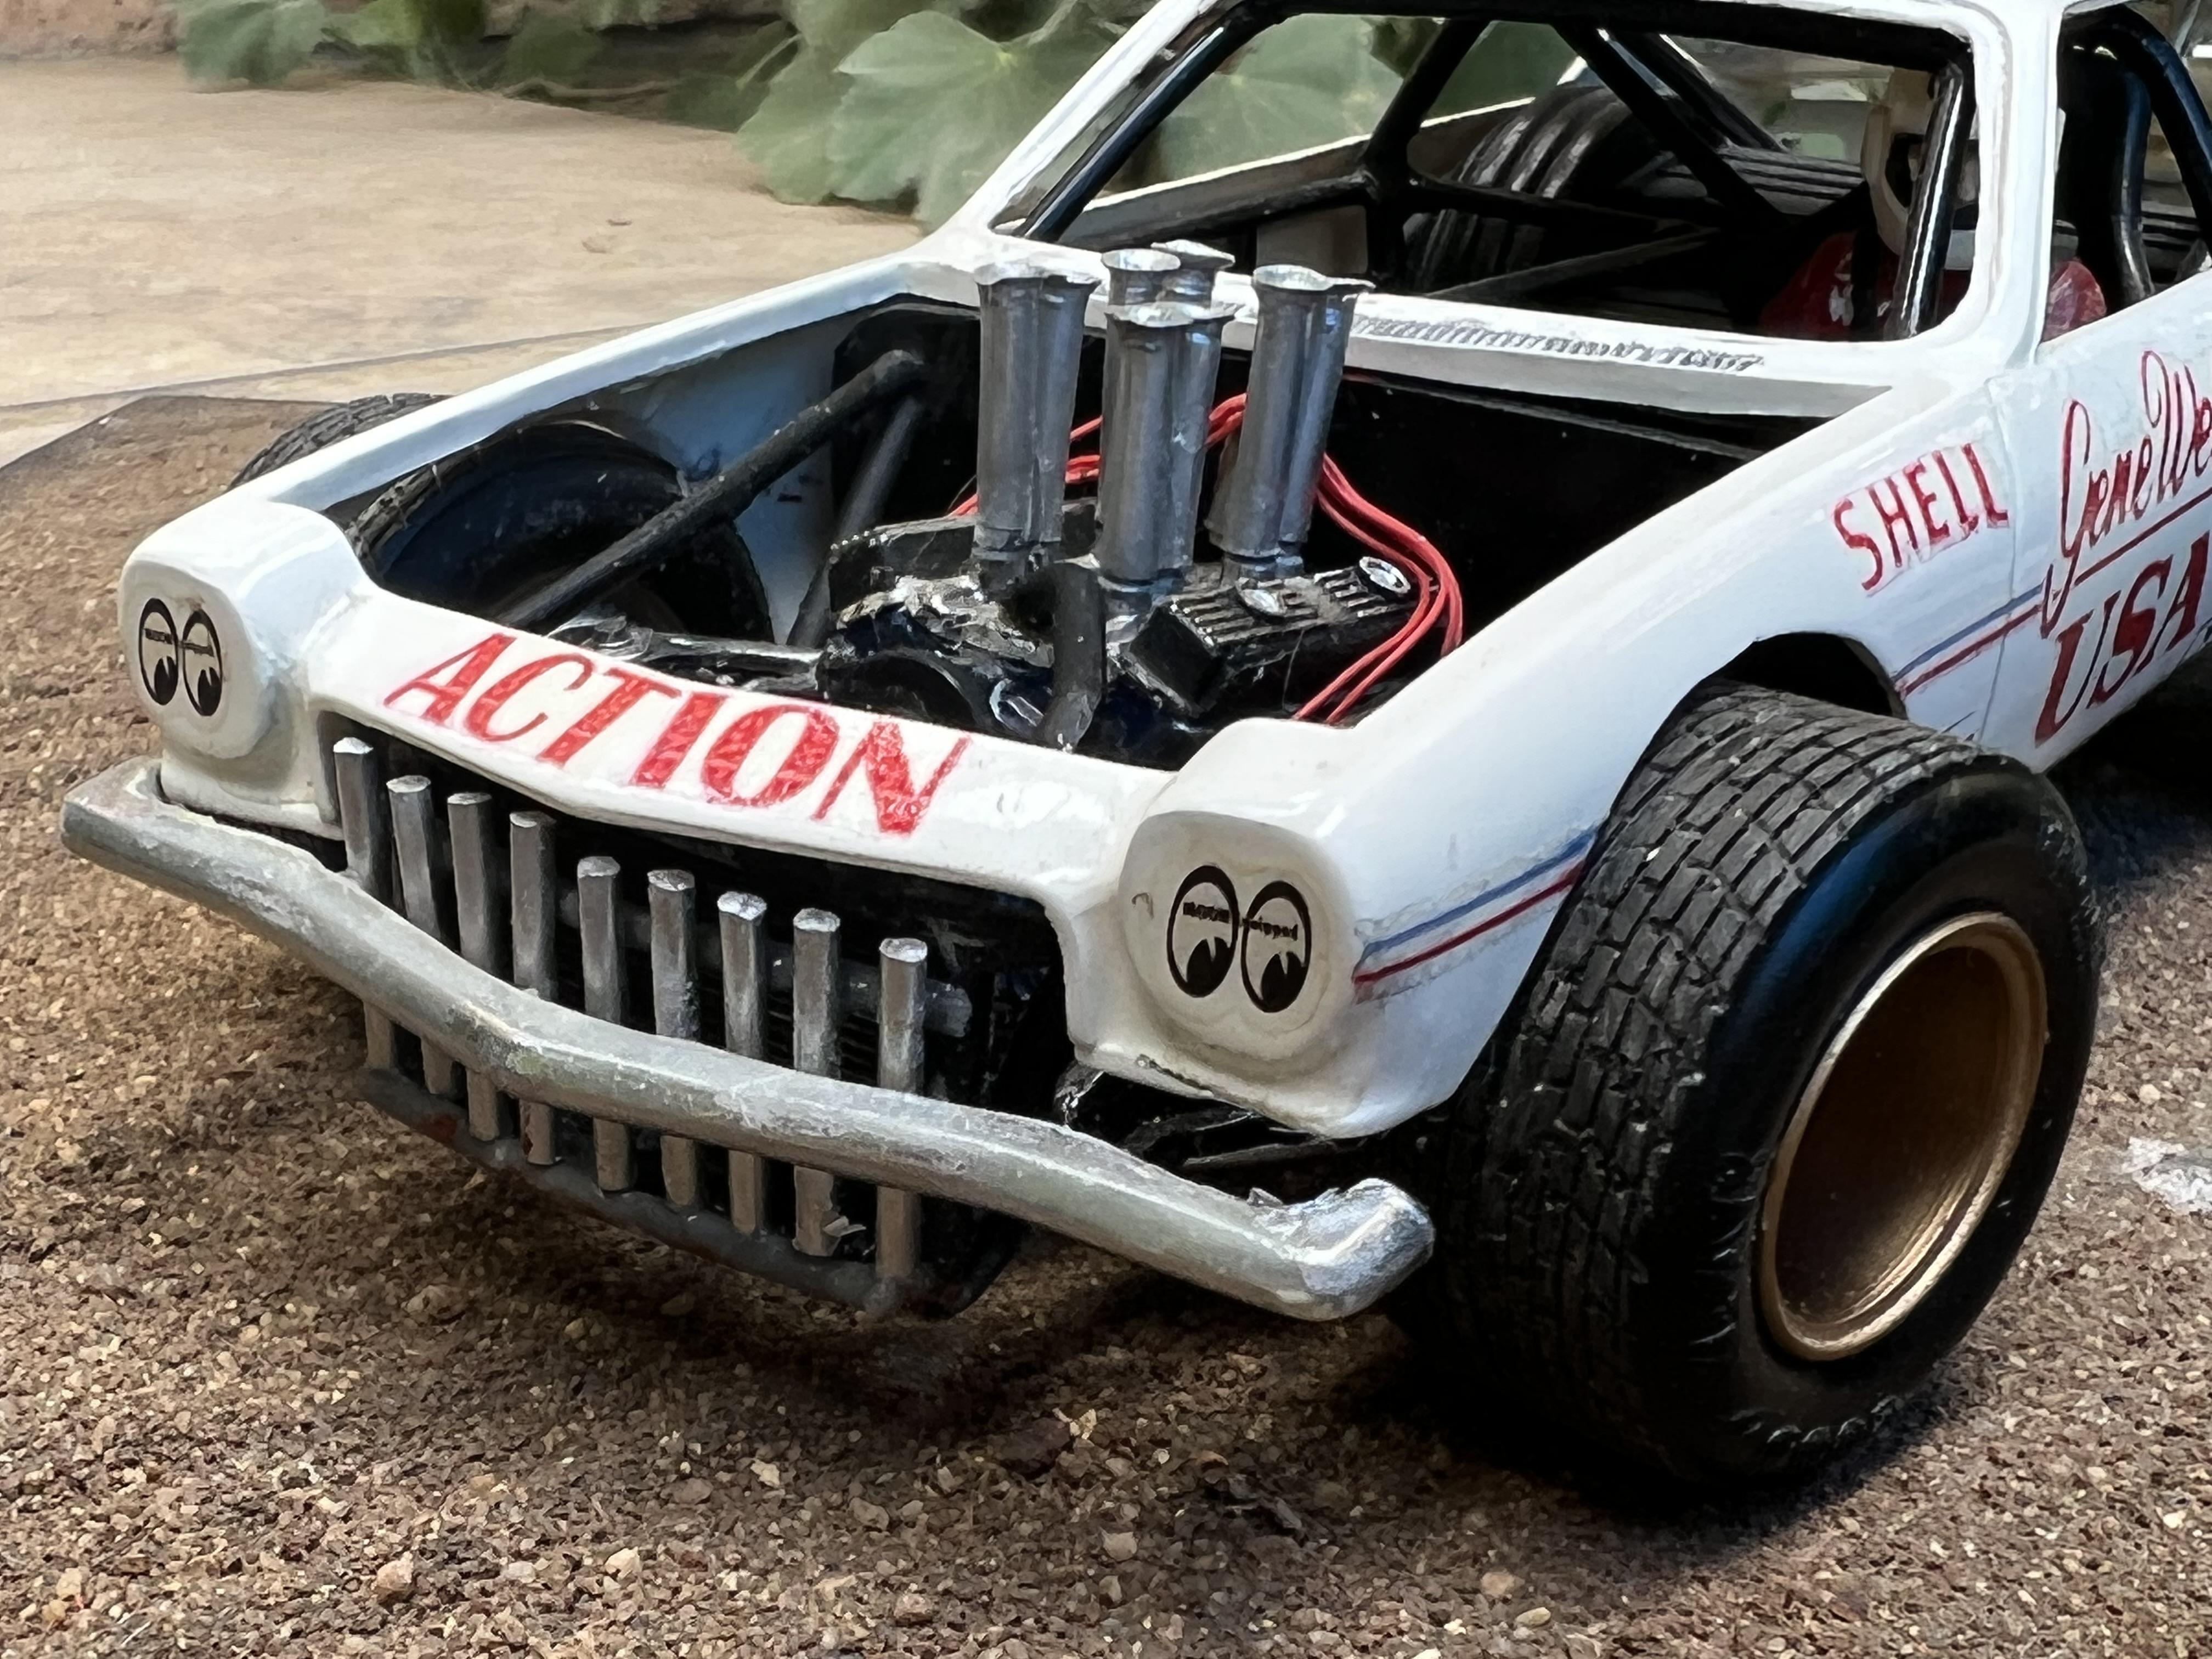
Here's a puzzler for you - can you think of an American race car built from an American sedan by an American racer to compete as part of an American team - but practically no American knows about? Still waiting.......... O.K. The car you see here is one of a four car team of Chevy Vegas brought to Australia for the summer of 74/75 by Gene Welch. But first, a little history. Speedway sedan racing, what you guys call late models, only really took off in Australia in the late sixties. By the early seventies it had taken top billing from the midgets, super mods and solo bikes that were fan favourites in the sixties. Around 1971/72, Californian Gene Welch came out to Australia to race over the summer season, your winter, on the eastern seaboard. He brought with him his 65 Chevelle and had a pretty successful season, enough to make him want to come back the next year. This time he brought a 69 Camaro, and like the Chevelle, it was a pretty typical short track racer from the era. Things took a twist the next year, however, when Gene returned with a purpose built weapon in the form of a shortened 71 or so fibreglass Camaro on basically a modified sprintcar frame. Reputed to have cost a mind blowing $12.000 back in the day, it was meant to blow the Aussie competition off the planet. It wasn't as dominant as expected but the seed had been sown. For the next season, Gene returned with a four man team in near identical Vegas. These were no ordinary Vegas. Local speedway magazines stated that Gene chose the Vega because it was the smallest car that GM made with a V8. Heck, those dumb Aussies won't no that GM never made a V8 Vega!!! A magazine article on the build stated that they were a steel bodied car with a NASCAR frame, 3 inch finned drums on all four corners, a quick change rear and injected 350 Chevy powerplants. Oh yeah, and outrageous steamroller rubber, wider than we had ever seen on a dirt track and crazy wide, like Formula One wide, for the pavement ovals that were popular on the East Coast. The drivers were Gene Welch, Big Ed Wilbur, Mike Klein ( "Hash Brown") and Wayne Sue. This American tour was all over the local news and as a seventeen year old I made a point of heading to Claremont Speedway to see them race, and hopefully watch the local hot shoes destroy this bunch of Yankee invaders! it didn't quite work like that as these cars were absolute missiles compared to the heavily re-inforced Aussie muscle cars that our guys were racing but it was a great night and I will never forget it. One thing I remember clearly is that once the locals realised they couldn't beat them, they beat them up instead. Boy did those lightweight Vegas take a beating! I always wanted to build a model of Gene's Vega and about twenty five years ago got into it with my childhood 72 Vega kit, with a heavily modified but unknown AMT NASCAR kit for the frame, narrowed and shortened, and a lot of scratchbuilt and heavily modified parts. Only problem was, I had no idea how to make the decals so it sat in a plain white wrapper ever since. Recently I met Jackson Bull, a very pleasant and knowledgeable young man who wasn't even born when I first built this model. I wondered out loud if he thought he could make the decals I needed. In under 2.5 seconds he had found colour photos of the car on his phone and by the end of the week I had my decals, and they were near perfect! There is nearly a fifty year age difference between myself and Jackson but his knowledge and passion for hot rods and models blows me away and I am eternally grateful for him enabling me to finish this model. So here it is, finally finished after all these years. There is not a lot of info about these cars on the net. Most of my reference photos were from old black and white Aussie speedway magazines from the era. I have no idea what happened to the cars - whether they returned to the USA or not, except that to the best of my knowledge they were never raced here again. (Gene's earlier 69 Camaro was sold to local supermod hero, Alf Barbagallo but it was raced only briefly by him before he returned to supermods). In following years the team returned with Camaros, Monzas, Corvettes and eventually the wedge shaped late models but they were all conventional short track racers of the day - only the Vegas were custom built Aussie killers and that is what has always fascinated me about this team. I hope you enjoy my model and if anyone can tell me anymore about the cars from an American standpoint I would be all ears! Cheers Alan PS When I built the model I honestly believed the wheels had been gold. When I finally found a colour photo, it seems they were blue. On the other hand, Perth seemed to be at the end of the tour and by the time they got here a lot had changed on the cars so maybe I did see gold wheels way back when - who knows?
-
Couldn't agree more, KKK! I will hopefully have my whole combo ready to post later this week. Cheers Alan
-
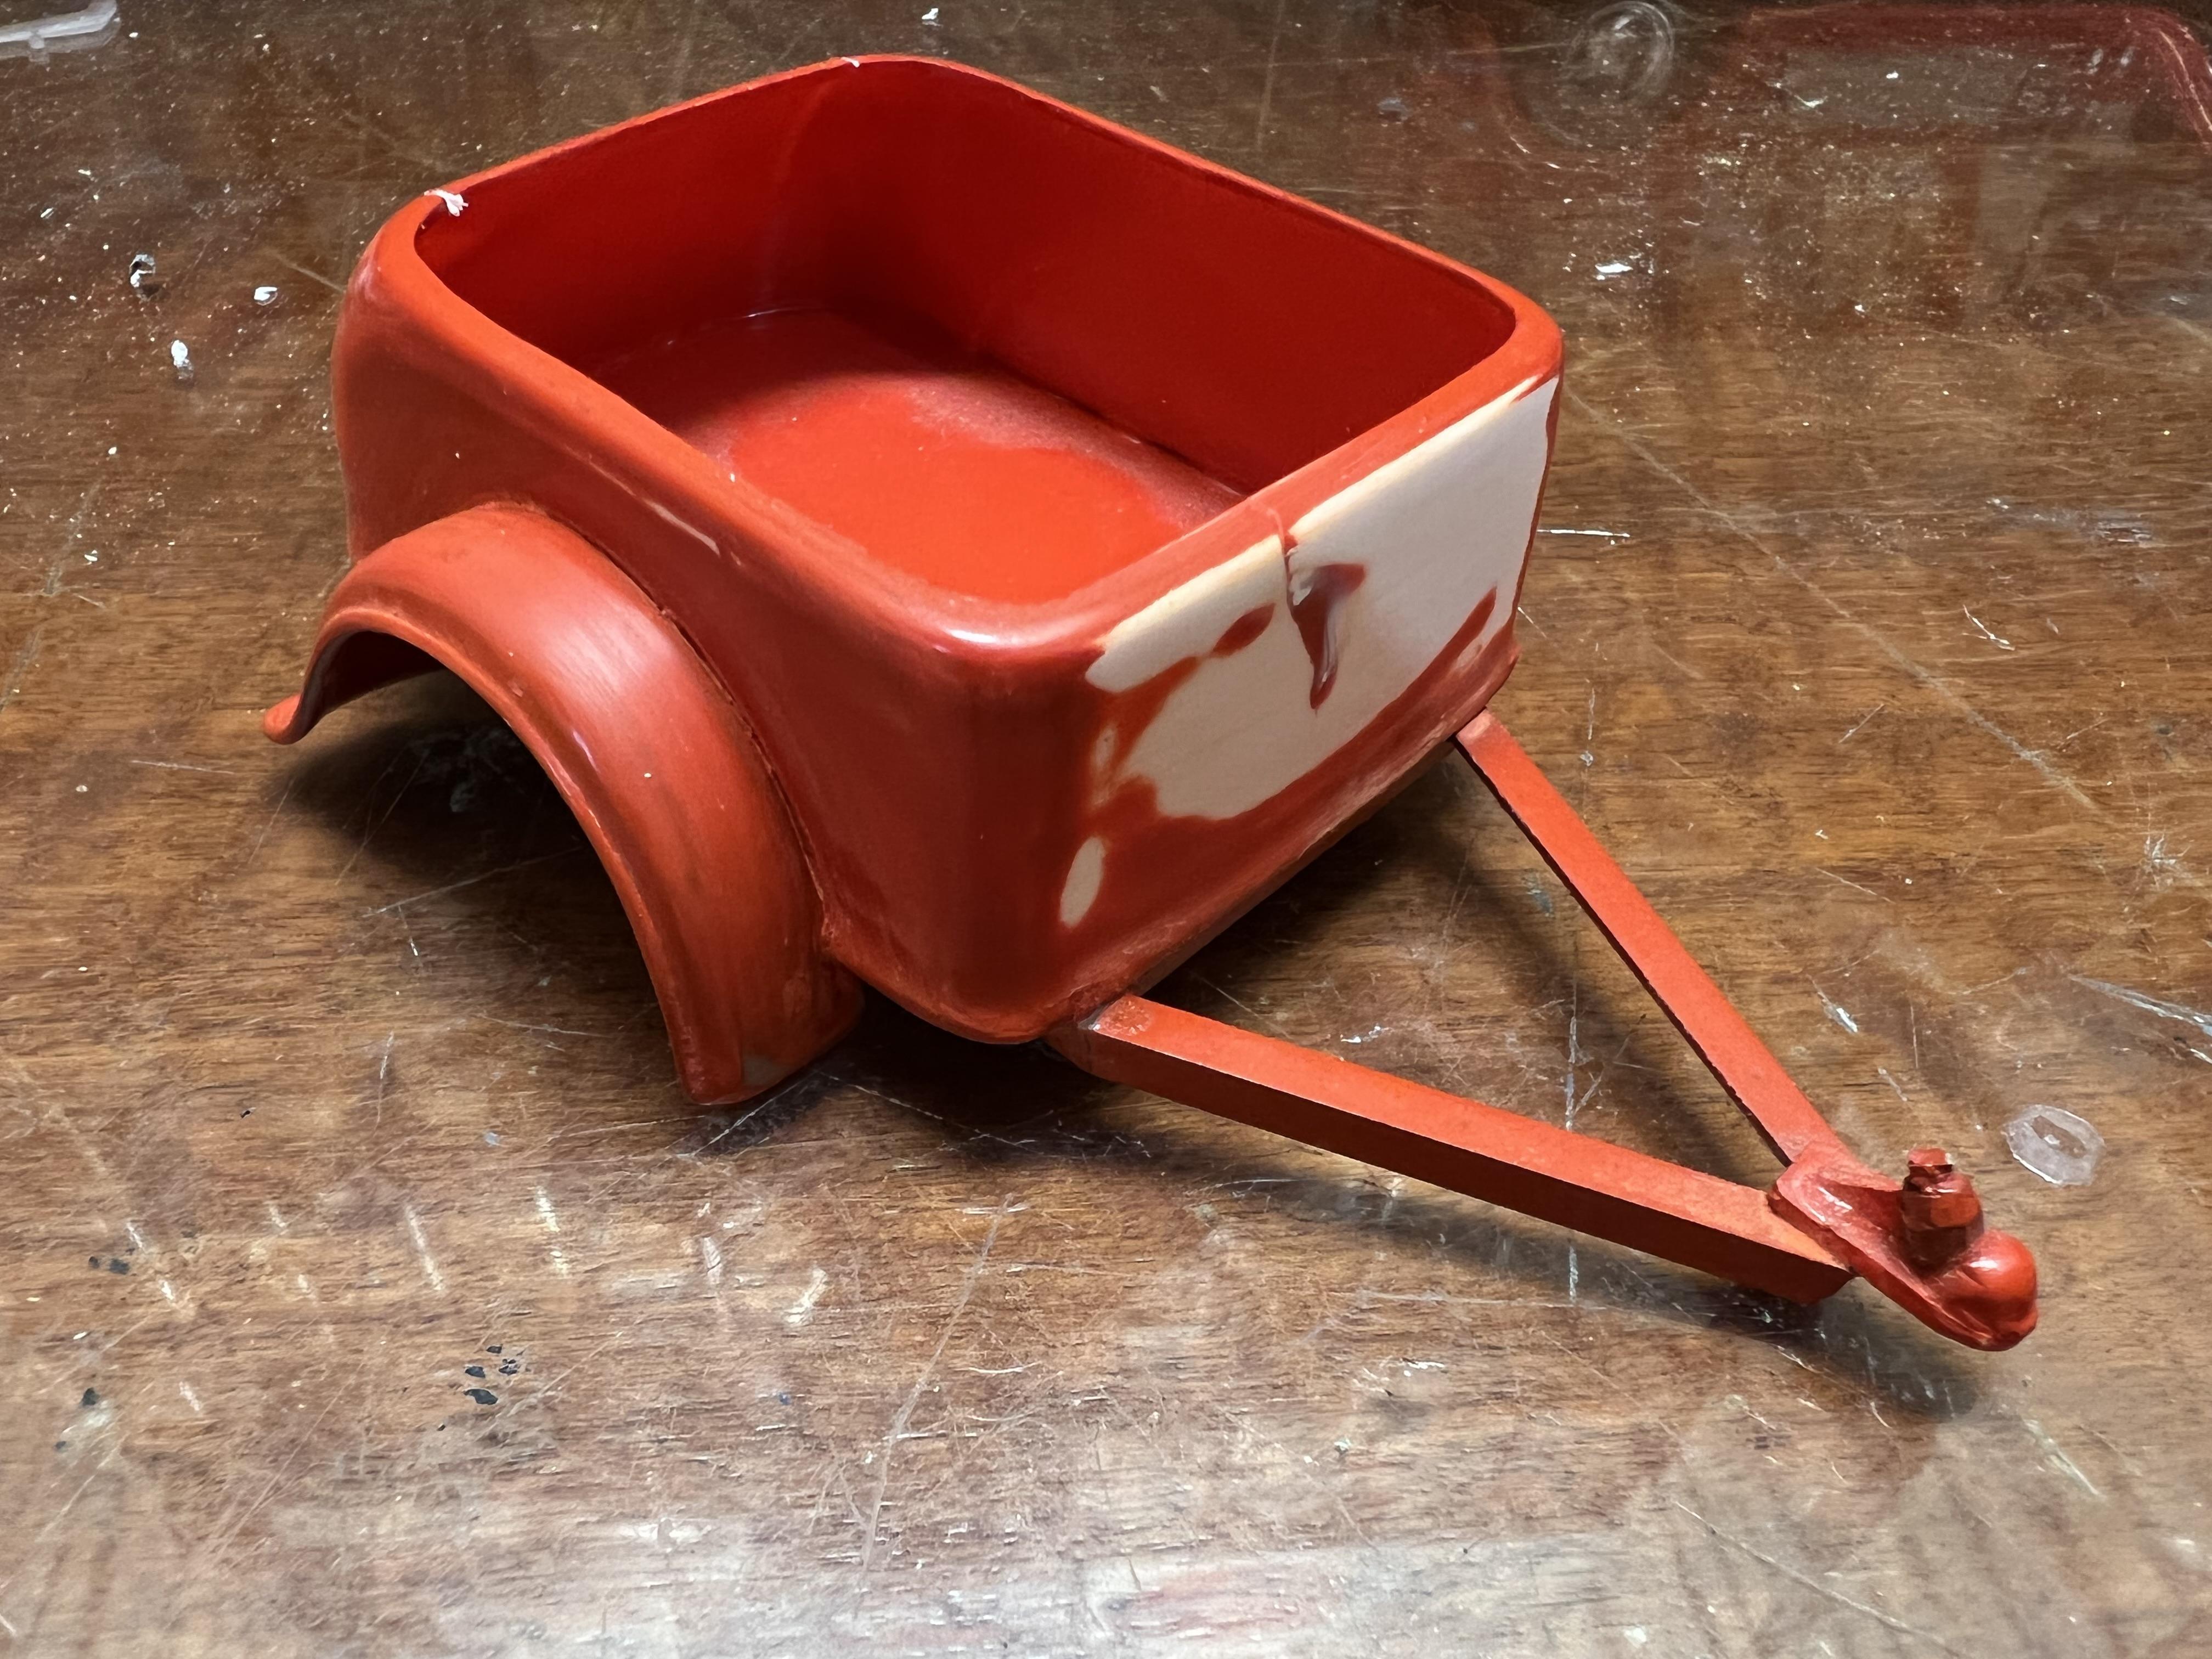
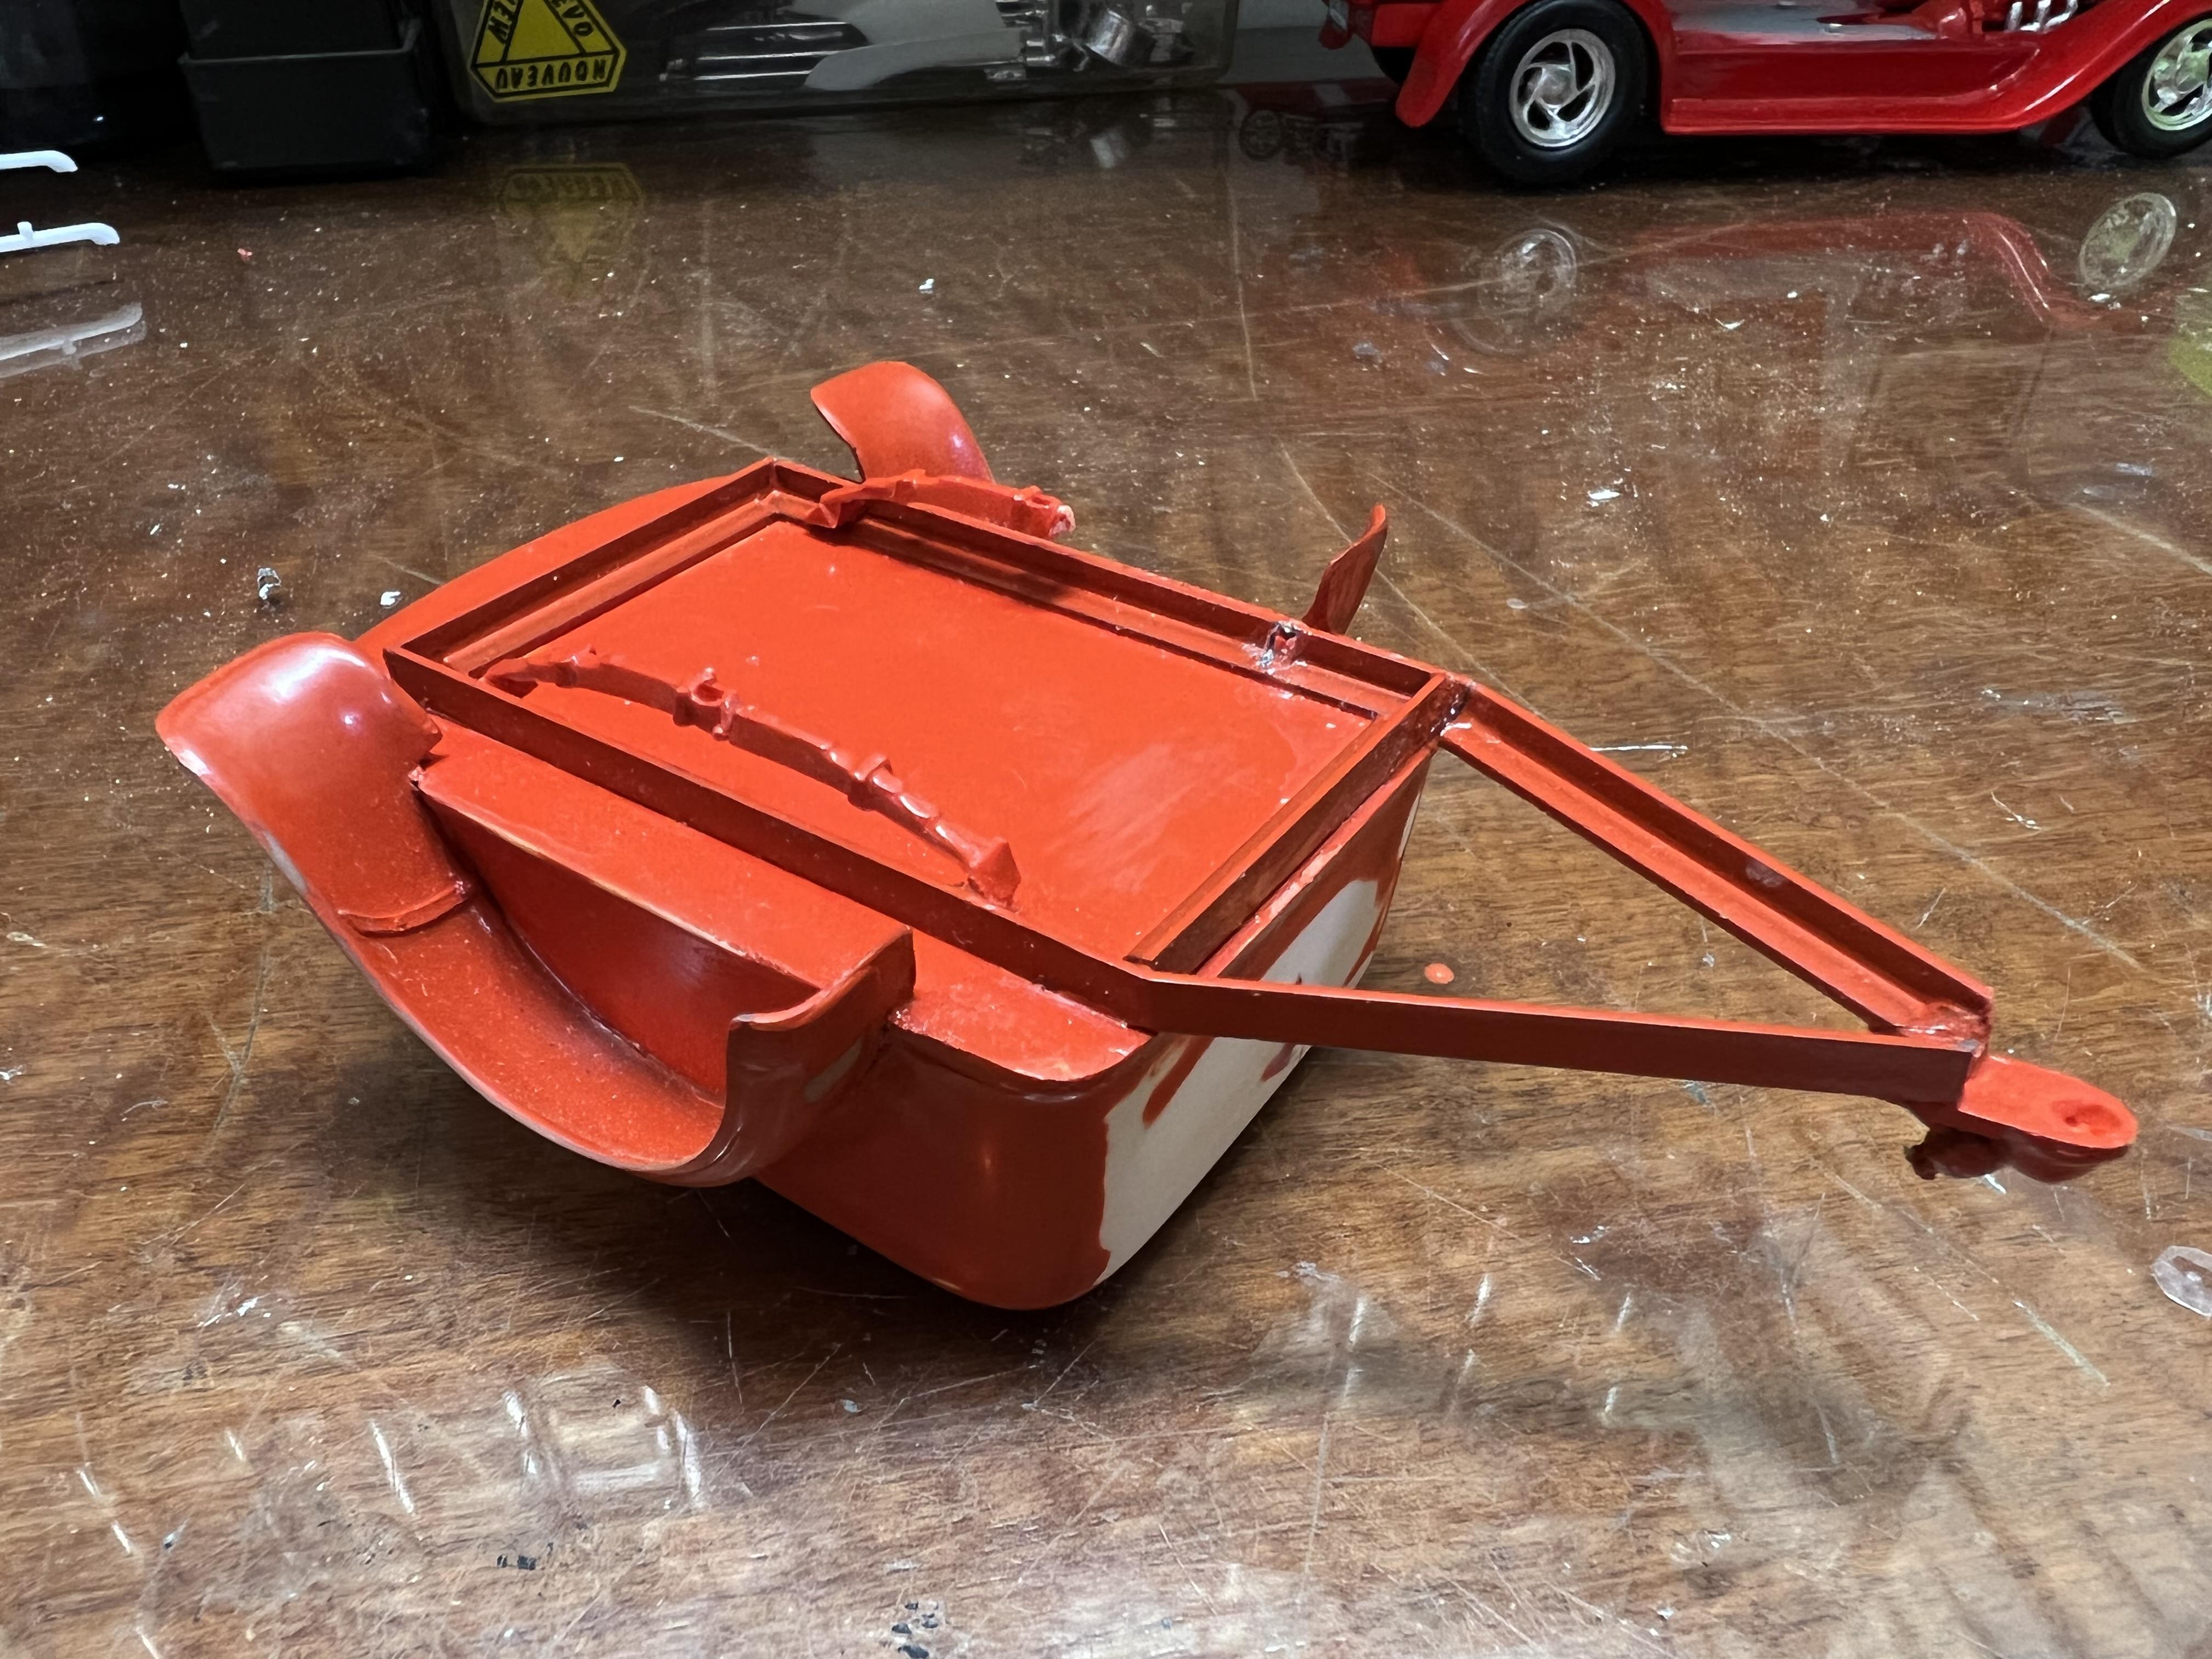
My pleasure Tim, you richly deserve the accolades. it's great to know you like my Model A. I have decided to take this project one step further. Partly because KKK is doing a trailer and partly because while looking for something else I stumbled on a very old project. Back in the early 90's I had aspirations to start up a business making vacformed parts. Alas, I was on the wrong side of the world, the Internet had barely been thought of and I just didn't push it hard enough. Anyhow, of the thirty or so wooden moulds I handcarved, one of them was a Mullins Redcap trailer. Now this was well before Revell released the 37 Cabriolet with a Mullins as an accessory. I took the dimensions from an old article in Rod Action magazine and took it from there. I designed it with flat sides so that appropriate vintage fenders could be attached to match the towcar. I built three of them but this one got damaged and the paint was blaaaaahhh so I put it away for decades until I uncovered it last weekend. I had some restoration to do and decided to hinge the top while I was at it. The top is not removable on the Revell item. Then I thought - what will go in it? After all, if you are driving a pickup, load space is not usually an issue! Bu what if you had a toy that was too big for a pickup bed? Like, a pedal car or push car? Perfect! I am a huge collector of diecast hot rods and toy hot rods and the first thing that came to mind and to hand was a tatty Hot Wheels AOK. This 1978 toy is of a nicely proportioned 29 Sedan Delivery. With less than two hours work I had the makings of a Model A stretch cab toddler rod! I have to go and pick up some pink primer from my LHS before I can go further but I am pretty happy with the results so far. Still gotta fabricate a towbar for the rod. Cheers Alan
-
That's progressing nicely, Bill! I think it is great that every build so far has been a totally different colour. When everyone is finished we should repost one three-quarter post each in succession so that they can all be compared. Cheers Alan
-
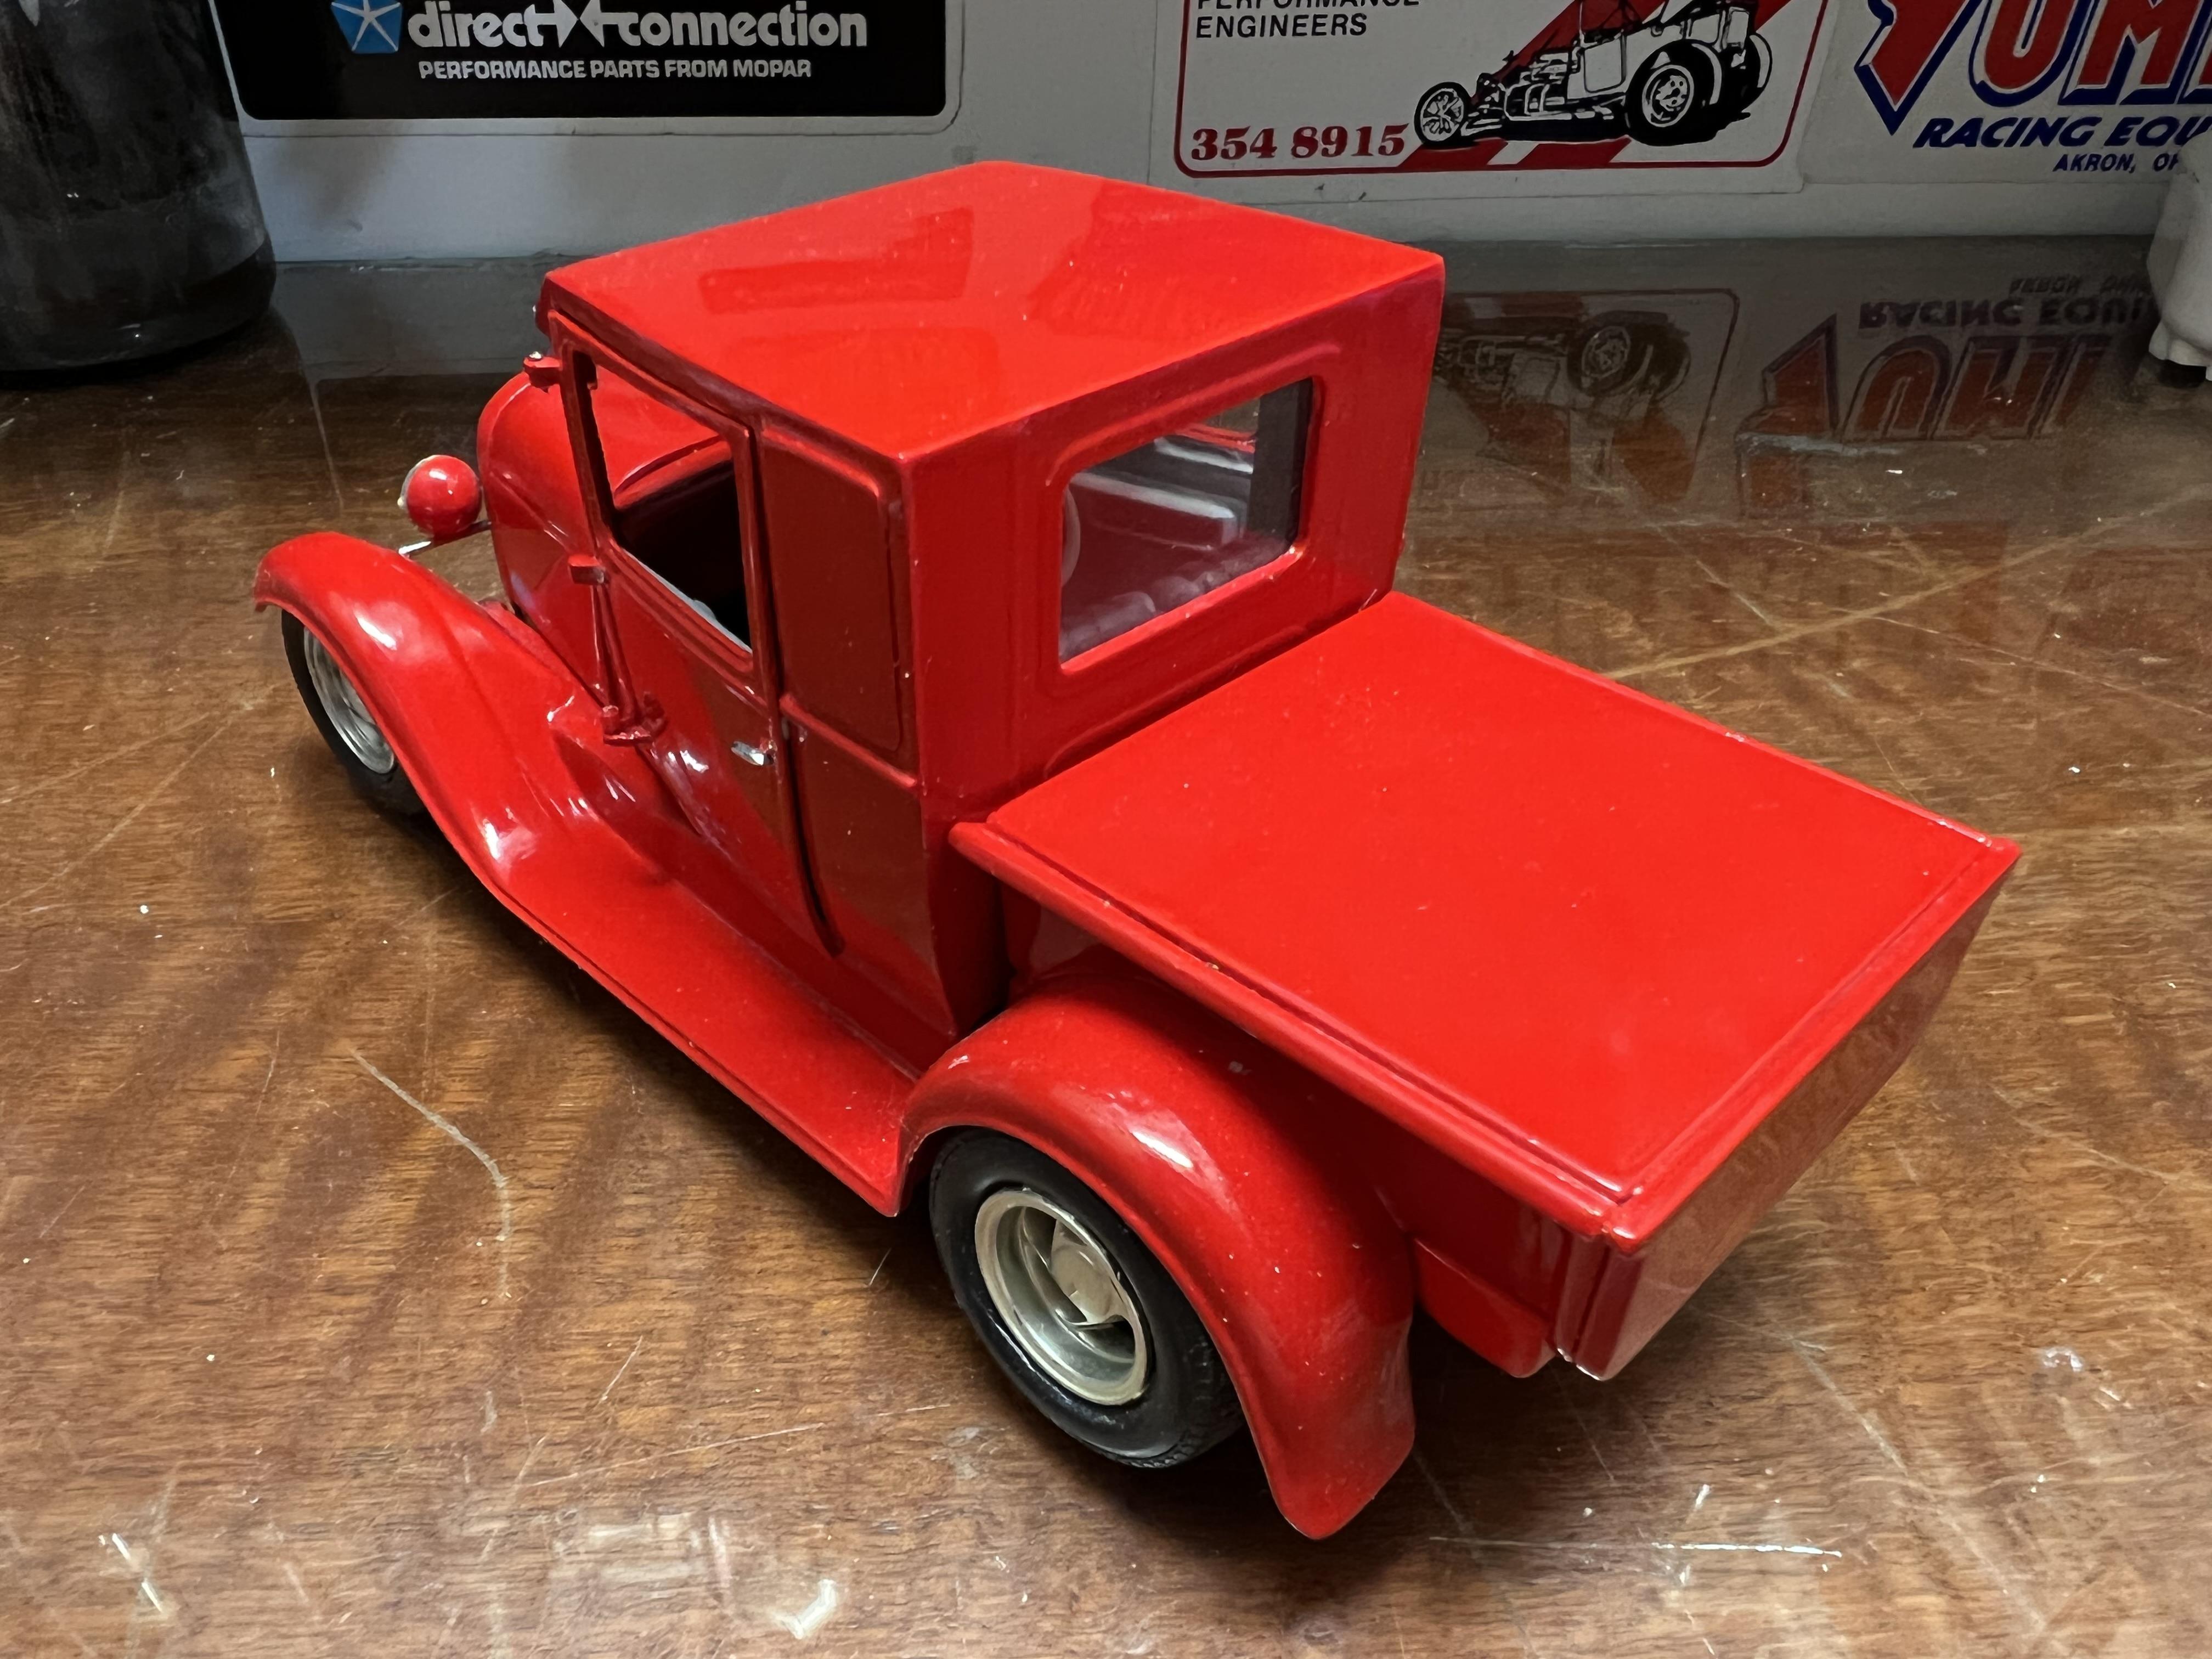
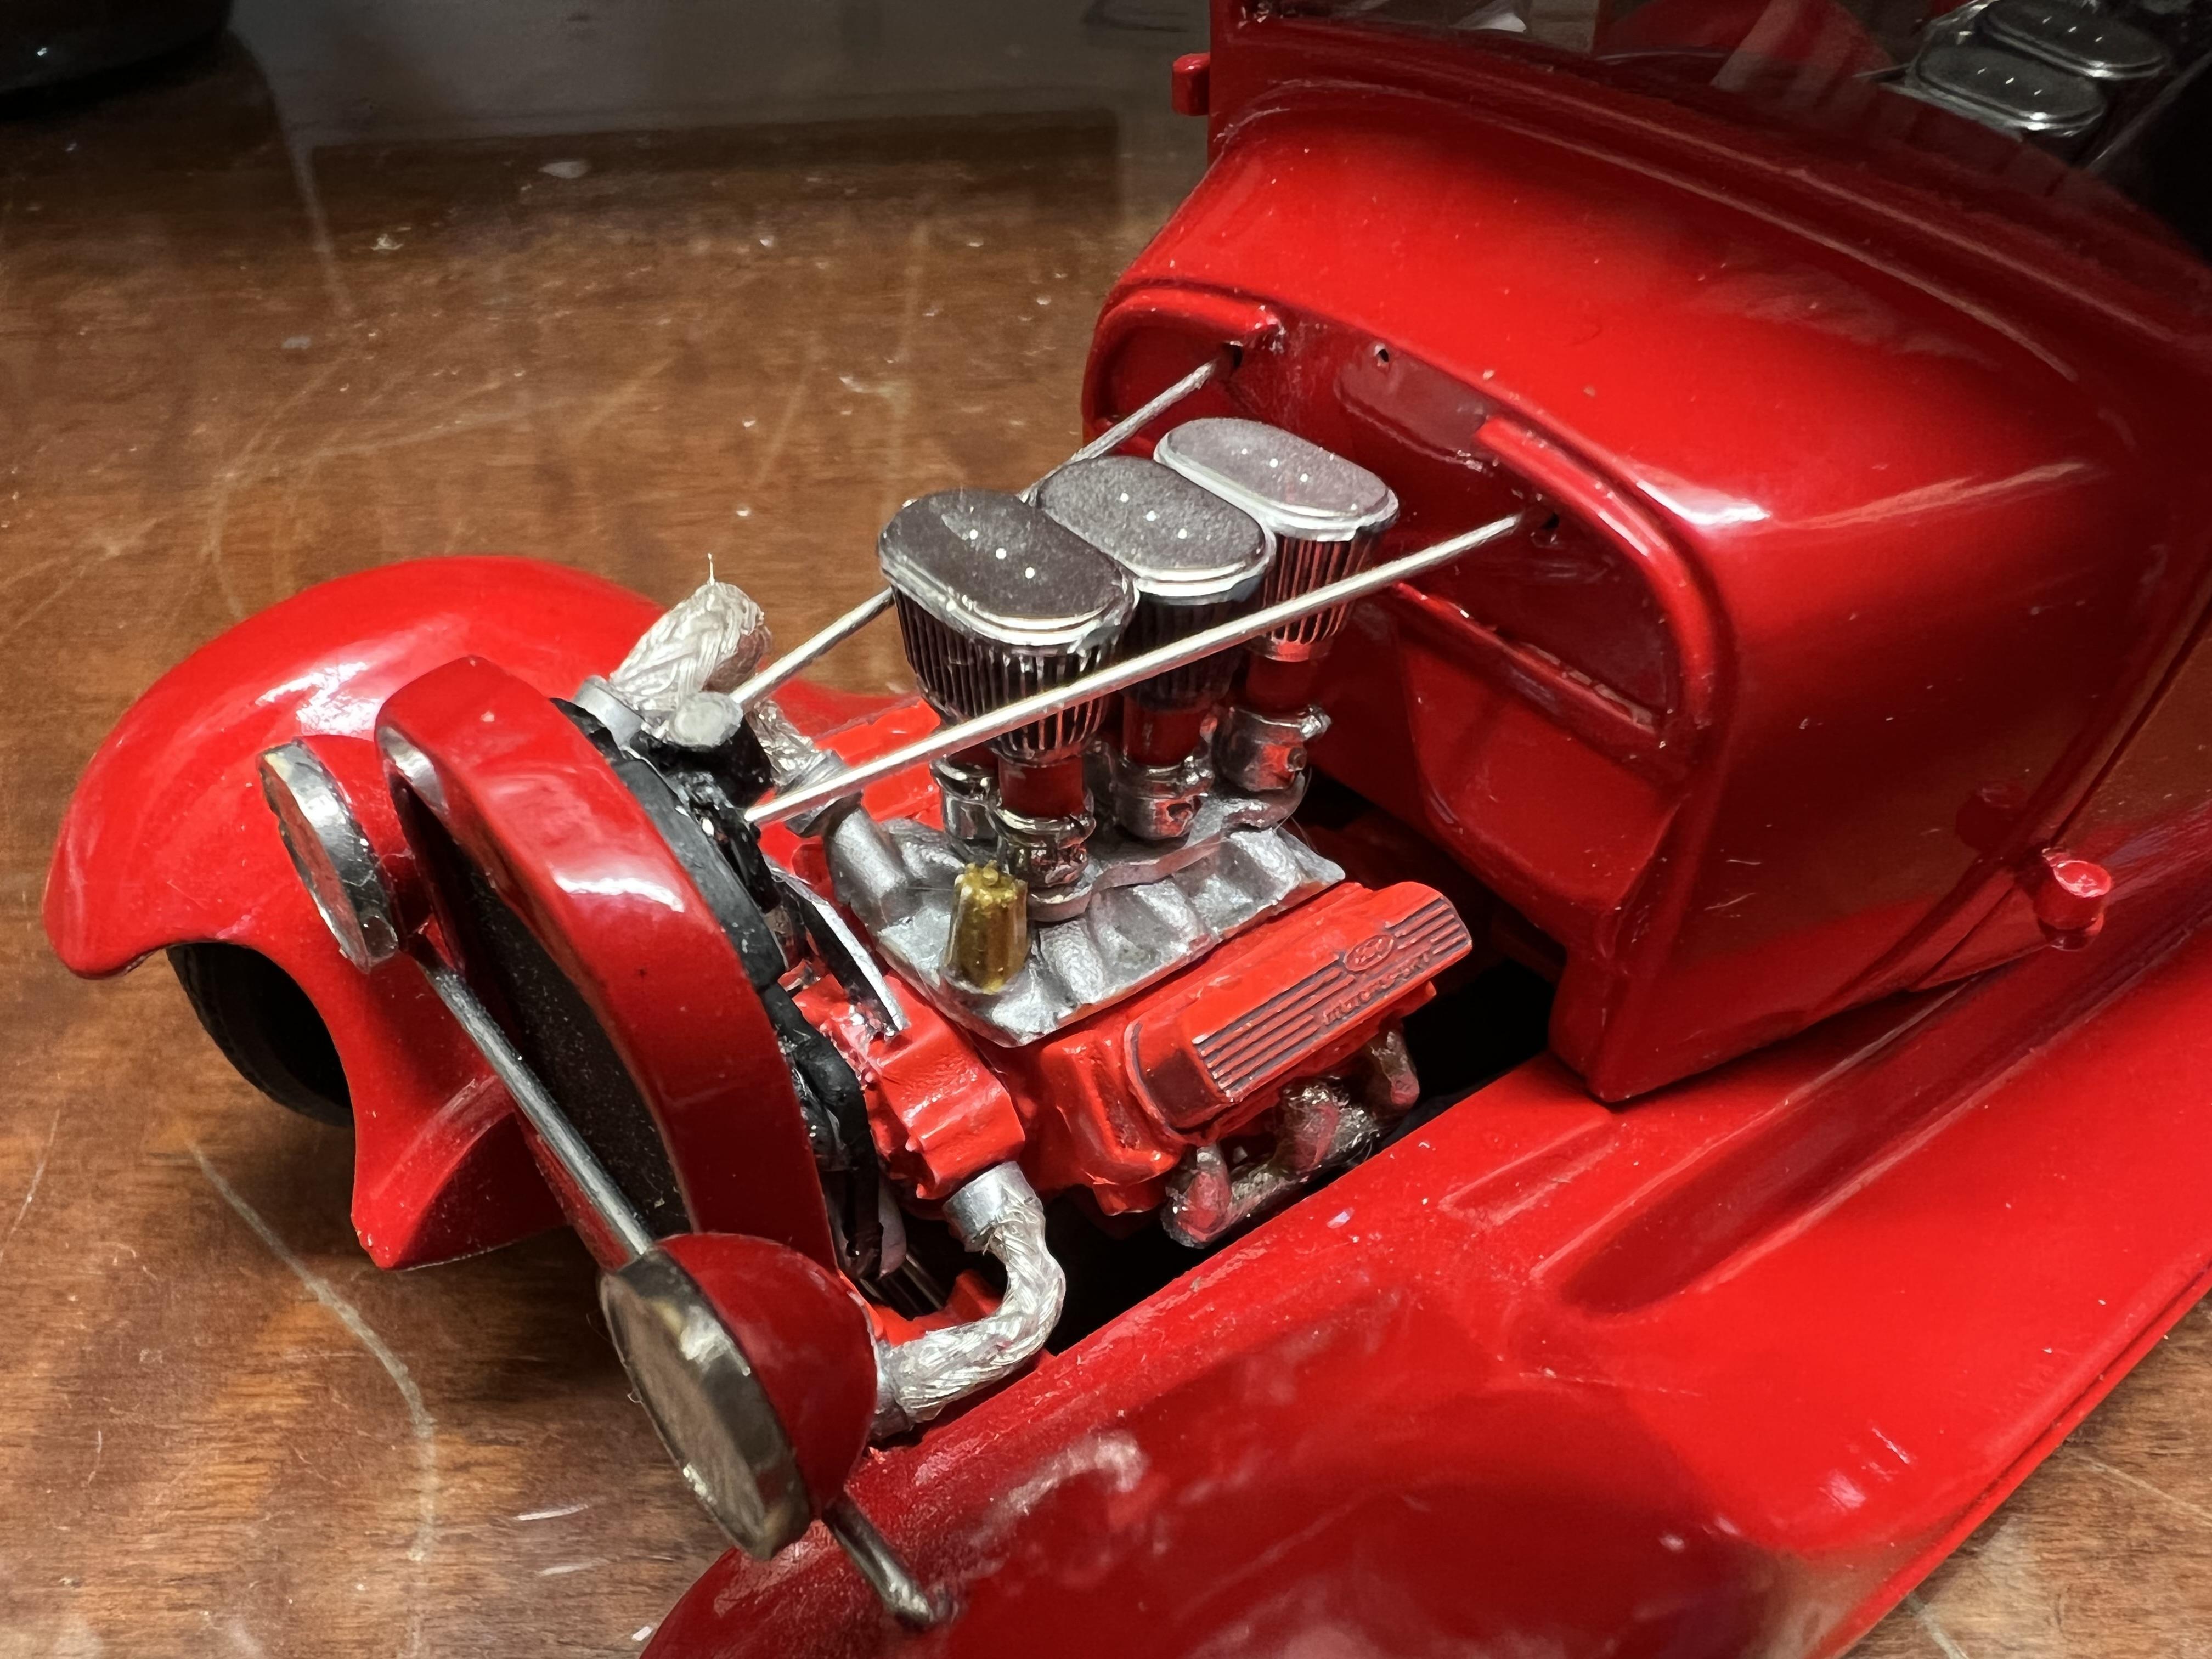
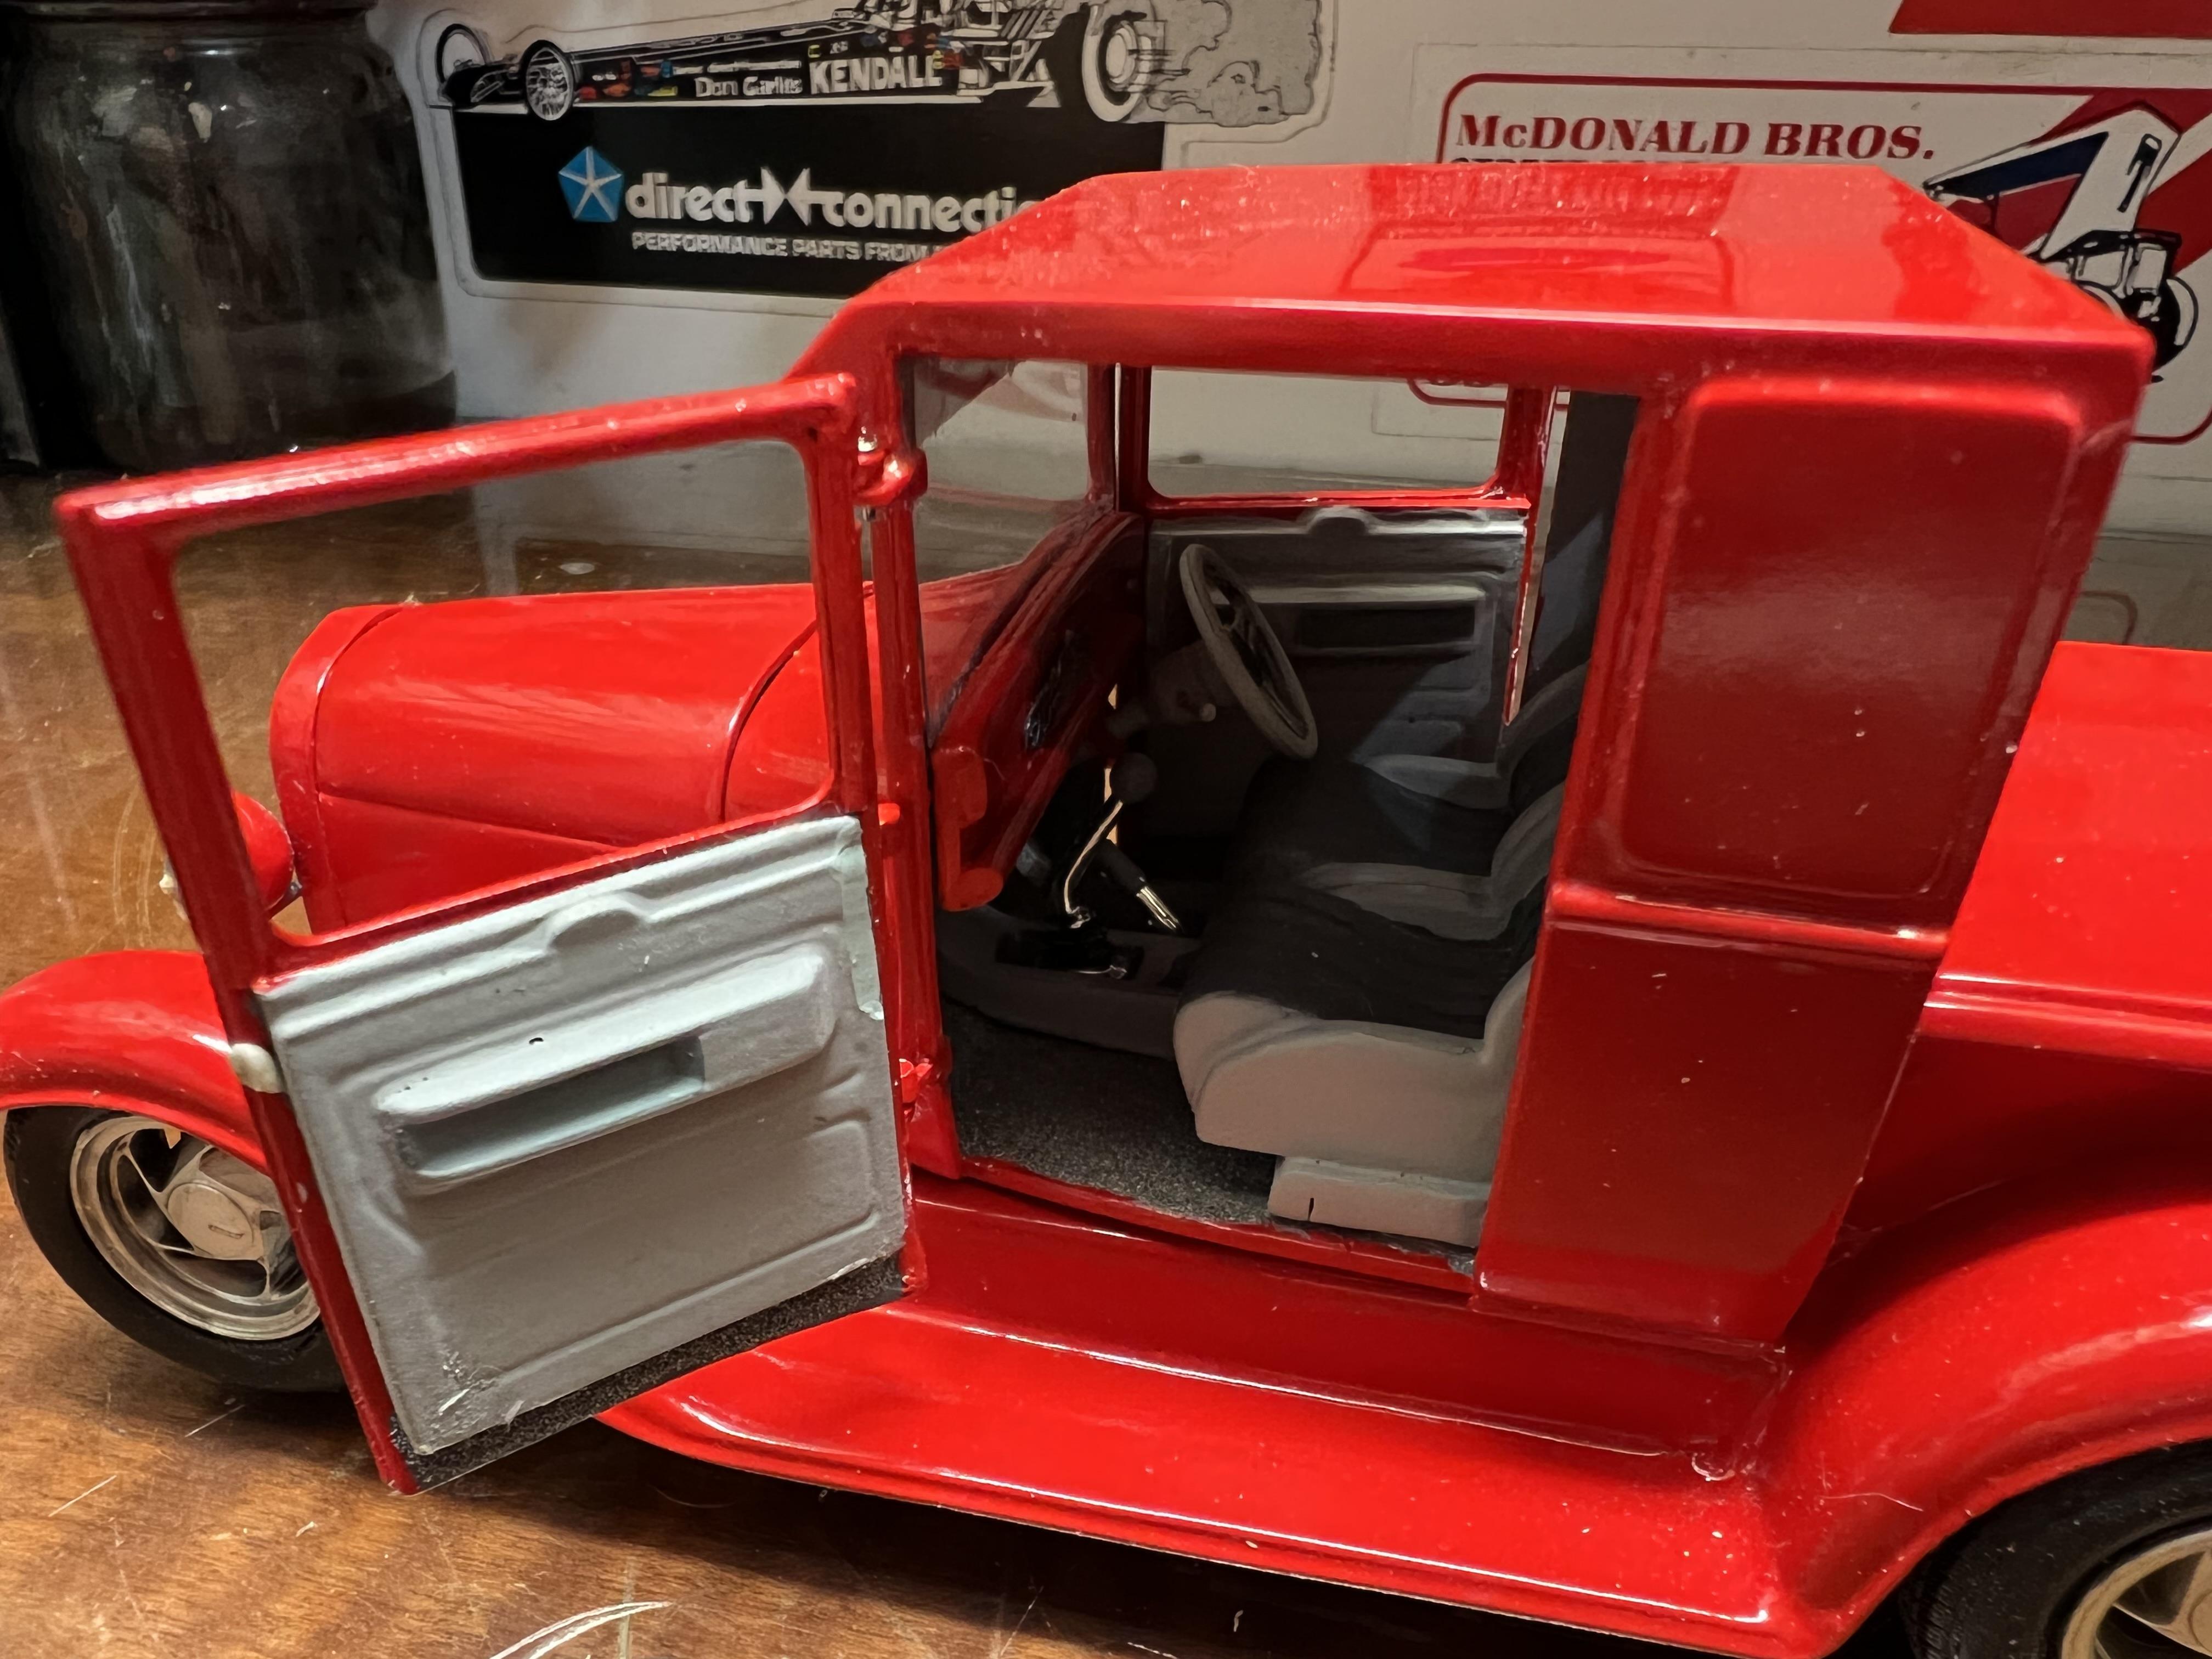
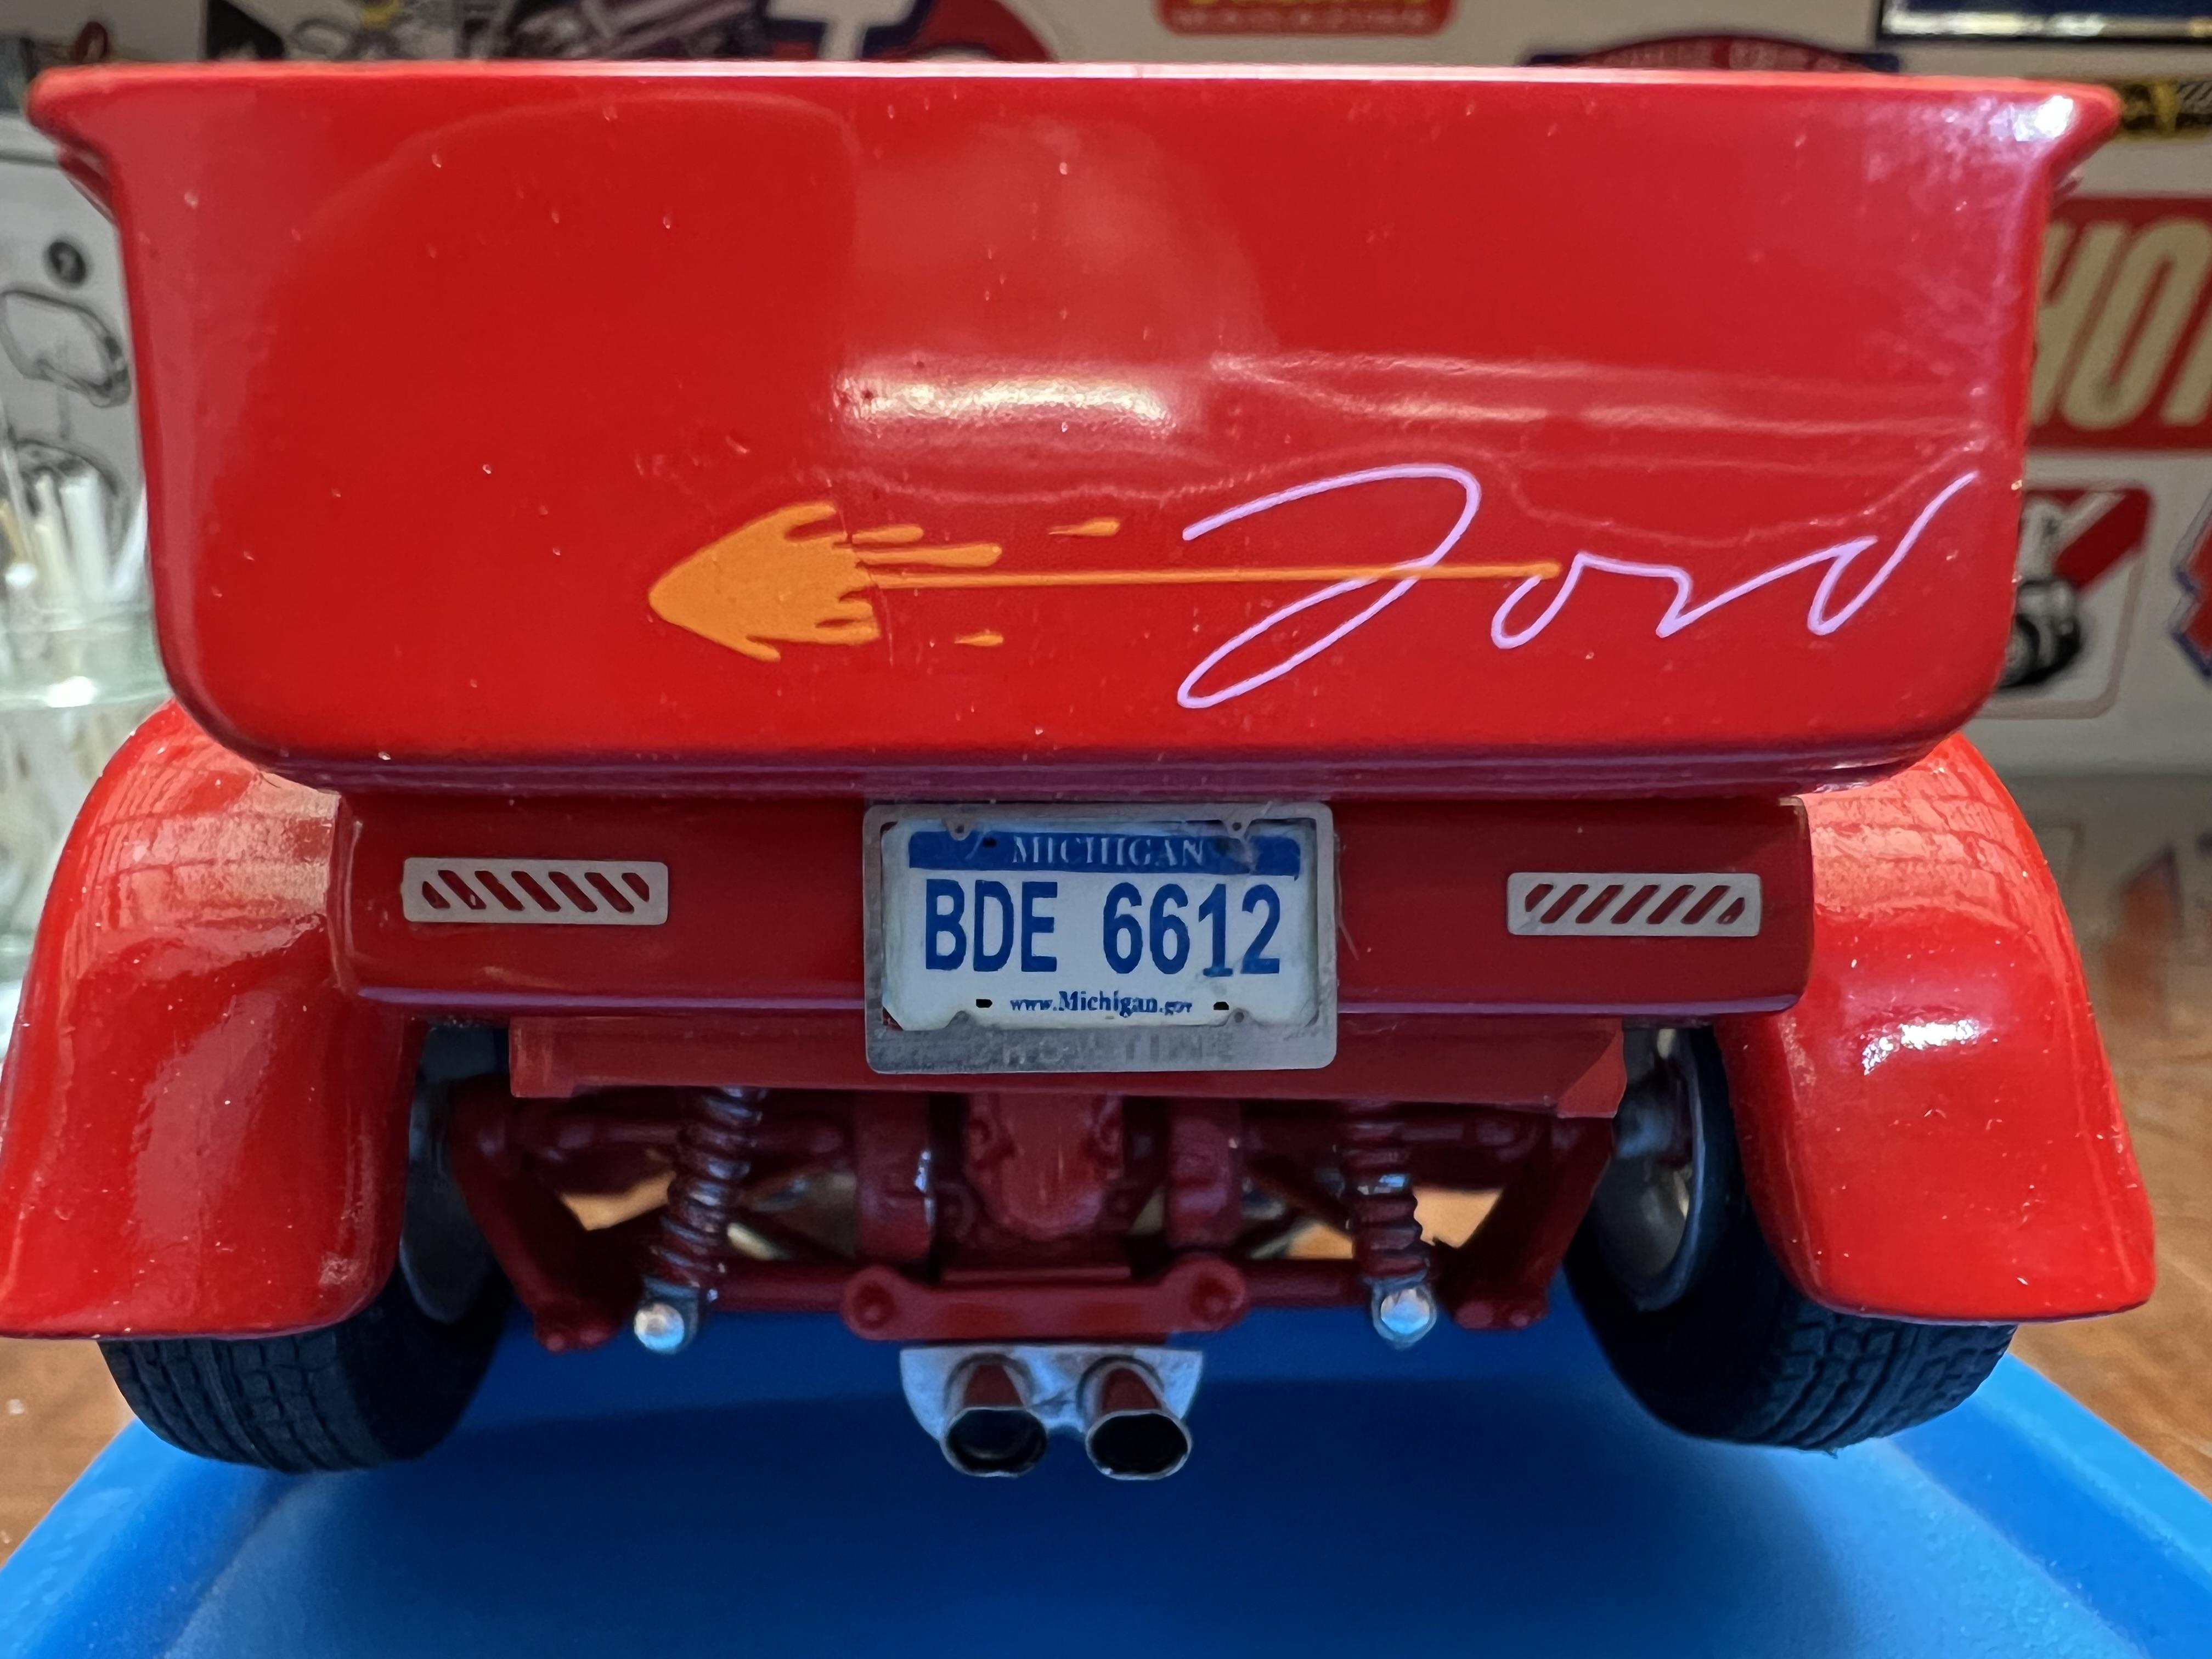
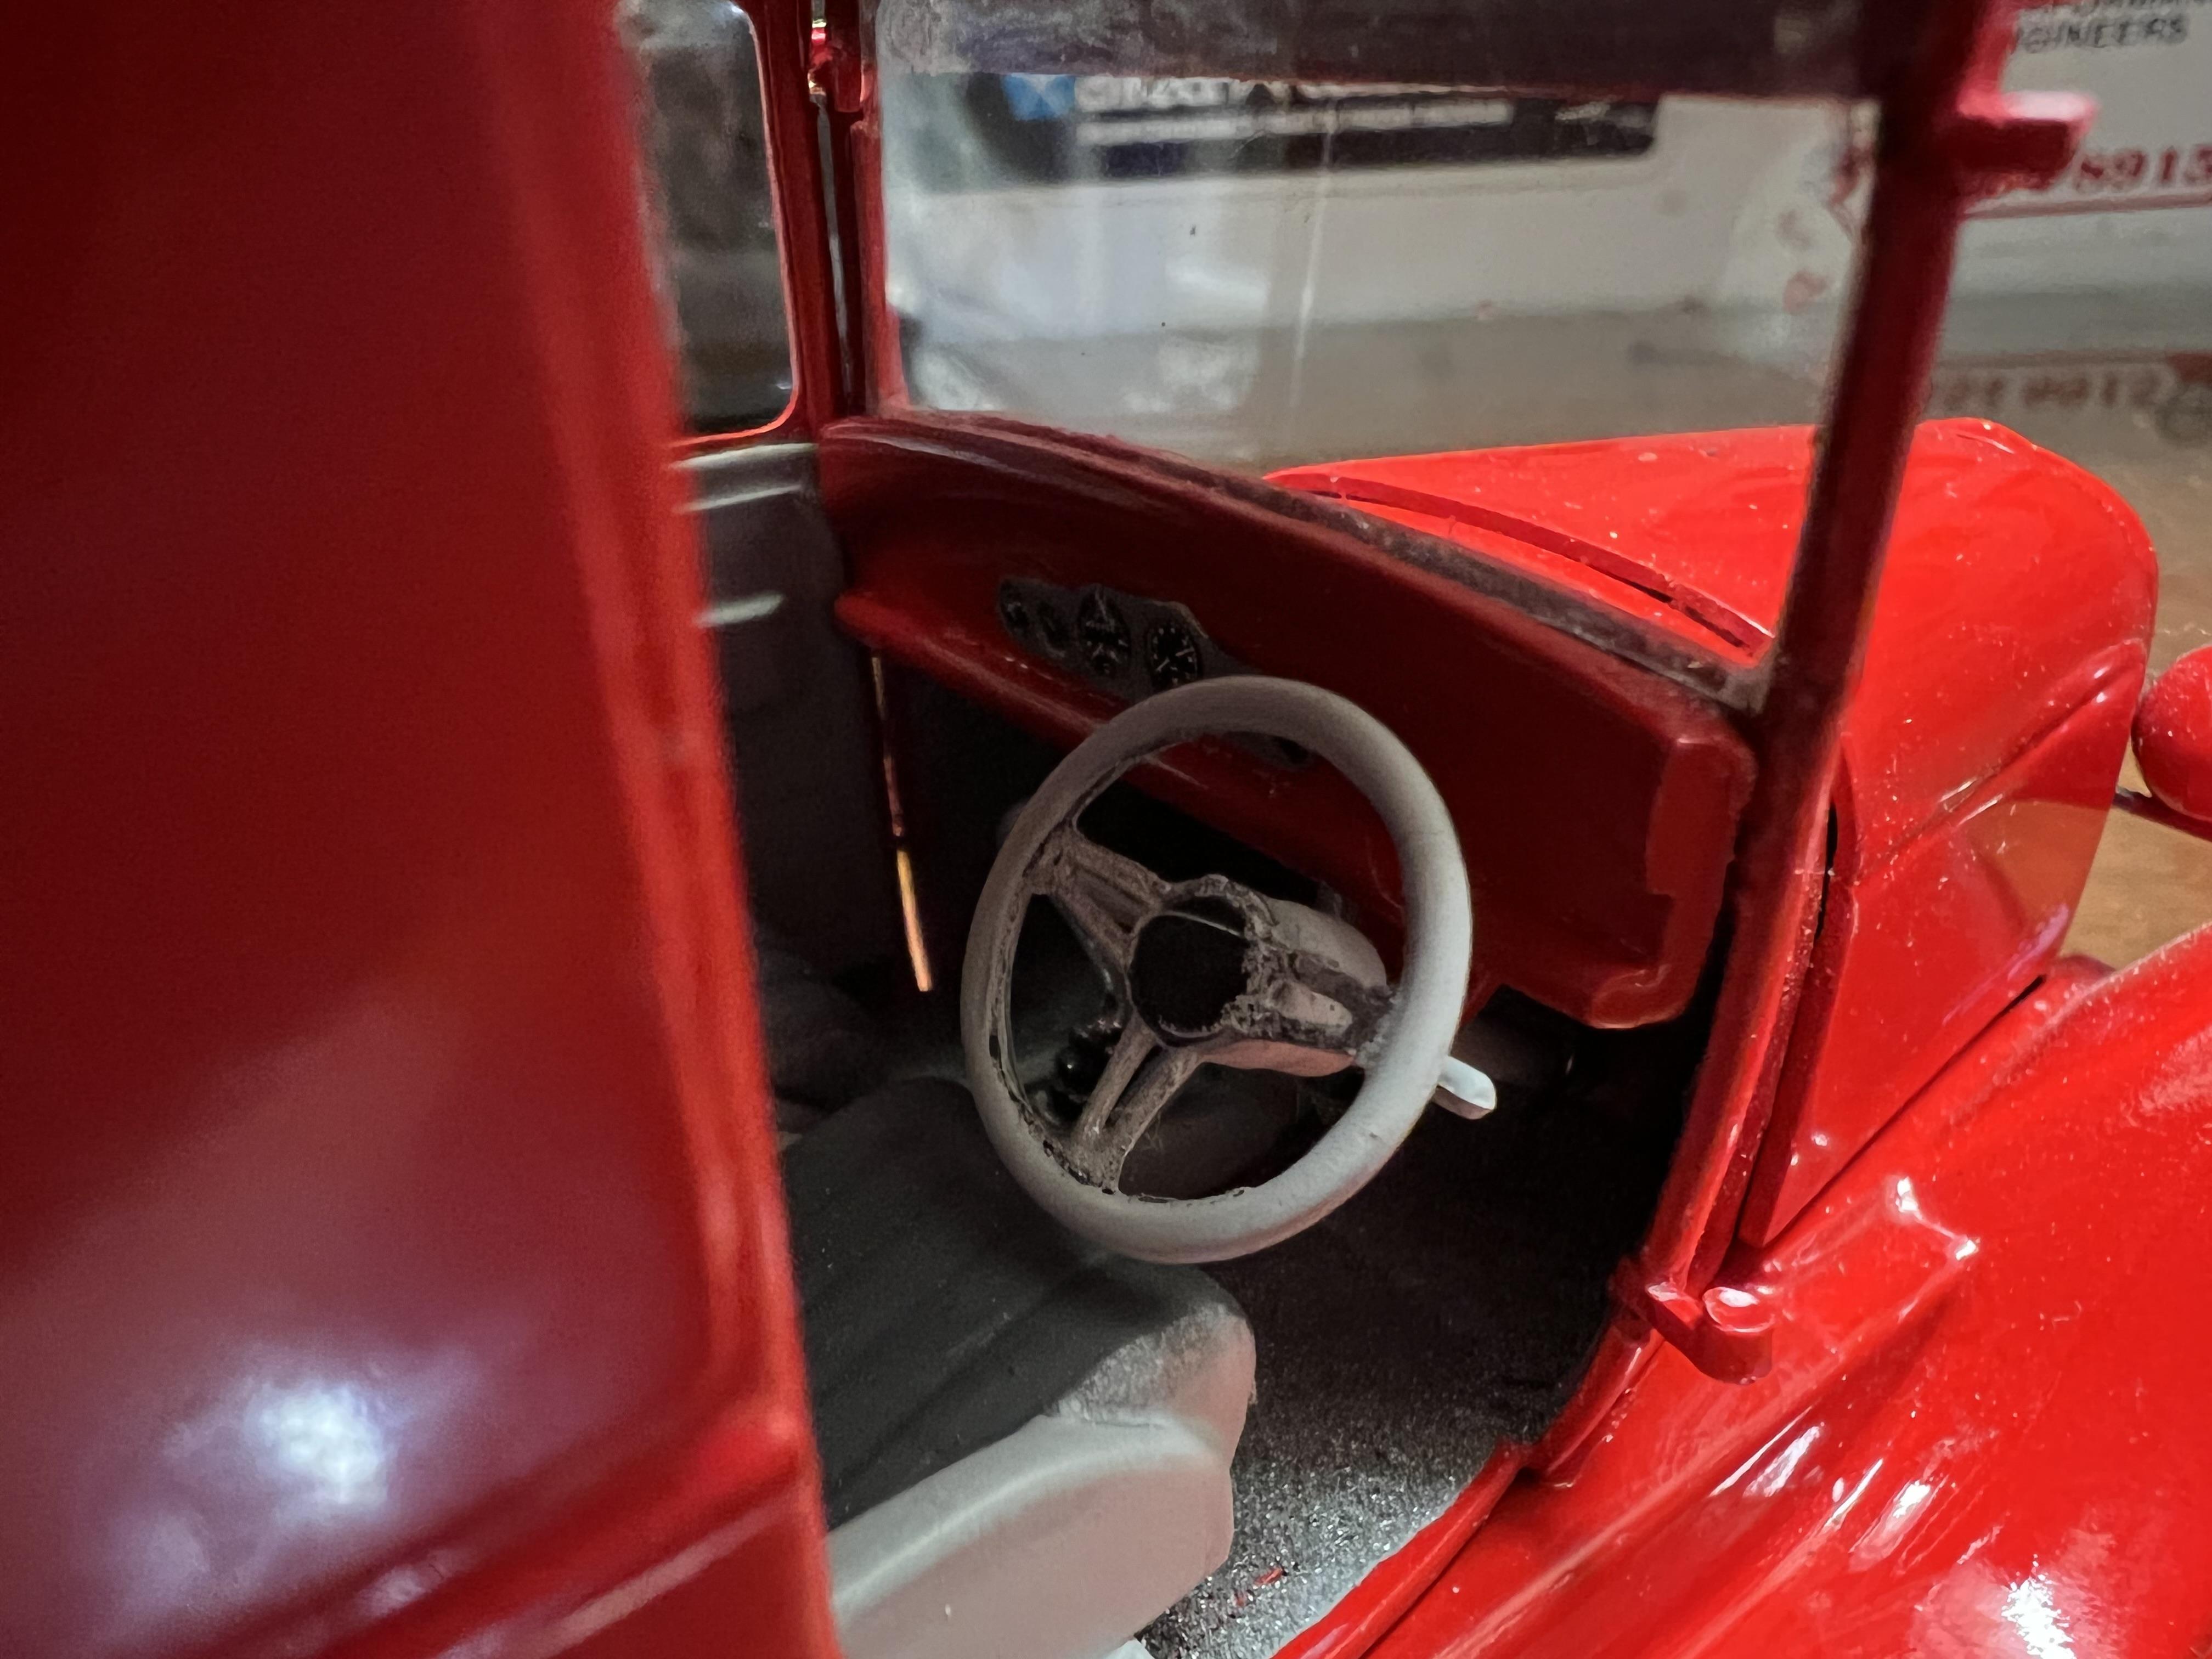
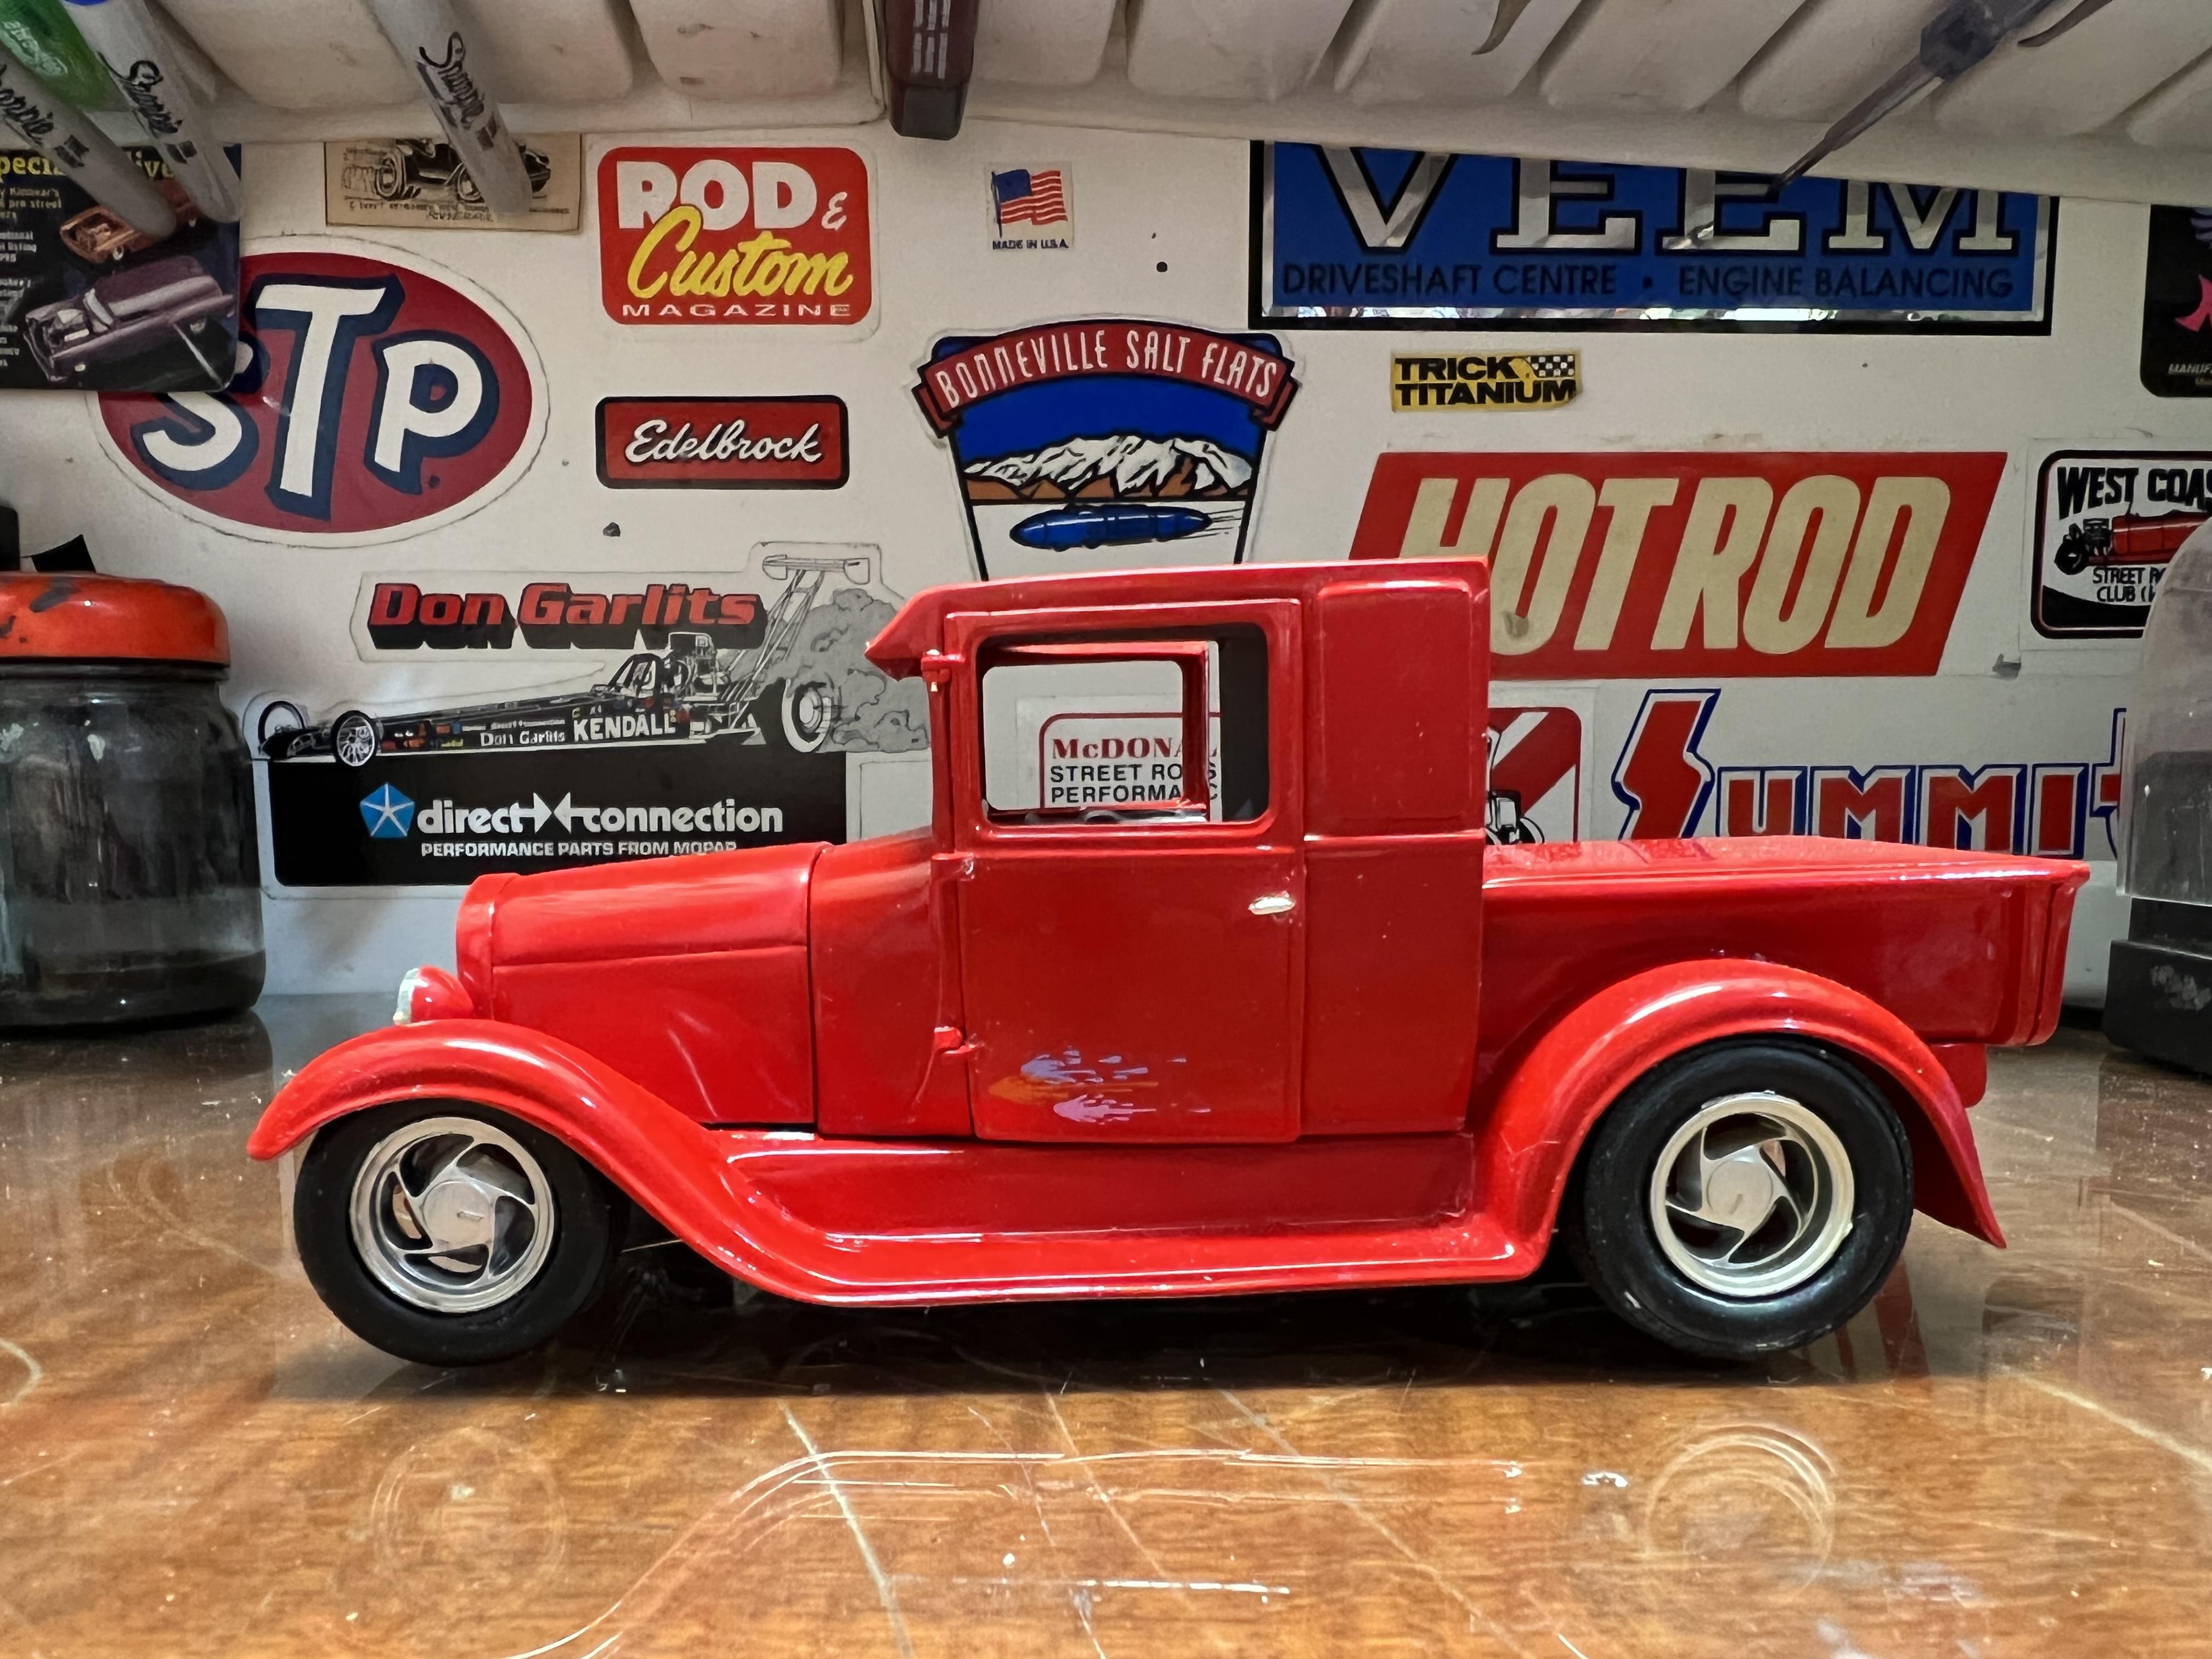
Tadaaaaah! She's done! I will take some outdoor photos tomorrow in Under Glass . And I will be more thorough in dusting when I do! It has been quite the project. A new surprise today was finding that the driver's door wouldn't close because the armrest hit the steering wheel. That involved wrestling the steering column and dashboard out of the car after it was fully assembled - fortunately I had used Mod Plodge to hold the dash in as I wanted time to manoeuvre it and that was the saving grace, believe me. The steering column was superglued to the floor but a lot of gentle jiggling got it to let go without damage. I don't want to embarrass Tim because I have met him and he is a very humble man but his correspondence to me over forty years ago was the spark that got me pursuing models as a serious adult passion rather than just a teenage hobby. At the time I was living in a 10 x 12 single men's quarters room in Paraburdoo, a remote mining town some 1000 miles from my home city of Perth, which in turn is the most remote capital city in the world. Tim put me onto Scale Auto Enthusiast, Automotive Miniatures and Model Empire and from there I was away. I have now travelled the world meeting enthusiasts all over Australia, USA, Canada and New Zealand. With my wife and four friends I was the promoter of our NNL here in Perth for 20 years. It grew to be one of the biggest in the world, with model counts consistently between 800 and a thousand and topping out at 1150 one year. So for me to be able to participate in this challenge through the miracle of the Internet and honour Tim with a model that has embodied as many of his signatures as I can think of has been a very satisfying experience, broken windshield posts notwithstanding! So Tim Boyd, I dedicate these features to you. Stance - ya gotta get it sitting right. Unconventional powerplant - a Ford Motorsports V6 Any powerplant other than a Chevy - see above! Unusual induction - kit-bashed sprintcar fuel injection setup Phantom body style - extended cab Model A phone booth pickup. Fabricated suspension using components from later era kits on a classic era model - Buttera Jag and Revell dropped tube axle with fabricated radius rods front and rear. Minimal engine wiring - just radiator hoses but..... A tan distributor cap -you always told us detail painting an engine would enhance it as much as wiring! A variety of tones and finishes in the interior Chrome headlight lenses painted flat aluminium and coated with white glue. Brian Borden graphics - I know you were a fan back then Michigan number plate with NNL East Showtime plate frame (thanks Tom Geiger!) Lots of mockups! Of course, a huge thanks to Dennis Lacey for getting the wheels in motion and graciously encouraging others to join him, and all the other guys who are participating. Let's see this thread hit 40,000 posts! Cheers Alan
-
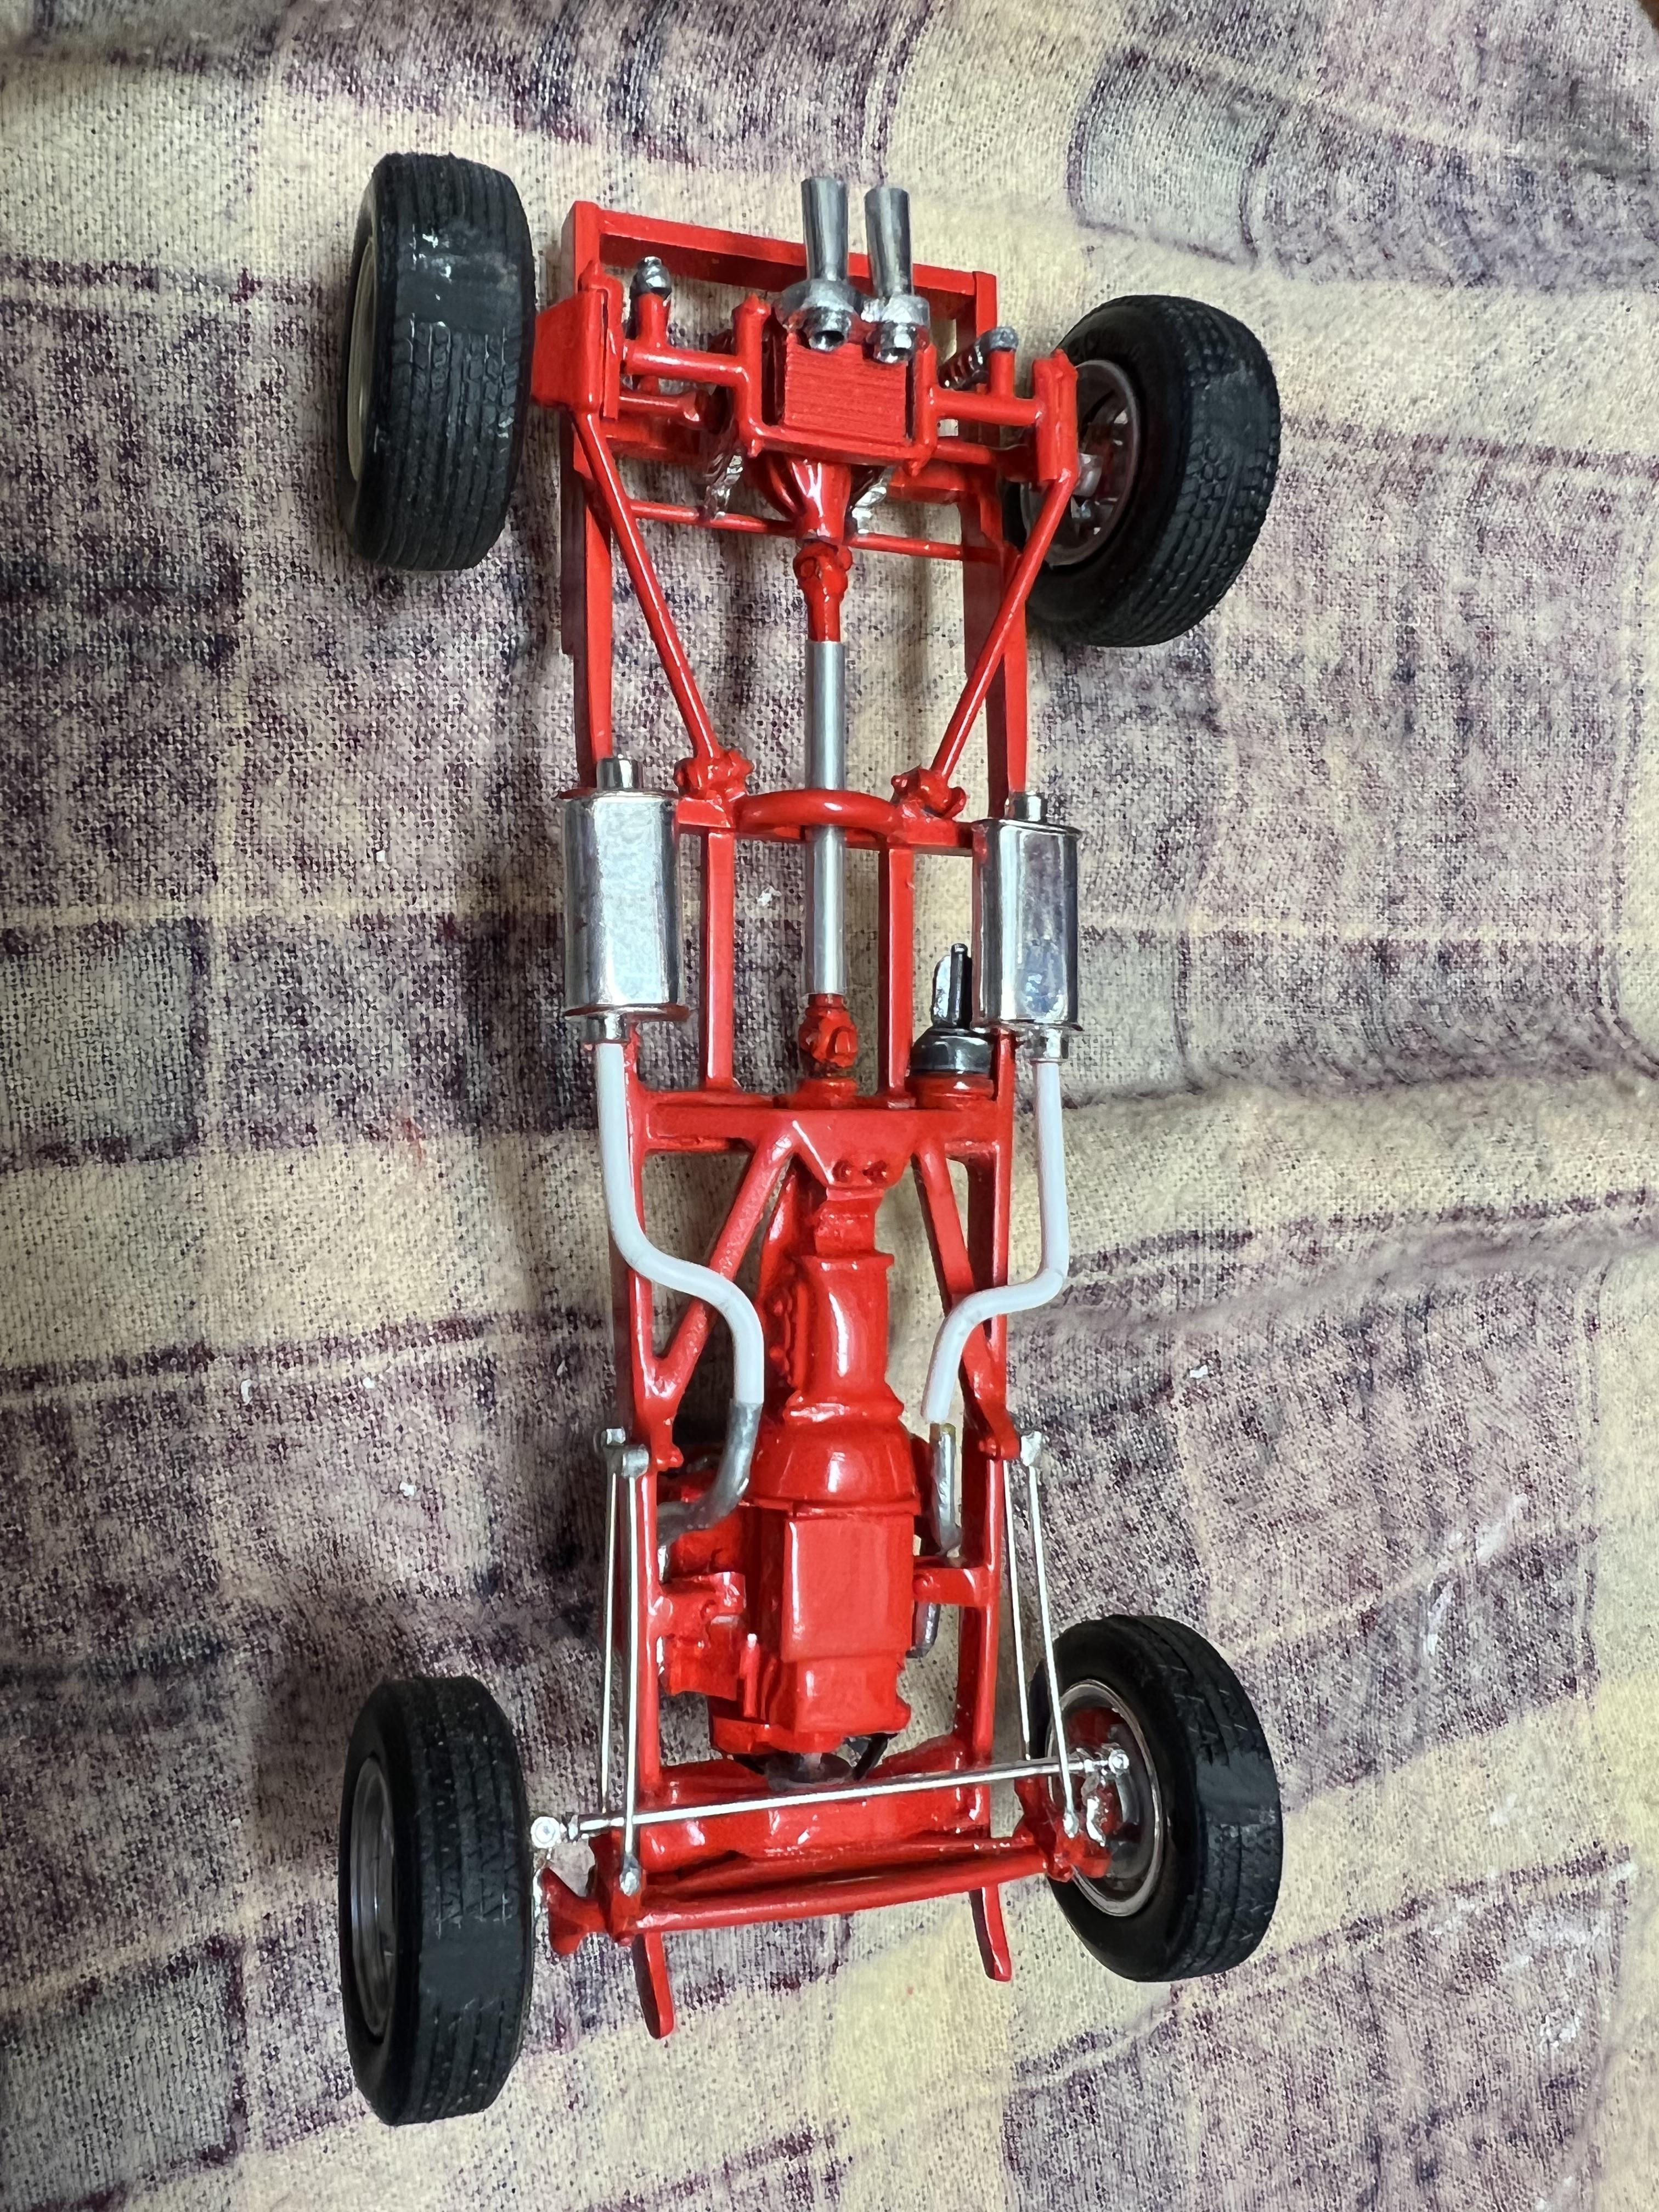
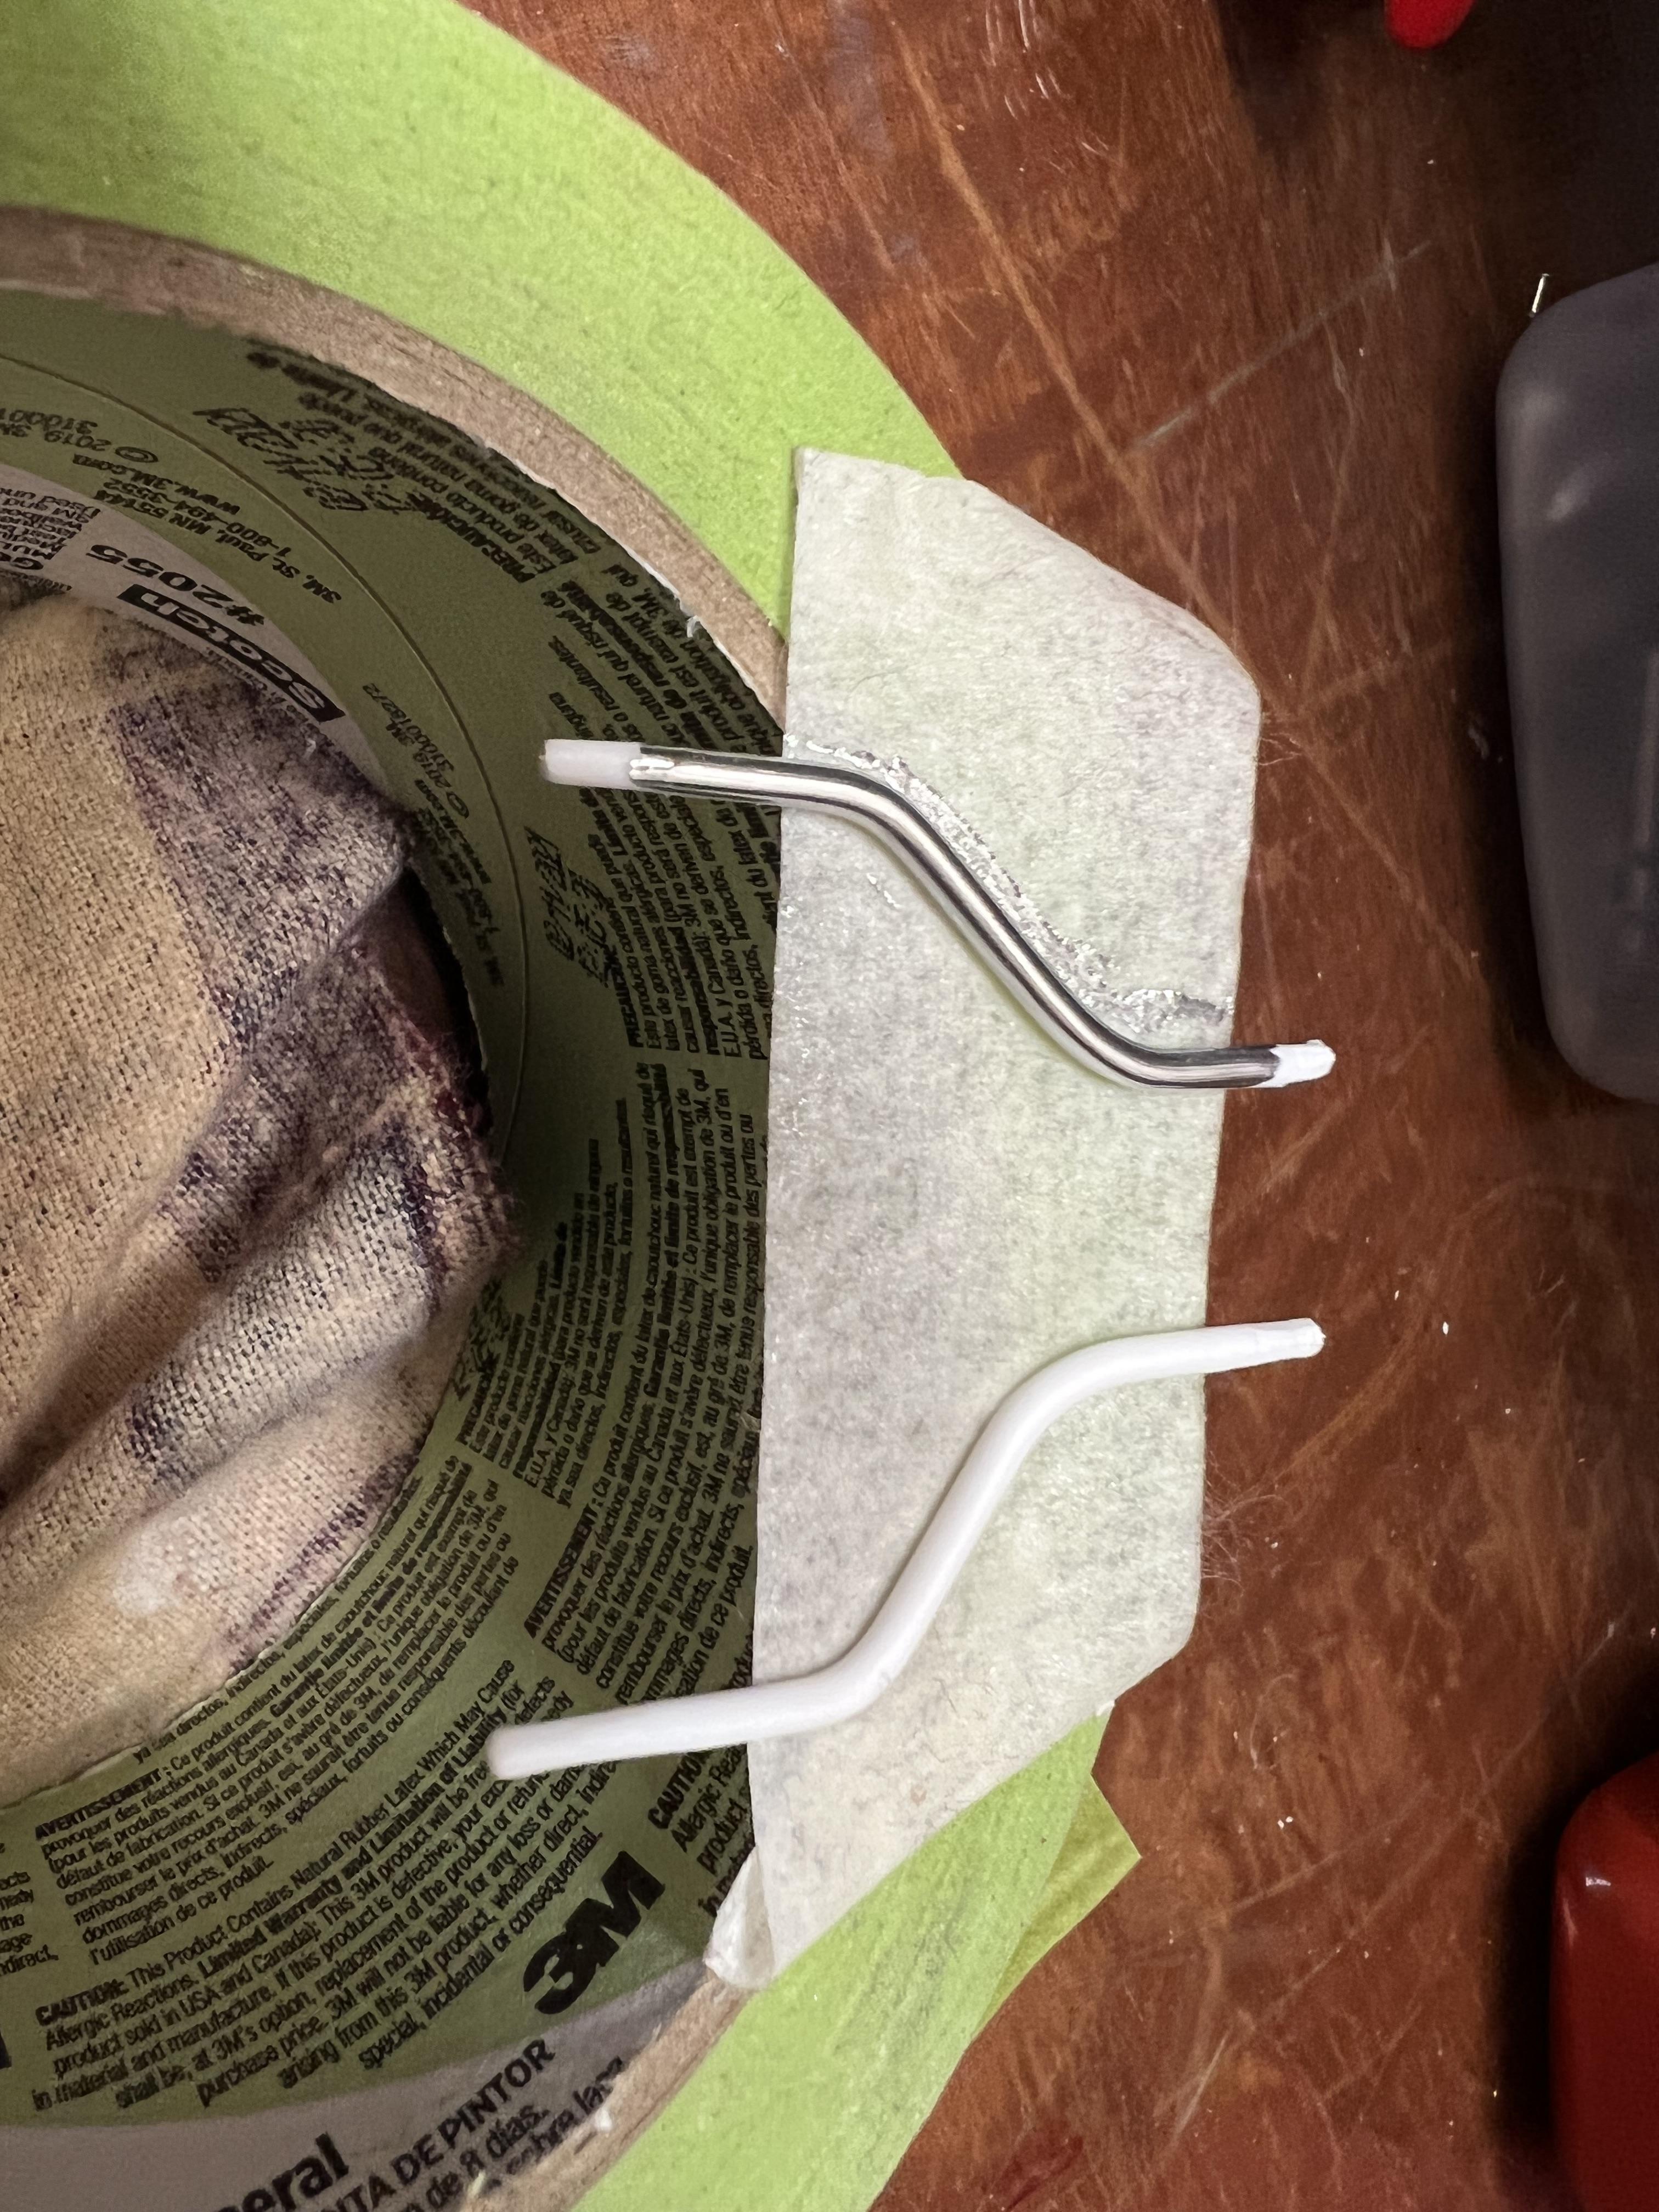
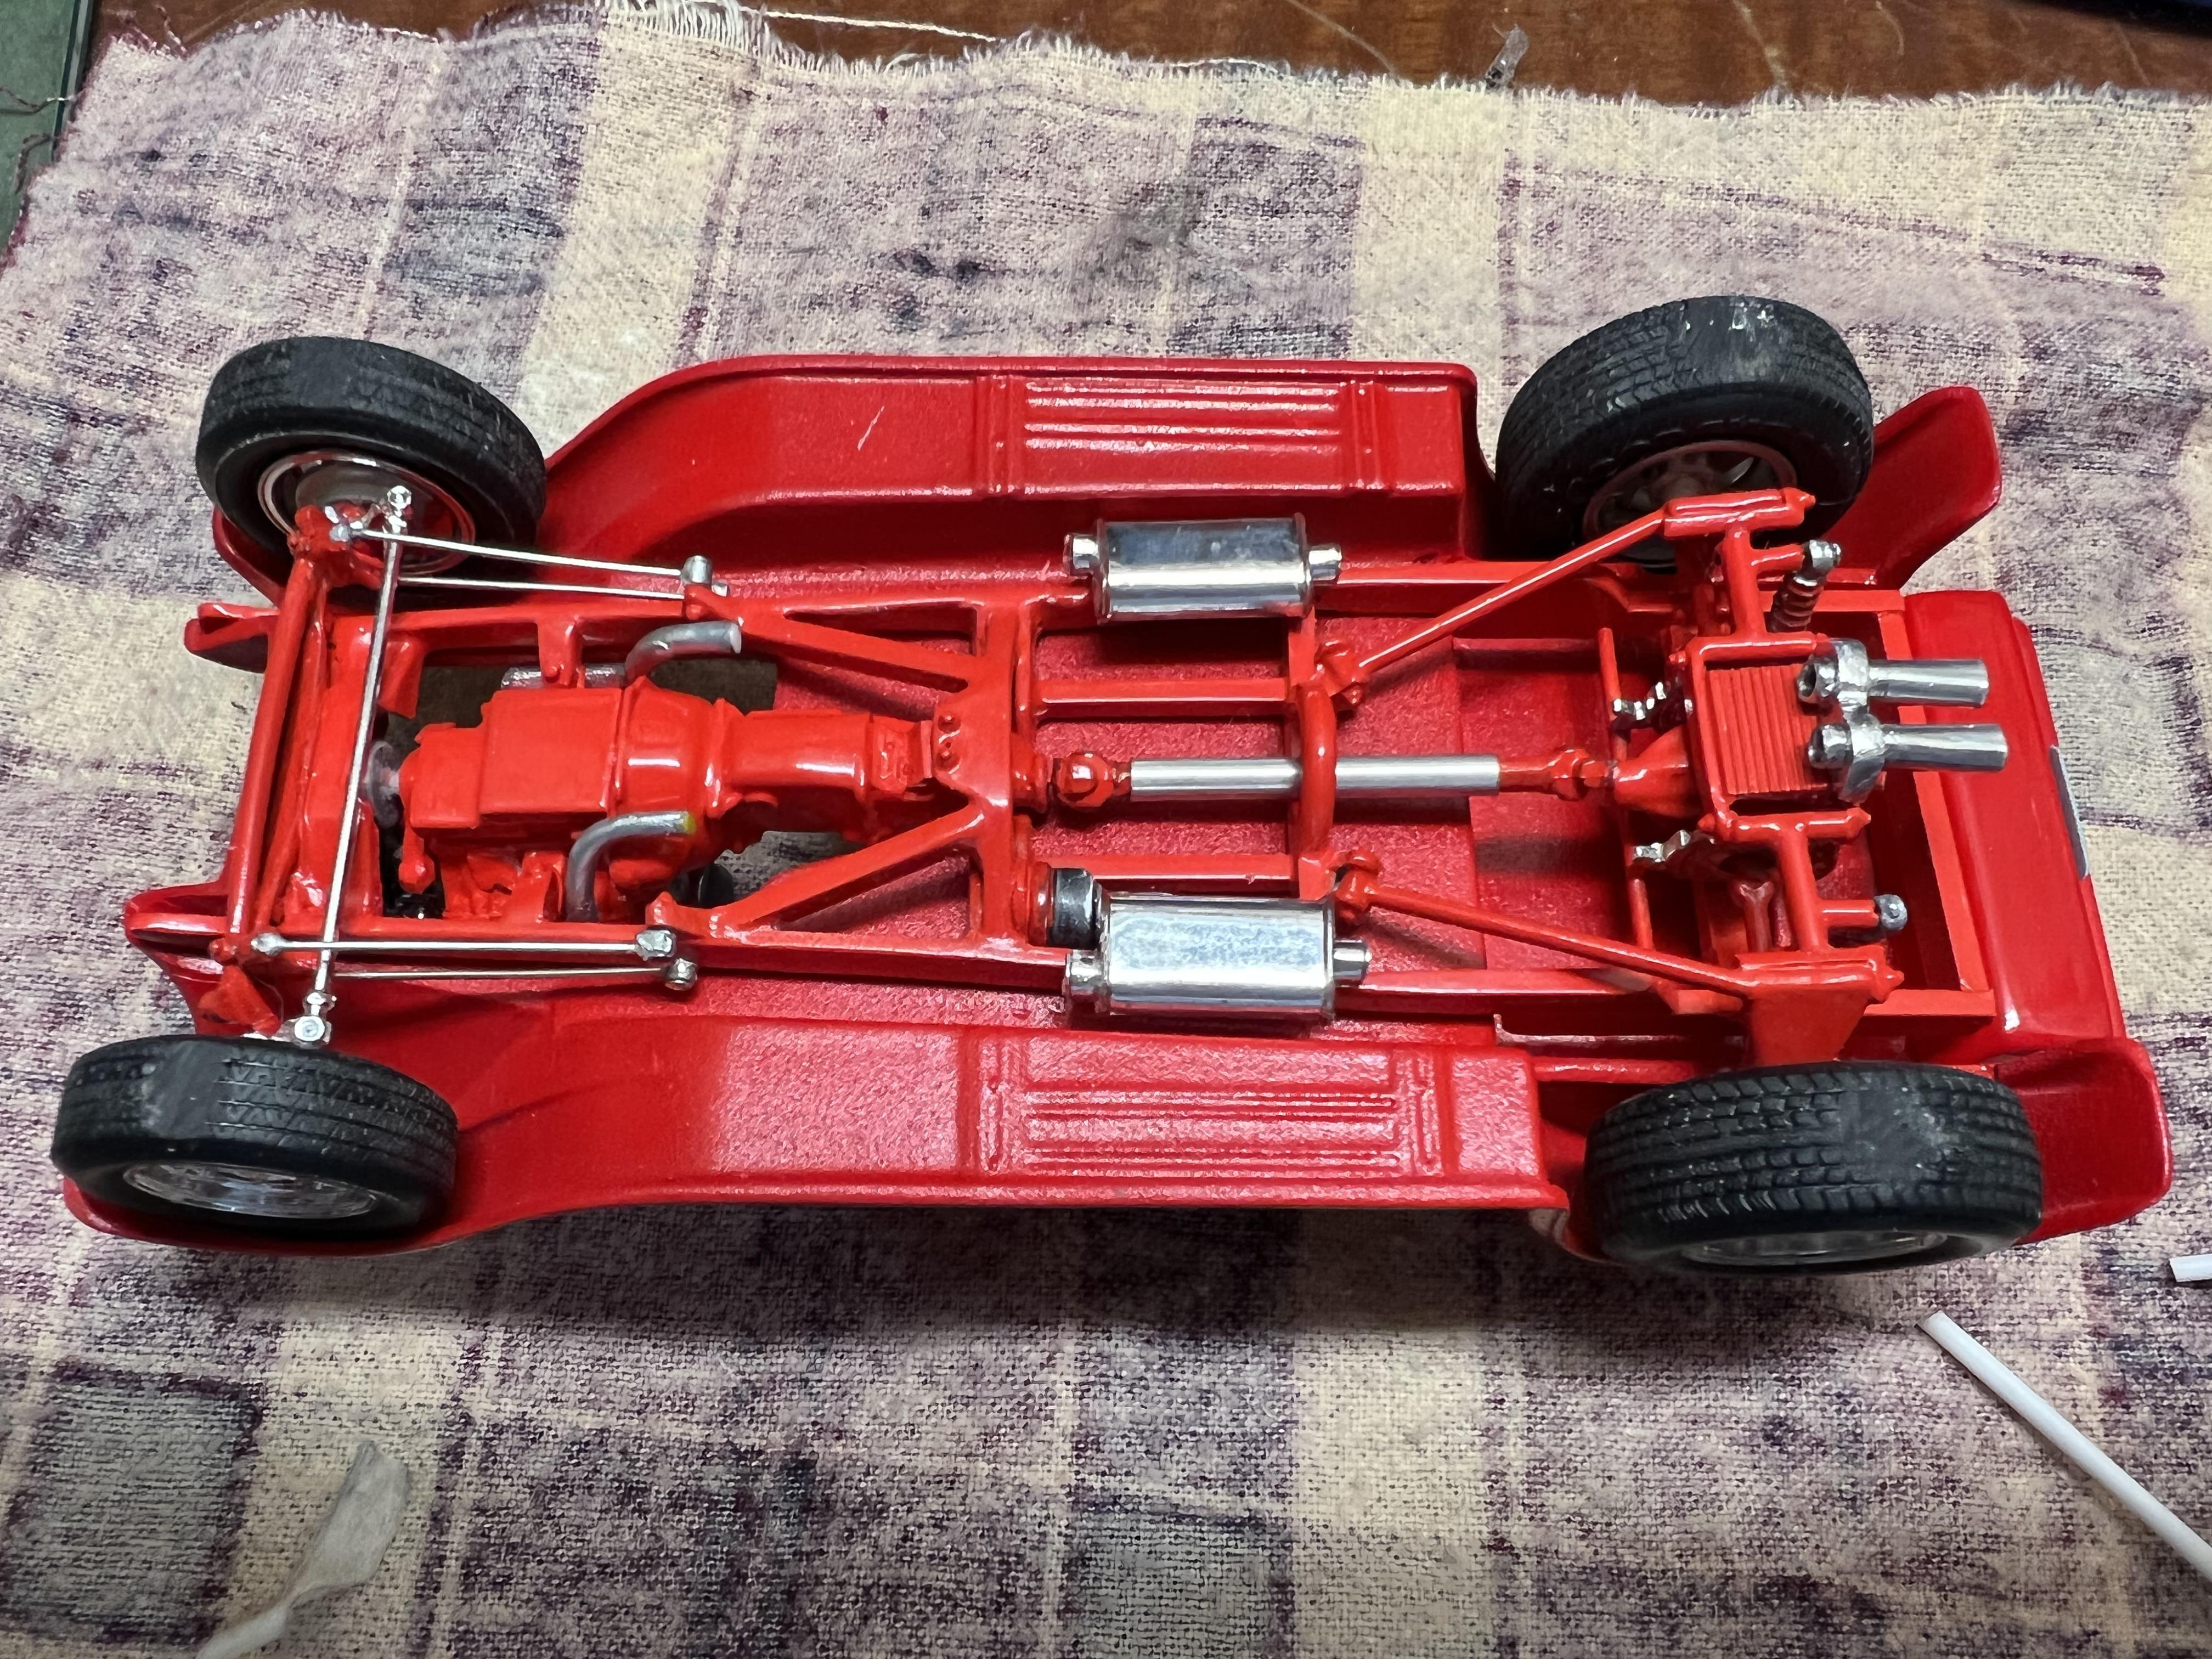
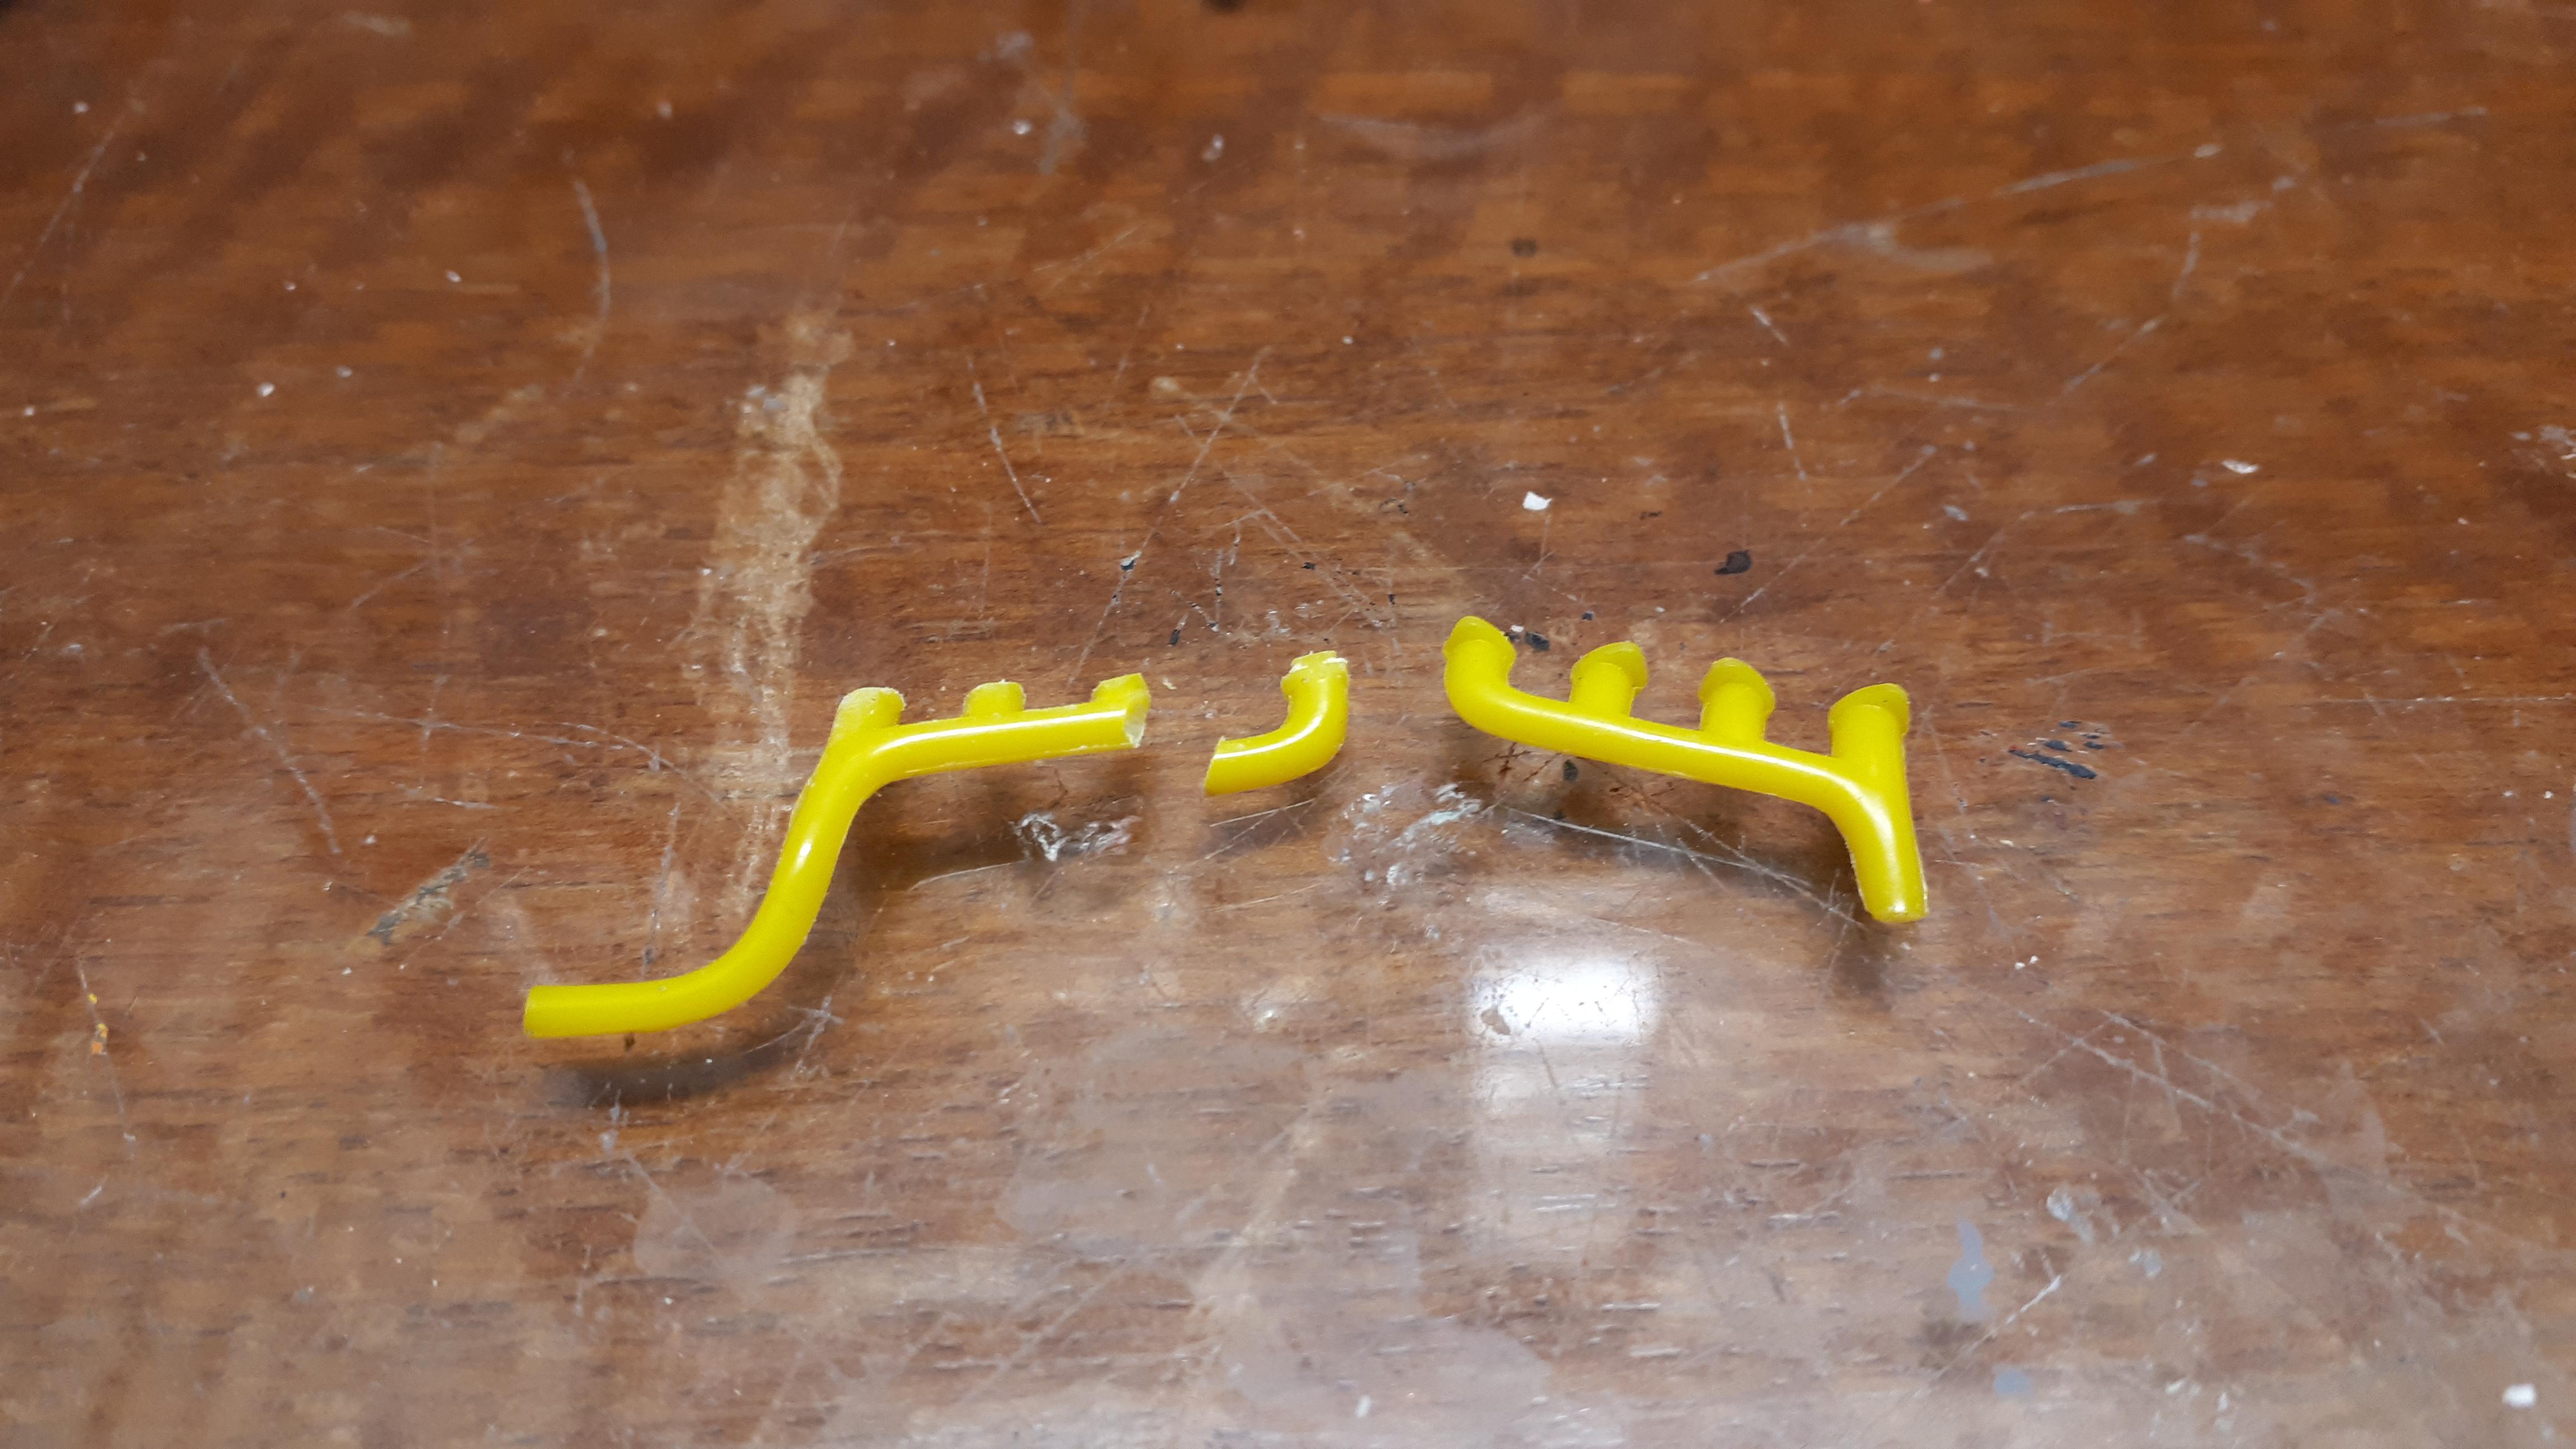
You won't have to wait much longer, Kit. The big reveal could be tomorrow, all things going well! Got a few things done today but the big one was getting the damaged pillars painted. Next I made and chromed the exhaust. I used Evergreen # 222 and bent it between my fingers. I then taped it down and painted the underside of the pipes. When they were reasonably dry, I carefully fitted them onto the car and then painted the top side, thus minimising handling the Molotow chrome. Very happy with the outcome. I also made a radiator support bracket for the top of the radiator, a radiator hose and alternator brackets - can't have floating alternators, can we? Tomorrow just need to install the radiator parts and fit the overhead console and that should be it! See you then. Cheers Alan
-
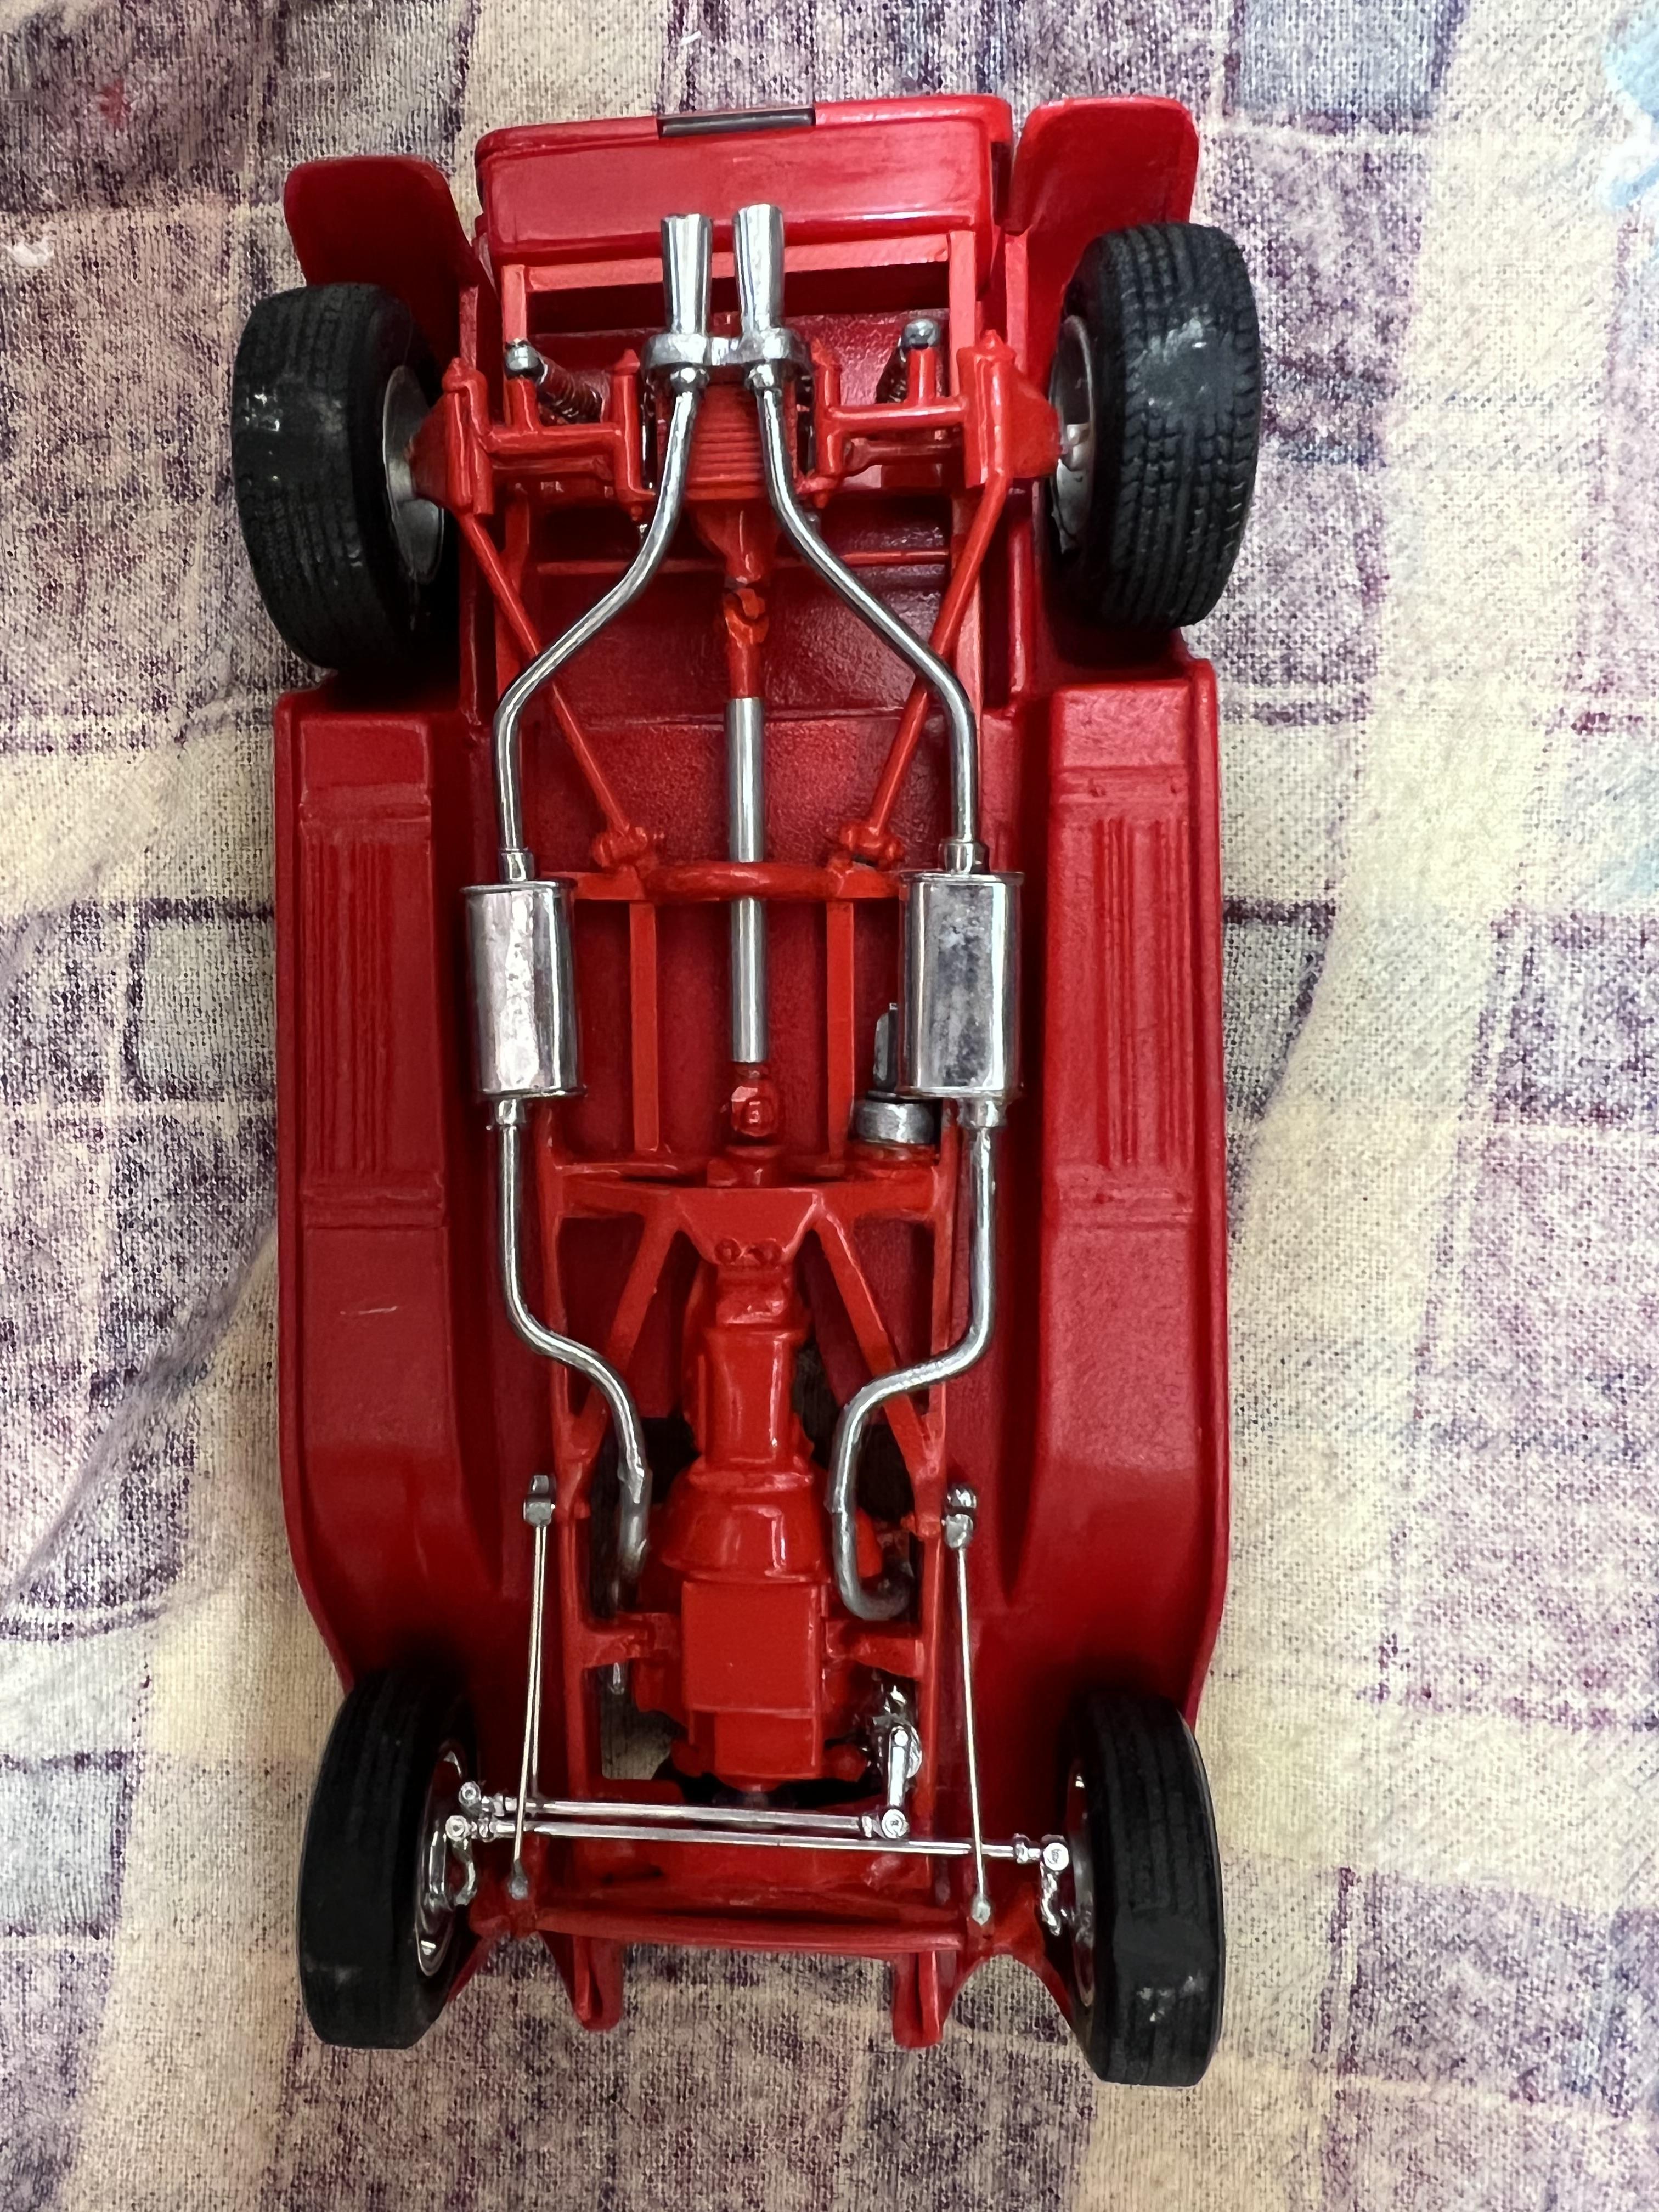
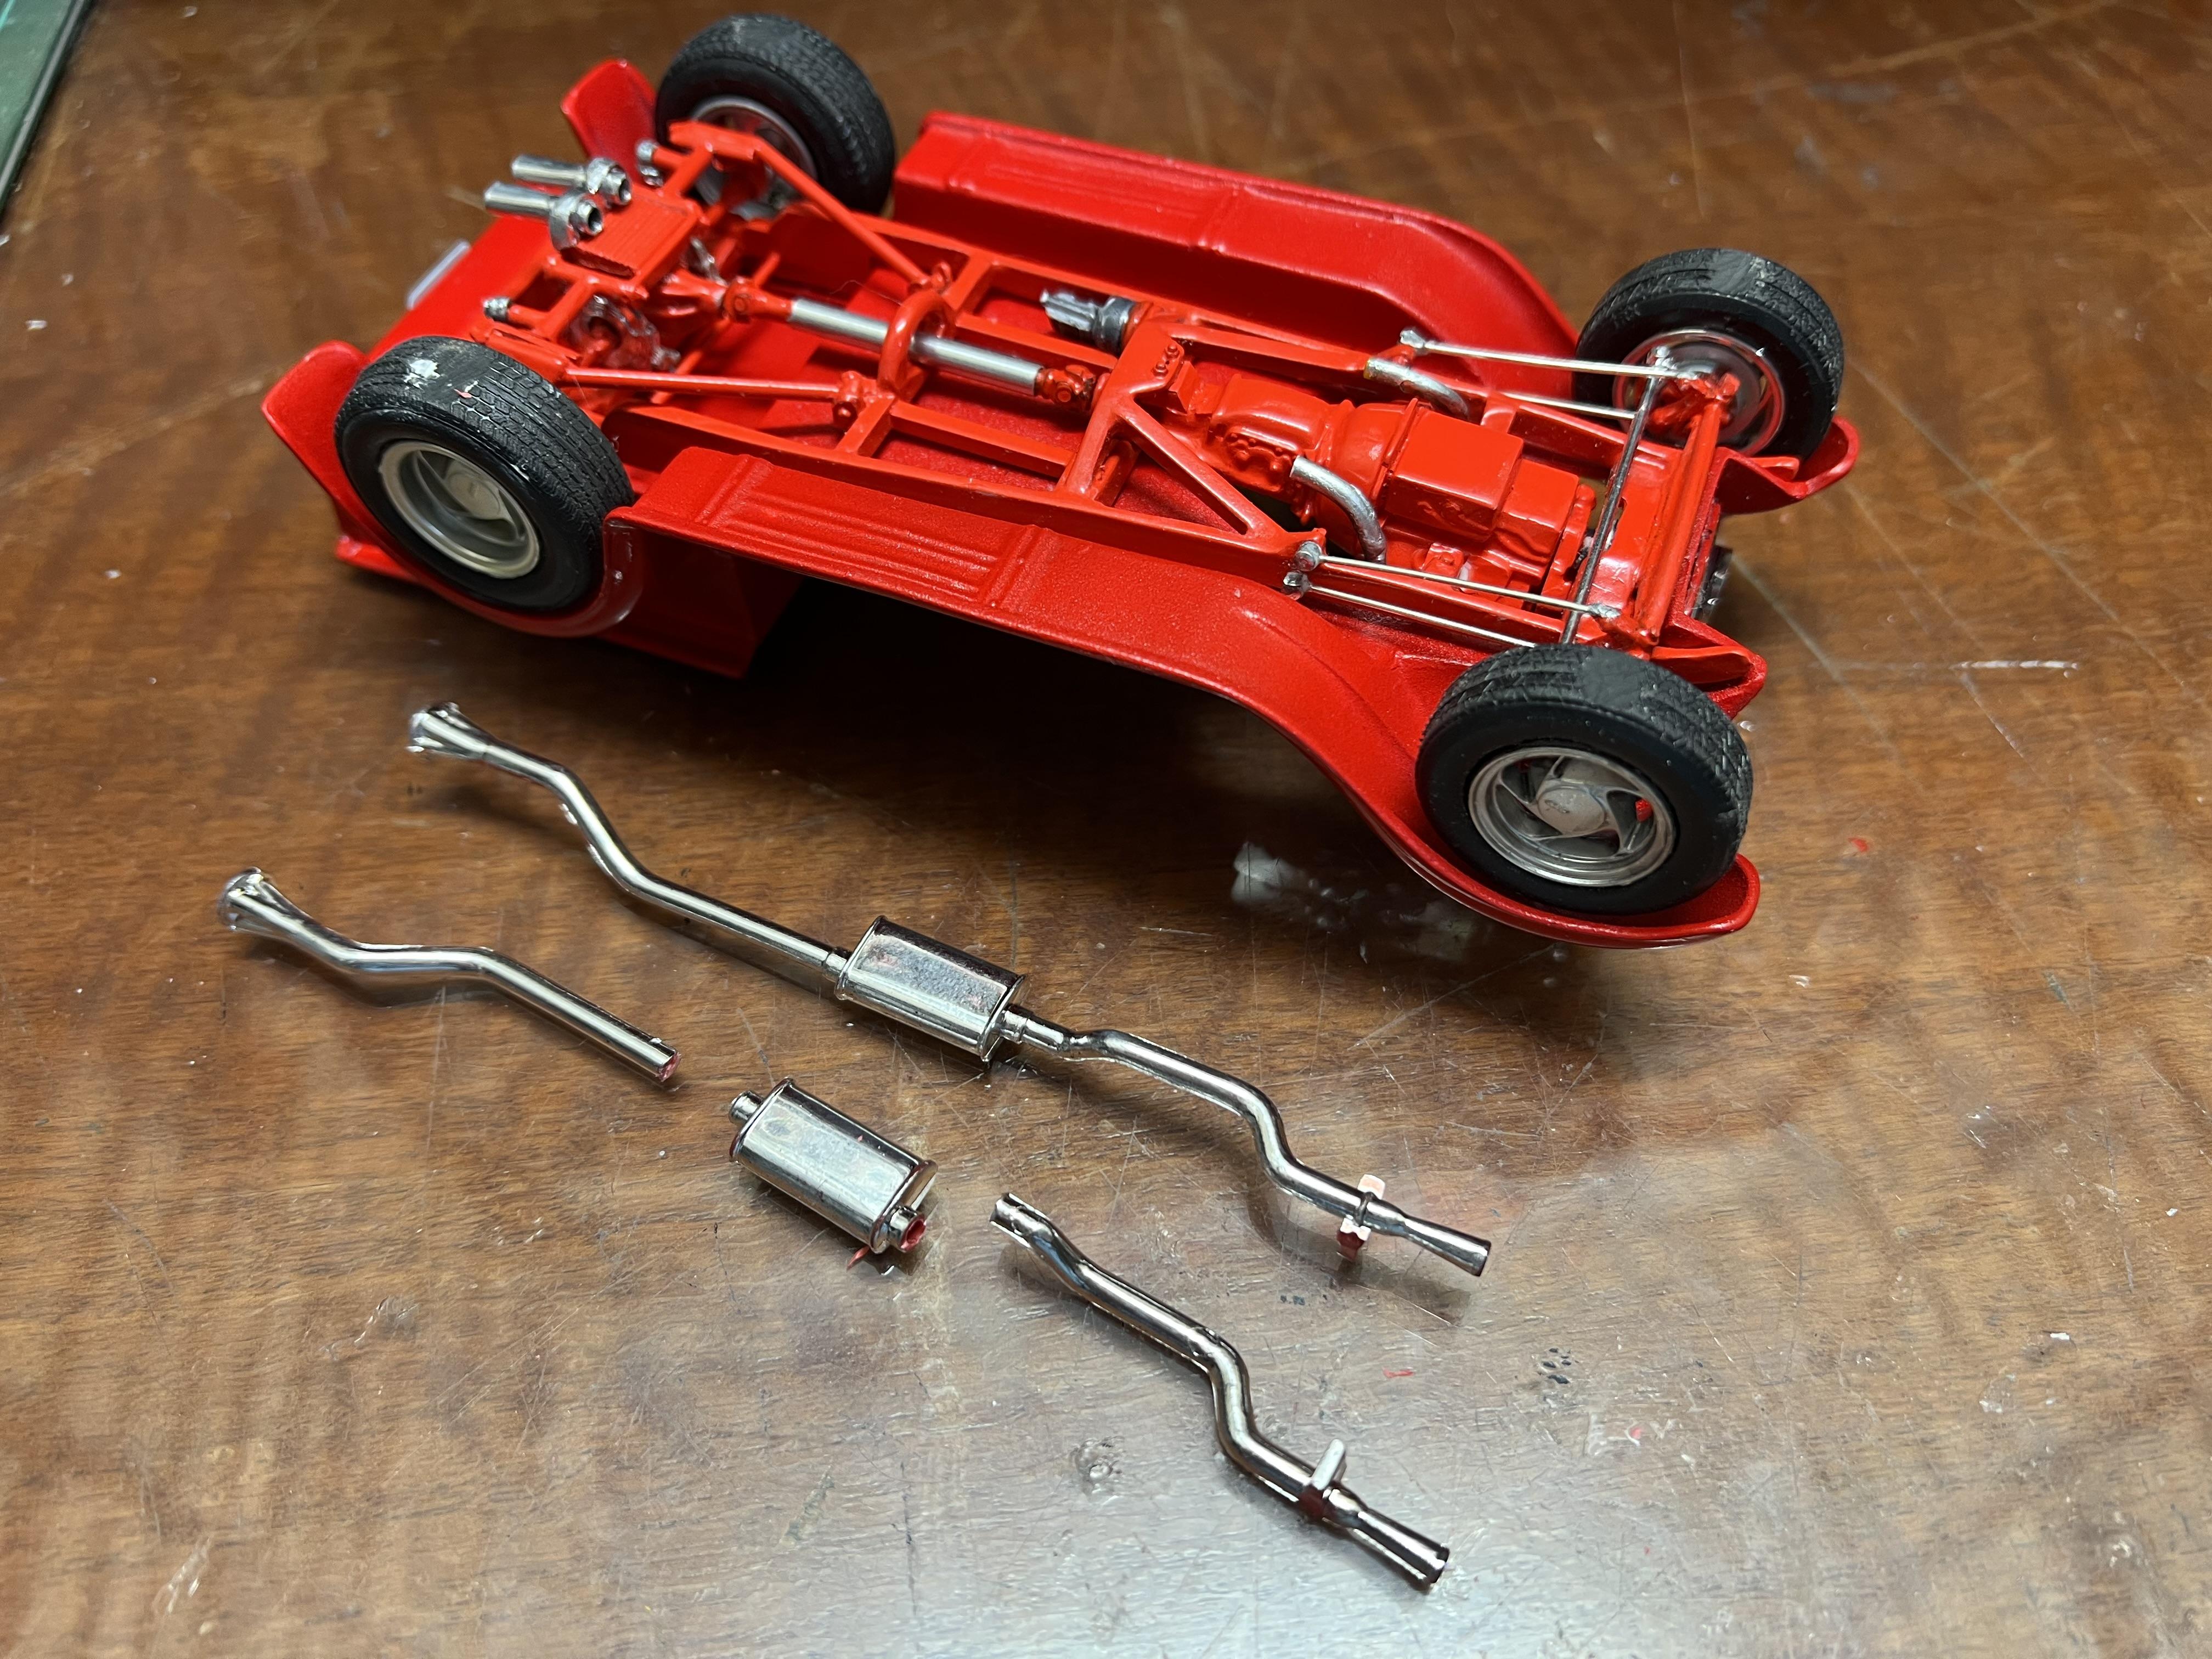
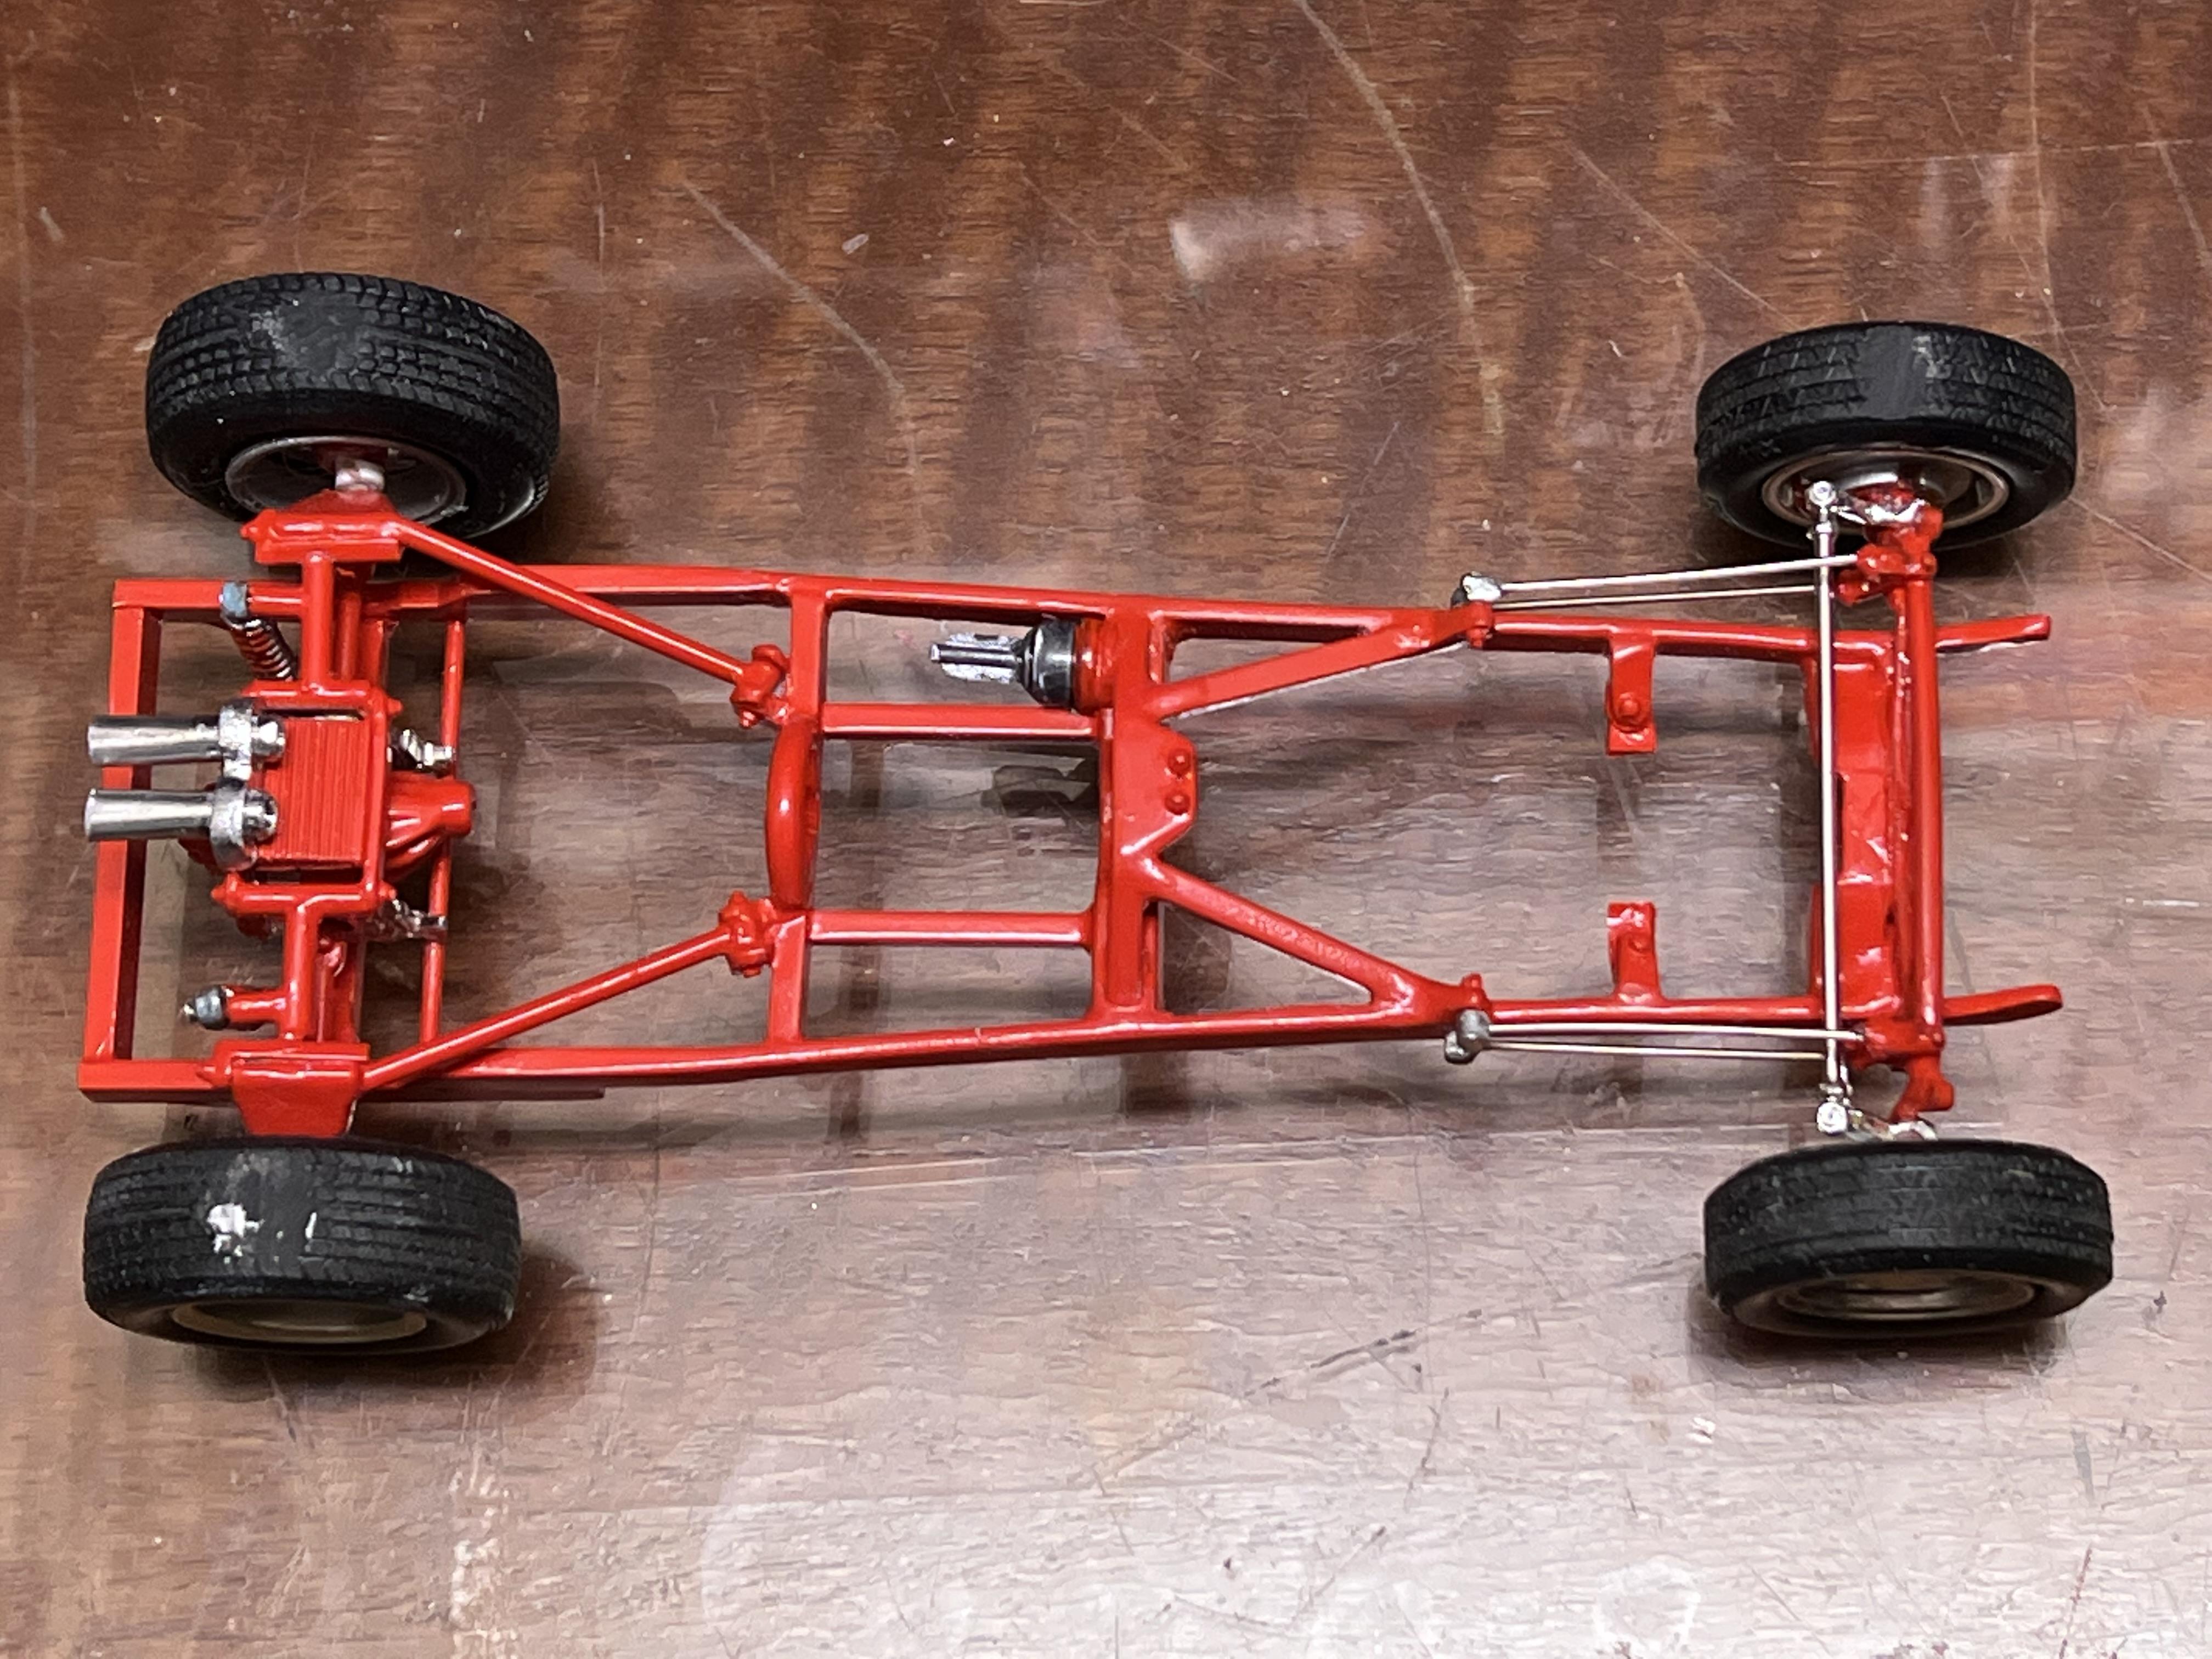
First off, I think Pete's paint job just lifted the bar for all of us! Wow, is that going to look amazing. Had a slow and steady day today. The pillars are repaired and the doors are hung so tomorrow I will get the pillars repainted and put them aside to dry. I dropped the chassis onto the fender unit this evening and spent a long time working out how to run the exhaust. As I did so, I realised how close the layout of the crossmembers is to my own 1:1 in the garage - and the mufflers have ended up in nearly the same spot. The real ones are actually canted slightly so that they tuck up under the valance panels but on the model flat above the frame rails will work fine. Letting them set nice and solid overnight before connecting up the pipes. Those mufflers are off the ZZTop 33 coupe, again, almost identical to my real ones except both my outlets are offset, not one end central like the model. Finally put a decal on one door before I head for bed. It may not stay on the car - it was ultra fragile and started to tear but worse still, had a film underneath. I have been known to wash that film off but it will never happen on these ones. I have used some Micro Set ( but no Microsol afterwards ) and will see if it dries clear in the morning. If not, they come off. Cheers Alan
-
I don't think I have ever seen such a cool treatment of the AMT 25 T Coupe! I've yet to tackle one and now I have a whole lot of thoughts in my head. This looks like it would carry the front wheels for city blocks! Cheers Alan
-
That's working! Great to see a Lil Deuce grille being used on a different topic. Cant wait to see it finished. Cheers Alan
-
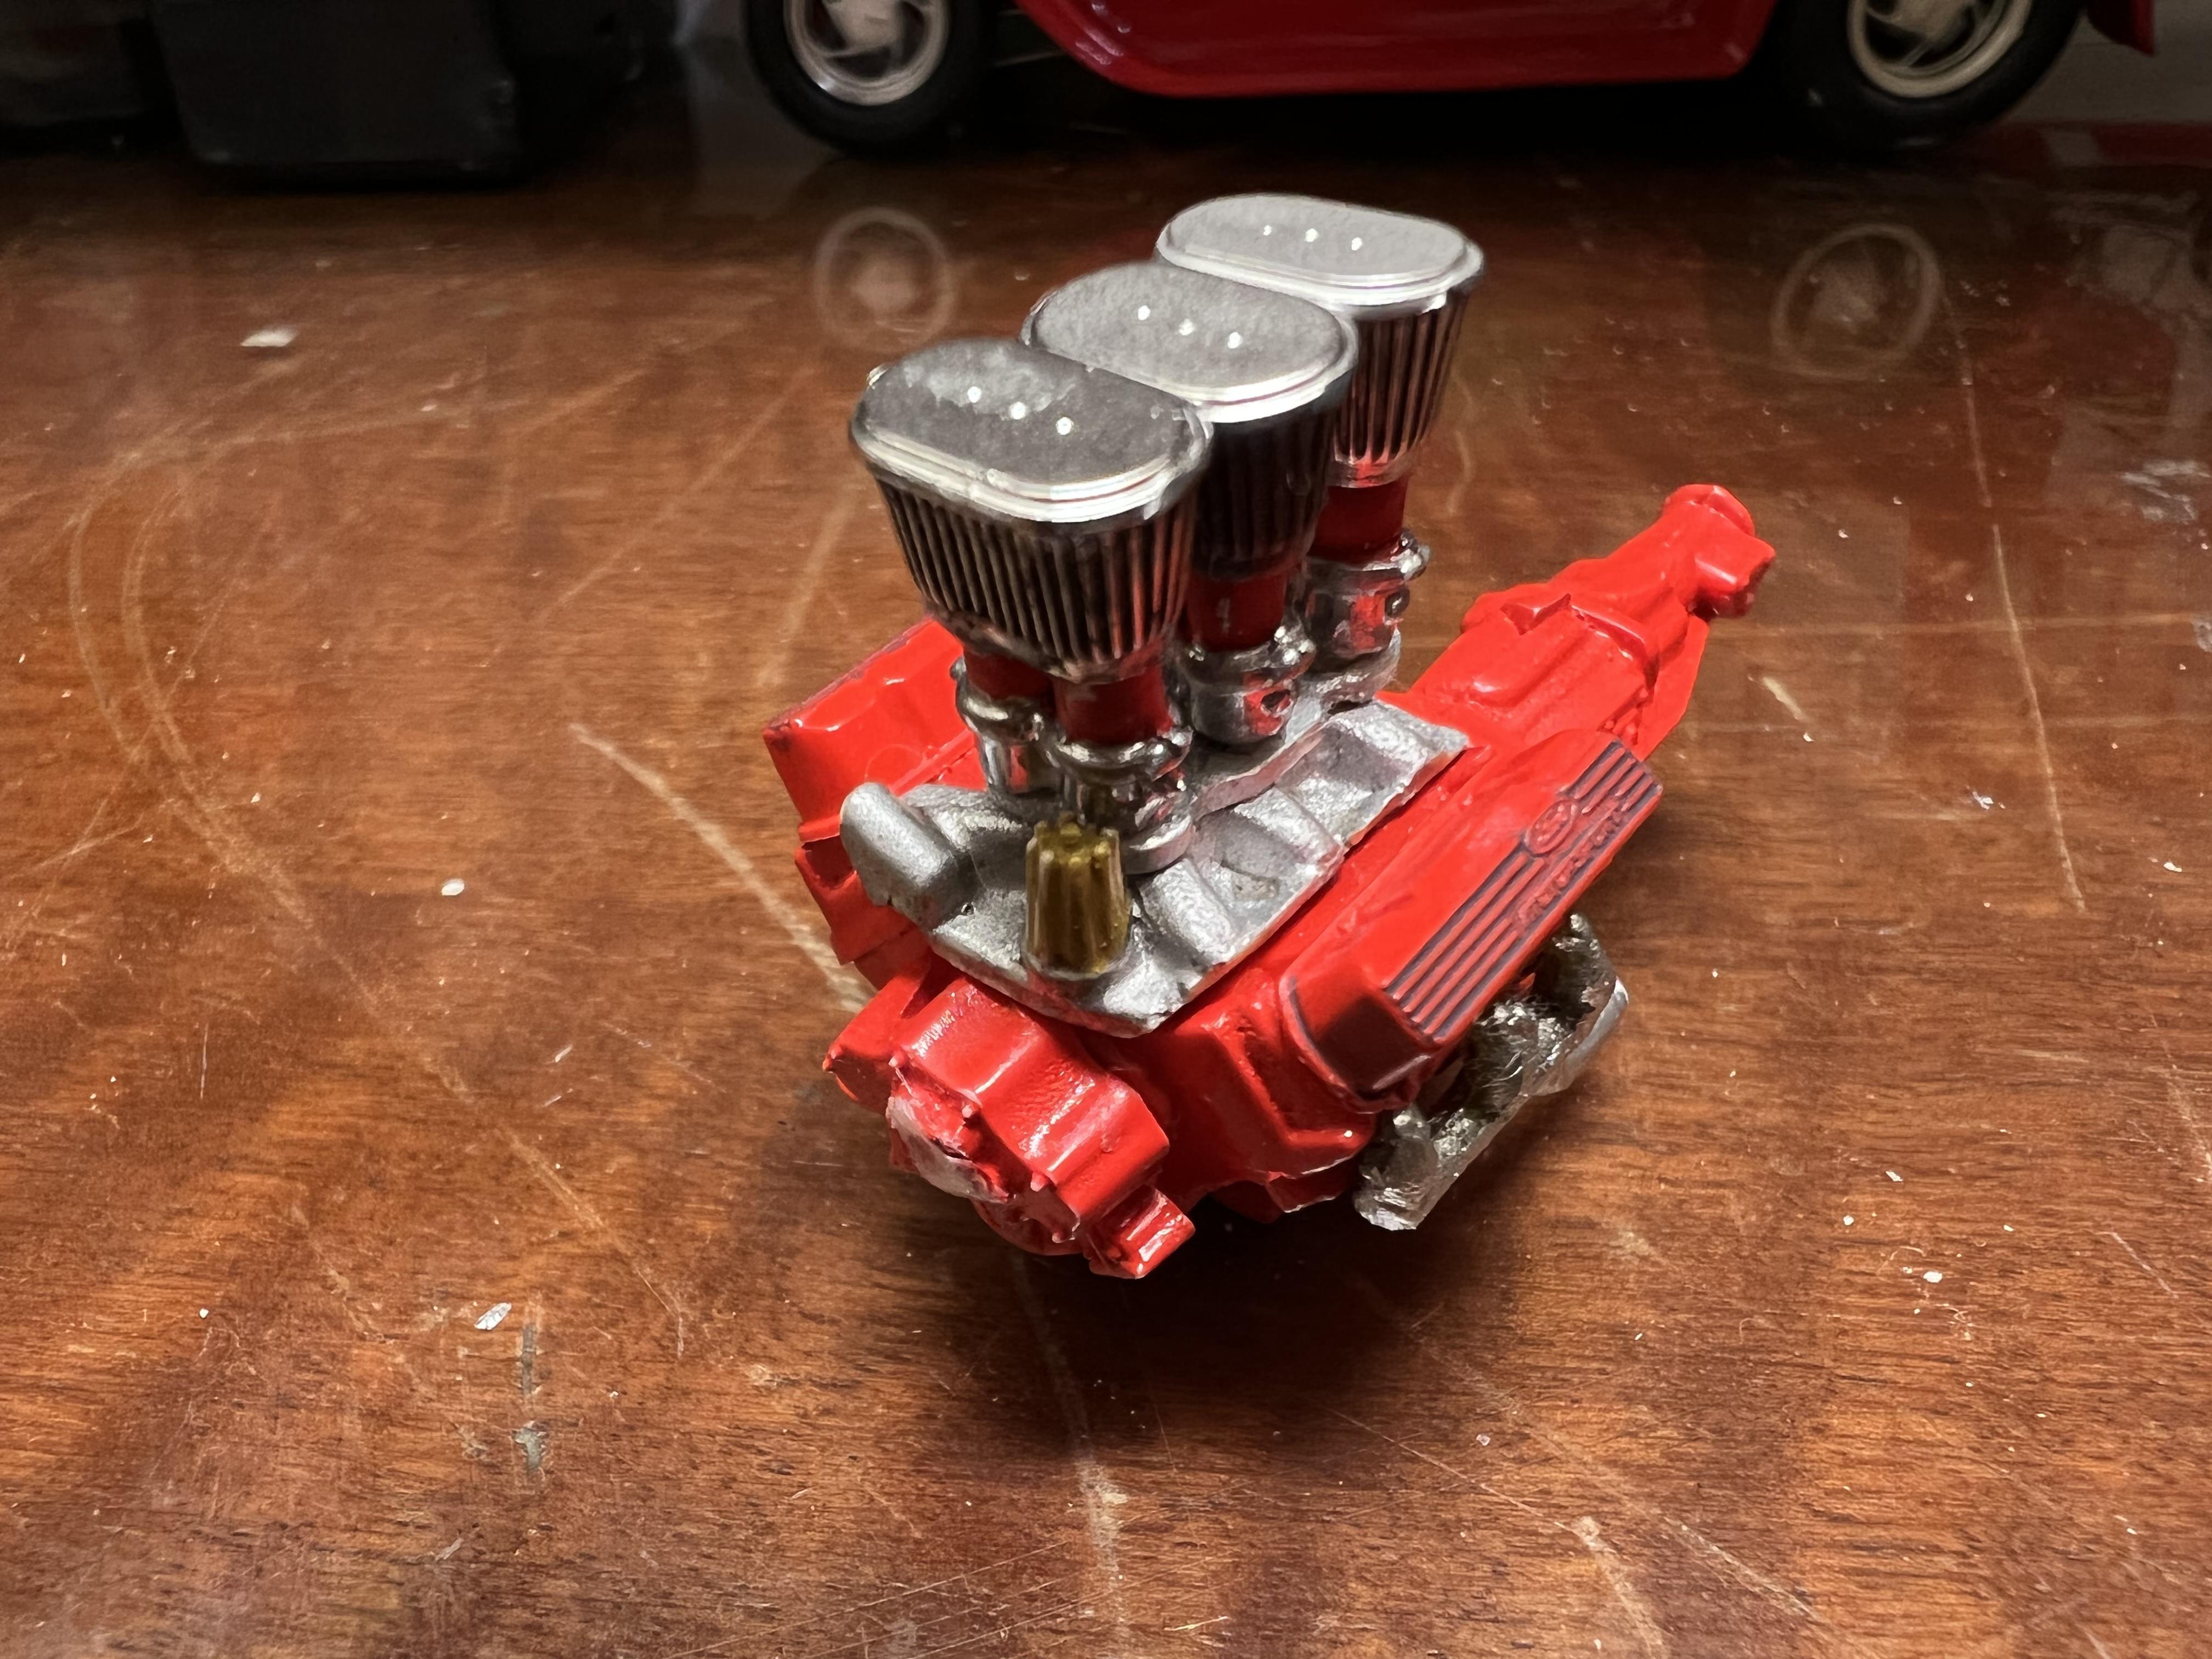
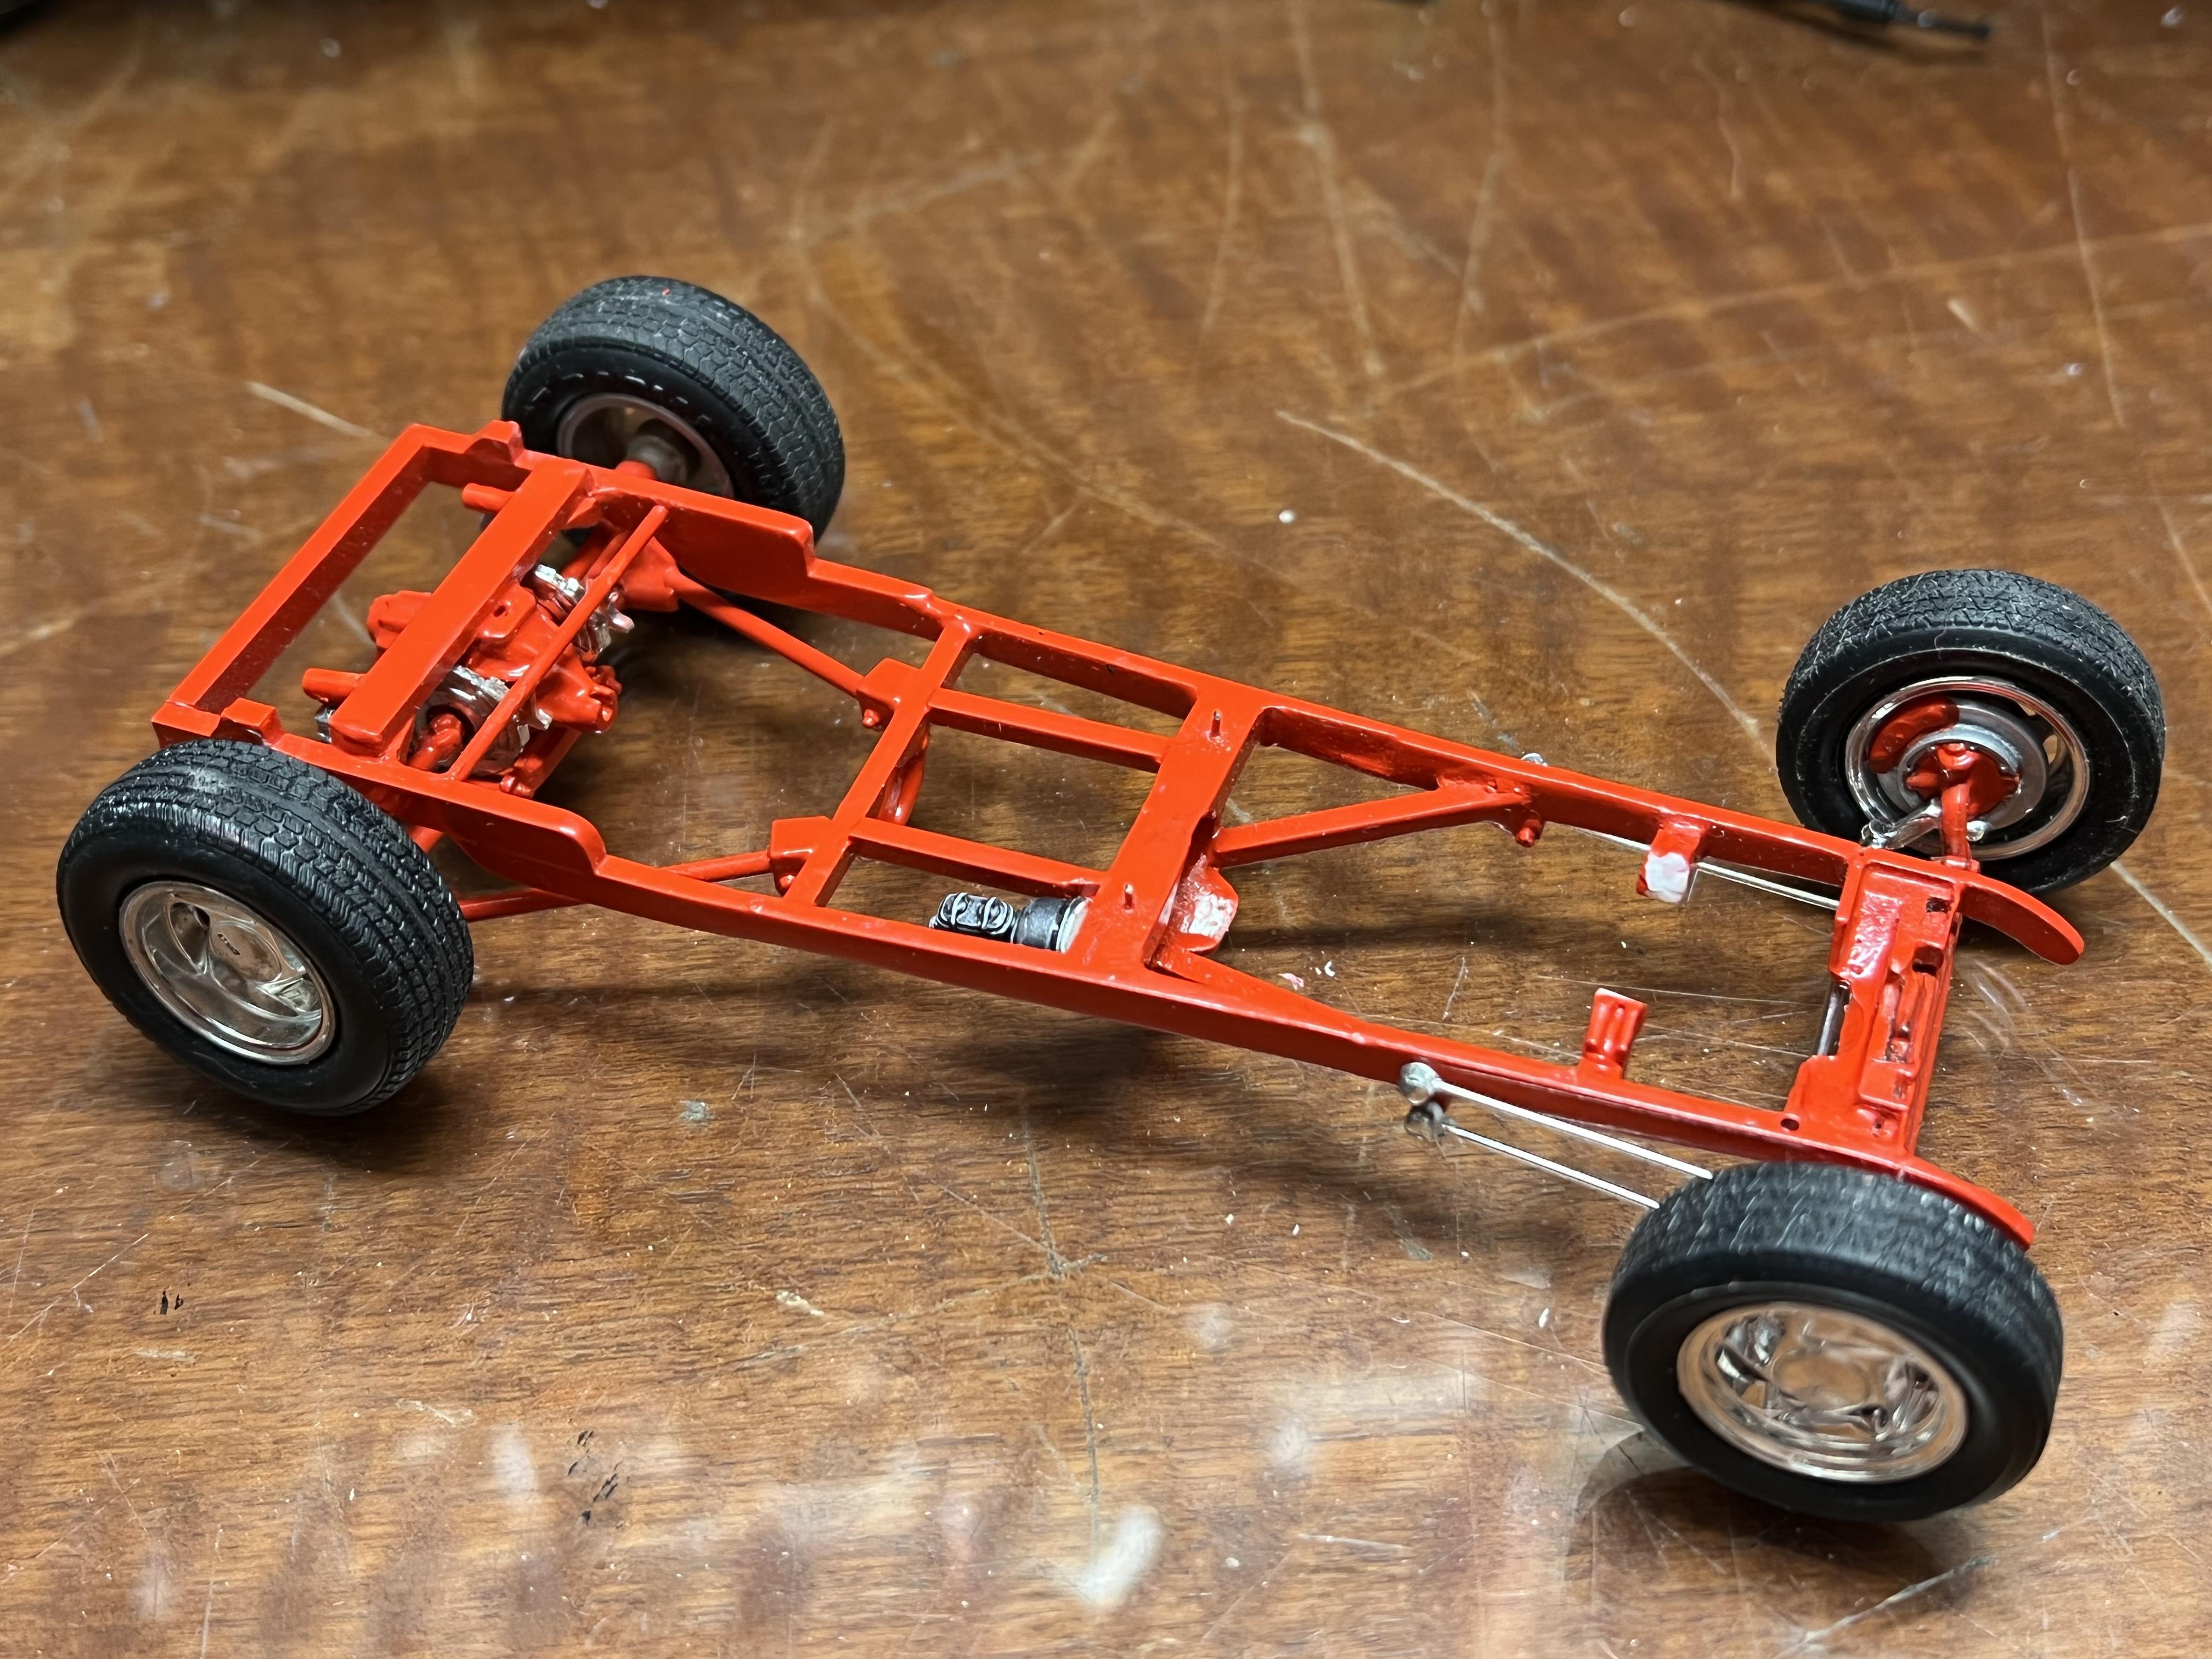
Thanks guys, I am not giving up! Progress today has been OK. The pillars are glued up and I am using sanding pads to bring the muck around the joint back down to level. Then I will mask off all but the windshield area, paint it and quickly (and carefully!) remove the tape so that hopefully the paint edge blends in as it dries. It will be what it will be. I did get one door hung but wouldn't you know it, a plastic pin broke -surprise, surprise - so I drilled out that hinge and put a steel pin in to replace it. Meanwhile I got the exhaust hanger glued in place and the exhaust headers painted and glued to the block. They are modified hemi ones, from the 53 Ford F100 I think. I don't think I showed the underside of the fender unit but I tried something new that I am really happy with. The bottom of that fender unit took a LOT of bodywork and was not very crisp so I thought I would try for a texture like sound deadening or bed liner. First, I sprayed primer on from quite a distance. I then sprayed the Tamiya red on, virtually letting a red cloud float through the air and fall on the plastic. Finally, I did the same with flat clear. I am VERY happy with the results and will probably use it again in future. In the last photos that I posted of the engine I wasn't very happy with my paint detailing of the Ford Motorsports rocker covers so I stripped them, ran Tamiya panel wash on the fins and then lightly sprayed red over the top. Definitely an improvement. So here is where we are now as I wait for some stuff to dry. Cheers Alan
-
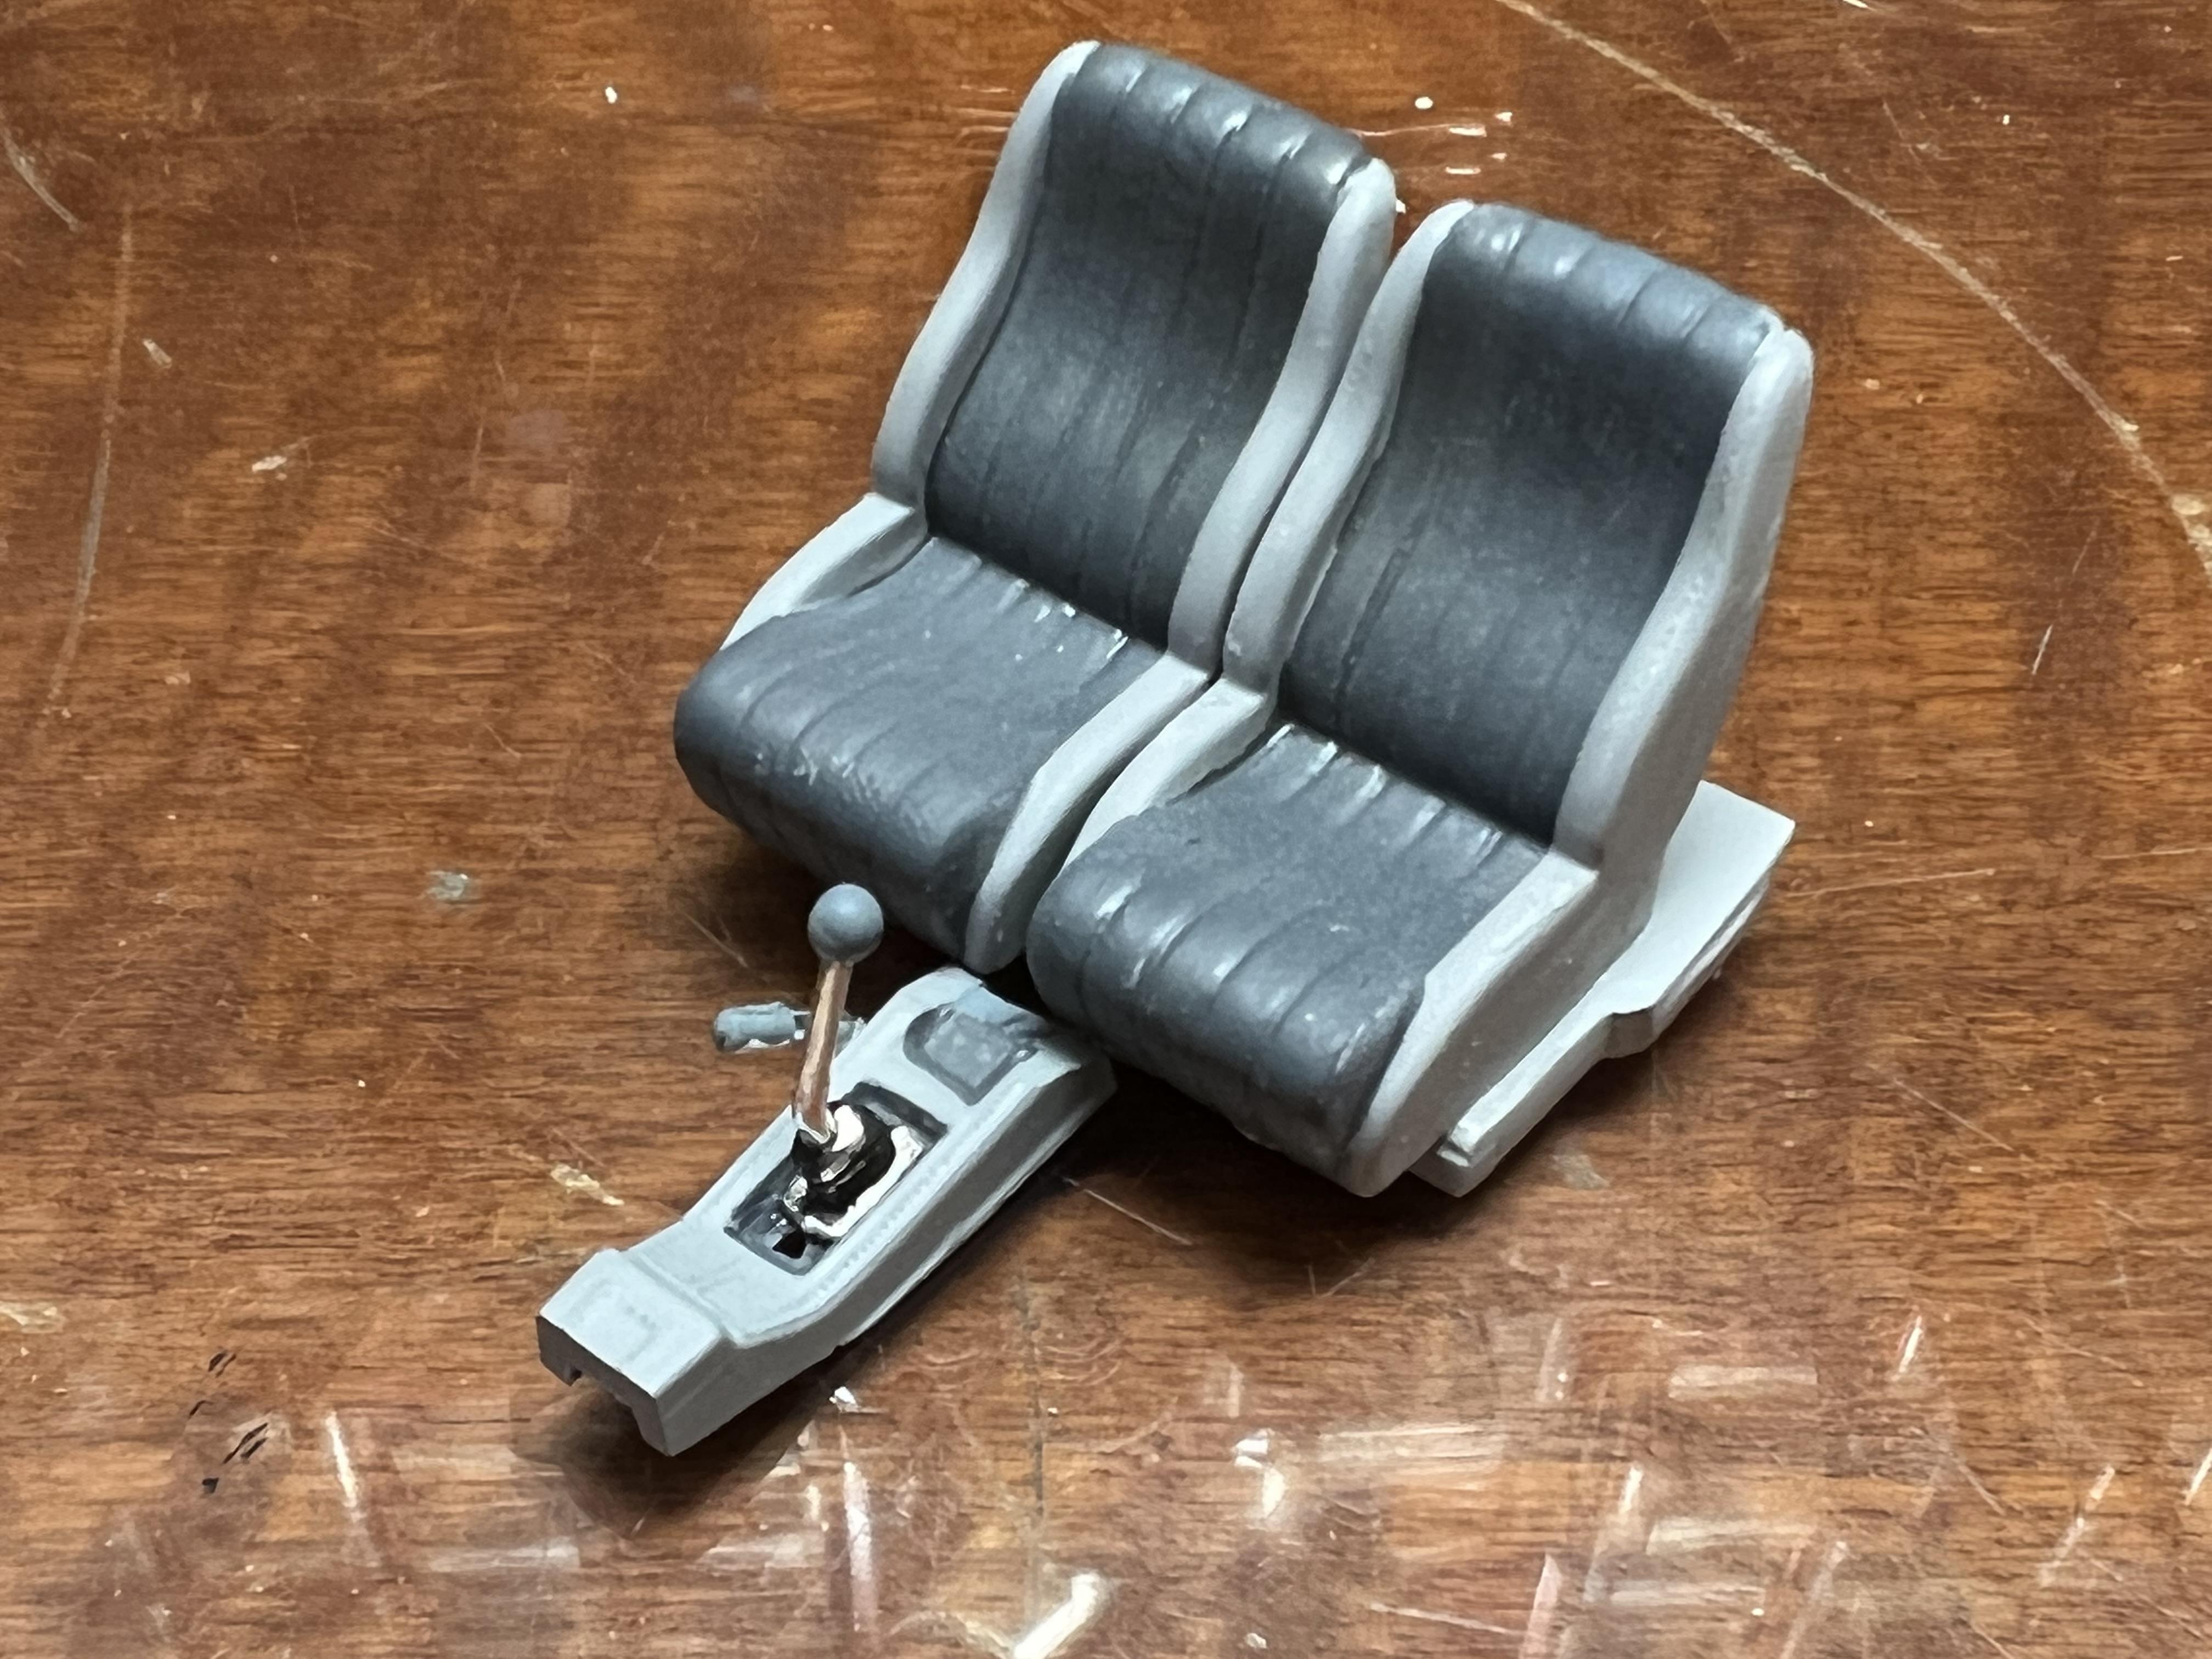
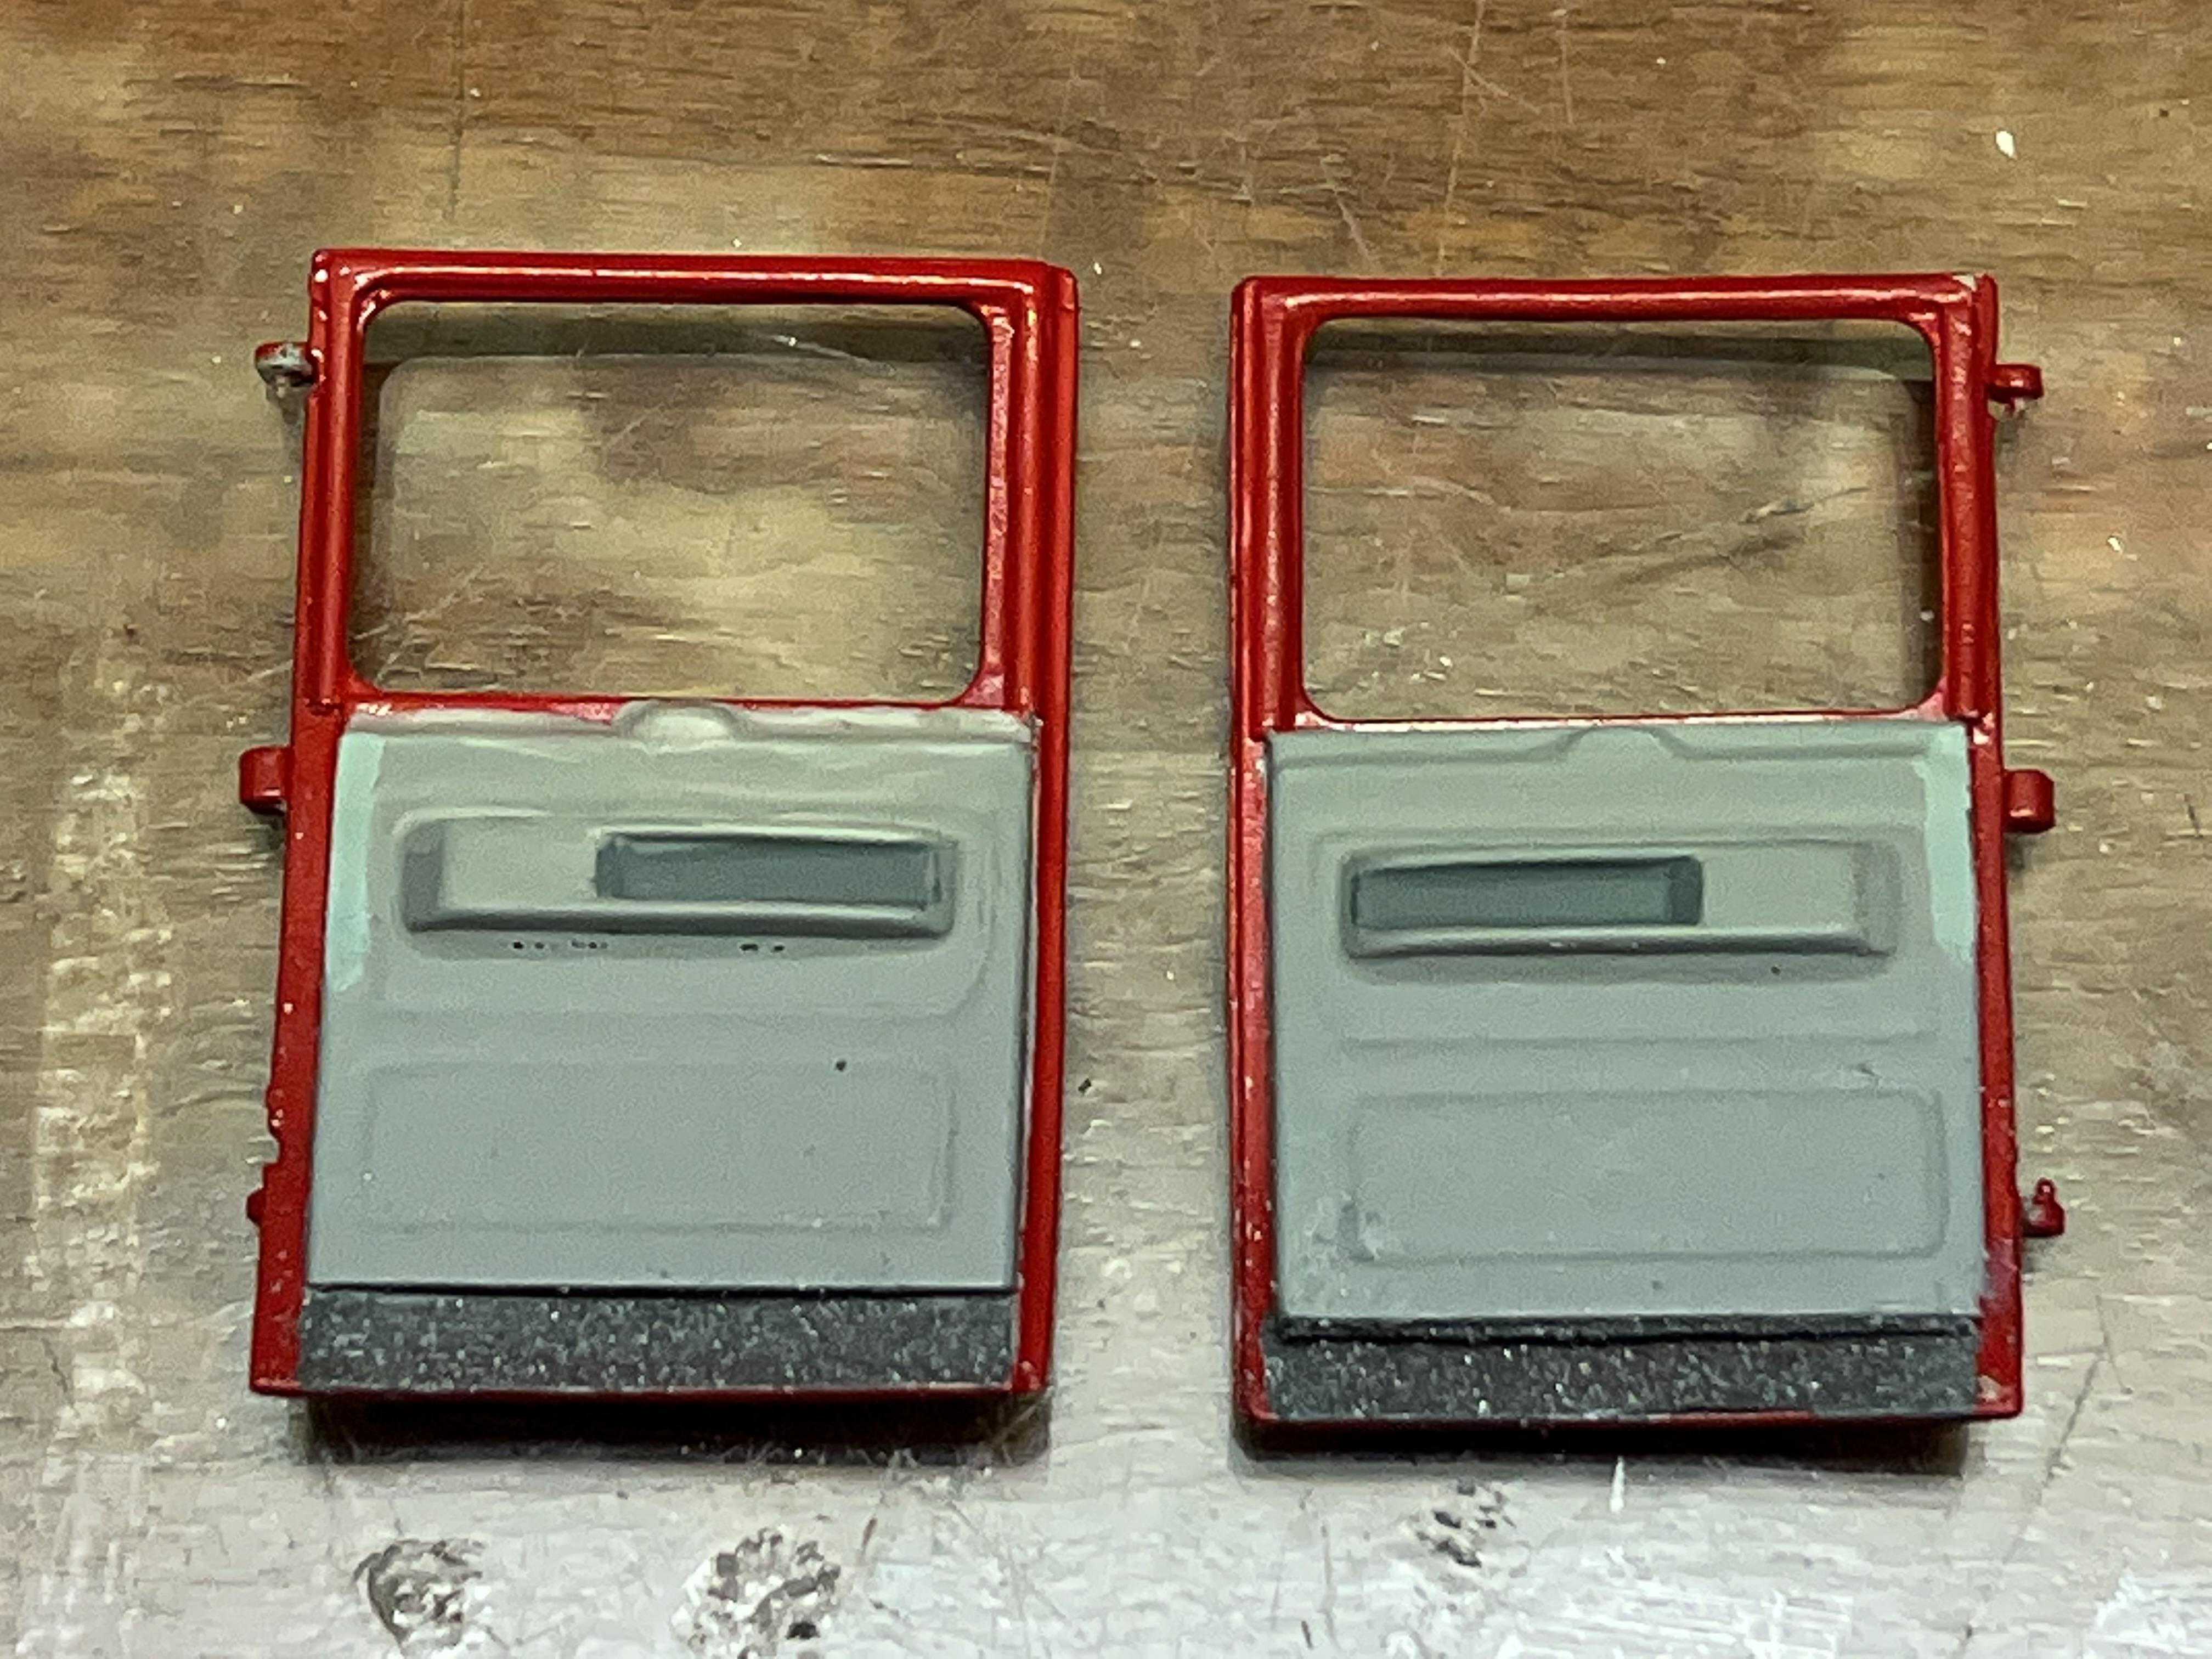
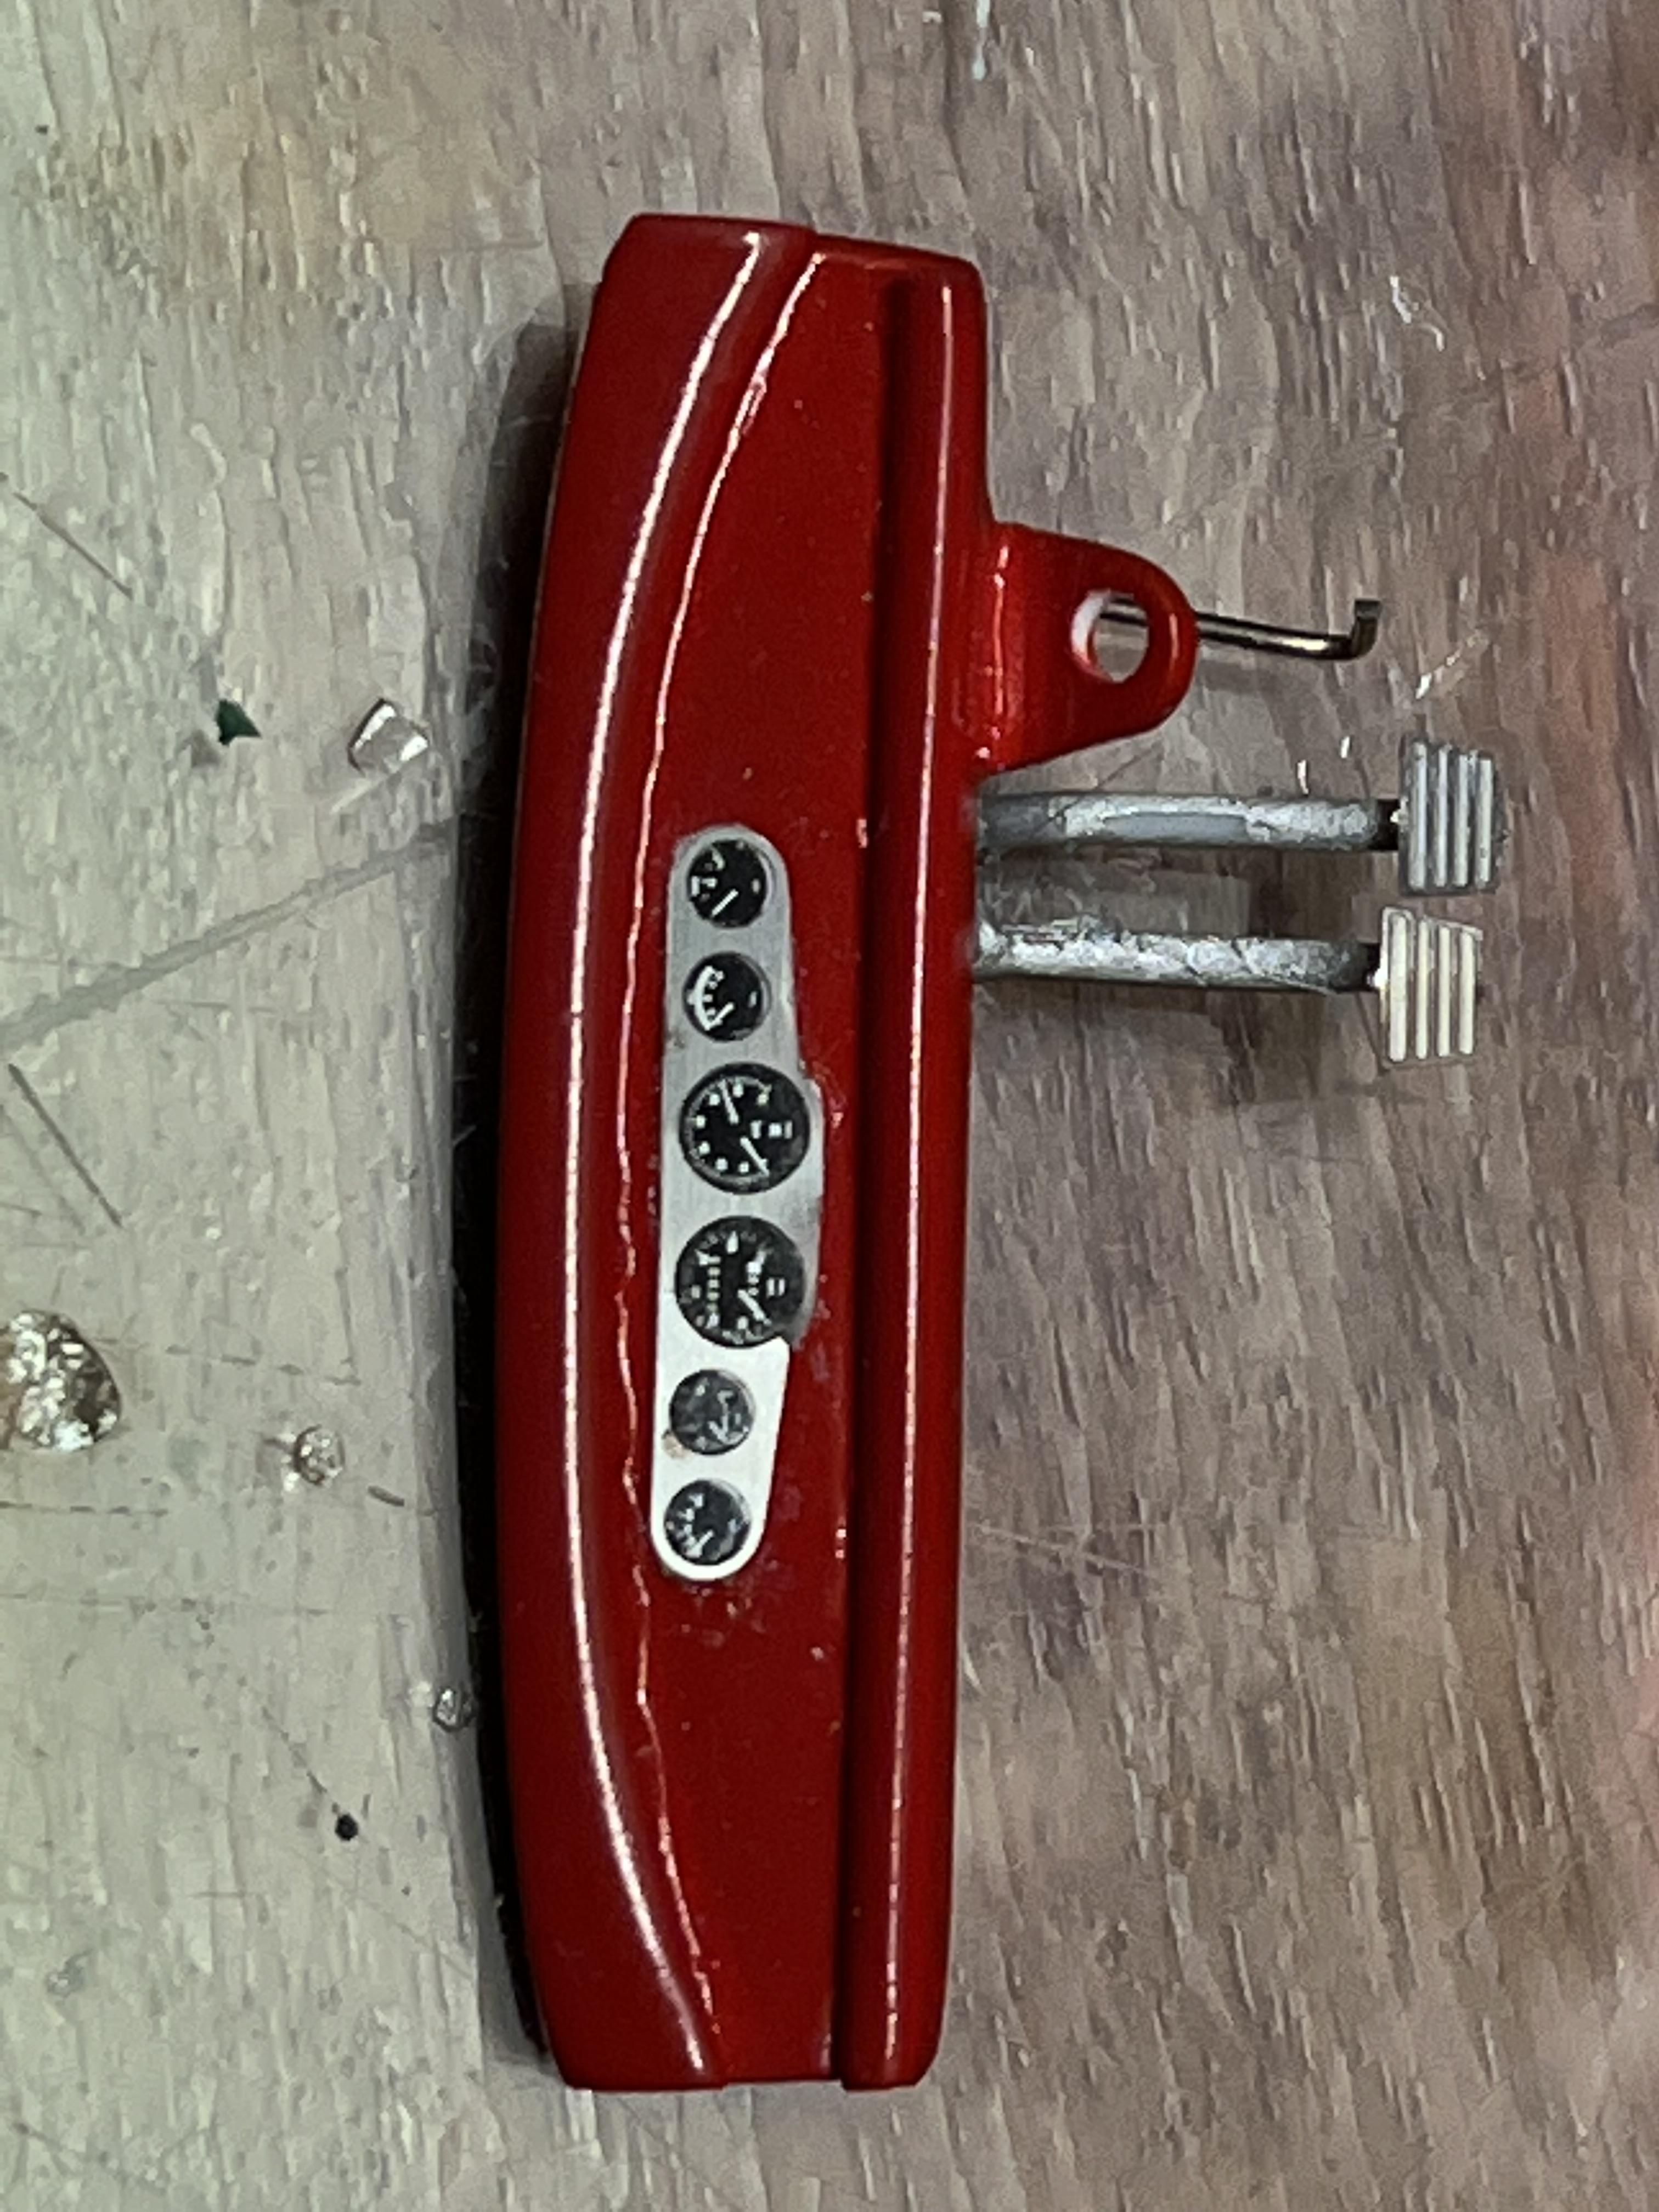
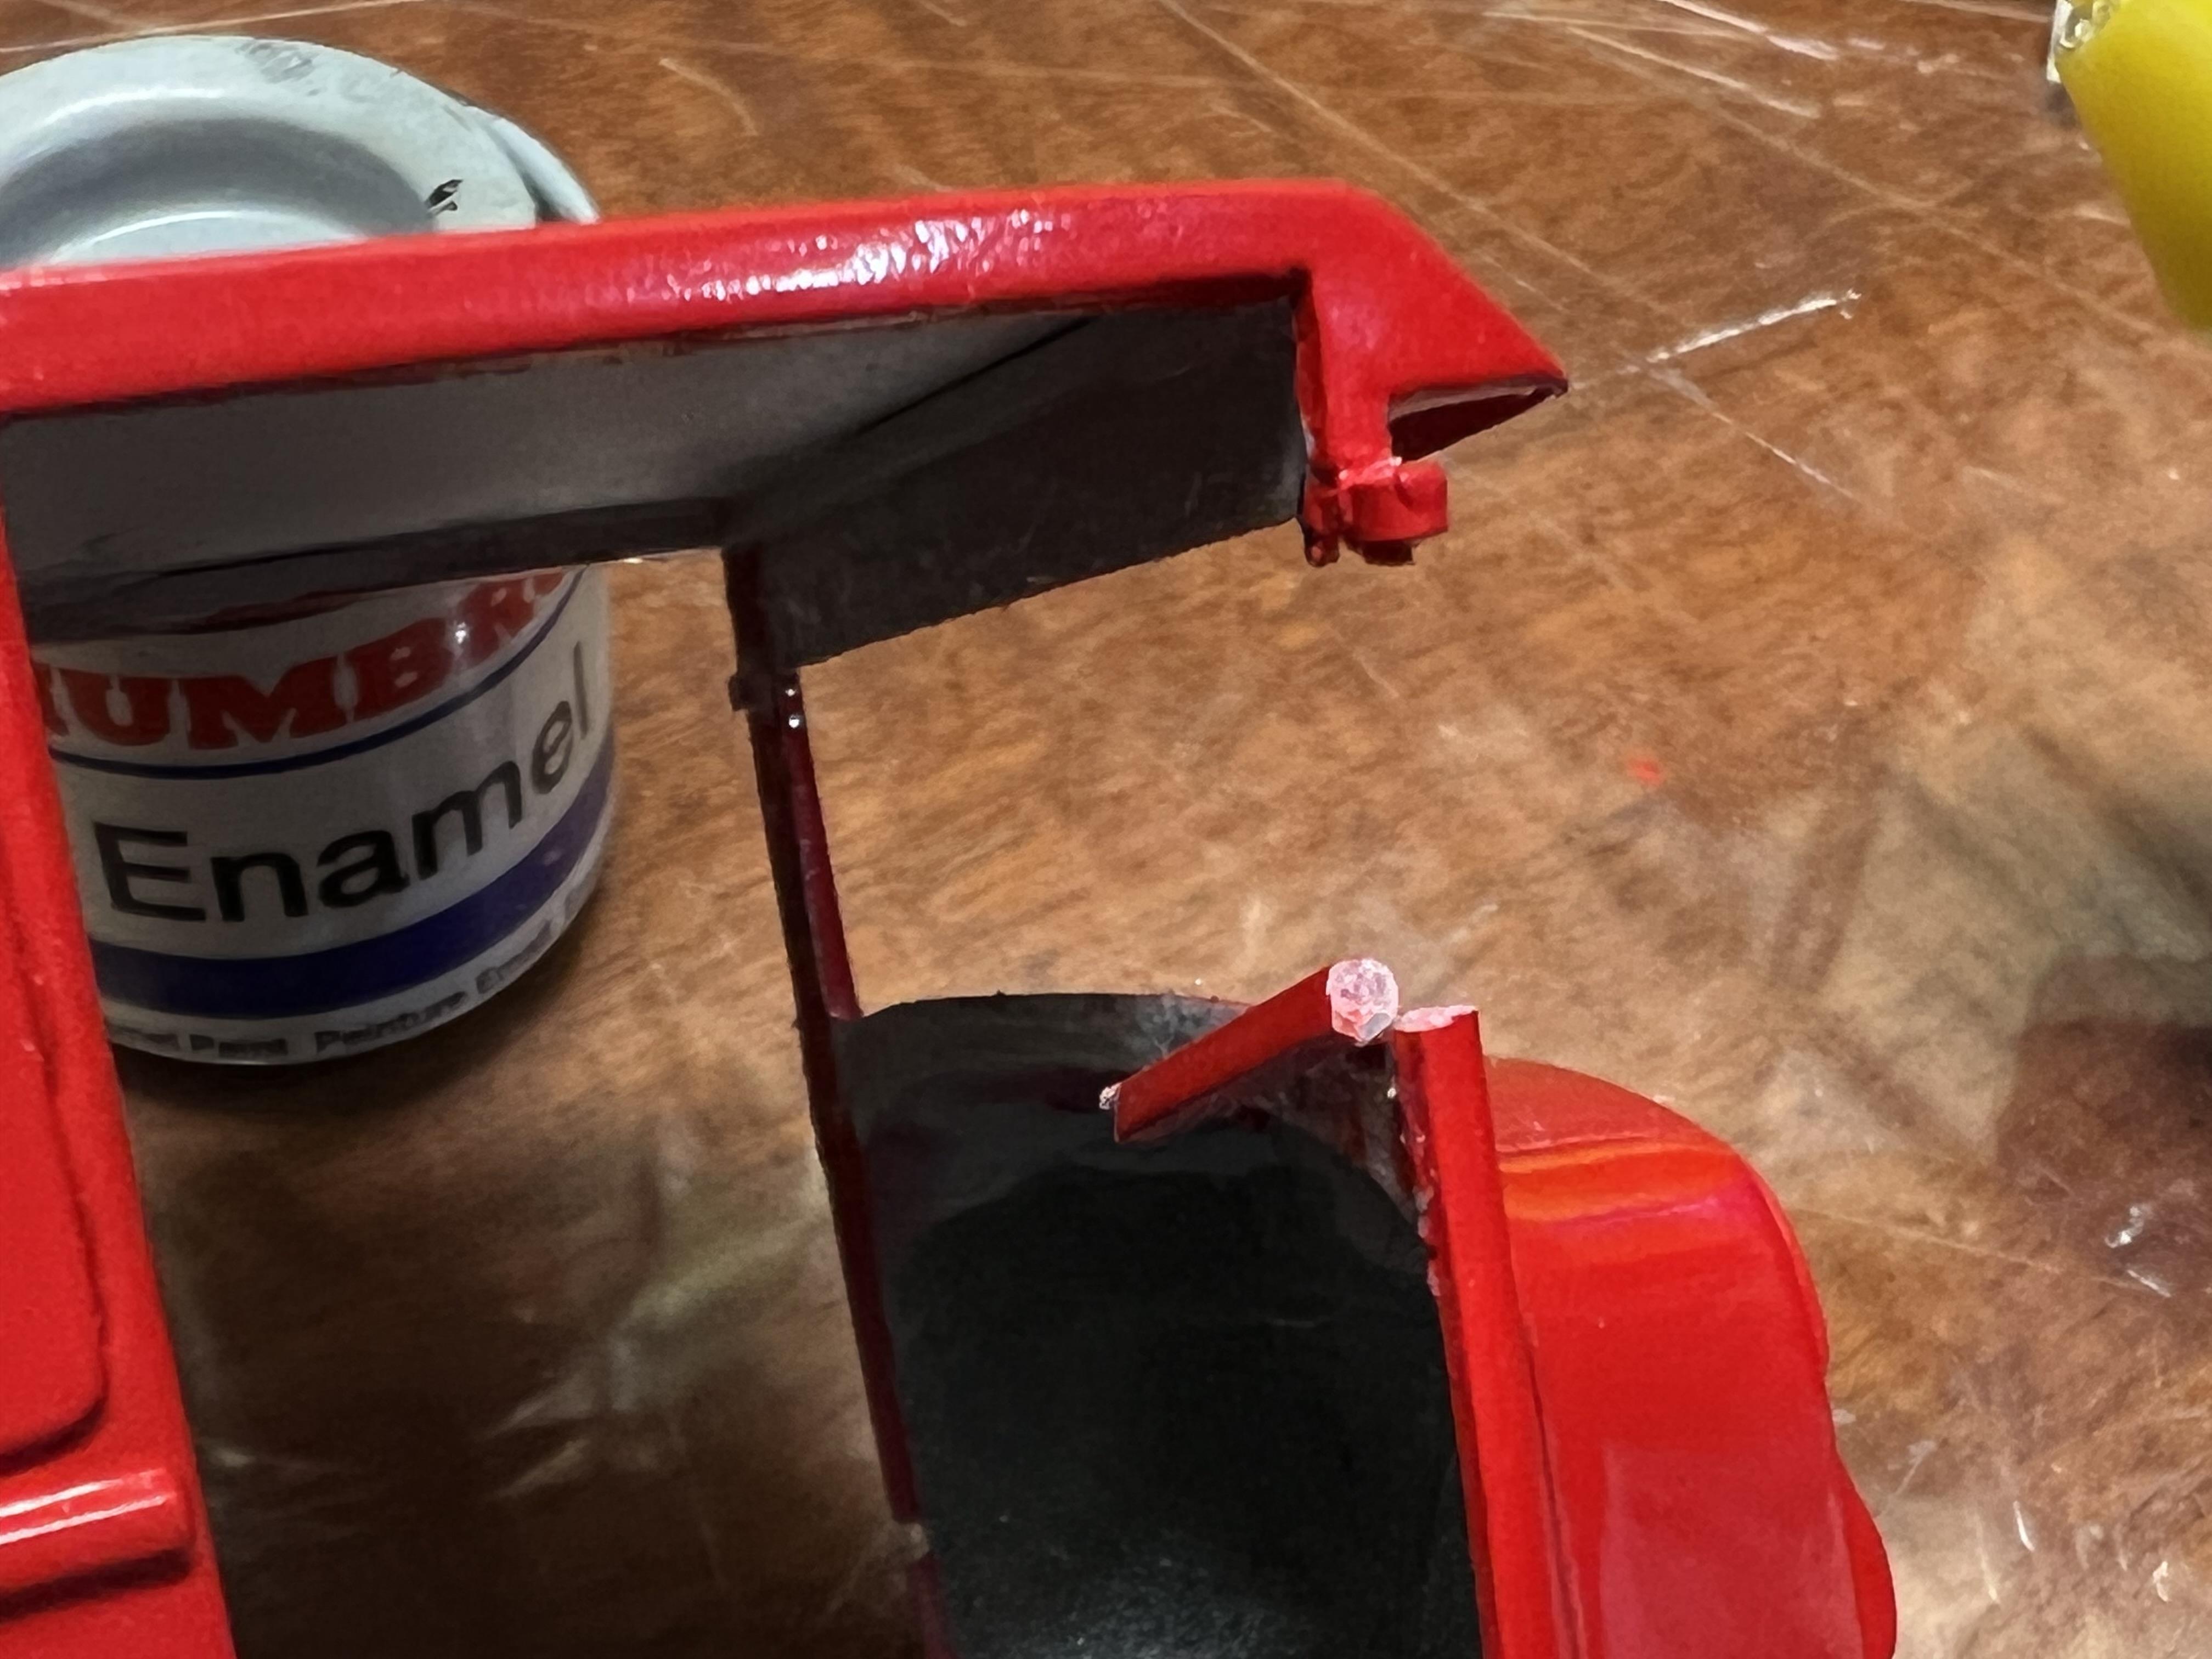
Thanks for your encouragement Tim, it means a lot, even more right now. What a day! I finished touching up the four bars today and then made an exhaust hanger to go under the Jag rear end. Hope there are no speed bumps at the fairgrounds because I reckon it's only got two inches of ground clearance there but hey, ground clearance can be over-rated, right? I then decided that I wanted to get the cab finished. Turns out that with a bit of shaving of the door panels the doors will close without touching the dash. This is a lot nicer solution than trying to cut the dash up. I then added some carpet to the bottom of the doors and got the door handles glued on. There were marks I hadn't noticed before on the windshield so I made a new one and glued it in place. There were some small glue marks on the rear window so all I needed to do prior to final assembly was clean those off and I could hang the doors. And then it happened. The windshield pillars collapsed. Both of them. I had polished the roof earlier today, being ultra careful and my efforts were rewarded. And yet now, with only the tiniest pressure, everything has gone south. For now, I have glued the pillars back together and will leave them overnight. I hope to do some very gentle sanding followed by awkward masking and painting will get the repair as discrete as possible. We used to have a phone company advert here in Oz where a clearly upset lady trying to be calm utters the phrase, "Not happy, JAN!" That's me right now. So here's a happier couple of photos of the interior, a pair of buckets from the Dan Fink Speedwagon and a console cut form the ancient AMT Mustang II interior. The dash is scratchbuilt with photo-etched instruments and pedals - yep, she's a four speed! In the last shot, the left hand pillar is already glued back and the right hand one is hanging on by the thickness of the paint. We will see what I have in the morning. Cheers Alan
-
1963 Chevy Nova Wagon: Early 90’s Street Machine
Alan Barton replied to Dennis Lacy's topic in Model Cars
Outrageous creativity combined with surgical cleanliness - what a stunning model. This would have been a cover car for Car Craft, for certain! Cheers Alan -
That just flat works! I love crazy mash-ups, they can be so much more rewarding as the carefully planned yet often frustrating "serious" builds! Cheers Alan
-
As requested by Tim Hoffman & Others....1931 Model A Closed Cab Pickup
Alan Barton replied to tim boyd's topic in Model Cars
I remember the article well, Tim and have plans to refer to it later this year to build my own pickup. Looking back, would you see any advantage in cutting off a slice form the back of the sedan delivery kit or would you still do it the way you did back then? I really admire the accuracy of your masking, as kill I am still l trying to master after all these years. Overall this is such a nice, balanced and totally believable pickup. If I build a 27 T, 32, and 35, 37 and 38 to go with my 29, 34, and 40 I will have a nice little time line of early Ford pickups. Re-reading that, it looks ridiculous because only three are built and I need six more to achieve my goal - oh well, that is what retirement is for! Cheers Alan


.JPG.ade1b0d77bb201ad226c9268d9257f15.JPG)