alan barton
-
Posts
2,105 -
Joined
-
Last visited
Content Type
Profiles
Forums
Events
Gallery
Everything posted by alan barton
-
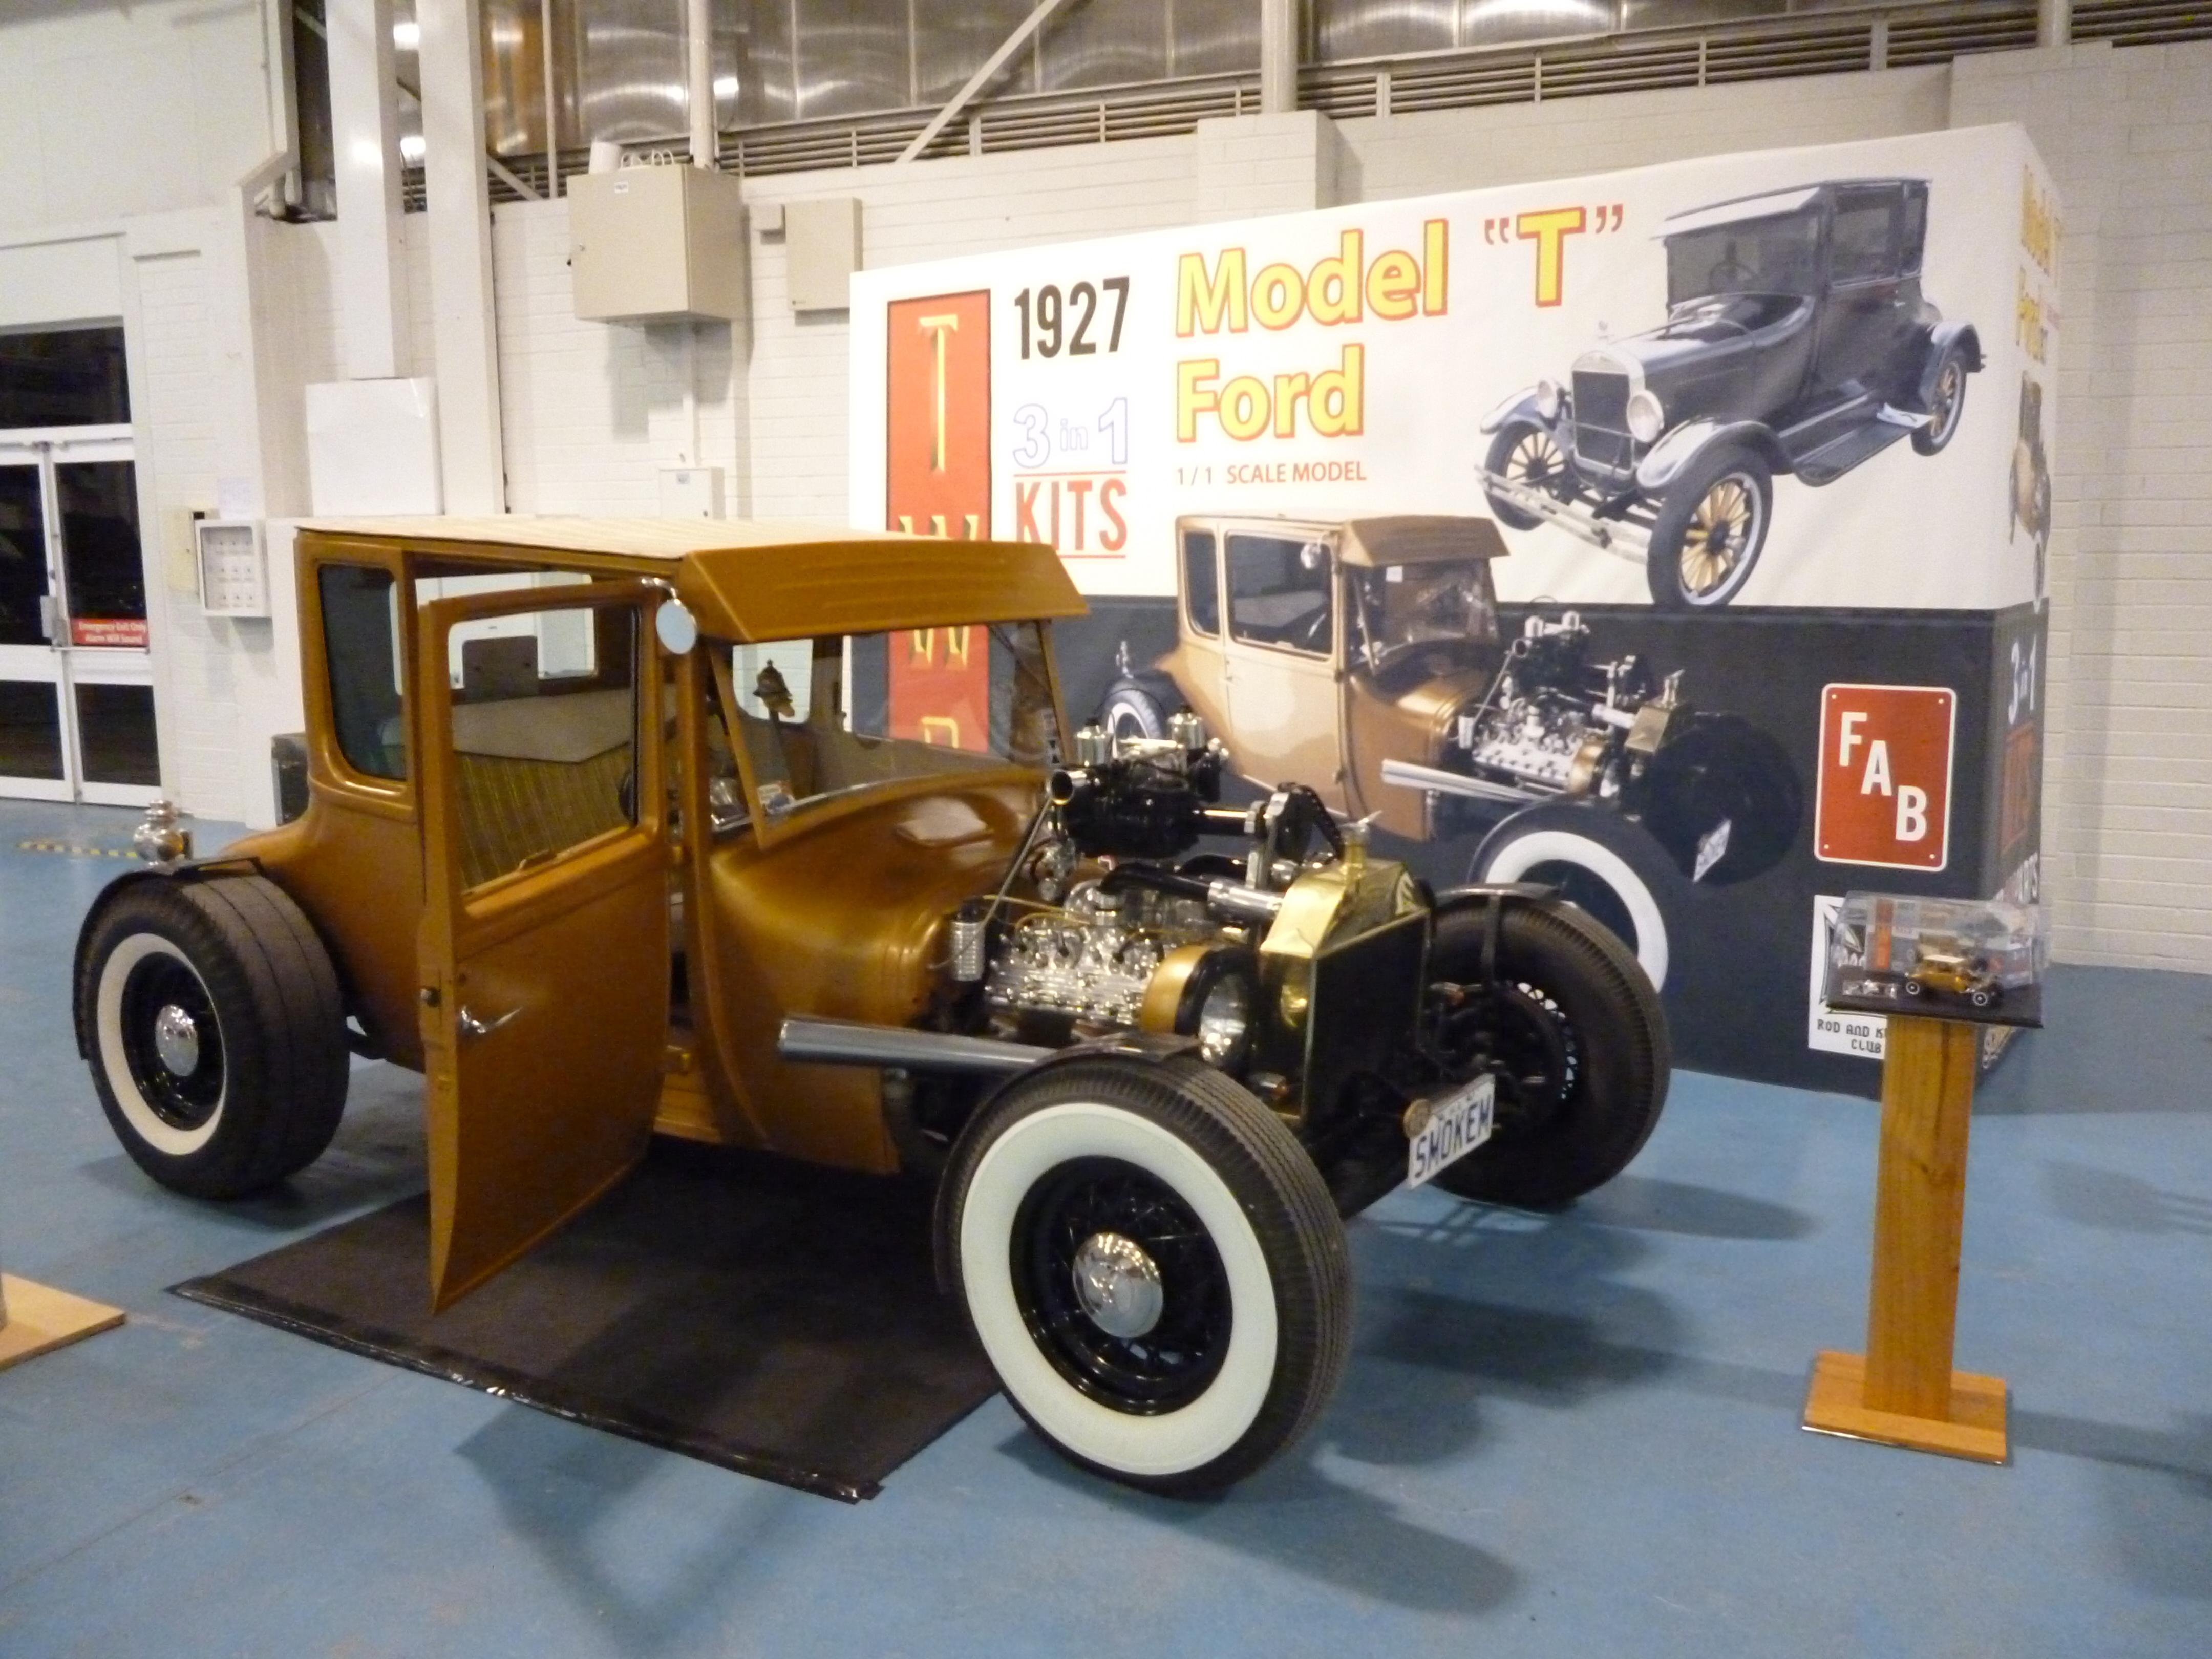
Thanks for the info about the resin body, Oldr n dirt. I have bought quite a bit of resin the past but have pretty much stopped buying anything from the USA because of the outrageous postage rates that people charge these days. It's not uncommon for a $20 item to have a $50-70 postage fee. Takes all the fun out of it - I know Perth is a long way from America but fair dinkum, that is obscene! The full size T you see here has an interesting story. Ben got about sixty mates together on a cold Saturday morning and said, "Lets see if we can build a running hot rod in two days!!!!" Now they did already have a frame fabbed up, the flattie was in running condition and a floor had been welded into the T body but that was it. At about 6.30pm on the Sunday, they drove a painted, upholstered hot rod out the shed door! The whole thing was videoed and you can buy a dvd on it from Graffiti Publications. Tom, I am building this one (and did so with the gold one) from the Revell 27 Tudor, not the AMT 25 from long ago. In fact, when Ben first approached me about building the car he gave me a 25 T kit but we soon decided that was never going to be close enough. Ironically it took me about nine months to build but then, I didn't have sixty mates helping me! And yes, it is an interesting induction setup. I seem to recall that it is a baby Toyota blower with a pair of sidedraft SU carbs. It runs well! Cheers Alan
-
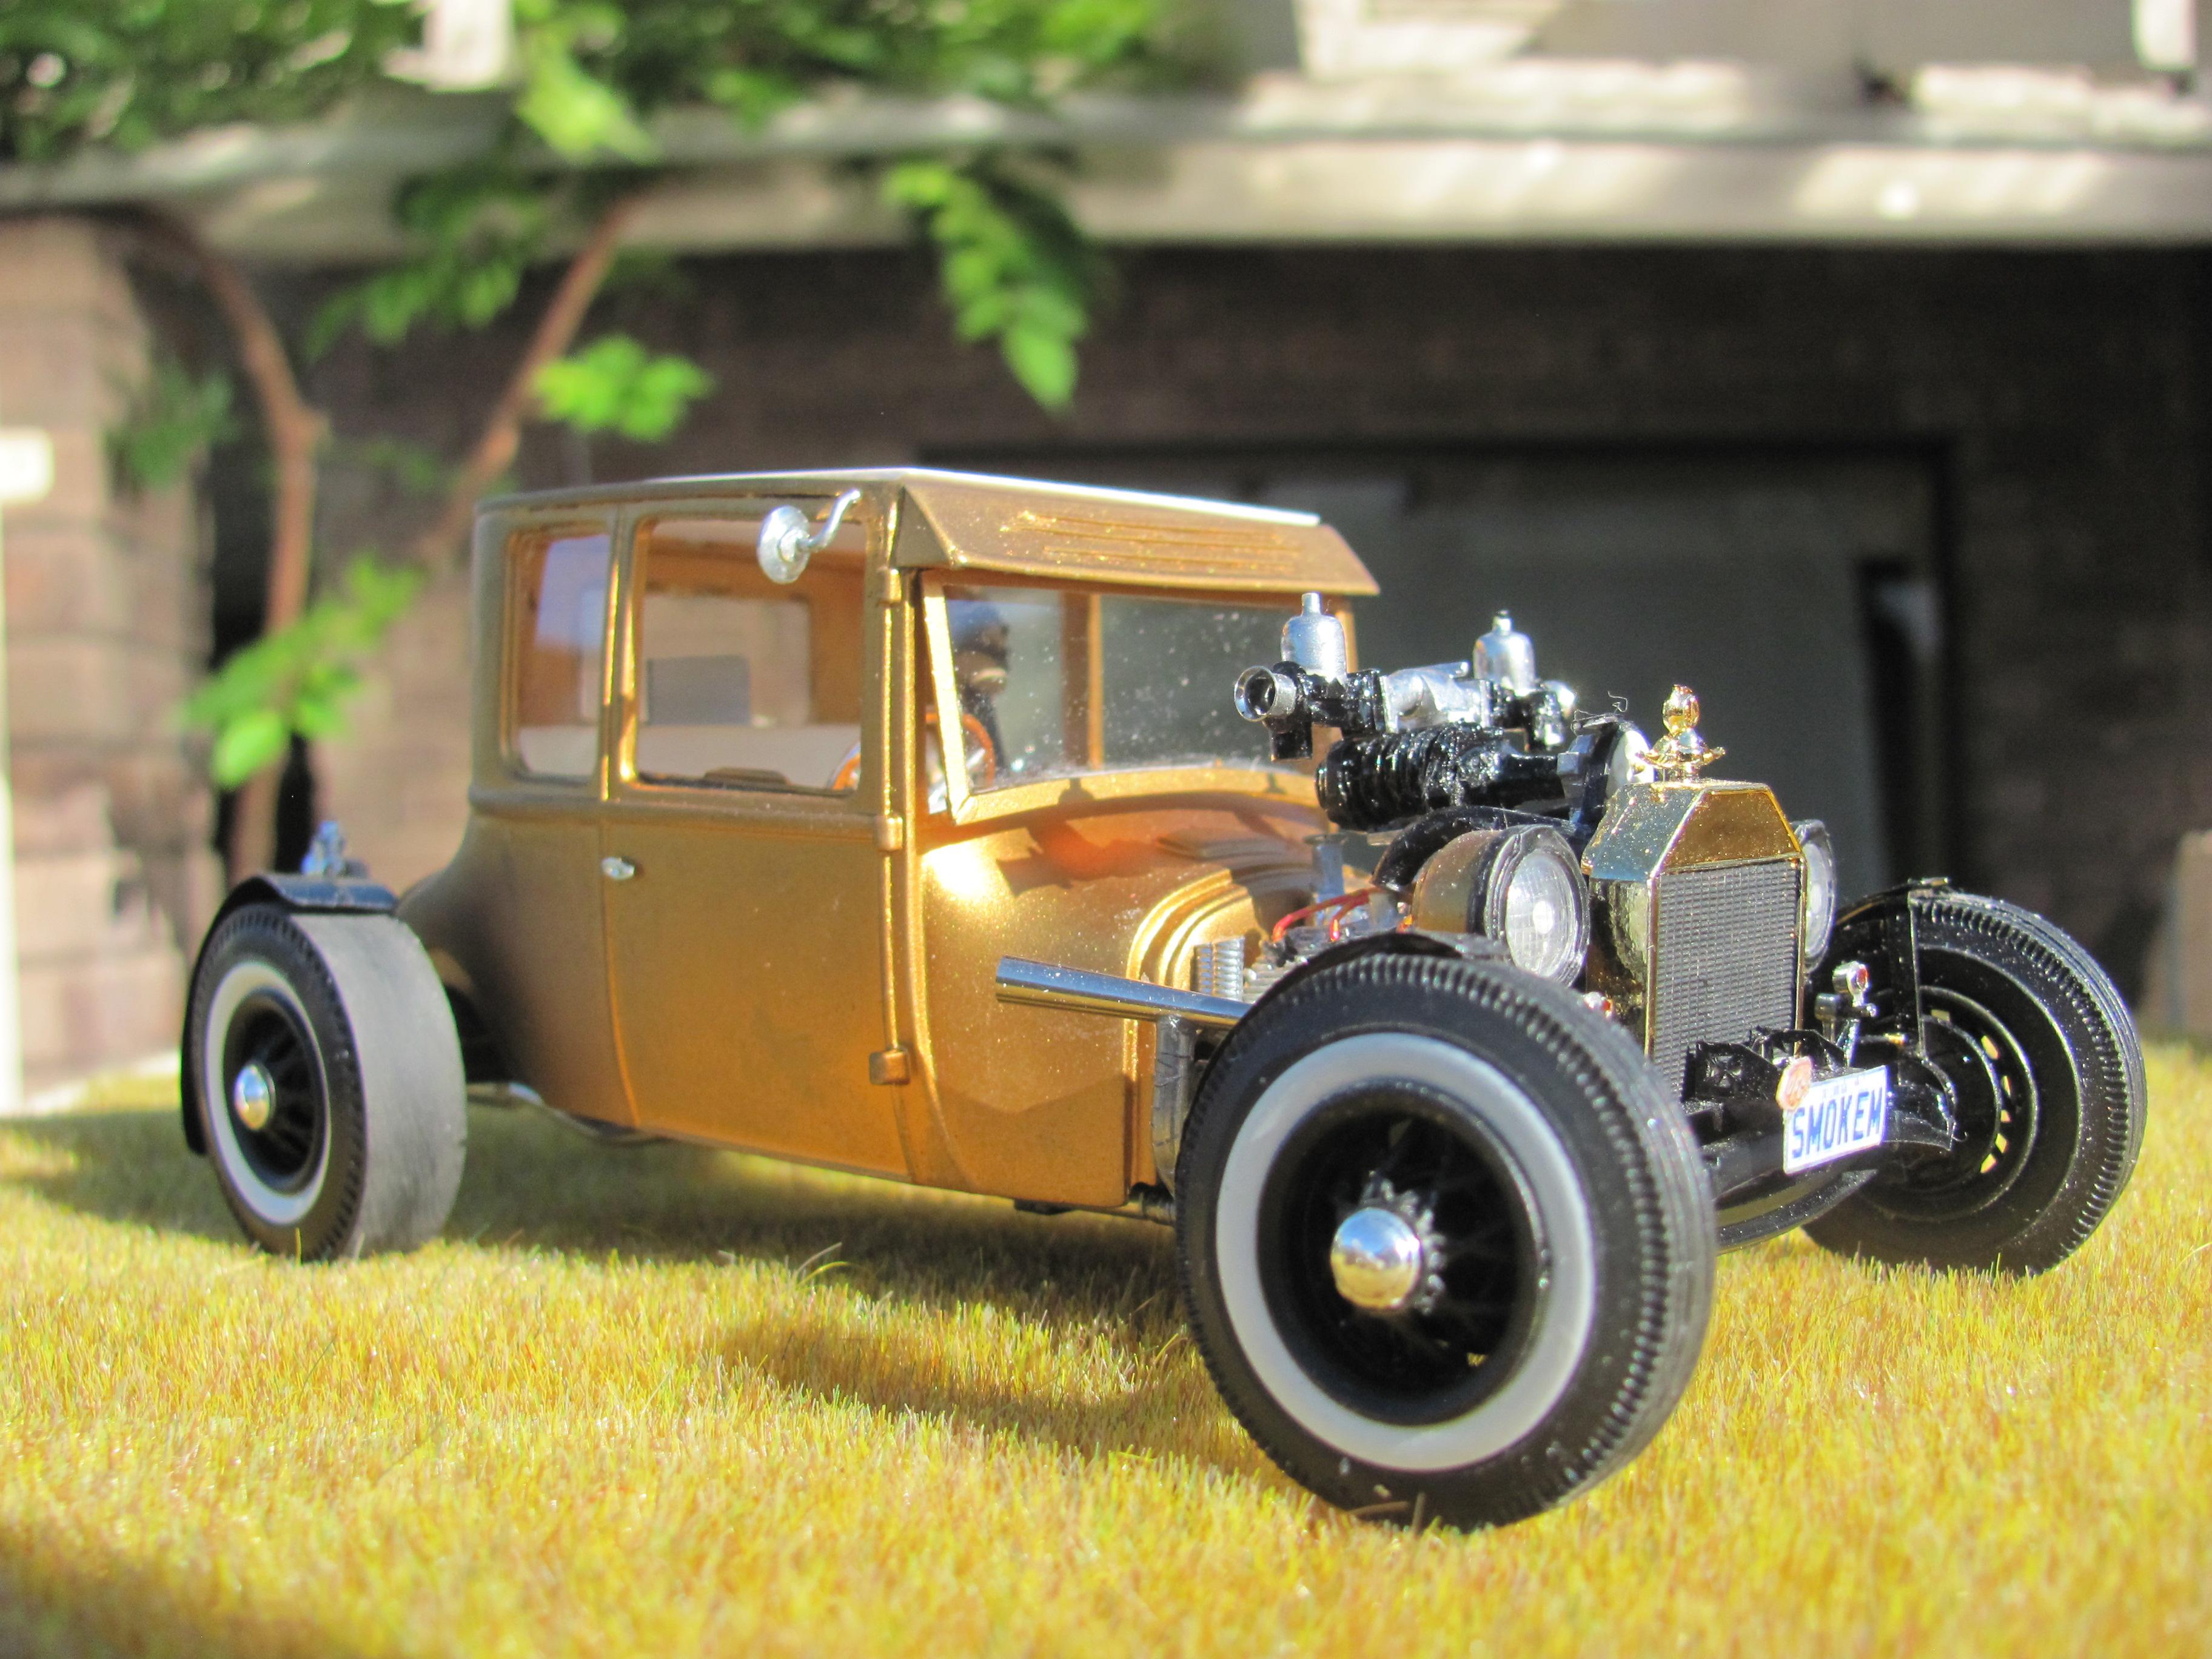
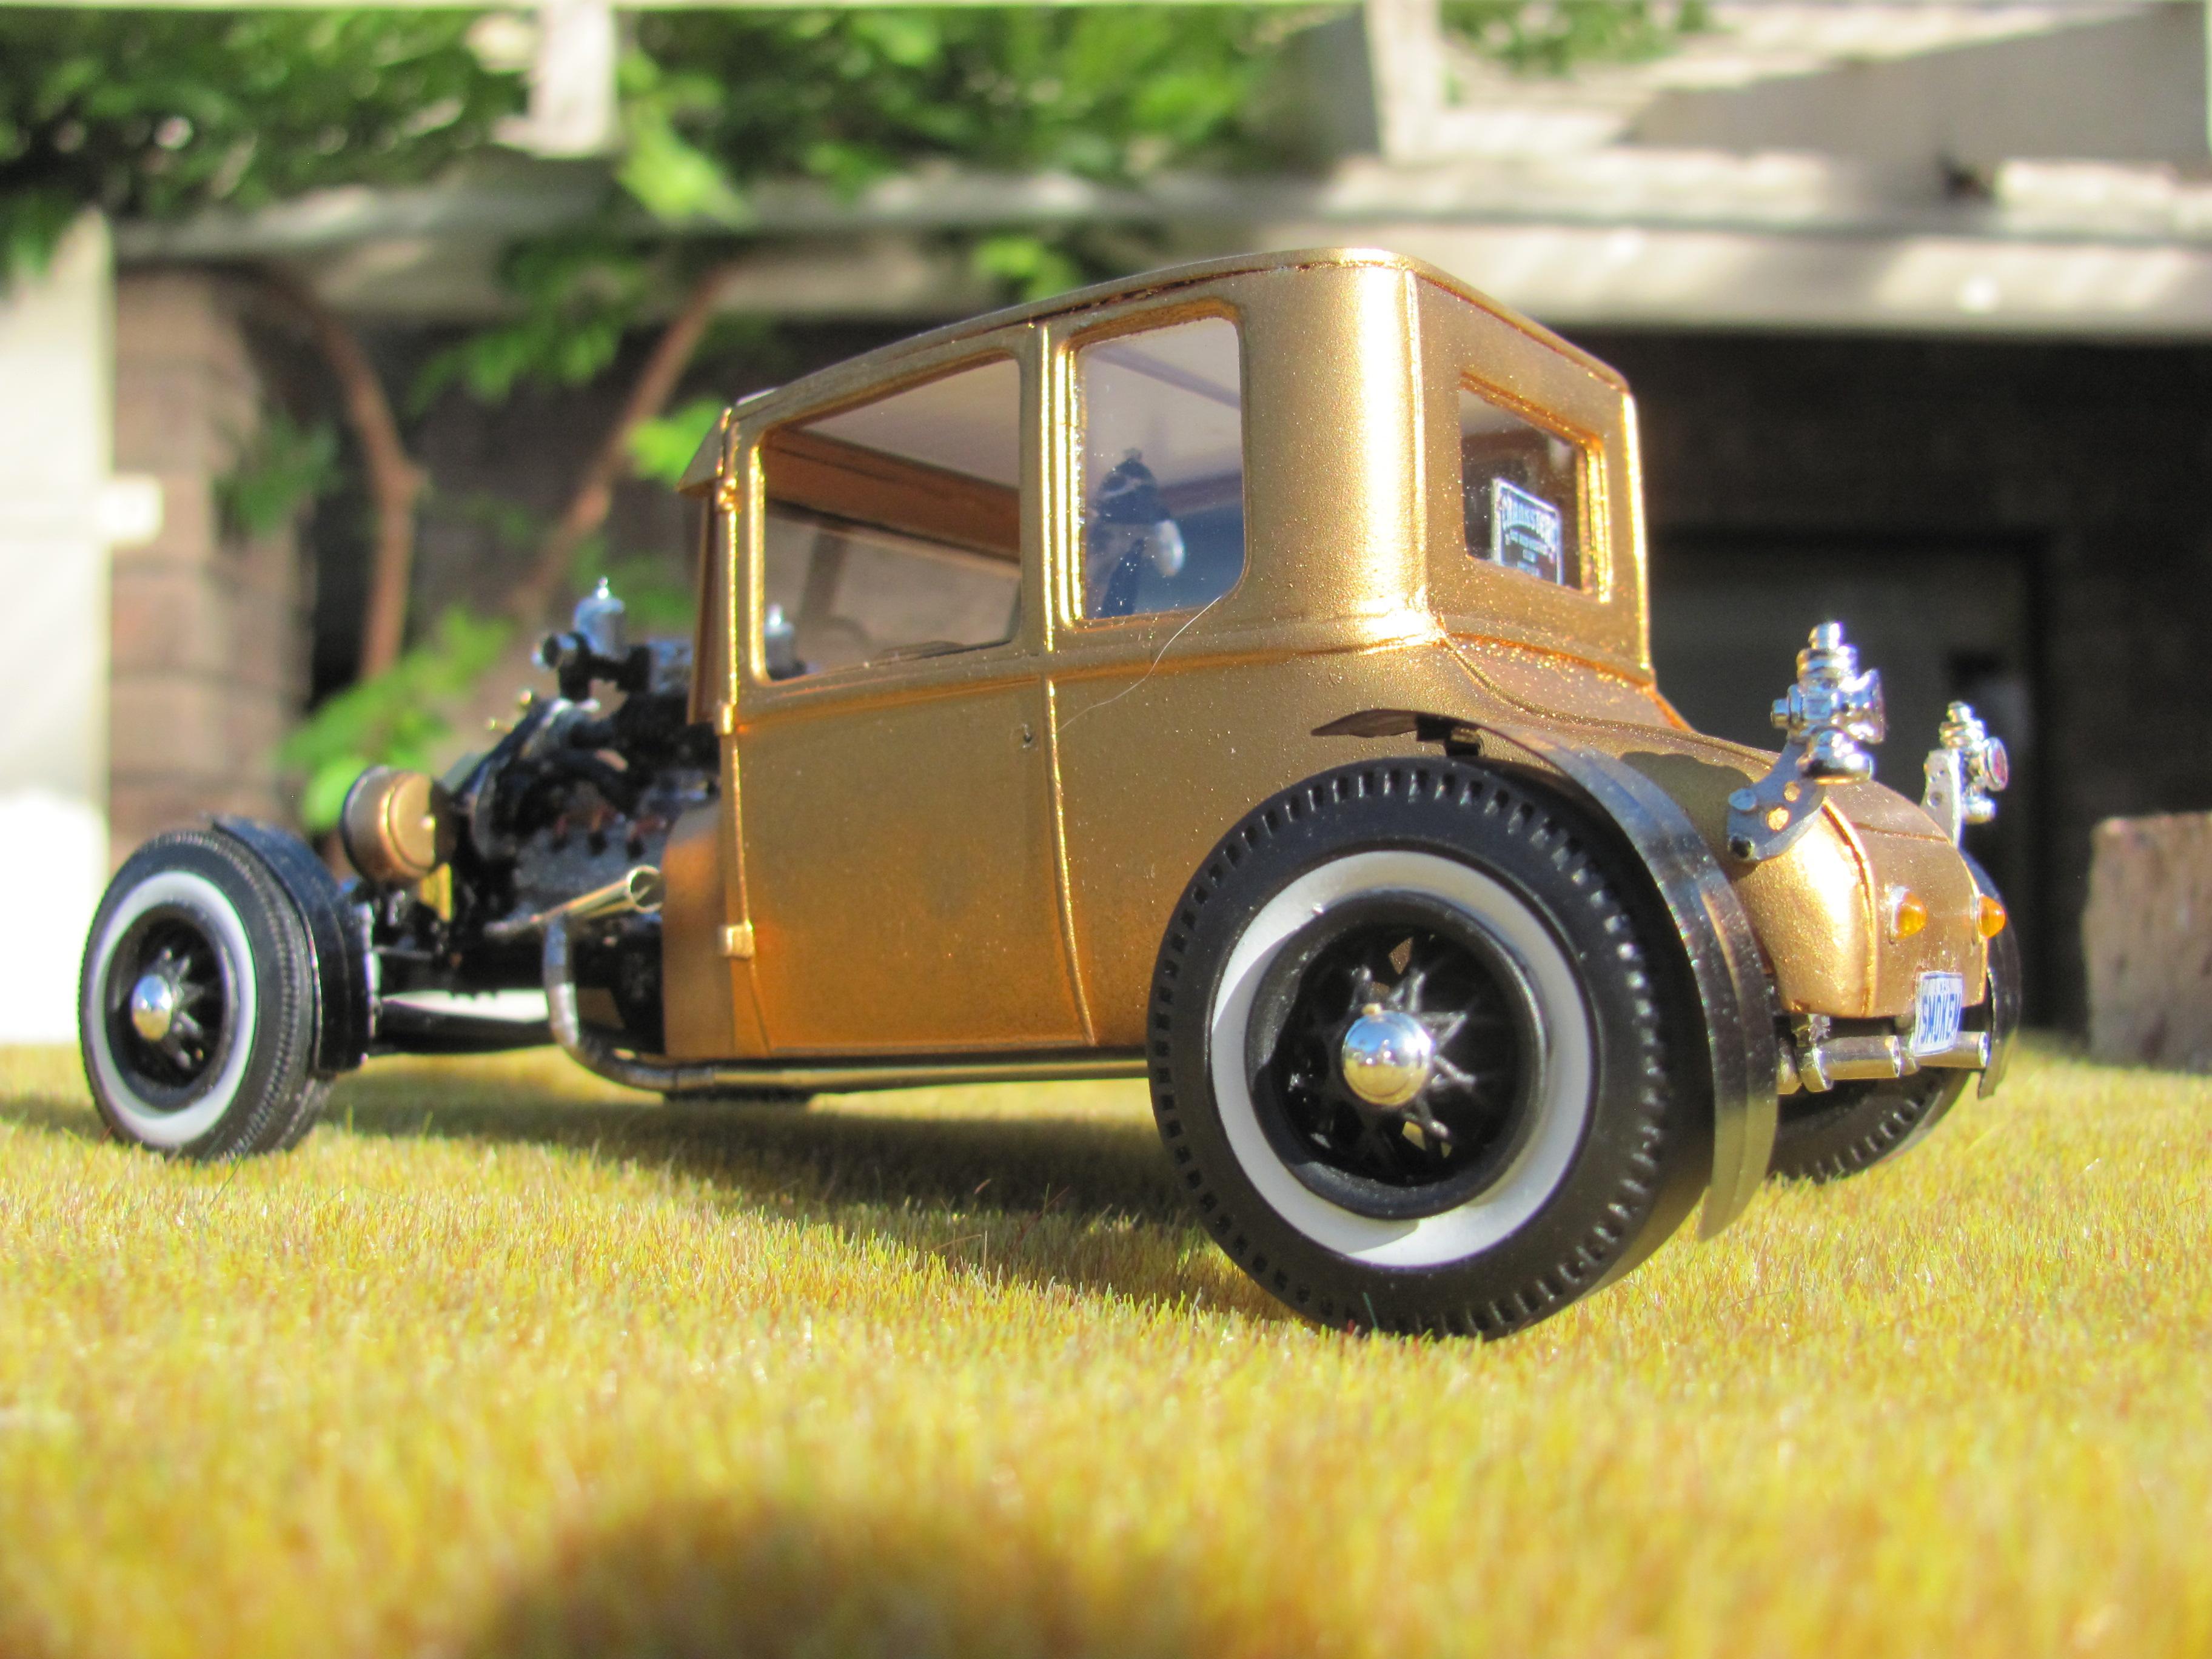
Here is the model.

-
This is the second 27 T coupe I have fabricated but as my first one ended up turning into a commission build for a local hot rodder I decided to do a second one and try a few different techniques to see if it made things easier. I want to share this with people because none of the manufacturers ever did a decent 1/25th scale one and they are such a cool car, especially with the rat rod/nostalgia rod craze as it is. Best of all, this was easily one of the most straight forward body conversions I have ever attempted so if you have a spare Revell 27 T Tudor or Delivery in your stash, it is worth having a crack! I won't be taking this thread through to a finished model just yet as I have a lot of other UFOs waiting in line but I will get it up to primer so that it is ready when the time comes. Here is the first coupe I built. I modified the Tudor body and added a vacformed turtledeck that I made over a carved wooden mould. It worked pretty good but I did not get the dimensions exactly right and it did not match up well to the stock full fenders. When Ben asked me to produce a model of his fenderless rod, it was an easy decision to use this one! As you can see, after he received the model he decided to have a custom made vinyl banner of a fictitious AMT box art ( FAB is a local "in joke" about makeshift engineering and unfortunately the explanation would be inappropriate for a family oriented site such as this - I'm sure you get the picture!) The model is sitting on the pedestal in front of is car.
-
Sure was helpful! I have been a spray can guy for years and am only just recently started warily using an airbrush. And I agree totally with your value for money comments - we pay around $12 a can for Testors and around $16 a can for Tamiya - silver is a mind numbing $23!!!!! Cheers Alan
-
I remember when you first posted this, an evil voice in my head went "What is he thinking? Why would you change the details on a 27 T?" I have to say I am eating my words now - this is a very cool rendition and the modifications come together as a whole design. I have a real 1935 phaeton in the shed and your door panel design is giving me some inspiration for that project! CAn't wait to see this finished. Cheers Alan
-
Mattias, if you can dig up a copy of the AMT 36 roadster/three window coupe kit, the roadster cowl and door tops can be grafted onto the Monogram 34 cabriolet body quite effortlessly and you will then have the roadster contours that you desire. It will also give you a believable windshield frame. The 34 and 36 Ford windshield posts are remarkably similar, it is just that the 36 ones are a bit bigger in all dimensions. In this case, the difference between 1/24 and 1/25 works in your favour. The cabriolet details around the waistline are quite clunky by comparison. I have done this conversion but unfortunately wont be able to shoot a photo for a couple of weeks. Trust me, it works! Cheers Alan
-
Very nice! I dream of getting a gloss on my paint like that purple metallic - that is stunning! Cheers Alan
-
Love the orange chassis! Those rich guys had some crazy colour combos back in the day and this sits fine with my eyes. For what it is worth, if it was my resto, I would grab one of those triple grit polishing sticks and take that hint of flash off the leading edge of the front fender. It would soften the look and reduce the impression of being a plastic part. I hope we get to see this one photographed alongside your recent conversion - they would make a great pair! Cheers Alan
-
If this forum is anything to go by, we seem to be going through a golden age of hot rod building over the last twelve months or so. There are probably a dozen members here building absolutely stunning rods, whether they be styled form the forties, the fifties, the sixties right up to today. Seems like every time I log in there is something cool and inspirational to look at. And Daniel, your coupe illustrates exactly what I am talking about! Such thoughtful design, and attention to detail, so that when the model is completed, I am sure, we will just look at it and go "oh yeah!" But I am glad you took the spring perches off the backing plates! In real life that could only have ended in tears! Cheers Alan
-
I am really enjoying your work on this model, Dann, and it is providing me with a lot of inspiration. I've got one of these on the backburner. I got as far as a primed body but looking at yours, when I get home I am going to have to see how much I missed! Probably the thing that most stopped me on this model was the thought of all that masking to produce the candy red panels on the white body. I have already completed a Milk Truck and an Outhouse car and as I was building them, I remember thinking - "Surely two different people designed this kit?" Seems like the body contours and proportions are darn near spot on while the chassis and running gear could have been made from Plasticene! With my Invader I am thinking of using two Revell Parts Pack Pontiacs because the Eldon versions are highly squintable!!! Cheers Alan
-
Michael, just wanted to say how much I am enjoying this stunning rendition of a contemporary rod. I have done adaptations of the Buttera suspension and as you pointed out, they are great parts but require a little massaging to get a convincing result. I love your front crossmember - will definitely be trying that next time! With the exotic colours you are using, are you able to get them mixed a local paint shop is do you have to find a specialist supplier? I know colours is colours but I just wonder if your average guy carries formulas for Lambo, Ferrari, etc. And yeah, you nailed the stance! Cheers Alan
-
Thanks everyone! Yeah, it is a bit of a dog going by the box art but the bones are strong and it took surprisingly little work to turn things around. I would buy it again. Cheers Alan
-
AMT All Stars '32 Ford question
alan barton replied to ChrisBcritter's topic in Car Kit News & Reviews
Yes, the 1/32 scale Tudor is definitely a Palmer. I have both the AMT and Palmer Tudors. The AMT has a one piece body while the Palmer is three piece just like a Pyro. And while we are at it, both the Pyro 1/32 scale 32 roadster and 32 3 window coupe (ugh!) are very similar to the 1/25th AMT kits - there is a hint of a section and the chassis is a straight copy down to the lack of fuel tank and the stub of exhaust going over the crossmember. Cheers Alan -
Favorite Automotive Concept Artists?
alan barton replied to JollySipper's topic in General Automotive Talk (Trucks and Cars)
Bill, for that double bubble, blow molding might be the trick! Get a piece of particle board, cut a hole out of the middle in the shape of the outline of the interior and then form a vertical spin out of another piece of wood and fasten it down the centre line, You then have to organise the clamp the sheet between the mould and another piece of board that has just one hole in the middle that you can place an air hose of some description. Heat the plastic, clamp it between the wood, blow air in the hole and you should end up with the shape you want. That crazy guy on Full Custom Garage, Ian??? did the same thing full size for his 62 T Bird project. Cheers Alan -
That really is an outstanding combination of kits, especially when you consider how challenging they are to build in box stock form! Makes me want to try it myself. Like everyone else has said, Jim your paint is just a joy to study. This is absolutely in no way a criticism of this outstanding model, but if anyone is going for pure factory stock proportions, it is worth noting that when Revell produced the 1931 Sedan delivery, they modified it from a Tudor kit. To be perfectly accurate the side "window" panels need to be extended rearwards and the rear pillar becomes correspondingly slimmer. This is the case for both early and late Model As. I'm guessing old Henry wanted to give his customers more room to apply signwriting. A quick Google search will show what I mean. On the other hand, lengthening those panels would be a very finicky operation so I perfectly understand anyone who decides to leave those panels as they currently exist! Cheers Alan
-
1975 Duster ProMod- scratchbuilt
alan barton replied to Claude Thibodeau's topic in WIP: Drag Racing Models
Not sure how I missed this one when you first posted it but wow, what a stunning Pro Mod. Your choice of a modified funnycar body is sheer genius - now I know what to do with some spares I have! As for the engine detailing, I am in awe of your clean craftsmanship. Having just finished my Mickey Thompson Mustang build, I know I aimed for that level but your plumbing is still something to aim for. The whole car, its stance, fit and finish is just breathtaking. Your trophy was well deserved! Cheers Alan -
I am really enjoying your build, Michael. Your detailing of the front and rear ends is a lesson for us all. Very classy! Cheers Alan
-
Hi Jim, This is a fantastic idea and one that has been in my head for a long time. I always "kinda" liked the T rantula, kinda because I think the design of the rear of the car is sensational while the front always left me going "mehhh". Here's my thoughts. Form up a new front clip, maybe starting with one of the Young American or Tommy Ivo kits. Long, smooth and slender and it would also give you a good start on an accurate tube frame. Keep the elliptical sockets for the headlights but create them from a longitudinal slice of Evergreen round tubing so that they are a lot more discrete than the kinda exaggerated versions on the original. Not sure about the double bumps in front of the engine - you could graft the T rantula ones on or just leave them off altogether. Probably the part I like the least in Tom's design is the "beak" or "jaws" (fangs?) sticking out the front. Just interrupts the flow right at the start as far as I am concerned. What about if you kept a conventional T/F nose but then created a new front axle airfoil that had canted supports, kinda jawlike, or maybe a fang shape to the airfoil itself? A braver person than me would grind out the inside of the rear fenders and then open the louvres. They would look spectacular then. On the other hand, a trick I stumbled on accidentally is to paint the area flat black and then carefully shoot your colour coats from the front of the louvres (the closed side in this case). This leaves what would have been the openings in flat black - it looks better than it sounds! Mechanically, the dropped front axle is beautiful but I reckon I would ditch the cobweb radius rods and incorporate cobwebs into the paint design. But that's just me. The biggest change I would make would be to replace those obviously fake double scoops with a full double blower setup. There is one in the 53 Stude kit and another in the Eldon Bathtub Buggy but it wouldn't be hard to fabricate a simple triangular manifold anyway. This would add a heap of muscular bulk to the engine bay. Imagine the additional detailing you could fir in there, machined pulleys, injector linkages, plumbing - yum, yum, yum!!!! Good luck with your project. I was fortunate to attend NNL East back in 1996 and Tom Geiger and his crew run a fantastic show - I guarantee you will love every minute of your weekend! Cheers Alan
-
Fiat Comp coupe - another take on the MPC FED frame
alan barton replied to alan barton's topic in WIP: Drag Racing Models
Glad you are enjoying it guys. I was very satisfied to be able to revive a long dead teenage model of mine to what you see here. Funny thing is, the mould I carved was never intended to go on an FED but I just had one of those penny drop moments and next minute it was working! Best thing was, it was a vacform that didn't pull down properly and would have been wasted but all the bad bits got cut off. I will see if I can get a few photos of the mould so that you can see where I started. Cheers Alan -
Seeing as how there have been so many of the MPC frames on here recently - Jawbreaker, Ramchargers etc, I thought I would add one more. This was once a Carl Casper Galloping Ghost from my teenage years. I still have the front bodywork waiting for a resurrection but sadly the chute back body disappeared years ago. The chassis is restored from my glue bombing efforts forty something years ago but otherwise stock MPC. I produced my own body by free-form carving a wooden mould for a stretched, chopped Topolino and then vacforming copies in 1mm white styrene. I have two others on the bench, one as a nineties fuel altered and another as a streamlined salt car. Obviously I did a fair bit of carving to fit this onto the MPC frame. I also scratchbuilt the interior tins. Hope you enjoy it! Cheers Alan
-
That is really something. I can't get over how the paint and foil finishes are so authentically in scale. Just magnificent - would look amazingly real in a lifelike setting. Cheers Alan
-
Different twist on a Ramchargers kit
alan barton replied to Old Coyote's topic in WIP: Drag Racing Models
John, I've always wanted to do one of these nose-down fuelers and yours looks awesome. Tell me, did you raise the rear axle mounts and then use taller tyres to make this happen or were you able to just 'tweak" what was already there. P.S., love the Aussie references! I have that same set of decals earmarked for a salt car. There's a spare Ramchargers chassis and a spare 37 Chevy rat in my stash so this might happen sooner than later! Cheers Alan -
Hey Rodney, I had already filled in the wheel arches of my second body but wasn't sure what direction to take - now I know! Hope you don't mind if I borrow the concept! I especially like the shortened rear quarters and it seems we both had the same idea with the swage line out of Evergreen. What a stunner! Cheers Alan
-
A double trophy winner right there - Best Paint and Best Front Rims! Cheers Alan
-
Deuce roadster in a smaller scale
alan barton replied to Greg Myers's topic in General Automotive Talk (Trucks and Cars)
Thanks Bob, glad you liked it! If anyone is interested in 1/32 scale rods in general, here is a link to a Fotki album that belongs to Tom Geiger but is of my 1/32 scale collection about ten years ago. It's about double that size now with a few more to go yet and like I said earlier, four more still to find. Thanks Tom for the link - here it is https://public.fotki.com/modelcitizen/model_cars/abs-132-hot-rods/ Cheers Alan