Phildaupho
-
Posts
4,087 -
Joined
-
Last visited
Content Type
Profiles
Forums
Events
Gallery
Everything posted by Phildaupho
-
 Thanks Steve - The collector boxes are really cool. The chrome plate is removed for fully open exhaust which Tom McMullen used while racing at the dry lakes and drag strips. With the plate secured the exhaust is connected to the fitting at the rear of the box. here are are couple of photos of the real thing which might make it clearer. See my reply to MRM regarding the flame job.
-
Thanks guys. Hey Jim you mean this cover.
-
I love the entire look. The see through grill really enhances the appearance..
-
Thanks Michael Thanks Dennis. I have made a set of decals based on downloaded photos which I hope will look OK at least from a distance to the naked eye. As for the pin stripping I found a decal much like the trunk design and I may try to cut self adhesive vinyl to try and pinstripe some of the character lines. If none of that works it may just be a black traditional Hi-Boy !!
-
Part 2 The engine is the heart of this build and determines where many other components will be located. It is very difficult to establish exactly how it will fit unless it is totally together. Engine & Transmission – The engine is from the Revell ’59 Corvette and the transmission is from the original Ala Kart Hemi found in the old Revell ’29 Ford Roadster kits. - Front engine mounts were moved to near bottom of block - 4-71 Blower assembly from Testor’s Coupster - Air Cleaners from ’32 5-W - Distributor drive and mount converted for left hand mount - Headers I think were from the Beatnik Bandit. The unique collector boxes were fabricated from Evergreen styrene. Once completed I did successfully fit the engine between the frame rails, the firewall, the radiator and the hood. Now I can move onto installing the front motor mounts and then fabricating and installing the K-member/rear engine mount.
-
The new owner is Galpin Auto Sports in LA and are well know preservers of specials cars like many of Ed Roth's creations. The Hirohata was on display at the Grand National Roadster Show.
-
Thanks for reviving this trio. It is fun to see them together again after almost two years of the pandemic.
-
I really like the look of your tough Deuce
-
Thanks everyone for your encouragement. It took me awhile to decide what to do next. My current strategy is to mock up the engine so I can locate the forward engine mounts and the K-member. I have already lowered the engine mounts on the engine from the stock Corvette location to the bottom of the block.
-
Auto Modelrama Greater Vancouver BC Canada
Phildaupho replied to Phildaupho's topic in Contests and Shows
The last AMB show in March 2020 was cancelled due the pandemic. The core group of modellers have stayed connected with regular on-line meetings. -
Great detective work JC. Mystery solved. There is so much info in the registry that I have only scratched the surface.
-
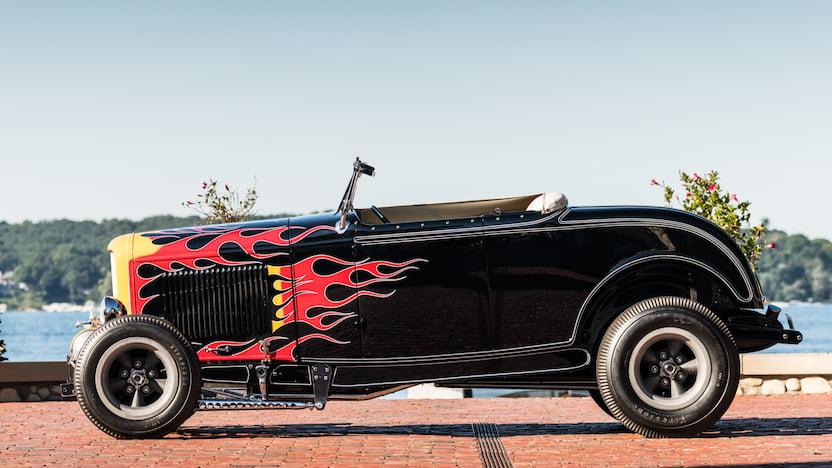
With 2022 being the 90th anniversary of the ’32 Ford and Deuce Days happening again here in my home town of Victoria BC Canada this July, I figured I should have a Deuce project on the bench. I have chosen a very ambitious project to build a tribute to one of the most iconic and recognizable Deuces – the Tom McMullen Hi-Boy Roadster. I say ambitious because it featured virtually every component of a traditional hot rod and I say tribute because my model will not come close to being an exact replica like the Danbury Mint Diecast. This is a photo of the actual car as restored to its 1963 configuration which I hope to come close to with my model.. I have collected many of the parts I think will be needed and have make a set of flame decals from downloaded images of which there are plenty. Referencing my McMullen Roadster photo album and various articles, I decided to start from the ground up. Part 1 Wheels & Tires – The Torque-Trust wheels are from the Revell Deuce kits narrowed and combined with just the outer back rims without the centre sections. The front tires are from the Revell Model A kits and the back tires from the Revell ’50 Olds Brakes – The brakes are from the Revell Model A kits with the fin detail removed Frame – From Revell Deuce kits with floor pan removed and various locating notches were filled. There will be a lot more work on the frame as time goes on like a transverse rear spring mount, fabrication and mounting of a K-member and attachment of front engine mounts Engine & Transmission – I decided to use the engine from the Revell ’59 Corvette kit which I have a few of. This selection gives me a stock oil panel, chrome Corvette valve covers and front engine mounts which will give clearance for the headers. The McMullen has a ’39 Ford transmission. I am using a similar dimensioned transmission from the original Ala Kart Hemi found in the old Revell ’29 Ford Roadster kits.
-
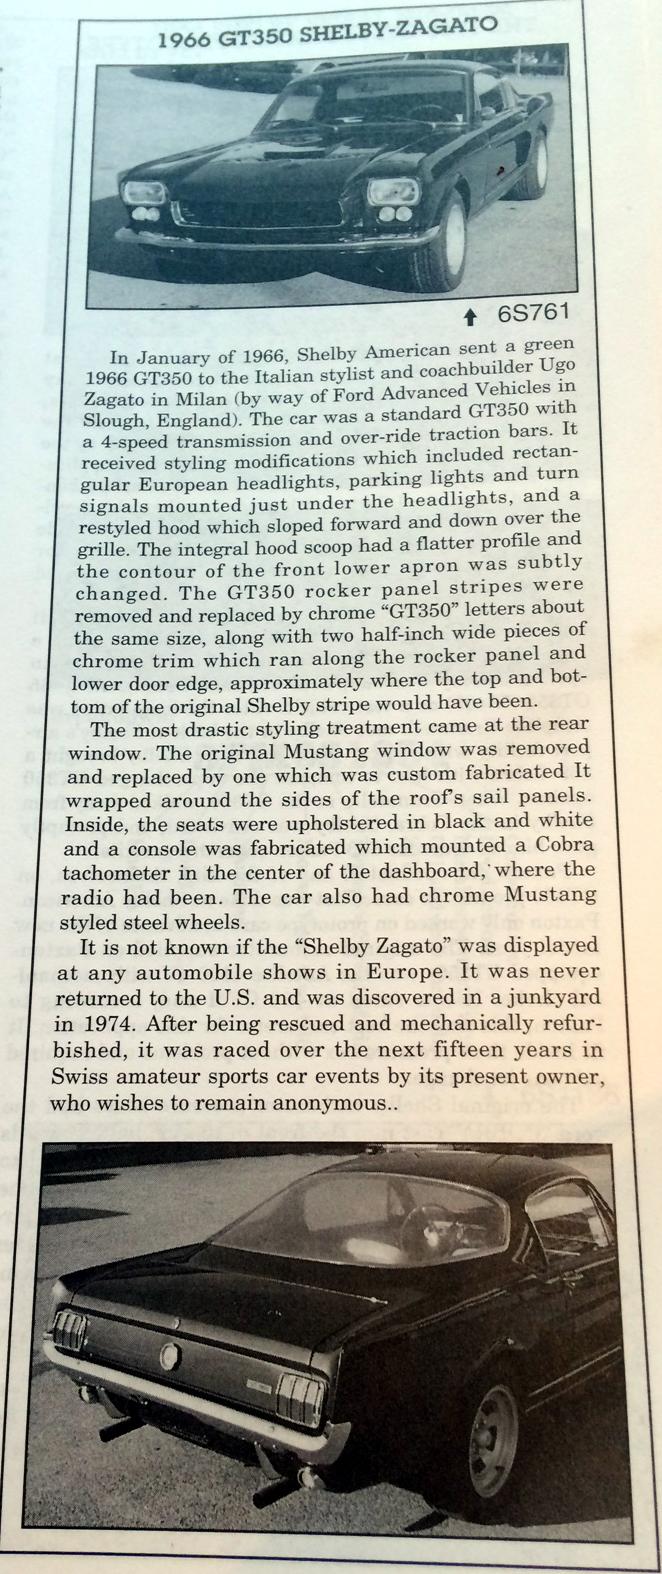
1966 GT350 Shelby-Zagato - On the page opposite the information regarding the convertible is this interesting car which would make a great model car subject
-
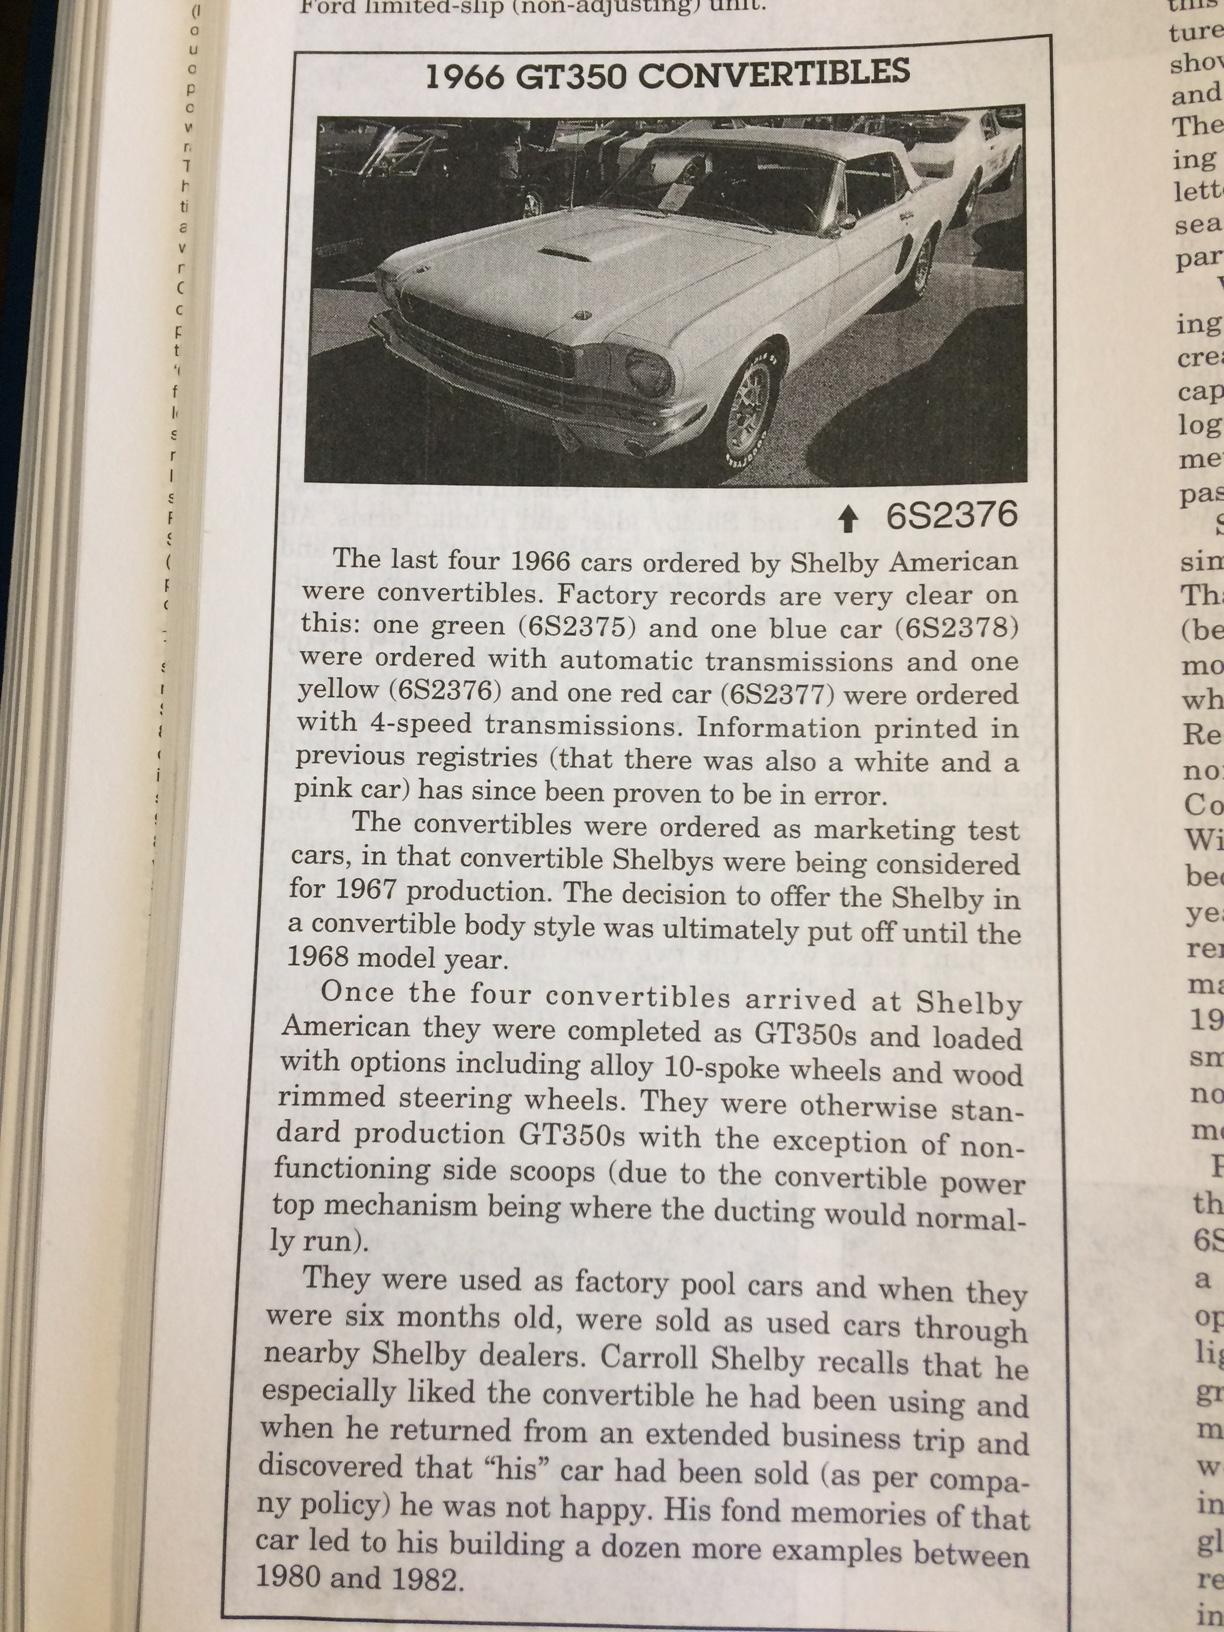
I just checked my 1997 registry and have attached the information on the convertible below. I was at the 1990 Palm Springs Historics at which Shelby were the featured cars. There was a red convertible on display and they were giving out information sheets. I got one which I saved but currently cannot locate. I am pretty sure they wanted to build another series of continuation convertible. The car on display had a very simple roll bar. For years I have had a '64 1/2 convertible kit set aside with all the GT350 parts and a very nice set of GMP ten spoke wheels with Goodyear lettered tires. Randy Leffingwell said in his book that the car Carroll drove was Candy Apple Red which would make a great looking model.
-
Thanks Richard - I always enjoy your insightful and educational posts.
-
Great looking Cobra and I really like your photos
-
For the most complete collection of photos of virtually the complete history and every component of the McMullen Hi-Boy Deuce Roadster check out TOM McMULLEN'S ROADSTER album | LOUD-PEDAL | Fotki.com, photo and video sharing made easy.
-
Yes I like the look too. Maybe one of the most attractive flat paint jobs I have seen. Being over a great looking body sure is an advantage.
-
Thanks guys. I am amazed and grateful at how popular this Ranchero is.
-
Thanks everyone. I really appreciate your comments. This model does show that a presentable conversion can be done relatively easily from the Del Rio Ranch Wagon however close does not count when it comes to an actual model car kit. These days a new kit has to be virtually perfect to pass scrutinizing. The back window and surrounding area would probably be the most difficult for Revell to get right. If Revell did offer a Ranchero kit, I am sure it would be very popular.
-
Thanks Claude - I am running out of ignition wire and green was all I had left so it worked out well.
-
Thanks Lee
-
Thanks everyone. I am very pleased how the Ranchero turned out.
-
I have always liked ’57 Fords. Family friends got a brand new two-tone yellow and white 2-door hardtop which was probably the best-looking car I had ever seen up to that point. There was a full range of cars from Ford in 1957 including a couple of new and unique versions – the retractable hardtop and the Ranchero. It was the Ranchero that has always been a favourite of mine. I remember as a kid dreaming about owning a ’57 Ranchero which of course would have to have had some modifications. Although I have built a few ’57 Ford models in the past, I had an urge to build a model something like the one I dreamed about all those years ago. When Revell released the ’57 Del Rio 2-door Ranch wagon there was a great deal of hope that it might be followed by an up to modern standards Ranchero kit. With all that Revell has gone through over the last few years the chances of that happening are very remote. One day late last year with nothing better to do I had an irresistible urge to convert the Del Rio Wagon into a Ranchero. Modifications I made - Cut roof near the b-pillar with a bit of a cut back to the pillar - Sanded off the raised contour on the remaining part of the roof - Separated rear window from removed roof and glued it to the new roof ending and b-pillar - The rear bulkhead of the passenger compartment was made from the cut off roof - The interior side panels were cut to have separate sections for the interior and pickup bed - The inner side panels and tailgate panels were glued to the body - A new pickup floor was fabricated from smooth and grooved Evergreen styrene - The forward bulkhead of the pickup bed was made from various elements of Evergreen styrene with everything faired in with putty - A small shelf was added below the inside of the back window - Separated the wheel tubs from the floor pan and attached to pickup bed floor. The tubs were faired in with the floor using putty and a styrene molding was added where the wheel tubs meet the side panels PAINT is Tamiya TS-26 Pure White and TS-60 Pearl Green from the spray cans without clear DECALS for the most part are from the kit. The door panel decals did not fit properly because the cut out for the armrests are misplaced. I also used some Ranchero decals I had made up for a previous built. The gold in the side trim is gold Bare-Metal-Foil rather than the provided decals. Modifications to create my dream Ranchero - Removed front gravel pan from the frame to paint body color which may not be correct but I prefer it that way - Added a stick shift and a tachometer - American Torque-Thrusts and tires from Revell ’32 Ford - FE engine from AMT ’60 Ford with Thunderbird enhancements including three carbs - Removable bed rails from AMT ’59 El Camino The Workbench thread for this build
-
Very sharp looking and super well built
.JPG.c127cab5a4e3863b855af42c6105d81d.JPG)