

David G.
-
Posts
11,326 -
Joined
-
Last visited
Content Type
Profiles
Forums
Events
Gallery
Everything posted by David G.
-
Thanks Carl, welcome aboard! David G.
-

Monogram's 1955 Lincoln Futura Concept Car: WIP
David G. replied to David G.'s topic in WIP: Model Cars
Actually Jim I plan to flatten them a little on a sanding block. But just on the bottom. Already done that Len! I used some dull coat to knock back the styrene sheen on the whitewalls. Thank you Ken. It's great to have you along for the ride. They are, aren't they Glen? Sort of like rocket satellite dishes. David G. -
Nice color choice, very "Fifties". The chrome looks good too, especially for having a clear coat on it. I'll have to try that with the chrome paint I use to see if it helps. David G.
-
That red sounds like a good color choice too. Colors are one thing they did well back in that era. The trim on that car is not very well defined, rescribing is almost a necessity. Another tactic I've used is placing the chrome tape down after the first primer coat, before the paint has a chance to obscure the lines. Between each coat of paint I cleaned off the foil with lacquer thinner and cotton buds. It worked well enough but in the photo you may be able to see where the paint piled up around the edges of the foil, sort of like a reverse masking line. This one is also painted in enamel paint which tends to be thicker than lacquer. For this reason, it works better with lacquer paints. I've used this technique just a few of times and it... works. The end results just aren't worth all the extra bother. I've also noticed, as have you the adhesive residue left behind from the newest batch of BMF. It used to be that isopropyl alcohol would remove the residue but it seems to do little with this current batch except smear it around. I've found that mineral spirits take it right off. If you're using lacquer paint there's no problem but be careful with enamels, of course. Even with that, it's still the best batch of BMF I've had in quite some time. Cheers, David G.

-
That is really looking sharp Nigel! Having all those parts together in one tidy pile must be exciting. I'm sure you're eager to bring this one across the finish line. David G.
-
Monogram's 1955 Lincoln Futura Concept Car: WIP
David G. replied to David G.'s topic in WIP: Model Cars
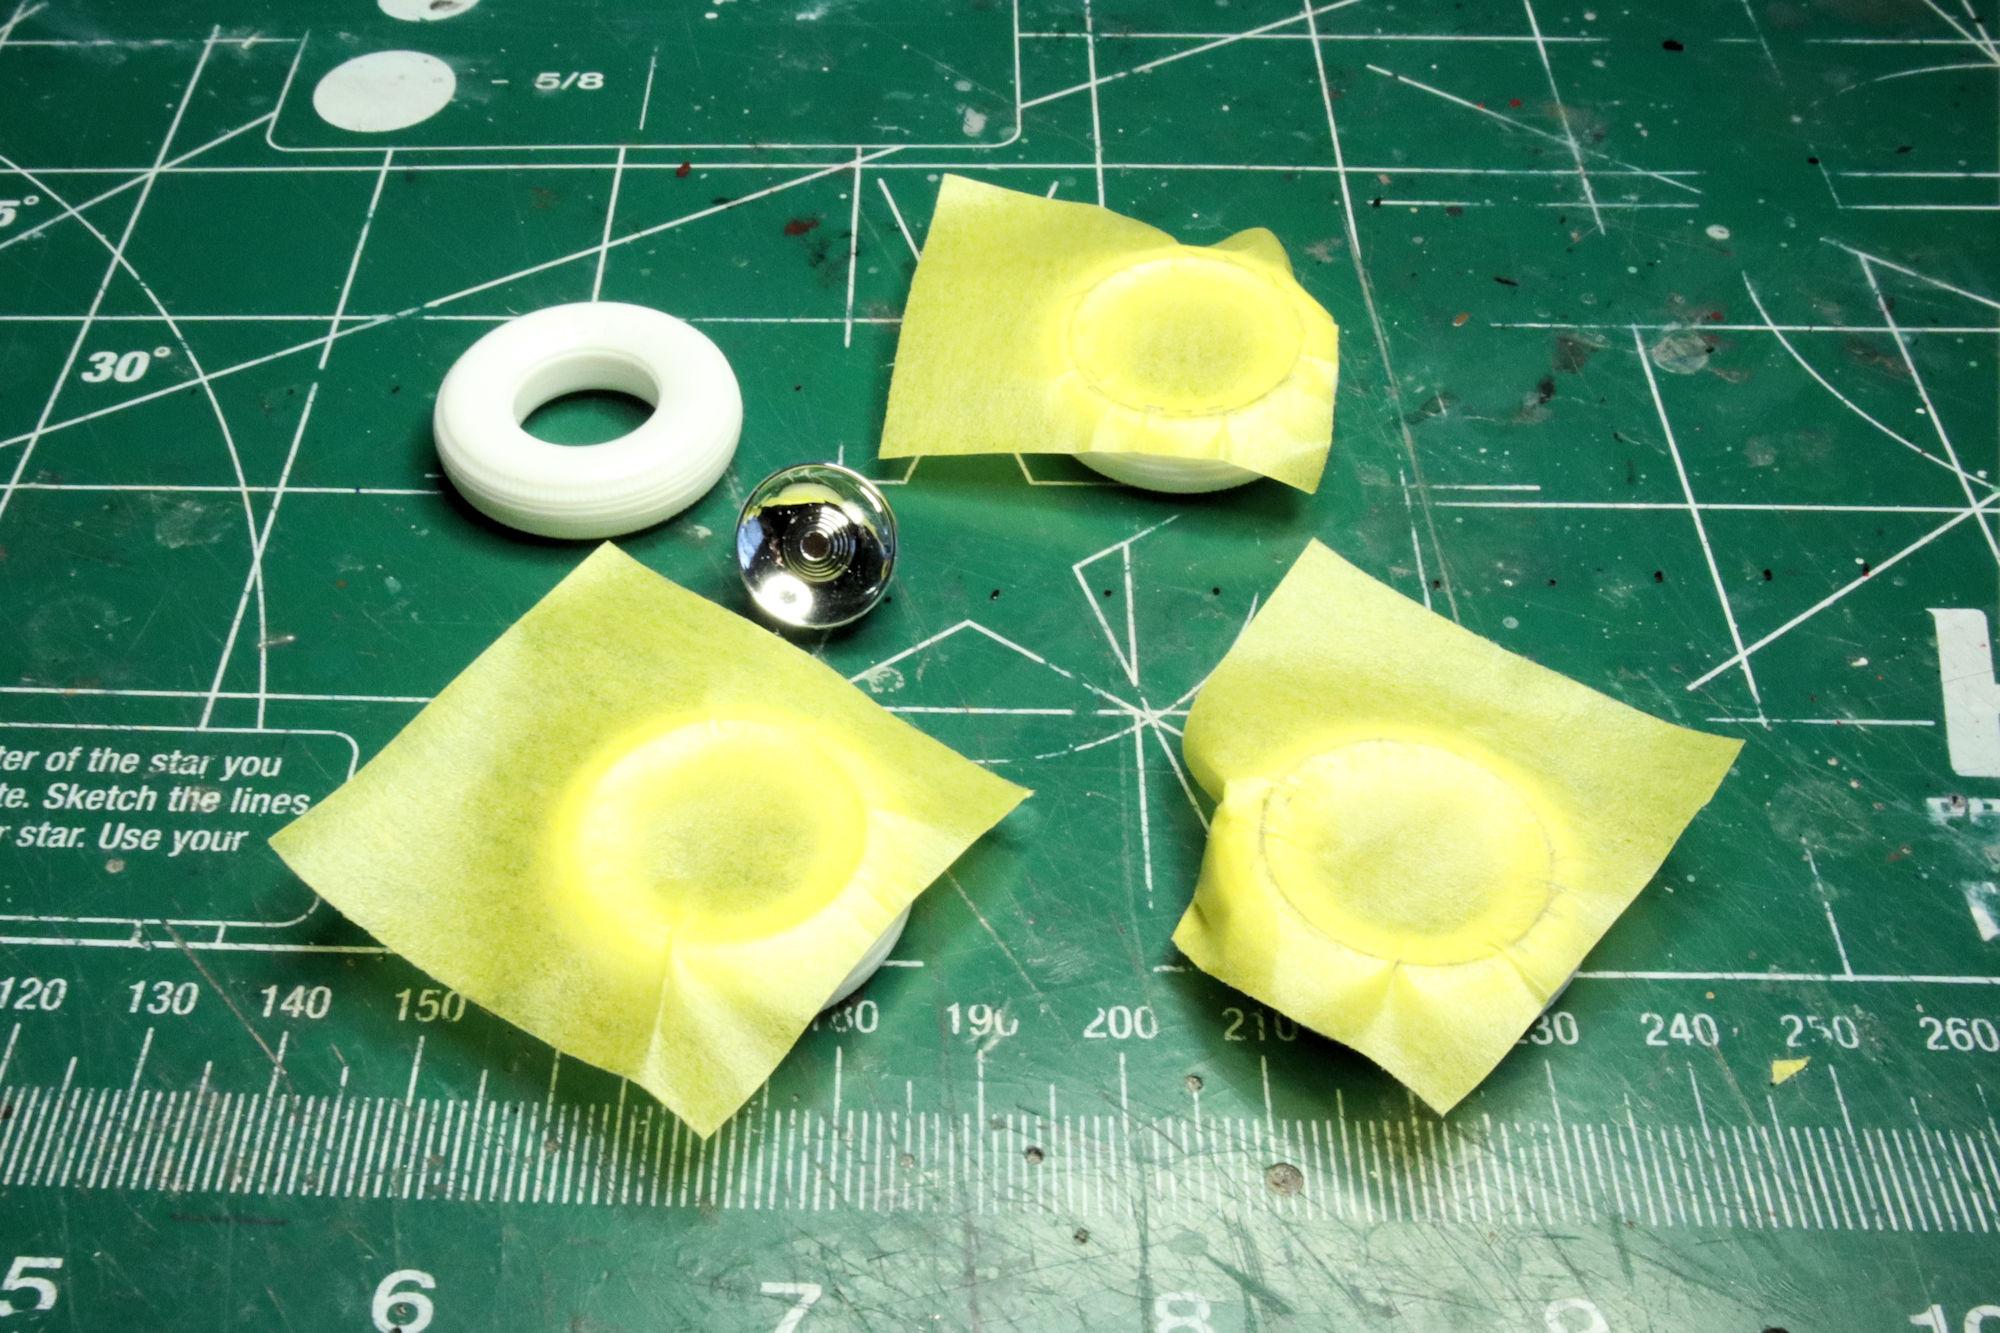
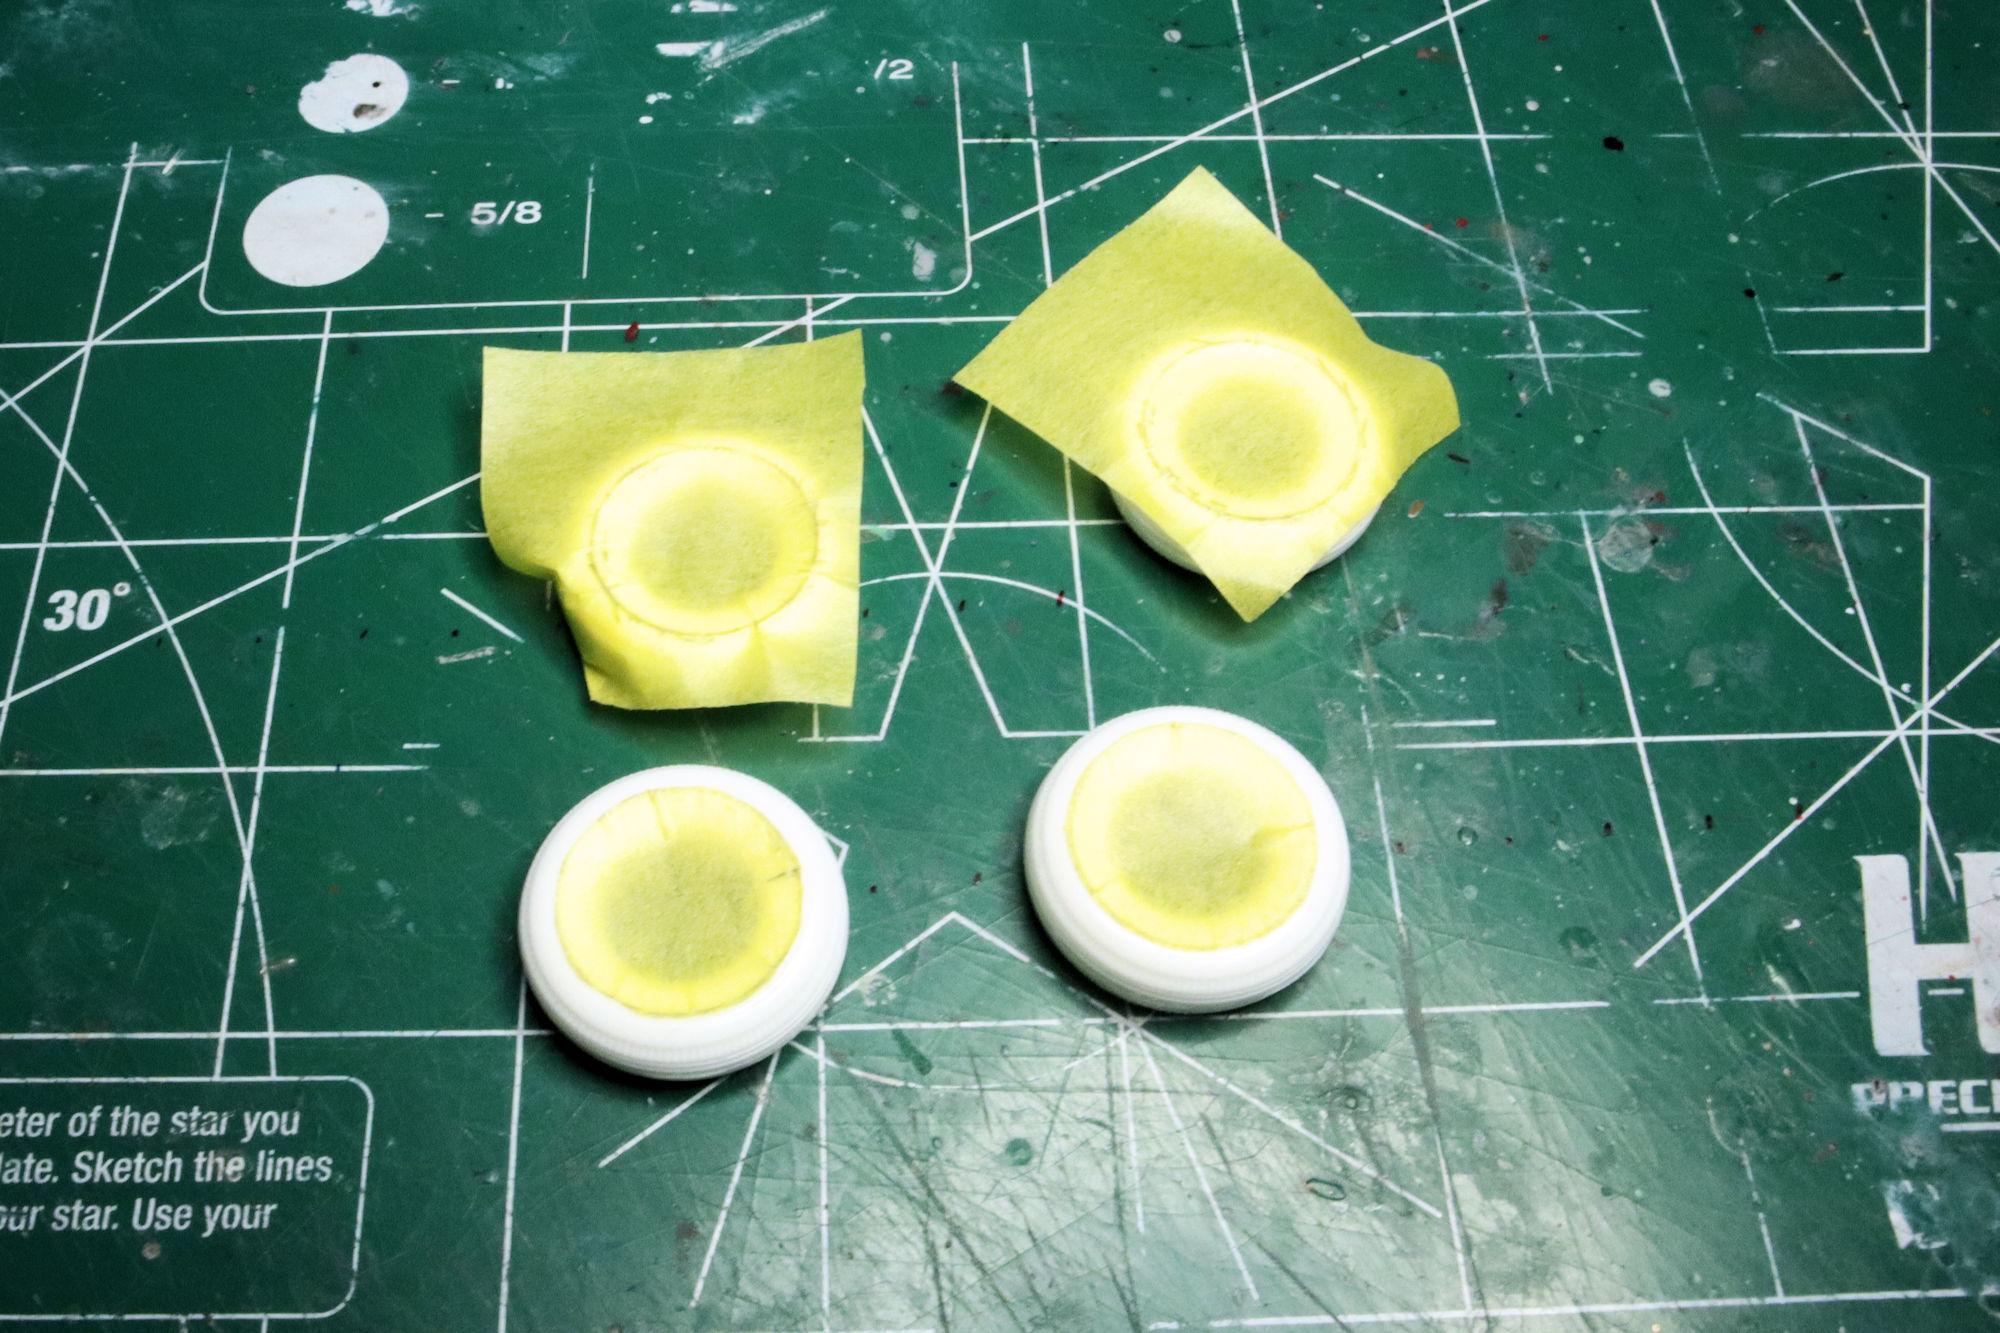
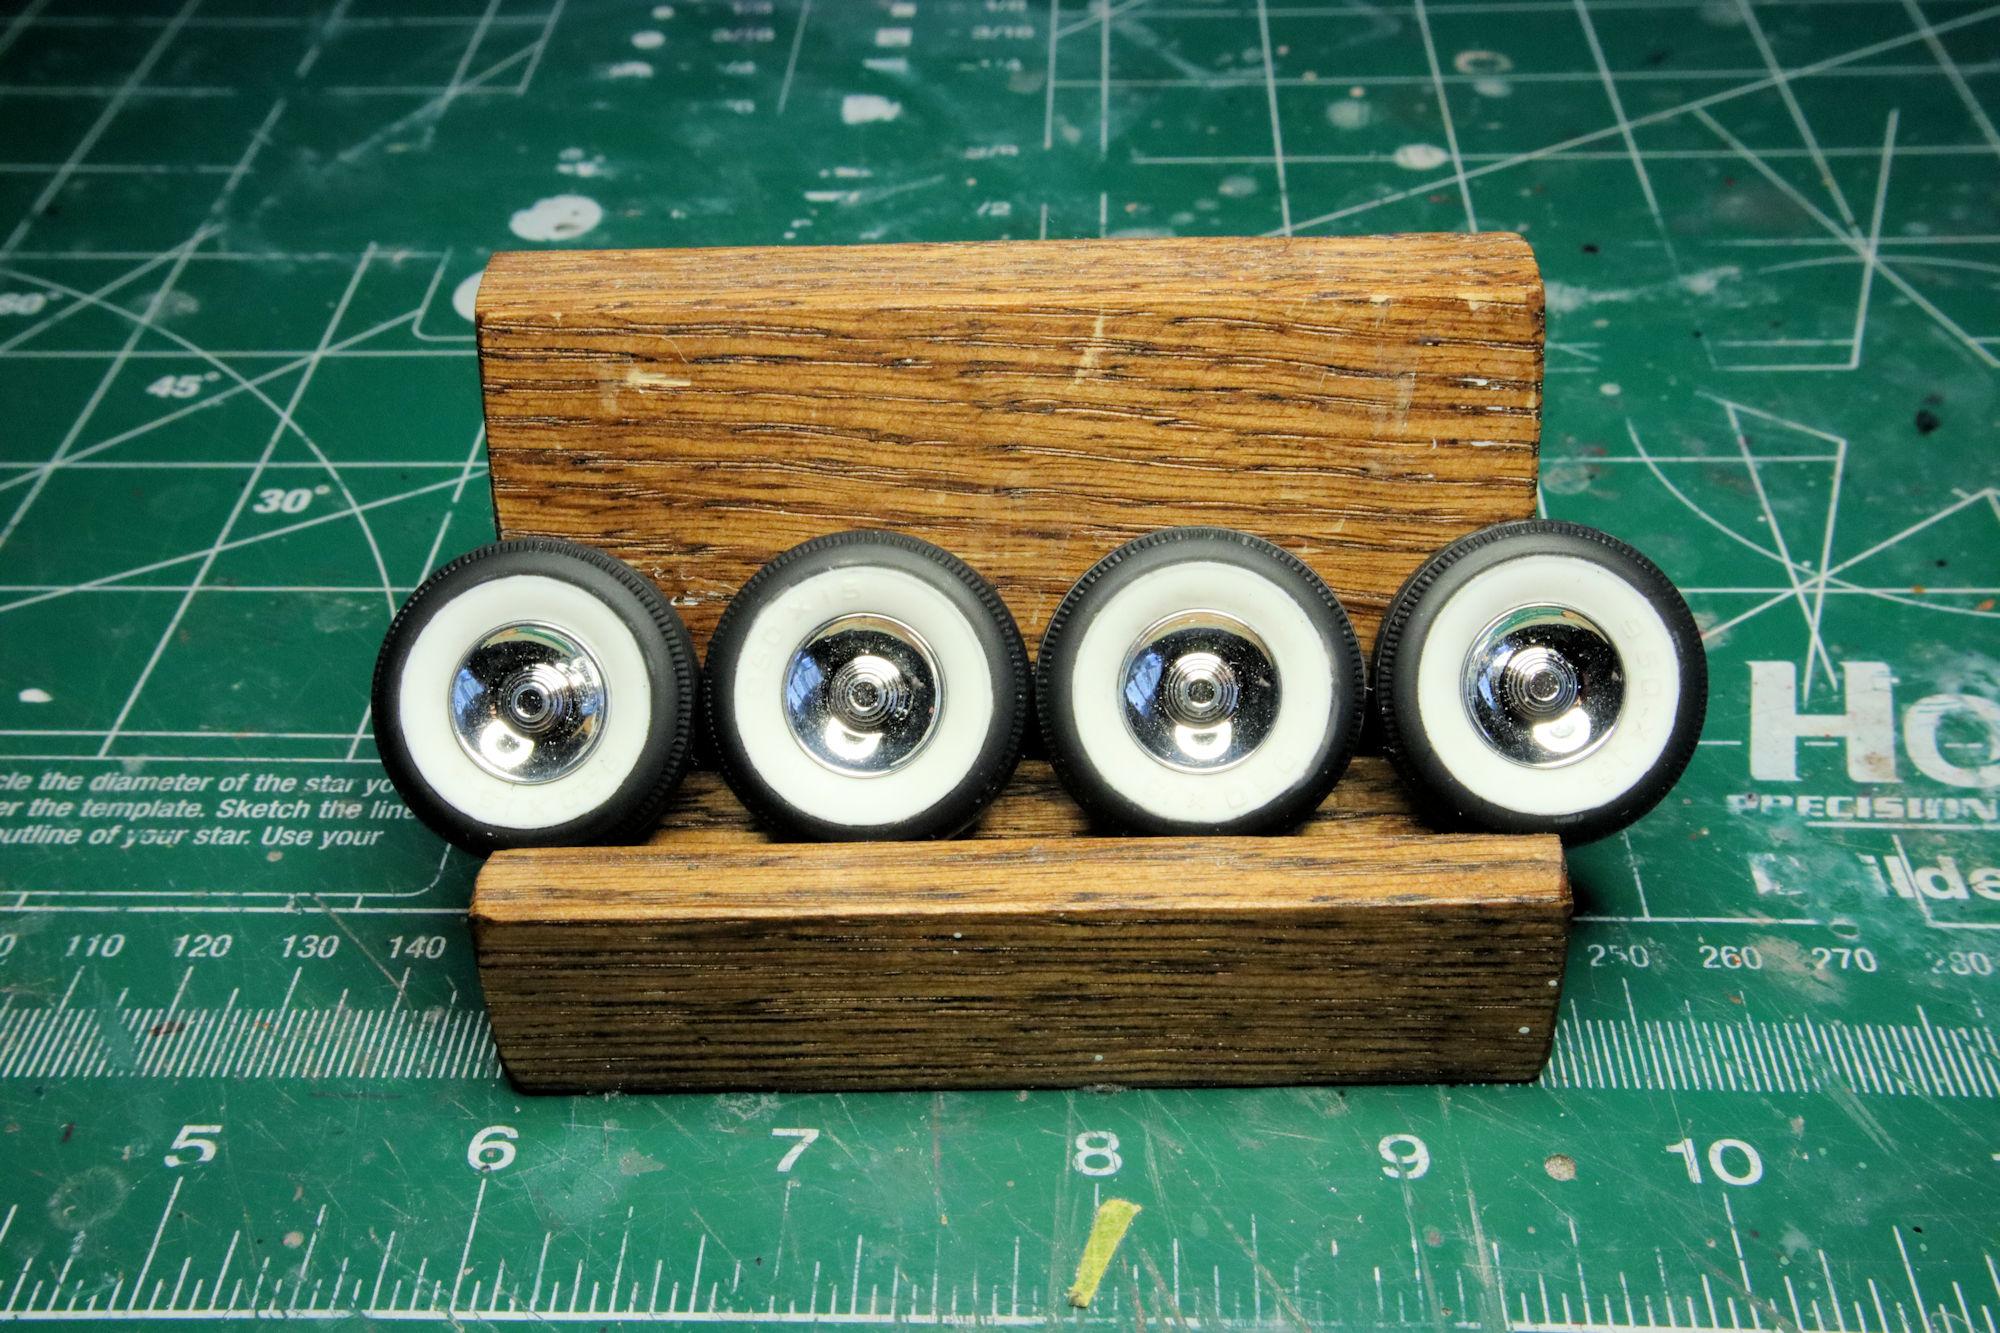
Hello Everybody! In spite of my plodding, progress is being made and here's proof! Two-piece styrene tires. In spite of the bad reputation given to them by some, with proper attention they can actually yield good results. One advantage they have is being an ideal starting point for tires sporting wide whitewalls. It's far easier to make a tire black than it is to make a whitewall white. I've started masking these for painting the flat black for the body of the tire. A little pencil rubbing on the raised bit that outlines the whitewall helps to guide the blade when cutting the tape. There's just a little bit of cleanup but I think they look as they should. I'll probably give them a quick shot of dull coat to take some of the plasticky shine off the whitewalls, but other than that, I think they're good. Here are the tires all cleaned up and ready for service. As always, thanks for taking the time to look and please feel free to comment. David G.
-
Yes, there's this one, the 1966 Chaparral 2D Coupe and the 1955 Lincoln Futura. I usually have at least two builds going simultaneously. That way I can I can be getting the suspension prepped for paint on the Galaxie while the paint is curing on the Chaparral. Then while the paint dries on the Galaxie's suspension, I can start sanding the putty I put on the Futura body the day before. By then, the Chaparral is ready for polish and decals. Doing this also helps to keep me from losing interest in a build. Sometimes, for any one of a variety of reasons, I just need to set one down for a few days. A kind of "cooling off" period. Having other builds to occupy myself provides a good distraction while I sort out some details and let my attitude reset itself. I find that this works for me. Thanks for your comment Pierre. David G.
-
Thank you Ken. You mean other than those big whitewalls? Thank you Stephen, I appreciate that. David G.
-
Nice lay on the primer! David G.
-
Thank you David. I'd like to build another, this time in Orchid Gray. I'm not sure how I would handle the chrome this time. I'd probably try foil given the experience I had with masking for the paint. It's been more than a decade and I'm still traumatized! David G.
-
That turned out to be one great looking build! David G.
-
Dang! I wish I had known about those when I built my Superbird. Those are sweet! David G.
-
Tight and tidy! It looks fabulous! David G.
-
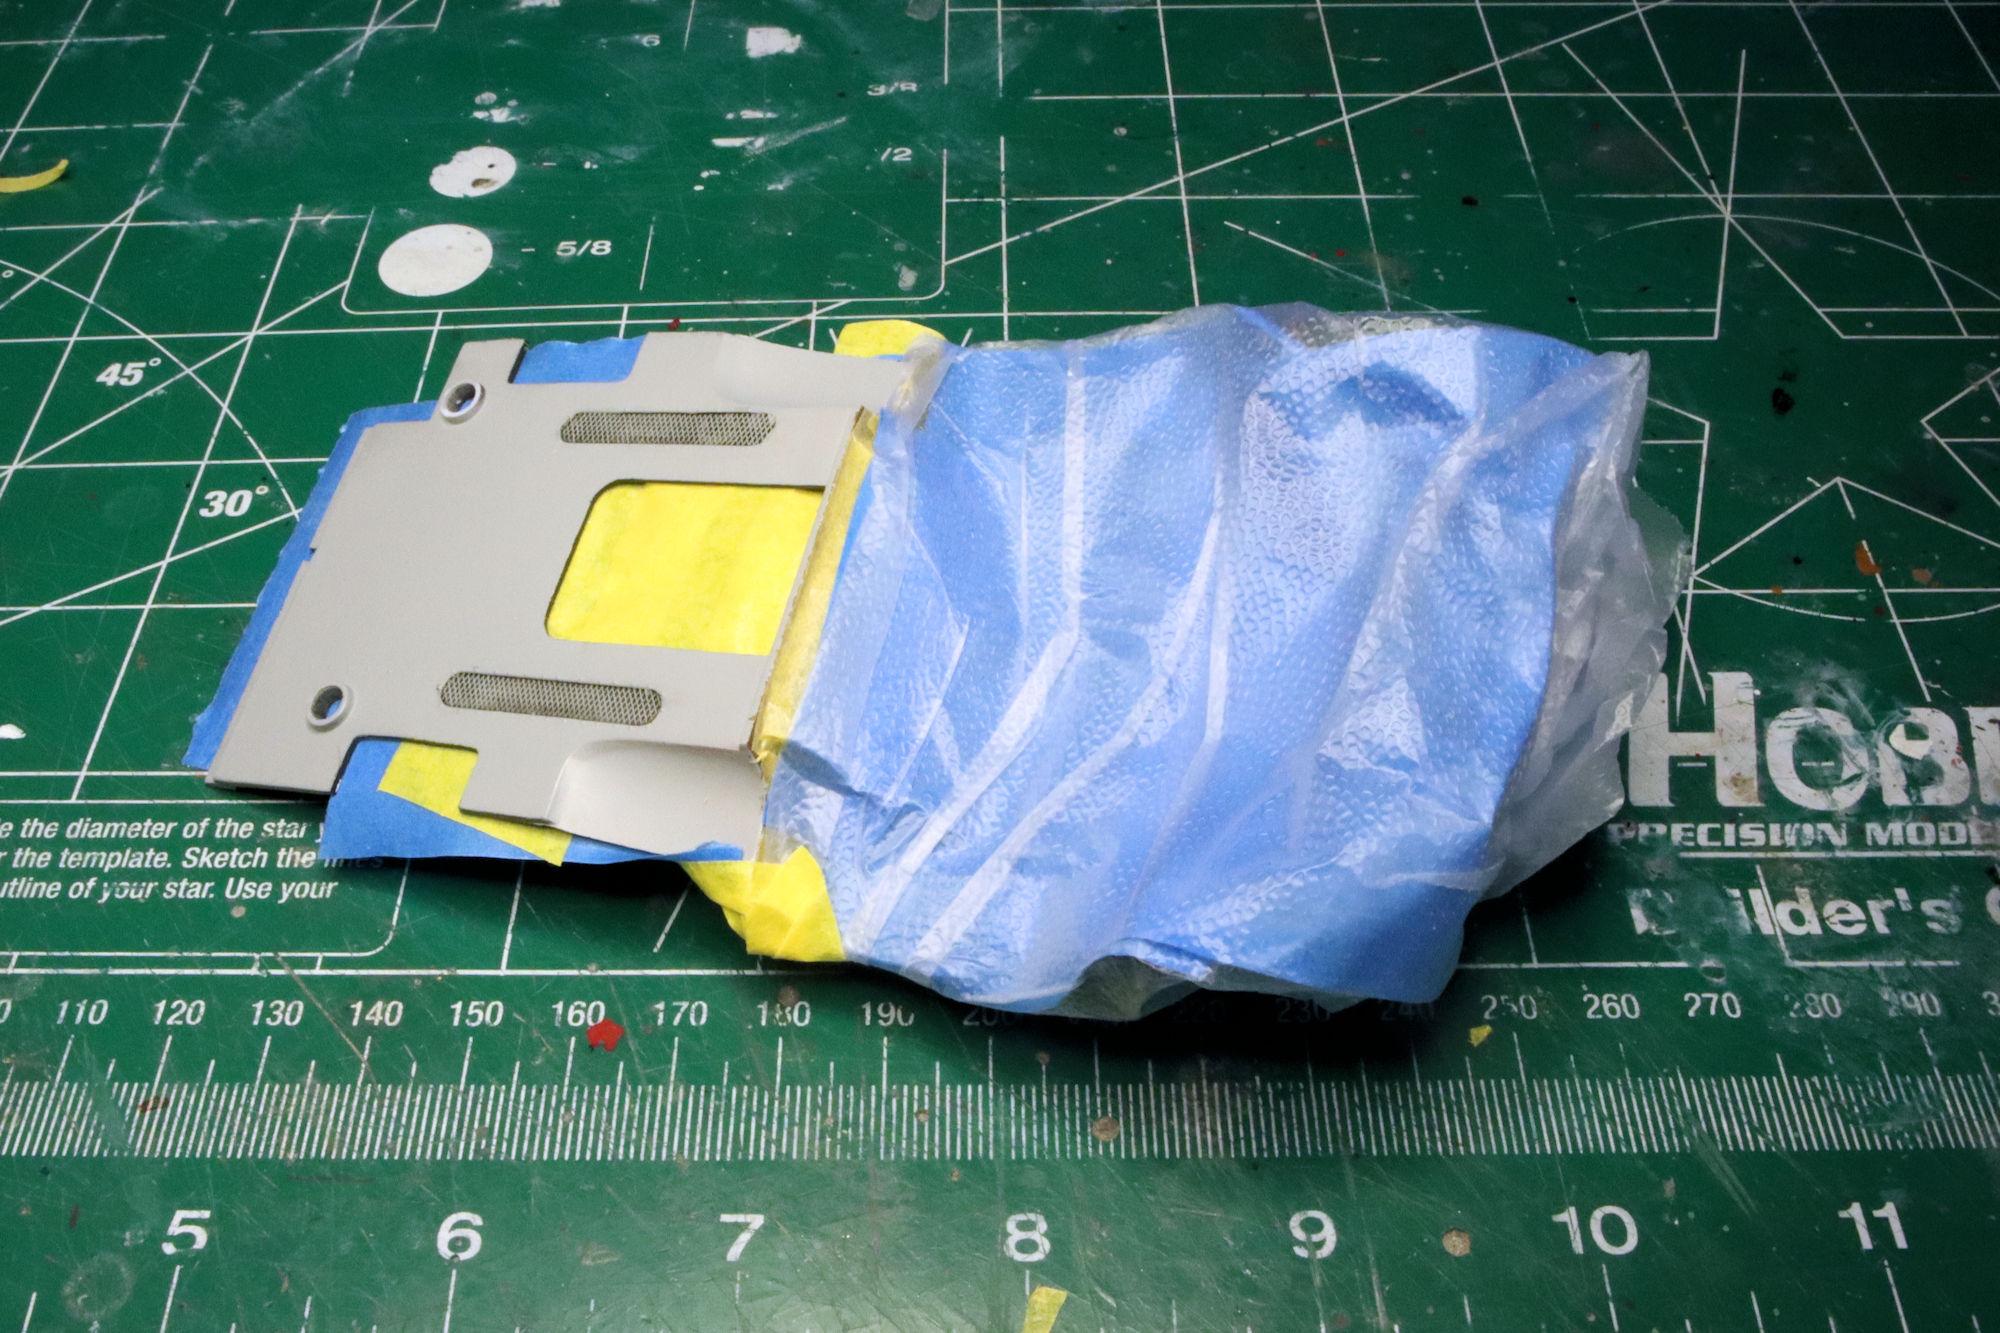
Hello Everybody! Just a quick minor update. Masking for the main body color on the interior plate. With some pre-shading for the engine vents. After the paint is shot and masking is removed, it's time for a test fit. I wanted to see how the glass fit. That way, if any adjustments needed to be made, I could make them before I painted the body! Luckily, the glass fits quite nicely. That's it for this post. As always, thanks for taking the time to look and please feel free to post a comment if you have one. David G.
-
I did consider a chassis swap just so I could make better use of the side pipes. But yeah, that's more work than I wanted to do on this one Bob. That's good to know. As cool as those old cars were getting in a wreck with one could be like falling into a large box of knives and hammers at 30 mph. Thank you Bob, I'm glad to know you're following along. David G.
-
Monogram's 1955 Lincoln Futura Concept Car: WIP
David G. replied to David G.'s topic in WIP: Model Cars
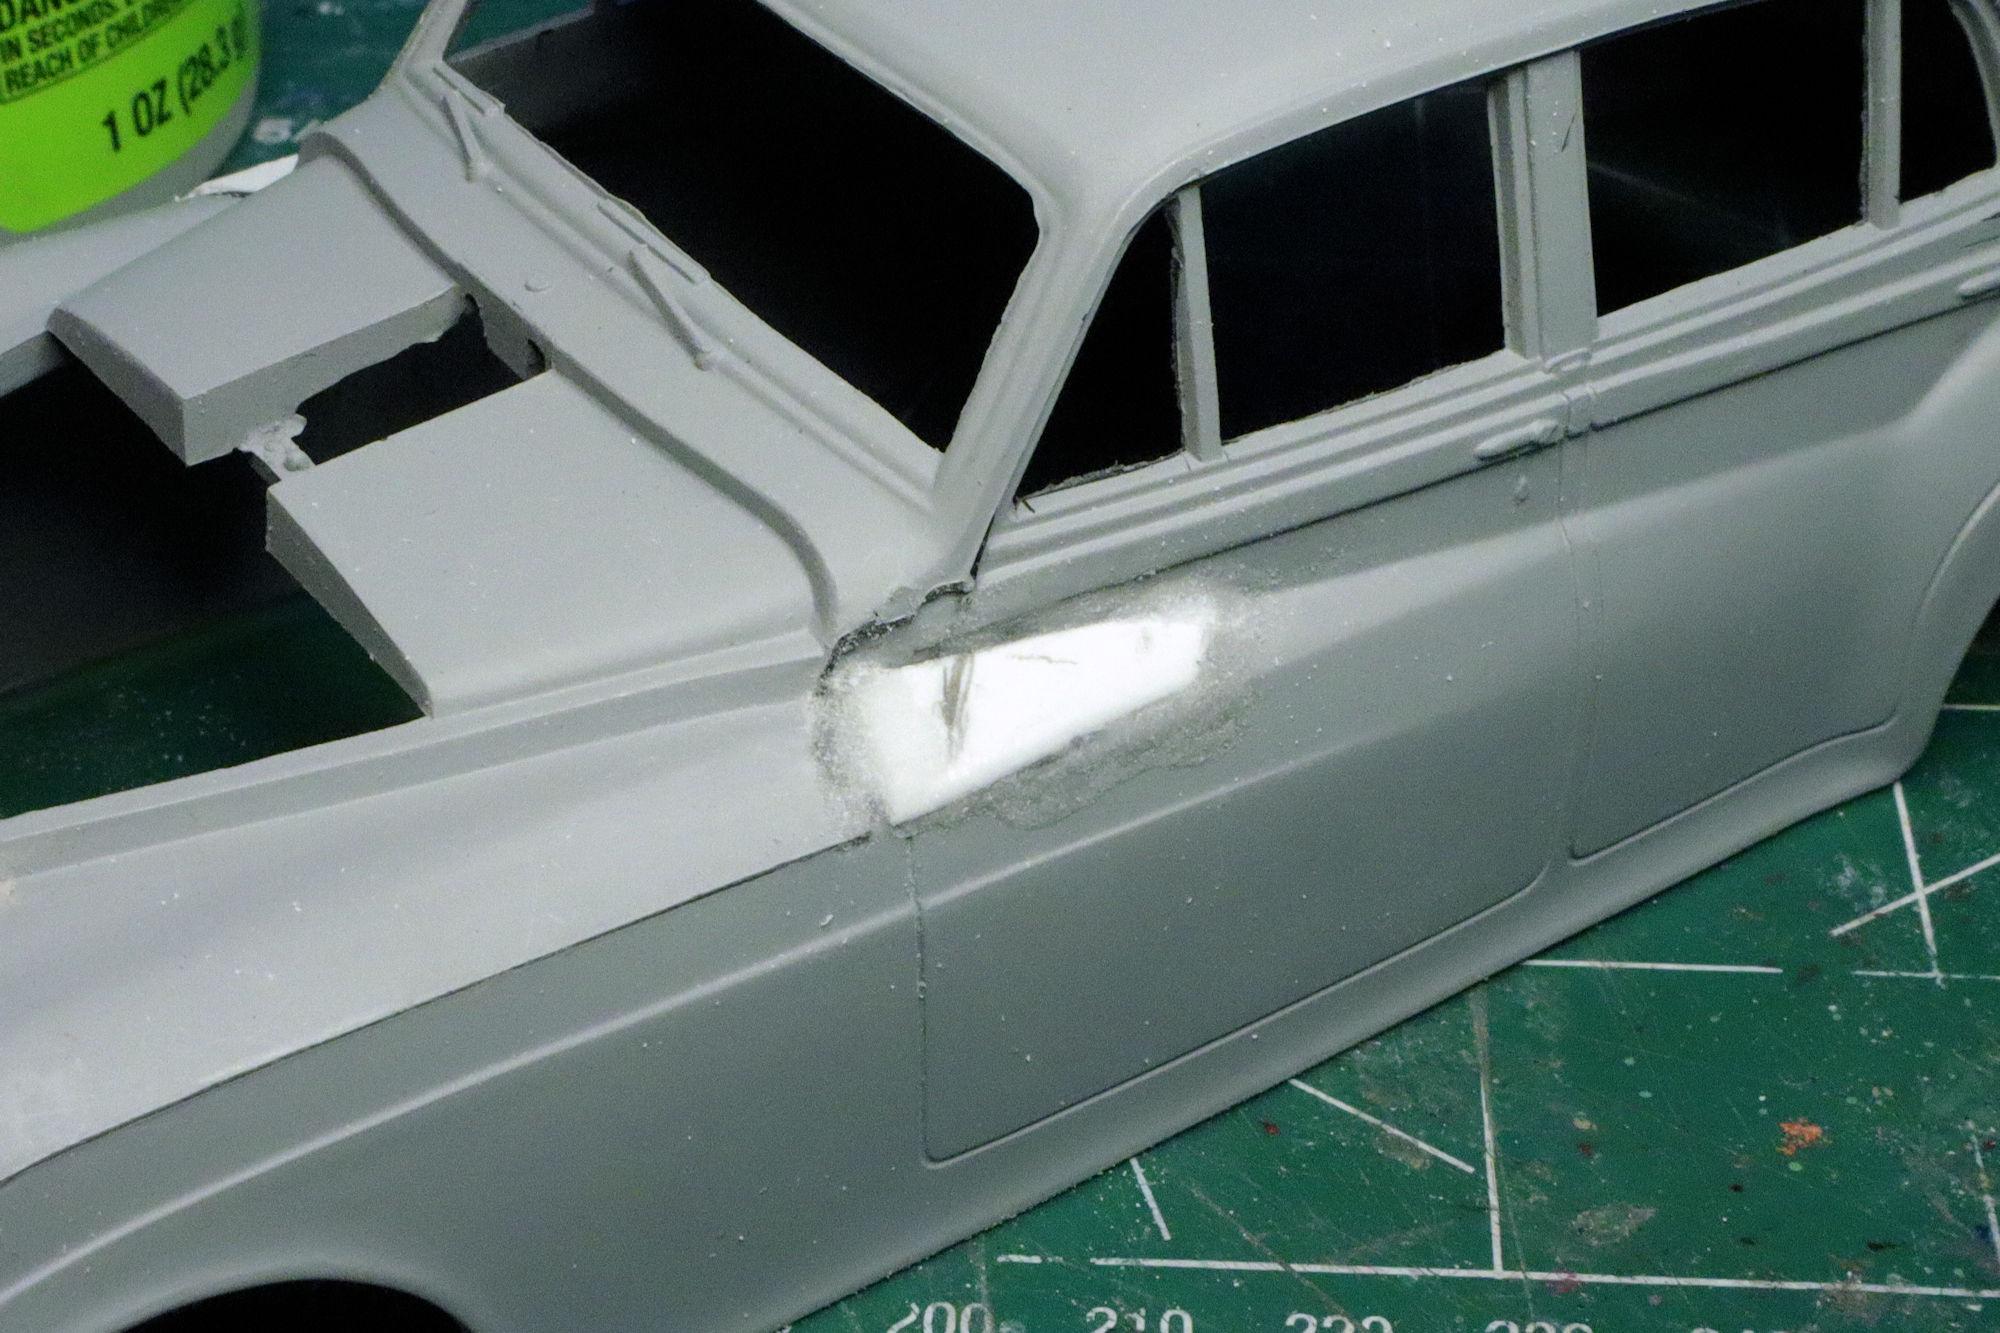
Ummm, doing what Jim? No worries, we're good. Thanks Bob, I've used CA a number of times before and with a few exceptions, I had trouble getting satisfactory results. I can't seem to hit the right point in the CA cure cycle and start working it when it's still too soft or has already hardened to diamond. More often than not I started working it when the top was cured and the base was not making an unpleasant mess of it. As I mentioned above, I have tried CA as a body filler and I do still use it when the circumstance calls for it. I have a small container of baking soda on my desk that I mix with CA for filling larger areas, like I did on my Rolls when I had to build up that transitional area between the fenders and doors. So yeah, I'm familiar with using CA as a body filler but I just have to work with the materials that give me the best results for the way that I work. The wait time is not a problem for me. I have to wait for paint to cure before I color sand it, waiting for the putty to cure is no different to me. Those wait times are the times are when I either work on some other task. Like getting the suspension parts ready for paint or working on one of the other builds I have going. Of which I currently have three. Please don't misunderstand me. I do appreciate suggestions, tips and pointers. I'm not upset or insulted by any help or suggestions that anyone offers. After all, no one really knows what someone else knows and doesn't know. Ya know? Thank you both for taking the time to offer your pointers, I appreciate your thoughtfulness and consideration. Cheers, David G.
-
Aw, that's a heartbreaker. I assume that everyone came out of the wreck okay? David G.
-
The kit does seem to be a pretty good one so far Bob. There are a couple of things I wish they had done differently but it should look good in the ol' Display Case when it's done. Thanks Ace. I've always liked this Galaxie body style too. My father had one in dark blue when I was very young. Based on what I remember of the shape of the tail lights, it was probably a '65 too. I noticed too that the interior was for a convertible. Which puzzled me as I don't recall seeing a convertible version of this kit offered. I agree that the chassis is nice, I just wish they had done the exhaust separately. Thank you Monty. While doing my prebuild perusal of the directions I did notice that the headlights are to be glued onto the grille casting in what seemed to be an odd way. I agree with you, that won't look right. Do you have any suggestions on how to correct this? And the exhaust system is a bit of a disappointment. There are side pipes offered in the kit which I'd like to use. Unfortunately with the molded exhaust and what AMT offers to accommodate the side pipes, there's just no easy way to make everything look like it would work in real life. I've thought about making it look like there were cut-outs for the side pipes. But the side pipes aren't really great and to me it's just not worth the effort. So I kind of gave up on that and I'll detail paint the exhaust as it is and move on with the build. Thanks again, David G.
-
Monogram's 1955 Lincoln Futura Concept Car: WIP
David G. replied to David G.'s topic in WIP: Model Cars
I use spot putty. I prime, sand, apply putty to any sink marks I see (there are many) and let that cure for a day or two- lather, rinse and repeat. I apply the putty in very thin layers to avoid shrinking and cracking and I almost never get one completely filled and smoothed on the first pass. And it seems like there is always just one more. That, and I've always been a slow builder. Indeed, that would be cool. Thanks for your comments Jim, and the cool photos too. David G. -
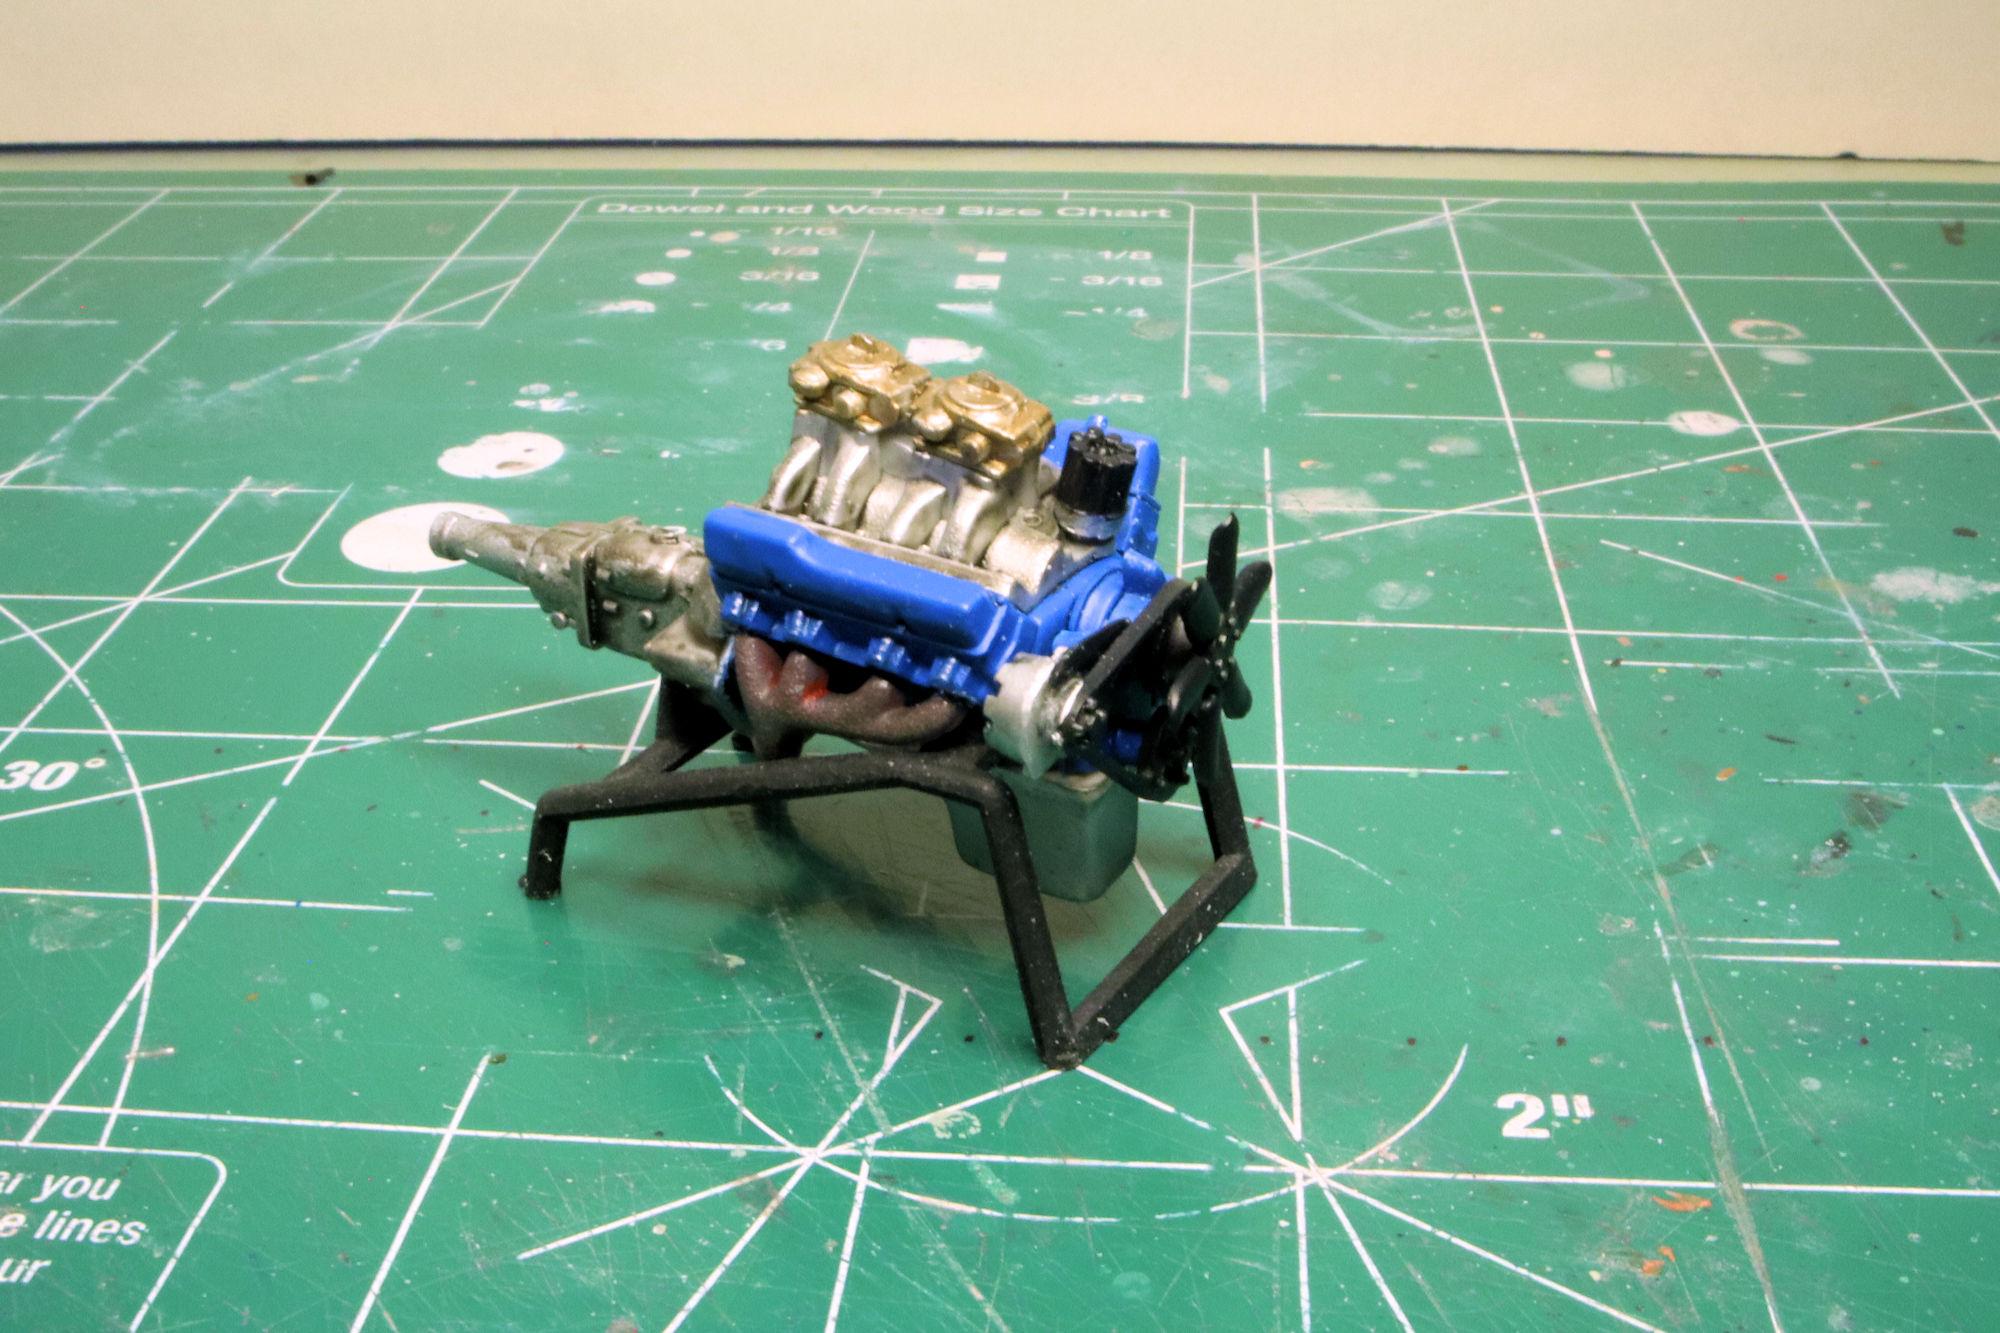
Hello Everybody! Here is AMT's 1965 Ford Galaxie 500 XL. This kit can be built a couple of different ways. It comes with a nice set of Cragar SS wheels and some racing slicks. Also provided is a dual quad high-rise intake manifold with a cold air system. Oh, and side pipes! Given those options, I've decided that I want to build this one as a mostly factory mild custom. Kind of a COPO build for a young guy with more money than time who likes to spend weekends at the strip. After a couple of build sessions, I have an engine ready to install. A dual quad 427 by my reckoning. There's also a cold air system and air cleaner being prepped for installation during final assembly. I even fabbed up a bracket for the alternator! I've selected the color for this build, Tamiya TS-37 Lavender over black primer... hence the black primer. Wow! That makes three I currently have on the ol' Work-Shelf. It looks like I'll have plenty to keep me busy in the coming weeks. As always, thanks for taking the time to look and please feel free to share any thoughts, opinions or observations you may have. David G.
-
Thank you Carl! David G.
-
Monogram's 1955 Lincoln Futura Concept Car: WIP
David G. replied to David G.'s topic in WIP: Model Cars
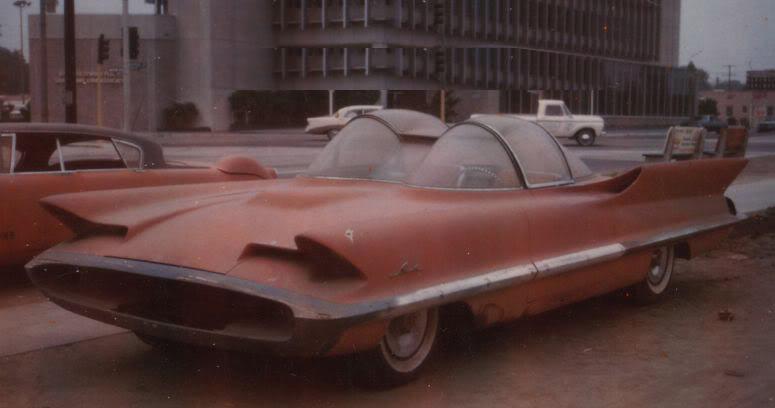
Yeaaaah, don't remind me Len. I've been leaning toward the "easier" builds lately. Currently there's this one and the Chaparral, both are curbside kits with fewer total pieces than are in just the engine and chassis of most "traditional" style AMT or Revell kits. When I started planning this build I thought about upgrading the details. I dug out one of the more recent Moebius Batmobile to see if I could maybe kit-bash the two of them into one nicely detailed Futura. It turns out that the two of them are totally different creatures. The proportions don't match in any significant way... they don't even seem to be in the same scale! On top of that, the reference material for the Futura seems limited to about a dozen photos, most of which are of marginal quality. Making a detailed model with those materials and circumstances would take a serious amount of guesswork some creative engineering. At least more than I currently have at my disposal. It would end up being another one of those ambitious projects that, once started I might never finish. As for what Barris did to the original Futura, all artistic critiques aside, I think his actions probably saved it from obscurity. How many of those concept cars from that era still exist? From what I understand, when Barris got his hands on the Futura it was decomposing in a back lot, already well on its way down the road to obscurity. He took a soon-to-be-forgotten relic and made it into an icon. I would love to see a more accurate, more detailed kit for the Futura. In the meantime maybe you'll have some luck with a kit-bash of the Moebius and Monogram kits. Of course with the recent upsurge of CAD drafted 3D printed models, maybe somebody's working on right now. That would be great, wouldn't it? David G.
-
Thank you Steve. David G.
-
Nice grille. With these older kits, I find it's often better to just remove the chrome. David G.
-
Nice progress on the kit-bash! David G.


.jpg.3f7087348671717485352d69f9ddea01.jpg)