Nitro330
-
Posts
287 -
Joined
-
Last visited
Content Type
Profiles
Forums
Events
Gallery
Everything posted by Nitro330
-
Very cool, gotta love Willys gassers!
-
Thanks Will, appreciate all of your comments as I was building this too!.
-
Thanks Scott! The moon tank is an aluminum part from Mr. Model (out of Brazil).
-
Thanks guys, really appreciate it! And yeah John, that hemi with short wheelbase and lifted front end must be a challenge to keep control of.
-
Really cool 34! Fit and finish looks great! Love the stance.
-
Finally finished it!!! Pictures are up in Under Glass - Drag Racing.
-
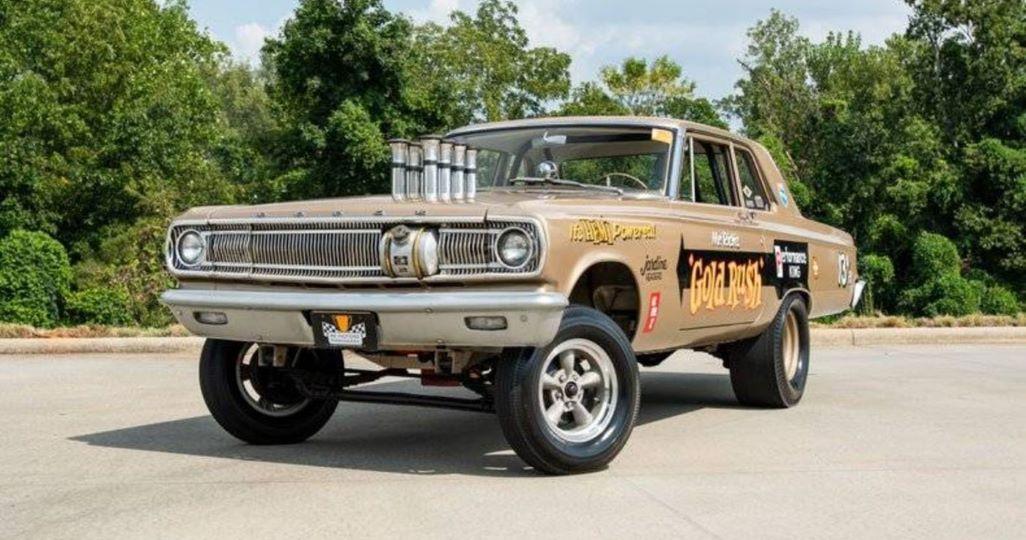
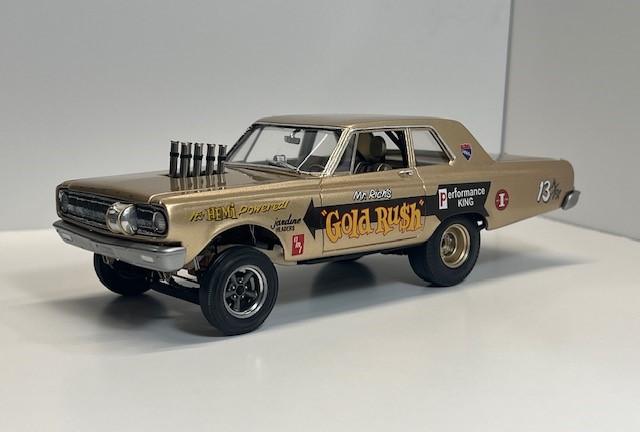
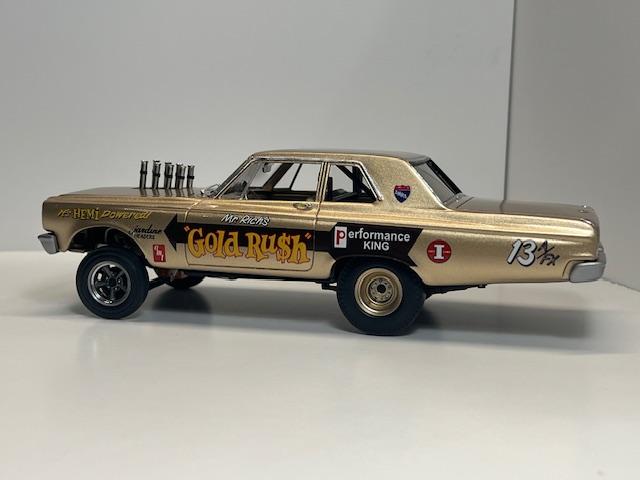
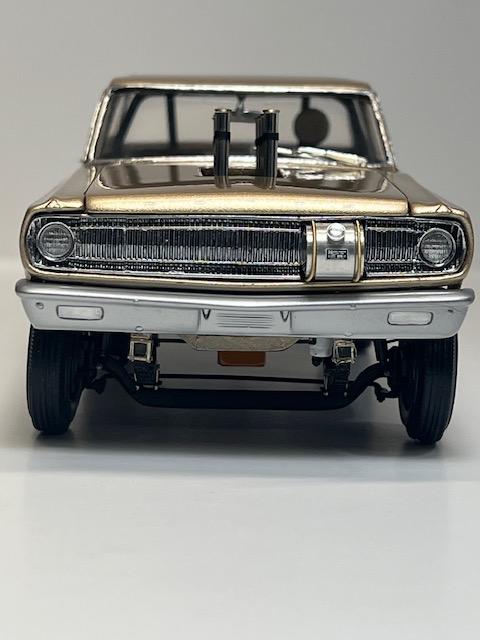
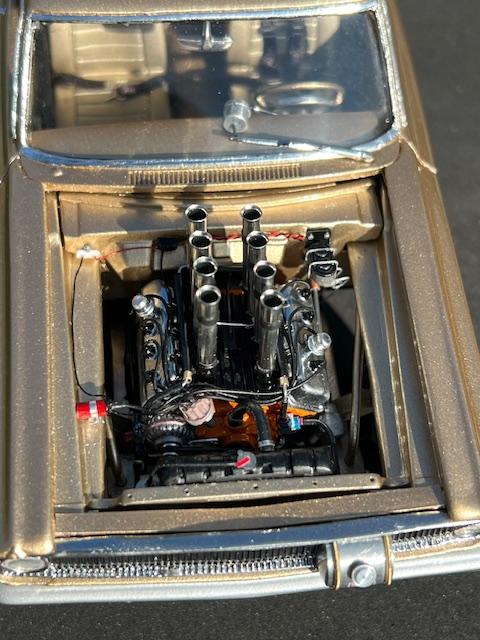
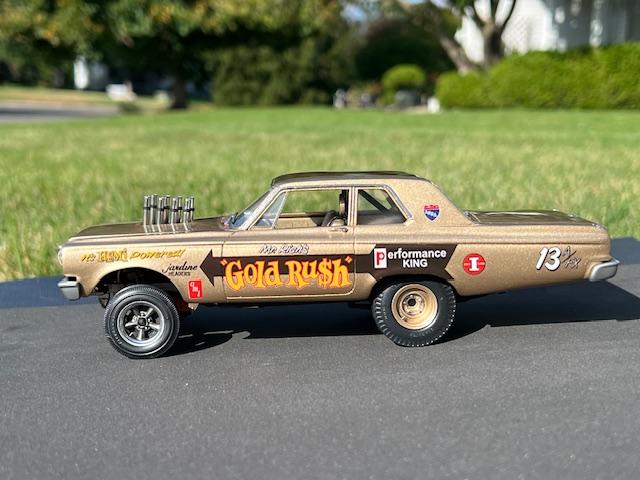
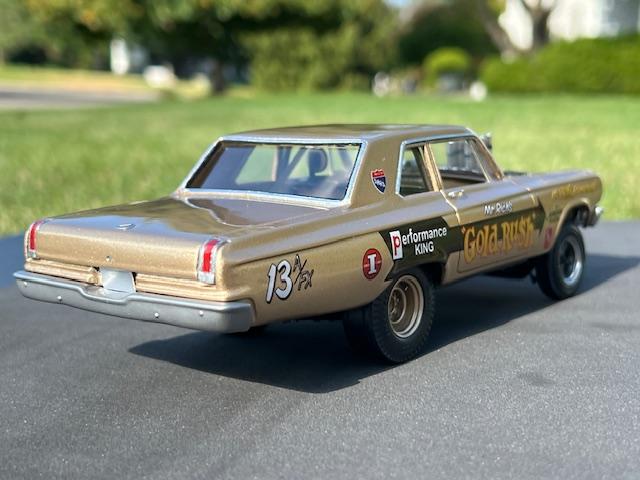
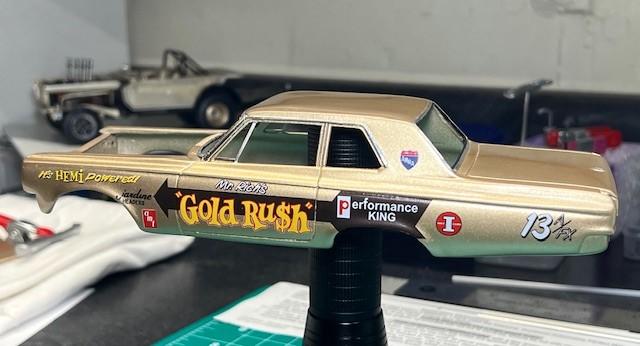
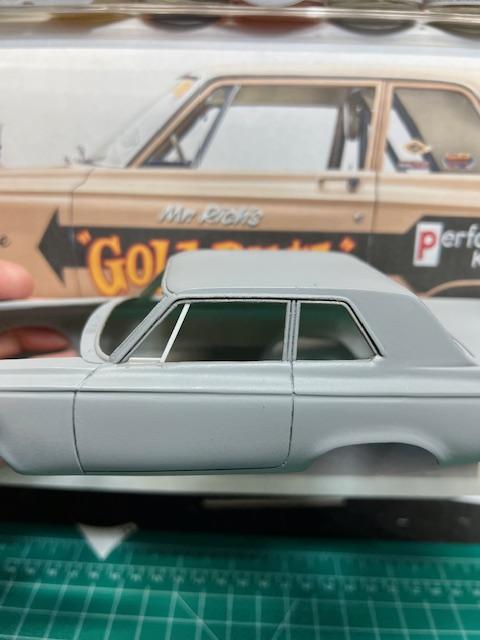
Just finished my first ever build starting without a kit. This is all pulled together starting with a resin-cast body and frame (not 3D printed), several 3D printed parts, plenty of scratchbuilding, parts box items and lots of modifying. The build is on the WIP Drag Racing page if you would like to see some of the work that went into it. The Lindberg Ramcharges Dodge supplied the engine block, dashboard, seats and front third of the frame. Unfortuntely the window glass did not fit, so all of the glass is made from .010" clear sheet. Most everything on this build had to be modified in some way. It was a lot of work, but very satisfying and pushed me to try new things. The actual car is a Match Bash racer originally built by Rich "Mister Rich" LeFebvre, but had a complete professional freshing in 2017 to refine it into a more street friendly beast. It has a Holley EFI system that I tried to represent with some scratch built fuel rails and plumbing. Getting the stance correct and all the fabrication for the front of the frame was one of the biggest challenges (and there were many challenges!). Paint is ScaleFinishes 65 Dodge A Gold with Acme 2K clear. Decals are custom made from STS. I think it ended up being a pretty nice representation of the original (the last two pics are the actual and the build side by side).

- 25 replies
-
- 11
-

-
-
This is really cool Scott! Paint and decals look great.
-
What a cool project! That is one wild looking Valiant.
-
Just a quick peek at the body with the trim work and decals done. Really pleased with the decals. My first time using STS decals and they were great! Easy to place and can barely see any edges. Will be adding a couple coats of clear tomorrow. I'm hopefull that my next update may be to say that it's finished. If I can get the time, I'm shooting for next weekend, but there are a lot of final assembly things to do (the windshield glass may be tricky).
-
Thanks so much guys! Appreciate you all checking in on the build and giving feedback. Really helps keep me motivated.
-
Thanks everyone! I got it painted this weekend and the first coat of clear. Hope to get the trim work and decals done this week and then another coat of clear. Did get a lot of other things done this weekend but didn't take any pictures when I was doing them. (bumpers/grill painted, window templates made, added a ballast resistor and some misc. touch up).
-
Wild Willie Borsch Tribute/What If? Charger Funny Car
Nitro330 replied to RancheroSteve's topic in Drag Racing
Awesome build Steve! The arm out the window is a great tribute to Wild Willie. -
A few updates. Cut the hood opening, made the wing window frames and did some more detail in the engine compartment: steering shaft, radiator hoses, cap and overflow tank, mounted the coil, and hooked up the brake lines. Other little miscelaneous items. Hope to maybe paint the body this weekend.
-
Thanks Brian and Tony! Really appreciate it.
-
Thanks Will! The injector stacks are from Speed City Resins. You can get them in several sizes.
-
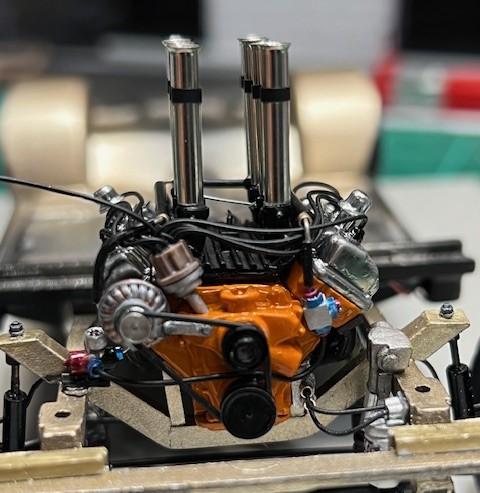
Got the engine mounted in the chassis and plug wires/fuel lines and oil filter lines hooked up. Then added the fan belt and injector stacks. Will put the fan on after making the radiator hoses. Also got the interior finished. Made an insert for the dash, EFI digital display box, and column shifter. Added the moon tach and underdash gauges to finish it up. You can't see it in the picture, but there are also a couple of toggle switches and a key in the ignition just for fun. Now it's on to the body which still requires quite a bit of sanding, wing window frames made and the cut out in the hood. I think I am also going to make the glass templates before I paint the body.
-
1/16th 1957 Corvette Super Gas 80's
Nitro330 replied to Ian McLaren's topic in WIP: Drag Racing Models
Love this project Ian. And even "a less ambitious" build from you is going to be pretty awesome, as that transmission/bellhousing shows. Look forward to watching this. -
Wow, you nailed it Terry! Love the before/after shots. Awesome job!
-
Super cool! Some great scratchbuilding. Really like the exhaust too!
-
Looks awesome Bob! That is a tricky kit in many ways. You did a great job!
-
Thanks guys, appreciate the compliments! It's been challenging, but fun. Still a ways to go, but am happy with the progress in the last couple weeks.
-
Only worked half day today and it's hot and humid out, so decided to skip mowing the lawn and get some bench time. Finished up the front end work on the chassis and made a remote oil filter bracket. Added the headers on the engine. Will be mounting it in the chassis and running the oil and fuel lines this week. The actual cars runs a Holley EFI system. I debated just going old school with the Hilborn injection, but decided to do the EFI and made up some fuel rails and plumbing just to look the part. Most of the rest of the engine details will come after mounting it in the chassis. The Hemi manifold and valve covers are from Speed City Resins.
-
Another really cool build Scott! Looking forward to the Lyles Cuda.