oldcarfan
-
Posts
2,828 -
Joined
-
Last visited
Content Type
Profiles
Forums
Events
Gallery
Everything posted by oldcarfan
-
 I just figure they already have paid for the molds, so maybe they could get extra use out of them. Even when the original source kit isn't currently being produced, they could maybe pick up some more money on the wheels and tires. Plus it keeps guys like me coming back to the hobby shop.
 -
Thanks to Curt Raitz!
oldcarfan replied to oldcarfan's topic in General Automotive Talk (Trucks and Cars)
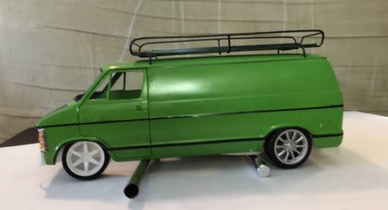
Here is a phone picture of them mocked up in place.They are beautifully cast! I think this is about the right ride height. I am also trying my hand at weathering, don't know if I'll keep that.
-
I guess the title says it all, but I really would love to see Revell release some of their current tires and wheels in a parts pack format. Maybe the tires and wheels from the Rat Roaster and the same from the new 29 A. Possibly some of the Chip Foose or similar sets as well for later types of cars? Just a thought for what little that is worth! Lol. It might be a way to get more mileage out of the molds. Don't know if it is feasible to produce just those parts, but it would be nice.
-
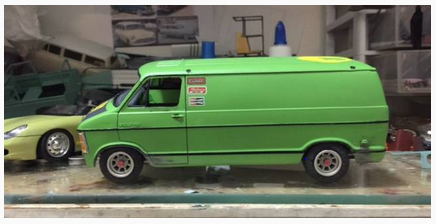
Hope it is alright to post this here. A little while back I found a Dodge Van and decided it needed a set of Minilites. I knew I had some somewhere that I had used to make a mold off of, but couldn't find them. Not too long after mentioning it, I got a message from Curt saying he had a set he would send me. I just want to thank him publicly, he is a 1/25th scale life saver!
-
I'm thinking gauges as well. Some show and race cars had a duplicate set of them mounted ostensibly so the person working on the engine could see them. Probably most of them were actually more for looks. Either way, you have a great looking start!
-
Nice work. You've got me thinking that I need one in silver with the maroon vinyl half-top and maroon velour upholstery!
-
Looks like you'll have fun. I used to go to hobby stores and only look at the kits. Now I spend about as much time in the Plastruct area looking for stuff that I don't need but think I might someday!
-
I love these factory stock models!
-
A Happy Accident With Castrol Purple
oldcarfan replied to oldcarfan's topic in General Automotive Talk (Trucks and Cars)
I've never sen it turn to jelly, might have been an old/bad batch? I always use it for a few days or car bodies whichever comes first and then discard it so maybe it only works well fresh? -
A Happy Accident With Castrol Purple
oldcarfan replied to oldcarfan's topic in General Automotive Talk (Trucks and Cars)
Me too! I love this site! Between the tips and the project ideas, you guys keep me in trouble with my wife. -
A Happy Accident With Castrol Purple
oldcarfan replied to oldcarfan's topic in General Automotive Talk (Trucks and Cars)
It may make me want to go back and revisit some of my past poor body work decisions. I've used it before, but never noticed it doing that before. One more way to salvage those puttied up eBay rejects! -
I bought some Castrol Purple to strip the paint off several models I have bought from thrift shops. I also have a Monogram Land Rover that I had started a long time ago. Anyway, I put the Landie in first as I had just messed it up trying to repaint it a week before. When I got it out a couple days later the paint job was gone but so was the red spot putty that I had used to fill sink marks. I may have said a discouraging word about that time. Anyway, it gave me an idea. I have an original DOH Charger that someone used green putty to fill the side and hood vents. I dunked it in the magic purple juice and it is now looks almost like a new body.Now I wish I had one of those old AMT kits that had the custom front ends that had to be puttied into place. Wonder if it'll work on that too?
-
Enjoy it, this is a good group of people here.
-
I like it, nice truck!
-
Revell '29 roadster pick up
oldcarfan replied to Jantrix's topic in Model Trucks: Pickups, Vans, SUVs, Light Commercial
Nice 29, dude! -
I'm really hoping for the step-side version of the 84 GMC, but i"ll take whichever one I can get. I really want a 1/25 GMC grille to put with the SnapFast Blazer so I can have the one from Jaws 2.
-
Some kid wanted a Bat-mobile really badly. I can't tell what the base car was. Maybe a 64 Plymouth? The trailer came in the Chevy II wagon, I believe.
-
Anyone bought the newest AMT Studie release?
oldcarfan replied to oldcarfan's topic in Car Kit News & Reviews
The Watanabes would be my first choice but the Minilites are a pretty close match. Close enough for me at any rate! Lol! -
Forgive the crude picture. I am not good about documenting projects, much less finishing them. I tend to just build till I lose interest and move on. I am going to try to finish this one. It is a 1982 release that my dad gave me. It was missing the interior bucket and the drive-train but the body and chassis and chrome was there. I bought the new release of this kit for the interior and have decided to make a crude interior bucket since it doesn't really show anyway. It'll be a curbside only so the engine and such are not a big deal to me. I got the paint on it and mocked it up with a couple of tire choices, then I got an offer for a set of 15" Minilites which are the best option so I will use them when they get here. The only thing I haven't really decided on is the roof rack. I made it out of floral wire and [\plastic as a track viewing platform and supply carrier but I'm not sure if I'll use it or not.
-
Just Ordered!
oldcarfan replied to ProStreetOnTheStrip's topic in General Automotive Talk (Trucks and Cars)
If I remember right, it is a race only version. It is typical 70s Revell in that it is kind of fiddly but builds up into a really nice looking car. I seem to remember it had the vinyl two part tires that can never be glued correctly. Revell also did the BRE 510. -
Anyone bought the newest AMT Studie release?
oldcarfan replied to oldcarfan's topic in Car Kit News & Reviews
Indeed I am. I have been saving a picture of one for a while, waiting for a model to use. I was thinking it would be a cool vehicle to tow trailers and stuff. Last weekend we were at my parents house and my dad had a box of random parts. There was most of an 82 Dodge van and I decided to do a curbside Dajiban. Monday I stopped by a hobby shop and they had the re-re-release in stock so I got that as well. -
Anyone bought the newest AMT Studie release?
oldcarfan replied to oldcarfan's topic in Car Kit News & Reviews
Thanks for the answer guys. I used to have a couple that I used to make castings off. I'll try to dig them up. -
MPC funny cars almost done now chassis
oldcarfan replied to ratnasty's topic in WIP: Drag Racing Models
Ooooh! I got a yellow Pisano Vega kit for Christmas one year. I loved that model! You do amazing work! -
I recently bought the MPC Dodge Van release ad now find myself in need of some Minilites. I have a 4 lug one that I can cast, but I really would prefer the 5 lug. The last time I bought the Studebaker, many years ago it had some 5 lug Minilites. It doesn't show them on the box and I am reluctant to buy the kit just on the chance they are still in there. Anyone able to shed some light?
-
That is so cool!